The moment you sink your teeth into LongHorn Steakhouse’s corn on the cob, you know you’re eating something special. It’s not just corn — it’s that perfect balance of sweet kernels, a subtle char, and that incredible seasoned butter coating that somehow makes you reach for another piece before you’ve even finished the first one. The good news? This restaurant favorite is surprisingly easy to replicate at home, and once you master the technique, you’ll wonder why you ever paid for it at a steakhouse.
What sets this corn apart from standard preparations is the combination of three elements working in harmony: a perfectly charred exterior that develops on the grill, a custom seasoned butter that clings to every kernel, and a light dusting of seasonings that adds complexity without overwhelming the sweet corn flavor. The technique is straightforward enough for a beginner, but there are several small details that separate mediocre results from that authentic steakhouse experience. Understanding these details is what this recipe is all about.
The butter sauce deserves particular attention because it’s not just plain melted butter — it has a subtle richness and a hint of salt and spice that makes you want to lick it off your hands. Some copycat versions miss this entirely and end up tasting flat. The real version uses quality butter, the right balance of seasonings, and a technique that ensures every kernelRow gets thoroughly coated, not just the outside layer.
What Makes LongHorn Steakhouse Corn So Irresistible
LongHorn’s corn on the cob has been a signature side dish for good reason. The corn itself is sweet and tender, but the magic happens in the preparation and seasoning. Unlike standard buttered corn, this version has a subtle complexity that keeps people guessing about what makes it taste so good.
The first element is the char. This doesn’t mean burning the corn — it means developing a light golden-brown layer on some of the kernels through direct heat exposure. This charring process brings out the natural sugars in the corn and adds a subtle smoky depth that feels restaurant-quality. It’s the difference between corn that tastes like corn and corn that tastes like something you’d pay extra for.
The second element is the butter mixture. This isn’t just salted butter melted on top. There’s a savory depth, a hint of seasoning blend, and a richness that suggests real butter (not margarine or oil). The butter needs to be mixed properly so the seasonings distribute evenly, then applied generously while the corn is still warm enough that the butter soaks in slightly.
The third element is the seasoning. A light dusting of a seasoning blend — something with salt, a touch of paprika, perhaps a hint of garlic or other spices — gives the corn a professional touch without making it taste “seasoned” in an obvious way. The seasoning should complement rather than dominate.
The simplicity is actually what makes this special. You’re not dealing with complex flavor combinations or techniques that require special equipment. You’re dealing with quality ingredients, proper timing, and attention to detail.
The Secret to Restaurant-Quality Butter Sauce
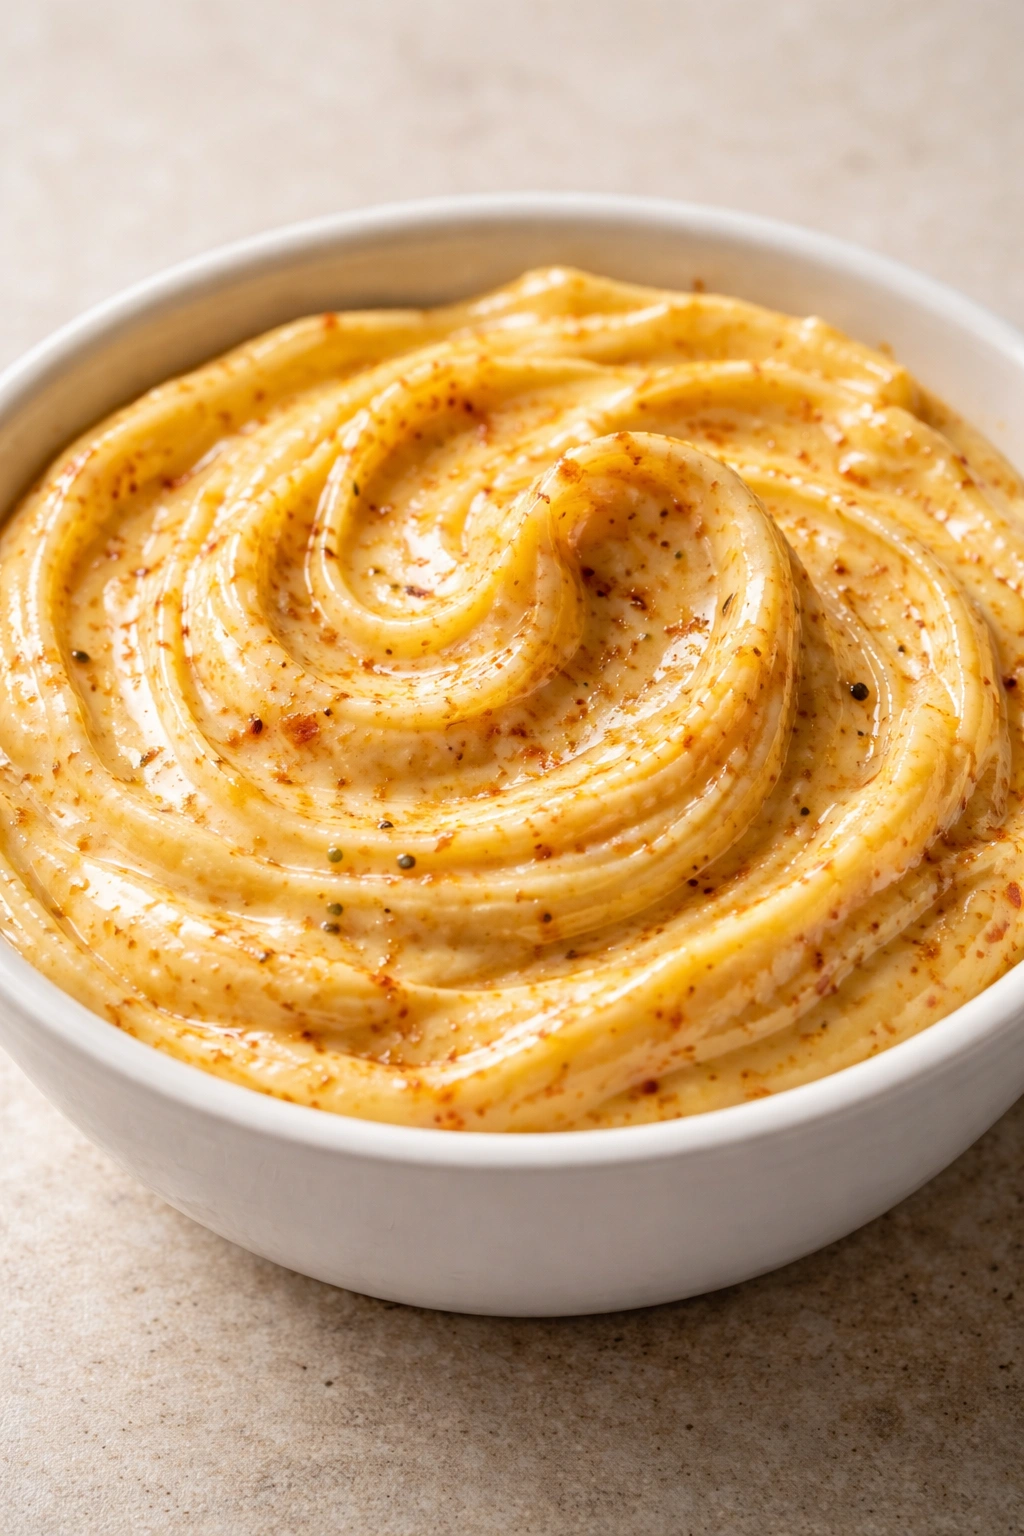
The butter sauce is where most homemade attempts fall short. People often assume LongHorn just brushes regular melted butter on the corn, but that’s not quite right. The butter sauce in this copycat version contains seasonings that get mixed thoroughly into the butter before application, creating an emulsion that sticks to the corn and provides consistent flavor throughout.
The key is using room-temperature butter so you can cream the seasonings into it thoroughly. Warm butter just slides off the corn. Room-temperature butter is thick enough to coat the corn and stay put as it cools slightly on the hot corn surface. This is why beating the butter mixture is important — you’re incorporating air and creating a paste-like consistency that clings beautifully.
The seasoning profile is subtle but deliberate. It includes salt (because plain butter can taste flat), a small amount of garlic powder or minced fresh garlic (which adds savory depth), and potentially a touch of paprika or black pepper (for color and warmth). Some versions also include a pinch of cayenne or a dried herb like oregano, but less is more here — you want to enhance the corn, not mask it.
The amount of butter matters too. You want enough that every kernel gets a light coating, but not so much that it drips down your arm or puddles at the base of the corn. About a tablespoon of seasoned butter per ear is the sweet spot. This is enough to be generous without being excessive.
Understanding the Char and Seasoning Profile

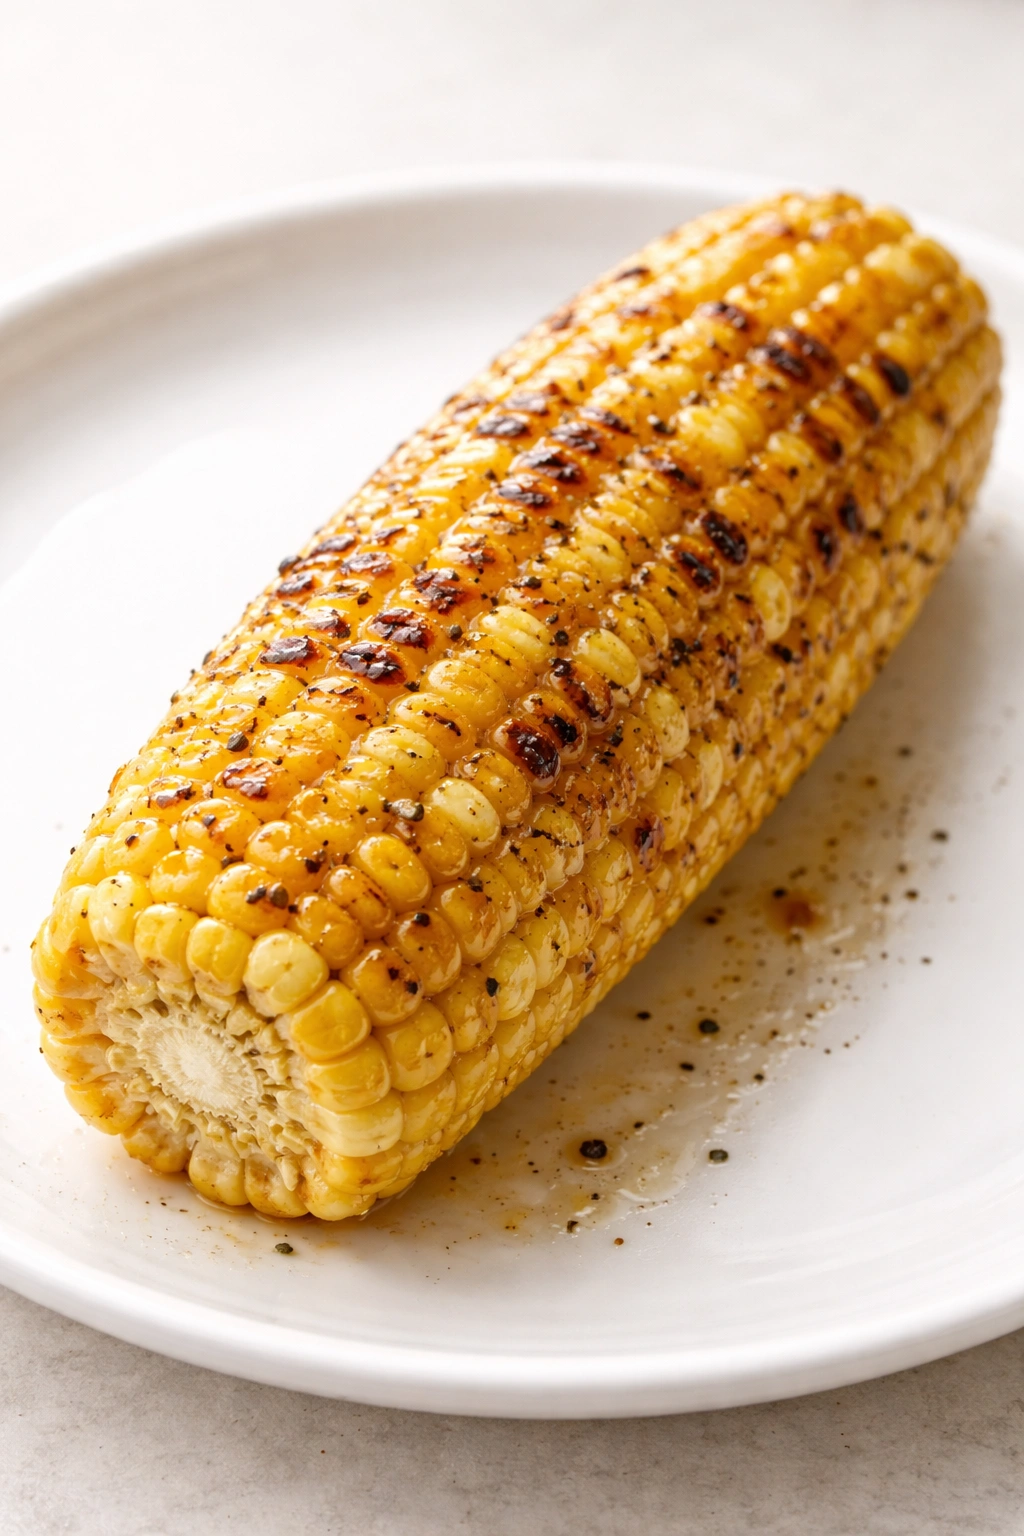
Charring corn on the cob isn’t difficult, but it does require attention. The goal is light char marks on maybe 20-30% of the corn’s surface — just enough to add visual appeal and flavor depth without making the corn taste burned. This happens over direct medium-high heat, usually in about 10-12 minutes, rotating the corn every few minutes.
The char develops because direct heat causes the natural sugars in the corn kernels to caramelize slightly. This creates those browned spots and adds a subtle sweetness that intensifies the corn’s natural flavor. The char also adds a barely-perceptible smokiness that makes people think you spent hours smoking it, when really you just rotated it on the grill a few times.
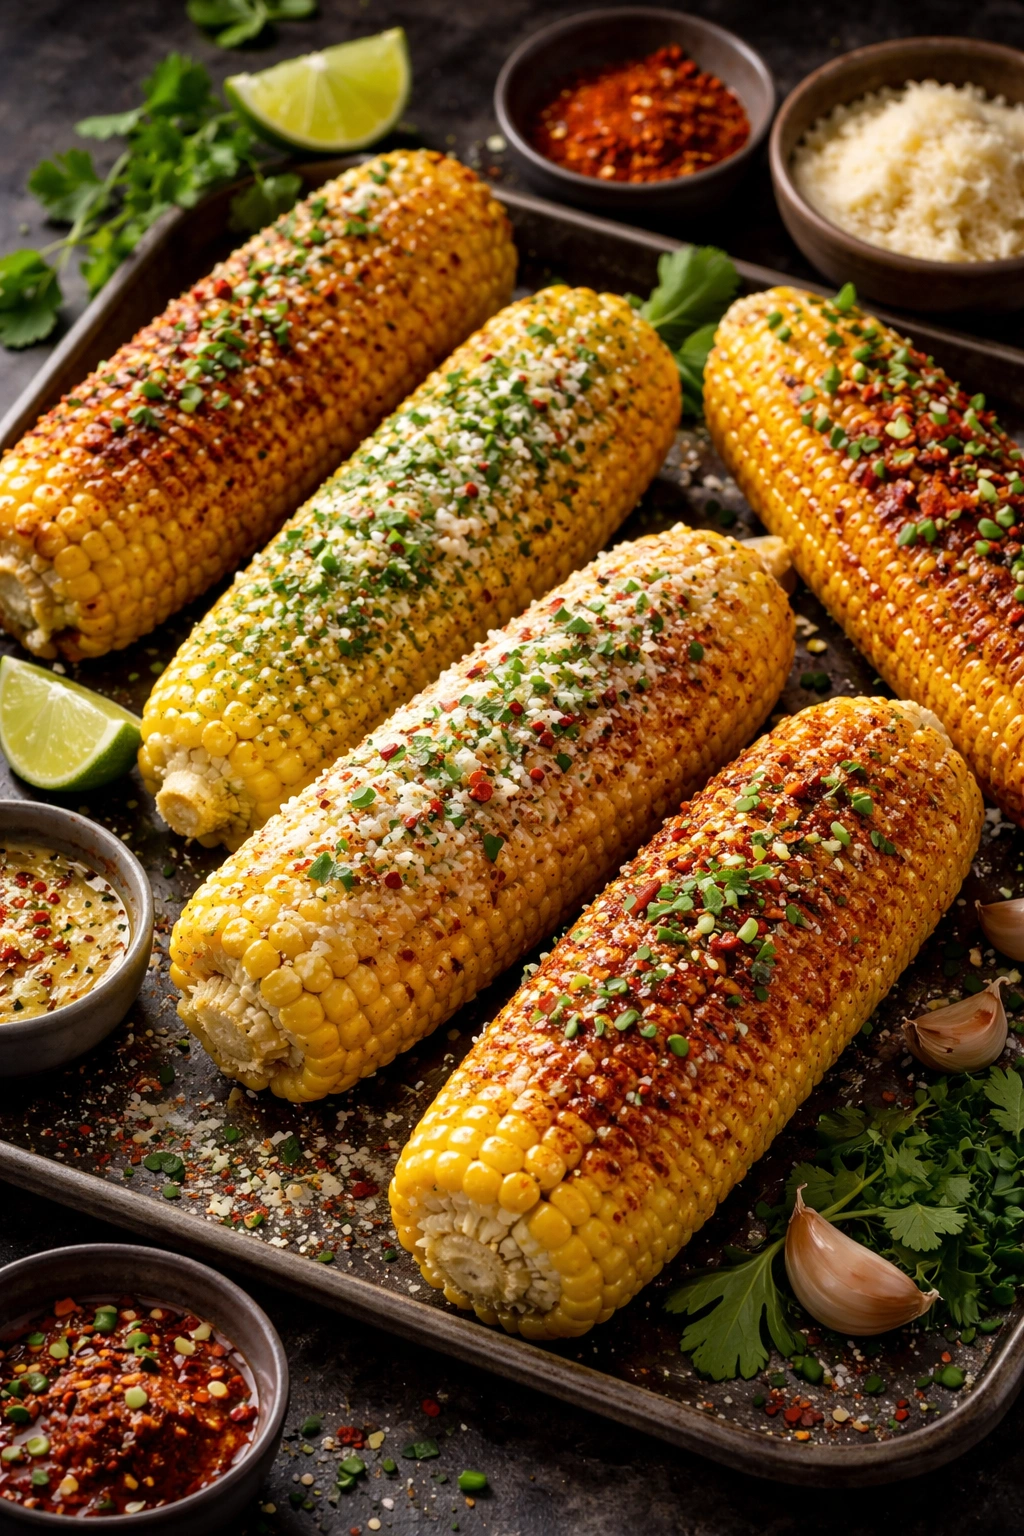
The seasoning dust applied at the end serves multiple purposes. Visually, it adds color and makes the corn look restaurant-quality. Flavor-wise, it adds a savory note that enhances the sweetness of the corn and the richness of the butter. The seasoning also prevents the butter from making the corn feel overly rich or heavy — the salt and spices provide balance.
The seasoning blend used here is adaptable depending on what you have on hand. A basic version uses just salt and black pepper. A more complex version might include garlic powder, onion powder, smoked paprika, and a tiny pinch of cayenne. The key is restraint — you’re adding a light dusting, not a heavy coating.
Complete Ingredient List
Yield: Serves 4 (4 ears of corn) | Prep Time: 15 minutes | Cook Time: 12–15 minutes | Total Time: 27–30 minutes | Difficulty: Beginner — This recipe requires only basic cooking skills and standard grill equipment. Even if you’ve never grilled corn before, the straightforward technique and visual cues make success nearly guaranteed on your first try.
For the Corn:
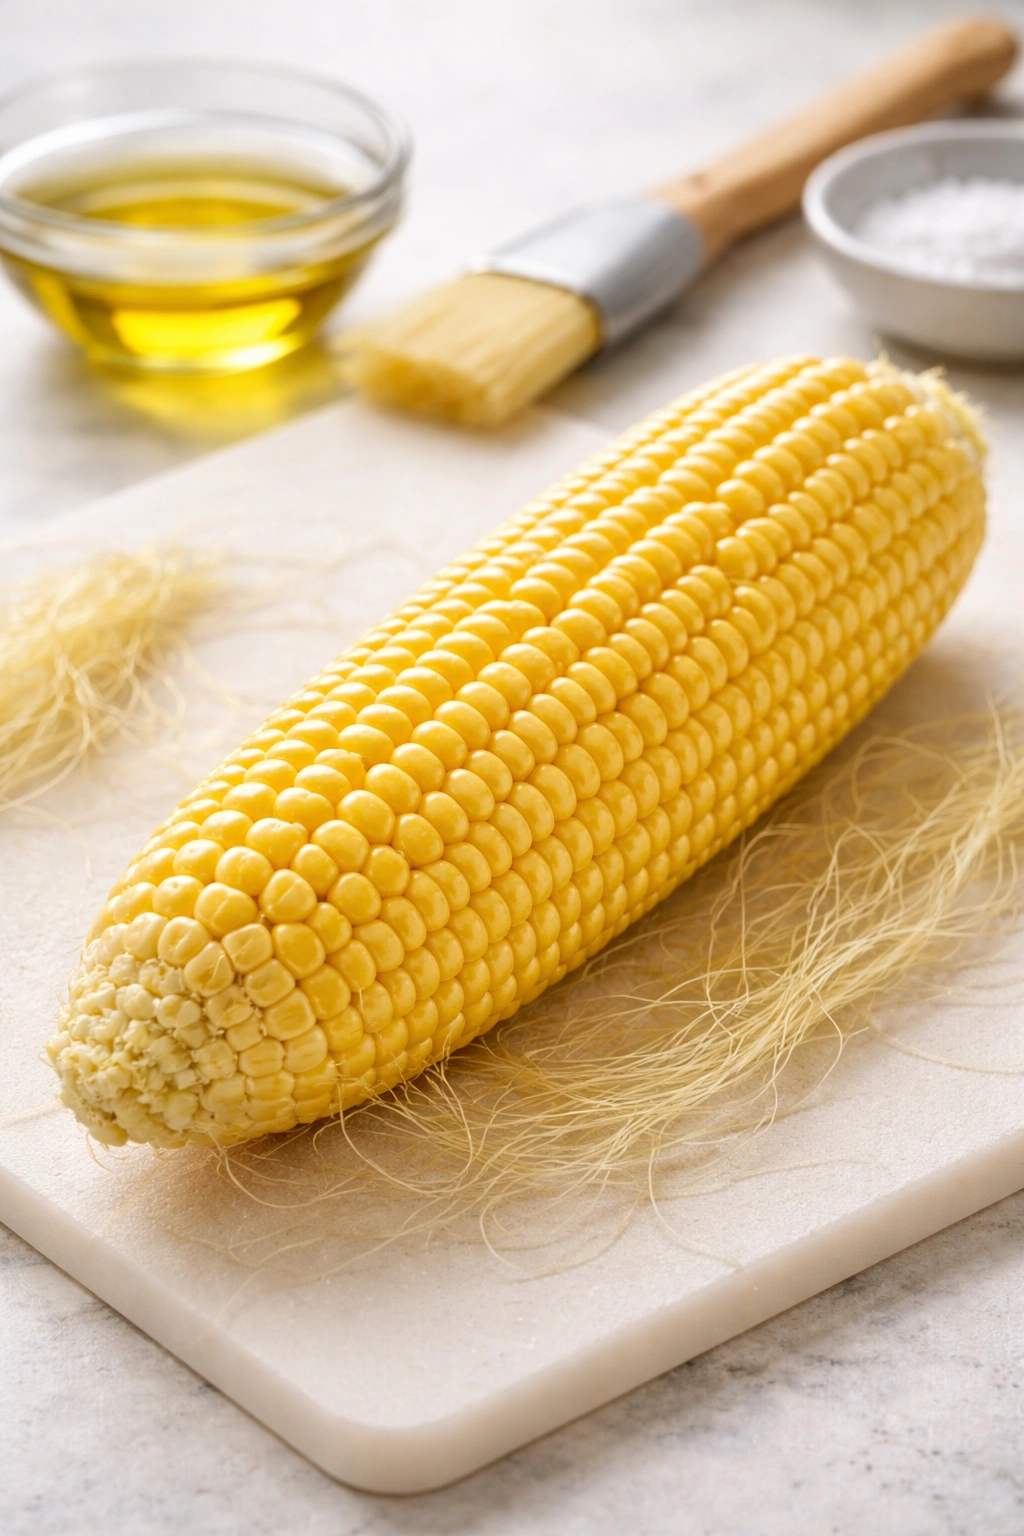
- 4 ears of fresh corn, husked and cleaned completely (see tips for best results)
- 2 tablespoons neutral oil (such as vegetable or canola oil), divided
For the Seasoned Butter Sauce:
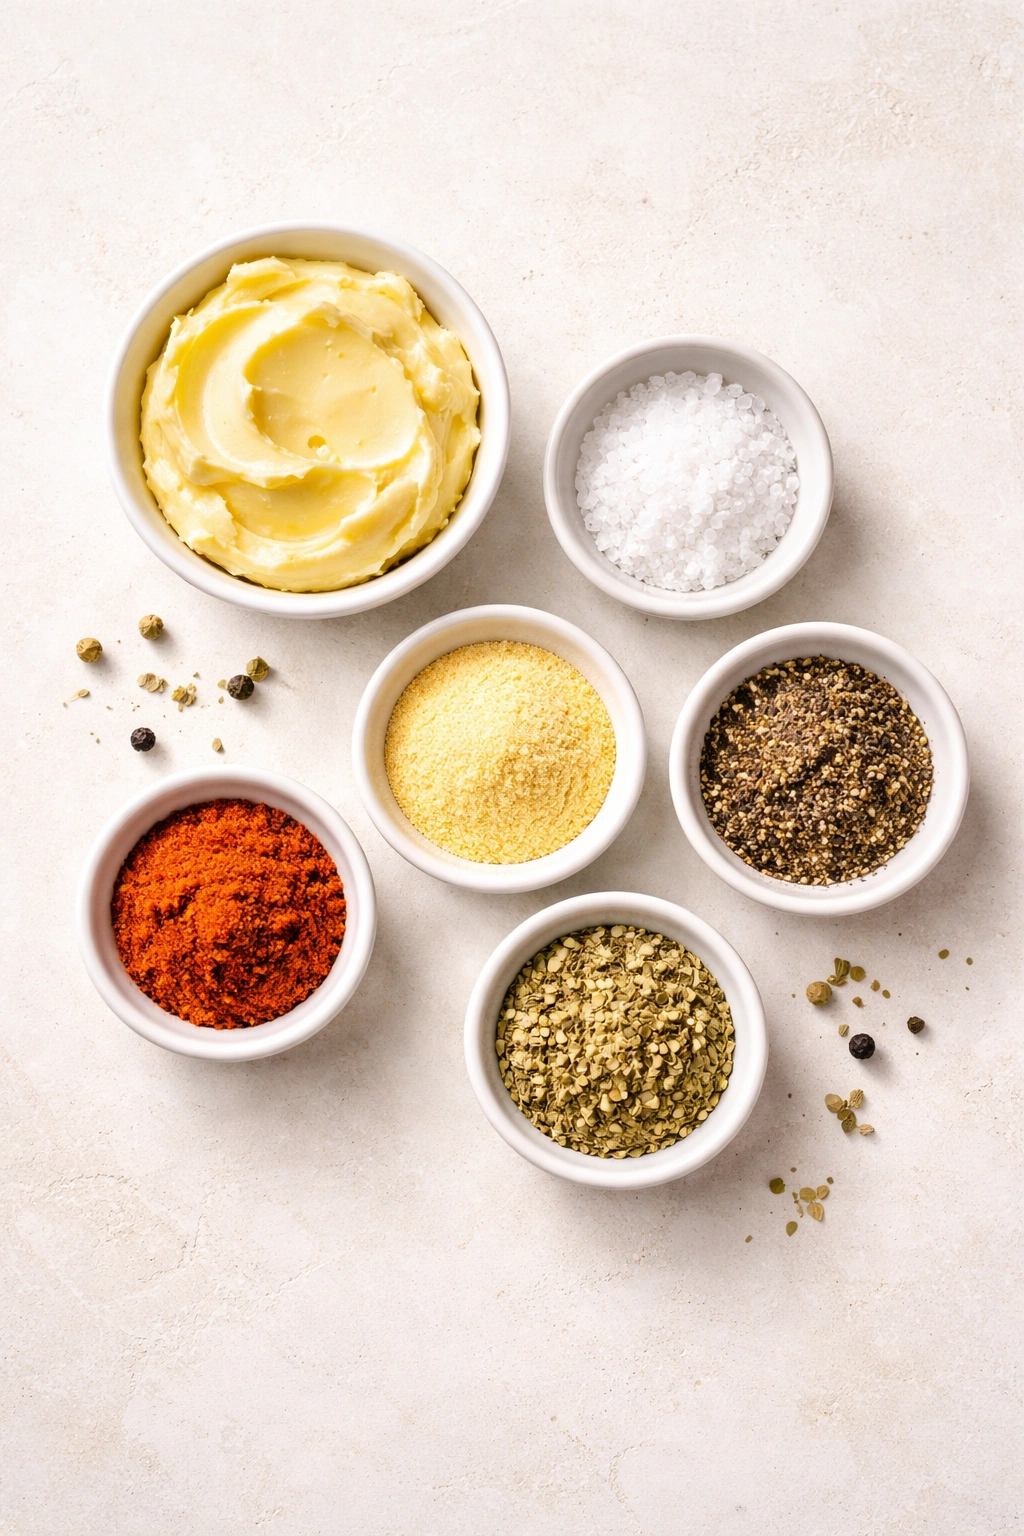
- 6 tablespoons (¾ stick) unsalted butter, softened to room temperature
- ½ teaspoon fine sea salt
- ¼ teaspoon freshly ground black pepper
- ⅛ teaspoon garlic powder (or ½ teaspoon minced fresh garlic, very finely minced)
- Pinch of smoked paprika (optional but recommended for authentic steakhouse flavor)
- Pinch of dried oregano or Italian seasoning (optional)
For the Final Seasoning Dust:
- 1 teaspoon coarse sea salt or fleur de sel
- ½ teaspoon smoked paprika (or regular paprika)
- ¼ teaspoon garlic powder (optional)
- Pinch of freshly ground black pepper
Optional Additions:
- 1 tablespoon fresh parsley, very finely minced (for garnish and color)
- Juice of ½ lime (to brighten the flavors if desired)
Preparing Your Corn and Equipment
Start by selecting corn that looks fresh and feels heavy for its size — this indicates good kernel development and moisture. The husks should be bright green (or yellow-green), not dried out or brown. Avoid corn that feels light and dry, as it may have been stored too long.
Remove the husks completely by hand, working from the thick end down. Most of the silk (the thin strands clinging to the kernels) will come off with the husks, but you’ll likely have some remaining. Hold the corn under cool running water and use a soft vegetable brush or a clean cloth to gently brush away any remaining silk. Pay special attention to the tips and between the kernels. Getting the corn completely clean matters because any remaining silk will stick to your teeth when you eat it — not fun.
Pat the corn completely dry with paper towels or a clean kitchen towel. Moisture on the surface of the corn will create steam on the grill and prevent proper charring. You want the surface dry enough that when you brush on the oil, it spreads evenly rather than beading up.
For the grill, preheat it to medium-high heat (about 400°F if you have a thermometer, or hot enough that you can hold your hand a few inches above the grate for only 3–4 seconds before pulling away). If you’re using a gas grill, light all burners and set them to medium-high. If you’re using charcoal, arrange the coals so you have both direct heat and a slightly cooler zone — this gives you flexibility if the corn starts charring too quickly.
Clean the grill grate thoroughly with a grill brush. This removes debris and helps prevent sticking. Once the grill is clean, dip a folded paper towel in neutral oil and use tongs to wipe down the grate thoroughly. This oil-coating prevents the corn from sticking and helps develop even char marks.
Making the Seasoned Butter Mixture
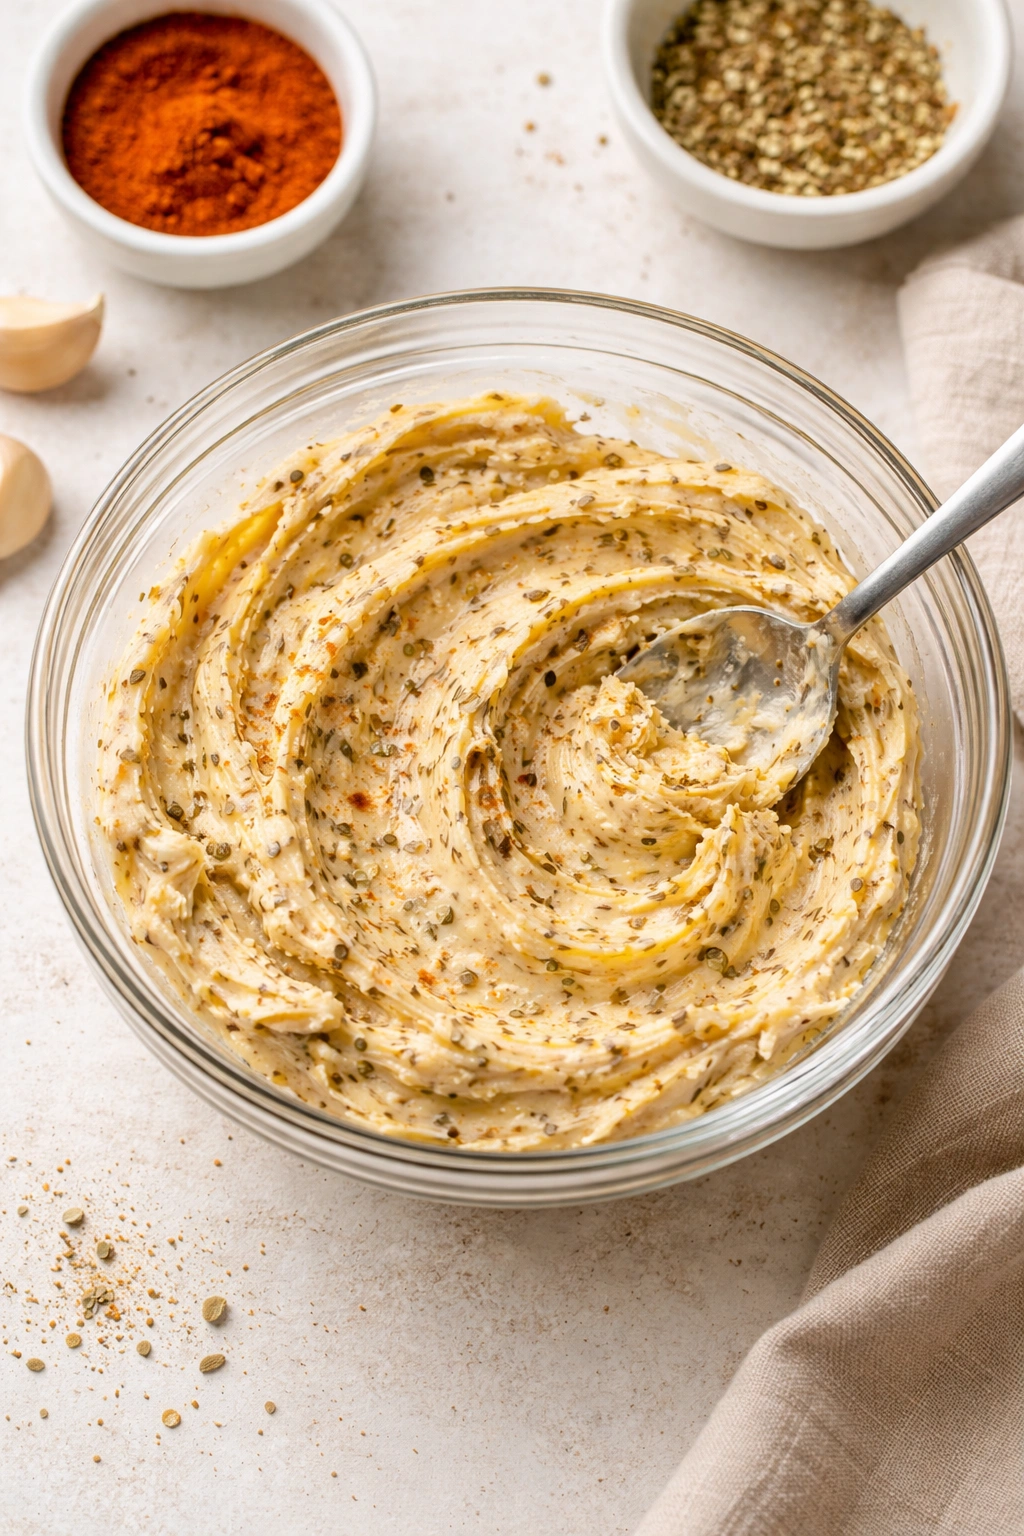
The butter needs to be softened to room temperature — not melted, but soft enough to mix easily with a fork or small spoon. If you’ve forgotten to take butter out of the fridge, you can speed this up by cutting the cold butter into small cubes and letting it sit for 10–15 minutes. Never microwave the butter, as it will melt unevenly and you’ll end up with a thin, runny mixture that slides right off the corn.
Place the softened butter in a small bowl. Using a fork, mash it gently until it’s smooth and spreadable, about the consistency of peanut butter. Add the salt, pepper, garlic powder, paprika, and oregano (if using). Using the fork, beat the mixture vigorously for about 1–2 minutes, incorporating the seasonings thoroughly until they’re evenly distributed and the butter lightens slightly in color and texture. This whisking action incorporates air and ensures even seasoning distribution.
Taste a tiny dab of the butter mixture on your finger. It should taste noticeably savory and slightly salty, but not overpowering — the butter’s sweetness should still be the dominant flavor. If it tastes flat, add a few more grains of salt. The seasoning needs to be more pronounced than you might expect because it will be diluted when spread over the corn’s surface.
Set the finished butter mixture aside at room temperature. If your kitchen is very warm, you can keep it in the fridge until you’re ready to apply it to the corn, but pull it out about 5 minutes before you need it so it’s soft enough to spread easily.
Grilling the Corn to Perfection
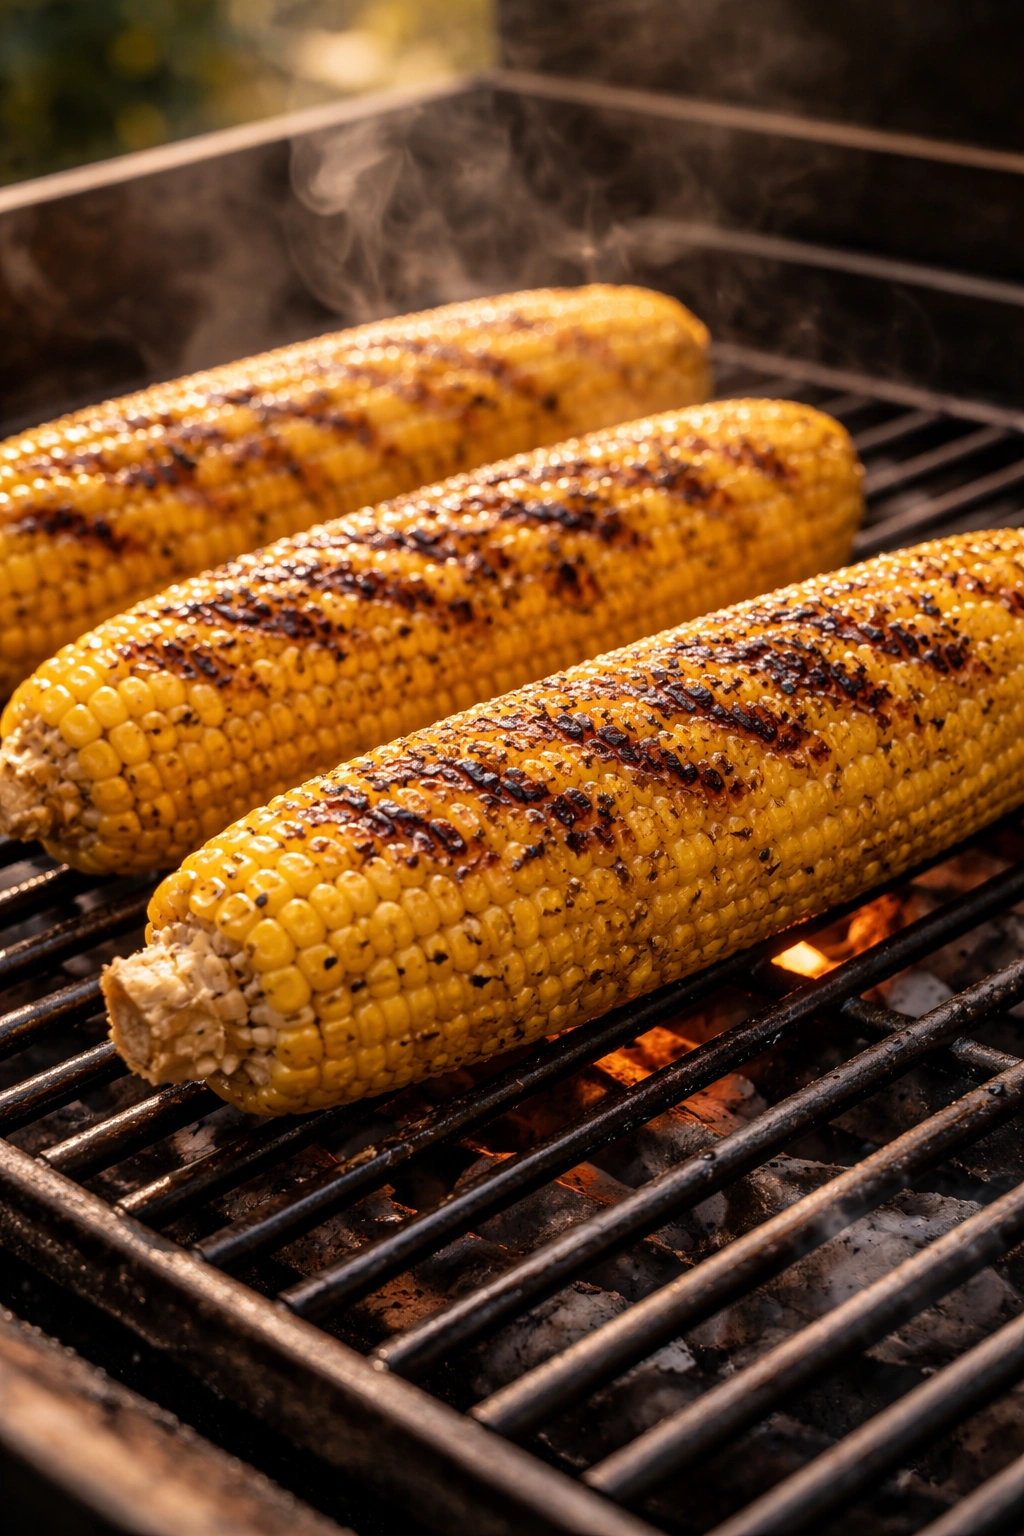
Once the grill is preheated and oiled, place the dried corn directly on the grate perpendicular to the grate lines. This positioning prevents the corn from rolling through the grates and also helps create even char marks in both directions.
Brush each ear of corn lightly and evenly with about ½ teaspoon of neutral oil. This oil promotes browning and charring and prevents sticking. Don’t skip the oil — this is what allows the grill marks to develop.
Let the corn sit untouched for 2–3 minutes. During this time, the bottom side will start to develop color and char marks. You’ll see some kernels turn from pale yellow to light golden-brown, and you might notice a subtle change in appearance.
Using tongs, rotate the corn a quarter turn (90 degrees) and let it cook for another 2–3 minutes. Repeat this rotation two more times, so you’ve rotated the corn four times total, each time letting it cook 2–3 minutes before rotating. This quarter-turn method creates an even distribution of light char marks across all sides of the corn.
After about 10–12 minutes total, the corn should be mostly cooked and have light char marks covering about 25–30% of the surface. The kernels should be bright yellow with golden-brown spots. The total cooking time depends on the thickness of the corn and the exact temperature of your grill — thicker ears take longer, and a hotter grill cooks faster.
Test for doneness by piercing a kernel with a sharp knife or the tip of a fork. The kernel should give easily and feel slightly tender, not hard and starchy. If the corn feels hard or starchy, give it another 1–2 minutes.
Transfer the finished corn to a clean cutting board or serving plate. Let it rest for about 1–2 minutes — this keeps it from being so hot that it burns your hands, and it allows the residual heat to finish the cooking process very slightly.
Applying the Butter Sauce and Final Seasoning
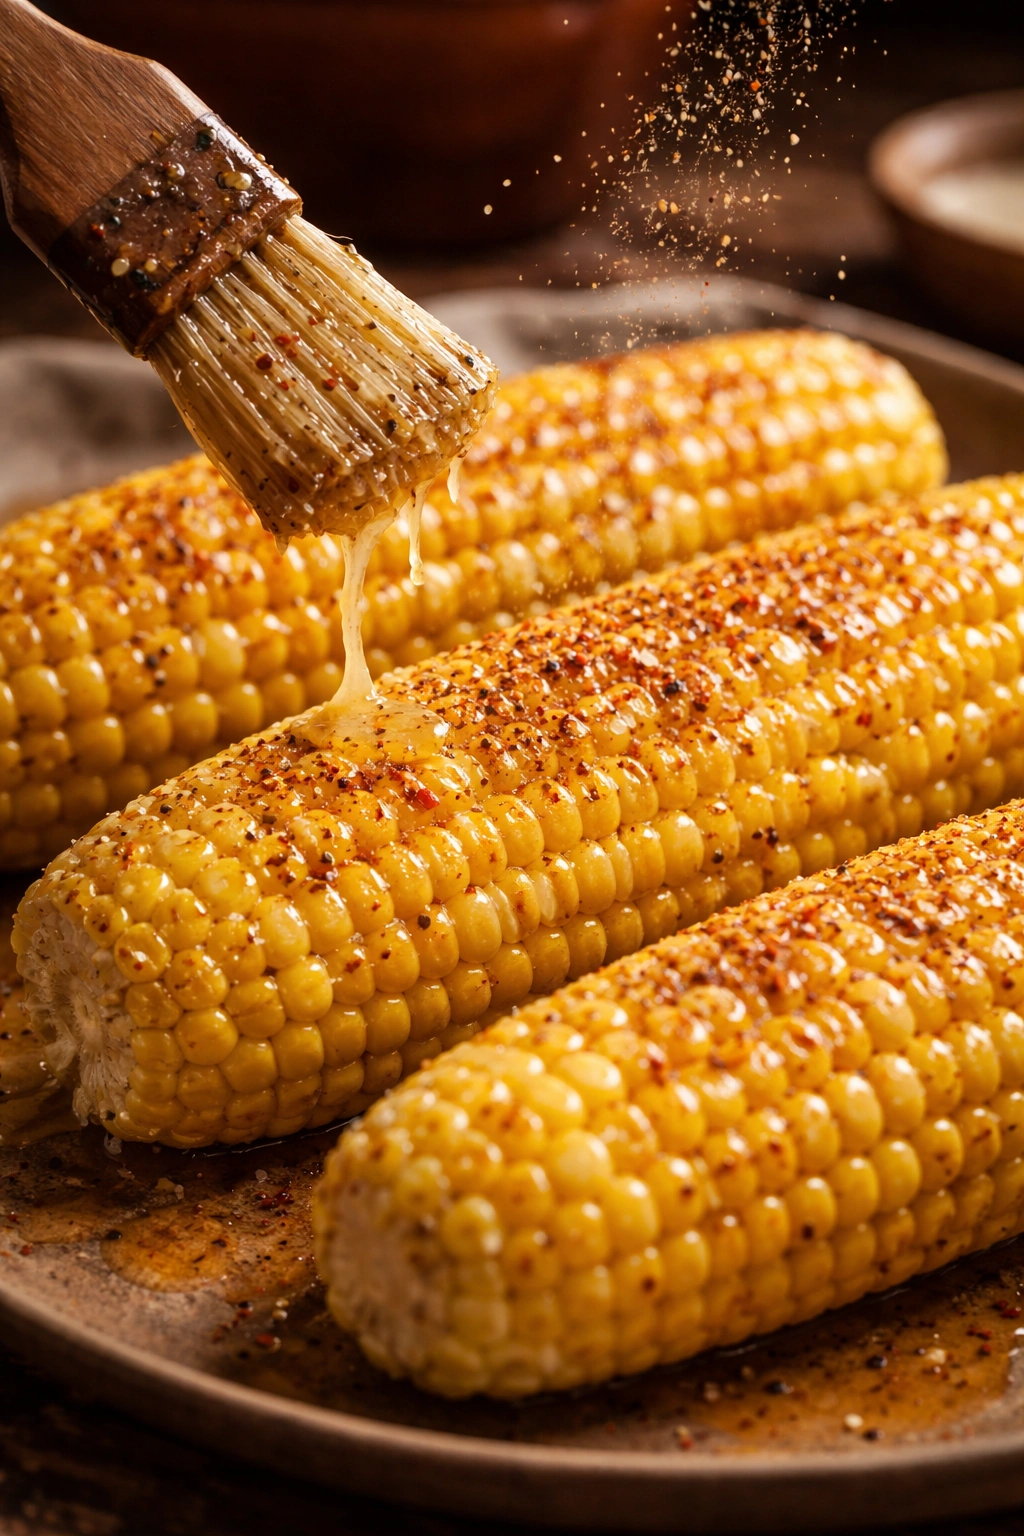
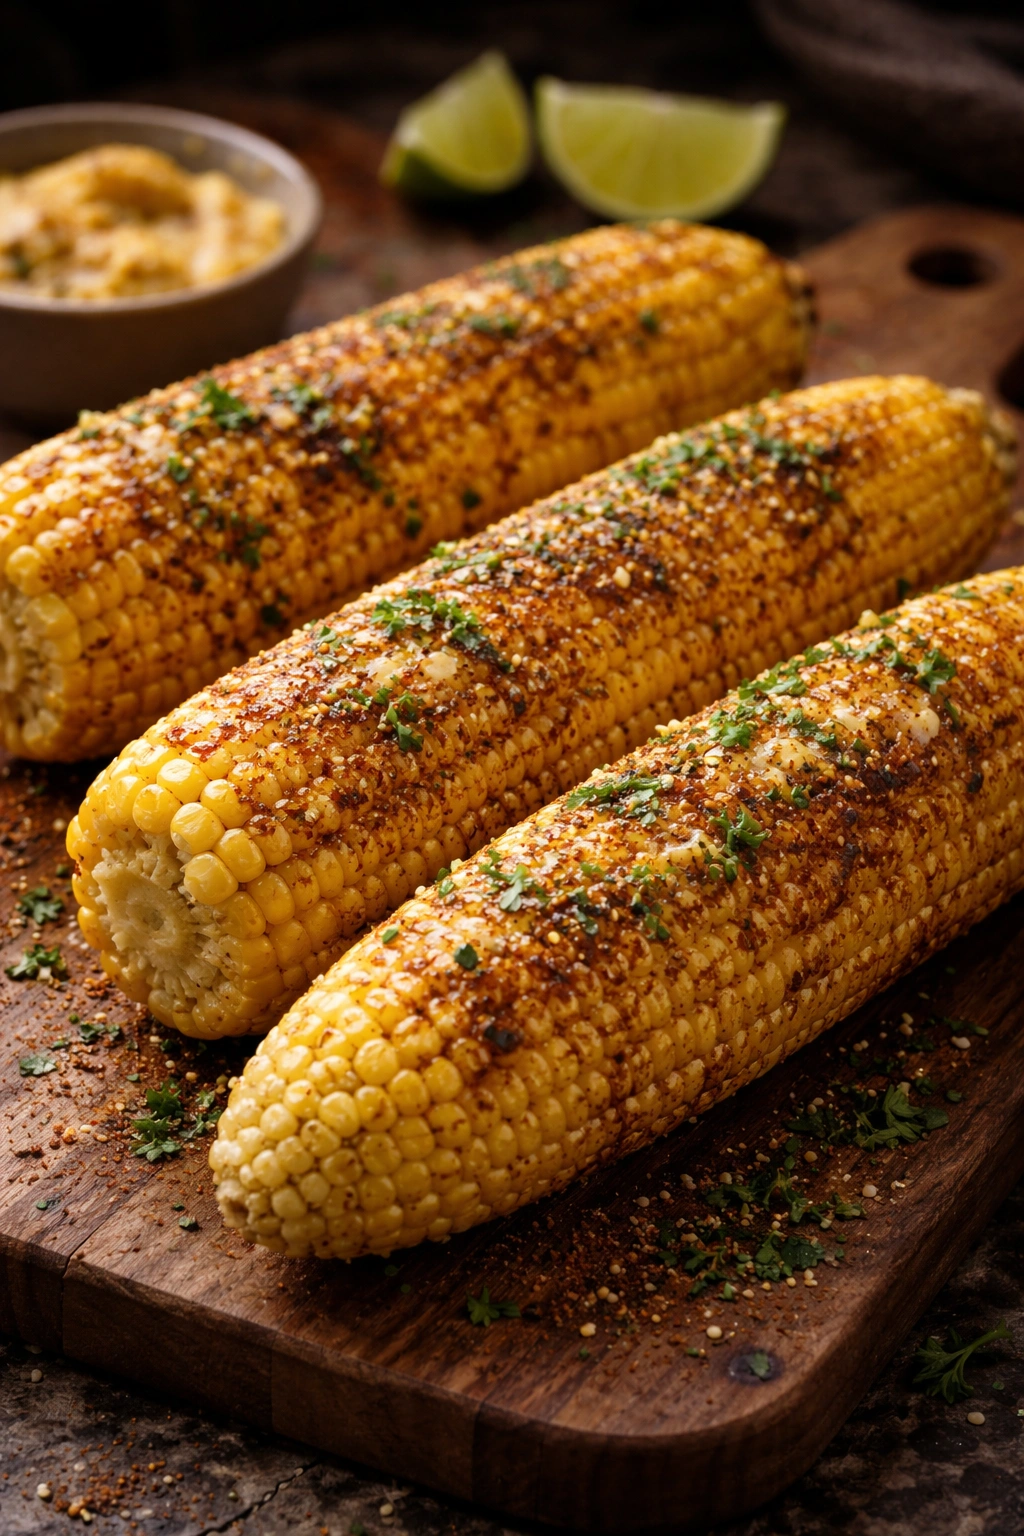
While the corn is still hot from the grill, apply the seasoned butter generously using a brush, a knife, or the back of a spoon. Work your way around the entire ear, ensuring every part of the surface gets a light coating. Use about 1–1.5 tablespoons of butter per ear.
The heat of the corn will warm the butter slightly so it spreads more easily, but it shouldn’t be so hot that the butter melts completely and slides off. The butter should adhere to the kernels and create a light, clingy coating.
As soon as you’ve applied the butter to all four ears, immediately dust each ear with a light sprinkle of the final seasoning mixture. Work over a plate or shallow bowl to catch any seasoning that falls. Sprinkle from about 6 inches above the corn so the seasoning distributes evenly rather than clumping in one spot. You want a light, even coating, not a heavy dusting.
The seasoning will stick to the warm butter, creating that finished, restaurant-quality appearance. The salt and paprika will be visible on the kernels, and any moisture from the butter will help the seasonings adhere.
If you want to add fresh parsley for color and a fresh herbaceous note, mince it very finely and sprinkle it over the top immediately after the seasoning dust, while the butter is still warm and slightly tacky. The heat won’t cook the parsley, but the warmth will release its aromatic oils.
Serve the corn immediately while it’s still hot. At this point, it tastes almost identical to what you’d get at LongHorn Steakhouse — sweet, buttery, perfectly charred, and seasoned just right.
Common Mistakes and How to Avoid Them
Wet corn: If you don’t dry the corn thoroughly before oiling and grilling it, the moisture will create steam that prevents charring. The result is pale, steamed corn rather than grilled corn with a charred exterior. Solution: Pat the corn completely dry with paper towels, and make sure to remove all the silk.
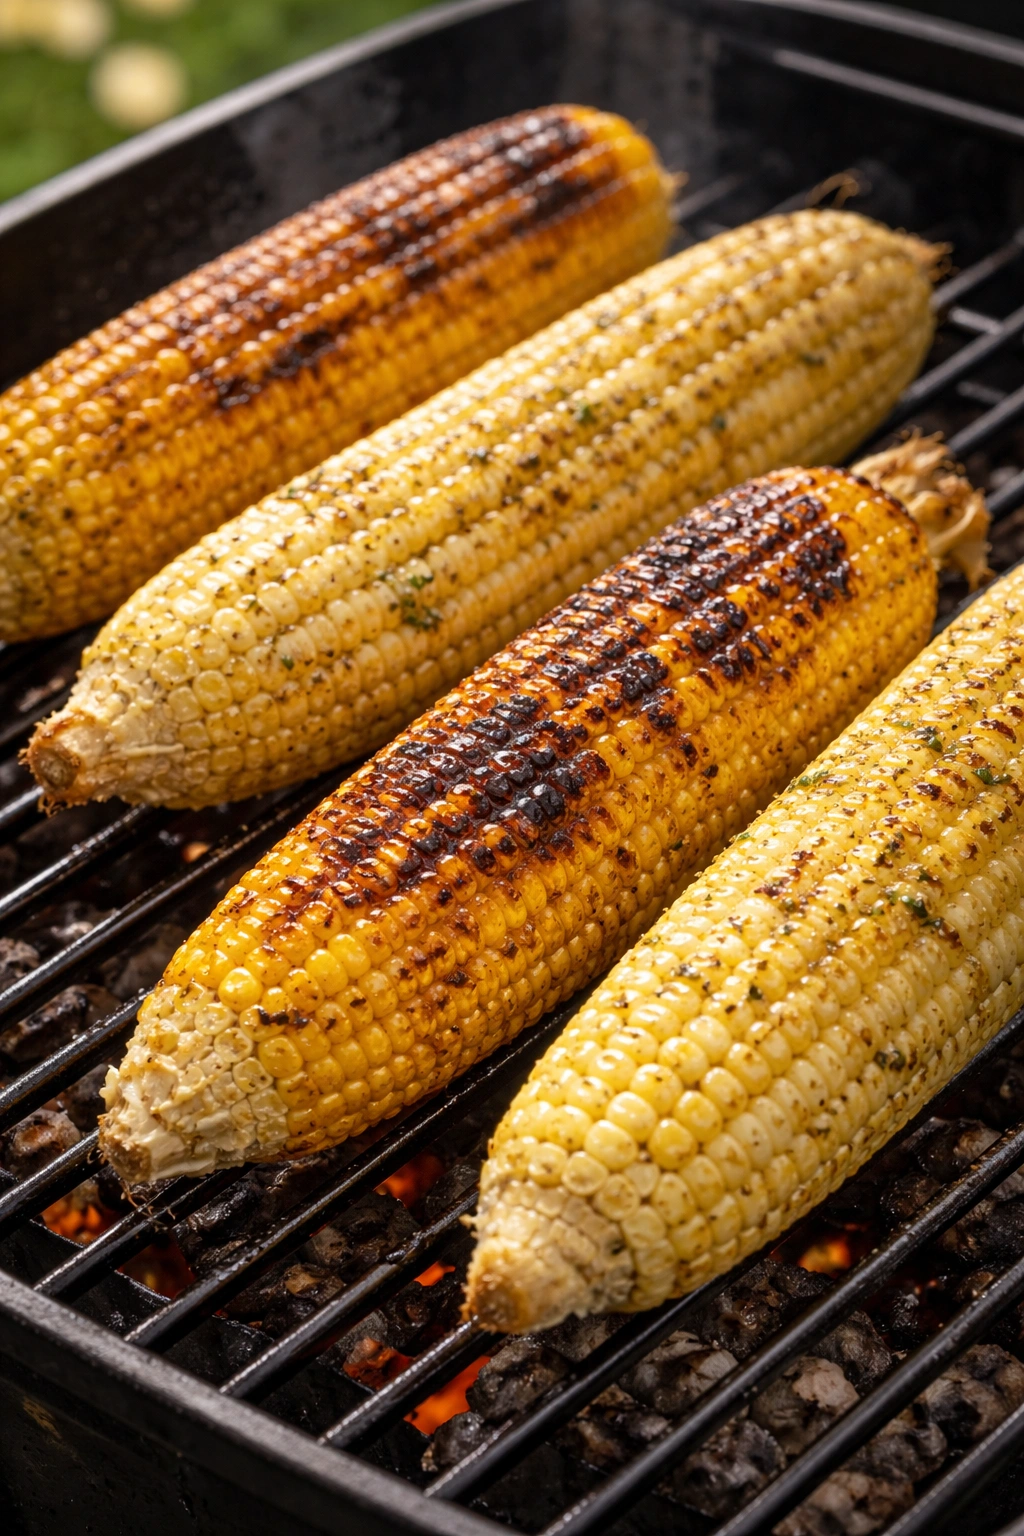
Over-charring: If you leave the corn on the grill too long or on too-high heat, you’ll end up with burned spots that taste bitter rather than pleasantly charred. The char should be light golden-brown, not black. Solution: Use medium-high heat (not maximum heat), rotate frequently, and check for doneness at the 10-minute mark.
Under-charring: If you don’t leave the corn on the grill long enough, you’ll miss the flavor development that charring provides. The corn will taste steamed rather than grilled. Solution: Give it the full 12–15 minutes, rotating every few minutes, and don’t pull it off just because the kernels look done — the char is part of the goal.
Butter that slides off: If you’re using melted butter instead of softened butter, or if you apply the butter to corn that’s already cooled to room temperature, it won’t cling to the kernels. It will slide off as the butter cools. Solution: Use room-temperature softened butter and apply it to corn that’s still hot from the grill. The heat of the corn will temporarily warm the butter enough for it to adhere.
Seasonings that don’t stick: If you apply the seasoning dust to corn that’s already cooled, it won’t adhere well — it will fall off as you eat. Solution: Apply the butter while the corn is hot, then immediately dust with seasoning while the butter is still slightly warm and tacky.
Uneven seasoning: If you dump all the seasoning in one spot or apply it heavily, you’ll end up with some kernels that taste heavily seasoned and others that taste bland. Solution: Sprinkle the seasoning from a distance of about 6 inches above the corn, working your way around the entire ear and rotating as you go.
Bland-tasting butter mixture: If you under-season the butter, the finished corn will taste like plain buttered corn rather than restaurant-quality corn. The seasoning needs to be more pronounced than you’d expect because it gets diluted when spread over the corn. Solution: Taste the butter mixture before applying it, and make sure it tastes noticeably savory and salty.
Corn that’s tough or starchy: If the corn isn’t cooked long enough, the kernels will feel hard and the starch won’t break down properly. Solution: Cook for the full 12–15 minutes, and test for doneness by piercing a kernel with a fork — it should yield easily.
Storage, Make-Ahead, and Reheating Tips
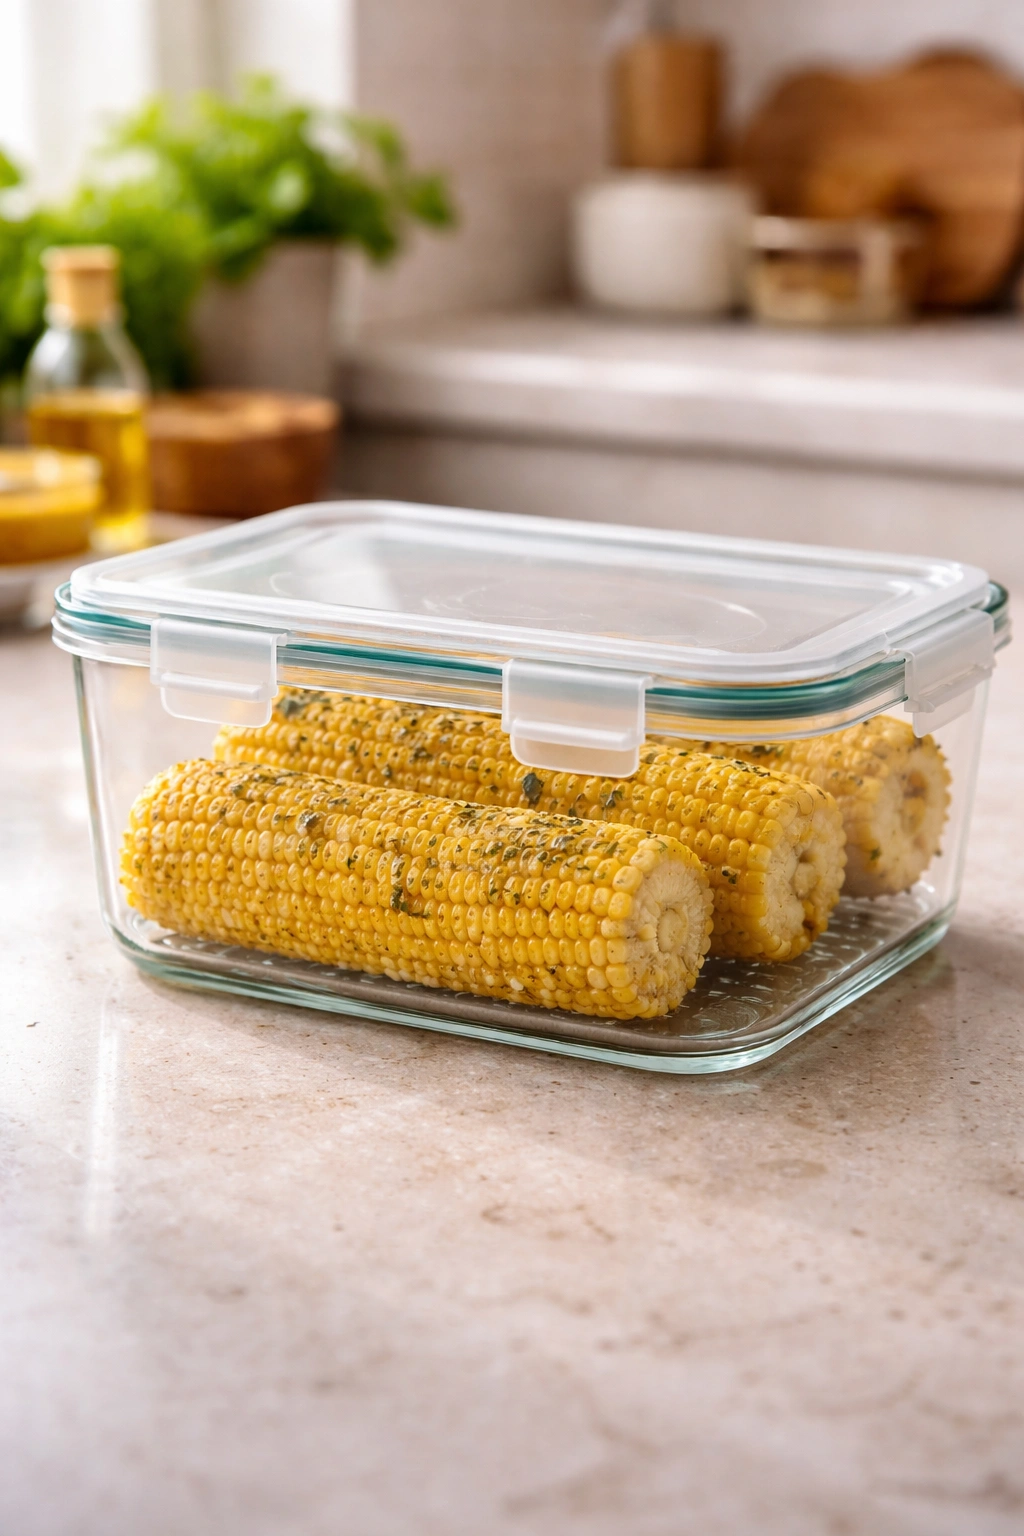
Leftover corn on the cob keeps well in the refrigerator for up to 3 days when stored in an airtight container. The corn will firm up as it cools, but it’s still delicious eaten cold or reheated.
To reheat, you have a few options. The best method for maintaining the grilled texture is to place the corn on a grill or griddle over medium-high heat for 2–3 minutes, rotating occasionally, until warmed through and lightly re-crisped. If you don’t have access to a grill, you can wrap the corn in a damp paper towel and microwave it for 30–45 seconds (depending on how many ears and how cold they are), which will warm it through without drying it out. Alternatively, you can unwrap the corn and reheat it in a dry skillet over medium-high heat, rotating frequently, for 2–3 minutes until warm.
Do NOT refrigerate the seasoned butter mixture ahead of time if you can avoid it. Make it fresh shortly before you’re ready to grill the corn, so it’s at room temperature and ready to use immediately. If you do make it ahead, store it in an airtight container in the fridge for up to 5 days, but let it soften to room temperature before using.
You can prep the corn itself the morning of serving — husk it, clean it, and pat it dry, then store it wrapped loosely in plastic wrap in the fridge. This saves time on the day you’re cooking. The corn should stay fresh for up to 24 hours when stored this way, though it’s best used the same day.
You can grill the corn several hours ahead and let it cool to room temperature, then reheat it just before serving. This works well if you’re preparing a large meal and want to stagger your cooking. Keep the cooled corn loosely covered at room temperature (not in the fridge) so the kernels don’t become starchy and hard.
The corn is absolutely best eaten immediately after applying the butter and seasonings, while it’s still hot and the butter is at its most flavorful. However, it’s also quite good at room temperature as a side dish or even as part of a salad the next day.
Delicious Variations and Flavor Twists
Spicy Garlic Butter Corn: Add ¼ teaspoon of cayenne pepper and ½ teaspoon of minced fresh garlic to the butter mixture for a version with more kick. This is perfect if you love bold flavors and want to pair it with steak or BBQ.
Herb-Infused Corn: Replace the oregano with fresh herbs like basil, cilantro, or tarragon. Use about ½ teaspoon of minced fresh herbs mixed into the butter. This creates a lighter, fresher flavor profile that works beautifully in summer meals.
Lime-Cilantro Variation: Make the basic butter mixture, then add the juice of ½ lime and about 1 tablespoon of finely minced fresh cilantro. Apply the butter, then dust with a coarse sea salt and a tiny pinch of chili powder instead of paprika. This version tastes like street corn (elote) with a steakhouse twist.
Parmesan and Garlic Corn: After applying the butter and while it’s still warm, grate some finely grated Parmesan cheese over the corn instead of the standard seasoning dust. Add minced garlic to the butter. The Parmesan will stick to the warm butter and melt slightly, creating a richer, more savory version.
Smoked Paprika and Black Garlic Corn: Increase the smoked paprika in both the butter mixture (use ¼ teaspoon) and the final seasoning dust (use ¾ teaspoon). Add ¼ teaspoon of freshly ground black pepper. This creates a smokier, deeper flavor profile that pairs well with BBQ or smoked meats.
Honey-Butter Corn: Keep the basic butter mixture, but add ½ teaspoon of honey mixed in with the butter. The honey adds a subtle sweetness that complements the natural sweetness of the corn. Apply the honey-butter, then dust with a coarse sea salt and a tiny pinch of black pepper. Skip the paprika to keep the sweetness the star.
Cajun Corn: Make the butter mixture, but instead of paprika, use ¼ teaspoon of Cajun seasoning (like smoked paprika, cayenne, garlic powder, and oregano combined). This creates a spicier, more complex version that pairs well with seafood or soul food sides.
Truffle Oil Corn: After applying the standard seasoned butter, drizzle a tiny amount of truffle oil over each ear (just a few drops — truffle oil is potent). This elevates the corn to a luxe side dish that’s perfect for special occasions.
Serving Suggestions and Pairing Ideas
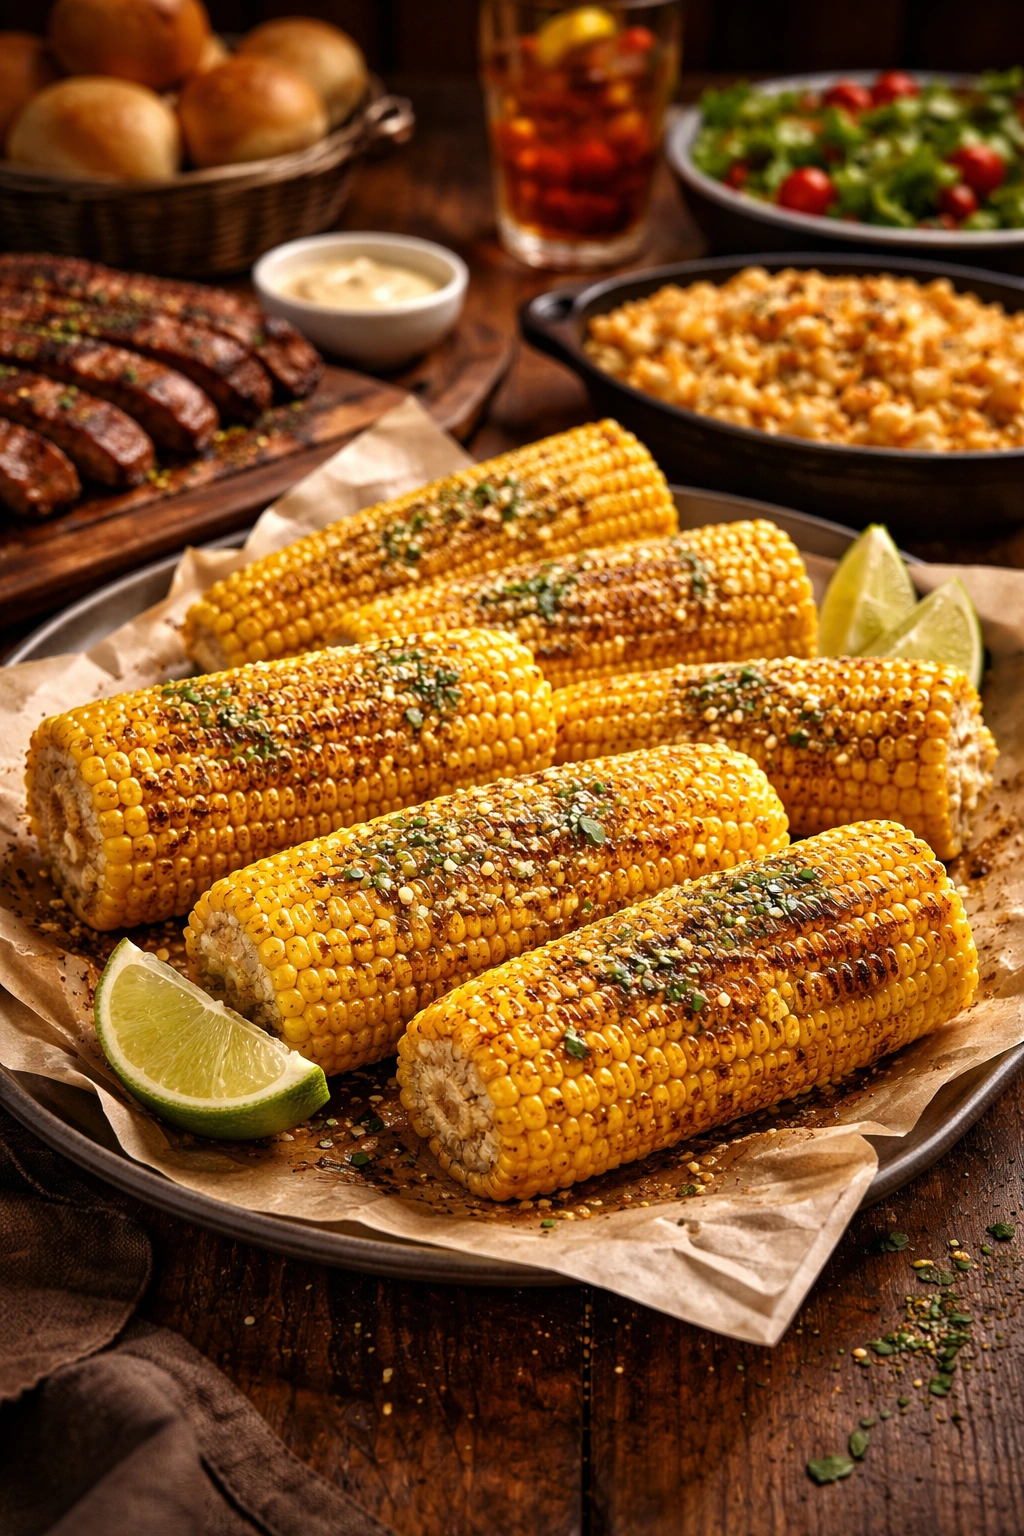
Corn on the cob prepared this way is the perfect steakhouse-style side dish, so it pairs beautifully with grilled or seared steak, prime rib, or ribeye. The sweet, buttery corn balances the richness of high-fat cuts perfectly.
Serve it alongside baked potatoes and a grilled vegetable medley for a classic steakhouse-style meal. The corn’s sweetness and the potato’s earthy richness complement each other perfectly.
This corn also works well as part of a summer grilling spread with burgers, hot dogs, grilled chicken, or grilled fish. It’s equally at home at a casual backyard gathering or a more formal dinner party.
For presentation, serve the corn on a warm platter lined with parchment paper (so the butter doesn’t soak through), and provide napkins in abundance — eating corn on the cob is always an adventure, and the seasoned butter makes it even more so.
If you’re serving a crowd, arrange the corn standing upright on the platter with the cut end down, or lay it flat in a single layer. Both presentations work well, though standing them upright makes for a more dramatic presentation.
For a more refined presentation suitable for a dinner party, you can offer corn holders (those cute handles with pins on the ends) for guests to use while eating. Provide butter knives for applying additional butter if desired, and keep extra napkins nearby.
This corn is also excellent served at room temperature the next day as part of a grain-based salad or as a side with grilled fish. Simply cut the kernels from the cob and toss them with other ingredients.
For a lighter version, you can serve this corn as part of a summer salad with fresh vegetables, herbs, and a light vinaigrette. The charred kernels add depth to the salad, and the residual butter flavor enriches the greens.
Final Thoughts
Making LongHorn Steakhouse-style corn at home is easier than most people expect, and the results are indistinguishable from what you’d pay $4–5 extra for at the restaurant. The three-part formula — properly charred corn, seasoned butter, and a light seasoning dust — creates a side dish that tastes special without requiring any special equipment or difficult technique.
The key to success is not rushing the process. Give the corn the full 12–15 minutes on the grill so the char develops properly. Use softened butter (not melted) so the seasoning adheres and clings to the kernels. Apply the seasoning dust while the butter is still warm so it sticks rather than falling off. These small details are what separate restaurant-quality corn from regular buttered corn.
Once you’ve mastered the basic technique, you’ll find yourself making variations and experimenting with different herb and spice combinations. The foundation is so solid that you can build on it endlessly while maintaining that steakhouse quality. Whether you keep it simple with just salt and paprika or jazz it up with fresh herbs and lime, you’ll have a side dish that elevates any meal and impresses anyone eating it.