There’s a strange magic that happens when flour, water, salt, and yeast get left alone for a really long time. You don’t muscle the dough into submission. You don’t knead it for ten minutes until your forearms burn. You just wait. And somehow, the dough becomes something extraordinary—crusty on the outside, open and tender on the inside, with a complexity of flavor that makes people swear you spent all day in the kitchen when you barely touched anything.
No-knead bread changed the way people bake at home. Before this technique became mainstream, many home bakers felt like they needed special equipment, extensive knowledge, and plenty of physical effort to produce a decent loaf. But the no-knead method—popularized by Jim Lahey at Sullivan Street Bakery—strips all of that away. It’s built for people who’ve never made bread before, people with bad shoulders, people who want amazing results without drama. And the truly beautiful part? It actually works better because you’re not doing anything wrong. There’s almost nothing to mess up.
The reason this method is so forgiving is that time does the heavy lifting instead of your hands. Long, slow fermentation develops gluten structure naturally, builds flavor depth through microbial activity, and creates the exact conditions you need for a gorgeous, crispy crust. The dough gets so forgiving that even if your timing is off by a few hours, you’re still going to make great bread. First-time bakers often produce loaves that rival what professional bakeries sell, and that confidence boost keeps them coming back to the kitchen.
Why No-Knead Works So Well for Beginners
The traditional bread-making process asks you to develop gluten through repetitive, physical folding or kneading. It requires timing precision, a feel for dough consistency that only experience teaches, and frankly, some upper-body strength. No-knead bread flips this entirely. Instead of manually developing gluten, you let time and the dough’s own moisture create the structure. Instead of trying to judge fermentation by how the dough looks or feels—something that’s incredibly hard for new bakers—you follow a simple clock.
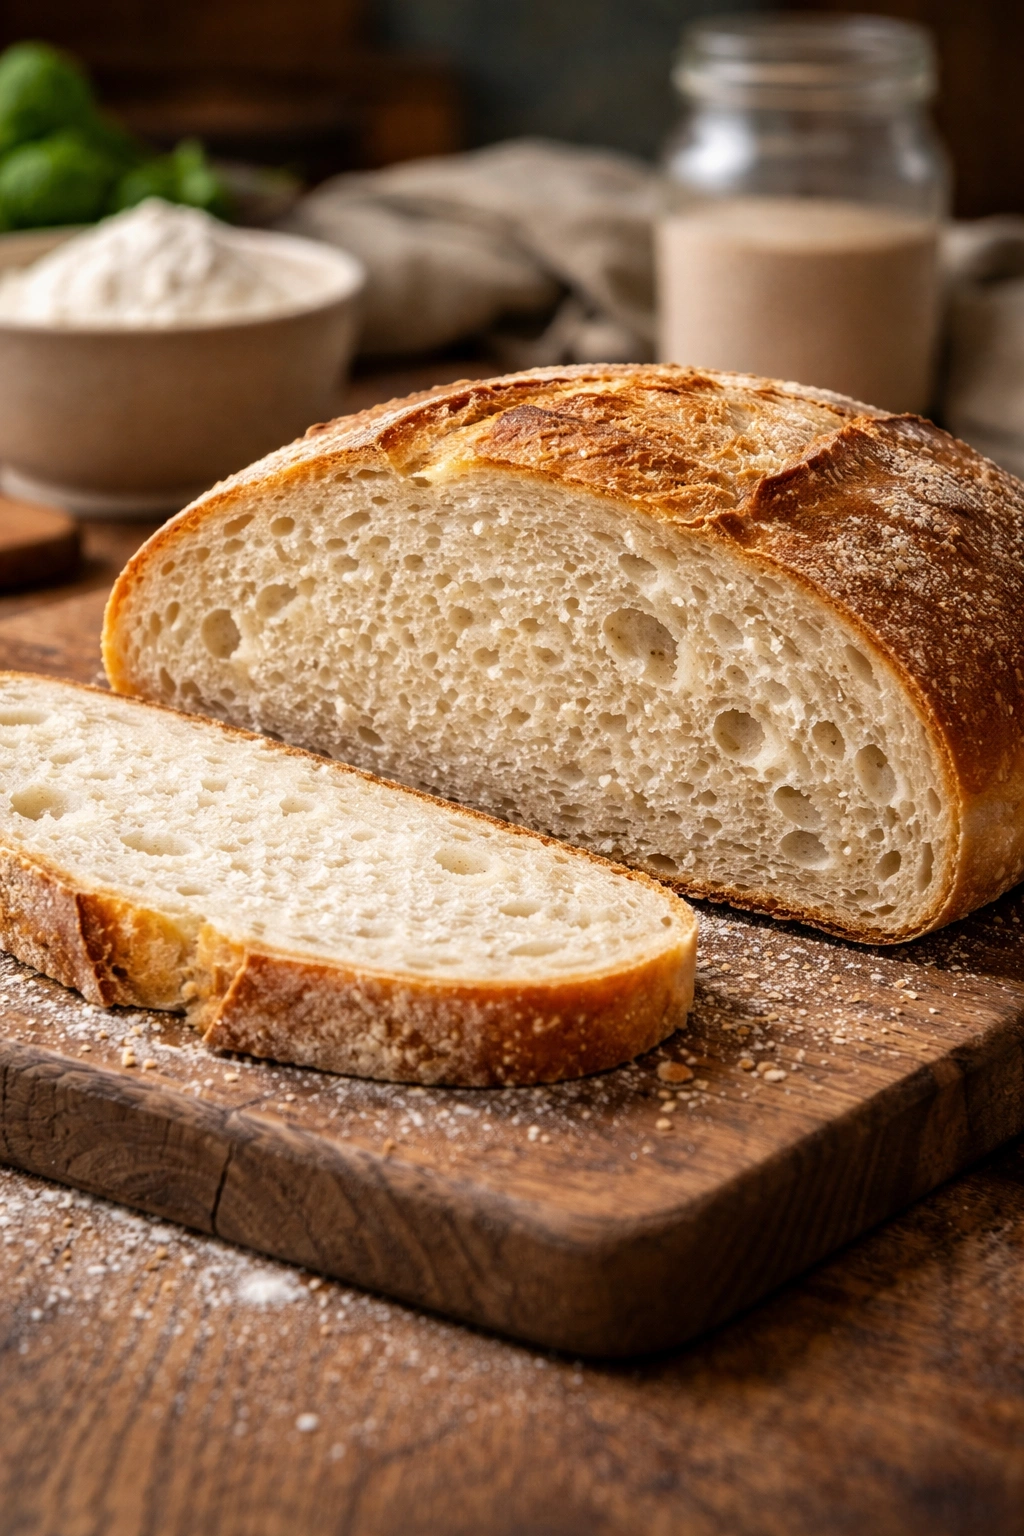
This approach removes the skill requirement without removing the quality. A beginner baker following this method will produce a loaf that’s honestly as good as what many experienced bakers make. The crust will be crispy and shattering. The crumb will be irregular and open, with big, beautiful holes. The flavor will be complex—slightly tangy, nutty, with the depth that only slow fermentation creates. And you’ll get there with minimal stress or failure.
The psychological benefit matters too. Baking can feel intimidating when you’re not sure if you’ve kneaded enough, or if your rise looks right, or if you’ve shaped the dough correctly. No-knead bread gives you clear, simple checkpoints. Mix. Wait. Shape. Wait. Bake. There’s almost nothing subjective in the process, which means almost nothing to second-guess yourself about. You follow the steps, and the bread happens.
The Magic of Long Fermentation
Fermentation is where the real transformation occurs, and it’s the key to understanding why this method works so well. When yeast consumes the sugars in flour, it produces carbon dioxide (which makes the dough rise) and alcohol (which evaporates during baking). But fermentation does way more than just inflate the dough. It also develops flavor compounds, breaks down gluten proteins, and creates acids that give bread its distinctive tang.
Most commercial bread rises for only 1-3 hours. No-knead bread typically ferments for 12-18 hours at room temperature or even longer if refrigerated. During that extended time, the yeast multiplies and creates more aromatic compounds. Bacteria also become active, producing lactic and acetic acid—the sourness you taste in artisan bread. These microorganisms also contribute enzymes that break down starches and proteins, which makes the bread easier to digest and more flavorful.
The extended fermentation also creates a beautiful side effect: the gluten develops without any kneading. Water slowly absorbs into the flour, and the dough’s own movements (usually just one or two folds halfway through) align the gluten network. It’s a gentler process than traditional kneading, which often leads to a more open, irregular crumb structure. The long wait gives the dough time to fully hydrate, develop flavor, and gain strength—everything you’d normally spend fifteen minutes kneading to achieve.
This is also why the dough is incredibly forgiving of timing variations. If you can’t bake your dough at 14 hours, wait until 16. The extra fermentation won’t ruin anything; it’ll just make the dough slightly more sour and open. Home bakers often get nervous about timing because they think precision is critical. With no-knead bread, it genuinely isn’t. That flexibility is part of what makes it so beginner-friendly.
Equipment You Actually Need

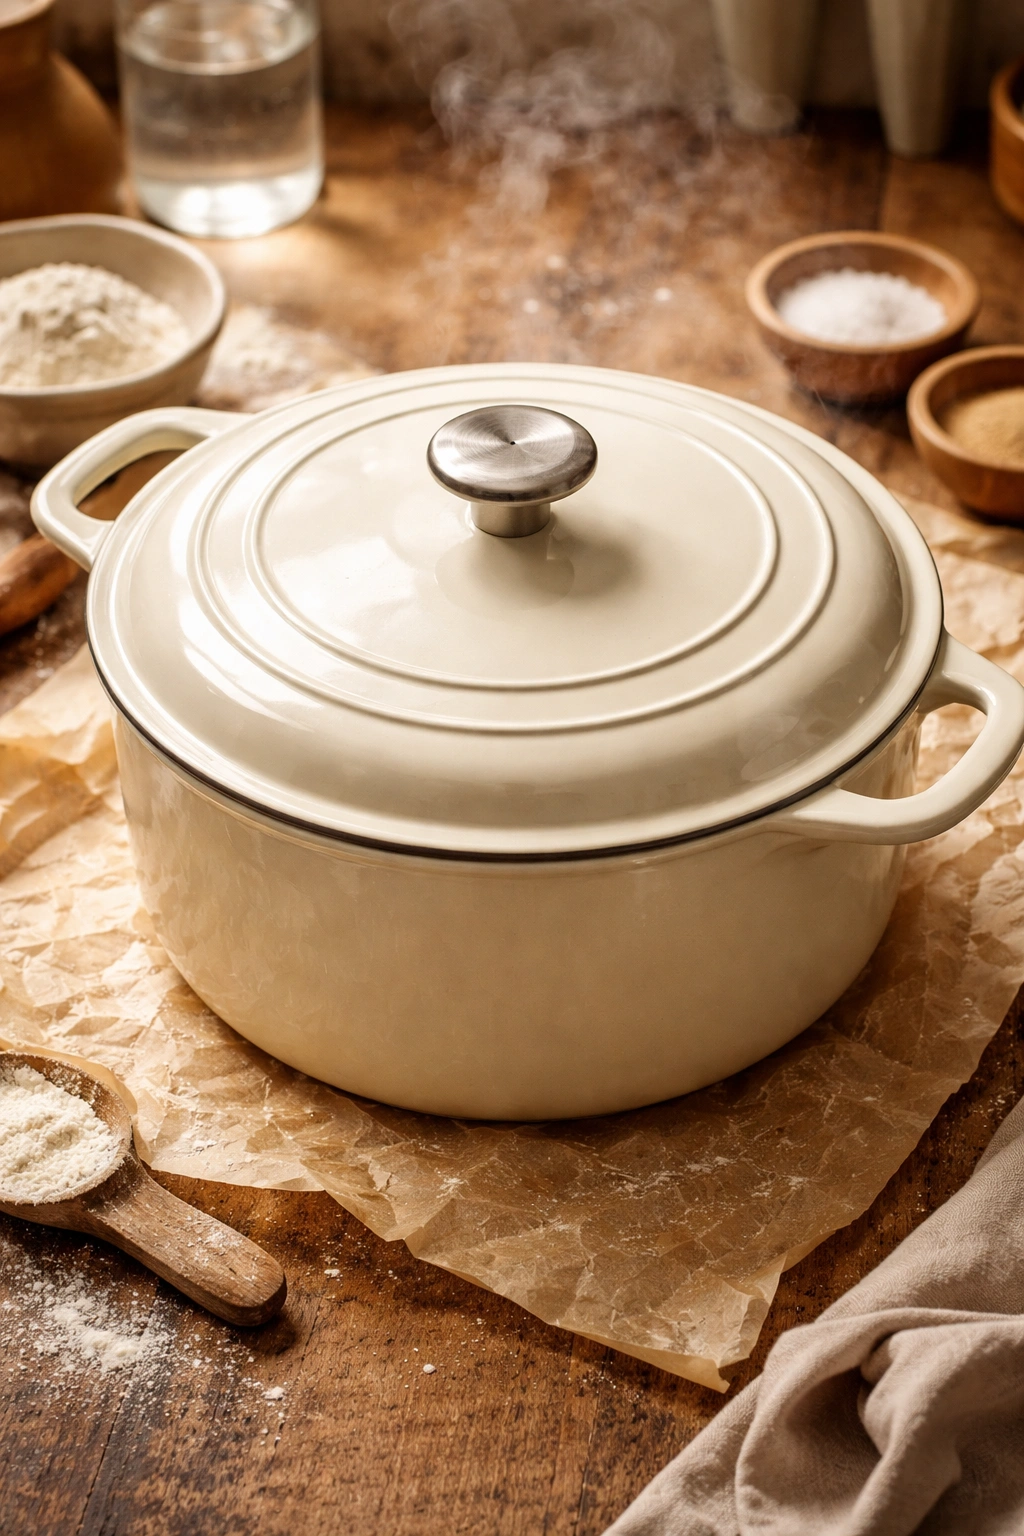
One of the best parts of no-knead bread is that you don’t need special gear. You don’t need a stand mixer. You don’t need a Danish dough whisk or any boutique tools. You genuinely need just three things: a bowl, a spoon, and a Dutch oven.
The bowl can be any container that holds at least four quarts and has a lid or a way to cover it (a kitchen towel works fine). Stainless steel is great because it doesn’t react with acidic dough. Glass is lovely because you can see the dough rise. Even a plastic container works perfectly well. The spoon can be a regular wooden spoon, a silicone spatula, or just your hand—you’ll probably prefer your hand once you try it because you’ll feel less dough sticking to it.
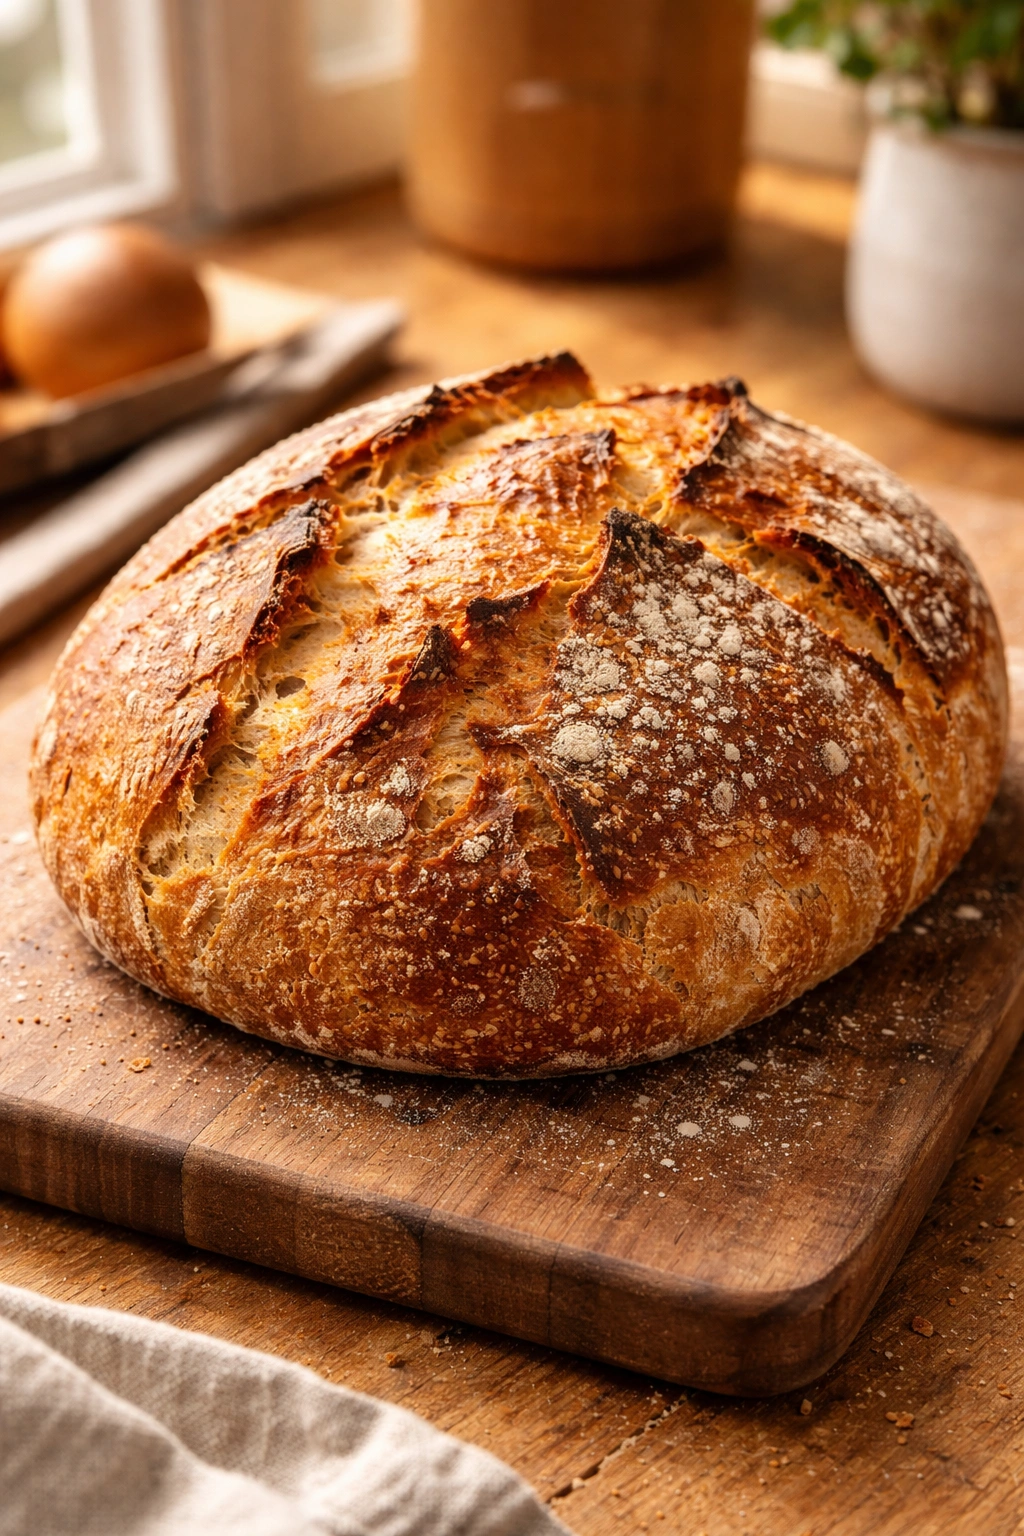
The Dutch oven is the real star here. It’s a heavy pot with a lid, usually made from enameled cast iron. When you put your cold dough in a preheated Dutch oven and cover it, something beautiful happens: the moisture from the dough gets trapped inside the pot. That trapped steam creates the exact conditions bakery ovens use to make crispy crusts. The steam allows the bread to expand freely before the crust sets, which creates a bigger oven spring (more rise) and ultimately more gorgeous scoring patterns.
If you don’t own a Dutch oven, you have options. Some people bake their bread on a hot baking stone or steel with a tent of aluminum foil creating a steam chamber above. It’s slightly fussier, but it works. You could also try putting a hot cast iron skillet on the bottom oven rack and pouring water in it to create steam. What matters is that you’re creating a moist heat environment for the first 20-30 minutes of baking. If a Dutch oven isn’t in your budget yet, it’s a worthy investment—you’ll use it constantly for bread, braised dishes, roasts, and soup.
The Ingredients and What They Do
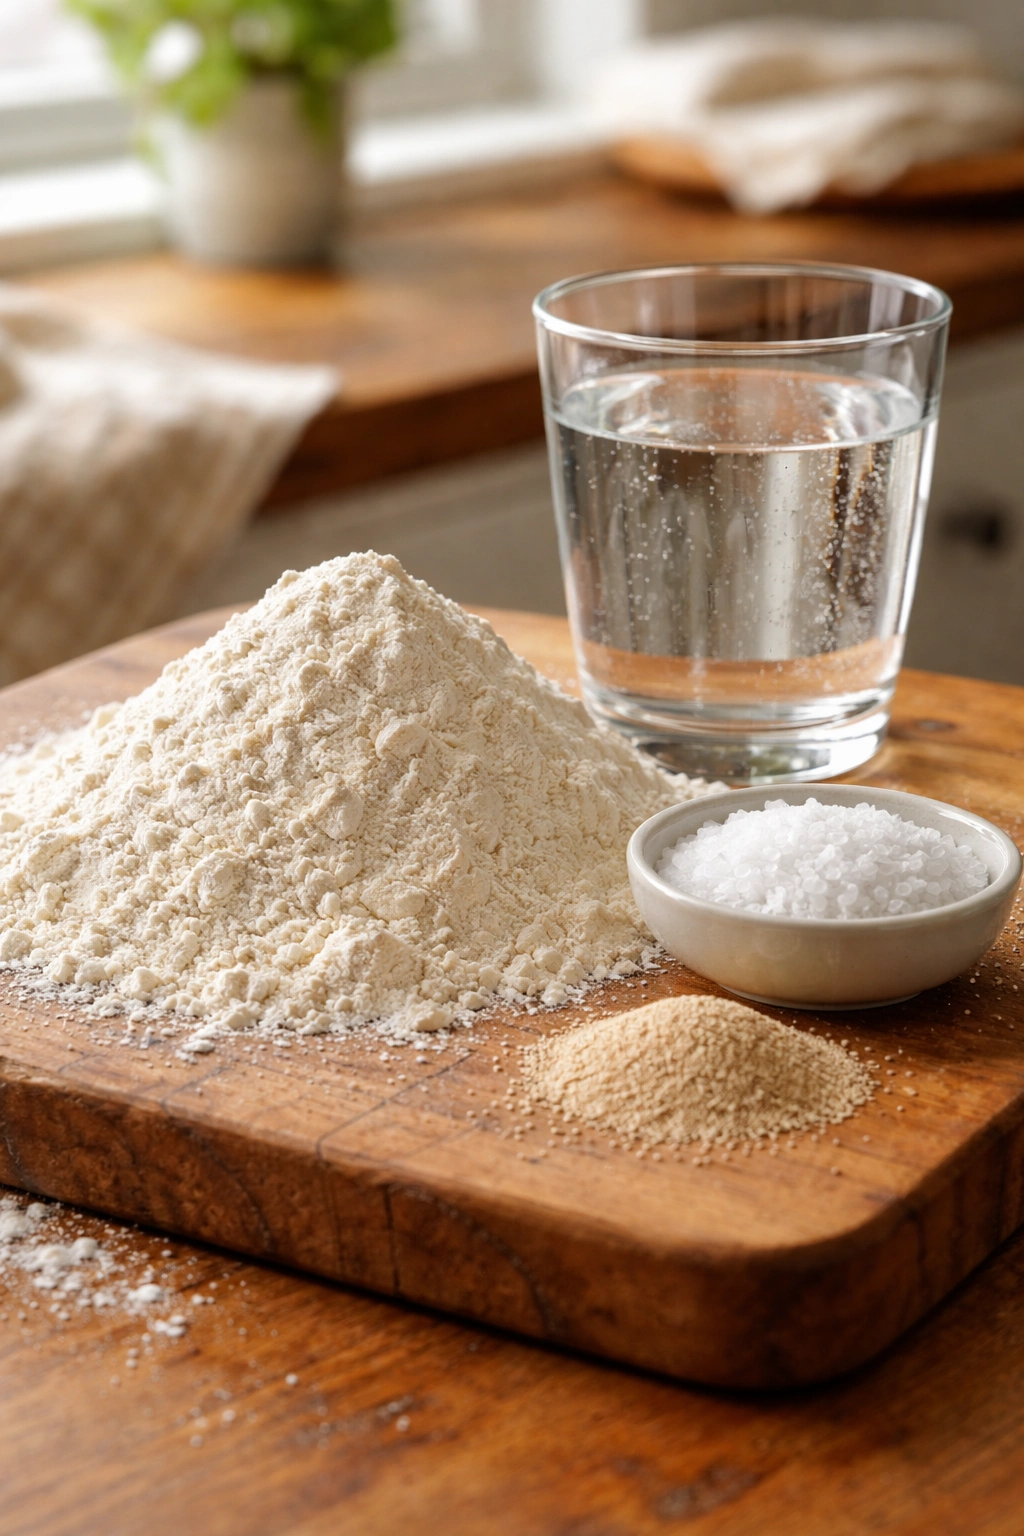
Every ingredient in no-knead bread serves a purpose, and understanding those purposes helps you troubleshoot if something doesn’t go perfectly. The basic formula is simple: flour, water, salt, and yeast. But each component affects the final loaf in measurable ways.
Flour is the structural foundation. All-purpose flour (about 10-12% protein) works beautifully for no-knead bread. Bread flour (12-14% protein) will give you a slightly chewy crumb and better oven spring. Whole wheat flour adds nutrition and nuttier flavor but also absorbs more water, so you’d need to adjust the hydration if using more than 20% whole wheat. The flour contains starch and protein, and when water hydrates them over hours, gluten develops naturally without kneading.
Water makes up about 67-75% of the total dough weight in no-knead recipes. This is quite wet compared to traditional bread dough, which is why the dough feels almost like thick batter when you’re mixing. The high hydration is actually essential—it creates steam during baking, which produces that gorgeous crust, and it leads to a more open crumb structure with bigger holes.
Salt does two things that matter. It seasons the bread, obviously, but it also strengthens the gluten network and slows fermentation slightly, which gives more flavor development time. Never skip the salt or reduce it drastically.
Yeast is the living component. You need very little—just a quarter teaspoon for a long fermentation. The long time means the yeast has plenty of time to work, so you don’t need much. This slow, low-yeast approach also reduces the harsh “yeasty” flavor some breads have. The yeast you use can be instant yeast, active dry yeast, or even fresh yeast. They all work, though instant yeast is the easiest to keep on hand.
Yield: One 1.5-pound loaf | Serves 8 to 10
Prep Time: 10 minutes (hands-on mixing time)
Fermentation Time: 12 to 18 hours at room temperature, or up to 48 hours in the refrigerator
Cook Time: 45 minutes (20 minutes covered, 25 minutes uncovered)
Total Time: 12 to 18 hours active fermentation + 45 minutes baking (or longer if cold fermenting)
Difficulty: Beginner — No kneading required, just a simple mix-and-wait process. Even if your timing is off by a few hours, the bread will turn out beautifully.
For the Dough:
- 3 cups (390g) all-purpose flour or bread flour
- ½ teaspoon instant yeast (do not increase this)
- 1½ teaspoons fine sea salt
- 1½ cups (360ml) room temperature water
Optional Add-Ins (Mix Into Dough Before Fermenting):
- ½ cup whole wheat flour (replace ½ cup all-purpose flour)
- 2 tablespoons honey or sugar (feeds the yeast slightly, increases browning)
- 1 teaspoon instant coffee powder (deepens crust color and flavor, you won’t taste coffee)
Mixing and Fermenting Your Dough
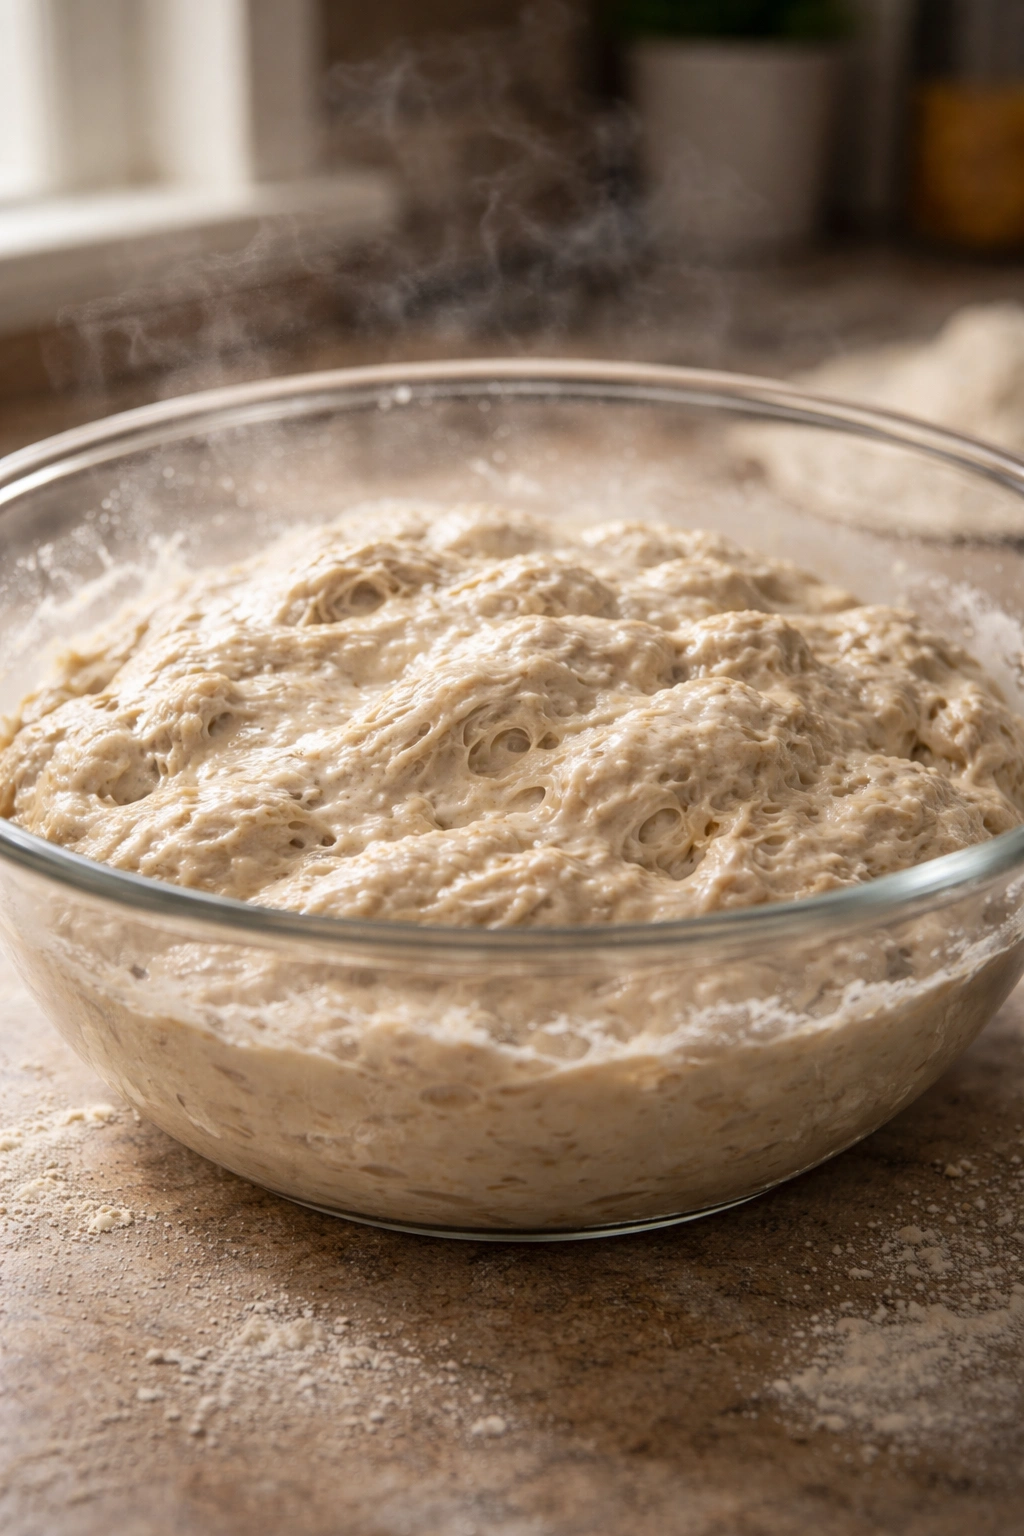
The actual mixing is almost comically simple. You’re not trying to make a smooth, elastic dough like traditional bread. You’re making a shaggy, wet mixture that looks more like biscuit dough or thick hummus than bread dough. That’s exactly what you want.
Combine the Dry Ingredients:
Pour the flour, yeast, and salt into a medium bowl. Stir them together with a wooden spoon or your fingers for about 30 seconds until they’re evenly distributed. The goal is to make sure the yeast and salt are scattered throughout the flour rather than sitting in clumps. If they sit in one spot, they might create weird flavor pockets or uneven fermentation.
Add Water and Mix:
Pour the room temperature water into the flour mixture. Using a spoon (or your hand, which honestly works better), stir the mixture for about one minute. You’re not trying to develop gluten or incorporate air—you’re just getting everything wet and roughly combined. Stop when you see no more dry flour. The dough will look rough, shaggy, and quite wet. If it looks too thin, it’s actually fine. If you see dry flour streaks, add another tablespoon of water and stir again.
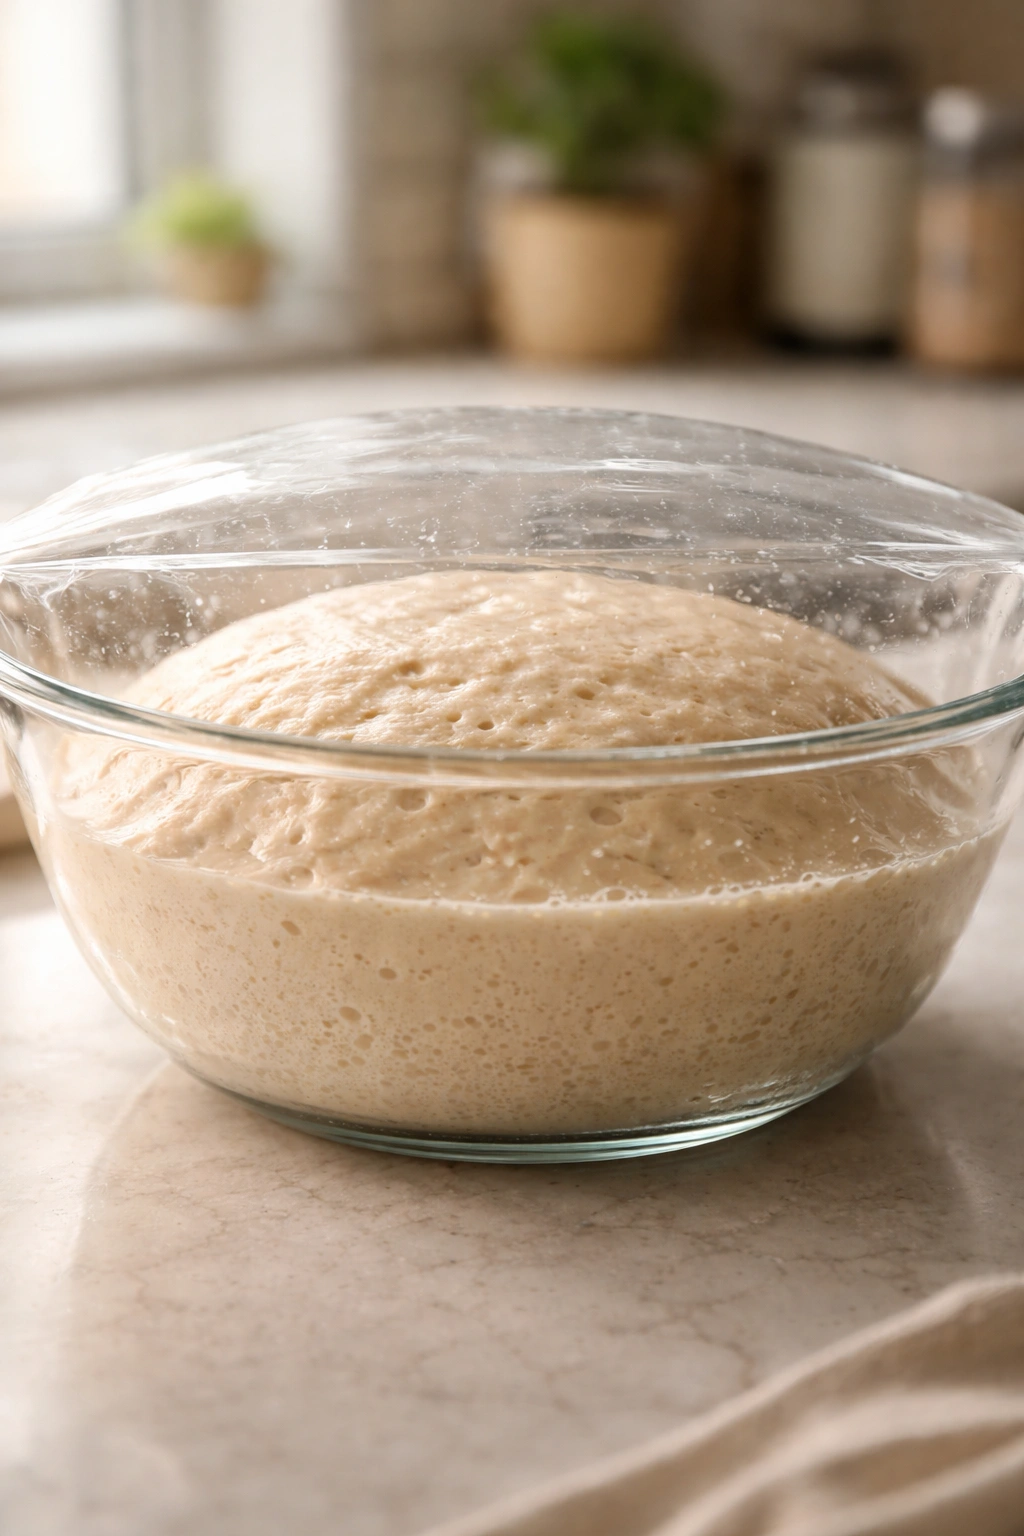
Cover and Ferment at Room Temperature (12-18 Hours):
Cover the bowl with a lid, plastic wrap, or even a kitchen towel. Place it on your counter somewhere that won’t get disturbed—not directly in the sun, and somewhere cool-ish if possible (ideally 68-72°F, though it’ll work anywhere between 65-78°F). Now you wait. During this time, the yeast will slowly work, the flour will continue absorbing water, and gluten will develop on its own.
Optional: Fold the Dough Halfway Through (8-10 Hours In):
About halfway through fermentation, you can perform one gentle fold. Using a wet spoon or wet hand, reach down to the edge of the dough, lift the bottom portion up and fold it over the top. Rotate the bowl a quarter turn and repeat three more times—you’ve just done four folds. This helps organize the gluten structure and creates a slightly better crumb. It’s optional because the dough will rise beautifully without it, but many bakers find it improves the final loaf. If you forget, don’t worry; the dough will still be fantastic.
Signs Your Dough Is Ready:
The dough is ready when it’s roughly doubled in size and has a bubbly, airy surface with visible bubbles underneath when you look at the edges. The smell should be pleasant and slightly tangy. The dough won’t look like a smooth, finished dough—it’ll be bubbly and loose. That’s perfect.
Step-by-Step Baking Instructions
Baking no-knead bread happens in three phases: shaping, second rise, and baking. Each phase is short, and the timing is very forgiving.
Prepare Your Equipment:
-
About 1-2 hours before you plan to bake, position an oven rack in the lower-middle part of the oven and place your Dutch oven (with the lid on) inside. Preheat the oven to 500°F (260°C). The Dutch oven needs to be hot so it can create steam. If you skip the preheat step, the bread won’t develop the same gorgeous crust, so don’t rush this.
-
While the oven preheats, lightly dust a large piece of parchment paper (about 15×15 inches) with flour or cornmeal. This will be your bread’s resting surface and will go into the hot Dutch oven with the bread, so make sure it can fit inside your pot.
Shape the Dough:
-
Turn your fermented dough out onto a lightly floured surface. Don’t dump it roughly—use a bench scraper or spoon to gently coax it out of the bowl. The dough will be quite sticky and loose, which is normal. You’re not trying to make it less sticky or knead air out of it.
-
Using wet or floured hands, gently fold the edges of the dough toward the center, creating a loose round package. You’re creating surface tension, which helps the bread rise upward instead of spreading sideways. Do not knead or overwork the dough at this stage. Fold it gently 4-6 times around the perimeter, rotating the dough as you go. It should still look a bit shaggy and loose—that’s right.
-
Flip the dough over seam-side down onto your parchment-lined surface. Let it rest for 20-30 minutes. It doesn’t need to rise much—just enough for a tiny bit of puff. This short rest allows the gluten to relax slightly before baking.
Advertisements
Bake the Bread:
-
Carefully remove the screaming-hot Dutch oven from the oven. Set it on a heat-safe surface and remove the lid. Be very careful—the lid and pot are hot enough to cause severe burns. Using the parchment paper as handles, gently lower the dough into the pot. The parchment can stay underneath the bread; it won’t burn. If it sticks up above the bread, tear off the excess.
-
Cover the pot with the lid and bake for 20 minutes at 500°F (260°C). You won’t peek at the bread during this time. The lid traps steam, and opening it releases that precious moisture. Just leave it alone.
-
After 20 minutes, carefully remove the lid. The bread should have risen and expanded beautifully. The surface might be pale or light golden—that’s fine. Set the lid aside and return the uncovered pot to the oven.
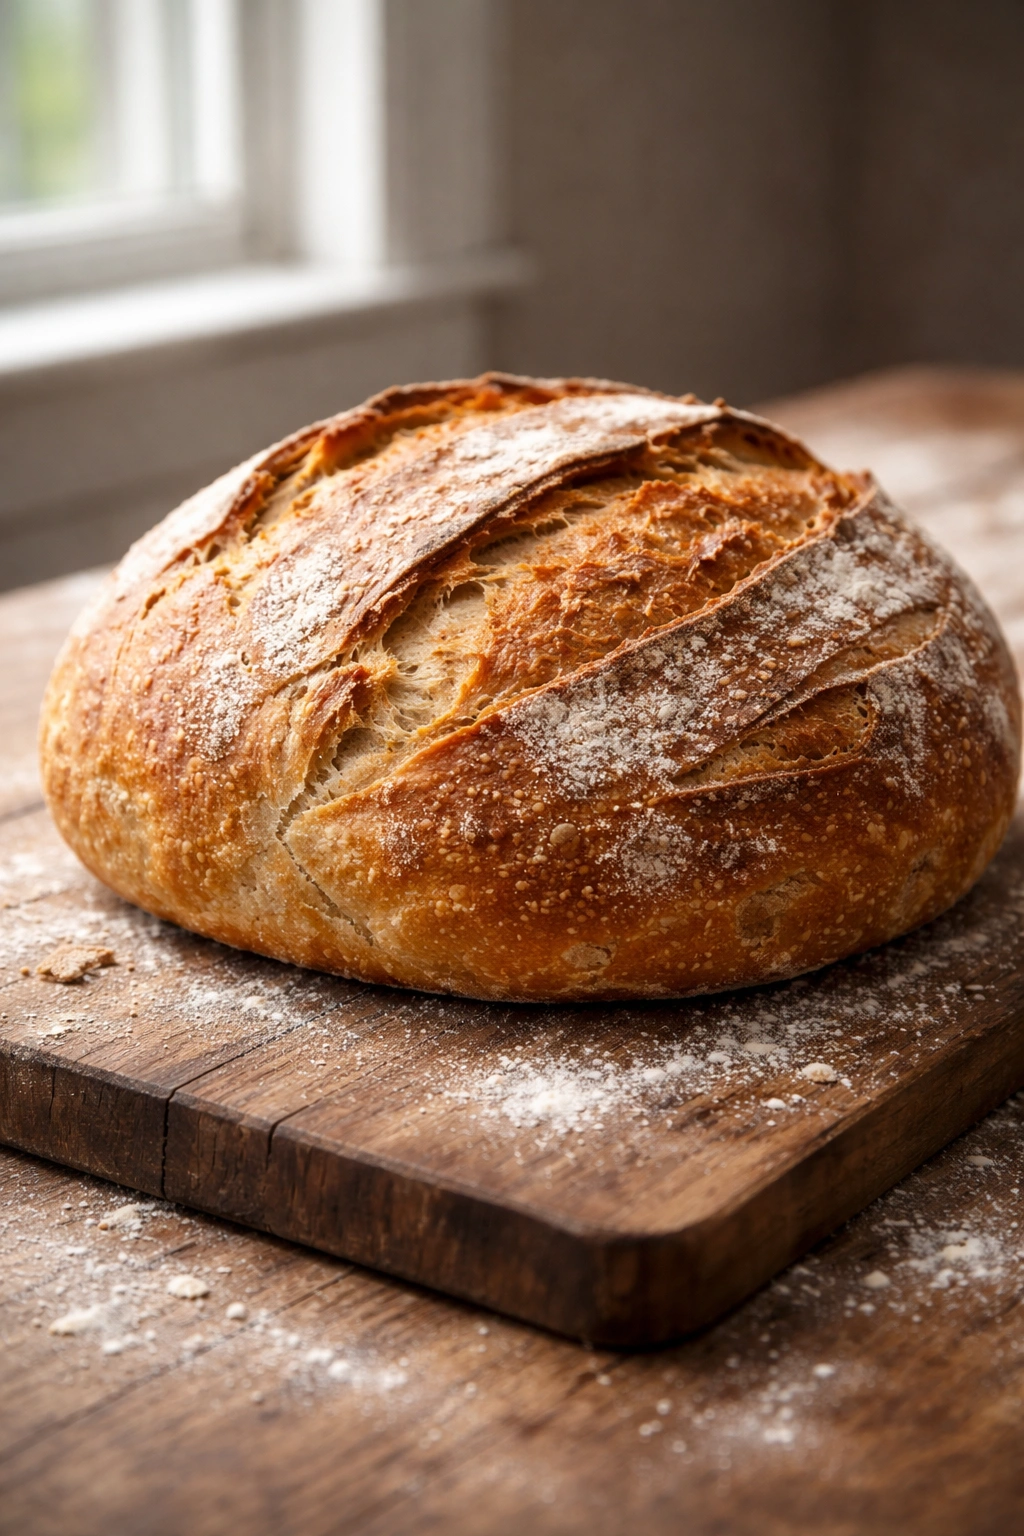
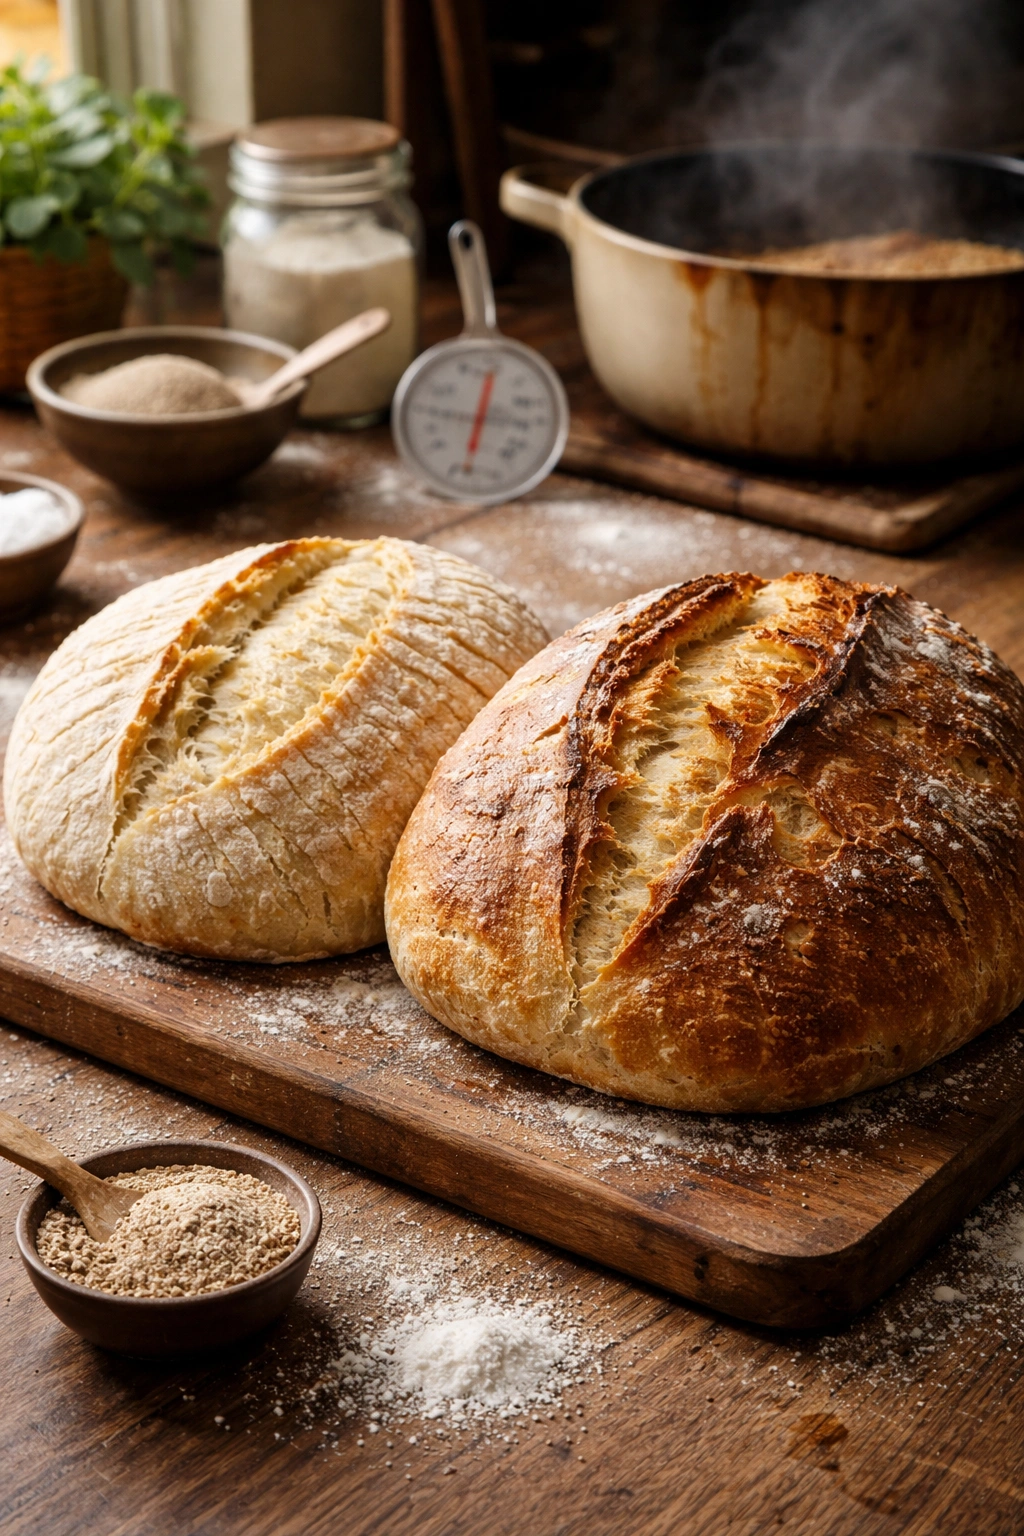
-
Bake uncovered for 25-30 minutes, until the bread is a deep golden-brown color, almost mahogany on the highest points. The entire surface should look burnished and gorgeous. The bread should have a hollow sound when you tap the bottom. If it still sounds solid and dense, bake another 5 minutes.
-
Using tongs or a bread peel, carefully remove the bread from the pot and place it on a wire cooling rack. This step is crucial: let the bread cool completely before slicing—at least 1 full hour, ideally 2-3 hours. The interior is still cooking as it cools. If you slice it while warm, the steam escapes and you’ll have a gummy crumb. Cool bread slices cleanly and has the correct texture.
Common Mistakes and How to Avoid Them
Even though no-knead bread is forgiving, certain mistakes do show up in the final loaf. Knowing what to watch for means you’ll troubleshoot faster and adjust your next loaf confidently.
Too Little Yeast: Some recipes call for just a tiny pinch of yeast, and people sometimes reduce it further. Don’t. A quarter teaspoon is already minimal. Less than that, and your dough won’t rise enough and won’t develop much flavor. The long fermentation means you don’t need much yeast, but you do need some.
Too Warm During Fermentation: If your kitchen is very warm (above 78°F), the fermentation can move faster than expected. Your dough might be ready in 10-12 hours instead of 14-16, and the crust might not develop the same deep color. If you know your kitchen is warm, ferment in a slightly cooler spot or reduce fermentation time by a couple hours. You can also cold-ferment in the refrigerator for 24-48 hours, which actually produces even better flavor.
Not Preheating the Dutch Oven Long Enough: This is the most common issue I see. Home bakers preheat for 20 minutes and think that’s enough. The Dutch oven needs to be deeply hot—at least 45 minutes to an hour at 500°F. An adequately hot pot creates an immediate burst of steam, which creates that gorgeous, crispy crust. An insufficiently hot pot just bakes the bread normally, and the crust won’t be as shattering.
Slicing Too Early: It’s tempting. The bread smells amazing, looks amazing, and you want to taste it immediately. But warm bread has a gummy crumb because the internal structure is still set. Wait. I know it’s hard, but waiting makes all the difference.
Opening the Lid Too Many Times: Every time you lift the lid during the first 20 minutes of baking, steam escapes and your bread loses that crucial moisture. Peek once if you absolutely must, but ideally, don’t open it until the 20-minute mark.
Tips From Experienced Bakers
Once you’ve made this bread once or twice, you’ll start noticing small details and preferences. Here are adjustments that experienced bakers make to fine-tune their loaves.
Cold Fermentation for Better Flavor: After mixing, instead of fermenting at room temperature for 12-18 hours, you can refrigerate the dough for 24-48 hours. Cold fermentation dramatically slows the yeast but speeds up the bacteria that create acidity and complexity. Bread fermented cold in the fridge often tastes tangier and more complex than room-temperature fermentation. Shape cold dough straight from the fridge and give it just 1-2 hours to come to room temperature before baking.
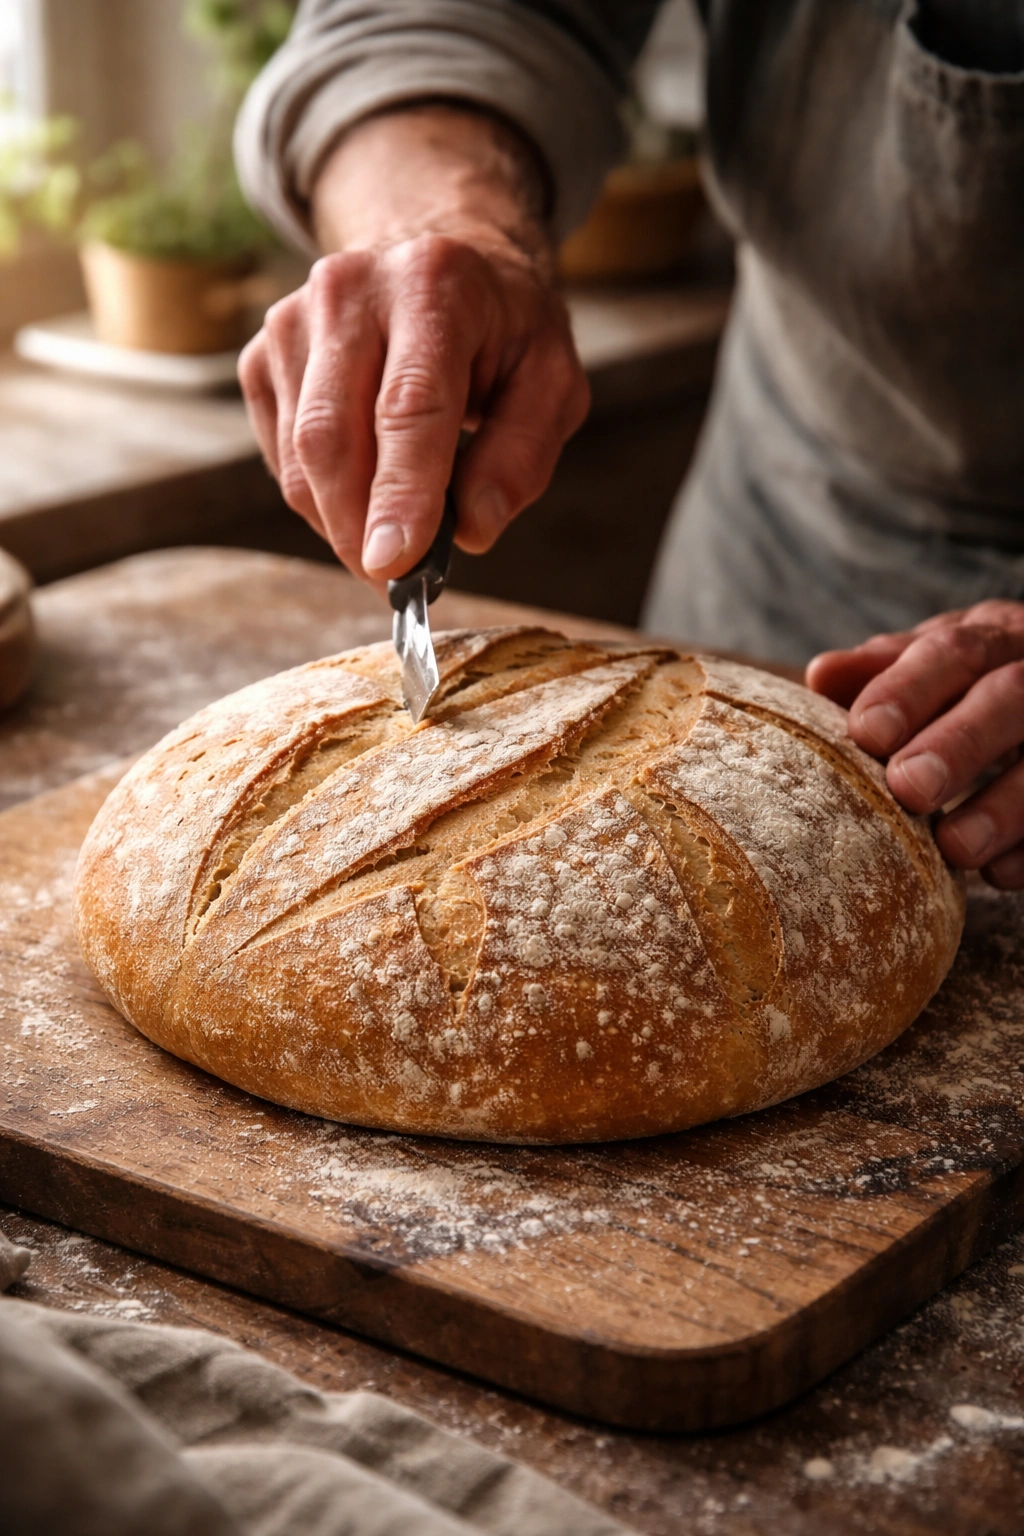
Scoring the Top: You don’t have to score (slash) your bread, but it looks beautiful and controls how the bread expands. If you want to try it, use a sharp bread knife or a lame (a razor blade on a stick) to make one or two decisive cuts just before putting the bread in the oven. A single slash down the center at a 30-degree angle is the simplest approach. Score at the very last second before baking so the dough doesn’t deflate. The cut should be about ¼ inch deep and completely confident—hesitant cuts don’t open up nicely.
Using Different Flours: Bread flour makes a slightly chewier loaf with better oven spring. Whole wheat flour adds nutty flavor (use 20-30% max or the crumb gets dense). Spelt or heritage grains create interesting flavors but often need slightly more water. Even all-purpose flour works beautifully, so don’t feel like you need specialty flour. Experiment once you’ve made it a few times.
Adjusting Hydration: If your dough feels so wet that it’s almost impossible to work with, reduce water by 2-3 tablespoons next time. If it seems dry and stiff, add water a tablespoon at a time. Different flours absorb water differently. What works perfectly with your specific flour is the sweet spot—remember it for next time.
The Sound Test: When the bread comes out of the oven, tap the bottom. A done loaf sounds hollow, almost like knocking on a wooden table. If it sounds dense and solid, it needs more time. This test becomes intuitive after a few loaves.
Troubleshooting Dense or Flat Bread
Sometimes your bread doesn’t turn out exactly right, and that’s when troubleshooting helps. Here’s what happens when common issues show up and how to fix them on your next bake.
The Crumb Is Dense and Doesn’t Have Big Holes: This usually means the dough either didn’t ferment long enough or got too warm. Dense bread also happens if the oven wasn’t hot enough or the Dutch oven wasn’t preheated sufficiently. The fix: Make sure your fermentation goes the full 12-18 hours, preheat the Dutch oven for at least 45 minutes to an hour, and verify your oven temperature with an oven thermometer (many ovens run cooler than the dial says).
The Bread Didn’t Rise Much—It’s Flat and Heavy: Flat bread usually means either not enough yeast (check that you’re using ¼ teaspoon), fermentation that was too short, or fermentation in a space that was too cold. It could also mean you’re using yeast that’s past its prime (check the expiration date). The fix: Use the full ¼ teaspoon yeast, ferment for the full time, and if your kitchen is cold, ferment in a warmer spot (near a sunny window, on top of the refrigerator, or even in a proofing box if you have one).
The Crust Is Pale Instead of Deep Golden-Brown: A pale crust means the bread didn’t bake long enough or the oven temperature was low. It could also mean the Dutch oven wasn’t hot enough. The fix: Make sure your oven is actually at 500°F (verify with a thermometer), bake uncovered for the full 25-30 minutes until the color is deep golden-brown, and preheat the Dutch oven thoroughly.
The Crumb Is Gummy or Doughy: This almost always means you sliced the bread before it was fully cooled. Warm bread feels gummy because the structure is still setting. The fix: Let the bread cool completely—at least 1-2 hours, ideally 3 hours. Once cooled, the crumb will be perfect.
The Dough Overflowed Out of the Dutch Oven: The dough got too much rise—either the fermentation was too long or the kitchen was too warm. For next time, reduce fermentation by 2-3 hours or ferment in a cooler spot.
Flavor Variations Worth Trying
Once you’ve made the basic recipe a few times, you can start playing with add-ins and flavor variations. The beauty is that the long fermentation method is so stable that it handles variations beautifully.
Whole Wheat and Seed Bread: Replace ½ cup of all-purpose flour with whole wheat flour. Add 3-4 tablespoons of mixed seeds (sunflower, sesame, pumpkin) and 1 tablespoon honey to the dough. The seeds add texture and flavor, and the honey feeds the yeast slightly, increasing browning. Make sure to increase water by 1-2 tablespoons because whole wheat absorbs more liquid than white flour.
Rosemary and Olive Oil Bread: Add 1 tablespoon of finely chopped fresh rosemary (or 1 teaspoon dried) and 1 tablespoon of good-quality olive oil to the dough. This creates an earthy, fragrant loaf that’s wonderful with soups, stews, or simply toasted with butter. If using dried rosemary, crush it between your fingers before adding so it distributes evenly.
Garlic and Herbs: Add 2-3 minced garlic cloves, 1 teaspoon of dried Italian herbs (or 1 tablespoon fresh mixed herbs), and ½ teaspoon of black pepper to the dough. This creates a savory loaf that’s perfect for making sandwiches or serving alongside pasta. Fresh herbs should be added right before baking so they stay bright; dried herbs can be mixed in at the beginning.
Everything Bagel Seasoning: After shaping and before the final rest, lightly brush the top with water and sprinkle with everything bagel seasoning (sesame, poppy, caraway, dried garlic, dried onion, and salt). Press it gently so it adheres. The result is a spectacularly flavored loaf that’s stunning to look at.
Sweet Loaf: Add 2 tablespoons of honey and 1 teaspoon of vanilla extract to the water before mixing. If you like, add ½ teaspoon of cardamom or cinnamon. This creates a slightly sweet, aromatic bread that’s wonderful for breakfast or afternoon snacking. The sweetness helps the crust brown more deeply.
100% Whole Wheat: Once you’re confident with the basic recipe, try making it with 100% whole wheat flour instead of all-purpose. You’ll need to increase water to 1¾ cups because whole wheat is much thirstier. The fermentation might move slightly faster. The result is a denser, earthier loaf with serious nutritional content. Many bakers find they prefer the flavor, even if the crumb is tighter.
Storage, Reheating, and Make-Ahead Options

No-knead bread keeps beautifully, and knowing how to store and reheat it means you can bake less frequently.
Room Temperature (Up to 3 Days): Store completely cooled bread in a paper bag or wrapped loosely in a kitchen towel at room temperature. Don’t use plastic for more than a few hours—plastic creates condensation that softens the crust. The crust will gradually soften, but that’s how you know the bread is still fresh. After 3 days, the bread starts to stale noticeably, though it’s still fine for toasting.
In the Refrigerator (Up to 1 Week): Wrap completely cooled bread tightly in plastic wrap or an airtight container and refrigerate. Cold storage slows staling significantly. The bread will keep for 5-7 days. Before eating, bring it back to room temperature or toast it—cold bread is fine for sandwiches but tastes best at room temperature.
Freezing (Up to 3 Months): Wrap cooled bread in plastic wrap, then again in aluminum foil, and place in the freezer. Frozen bread keeps beautifully for 2-3 months. To thaw, leave it at room temperature wrapped (takes 2-3 hours) or unwrap and toast it directly from frozen. Toasting frozen bread actually restores crispness to the crust better than thawing first.
Make-Ahead Dough Option: After the first fermentation, you can refrigerate the shaped dough in the Dutch oven for up to 48 hours before baking. Shape your dough, place it on parchment in the cold Dutch oven, cover the whole pot with plastic wrap, and refrigerate. When you’re ready to bake, remove from the fridge, let it sit at room temperature for 1-2 hours, then bake directly in the cold pot. This is perfect for planning to have fresh bread on a specific day.
Reheating Tips: Toasted bread is almost always better than reheated bread because the dry heat re-crisps the crust and warms the interior. Toast slices or wrap the whole loaf in foil and warm at 350°F for 10-15 minutes. Never microwave bread; it makes the crumb rubbery.
Serving Ideas and Pairings
Freshly baked bread is so good that it almost needs no accompaniment. But here’s how to get the most out of your loaf.
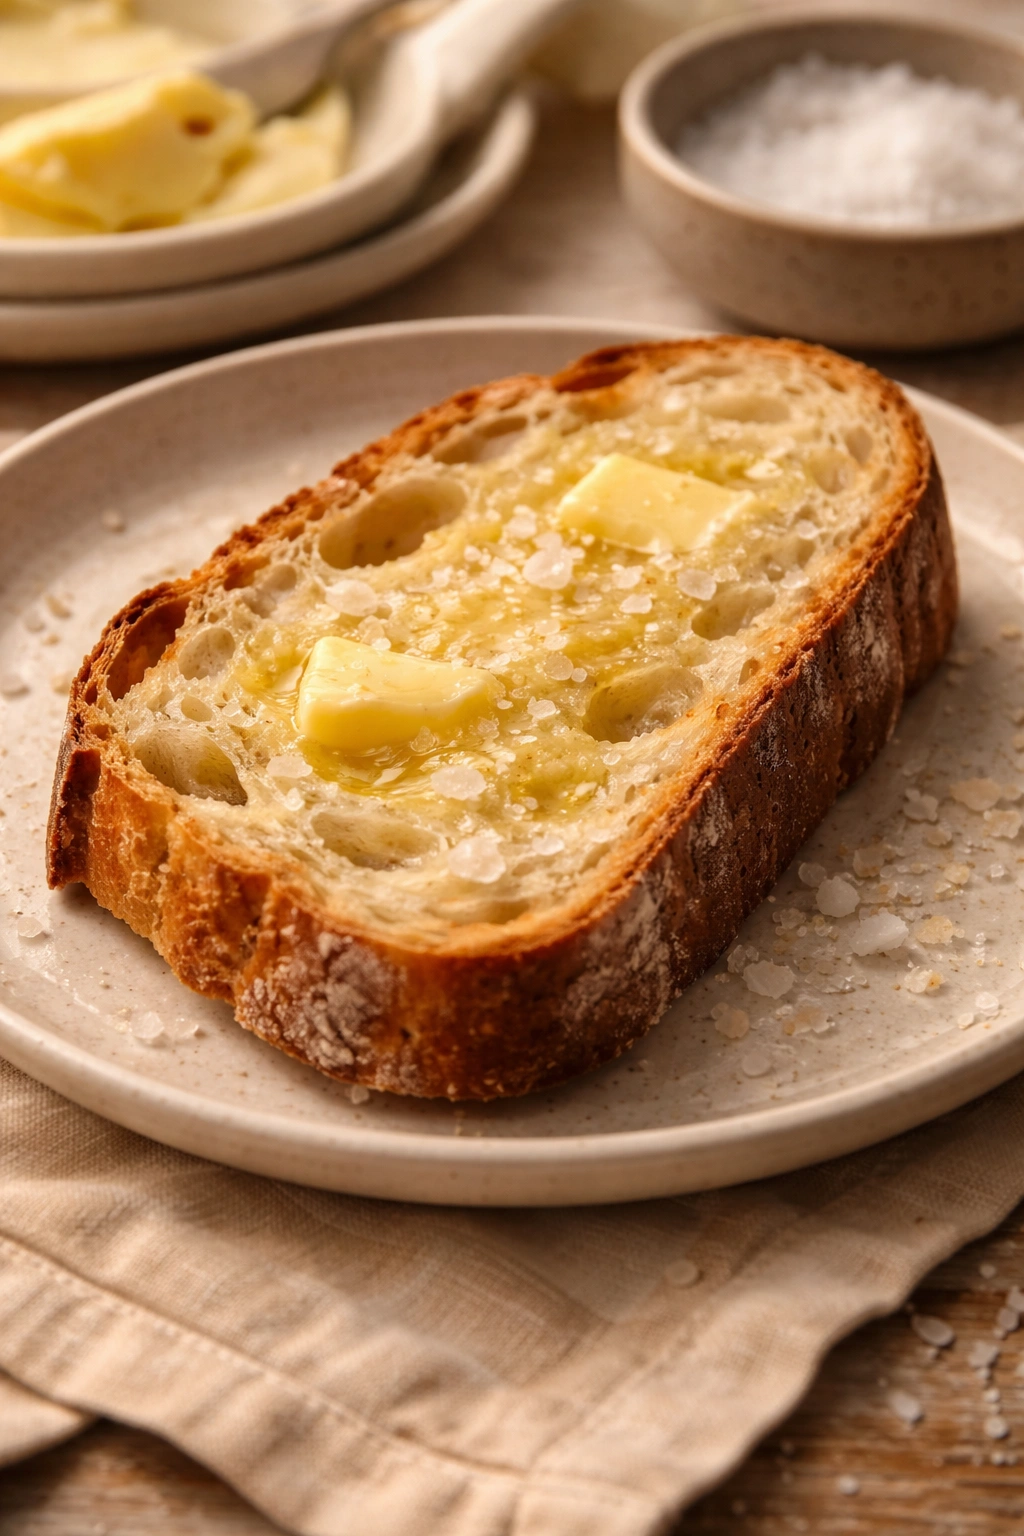
Simple and Perfect: Slice warm or room-temperature bread and serve with good butter, sea salt, and maybe a drizzle of honey. That’s all you need. The bread’s own complex flavor shines through.
With Soups and Stews: This bread is perfect for dipping into creamy soups (tomato, butternut squash, mushroom), rich stews, or even chili. The crusty exterior soaks up liquid without falling apart, and the tender interior melts into the soup. Toast the slices first if you want them to stay crispy longer.
For Sandwiches: Day-old bread makes the best sandwiches because the crumb is set and slices evenly. The chew and crust add genuine texture compared to soft sandwich bread. Try it with roasted chicken, fresh mozzarella and tomato, cold beef and horseradish, or just good cheese and cured meats.
As Bruschetta or Crostini: Slice the bread on a slight diagonal (creates larger surface area), toast the slices, rub with a cut garlic clove, drizzle with good olive oil, and top with whatever you like—tomato and basil, white bean spread, roasted red peppers, ricotta and honey. The bread’s stability and crust make it perfect for loaded toasts.
Breakfast Toast: Slice, toast until crispy, and top with smashed avocado, ricotta and honey, almond butter with sliced banana, or cream cheese and smoked salmon. The sturdy crumb handles any topping without falling apart.
Bread Salads and Panzanella: Slightly stale bread is actually ideal for salads like panzanella (Italian bread and tomato salad) where the bread absorbs the dressing. Cut day-old bread into cubes, toss with fresh tomatoes, basil, red onion, olive oil, and vinegar. It’s refreshing and a perfect way to use bread that’s past its prime for eating plain.
Final Thoughts
No-knead bread isn’t a shortcut to good bread—it’s a different path to excellent bread. You’re not saving time by reducing steps; you’re redistributing that time so you work for ten minutes and then let biology and chemistry do the heavy lifting. The loaf you pull out of the oven will have a shattered crust that crackles as you slice it, an interior with an irregular, open crumb structure, and a flavor that’s noticeably more complex and satisfying than sandwich bread.
The real gift of this method is that it removes the technical barrier to bread baking. You don’t need special equipment beyond a bowl and a Dutch oven. You don’t need to develop a feel for dough or timing. You don’t need to knead for ten minutes or judge fermentation by eye. Follow the recipe, give it time, and the bread becomes something you genuinely look forward to making. Most people who try no-knead bread once end up making it regularly—sometimes weekly—because it fits into real life while still producing genuinely bakery-quality results.
Start with the basic version. Make it a few times until you feel confident with the process. Then start experimenting with whole wheat, seeds, herbs, or whatever flavors you find yourself craving. The method is stable enough to handle almost any variation. Your first loaf might not be perfect, but it’ll still be delicious. Your third or fourth loaf will probably impress you with how good it is. And once you’ve tasted homemade bread with a real crust and an open crumb, you’ll never look at commercial bread the same way again.