Sourdough has this almost magical reputation — the kind of bread that seems to require some mysterious expertise, expensive equipment, and years of trial and error. The truth is far simpler. A beginner can absolutely bake beautiful, tangy, open-crumbed sourdough at home, and the process, while it does take time, is nowhere near as complicated as the mystique suggests. What it takes is patience, an understanding of a few core principles, and a willingness to pay attention to what your dough is telling you rather than watching the clock obsessively.
The reason sourdough intimidates people is that it operates differently from yeasted bread. There’s no instant yeast packet to add, no rising timeline that fits neatly into your schedule, and no guarantee that everything will work the first time. But that unpredictability is also exactly what makes sourdough worth learning. You’re working with living cultures, understanding fermentation, and tapping into a baking method that humans have used for thousands of years. Once you grasp the rhythm of it, you’ll find sourdough is actually more forgiving than many bakers realize — it just asks you to think differently about time and temperature and what “done” actually means.
This guide walks you through every step of sourdough baking, from building your own starter to pulling a perfectly scored loaf from the oven. You don’t need fancy equipment, professional training, or years of experience. You just need flour, water, salt, and a willingness to slow down.
Why Sourdough Is Worth the Wait
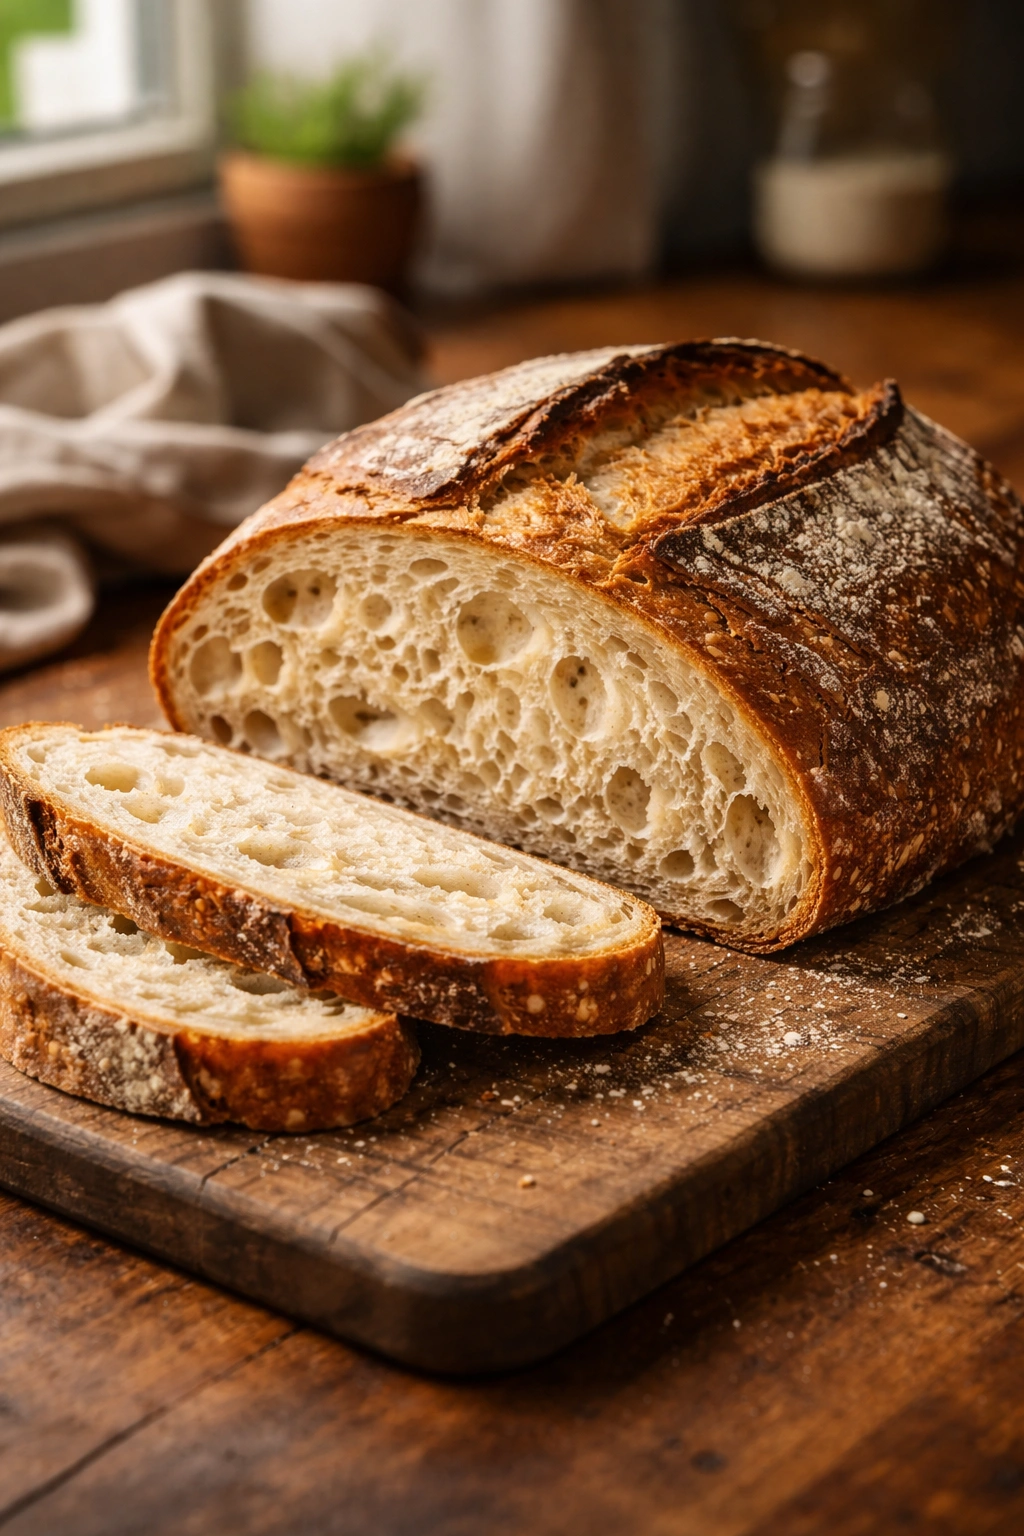
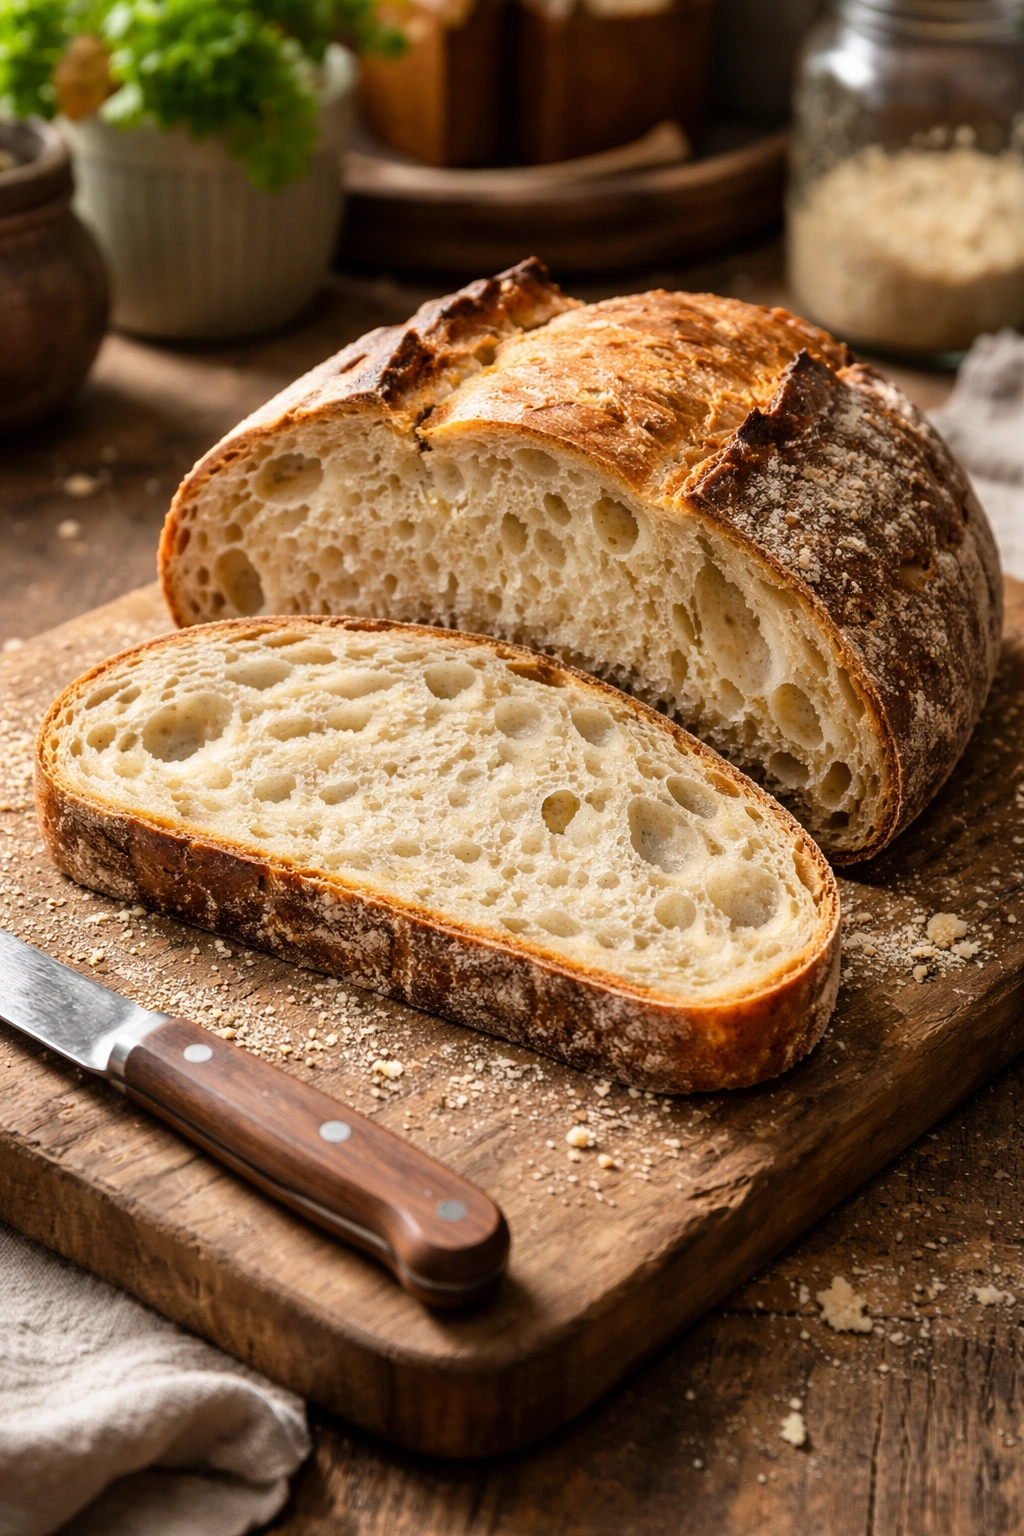
Sourdough tastes nothing like the soft, slightly sweet sandwich bread most of us grew up with. The flavor is complex — tangy but balanced, earthy and a little nutty, with the kind of depth that comes from slow fermentation. A properly fermented loaf has a crispy, crackling crust that shatters when you bite into it, surrounding a crumb structure filled with irregular holes that signal good gluten development and gas retention. The texture is tender but substantial, with a slight chew and a sophistication that grocery-store bread simply cannot match.
Beyond flavor, sourdough fermentation does something important to the dough that quick yeast breads never achieve. Long, slow fermentation breaks down phytic acid (an antinutrient that can inhibit mineral absorption), develops gluten structure without the need for vigorous kneading, and allows flavor compounds to develop gradually. Many people who find regular bread sits heavy in their stomach find that properly fermented sourdough digests more easily. The tang also comes from natural acids produced during fermentation, not from additives.
The learning curve is gentler than you might think. Yes, you’ll have a few loaves that don’t rise perfectly or don’t score the way you hoped. But understanding why those things happen teaches you more about bread-making than any perfectly executed first loaf ever could. Every baker — even professionals — has stories about early sourdough disasters. The difference is they learned what to adjust next time.
Understanding Your Sourdough Starter

Before you can bake sourdough, you need a starter — a living culture of wild yeast and beneficial bacteria (primarily Lactobacillus) that you’ll feed regularly and use to leaven your dough. The starter is the heart of sourdough baking. Without it, you just have dough, not sourdough.
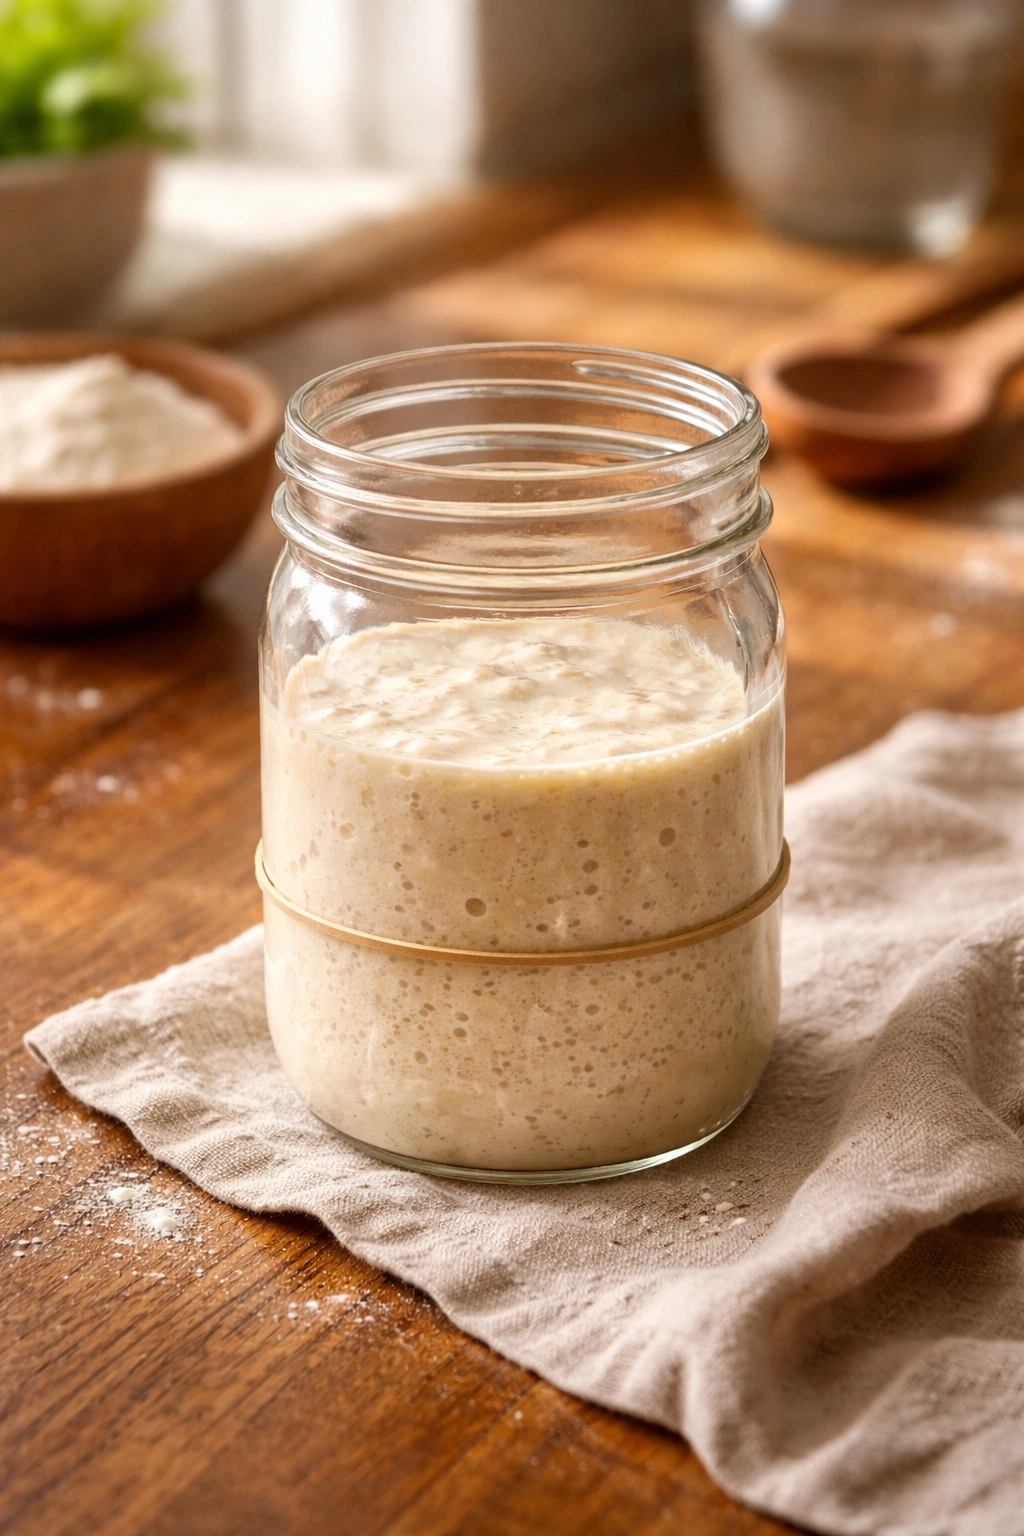
A healthy starter bubbles actively, smells pleasantly tangy and yeasty (not acetone-like or musty), and roughly doubles in volume within 4 to 8 hours of feeding, depending on room temperature and the strength of your culture. When you feed your starter, you’re essentially feeding the wild yeast and bacteria, allowing them to multiply and stay vigorous. A well-maintained starter is essentially immortal — bakers have starters that are over a hundred years old, passed down through families or kept in institutional bakeries for generations.
Your starter doesn’t need to be complicated. It’s simply a mixture of flour and water that you keep at room temperature, feeding it regularly. Some bakers prefer a thick paste consistency (called a stiff starter), while others use a looser ratio (a liquid starter). For beginner baking, a 1:1:1 ratio by weight — equal parts starter, flour, and water — is straightforward to manage and works beautifully for most loaves. Some bakers find that doubling the flour in their feeding schedule creates a starter that peaks more predictably, making it easier to time your bake.
Temperature dramatically affects how quickly your starter ferments and rises. A starter at 70°F (21°C) will take noticeably longer to double than one at 75°F (24°C) or 80°F (27°C). During warmer months, your feeding schedule might compress to once a day; in winter, you might feed every 24 to 36 hours. This variability is normal and part of what makes sourdough baking responsive to your environment.
Creating Your Own Starter From Scratch
If you don’t have a starter yet, making one is simple but requires patience — plan on 5 to 7 days before your culture is strong enough to reliably leaven bread. You’re essentially creating an environment where wild yeast naturally colonizes your flour-and-water mixture.
Day 1: Mix 50 grams of whole-wheat or rye flour with 50 grams of room-temperature filtered or dechlorinated water in a clean jar. Whole-wheat and rye flours ferment faster than all-purpose because they contain more wild organisms. Stir until combined, cover loosely with a cloth or paper towel (you want airflow but not contamination from dust), and leave it on your counter.
Days 2–3: You might see some bubbles, or nothing at all — either is fine. Once a day, discard half the mixture (about 50 grams) and feed with 50 grams all-purpose flour and 50 grams water. By day 3, you’ll likely notice some rise and an increasingly sour smell. This is fermentation beginning.
Days 4–5: Continue once-daily feedings. You should see reliable bubbling within 24 hours of feeding, and the mixture should roughly double. When this happens consistently — typically by day 5 or 6 — your starter is strong enough to use for baking.
Days 6–7: Do a final feeding and let it sit until it’s at peak (roughly doubled and showing some collapse at the top), then you can use it. If you’re not ready to bake yet, move it to the refrigerator after this feeding, and it will keep for up to two weeks between feedings.
One common concern: What if your starter doesn’t show activity by day 3 or 4? This happens, especially if your kitchen is cold or if you used chlorinated water. The chlorine can inhibit fermentation slightly. Keep feeding. Most starters eventually become active by day 6 or 7, even if they seem dormant at first.
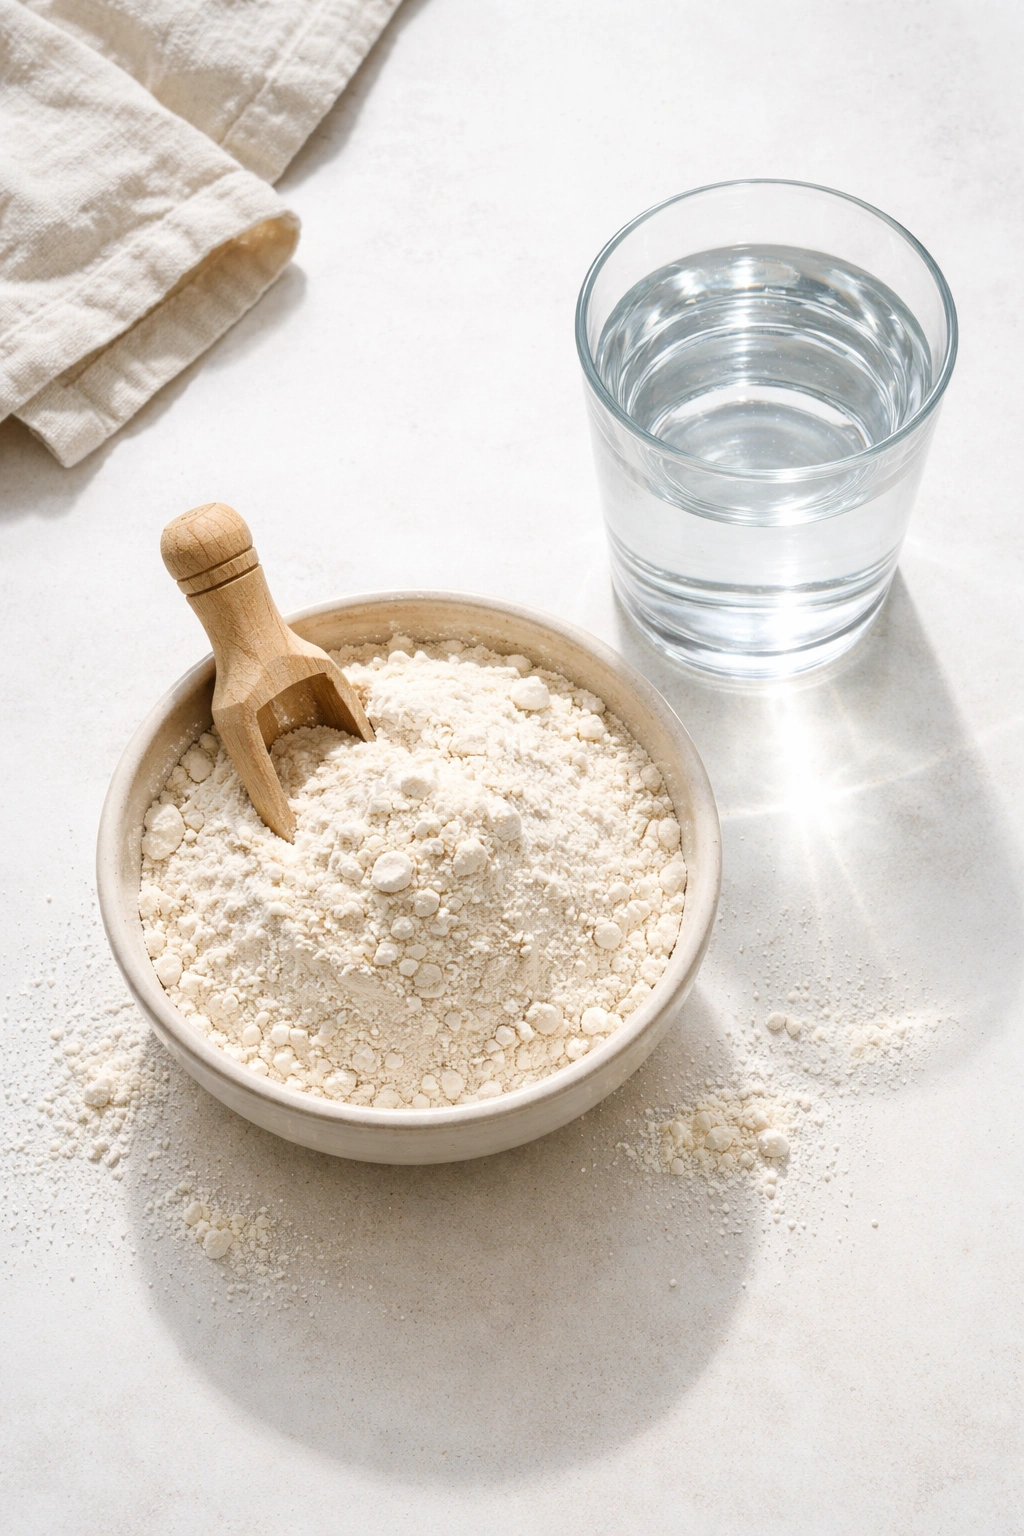
Choosing Your Flour and Water
The quality of your flour directly affects your bread. Bread flour, with a protein content around 12 to 14 percent, develops gluten more readily than all-purpose flour (usually 10 to 12 percent). The higher gluten network holds gas better, which is why bread flour produces more dramatic oven spring and a more open crumb structure. If you’re using all-purpose flour, your bread will still be delicious, but the crumb may be slightly tighter and the rise slightly less pronounced.
Whole-wheat flour and rye flour add flavor, color, and earthiness. A small percentage — 10 to 20 percent of your total flour — adds complexity without overwhelming the loaf or making it dense. These flours absorb more water than white flours (they contain bran and germ, which are thirsty), so if you substitute more than 20 percent, you may need to adjust your hydration slightly.
Water matters too, though far less mysteriously than some sourdough guides suggest. Use filtered water if your tap water is heavily chlorinated — chlorine can inhibit fermentation. Beyond that, room-temperature water is fine; cold water slows fermentation, while very hot water can kill your yeast. Let tap water sit overnight before use if you want the chlorine to dissipate.
Why Patience Matters More Than Temperature

One of the biggest mindset shifts beginning sourdough bakers need to make is letting go of strict timelines. Traditional sourdough recipes often specify feedings like “8 a.m.” and “3 p.m.” and rising times like “4 to 6 hours.” These are guidelines, not commandments. In reality, your timeline depends on room temperature, the strength of your starter, flour hydration, and how sour you want your bread.
This is actually liberating. It means you don’t have to bake on a specific schedule — you can stretch fermentation to fit your life. A cold kitchen extends every timeline. A warm kitchen speeds everything up. You don’t need a proofing box or controlled environment (though they’re nice). You just need to understand what you’re looking for visually and by feel rather than watching the minutes tick by.
The dough tells you when it’s ready. It’s puffier, holds gas when you poke it (instead of collapsing immediately), and smells more sour and developed. A bulk fermentation that takes 6 hours in a warm kitchen might take 10 to 12 hours in a cool one. Both produce great bread — the cooler fermentation actually develops more flavor.
A Beginner-Friendly Sourdough Recipe
This recipe uses a straightforward timeline and simple techniques. It assumes your starter is active and approximately doubled in volume within 8 to 12 hours of feeding — if yours takes longer, adjust your schedule accordingly. The result is a rustic, flavorful boule with a beautiful crust and open crumb.
Yield: Makes one 750-gram (26-ounce) loaf, about 8 to 10 slices
Prep Time: 20 minutes (hands-on work spread across the day)
Cook Time: 45 minutes (baking) + 2 hours (cooling before slicing)
Total Time: 16 to 18 hours (mostly passive, including overnight cold fermentation)
Difficulty: Beginner — The steps are straightforward, and the long fermentation actually makes this forgiving. No special equipment beyond a Dutch oven and a banneton or kitchen towel is required.
Best Served: After cooling completely at room temperature (at least 2 hours), when the crust has set and the crumb has finished its final structure development. Fresh, day-of bread is always best, but sourdough keeps beautifully in a paper bag for 3 to 4 days.
Ingredients
For the Dough:
- 500 grams bread flour (or all-purpose flour if bread flour isn’t available)
- 350 grams room-temperature filtered or dechlorinated water (70 percent hydration)
- 100 grams active sourdough starter (fed 4 to 8 hours prior and at or near peak — roughly doubled in volume and showing some collapse)
- 10 grams fine sea salt
Note: If you’re using whole-wheat or rye flour, substitute 50 to 100 grams of the bread flour with whole-wheat or rye (a 10 to 20 percent blend works beautifully). If you do, increase the water by 25 to 50 grams, as these flours absorb more liquid.
Why These Proportions Matter
The 70 percent hydration in this recipe creates dough that’s wet enough to develop an open crumb but dry enough that beginners can handle it without it being completely unmanageable. The 100 grams of active starter is roughly 20 percent of the flour weight — a percentage that works across different starter consistencies and gives reliable fermentation without rushing.
The salt isn’t optional, and it’s not just for flavor. Salt strengthens gluten, slows fermentation slightly (giving you more control over timing), and is essential to proper sourdough structure. It’s typically added after the initial autolyse, which allows the flour and water to fully hydrate before the salt contracts the gluten.
The Autolyse: Resting Your Dough Before You Begin
The autolyse is one of the most underrated techniques in bread-making. It’s simple: mix your flour and water together (without salt or starter), let it rest for 30 minutes to 2 hours, then add your starter and salt and proceed. During this rest, the flour fully absorbs the water, gluten begins developing naturally, and enzymes in the flour start breaking down starches and proteins, which improves flavor and makes the dough easier to work with.
The autolyse sounds optional but genuinely transforms your bread. Flour that’s fully hydrated develops gluten faster and more reliably. Your dough will be more extensible (stretchy) and less sticky to handle. The flavor will be more complex. Even 30 minutes makes a difference; going to 2 hours makes a remarkable one.
This is also where you can build flexibility into your schedule. If you’re not ready to continue with the rest of the process, you can autolyse overnight in the refrigerator. The next day, bring the dough to room temperature (30 minutes or so), add your starter and salt, and proceed. This works beautifully and is one way to fit sourdough into a realistic schedule.
Prepare Your Space:
-
Set up your workspace with all ingredients measured and ready. Have a large bowl, a kitchen scale, a Dutch oven (or covered baking vessel), and a banneton or kitchen towel for the final proof ready to go. If using a kitchen towel instead of a banneton, line a small bowl with it and dust generously with flour so the dough doesn’t stick during its final rise.
-
If you don’t have a banneton or towel-lined bowl, you can proof the dough directly on a piece of parchment paper that you’ll transfer into the Dutch oven later.
Autolyse:
- In a large bowl, combine the 500 grams of flour and 350 grams of water. Mix with your hands or a fork until all the dry flour is hydrated and you have a shaggy, somewhat lumpy mixture. The dough should look rough and unmixed — that’s correct. Cover the bowl with a damp cloth or plastic wrap and let it sit at room temperature for 30 minutes to 2 hours. If you have time, going longer (even overnight in the refrigerator) will noticeably improve your bread.
Mix in Starter and Salt:
-
After the autolyse, add the 100 grams of active, fed starter and the 10 grams of salt to the dough. If your starter is very thick (like a stiff dough), you may need to dissolve it slightly in a few drops of water first, or wet your hands before mixing. Using wet hands makes incorporating ingredients into sourdough much easier.
-
Mix thoroughly, using a technique called “pincer method” — using your fingers to pinch and fold the dough onto itself while rotating the bowl, breaking up the starter and distributing the salt evenly throughout. This takes about 3 to 5 minutes. The dough should look relatively cohesive and well-combined, though it will still feel somewhat sticky. This is normal at 70 percent hydration.
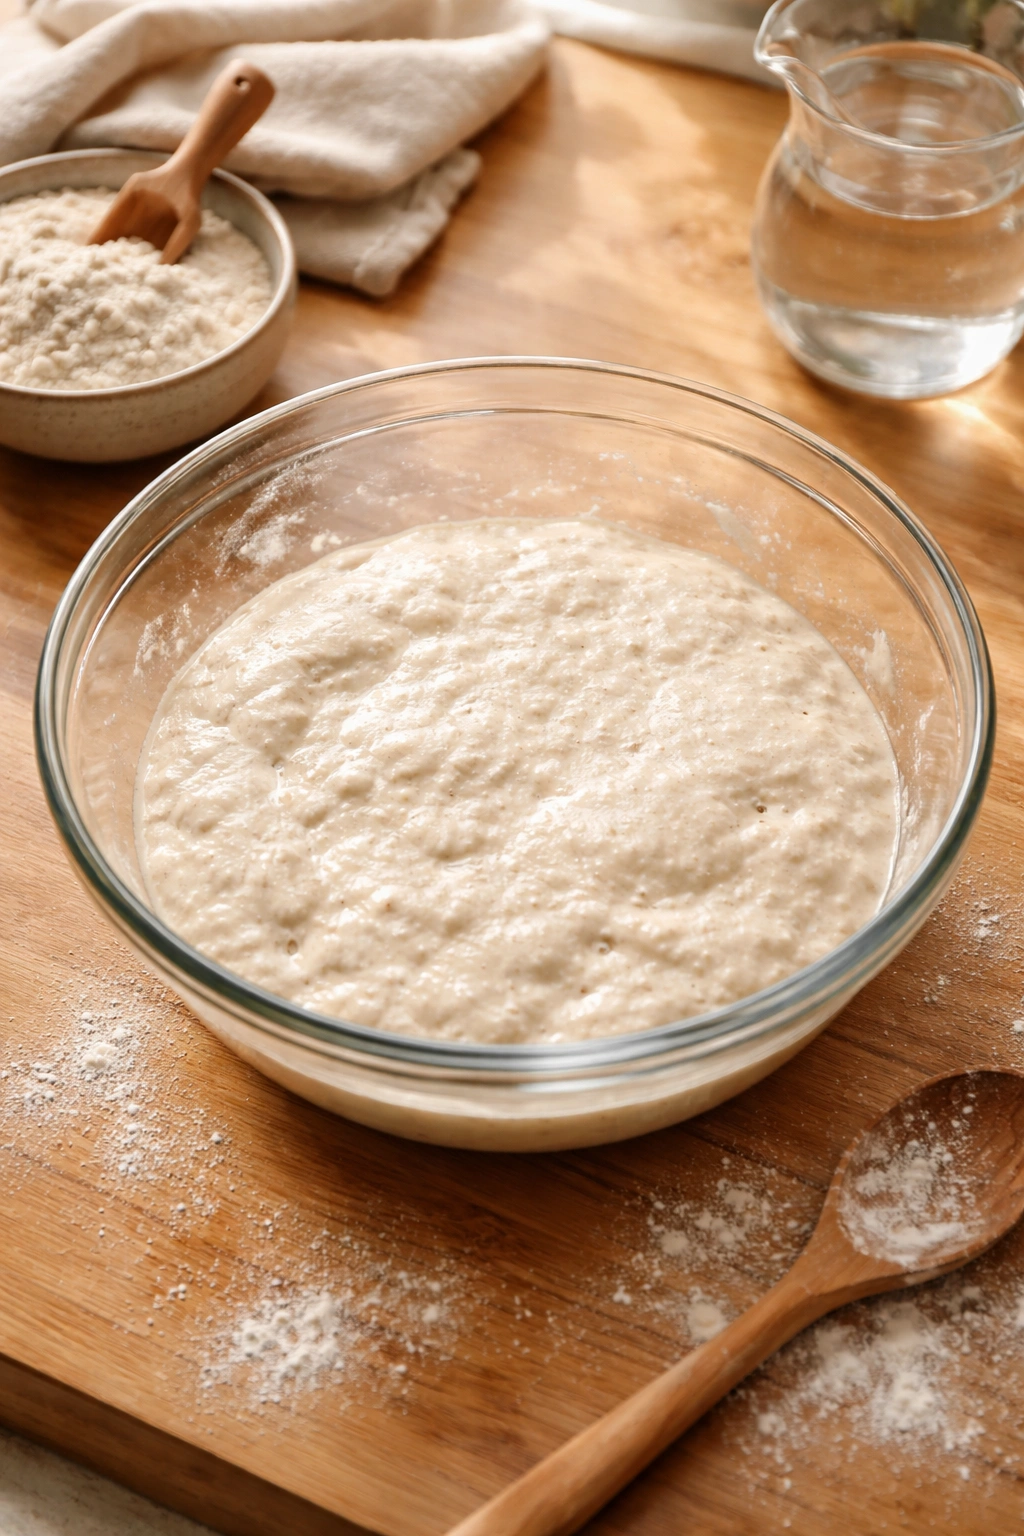
Bulk Fermentation with Stretch and Folds:
-
Let the dough rest for 30 minutes at room temperature (around 70°F / 21°C). After 30 minutes, perform the first “stretch and fold.” Wet your hand, grab one side of the dough, stretch it up and fold it over itself. Rotate the bowl 90 degrees and repeat, stretching and folding from each of the four quadrants. This develops gluten without aggressive kneading and takes only about 1 minute. You should feel the dough become slightly firmer and more structured.
-
Rest for another 30 minutes, then repeat the stretch and fold. Do this a total of four times over 2 hours (stretch and fold at the 30-minute, 60-minute, 90-minute, and 120-minute marks). Each time, the dough should feel a bit tighter and more cohesive. By the fourth fold, you’ll notice the dough springs back more noticeably when you stretch it, indicating developing gluten strength.
-
After the final stretch and fold (around the 2-hour mark), let the dough rest undisturbed for the remainder of the bulk fermentation. The total bulk fermentation is 4 to 6 hours at room temperature, or until the dough has increased in volume by about 50 percent and shows visible bubbles on the surface and sides. In a warm kitchen (78°F / 26°C), this might take 4 hours; in a cool kitchen (70°F / 21°C), it might take 6 to 8 hours. The dough is ready when it jiggles slightly when you gently shake the bowl and passes the “poke test” — when you poke it lightly with a floured finger, the indentation springs back slowly over 2 to 3 seconds, rather than immediately or not at all.
Preshape and Final Proof:
-
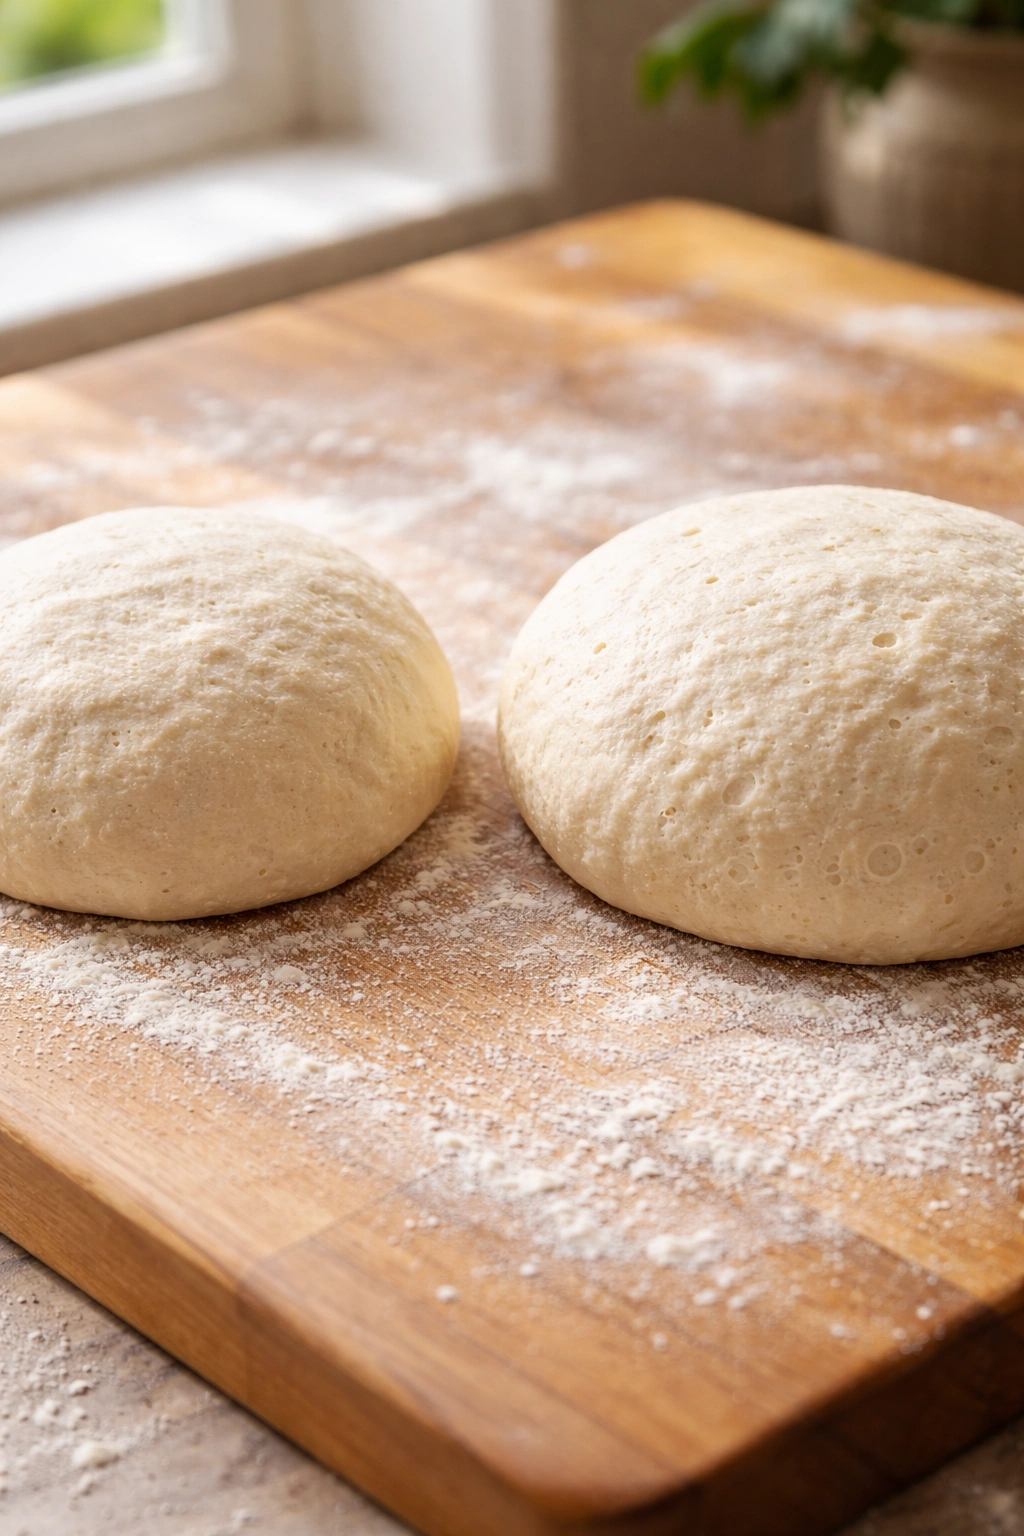
Turn the dough out onto a lightly floured work surface. Using a bench scraper or the edge of your hand, gently fold the dough into a loose round shape without degassing it completely. You want to create surface tension, but you’re not trying to make a perfectly tight boule yet. Let this preshape rest on the counter for 20 to 30 minutes — this is called the “bench rest” and allows the gluten to relax slightly and makes the final shaping easier.
-
Dust the banneton or towel-lined bowl generously with rice flour or flour (rice flour doesn’t absorb moisture and prevents sticking better than wheat flour). Shape the dough into a final boule: place it seam-side up in your floured banneton, then gently fold and tuck the edges underneath to create surface tension. Avoid degassing the dough too much — you want to preserve the gas bubbles that developed during bulk fermentation; the boule should be puffy and feel light.
Advertisements -
At this point, you have two options:
Cold Overnight Proof (Recommended for Beginners): Cover the banneton with plastic wrap and refrigerate overnight (8 to 16 hours). Cold fermentation develops flavor, makes scoring easier (cold dough doesn’t spread as much when you score it), and gives you scheduling flexibility. The next morning, bake directly from the refrigerator.
Same-Day Final Proof: Cover the banneton with a damp cloth at room temperature for 2 to 4 hours, until the dough has increased visibly in volume and passes the poke test again — a gentle poke should leave a slight indentation that springs back only slightly, not completely. If it springs back fully, it needs more time; if it doesn’t spring back at all, it’s overproofed. In a cool kitchen, this might take closer to 4 hours; in a warm kitchen, it might be done in 2 hours.
Scoring and Baking Your Loaf
Preheat Your Oven:
- At least 45 minutes before baking, preheat your oven to 500°F (260°C) with a Dutch oven inside. A Dutch oven traps steam, which is essential for good crust development and oven spring. If you don’t have a Dutch oven, you can bake the loaf on a baking stone or steel with a pan of hot water in the oven below it to create steam, though the Dutch oven method produces superior results for beginners.
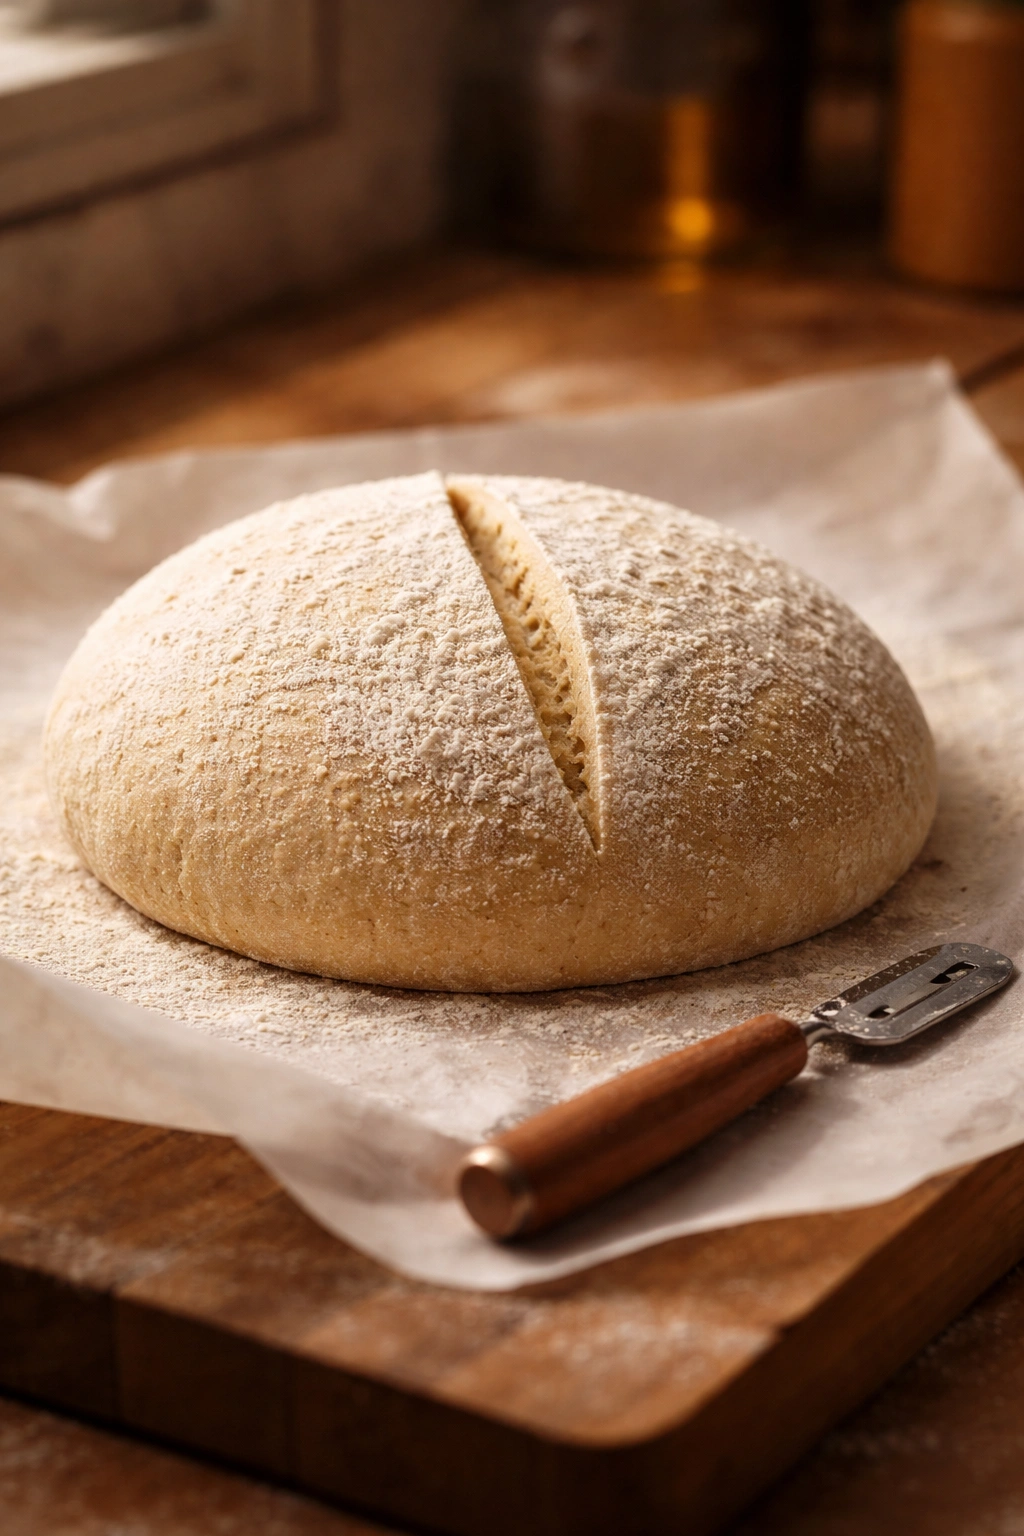
Score the Dough:
-
Once the oven is fully preheated, turn the dough out of the banneton onto a piece of parchment paper. If it’s been chilled overnight, let it sit at room temperature for just 5 to 10 minutes before scoring — this prevents the dough from tearing during the scoring.
-
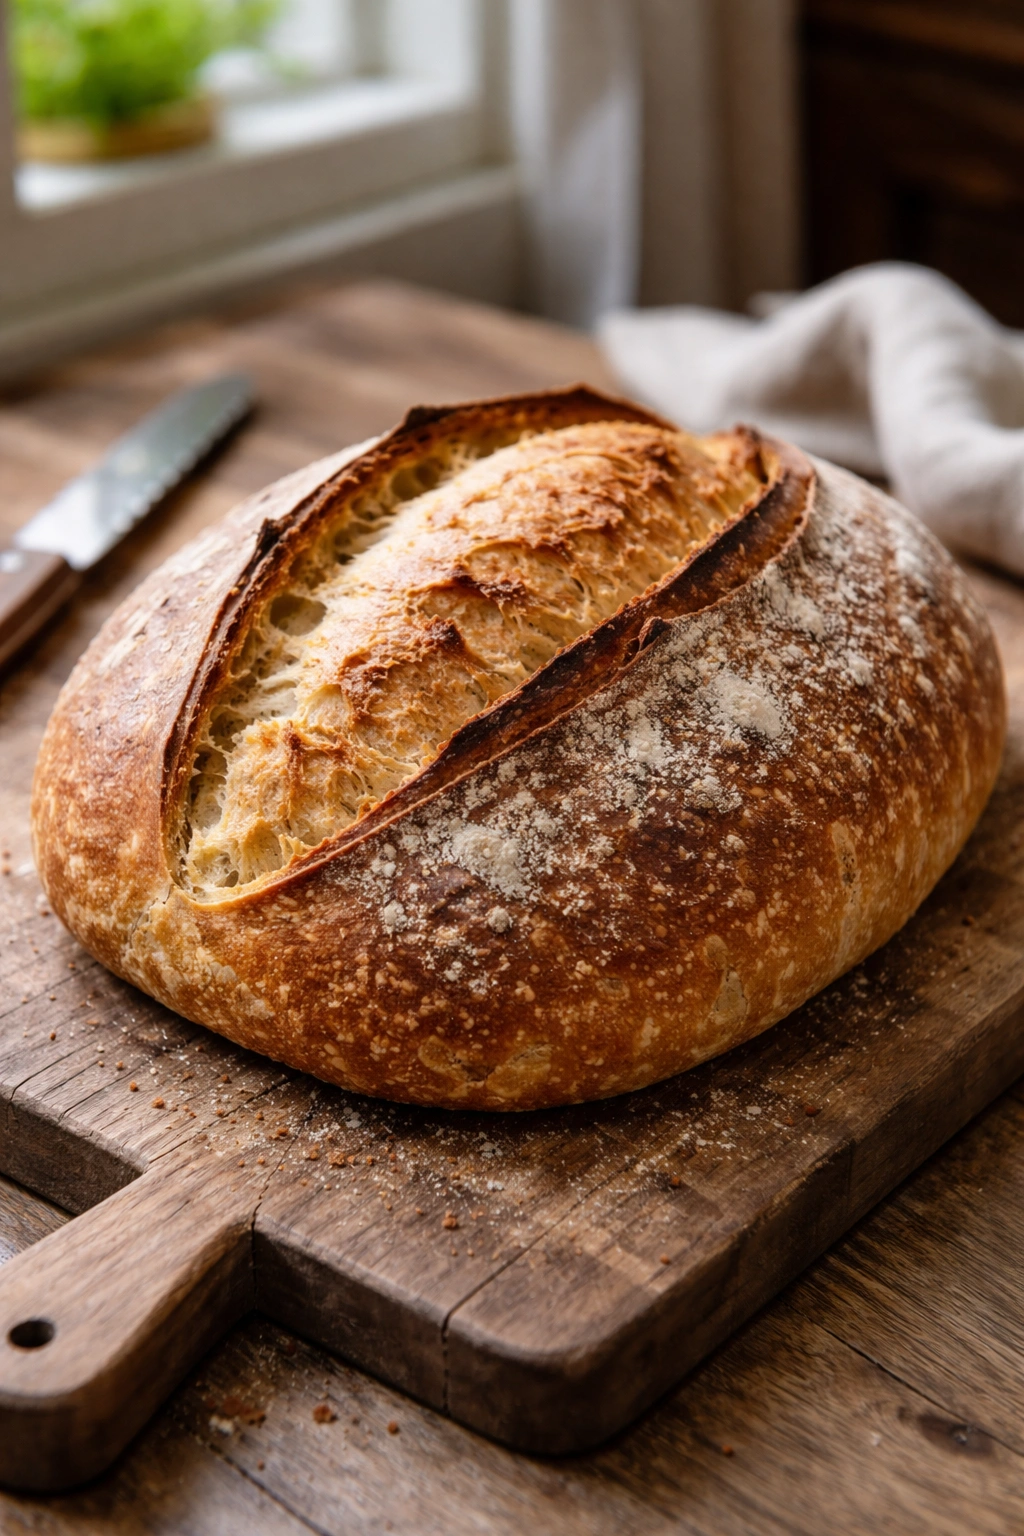
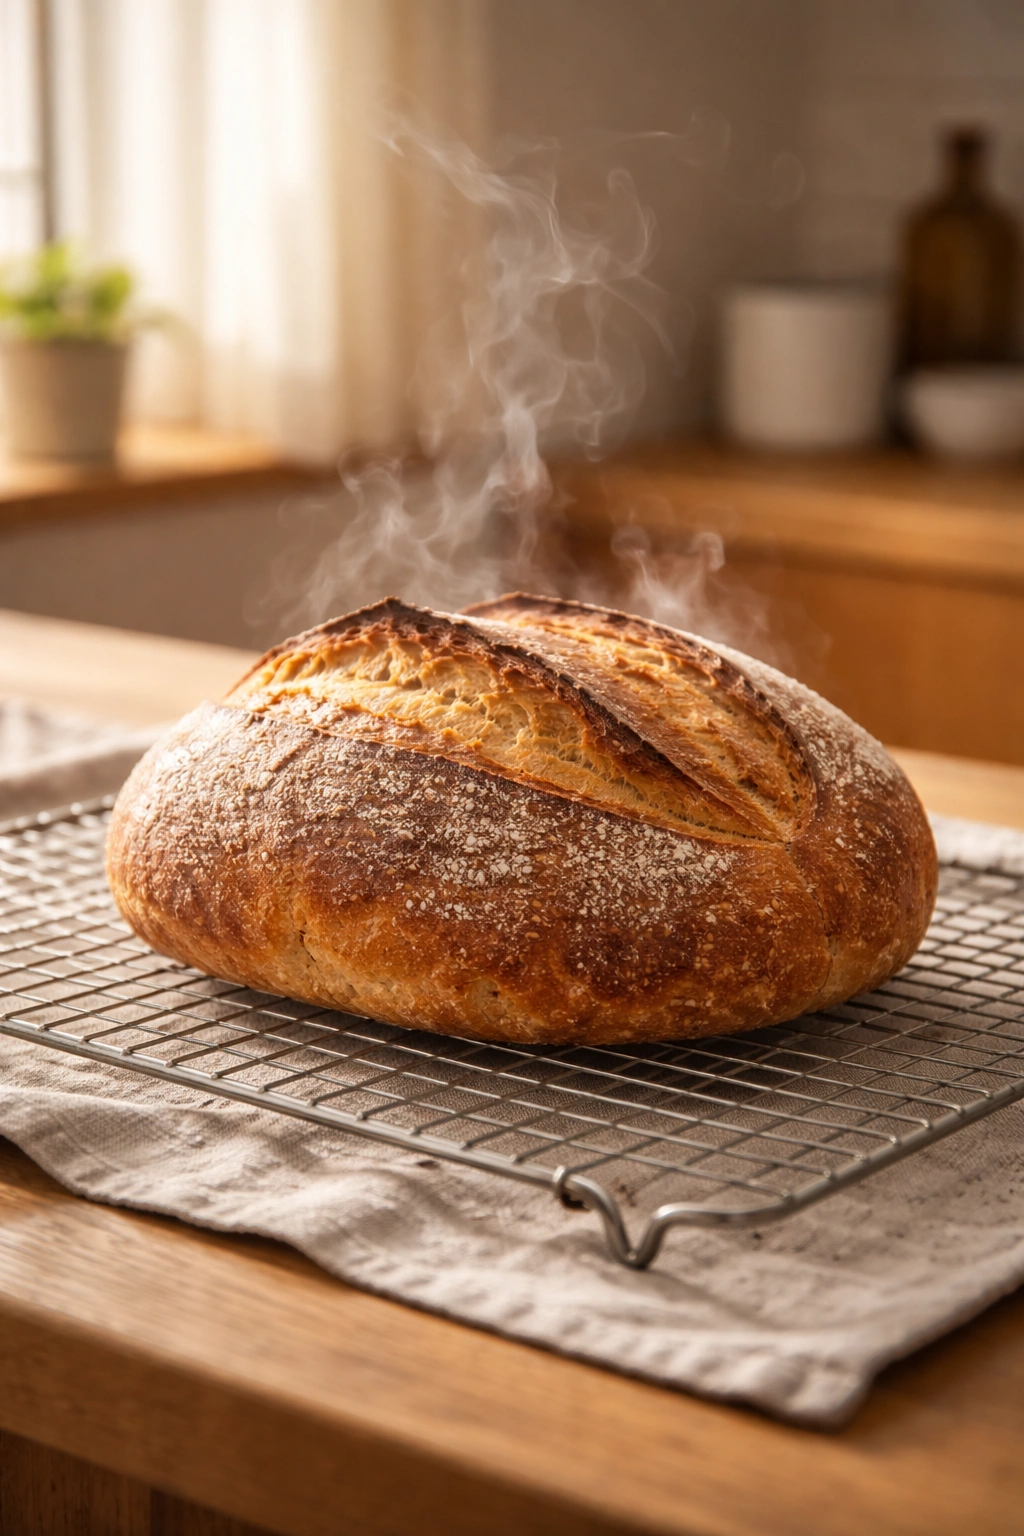
Using a lame (a special bread-scoring blade), a very sharp knife, or even a clean razor blade, make one confident slash across the top of the boule, about ¼ inch deep and 4 to 5 inches long, at roughly a 30-degree angle. This score controls where the bread expands as it bakes, encouraging oven spring and creating an “ear” — the crispy flap that extends from the cut. A single slash is classic and effective for beginners; as you gain confidence, you can experiment with multiple scores or decorative patterns.
Bake:
-
Carefully remove the hot Dutch oven from the oven. Place the parchment paper with the dough inside (or transfer the dough directly to the bottom of the Dutch oven if you’re confident). Be extremely careful — the pot is dangerously hot. Cover with the Dutch oven lid and immediately reduce the oven temperature to 450°F (232°C).
-
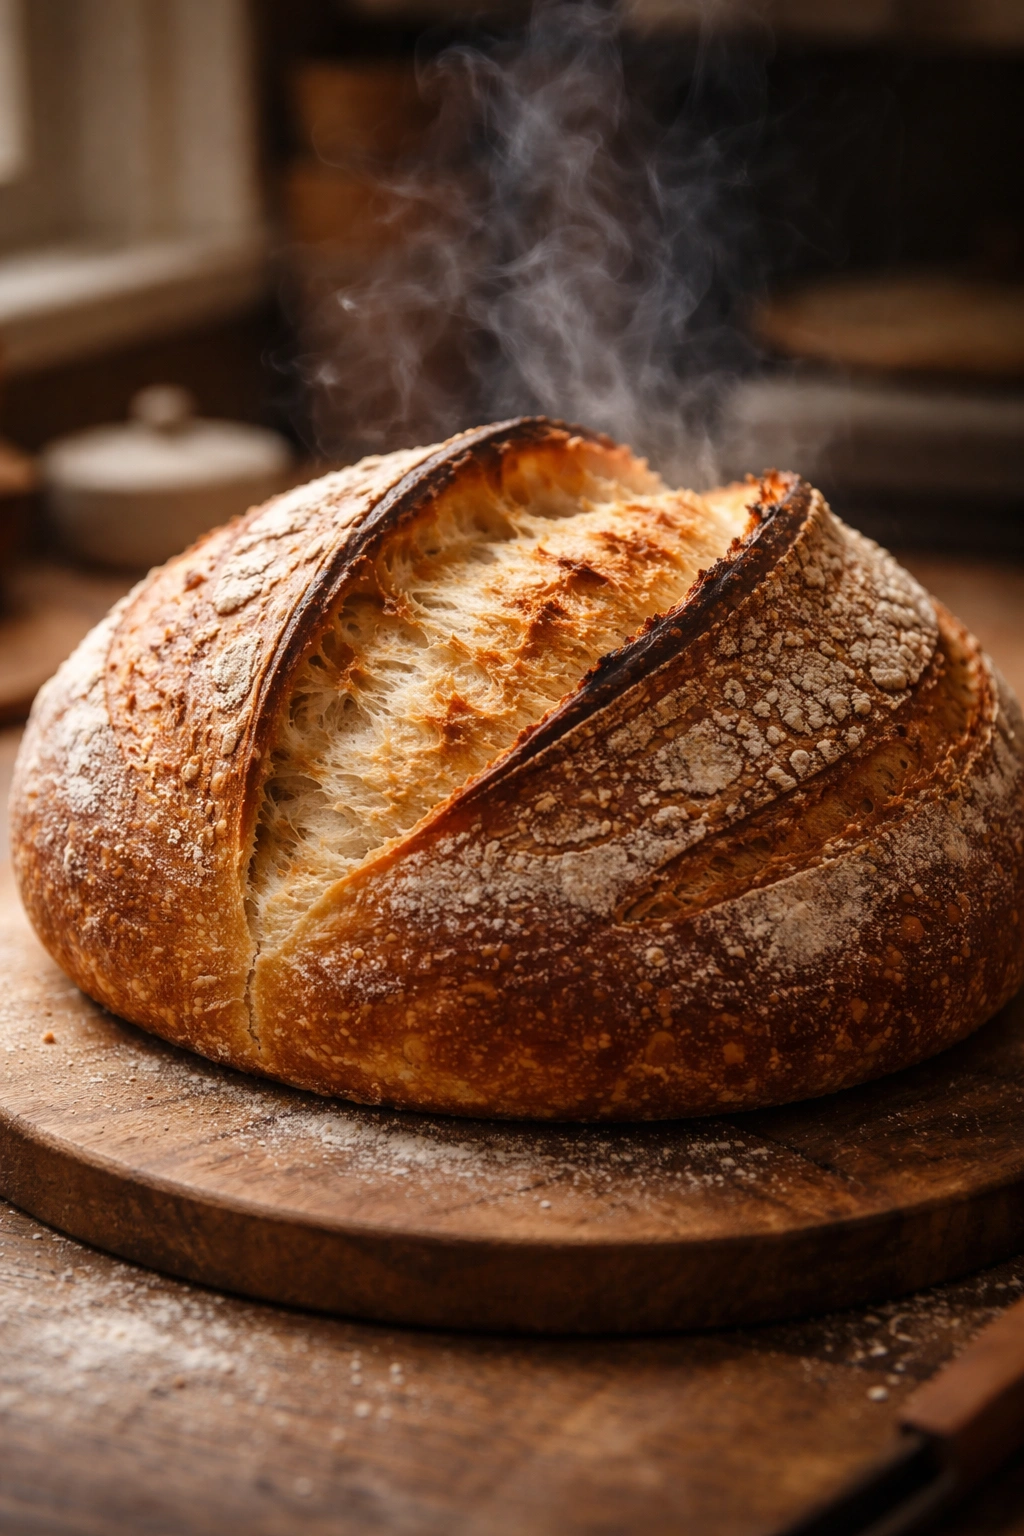
Bake covered for 20 minutes. This traps steam and allows the dough to expand with minimal crust formation. After 20 minutes, remove the lid and bake for an additional 25 to 30 minutes, until the crust is a deep, rich golden-brown (almost chestnut color, not pale tan). You want the crust to be deeply colored because that indicates proper caramelization and crust development — pale bread is underbaked. The internal temperature should reach 205 to 210°F (96 to 99°C) when measured with an instant-read thermometer inserted into the center of the loaf.
Advertisements -
Remove from the oven and transfer to a wire cooling rack. The single most important step many bakers skip: let the bread cool completely before slicing. This takes at least 1 to 2 hours. While it’s cooling, the crust continues to set and the interior structure finishes developing. If you slice into warm bread, you’ll find a gummy interior that hasn’t yet reached its final texture. Patience here makes an enormous difference.
Common Mistakes and How to Avoid Them
The Starter Isn’t Active Enough
Using a starter that hasn’t fully doubled or is past its peak will result in a loaf that barely rises and tastes more like dense bread than sourdough. Always feed your starter 4 to 8 hours before using it, and watch it carefully. Peak happens at the moment when the starter has roughly doubled and is just beginning to collapse at the edges — not when it’s fully collapsed, and not when it’s only halfway to double. If you consistently catch your starter collapsed by the time you want to bake, try feeding it more frequently or keeping it warmer.
Skipping or Shortening the Autolyse
The autolyse genuinely does improve your bread, and it’s worth the 30 minutes minimum. If you rush into mixing your starter and salt right away, your gluten development will suffer and your crumb will be tighter. Even 30 minutes makes a difference.
Underproofing (Dough Not Ready for Baking)
A loaf that hasn’t fermented enough will be dense, with minimal rise in the oven and a tight crumb. You’ll recognize it because the dough feels firm and springs back immediately when you poke it, rather than slowly. The problem is usually rushing the bulk fermentation or not watching the dough closely enough. Room temperature is your guide — if your kitchen is 72°F, bulk fermentation will take longer than if it’s 76°F.
Overproofing (Dough That’s Fermented Too Long)
Overproofed dough collapses during shaping or baking, spreads excessively, and produces a dense, gummy crumb. You’ll know it’s overproofed because the poke test fails — your finger sinks in and doesn’t spring back at all, or it springs back so slowly that the indentation is still visible after 5 seconds. If this happens, reshape very gently (you’ve already lost some gluten strength) and bake immediately rather than waiting longer.
Not Creating Enough Steam in the Oven
Without steam, the crust sets too quickly, trapping the dough and preventing oven spring. The result is a pale, hard crust and minimal rise. Always use a Dutch oven or a similar steaming method. Opening the oven door unnecessarily also loses steam, so keep the oven closed during the first 20 minutes of baking.
Slicing Before the Bread Is Cool
This is so common and so easy to avoid. Warm bread has a gummy interior because the starches haven’t finished gelatinizing. The crumb will compress and tear when you slice it, making beautiful slices impossible. Wait the full 1 to 2 hours.
Getting the Scoring and Oven Spring Right
Scoring serves three purposes: it controls where the bread expands, it creates an attractive appearance, and it increases surface area slightly, which helps crust development. A proper score is decisive and confident — hesitant, shallow cuts won’t work. The blade should be at a shallow angle (about 30 degrees to the surface), and you should cut about ¼ inch deep.
The classic “one slash” score is the best approach for beginners. Angle your blade from upper left to lower right (or vice versa), and make one smooth cut in a slight arc across the top of the boule. You want the cut to be 4 to 5 inches long. The dough should open slightly under the blade as you cut, which is exactly what you want — that tells you the dough is at the right proof.
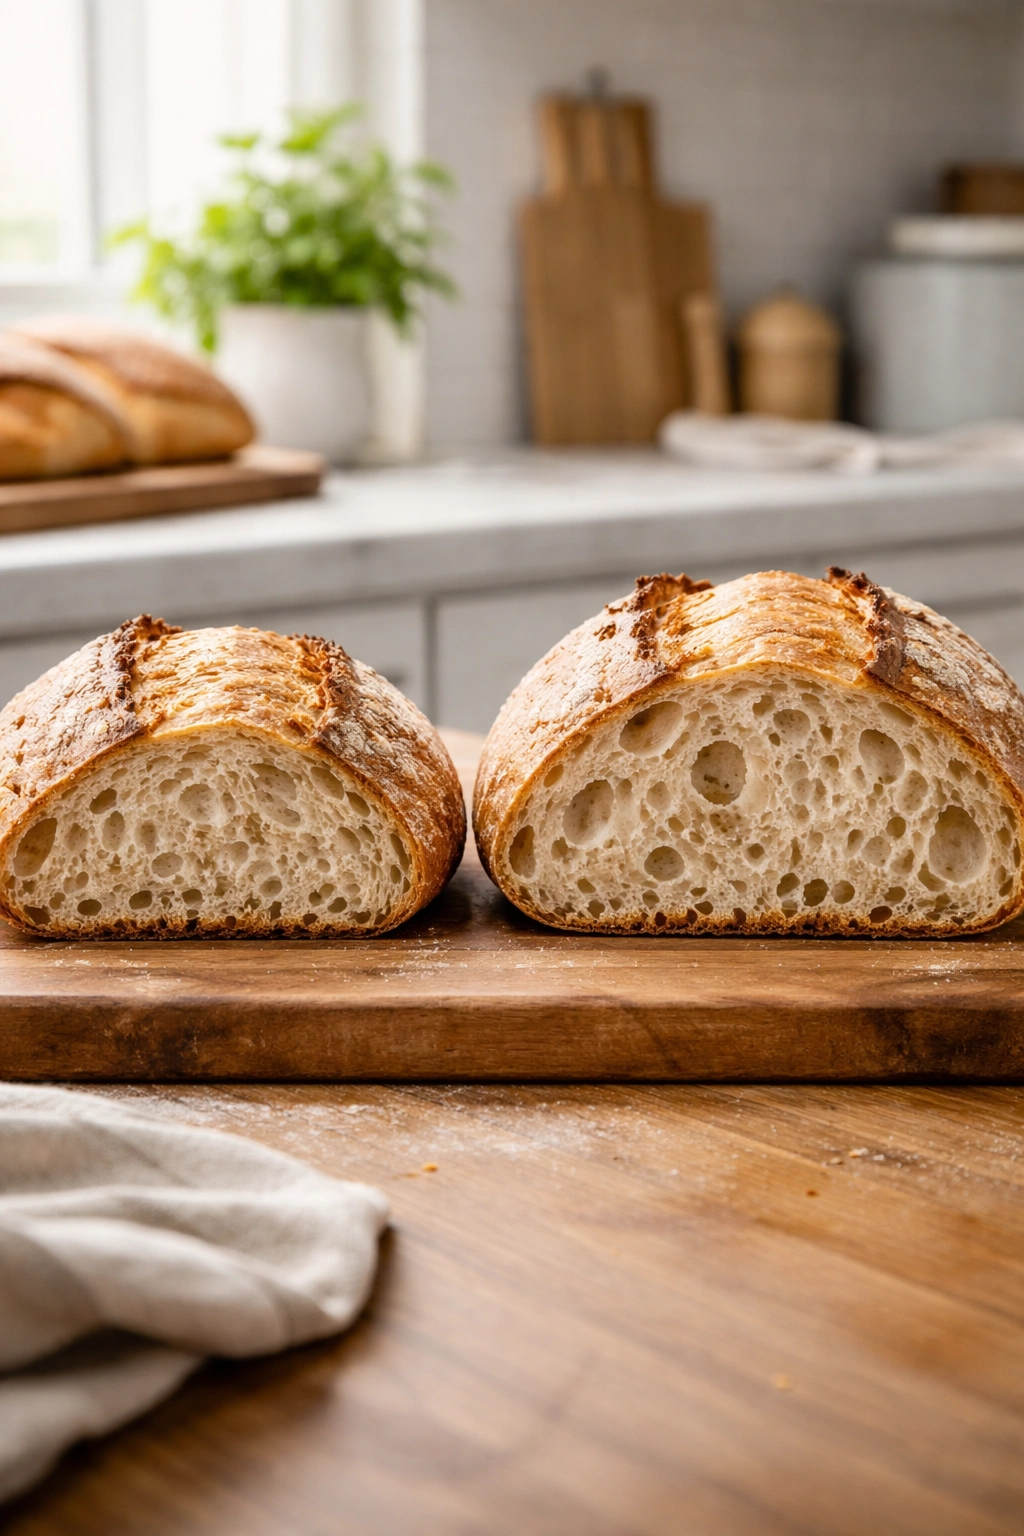
Oven spring is the dramatic rise that happens in the first 10 to 15 minutes of baking, when the heat causes gases to expand and the yeast to have one final burst of activity before dying off. A loaf with good oven spring will visibly expand in the oven, and the slash will open into a crispy ear. Poor oven spring usually indicates underproofing, insufficient steam, or a dull scoring blade that tears the dough instead of creating a clean cut.
How to Store Your Sourdough
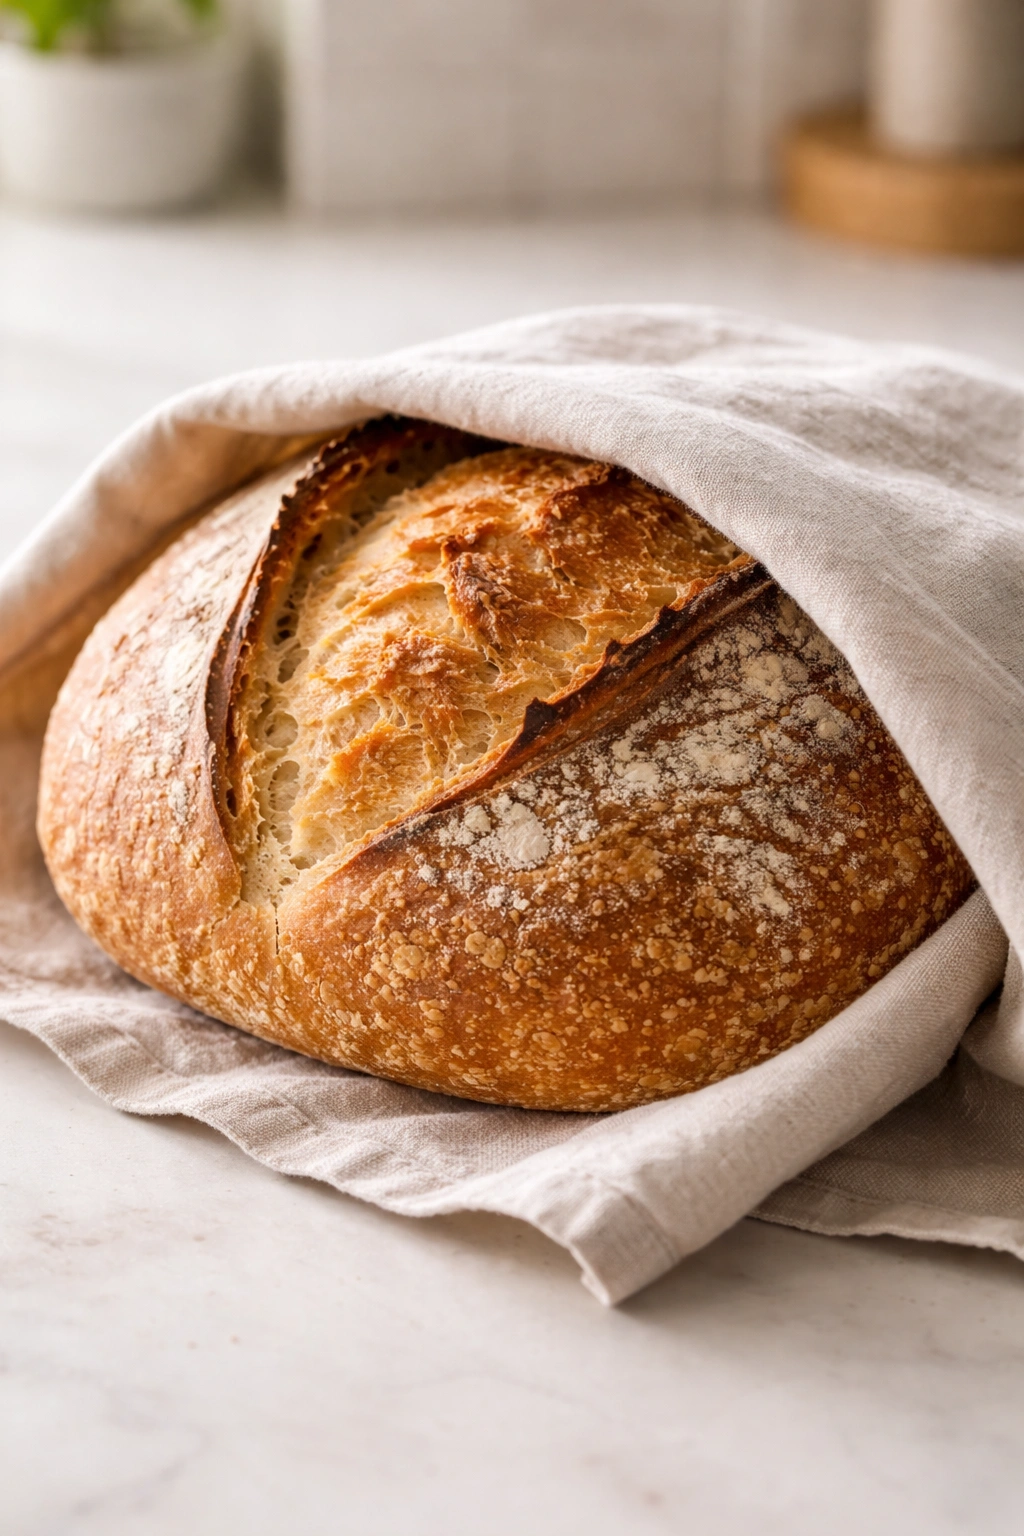
Fresh sourdough is best the day you bake it, but it stays delicious for 3 to 4 days if stored properly. After the loaf has cooled completely, store it cut-side down on the counter in a paper bag or wrapped loosely in a kitchen towel. Paper allows the crust to breathe; plastic will trap moisture and soften the crust. Never refrigerate sourdough unless you want it to go stale faster — cool temperatures actually accelerate staling.
If you want to keep sourdough longer, slice it completely and freeze it in a zip-top freezer bag. It will keep for 2 to 3 months. Thaw slices at room temperature or toast them directly from frozen. Toasting frozen slices actually revives them beautifully, giving you a crispy crust and warm interior.
To revive day-old or slightly stale sourdough, lightly spritz the whole loaf with water and warm it in a 375°F (190°C) oven for 10 to 15 minutes. The moisture temporarily softens the crumb, and the heat activates the aromatics. It won’t taste exactly like fresh-baked bread, but it will be noticeably better.
Flavor Variations to Try

Once you’re comfortable with the basic recipe, experimenting with variations is where sourdough becomes truly personal. Here are approaches that work well without complicated adjustments:
Whole-Wheat Sourdough: Replace 100 grams of the bread flour with whole-wheat flour (20 percent). Increase water by 30 grams (whole wheat absorbs more). The result is nuttier and more complex, with a tighter but still satisfying crumb. The loaf will feel slightly denser, which is normal and expected.
Seeds and Nuts: Toast 100 grams of seeds or nuts (sunflower seeds, pumpkin seeds, walnuts, or a combination) lightly, then add them to the dough after the autolyse during the first stretch and fold. They add flavor and texture and won’t significantly affect fermentation timing.
Herb and Olive Oil: Add 10 grams of dried herbs (rosemary, thyme, or Italian seasoning) and 15 grams of good olive oil after the autolyse. The result is a Mediterranean-style loaf perfect for dipping.
Higher Hydration for Maximum Openness: Once you’re comfortable with 70 percent hydration, try 75 or 80 percent. The higher water content creates a more open, irregular crumb. The dough will feel stickier, requiring slightly more wet handling and familiarity with how it behaves. This is a subtle adjustment that teaches you a lot about dough hydration.
Spelt or Einkorn Wheat: Ancient grains like spelt and einkorn have different gluten structures and ferment differently. They work beautifully in sourdough but may need slightly less water and shorter fermentation times. Research your specific grain before substituting.
Troubleshooting Your Loaf
Dense, Gummy Crumb (Most Common Problem)
The most frequent sourdough issue is slicing into a beautiful-looking loaf only to find the interior is dense, slightly gummy, and disappointing. This usually means one of three things: the dough was underproofed (didn’t ferment long enough), you sliced it before it cooled completely, or your starter isn’t strong enough to properly leaven the dough. Start by checking your starter — is it consistently doubling within 8 hours of feeding? If not, feed more frequently or keep it warmer. For the next bake, extend the bulk fermentation and cold proof longer, and wait the full 2 hours before slicing.
Loaf That Doesn’t Rise Much (Minimal Oven Spring)
If your baked loaf is flat and didn’t expand much in the oven, the dough was likely underproofed, or you lost steam during baking. Check that you’re using an active, recently fed starter. Make sure your Dutch oven is fully preheated and you’re covering it immediately after loading the dough. Consider extending your bulk fermentation or cold proof slightly next time.
Loaf That Spreads Instead of Rising Up
This is overproofing. The dough has fermented past its peak gluten strength and collapses during shaping or baking. Bake a bit sooner next time — move your cold proof from 16 hours to 12 hours, or shorten your bulk fermentation by 30 minutes to an hour. Overproofing is actually a sign your starter is strong and your timing is working; you just need to catch it a bit earlier.
Crust That’s Too Hard or Too Pale
If the crust is pale tan instead of golden brown, your loaf didn’t bake long enough. Try extending the uncovered baking time by 5 to 10 minutes. If the crust is extremely hard and actually painful to bite through (rather than crispy), you may have baked too long or your oven temperature was too high. An oven thermometer helps here — ovens are often inaccurate.
Shattered or Ugly Score
A scoring blade that’s dull or held at the wrong angle will tear the dough instead of creating a clean cut. Make sure your blade is extremely sharp, and use a confident, single motion rather than multiple passes. If you’re using a regular knife, try dipping it in water first — sometimes that helps. Alternatively, a lame (specialty bread-scoring blade) is inexpensive and makes a dramatic difference.
Bread That Tastes Sour but Isn’t Fluffy
This suggests your dough is being overfermented (developing lots of flavor) but your starter isn’t strong enough to create adequate rise. Try using more starter (150 grams instead of 100 grams) to speed fermentation and improve leavening power. Also check that your starter is genuinely active — it should double noticeably after feeding.
What You’ll Learn With Your Second and Third Bakes
Your first sourdough loaf will probably be good. Your second will likely be noticeably better because you’ll understand the feel of the dough and what fermentation looks like in your specific kitchen. By your third or fourth loaf, you’ll stop relying on timers and start trusting visual and tactile cues. You’ll know, by how the dough feels when you do a stretch and fold, whether fermentation is on track. You’ll read the poke test accurately. You’ll understand how room temperature affects your timeline and adjust naturally.
This is when sourdough stops feeling like you’re following a recipe and starts feeling like you’re actually baking. It’s also when you realize the “complexity” of sourdough isn’t complexity at all — it’s just understanding fermentation and having patience. Those are skills that apply to every other bake as well.
Final Thoughts
Sourdough intimidates people because it asks something most modern cooking doesn’t: time and attention that can’t be rushed. There’s no microwave version, no shortcut, no way to skip from mixing to baking in an hour. What feels like a drawback is actually the entire point. The long fermentation is what builds flavor, what makes the bread digestible, what creates that distinctive tang and complex taste that makes people fall in love with sourdough in the first place.
Your first loaf might not be perfect, and that’s genuinely fine. Even if it’s denser than you hoped or the crust isn’t as crispy as you wanted, you baked bread from flour, water, and salt, using a living culture you fed and maintained. That’s remarkable. Every single baker — professional or home enthusiast — has baked loaves that didn’t turn out the way they hoped. The learning is in understanding why and changing something for the next bake.
Start with the basic recipe, pay attention to how your dough behaves, and don’t rush the process. Your kitchen’s temperature, your starter’s strength, and your flour’s specific absorption will all vary from mine, and that variability is part of what makes sourdough baking interesting. Trust the visual and tactile cues — poke tests, how much the dough has risen, how it feels when you fold it — far more than you trust any specific time. Bake your second loaf while your first is still on the cooling rack. By your third or fourth, you’ll have internalized the rhythm, and sourdough will no longer feel like an intimidating project. It will feel like what it actually is: a beautiful, straightforward process that rewards patience and attention with bread that tastes incredible.