There’s something almost magical about pulling a warm, crusty loaf of homemade bread from the oven. The aroma that fills your kitchen, the satisfying crack of the crust under your knife, that first bite of tender crumb studded with a chewy interior—it’s a sensory experience that store-bought bread simply cannot replicate. Yet despite bread’s seemingly sophisticated reputation, the truth is that baking bread from scratch is far more approachable than most home cooks believe. You don’t need fancy equipment, years of experience, or even flawless technique to create exceptional bread in your own kitchen.
The barrier to bread baking isn’t complexity; it’s misconception. Many people assume that yeast is temperamental, that you need a professional oven or special baking stones, or that the process takes an entire day of hands-on work. The reality is much more forgiving. Most of the time you’ll spend waiting for dough to rise happens passively—you can be doing something else entirely. The actual hands-on work is usually just 15-30 minutes spread across a few steps. Modern home kitchens have everything you need: a mixing bowl, an oven, and perhaps a Dutch oven (which you may already own) or even just a regular baking pan.
What follows are ten genuinely achievable bread recipes that range from virtually foolproof (no-knead breads that handle neglect gracefully) to slightly more involved but still very manageable projects (enriched doughs with butter and eggs). Each one has been tested countless times and refined to work reliably in home ovens, with home ingredients, and with realistic time commitments. Whether you’re baking your first loaf or looking to expand your bread repertoire, these recipes will build your confidence and produce beautiful, delicious results.
1. No-Knead Artisan Bread
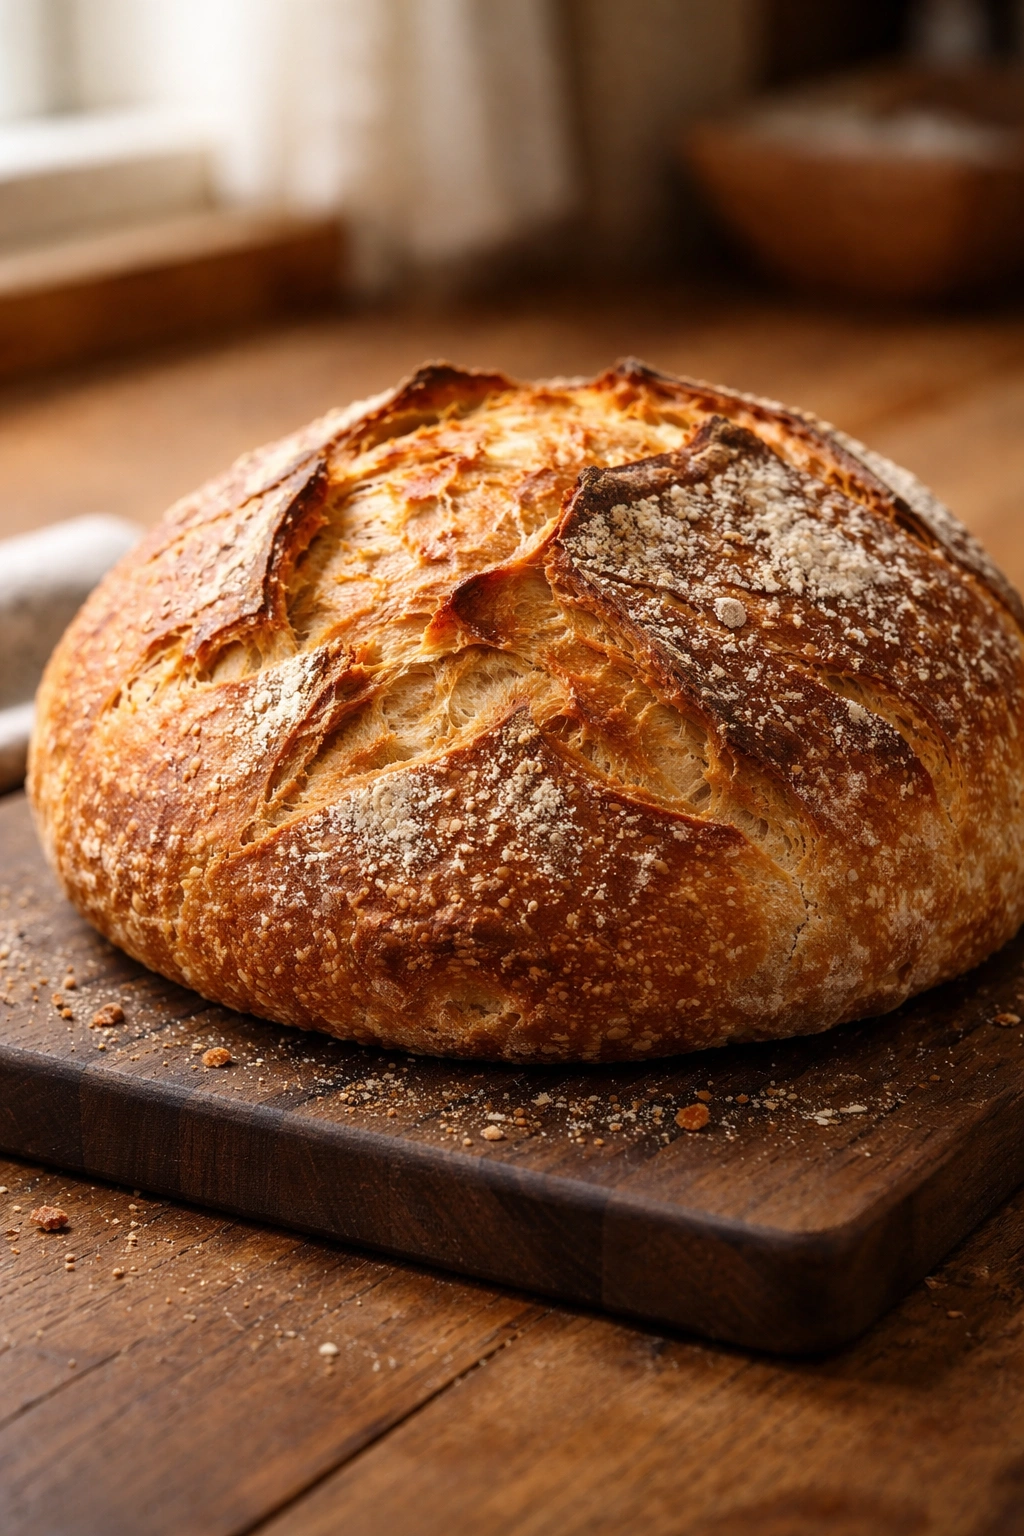
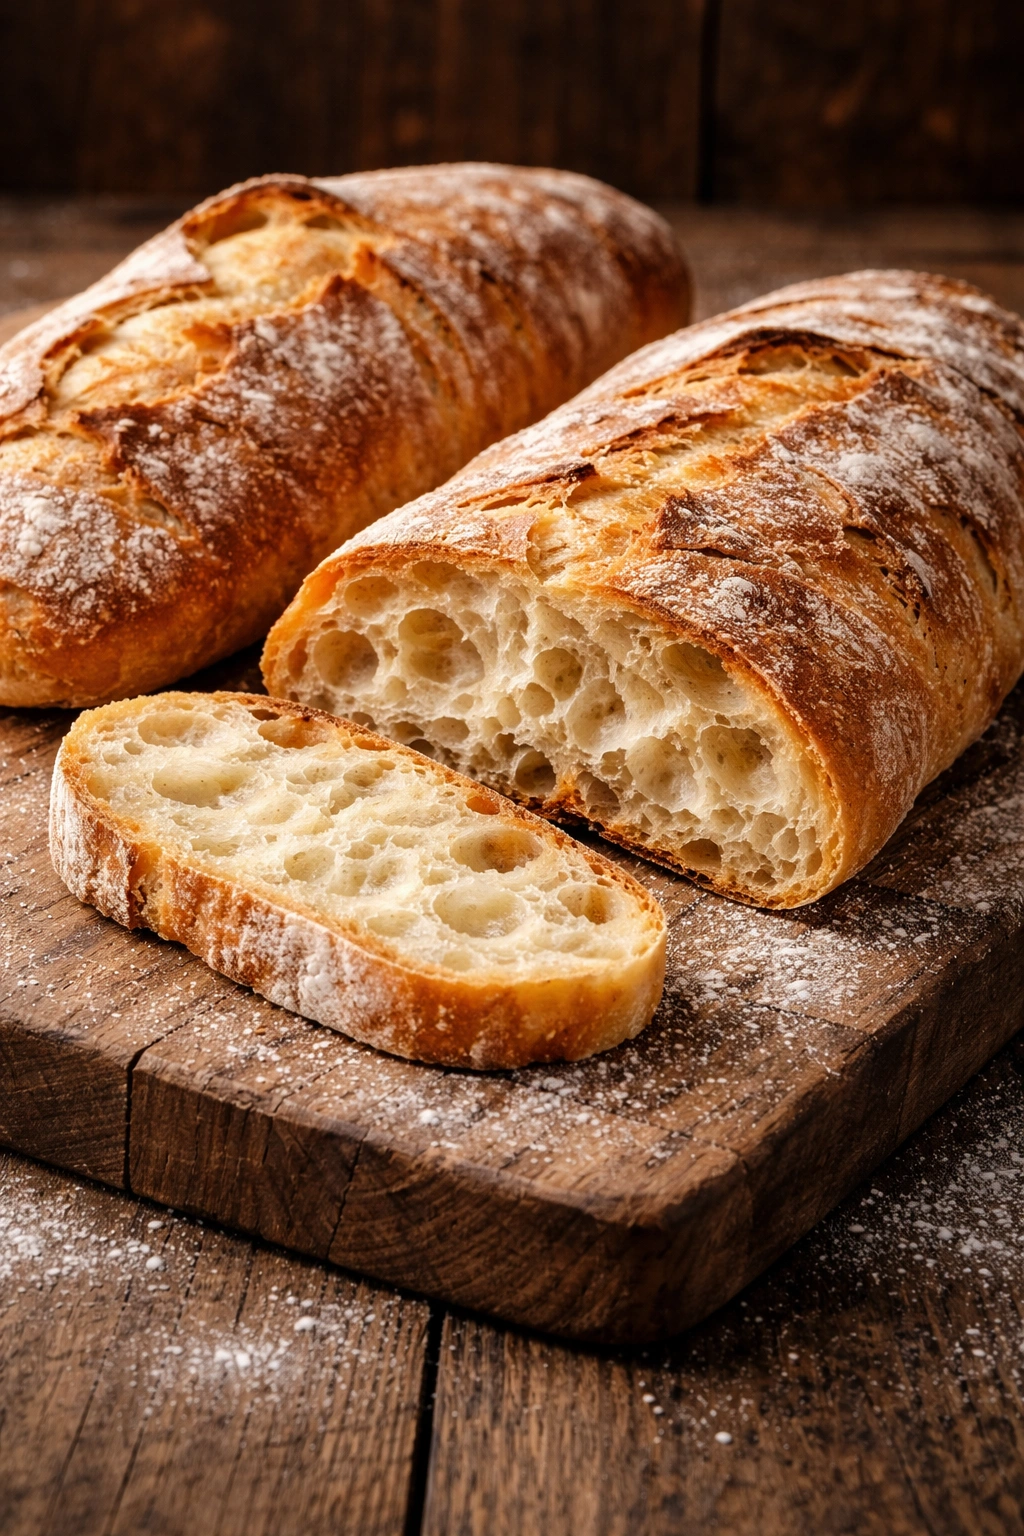
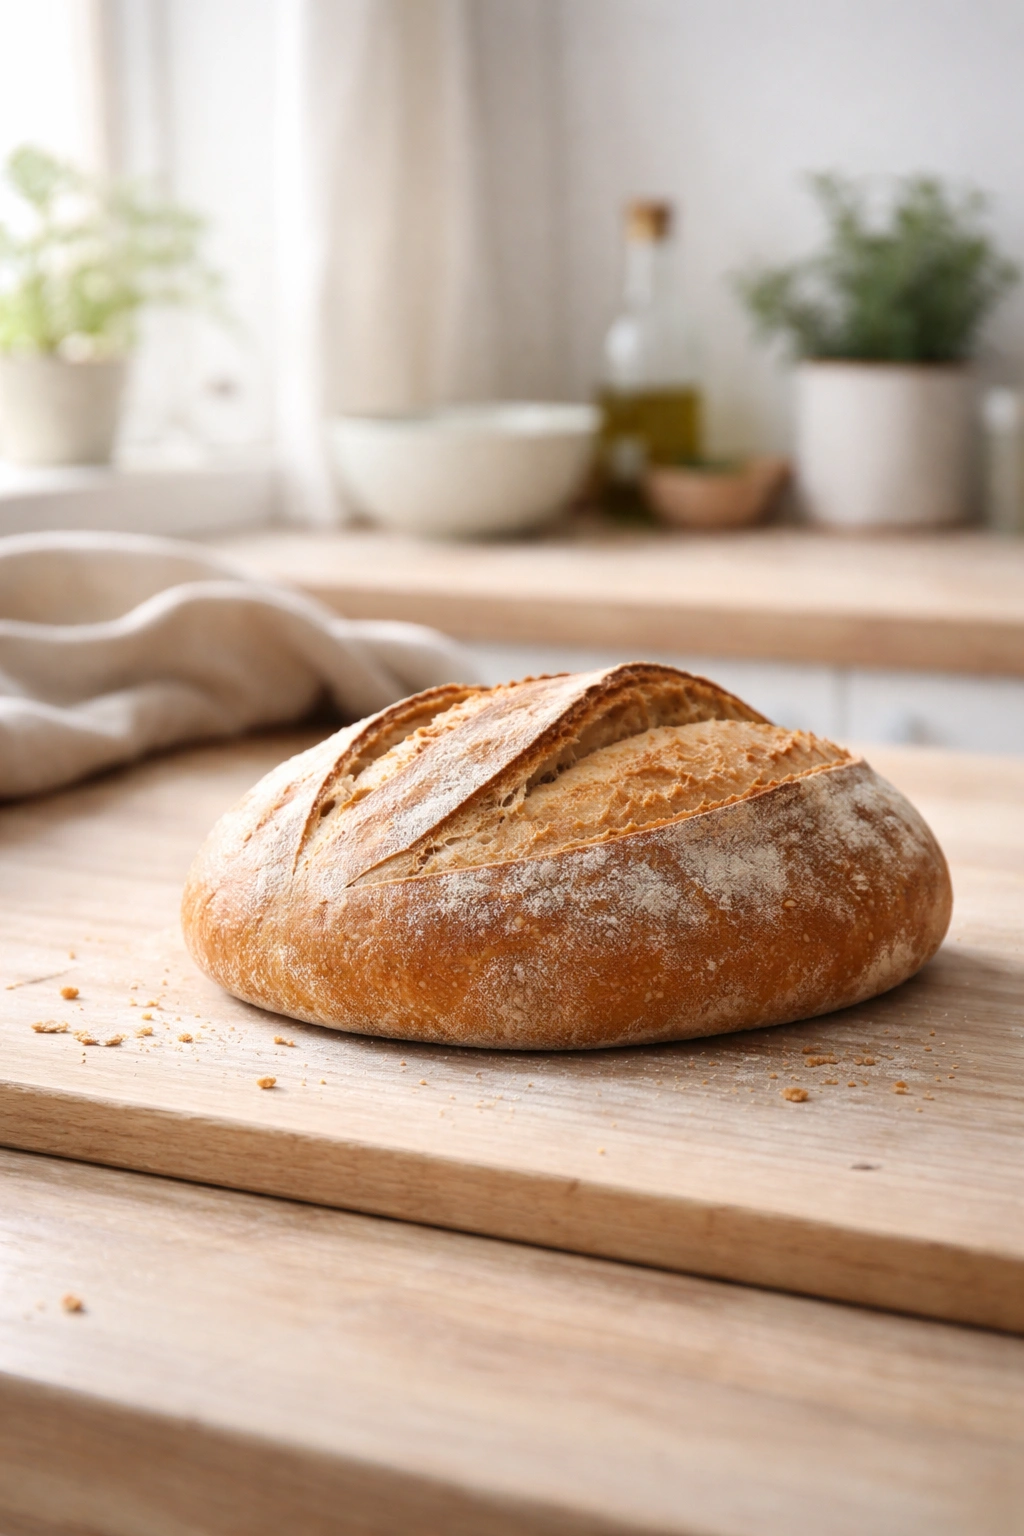
This is the recipe that changed home baking forever. Created by food scientist Jim Lahey, no-knead bread requires just four ingredients and approximately zero intervention over 18 hours, yet produces a loaf with an audaciously crunchy crust and an open, airy crumb that rivals professional bakeries. The magic lies in long, slow fermentation. Rather than working gluten development through aggressive kneading, you let time do the work. The result is bread so good it’s almost deceptive in how easy it actually is to make.
Yield: Makes 1 large round loaf (serves 6-8)
Prep Time: 10 minutes (plus 18 hours rising)
Cook Time: 45 minutes
Total Time: 18 hours 55 minutes (mostly hands-off)
Difficulty: Beginner — this recipe is deliberately minimal and forgives schedule fluctuations.
Ingredients:
- 3 cups (360g) all-purpose flour or bread flour
- ½ teaspoon instant yeast
- 1¼ teaspoons fine sea salt
- 1½ cups (360ml) cool water, room temperature
Instructions:
Prepare the Dough:
-
In a large bowl or container (not a mixing bowl — something with a lid or that can be covered loosely), combine the flour, yeast, and salt using a fork or small whisk, breaking up any clumps.
-
Add the water and stir with a wooden spoon or your hand until the mixture comes together into a shaggy, sticky dough. The dough will look rough and unpromising — this is exactly right. Every bit of flour should be hydrated, but don’t knead it. Scrape down the sides of the bowl to ensure all flour is moistened.
Advertisements -
Cover the bowl with a kitchen towel or plastic wrap (loosely, not airtight) and leave it at room temperature for 12 to 18 hours. You’ll see the dough transform gradually — it will become pillowy, develop bubbles, and smell distinctly yeasty and fermented. Don’t worry if it looks a bit messy or slightly deflated by the final hours; that’s fine.
Shape and Rise:
-
Preheat your oven to 450°F (230°C) and position a rack in the lower-middle position. If you own a Dutch oven or any heavy lidded pot that can handle oven heat, place it in the oven while it preheats.
-
Heavily flour a work surface and gently turn the dough out onto it. Don’t deflate it aggressively — you want to retain those bubbles. Using floured hands, fold the edges toward the center a few times, then flip the dough seam-side down. Using a circular motion with your hands (not rolling or pressing, just gentle shaping), create surface tension by dragging the dough toward you across the floured surface.
-
Once shaped, place a piece of parchment paper on your counter, dust it with flour, and transfer the dough to it seam-side up. Let it rest for 20 to 30 minutes while the oven finishes preheating.
Bake:
-
Carefully remove the hot Dutch oven from the oven. Transfer the dough (still on the parchment) into the pot by lifting both ends of the parchment and lowering it gently. Be careful — the pot is extremely hot.
-
Cover with the lid and bake for 30 minutes. The trapped steam is essential; it gelatinizes the starches on the surface and allows the bread to expand fully before the crust sets.
-
Remove the lid and bake for another 12 to 15 minutes, until the crust is a rich, deep golden brown—almost mahogany in color.
-
Lift the bread out of the pot using the parchment edges and place it directly on a wire rack to cool. Let it rest for at least 30 minutes before slicing; the interior continues to cook and set as it cools.
Advertisements
Why This Works So Well
The long fermentation at cool room temperature allows the dough to develop flavor and structure without any muscle work on your part. The yeast produces carbon dioxide slowly and steadily, creating a network of small, even bubbles. Meanwhile, lactic and acetic acids develop naturally, giving the bread its pleasant, subtle tang. When the wet dough hits the oven and the Dutch oven traps steam, the exterior sets quickly while the interior continues to rise and gelatinize, creating that distinctive open crumb structure you see in artisan bakeries.
Pro Tips for Perfect Results
- The dough is ready when it’s puffy and filled with visible bubbles, not necessarily at exactly 18 hours. If your kitchen is very warm, it might be ready at 16 hours. If it’s cool, it might need 20. The visual cues matter more than the clock.
- If you don’t own a Dutch oven, you can bake the bread on a preheated baking stone or baking sheet, but spray the interior of your oven with water several times in the first 10 minutes to create steam. The results won’t be quite as dramatic, but still excellent.
- This dough actually improves with slightly longer fermentation. Refrigerate it after 12 hours and bake the next day if it’s more convenient—cold dough also handles and scores more predictably.
2. Simple Sandwich Bread
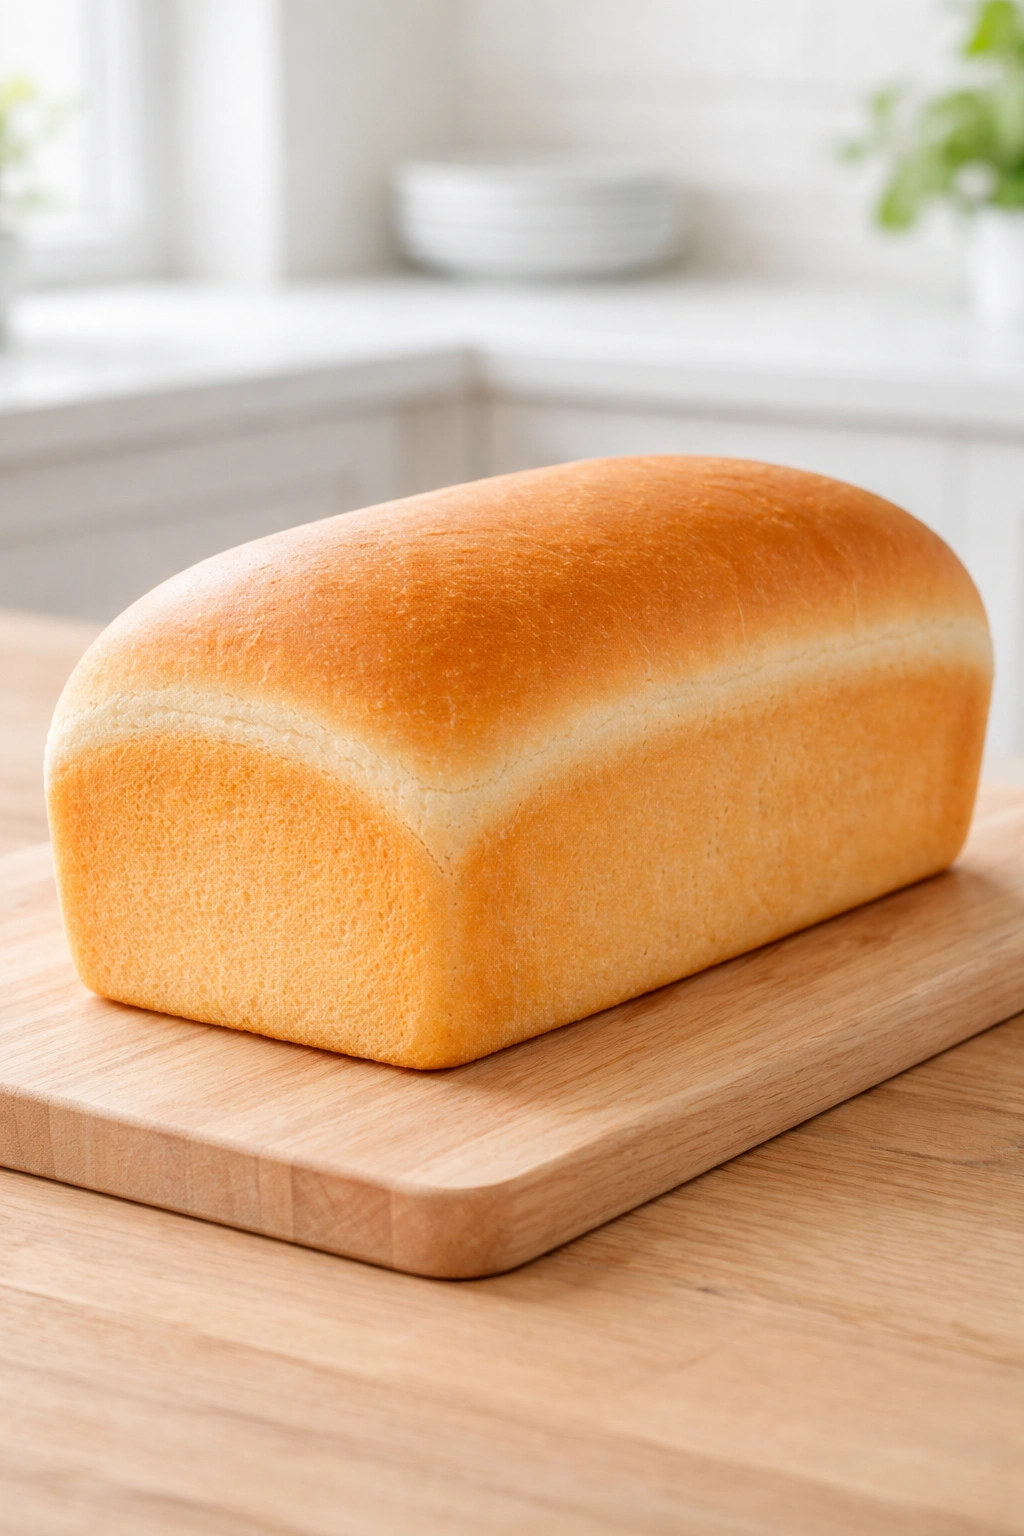
This is the bread to make when you want something reliable, mild-flavored, soft, and delicious enough to actually want to eat daily. It’s the straightforward, accessible loaf that works for sandwiches, toast, or just eating plain. Unlike artisan breads, this one uses a more traditional approach with proper kneading and shaping, and the active work takes less than an hour total. The result is a tender, even-textured loaf that stays soft for days.
Yield: Makes 1 large loaf (8-10 slices)
Prep Time: 20 minutes (plus 90 minutes rising)
Cook Time: 30 minutes
Total Time: 140 minutes (about 2.5 hours, including rises)
Difficulty: Beginner — straightforward steps and very forgiving dough.
Ingredients:
- 3½ cups (420g) all-purpose flour
- 1 tablespoon granulated sugar
- 2 teaspoons fine sea salt
- 2 tablespoons unsalted butter, softened
- 1 tablespoon instant yeast (or 2¼ teaspoons)
- 1¼ cups (300ml) warm water (around 110°F / 43°C — warm to the touch but not hot)
Instructions:
Mix and Knead:
-
In a large bowl or the bowl of a stand mixer, combine the flour, sugar, salt, and softened butter. If using a stand mixer, add the yeast and water, then fit the mixer with a dough hook. Mix on low speed for 2 minutes until the dry ingredients are moistened, then increase to medium-low speed and knead for 8 to 10 minutes, until the dough becomes smooth, elastic, and slightly tacky but not sticky. If mixing by hand, combine the ingredients in a large bowl, then turn the dough out onto a lightly floured surface and knead by hand for 10 to 12 minutes, using the heel of your hand to push the dough away from you, then folding it back over itself repeatedly until it’s smooth and elastic.
-
The dough should pass the “windowpane test”: pinch off a small piece and stretch it gently. If you can stretch it thin enough to see light through it without it tearing, the gluten is properly developed.
First Rise:
- Form the dough into a ball, place it in a lightly oiled bowl, cover with a damp kitchen towel or plastic wrap, and let it rise in a warm, draft-free spot for 60 to 75 minutes, until it’s roughly doubled in size.
Shape:
-
Punch down the dough gently to release excess gas. Turn it out onto a lightly floured surface and shape it into a loaf: flatten it into a rough rectangle about 8 inches wide. Fold the rectangle in thirds lengthwise (like a letter), pressing firmly with the heel of your hand to seal. Fold the two short ends in to meet in the middle, then roll the dough tightly from top to bottom, sealing the seam with the heel of your hand as you go.
-
Place the shaped dough seam-side down in a well-buttered 9×5-inch loaf pan. Cover loosely with plastic wrap or a damp towel.
Second Rise:
- Let the dough rise in the same warm spot for 45 to 60 minutes, until it rises about an inch above the top of the pan (called “pan spring” — it will rise more in the oven).
Bake:
-
Preheat your oven to 375°F (190°C) about 15 minutes before baking. Position the rack in the center of the oven.
-
Bake for 28 to 32 minutes, until the loaf is golden brown on top and a thermometer inserted into the center (through the end of the loaf, not from the top) reads 190-195°F (88-90°C). The loaf should sound hollow when tapped on the bottom.
-
Turn the loaf out of the pan and place it on a wire rack to cool completely before slicing — at least 1 hour. Cutting into a still-warm loaf will result in gummy, compressed crumb.
Why This Recipe Delivers
This dough uses a standard hydration and fermentation schedule that works in almost any home kitchen. The combination of sugar and butter creates a slightly enriched crumb that stays soft longer and has a tender bite. The proper kneading develops gluten steadily and predictably, giving you a loaf with an even, fine crumb rather than large irregular holes. The two-rise schedule allows time for flavor development without being so long that the dough becomes unpredictable.
Key Variations
Whole Wheat Version: Replace up to 1 cup of the all-purpose flour with whole wheat flour. The dough will be slightly heavier and may need a few extra minutes of kneading. You may also need to add 1-2 additional tablespoons of water, as whole wheat absorbs more liquid than white flour.
Honey Oat Bread: Replace the sugar with 1 tablespoon honey and add ½ cup rolled oats to the flour. The oats add texture and a subtle sweetness.
3. Focaccia with Rosemary and Sea Salt

Focaccia is the approachable entry point to flatbread baking. It’s dramatically forgiving (you can’t really mess it up), visually stunning (dimples, olive oil, herbs), and delicious enough that people think you spent far more effort than you actually did. This bread skips the traditional kneading, instead using a wet dough that proofs for just 2-3 hours and bakes into something with a crispy-yet-tender crust and an airy, open interior. It’s excellent served alongside soup, as a side for dinner, or as the base for sandwiches.
Yield: Makes one 11×15-inch focaccia (12-16 pieces)
Prep Time: 15 minutes (plus 2.5 hours rising)
Cook Time: 22 minutes
Total Time: 2 hours 50 minutes
Difficulty: Beginner — wet dough is forgiving and embraces a rustic appearance.
Ingredients:
- 3¾ cups (450g) all-purpose flour or bread flour
- 1½ teaspoons instant yeast
- 1¾ teaspoons fine sea salt
- 1½ cups (360ml) warm water
- 6 tablespoons olive oil (divided: 3 for the dough, 3 for topping)
- 2 tablespoons fresh rosemary leaves (or 1 tablespoon dried)
- Fleur de sel or coarse sea salt for finishing
Instructions:
Mix the Dough:
-
In a large bowl, whisk together the flour, yeast, and fine sea salt. Make a well in the center and pour in the warm water and 3 tablespoons of the olive oil. Using a wooden spoon, stir until the ingredients come together into a shaggy, wet dough. The dough will look quite sticky — this is intentional and essential for focaccia’s characteristic open crumb.
-
Cover the bowl loosely with plastic wrap and let the dough rest for 15 to 20 minutes (this is called autolyse, and it helps the flour fully hydrate).
-
Stretch and fold the dough: wet your hand, then reach under one side of the dough, stretch it up and over the center, and fold it down. Rotate the bowl and repeat from all four sides. This gentle manipulation develops gluten without kneading. Do this 4 to 6 times total.
-
Cover the bowl and let it rest for 30 minutes. Repeat the stretch-and-fold process 2 to 3 more times at 30-minute intervals. After the final fold, cover and let the dough rise for 1 to 1.5 hours, until it’s noticeably puffy and filled with visible bubbles.
Shape and Proof:
-
Pour the remaining 3 tablespoons of olive oil into an 11×15-inch (or similar sized) baking pan, tilting to coat the bottom and sides. Gently turn the dough out onto the oiled pan. It will deflate slightly — that’s fine. Using well-oiled hands (the dough is sticky; oil makes handling easier), gently stretch the dough to fill the pan. Don’t force it; if it springs back, cover it for 10 minutes and try again. The dough should reach all corners of the pan.
-
Cover loosely with plastic wrap and let it rise for 45 minutes to 1 hour, until it’s puffy and filled with bubbles.
Top and Bake:
-
Preheat your oven to 425°F (220°C) about 15 minutes before baking.
-
Using your fingertips or the knuckles of your hand, dimple the entire surface of the dough, creating deep indentations across the entire pan. Don’t be timid; these dimples should be noticeable and deep. Sprinkle the rosemary leaves evenly over the surface and finish with a generous pinch of coarse sea salt. Drizzle with any remaining oil from the pan if it’s pooled on the surface.
-
Bake for 20 to 24 minutes, until the top is a rich golden brown and the edges pull away slightly from the sides of the pan. The focaccia should smell fragrant and warm.
-
Transfer to a wire rack and let cool for 5 to 10 minutes before cutting. It’s delicious warm or at room temperature.
The Science of Focaccia’s Texture
Focaccia’s signature open crumb comes from two things: a high-hydration dough (more water relative to flour than many breads) and stretch-and-fold mixing (which develops gluten gently without degassing the dough completely). The final dimpling serves two purposes: it allows your fingers to reach down and experience the warm, fermented dough, adding to the therapeutic baking experience, and it traps air and prevents the bread from becoming too dense during baking. The olive oil seeping into and coating the dough creates that tender, almost tender-crisp crust that distinguishes focaccia.
Flavor Variations to Try
- Olive and Garlic: Scatter 1 cup of pitted Castelvetrano olives (or your favorite variety) and 3 minced garlic cloves over the surface before baking.
- Caramelized Onion: Top with 1.5 cups of onions that have been slowly cooked with a bit of olive oil until deeply golden and sweet.
- Everything Bagel Spice: Combine sesame seeds, poppy seeds, dried garlic, dried onion, and sea salt, then sprinkle over the oiled dough before baking.
- Herb and Cheese: Sprinkle 1 cup of grated Parmigiano-Reggiano mixed with additional fresh herbs (thyme, oregano, or basil) over the top.
4. Soft Brioche
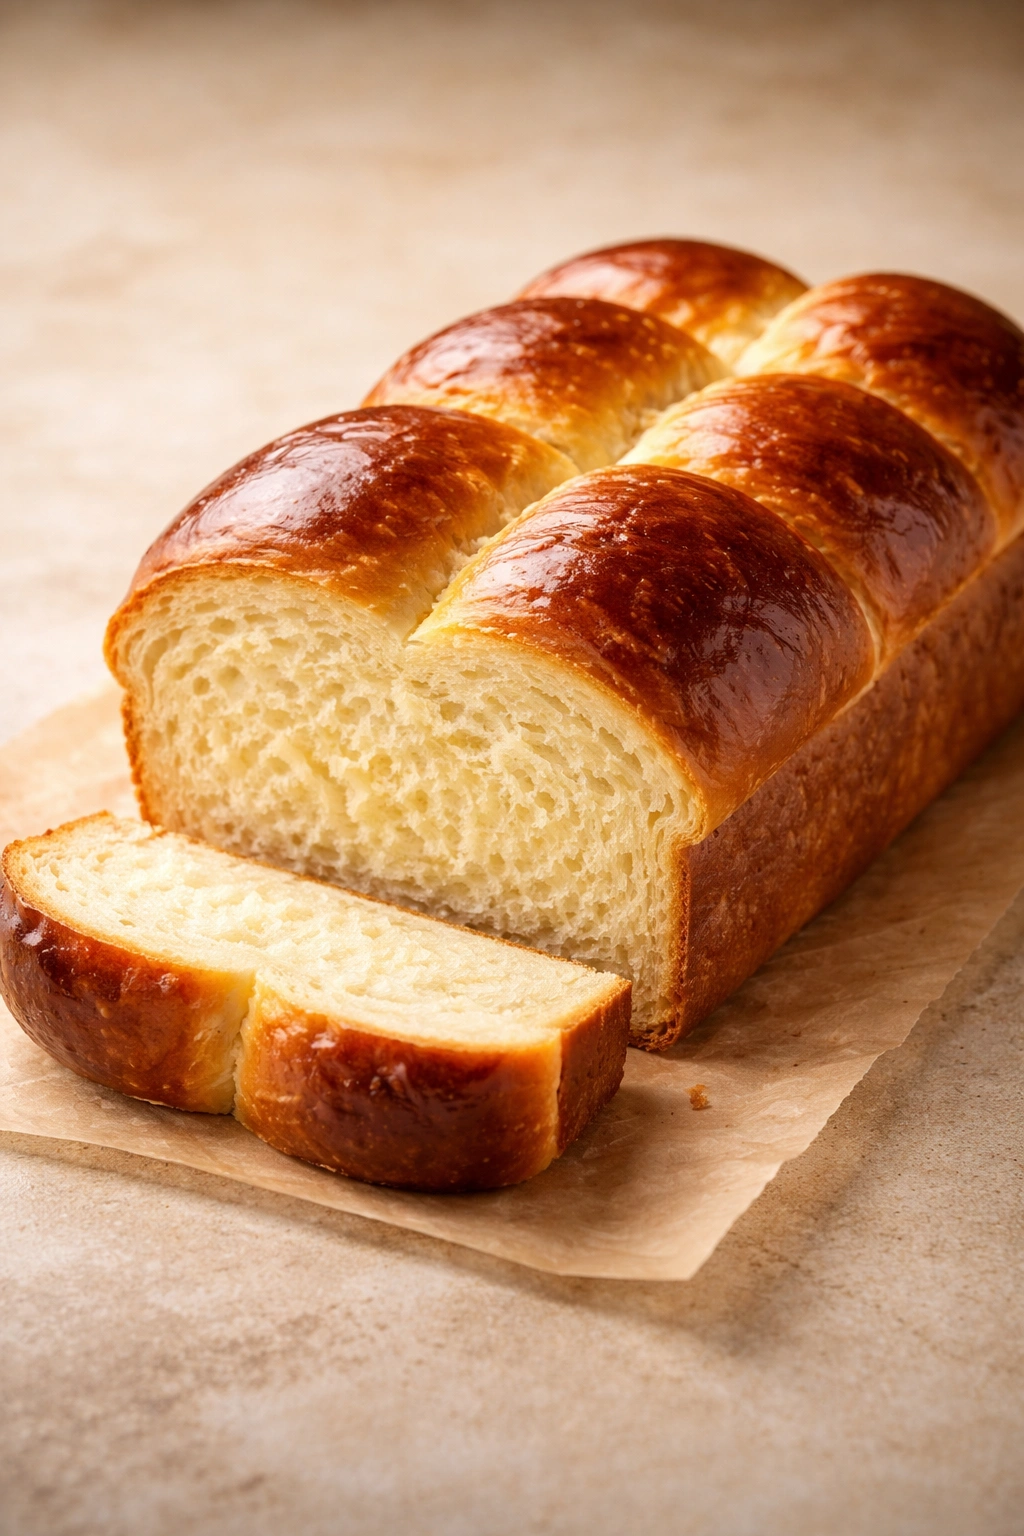
Brioche is the rich, buttery bread that makes every sandwich extraordinary and transforms ordinary breakfast into something special. It seems intimidating—all that butter, all that egg—yet it’s actually quite manageable in a stand mixer. The enriched dough is slightly wetter and takes a bit longer to rise than basic breads, but the technique is straightforward. The result is golden, tender, and subtly sweet, with a silky crumb and a flavor that’s actually worth the modest extra effort required.
Yield: Makes 1 large loaf (10-12 slices)
Prep Time: 20 minutes (plus 3 hours rising)
Cook Time: 35 minutes
Total Time: 3 hours 55 minutes
Difficulty: Intermediate — requires a stand mixer and a bit of patience, but the steps are clear and forgiving.
Ingredients:
- 3½ cups (420g) all-purpose flour
- 2¼ teaspoons instant yeast
- ½ teaspoon fine sea salt
- 3 tablespoons granulated sugar
- ½ cup (120ml) whole milk, warmed
- 3 large eggs, room temperature
- 6 tablespoons (85g) unsalted butter, softened to room temperature and cut into small cubes
- 1 tablespoon water (for egg wash)
Instructions:
Mix the Dough:
-
In the bowl of a stand mixer fitted with the dough hook, combine the flour, yeast, salt, and sugar. Add the warmed milk and 2 of the eggs. Mix on low speed for 2 minutes until the ingredients come together, then increase to medium-low speed and mix for 5 minutes. The dough will still look quite shaggy.
-
Add the third egg and continue mixing on medium-low speed for 3 to 4 minutes. The dough should now look smoother, though still somewhat sticky.
-
With the mixer still running, add the softened butter in 2 or 3 additions, allowing each addition to become mostly incorporated before adding more. This will take another 4 to 6 minutes. Once all the butter is incorporated, continue mixing for another 3 to 4 minutes, until the dough is smooth, silky, and only slightly sticky. The dough should pull away from the sides of the bowl while still clinging to the bottom.
First Rise:
- Transfer the dough to a lightly oiled bowl, cover with plastic wrap or a damp towel, and let it rise in a warm spot for 1.5 to 2 hours, until it’s noticeably puffy and increased in volume by about 50%.
Chill (Important Step):
- Once the dough has risen, refrigerate it for at least 1 hour (or up to overnight). Cold dough is much easier to shape, and the long, slow fermentation in the fridge actually improves the flavor. This is a crucial step for brioche — don’t skip it.
Shape:
-
Butter a 9×5-inch loaf pan generously. Turn the cold dough out onto a lightly floured surface and shape it into a loaf using the same method as the Sandwich Bread (flatten, fold into thirds, roll, seal). Place the shaped dough seam-side down in the prepared pan.
Advertisements -
Cover loosely with plastic wrap and let the dough rise at room temperature for 1 to 1.5 hours, until it rises about an inch above the top of the pan.
Egg Wash and Bake:
-
Preheat your oven to 375°F (190°C) about 20 minutes before baking.
-
Beat the remaining egg white with 1 tablespoon of water to create an egg wash. Brush the entire top surface of the brioche with this mixture, being generous but careful not to let it pool in the corners (it will bake into a shiny, golden exterior).
-
Bake for 32 to 38 minutes, until the top is a rich golden brown and a thermometer inserted into the center reads 190-195°F (88-90°C). If the top begins to brown too quickly (usually around 25 minutes), tent it loosely with foil to prevent over-browning while the interior continues to bake.
-
Turn the brioche out of the pan and place it on a wire rack to cool completely before slicing — at least 1 hour.
Why Brioche Requires Butter Last
Brioche’s high butter content creates a challenge: if you add all the butter at once, the mixer will struggle to incorporate it evenly, and the dough will become greasy rather than silky. By adding butter in stages after the dough has already developed some structure, the bread flour’s gluten can properly embrace the fat molecules, creating an emulsion that’s smooth and supple. This is also why the dough needs to be chilled before shaping — warm, buttery dough is difficult to handle and will spread rather than rise.
Make-Ahead Strategy
Brioche’s long fermentation makes it ideal for advance preparation. You can refrigerate the shaped dough overnight after Step 6, then bake it directly from the fridge the next morning (no need to bring it to room temperature first — just add 5 extra minutes to the baking time). This actually produces even better flavor, as the cold dough ferments slowly overnight.
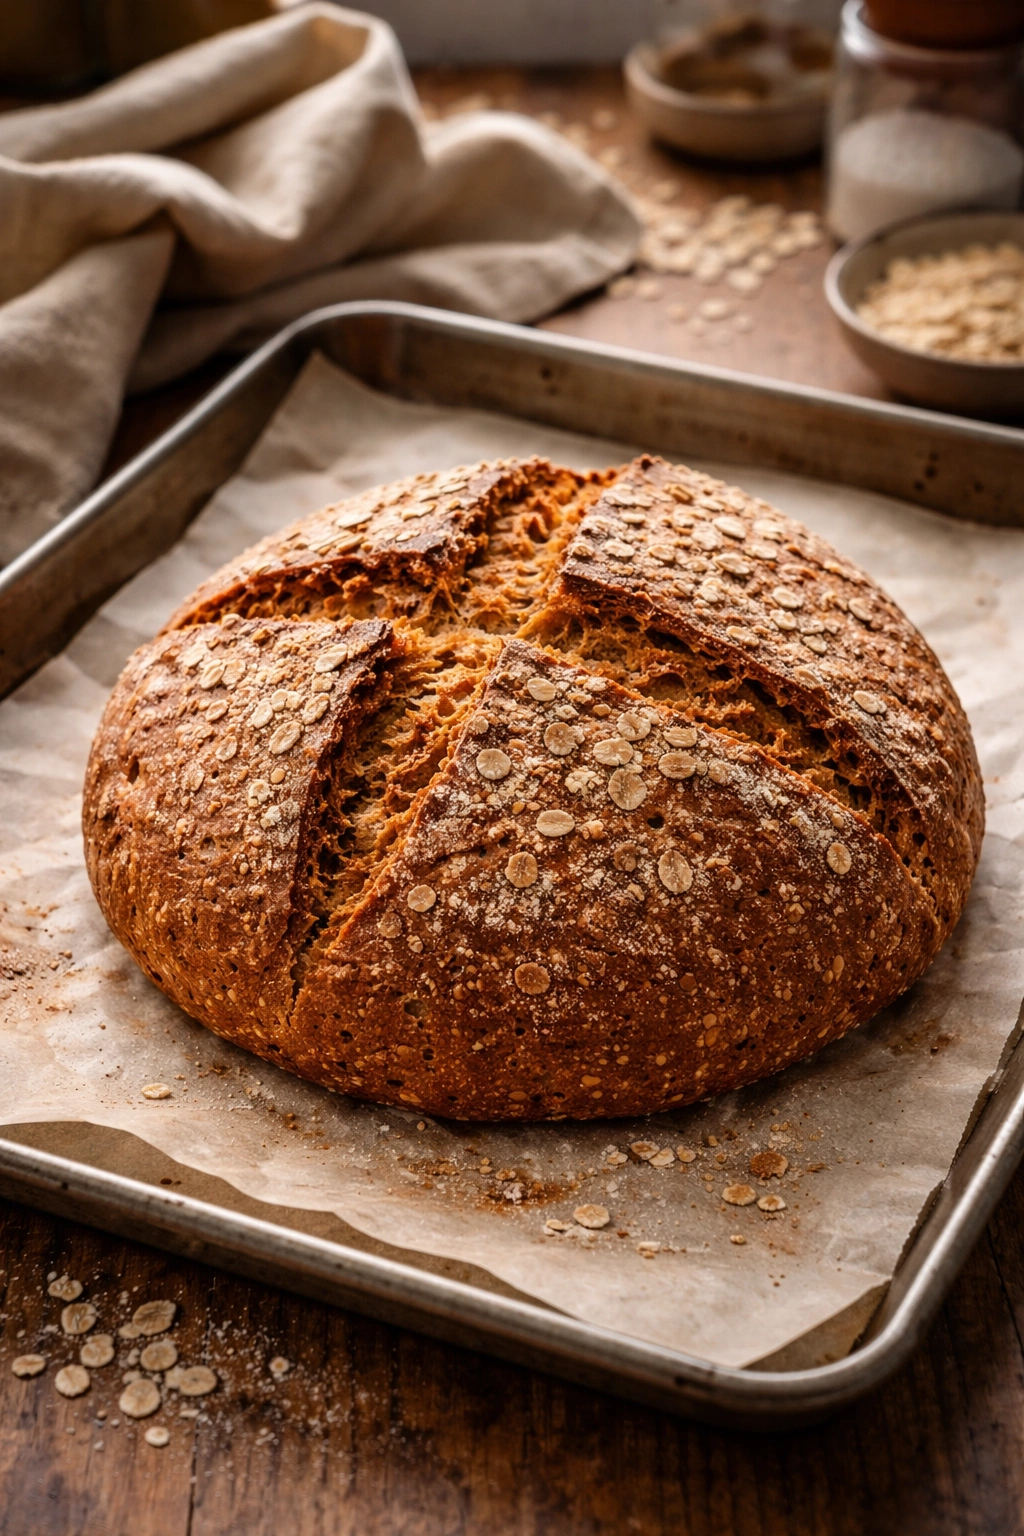
5. Whole Wheat Honey Bread
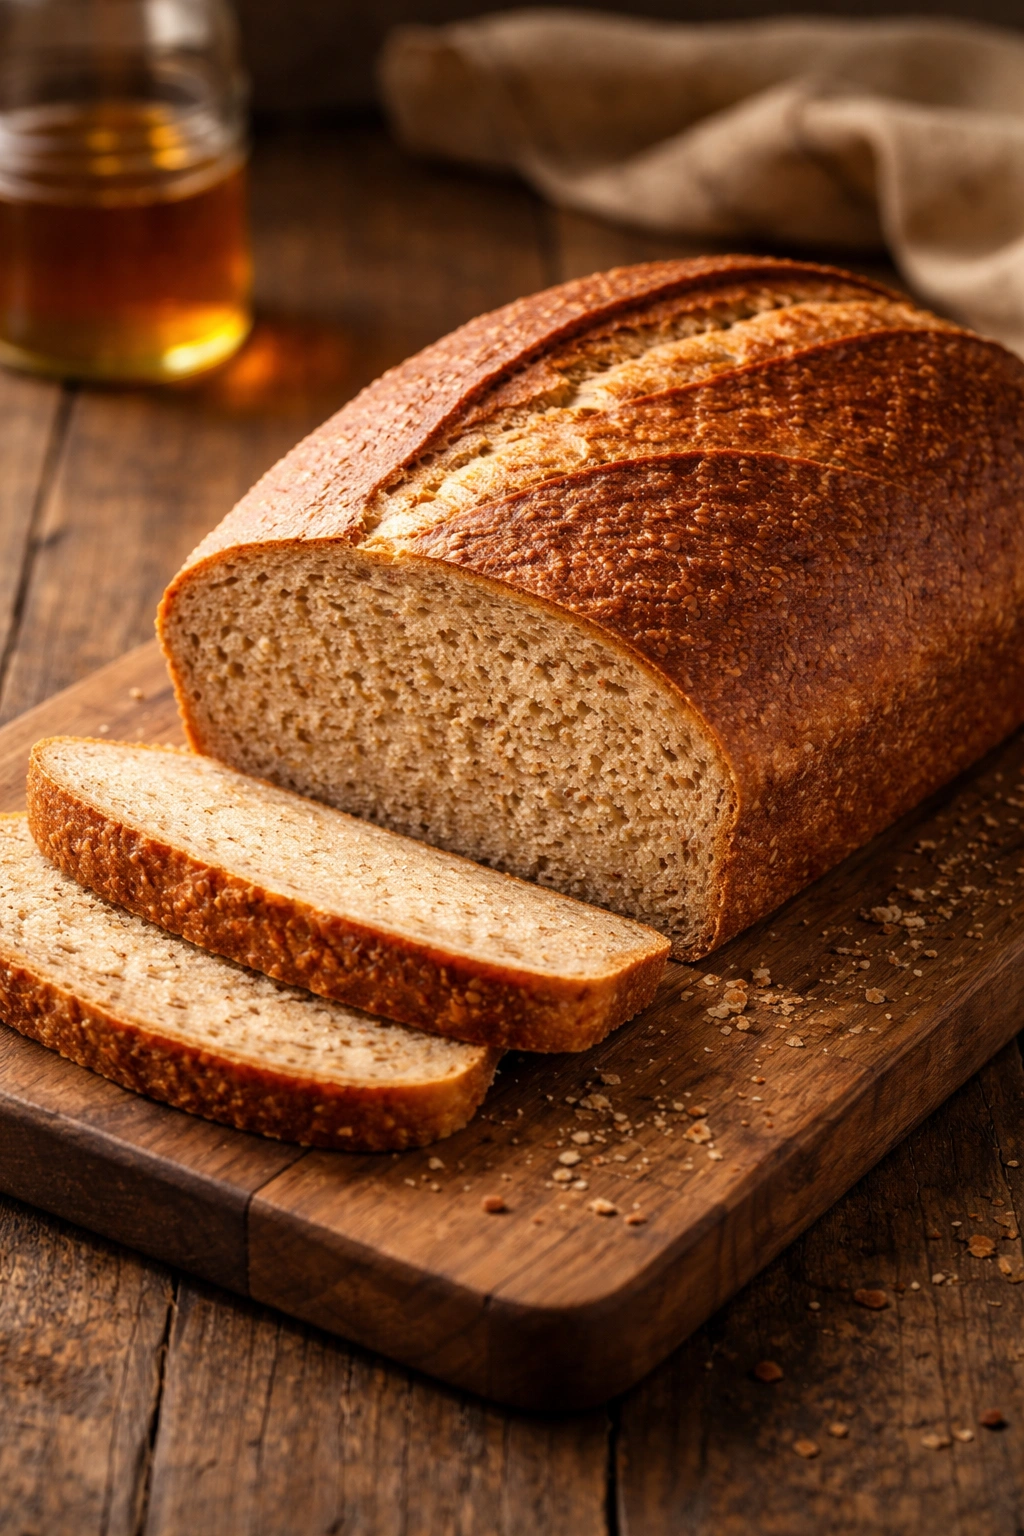
This bread bridges the gap between nutrition and indulgence. It uses a blend of whole wheat and all-purpose flour, which creates a darker, nuttier loaf with more fiber and nutrients, but the honey keeps it naturally sweet and the butter keeps it tender. It’s hearty enough to feel like a serious whole grain bread, but approachable enough for everyday eating. The dough is only slightly stiffer than white bread dough, making it beginner-friendly despite the whole wheat flour.
Yield: Makes 1 large loaf (8-10 slices)
Prep Time: 20 minutes (plus 90 minutes rising)
Cook Time: 32 minutes
Total Time: 142 minutes (about 2.5 hours total)
Difficulty: Beginner — whole wheat is forgiving and the process is identical to sandwich bread.
Ingredients:
- 2 cups (240g) bread flour or all-purpose flour
- 1½ cups (180g) whole wheat flour
- 2¼ teaspoons instant yeast
- 1½ teaspoons fine sea salt
- ¼ cup (60ml) honey
- 2 tablespoons unsalted butter, softened
- 1¼ cups (300ml) warm water
- 2 tablespoons rolled oats (optional, for topping)
Instructions:
Mix and Knead:
-
In a large bowl or the bowl of a stand mixer, combine the bread flour, whole wheat flour, yeast, and salt. In a separate small bowl, whisk together the honey, softened butter, and warm water until the honey is dissolved and the butter is dispersed.
-
If using a stand mixer, add the wet ingredients to the flour mixture, fit the mixer with a dough hook, and mix on low speed for 2 minutes until the ingredients come together. Increase to medium-low speed and knead for 10 to 12 minutes, until the dough becomes smooth, elastic, and only slightly sticky. The whole wheat flour will make this dough slightly wetter-feeling than all-white bread dough, but it should still hold together.
-
If mixing by hand, combine the wet and dry ingredients in a large bowl and stir until the dough comes together. Turn onto a lightly floured surface and knead for 12 to 15 minutes.
First Rise:
- Form the dough into a ball and place it in a lightly oiled bowl. Cover with a damp kitchen towel and let it rise in a warm place for 60 to 75 minutes, until doubled in size.
Shape:
- Turn the dough out onto a lightly floured surface and gently deflate it. Shape it into a loaf (flatten into a rectangle, fold in thirds, then roll tightly from top to bottom) and place it seam-side down in a well-buttered 9×5-inch loaf pan.
Second Rise:
- Cover loosely with plastic wrap or a damp towel and let the dough rise for 45 to 60 minutes, until it rises an inch above the top of the pan.
Egg Wash and Bake:
-
Preheat your oven to 375°F (190°C) about 15 minutes before baking.
-
In a small bowl, beat 1 egg with 1 tablespoon of water. Brush this egg wash over the top of the loaf. If desired, sprinkle the 2 tablespoons of rolled oats over the top before baking — they’ll toast slightly and add a subtle nutty flavor and appealing texture.
-
Bake for 30 to 35 minutes, until the top is deep golden brown (whole wheat breads brown slightly faster than white breads) and a thermometer inserted into the center reads 190-195°F (88-90°C).
-
Turn the loaf out of the pan and place it on a wire rack to cool completely before slicing — at least 1 hour.
Why Whole Wheat Works Here
Whole wheat flour contains the bran and germ of the wheat kernel, which adds nutrients, fiber, and a nutty flavor, but it also absorbs more water than refined flour. This is why this recipe uses slightly more water than a basic white bread recipe. The honey adds natural sweetness that balances the deeper, earthier notes of whole wheat, making the bread appealing to people who might otherwise find whole grain breads too dense or bitter. The combination is nutritionally richer than white bread while remaining accessible and delicious.
Storage Note
Whole wheat breads typically stay fresh for 2-3 days at room temperature (they dry out slightly faster than white breads). To extend the shelf life, wrap cooled bread tightly in plastic wrap or foil and refrigerate for up to 5 days, or freeze for up to 3 months.
6. Crusty Italian Ciabatta
Ciabatta is one of the most distinctive breads—flat, wide, and seemingly haphazardly shaped, with a crispy exterior and an interior that’s practically hollow inside because of its large, irregular holes. Ironically, this challenging-looking bread uses one of the simplest and most forgiving techniques: an extremely wet dough that’s barely manipulated, just stretched and folded minimally, then baked in a steaming oven. The high hydration creates those signature large bubbles, and the minimal handling keeps them intact. It’s the perfect bread for Caprese sandwiches, for dipping in olive oil, or for soaking up the last drops of sauce.
Yield: Makes 2 ciabattas (each serves 2-3)
Prep Time: 15 minutes (plus 3 hours rising)
Cook Time: 25 minutes
Total Time: 3 hours 40 minutes
Difficulty: Intermediate — the wet dough requires confidence and a commitment to gentle handling, but there’s nothing technically difficult.
Ingredients:
- 3½ cups (420g) bread flour (ciabatta really benefits from bread flour’s higher protein)
- 1¼ teaspoons instant yeast
- 1½ teaspoons fine sea salt
- 1½ cups (360ml) warm water
- 2 tablespoons olive oil (plus extra for oiling hands)
Instructions:
Mix and Rest:
-
In a large bowl, combine the bread flour, yeast, and salt using a whisk or fork. Add the warm water and olive oil. Using a wooden spoon or your hand, stir until the ingredients come together into a very wet, shaggy dough. It will look almost more like thick batter than traditional bread dough — this is exactly what you want. Make sure all the flour is hydrated.
-
Cover the bowl with plastic wrap and let the dough rest for 20 minutes.
Stretch and Fold Cycle:
-
Wet one hand with cool water (this prevents sticking). Reach under one side of the dough, pull it up and stretch it over the center, and fold it down. Rotate the bowl and repeat from all four sides. Do this 4 to 6 times total in one session. Cover and rest for 30 minutes.
-
Repeat the stretch-and-fold process a total of 3 times, with 30 minutes of rest between each session. After the final fold, cover and let the dough rise undisturbed for 1.5 to 2 hours, until it’s very puffy and filled with visible bubbles.
Shape:
-
Generously flour a large work surface (a wooden board works well — the flour will help later). Wet your hands thoroughly with cool water. Very gently, trying to preserve the bubbles, turn the dough out onto the floured surface. Do not fold, punch, or compress it in any way.
-
Dust the top of the dough with flour. Using floured hands and a gentle touch, stretch the dough into a roughly rectangular shape about 12 inches long and 6 inches wide. Dust generously with more flour on top and between where the two ciabattas will be. Using a floured knife, score a line down the center, dividing the rectangle into two long ovals.
Final Proof:
- Cover loosely with plastic wrap or a clean towel and let the dough rest for 45 minutes to 1 hour.
Bake:
-
Preheat your oven to 450°F (230°C). If you have a baking stone, place it on the rack now; if not, place a baking sheet on the rack. Place a small oven-safe pan (like a small cast iron skillet) on the bottom rack of the oven to preheat as well — this will be for creating steam.
-
Once the oven is fully preheated, carefully transfer the ciabatta (you can slide it onto the stone or baking sheet from the floured board, or transfer it on parchment paper if you’re nervous). Immediately add ½ cup of boiling water to the hot pan on the bottom rack to create steam.
-
Bake for 23 to 27 minutes, until the ciabatta is deeply golden and sounds hollow when tapped on the bottom. Open the oven door at 15 minutes and vent out some of the steam if the top seems to be browning too quickly.
-
Transfer to a wire rack and cool completely before cutting — at least 30 minutes. The interior will set as it cools.
The Ciabatta Paradox
Ciabatta seems hard because it looks rustic and has those huge irregular holes. But it’s actually easier than many breads because there’s no complex shaping, no proofing boxes, and the dough forgives neglect. The only trick is accepting that the dough will be very wet and learning to trust the fermentation process. The wet dough creates steam internally as it bakes, which creates those characteristic large holes. The minimal handling preserves the bubbles rather than breaking them down.
Storage
Ciabatta is best eaten the day it’s baked, while the crust is still crispy. After that, the crust softens. You can briefly refresh it by wrapping it tightly in foil and warming it in a 300°F oven for 5-10 minutes. Or simply embrace day-old ciabatta for toasting.
7. Dinner Rolls
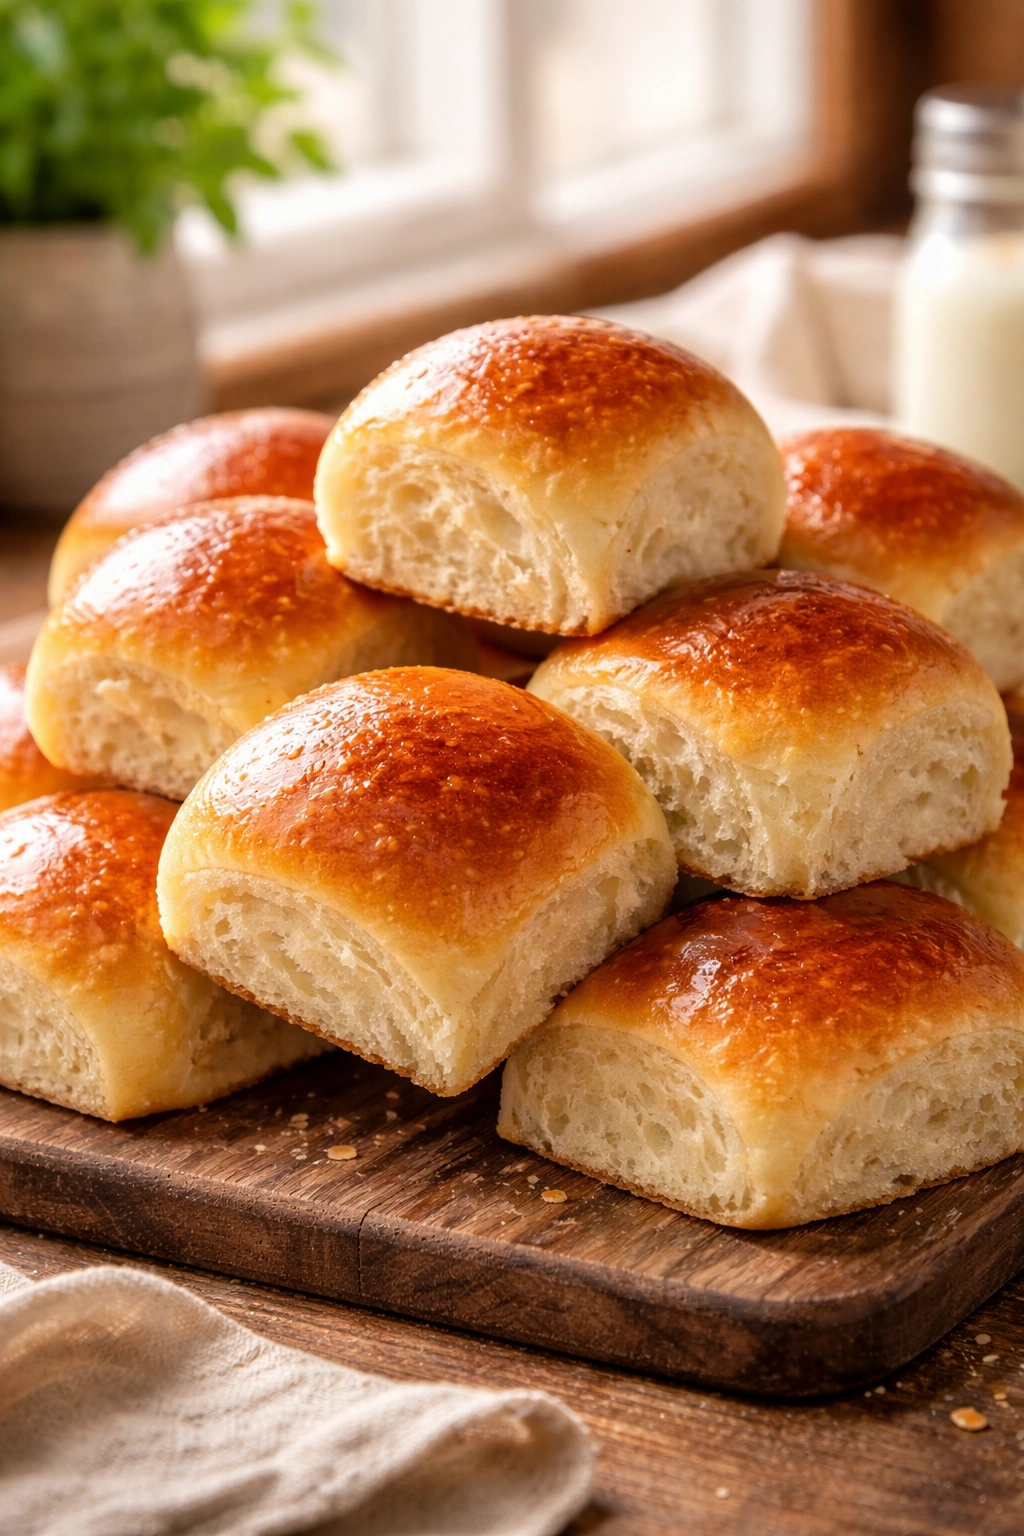
These are the rolls that appear on every holiday table and never fail to disappear first. They’re soft, buttery, warm, and infinitely customizable. The dough is enriched with butter and egg (making it similar to brioche but less decadent), so it stays soft for days. The magic is in the overnight refrigeration, which develops flavor and makes shaping easier. You can mix the dough in the morning, refrigerate overnight, then shape and bake the next day—perfect for holiday planning.
Yield: Makes 12 rolls
Prep Time: 25 minutes (plus overnight refrigeration and 1 hour proofing)
Cook Time: 18 minutes
Total Time: 8.5 hours (mostly hands-off)
Difficulty: Beginner — straightforward technique and very forgiving dough.
Ingredients:
- 4 cups (480g) all-purpose flour
- 2¼ teaspoons instant yeast
- ¾ teaspoon fine sea salt
- 2 tablespoons granulated sugar
- ½ cup (120ml) warm milk
- 3 tablespoons unsalted butter, melted
- 1 large egg, room temperature
- Egg wash: 1 egg beaten with 1 tablespoon water
Instructions:
Mix the Dough:
-
In the bowl of a stand mixer fitted with the dough hook, combine the flour, yeast, salt, and sugar. In a separate bowl, whisk together the warm milk, melted butter, and whole egg.
-
Add the wet ingredients to the flour mixture. Mix on low speed for 2 minutes until the ingredients come together, then increase to medium-low speed and knead for 8 to 10 minutes, until the dough is smooth, elastic, and only slightly sticky. The dough should clean the sides of the bowl.
First Rise (Overnight):
- Transfer the dough to a lightly oiled bowl, cover with plastic wrap, and refrigerate overnight (or up to 24 hours). The long, slow fermentation in the fridge develops flavor and makes the dough more extensible and easier to shape.
Shape:
-
Remove the dough from the refrigerator 30 minutes before shaping — it’s easier to work with when slightly warmed.
-
Generously butter a 9×13-inch baking pan. Turn the dough out onto a lightly floured surface and gently flatten it. Using a bench scraper or knife, divide the dough into 12 equal pieces (divide in half, then in half again, then into thirds). Roll each piece into a smooth ball by gently cupping it in your hands and rolling it toward you on the work surface.
-
Arrange the rolls in the prepared pan in 4 rows of 3, leaving a bit of space between each one (they’ll expand as they proof). Cover with plastic wrap or a damp towel.
Second Rise:
- Let the rolls rise at room temperature for 1 to 1.5 hours, until they’ve grown noticeably and are gently touching each other. Do not over-proof — if they rise too much, they can collapse in the oven. Gently poke a roll; it should spring back slowly with a slight indentation remaining.
Egg Wash and Bake:
-
Preheat your oven to 375°F (190°C) about 15 minutes before baking.
-
Brush the top of each roll with the egg wash, being careful not to let it pool between the rolls.
-
Bake for 16 to 20 minutes, until the rolls are a light golden brown on top and have spring back if you gently press one. They should be soft to the touch but fully baked through.
-
Remove the pan from the oven and, if desired, brush the warm rolls with melted butter for extra richness. Transfer to a wire rack to cool slightly — these are best eaten warm.
Why This Dough Works So Well
The butter and egg create a rich dough that’s tender and forgiving. The overnight refrigeration serves multiple purposes: it develops flavor through extended fermentation, it chills the dough enough that it’s easy to shape without sticking, and it gives the gluten time to relax and extend, making each roll tender rather than tough.
Flavor Variations
- Herb and Cheese: Add 1 teaspoon of dried Italian herbs (or 1 tablespoon fresh chopped herbs) to the dough, and sprinkle grated Parmigiano-Reggiano and additional herbs on top before baking.
- Garlic Butter: Brush cooled rolls with butter infused with roasted garlic and fresh parsley.
- Whole Wheat Dinner Rolls: Replace 1 cup of the all-purpose flour with whole wheat flour. The dough may need an extra tablespoon of water.
8. Quick Irish Brown Bread
This is bread for when you want something wholesome and delicious without yeast, rising times, or planning ahead. Irish brown bread uses baking soda as its leavening agent instead of yeast, and it comes together in about 10 minutes of active work plus 45 minutes of baking. The result is a dense, moist, slightly nutty loaf that’s best eaten within a day (it dries out quickly) but is perfect for slathering with butter, eating alongside soup, or serving for breakfast. It’s the ideal bread to bake on a weekend afternoon with zero advance planning.
Yield: Makes 1 round loaf (8-10 slices)
Prep Time: 10 minutes
Cook Time: 45 minutes
Total Time: 55 minutes
Difficulty: Beginner — no mixing challenges, no fermentation guesswork, no yeast.
Ingredients:
- 3 cups (360g) whole wheat flour
- 1 cup (120g) all-purpose flour
- 1 tablespoon granulated sugar
- 1½ teaspoons fine sea salt
- 1 teaspoon baking soda
- 2 tablespoons unsalted butter, cold and cut into small cubes
- 1¼ cups (300ml) buttermilk (or regular milk plus 1 tablespoon lemon juice or white vinegar, let sit 5 minutes)
Instructions:
Mix:
-
Preheat your oven to 425°F (220°C) and line a baking sheet with parchment paper, or place a Dutch oven in the oven to preheat.
-
In a large bowl, whisk together the whole wheat flour, all-purpose flour, sugar, salt, and baking soda. Add the cold butter cubes and, using a fork or your fingertips, work the butter into the flour until the mixture resembles coarse breadcrumbs.
-
Make a well in the center of the dry ingredients and pour in the buttermilk. Using a wooden spoon or your hand, gently stir until the ingredients just come together into a shaggy dough. Do not overmix — overworking the dough will make it tough. It’s okay if a few dry flour streaks remain.
Shape:
- Turn the dough out onto a lightly floured surface. Gently shape it into a round loaf about 7 inches in diameter. It will be rough and rustic-looking — that’s correct. Using a sharp knife, score a cross about ½ inch deep into the top of the loaf (this is traditional and helps the bread bake evenly).
Bake:
-
If you’re baking on a baking sheet, simply place the loaf on the parchment paper. If you preheated a Dutch oven, carefully transfer the loaf to the hot pot, cover with the lid, and bake for 30 minutes. Then remove the lid and bake for another 12 to 15 minutes.
-
If baking on a baking sheet, simply bake for 40 to 45 minutes total, until the loaf is deep brown and sounds hollow when tapped on the bottom.
-
Transfer to a wire rack and cool for at least 20 minutes before slicing. This bread is delicious warm or at room temperature.
Why No Yeast Works Here
Baking soda reacts with the acidity in buttermilk to produce carbon dioxide, creating lift and creating a crumb structure. The result is denser and more compact than yeast breads (which use living microorganisms to create bubbles over hours), but it’s still light and pleasant. The whole wheat flour contributes moisture and density, making this bread hearty and satisfying without needing fermentation time.
Make-It-Your-Own Variations
- Seeded Brown Bread: Add ¼ cup of rolled oats, sesame seeds, or sunflower seeds to the dry ingredients.
- Sweet Brown Bread: Add 2 tablespoons of honey or molasses to the buttermilk before mixing, and reduce the sugar to 1 teaspoon. This creates a sweeter loaf that’s excellent for breakfast.
- Treacle Bread: Irish treacle bread uses treacle or black molasses instead of regular sugar. Replace the sugar with 1 tablespoon of treacle or molasses mixed into the buttermilk.
9. Garlic and Herb Focaccia Breadsticks

These breadsticks are the bread equivalent of potato chips — it’s nearly impossible to eat just one. They’re crispy on the outside, tender within, and loaded with garlic and herbs. The dough is the same wet, stretchy dough used for focaccia, but instead of baking it as a single flatbread, you cut it into strips and bake them until they’re golden and snappy. They’re perfect for serving alongside pasta, for dipping in marinara or oil, or for eating by the handful straight from the cooling rack.
Yield: Makes approximately 20 breadsticks
Prep Time: 15 minutes (plus 2 hours rising)
Cook Time: 20 minutes
Total Time: 2 hours 35 minutes
Difficulty: Beginner — the technique is identical to focaccia, just cut differently.
Ingredients:
- 3½ cups (420g) all-purpose flour or bread flour
- 1½ teaspoons instant yeast
- 1¾ teaspoons fine sea salt
- 1½ cups (360ml) warm water
- 4 tablespoons olive oil (divided: 2 for the dough, 2 for topping)
- 4 cloves garlic, minced very finely
- 2 tablespoons fresh Italian herbs (parsley, oregano, or basil), finely chopped (or 1 tablespoon dried)
- Coarse sea salt for finishing
- Optional: 2 tablespoons grated Parmigiano-Reggiano cheese
Instructions:
Mix and Rise:
-
In a large bowl, combine the flour, yeast, and fine sea salt. Add the warm water and 2 tablespoons of the olive oil, stirring with a wooden spoon until the ingredients come together into a wet, shaggy dough.
-
Cover the bowl loosely with plastic wrap and let the dough rest for 15 minutes (autolyse).
-
Using a wet hand, stretch and fold the dough 4 to 6 times, then cover and rest for 30 minutes. Repeat the stretch and fold 2 more times at 30-minute intervals. After the final fold, cover and let the dough rise for 1 to 1.5 hours, until puffy and filled with bubbles.
Shape and Oil:
-
Pour the remaining 2 tablespoons of olive oil into a 9×13-inch baking pan. Gently turn the dough out onto the oiled pan, stretching it to fit the pan with oiled hands. The dough should cover the bottom of the pan.
Advertisements -
In a small bowl, mix the minced garlic, herbs, and an additional pinch of salt. Drizzle this mixture evenly over the surface of the dough, along with the remaining olive oil if it has pooled on the sides.
Proof and Cut:
-
Cover loosely with plastic wrap and let the dough rise for 45 minutes to 1 hour, until puffy and filled with bubbles.
-
Preheat your oven to 425°F (220°C).
-
Using a sharp, well-oiled knife or a pizza cutter, cut the dough into strips about ½ inch wide (you can cut them either lengthwise or in a grid, depending on your preference). Don’t worry if they’re not perfectly uniform — rustic is fine.
-
Spread the strips out slightly so they’re not touching too closely. Sprinkle with coarse sea salt and, if desired, grated Parmigiano-Reggiano.
Bake:
-
Bake for 18 to 22 minutes, until the breadsticks are golden brown and noticeably crispy on the edges. Some strips may brown faster than others — stir them around halfway through if the edges seem to be burning.
-
Transfer to a wire rack and let cool for at least 10 minutes (they’ll crisp up more as they cool). Serve warm or at room temperature.
Why These Disappear So Fast
The combination of garlic, herbs, and olive oil hits all the savory cravings, while the high-moisture dough creates a tender interior and the high oven temperature creates a snappy crust. Humans find these nearly irresistible, so make a double batch if you’re feeding other people.
10. Sourdough Bread (Using a Starter)
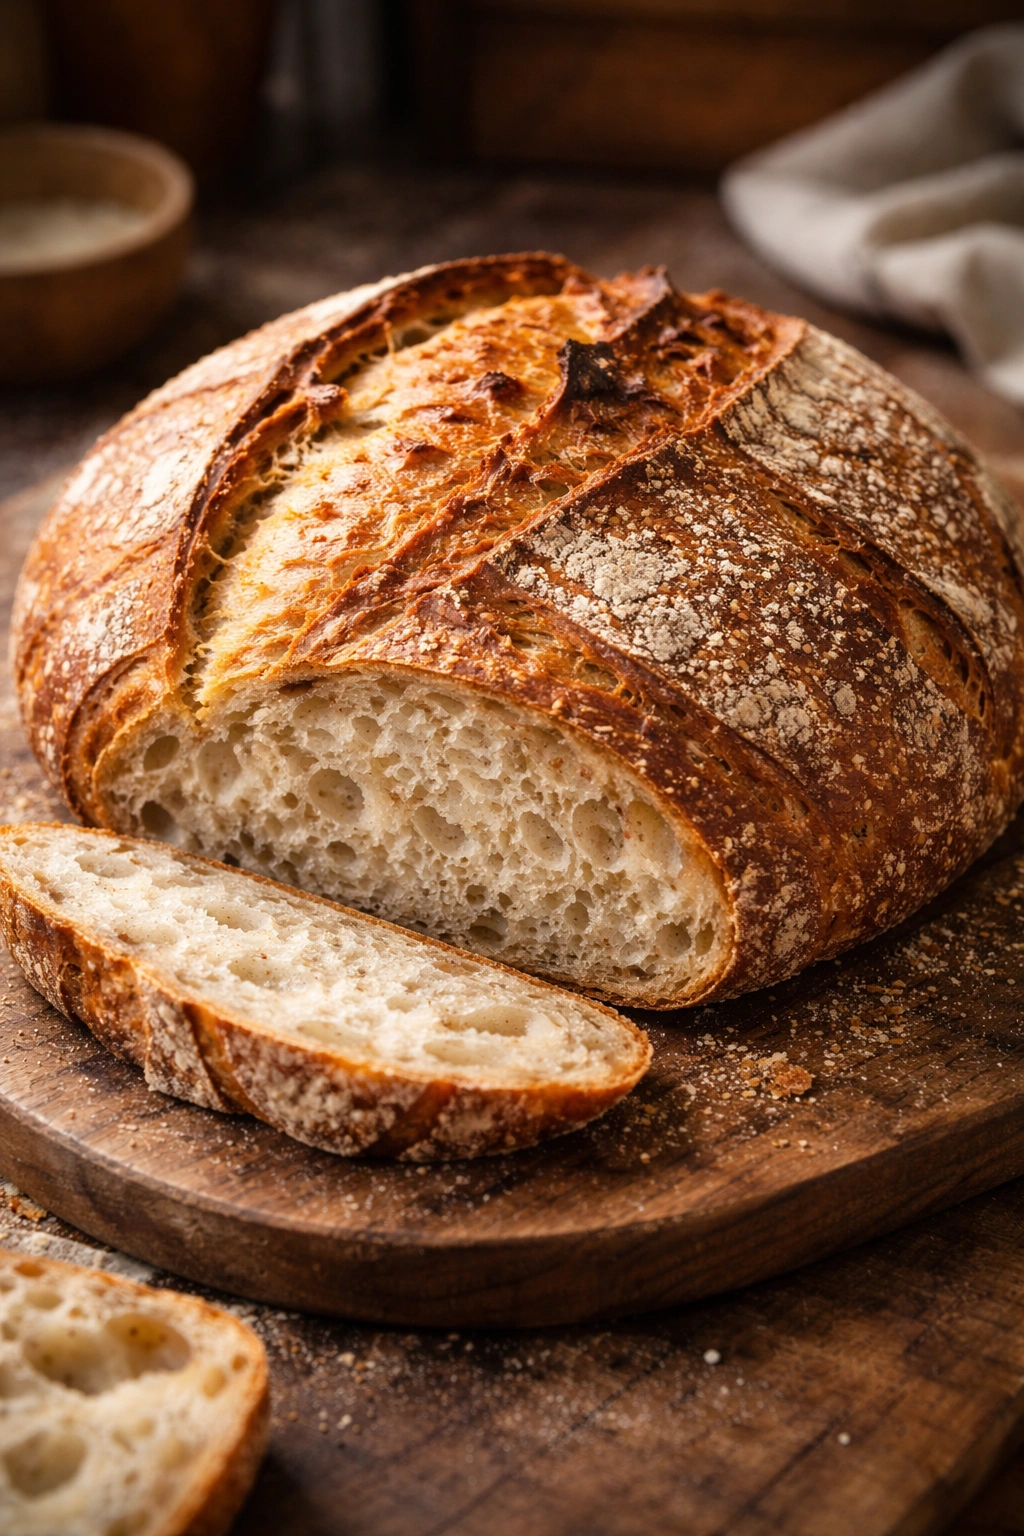
Sourdough is the bread that converts casual home bakers into obsessive bread enthusiasts. It requires a living culture called a starter (a mixture of flour, water, and wild yeast), takes patience, and demands that you pay attention to how your dough looks and feels rather than just following a timer. But the payoff is extraordinary: complex flavor, a beautiful open crumb structure, and bread that stays fresh longer than commercial yeasted breads. If you’re new to sourdough, start here.
Yield: Makes 1 large round loaf (8-10 slices)
Prep Time: 20 minutes (plus 4-6 hours fermentation)
Cook Time: 45 minutes
Total Time: Approximately 5-7 hours, depending on temperature (mostly hands-off)
Difficulty: Intermediate — requires patience, a starter, and understanding fermentation cues rather than just following timing.
Note: This recipe assumes you have a mature sourdough starter (fed and bubbly within the last 4-8 hours). If you don’t have one, you’ll need to create one first, which takes 5-7 days.
Ingredients:
- 500g (about 4 cups) bread flour or all-purpose flour
- 350ml (about 1.5 cups) cool water
- 100g (about ½ cup) active sourdough starter (fed and bubbly)
- 10g (about 2 teaspoons) fine sea salt
Instructions:
Mix:
-
In a large bowl, combine the flour and cool water. Stir until the mixture is shaggy and all the flour is hydrated — every bit should be moistened. Let this mixture rest, uncovered, for 1 to 2 hours at room temperature. This period is called autolyse, and it allows the flour to fully absorb the water and begins developing gluten naturally without any mixing.
-
After the autolyse rest, add your active starter and salt to the dough. Using a wet hand or a dough scraper, incorporate these ingredients by folding the dough over itself repeatedly for about 2 minutes. The dough should come together, though it will still look rough.
Bulk Fermentation (The Key Step):
-
Cover the bowl loosely and let the dough rest for 15 to 20 minutes, then perform a stretch and fold: wet your hand, grab the dough from one side, stretch it up and over the center, and fold it down. Rotate the bowl and repeat from all four sides. This takes about 1 minute total.
Advertisements -
Cover and rest for another 15 to 20 minutes, then repeat the stretch and fold 3 more times. After the final fold, cover the bowl and let it rest undisturbed.
-
The total bulk fermentation should take 4 to 6 hours, depending on your kitchen temperature. Watch your dough rather than the clock. It’s ready when it’s visibly increased in volume (roughly 50% larger), has bubbles visible on the surface and interior, and wobbles slightly when you move the bowl. If you poke it gently, it should spring back slowly with a slight indentation remaining.
Shape:
-
Turn the dough out onto a lightly floured work surface. Gently flatten it into a rough circle, then fold the edges toward the center to create tension on the surface. Flip it seam-side down and, using a circular motion, drag the dough toward you across the floured surface to create a taut round.
-
Line a colander or small bowl with a well-floured kitchen towel (or use a banneton proofing basket if you have one). Place the dough in the lined bowl seam-side up.
Cold Retard (Optional but Excellent):
- Cover the bowl with plastic wrap and refrigerate overnight (or up to 24 hours). Cold fermentation develops deep flavor and makes the dough easier to score. This step is completely optional but highly recommended for sourdough.
Preheat and Score:
-
If you refrigerated the dough, remove it from the fridge 30 minutes before baking. Preheat your oven to 475°F (245°C). If you have a Dutch oven, place it in the oven to preheat as well.
-
Turn the dough out onto a piece of parchment paper. Using a very sharp knife or a bread lame, score the top with a single diagonal slash or an artistic pattern about ¼ inch deep. This controls how the bread expands during baking.
Bake:
-
Carefully transfer the dough (still on the parchment) into the hot Dutch oven. If you don’t have a Dutch oven, transfer the dough to a preheated baking stone or baking sheet and spray the interior of the oven with water several times during the first 10 minutes of baking.
-
Cover with the Dutch oven lid and bake for 30 minutes, creating steam that allows the bread to expand fully before the crust sets.
-
Remove the lid and bake for another 15 to 20 minutes, until the crust is a deep mahogany brown.
-
Remove from the oven and let cool on a wire rack for at least 1 hour before slicing. The interior continues to set as it cools.
The Sourdough Learning Curve
Sourdough is less about following exact timing and more about understanding your dough’s readiness through visual and tactile cues. Your kitchen temperature, humidity, and starter strength all affect fermentation speed. A dough that’s ready in 4 hours in a warm kitchen might need 6 hours in a cool one. This is actually liberating once you accept it — you’re not a prisoner to the clock. Pay attention to how your dough looks and feels, and you’ll develop an intuition that makes sourdough baking genuinely easy.
Troubleshooting
If your crumb is too dense: Your bulk fermentation was too short, or your starter wasn’t sufficiently active. Make sure your starter is genuinely bubbly and has recently doubled before using it, and watch for the dough to become obviously puffy and aerated.
If your bread spread instead of rising up: Your dough was over-fermented. It was ready before you baked it, so it ran out of oomph. Start checking for readiness around 4 hours.
If your crust cracked unevenly: The oven temperature might have been too high, or you scored too deep. Reduce oven temp by 25°F or score more shallowly next time.
Final Thoughts
The satisfaction of pulling a beautiful, fragrant loaf from your oven never gets old — even after you’ve made bread dozens of times. Each of these ten recipes approaches bread from a different angle: some rely on time and fermentation, others on technique and enrichment, and some on speed and simplicity. The wonderful thing about home bread baking is that you don’t need to choose just one. As your confidence grows, you’ll find yourself naturally gravitating toward the methods that fit your schedule and your personality.
The breads that take the longest (sourdough, no-knead artisan bread) actually require the least active work from you. The breads that come together fastest (Irish brown bread, dinner rolls) rely on different chemistry. Some are perfect for learning fundamental technique (sandwich bread, brioche), while others teach you that there are multiple valid approaches to the same goal.
The real secret to becoming a great bread baker isn’t memorizing recipes or investing in special equipment. It’s paying attention. Watch how your dough changes. Notice how humidity affects fermentation in your specific kitchen. Taste your bread and adjust salt, hydration, or fermentation time based on what you actually prefer, not what someone else’s recipe dictates. Trust that bread is fundamentally forgiving — it wants to be baked, and it will succeed in your hands far more often than it fails.
Pick one recipe that speaks to you, gather your ingredients, and start baking. The bread will teach you everything else you need to know.