Forget about those mass-produced pickles sitting in grocery store aisles for months. Homemade refrigerator pickles are ready to eat within hours, taste exponentially fresher, and cost a fraction of what you’d pay for premium brands. The best part? You need no fancy canning equipment, no pressure cooker, no boiling water bath, and no sterilization process. Just a jar, some vegetables, a quick brine, and your refrigerator does the rest of the work while you sleep.
Refrigerator pickling is one of those kitchen skills that feels like a professional-level trick but is actually simpler than making pasta. The acid in vinegar and the salt in the brine work together to preserve vegetables and develop complex flavors that deepen over time. Unlike traditional canning, refrigerator pickles don’t require you to master temperature control, jar sealing techniques, or processing time calculations. They’re genuinely foolproof, and once you make your first batch, you’ll wonder why you ever bought pickles at the store again.
The magic happens because the vinegar immediately begins breaking down the vegetable’s cell walls, softening the texture while the salt draws out moisture and builds flavor. Within 24 hours, you’ve got pickles that taste tangy and crisp. By day three or four, the flavors have mellowed and integrated, creating something truly special. Different vegetables respond differently to pickling—cucumbers stay crisp, peppers develop deep sweetness, green beans remain snappy, and onions soften into tender silvers that work beautifully on sandwiches and tacos.
What makes refrigerator pickling even better is how customizable it is. That basic brine of vinegar, water, salt, and sugar becomes a canvas for your favorite spices, herbs, and aromatics. Dill and garlic are the classics for a reason, but horseradish, ginger, mustard seeds, coriander, peppercorns, and fresh herbs open up entirely new flavor possibilities. You can make a gentle bread-and-butter style pickle one week and an aggressively spicy pickle the next. The vegetables you choose matter too—while cucumbers are the obvious choice, you can pickle almost anything: jalapeños, bell peppers, green beans, carrots, cauliflower, red onions, radishes, and even Brussels sprouts.
Storage is wonderfully simple. Refrigerator pickles keep for about three to four weeks in the fridge, giving you plenty of time to enjoy them. They won’t last forever like shelf-stable canned pickles, but honestly, they rarely stick around that long. Once you taste a batch of homemade pickles after just two days of pickling, you’ll start using them on sandwiches, in salads, chopped into potato salads, alongside charcuterie boards, or eaten straight from the jar as an addictive, no-guilt snack.
The ten recipes below cover the full spectrum of pickle possibilities—from dead-simple classic dill to adventurous flavor combinations that will make you rethink what pickles can be. Each one is genuinely easy, genuinely fast, and genuinely delicious. Pick your favorite flavor profile and start there, but I’d encourage you to make all ten over the next few months. You’ll quickly develop favorites and discover which pickles work best with your regular cooking rotation.
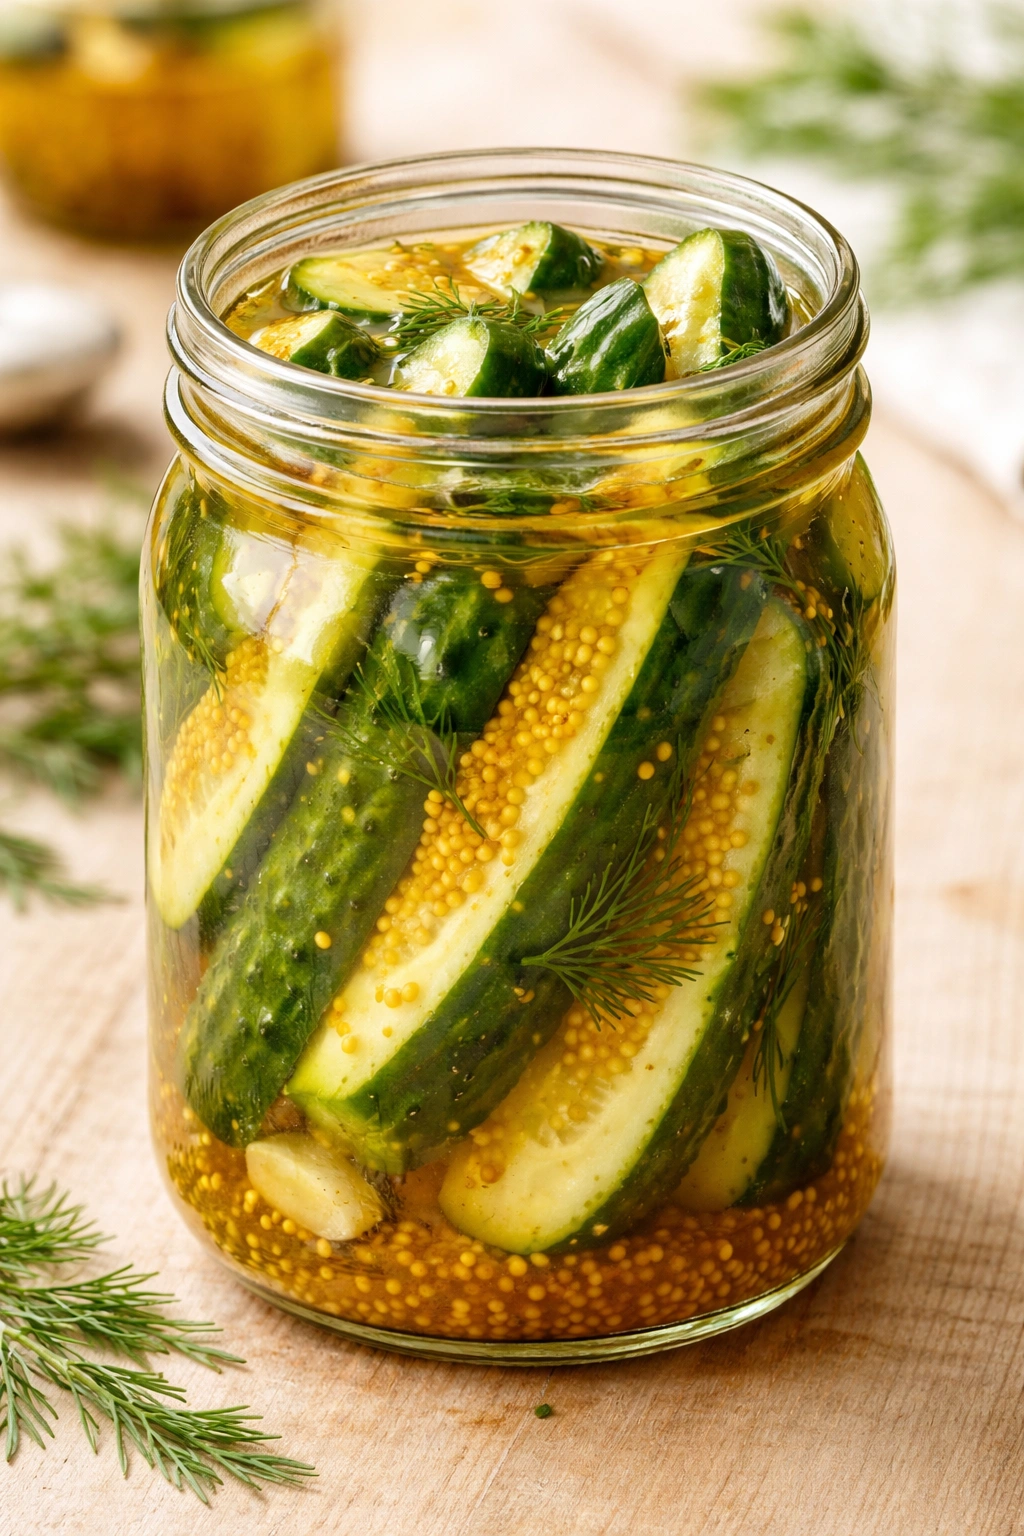
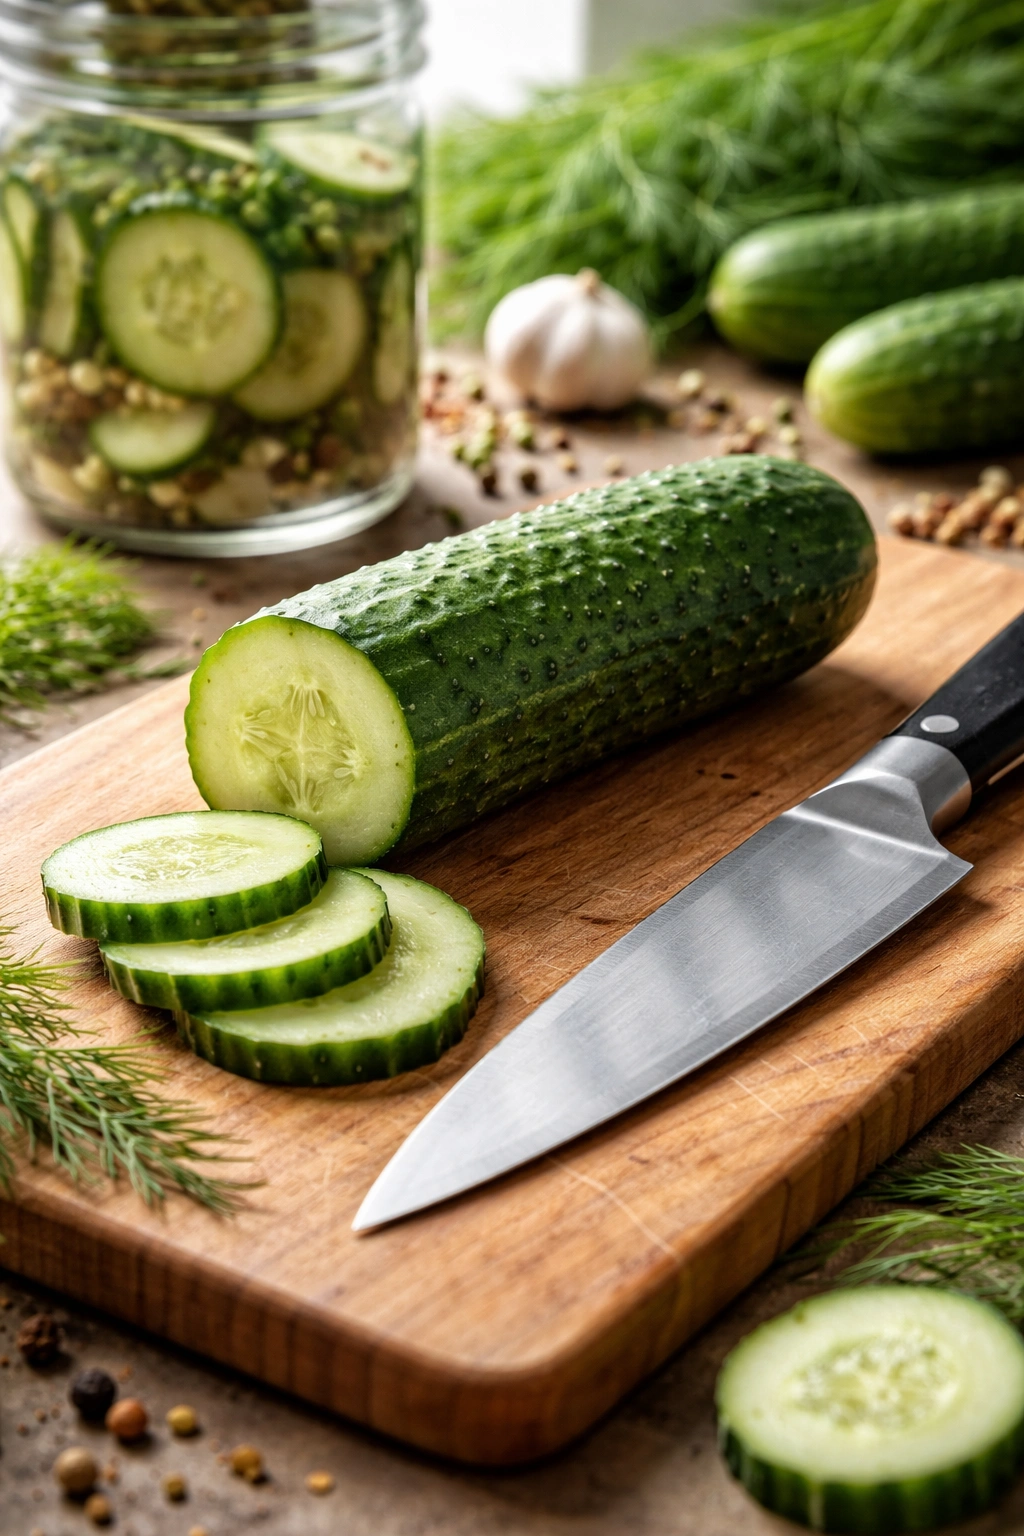
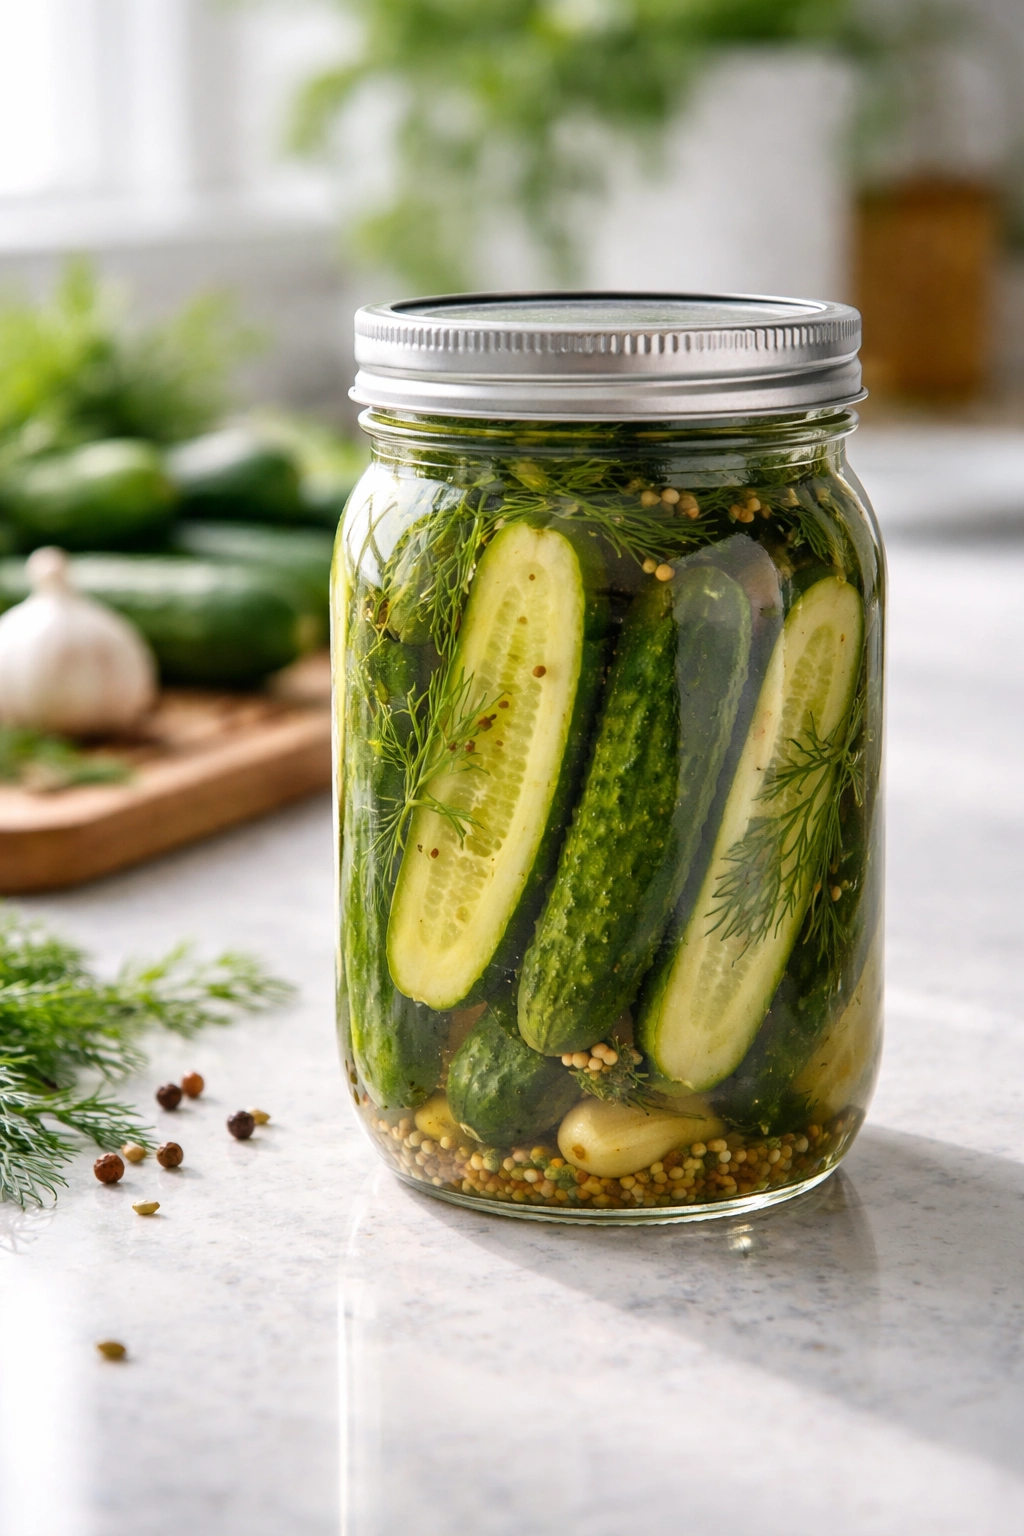
1. Classic Dill Pickles
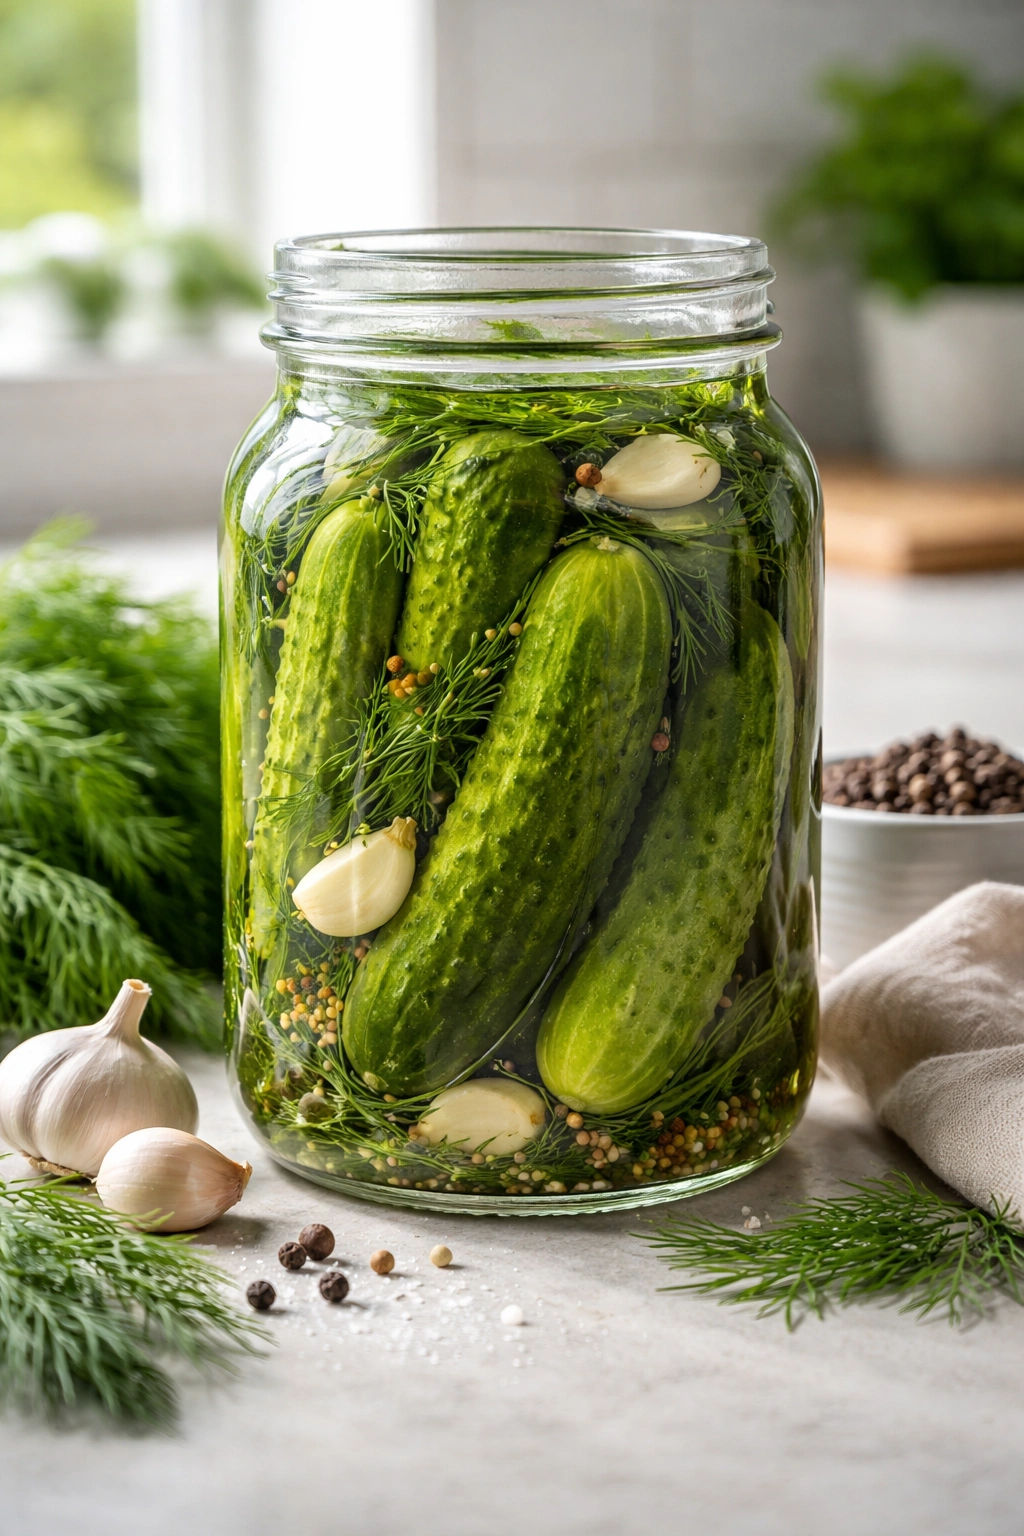
This is the recipe that got me hooked on homemade pickling. It’s straightforward, it tastes like a proper deli pickle, and it demonstrates perfectly how little fuss the whole process actually is. The combination of fresh dill, garlic, and a traditional vinegar-based brine creates something that tastes like it came from a high-end grocery store, except it cost about a quarter of that price.
Yield: Makes one 32-ounce jar (about 8-10 pickle spears) Prep Time: 15 minutes Cook Time: 5 minutes (for the brine) Total Time: 20 minutes active + 24 hours chilling before eating Difficulty: Beginner — no special skills required, just basic measuring and jar assembly.
For the Pickles:
- 1½ pounds pickling cucumbers (or small Persian cucumbers), cut into spears or left whole if finger-size
- 4-5 sprigs fresh dill (or 2 tablespoons dried dill if fresh is unavailable)
- 4 cloves garlic, peeled and smashed
- 1 teaspoon black peppercorns
- ½ teaspoon mustard seeds (optional but recommended)
- 1 dried red chili or ¼ teaspoon red pepper flakes (optional, for gentle heat)
For the Brine:
- 1 cup white vinegar (5% acidity)
- ¾ cup water
- 2 tablespoons kosher salt
- 1 tablespoon granulated sugar
- 1 bay leaf
Preparing the Brine
-
In a small saucepan, combine the vinegar, water, salt, sugar, and bay leaf. Bring to a boil over medium-high heat, stirring occasionally until the salt and sugar dissolve completely — this takes about 3 to 4 minutes. You’ll know it’s ready when there are no grainy particles visible at the bottom of the pan and the liquid looks clear.
-
Once the brine reaches a rolling boil, remove the pan from heat and let it cool for 3 to 5 minutes. This brief cooling prevents the heat from softening your cucumbers too much when you pour it in.
Assembling the Pickle Jar
-
While the brine cools, pack a clean 32-ounce glass jar (a quart-size mason jar is perfect) with the prepared cucumbers standing upright, arranging them as tightly as possible without crushing them. They should take up about three-quarters of the jar.
-
Distribute the dill, garlic cloves, peppercorns, mustard seeds, and chili pepper evenly among the cucumbers, nestling them into the spaces between the spears. This distribution of flavorings matters — you want each bite to have a bit of everything.
-
Pour the warm brine slowly over the cucumbers until they’re completely submerged and the jar is filled to about ½ inch from the top. Make sure no cucumber pieces stick above the brine line — any part exposed to air can develop mold or spoilage.
-
Let the jar cool completely to room temperature on the counter, which takes 30 minutes to an hour. Once cooled, cover the jar with a tight-fitting lid (plastic or metal lids both work fine for refrigerator pickles) and transfer it to the refrigerator.
Flavor Development Timeline
The pickles will be technically “ready” within 12 hours — you can eat them then if you’re impatient. However, they taste noticeably better after 24 hours when the brine has fully penetrated the cucumber flesh and the flavors have started to integrate. By day three, the dill flavor becomes more pronounced and the overall taste reaches its peak. They’ll stay crisp and delicious for about three to four weeks in the refrigerator, though they do gradually soften the longer they sit.
Pro tip: Reserve the brine once you’ve eaten most of the pickles. You can use that flavored vinegar to make a second batch of pickles with fresh cucumbers — just heat it once more, let it cool, and pour it over new vegetables. It’s a money-saving trick that works beautifully.
Real talk: The texture of your finished pickles depends heavily on how fresh your cucumbers are when you pickle them. Buy them the day you plan to pickle, or at most the day before. Older cucumbers that have been sitting in the grocery store produce section for days will never develop the crisp, snappy texture you’re after — they’ll be more mushy, no matter what you do.
2. Spicy Garlic Pickles
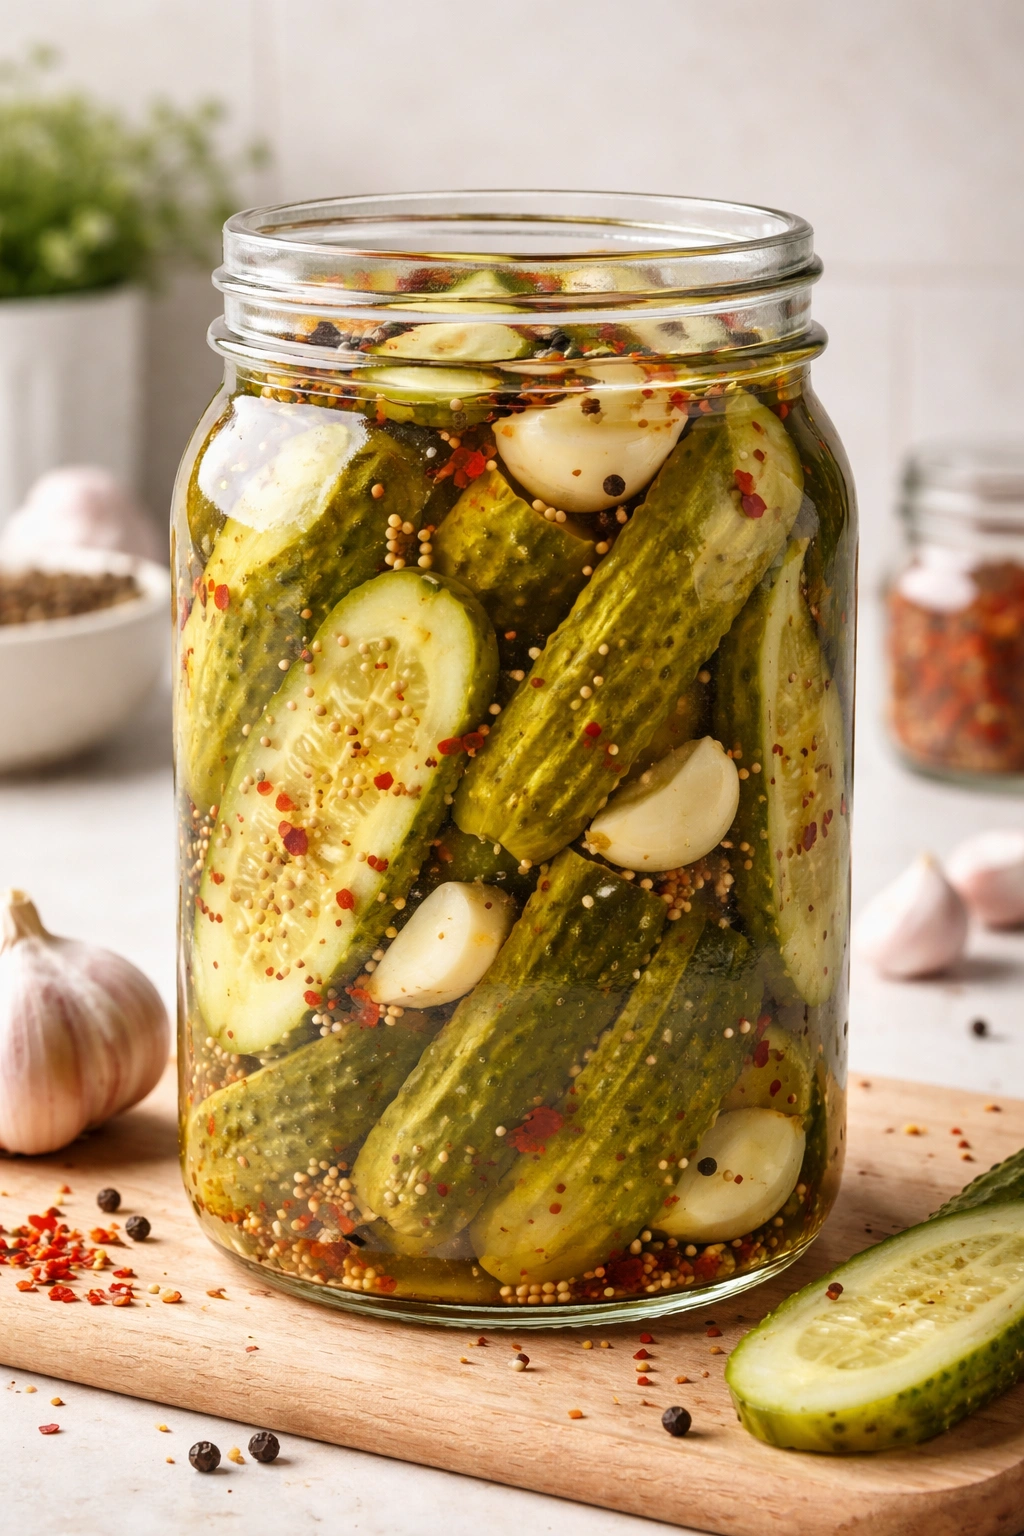
If you like your pickles with a persistent heat that builds with each bite, this recipe is your answer. It’s not aggressively fiery — the spice comes from black pepper and red pepper flakes working together rather than from anything that will make you sweat — but it’s definitely got character. The heavy garlic presence makes these perfect for sandwiches, or honestly, just eating straight from the jar while standing in front of the fridge.
Yield: Makes one 32-ounce jar Prep Time: 15 minutes Cook Time: 5 minutes (for the brine) Total Time: 20 minutes active + 24 hours chilling Difficulty: Beginner — the ingredients are straightforward, assembly is the same as the classic version.
For the Pickles:
- 1½ pounds pickling cucumbers, cut into spears
- 8 cloves garlic, peeled and left whole (yes, really — this is a garlic-forward pickle)
- 1½ teaspoons black peppercorns
- 1 teaspoon crushed red pepper flakes
- ¾ teaspoon mustard seeds
- 2 sprigs fresh thyme or ½ teaspoon dried thyme
- 3-4 whole dried chilis or 2 fresh jalapeños, sliced
For the Brine:
- 1 cup distilled white vinegar
- ¾ cup water
- 2 tablespoons kosher salt
- 1 tablespoon sugar
- 1 teaspoon whole coriander seeds
Making and Pouring the Brine
-
Combine the vinegar, water, kosher salt, sugar, and coriander seeds in a saucepan. Bring to a boil over medium-high heat, stirring occasionally. Once boiling and the salt and sugar have dissolved, remove from heat and let cool for 3 to 5 minutes.
-
Pack the cucumbers upright into a clean 32-ounce jar. Distribute the garlic cloves, black peppercorns, red pepper flakes, mustard seeds, thyme, and dried chilis throughout the jar, making sure the spices and aromatics are spread evenly rather than clumped in one area.
-
Pour the warm brine over everything, making sure no cucumber pieces poke above the liquid level. Cool completely, cover tightly, and refrigerate.
Why the Garlic Is Extra Here
Unlike the classic dill version, this recipe uses nearly double the garlic. Eight cloves might sound like a lot, but garlic actually mellows and sweetens considerably during pickling. It won’t taste aggressively pungent — instead, it develops a mellow, almost caramelized quality that complements the spice beautifully. The garlic cloves themselves also soften and become almost candy-like, and many people eat them along with the pickles.
Heads up: The fresh jalapeños, if you choose to use them instead of dried chilis, will slowly soften in the brine and develop a slightly sweet undertone. If you prefer spice that stays sharp, stick with dried chilis instead, which maintain their heat character throughout the pickling process.
Excellent pairing: These spicy garlic pickles are absolutely stunning alongside smoked meats, on charcuterie boards, or chopped into a taco filling. The garlic-and-spice combo plays really well with beef, pork, and smoked turkey.
3. Bread and Butter Pickles
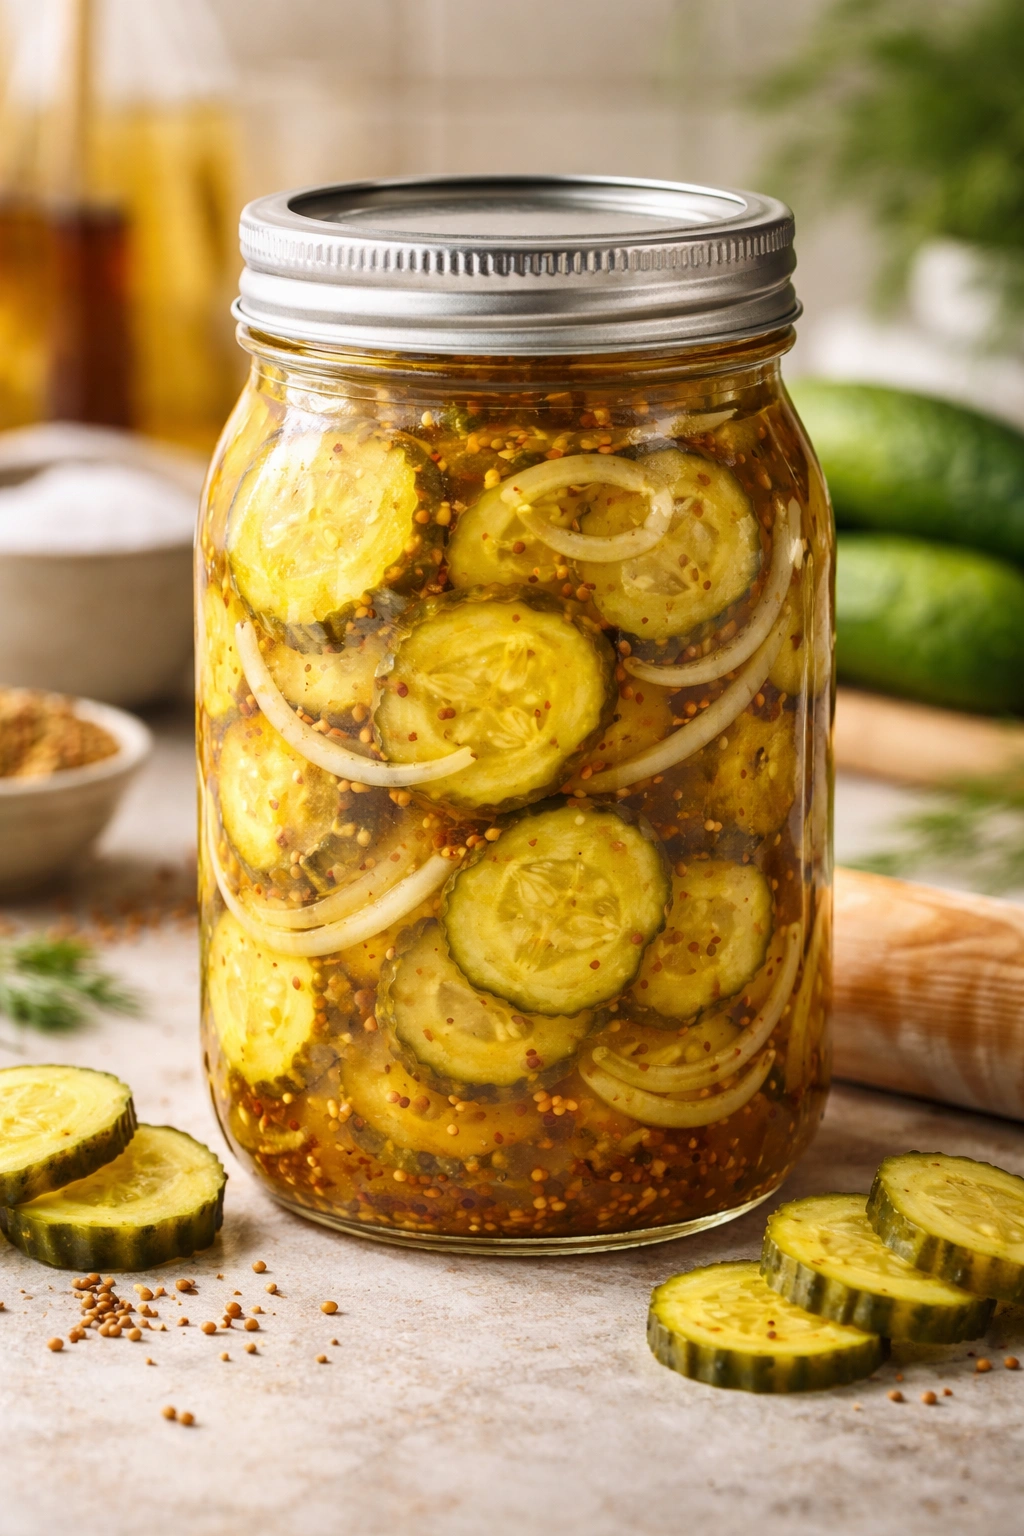
This is the recipe for people who think they don’t like pickles, or who prefer something sweet and tangy rather than purely sour. Bread and butter pickles have a genuine following for a reason — they’re versatile, approachable, and genuinely delicious on pulled pork sandwiches, alongside burgers, or mixed into potato salad. The sugar content is noticeably higher than in classic dill pickles, creating a balanced sweet-sour profile that’s almost addictive.
Yield: Makes one 32-ounce jar Prep Time: 20 minutes Cook Time: 8 minutes (for the brine) Total Time: 30 minutes active + 12 hours chilling Difficulty: Beginner — slightly more ingredients but identical technique to the classic version.
For the Pickles:
- 1½ pounds pickling cucumbers, cut into ¼-inch-thick rounds (you want coins, not spears)
- 1 medium yellow onion, sliced into thin rings
- 4 cloves garlic, peeled and sliced thin
- 1 teaspoon mustard seeds
- ½ teaspoon turmeric
- ¼ teaspoon ground coriander
- 3-4 whole cloves
For the Brine:
- ¾ cup white vinegar
- ¾ cup apple cider vinegar (or all white vinegar if you prefer)
- ¾ cup water
- ½ cup granulated sugar
- 3 tablespoons kosher salt
- 1 tablespoon honey
Building the Brine with Multiple Sweeteners
- In a saucepan, combine both vinegars, the water, sugar, salt, and honey. Bring to a boil over medium heat, stirring occasionally. Once the sugar and salt have completely dissolved and the mixture is at a rolling boil, remove from heat and let cool for 5 minutes.
Layering the Jar for Even Flavor Distribution
-
Cut the cucumbers into thin round slices — thickness matters here because you want each coin to have maximum surface area for the brine to penetrate. Thinner slices also give you a nicer texture in the finished pickle.
-
In your clean jar, begin layering: a layer of cucumber slices, then some of the onion rings and garlic slices, then a small sprinkle of mustard seeds, turmeric, coriander, and a couple of whole cloves. Repeat this layering pattern until the jar is about three-quarters full, ending with a final layer of cucumbers.
-
Pour the warm brine slowly over everything until the jar is filled to ½ inch from the top. Make sure every slice is submerged. Cool completely, cover, and refrigerate.
Texture and Flavor Notes
Bread and butter pickles take on their best texture and flavor after about 12 hours, though they’re definitely edible after 6-8 hours if you’re impatient. The onions will soften considerably and develop a sweet, mild flavor that complements the cucumber slices. The turmeric gives them a subtle earthy undertone and a slightly golden color, while the whole cloves provide little bursts of warm spice if you bite into one.
Pro tip: The thin slices mean these pickles soften more quickly than spear-style pickles. They’re best eaten within 2-3 weeks rather than the full month you get with other styles. After that, they’re still safe to eat but become noticeably softer in texture.
Serving idea: These are absolutely phenomenal chopped and stirred into tuna or chicken salad, spread across pulled pork, or served alongside smoked brisket sandwiches. The sweetness balances out the savory-smoky flavors beautifully.
4. Dill and Horseradish Pickles

Here’s the pickle recipe for people who want genuine punch and intensity. Horseradish brings a sharp, nasal-clearing heat that’s completely different from chili pepper spice — it’s almost floral and certainly memorable. Combined with fresh dill and a heavy garlic presence, these pickles taste like a deli-quality spicy dill but with an extra layer of complexity that most people can’t quite identify until you tell them it’s horseradish.
Yield: Makes one 32-ounce jar Prep Time: 15 minutes Cook Time: 5 minutes (for the brine) Total Time: 20 minutes active + 24 hours chilling Difficulty: Beginner — horseradish is the only slightly unusual ingredient, but it’s readily available and easy to use.
For the Pickles:
- 1½ pounds pickling cucumbers, cut into spears
- 3-4 sprigs fresh dill (or 1½ tablespoons dried)
- 5 cloves garlic, peeled and smashed
- 2-3 tablespoons freshly grated horseradish (or 2 tablespoons prepared horseradish if fresh is unavailable)
- 1 teaspoon black peppercorns
- ½ teaspoon mustard seeds
- 1 small dried chili or ¼ teaspoon red pepper flakes (optional)
- 1 bay leaf
For the Brine:
- 1 cup white vinegar
- ¾ cup water
- 2 tablespoons kosher salt
- 1 tablespoon sugar
Using Horseradish Properly
-
If you’re using fresh horseradish root, peel it and grate it on the finest setting of your box grater or with a microplane — do this right before assembling the pickles so the horseradish stays as pungent as possible. Fresh horseradish loses its bite quickly once grated. If using prepared horseradish from a jar, use about 2 tablespoons and drain off any excess liquid so you don’t dilute the brine.
-
Make the brine by combining vinegar, water, salt, and sugar in a saucepan. Bring to a boil, stirring until the salt and sugar dissolve, then remove from heat and let cool for a few minutes.
Assembling the Jar
-
Pack the cucumber spears upright into a clean jar. Distribute the fresh dill, smashed garlic cloves, horseradish, peppercorns, mustard seeds, chili, and bay leaf throughout, mixing them so that you’ll get a bit of each component in every bite.
-
Pour the warm brine slowly over everything until fully submerged. Cool completely, cover, and refrigerate.
The Horseradish Flavor Arc
These pickles have a very noticeable horseradish kick immediately — within 12 hours, you’ll definitely taste it. By day two, the horseradish flavor has integrated with the dill and garlic, creating something that’s complex rather than aggressively sharp. By day four or five, the flavors have mellowed slightly and developed real cohesion. These pickles are excellent for the full three to four weeks they keep, though they soften more noticeably in the third week.
Important note: Prepared horseradish (from a jar) contains vinegar and salt already, so if you use that instead of fresh, reduce the salt in the brine by about ½ teaspoon to avoid an overly salty result.
Best use: These are phenomenal on beef sandwiches, alongside corned beef, or eaten straight. They’re also incredible finely chopped and stirred into deviled egg filling or potato salad for unexpected depth.
5. Spicy Jalapeño Pickles
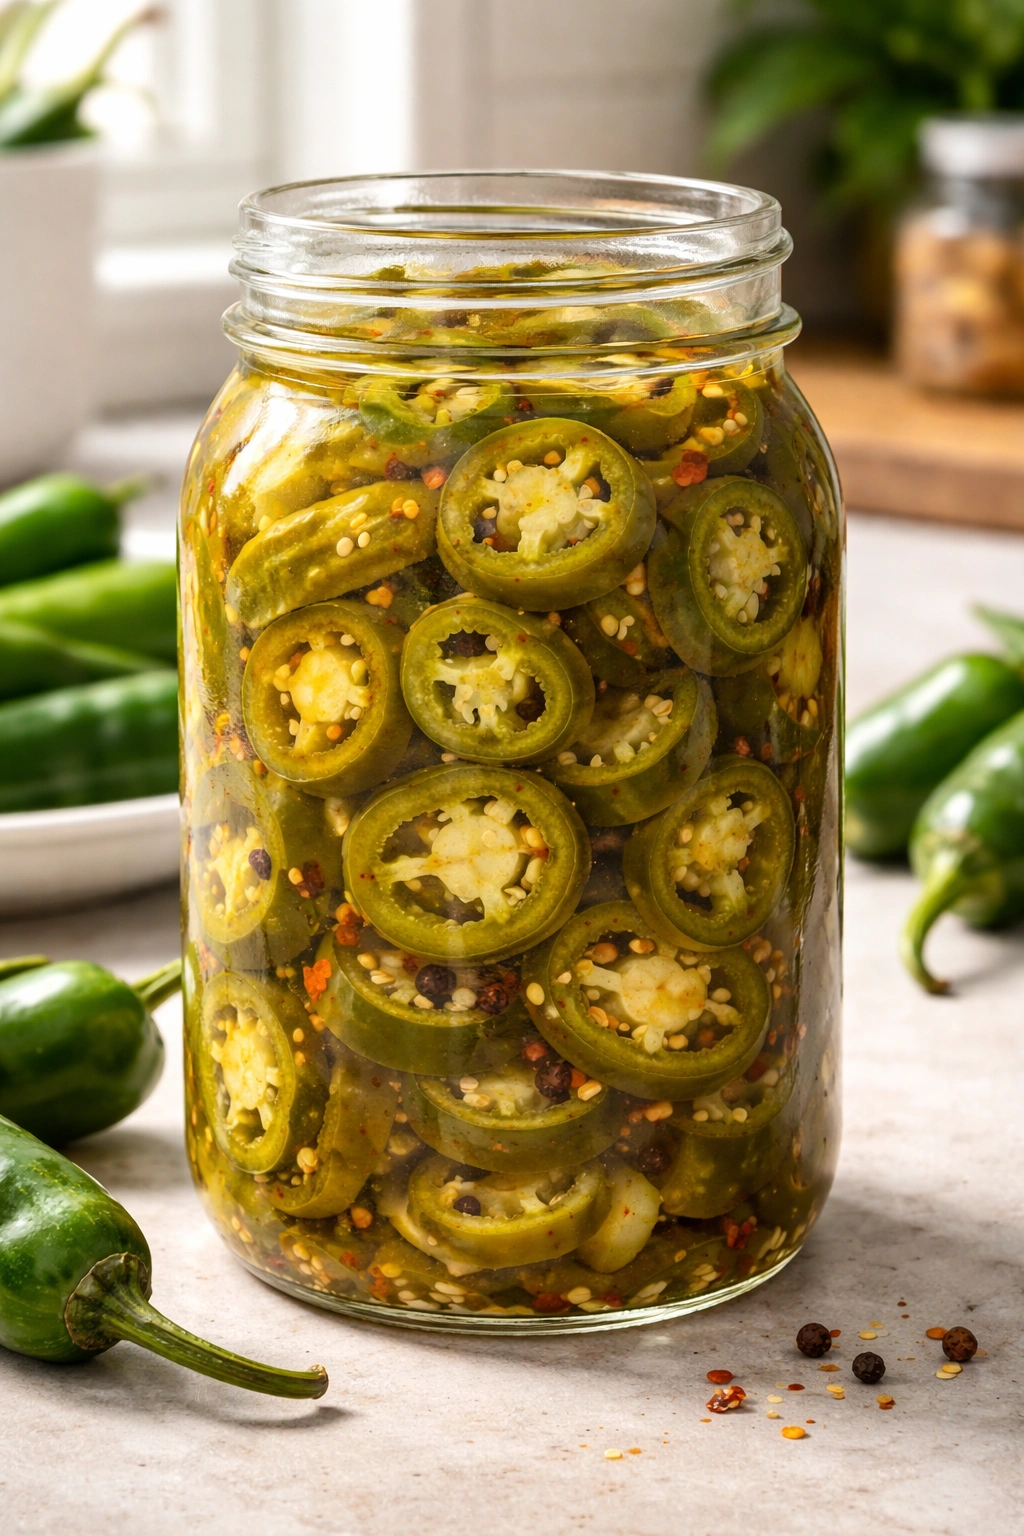
Sometimes you don’t want cucumber pickles at all — you want something that’ll add real heat and flavor to tacos, nachos, sandwiches, or pizza. Pickled jalapeños are the answer, and they’re easier to make than any cucumber pickle. The whole process is identical, but the results are completely different because jalapeños have so much more natural flavor and character than cucumbers. These become a condiment you’ll reach for constantly once you realize how fresh-tasting and customizable they are.
Yield: Makes one 32-ounce jar (about 15-20 jalapeño halves) Prep Time: 15 minutes Cook Time: 5 minutes (for the brine) Total Time: 20 minutes active + 12 hours chilling Difficulty: Beginner — the only difference from cucumber pickling is your vegetable choice and the slicing approach.
For the Pickles:
- 1 pound fresh jalapeños (about 12-15 medium peppers), sliced into rings, seeds and membranes removed (optional — keep them for more heat)
- 6 cloves garlic, peeled and sliced thin
- 1 teaspoon mustard seeds
- ½ teaspoon cumin seeds
- ¼ teaspoon coriander seeds
- 4-5 whole peppercorns
- 2-3 sprigs fresh cilantro (optional)
- ½ white onion, sliced thin (optional but adds sweetness)
For the Brine:
- 1 cup white vinegar
- ¾ cup water
- 2 tablespoons kosher salt
- 2 tablespoons sugar (the extra tablespoon creates balance with the jalapeños’ natural heat)
- 1 bay leaf
Preparing the Jalapeños
-
Wearing gloves (jalapeño oils will irritate your eyes and skin), wash the jalapeños and pat them dry. Slice them into rings about ¼ inch thick. For milder pickles, scrape out the seeds and remove the white membrane inside — this is where most of the heat lives. For spicier pickles, leave some or all of the seeds in place.
-
Make the brine by combining vinegar, water, salt, sugar, and bay leaf in a saucepan. Bring to a boil, stirring occasionally, then remove from heat and let cool for 3-5 minutes.
Building the Jar
-
In your clean jar, layer the jalapeño rings with the sliced garlic, mustard seeds, cumin seeds, coriander seeds, peppercorns, cilantro, and onion slices. Mix them fairly evenly so each layer is balanced. The spices settle, so try to distribute them throughout the jar rather than having them all float to the bottom.
-
Pour the warm brine slowly over the jalapeños until the jar is full to ½ inch from the top. Every pepper slice must be submerged. Cool completely, cover tightly, and refrigerate.
Timing and Heat Development
Pickled jalapeños are edible within 6-8 hours, but they’re genuinely better after 12 hours when the brine has penetrated fully. The initial heat is sharp and immediate, but by day three, the heat has mellowed slightly while the vinegar-spice flavor has deepened. These stay crisp and flavorful for three to four weeks in the refrigerator, though they do gradually soften over time — they’re best in the first two weeks.
Flavor secret: The cumin and coriander seeds add a subtle warmth and earthiness that makes these pickles work beautifully in Mexican food contexts — tacos, nachos, ceviche, or chilaquiles. Without those spices, they’re just hot pickles. With them, they’re a complete condiment.
Pro application: Chop these finely and stir them into cream cheese for a spicy pepper spread, use them to top deviled eggs, or add them to guacamole for immediate upgrade. They’re also phenomenal on charcuterie boards.
6. Herb Garden Pickles
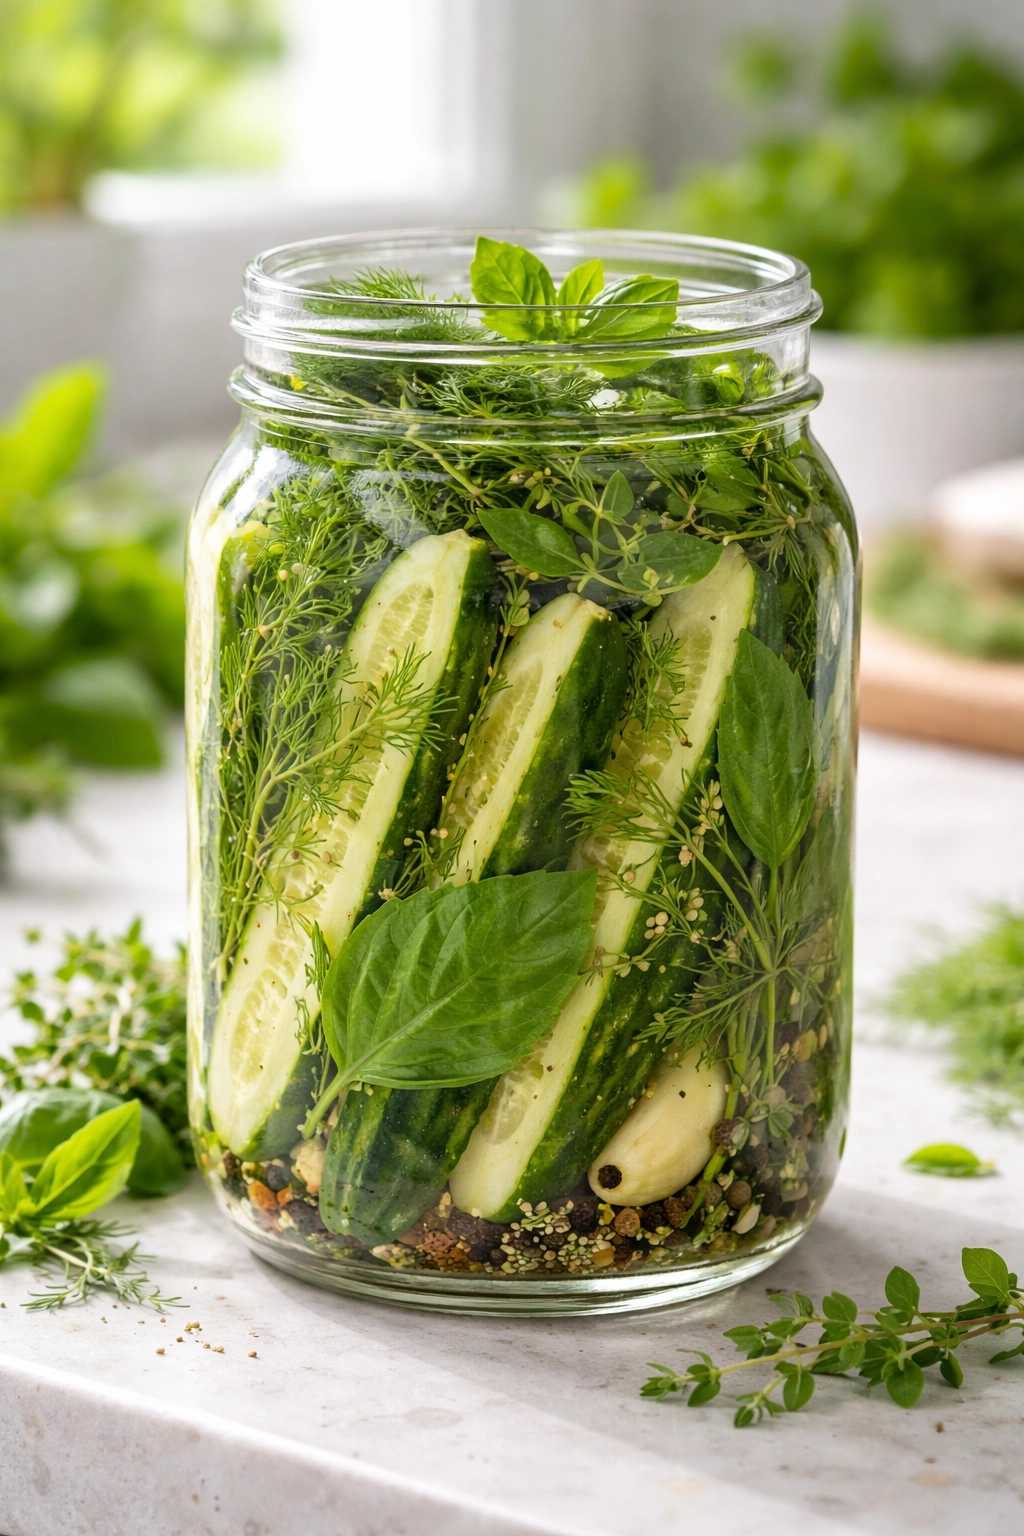
This is the recipe for herb lovers and gardeners. Instead of focusing on one or two herbs, this pickle celebrates fresh herbs in all their glory — dill, basil, oregano, and thyme work together to create something that tastes like a gourmet pickle. If you grow herbs, this is the perfect way to use them at peak season. Even without a garden, fresh herbs from the grocery store produce section create something that tastes like it cost thirty dollars a jar.
Yield: Makes one 32-ounce jar Prep Time: 20 minutes Cook Time: 5 minutes (for the brine) Total Time: 25 minutes active + 24 hours chilling Difficulty: Beginner — straightforward assembly, just with more fresh herbs than usual.
For the Pickles:
- 1½ pounds pickling cucumbers, cut into spears
- 2-3 sprigs fresh dill
- 4-5 fresh basil leaves (tear them slightly so they release more flavor)
- 3-4 sprigs fresh oregano
- 2-3 sprigs fresh thyme
- 4 cloves garlic, peeled and sliced thin
- 1 teaspoon black peppercorns
- ½ teaspoon mustard seeds
- 4-5 fresh chive blades or ½ small white onion, thinly sliced
- 1 small dried chili (optional)
For the Brine:
- 1 cup white vinegar
- ¾ cup water
- 2 tablespoons kosher salt
- 1 tablespoon sugar
- ½ teaspoon whole coriander seeds
Using Fresh Herbs in Pickling
-
Fresh herbs will gradually darken and lose their vibrant color during pickling — this is normal and doesn’t affect the flavor. If you want them to maintain their green color for visual appeal, add them after the brine is poured in, placing them near the top where they’re partially exposed to less heat. They’ll still pick up flavor.
-
Make the brine by combining vinegar, water, salt, sugar, and coriander seeds in a saucepan. Bring to a boil, stirring occasionally, then remove from heat and let cool.
Layering with Herbs
-
Pack the cucumber spears upright into your jar. Layer the fresh herbs, garlic, peppercorns, mustard seeds, chives, and chili throughout the jar, distributing them as evenly as possible. Don’t cram them all in one area — the goal is that every pickle spear has access to the herb flavors.
-
Pour the warm brine slowly over everything, making sure all cucumbers are fully submerged. Cool completely, cover, and refrigerate.
Herb Flavor Development
These pickles taste distinctly herbal by 24 hours and absolutely incredible by day three. The basil will develop the most noticeable flavor, followed by the dill. The oregano and thyme contribute a subtle, complex background note that most people can’t specifically identify but definitely taste. By the end of the first week, the herb flavors have integrated completely and created something that tastes intentional and sophisticated.
Substitution note: Use whatever fresh herbs you have available or prefer. Chervil, parsley, tarragon, or fennel fronds all work beautifully. Avoid mint or other overly strong herbs that might overpower the pickle. Stick to the classic Mediterranean herbs for the best results.
Creative serving: These herb-forward pickles are absolutely stunning with soft cheeses on a charcuterie board, alongside grilled fish or chicken, or chopped into a fresh salad. They’re particularly wonderful with Mediterranean flavors — serve them with feta, olives, and fresh bread.
7. Honey Mustard Pickles
If you love the tangy-sweet flavor of honey mustard dressing, you’ll be obsessed with these pickles. They balance vinegar tang with the mellowness of honey while mustard seeds provide background spice and texture. The result is something that tastes almost like a condiment itself — you can eat these straight, use them on sandwiches, or chop them to make a quick relish for hot dogs and burgers.
Yield: Makes one 32-ounce jar Prep Time: 15 minutes Cook Time: 5 minutes (for the brine) Total Time: 20 minutes active + 18 hours chilling Difficulty: Beginner — the brine has slightly more ingredients than the classic version but is just as easy to prepare.
For the Pickles:
- 1½ pounds pickling cucumbers, cut into spears
- 4 cloves garlic, peeled and smashed
- 1½ teaspoons mustard seeds
- ½ teaspoon yellow mustard powder (optional but adds intensity)
- 1 teaspoon black peppercorns
- ½ teaspoon fennel seeds (optional, adds licorice note)
- 1 bay leaf
- 2-3 fresh dill sprigs or ½ teaspoon dried dill
For the Brine:
- ¾ cup white vinegar
- ¾ cup water
- 2 tablespoons kosher salt
- 3 tablespoons honey (this is more than usual — it’s essential to the flavor)
- 1 tablespoon whole grain mustard
- ½ tablespoon Dijon mustard
Making a Mustard-Honey Brine
-
In a saucepan, combine the white vinegar, water, and kosher salt. Bring to a boil, stirring occasionally. Once the salt has dissolved, reduce heat to low and whisk in the honey and both mustards until fully incorporated and smooth. If lumps of mustard form, whisk more vigorously or let the mixture cool slightly before whisking again. Don’t skip the whisking — you want these ingredients fully combined.
-
Once the brine is smooth and combined, remove from heat and let cool for 5 minutes.
Assembling and Flavoring
-
Pack the cucumber spears tightly into your clean jar. Distribute the smashed garlic, mustard seeds, mustard powder, black peppercorns, fennel seeds, bay leaf, and dill throughout the jar, mixing them in evenly.
-
Pour the warm honey-mustard brine slowly over the cucumbers, making sure they’re fully submerged. Cool completely, cover, and refrigerate.
Advertisements
Flavor Profile and Timing
These pickles taste good within 18 hours, but they’re genuinely better after 24 hours when the mustard flavor has had time to develop. The honey comes through as a mellow sweetness rather than obvious sugar flavor — it balances the vinegar’s acidity beautifully. By day three, the flavors have completely integrated and created something that tastes refined and intentional. These maintain their flavor well for three to four weeks in the refrigerator.
Storage note: If you notice the brine becoming slightly cloudy after a week or so, that’s the mustard settling and is completely normal. Just give the jar a gentle shake before serving to redistribute it.
Serving suggestion: These are outstanding on pulled pork sandwiches, alongside smoked meats, or chopped and stirred into a mayo-based sandwich spread. They’re also wonderful alongside aged cheeses on a board.
8. Ginger-Turmeric Pickles
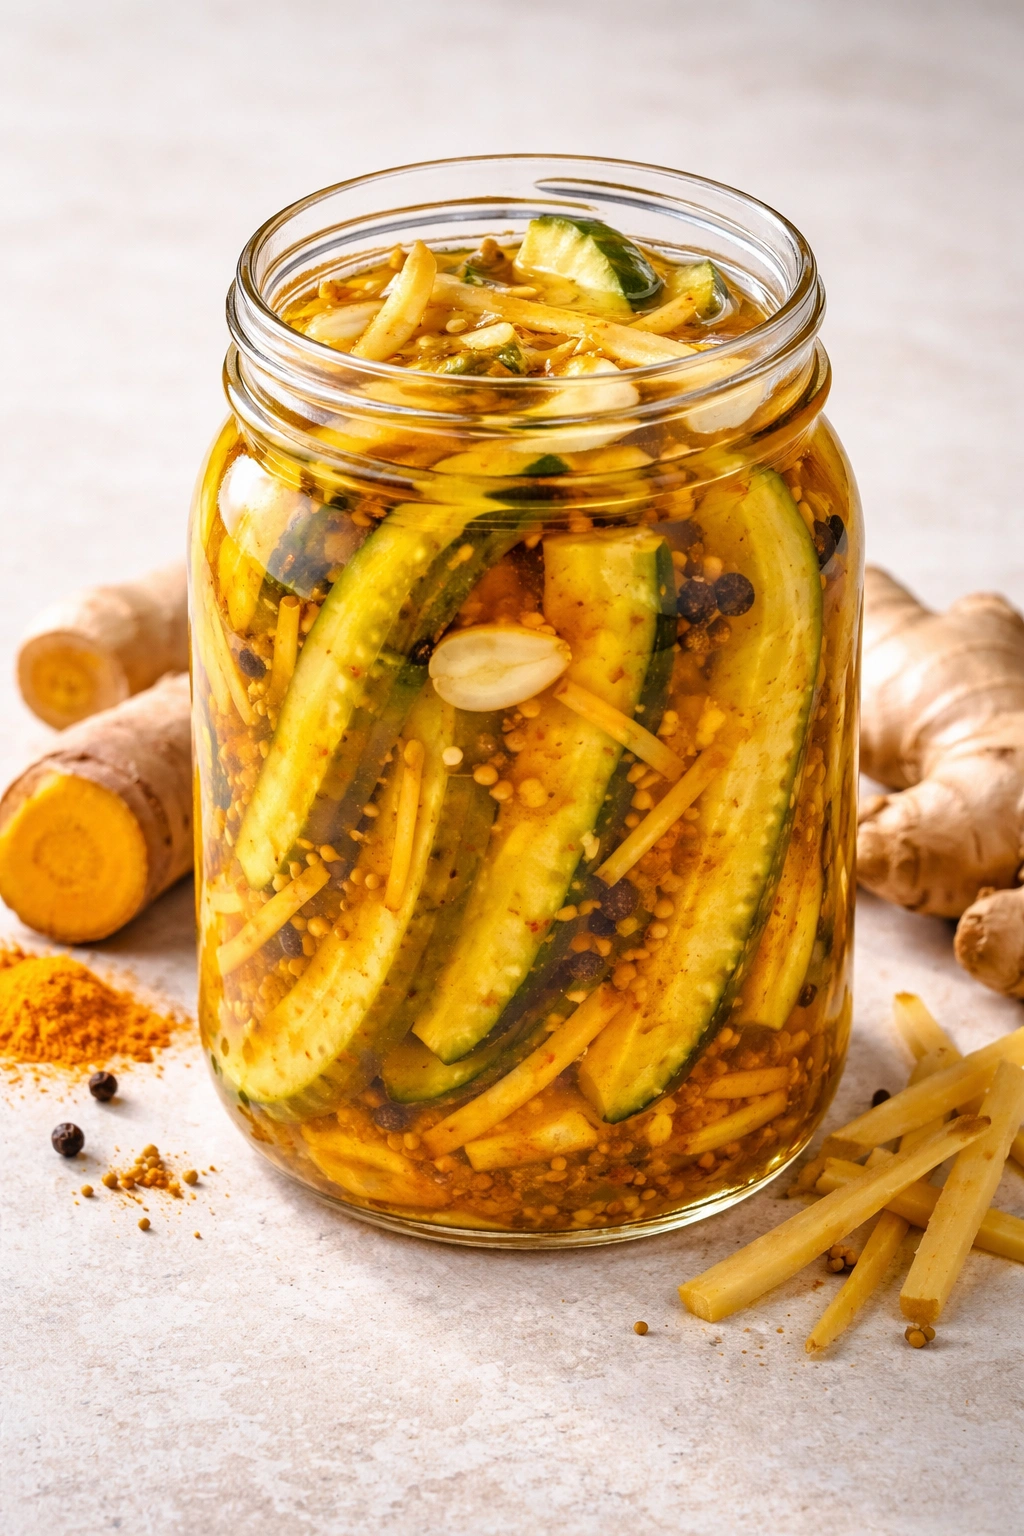
This is the pickle recipe that tastes exotic and sophisticated but is absolutely as easy as every other refrigerator pickle. The ginger brings bright, warm spice while turmeric adds earthy complexity and a beautiful golden color. If you’ve ever enjoyed ginger ale or turmeric lattes, you’ll recognize those flavor families here, but in a pickle context they create something uniquely interesting. These are particularly wonderful if you’re interested in the inflammation-fighting properties of turmeric — fresh ginger and turmeric together are powerful anti-inflammatory ingredients.
Yield: Makes one 32-ounce jar Prep Time: 20 minutes (includes ginger prep) Cook Time: 5 minutes (for the brine) Total Time: 25 minutes active + 24 hours chilling Difficulty: Beginner — the only skill required is basic vegetable prep, and you probably already have ginger at home.
For the Pickles:
- 1½ pounds pickling cucumbers, cut into spears
- 3 tablespoons fresh ginger, peeled and cut into thin matchsticks
- 4 cloves garlic, peeled and sliced
- 1 tablespoon ground turmeric (yes, 1 full tablespoon — this is what creates the golden color and earthy flavor)
- ½ teaspoon black peppercorns
- ½ teaspoon mustard seeds
- 4-5 whole coriander seeds
- 1 dried red chili or ¼ teaspoon red pepper flakes
- 2-3 fresh thyme sprigs or ½ teaspoon dried thyme
For the Brine:
- 1 cup white vinegar
- ¾ cup water
- 2 tablespoons kosher salt
- 1 tablespoon sugar
- 1 bay leaf
Preparing Fresh Ginger
-
Peel a piece of fresh ginger about the size of your thumb with the edge of a spoon (this removes the skin more effectively than a knife). Cut the peeled ginger into thin matchsticks about the thickness of toothpicks and 1-2 inches long. Fresh ginger cut this way releases more flavor than larger chunks and distributes throughout the jar more evenly.
-
Make the brine by combining vinegar, water, salt, sugar, and bay leaf in a saucepan. Bring to a boil, stirring occasionally, then remove from heat and let cool for a few minutes.
Adding Turmeric
- Here’s the key technique for turmeric: once the brine cools slightly, whisk in the ground turmeric directly into the warm brine. This distributes it evenly and prevents clumping. If the turmeric hasn’t fully dissolved by the time you pour the brine into the jar, that’s fine — it’ll continue dissolving as the pickles chill.
Building the Jar
-
Pack your cucumber spears upright into the jar. Layer the ginger matchsticks, garlic slices, peppercorns, mustard seeds, coriander seeds, chili, and thyme throughout, distributing them fairly evenly. The ginger pieces will float and settle, so don’t worry about perfect distribution.
Advertisements -
Pour the turmeric-infused brine slowly over everything. The liquid will be a beautiful golden color. Cool completely, cover, and refrigerate.
Flavor and Color Notes
These pickles look striking — a golden-yellow color from the turmeric — and they taste warm, slightly spicy, and complex. The ginger flavor is pronounced but not aggressive, and turmeric’s earthy, almost mineral taste creates a sophisticated background note. By day two, these are genuinely delicious. By day four, the flavors have mellowed and integrated into something really special.
Real talk: Turmeric will stain your hands, cutting board, and jar, but it all washes out easily with a little soap and water. It’s a small price for pickles that taste this interesting.
Health angle: Ginger and turmeric are both recognized for their anti-inflammatory properties, making these pickles a genuinely healthy addition to your meals. A serving or two with lunch can provide some of these beneficial compounds.
Best pairings: These pickles work beautifully with Asian-inspired foods, curry dishes, or alongside grilled fish. They’re also wonderful with roasted chicken or used to add interest to a grain bowl.
9. Garlic and Red Pepper Pickles
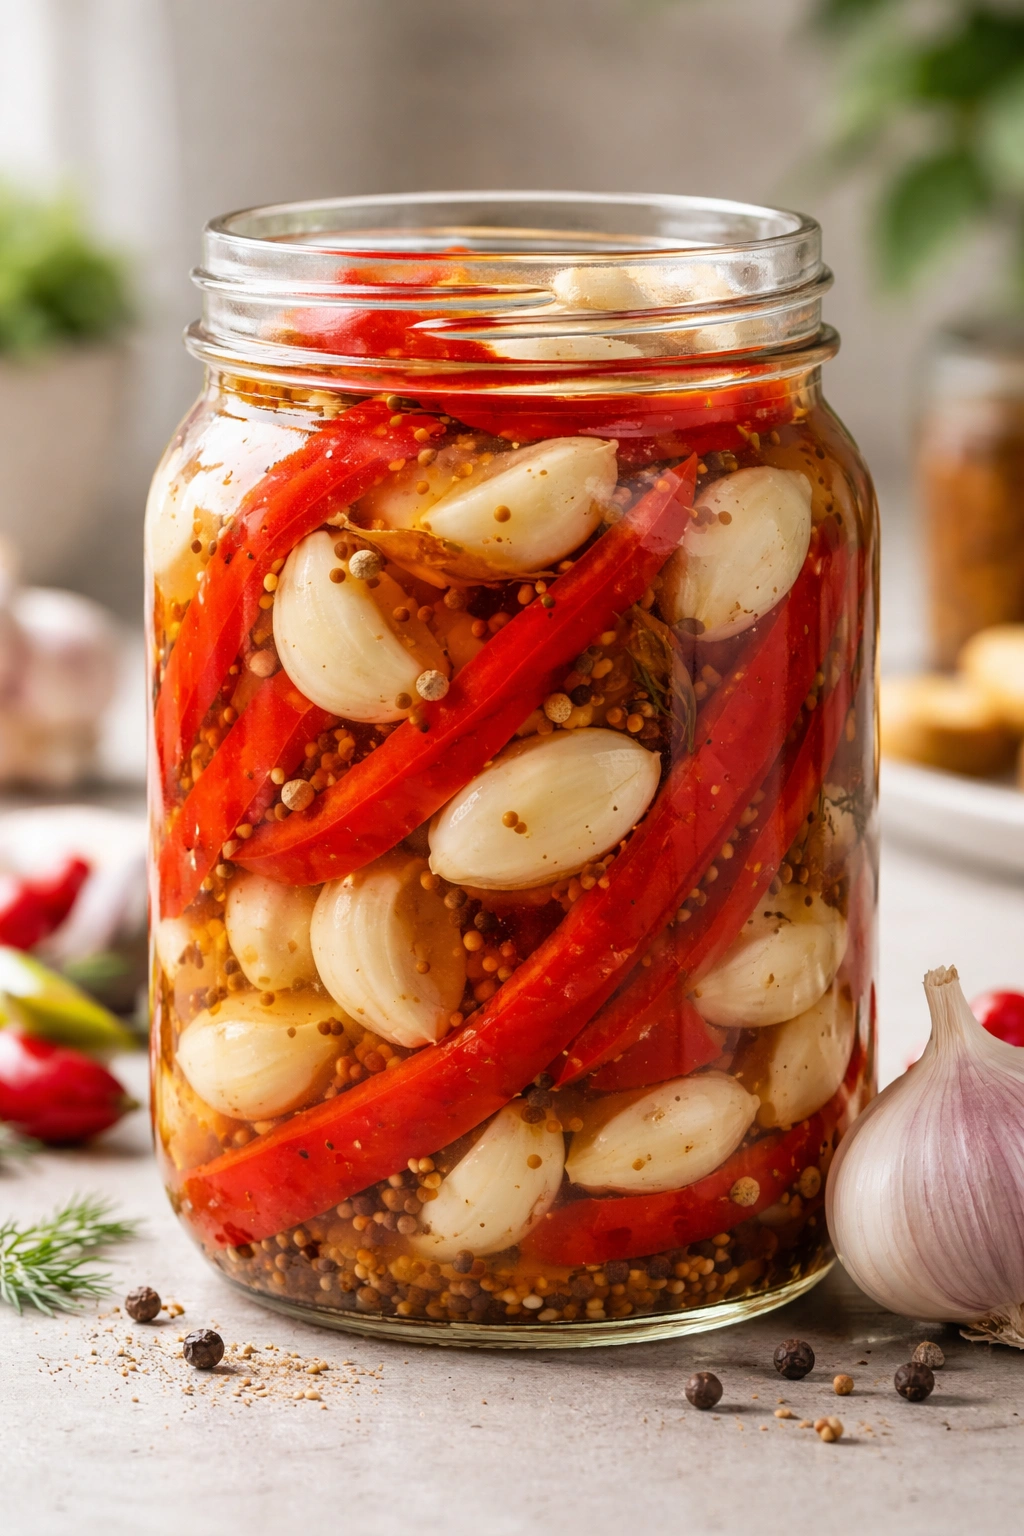
For those who love bold, saturated colors and deep garlic flavor, this recipe delivers both. Using red bell peppers instead of (or in addition to) cucumbers creates something different and visually stunning. The sweetness of red peppers balances beautifully with the sharpness of garlic and vinegar, and these pickles are tender enough that you can eat them straight from the jar as a snack, use them on sandwiches, or chop them into a relish.
Yield: Makes one 32-ounce jar Prep Time: 20 minutes Cook Time: 5 minutes (for the brine) Total Time: 25 minutes active + 18 hours chilling Difficulty: Beginner — identical to other pickle recipes, just with peppers instead of cucumbers.
For the Pickles:
- 2 large red bell peppers (about 1 pound), seeded and cut into thick strips or chunks
- ½ pound pickling cucumbers (optional, adds texture contrast), cut into spears
- 8 cloves garlic, peeled and left whole
- 1 teaspoon black peppercorns
- ½ teaspoon mustard seeds
- ¼ teaspoon red pepper flakes
- 4-5 whole coriander seeds
- 1 bay leaf
- 2-3 sprigs fresh basil or ½ teaspoon dried oregano (optional)
For the Brine:
- ¾ cup white vinegar
- ¾ cup apple cider vinegar (or all white vinegar if you prefer)
- ¾ cup water
- 2 tablespoons kosher salt
- 1 tablespoon honey (it balances the peppers’ sweetness beautifully)
- 1 bay leaf
Preparing the Red Peppers
-
Wash the red peppers thoroughly and pat them dry. Cut them in half, remove the seeds and white membrane, and cut them into thick strips (about 1-2 inches wide) or into rough chunks. Thicker pieces maintain better texture during pickling than thin slices, though you can slice them if you prefer more tender pickles.
Advertisements -
Make the brine by combining both vinegars, water, salt, honey, and bay leaf in a saucepan. Bring to a boil, stirring occasionally, then remove from heat and let cool slightly.
Assembling with Color in Mind
-
Pack the red pepper strips and optional cucumber spears into your clean jar, arranging them so the red peppers are visible and attractive — they’ll look beautiful through the glass jar. The peppers’ natural color will brighten the brine to a warm golden-red.
-
Distribute the whole garlic cloves, peppercorns, mustard seeds, red pepper flakes, coriander seeds, bay leaf, and basil throughout the jar, nestling them between the peppers.
-
Pour the warm brine slowly over everything until the jar is full to ½ inch from the top. All pieces must be submerged. Cool completely, cover, and refrigerate.
Texture and Sweetness Notes
Red peppers are naturally sweeter than cucumbers, so these pickles have an inherent sweetness even without added sugar. The honey in the brine enhances this slightly without making them taste like candy — the acidity from the vinegars keeps everything balanced. The texture softens noticeably over time, but they’re still pleasantly tender rather than mushy within the first two weeks.
Garlic note: The whole garlic cloves soften significantly during pickling and develop a mild, almost sweet flavor. Many people eat them along with the pickles — they’re genuinely good.
Ingredient variation: If you want even more color and flavor complexity, use a mix of red and yellow bell peppers. The yellow peppers add a slightly different flavor — a bit tangier than reds — and the color combination is absolutely stunning.
Serving suggestion: Chop these finely and use them as a topping for tacos, nachos, or pizza. They’re also wonderful on grain bowls, in salads, or stirred into mayo-based spreads. Their sweetness makes them work well with savory proteins.
10. Dill Pickle Spears with Grape Leaves

This is the classic deli-pickle trick that makes all the difference: grape leaves. If you’ve ever wondered why some pickles stay crisp even after weeks of pickling while others get soft, grape leaves are the secret. They contain tannins that help preserve the pickles’ crispness throughout their entire storage life. Combined with traditional dill-and-garlic flavoring, these taste like a proper deli pickle — the kind you’d pay premium prices for at a specialty grocer.
Yield: Makes one 32-ounce jar Prep Time: 15 minutes Cook Time: 5 minutes (for the brine) Total Time: 20 minutes active + 24 hours chilling Difficulty: Beginner — the only potentially unfamiliar ingredient is grape leaves, which are easy to find and simple to use.
For the Pickles:
- 1½ pounds pickling cucumbers, cut into spears
- 3-4 fresh grape leaves (or 2-3 dried grape leaves, softened in hot water for 5 minutes)
- 5 cloves garlic, peeled and smashed
- 3-4 sprigs fresh dill
- 1 teaspoon black peppercorns
- ½ teaspoon mustard seeds
- ¼ teaspoon red pepper flakes (optional, for gentle heat)
- 1 bay leaf
- 1-2 fresh oak or horseradish leaves (optional, provides additional tannins for crispness)
For the Brine:
- 1 cup white vinegar
- ¾ cup water
- 2 tablespoons kosher salt
- 1 tablespoon sugar
Finding and Using Grape Leaves
-
Fresh grape leaves are available in spring and early summer at farmers markets or ethnic grocery stores. Dried grape leaves are available year-round in the international sections of most large groceries or online. If using dried leaves, soften them in hot water for about 5 minutes so they’re pliable before adding to the jar. Rinse fresh leaves under cool water and pat dry.
-
Make the brine by combining vinegar, water, salt, and sugar in a saucepan. Bring to a boil, stirring occasionally, then remove from heat and let cool slightly.
The Grape Leaf Placement
-
This is the key difference: place one or two grape leaves on the bottom of your jar before adding anything else. These bottom leaves will leach their tannins into the brine while it sits, helping preserve crispness. The remaining grape leaves will go on top, creating a barrier between the cucumbers and any potential mold-causing bacteria.
-
Pack the cucumber spears upright over the bottom grape leaf or leaves. Distribute the smashed garlic, fresh dill, peppercorns, mustard seeds, red pepper flakes, and bay leaf throughout the jar.
-
Once the cucumbers are arranged, place the remaining grape leaves on top, positioning them so they partially cover the cucumbers and rest on the top layer — they should float just under the brine level or right at it. These top leaves act as a physical barrier.
-
Pour the warm brine slowly over everything, making sure the top grape leaves float and the brine covers all cucumber pieces. Cool completely, cover, and refrigerate.
Why Grape Leaves Matter
The tannins in grape leaves help maintain pickle crispness by strengthening the vegetable cell walls and preventing the enzymes that cause softening from being as effective. Pickles made with grape leaves will stay satisfyingly crisp for the full four weeks they keep in the refrigerator, while pickles without them gradually soften as time goes on. It’s not a miraculous difference, but it is noticeably real.
Substitution option: If you can’t find grape leaves, oak leaves (from an ornamental oak tree, not a road oak), horseradish leaves, or even dried dill flowers can provide similar tannin benefits. The key is finding something that adds tannins to strengthen the cell walls. Many people simply add an extra teaspoon of tannin-rich spices like mustard seeds or black peppercorns instead.
Appearance note: The grape leaves will darken as they steep in the brine, developing a brownish-green color. This is completely normal and doesn’t affect the pickle flavor or quality — the leaves have done their job.
Professional result: These pickles look and taste like what a professional pickle maker would create. They’re genuinely impressive to serve to guests, and people will ask you how you made them so crisp.
Pickling Secrets Worth Knowing
Now that you have ten complete recipes to choose from, here are some universal tips and tricks that apply across all refrigerator pickling and will help you get professional-quality results every time.
Cucumber Quality and Preparation
The freshness of your cucumbers determines about 80% of your success with pickle-making. Buy cucumbers the day you plan to pickle, or at very latest the day before. Cucumbers that have been sitting in the produce section for a week will never develop the crisp, snappy texture you’re after — they’ll be soft and disappointing regardless of your technique. Look for cucumbers that feel firm when you squeeze them gently, with smooth skin and no soft spots. Pickling cucumbers (also called Kirby cucumbers or Gherkins) are smaller and have fewer seeds than slicing cucumbers, making them ideal. If you can’t find pickling cucumbers, small Persian cucumbers work beautifully.
Before pickling, wash the cucumbers thoroughly under cool running water with a gentle vegetable brush to remove any field dirt or debris. Pat them completely dry with paper towels — any excess surface moisture can dilute your brine. Trim off the blossom end (the opposite end from the stem) by about a quarter-inch. This end contains enzymes that cause softening, and removing it helps maintain crispness.
Vinegar Choice and Acidity
The acidity level of your vinegar matters because it’s what actually preserves the vegetables and prevents spoilage. You need vinegar with at least 5% acidity — check the bottle label to confirm. White vinegar and distilled white vinegar are the most reliable because they’re consistently 5% acidity and won’t cloud your brine with sediment. Apple cider vinegar is also excellent but is slightly less predictable in acidity level and imparts a subtle apple flavor. Rice vinegar and other specialty vinegars typically have lower acidity and are not recommended for food preservation.
You can absolutely mix vinegars — some of my recipes use both white and apple cider vinegar for enhanced flavor — but the total vinegar volume stays the same and the combined acidity should still be at least 5%. Never use low-acidity vinegars like wine vinegar or balsamic vinegar for pickling; they won’t preserve the vegetables adequately.
Salt Selection and Salinity
Use kosher salt rather than table salt for pickling. Table salt contains anti-caking agents that create cloudiness in your brine and make pickles look less appealing. Kosher salt is pure salt with no additives, and it dissolves cleanly. The salt serves two purposes: it extracts moisture from the vegetables (which maintains crispness) and it helps the brine penetrate the vegetable flesh. Don’t skip it or reduce it significantly without understanding the consequences.
One quirk: if you use a different brand of kosher salt, you may notice the measurements feel different because of particle size variations. Diamond Crystal kosher salt (the lighter, airier kosher salt) requires more volume than Morton’s kosher salt (which is denser) to achieve the same salinity. My recipes use roughly 2 tablespoons per quart of brine, which is a safe amount. If you’re using Morton’s and notice your pickles taste extremely salty, reduce the salt by about ¼ teaspoon next time.
Container Selection and Sterilization
You can use any glass jar with a tight-fitting lid — mason jars in pint, quart, or larger sizes all work beautifully. The jar doesn’t need to be sterilized for refrigerator pickles because the cold storage prevents bacterial growth, but it should be clean. Wash it with hot soapy water, rinse thoroughly, and let it air-dry completely before using. Plastic lids and metal lids both work fine — metal lids don’t need to create a seal the way they do in water-bath canning, so there’s no sealing step required.
Brine Temperature and Cooling
Always let the brine cool for a few minutes after boiling before pouring it over your vegetables. If you pour boiling brine directly into a room-temperature jar of vegetables, it will soften them more than necessary and can potentially crack a cold glass jar. A 3-5 minute cooling period is ideal — the brine should still be warm enough to fully dissolve the salt and sugar, but cool enough that it won’t damage your vegetables or jar.
Storage Duration and Flavor Development
Refrigerator pickles are ready to eat within 12-24 hours, but they taste noticeably better after 3-5 days when the flavors have fully developed and integrated. The flavor continues to deepen throughout the first two weeks in the refrigerator. After three weeks, they’re still safe to eat, but the texture gradually softens and the flavor becomes slightly muted. Most pickles are at their absolute best between day 7 and day 21.
Refrigerator pickles keep for about three to four weeks in the refrigerator. After that, they’re not unsafe to eat, but the texture has softened considerably and the flavor has become quite subtle. It’s better to use them within three weeks and make another batch rather than trying to stretch them beyond that.
Leftover Brine and Second Batches
Once you’ve eaten all the pickles but have brine left in the jar, don’t throw it away. You can reuse that flavored brine to make another batch of pickles. Simply heat the brine again, let it cool, and pour it over a fresh batch of vegetables. The flavors will be slightly less intense because the brine has already extracted flavor from the first batch, but the pickles will still be delicious. You can usually reuse the brine one or two more times before the flavor becomes too subtle to be worthwhile.
Troubleshooting Soft or Mushy Pickles
If your pickles turned out soft when you were expecting them to be crisp, the issue was almost certainly one of three things: the cucumbers were old when you started, you removed the blossom end, or you forgot to use ingredients with tannins (like grape leaves or spices rich in tannins). Solve this by using the freshest possible cucumbers, always trimming the blossom end, and adding grape leaves or extra mustard seeds to your next batch. Fresh spices help too — old mustard seeds or peppercorns that have been sitting in your cabinet for years have lost potency.
Making Spice Combinations Personal
The spice combinations in these recipes are starting points, not requirements. Once you understand the basic technique, experiment with your own favorite flavors. Love cinnamon? Add a small piece of cinnamon stick. Prefer cardamom? Add a couple of pods. Enjoy licorice flavors? Add fennel seeds or a small piece of star anise. The basic brine ratio stays the same, and the vegetable-to-brine ratio stays the same, but the aromatics and spices are completely customizable based on your preferences.
Final Thoughts
Homemade refrigerator pickles represent some of the easiest, most satisfying food preservation you can do at home. Within 20 minutes of active work, you’ve got pickles that will last for weeks and taste better than anything you could buy at a store. Every recipe in this guide produces genuinely delicious, professional-quality results using ingredients you probably already have or can easily find.
Start with the classic dill if you want to ease in gently, or jump straight to whatever flavor combination sounds most appealing. Make a batch this week, and I promise you’ll be making another batch within a month once you taste how much fresher these are compared to store-bought versions. Once pickling becomes part of your kitchen routine, you’ll wonder why you didn’t start sooner.
The beauty of these recipes is that once you understand the basic technique and ratios, you’ll feel confident improvising your own combinations. You’ll keep cucumbers and vinegar in stock specifically so you can make a batch when inspiration strikes. You’ll save the brine from finished jars to start the next batch. And you’ll absolutely use these pickles more than you expect — on sandwiches, in salads, alongside meats, as a quick snack, and as a gift for people who appreciate good food.
Start with whichever recipe calls to you, make it this week, and discover what I already know: homemade pickles aren’t just better than store-bought — they’re in an entirely different category of deliciousness.