Focaccia is honestly one of the most forgiving breads you can make at home, yet most home bakers avoid it entirely—convinced it requires some kind of professional skill or expensive equipment. The truth? You need nothing more than a bowl, a measuring spoon, and a flat pan to produce focaccia that’s crispy on the outside, tender and dimpled within, and absolutely loaded with olive oil flavor. The beauty of focaccia lies in how it forgives overproofing, welcomes a variety of toppings, and actually improves with a simple cold fermentation that fits perfectly into a normal weekend schedule.
The reason focaccia is so approachable comes down to its high hydration and loose, forgiving dough structure. Unlike a tight, precision-demanding French baguette, focaccia dough is more like a batter—sticky, extensible, and incredibly hard to mess up. Even if your timing is off, even if your kitchen is cooler than ideal, even if you’re not sure exactly when it’s “ready,” focaccia remains generous and produces something delicious. It’s the bread that makes you feel like a baker without requiring you to be one, and once you’ve made it once, you’ll understand why it’s worth rotating into your regular kitchen rotation.
The History and Why Focaccia Tastes Like Home
Focaccia comes from the Liguria region of northwestern Italy, where it’s been a cornerstone of the local food culture for centuries. The name itself comes from the Latin word focus, meaning hearth or fireplace—a reference to the way the bread was historically baked directly on heated stone near a fire. In Liguria, focaccia is draped with local olive oil, coarse sea salt, and sometimes rosemary or onions, and it’s eaten as a snack, a light lunch, or alongside almost any meal.
What makes traditional focaccia different from pizza is both the dough and the approach. While pizza dough is tossed and shaped to be thin and crispy, focaccia dough is pressed gently into an oiled pan and allowed to rise until billowy, creating a bread that’s crispy-edged but tender and open-crumbed within. The famous dimples you see across the top aren’t just decoration—they’re intentionally created pockets that catch and hold olive oil, creating pockets of intense flavor throughout every bite.
Over the years, focaccia traveled beyond Italy and reinvented itself in bakeries around the world, picking up countless regional toppings and interpretations. You’ll find focaccia topped with caramelized onions in France, with za’atar and olive tapenade in the Middle East, and with herbs and sea salt everywhere. The versatility is part of what makes it so beloved—it’s a canvas that works with almost any savory flavor profile you want to explore.
The reason this bread works so beautifully as a home-baked project is that it doesn’t demand precision or perfect technique. The high water content means minor timing variations don’t derail the whole project. The long, slow rise develops deep flavor without requiring a separate autolyse or complex shaping skills. And the result feels and tastes like something that took way more effort and expertise than it actually did.
Why Homemade Focaccia Beats the Bakery Version
Store-bought focaccia often tastes like delivery-aisle bread with a thin coating of olive oil on top. It’s usually dense, a bit stale within hours, and doesn’t remotely justify the price tag. The moment you taste your own focaccia—still warm, with olive oil that soaked into every crevice while it was baking—you understand immediately why it’s worth making.
Homemade focaccia has an open, irregular crumb structure that’s impossible to replicate at scale. Commercial bakeries use dough conditioners, optimize for shelf stability, and often rush fermentation to meet production demands. When you make focaccia at home with just flour, water, salt, and time, the gluten structure that develops is more refined, the crust is thinner and crispier, and the interior stays soft and tender far longer than store-bought.
The flavor difference is equally dramatic. Focaccia made with a long cold fermentation develops complexity and depth that no quick-proofed version can match. The simple dough—which contains no sugar, no eggs, no enrichment—becomes almost nutty and subtly sweet when given 18 to 48 hours in a cold environment. That transformation alone makes homemade focaccia taste like an entirely different bread from what you’ve probably bought before.
Control over toppings is another huge advantage. You can apply olive oil and salt in exactly the right proportions (most commercial focaccia is stingy with both). You can customize the toppings entirely, using whatever fresh herbs are available, whatever cheese you’re craving, or whatever vegetables you want to highlight. You can even make multiple variations in one baking session if you have a couple of pans—half topped with rosemary and fleur de sel, half with caramelized onions and black olives.
Essential Equipment You’ll Need
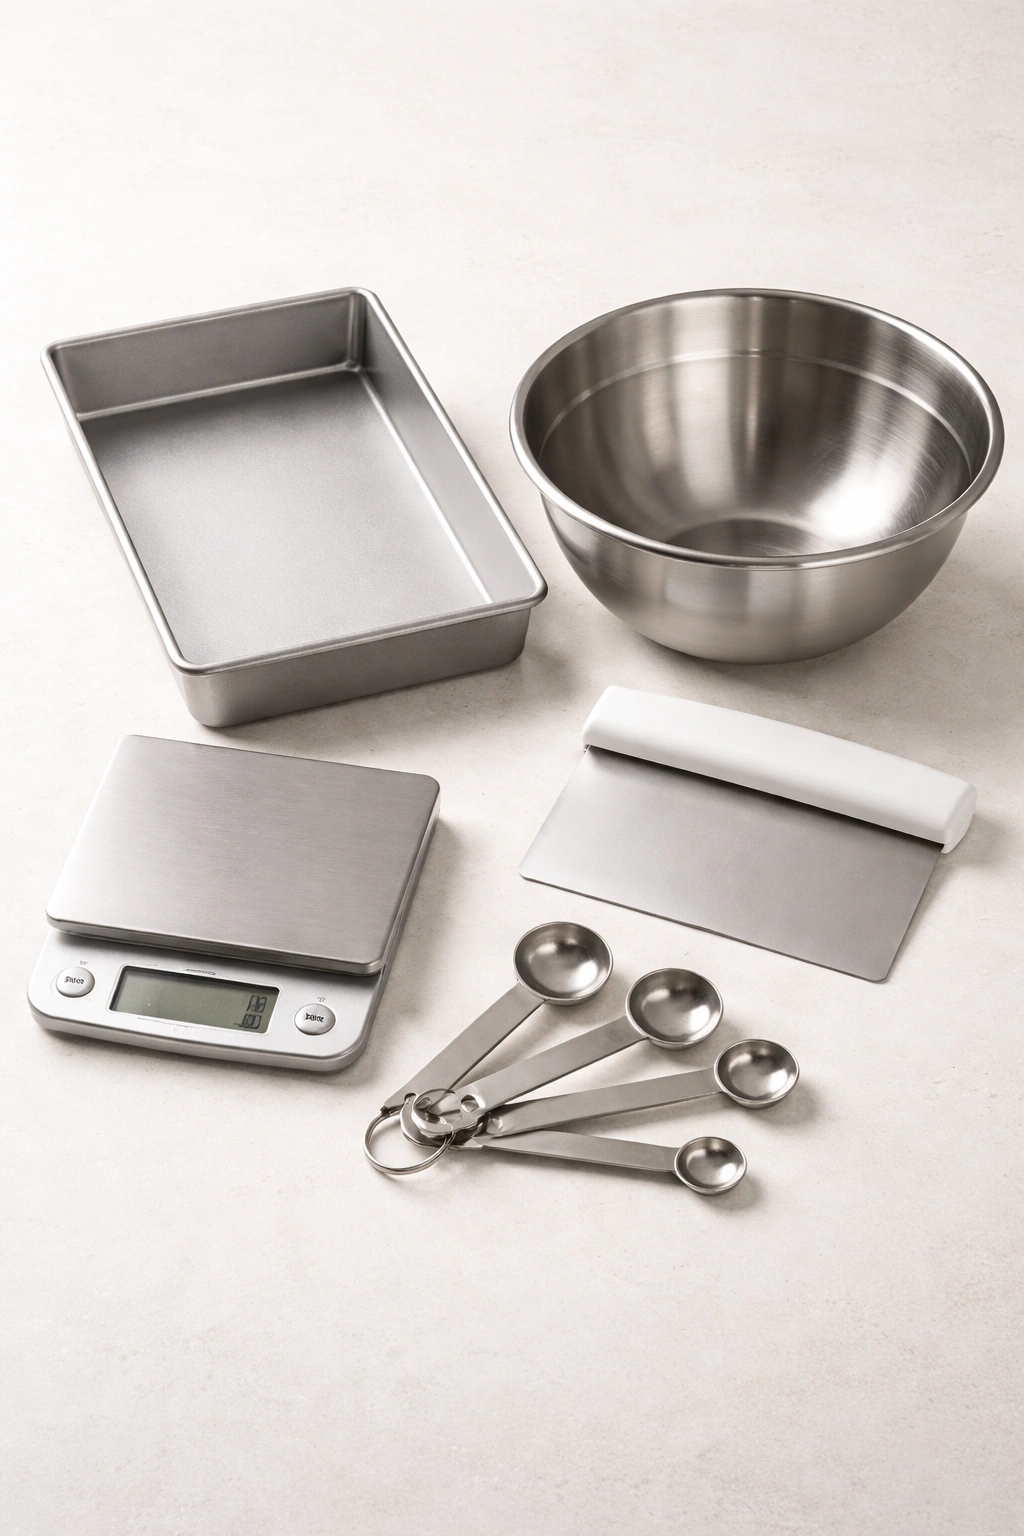
The beautiful part about making focaccia is that you don’t need anything fancy. A standard rectangular baking pan, ideally 9×13 inches, is the only specialized equipment that matters—and even a smaller 8×8-inch square pan works fine, you’ll just get a taller, thicker focaccia. A metal or ceramic pan both work equally well; glass pans work too but tend to brown the bottoms faster, so you might need to lower your oven temperature slightly.
A digital kitchen scale transforms your baking accuracy and makes recipes consistent across multiple batches. While you can certainly use measuring cups and spoons, a scale removes the guesswork entirely—flour compacts in measuring cups, which changes the actual weight by 5 to 10 percent and can throw off your hydration. If you’re serious about bread baking beyond focaccia, a scale is a worthwhile investment that costs under $20.
A large mixing bowl, measuring spoons, and a bench scraper or rubber spatula complete the essential toolkit. You’ll also want a simple kitchen thermometer to check water temperature if you’re paying attention to dough fermentation temperature (which speeds things up). A stand mixer is genuinely optional for focaccia—the dough is too sticky and loose to benefit from the kind of kneading you’d use for other breads. If you have a stand mixer with a dough hook, you can mix focaccia dough in it, but mixing by hand (which takes about 8 minutes) works perfectly and is honestly meditative.
One optional tool that many people love for focaccia is a spray bottle—not for the dough, but for the oven. Spraying the walls and floor of your oven with water during the first 10 minutes of baking creates steam, which helps develop a crisper crust and more oven spring. It’s not essential, but it’s a nice refinement if you’re willing to use it.
Choosing the Right Flour and Ingredients
Focaccia flour choice matters more than you might think, though the margin is forgiving. All-purpose flour is absolutely fine and is what most home bakers use—it has about 10 to 12 percent protein content, which develops enough gluten structure to trap the rising gases without being so high that the crumb becomes tough. Bread flour, which has 12 to 14 percent protein, will give you a slightly chewier crumb and a bit more lift—it’s a good choice if you want a more substantial, rustic texture.
Don’t use cake flour or pastry flour, which are too low in protein and will produce a focaccia that’s tender but won’t hold its shape or develop the characteristic open crumb structure. Italian flours like tipo 0 or tipo 00 produce beautiful, tender focaccia with a more delicate crumb—if you have access to them, they’re worth trying for the pure pleasure of it, but they’re genuinely optional.
Water quality matters primarily in that cold water is easier to control than warm water for precision fermentation. If your tap water is heavily chlorinated, letting it sit uncovered overnight before using it removes some of the chlorine—this is a refinement that bakers notice in the final flavor but is far from essential.
Salt is crucial, but it’s just salt. Sea salt, kosher salt, or table salt all work identically in the dough itself; the only difference is in how you measure it (table salt is denser, so 1 teaspoon of table salt weighs more than 1 teaspoon of kosher salt). For the topping, coarse salt or fleur de sel is more pleasant because larger granules don’t dissolve completely and add a pleasant texture and visual appeal.
Olive oil is the only ingredient where quality genuinely transforms the final result. Extra-virgin olive oil is absolutely worth using—it’s not a place to economize. Good olive oil has a fruity, sometimes peppery flavor that becomes deeper and more complex when heated during baking. Cheaper “light” olive oils are often refined and relatively flavorless; they’ll work in a pinch but will produce focaccia that tastes distinctly less special. Use a high-quality extra-virgin olive oil that you genuinely enjoy tasting, and use it generously—focaccia’s entire identity is built around the presence of olive oil.
Yeast can be either instant active-dry yeast or fresh yeast cakes; both work identically in focaccia. Store your yeast in the freezer after opening—it extends viability and ensures your yeast stays active longer. If you’re not sure whether your yeast is still alive, a simple test is to dissolve a pinch of yeast in a small amount of warm water with a tiny pinch of sugar; within a few minutes, it should become foamy if it’s viable.
Understanding Hydration and Dough Consistency
Focaccia is a high-hydration dough, meaning it contains a lot of water relative to flour. A typical hydration level for focaccia is around 75 to 80 percent, which means if you had 500 grams of flour, you’d use 375 to 400 grams of water. This high water content is precisely what makes focaccia work—the dough is loose and extensible, pockets of moisture create steam during baking (which puffs up the bread), and the finished crumb is tender and slightly open.
For comparison, most sandwich breads have hydration around 60 to 65 percent, and lean doughs like French breads might be 65 to 70 percent. Focaccia’s 75 to 80 percent hydration is closer to a thick batter than a traditional bread dough—it should feel sticky and loose in your hands, never tight or dry.
This stickiness is what intimidates beginners, but it’s actually your friend. The first time you make focaccia, the dough will feel like it’s too wet, like it’s failed, like something is wrong. Don’t fall into this trap. The dough is supposed to be sticky—that’s not a problem, that’s the entire point. Sticky dough is easier to work with than you’d expect because it clings to itself rather than to your hands, and it rises beautifully because the water content supports the gluten network and creates abundant steam during baking.
If you do find your dough is slightly too sticky to work with comfortably, the solution isn’t to add flour (which throws off your hydration and makes the crumb dense). Instead, wet your hands with water—this sounds counterintuitive but genuinely works. Wet hands help you shape and fold the dough without your hands sticking to it. Bakers call this “tension” in the dough, and building tension through gentle folding and handling is far more important than eliminating stickiness.
Building Flavor With Cold Fermentation
Here’s where homemade focaccia becomes genuinely special: time and cold temperature create flavor that no amount of commercial yeast or additives can replicate. A long, slow fermentation at cool temperatures allows the dough to develop complex flavors through enzymatic and yeast activity—the dough literally becomes more delicious the longer it sits.
The standard timeline is to mix your dough, let it rise at room temperature for 1 to 2 hours (just until it’s visibly puffy and increased in volume), then refrigerate it for at least 8 hours—ideally 16 to 48 hours. During this cold time, fermentation slows dramatically but doesn’t stop, and the dough develops subtle sweetness, nuttiness, and depth. When you pull that cold dough from the fridge, it smells nutty and complex, nothing like the neutral dough you made that morning.
This long cold fermentation also fits perfectly into normal life. You can mix dough in the evening, refrigerate it overnight, shape it the next day, let it come to room temperature for a couple of hours, then bake it off. Or you can shape it in the morning and bake it that evening. The flexibility is one of the reasons focaccia works so well as an everyday bread—you can fit it into your schedule rather than your schedule fitting around the bread.
Cold fermentation develops flavor because yeast and bacteria work more slowly at cool temperatures, producing more complex compounds than quick fermentation does. It also develops acidity, which strengthens gluten and contributes to flavor—there’s a reason that long-fermented breads always taste better than quickly proofed ones.
The second benefit of cold fermentation is practical: cold dough is easier to shape. Room-temperature dough can be slack and hard to work with, but cold dough has a firmer structure that holds its shape better. You can shape it more precisely, get cleaner edges, and build better tension in the dough. This is why professional bakers use cold fermentation—it’s not just for flavor, though that’s the payoff. It also makes the work easier.
Yield: One 9×13-inch focaccia, serves 8 to 12 as a side or appetizer | Makes about 12 pieces
Prep Time: 15 minutes hands-on, plus 1 to 2 hours for first rise
Cook Time: 25 to 30 minutes baking
Total Time: 18 to 48 hours including cold fermentation (most of that is inactive refrigerator time)
Difficulty: Beginner — The dough is forgiving, the shaping is straightforward, and no special skills or equipment are required beyond a standard baking pan.
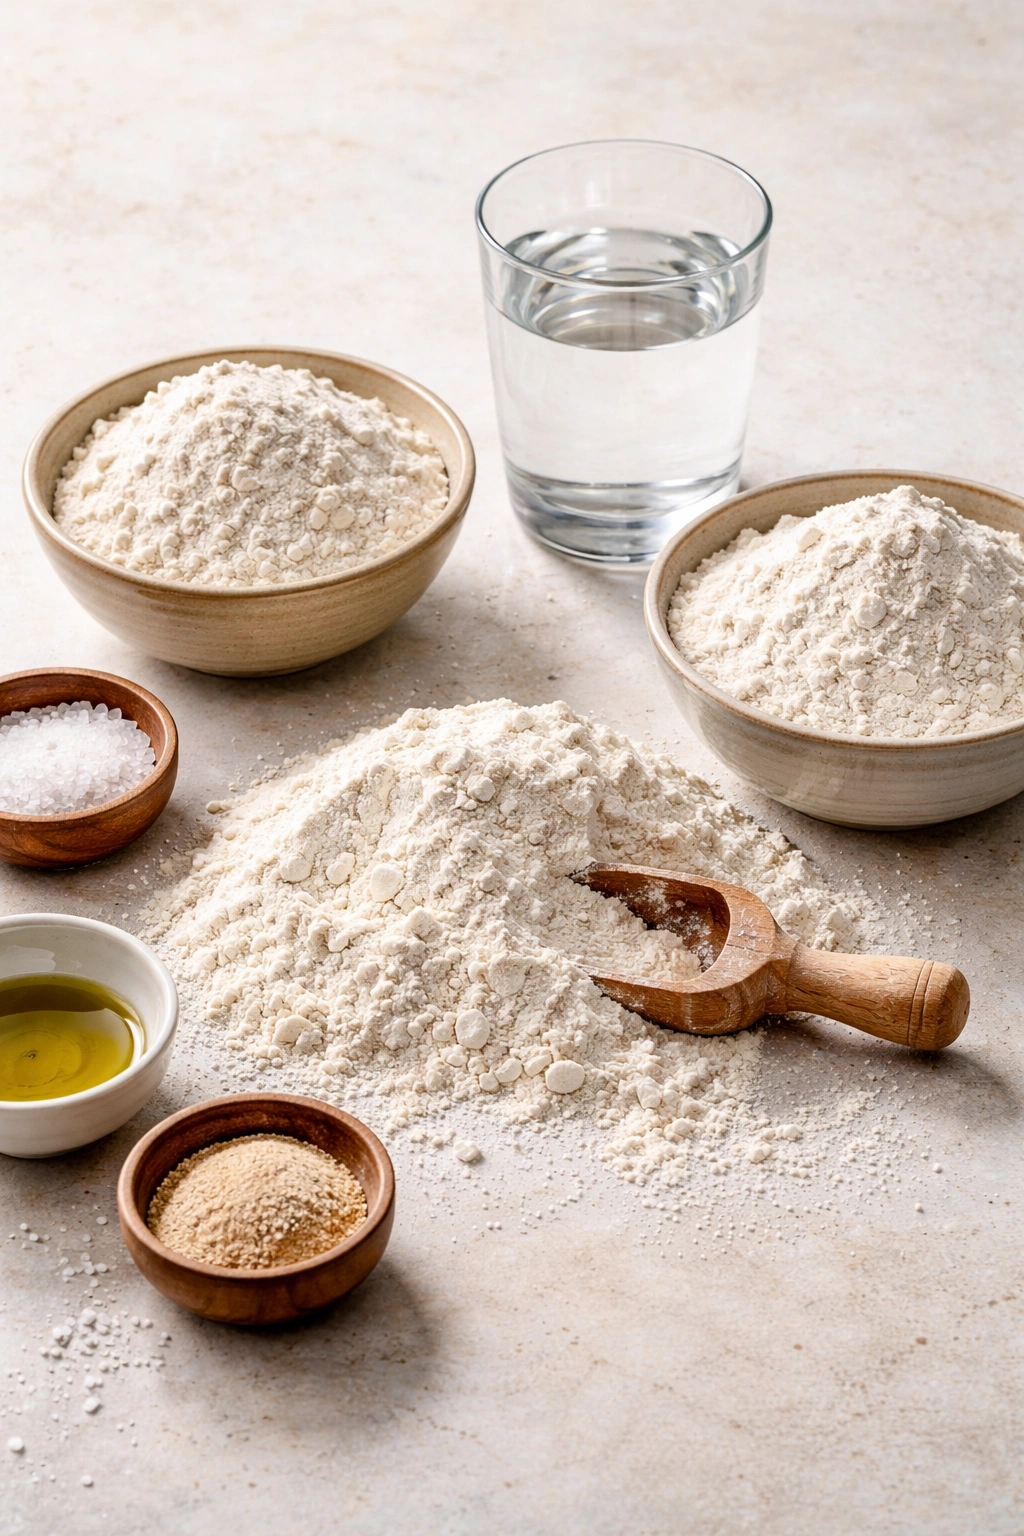
For the Focaccia Dough:
- 500g all-purpose flour (or bread flour for a slightly chewier crumb), plus extra for dusting
- 375ml lukewarm water (around 75°F / 24°C)
- 1 teaspoon instant active-dry yeast
- 10g fine sea salt (just under 2 teaspoons)
- 60ml extra-virgin olive oil, divided (about ¼ cup)
For the Topping:
- 2 to 3 tablespoons extra-virgin olive oil
- 1 to 1½ teaspoons coarse sea salt or fleur de sel
- 2 teaspoons fresh rosemary leaves (or any fresh herbs you prefer—thyme, oregano, or Italian seasoning blend all work beautifully)
- Optional: cracked black pepper, flake sea salt
Making Focaccia Dough: A Step-by-Step Method
Mix and Initial Rise:
-
Pour the lukewarm water into a large mixing bowl and sprinkle the yeast over the surface. Let it sit for 1 minute, then stir gently until the yeast is completely dissolved and the water turns slightly opaque—you should not see any visible yeast particles floating.
-
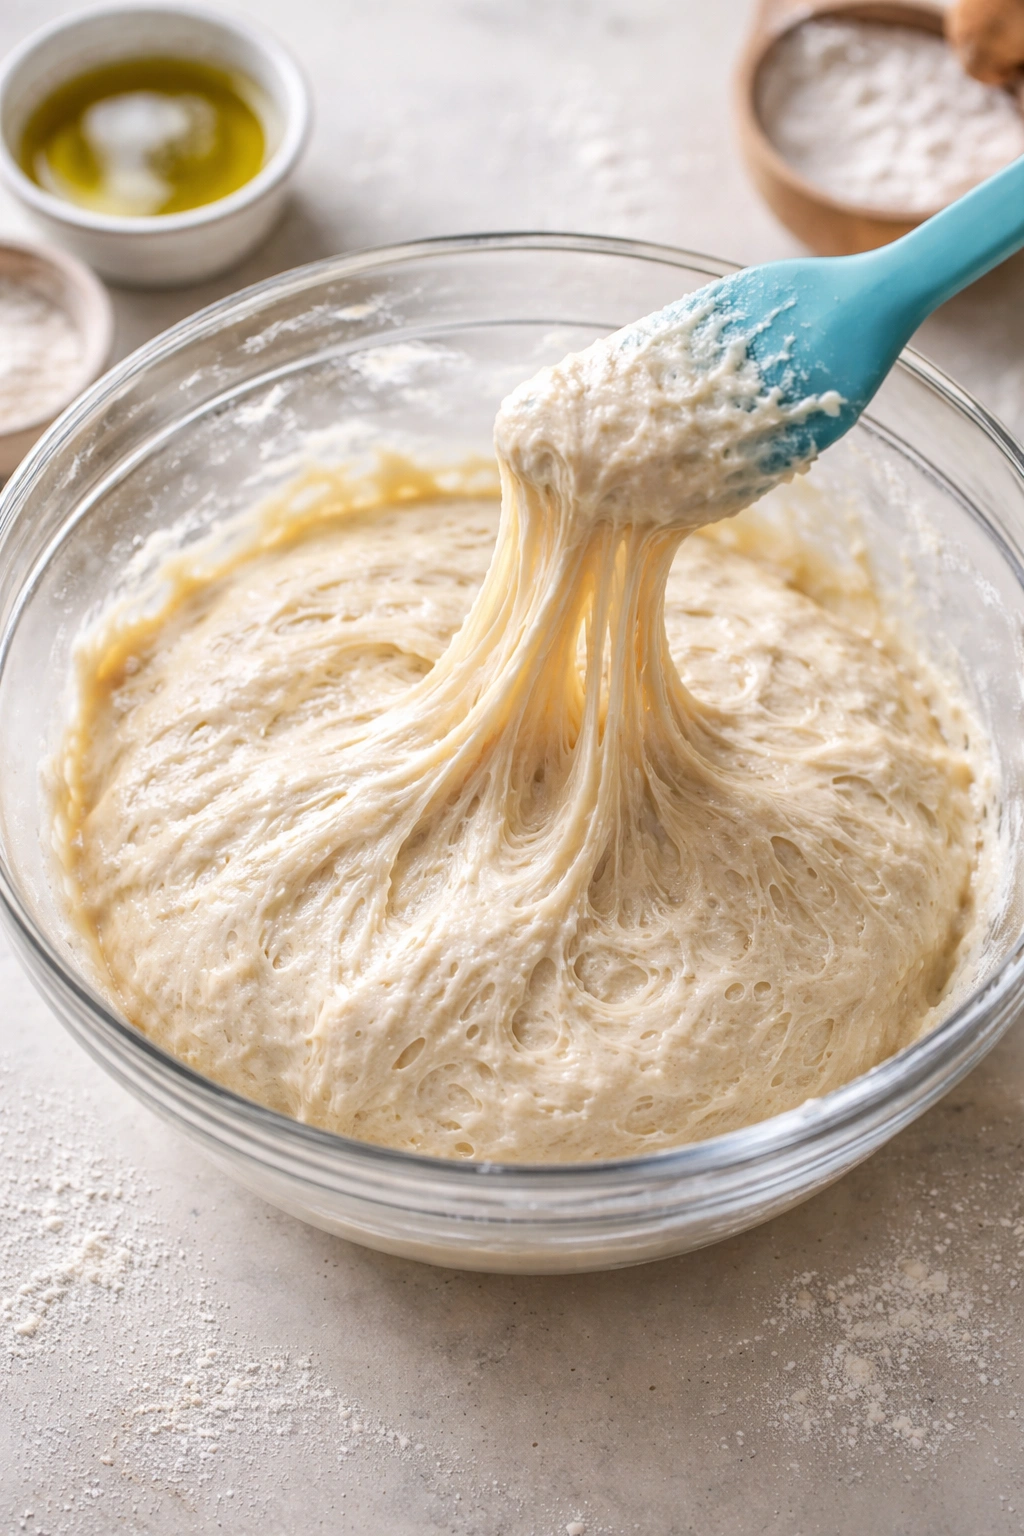
Add the flour to the same bowl and mix using your hands (or a rubber spatula if you prefer) until all the flour is hydrated and there are no dry flour bits visible. The dough will look shaggy and rough, not smooth. This is exactly right. Cover the bowl with a cloth or plastic wrap and let it rest for 30 minutes—this is the autolyse, a period where flour absorbs water and gluten begins developing without active mixing.
-
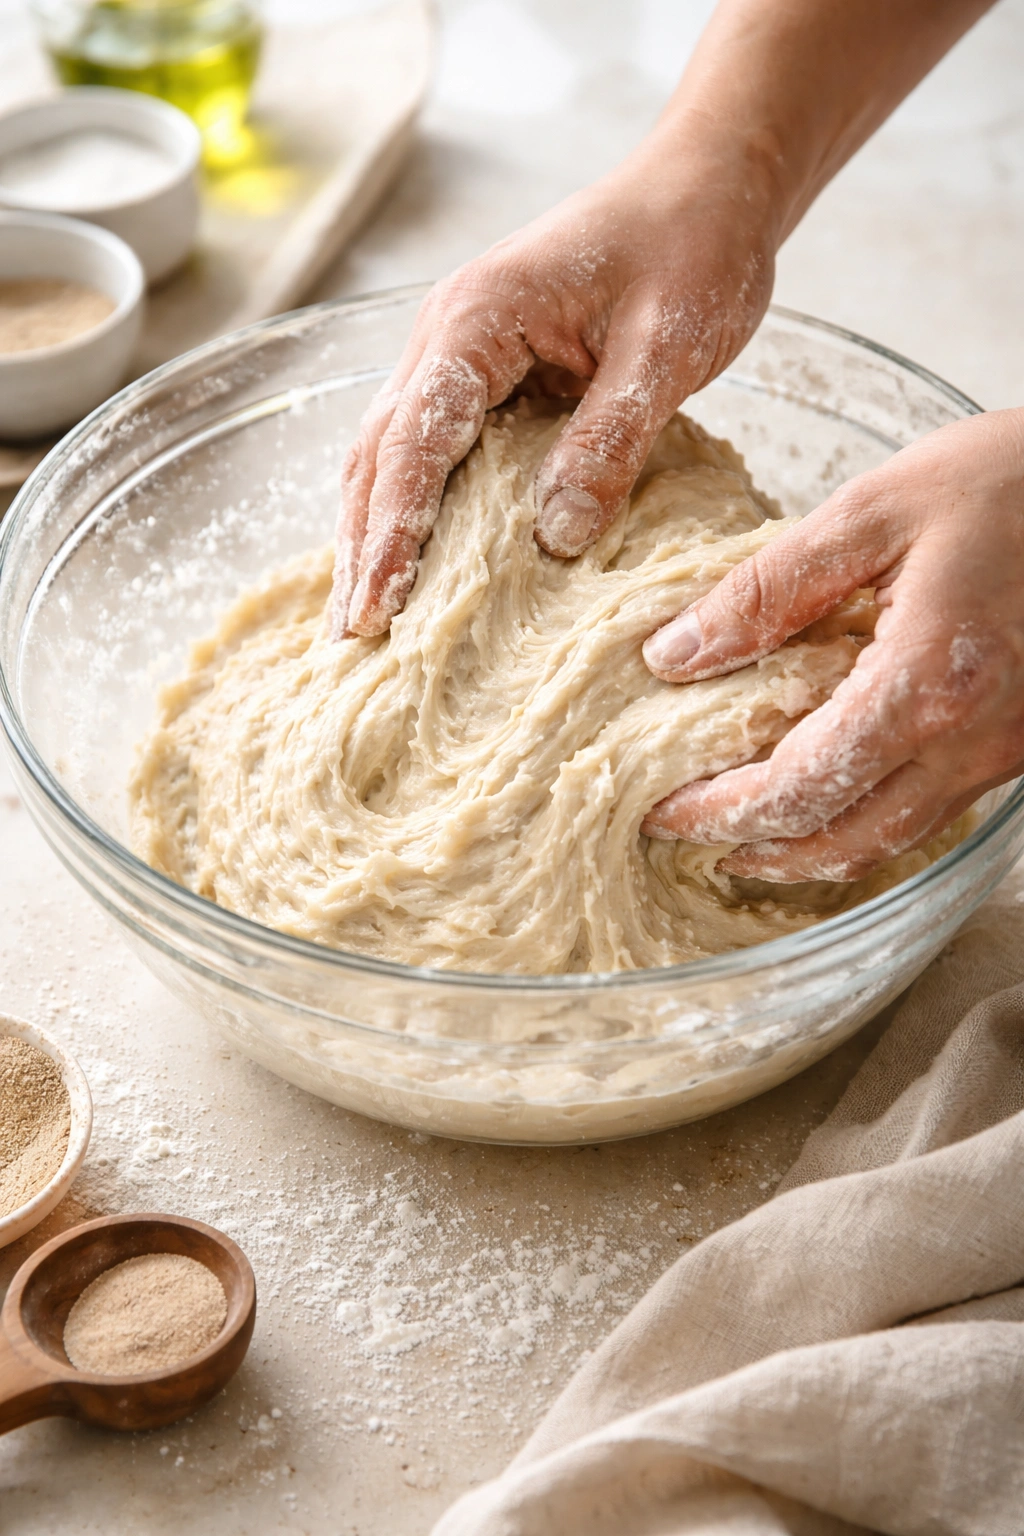
After 30 minutes, add the salt and 30ml of the olive oil to the dough. Mix with your hands for about 8 to 10 minutes, squeezing and folding the dough repeatedly until it feels smooth, elastic, and somewhat cohesive. The dough will remain quite sticky—this is correct and essential. You’re not trying to make a tight, dry dough; you’re building gluten structure in a dough that’s deliberately wet.
Advertisements -
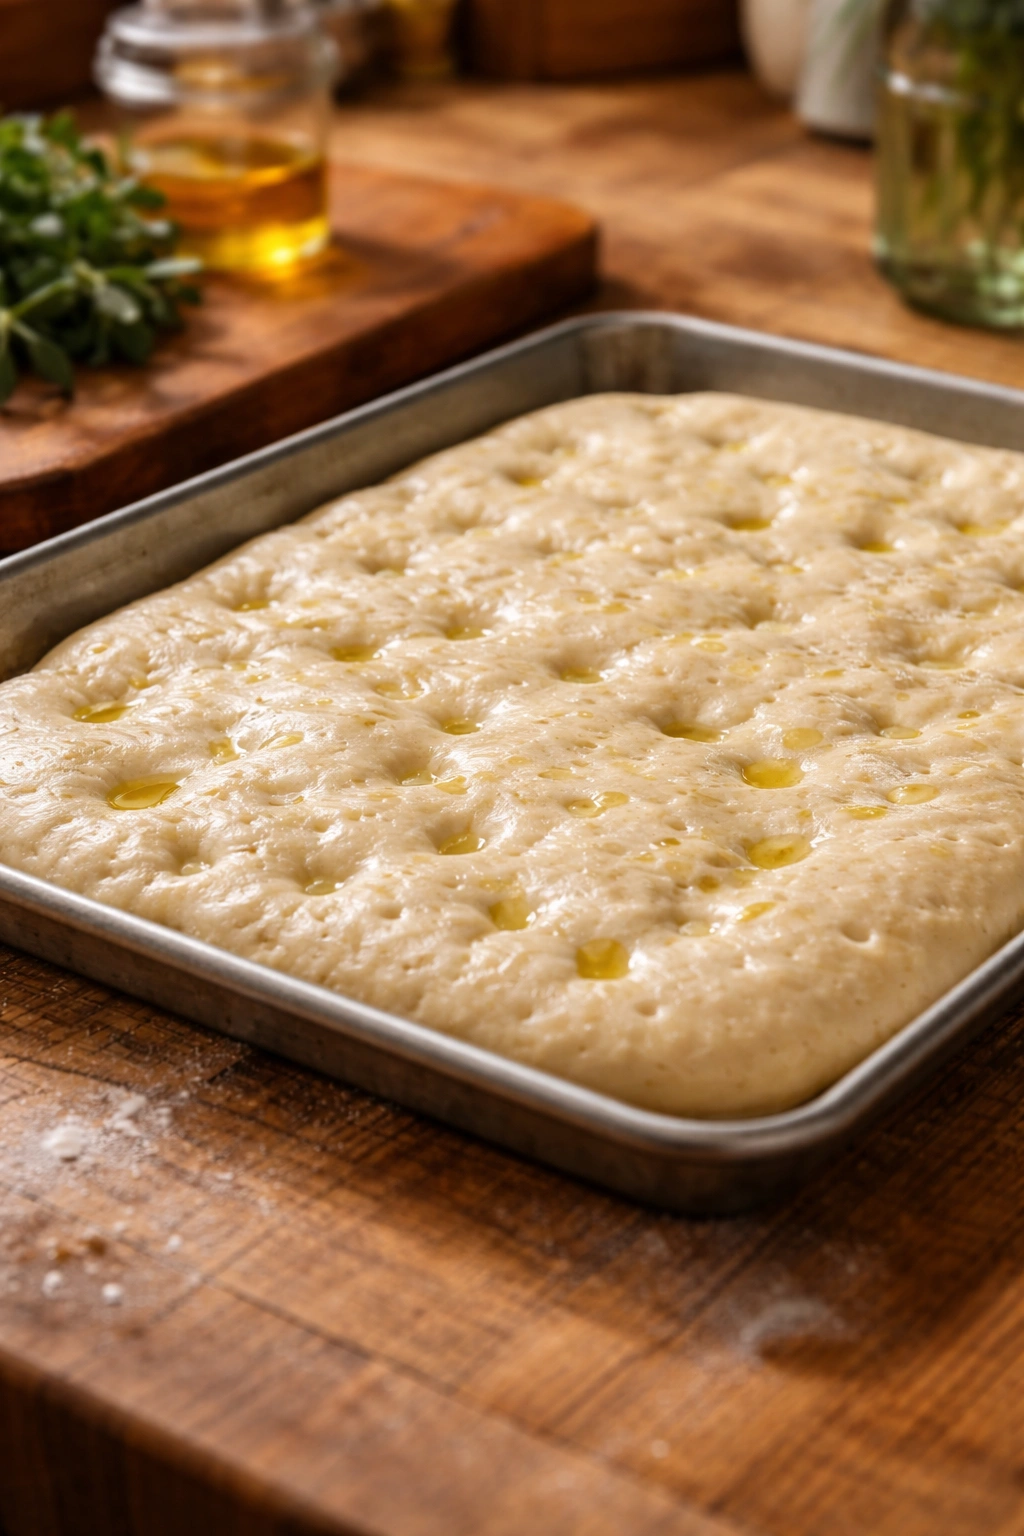
Oil a large clean bowl with about 15ml of the remaining olive oil. Transfer the dough to the oiled bowl, turning it once so the top is coated with oil. Cover with a cloth or plastic wrap and let it rise at comfortable room temperature (around 70°F / 21°C) for 1 to 2 hours, until visibly puffy and increased in volume—the dough doesn’t need to double, just show clear signs of rising. You should see bubbles visible on the surface, and the dough should feel airy and slightly elastic when you touch it.
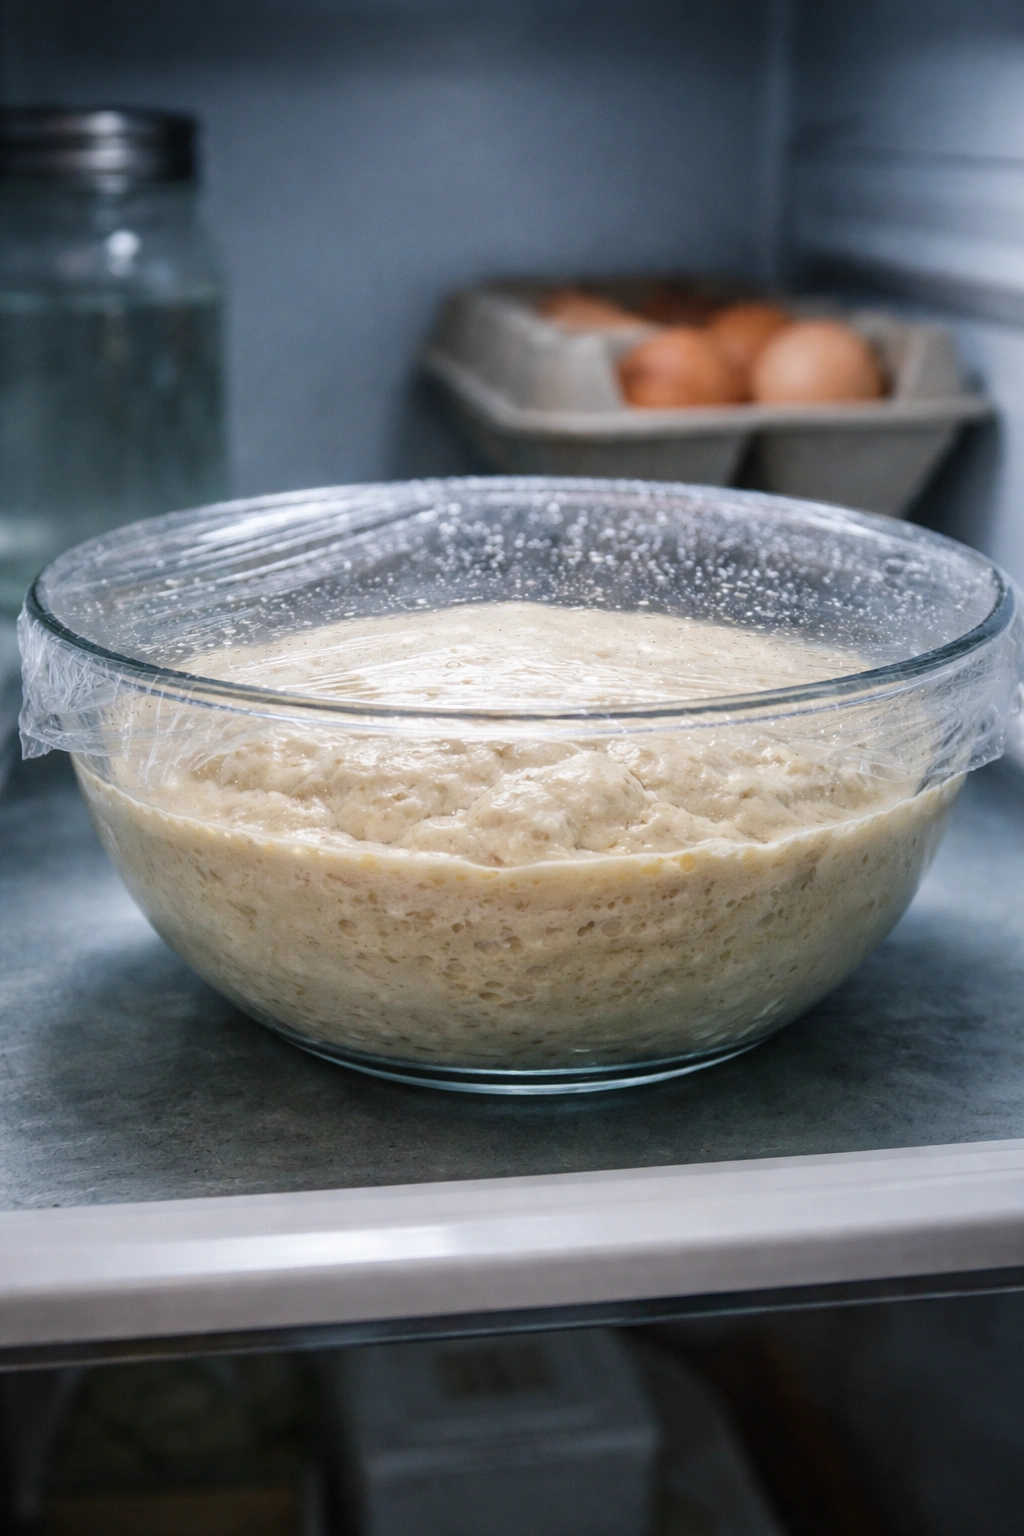
Cold Fermentation (the Flavor-Building Step):
-
After the initial rise, cover the bowl tightly with plastic wrap and refrigerate for at least 8 hours—ideally 16 to 48 hours. The dough will continue to slowly ferment in the cold, developing complex flavors and becoming easier to work with.
-
When you’re ready to bake, remove the dough from the refrigerator about 30 minutes before shaping. While you wait, pour the remaining 15ml of olive oil into your 9×13-inch baking pan, coating the entire bottom and sides generously. The pan should have a thin, visible layer of olive oil covering every surface.
Shaping and Final Rise:
-
Turn the cold dough out onto the oiled baking pan. Don’t flour your work surface; the olive oil is what prevents sticking. The dough will be cool and firm from refrigeration, which is perfect—it holds its shape beautifully.
-
Using your fingertips or your hands, gently stretch the dough to fill the entire pan, working from the center outward. You’re not aggressively kneading—just gently coaxing the dough to spread. If the dough resists and springs back, wait 5 to 10 minutes for it to relax, then continue stretching. The goal is an even, flat layer of dough covering the bottom of the pan.
-
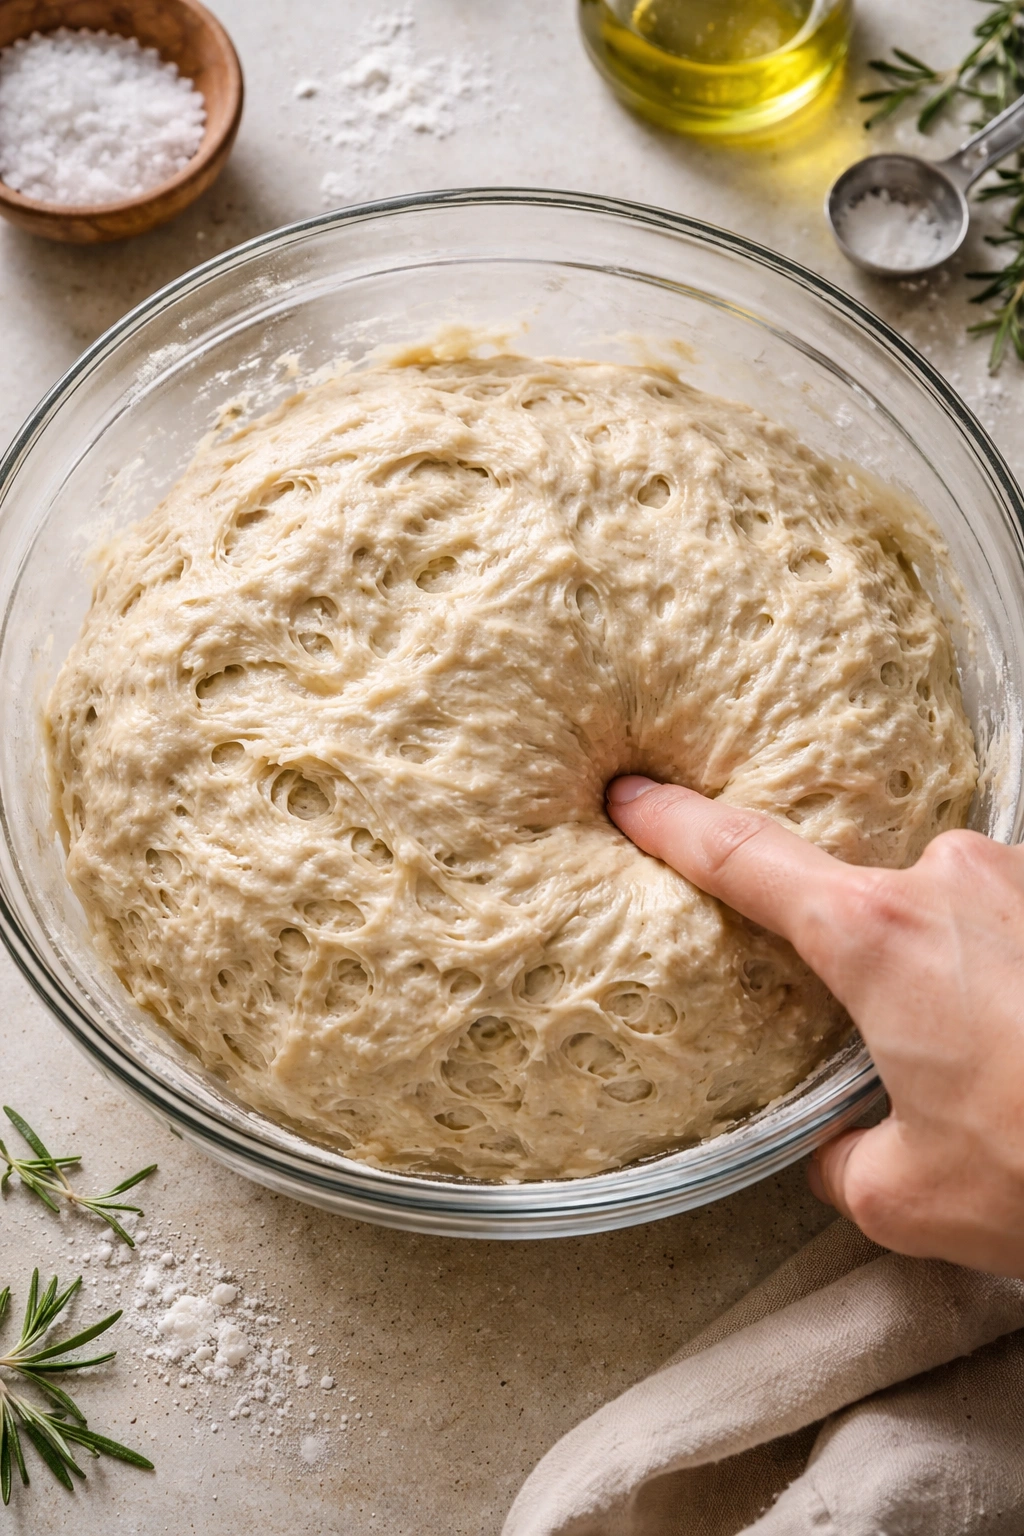
Once the dough is stretched to fill the pan, cover it loosely with a cloth or plastic wrap and let it rise at room temperature for 1 to 2 hours. The dough is ready when it’s visibly puffy and springs back slowly (not instantly) when you press a fingertip lightly into it. This is the second rise, and it’s much shorter than the first because the dough already had extensive cold fermentation.
Creating Dimples and Adding Toppings:
-
About 20 minutes before the end of the second rise, preheat your oven to 475°F (245°C). Position the rack in the middle of the oven.
Advertisements -
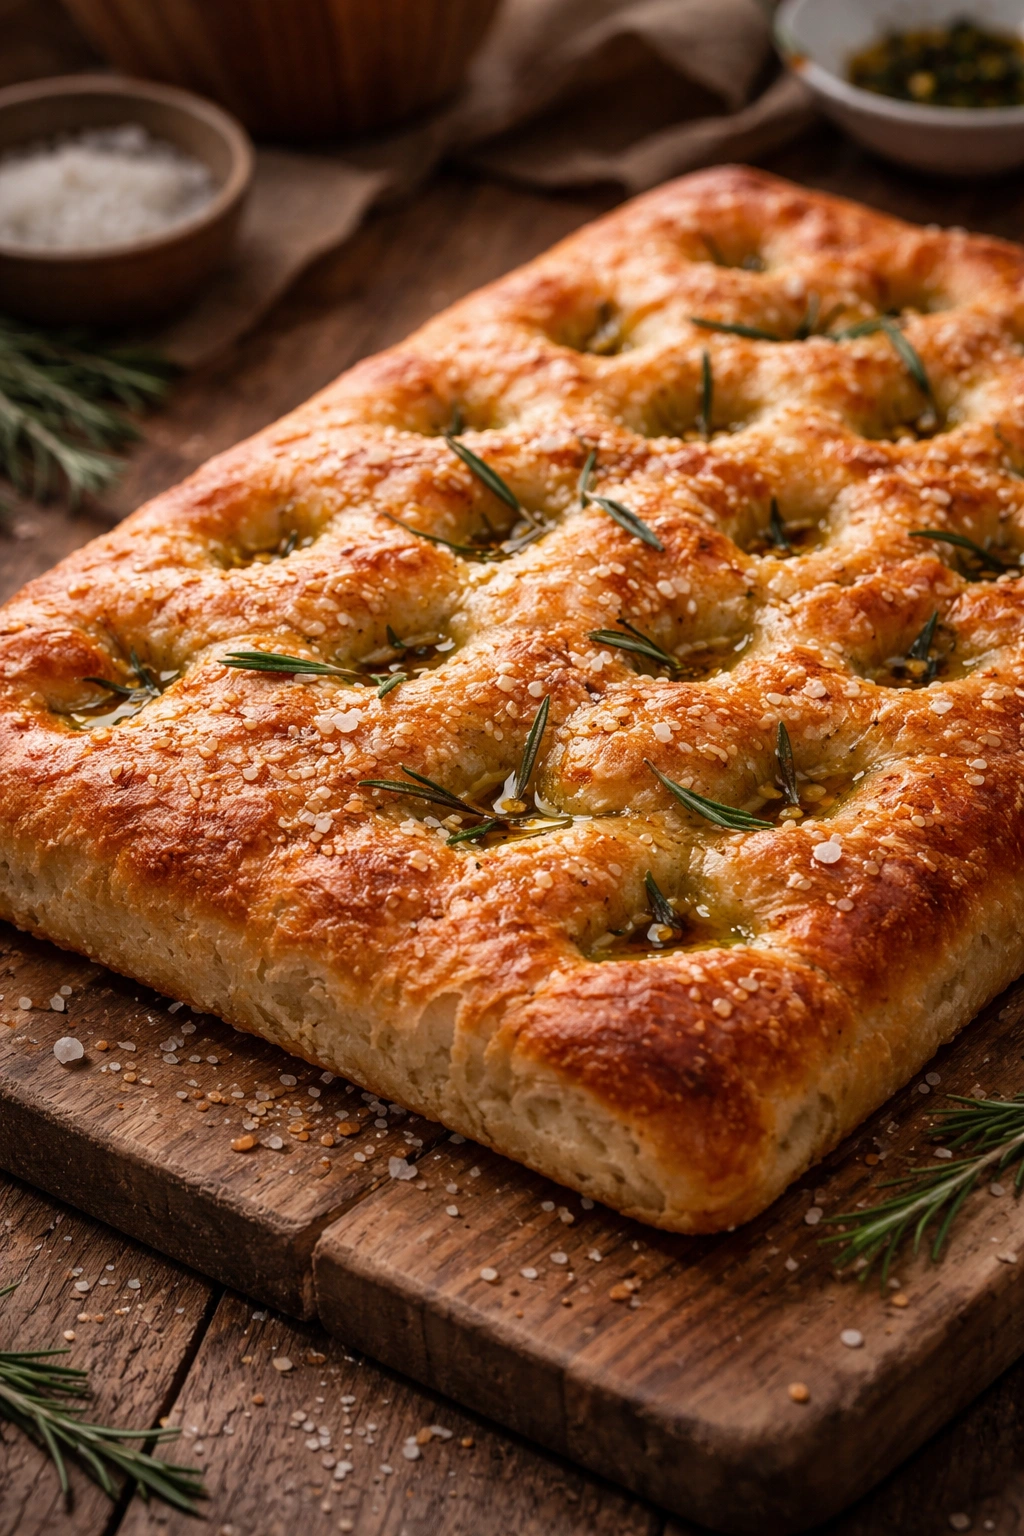
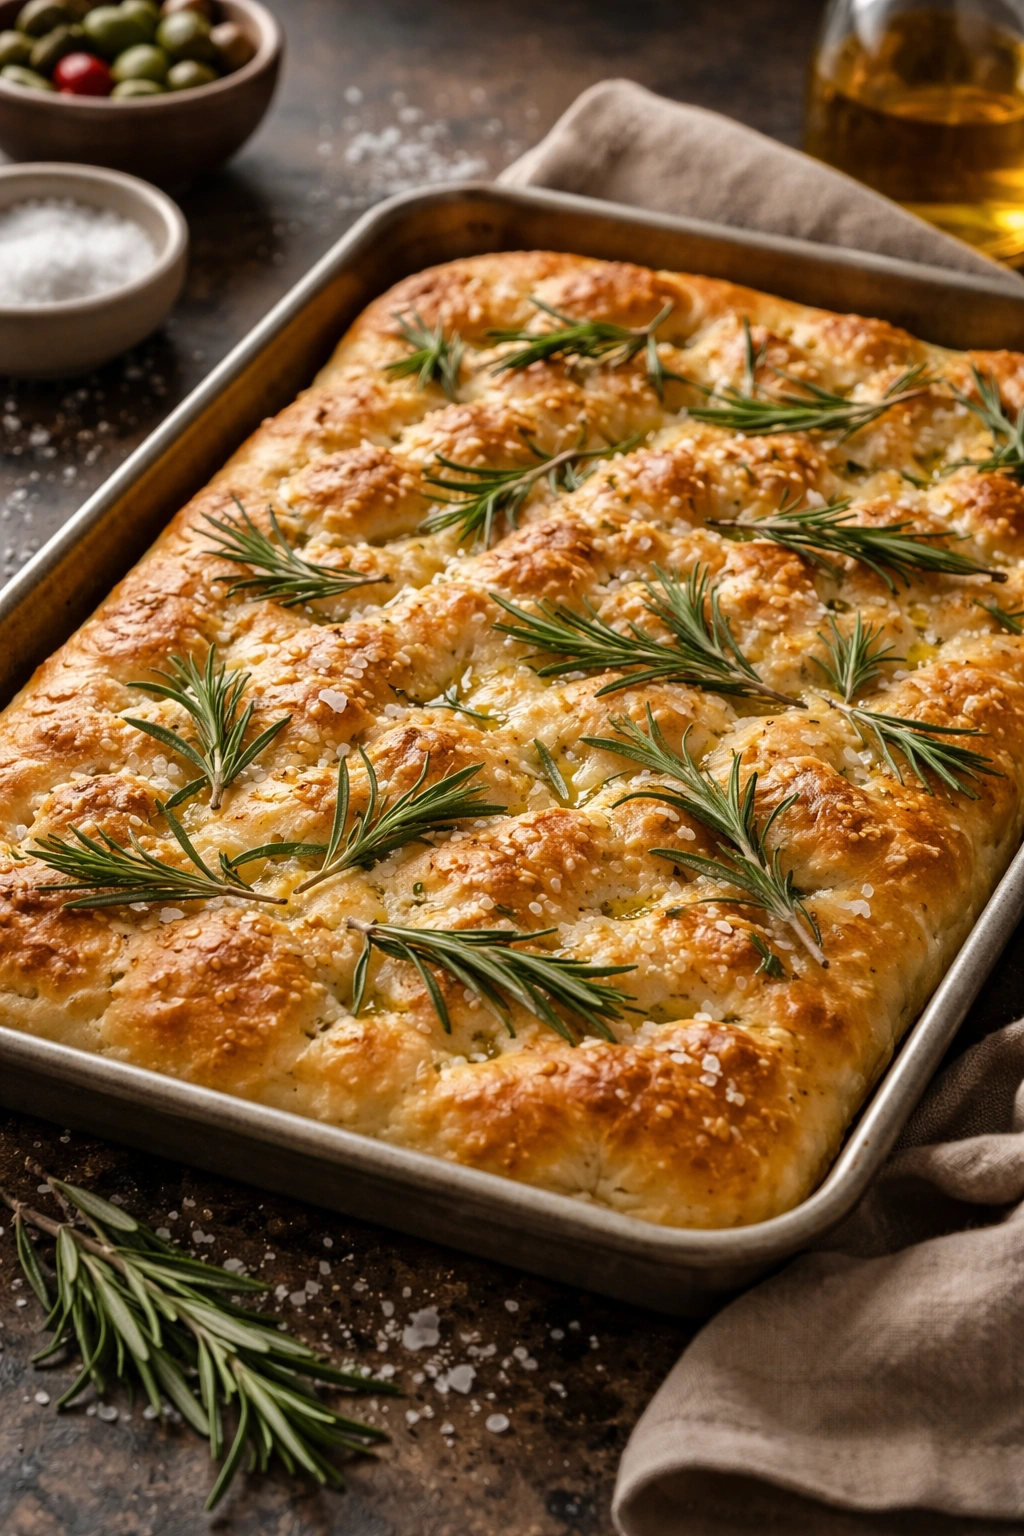
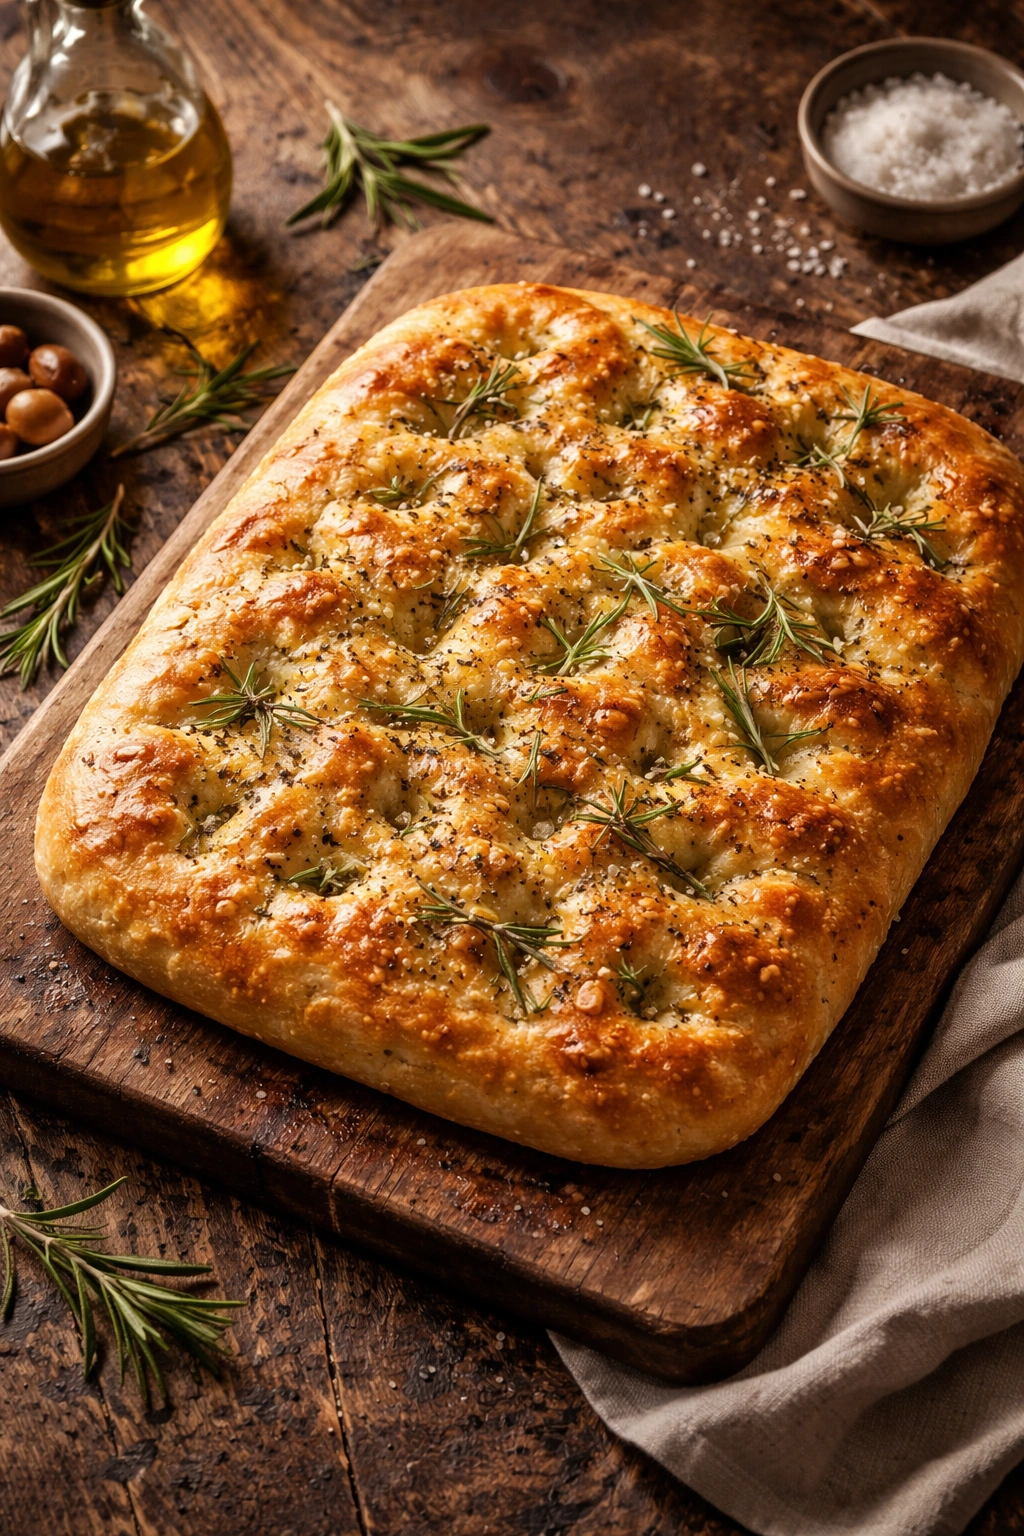
Once the dough has risen and is puffy, using your fingertips, gently press dimples all over the surface of the dough—these are the signature focaccia dimples. Press down with your fingertips to create little pools without completely deflating the dough. This step both looks beautiful and serves a practical purpose: the dimples catch and hold olive oil, creating pockets of intense flavor and crisped edges.
-
Drizzle or brush the 2 to 3 tablespoons of extra-virgin olive oil evenly over the entire surface, making sure some oil settles into each dimple. Sprinkle the coarse sea salt generously over the top—it should be visible across the entire surface. Scatter the fresh rosemary leaves over everything.
Baking:
-
If using a spray bottle for steam (optional but helpful): spray the walls and floor of your preheated oven lightly with water. This creates a steamy environment that helps develop a crispy crust and increases oven spring.
-
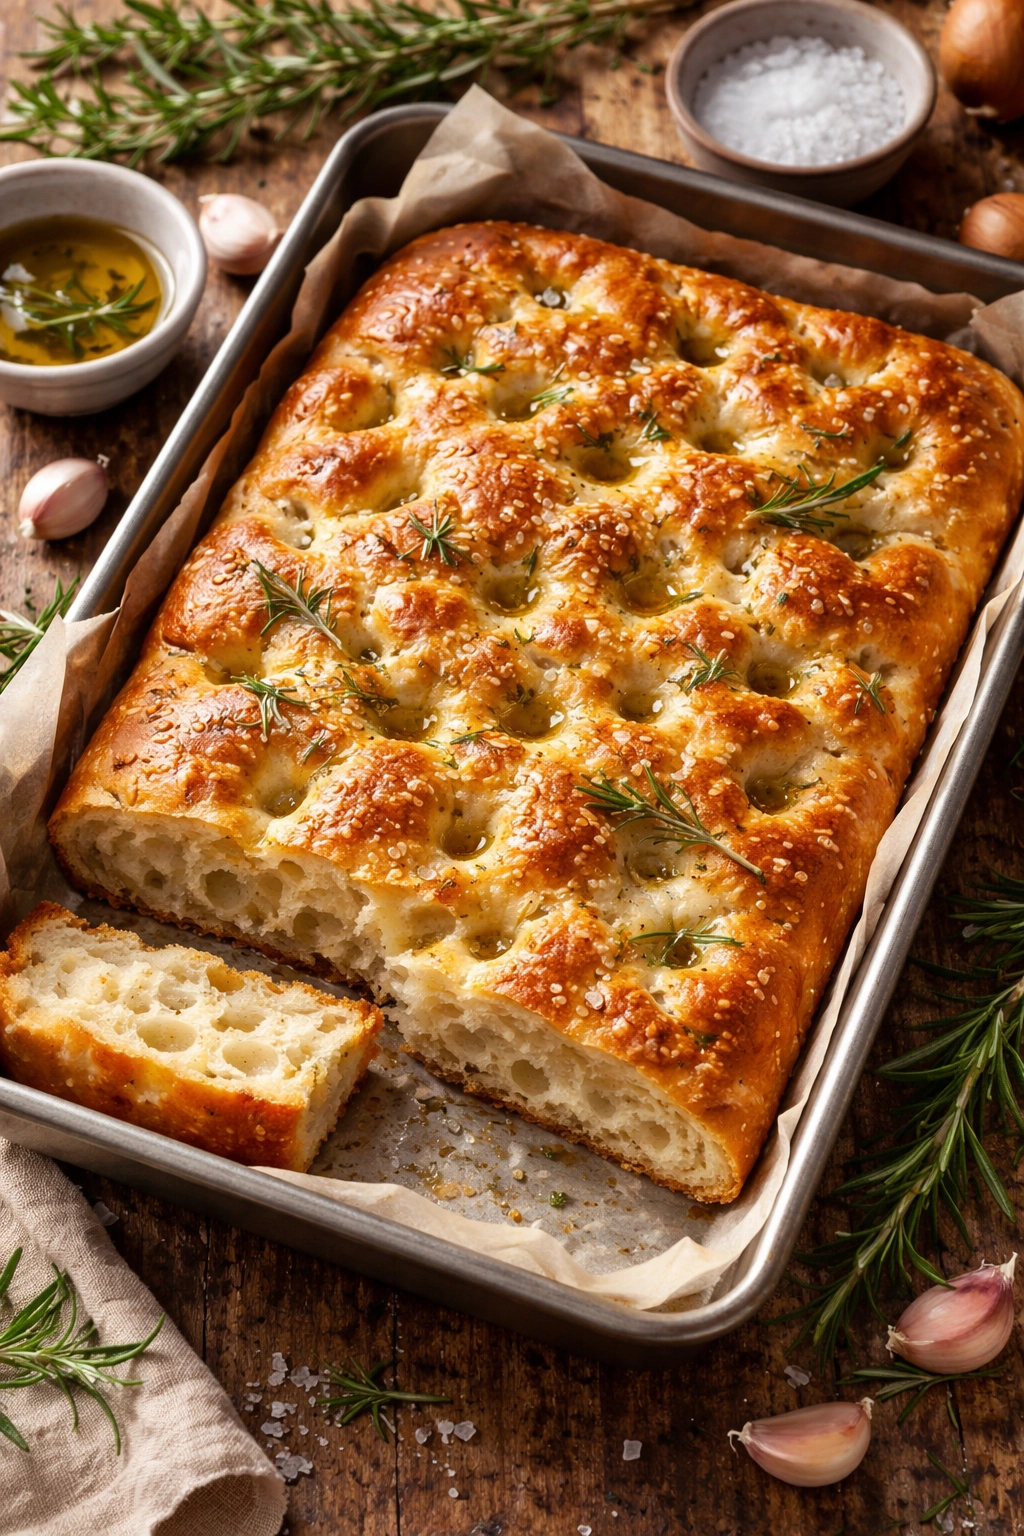
Transfer the pan to the preheated oven and bake for 25 to 30 minutes, rotating the pan halfway through for even browning. The focaccia is done when the top is deep golden brown (almost caramel-colored in places), the edges are crisped and pulling away from the sides of the pan, and when you tap the bottom (carefully using an oven mitt), it sounds hollow and firm, not soft or dense.
-
Remove the focaccia from the oven and immediately drizzle a small amount of high-quality extra-virgin olive oil over the top if you’d like extra richness and flavor. Transfer to a wire cooling rack and let it cool for at least 10 to 15 minutes before serving—this allows the structure to set. Do not skip this cooling time; cutting into warm focaccia will make it compress and lose its light, airy texture.
Common Mistakes and How to Avoid Them
Dense, heavy focaccia almost always comes from either overworking the dough during initial mixing or not allowing enough rise time. If you knead focaccia dough like you would sandwich bread—aggressively and for long periods—you’ll develop excess gluten and trap too much structure, resulting in a heavy, dense crumb. Remember: you’re building just enough gluten to trap gas, not maximum gluten development. Mix gently, fold rather than knead, and respect the high hydration by letting time do the work instead of aggressive handling.
Insufficient rise time produces focaccia that’s flat and doesn’t puff up in the oven. If you rush the second rise because you’re hungry or impatient, you’ll get a bread that bakes up dense and compact rather than open and billowy. The second rise is shorter than the first (1 to 2 hours instead of overnight), but it’s absolutely necessary. If your kitchen is cold, the rise takes longer—that’s fine, just wait until the dough passes the poke test (springs back slowly).
Uneven browning usually means the oven rack isn’t positioned correctly or you didn’t rotate the pan halfway through. Focaccia should be in the middle third of the oven, not too close to any heating element. Rotating halfway through baking compensates for hot spots in your oven and ensures even browning on the bottom and top.
Not enough olive oil in the pan results in focaccia that sticks and doesn’t brown evenly. This is not a place to be stingy—generously oil your pan, and the dough will release beautifully during baking. The oil crisps the edges and creates a golden, flavorful base. Skipping oil or underoiling is a false economy that compromises both texture and taste.
Forgetting to dimple the focaccia before baking means you miss both the visual signature and the practical benefit of those oil-catching pockets. If you accidentally skip dimpling, all isn’t lost—the focaccia will still be delicious—but those dimples are what make focaccia instantly recognizable and what allow olive oil to pool and crisp certain parts of the surface.
Over-proofing dough (letting it rise too long, especially at warm temperatures) makes it collapse in the oven instead of rising up. The gluten network weakens from over-fermentation, and instead of trapping gas and puffing up, the dough spreads thin and bakes up dense. The cold fermentation method actually prevents this because cold temperatures slow fermentation dramatically, making it nearly impossible to over-proof in the traditional sense—you’d have to leave the dough in the fridge for days past the 48-hour mark before over-fermentation becomes a real issue.
Variations to Try Once You’ve Mastered the Basic
Once you’re comfortable with the basic focaccia, endless variations open up. Try replacing half the water with beef or vegetable broth for a deeper savory flavor—the resulting focaccia tastes almost meaty and pairs beautifully with hearty soups. Reduce the salt slightly if using broth, since broth contains its own sodium.
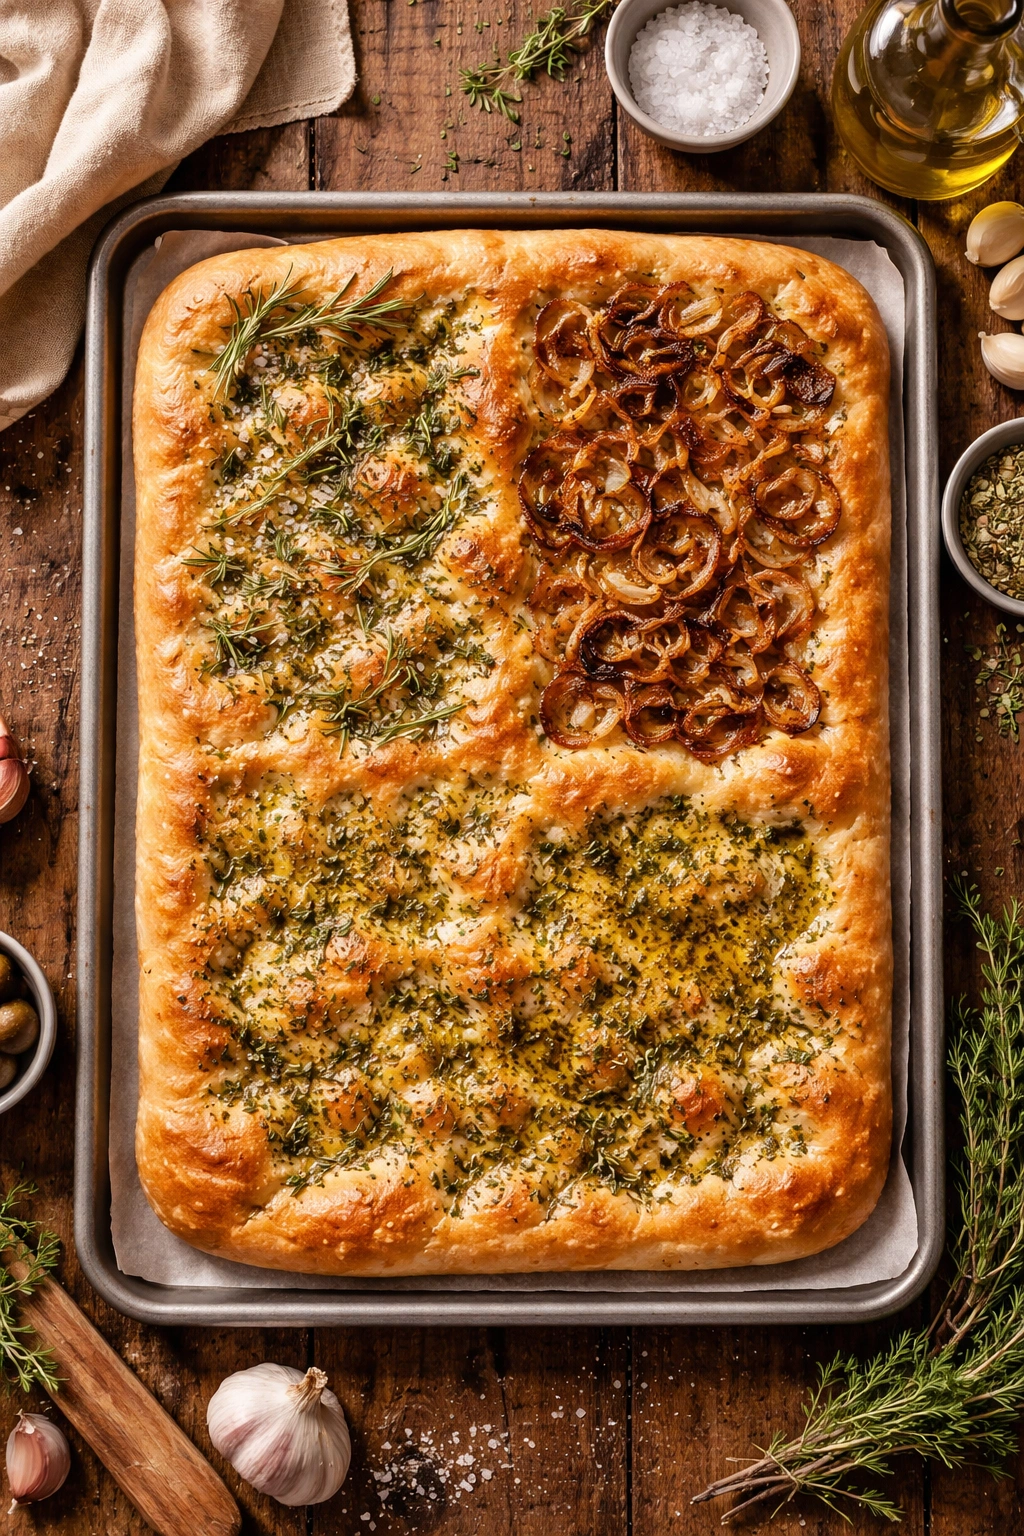
Caramelized onions are a classic Italian focaccia topping and genuinely transform the bread. Slice 2 to 3 large yellow onions thinly and cook them low and slow in olive oil for about 45 minutes, stirring occasionally, until deeply golden and sweet. Apply them to the focaccia after dimpling but before the final rise, and skip the rosemary if you prefer the onion flavor to be the star.
A whole grain version works beautifully if you replace 100 to 150 grams of the all-purpose flour with whole wheat flour. The bread will be slightly denser and nuttier—not a bad thing, just different. Whole wheat flour absorbs slightly more water, so you might need an extra 10 to 15ml of water if the dough seems too stiff.
Herb variations are endless: try fresh sage instead of rosemary, or a combination of herbs. Italian seasoning, herbes de Provence, or za’atar all create entirely different flavor profiles while using the exact same dough. For a Mediterranean twist, top the focaccia with Kalamata olives (pitted and halved), crumbled feta cheese, and dried oregano.
Cheese versions are gloriously indulgent—scatter grated Gruyère, sharp cheddar, Parmigiano-Reggiano, or a combination across the top before the final rise. The cheese will melt into the bread and create crispy, caramelized bits on the edges. A focaccia topped with caramelized onions, crispy bacon bits, and Gruyère is essentially a savory bread that tastes like a loaded baked potato.
For a spicy version, sprinkle red pepper flakes and a drizzle of hot chili oil across the top. Fresh chiles, finely minced, also work beautifully—just scatter them over the dimpled dough before the final rise.
Toppings That Transform Your Focaccia
The magic of focaccia is that the same basic dough becomes an entirely different experience depending on what you top it with, and you can make multiple variations in a single baking session if you have multiple pans or divide your dough into smaller portions and bake them sequentially.
Classic Rosemary and Sea Salt remains unbeatable—it’s the archetypal focaccia because the combination is genuinely perfect. The herbaceous, slightly piney flavor of fresh rosemary pairs with salty, crispy edges and rich olive oil. This is the version to make first, the standard against which all other variations are judged.
Tomato and Garlic works beautifully if you brush the dimpled dough with a thin layer of crushed tomato or tomato paste mixed with minced garlic and olive oil before the final rise. The tomato becomes slightly caramelized during baking, and the garlic mellows and sweetens. Add a handful of fresh basil or oregano if you have it.
Olive and Anchovy creates an intensely savory, umami-forward bread. Scatter chopped Kalamata olives and small anchovy fillets (or anchovy paste mixed into the olive oil) across the surface. It sounds aggressive but balances beautifully—the bread is rich enough to handle it, and the result is something genuinely special.
Caramelized Onion and Gruyère is almost a meal in itself. Layer caramelized onions (made as described earlier) across the surface, scatter Gruyère cheese, and finish with cracked black pepper. It’s indulgent and warming.
Focaccia al Formaggio is a traditional Italian version where you press thin slices of cheese between two layers of dough before the final rise. It’s more involved but creates a bread that’s almost half cheese by the time it’s baked. Use a mild cheese like mozzarella or fontina so it melts without overpowering the bread.
Garlic and Oil, called Focaccia all’Aglio, is the simplest imaginable—brush the dimpled dough with a mix of olive oil infused with minced raw garlic before the final rise. The garlic becomes slightly crispy and sweet during baking. Finish with fresh chopped parsley and coarse salt.
Storage, Reheating, and Make-Ahead Options
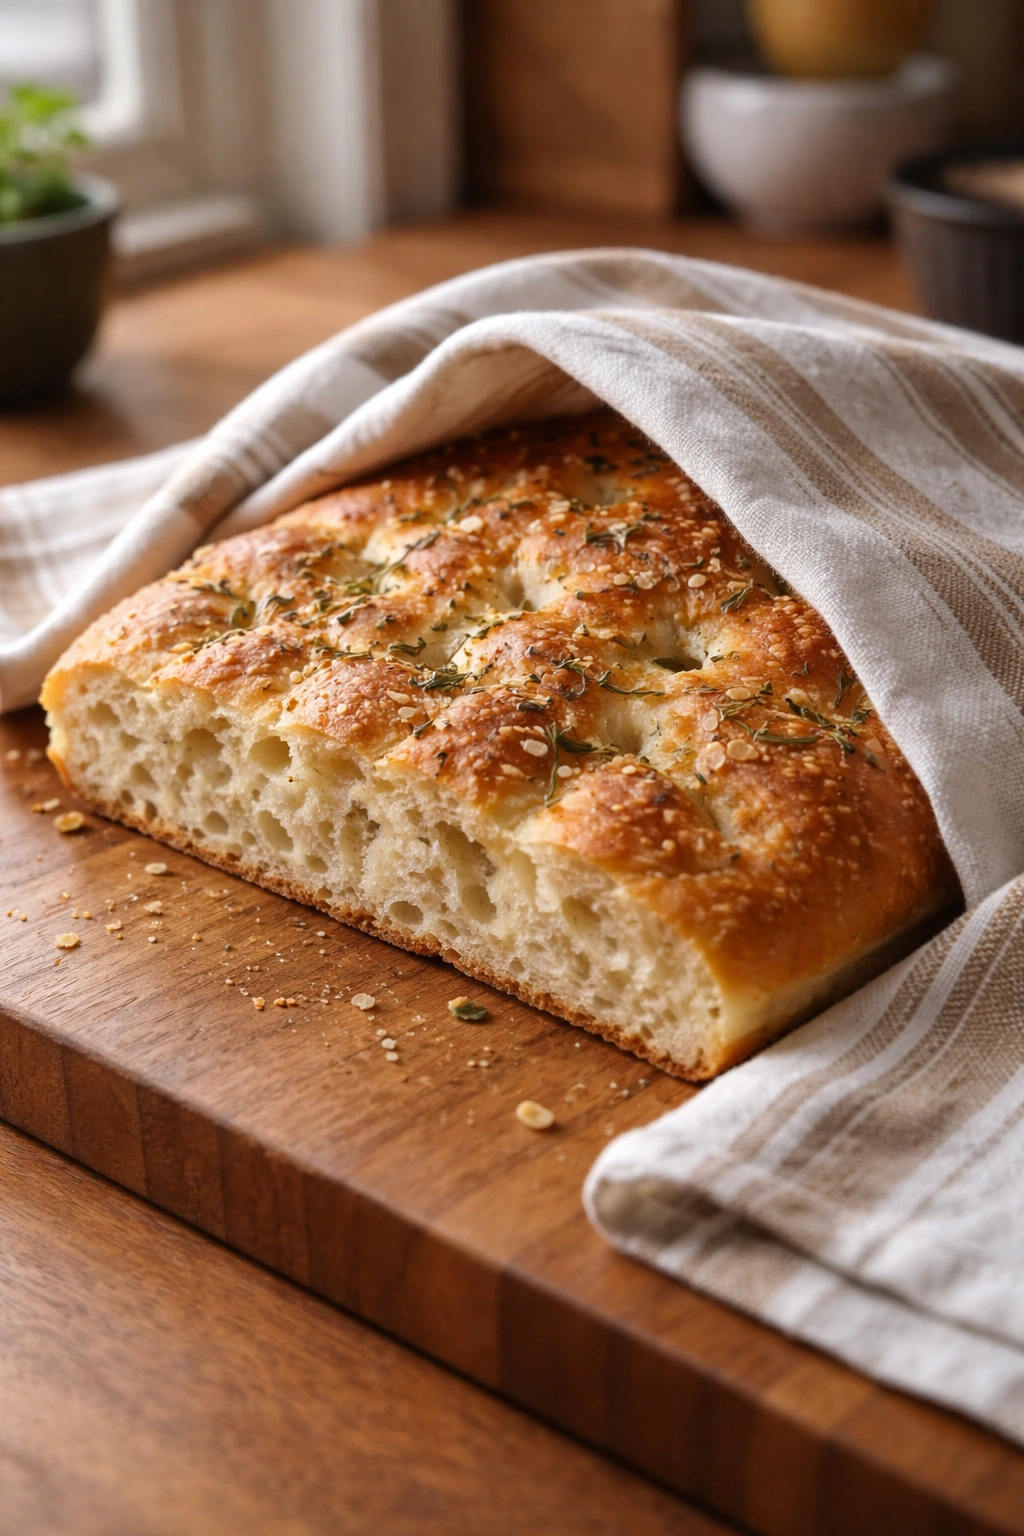
Homemade focaccia is best eaten the day it’s made, still warm or at room temperature, when the crumb is tender and the crust still has some crispness. But it keeps far better than most breads if you store it properly.
At room temperature, wrapped in a clean kitchen towel or placed in a paper bag (not plastic, which traps moisture and makes it stale faster), focaccia stays pleasant for 2 to 3 days. The crust softens slightly, but the interior remains tender. If you’re keeping it longer than a few hours, an airtight container or wrapped tightly in plastic wrap extends this to 4 to 5 days—the crust will be softer, but the bread won’t dry out.
In the freezer, focaccia keeps beautifully for up to 3 months. Wrap individual pieces or the whole focaccia (sliced or whole) tightly in plastic wrap, then place in a freezer bag or airtight container. Label it with the date so you know how long it’s been frozen. Thaw at room temperature for 2 to 3 hours, or reheat from frozen in a 325°F (160°C) oven for about 15 to 20 minutes, loosely covered with foil to prevent over-browning.
To revive slightly stale focaccia without it becoming tough, lightly spray or brush the surface with water and place it in a 375°F (190°C) oven for 10 to 15 minutes. The moisture rehydrates the interior, and the heat revives the crust. This works beautifully for room-temperature stored focaccia that’s a day or two old.
For make-ahead convenience, the cold fermentation is genuinely where the work happens. You can refrigerate the shaped dough (already in its final pan) for up to 12 hours before the final rise. In the morning, take it out, let it come to room temperature for 1 to 2 hours, dimple and top it, then bake. This makes focaccia perfect for entertaining—most of the work is done ahead, and you just bake it off an hour or two before serving.
You can also freeze the dough after the first rise (after mixing and the initial 1-2 hour rise, but before the cold fermentation). Portion it into your pan, let it come to room temperature slightly, then wrap tightly and freeze for up to 1 month. Thaw in the refrigerator overnight, then proceed with the final rise and baking the next day.
Pairing Ideas and Serving Suggestions
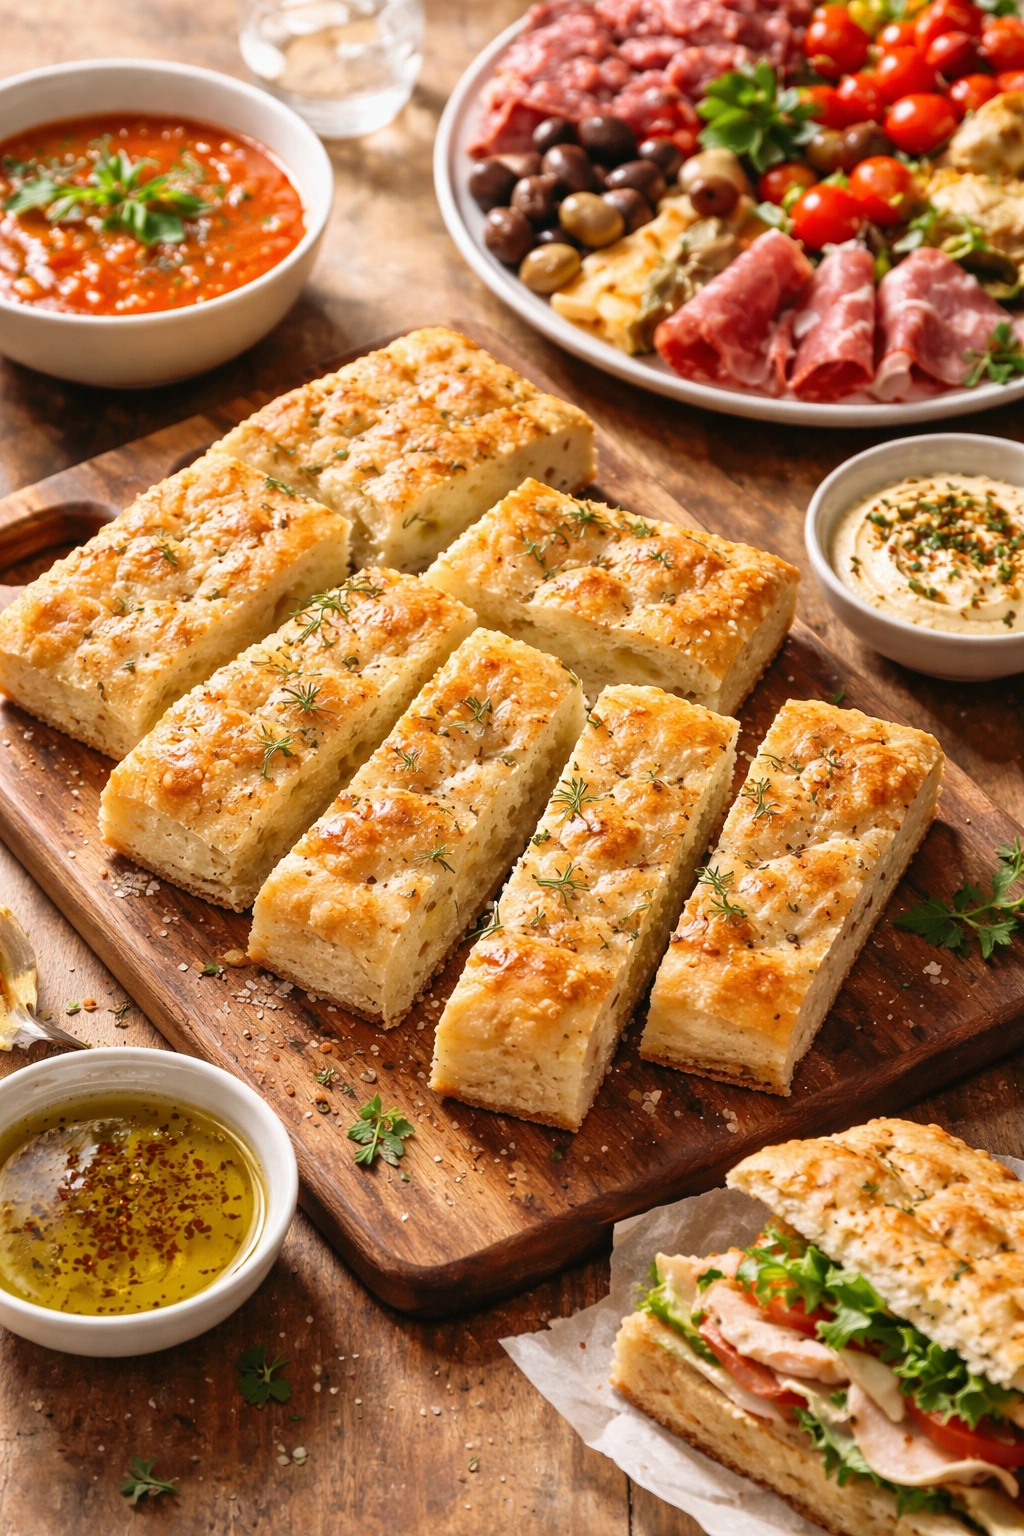
Focaccia is endlessly versatile, working as a side to almost any savory meal, as an appetizer, or as a vehicle for lunch sandwiches.
With Soups: Focaccia is the perfect companion to vegetable soups, minestrone, tomato bisque, or creamy mushroom soups. Tear pieces and dip them in, or serve alongside. The bread’s structure is hearty enough to stand up to rich, flavorful soups without falling apart.
As an Antipasto Board: Arrange focaccia (cut into pieces) on a wooden board alongside cured meats, cheeses, olives, marinated vegetables, and fresh fruit. It becomes the bread component of an entire meal. A rosemary and salt focaccia is perfect here, as it doesn’t compete with the other flavors.
For Sandwiches: Slice focaccia horizontally and use it as sandwich bread. Its tender crumb and rich flavor make ordinary sandwiches extraordinary. Try roasted vegetables with pesto and mozzarella, or cured meats with cheese and fresh tomato.
As a Simple Appetizer: Brush warm focaccia with garlic-infused olive oil, top with fresh herbs, and serve immediately. Add a small bowl of really good olive oil for dipping. Most people eat focaccia faster than you’d expect—it’s incredibly moreish.
With Cheese and Charcuterie: Focaccia pairs beautifully with aged Parmesan, fresh ricotta, prosciutto, and salami. The bread’s richness holds its own against bold flavors.
With Roasted Vegetables: Any roasted vegetables—broccoli, cauliflower, root vegetables, mushrooms—taste better alongside focaccia. The bread absorbs the flavors and oils from the vegetables, creating a complete, satisfying meal.
With Wine and Cheese: Make it an Italian-style snack—a slice of focaccia with a wedge of cheese and a glass of wine. The bread is substantial enough to be satisfying but light enough not to overwhelm.
Troubleshooting Dense or Flat Focaccia
If your focaccia turned out dense or didn’t rise as much as expected, several factors could be at play, and understanding them means your next batch will be better.
The dough didn’t rise properly before you shaped it. Room temperature in your kitchen matters more than you’d expect—if your space is cool (under 65°F / 18°C), fermentation slows dramatically. Cold dough takes longer to rise; sometimes significantly longer. If you’re in a cool environment, let the first rise happen for 3 to 4 hours instead of the usual 1 to 2, and be guided by how the dough looks rather than the clock.
The yeast was dead or insufficient. Old yeast, yeast that was stored improperly, or using too little yeast in the first place all result in slow or no rise. If you’re not sure your yeast is viable, do a quick bloom test: mix a pinch of yeast with warm water and a tiny pinch of sugar, and wait 5 minutes. If it gets foamy, you’re good. If it stays flat, your yeast isn’t alive.
You didn’t allow enough cold fermentation time. Cold fermentation doesn’t just build flavor—it also allows the yeast to work (slowly) and develop the dough structure. If you skipped the refrigeration overnight and only did a room-temperature rise, you’re missing the extended development that makes focaccia light and open. Next time, do the full overnight cold fermentation.
The dough was over-worked during mixing. If you kneaded aggressively for a long time, you developed so much gluten that the dough became tight and strong rather than open and extensible. This prevents it from rising normally. Focaccia dough should be mixed just until smooth and cohesive, not aggressively kneaded.
The second rise wasn’t long enough. The most common mistake is rushing the final rise before baking. The dough needs to be visibly puffy and should spring back slowly when you poke it. If you baked it when it still looked relatively flat or tight, it won’t have enough rise in the oven.
Final Thoughts
Making focaccia at home is one of those kitchen projects that feels far more impressive than the effort it actually requires. The dough is forgiving, the ingredients are simple, and the method fits easily into a normal week. You’ll spend maybe 15 to 20 minutes actually working with the dough, and the rest is just time—cold fermentation that happens while you sleep, a gentle rise that happens while you go about your day.
The first time you pull a golden, aromatic focaccia from your oven, still hot, glistening with olive oil, dimpled and herb-scattered, you’ll understand why this bread has remained a staple of Mediterranean cooking for centuries. It’s not fancy, it’s not complicated, but it’s absolutely satisfying in the most basic, delicious way.
Start with the basic rosemary and salt version—master that, understand how your oven browns it, learn how long your kitchen takes to proof it. Then play. Top it with caramelized onions or fresh tomatoes or whatever you’re craving. The dough is stable and forgiving enough that experimentation becomes genuinely fun rather than risky. You’ll find yourself making focaccia regularly, inviting people over just to share it warm, and genuinely looking forward to baking days.