Weeknight cooking doesn’t need to be complicated, expensive, or time-consuming. When you’re exhausted after a long day, the last thing you want is to spend hours in the kitchen juggling multiple pans, exotic ingredients, and complicated techniques. The truth is, some of the best dinners come together with just a handful of everyday ingredients and straightforward, no-fuss methods—and they taste genuinely delicious, not like shortcuts or compromises.
The challenge most home cooks face isn’t a lack of hunger or desire to eat well; it’s decision fatigue, ingredient overwhelm, and the mental burden of remembering a 15-ingredient recipe when your brain is already full. That’s where the five-ingredient dinner framework becomes a game-changer. By limiting yourself to five core ingredients (not counting pantry staples like salt, pepper, oil, or water), you simplify shopping, reduce waste, cut prep time drastically, and often spend less money per meal. More importantly, you remove the friction that stops you from cooking at all.
Each of the dinners below delivers on flavor, nutrition, and satisfaction while respecting your time and energy. These aren’t deprivation meals or sad desk lunches—they’re recipes built around smart ingredient combinations, efficient cooking methods, and the philosophy that great food doesn’t require complexity. Whether you’re cooking for yourself, a partner, or a small family, these dinners scale easily and come together in 30 minutes or less. Most use a single pan or pot, which means less cleanup and more time to actually enjoy your meal or collapse on the couch guilt-free.
1. Sheet Pan Lemon Garlic Chicken with Roasted Broccoli
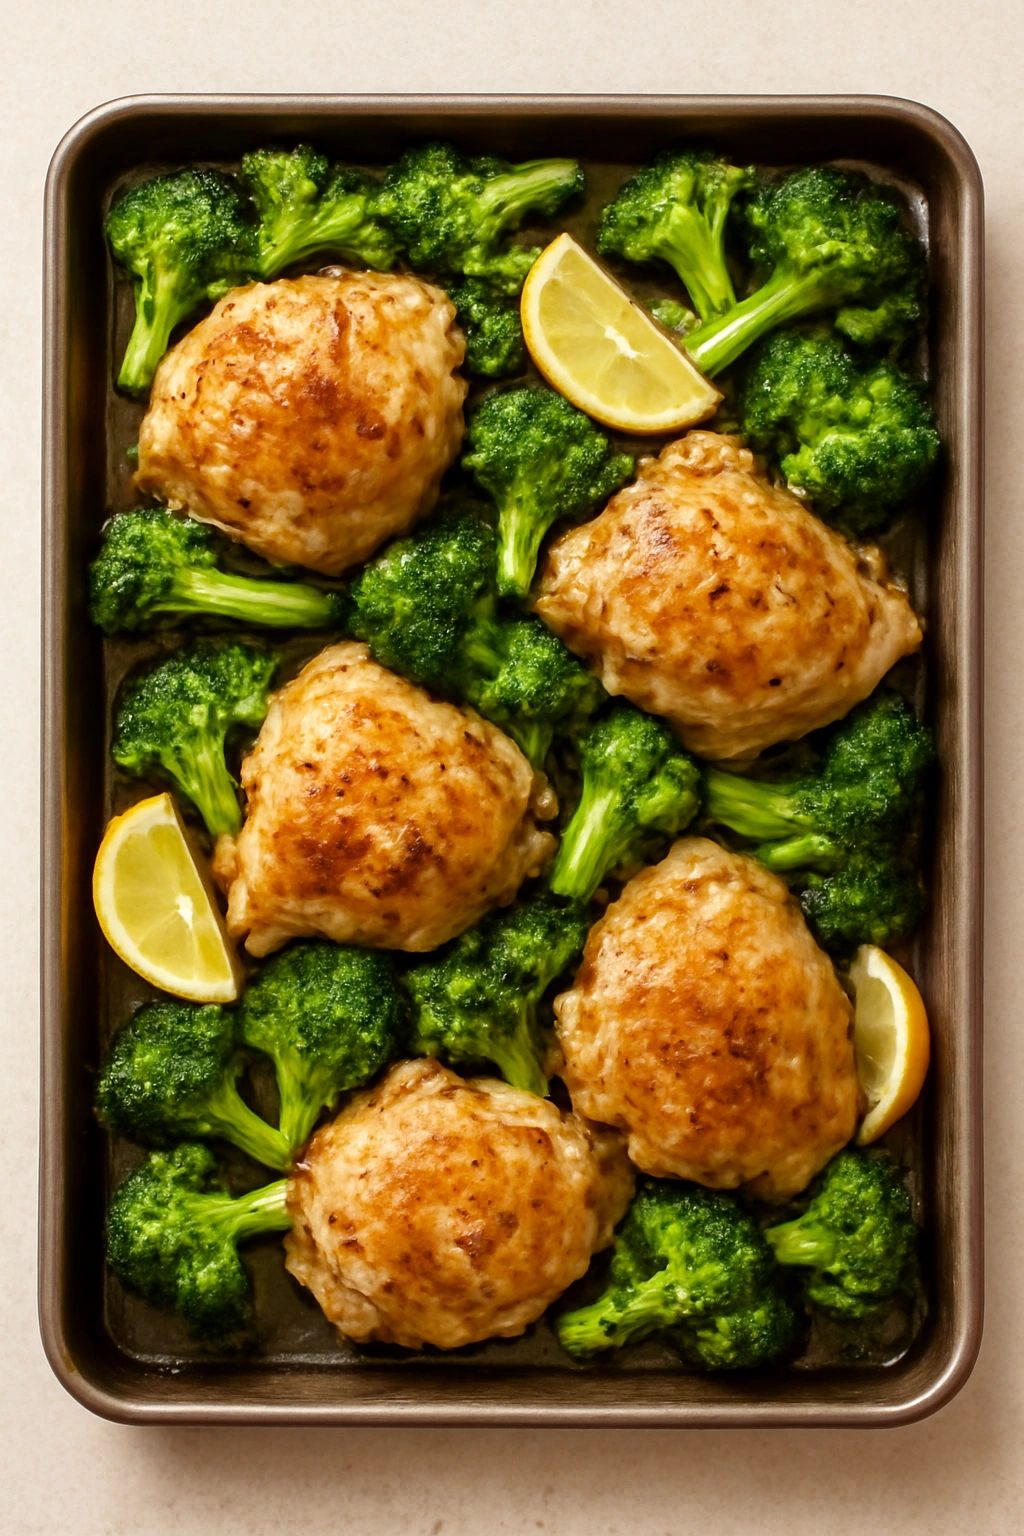
One of the most reliable lazy-weeknight dinners is a sheet pan meal where protein and vegetables roast together in the oven while you do absolutely nothing. This lemon garlic chicken is bright, aromatic, and genuinely craveable—the kind of simple dinner that tastes far better than the minimal effort suggests.
The magic here is in the oven doing all the work. You arrange chicken thighs (thighs, not breasts, because they stay juicy and forgiving) on a sheet pan along with broccoli florets, toss everything with oil, fresh garlic, lemon juice, and seasoning, then let the oven work for 25 minutes while you rest. By the time it comes out, the chicken skin is golden and crispy, the broccoli is caramelized at the edges, and the whole pan smells like a restaurant kitchen.
Yield: Serves 2 to 3 | Prep Time: 10 minutes | Cook Time: 25 minutes | Total Time: 35 minutes | Difficulty: Beginner — assembly is straightforward, hands-off cooking, minimal technique required
Ingredients:
- 1½ pounds bone-in, skin-on chicken thighs (about 4 to 6 pieces)
- 1 large head fresh broccoli, cut into florets
- 4 cloves fresh garlic, minced
- 3 tablespoons extra-virgin olive oil
- 2 fresh lemons (about ¼ cup juice + zest of 1 lemon)
Instructions:
Prepare and Season:
- Preheat your oven to 425°F (220°C) and position the rack in the upper-middle position so the heat surrounds the food evenly.
- Pat the chicken thighs dry with paper towels—this is crucial for getting the skin crispy. Dry skin browns; wet skin steams. Don’t skip this step.
- On a large sheet pan (at least 18 × 13 inches), arrange the chicken thighs skin-side up. Add the broccoli florets around and between the chicken pieces.
- In a small bowl, whisk together the minced garlic, olive oil, lemon juice, lemon zest, ½ teaspoon salt, and a generous grinding of black pepper.
- Drizzle the garlic-lemon mixture evenly over the chicken and broccoli, making sure to coat the broccoli well. The chicken skin should have some of the mixture on top, and the broccoli should be thoroughly tossed.
Roast: 6. Slide the sheet pan into the oven and roast for 23 to 27 minutes, until the chicken skin is deeply golden and crispy, the juices run clear when you pierce the thickest part of the thigh with a fork, and the broccoli is tender with charred edges. 7. Remove from the oven and let rest for 2 to 3 minutes before serving—this allows the chicken juices to redistribute and stay moist when you cut into it.
Why This Works for Lazy Weeknights
Bone-in, skin-on chicken thighs are genuinely superior to breasts for weeknight cooking because they’re nearly impossible to overcook. Breasts dry out in a heartbeat; thighs stay succulent and forgiving. The skin crisps beautifully, giving you that satisfying textural contrast without any special technique—just dry them and let the oven do the work. The broccoli caramelizes in the same pan, soaking up all those lemon-garlic flavors, and everything finishes at the same time.
Practical Tips and Variations
Build in flavor from the start: If you want more depth, add 1 teaspoon of dried oregano or Italian seasoning to the garlic mixture. Fresh thyme sprinkled on at the end adds a restaurant-quality touch with zero extra effort.
Swap the vegetable: Brussels sprouts cut in half work beautifully, as do thick asparagus spears or cauliflower florets. Cherry tomatoes added in the last 10 minutes of cooking are excellent too.
Make it spicy: Add ¼ teaspoon of red pepper flakes to the garlic oil for a gentle heat that doesn’t overwhelm the bright lemon flavor.
Skip the lemon?: Use lime instead and add a tablespoon of soy sauce to the oil mixture for an Asian-inflected version.
Storage and Make-Ahead
Leftovers refrigerate beautifully for up to 4 days. Shred the leftover chicken and toss it with the roasted broccoli, a bit of the pan drippings, and some cooked grains for a next-day grain bowl. You can also freeze this meal for up to 3 months—thaw overnight in the fridge and reheat gently in a 350°F oven for 15 minutes until warm through.
2. Quick Beef Tacos with Fresh Pico de Gallo

Tacos are often overlooked as “lazy” meals because people assume they require a long simmer, a dozen ingredients, and complicated spice blends. In reality, good tacos come together in 15 minutes with five ingredients and taste infinitely better than the boxed seasoning mix version.
Ground beef tacos work because ground beef cooks rapidly—it goes from raw to fully cooked in about 5 minutes over medium-high heat. The key is seasoning it boldly so it tastes restaurant-quality without relying on a heavily processed packet. Fresh lime juice, garlic, and cumin are your holy trinity here, and they deliver a flavor profile that feels authentic and satisfying.
Yield: Serves 2 to 3 (makes 6 to 8 tacos) | Prep Time: 10 minutes | Cook Time: 10 minutes | Total Time: 20 minutes | Difficulty: Beginner — just browning meat and chopping tomatoes; no special skills needed
Ingredients:
- 1 pound ground beef (85/15 blend)
- 1 tablespoon ground cumin
- 4 cloves fresh garlic, minced
- 3 medium fresh tomatoes, finely diced (or 1½ cups cherry tomatoes, quartered)
- 2 fresh limes (about 3 tablespoons juice total)
Instructions:
Brown the Beef:
- Heat a large skillet over medium-high heat until it’s hot enough that a drop of water sizzles immediately on contact.
- Add the ground beef and cook, breaking it apart with a wooden spoon or spatula as it browns, for 4 to 5 minutes, until no pink remains and the beef is cooked through. Don’t stir constantly—let it sit for 30 seconds at a time so it browns rather than just steaming.
- Drain off excess fat if there’s more than a thin layer at the bottom of the pan—a small amount of fat carries flavor, but you don’t want a pool of grease.
Season and Finish: 4. Reduce heat to medium and add the minced garlic and cumin. Stir constantly for 30 to 45 seconds until fragrant—don’t let the garlic burn or it becomes bitter. 5. Squeeze the lime juice over the meat, add ½ teaspoon salt and a few grinding of black pepper, and stir to combine. Taste and adjust seasoning as needed—it should taste boldly seasoned, not bland.
Make the Pico: 6. While the meat cooks, combine the diced tomatoes with the juice of the remaining lime and a pinch of salt in a small bowl. Set aside. 7. Warm your taco shells or tortillas (flour or corn, your preference) in a dry skillet over medium heat, about 20 seconds per side, until pliable and warm.
Assemble: 8. Fill each shell with a spoonful of seasoned beef and top generously with the fresh pico de gallo.
Why This Method Beats the Box
Boxed taco seasoning packets contain salt, anti-caking agents, and fillers that make the meat taste more processed than fresh. When you use cumin, garlic, and lime juice, you’re seasoning with whole ingredients, and the flavor tastes alive. The fresh pico de gallo—just tomatoes and lime—adds brightness and textural contrast that canned salsa never achieves. Total time is actually faster than the packet version, and you know exactly what you’re eating.
Practical Tips and Customizations
Make it spicy: Add ¼ to ½ teaspoon of cayenne pepper or a finely minced jalapeño to the meat while it cooks. Start small and adjust to your heat preference.
Add depth: A tablespoon of tomato paste stirred into the cooked meat adds savory complexity without making the dish taste more complicated.
Bulk it up: Add ½ cup of black beans (canned and rinsed) to the meat for extra fiber and texture if you want to stretch the recipe.
Pico variations: Add finely minced red onion, fresh cilantro, or diced avocado to the pico. A squeeze of garlic into the pico adds another layer of flavor.
Storage and Meal Prep
The seasoned beef keeps in the fridge for up to 4 days and can be gently reheated before serving. The pico is best made fresh but will hold for up to 24 hours if you keep it in an airtight container. Use leftovers for taco-salad bowls, add to rice and beans for a burrito bowl, or layer into a quick quesadilla with cheese.
3. Creamy Tomato Pasta with Spinach
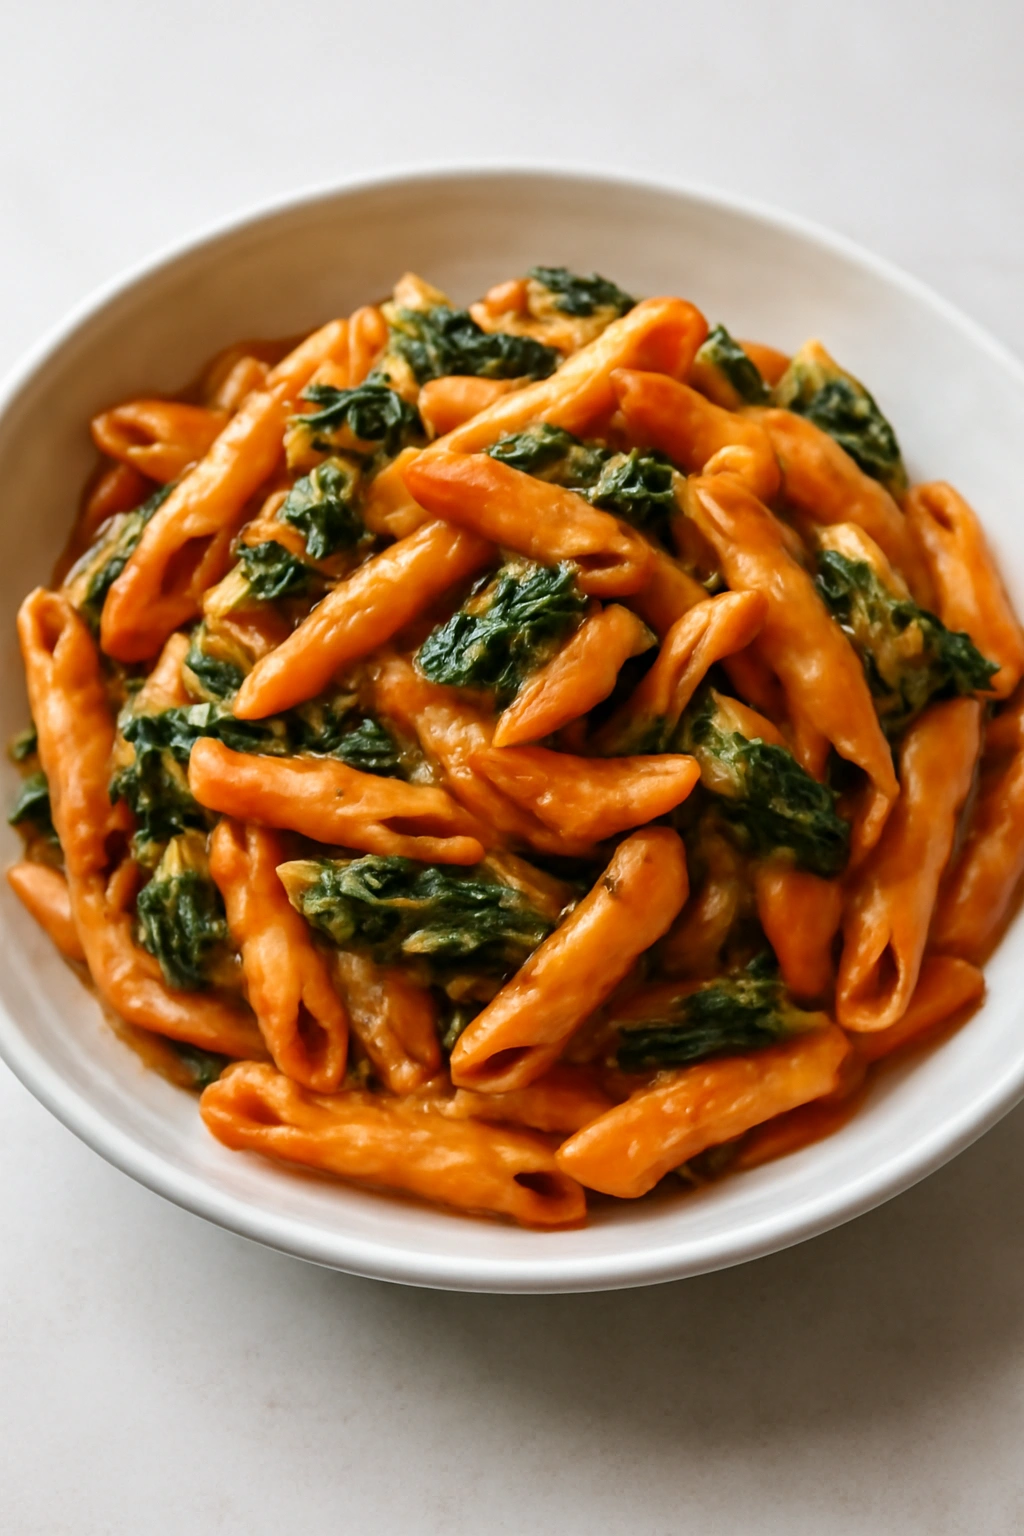
Pasta is the ultimate lazy cook’s friend because it’s fast, forgiving, and endlessly variable. This version comes together in 20 minutes and tastes genuinely luxurious—creamy, tomatoey, and brightened by fresh spinach. It’s the kind of weeknight dinner that feels indulgent without the guilt of being overly heavy or complicated.
The sauce comes together quickly because you’re not simmering for hours; instead, you’re using canned tomatoes (which are excellent quality and require zero peeling) combined with cream and pasta water to create a silky, cohesive sauce. The spinach wilts into the sauce in the final minutes, adding nutrition and a subtle earthy note that balances the richness.
Yield: Serves 2 to 3 | Prep Time: 5 minutes | Cook Time: 18 minutes | Total Time: 23 minutes | Difficulty: Beginner — boiling pasta and stirring a sauce; absolutely foundational cooking
Ingredients:
- 8 ounces dried pasta (penne, rigatoni, or fettuccine—any shape works)
- 1 can (14 ounces) crushed tomatoes
- 3 cloves fresh garlic, minced
- ½ cup heavy cream (or half-and-half for a lighter version)
- 3 cups fresh spinach (loosely packed)
Instructions:
Start the Pasta:
- Bring a large pot of salted water to a rolling boil—it should taste like the sea. Salt is crucial; it seasons the pasta as it cooks and lifts the flavor significantly.
- Add the pasta and cook according to package directions until al dente (just tender but still with a slight firmness when you bite it). Most shapes take 9 to 12 minutes. Stir occasionally to prevent sticking.
- Reserve 1 cup of pasta cooking water before draining. This starchy liquid is your secret to silky sauces—it emulsifies the cream and tomato together into something luscious.
Make the Sauce: 4. While the pasta cooks, heat 1 tablespoon of olive oil or butter in a large skillet over medium-high heat. 5. Add the minced garlic and cook for 30 to 45 seconds, stirring constantly, until fragrant but not browned. If the garlic browns, it becomes acrid and bitter—watch it closely. 6. Add the crushed tomatoes (with their juice), a pinch of salt, and a grinding of black pepper. Stir to combine and let the sauce simmer for 2 to 3 minutes. 7. Reduce heat to medium and pour in the cream. Stir to combine—the sauce will darken slightly and become silky. Simmer for another minute.
Combine: 8. Add the fresh spinach to the sauce and stir until completely wilted—this takes about 1 minute. 9. Add the drained pasta directly to the sauce (not to a colander, into the sauce itself). Toss gently to coat every strand. 10. If the pasta seems dry, add pasta water one-quarter cup at a time, stirring gently, until the sauce coats the pasta and clings to every piece. You want creamy, glossy pasta, not a watery pool at the bottom.
Serve: 11. Transfer to bowls or plates and serve immediately while hot. Grate fresh Parmesan over the top if you have it on hand.
Why This Dish Works for Weeknight Fatigue
Creamy tomato pasta is comfort food that feels special without requiring any special skill or exotic ingredients. The sauce takes 5 minutes to make, the pasta cooks while you handle the sauce, and everything comes together in one skillet. There’s minimal cleanup because you’re cooking in one pot and one pan. The spinach adds nutrition without changing the flavor significantly—most people don’t even notice it’s there, they just know the dish tastes rich and complete.
Practical Tips and Flavor Adjustments
Deepen the flavor: Add 1 tablespoon of tomato paste to the crushed tomatoes and let it cook for 30 seconds—it concentrates the tomato flavor and adds savory depth without tasting more “tomatoey.”
Make it more savory: Stir in a tablespoon of balsamic vinegar or a teaspoon of sugar if the sauce tastes too acidic. Acid-forward sauces are fine, but a touch of sweetness balances it.
Add protein: Stir in a handful of white beans, some chopped cooked chicken from a rotisserie bird, or crumbled sausage. Even a handful of Parmesan stirred in at the end makes it more substantial.
Fresh basil version: Skip the spinach and add a handful of fresh basil leaves at the very end, stirring them in just before serving so they stay bright and fresh.
Storage and Reheating
This pasta keeps in the fridge for up to 3 days. Reheat gently on the stovetop over low heat, adding a splash of cream or pasta water to loosen it up—microwave reheating can make the pasta texture gummy. Freezing isn’t ideal for cream-based pasta dishes, but you can freeze the sauce separately (without pasta) for up to 3 months, then cook fresh pasta and combine them later.
4. Soy-Glazed Salmon with Bok Choy
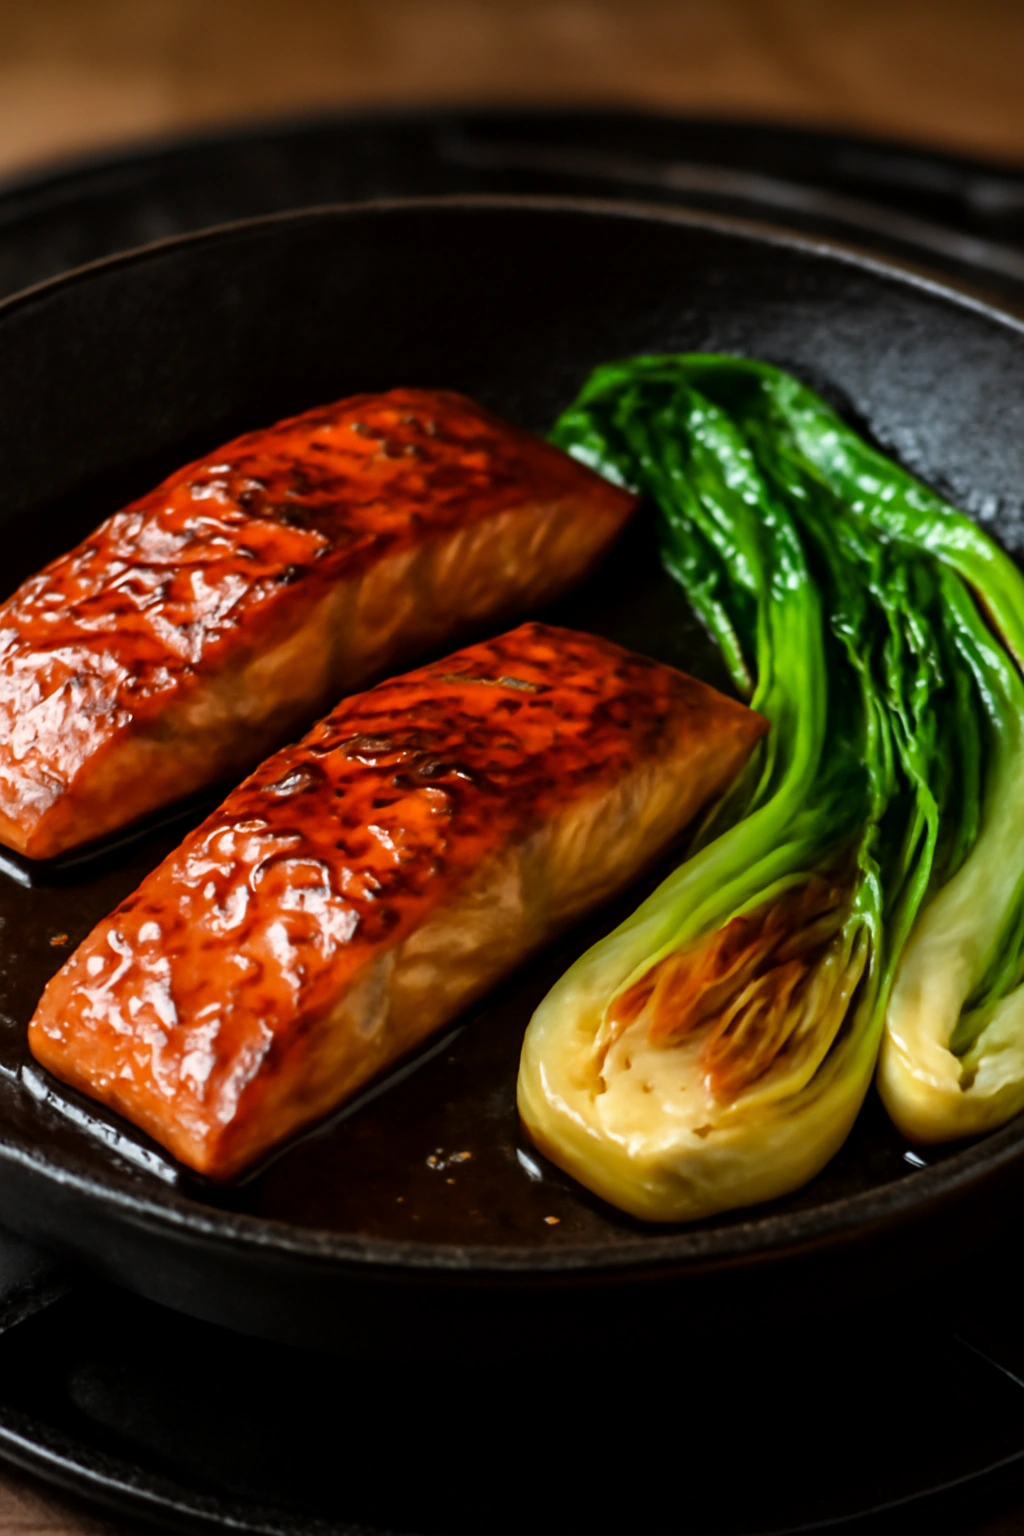
Salmon is one of the fastest, most elegant proteins for lazy weeknight cooking because it cooks in 12 minutes flat and tastes expensive without any fussy technique. A simple soy glaze—just soy sauce, garlic, and a touch of sweetness—delivers restaurant-quality flavor that feels indulgent but takes minimal effort. Bok choy, which cooks in the same pan, soaks up the glaze and becomes tender and slightly charred.
This is the dinner you make when you want something that tastes like you’ve made actual effort but you’re genuinely exhausted. It looks impressive, tastes sophisticated, and comes together faster than ordering takeout.
Yield: Serves 2 | Prep Time: 5 minutes | Cook Time: 15 minutes | Total Time: 20 minutes | Difficulty: Beginner — pan-searing and glazing are foundational techniques; nothing complicated
Ingredients:
- 2 salmon fillets (about 5 to 6 ounces each, skin-on)
- 1 pound fresh bok choy, halved lengthwise
- 3 tablespoons soy sauce
- 2 cloves fresh garlic, minced
- 1 tablespoon honey or maple syrup
Instructions:
Prepare the Glaze:
- In a small bowl, whisk together the soy sauce, minced garlic, and honey until the honey dissolves. Set aside.
Sear the Salmon: 2. Heat 1 tablespoon of neutral oil (vegetable, canola, or avocado oil) in a large skillet over medium-high heat until shimmering—you should see the oil moving fluidly across the pan. 3. Place the salmon fillets skin-side down in the pan and let them sear without moving for 4 to 5 minutes. You’re building a golden, crispy skin. Resist the urge to poke or flip; stillness is your friend here. 4. Flip the salmon carefully with a fish spatula or thin metal spatula, and cook for another 2 to 3 minutes on the flesh side until the flesh is opaque and flakes easily when pressed with a fork. The salmon will continue to cook slightly after you remove it from heat, so don’t wait until it looks completely cooked—it should still be just barely translucent in the very center.
Add the Bok Choy: 5. Push the salmon to the side of the skillet and add the bok choy halves cut-side down. Let them sear undisturbed for 2 to 3 minutes until the cut sides turn golden and caramelized. 6. Flip the bok choy and cook for another 1 to 2 minutes on the other side.
Glaze and Finish: 7. Pour the soy glaze over the salmon and bok choy, tilting the pan so it pools together. Let everything cook together for 30 to 45 seconds, then spoon the glaze back over the salmon and bok choy several times to coat evenly. The glaze will thicken slightly and cling to the fish and vegetables. 8. Transfer the salmon and bok choy to a plate or bowl and spoon any remaining glaze over the top. Serve immediately while everything is hot.
Why This Combination Is Perfect for Tired Cooks
Salmon has the highest oil content of most fish, which means it’s nearly impossible to overcook—it stays moist and tender even if you cook it slightly longer than intended. The skin crisps without any extra technique, just by making sure the pan is hot and leaving it alone. Bok choy cooks in the same pan, so there’s minimal cleanup, and the glaze brings everything together with bold, savory-sweet flavor that tastes nothing like weeknight cooking.
Practical Tips and Variations
Frozen salmon?: You can cook frozen salmon straight from the freezer—it’ll just need an extra 2 to 3 minutes per side. Pat it dry first to help it brown.
More vegetable options: Broccoli florets, snap peas, or even thick asparagus spears work beautifully in place of bok choy. Adjust cooking time based on vegetable thickness—thicker vegetables need a bit longer.
Make it spicy: Add ¼ teaspoon of red pepper flakes or a teaspoon of sesame oil to the glaze for a heat-forward or aromatic version.
Ginger version: Add 1 teaspoon of minced fresh ginger to the glaze for a brighter, slightly more complex flavor.
Storage and Leftovers
Cooked salmon keeps in the fridge for 3 to 4 days. Eat it cold on a salad, shred it and toss with grains, or reheat gently in a 275°F oven for 8 to 10 minutes until just warmed through. Don’t microwave salmon—it can become dry and fishy-smelling. Freezing cooked salmon is fine for up to 2 months; thaw in the fridge overnight before reheating.
5. One-Pot Sausage and White Bean Soup
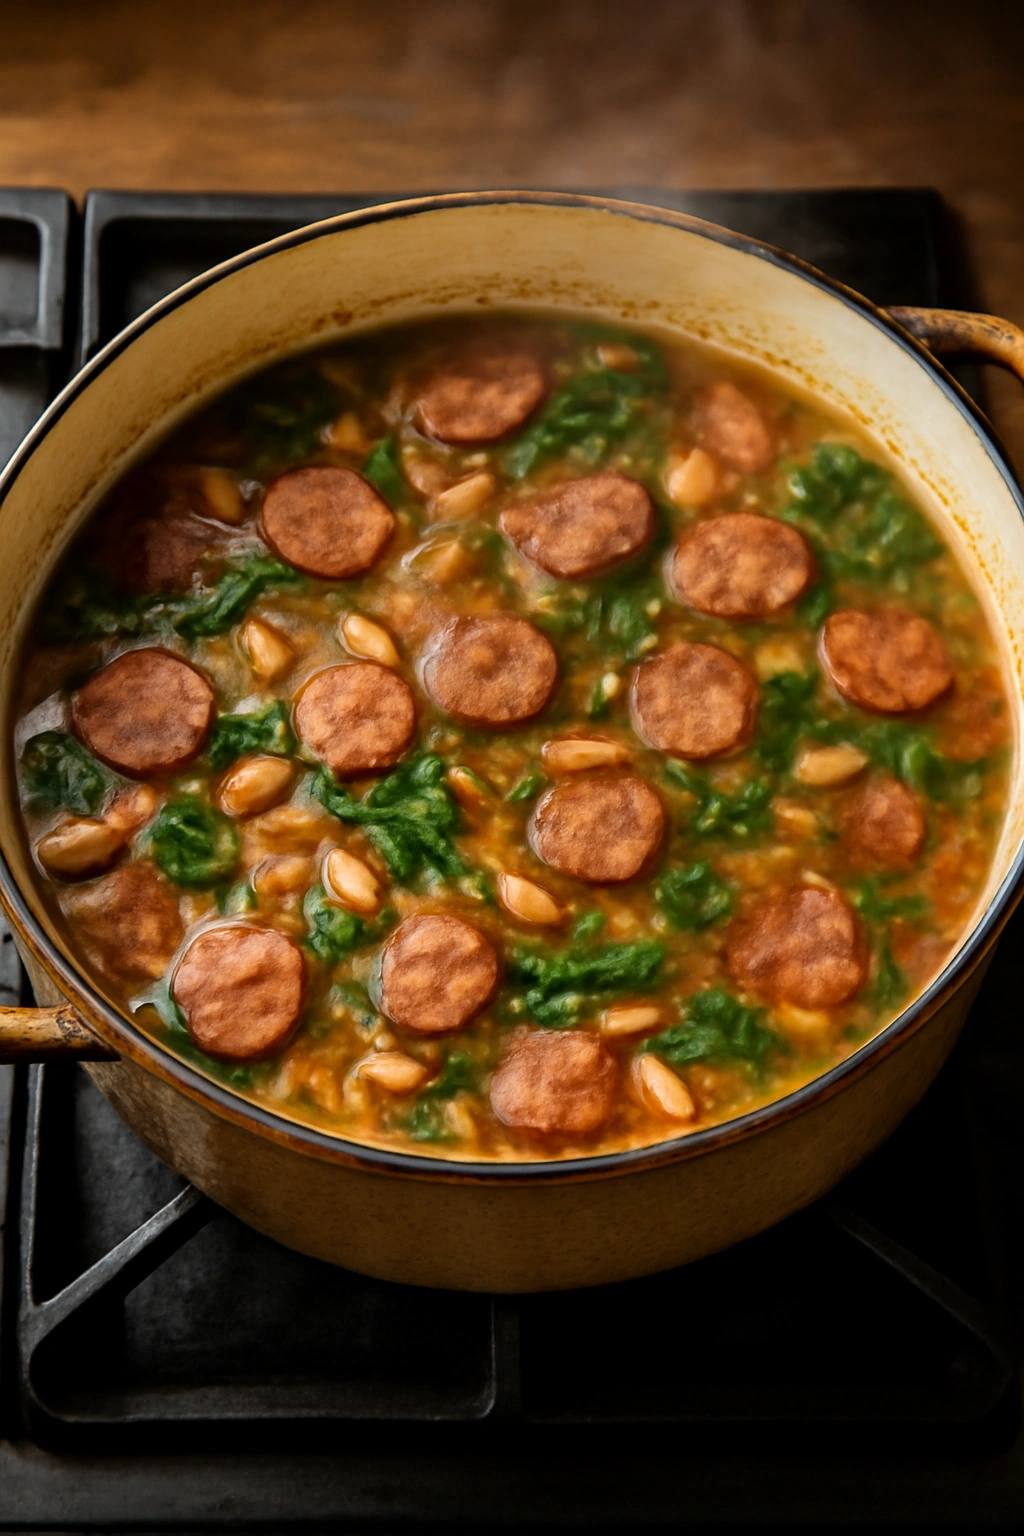
Soup is the epitome of lazy-cook cooking—everything goes into one pot, and the pot does the heavy lifting while you sit down. This sausage and white bean soup is hearty enough to be a complete meal, takes 25 minutes, and tastes like it’s been simmering all day. The sausage seasons the broth, the beans provide substance and nutrition, and the result is warming, satisfying, and infinitely better than opening a can.
This is the dinner you make when you’re genuinely depleted—when even standing at the stove feels like too much effort. You brown the sausage, dump everything else in, and wait. That’s it.
Yield: Serves 3 to 4 (makes about 6 cups) | Prep Time: 5 minutes | Cook Time: 20 minutes | Total Time: 25 minutes | Difficulty: Beginner — one-pot cooking with minimal chopping or technique
Ingredients:
- 1 pound Italian sausage (sweet or spicy, your preference), casings removed
- 2 cans (15 ounces each) white beans (cannellini or great northern), drained and rinsed
- 4 cups chicken or vegetable broth
- 2 cloves fresh garlic, minced
- 1 bunch fresh spinach (about 3 cups loosely packed) or 1 cup kale, chopped
Instructions:
Brown the Sausage:
- Heat a large pot (at least 4-quart capacity) over medium-high heat.
- Add the sausage and cook, breaking it apart with a wooden spoon as it browns, for 4 to 5 minutes, until cooked through and no pink remains. The sausage will release fat, which is good—that fat carries flavor.
- Add the minced garlic and cook for 30 seconds, stirring constantly, until fragrant. Do not let the garlic burn.
Build the Soup: 4. Pour the broth into the pot along with the drained beans. Stir to combine and bring the liquid to a gentle simmer—you’ll see small bubbles breaking the surface. Do not let it boil hard or the beans can break apart. 5. Reduce heat to medium and let the soup simmer for 10 to 12 minutes, which allows the flavors to meld and the beans to warm through completely. Taste the broth and add salt and pepper as needed—the sausage is already seasoned, but you may need to adjust.
Finish with Greens: 6. Add the spinach or kale (if using kale, it can handle a full simmer, so add it earlier if you prefer more tender greens). Stir until wilted, which takes about 1 minute for spinach, 2 to 3 minutes for kale. 7. Taste once more for seasoning and adjust as needed. The soup should taste savory and full-bodied, not watery or underseasoned.
Serve: 8. Ladle into bowls and serve hot. A drizzle of good olive oil and a grating of Parmesan over the top elevate this from simple to special.
Why One-Pot Soup Is a Lifesaver
When you’re exhausted, the thought of dirtying multiple pans is often enough to make you reach for takeout instead of cooking. One-pot soup eliminates that friction—everything cooks in a single vessel, which means one thing to wash at the end. The cooking is passive; once everything is in the pot, you’re just waiting. The flavor is deep because the sausage seasons the entire broth, and everything tastes cohesive. It’s also naturally healthy, warming, and the kind of meal that actually feels nourishing when you’re tired.
Practical Tips and Customizations
More vegetables: Add diced carrot, celery, or zucchini along with the broth if you want more vegetable content. They’ll cook through in 10 to 12 minutes.
Tomato version: Substitute half the broth with canned crushed tomatoes for a more Italian, tomatoey soup—add it when you add the broth.
Make it creamy: Stir in a splash of heavy cream or half-and-half at the very end for a luxurious finish, or blend a portion of the soup with an immersion blender to thicken it naturally.
Different beans: Chickpeas, kidney beans, or a mix of different beans work beautifully. Whatever you have on hand will work.
Storage and Make-Ahead Possibilities
This soup is genuinely better the next day once flavors have time to meld. It keeps in the fridge for up to 5 days and freezes beautifully for up to 3 months—freeze in 2-cup portions in freezer bags or containers for easy reheating. Thaw overnight in the fridge and reheat gently on the stovetop until steaming hot.
Final Thoughts

These five dinners prove that weeknight cooking doesn’t require complexity, exotic ingredients, or hours of your evening. Each one uses just five core ingredients, comes together in 30 minutes or less, and tastes genuinely good—not like a compromise or a shortcut, but like actual food that nourishes you and tastes delicious.
The real freedom these recipes offer isn’t just about speed or simplicity; it’s about removing the mental burden of cooking when you’re tired. When you limit yourself to five ingredients, shopping becomes straightforward, meal planning becomes less stressful, and the act of cooking feels manageable rather than daunting. You’re not standing in front of your pantry paralyzed by choices or trying to hunt down some ingredient you don’t have. You know exactly what you’re making and what you need.
The most important thing about weeknight cooking is that it happens at all. Whether you choose the sheet pan chicken, the tacos, the pasta, the salmon, or the soup, you’re taking care of yourself by choosing to cook rather than defaulting to takeout or processed convenience foods. That’s a win, and these dinners make it easy to keep winning, night after night.