Stuffed avocados hit that sweet spot where lunch feels both indulgent and genuinely nutritious. You slice an avocado in half, scoop out just enough room, and load it with flavorful fillings that turn a simple fruit into a complete, satisfying meal. There’s something deeply satisfying about eating straight from the skin with a spoon, and the natural richness of the avocado means you don’t need heavy sauces or loads of added fat. These recipes range from protein-packed options that keep you full all afternoon to lighter vegetarian versions that let fresh vegetables shine. Each one comes together in minutes—most in under 15 minutes of actual hands-on time—making them perfect for weekday lunches when you need something fast but refuse to sacrifice flavor or nutrition.
The beauty of stuffed avocados lies in their versatility. The creamy base pairs with virtually any filling, from Mediterranean-inspired combinations to Asian-influenced flavors to classic American comfort-food arrangements. Because avocados are perishable and best eaten fresh, these recipes come together just before you eat them, which means maximum freshness and the best texture. Unlike sandwiches that get soggy or grain bowls that separate during transport, a stuffed avocado stays cohesive and delicious from kitchen to lunchbox.
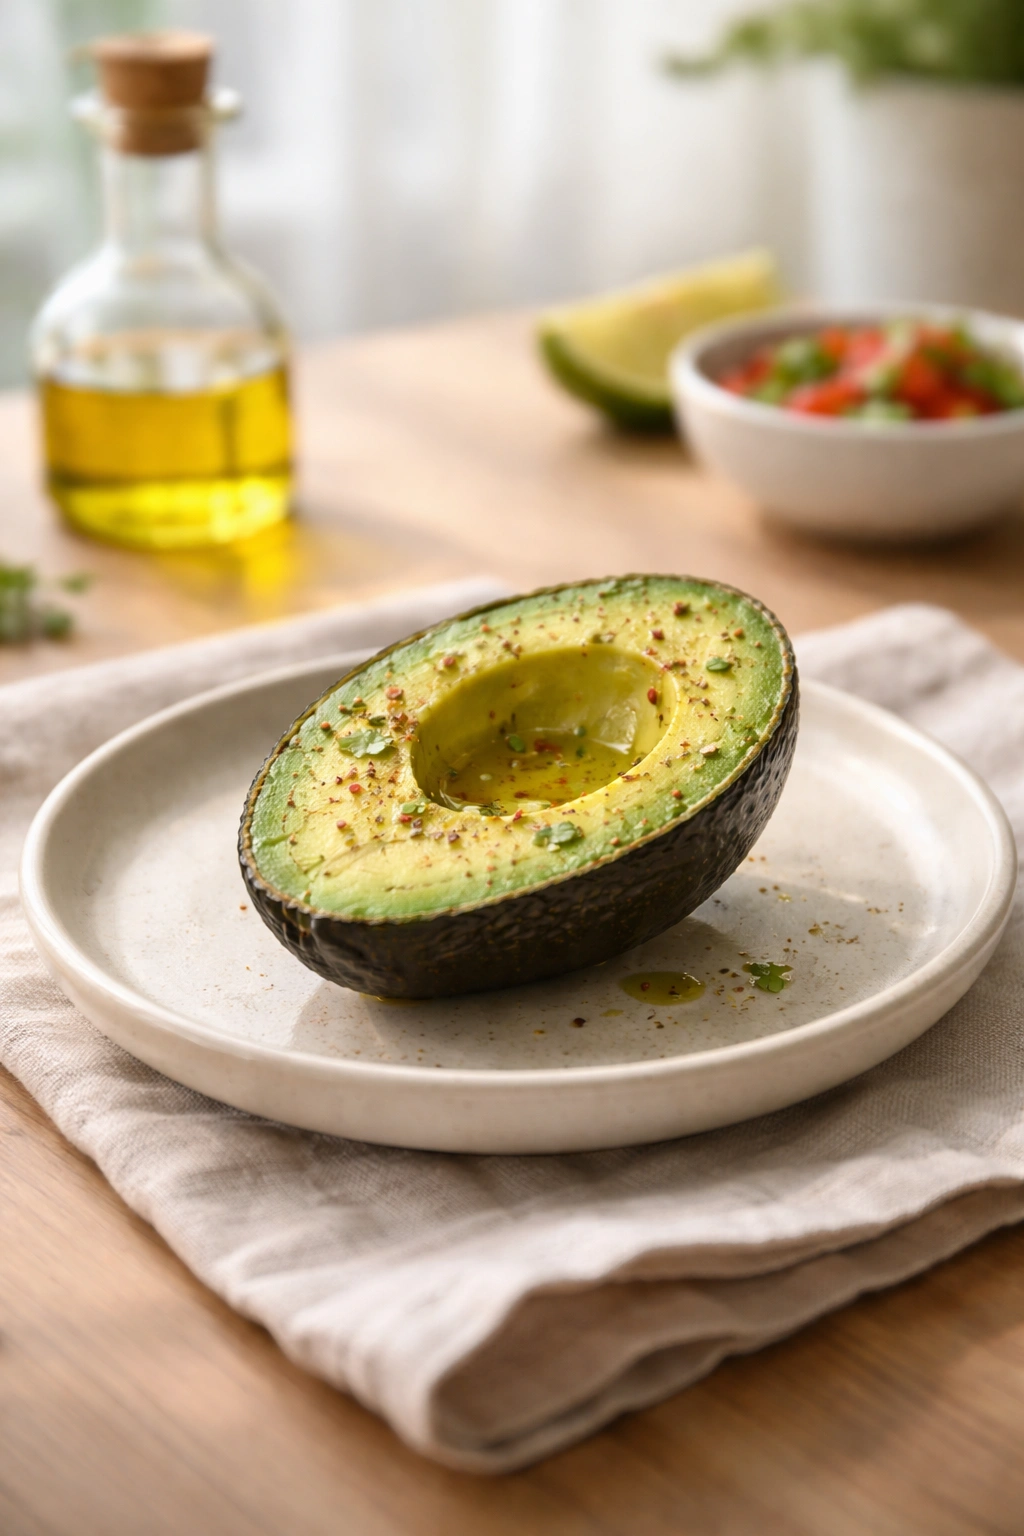
1. Mediterranean Chickpea and Feta Stuffed Avocados
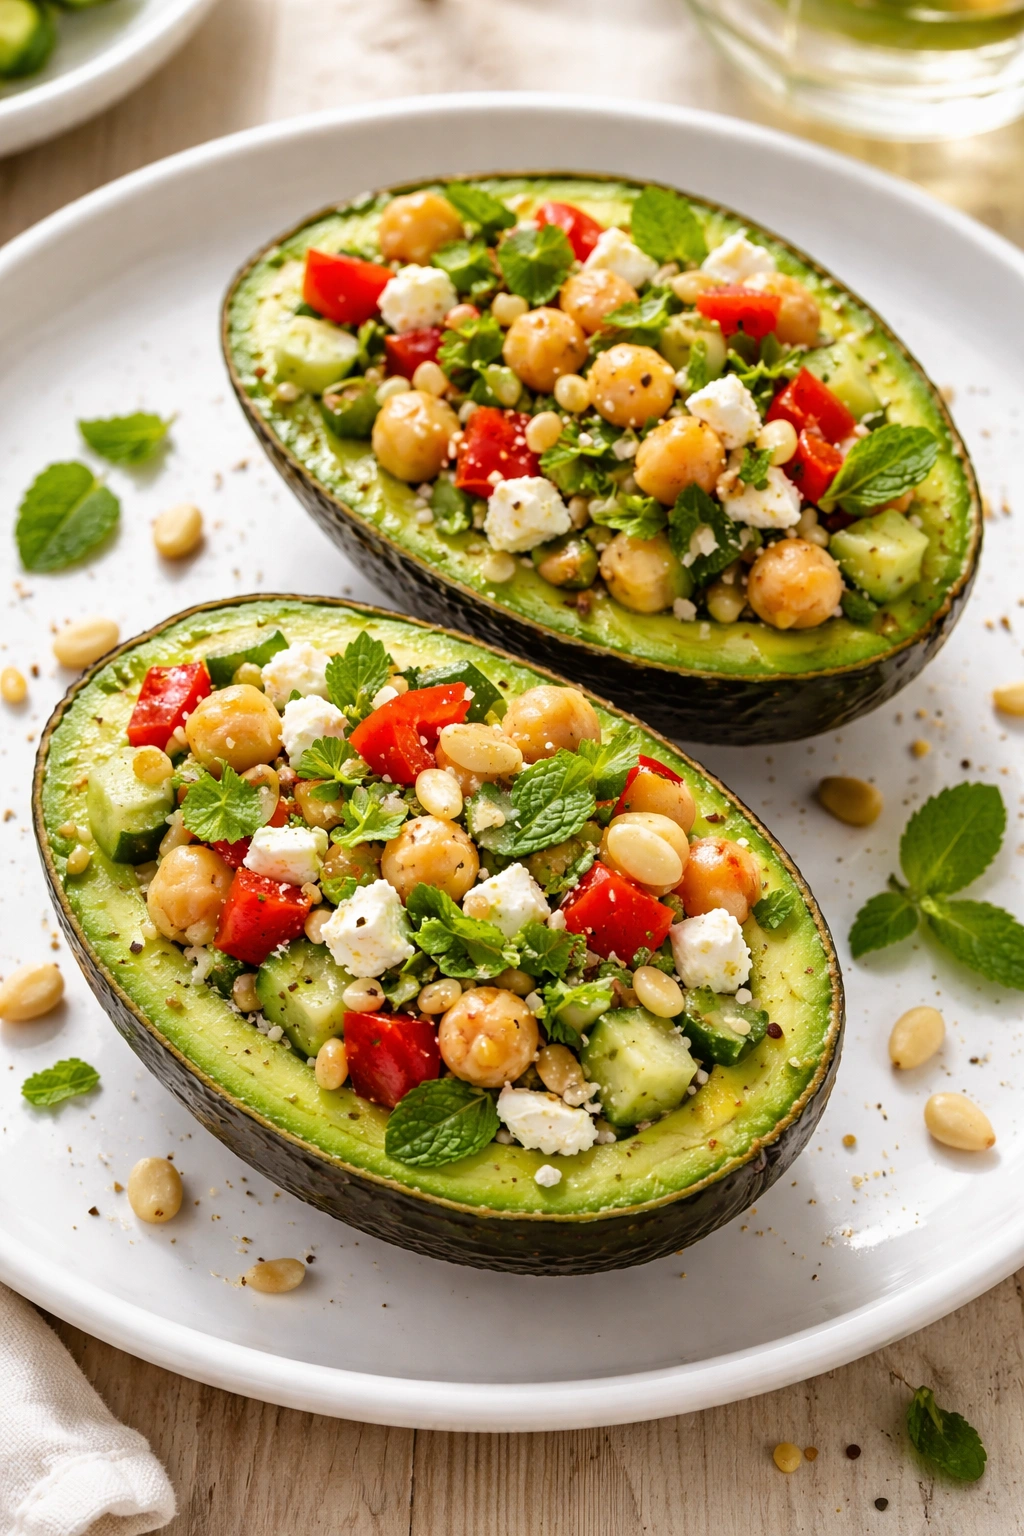
This recipe delivers everything you need from a lunch in one satisfying avocado half: creamy richness from the avocado, fiber and plant-based protein from the chickpeas, tangy brightness from feta and lemon, and a pleasant textural contrast from toasted pine nuts and fresh herbs. The combination tastes intentional and sophisticated—like you’ve ordered something special from a farm-to-table restaurant—yet it takes about 10 minutes to assemble.
Yield: Serves 2 | Makes 2 stuffed avocado halves
Prep Time: 10 minutes
Cook Time: 5 minutes (if toasting pine nuts fresh)
Total Time: 15 minutes
Difficulty: Beginner — all components are mixed together without cooking, no special equipment needed.
For the Filling:
- 1 can (15 oz) chickpeas, drained and rinsed thoroughly
- ¼ cup crumbled feta cheese
- ¼ cup diced cucumber, seeds removed so it doesn’t release excess moisture
- ¼ cup diced red bell pepper
- 3 tablespoons fresh parsley, finely chopped
- 2 tablespoons fresh mint, finely chopped
- 2 tablespoons toasted pine nuts, roughly chopped
- 2 tablespoons extra-virgin olive oil
- 1 tablespoon fresh lemon juice
- 1 clove garlic, minced very finely
- ¼ teaspoon sea salt
- ⅛ teaspoon black pepper
- Pinch of red pepper flakes (optional, for subtle heat)
For Assembly:
- 1 ripe but firm avocado
- Additional fresh lemon juice for the avocado flesh
- Optional garnish: a few extra pine nuts, fresh mint leaves, or a sprinkle of red pepper flakes
Preparation and Assembly:
-
If using raw pine nuts rather than pre-toasted ones, toast them gently in a small dry skillet over medium heat for 2 to 3 minutes, shaking the pan frequently, until they’re fragrant and very lightly golden. Transfer them to a small plate to cool completely — this step takes them from bland to rich and nutty, and it’s worth the few minutes of attention. Once cooled, chop them roughly.
-
In a medium mixing bowl, combine the drained chickpeas with the feta, diced cucumber, red bell pepper, parsley, and mint. The mixture should look bright and fresh, with green herbs visible throughout.
-
In a small bowl, whisk together the olive oil, lemon juice, minced garlic, salt, black pepper, and red pepper flakes if using. Pour this dressing over the chickpea mixture and stir gently until everything is evenly coated. The chickpeas will be slightly fragile—avoid vigorous stirring that breaks them apart. Fold in the toasted pine nuts last, just before serving.
Advertisements -
Cut the avocado in half lengthwise, working your knife around the large pit. Twist the halves apart gently. Using a small spoon, carefully remove a small amount of flesh from the center of each avocado half, creating a shallow well that’s about ¼ inch deep and roughly the size of a golf ball. This gives the filling a place to nest while you still enjoy the rich avocado. Discard the scooped-out flesh or save it for another use.
-
Rub the interior of each avocado half lightly with fresh lemon juice — this prevents browning and adds brightness.
-
Divide the chickpea filling evenly between the two avocado halves, mounding it slightly in the center of each. You’ll have more filling than can actually fit in the well — it should overflow slightly onto the green flesh surrounding the hollow, creating a generous, abundant presentation.
-
Serve immediately, eating straight from the avocado skin with a spoon, starting from the outside edge and working your way toward the center, combining bites of avocado with the filling in every spoonful.
Why This Works for Lunch
Chickpeas provide substantial plant-based protein—about 15 grams per can—that stabilizes your blood sugar and keeps hunger at bay for hours. The healthy fats from both the avocado and olive oil promote satiety and aid nutrient absorption, while the fiber from chickpeas and fresh vegetables supports digestion. Fresh herbs brighten the entire dish without any added sodium, and the lemon juice acts as both a flavor enhancer and a preservation agent that delays browning. This is genuinely filling lunch-time food that doesn’t weigh you down.
Tips and Common Mistakes to Avoid
Texture matters: Make sure your avocado is ripe but still firm enough to hold its shape when you scoop. An overripe avocado with mushy flesh will disintegrate into the filling. Gently squeeze the avocado—it should yield slightly to pressure but not feel soft all over. If you’re preparing this the night before, keep the avocado separate and assemble the meal just before eating.
Don’t skip the cucumber prep: After dicing your cucumber, sprinkle it lightly with salt and let it sit in a fine-mesh strainer for 2 to 3 minutes. This draws out excess moisture that would otherwise make the filling watery and dilute the other flavors. A quick pat with a paper towel finishes the job.
Toast the pine nuts yourself: Store-bought toasted versions work in a pinch, but toasting raw ones yourself transforms them from bland to rich and complex. The aroma alone tells you when they’re done—that fragrant, nutty smell is your cue to remove them from heat immediately.
Make it vegan: Replace the feta with ¼ cup of hummus or mashed cashew cream, which adds creaminess while keeping everything plant-based. The feta’s saltiness and tang are harder to replicate, but a squeeze of extra lemon juice and a pinch more salt can approximate that brightness.
Storage and Make-Ahead Options
The chickpea filling keeps in an airtight container in the refrigerator for up to 2 days, which makes it convenient for building multiple lunches throughout the week. However, once the filling is combined with fresh herbs, the herbs will begin to darken and wilt after a few hours, so prepare the filling no more than 4 hours before you plan to eat. The avocado should always be halved and filled just before serving—assembling ahead means the avocado will brown and the filling will absorb moisture from the avocado flesh.
2. Spicy Tuna Salad with Avocado Nests
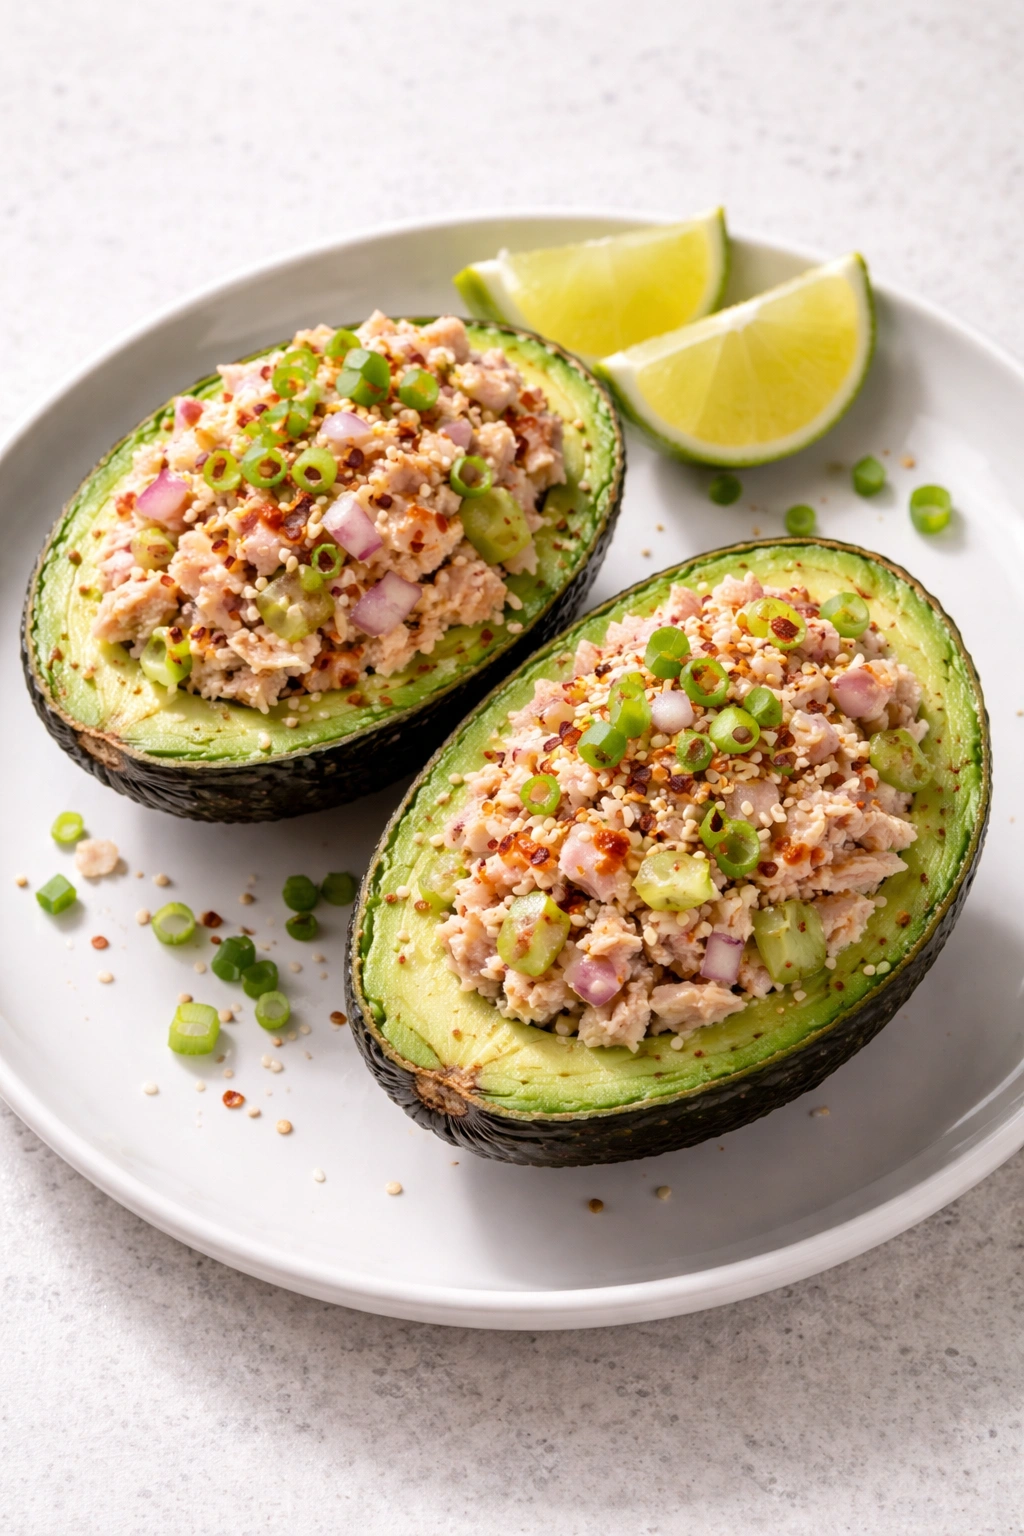
This recipe takes a deli-counter tuna salad and elevates it with sriracha heat, crisp vegetables, and a touch of sesame oil that makes the whole thing taste intentionally crafted rather than hastily thrown together. The creamy avocado base mellows the spice while the crisp celery and red onion provide snap and freshness. It’s the kind of lunch that feels indulgent but delivers lean protein and healthy fats without any guilt.
Yield: Serves 2 | Makes 2 stuffed avocado halves
Prep Time: 12 minutes
Cook Time: 0 minutes
Total Time: 12 minutes
Difficulty: Beginner — no cooking required, just mixing and assembly.
For the Tuna Filling:
- 2 cans (5 oz each) wild-caught tuna in water, drained thoroughly and flaked with a fork
- ¼ cup mayonnaise (or Greek yogurt for a lighter version)
- 1 tablespoon sriracha, or to taste (adjust based on your heat preference)
- 1 tablespoon fresh lime juice
- 2 tablespoons diced red onion, minced finely
- ¼ cup diced celery (about 1 large stalk), chopped into small pieces
- 2 tablespoons diced red bell pepper
- 1 green onion (scallion), white and light green parts only, sliced thin
- 1 teaspoon sesame oil
- 1 teaspoon rice vinegar
- ¼ teaspoon kosher salt
- Pinch of black pepper
- Optional: ¼ teaspoon wasabi powder for extra sinus-clearing heat
For Assembly:
- 1 ripe but firm avocado
- Fresh lime juice for the avocado flesh
- Optional garnish: sesame seeds, thinly sliced green onion tops, cilantro leaves, or a drizzle of sriracha
Preparation and Assembly:
-
Drain the tuna cans thoroughly, pressing gently with a spoon against the strainer to remove all excess liquid—watery tuna leads to a soggy, underseasoned filling. Place the flaked tuna in a medium mixing bowl.
-
Add the mayonnaise, sriracha, and lime juice to the tuna. Stir gently, breaking up any remaining large flakes so the mixture is evenly combined but not paste-like. Taste a small spoonful and decide if you want more sriracha; if you prefer milder heat, add it in small increments rather than all at once.
-
Fold in the diced red onion, celery, red bell pepper, and green onion, stirring gently until the vegetables are distributed throughout. The mixture should be chunky with visible vegetable pieces, not uniform and smooth.
-
In a small bowl, whisk together the sesame oil, rice vinegar, salt, and black pepper. Drizzle this over the tuna mixture and fold gently until everything is evenly coated. If you’re using wasabi powder, sprinkle it in and mix thoroughly—it will dissipate and add heat without being gritty.
-
Cut the avocado in half lengthwise, remove the pit, and rub the interior of each half with fresh lime juice. Scoop out a shallow well in the center of each half, similar to the Mediterranean recipe, creating a small hollow that will cradle the filling.
Advertisements -
Spoon the tuna salad into the avocado wells, mounding it generously so it overflows slightly onto the surrounding avocado flesh. If you have extra filling, pile it on—tuna salad and avocado together are essentially a complete, satisfying meal.
-
Garnish with sesame seeds, extra green onion slices, cilantro, or a light drizzle of sriracha if you want to telegraph the heat level. Serve immediately with a spoon, eating from the skin just like the Mediterranean version.
Why Tuna and Avocado Are a Nutritional Power Duo
Tuna is one of the few complete plant-free proteins—meaning it contains all nine essential amino acids that your body cannot manufacture on its own. It’s also rich in omega-3 fatty acids, specifically DHA and EPA, which support brain health and reduce inflammation. The avocado adds additional healthy monounsaturated fats, which work synergistically with the omega-3s from the tuna. Together, they create a nutritionally dense lunch that stabilizes blood sugar, supports cognitive function, and keeps you satisfied for hours. The spice from sriracha actually boosts metabolism slightly and may promote appetite control by adding flavor intensity without calories.
Tips and Common Mistakes to Avoid
Drain that tuna aggressively: Canned tuna swimming in liquid creates a watery filling that dilutes all your flavors. Use a fine-mesh strainer and press down gently but firmly with a spoon to remove every drop of liquid. Dry tuna means a filling that stays creamy without becoming soupy.
Prep your vegetables ahead but assemble last: You can dice the red onion, celery, and bell pepper the night before and store them in airtight containers, but wait to combine everything with the tuna and dressing until just before assembly. The vegetables will release water over time, which will eventually make the filling loose and watery.
Use sesame oil sparingly: Sesame oil is intensely aromatic and flavorful—a teaspoon is plenty. More than that overpowers the delicate tuna and avocado. It should be a background note that adds complexity, not the dominant flavor.
Make it lower-calorie: Swap the mayo for Greek yogurt (same volume), which cuts calories roughly in half while adding extra protein and creaminess. The flavor is slightly tangier but works beautifully with the sriracha and lime.
Substitute the protein: If you don’t eat fish, use shredded rotisserie chicken instead of tuna (using the same volume). Omit the sesame oil and rice vinegar, and boost the lime juice to compensate. The sriracha and vegetables remain the same, creating a spicy chicken salad that’s equally satisfying.
Storage and Serving Notes
Tuna salad keeps in the refrigerator for up to 3 days in an airtight container, but the vegetables will gradually release water, making the mixture wetter over time. For meal prep, store the drained tuna, vegetables, and dressing separately and combine them the morning you want to eat. This keeps everything fresh and prevents the filling from becoming mushy. The stuffed avocado itself should always be assembled the same day you plan to eat it—tuna is best enjoyed fresh, and avocados brown quickly once cut.
3. Caprese-Inspired Avocado with Tomato, Mozzarella, and Basil
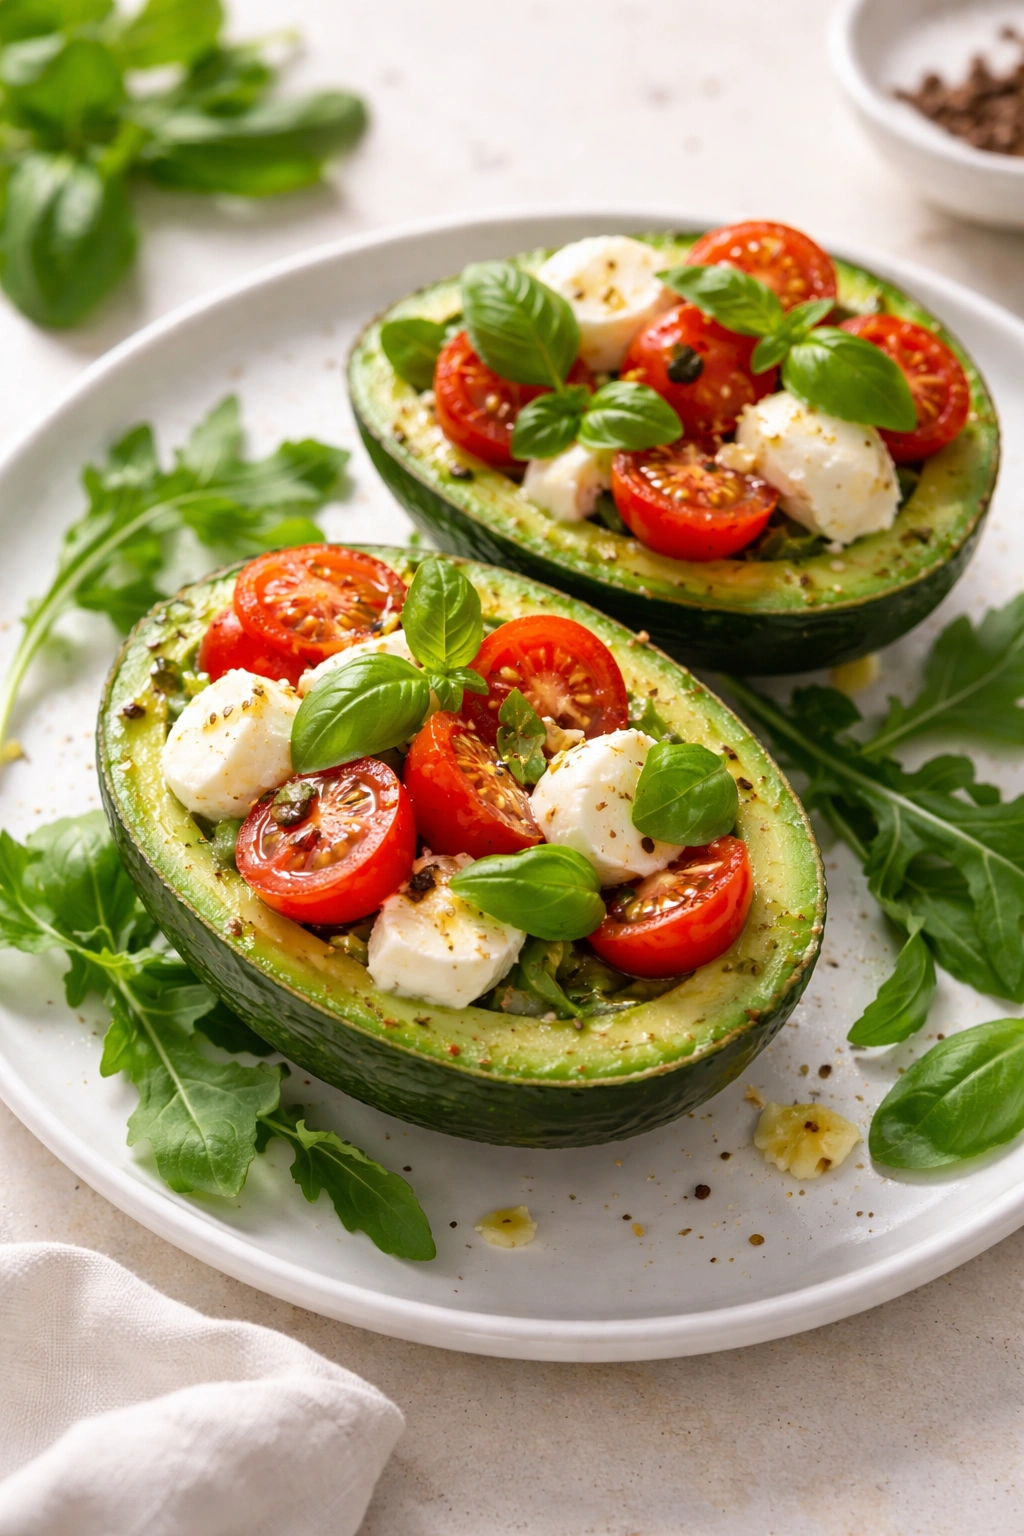
This recipe channels the classic Italian caprese salad—ripe tomato, creamy mozzarella, fresh basil, and good olive oil—and translates it into avocado format. It’s bright, summery, and somehow feels fancy without requiring any special technique. The key is using the ripest, most flavorful tomatoes you can find and fresh mozzarella that’s still slightly warm, if possible. Every bite tastes like a vacation to the Italian countryside.
Yield: Serves 2 | Makes 2 stuffed avocado halves
Prep Time: 10 minutes
Cook Time: 0 minutes
Total Time: 10 minutes
Difficulty: Beginner — no cooking involved; the entire recipe is simple assembly.
For the Caprese Filling:
- 1 cup cherry tomatoes, halved, or 1 medium heirloom tomato, diced into small pieces
- 8 oz fresh mozzarella, either a large ball (burrata or buffalo mozzarella) or smaller bocconcini balls, torn into bite-sized pieces
- ¼ cup fresh basil leaves, torn by hand (never cut basil with a knife—it bruises and oxidizes)
- ¼ cup (or more, to taste) fresh baby arugula or mixed microgreens
- 3 tablespoons extra-virgin olive oil, preferably a peppery or fruity variety
- 1 tablespoon aged balsamic vinegar (or good quality white wine vinegar if you prefer less sweetness)
- 1 clove garlic, minced very finely
- ¼ teaspoon sea salt, preferably fleur de sel or another finishing salt
- Freshly cracked black pepper (use a pepper mill if you have one—the flavor is noticeably better)
- Optional: a pinch of red pepper flakes, a small grating of lemon zest, or a tiny drizzle of honey
For Assembly:
- 1 ripe but firm avocado
- Fresh lemon juice for the avocado flesh
- Additional fresh basil leaves for garnish, or a light drizzle of aged balsamic
Preparation and Assembly:
-
If using cherry tomatoes, halve them and place them in a small bowl. If using a larger heirloom tomato, cut it in half, squeeze out the excess seeds and juice (which can make the filling watery), and dice it into small pieces. The goal is tomato pieces that are no larger than ¼ inch—large chunks make the filling hard to eat from the avocado skin.
-
Tear the fresh mozzarella into bite-sized pieces roughly the same size as your tomato pieces. Avoid cutting it with a knife, which creates a dense texture rather than the delicate, creamy consistency you want. If using a whole ball of burrata, tear it open and separate the creamy center from the outer cheese layer, allowing them to mingle.
-
In a small bowl, whisk together the olive oil, balsamic vinegar, minced garlic, salt, and black pepper. Taste this dressing on a piece of tomato—it should taste balanced between acid and oil, with garlic flavor present but not overwhelming.
-
Gently toss the tomatoes and mozzarella with the dressing. Add the torn basil and arugula, folding very gently so the mozzarella doesn’t break apart and the basil doesn’t get bruised. This filling is best assembled just before eating because the tomato’s moisture will start to release and soften the mozzarella if left sitting.
-
Cut the avocado in half lengthwise, remove the pit, and rub the interior flesh lightly with lemon juice. As with the previous recipes, scoop out a small well in the center of each half to create a small hollow.
-
Spoon the caprese filling into the avocado wells, letting the excess overflow onto the surrounding green flesh. Avoid pressing or packing the filling—let it sit loosely in the avocado so every component remains distinct and fresh.
Advertisements -
Garnish with an additional fresh basil leaf or two and, if you want, a light drizzle of aged balsamic. Serve immediately, eating directly from the skin with a spoon, ensuring every bite contains avocado, tomato, and mozzarella together.
What Makes This Recipe Feel Restaurant-Worthy
The caprese combination succeeds because of contrast and balance. The bright acidity of the tomato and balsamic cuts through the richness of the avocado and mozzarella. The peppery olive oil adds complexity. The fresh basil bridges all the flavors with its aromatic sweetness. Because all the components are high-quality and minimal, each one shines individually—nothing gets lost. This is what minimalist Italian cooking does so well: let the ingredients speak rather than covering them up with complicated techniques.
Tips and Common Mistakes to Avoid
Choose tomatoes like your life depends on it: Flavorless, mealy grocery-store tomatoes will ruin this dish. Seek out heirloom varieties, vine-ripened tomatoes, or cherry tomatoes at farmers markets. The tomato is roughly 40 percent of this recipe’s flavor profile—don’t skimp. A truly ripe tomato should smell fragrant at the stem end and give slightly when you press it gently.
Use fresh mozzarella, not the aged kind: Aged, firm mozzarella (like mozzarella that’s been sitting in your fridge for weeks) won’t have the delicate, creamy texture that makes this dish work. Fresh mozzarella balls, burrata, or buffalo mozzarella are all excellent choices. If they’re cold from the refrigerator, let them sit on the counter for 5 to 10 minutes so they warm slightly and the flavor becomes more delicate and sweet.
Tear the basil, never cut it: A knife damages the cell walls of basil leaves, which oxidizes the leaf and turns the edges black. Tearing by hand preserves the leaf’s integrity and flavor. If you must use a knife, do it at the absolute last moment before serving.
Don’t assemble too far ahead: Unlike some fillings that improve with time, this one is best served immediately after assembly. The tomato’s liquid will gradually soften and cool the mozzarella, and the basil will start to darken. This is a same-day, same-hour assembly dish.
Upgrade your olive oil: Since you’re using very few ingredients, the quality of the olive oil becomes noticeable. Seek out a cold-pressed, early-harvest extra-virgin olive oil with peppery or fruity notes. Grocery-store generic olive oil will taste flat by comparison.
Make it vegan: Omit the mozzarella entirely and add ¼ cup of additional arugula or mixed greens, plus ¼ cup of thinly sliced cucumber for a crisp texture. Use the same olive oil and balsamic dressing, and you have a fresh, bright, vegetable-forward version that’s equally delicious.
Storage and Serving Notes
The individual components—tomatoes and mozzarella—can be prepared up to 4 hours ahead and stored separately in the refrigerator. However, once they’re combined with the basil and dressing, they should be consumed within 30 minutes for best flavor and texture. The avocado must always be cut and assembled immediately before eating to prevent browning and ensure the best flavor. This is fundamentally a fresh, summer-style lunch best enjoyed at its moment of peak brightness.
4. Mediterranean Quinoa and Herb Stuffed Avocado
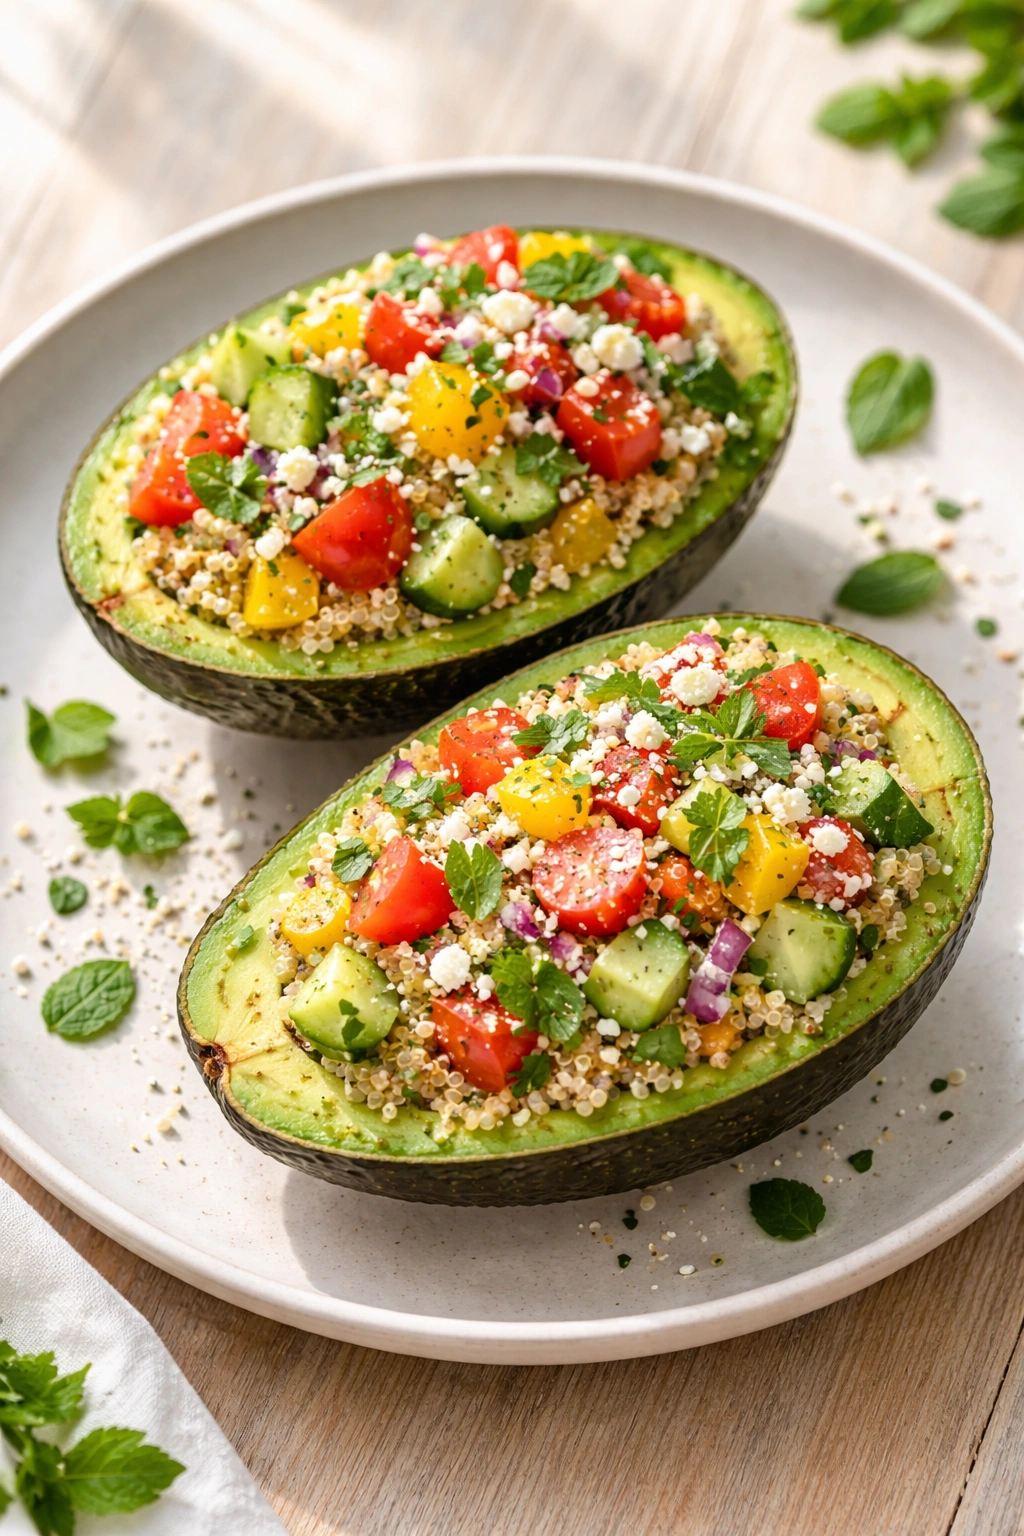
This is the vegetarian power-lunch option—a complete protein from quinoa combined with fresh herbs, crisp vegetables, and a lemony dressing that makes every component taste like it was designed to go together. The quinoa base is hearty enough to keep you full all afternoon, while the fresh vegetables and herbs keep it light and refreshing. It’s the kind of lunch that looks colorful and interesting in a lunchbox, making your coworkers ask what you’re eating.
Yield: Serves 2 | Makes 2 stuffed avocado halves
Prep Time: 15 minutes (including cooking quinoa if starting from scratch)
Cook Time: 15 minutes (if cooking quinoa fresh; skip if using pre-cooked)
Total Time: 30 minutes (or 10 minutes if using pre-cooked quinoa)
Difficulty: Beginner — no special techniques, straightforward mixing and assembly.
For the Quinoa Filling:
- 1 cup cooked quinoa, cooled to room temperature (about ⅓ cup dry quinoa, cooked according to package directions)
- ¼ cup diced cucumber, seeds removed
- ¼ cup diced red bell pepper
- ¼ cup diced yellow bell pepper
- ¼ cup diced red onion, minced finely
- ¼ cup diced tomato, seeds removed
- 3 tablespoons fresh parsley, finely chopped
- 2 tablespoons fresh mint, finely chopped
- 2 tablespoons fresh dill, finely chopped (or 1 teaspoon dried dill if fresh is unavailable)
- ¼ cup crumbled feta cheese
- 3 tablespoons extra-virgin olive oil
- 2 tablespoons fresh lemon juice
- 1 tablespoon red wine vinegar
- 1 clove garlic, minced very finely
- ¼ teaspoon sea salt
- ⅛ teaspoon black pepper
- Optional: ¼ teaspoon dried oregano, a pinch of sumac for tartness and color, or a handful of Kalamata olives, pitted and chopped
For Assembly:
- 1 ripe but firm avocado
- Fresh lemon juice for the avocado flesh
- Optional garnish: additional fresh herb sprigs, a few extra pine nuts or pumpkin seeds, or a sprinkle of sumac
Preparation and Assembly:
-
If cooking quinoa fresh, bring 1 cup water or vegetable broth to a boil in a small saucepan. Add ⅓ cup dry quinoa and return to a boil, then reduce heat to low, cover, and simmer for 12 to 14 minutes until the liquid is absorbed and the quinoa grains are tender. You’ll notice a tiny tail sprout emerging from each grain when the quinoa is fully cooked—that’s your visual cue it’s done. Fluff with a fork and spread it on a plate to cool to room temperature while you prepare the other ingredients. If using pre-cooked quinoa (from the grocery store refrigerated section or leftover from another meal), simply measure out 1 cup and proceed.
-
In a large mixing bowl, combine the cooled quinoa with the diced cucumber, both bell peppers, red onion, tomato, parsley, mint, and dill. Gently fold everything together so the fresh herbs are distributed throughout. The mixture should look vibrant and green-flecked from all the herbs.
-
In a small bowl, whisk together the olive oil, lemon juice, red wine vinegar, minced garlic, salt, and black pepper. If using oregano or sumac, add it now. Drizzle this dressing over the quinoa mixture and fold gently until everything is evenly coated. The grains will absorb the dressing as they sit, so they’ll taste better a few minutes after mixing than immediately.
-
Fold in the crumbled feta cheese gently, and add any olives if you’re using them. Taste a spoonful and adjust the salt and lemon juice to your preference. The filling should taste bright and herbaceous, with the grains well-coated in dressing but not soggy.
-
Cut the avocado in half, remove the pit, and rub the interior with fresh lemon juice. Scoop out a well in the center of each half, creating a small hollow.
-
Spoon the quinoa filling into the avocado wells, mounding it generously. The quinoa mixture is sturdy enough to pile up more than the other fillings, so feel free to load it up—you want a full, satisfying presentation.
Advertisements -
Garnish with an additional fresh herb sprig, a few extra seeds or nuts if you have them, or a tiny pinch of sumac for color. Serve immediately, eating from the skin as with the other recipes.
Why This Recipe Is a Lunch-Game Changer
Quinoa is a complete protein containing all nine essential amino acids, making it an exceptional choice for plant-based eaters. Combined with the healthy fats from avocado and olive oil, this lunch delivers sustained energy without the blood-sugar spike that follows simple carbohydrates. The fresh herbs add flavor complexity with minimal calories and carry phytochemicals that support overall health. The vegetables provide fiber, vitamins, and minerals. This is genuinely nutrient-dense, fill-you-up food that’s also delicious—not a compromise between taste and health but a dish where both are optimized.
Tips and Common Mistakes to Avoid
Cool the quinoa completely: Warm quinoa will soften the avocado from the inside out and melt any cheese you add. Make sure the quinoa reaches room temperature before combining it with other ingredients. If you’re in a time crunch, spread it on a plate for faster cooling.
Cucumber and tomato prep matters: Just like with the first recipe, dice your cucumber and remove the seeds, then let it drain for a few minutes. Do the same with the tomato—scoop out the watery seed cavity with a small spoon to prevent the filling from becoming waterlogged. These steps take literally one minute but make a noticeable difference in the final texture.
Fresh herbs make the dish: Dried herbs simply won’t deliver the same brightness and freshness. If you only have dried versions available, use a smaller quantity—dried herbs are more concentrated. One tablespoon fresh = about 1 teaspoon dried as a general rule, but with herbs this is the star, use fresh or skip the recipe and make something else.
Make it vegan: Omit the feta cheese and add an extra ¼ cup of cooked chickpeas for additional protein. The lemon and herbs in the dressing provide plenty of flavor to compensate for the loss of the salty, tangy cheese.
Prep this component ahead: Unlike the caprese or Mediterranean chickpea versions, this filling actually improves if made a few hours ahead. The quinoa absorbs the dressing, and the flavors meld together. Store it in an airtight container in the refrigerator for up to 2 days. Assemble with the avocado just before eating.
Storage and Make-Ahead Strategy
This filling is the most make-ahead-friendly of all the recipes here. You can prepare it the evening before and refrigerate it in an airtight container, then assemble with fresh avocado the next day. The flavors actually improve overnight as the grains absorb more of the lemon-oil dressing. The avocado, of course, should be cut and assembled immediately before eating to prevent browning.
5. Spicy Korean-Inspired Gochujang Chicken Stuffed Avocado
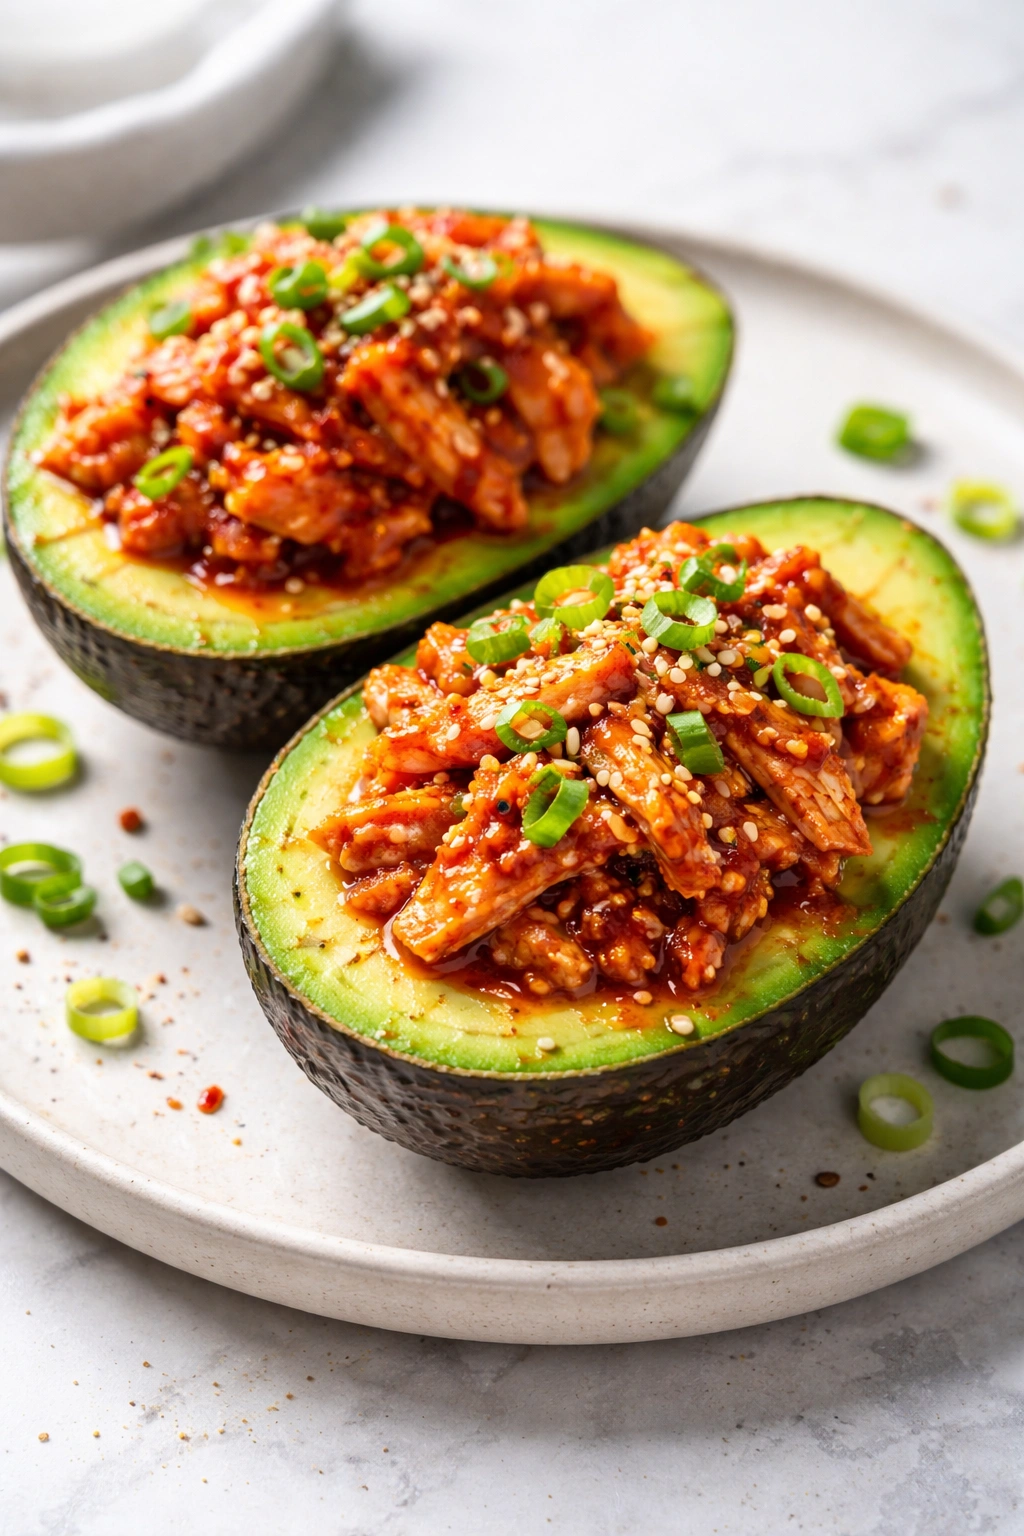
This recipe brings Korean flavors into avocado territory with gochujang (Korean red pepper paste) that provides heat, umami depth, and a subtle fermented complexity that transforms simple shredded chicken into something exciting. The filling comes together in minutes if you use rotisserie chicken, making this an excellent option for a quick weekday lunch. Each bite delivers heat, creaminess, and savory depth—the kind of lunch that makes you feel like you’ve invested real effort even though you haven’t.
Yield: Serves 2 | Makes 2 stuffed avocado halves
Prep Time: 10 minutes
Cook Time: 0 minutes (if using rotisserie chicken)
Total Time: 10 minutes
Difficulty: Beginner — rotisserie chicken does the heavy lifting; assembly is simple mixing and stuffing.
For the Gochujang Chicken Filling:
- 1½ cups shredded rotisserie chicken (about ¾ of a whole chicken), or cooked chicken breast shredded into small pieces
- 3 tablespoons gochujang (Korean red pepper paste—find it in the Asian section of most grocery stores or online)
- 2 tablespoons mayonnaise or sour cream (helps mellow the heat)
- 1 tablespoon rice vinegar
- 1 tablespoon sesame oil
- 1 tablespoon low-sodium soy sauce or tamari
- 1 tablespoon honey or agave syrup (balances the spice with subtle sweetness)
- 2 teaspoons grated fresh ginger
- 2 cloves garlic, minced very finely
- 1 green onion (scallion), white and light green parts, sliced thin
- 2 tablespoons diced red bell pepper
- 1 tablespoon toasted sesame seeds
- ¼ teaspoon black pepper
- Optional: ½ teaspoon grated lime zest, 1 to 2 teaspoons sriracha for extra heat, or 1 teaspoon white miso for additional umami depth
For Assembly:
- 1 ripe but firm avocado
- Fresh lime juice for the avocado flesh
- Optional garnish: additional sesame seeds, sliced green onion, cilantro leaves, or thinly sliced cucumber on the side
Preparation and Assembly:
-
Place the shredded rotisserie chicken in a medium mixing bowl. If using bone-in chicken pieces, pick the meat from the bones carefully, shredding it into small, bite-sized pieces. Discard any skin (or save it for stock if you prefer a richer, more indulgent version) and bones. You should have roughly 1½ cups of shredded meat.
-
In a small bowl, combine the gochujang, mayonnaise, rice vinegar, sesame oil, soy sauce, and honey. Whisk this mixture thoroughly until completely smooth—any lumps of gochujang remaining will taste gritty. This becomes your sauce base, and it should be thick, silky, and a deep rust-red color.
-
Add the minced ginger and garlic to the sauce and stir until combined. Taste a small spoonful and gauge the heat level—if it’s too spicy for your preference, whisk in an additional teaspoon of mayonnaise to mellow it. If you want more heat, add sriracha or white miso gradually.
-
Pour the sauce over the shredded chicken and fold gently until every piece is evenly coated. The chicken should look glossy and red, not dry.
-
Fold in the sliced green onion, diced red bell pepper, and toasted sesame seeds. Add black pepper and any optional ingredients you’re using. Taste again and adjust salt, heat, or acid (rice vinegar) as needed. The filling should taste balanced between spicy, savory, and slightly sweet, with the chicken being the star.
-
Cut the avocado in half, remove the pit, and rub the interior with fresh lime juice. Scoop out a well in the center of each half.
-
Spoon the gochujang chicken filling into the avocado wells, mounding it generously. The filling is sturdy and substantial—pack it in. If you have extra filling, pile it on the side or serve it alongside the stuffed avocado.
Advertisements -
Garnish with additional sesame seeds, green onion slices, or cilantro. Serve immediately with a spoon, eating directly from the skin. A squeeze of fresh lime over the top adds brightness that cuts through the richness.
Why Gochujang Takes Chicken to the Next Level
Gochujang is a fermented paste made from red chiles, soybeans, salt, and glutinous rice, aged for years to develop complex, umami-rich flavor. That fermentation creates depth that you can’t achieve with fresh spices alone. When you combine gochujang with simple rotisserie chicken, the paste’s savory complexity elevates something humble into something genuinely exciting. The mayo and honey balance the heat so it’s not overwhelmingly spicy but instead layers heat, sweetness, and savory depth. This is why Korean food tastes so crave-able—the balance of multiple flavor dimensions all happening at once.
Tips and Common Mistakes to Avoid
Use gochujang properly: Gochujang is a thick, fermented paste, not a sauce. You must thin it with liquid (mayo, soy sauce, rice vinegar, sesame oil) and whisk it thoroughly to make it smooth and spreadable. A lumpy gochujang filling will taste gritty and unpleasant. Spend 30 seconds whisking the sauce component before you add it to the chicken—this small step makes a huge texture difference.
Taste as you go: Heat perception varies wildly from person to person. Make the filling, taste it, and adjust before stuffing the avocados. It’s far easier to add heat than to remove it, so start conservatively with the gochujang and add more if you want it spicier.
Rotisserie chicken is your friend: Buying a rotisserie chicken saves massive amounts of time and effort while delivering more flavorful results than store-bought pre-cooked chicken breast. One rotisserie chicken typically yields more than enough shredded meat for this recipe plus leftovers for other meals.
Toast your own sesame seeds: Like the pine nuts in the first recipe, toasting sesame seeds transforms them from bland to nutty and complex. Do this in a dry skillet for 1 to 2 minutes over medium heat, shaking frequently, until fragrant. The entire kitchen will smell amazing, and you’ll notice the flavor difference immediately.
Add cucumber for texture: If you want extra crunch, serve the stuffed avocado alongside sliced cucumber or inside a cucumber boat (hollow out half a cucumber lengthwise and fill it with the chicken mixture instead of using avocado). This adds refreshing crispness that balances the rich, spicy filling.
Make it vegetarian: Substitute the chicken with pressed or baked tofu (which has been pressed dry and cubed), edamame, or chickpeas. The gochujang sauce works beautifully with all of these. Use the same sauce proportions, and you have a vegan option that’s equally satisfying.
Storage and Make-Ahead Options
The gochujang chicken filling keeps in an airtight container in the refrigerator for up to 3 days, and the flavors actually intensify as the ingredients meld together. You can prepare it the morning you plan to eat lunch or the evening before. The avocado should always be cut and filled just before eating. This recipe is excellent for meal prep—prepare the filling in bulk and assemble with fresh avocados throughout the week.
Which Stuffed Avocado Recipe Fits Your Lunch Needs
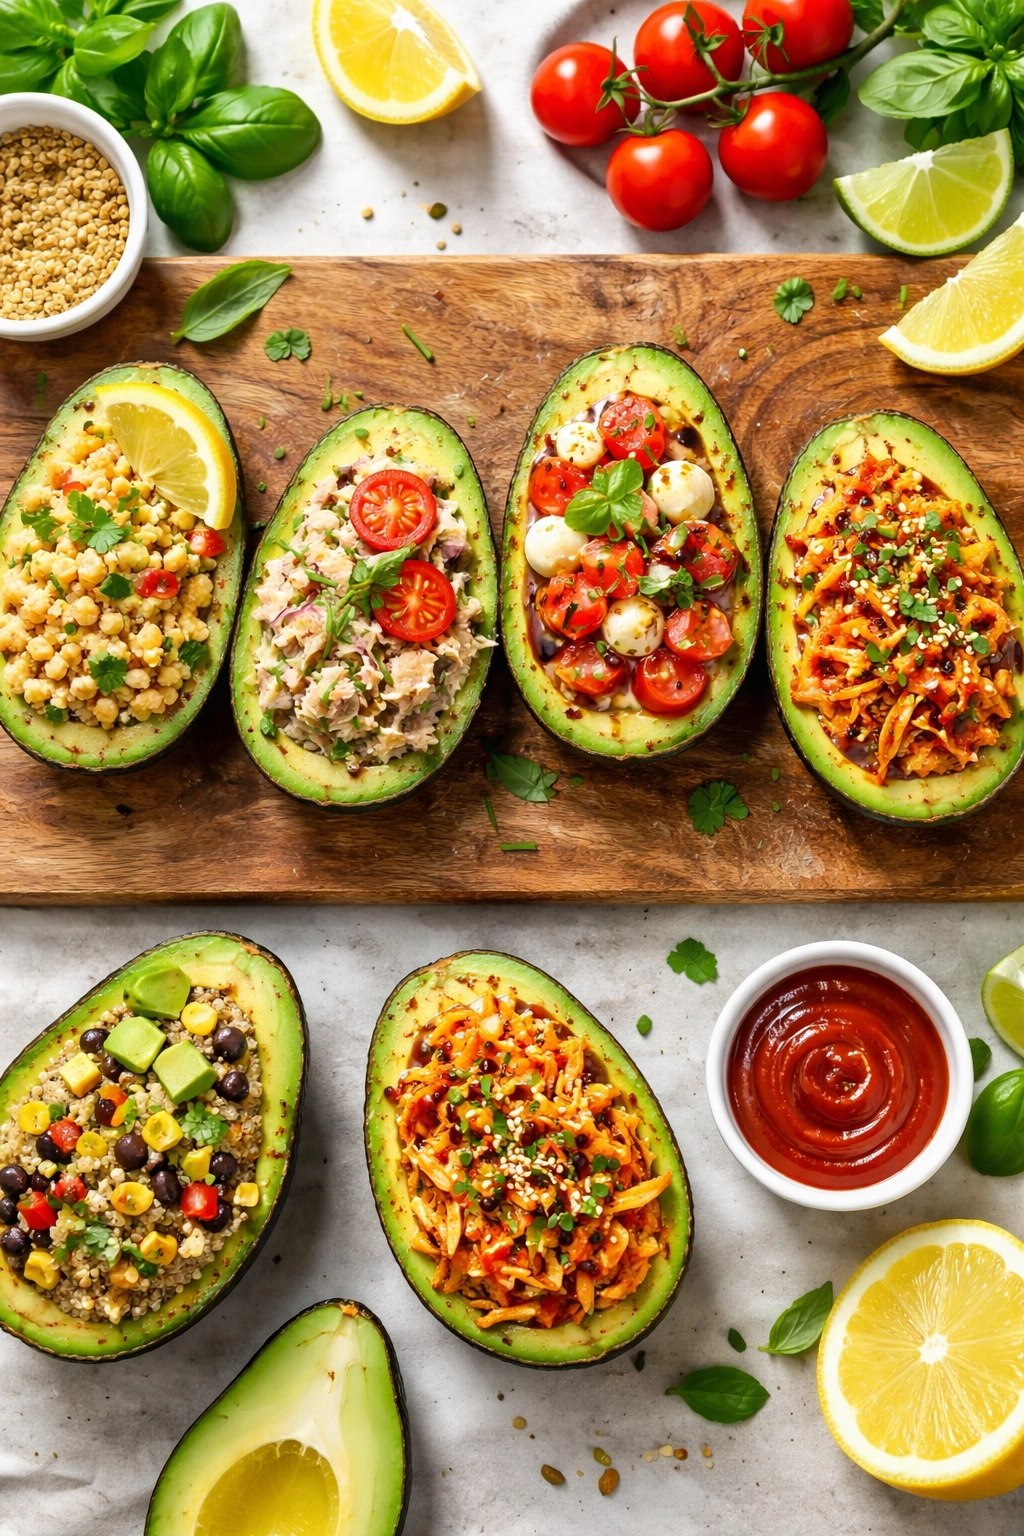
All five of these recipes deliver complete nutrition and genuine satisfaction, but each one caters to slightly different preferences and dietary approaches. The Mediterranean chickpea version is your best choice if you eat plant-based or follow a vegetarian diet—it’s hearty, protein-rich, and full of whole-food ingredients. The tuna salad is perfect if you’re prioritizing lean protein and omega-3 fatty acids; it’s particularly excellent on days when you need sustained energy without feeling weighed down. The caprese version is your answer on days when you want something bright, fresh, and summery—it’s the most elegant option if you’re eating at a nice café or in front of coworkers whose opinions might matter.
The quinoa-based filling works beautifully if you like grain-forward lunches or if you’re feeding multiple people and want something that’s easy to scale. It’s also the most make-ahead-friendly if you’re doing meal prep for the entire week. Finally, the gochujang chicken is your go-to when you want something with maximum flavor impact and spice—it’s quick if you’re using rotisserie chicken, and it’s the kind of lunch that leaves you genuinely satisfied and prevents afternoon cravings.
Storage, Transport, and Timing: Making Stuffed Avocados Work for Your Schedule
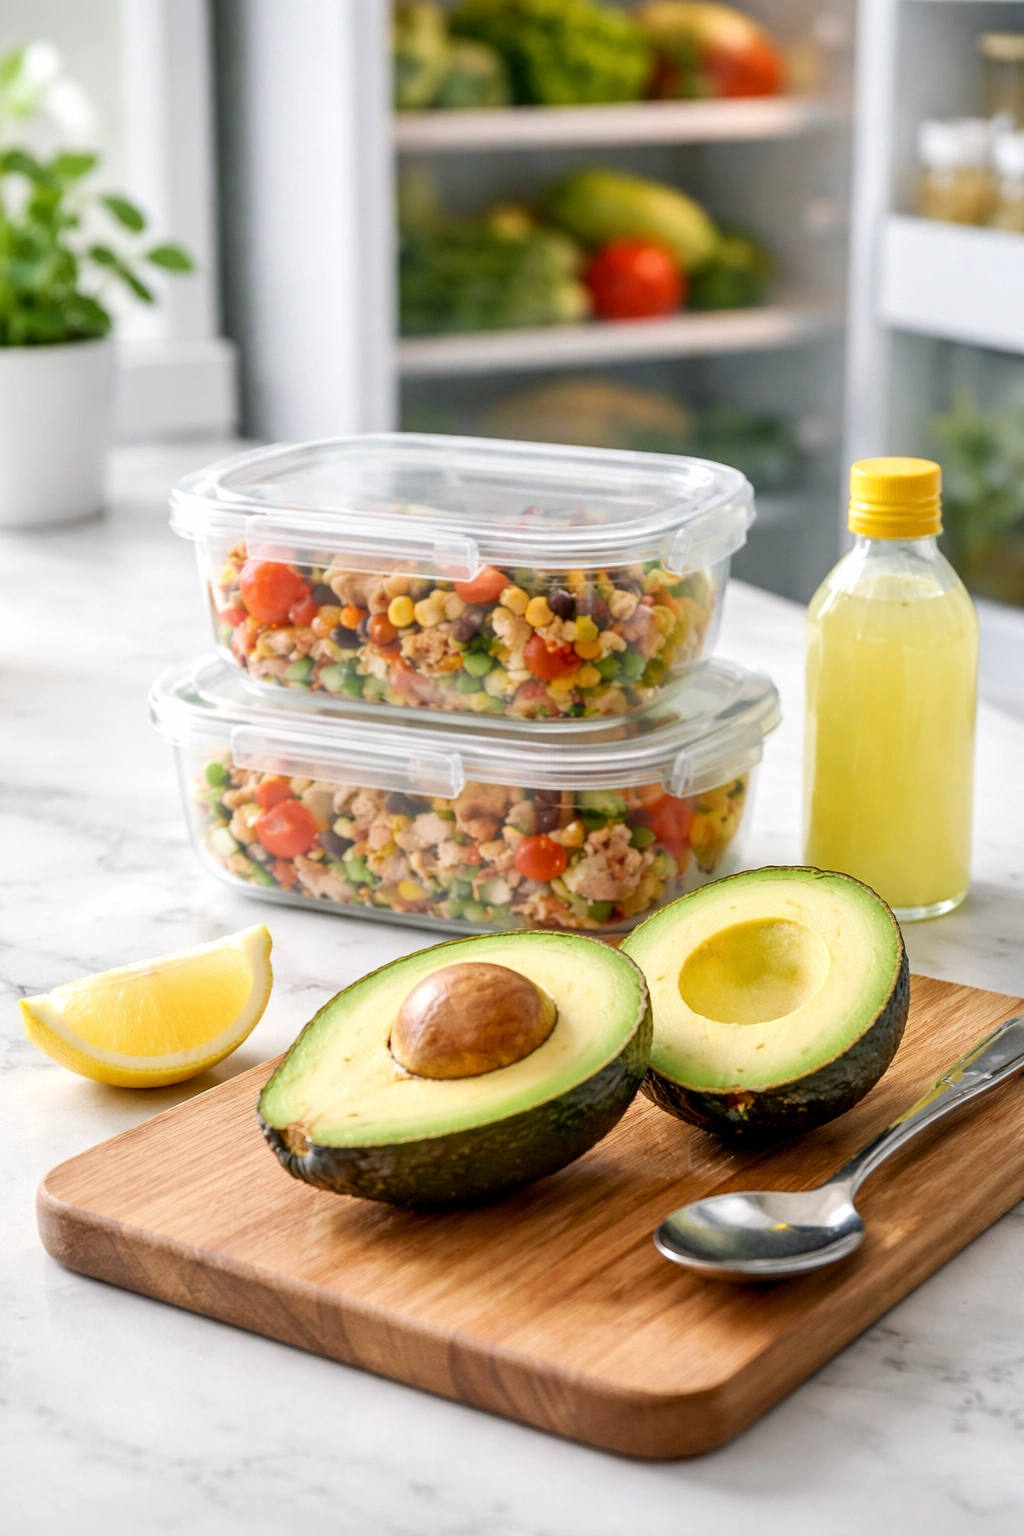
Stuffed avocados are best served immediately after assembly, which is the honest truth and the key difference between a mediocre avocado lunch and an excellent one. The avocado’s flesh will brown if exposed to air for extended periods, and the fillings will gradually release moisture that softens the fruit. However, you can work around this timing challenge with smart preparation.
If you’re packing lunch to take somewhere, assemble the stuffed avocado just before you leave home. Many of these fillings (particularly the quinoa and gochujang chicken versions) can be prepared the evening before and stored in airtight containers in the refrigerator. Cut your avocado at home, rub it with lemon juice to slow browning, and pack it in a separate small container. Keep the filling in another container. When you’re ready to eat, assemble the two in minutes.
Alternatively, if your workplace has a refrigerator, pack the avocado half and filling separately, then assemble them just before lunch. This takes 90 seconds and guarantees your avocado is ripe, your filling is cold, and everything is fresh. The effort is minimal and the payoff—a genuinely delicious lunch—is significant.
Simple Sides That Pair Beautifully With Any Stuffed Avocado
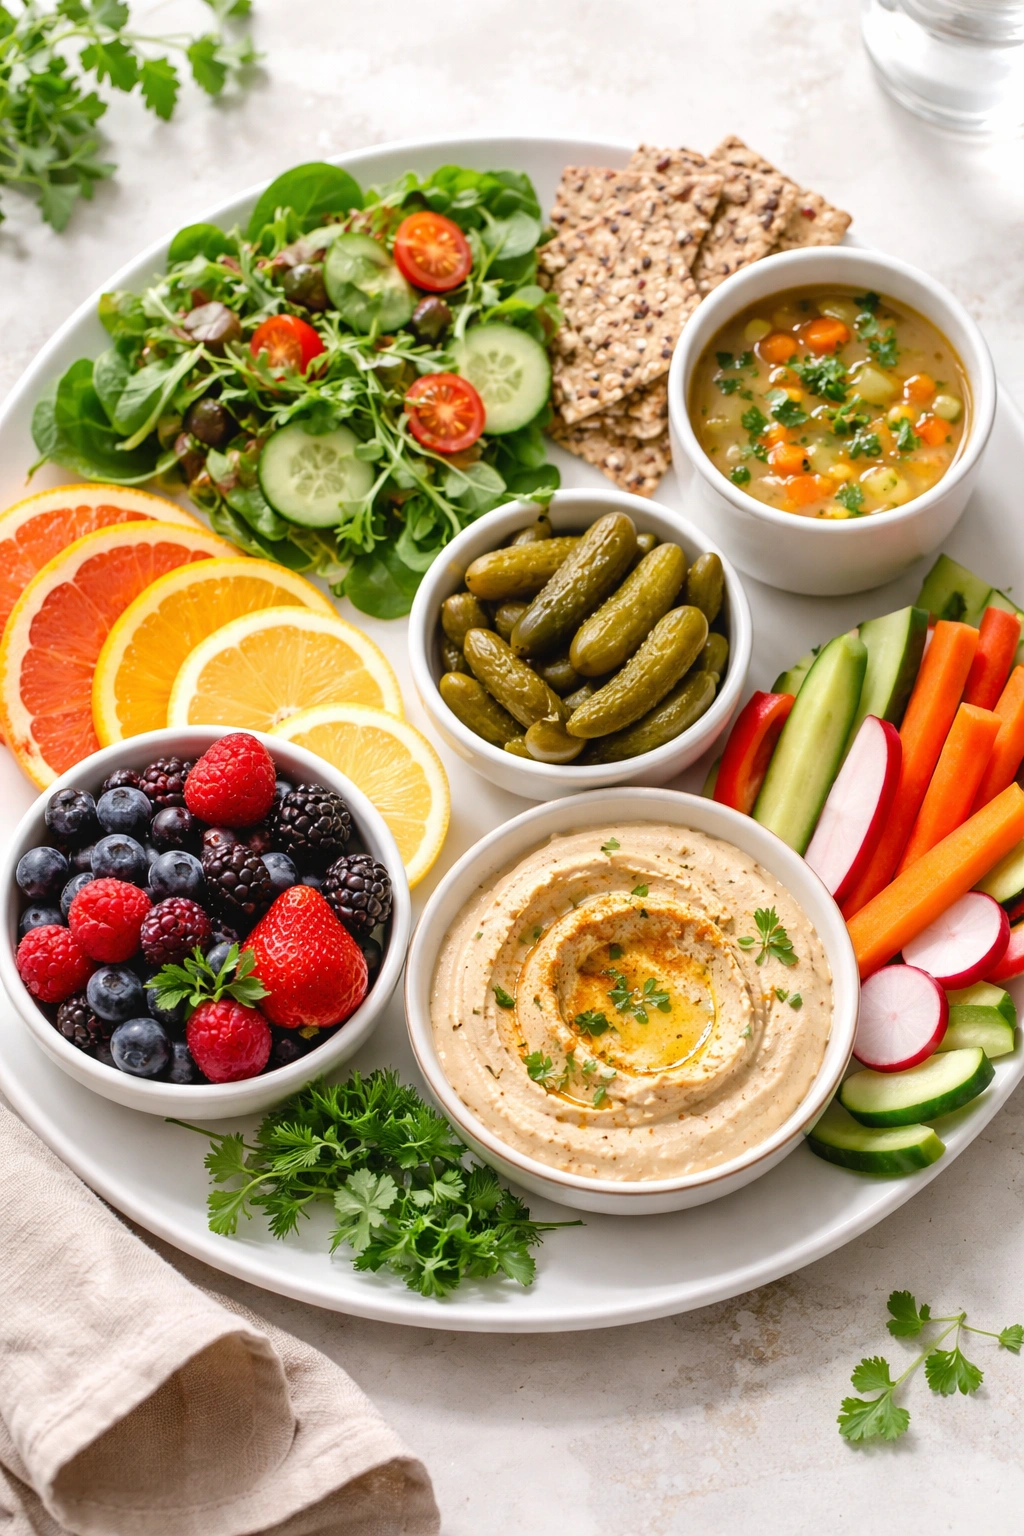
A stuffed avocado is technically a complete meal, but adding a simple side makes lunch feel more substantial and adds textural variety. A small handful of crisp greens—arugula, spinach, or mixed salad greens tossed with lemon juice and olive oil—adds freshness and crunch. Whole-grain crackers, crispy bread, or toasted pita chips provide textural contrast and a vehicle for any filling that escapes. A small cup of soup, particularly a cold gazpacho in warm months or a light vegetable soup in cooler seasons, bridges the meal and adds satisfaction.
Fresh fruit—berries, sliced citrus, melon, or grapes—provides sweetness and brightness that follows the savory main course. A pickle or fermented vegetable like sauerkraut or kimchi adds probiotic benefits and a salty, sour punch that complements the creamy avocado beautifully. Hummus or another creamy dip alongside crudités (raw vegetables) gives you something to snack on while you finish the avocado. The goal is to add components that enhance rather than compete—the avocado and filling should remain the stars.
Final Thoughts
Stuffed avocados represent the sweet spot where lunch becomes both nutritious and genuinely pleasurable. They’re fast enough for a weekday when time is tight, impressive enough to feel intentional on days when you want your lunch to feel special, and flexible enough to accommodate nearly any dietary preference or flavor craving. You can follow these five recipes exactly, or treat them as inspiration for your own combinations. The template remains the same: ripe avocado + flavorful filling + fresh components + good olive oil = lunch that satisfies on every level.
The beauty of this approach is that once you understand the concept, you can endlessly rearrange based on what’s in your kitchen. Use whatever vegetables, proteins, and fresh herbs appeal to you on any given day. Keep gochujang on hand for spicy days. Keep lemon and good olive oil in constant supply. Keep avocados ripening on your counter so you always have one or two ready to halve. Once you develop this habit, stuffed avocados become your go-to lunch option—the meal you come back to again and again because it’s genuinely delicious, genuinely filling, and genuinely good for you.