There’s something deeply satisfying about serving a cold salad on a sweltering day — the cool crunch against your teeth, the refreshing bite of vinaigrette, the way a well-made salad can feel like both a meal and a relief at the same time. When temperatures climb and the thought of standing over a hot stove feels unbearable, cold salads become your secret weapon: no cooking required (or minimal cooking), maximum flavor, and the kind of nourishment that actually sounds appealing when you’re melting in the heat.
The problem most people run into is treating summer salads like an afterthought — a bowl of iceberg lettuce with a sad tomato and some store-bought dressing, eaten out of obligation rather than genuine appetite. That’s not what we’re doing here. These six salads are designed to be the main event, the reason someone looks forward to lunch or dinner. They’re hearty enough to satisfy genuine hunger, interesting enough to make your taste buds wake up, and built to stay fresh and delicious for days in your refrigerator.
Each of these salads comes together quickly, holds up beautifully when made ahead, and delivers the kind of refreshing satisfaction that makes hot-weather eating genuinely enjoyable. Some lean toward vibrant vegetables and bright vinaigrettes; others build in proteins and grains for staying power. All of them prove that summer cooking doesn’t have to be complicated — just intentional, fresh, and delicious.
1. Mediterranean Chickpea Salad with Feta and Dill
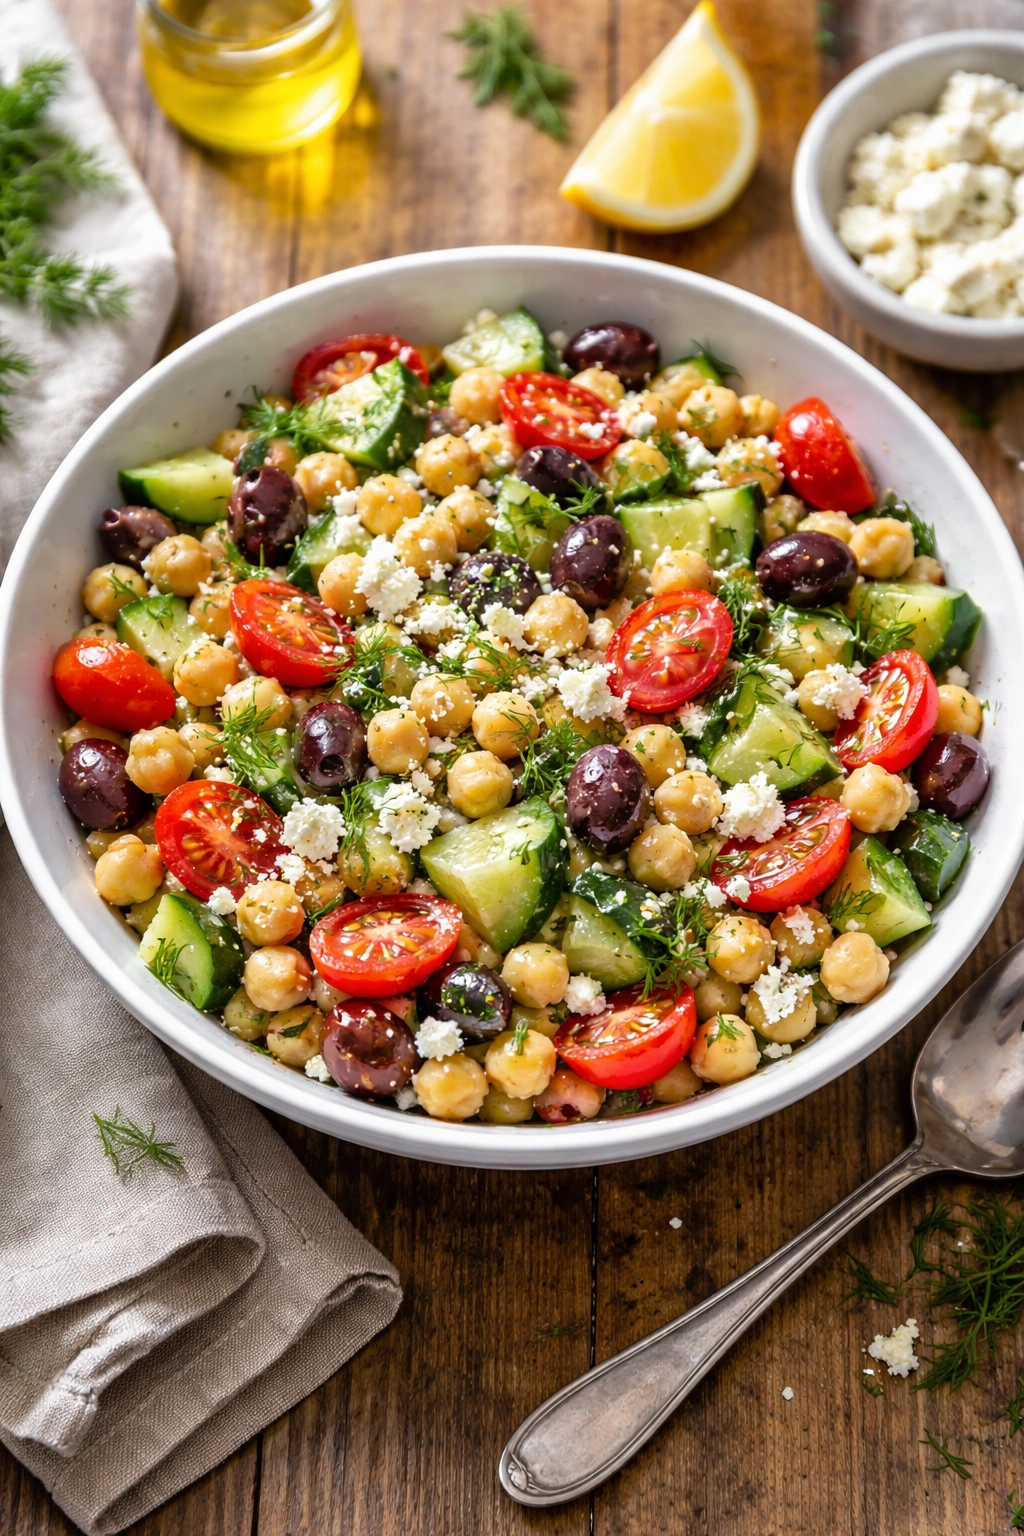
This is the salad that turns a simple lunch into something you’ll actually crave — loaded with hearty chickpeas, cool cucumbers, briny olives, and creamy feta that pulls everything together. The dill and lemon dressing is the secret: it’s bright without being aggressive, herbaceous without being grassy, and it gets better the longer the salad sits. This is one of those salads that’s genuinely better the next day, after the flavors have had time to mingle and develop. It’s substantial enough for a main course, yet light enough that you won’t feel weighed down on a hot afternoon.
Yield: Serves 4 to 6 as a main course, or 6 to 8 as a side Prep Time: 15 minutes Cook Time: 0 minutes (no cooking required) Total Time: 15 minutes Difficulty: Beginner — simple chopping and mixing, no special techniques or equipment needed.
For the Salad:
- 2 cans (15 ounces each) chickpeas, drained and rinsed, or 3 cups cooked fresh chickpeas
- 1 large English cucumber, cut into half-moons (about 2 cups)
- 1 cup cherry tomatoes, halved
- ½ red onion, finely diced (about ⅓ cup)
- ¾ cup Kalamata olives, pitted and halved
- 1 cup crumbled feta cheese
- ⅓ cup fresh flat-leaf parsley, roughly chopped
- 3 tablespoons fresh dill, finely chopped (or 1 tablespoon dried dill if fresh isn’t available)
For the Dressing:
- ¼ cup fresh lemon juice (from 1 to 2 lemons)
- 3 tablespoons extra-virgin olive oil
- 1 tablespoon red wine vinegar
- 2 cloves garlic, minced very fine
- 1 teaspoon dried oregano
- ¼ teaspoon fine sea salt
- ⅛ teaspoon black pepper
Make the Dressing:
- In a small bowl or a jar with a tight-fitting lid, whisk together the lemon juice, olive oil, red wine vinegar, minced garlic, dried oregano, salt, and pepper until well combined. Taste and adjust the seasoning — the dressing should be bright and herbaceous, with the lemon juice balanced by the olive oil so it’s not too sharp.
Assemble the Salad: 2. In a large bowl, combine the chickpeas, cucumber, cherry tomatoes, red onion, olives, feta, parsley, and dill. Toss gently to distribute everything evenly.
- Pour the dressing over the salad and toss again, gently, to coat all the components. Let the salad sit for at least 5 minutes before serving so the flavors can meld — or refrigerate for up to 2 hours and serve chilled.
Why This Salad Works
Chickpeas provide substantial protein and fiber, making this salad genuinely filling without being heavy. The cucumber and tomatoes keep everything fresh and hydrating, which matters when it’s hot outside. The feta adds a salty, creamy richness that makes you feel satisfied rather than like you’re eating “rabbit food,” and the lemon-dill dressing is the engine that ties every component together into something greater than the sum of its parts.
Make-Ahead and Storage Tips
This salad actually improves if you make it a few hours ahead or even the night before. The chickpeas and vegetables absorb the dressing flavors beautifully, and everything stays crisp because there’s no delicate greens to wilt. Store it in an airtight container in the refrigerator for up to 4 days. If you’re making it more than a day ahead, store the dressing separately and toss just before serving to keep the vegetables as crisp as possible — though even a day-old version tastes wonderful.
Pro tip: If you’re bringing this to a picnic or potluck, pack it in a container with a tight-fitting lid. The sturdy vegetables and chickpeas mean it travels beautifully, and it actually stays fresh longer in a cool bag than a delicate lettuce-based salad would.
Variations and Swaps
Prefer a different grain? Swap the chickpeas for cooked farro, barley, or wheat berries — each brings a different texture. Don’t have feta? Crumbled goat cheese or a sharp white cheddar work beautifully. Want more freshness? Add a handful of fresh mint or a bit of fresh arugula just before serving. For extra protein, toss in some grilled shrimp or white fish — the Mediterranean flavors work brilliantly with seafood too.
2. Crispy Tofu and Sesame Noodle Salad with Charred Vegetables
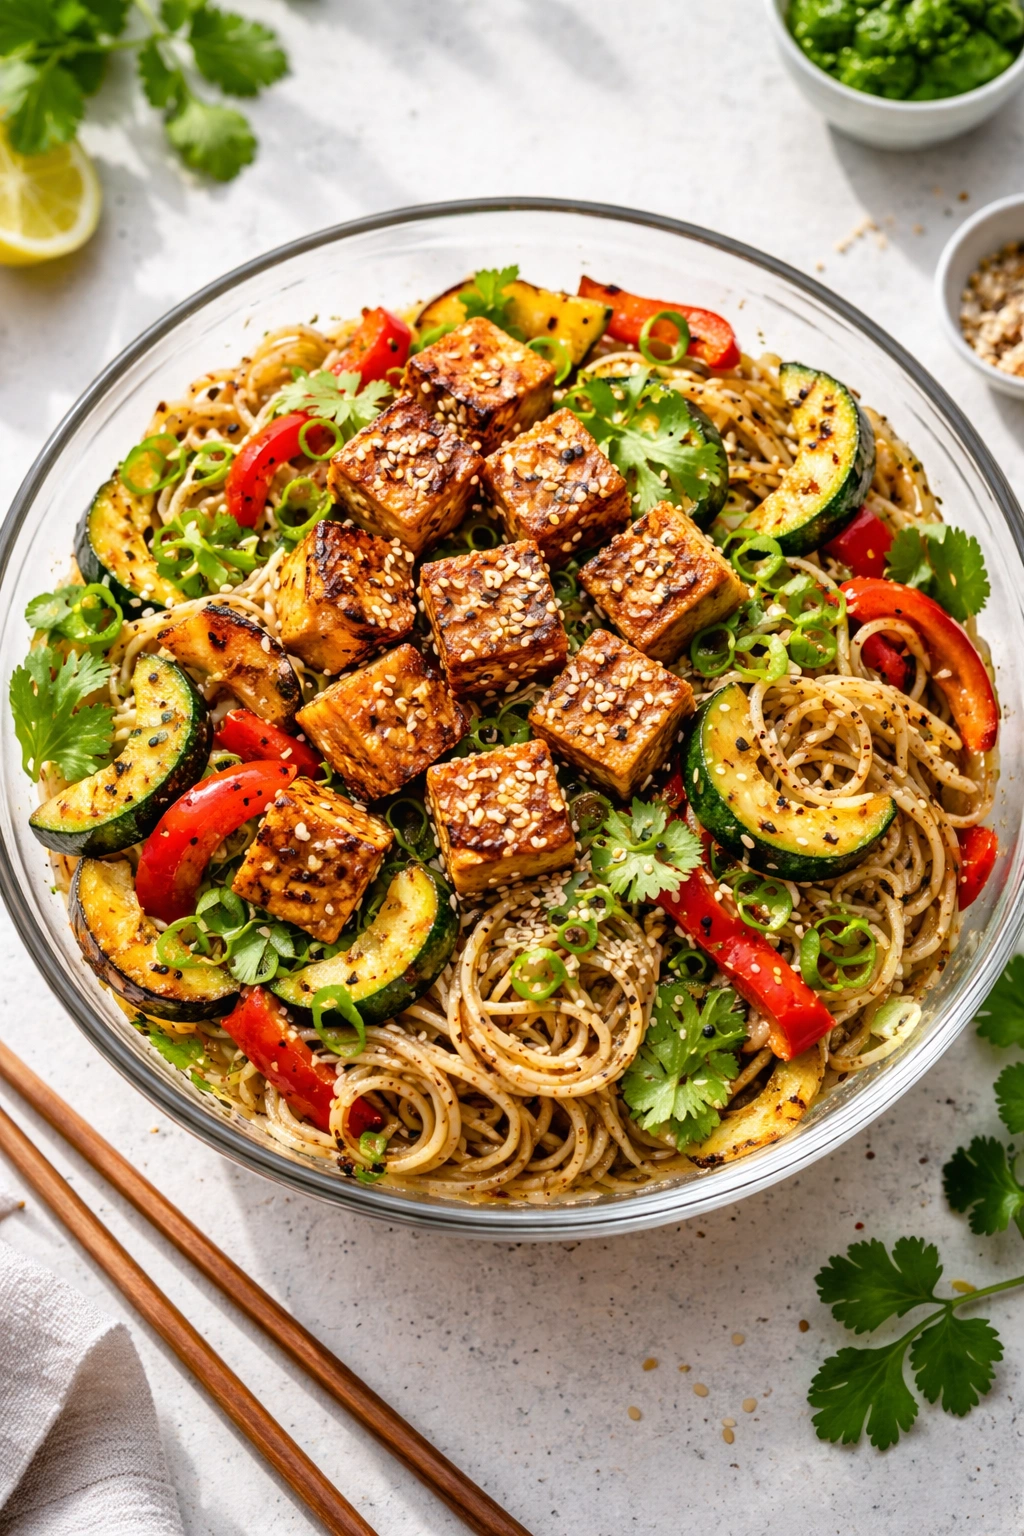
This is the salad that converts people who claim they don’t like cold noodles into devoted fans. Chewy noodles coated in a deeply savory sesame dressing, crispy pan-fried tofu that stays crunchy even when chilled, tender charred vegetables, and a shower of fresh herbs and toasted sesame seeds create a salad with real textural interest. It’s entirely plant-based but satisfying enough that no one will miss meat, and it comes together faster than you’d expect for something this impressive.
Yield: Serves 4 as a main course Prep Time: 20 minutes (including tofu pressing and frying) Cook Time: 12 minutes (charring vegetables and cooking noodles) Total Time: 32 minutes Chill/Rest Time: Optional — can be served warm or chilled; chilling for 1 hour intensifies the flavors Difficulty: Intermediate — requires pressing tofu and pan-frying, but no advanced techniques.
For the Salad:
- 14 ounces firm or extra-firm tofu, pressed and cut into ¾-inch cubes (see pressing instructions below)
- 8 ounces dried egg noodles, ramen noodles, or rice noodles
- 2 medium summer squash (yellow or zucchini), sliced into ¼-inch rounds
- 1 red bell pepper, cut into wide strips
- 2 cups broccoli florets, cut into bite-sized pieces
- 3 tablespoons neutral oil (vegetable, canola, or light sesame oil) for frying tofu
- ½ cup fresh cilantro, roughly chopped
- ⅓ cup fresh mint, roughly chopped
- ¼ cup thinly sliced scallions (green parts)
- 2 tablespoons white or black sesame seeds, toasted (or more for garnish)
- ¼ teaspoon red pepper flakes (optional, for a hint of heat)
For the Sesame Dressing:
- 3 tablespoons toasted sesame oil
- 3 tablespoons rice vinegar or white wine vinegar
- 2 tablespoons low-sodium soy sauce or tamari
- 1 tablespoon lime juice (from ½ lime)
- 1 tablespoon smooth peanut butter or tahini
- 1 clove garlic, minced very fine
- 1 teaspoon fresh ginger, grated on a microplane or minced very fine
- 1 teaspoon agave or honey (optional, for subtle sweetness)
- Salt and black pepper to taste
Prepare and Cook the Components:
-
If using regular tofu, press it first: Drain it from its container, wrap it in a clean kitchen towel or paper towels, and set it on a plate. Place another plate on top and weight it with a heavy object (a can of beans, a book, whatever you have) for 10 to 15 minutes. This removes excess moisture so the tofu can brown properly when fried.
-
Once pressed, cut the tofu into ¾-inch cubes. Heat the neutral oil in a large skillet over medium-high heat. When the oil shimmers and moves easily around the pan, add the tofu cubes in a single layer. Do not stir immediately — let them sit undisturbed for 3 to 4 minutes so they develop a golden, crispy exterior. Stir, then continue cooking for another 3 to 4 minutes until most sides are browned. Transfer the tofu to a plate lined with paper towels and set aside.
Advertisements -
In the same skillet (no need to wash it), arrange the squash and bell pepper strips in a single layer. Let them sit undisturbed for 2 to 3 minutes until you see charring on one side, then flip and cook for another 2 minutes. Transfer to a plate. Add the broccoli florets and cook for 3 to 4 minutes, stirring occasionally, until they develop color and are tender-crisp. Transfer to the plate with the other vegetables.
-
Bring a large pot of salted water to a rolling boil. Add the noodles and cook according to package directions until just al dente — check a minute or two earlier than the package suggests to avoid overcooking. Drain in a colander and rinse with cool water to stop the cooking and remove excess starch.
Make the Dressing: 5. In a small bowl, whisk together the toasted sesame oil, rice vinegar, soy sauce, lime juice, peanut butter or tahini, minced garlic, grated ginger, and agave (if using). Whisk until smooth and well combined. Taste and adjust — it should be deeply savory and nutty from the sesame, with bright acidity from the vinegar and lime balancing it. Season with a pinch of salt and black pepper.
Assemble the Salad: 6. In a large bowl, combine the cooked noodles, fried tofu cubes, charred vegetables, cilantro, mint, and scallions. Pour the dressing over everything and toss gently until the noodles and vegetables are evenly coated. Sprinkle the toasted sesame seeds and red pepper flakes (if using) over the top.
- Serve warm, or refrigerate for up to 2 hours and serve chilled. The flavors deepen and marry together as it cools.
The Science Behind Crispy Tofu
The key to tofu that stays crispy even when cold is pressing out the excess moisture and then frying it at a high enough temperature to create a golden exterior. That exterior acts like a barrier, keeping the inside creamy while the outside maintains its crunch. Cold tofu loses some of its crispness, but a properly fried piece will still have enough texture to be interesting even when chilled.
Storage and Make-Ahead Strategy
This salad keeps beautifully for 3 to 4 days in an airtight container in the refrigerator. The noodles absorb the dressing flavors as they sit, which is actually an advantage here — it doesn’t get soggy the way lettuce would. If you’re making it more than a few hours ahead, you can store the dressing separately and toss it with the noodles and vegetables just before serving for maximum freshness, though even a day-old batch tastes delicious.
Insider note: Toast your own sesame seeds if you can — they develop a richer flavor than pre-toasted versions. Spread them on a dry skillet over medium heat for 2 to 3 minutes, shaking occasionally, until fragrant.
Flavor Variations
Want more heat? Add a tablespoon of sriracha or chili sauce to the dressing. Prefer something creamier? Whisk a tablespoon of coconut milk into the dressing for richness. Swap the peanut butter for tahini for a different nutty flavor. Add shredded carrots or thinly sliced radishes for extra crunch. Use whatever fresh herbs you have on hand — basil, chives, or Thai basil all work beautifully here.
3. Charred Corn and Black Bean Salad with Lime and Jalapeño
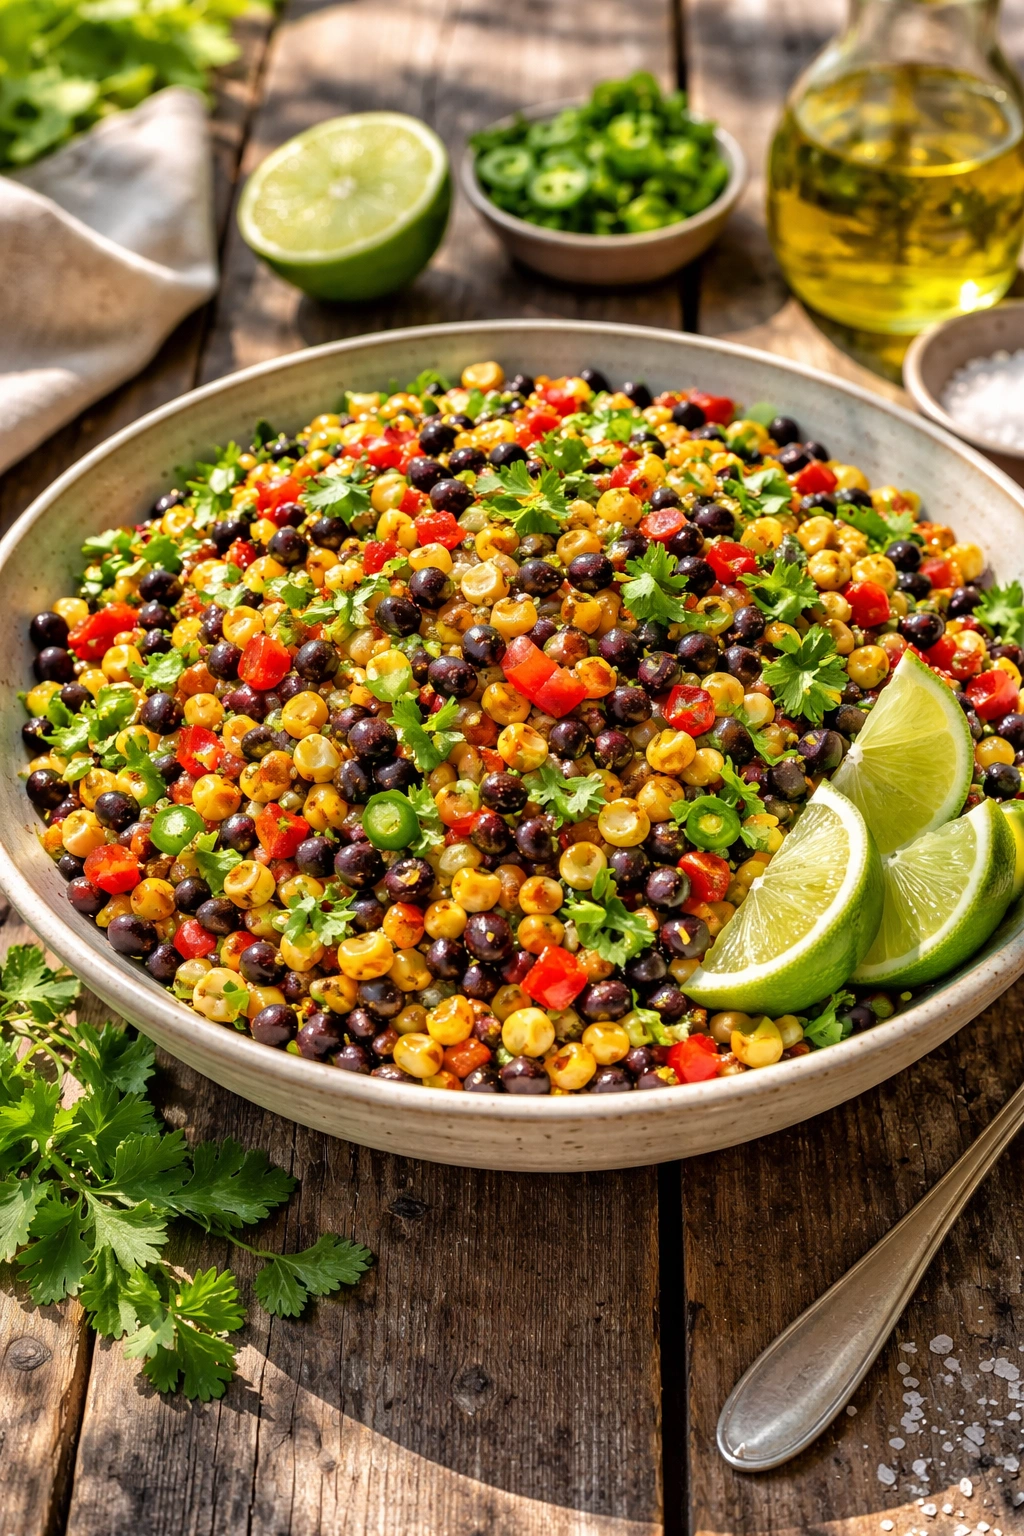
This salad captures the bright, summery flavors of corn season and builds on them with earthy black beans, charred peppers, and a fiery-fresh lime-jalapeño dressing. It’s visually stunning — all those jewel tones of corn, black beans, red pepper, and green cilantro — and it comes together in the time it takes corn to char in a hot pan. Make it in bulk and you’ll find yourself eating it straight from the container all week. It’s perfect as a side dish, mixed into grain bowls, stuffed into warm tortillas, or served with chips as a dip-like salad.
Yield: Serves 6 as a side dish, or 4 as a hearty main course Prep Time: 15 minutes Cook Time: 8 minutes (charring corn) Total Time: 23 minutes Difficulty: Beginner — simple chopping and pan-charring, no special skills needed.
For the Salad:
- 4 cups fresh corn kernels (from 5 to 6 medium ears) or frozen corn, thawed
- 2 cans (15 ounces each) black beans, drained and rinsed, or 3 cups cooked fresh black beans
- 1 large red bell pepper, finely diced (about 1 cup)
- ½ red onion, finely diced (about ⅓ cup)
- 1 jalapeño pepper, seeded and minced fine (leave the seeds if you want serious heat)
- ½ cup fresh cilantro, roughly chopped
- 1 avocado, sliced or cubed (add just before serving to prevent browning)
- Juice and zest of 2 limes (about ¼ cup juice)
For the Dressing:
- ¼ cup fresh lime juice (from 2 limes, or more to taste)
- 3 tablespoons extra-virgin olive oil
- 1 clove garlic, minced very fine
- 1 jalapeño pepper, finely minced (include some seeds for heat, or remove them for mild)
- ½ teaspoon ground cumin
- ¼ teaspoon smoked paprika (optional, for depth)
- ¼ teaspoon fine sea salt
- Pinch of black pepper
Char the Corn:
- Heat a large skillet (cast iron works beautifully here, but any large pan is fine) over medium-high heat. Add the corn in a single layer and let it sit undisturbed for 2 to 3 minutes until the kernels start to char and turn golden brown. Stir, then let it cook for another 2 to 3 minutes until more kernels are charred and the corn is fragrant and tender. Transfer to a plate to cool slightly.
Make the Dressing: 2. In a small bowl or jar, whisk together the lime juice, olive oil, minced garlic, minced jalapeño, cumin, smoked paprika (if using), salt, and black pepper. Taste and adjust — it should be bright and spicy, with the lime juice balanced by the oil so it’s not too sharp. Add more lime juice if you want extra brightness, or more oil if it’s too acidic.
Assemble the Salad: 3. In a large bowl, combine the charred corn, black beans, diced red bell pepper, diced red onion, minced jalapeño, and cilantro. Pour the dressing over the salad and toss gently to coat everything evenly. Let it sit for at least 10 minutes before serving so the flavors can meld.
- Just before serving, fold in the sliced or cubed avocado to keep it from browning. Taste and adjust the seasoning if needed — sometimes you’ll want a squeeze more lime juice or another pinch of salt.
Why Charring Matters
Charring the corn transforms it from mild and slightly sweet to deeply caramelized and nutty. The heat brings out the corn’s natural sugars and adds a sophisticated smoky depth that makes the entire salad more interesting. It’s the difference between a decent salad and one you’ll actually remember.
Perfect Timing and Make-Ahead Notes
This salad is best served within a few hours of assembly, when the vegetables are still crisp and the avocado hasn’t oxidized. However, you can prepare everything except the avocado up to a day ahead and store it in an airtight container in the refrigerator. The flavors actually improve as they sit together. Add the avocado just before serving to keep it fresh and green. If you do notice any browning on the avocado, simply scoop it off the surface — the rest underneath is usually still perfectly good.
Worth knowing: If you’re taking this to a potluck or picnic, skip the avocado entirely and pack it separately to add just before eating. Alternatively, toss a small squeeze of lime juice directly onto the avocado pieces to help prevent browning.
Ingredient Swaps and Additions
Prefer fresh corn that’s less intense? Use it uncharred — it’s still delicious, just milder. Can’t find fresh corn? Frozen corn works beautifully and actually saves you the charring step (just thaw it and add it to the salad). Don’t like black beans? Pinto beans or kidney beans are equally delicious. Want more protein? Add crumbled queso fresco or cotija cheese, or toss in some shredded grilled chicken. For extra freshness, add diced cucumber or tomato. A handful of thinly sliced radishes adds a peppery crunch that works wonderfully here.
4. Grilled Chicken and Stone Fruit Salad with Burrata and Basil
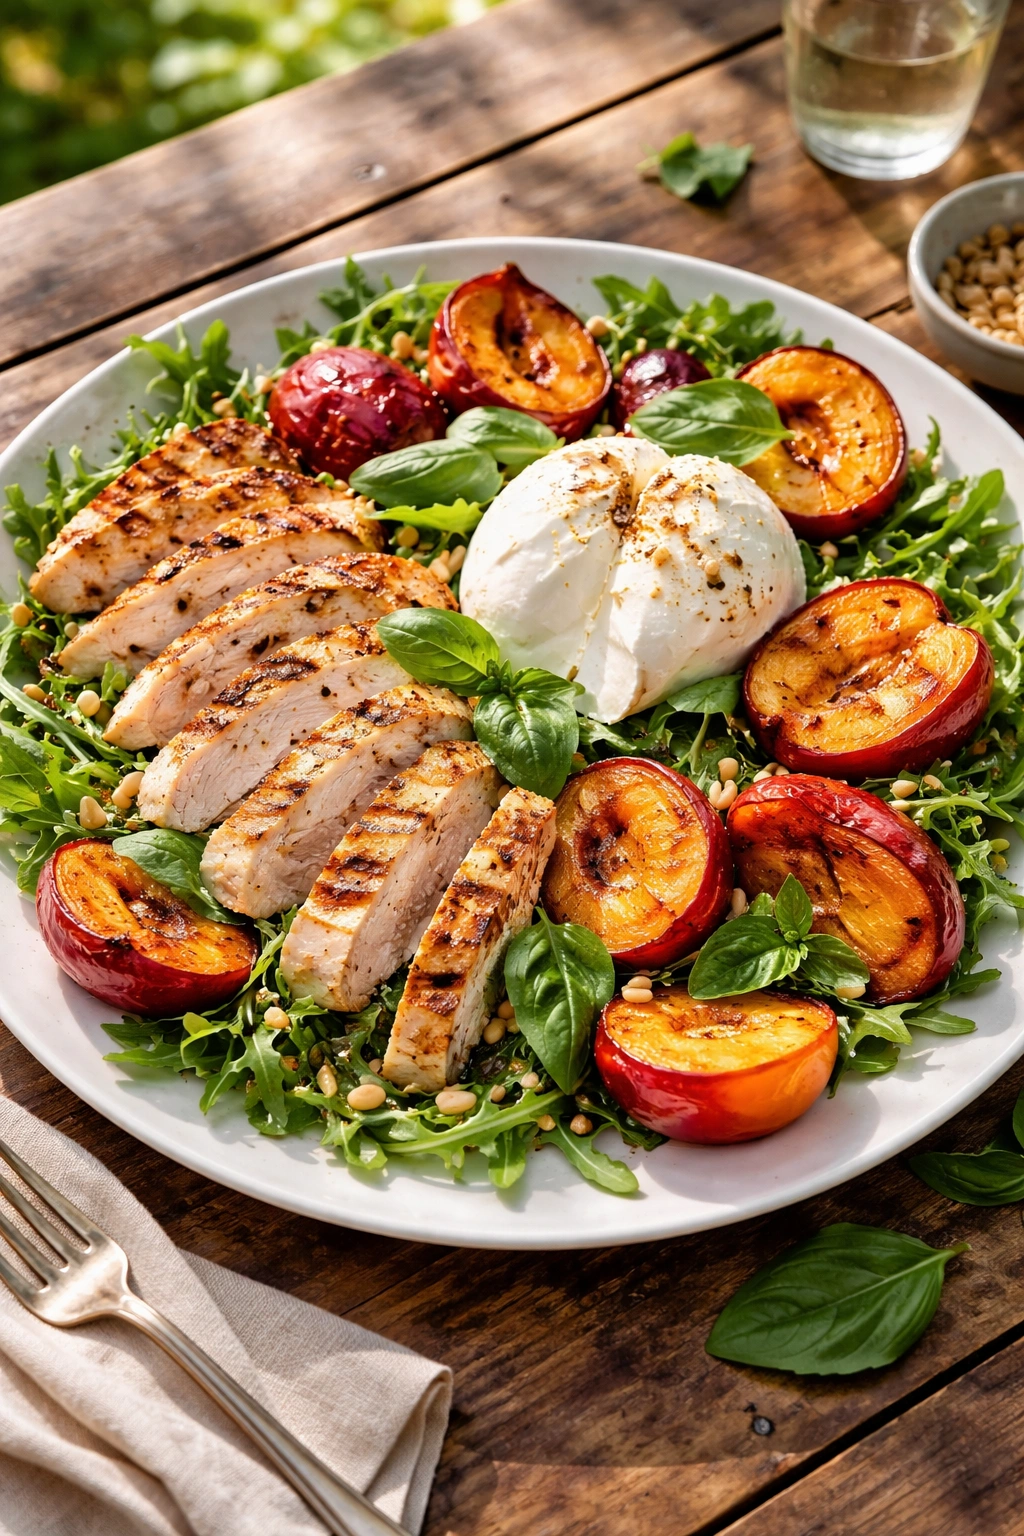
This is the salad you make when you want something elegant but unfussy — juicy grilled chicken, caramelized stone fruits, creamy burrata cheese that melts slightly into warm chicken, peppery arugula, and a bright balsamic vinaigrette. It’s the kind of salad that looks like you spent hours on it but actually comes together in about 30 minutes. It’s equally at home on a weeknight dinner table or as the star of a summer entertaining menu.
Yield: Serves 4 as a main course Prep Time: 15 minutes Cook Time: 15 minutes (grilling chicken and fruit) Total Time: 30 minutes Difficulty: Intermediate — requires grilling or pan-searing chicken, but the technique is straightforward.
For the Salad:
- 4 boneless, skinless chicken breasts (about 6 ounces each), or 2 pounds of chicken thighs, trimmed
- 3 medium stone fruits (peaches, nectarines, or plums), cut in half and pit removed
- 6 cups fresh arugula or mixed greens
- 8 ounces burrata cheese (or fresh mozzarella if burrata isn’t available), torn into large pieces
- ⅓ cup fresh basil leaves, torn by hand (don’t use a knife — it bruises the basil)
- ¼ cup toasted sliced almonds or pine nuts
- 1 tablespoon fresh thyme leaves (optional, for aromatic depth)
- Fleur de sel or flaky sea salt for finishing
- Black pepper to taste
For the Dressing:
- ¼ cup aged balsamic vinegar
- 2 tablespoons extra-virgin olive oil
- 1 tablespoon honey or agave
- 1 clove garlic, minced very fine
- ¼ teaspoon fine sea salt
- ⅛ teaspoon black pepper
Prepare and Grill the Chicken:
-
Pat the chicken breasts or thighs dry with paper towels — this helps them brown beautifully. Brush both sides with a thin coating of olive oil and season generously with salt and black pepper on both sides.
-
Heat a grill to medium-high heat, or heat a cast-iron skillet over medium-high heat until it’s very hot. If using a grill, oil the grates with a folded paper towel dipped in neutral oil to prevent sticking. If using a skillet, add a tablespoon of neutral oil to the pan.
-
Place the chicken on the grill or in the hot skillet and do not move it for the first 4 to 5 minutes. This allows the bottom to develop a beautiful golden crust. Flip the chicken and cook for another 4 to 5 minutes on the second side, until the internal temperature reaches 165°F (74°C) when measured with an instant-read thermometer in the thickest part. Transfer the chicken to a plate and let it rest for 5 minutes before slicing.
Char the Stone Fruits: 4. While the chicken rests, place the stone fruit halves cut-side down on the same grill or skillet over medium-high heat. Grill for 2 to 3 minutes until they develop caramelized grill marks and the flesh is tender but still holds its shape. Transfer to a plate. Once they’re cool enough to handle, cut each half into 2 to 3 pieces.
Make the Dressing: 5. In a small bowl, whisk together the balsamic vinegar, olive oil, honey, minced garlic, salt, and pepper until emulsified. Taste and adjust — it should be sweet from the honey and balsamic, but balanced by the oil and salt so it’s not cloying.
Assemble the Salad: 6. Divide the arugula among four plates or shallow bowls. Top each with sliced grilled chicken, charred stone fruit pieces, and torn burrata cheese. Scatter the torn basil, toasted nuts, and fresh thyme (if using) over the top.
- Drizzle each salad lightly with the balsamic dressing — use about 2 tablespoons per plate so the salad doesn’t get soggy. Finish with a sprinkle of fleur de sel and black pepper. Serve immediately while the chicken is still warm and the burrata is creamy.
The Balance of Warm and Cold
This salad’s magic comes from the contrast between warm grilled chicken and cool fresh greens, with the burrata’s creaminess bridging the two. The warmth of the chicken slightly softens the burrata, creating a luscious texture that makes each bite feel indulgent. This is why timing matters — serve it as soon as the chicken finishes resting so you get that temperature contrast.
Make-Ahead Modifications
The chicken can be grilled up to 8 hours ahead and served at room temperature or reheated gently — it’s still delicious either way. The stone fruits can be grilled a few hours ahead too. Assemble the salad just before serving, though, so the greens don’t wilt and the burrata doesn’t separate. The dressing can be made a day ahead and stored in a jar in the refrigerator.
Pro tip: If you’re making this for a crowd, grill the chicken and stone fruits earlier in the day, then let everything come to room temperature. Arrange the salads just before serving. Room-temperature chicken is just as delicious as warm chicken in this context, and it’s far easier for entertaining.
Seasonal and Dietary Variations
In early summer, use apricots and early peaches. Later in the season, switch to freestone peaches and plums. In a pinch, grilled pineapple or even grilled figs work beautifully with the chicken and basil. Want to make it vegetarian? Skip the chicken entirely and add an extra 4 ounces of burrata and a scattering of toasted nuts for protein. For a heartier version, add cooked farro or barley to the base. If you’re avoiding dairy, fresh mozzarella still works, or skip the cheese entirely and add crispy chickpeas or white beans for texture.
5. Tuna and White Bean Salad with Red Onion, Celery, and Herbs
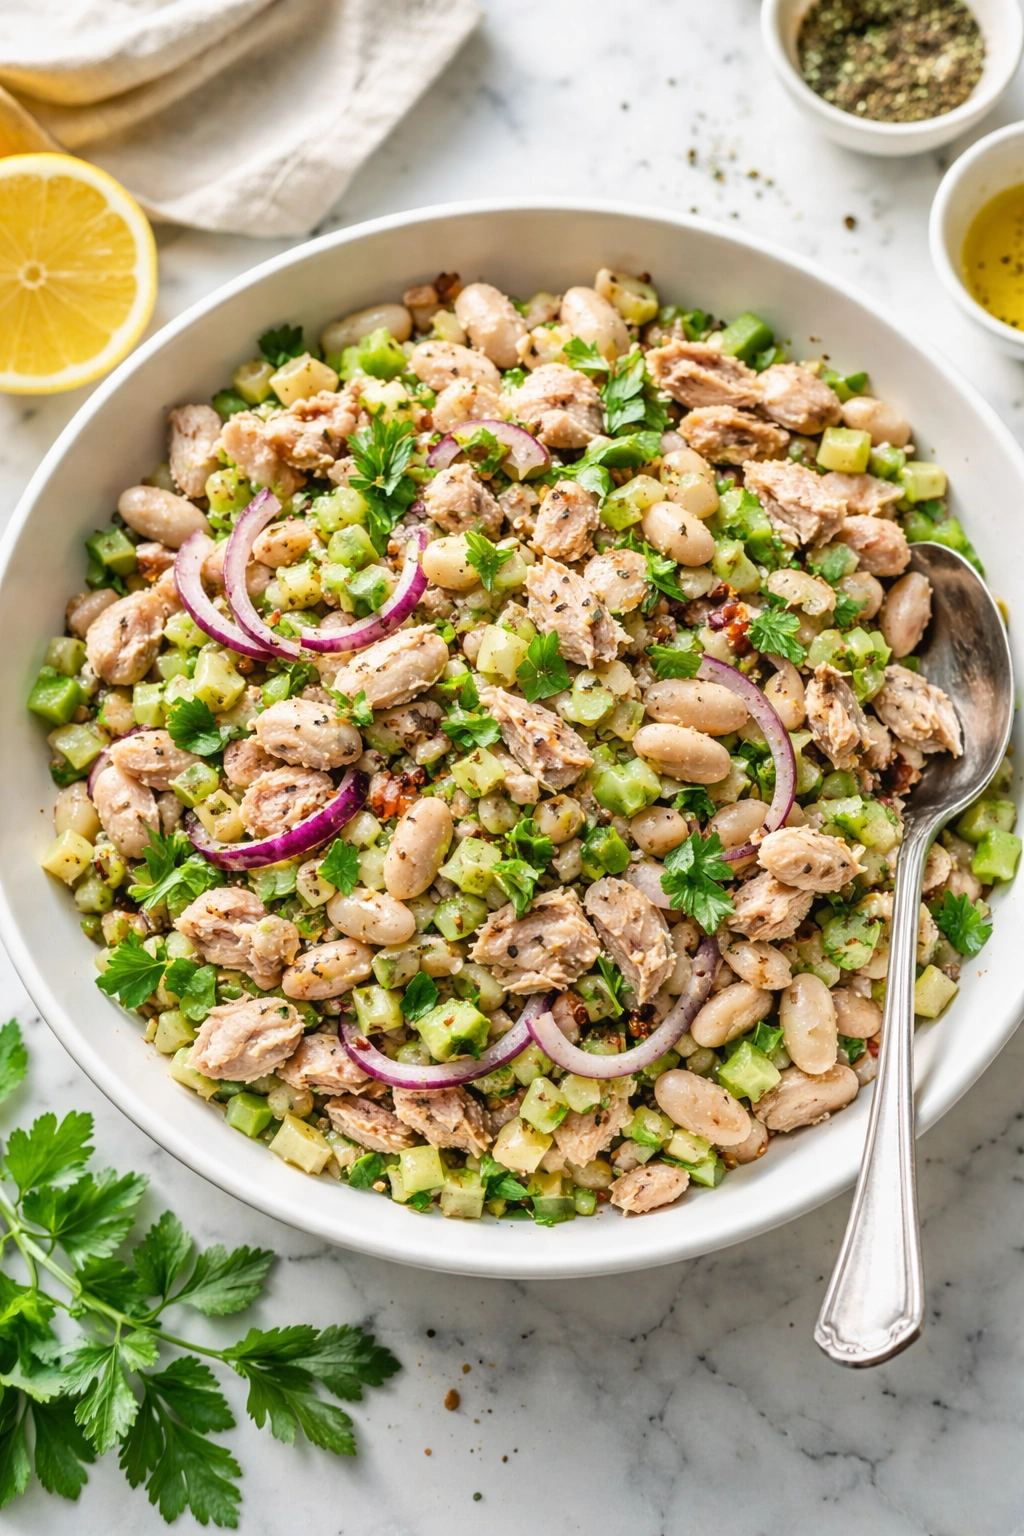
This is the salad you turn to when you want something substantial, nutritious, and ready in under 15 minutes. Canned tuna and white beans provide protein and substance; crisp celery and peppery red onion add texture and bite; fresh herbs and a simple lemon vinaigrette tie everything together. It’s the kind of salad that tastes like actual food rather than a diet compromise, and it’s built to be eaten straight away or packed into a container for lunch the next day. Serve it on toast, in a tomato, on a bed of greens, or just eat it straight from the bowl — it’s good every way.
Yield: Serves 4 as a main course, or 6 as a side or on toast Prep Time: 12 minutes Cook Time: 0 minutes (no cooking required) Total Time: 12 minutes Difficulty: Beginner — simple chopping and mixing, no special techniques.
For the Salad:
- 3 cans (5 ounces each) high-quality tuna packed in olive oil, or 12 ounces fresh cooked tuna
- 2 cans (15 ounces each) white beans (cannellini or great northern), drained and rinsed, or 3 cups cooked fresh white beans
- 3 stalks celery, trimmed and diced (about ¾ cup)
- ½ medium red onion, finely diced (about ⅓ cup)
- ¼ cup fresh flat-leaf parsley, roughly chopped
- 2 tablespoons fresh dill, finely chopped (or 1 tablespoon dried dill)
- 1 tablespoon fresh chives, finely sliced (optional, for subtle onion flavor)
- 2 tablespoons capers, drained (optional, for briny brightness)
- 2 hard-boiled eggs, chopped into large chunks (optional, for extra richness)
- Salt and black pepper to taste
For the Dressing:
- 3 tablespoons extra-virgin olive oil (or use some of the oil from the tuna can)
- 2 tablespoons fresh lemon juice (from ½ to 1 lemon)
- 1 clove garlic, minced very fine
- 1 teaspoon Dijon mustard
- ½ teaspoon fine sea salt
- ¼ teaspoon black pepper
Make the Dressing:
- In a small bowl, whisk together the olive oil, lemon juice, minced garlic, Dijon mustard, salt, and black pepper until well combined. Taste and adjust — it should be bright and tangy, with the lemon balancing the oil. Add a bit more lemon juice if you want extra brightness.
Assemble the Salad: 2. In a large bowl, combine the tuna (drained and flaked gently with a fork into large chunks), white beans, diced celery, diced red onion, parsley, dill, chives (if using), and capers (if using). Gently fold everything together, being careful not to break up the tuna chunks into tiny pieces — you want substantial flakes, not shredded tuna.
-
Pour the dressing over the salad and fold gently until everything is evenly coated. If using hard-boiled eggs, fold them in just before serving so they stay as intact as possible.
-
Taste and adjust the seasoning — sometimes you’ll need more salt or a squeeze more lemon juice. Serve immediately, or chill until ready to eat.
Choosing Quality Tuna
The difference between good and mediocre tuna salad is almost entirely about the tuna. Seek out brands that specify “pole-caught” or “troll-caught” albacore or skipjack tuna, packed in olive oil rather than water or soybean oil. The flesh should be meaty and substantial, not mushy. Taste a can before committing to a whole purchase if you’re trying a new brand — it makes a genuine difference.
Storage and Meal Prep
This salad keeps beautifully for 3 to 4 days in an airtight container in the refrigerator. In fact, it’s one of those salads that tastes better the next day once the flavors have had time to marry. If you’re packing it for lunch, store it in a container and wait to add any crisp additions like celery or capers until just before you eat it — though honestly, even slightly softened celery tastes fine here.
Worth knowing: If you’re making this more than a few hours ahead, taste it before serving and add an extra squeeze of lemon juice and a light drizzle of olive oil — flavors can mute as salads sit, and a little acid and fat will brighten them back up.
Flavor Variations and Additions
Want something Mediterranean? Add pitted Kalamata olives and sun-dried tomatoes. Prefer Italian flavors? Add diced fresh mozzarella, fresh basil instead of dill, and a splash of red wine vinegar to the dressing. Want more vegetables? Diced cucumber, sweet bell pepper, or cherry tomatoes all work beautifully. For extra richness, mash one of the hard-boiled eggs into the dressing to create a creamy emulsion. Want to make it heartier? Serve it on toasted bread, stuffed into a hollowed-out tomato, or over a bed of mixed greens. You can also mix in some cooked pasta or farro to make it stretch further as a main course.
6. Quinoa, Cucumber, and Mint Salad with Feta and Pomegranate
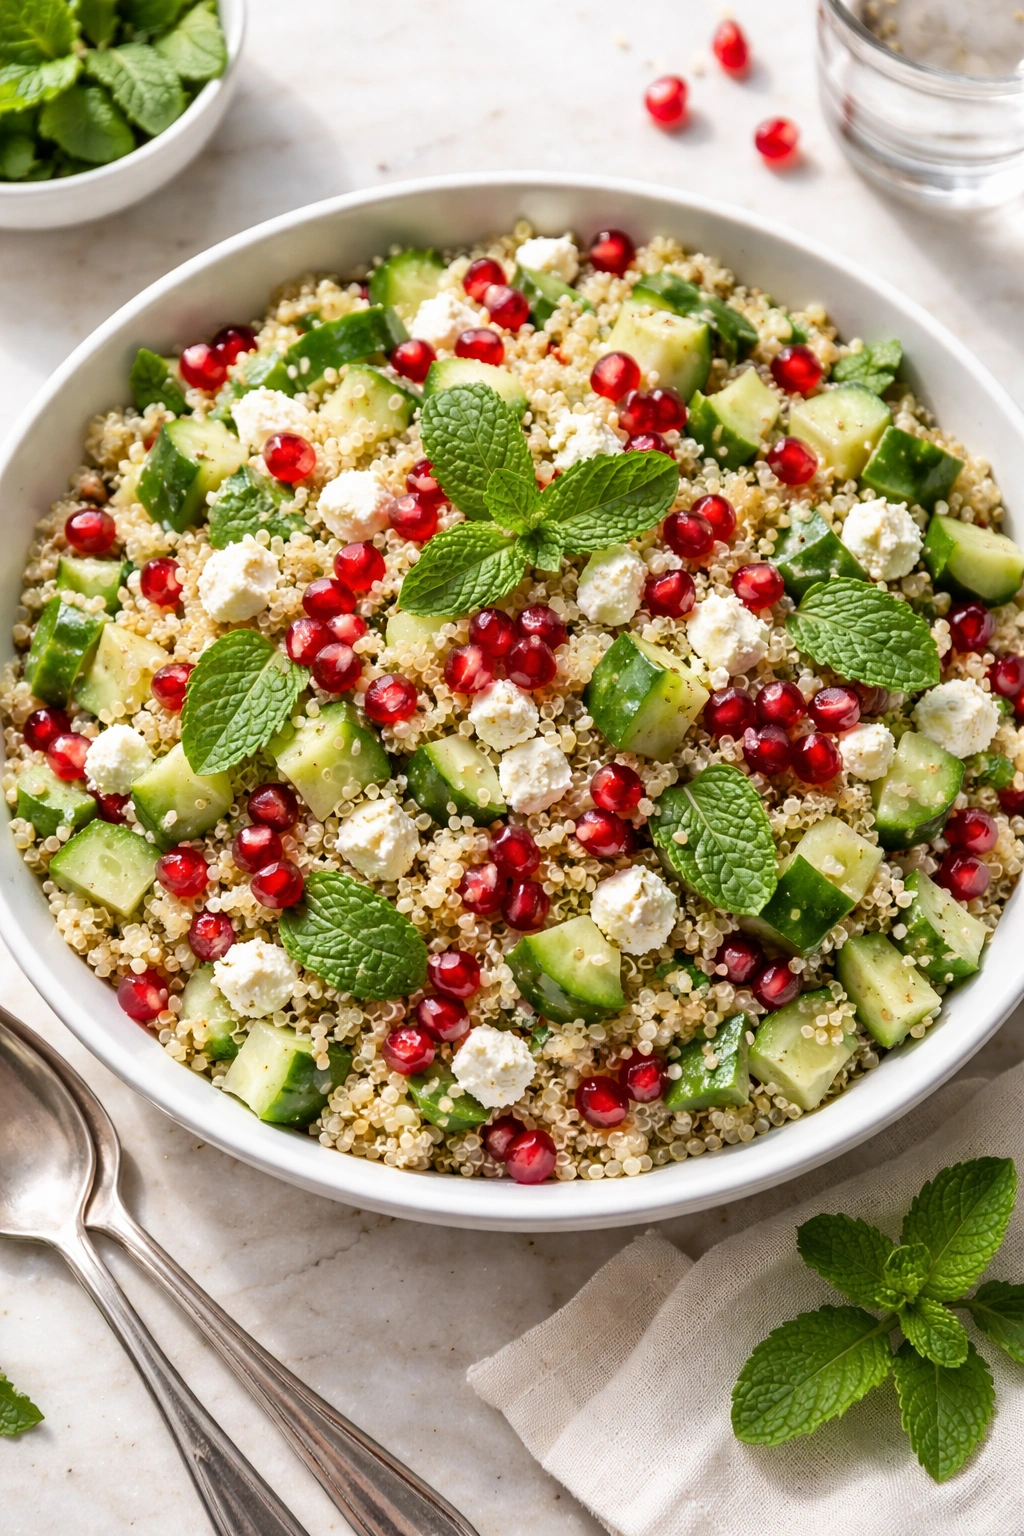
This is the salad that feels luxurious despite being straightforward — fluffy quinoa, crisp cucumbers, creamy feta, jewel-like pomegranate arils, and a mint-lime dressing that’s bright and herbaceous. It’s vegetarian and complete in itself, with all the protein and whole grains you need for a satisfying meal. It’s also visually stunning, which matters when you’re eating something fresh and cold and want it to feel special. The combination of textures — fluffy grains, crisp vegetables, creamy cheese, juicy pomegranate — makes every spoonful interesting.
Yield: Serves 4 to 5 as a main course, or 6 to 8 as a side Prep Time: 15 minutes Cook Time: 15 minutes (cooking quinoa) Total Time: 30 minutes (plus cooling time) Difficulty: Beginner — simple cooking and chopping, no special techniques required.
For the Salad:
- 1 cup uncooked quinoa, rinsed under cool running water
- 2 cups vegetable or chicken broth, or water
- 1 teaspoon fine sea salt (for cooking the quinoa)
- 2 English cucumbers (or 3 medium regular cucumbers), diced into ½-inch chunks (about 3 cups)
- 1 cup cherry tomatoes, halved
- ½ cup fresh mint leaves, roughly torn
- ⅓ cup fresh flat-leaf parsley, roughly chopped
- 4 scallions, white and light green parts only, thinly sliced (reserve dark green parts for garnish)
- ¾ cup pomegranate arils (seeds)
- ¾ cup crumbled feta cheese
- ¼ cup sliced or slivered almonds, toasted (optional, for crunch)
For the Dressing:
- ¼ cup fresh lime juice (from 2 limes)
- 3 tablespoons extra-virgin olive oil
- 1 tablespoon fresh lemon juice
- 1 clove garlic, minced very fine
- ½ teaspoon ground cumin
- ¼ teaspoon fine sea salt
- ⅛ teaspoon black pepper
Cook the Quinoa:
-
In a medium saucepan, bring the broth and 1 teaspoon salt to a rolling boil. Add the rinsed quinoa and stir once, then reduce the heat to low, cover with a lid, and simmer for 12 to 15 minutes until the liquid is absorbed and the quinoa is tender. You’ll know it’s done when you see a small white spiral (the germ) popping out of each grain.
-
Remove from the heat and let the quinoa sit, covered, for 5 minutes. Then fluff it with a fork and transfer it to a large bowl or a sheet pan to cool completely. This prevents the warm quinoa from making the fresh vegetables wilt. Cool for at least 15 minutes before assembly — or make the quinoa ahead and refrigerate it.
Make the Dressing: 3. While the quinoa cooks and cools, whisk together the lime juice, olive oil, lemon juice, minced garlic, cumin, salt, and black pepper in a small bowl. Taste and adjust — it should be bright and herbaceous, with the lime and lemon balanced by the oil so it’s not too sharp.
Assemble the Salad: 4. Once the quinoa is completely cool, combine it in a large bowl with the diced cucumbers, cherry tomatoes, torn mint, parsley, sliced scallions, pomegranate arils, crumbled feta, and toasted almonds (if using).
-
Pour the dressing over the salad and toss gently with a large spoon or by hand, being careful not to crush the pomegranate seeds or break up the feta too much. The salad should be evenly coated with dressing, with everything well distributed.
-
Taste and adjust the seasoning — sometimes you’ll want another squeeze of lime juice or a pinch more salt. Let the salad sit for 10 minutes before serving so the flavors can meld, then garnish with the reserved dark green parts of the scallions and serve chilled or at room temperature.
Why Fresh Herbs Matter Here
Mint is the secret star of this salad — it provides a cooling, refreshing quality that makes the entire dish feel lighter and more summery. The herb-to-grain ratio should be generous; don’t be shy with the mint and parsley. Fresh herbs make the difference between a salad that tastes fresh and alive versus one that tastes generic.
Make-Ahead and Storage
This salad is actually better if you make it an hour or more ahead — the quinoa and vegetables absorb the dressing flavors and the whole salad becomes more cohesive. Store it in an airtight container in the refrigerator for up to 3 days. If you’re making it more than a day ahead, store the pomegranate arils separately and fold them in just before serving so they stay plump and jewel-like rather than drying out. The feta also stays fresher if you fold it in just before serving, though overnight mixing is fine too.
Pro tip: If you’re taking this to a potluck or outdoor event, pack it in a container and store the extra dressing in a separate small container. The salad stays fresher longer this way, and you can adjust the amount of dressing right before serving based on how much liquid has been absorbed.
Seasonal and Dietary Variations
In late summer, when pomegranates aren’t in season, substitute diced peaches, nectarines, or fresh figs — they’re equally delicious. Want to make it vegan? Simply omit the feta or swap it for vegan cashew cheese or crumbled tofu. For extra protein, add chickpeas, white beans, or diced grilled chicken. If you prefer a different grain, farro, barley, or couscous all work beautifully in place of quinoa — adjust cooking time according to package directions. Add diced avocado or cucumber for extra creaminess and hydration. A handful of peppery arugula or baby spinach folded in at the last moment adds freshness and nutrition.
Final Thoughts
Cold salads are one of summer’s greatest gifts — quick to assemble, endlessly customizable, and genuinely refreshing on days when the heat makes cooking feel unbearable. The key to salads that people actually want to eat is balancing textures (crisp vegetables with creamy components, chewy grains or proteins), flavors (bright acid from vinegar or citrus balanced by rich oil, savory elements balanced by fresh herbs), and making sure there’s enough substance to satisfy real hunger rather than leaving you searching for a snack an hour later.
Each of these six salads holds up beautifully for several days, which means you can make them ahead and eat them across the week — perfect for meal prep without the monotony of eating the exact same thing every day. Build them into your regular rotation, and you’ll find that hot-weather eating becomes something you look forward to rather than something you endure.
The ultimate goal is to eat well even when it’s blazingly hot outside, and these salads make that easy and genuinely delicious. Make them, tweak them to match your tastes and what’s fresh at your market, and enjoy the season.