Movie night without snacks? That’s not actually movie night—that’s just sitting on your couch watching something on a screen. The real magic happens when you’ve got something genuinely good to munch on, something that keeps your hands busy and your mouth happy for the entire runtime. And honestly, there’s a reason cheese shows up at pretty much every gathering: it’s literally addictive on a neurochemical level, and it makes everything it touches taste better.
The problem is that most people show up to movie night with the same tired options—a bag of chips, some store-bought dip, maybe a bowl of popcorn if they’re feeling ambitious. Those are fine, sure, but they’re not memorable. When you break out something homemade or thoughtfully assembled—something with real cheese (not the spray-can kind), with layers of flavor, with actual texture and substance—that’s when people remember your movie night. That’s when people start asking you to host again.
The best cheesy snacks for movie night hit a specific sweet spot: they’re easy enough that you can actually make them while hanging out with people, they hold up well over a couple of hours, they’re not so messy that they wreck your couch, and they’re interesting enough that people will keep reaching for them even after they’re full. Most importantly, they taste like you actually cared, even if you threw them together in fifteen minutes.
Here are eight cheesy snacks that’ll make your next movie night the one everyone’s still talking about.
1. Loaded Nachos Supreme
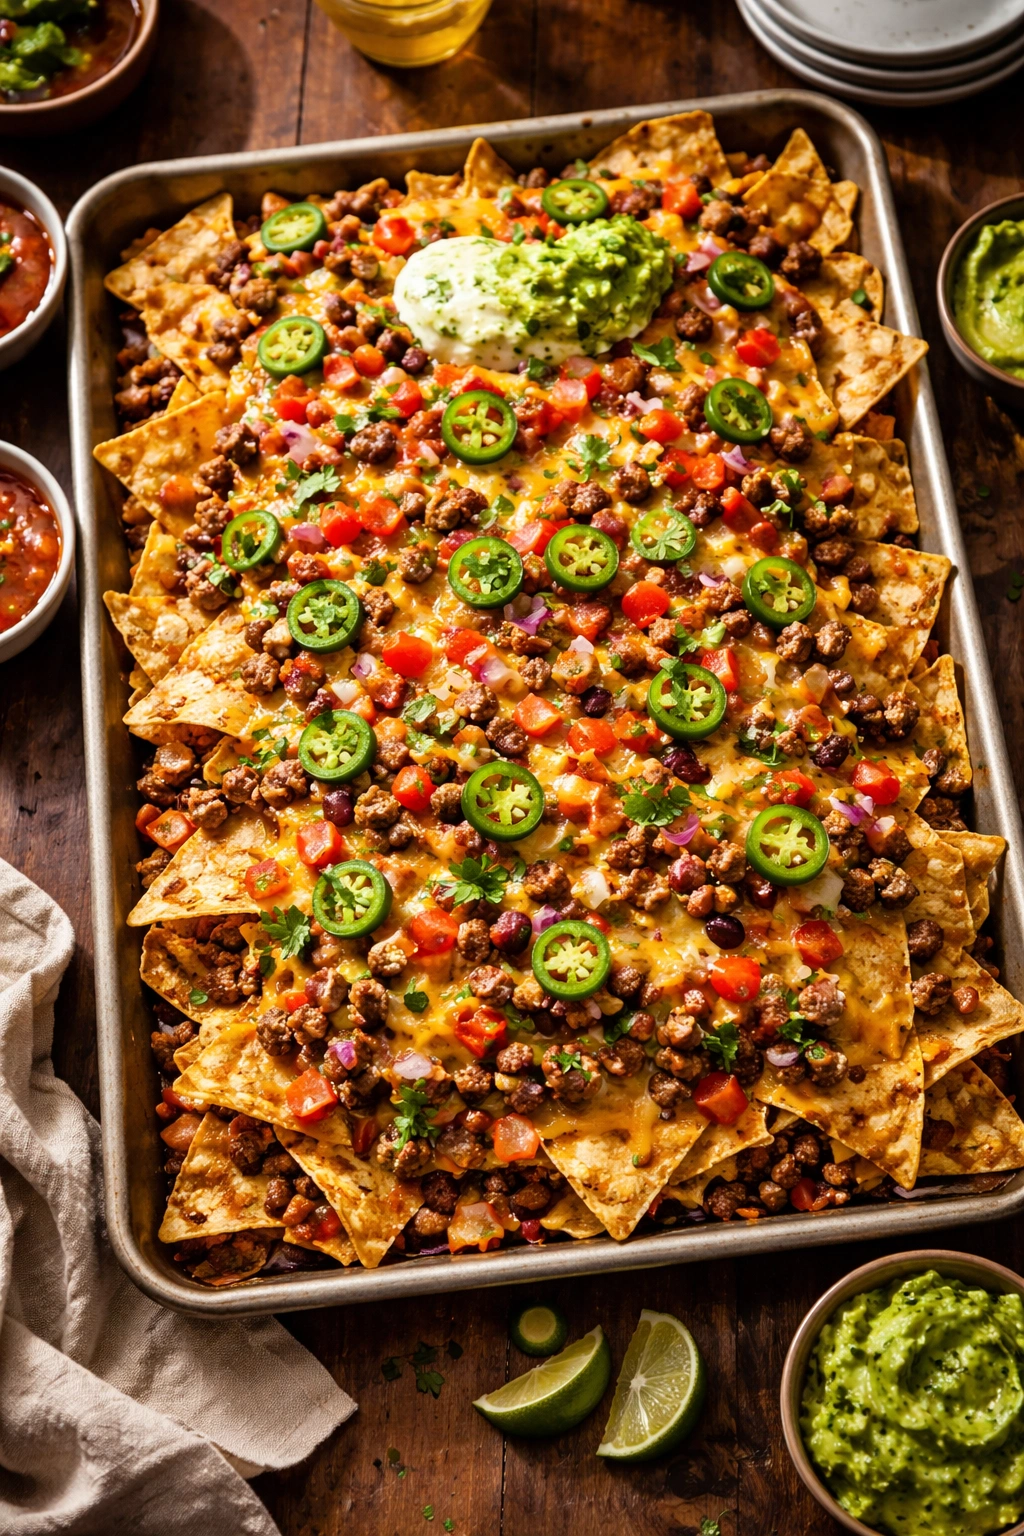
Real nachos—the kind where every chip has toppings, not just the ones on top—are a movie-night staple for good reason. They’re substantial enough to keep hunger at bay, interactive enough that people will keep eating them throughout the entire film, and they genuinely taste restaurant-quality when you put in even minimal effort. The key is building them in layers on a sheet pan so every single chip gets its share of cheese, toppings, and flavor.
Why Nachos Work for Movie Night
Nachos are endlessly customizable, which means you can adjust them based on what’s in your kitchen or what you know your guests prefer. They stay warm for at least 30-40 minutes when loosely covered with foil, so you don’t have to time them perfectly to when people actually sit down. Most importantly, there’s something about the combination of crispy, salty, cheesy, and spicy that keeps your hand reaching back to the pan even when you’re not really hungry—it’s that perfect ratio of textures and flavors that your brain doesn’t want to stop experiencing.
How to Build Nachos That Actually Work
Start with good tortilla chips—nothing thin and flimsy that’ll shatter under the weight of toppings. Spread them across a sheet pan in a single layer, and here’s the critical part: you’re going to build them in two stages. First layer of chips, then a light scatter of shredded cheese (a mix of sharp cheddar and Oaxaca or mozzarella works beautifully). Add your protein layer—seasoned ground beef, pulled pork, shredded chicken, or even crispy chorizo. Then more cheese, because the second melting is what holds everything together. Bake at 375°F for about 8-10 minutes until the cheese is bubbling and slightly browned at the edges.
Once they come out of the oven, that’s when you add the fresh stuff: jalapeños, diced red onion, cilantro, fresh lime juice, dollops of sour cream, and a generous drizzle of hot sauce or pico de gallo. The warm cheese and toppings create a perfect contrast with the cool, sharp finish of the fresh ingredients. Keep a small spoon nearby so people can scoop up the toppings without losing them off the chips.
Pro tip: Brown your meat with a good amount of spice beforehand—cumin, chili powder, smoked paprika. Those flavors will carry through the entire dish and make everything taste more intentional and delicious.
2. Jalapeño Popper Bites
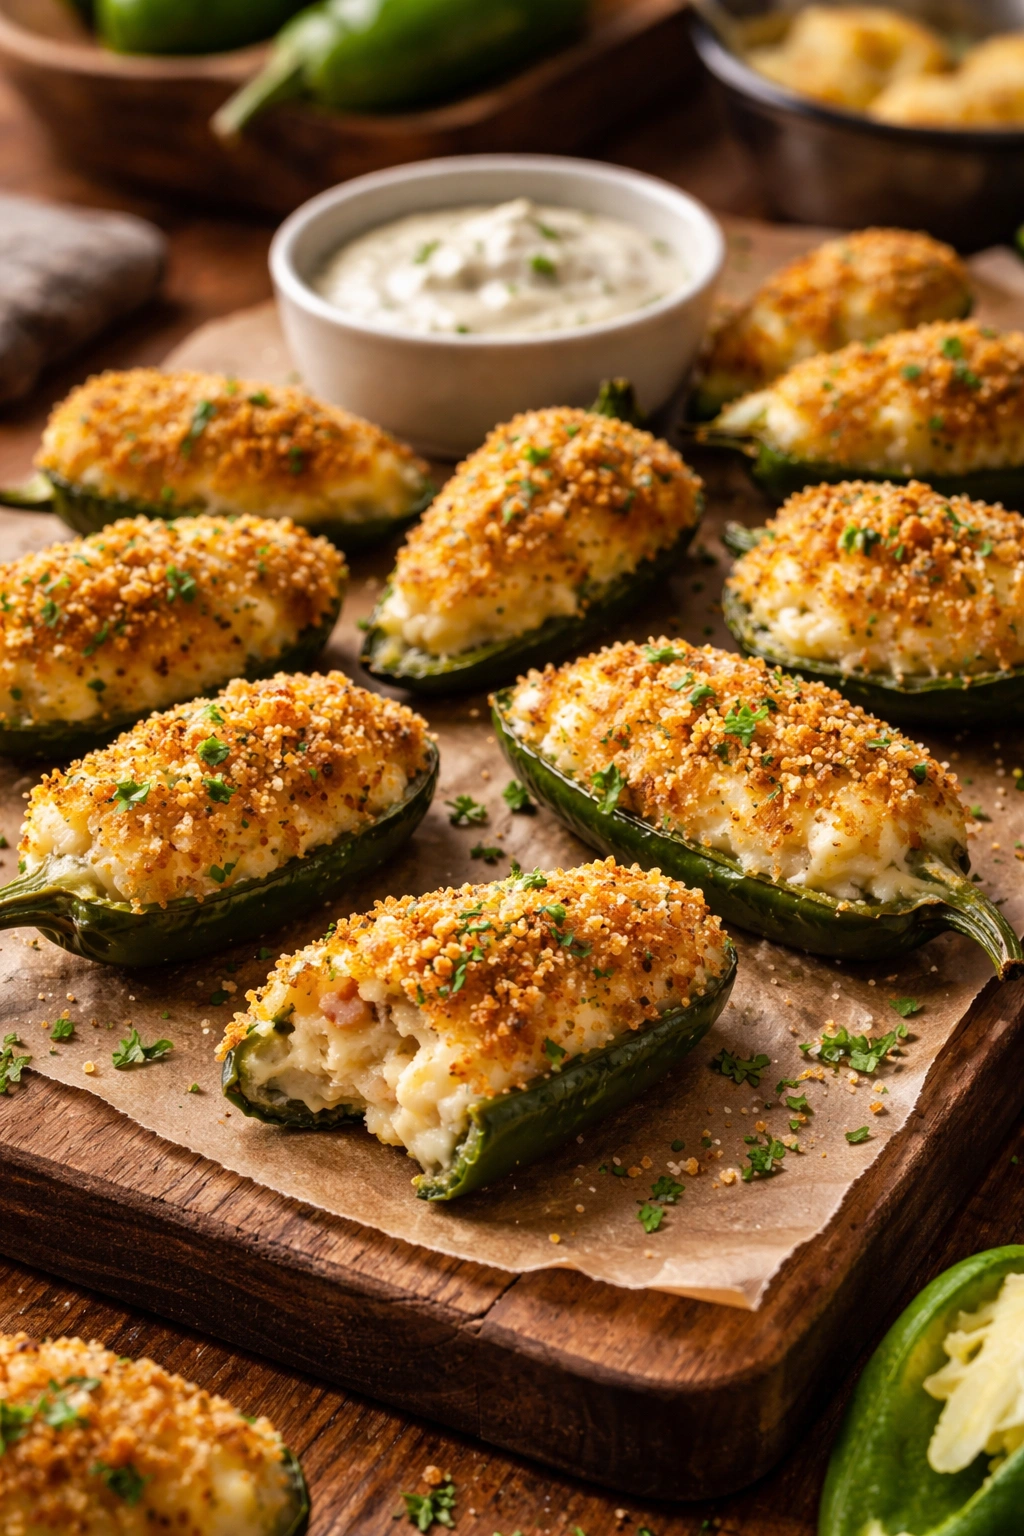
Jalapeño poppers are ridiculously easy to make and somehow feel fancy enough that people think you actually cooked something. They’re a study in contrast: the heat from the jalapeño, the coolness and slight tang of cream cheese filling, the crispy exterior from the breadcrumb coating, and the way melted cheese oozes out when you bite into them. They’re also perfectly portion-controlled—one bite, and you’re done, so people don’t feel like they’re eating an entire meal before the movie even starts.
What Makes Poppers the Perfect Bite-Sized Snack
The genius of jalapeño poppers is that they hit every flavor and texture note in a single bite. The heat from the pepper is balanced by the creamy filling, so they’re spicy without being overwhelming. They cook quickly—usually just 15-20 minutes in a hot oven—which means you can make them while people are arriving and settling in. And because they’re self-contained little packages, they’re way less messy than something saucy or drippy, which matters when you’re dealing with upholstered furniture and electronics.
Building the Perfect Popper
Slice fresh jalapeños in half lengthwise and carefully scoop out the seeds and membranes—that’s where most of the serious heat lives, so decide how spicy you actually want them to be. Mix cream cheese with shredded sharp cheddar, a pinch of garlic powder, and some smoked paprika. Stuff each jalapeño half generously with this mixture, then roll them in a combination of panko breadcrumbs mixed with parmesan cheese and a little melted butter. The butter helps them brown beautifully and keeps them from drying out in the oven.
Bake on a lined sheet pan at 400°F for 15-18 minutes until the breadcrumb coating is golden and crispy and the cheese inside has started to leak slightly out the sides. That little bit of oozing cheese is actually what you’re going for—it means the filling is hot enough to eat and the flavors are melding together.
The filling-to-pepper ratio matters more than you’d think. Too much filling and they’re hard to eat in one bite; too little and they taste hollow and disappointing. Aim for the cream cheese mixture to just reach the top of each pepper half without overflowing before you bread them.
Worth knowing: Make these up to a day ahead, cover them on a baking sheet with plastic wrap, and refrigerate. Then you just pop them straight into the oven when you’re ready to serve them. Even frozen, they’ll still cook beautifully in about 20-22 minutes.
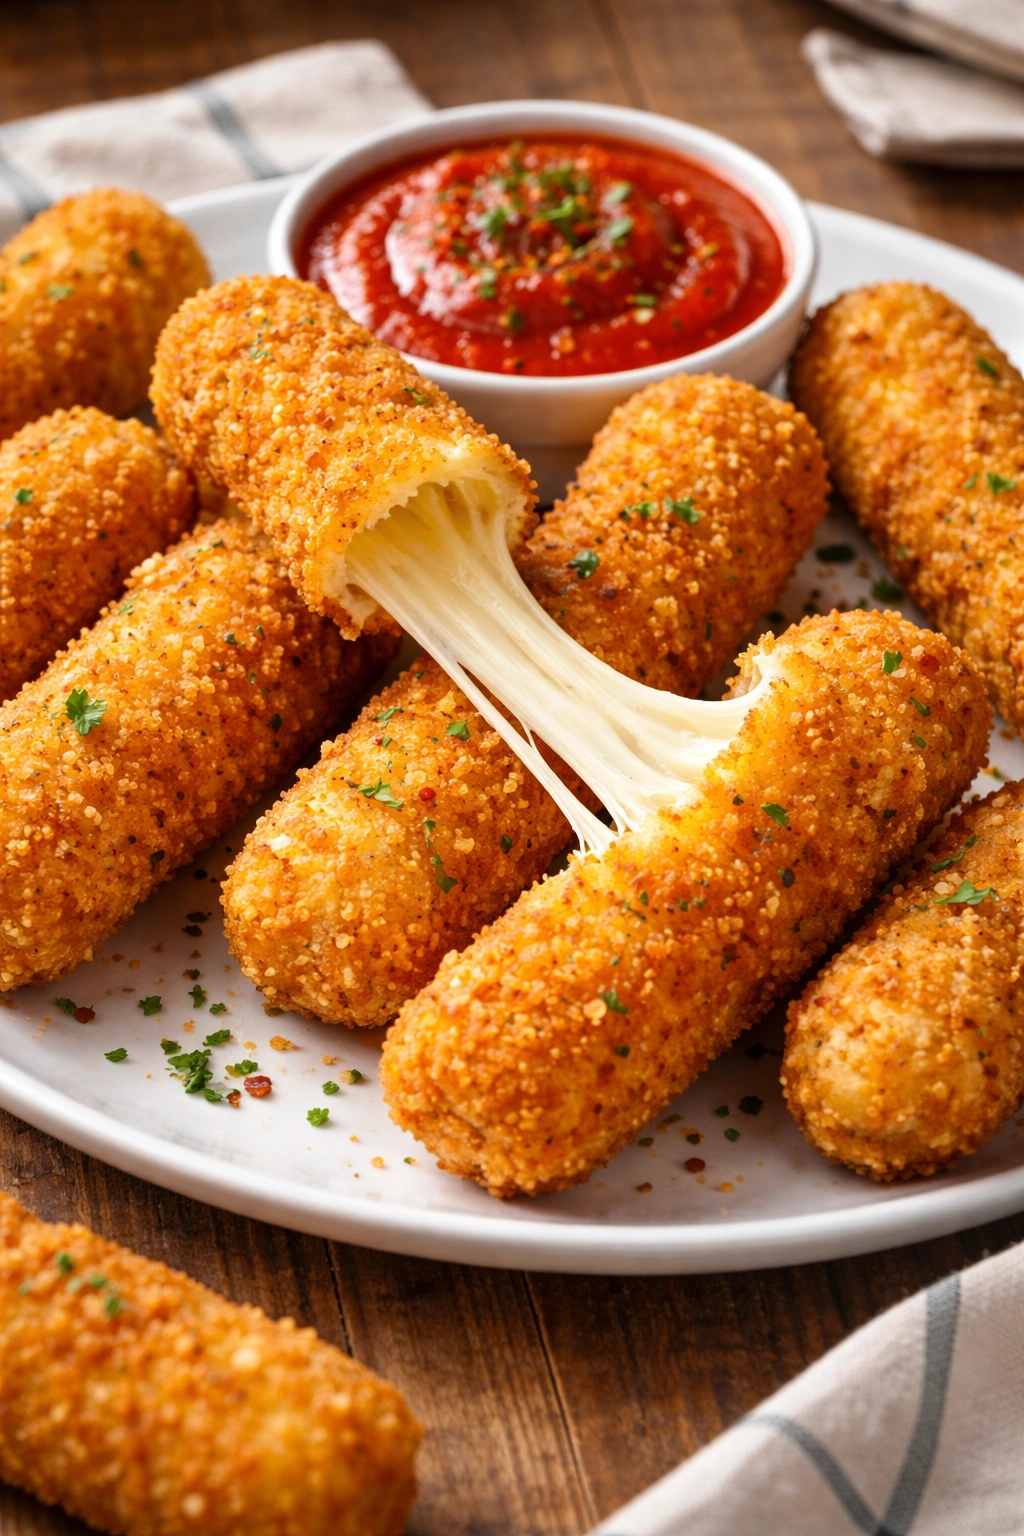
3. Crispy Mozzarella Sticks
Mozzarella sticks feel like retro nostalgia until you bite into a really good one—the kind where the outside is actually crispy, the middle is stretched mozzarella that hasn’t turned into a molten lava pocket that burns the roof of your mouth, and it’s served immediately. The magic happens in three things: proper freezing, the right coating technique, and knowing exactly when to pull them out of the oil or oven.
Why Fresh Mozzarella Sticks Hit Different
Store-bought frozen ones are convenience food, but homemade mozzarella sticks are texture food. When you use quality whole-milk mozzarella string cheese or cut mozzarella into sticks yourself, the difference is immediately obvious. The real cheese has a different melting point and a richer flavor. Plus, you control exactly how much breading you want and what flavors go into it. Adding everything bagel seasoning, Italian herbs, or even a touch of cayenne to the panko coating elevates them from “snack food” to “memorable snack.”
The Technique That Actually Works
This is one of those kitchen skills where the technique matters more than the ingredient list. Cut whole-milk mozzarella into sticks roughly the size of your pinky finger—not too thin or they’ll burst and leak everywhere, not too thick or the cheese won’t melt evenly. The crucial step is the double freeze: freeze the sticks for at least 4 hours (or overnight), then coat them in your breading mixture, then freeze them again for at least 2 more hours. This double freeze means the cheese stays centered and doesn’t leak out during cooking.
For the coating: whisk together an egg (or two eggs if you’re making a larger batch) in one shallow bowl. In another bowl, mix panko breadcrumbs with grated parmesan, Italian seasoning, salt, and black pepper. You can also add garlic powder, red pepper flakes, or everything bagel seasoning for more personality. Dredge each stick in the egg, then roll it in the panko mixture, and then immediately go back and dredge it in egg again and roll it in panko again. That double coating is what creates the crispy exterior.
Bake them at 400°F for 8-10 minutes on a parchment-lined sheet pan (or air fry at 380°F for 6-7 minutes if you have an air fryer). The trick is pulling them out when the coating is golden but the cheese hasn’t started actively leaking yet. You want that molten middle, but you don’t want it all over your baking sheet. Let them cool for about 2 minutes before serving—this gives the cheese a chance to set slightly so it doesn’t burn your mouth.
Pro tip: Serve them with marinara sauce for dipping, but don’t skip adding a pinch of fresh basil or oregano to the sauce. The fresh herbs make it taste homemade rather than jarred.
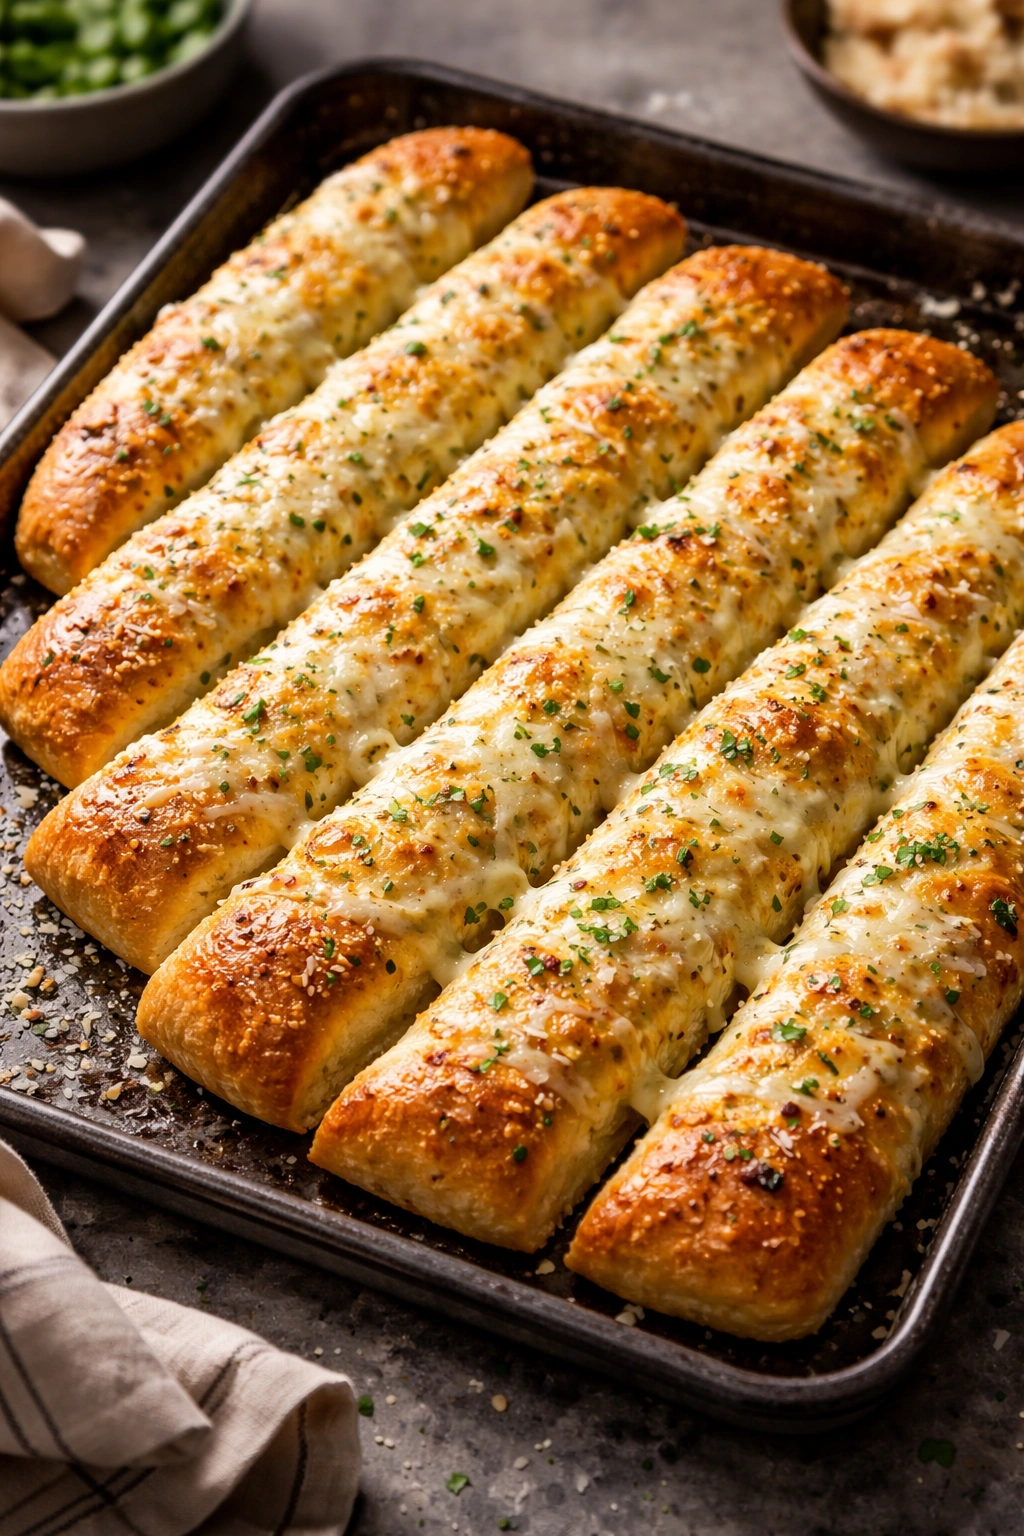
4. Cheesy Garlic Breadsticks
Breadsticks walk this interesting line where they don’t feel as heavy as actual bread, but they’re satisfying and filling in a way that lighter snacks aren’t. Garlic and cheese are the classic combination because they work—garlic amplifies the savory quality of the cheese, and cheese adds creaminess that makes the bread taste richer than it actually is. These are the kind of snack that’ll quietly disappear from the plate because people keep reaching for one more.
Why Breadsticks Over Regular Bread
Breadsticks have surface area. That means more opportunities for cheese to melt, more spots for garlic butter to soak in, and more crispy edges that actually caramelize and develop flavor. A slice of bread will soak up your toppings and get soggy; a breadstick stays structural and interesting the entire time it’s sitting there. They’re also less commitment—people will try a breadstick where they might feel weird about eating half a slice of bread.
Making Breadsticks That Actually Taste Good
The easiest route is starting with store-bought pizza dough (the kind from the refrigerated section or even frozen works fine). Roll it out to about ¼-inch thickness on a lightly oiled sheet pan, then brush the entire surface with a mixture of melted butter, minced garlic (real garlic, not powder), salt, and a pinch of red pepper flakes. Scatter shredded mozzarella and parmesan across the top—use more than you think you should because some will cook off.
Cut the dough into breadstick-sized pieces (roughly 1-2 inches wide, 4-5 inches long) and bake at 425°F for 12-15 minutes until the cheese is bubbly and slightly browned and the edges are golden and crispy. As soon as they come out of the oven, brush them again with a garlic butter mixture and sprinkle fresh parmesan and chopped fresh parsley on top.
If you want to make dough from scratch, a basic pizza dough recipe works perfectly—you’ll just need to let it rise for an hour before rolling and baking. But honestly, with pre-made dough, the quality of the garlic butter and the ratio of cheese is what makes or breaks the final result, so focus your energy there.
These stay reasonably edible for about an hour at room temperature, but they’re absolutely best eaten warm. If they cool down completely, they lose their appeal pretty quickly, so serve them fresh from the oven.
Insider note: Make the garlic butter with a really good quality butter—the difference in flavor is immediate and noticeable. Room-temperature butter mixed with fresh minced garlic, salt, and maybe a tiny bit of lemon zest creates a compound butter that tastes intentional.
5. Buffalo Chicken Dip with Cheese
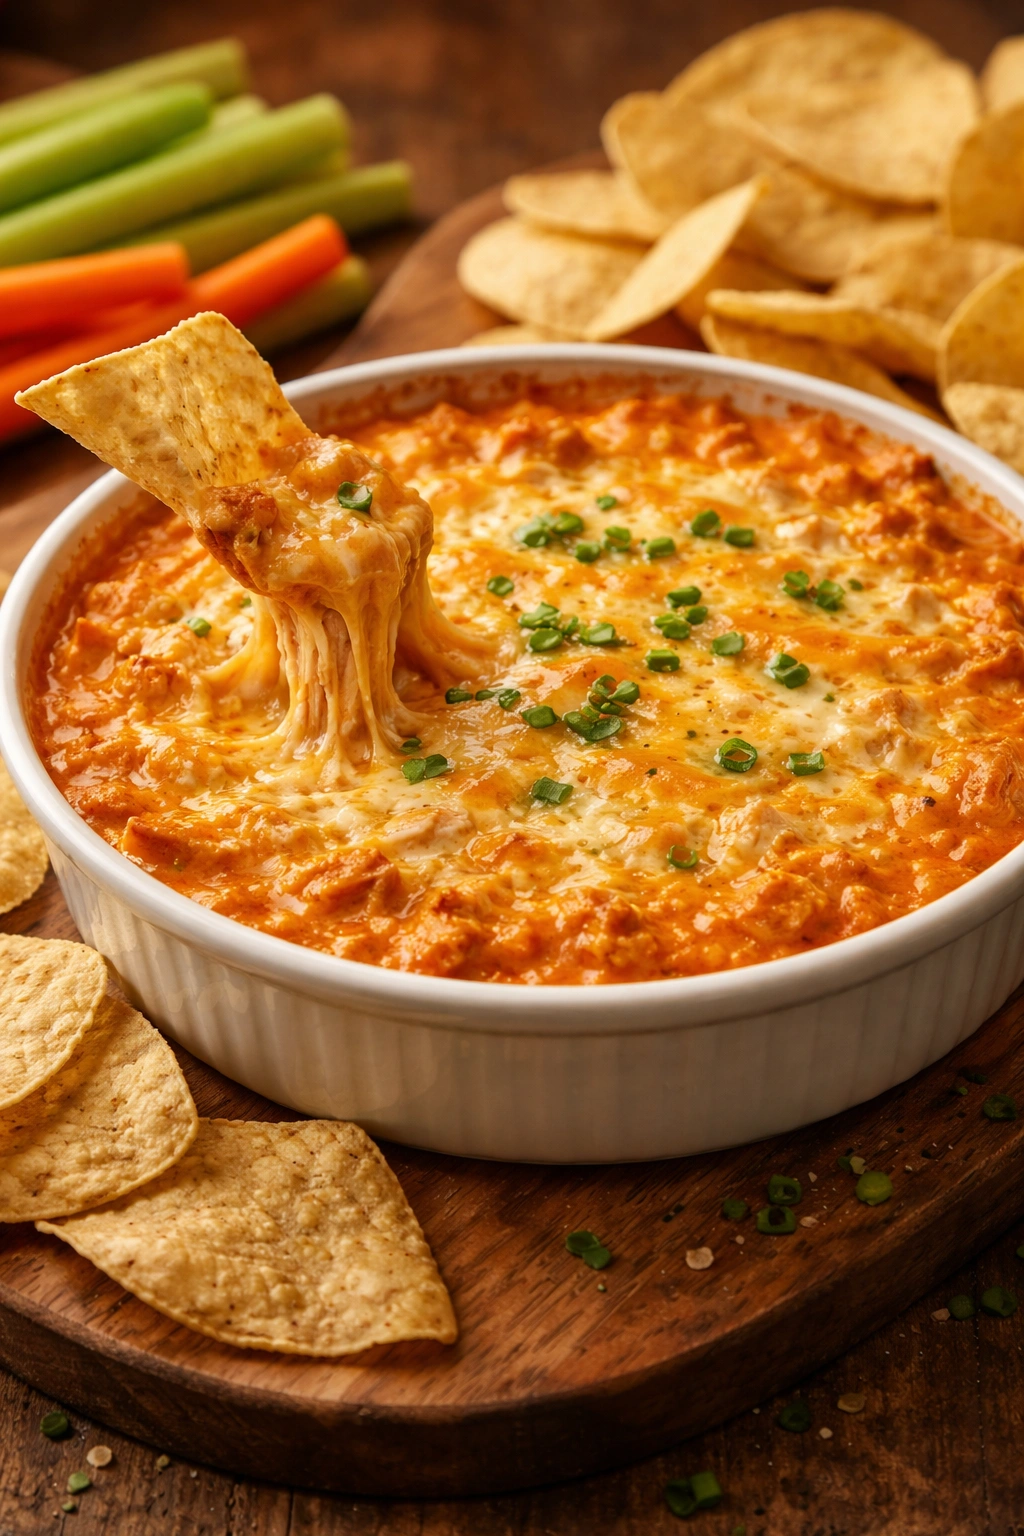
Hot dips are underrated movie-night snacks because they’re substantial, shareable, and they give people something warm to hold during a long film. A really good buffalo chicken dip with plenty of cheese isn’t just supporting flavor—the cheese is actually the structure that holds everything together and makes it creamy. When the cream cheese melts into the shredded chicken and hot sauce, you get something that’s way more sophisticated than the sum of its parts.
What Makes a Buffalo Dip Memorable
The secret is using actual shredded chicken (rotisserie chicken is perfect) instead of canned, and using quality hot sauce rather than the neon-orange industrial stuff. When you combine those elements with sharp cheddar, you get a dip that tastes like something you’d pay for at a sports bar, not something you threw together at home. The dip should have enough texture that it’s interesting to eat—not just smooth and uniform, but with distinct layers of flavor that you notice as you eat through the bowl.
Building the Dip for Actual Flavor
Start by mixing cream cheese (softened), shredded sharp cheddar, shredded mozzarella, hot sauce, and a pinch of garlic powder and paprika in a large bowl. The ratio matters: you want about 8 ounces of cream cheese, 1.5 cups of cheddar, ½ cup of mozzarella, and about ¾ cup of hot sauce, then adjust the hot sauce amount based on how spicy you actually want it and how thick the dip should be.
Stir in your shredded chicken (about 2-3 cups from one rotisserie chicken), then fold in ½ cup of ranch dressing (this adds creaminess and keeps it from being one-note spicy), diced red onion, and sliced green onions. Transfer everything to a baking dish or cast-iron skillet and top with a little more shredded cheddar and a handful of panko breadcrumbs mixed with melted butter. Bake at 375°F for about 20-25 minutes until the top is golden and the edges are bubbling.
Serve it directly in the baking dish or transfer to a slow cooker on the warm setting if you want it to hold temperature for an extended movie. Serve with tortilla chips, crackers, or those cheesy breadsticks mentioned above.
The beauty of this dip is that you can make it entirely ahead of time, refrigerate it in the baking dish, and then just pop it in the oven 20 minutes before people arrive. It’s essentially stress-free to serve.
Worth knowing: If your dip separates or looks greasy after baking, you’ve probably used too much hot sauce relative to cream cheese. Next time, add hot sauce a bit at a time and taste as you go—you’re looking for that tangy, spicy flavor to come through without overpowering the creamy cheese base.
6. Pepperoni and Cheese Crisps
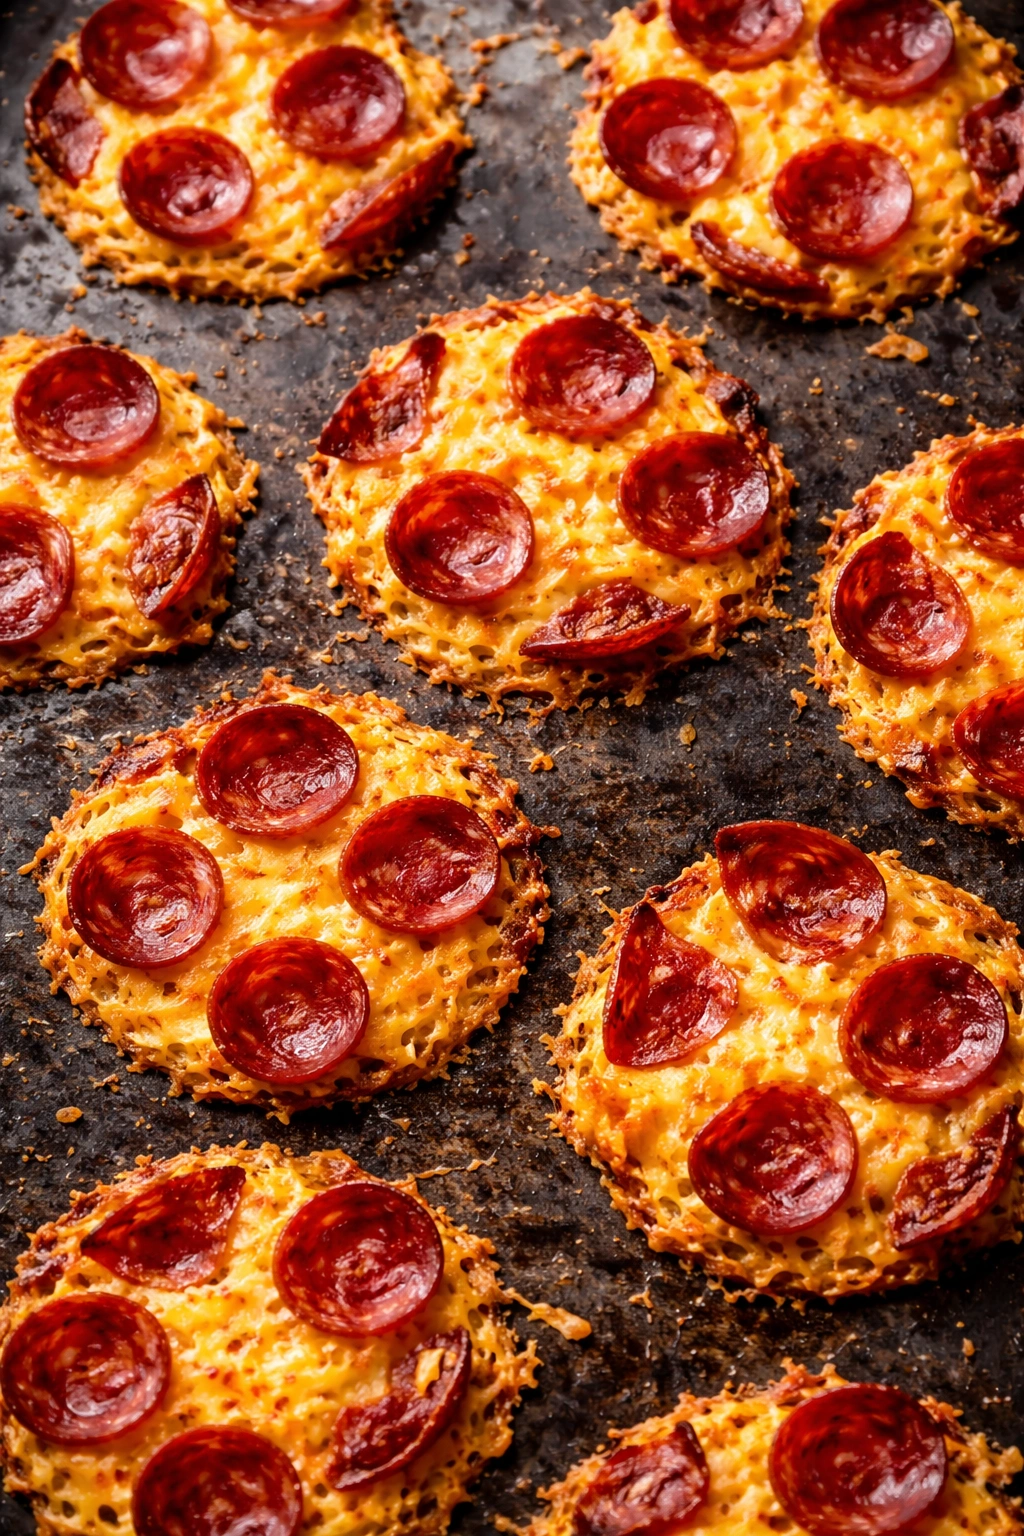
These are technically not a dip or a cooked item with multiple components—they’re a dead simple combination of two things that happen to be absolutely genius together. Crisps that are just cheese and meat, baked until the cheese is lacy and crispy on the edges and the pepperoni is curled and slightly charred, taste unexpectedly elegant. They feel like something you’d serve at a cocktail party, not a movie night, which is exactly why they land.
Why This Simple Combination Works So Well
When you bake thin slices of pepperoni in a hot oven, the fat renders out and the meat crisps up, almost like a tiny salami chip. When you layer cheese underneath that, it creates a crispy-creamy situation that just works. The salt and spice from the pepperoni plays against the mild creaminess of the cheese in a way that keeps your taste buds interested. They’re addictive in the way that a really good potato chip is addictive, except they’re actually protein and fat instead of mostly empty calories.
Making Crisps That Don’t Collapse
Use a good quality cheese—aged cheddar, gruyere, or gouda all work beautifully. Avoid pre-shredded cheese if possible because it has anti-caking agents that can make the crisps greasy instead of crispy. Shred your own block cheese (it takes literally two minutes), then portion it into rough tablespoon-sized piles on a parchment-lined baking sheet, leaving a couple of inches between each pile because they’ll expand as they bake.
Top each cheese pile with 2-3 thin slices of pepperoni, then bake at 400°F for about 8-10 minutes until the cheese is bubbling and starting to brown at the edges and the pepperoni is curled and crispy. The cheese will look wet and shiny when it comes out of the oven, but as it cools, it’ll crisp up significantly. Don’t remove them from the baking sheet until they’ve cooled for at least 5 minutes or they’ll fall apart.
These are absolutely best eaten within about 30-45 minutes of coming out of the oven, when they still have that delicate crispy texture. After that, they start to soften as they cool completely. If that happens, you can actually reheat them in a 300°F oven for a couple of minutes to re-crisp them, and they’ll perk right back up.
Pro tip: Use sliced pepperoni rather than the pre-packaged pepperoni chips because the thin slices will crisp up better and cook more evenly than the thicker-cut ones.
7. Parmesan Herb Popcorn
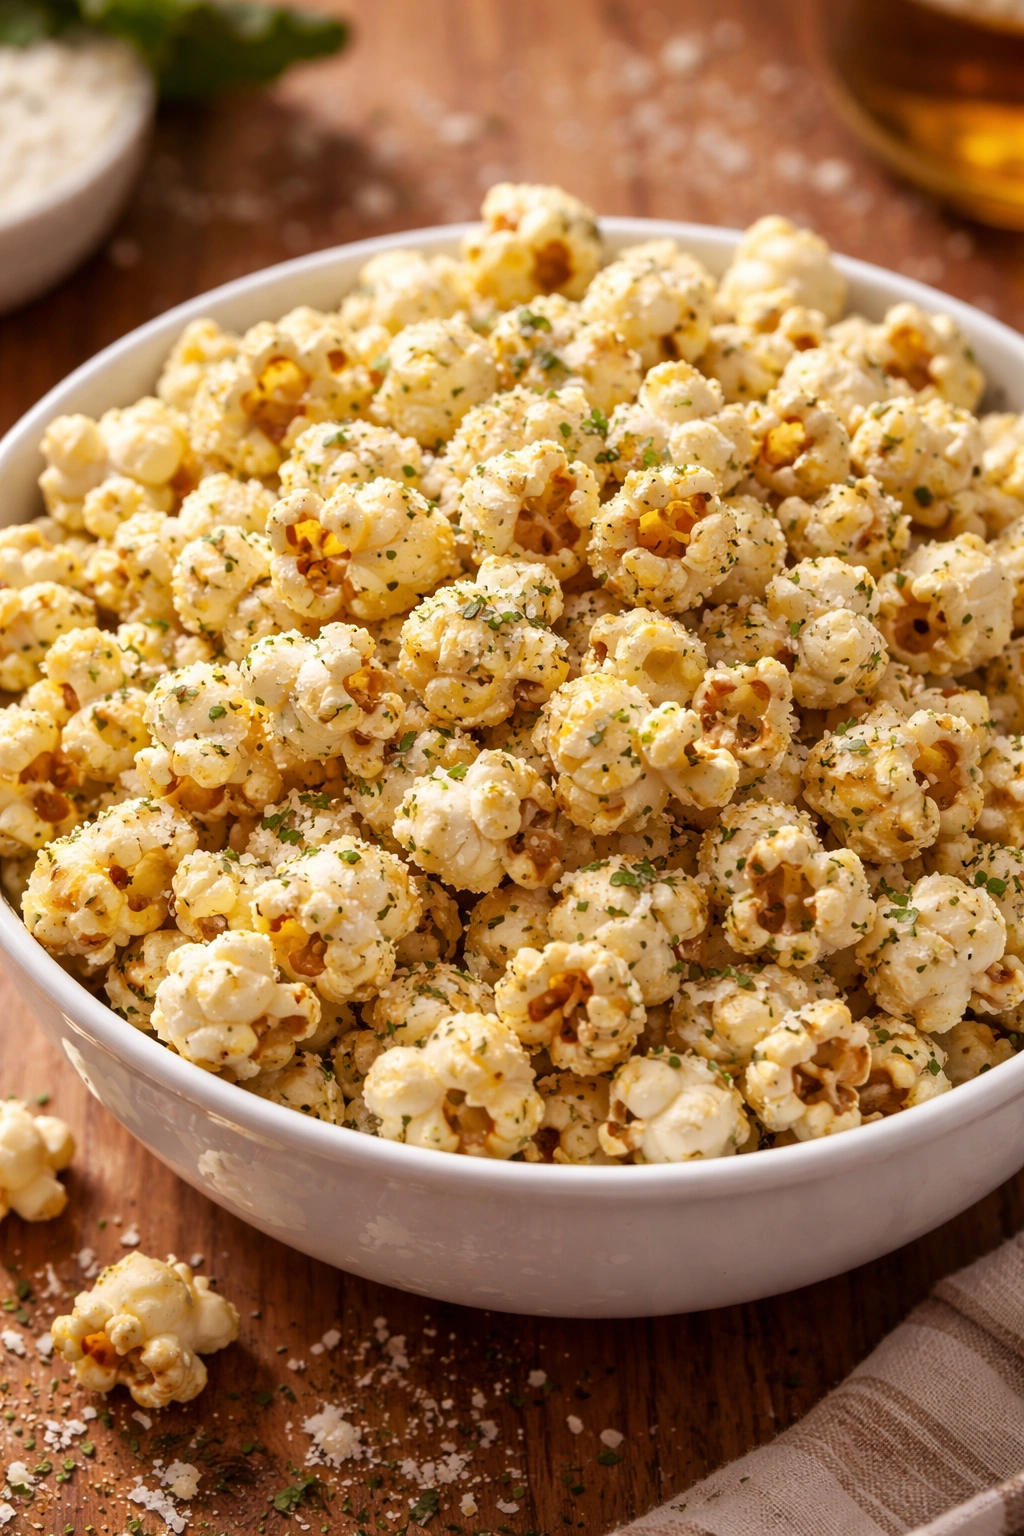
Popcorn is the sneaky snack that people will eat by the handful without even thinking about it. It’s light, it’s not so filling that you feel guilty, and it’s the perfect background snack that doesn’t demand your full attention like a dip or something messy would. The trick is making sure the seasoning actually adheres to the popcorn instead of just settling on the bottom of the bowl. Real melted butter with finely grated parmesan and Italian herbs creates popcorn that tastes restaurant-quality.
What Makes Seasoned Popcorn Stick
The reason most homemade seasoned popcorn fails is because the seasoning doesn’t stick to the popcorn properly. You either end up with bland popcorn and seasoning at the bottom of the bowl, or the seasoning is so heavy that it weighs down and softens the popcorn. The solution is using melted butter mixed with a fat-soluble ingredient (like parmesan) before drizzling it onto the popcorn, then tossing aggressively to coat everything. The butter acts as an adhesive that helps the seasoning cling to each piece.
The Actual Method That Works
Pop your popcorn (air-popped is fine, or stovetop, or use an air fryer—the method doesn’t matter as much as you’d think). While the popcorn is still warm, melt about 4 tablespoons of butter and whisk in finely grated parmesan cheese (not the shaker kind—actual grated parm from a block), dried Italian herbs, garlic powder, salt, and a tiny pinch of paprika for color. The ratio should be roughly 1 cup of finely grated parmesan to 4 tablespoons of butter, with the dried herbs and spices to taste.
Drizzle the butter mixture over the popcorn a little at a time while tossing aggressively with a large spoon or wooden spoon. You’re not trying to evenly coat every piece—that’s impossible and leads to overseasoning. Instead, you’re trying to coat roughly 80% of the popcorn while letting some pieces stay relatively plain. This creates variation in the bowl so you don’t get tired of the flavor halfway through.
The popcorn will stay crispy for about an hour, then it’ll start to absorb moisture from the air and get slightly chewy. For a movie that’s only two hours long, this timing works perfectly.
Worth knowing: Make the seasoned popcorn right before people sit down rather than ahead of time. The quality of the texture changes noticeably within an hour or so, and fresh is dramatically better than stale or chewy.
8. Bacon and Cheddar Potato Skins
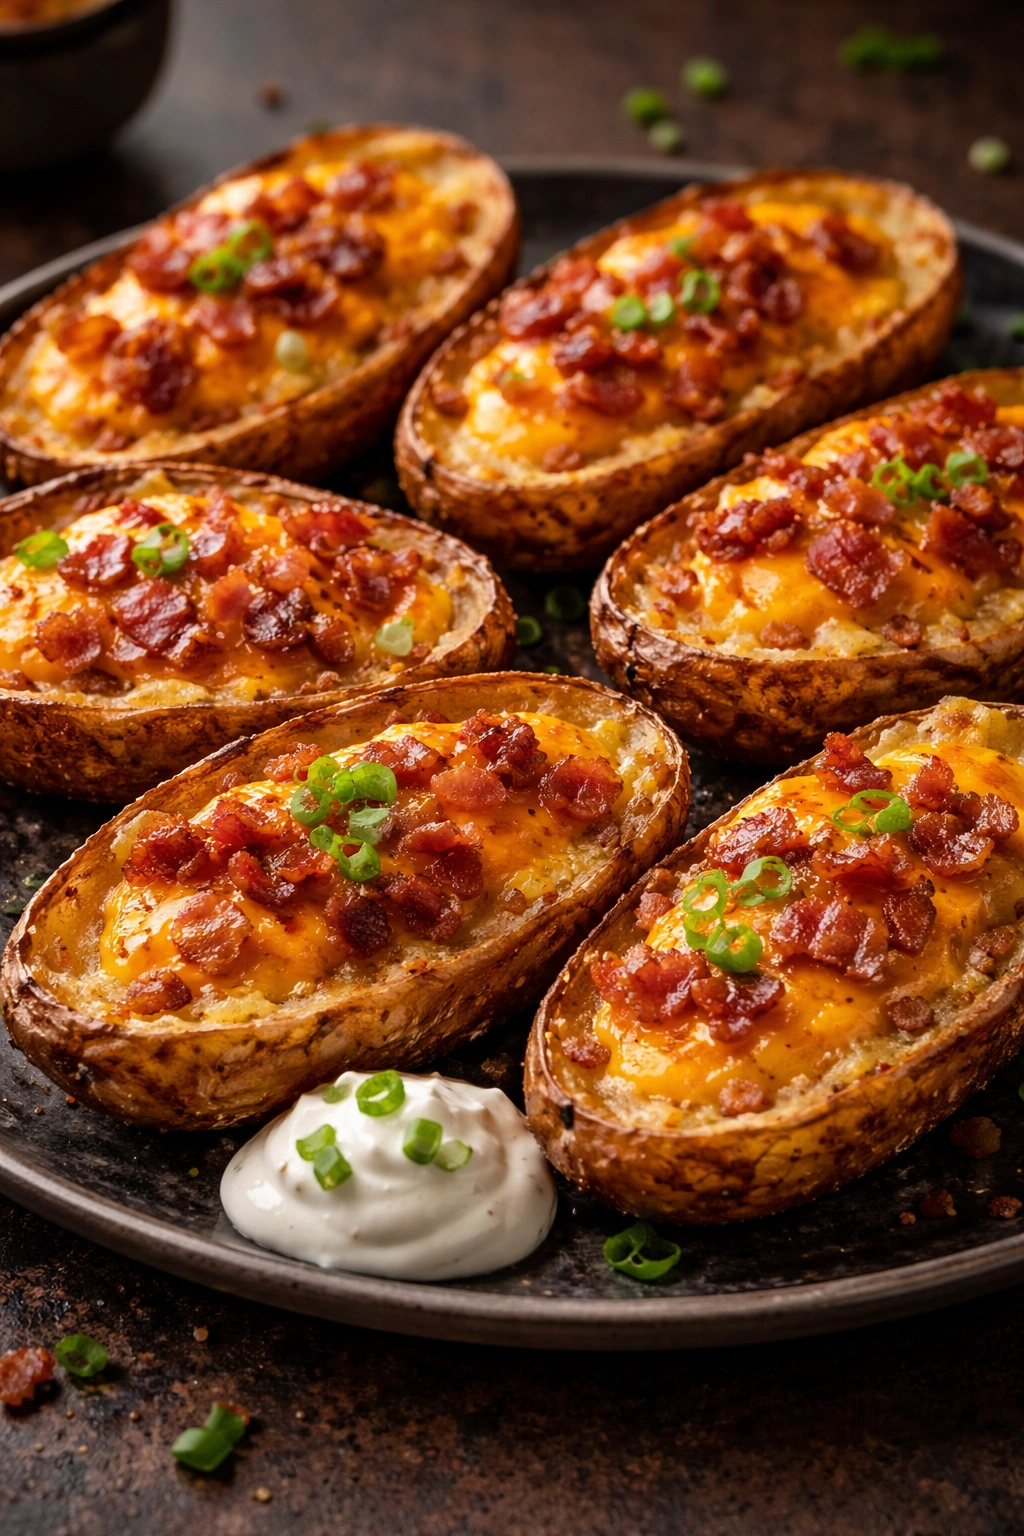
Potato skins walk the line between a snack and an actual appetizer. They’re substantial enough that they feel like real food, but they’re small enough that you’re not eating an entire meal before the movie starts. The combination of crispy potato, melted cheddar, and bacon is objectively perfect—it’s texturally interesting and flavorful enough to keep people coming back to the plate throughout the entire film.
What Makes Potato Skins Compelling
The genius of potato skins is that you get three distinct textures in every bite: the crispy exterior of the potato skin (which should actually be crispy, not floppy), the mealy interior of the potato, and the creamy melted cheese on top. That variety is what keeps your mouth engaged. They’re also heartier than most snacks, so they actually satisfy hunger in a way that lighter finger foods don’t. People will eat potato skins and feel like they actually had something to eat, rather than just snacking.
How to Make Skins That Are Actually Crispy
Start with russet potatoes because they have the right starch content and the skins are sturdy enough to hold up to crispy baking. Scrub them clean, cut them in half lengthwise, and use a small spoon or melon baller to scoop out most of the insides, leaving about ¼-inch of potato flesh attached to the skin. Save those scooped-out potatoes for something else (mashed potatoes, a soup, whatever).
Brush the skins generously on both sides with melted butter mixed with salt, garlic powder, and paprika. Place them skin-side down on a baking sheet lined with aluminum foil and bake at 425°F for about 15 minutes until the skin is beginning to crisp and the inside is starting to look dry. Remove them from the oven, turn them skin-side up, and fill each one with shredded sharp cheddar, cooked bacon pieces, and a pinch of fresh thyme. Top with a little more cheddar and bake for another 5-8 minutes until the cheese is completely melted and bubbling.
Right before serving, top each skin with a small dollop of sour cream, a sprinkle of fresh chives, and maybe a tiny bit more bacon. The warm cheese meeting the cool sour cream creates a perfect contrast in both temperature and flavor.
You can make these skins ahead through the baking step, refrigerate them, and then reheat them in a 350°F oven for about 10 minutes before adding the sour cream and final toppings. They’ll reheat beautifully as long as you don’t overbake them initially.
Pro tip: Use thick-cut bacon that you’ve cooked until it’s crispy, then crumble it roughly. The texture is way better than using bacon bits, and it actually tastes like bacon rather than a vague bacon-flavored powder.
Final Thoughts

The common thread running through all of these snacks is that they’re designed to be interesting enough to eat throughout an entire movie without becoming monotonous, substantial enough to actually satisfy hunger, and easy enough to execute that you’re not spending the first half of the film in the kitchen. They all use cheese as a core ingredient because cheese is, fundamentally, the most flavor-forward ingredient you can build a snack around. It adds richness, saltiness, creaminess, and umami all at once.
The other thing these snacks have in common is that they’re genuinely good. They’re not pretending to be something they’re not. A loaded nacho isn’t trying to be health food—it’s a delicious vehicle for cheese, meat, and toppings. A mozzarella stick isn’t trying to be sophisticated—it’s an unapologetic celebration of melted cheese with a crispy exterior. That honesty is actually what makes them work for movie night. You’re not eating something because you feel like you should; you’re eating something because it tastes genuinely good.
Most importantly, any one of these snacks will make your next movie night feel more intentional and memorable than the usual bag of chips. People notice when you actually cared about what you’re serving them, and they remember it. Break out one of these, and you’re not just having people over to watch something—you’re hosting an actual event, and that changes the entire energy of the evening.