Filipino home cooking strikes that perfect balance between bold flavor and weeknight simplicity. These dishes don’t demand complicated techniques or hard-to-find ingredients, yet they deliver the kind of satisfying, aromatic comfort food that fills your kitchen with incredible smells and your family’s bellies with genuine nourishment. After spending time in Filipino households and exploring the kitchens of friends who grew up eating these meals, I’ve learned that the best Filipino dinners aren’t complicated—they’re just intentional.
What makes Filipino cooking so accessible for busy weeknights is the reliance on a consistent flavor foundation: soy sauce, vinegar, garlic, and onion appear again and again, working together in different ways to create distinctly different dishes. You’re not hunting for exotic ingredients or standing over the stove for hours. Instead, you’re building layers of umami and tang that develop quickly in a single pan, often while rice cooks alongside. Most of these dinners come together in 30 to 45 minutes from start to finish.
The recipes that follow are the ones Filipinos actually make on ordinary Tuesday nights when they haven’t planned ahead, when the pantry’s got basics, and when someone still needs to eat well. Each one serves 4 to 6 people, reheats beautifully the next day, and tastes even better once the flavors have had time to meld overnight. These aren’t restaurant versions designed for Instagram photos—they’re the real thing, the dishes that show up on family tables because they work.
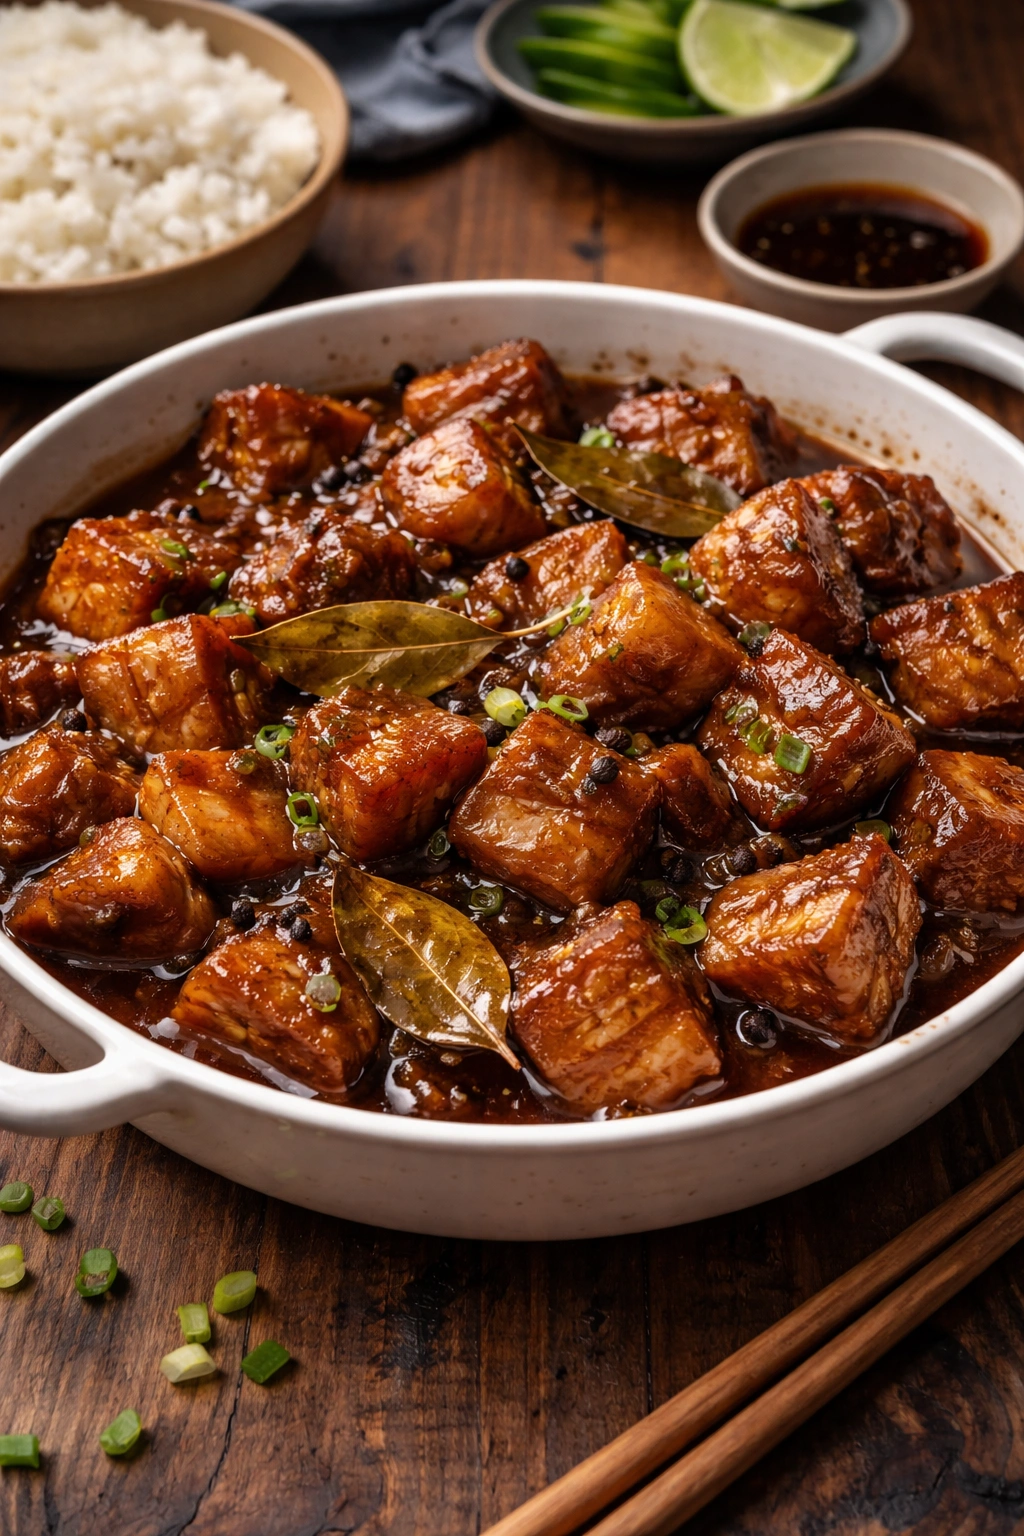
1. Quick Filipino Chicken Adobo That’s Ready in 30 Minutes
Chicken adobo is the national dish of the Philippines for good reason: it’s foolproof, deeply flavorful, and comes together faster than you’d expect. This particular version skips the traditional overnight marinating and still delivers that signature balance of savory, tangy, and garlicky that makes people come back to the table for seconds. The secret is using high-quality soy sauce and vinegar in the right proportion, letting them create a glossy, intensely flavored sauce that clings to tender chicken thighs.
Why This Version Works for Weeknights
Traditional adobo sometimes simmers for an hour or more, but chicken thighs—with their higher fat content—cook through and become tender quickly. By cutting the chicken into bite-sized pieces instead of leaving breasts whole, you reduce cooking time significantly without sacrificing juiciness. The acid from the vinegar penetrates faster, so you get that authentic adobo flavor without the wait. This approach respects your schedule while honoring the dish’s authentic foundations.
Core Ingredients and Flavor Balance
- 1.5 pounds boneless, skinless chicken thighs (roughly 6 to 8 thighs), cut into bite-sized pieces
- ½ cup soy sauce (use a quality brand like Kikkoman or a Filipino brand such as Datu Puti)
- ½ cup cane vinegar or distilled white vinegar (cane vinegar has a slightly smoother finish)
- 6 cloves fresh garlic, minced fine
- 1 medium yellow onion, sliced into thin half-moons
- ¼ teaspoon freshly ground black pepper
- 1 teaspoon whole black peppercorns
- 2 bay leaves
- 1 tablespoon avocado oil or another neutral cooking oil
- 1 cup water or chicken stock
The ratio of soy to vinegar matters tremendously. Equal parts creates that distinctive adobo tang without overwhelming the other flavors. The vinegar won’t taste vinegary once cooked—instead, it becomes a bright, savory undertone that sharpens your palate and makes you want another bite.
Step-by-Step Process
Heat the oil in a large skillet over medium-high heat. Once shimmering, add the minced garlic and sauté for 30 seconds until fragrant but not yet browned—you want to smell that raw garlic heat release, not bitter toasted garlic. Add the sliced onion and cook for about 2 minutes, stirring occasionally, until the onion starts to soften and becomes translucent at the edges.
Add the chicken pieces and cook, stirring frequently, for 5 to 7 minutes. You’re not trying to fully cook the chicken here—you just want the exterior to turn opaque and the pieces to firm up slightly. This helps them hold their shape in the sauce.
Pour in the soy sauce and vinegar, add the bay leaves and peppercorns, then pour in the water. Stir well to combine, ensuring all the chicken is submerged or mostly covered by liquid. Bring the mixture to a simmer, then reduce heat to medium-low and cook uncovered for about 15 minutes. The sauce should be noticeably reduced but still saucy—not dry, not swimming. The chicken will be completely cooked through and tender, and the liquid will have taken on a deep mahogany color.
Taste and adjust: add a pinch more salt if needed, though soy sauce usually provides enough. If it tastes too vinegary, that’s perfect—adobo is supposed to have that bright tang. Serve immediately over steamed white rice or jasmine rice, or cover and reheat gently the next day.
2. Beef Picadillo: Ground Beef Stew That Feels Fancy But Takes 45 Minutes

Filipino picadillo (called giniling, which simply means ground meat) appears on weeknight dinner tables across the archipelago because it satisfies everyone, comes together quickly, and uses affordable ingredients that don’t require a special trip to the market. Ground beef simmers in a tomato-based sauce with potatoes, carrots, raisins, and peas, creating a dish that’s savory, slightly sweet, and genuinely comforting. The raisins are the secret that sets Filipino picadillo apart—they plump up in the sauce and add gentle sweetness that balances the tomatoes’ acidity.
What Makes This a Crowd-Pleaser
Picadillo works as a standalone dish served over rice, as filling for empanadas or sandwiches, or as the base for other dishes. It’s forgiving—you can use whatever vegetables you have on hand. The prep time is genuinely minimal: mostly just chopping vegetables and opening cans. Children often love picadillo because the raisins add subtle sweetness, the sauce is rich without being heavy, and there are no challenging textures.
Ingredient Breakdown
For the Stew:
- 2 tablespoons avocado oil or neutral cooking oil
- 1 pound ground beef (80/20 blend works well)
- 1 medium yellow onion, diced small
- 3 cloves fresh garlic, minced
- 1 pound yellow potatoes, peeled and cut into ½-inch cubes
- 1 large carrot, peeled and cut into ½-inch dice
- 1 tablespoon tomato paste
- 1 can (15-ounce) diced tomatoes with their liquid, or fresh tomatoes if available
- ½ cup raisins (regular or golden)
- ½ cup frozen peas (or fresh if in season)
- 1 tablespoon fish sauce (optional but traditional)
- 2 tablespoons soy sauce
- 1 teaspoon chili-garlic paste or sambal oelek (optional, adds depth)
- ½ teaspoon kosher salt (adjust to taste)
- ¼ teaspoon black pepper
- 1 cup water or beef stock
- 2 bay leaves
The combination of tomato paste and canned tomatoes creates depth—the paste concentrates tomato flavor while the canned tomatoes add brightness and texture. Fish sauce might sound unusual, but just ½ tablespoon adds savory depth without tasting “fishy.”
Cooking Instructions
Sear the Meat:
Heat the oil in a large skillet over medium-high heat. Once hot, add the ground beef and cook, breaking it apart with a wooden spoon, for 5 to 7 minutes until browned. You want the meat to release its moisture and caramelize slightly, developing deeper flavor. Pour off excess fat if there’s more than a thin layer pooling at the bottom of the pan.
Build the Sauce Base:
Reduce heat to medium. Add the diced onion and cook for 2 minutes, stirring occasionally, until the onion softens. Add the minced garlic and sauté for 30 seconds, then add the tomato paste. Stir the tomato paste into the meat and onion mixture, coating everything. Let it cook for 1 minute—this toasting of the tomato paste deepens its flavor considerably.
Combine Everything:
Pour in the diced tomatoes with their liquid, the water, soy sauce, fish sauce, chili-garlic paste if using, bay leaves, and black pepper. Stir well. Add the diced potatoes and carrot. Bring to a simmer, then reduce heat to medium-low. Simmer uncovered for 20 minutes, stirring occasionally. The potatoes should be nearly tender but still holding their shape.
Finish with Sweet and Savory Elements:
Add the raisins and frozen peas, then simmer for another 5 minutes. The raisins will plump up and the peas will warm through. Taste and adjust seasoning—it should taste savory and slightly sweet, with visible depth. If it seems too thick, add a splash of water. If too thin, simmer uncovered for a few more minutes.
Serve and Store:
Serve over warm white rice or jasmine rice. The picadillo will continue to thicken as it cools. Leftovers keep refrigerated for up to 4 days and actually improve after a day or two as flavors meld. Reheat gently on the stovetop, adding a splash of water if needed to restore the sauce consistency.
3. Garlic Butter Fried Rice with Crispy Egg: Sinangag Done Right

Sinangag, or garlic fried rice, appears on Filipino breakfast tables but works beautifully as a complete dinner when topped with a fried egg and served alongside a simple protein or vegetable. This isn’t complicated stir-fry—it’s day-old rice kissed with butter and garlic so fragrant your kitchen will smell like a Filipino kitchen should. The key is using day-old rice (freshly cooked rice releases too much moisture), and the secret is the ratio of garlic to oil, which creates crispy, golden garlic bits throughout.
Why Day-Old Rice Makes All the Difference
Freshly cooked rice contains too much moisture, making it stick and steam rather than fry. Day-old rice has dried out slightly, allowing each grain to separate and absorb the butter and garlic evenly. If you don’t have day-old rice, spread freshly cooked rice on a plate and let it cool completely, or refrigerate cooked rice for a few hours. This single adjustment transforms ordinary fried rice into something genuinely delicious.
Simple Ingredient List
- 3 tablespoons avocado oil, divided
- 12 cloves fresh garlic, minced very fine (roughly ¼ cup)
- 2 cups day-old cooked white rice, broken up with your fingers before cooking
- 2 tablespoons butter
- 1 teaspoon kosher salt
- ½ teaspoon white pepper (or black pepper)
- 2 stalks green onion (scallion), sliced thin for garnish
- 4 eggs (for topping, one per serving)
- Extra butter and salt for frying eggs
The garlic-to-fat ratio is critical. More garlic than oil creates burnt, bitter garlic. The right balance means golden, crispy bits distributed throughout the rice. White pepper is traditional in Filipino cooking because it dissolves invisibly and adds peppery bite without visible black specks, but black pepper works fine if that’s what you have.
Building Perfect Garlic Fried Rice
Heat 2 tablespoons of the avocado oil in a large wok or skillet over medium heat. Add the minced garlic and cook, stirring frequently, for 2 to 3 minutes. Watch carefully—the garlic should turn golden and fragrant, not brown or burnt. Once the garlic is golden, remove roughly half of it to a small bowl, leaving the garlic-infused oil in the pan.
Add the remaining tablespoon of oil and the day-old rice to the pan. Use a spatula to break up any clumps and stir constantly, coating every grain with the garlic oil. Cook for 3 to 4 minutes, stirring constantly, until the rice is heated through and individual grains are separated and slightly glossy. Add the butter, reserved crispy garlic, salt, and white pepper. Stir well, cooking for another 1 to 2 minutes until the rice is fragrant and the butter is fully incorporated.
Transfer to a serving dish and top with sliced green onion. Wipe out the pan and add a tablespoon of butter. Crack the eggs into the pan and fry sunny-side up or over-easy, until the whites are set but the yolk remains runny. Top each serving of fried rice with a fried egg—the runny yolk becomes an instant sauce.
Building a Complete Dinner Around Sinangag
Serve alongside grilled or pan-seared protein: simple grilled chicken, pan-fried tilapia, or even canned tuna mixed with a little vinegar and onion. Add a side of quickly sautéed vegetables—green beans, bok choy, or simple cucumber salad. This becomes a legitimate dinner that feels both casual and intentional.
4. Filipino Bistek Tagalog: Beef and Onion Stew with Tangy Sauce
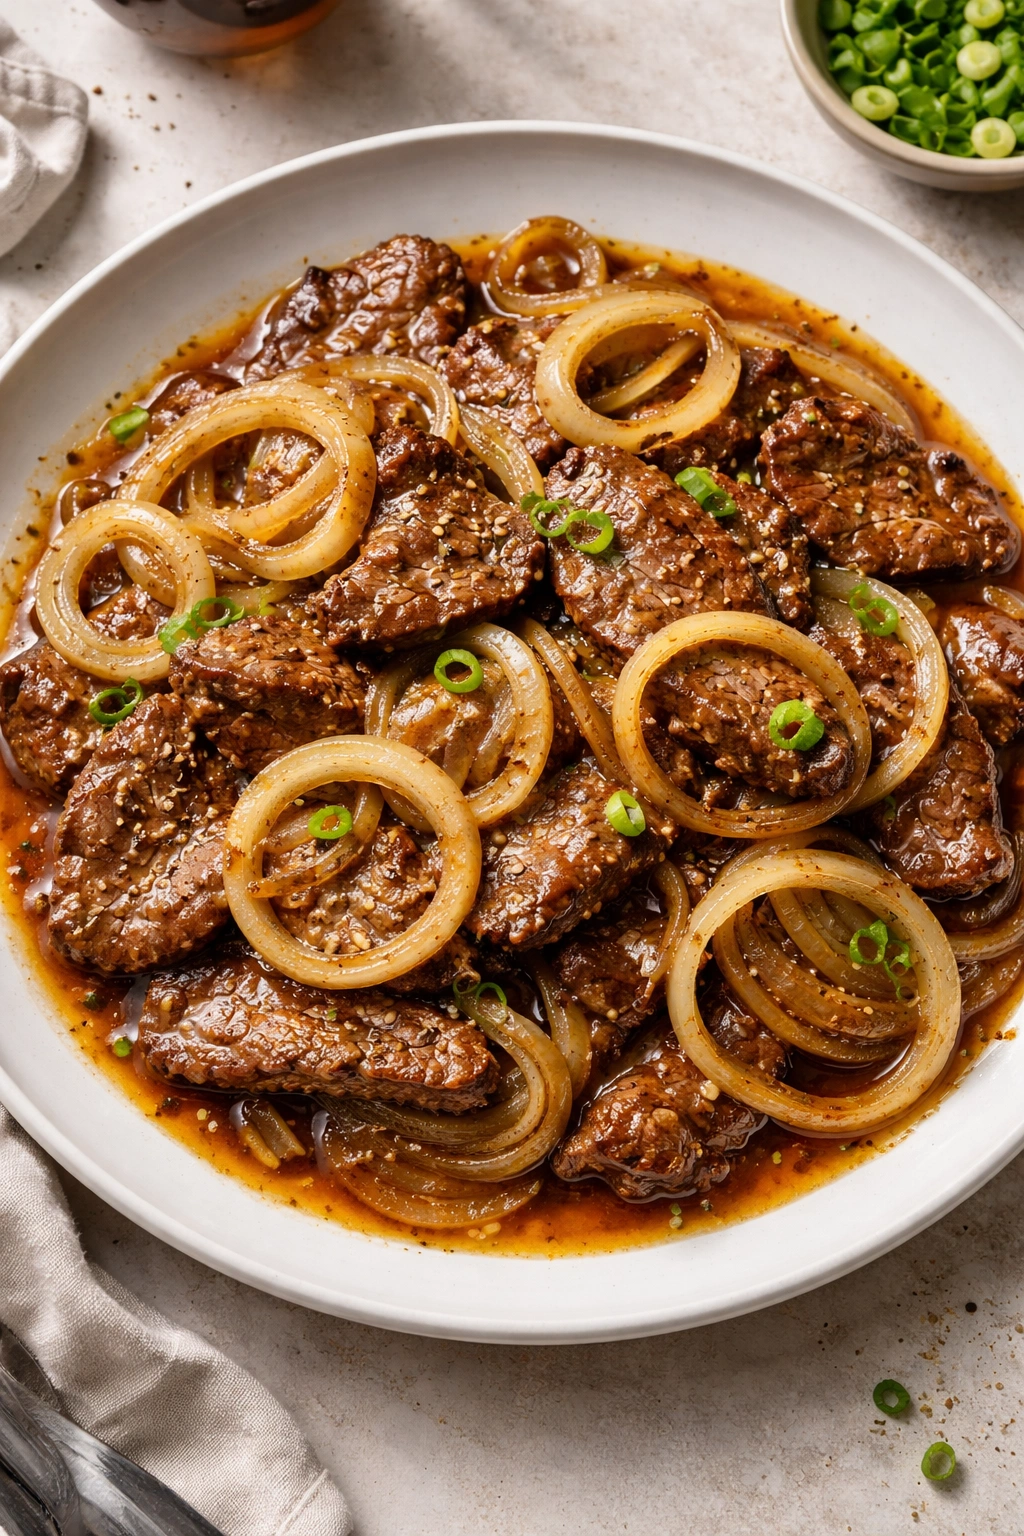
Bistek Tagalog (bistek from the Spanish bistec, meaning steak) is a Filipino take on braised beef that relies on the brightness of calamansi or lime juice to cut through the richness of soy and butter. Thin slices of beef sirloin are seared quickly, then simmered with deeply caramelized onions in a savory-tangy sauce. The beauty of this dish is how fast it comes together—once the onions are cooked, everything else happens in the pan in 15 to 20 minutes.
The Flavor Profile That Makes This Special
Unlike heavier stews that cook for hours, bistek is about bright acidity balanced with umami. The beef stays tender because it’s sliced thin and cooked quickly, and the sauce (which is essentially soy, lime juice, and garlic reduced around the meat) becomes glossy and clinging. This is weeknight cooking that tastes like you spent hours on it.
Essential Ingredients
For the Bistek:
- 1.5 pounds sirloin steak or ribeye, sliced thin (about ¼-inch thick)
- 3 tablespoons avocado oil, divided
- 3 large yellow onions, sliced into thin half-moons
- 6 cloves fresh garlic, minced
- ¼ cup soy sauce
- Juice of 2 limes (roughly 3 tablespoons), or calamansi juice if available
- 3 tablespoons butter
- 1 teaspoon whole black peppercorns, crushed lightly
- ½ teaspoon kosher salt
- ½ cup water or beef stock
The thin slicing is essential. Ask your butcher to slice the meat against the grain, or partially freeze it for an hour before slicing yourself. This ensures the beef becomes tender quickly despite minimal cooking time.
Step-by-Step Cooking
Caramelize the Onions (this takes time, but it’s worth it):
Heat 1 tablespoon of oil in a large skillet over medium-high heat. Once hot, add the sliced onions and a pinch of salt. Cook, stirring frequently, for 15 to 20 minutes. You want the onions to turn deep golden brown, almost caramelized, releasing their natural sugars. This creates the sweet, savory base of the dish. The onions should be soft and jammy, not crispy. Once caramelized, transfer them to a plate.
Sear the Beef:
Return the skillet to medium-high heat and add the remaining 2 tablespoons of oil. Working in batches to avoid crowding the pan, sear the beef slices for about 1 minute per side—you want a light crust but rare to medium-rare meat inside. Remove to a plate as each batch finishes.
Build the Sauce:
Reduce heat to medium. Add the minced garlic to the pan and sauté for 30 seconds until fragrant. Pour in the soy sauce and water, scraping up any browned bits stuck to the pan. Return the beef to the pan, add the caramelized onions, lime juice, crushed peppercorns, and butter. Stir gently to combine.
Simmer for 5 to 7 minutes, just until the sauce reduces slightly and becomes glossy. The beef should be cooked through at this point, tender from the thin slicing and quick cooking, and coated in a silky, intensely flavored sauce. Taste and adjust seasoning—add more lime juice if it tastes flat, more soy if it needs salt.
Serve Over Rice:
Serve immediately over steamed white rice or jasmine rice, making sure each plate gets plenty of sauce and caramelized onions. Bistek is best eaten fresh, though it keeps refrigerated for 2 days and reheats gently on the stovetop.
5. Simplified One-Pot Chicken Afritada: Chicken, Vegetables, and Tomato Sauce

Chicken afritada is a gentle stew simmered in tomato-based broth with potatoes, carrots, bell peppers, and green peas. It’s less assertively spiced than adobo and less rich than kare-kare—instead, it’s a clean, bright dish where you taste each ingredient clearly. The name comes from the Spanish guisado (stewed), and it reflects that influence: it’s essentially a Filipino version of a basic braise, comfortable and approachable, perfect for nights when you want something nourishing without complexity.
Why This Works for Weeknight Dinners
Afritada is naturally one-pot (or one-pan), uses common ingredients, and comes together in about 40 minutes. Unlike dishes that need long simmering or special components, everything goes in one vessel and cooks together. The result is both homey and satisfying, the kind of dish that cries out for plenty of rice and perhaps a simple cucumber salad on the side.
Complete Ingredient List
- 2 tablespoons avocado oil
- 6 to 8 boneless, skinless chicken thighs (about 2 pounds), cut into bite-sized pieces, or a combination of thighs and breasts
- 1 medium yellow onion, diced
- 4 cloves fresh garlic, minced
- 1 can (15-ounce) diced tomatoes with their liquid
- 1 cup water or chicken stock
- 1 pound yellow potatoes, peeled and cut into 1-inch cubes
- 1 large carrot, peeled and cut into ½-inch coins
- 1 red bell pepper, cut into 1-inch chunks
- 1 cup frozen peas (or fresh if in season)
- 2 tablespoons soy sauce
- 1 tablespoon fish sauce (optional but adds depth)
- 2 bay leaves
- ½ teaspoon black pepper
- ½ teaspoon kosher salt
- 1 teaspoon sugar or brown sugar (balances acidity)
Straightforward Cooking Process
Heat oil in a large pot or deep skillet over medium-high heat. Add the chicken pieces and cook, stirring frequently, until the exterior turns opaque and the pieces firm up slightly, about 5 to 7 minutes. You’re not trying to cook the chicken through—just get some color on it.
Add the diced onion and cook for 2 minutes, stirring occasionally, until it softens. Add the minced garlic and sauté for 30 seconds. Pour in the canned tomatoes with their liquid, water, soy sauce, fish sauce if using, bay leaves, and black pepper. Stir well.
Add the potatoes and carrot. Bring to a simmer, then reduce heat to medium-low, cover partially, and simmer for 20 minutes. The potatoes should be nearly tender at this point. Add the bell pepper and peas, then simmer uncovered for another 5 minutes.
Taste and adjust seasoning. It should taste tomatoey and savory, with bright acidity from the tomatoes and salty depth from the soy. If it tastes too tangy, add the sugar to balance. If it’s too thin, simmer uncovered for a few more minutes.
Storage and Reheating:
Afritada actually improves after sitting overnight, as the flavors develop and deepen. Keep it refrigerated for up to 4 days and reheat gently on the stovetop, adding a splash of water if the sauce has thickened too much.
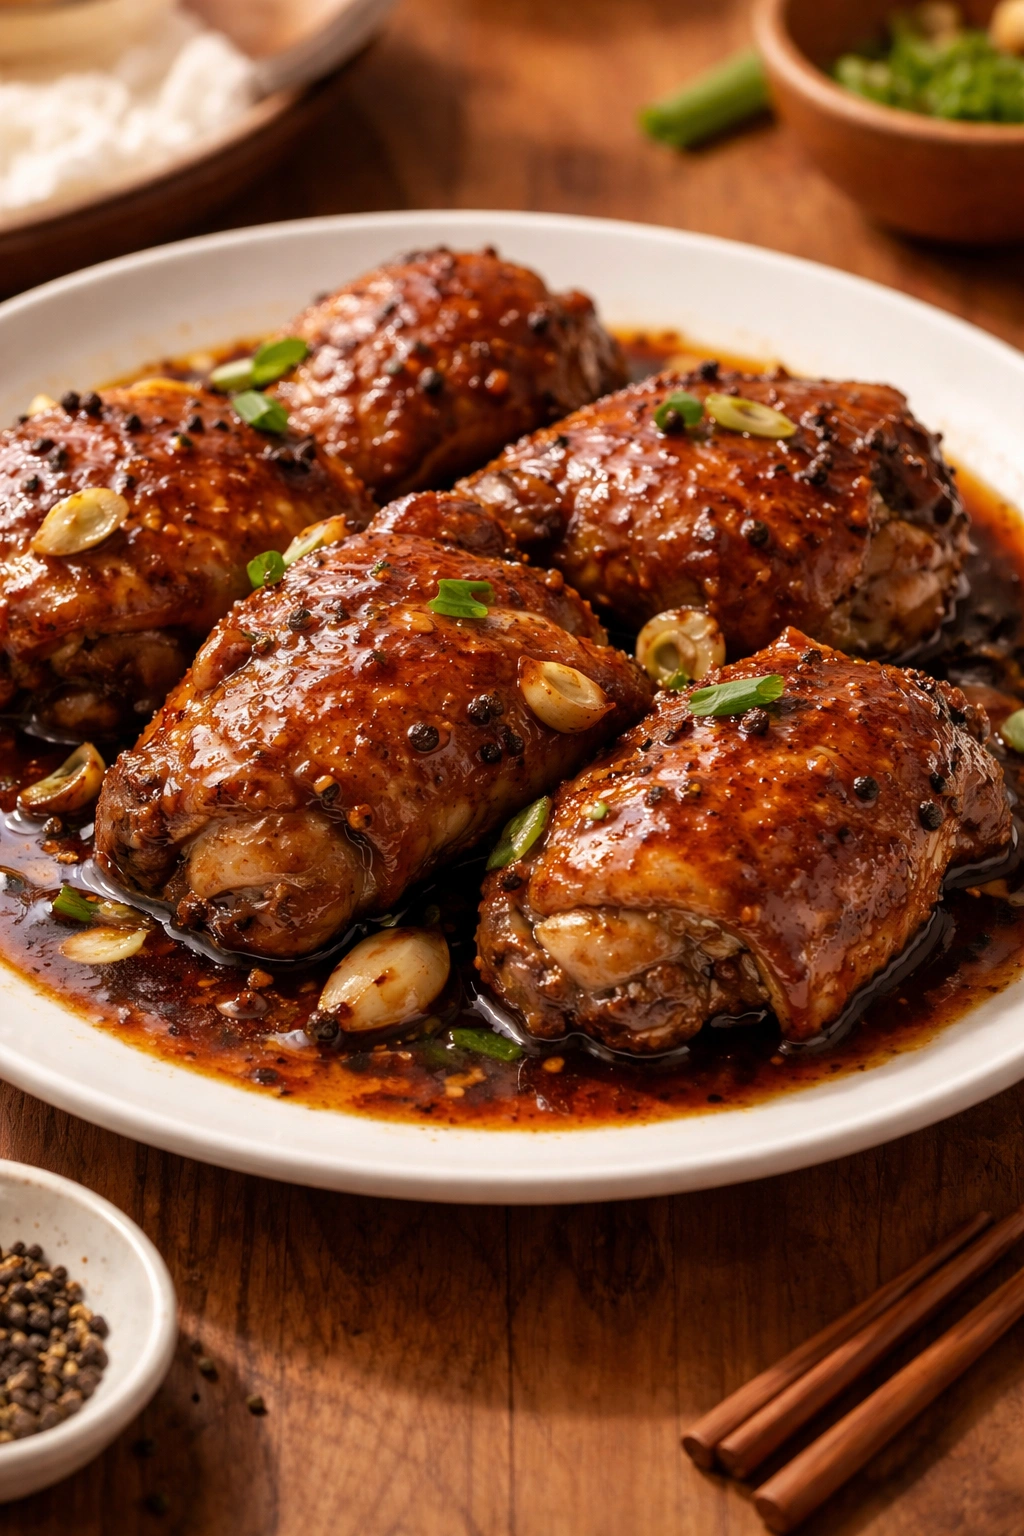
6. Quick Pork Belly Adobo: Rich, Tender, Deeply Flavorful
Pork belly adobo is the indulgent cousin of chicken adobo—the same savory-tangy-garlicky sauce, but with meat that’s fattier, more forgiving, and capable of becoming incredibly tender in the time it takes to properly simmer the sauce. This is weeknight cooking that feels luxurious: pork belly, which is more affordable than many cuts, becomes melt-in-your-mouth tender while the sauce reduces to a glossy, deeply colored coating. Prepare this when you want dinner to feel special without the effort.
Why Pork Belly Works So Well for Adobo
Pork belly contains enough fat that it stays moist and tender even with extended cooking. The fat also enriches the adobo sauce, creating a richer result than chicken alone would produce. The meat caramelizes where it touches the pan, developing deeper flavor, while staying tender inside. This cut forgives timing mistakes—slightly overcook it and it’s still delicious; slightly undercook it and it’s perfectly tender.
Ingredient List for Pork Belly Adobo
- 2 pounds pork belly, skin removed (ask your butcher to remove it), cut into 2-inch chunks
- 2 tablespoons avocado oil
- 6 cloves fresh garlic, minced
- 1 medium yellow onion, sliced into thin half-moons
- ½ cup soy sauce
- ½ cup cane vinegar or distilled white vinegar
- ¾ cup water
- ¼ teaspoon kosher salt
- 1 teaspoon whole black peppercorns
- 4 bay leaves
- 1 tablespoon brown sugar (balances acidity and enriches sauce)
- 2 to 3 fresh red chili peppers (optional, adds gentle heat)
The longer cook time (35 to 45 minutes instead of 25 to 30) allows the pork belly to become extremely tender while the sauce reduces properly. By the end, you’ll have glossy, rich sauce clinging to meat that shreds easily with a spoon.
Cooking Instructions
Build the Adobo Base:
Heat oil in a large pot or Dutch oven over medium-high heat. Once hot, add the pork belly chunks and cook, stirring occasionally, for 8 to 10 minutes. You’re looking for the meat to brown on the outside, developing crust and caramelization. Work in batches if necessary to avoid crowding—crowded meat steams rather than browns. Once browned, transfer to a plate.
Add the minced garlic to the pot and sauté for 30 seconds until fragrant. Add the sliced onion and cook for 2 minutes, stirring occasionally, until the onion begins to soften.
Simmer to Tenderness:
Return the pork belly to the pot. Pour in the soy sauce, vinegar, water, and brown sugar. Add the peppercorns, bay leaves, salt, and chili peppers if using. Stir well, ensuring the meat is mostly submerged.
Bring to a simmer, then reduce heat to medium-low. Cover partially and simmer for 35 to 45 minutes, stirring occasionally. The pork should be fork-tender—a piece should shred easily when pressed against the side of the pot with a spoon.
Reduce the Sauce:
Once the meat is tender, uncover and increase heat to medium-high. Simmer for another 5 to 10 minutes, allowing the sauce to reduce and become glossy and concentrated. The liquid should reduce by about half, coating the meat richly. The color should be a deep mahogany brown.
Taste and Adjust:
The finished adobo should taste deeply savory with bright acidity from the vinegar. If it tastes too sharp, add a pinch more brown sugar. If it’s too sweet, add a splash more vinegar. If it seems too thick, thin with a bit of water. If too thin, continue simmering.
Serve and Store:
Serve over steamed white rice, jasmine rice, or even with fried plantains on the side. Pork belly adobo actually tastes better the next day after the flavors have melded overnight. Keep refrigerated for up to 5 days—the fat in the pork belly helps preserve it. Reheat gently on the stovetop, adding water if the sauce has thickened too much while sitting.
Final Thoughts

These six dinners represent the backbone of Filipino weeknight cooking: they’re built on flavors that work together predictably, they use ingredients most groceries stock, and they come together in the time between getting home and sitting down to eat. None of them demand special equipment or techniques beyond basic knife skills and comfort with a hot pan.
The real secret to cooking Filipino food on a weeknight is understanding that these dishes improve with age. Make them knowing you’ll enjoy them fresh but that they’ll taste even better reheated the next day as flavors meld and deepen. Use this to your advantage: cook on Sunday afternoon, refrigerate, and reheat during the week. The sauce coats the rice differently, and you’ll taste layers you didn’t notice the first time.
Keep your pantry stocked with the essentials—good soy sauce, vinegar, fresh garlic, onions, and neutral oil—and these dinners become reflexive. You won’t need to plan ahead or hunt down special ingredients. You’ll simply know that tonight, dinner is adobo or picadillo or bistek, and it will be ready in less time than it takes to order delivery. That’s when cooking becomes genuinely easy.