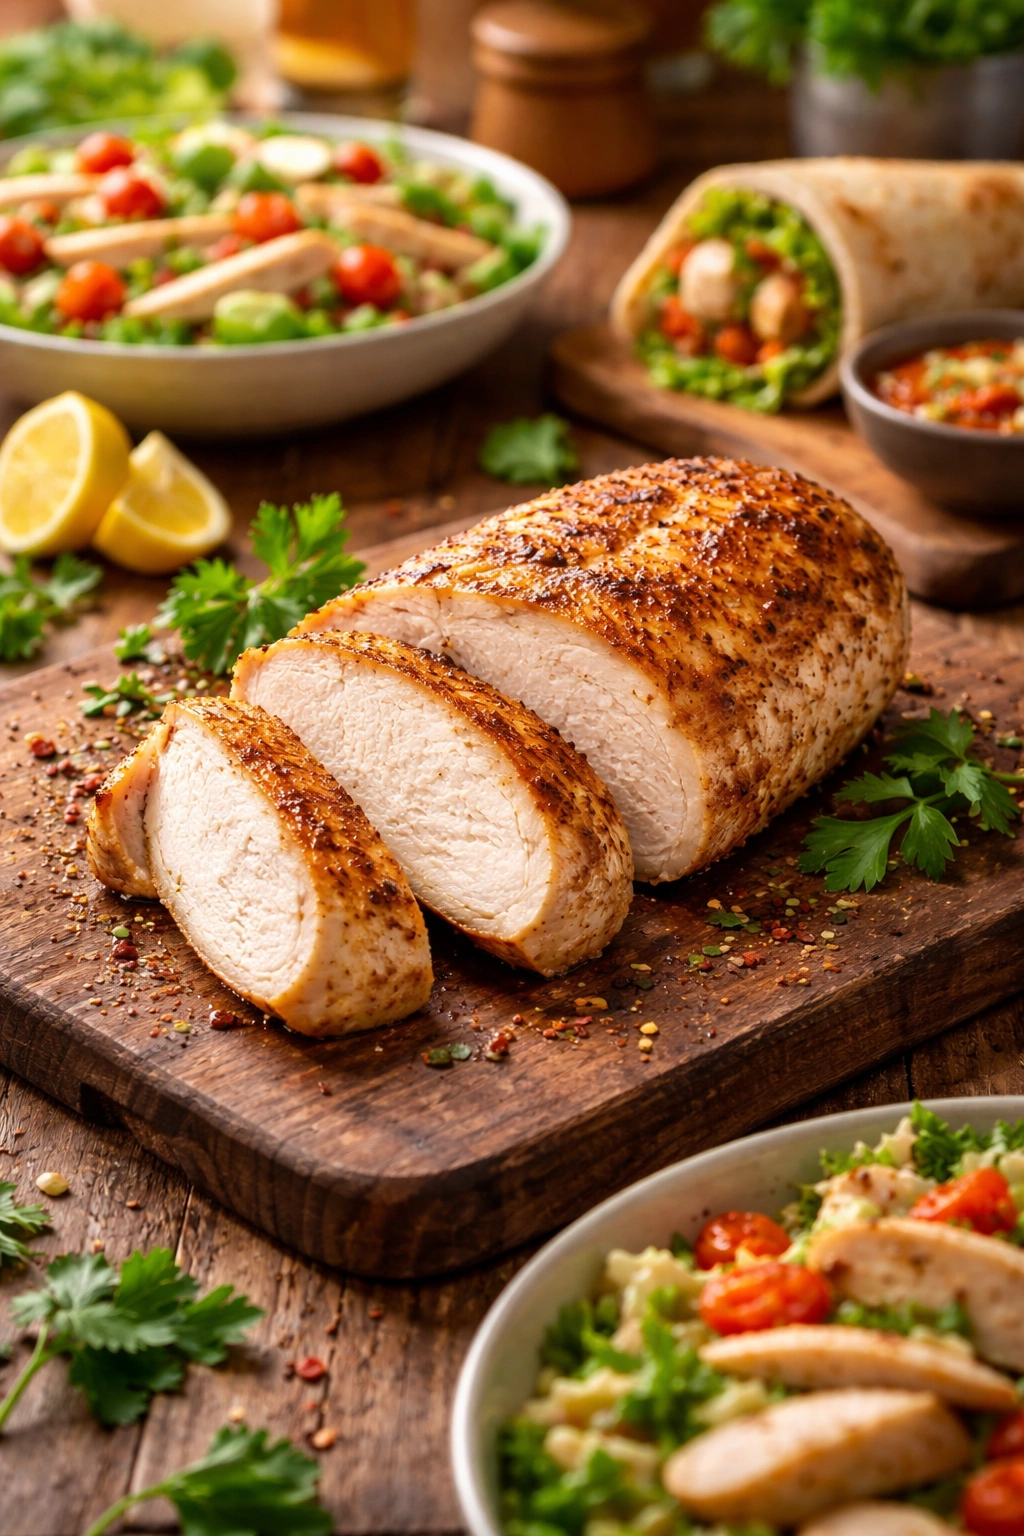
Chicken breast is one of the most popular proteins in home cooking. It’s affordable, versatile, lean, and works with virtually any cuisine or flavor profile you can dream up. Yet despite its popularity, countless home cooks struggle with the same frustrating problem: dry, rubbery, flavorless chicken breast that leaves you wondering why you bothered cooking at all. The good news? Juicy, tender, delicious chicken breast isn’t luck—it’s a learnable skill. The difference between a disappointing dinner and restaurant-quality chicken comes down to understanding a few core principles and knowing which cooking method works best for your situation.
This guide will walk you through everything you need to know to cook chicken breast perfectly every single time. Whether you’re searing and baking, using a simple stovetop method, or going the traditional oven route, you’ll discover exactly why certain techniques work and how to execute them with confidence. By the end, you’ll have multiple reliable methods in your cooking toolkit, plus the troubleshooting knowledge to fix any chicken disaster before it happens.
Why Chicken Breast Is More Challenging Than Other Cuts
Chicken breast occupies a tricky middle ground in the cooking world. It’s leaner than thighs or drumsticks, which means it has less fat to keep it moist during cooking. That same leanness also means it has less flavor on its own, which is why seasoning and cooking method matter so much. Unlike beef, which can be served medium-rare and still be perfectly safe, chicken must reach an internal temperature of 165°F throughout to eliminate foodborne pathogens—there’s no wiggle room for undercooking.
The real challenge is that the window between perfectly cooked and overdone is surprisingly narrow. Cook a chicken breast just 2-3 degrees past 165°F and the proteins begin to squeeze out their moisture, leaving you with dry, tough meat. This narrow margin is why so many home cooks end up with disappointing results. They cook with the best intentions, pull the chicken out when it looks done, and end up with a dry disaster. The solution is simple: use a meat thermometer and learn the resting step, but we’ll cover both of those in detail throughout this guide.
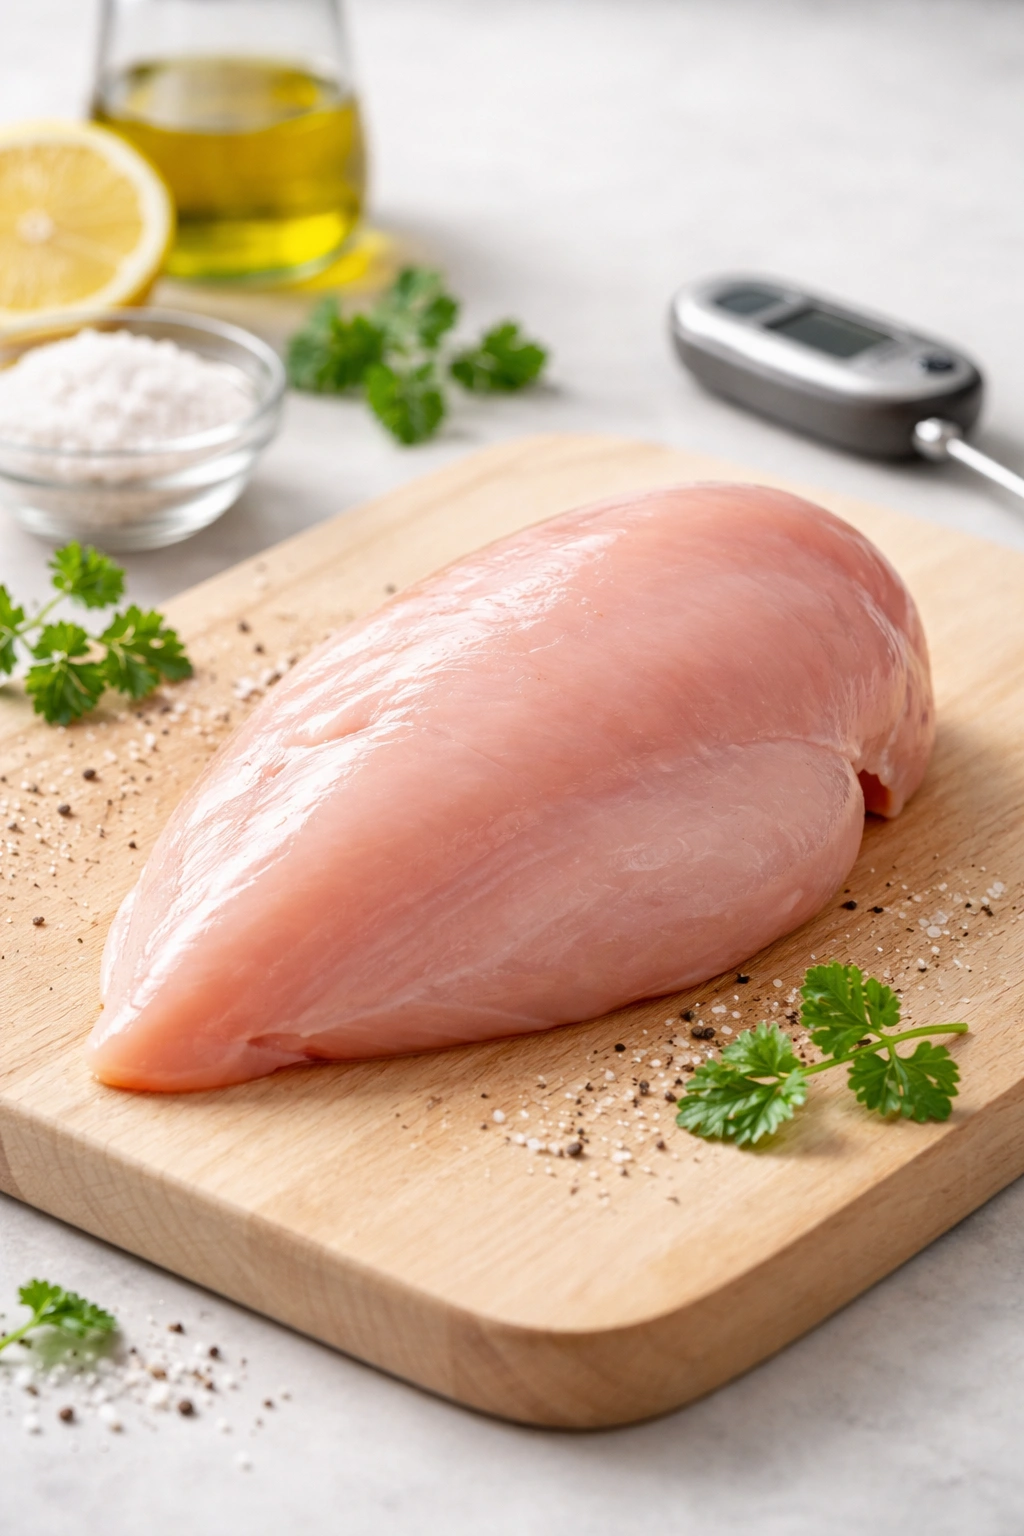
Invest in an Instant-Read Meat Thermometer
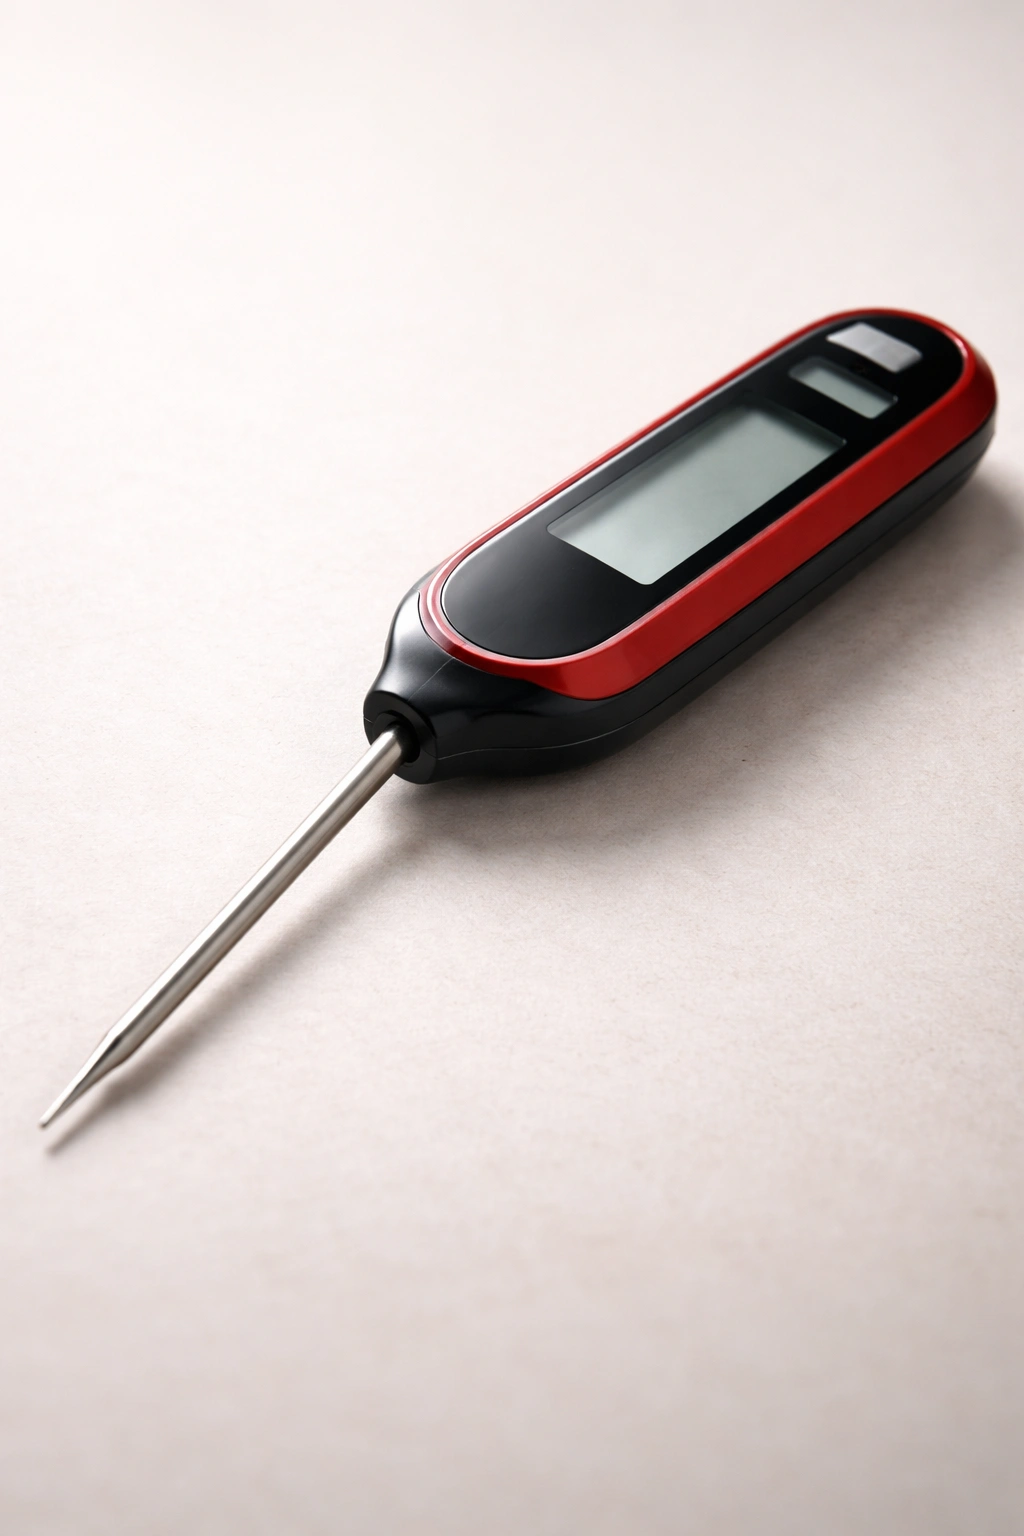
This is the single most important tool for cooking juicy chicken breast, and it’s not close. An instant-read thermometer removes the guesswork entirely from determining doneness. The FDA-recommended safe internal temperature for chicken is 165°F, and a good thermometer will tell you when you’ve hit that mark to the degree.
Look for a thermometer that reads in 3-5 seconds or less. Digital models are more reliable than analog dials, and they’re affordable—quality instant-read thermometers cost between $15 and $40. Some home cooks prefer a leave-in thermometer with an oven-safe probe and cord, which you can insert into the chicken before it goes in the oven and set to alarm when it reaches 165°F. This is especially helpful if you tend to overcook chicken out of habit; you’ll remove it the moment it’s done rather than leaving it in a few extra minutes “just to be safe.”
Insert the thermometer into the thickest part of the chicken breast without touching bone (if you’re cooking bone-in chicken). Check the temperature in multiple spots if you’re cooking multiple breasts of varying sizes. This simple habit eliminates overcooking and takes the stress completely out of the process.
Understanding the Pound-to-Even-Thickness Step
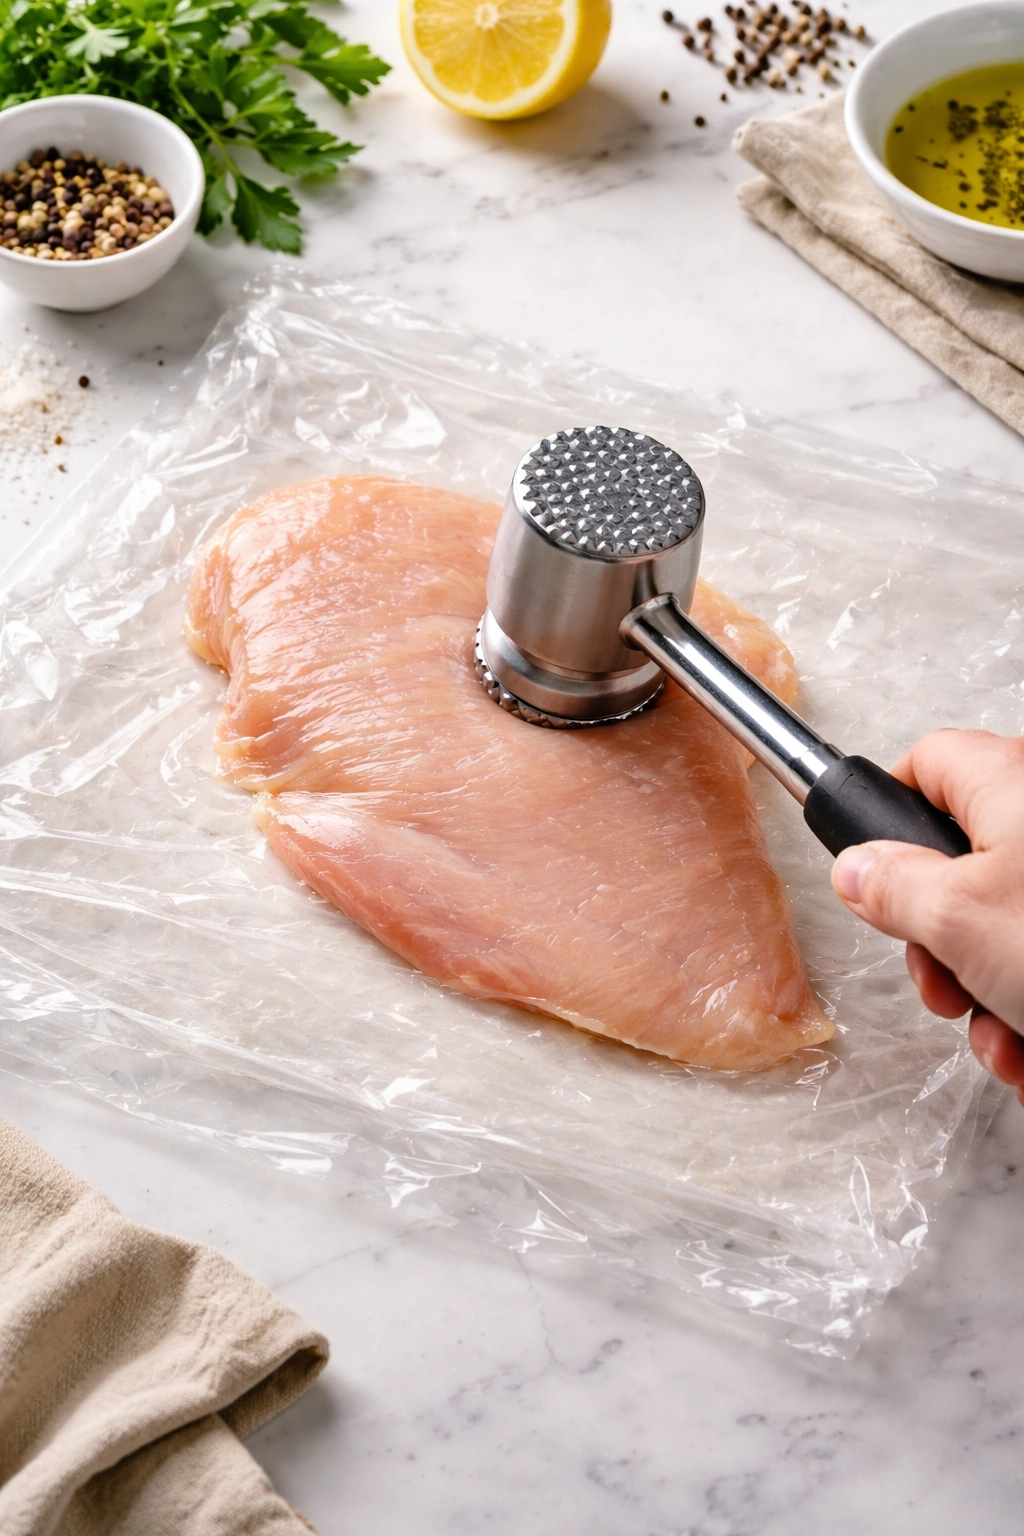
One of the most overlooked steps in chicken breast cooking is pounding the meat to an even thickness. This sounds like extra work, but it’s actually a game-changer for two reasons: it ensures even cooking and it naturally tenderizes the meat.
Raw chicken breasts are rarely uniform in thickness. They’re typically thicker at the center and taper down toward the edges. This means if you throw an uneven breast directly into the oven or onto a skillet, the thin edges will overcook while the thick center is still cooking through. Pounding solves this problem completely. Use a meat mallet, rolling pin, or even your fist to pound the breast to about ½ to ¾ inch thickness throughout. This process breaks down some of the muscle fibers, which actually makes the meat more tender and allows seasonings to penetrate more effectively.
Place the chicken between two sheets of plastic wrap before pounding (or use a sturdy zip-top bag) to avoid making a mess. Pound firmly but not aggressively—you’re not trying to destroy the meat, just create uniform thickness. This step takes maybe 30 seconds per breast and pays huge dividends in the final result.
The Critical Importance of Resting
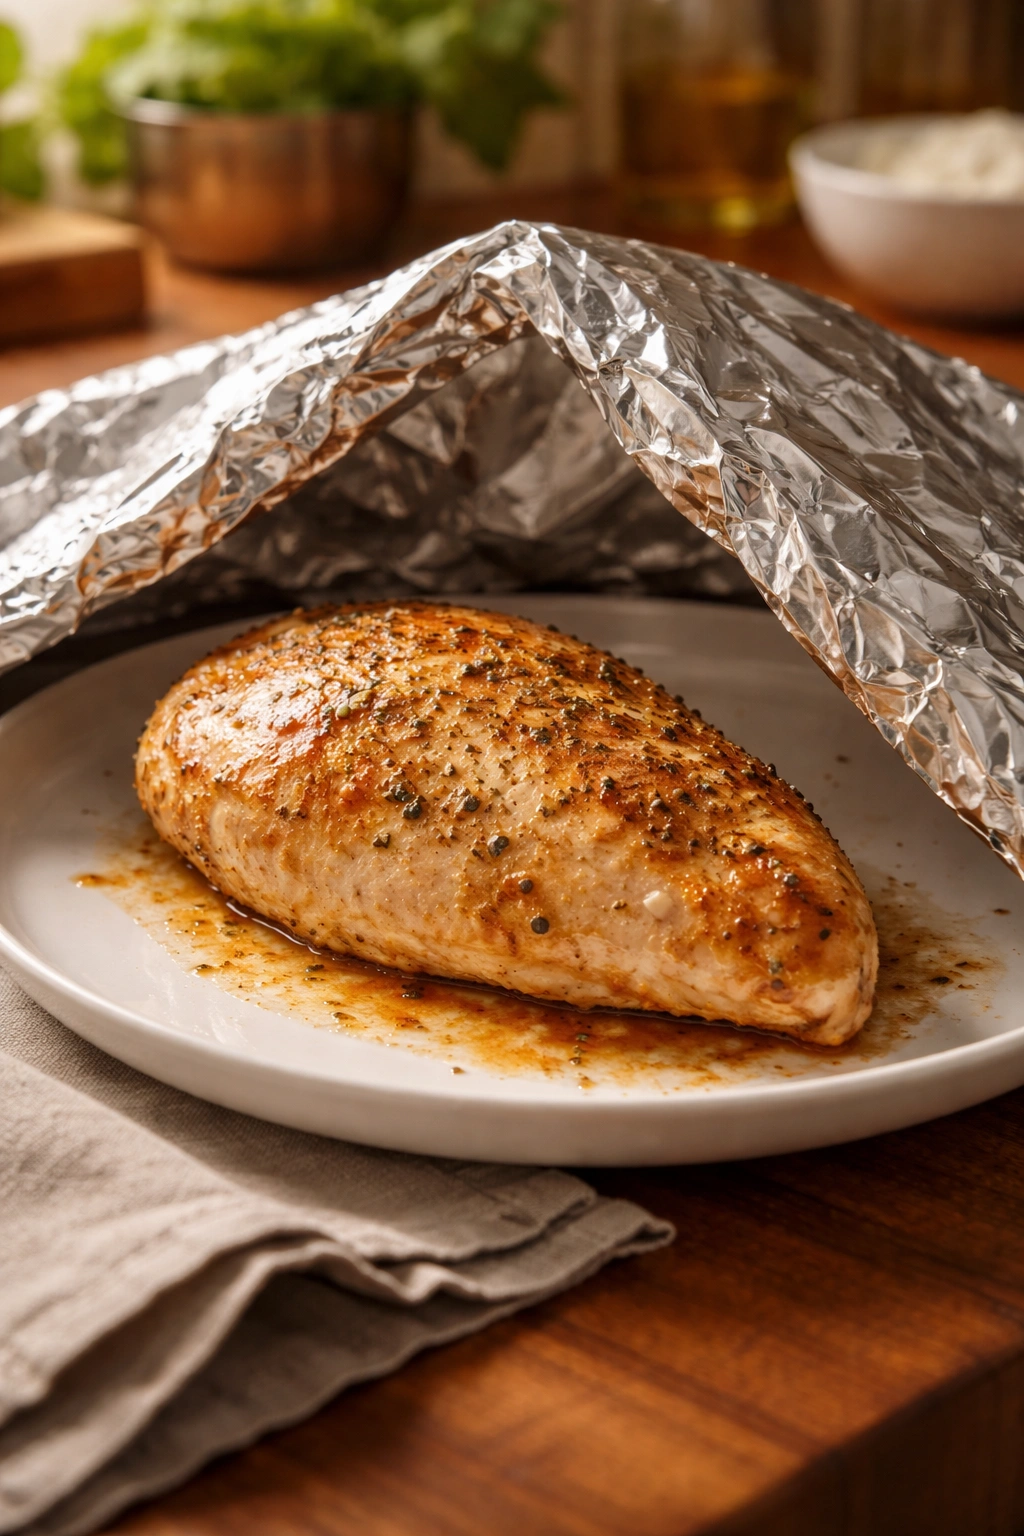
After your chicken reaches 165°F and you pull it from the heat, the cooking isn’t actually finished—and this is where many home cooks make a costly mistake by cutting right in. Resting is not optional; it’s essential for juicy, tender chicken breast.
When meat cooks, the proteins contract and squeeze out moisture. If you cut into the chicken immediately, all those juices run out onto your plate instead of staying in the meat. When you let the chicken rest for 5 to 10 minutes (even covered loosely with foil to keep it warm), the proteins relax slightly and reabsorb much of that moisture. The residual heat also finishes the cooking process gently, bringing the temperature up another degree or two while the meat is at rest, so you don’t need to cook it past 165°F before resting.
This step is so important that many professional chefs emphasize it as much as the actual cooking method. A perfectly cooked chicken breast that’s cut immediately will taste drier than one that’s slightly overdone but properly rested. The resting period is where tenderness and juiciness are locked in.
The Oven-Bake Method for Straightforward Results
The traditional oven-bake method is perhaps the most hands-off approach to cooking chicken breast, and it delivers reliably juicy results when done properly. The key here is using a high oven temperature and a cooking time matched to the thickness of your meat, rather than the low-and-slow approach that many home cooks assume is safer.
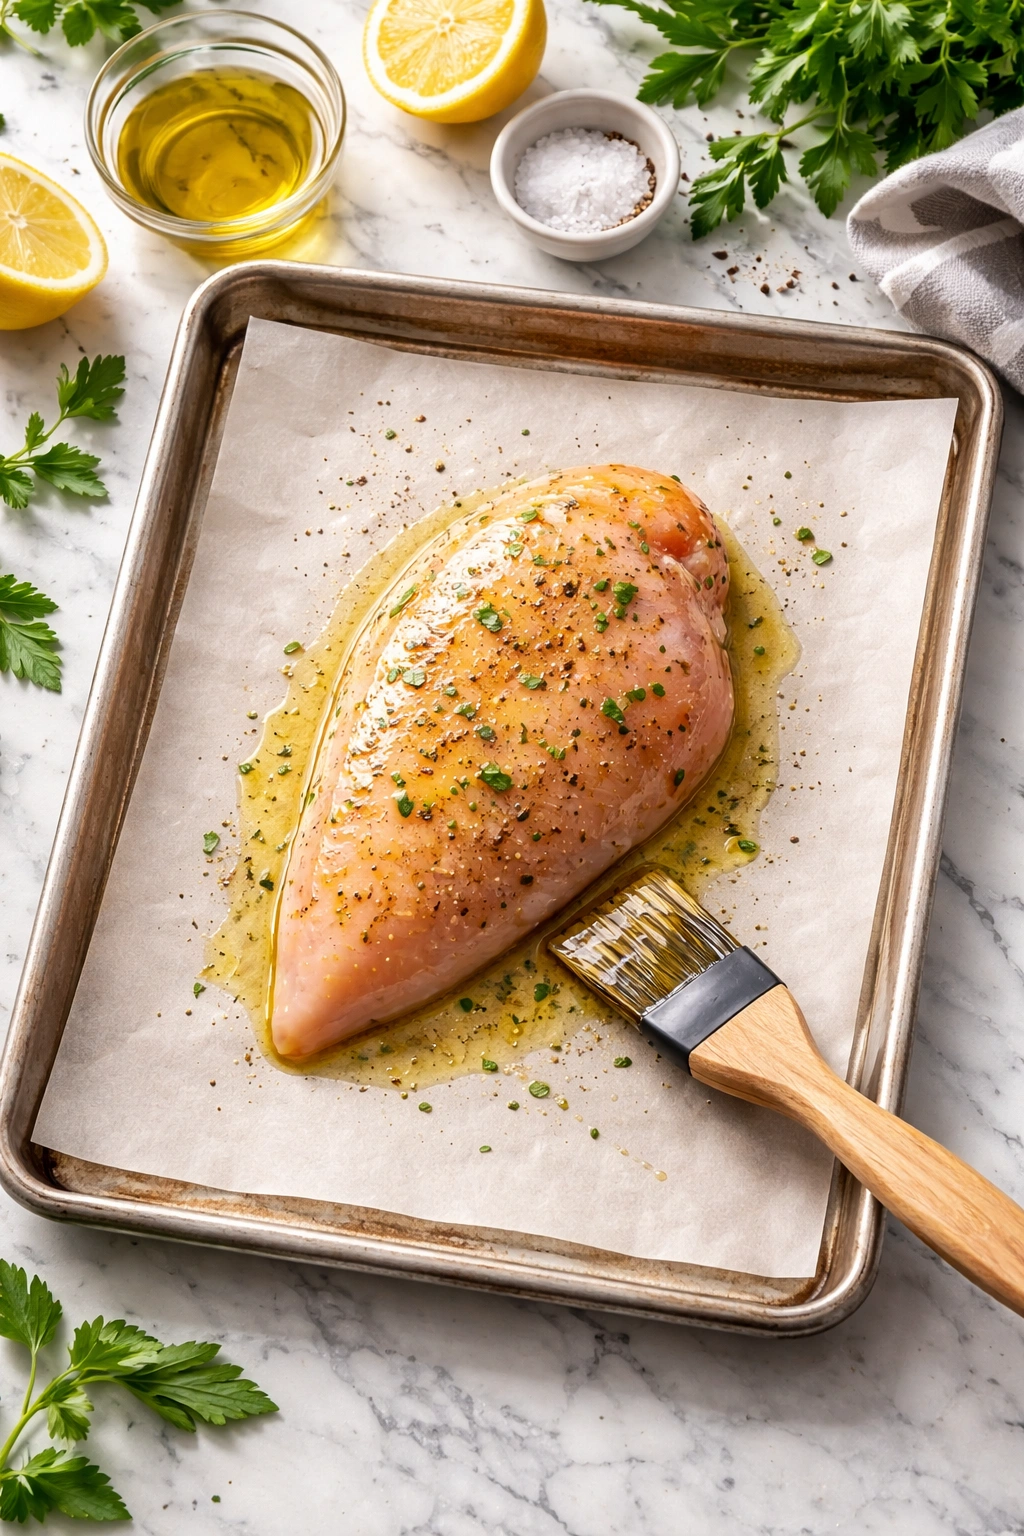
Preheat your oven to 400°F to 425°F (200°C to 220°C). Pat your chicken breasts dry with paper towels—any surface moisture will create steam and prevent browning. Brush or spray both sides with oil, which helps the seasonings stick and creates a golden crust. Season generously on both sides with salt, pepper, and any other seasonings you prefer. Arrange the chicken on a parchment-lined baking sheet in a single layer with a little space between pieces so air can circulate.
Bake for 15 to 22 minutes, depending on the thickness of your breasts. Thinner breasts (½ inch) will be done in 15-18 minutes, while thicker ones (¾ to 1 inch) need 20-22 minutes. The highest temperature setting actually works in your favor here because the high heat quickly develops a golden, caramelized crust on the outside while the inside stays moist. This caramelization also adds flavor through the browning reaction (the Maillard reaction).
Use your thermometer to check the thickest part of the largest breast. The moment it hits 165°F, remove it from the oven. Transfer to a plate, cover loosely with foil, and let rest for at least 5 minutes before serving or slicing.
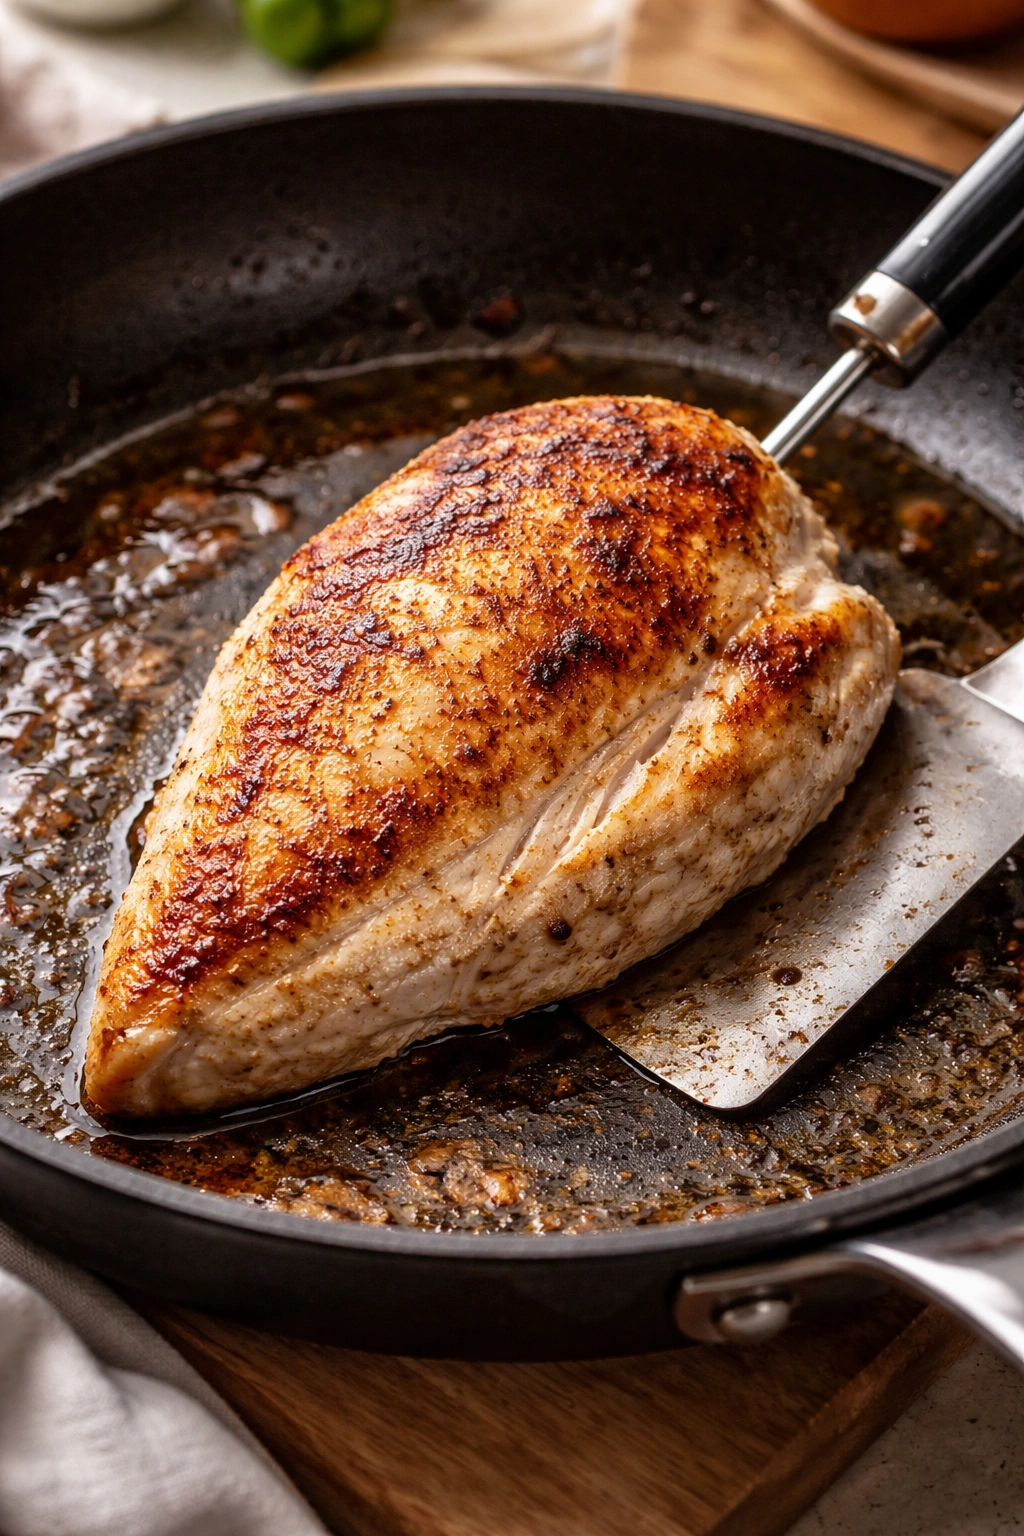
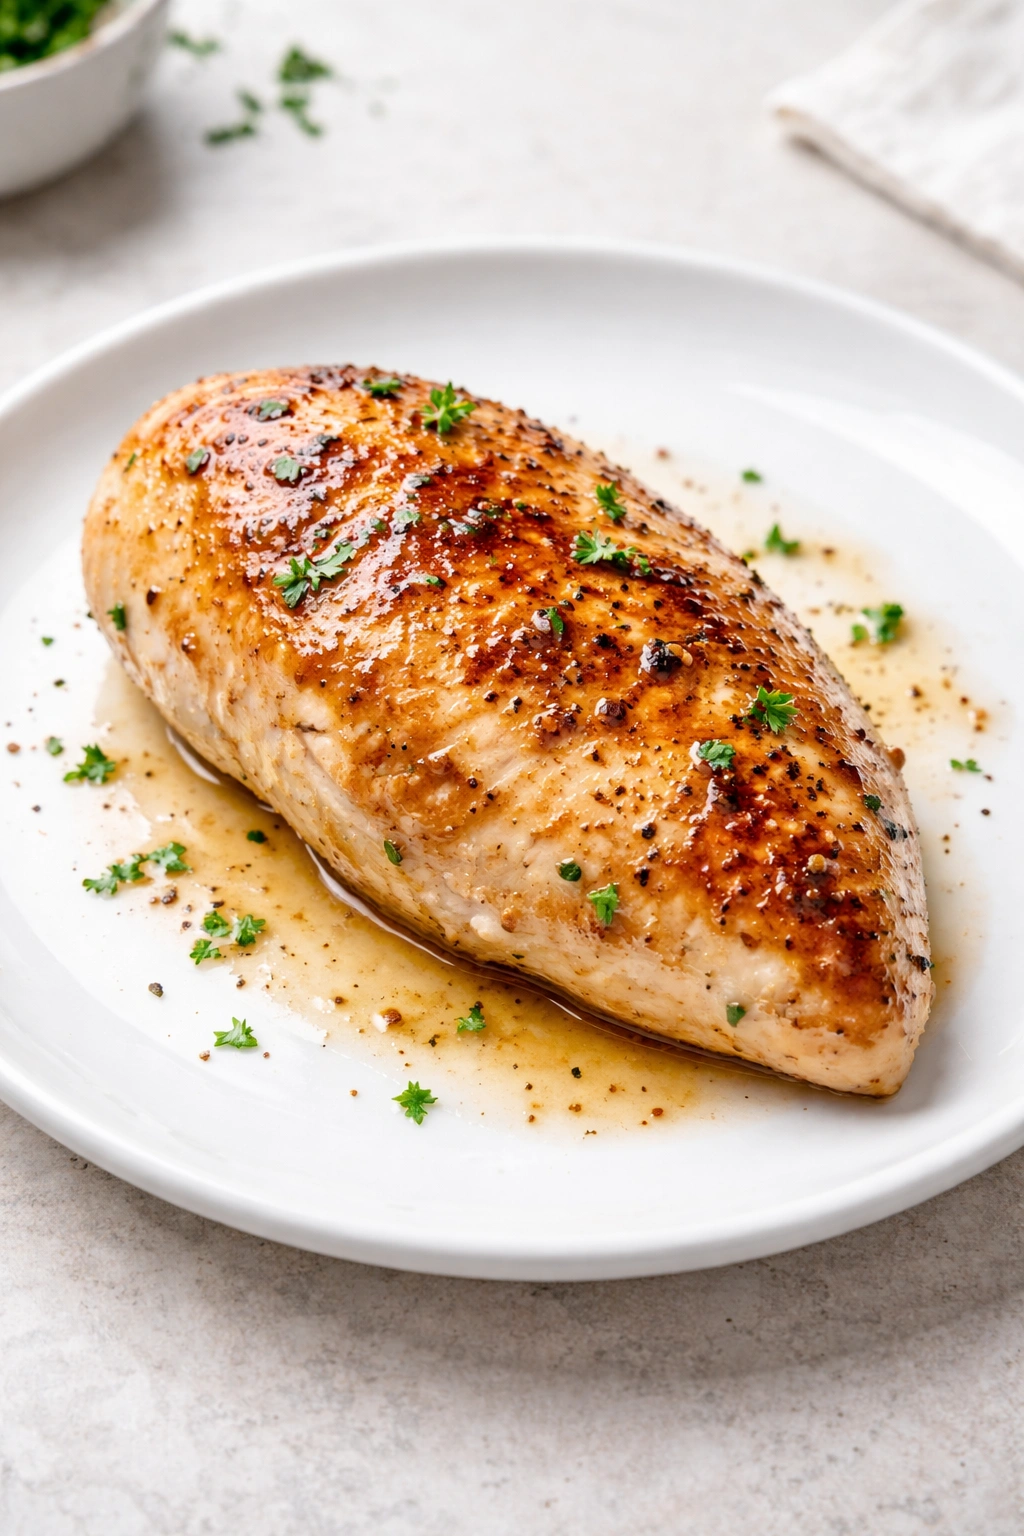
The Sear-and-Bake Method for Maximum Flavor
If you want the best of both worlds—a flavorful golden crust plus perfectly juicy interior—the sear-and-bake method is your answer. This approach starts the chicken on a hot stovetop to build a flavorful browned exterior, then finishes it gently in the oven.
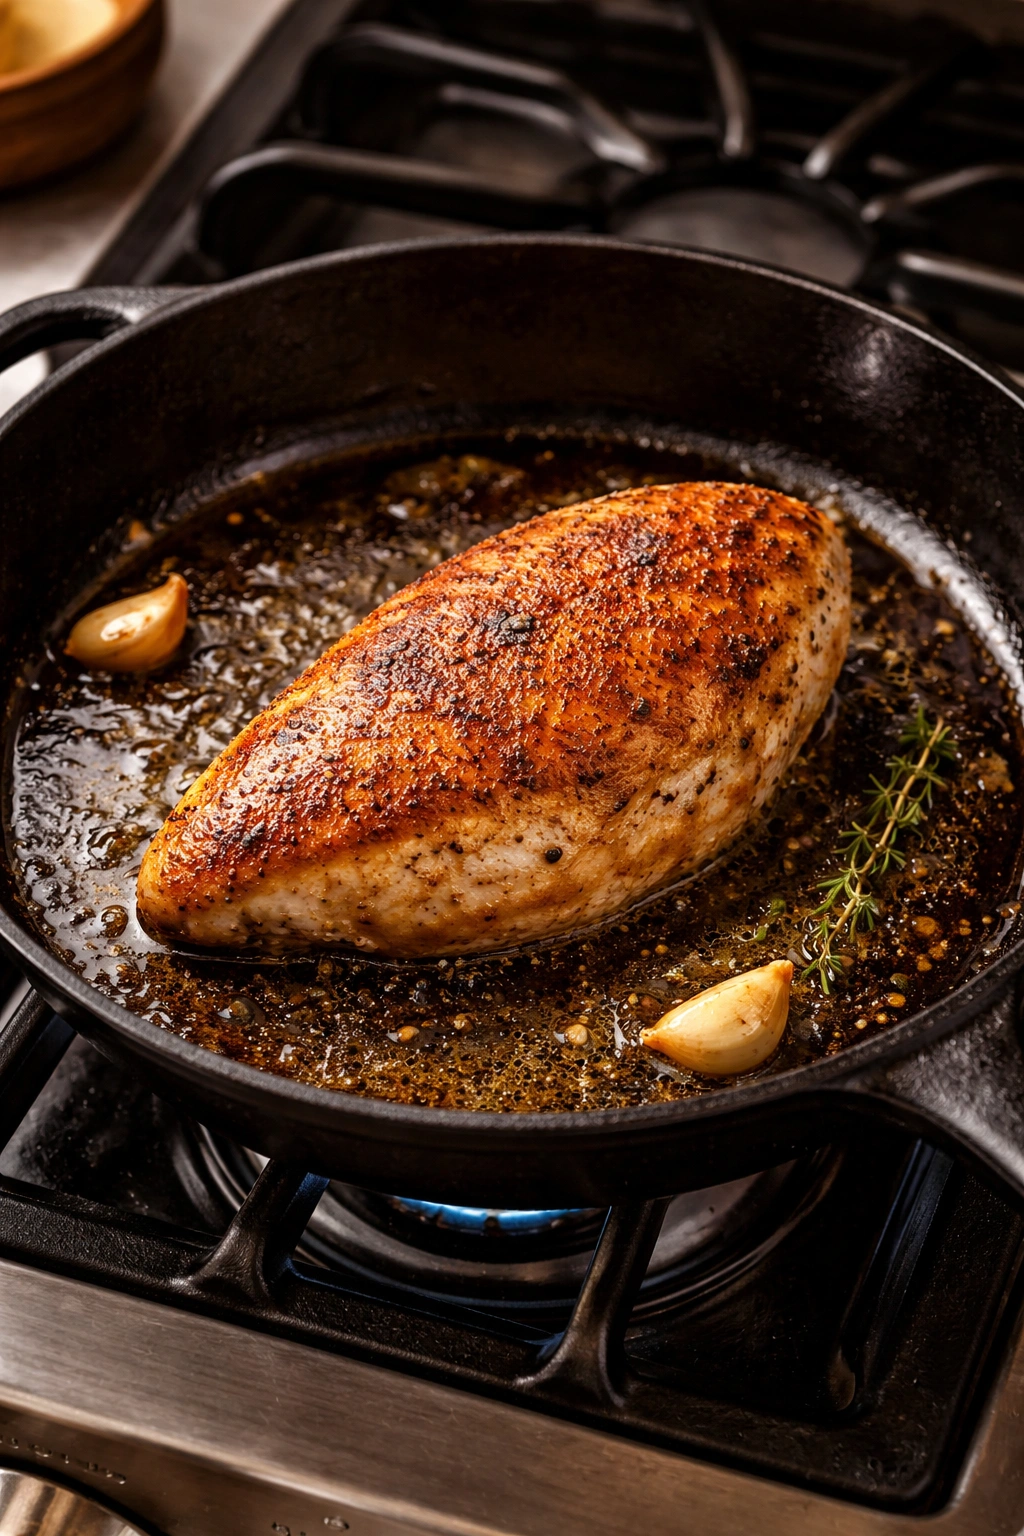
Heat an oven-safe skillet (cast iron is ideal, but any oven-safe pan works) over medium-high heat for a minute. While it heats, pat your chicken dry and season generously. Add a tablespoon of high-heat oil (avocado, vegetable, or light olive oil) to the pan and let it get shimmery. Place the chicken breast in the hot skillet and don’t move it. Let it sear undisturbed for 2 to 3 minutes to develop a golden crust.
Flip the chicken and sear the second side for another 2 to 3 minutes. This creates a flavorful browned exterior that adds richness and complexity to the finished dish. Transfer the entire skillet to a preheated 350°F oven. Bake for 10 to 15 minutes, depending on thickness, until the internal temperature reaches 165°F.
This method is particularly effective because the initial high-heat sear locks in flavor and develops a crust, while the oven’s gentle, even heat finishes cooking without drying out the meat. The oven also cooks more evenly than a skillet sitting on a single heat source, which helps prevent the edges from overcooking while you’re waiting for the center to come up to temperature.
The Stovetop-with-Lid Method for Quick Results
For weeknight dinners when you need dinner on the table fast, the stovetop-with-lid method is a reliable, hands-off approach that takes less than 25 minutes from start to table. This method combines the speed of stovetop cooking with the even heat of a covered pan to produce consistently juicy chicken.
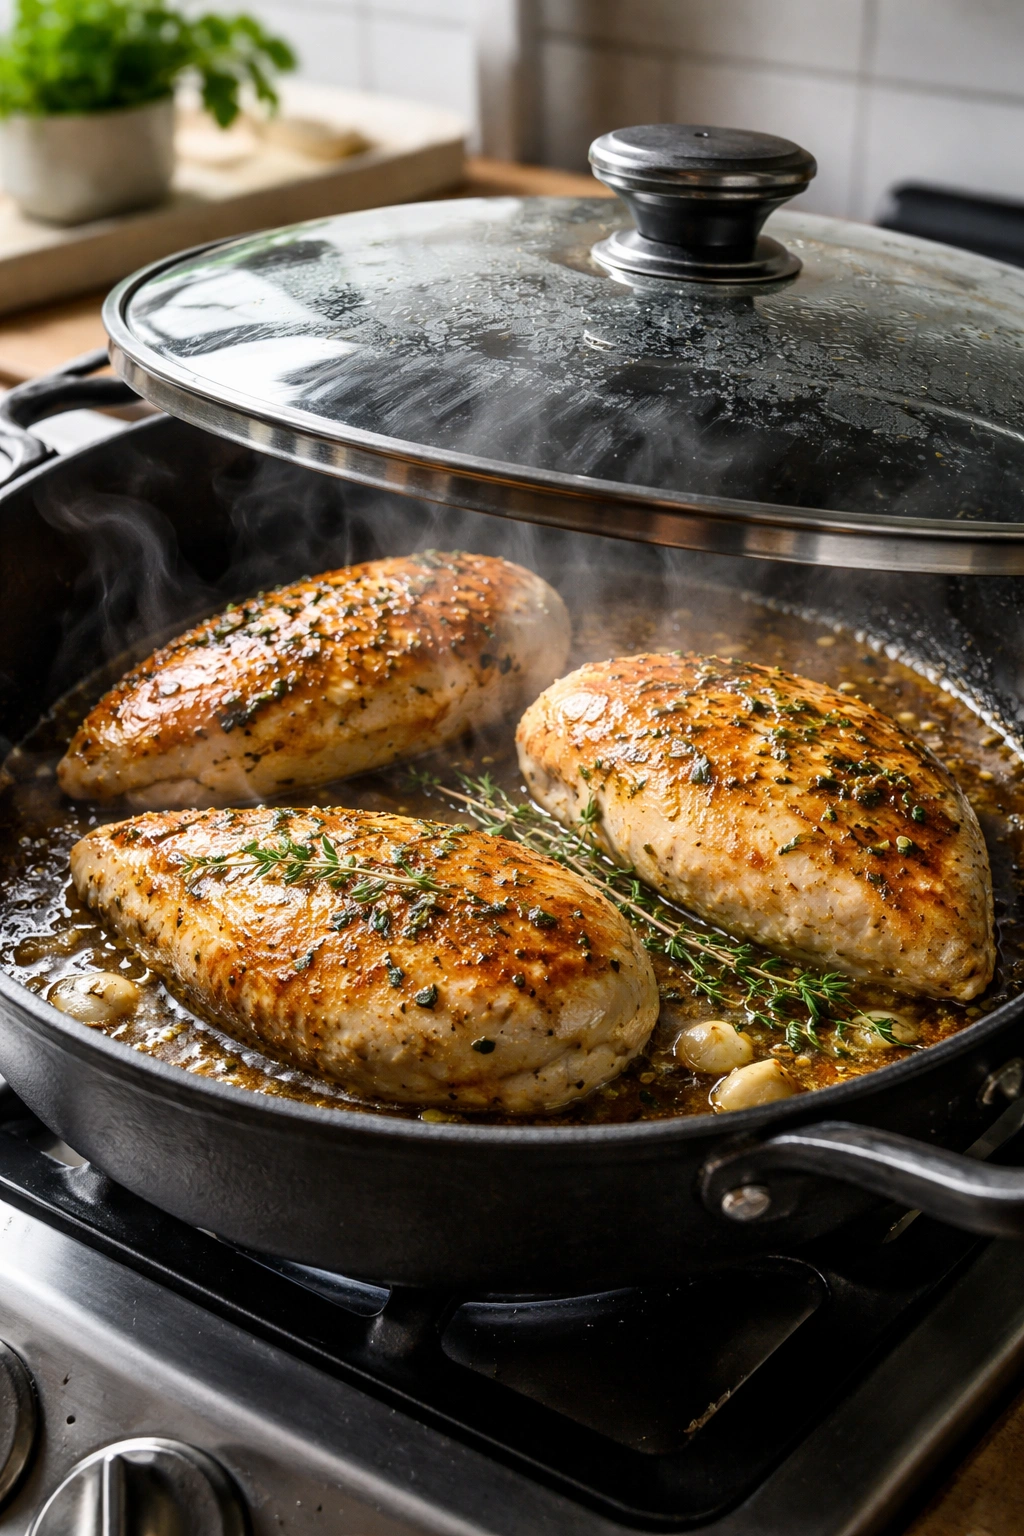
Heat a heavy-bottomed skillet (cast iron or stainless steel) over medium heat for 2 minutes. Season your chicken breasts with salt, pepper, and any other seasonings. Add enough oil to coat the bottom of the pan and let it heat for about 60 seconds. Place the chicken in the pan and sear for 5 minutes without moving it. Flip the chicken over.
Here’s the key to this method: add about 1 cup of water to the pan and immediately cover it with a lid. The water creates steam that gently cooks the interior while the bottom stays in contact with the hot pan. Reduce heat to low or medium-low. Cook for 3 to 4 minutes, then turn off the heat completely. This is the important part—don’t open the lid for at least 15 minutes. The residual heat and trapped steam will finish cooking the chicken gently without any risk of overcooking.
After 15 minutes, carefully remove the lid (watch out for the steam) and check the internal temperature. The chicken should be cooked through. If for some reason it’s not quite there, cover again and cook for a few more minutes. This method produces remarkably tender, juicy chicken because the steam environment prevents the surface from drying out while the chicken cooks through.
The Parchment-Paper Hack for Boneless Skinless Chicken
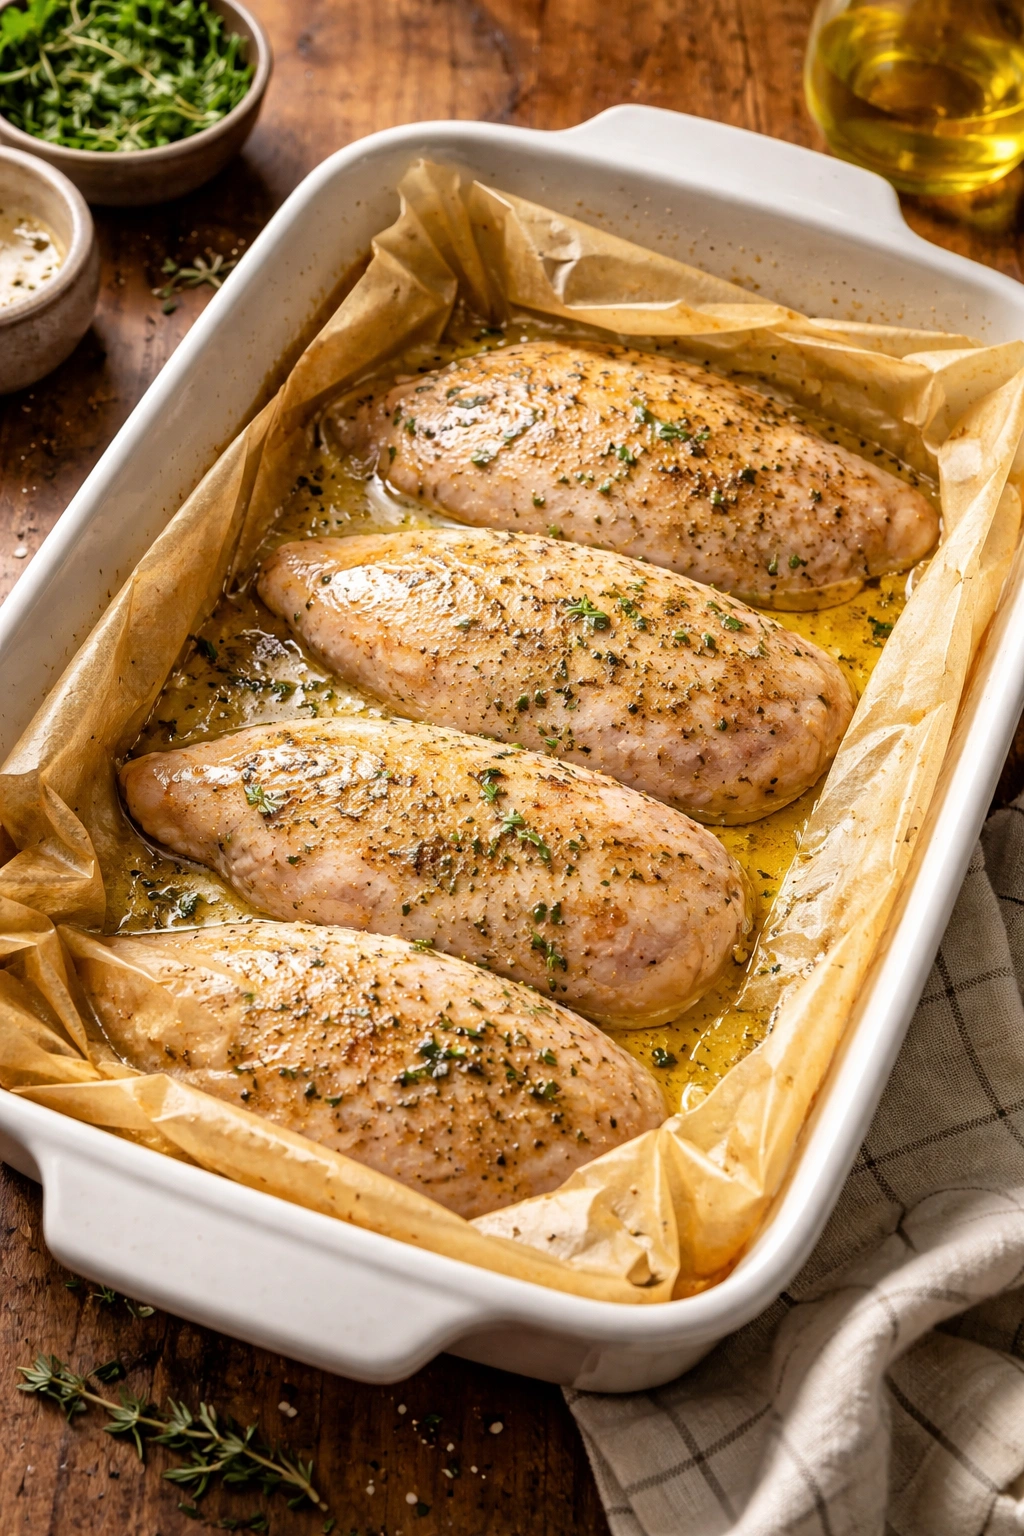
If you’re specifically working with boneless, skinless chicken breasts and want a foolproof hack that mimics the moisture-retention benefits of skin, the parchment paper method is almost impossible to mess up. This technique uses oiled parchment paper to trap moisture and prevent the chicken from drying out.
Preheat your oven to 400°F. Place chicken breasts in a 9×13-inch baking dish and season generously on both sides with salt, pepper, and whatever other seasonings you like. Coat a sheet of parchment paper with olive oil spray or brush it with about 1 to 2 teaspoons of oil, spreading it evenly across the entire sheet. Flip the parchment paper oil-side down and lay it directly on top of the chicken. Tuck the parchment under the chicken on all four sides, like you’re making a bed with a fitted sheet. Press it down so the oiled side is making contact with the top of the chicken.
Bake for 20 to 25 minutes, depending on thickness. The parchment traps steam and oil around the chicken, creating a moisture-rich microclimate that prevents drying out. The chicken will be incredibly tender and juicy. This method works so well because it mimics the effect of chicken skin—it traps moisture and creates gentle, even cooking conditions.
The Brining Method for Extra Insurance
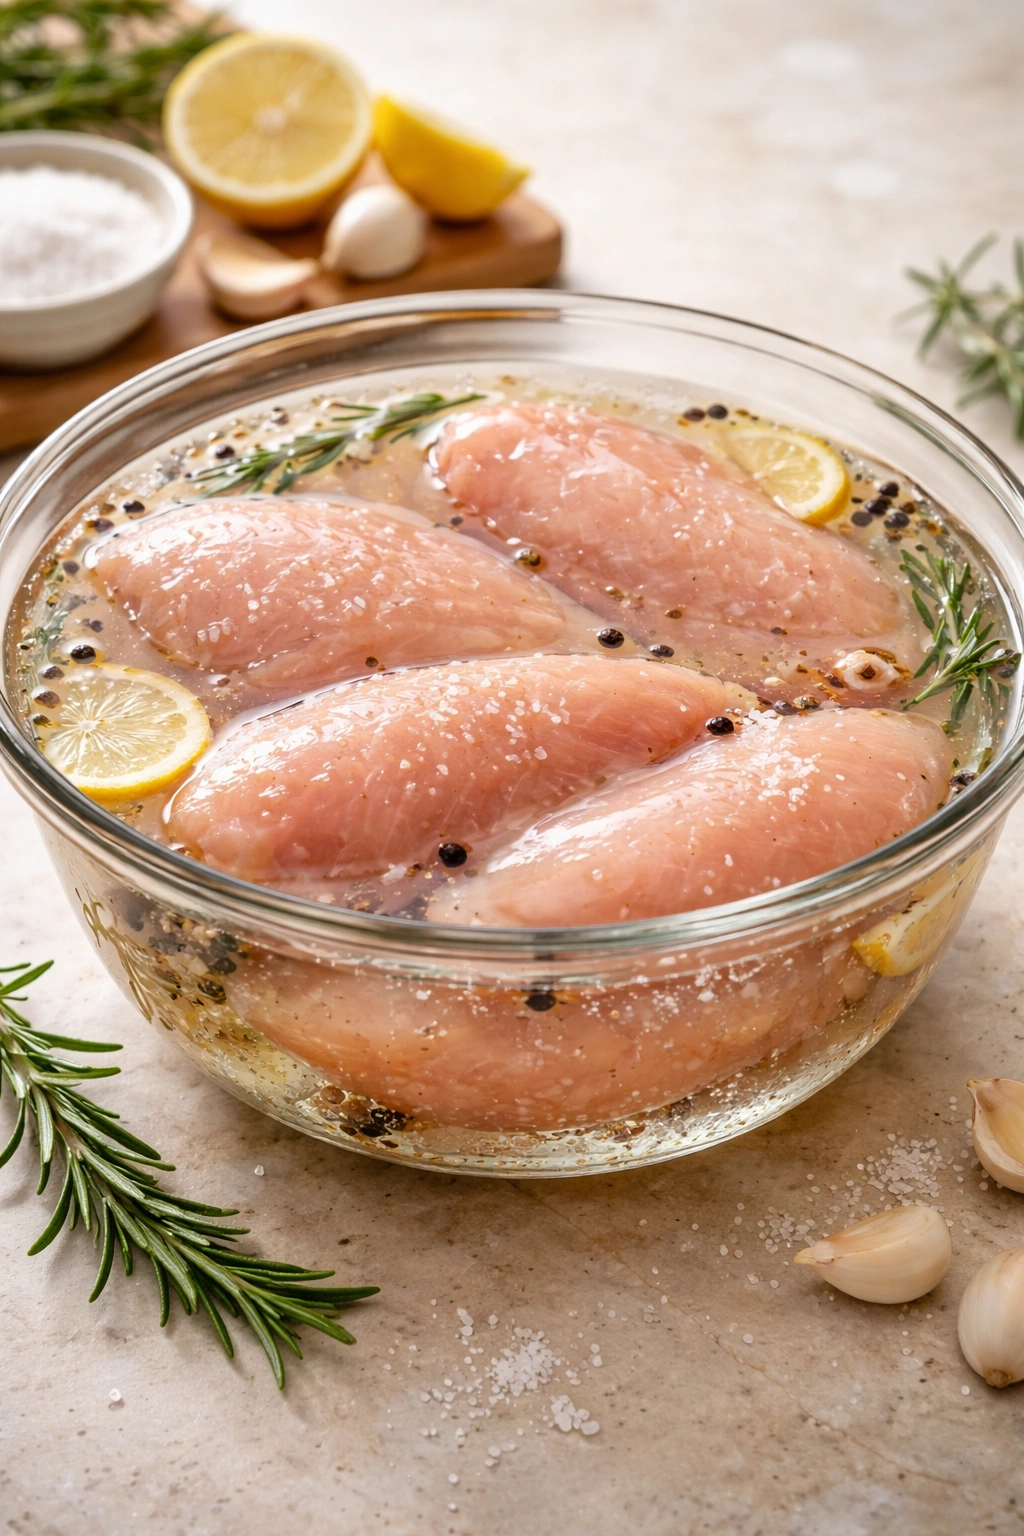
Brining is optional, but it’s an excellent technique if you want maximum juiciness and have a few extra minutes of prep time. Brining works by using salt to help the meat retain moisture during cooking.
To brine chicken breasts, fill a large bowl with 2 cups of lukewarm water and stir in ¼ cup of kosher salt until mostly dissolved. Add 2 cups of cold water or ice cubes to cool the brine to room temperature. Place your chicken breasts in the brine and let them sit for at least 15 minutes. You can also refrigerate the brine and chicken for up to 6 hours if you’re prepping ahead.
When you’re ready to cook, remove the chicken from the brine, rinse thoroughly under cold water to remove excess salt, and pat dry with paper towels. Proceed with your preferred cooking method. Important note: if your chicken has been pre-brined in a salt solution by the manufacturer (check the label), skip this step to avoid oversalting.
Brining adds noticeable juiciness, especially to larger breasts or those that might otherwise be on the drier side. The salt actually changes the structure of the muscle proteins slightly, allowing them to retain more water during cooking. The effect isn’t dramatic, but it’s a genuine improvement that many home cooks appreciate.
Seasoning Strategies That Add Real Flavor
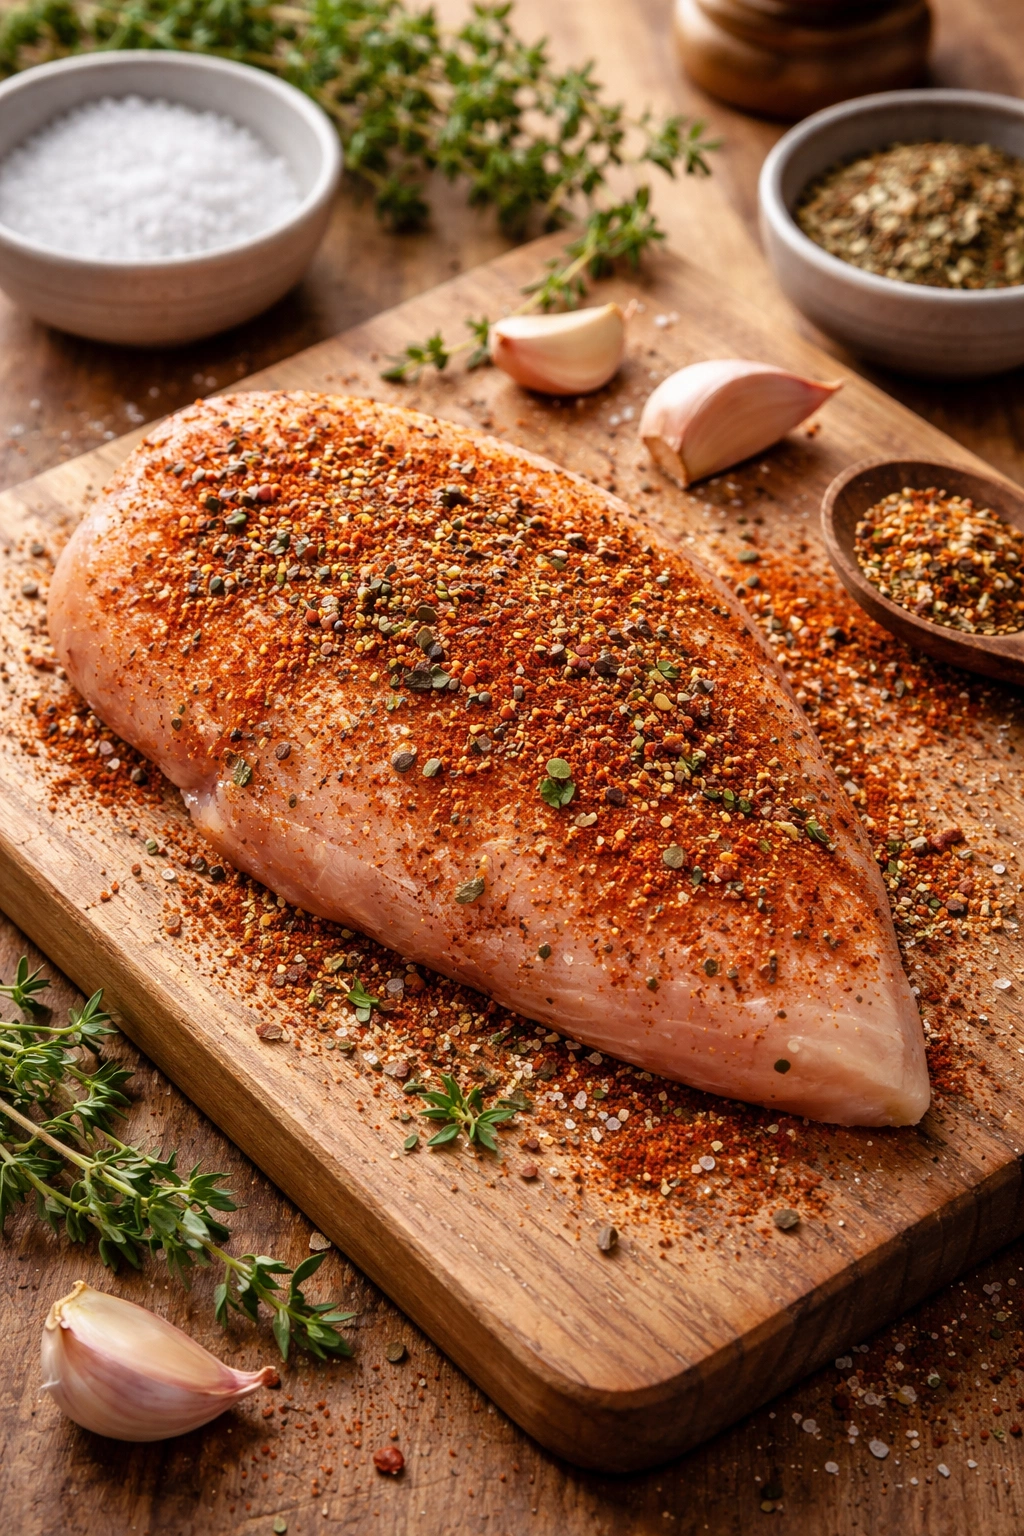
One common mistake is assuming that perfectly cooked chicken breast will be flavorful on its own. Salt and proper seasoning are non-negotiable for making chicken breast taste good. Use roughly ¾ to 1 teaspoon of salt per pound of chicken, distributed evenly on both sides.
Beyond salt and pepper, a simple seasoning blend makes a huge difference. A basic combination of garlic powder, paprika (sweet, hot, or smoked), and dried oregano or thyme works beautifully with virtually any dish you might serve the chicken with. This blend adds complexity and depth without overpowering the meat. The brown sugar trick—adding just 1 to 1.5 tablespoons of brown sugar to your seasoning blend—creates more seasoning and actually helps the chicken stay juicy by encouraging the meat to sweat while cooking, creating a semi-glossy surface.
For variety, rotate through Italian seasoning (oregano, basil, thyme), Cajun seasoning, taco seasoning, lemon pepper, or a simple BBQ rub. You can also season chicken differently based on what you’re serving it with—lighter herbs for salads, bolder spices for tacos or grain bowls, and warm spices for sheet pan dinners with roasted vegetables.
Avoiding the Most Common Cooking Mistakes
The number one cause of dry, rubbery chicken breast is overcooking, and it’s almost always the result of either not using a thermometer or cooking at too low a temperature. Low-heat baking (say, 350°F) takes longer and gives the heat more time to squeeze out moisture. Higher heat (400°F to 425°F) cooks faster, develops a crust, and locks in juices. Use your thermometer to pull the chicken at exactly 165°F, not higher.
Another common mistake is cutting into the chicken immediately to check for doneness. Every time you cut into it, you lose juices that should be staying in the meat. This is why a thermometer is so valuable—you can check doneness without opening the meat. If you’re nervous about using a thermometer, practice touching a properly cooked chicken breast with your finger to get a feel for its firmness. You’ll develop intuition over time, but use the thermometer until you do.
Skipping the pounding step is another easy mistake. Uneven thickness guarantees uneven cooking, with thin edges overcooked and thick centers potentially undercooked. Spend 30 seconds pounding and save yourself from disappointing results.
Finally, don’t skip the resting period. Cutting into chicken before it’s rested, even if it’s cooked to the right temperature, will result in a noticeably drier eating experience. Rest is where juiciness lives.
Storage, Make-Ahead, and Reheating Like a Pro
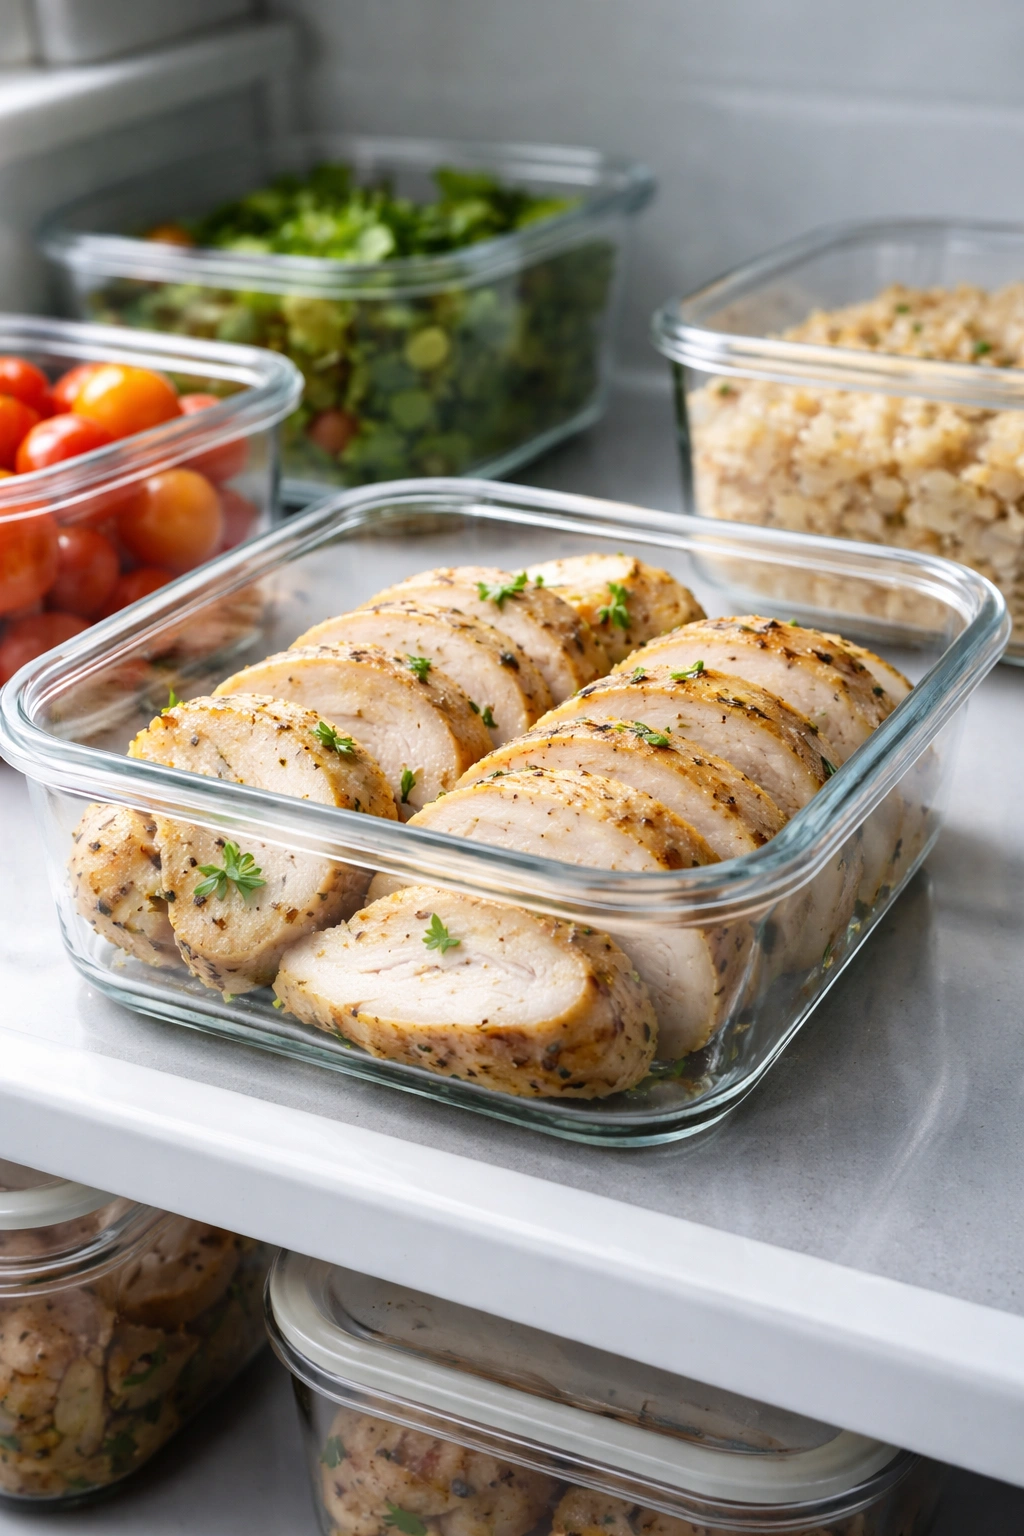
Cooked chicken breast keeps well, which makes it perfect for meal prep. Store cooled chicken in an airtight container in the refrigerator for 3 to 4 days, or freeze in freezer-safe containers for up to 3 months. For freezing, consider slicing or shredding the chicken first so you can use just what you need without thawing the entire portion.
If you’re prepping chicken breasts to cook later, you can season and oil them, cover, and refrigerate for up to 24 hours. Let them come to room temperature for 15 minutes before cooking to ensure even, faster cooking.
To reheat without drying out your carefully cooked chicken, avoid the microwave if possible. Instead, slice the chicken into thick 1-inch pieces and warm gently in a skillet over medium-high heat with a splash of water or chicken broth and a lid. Cook for just 1 to 2 minutes per side until heated through. The moisture and gentle heat prevent the chicken from overcooking further. Alternatively, reheat in a 325°F oven, covered with foil, for 10 to 15 minutes until the internal temperature reaches 165°F again.
Versatile Ways to Use Perfectly Cooked Chicken Breast
Once you’ve mastered cooking juicy chicken breast, the possibilities expand dramatically. Slice it hot and serve as the main protein with roasted vegetables on the side. The cooking method and seasoning blend determine the character of the meal—sear-and-bake with Italian seasonings pairs beautifully with green beans or roasted zucchini; Cajun-seasoned chicken works with cornbread and collard greens.
Shred or dice cooled chicken to add to salads (Greek salad, Caesar salad, cobb salad), grain bowls, wraps, and sandwiches. The mild flavor works with virtually any dressing or sauce. You can also toss shredded chicken into soups like chicken noodle, tortilla, or creamy mushroom—the mild flavor adapts to whatever broth and seasonings you’re using.
Add diced or chopped chicken to casseroles, enchiladas, chicken salad, or pasta dishes. Use shredded chicken for tacos, burritos, or burrito bowls. The versatility of perfectly cooked chicken breast means you can prep a batch on the weekend and incorporate it into multiple meals throughout the week, adapting seasonings and preparations to keep things interesting.
Understanding How Internal Temperature Relates to Texture
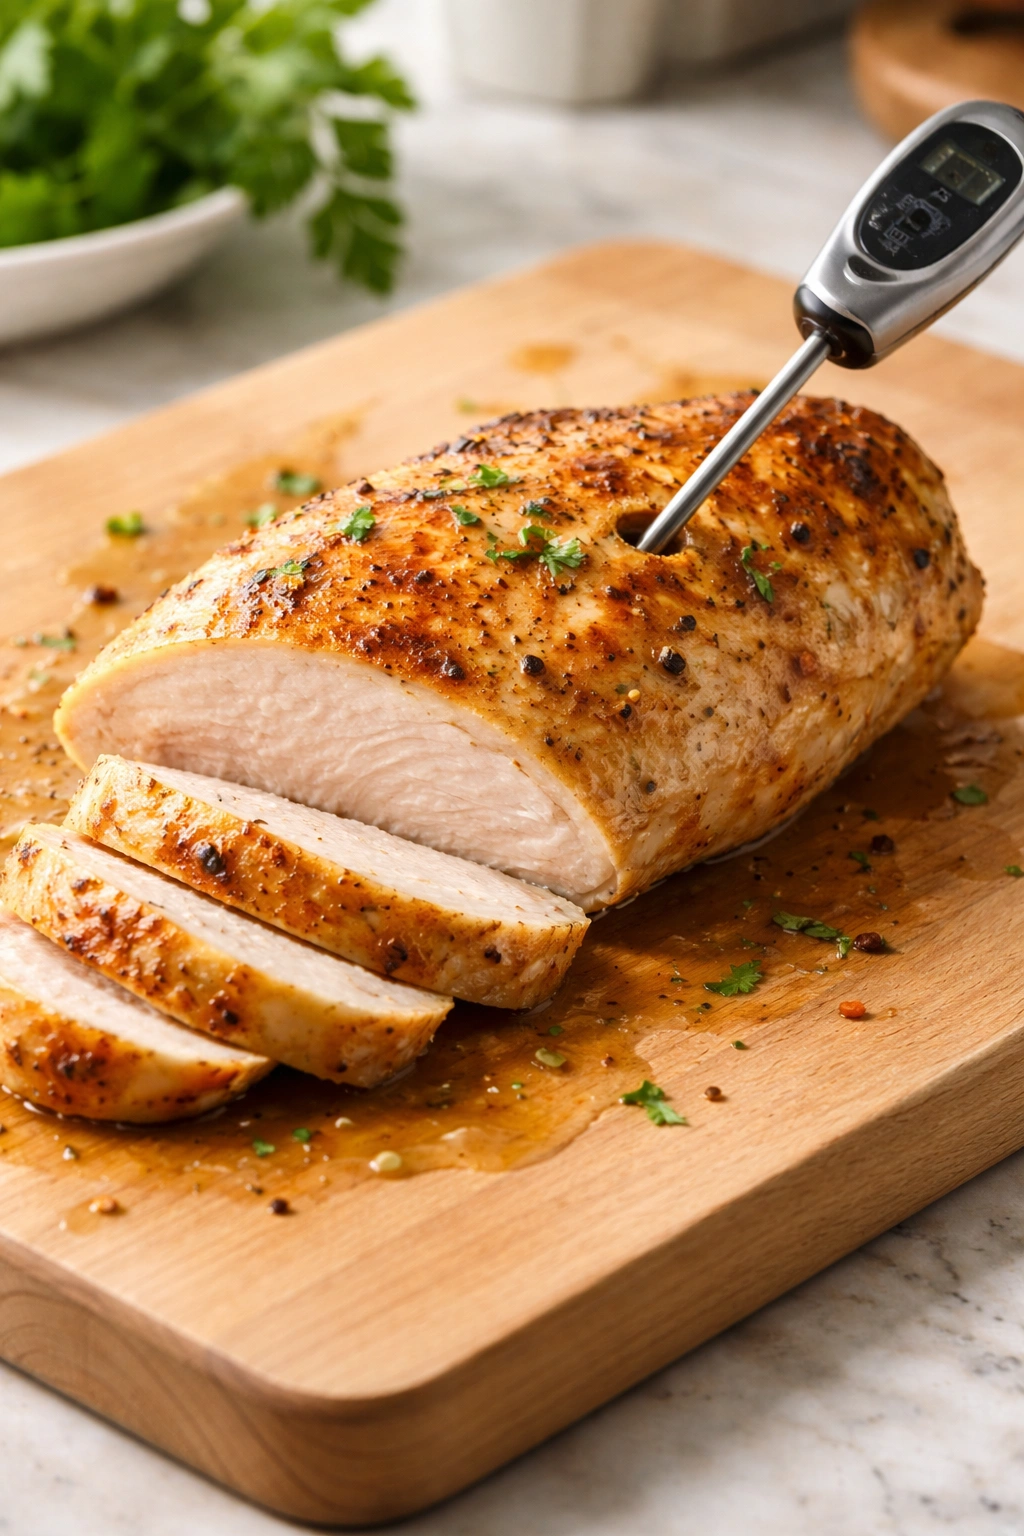
The relationship between internal temperature and texture in chicken breast is important to understand so you can cook with confidence. At 160°F, the chicken is cooked safely and still quite moist, but the center may appear slightly pink (which is cosmetic, not a safety issue, though many home cooks find this off-putting). At 165°F, the chicken is cooked throughout, fully opaque, and still very juicy if you’ve followed the resting step.
Beyond 165°F, the chicken remains safe to eat, but juiciness decreases noticeably. Every degree past 165°F is a small sacrifice in moisture. At 170°F, you’ll notice a difference in tenderness. At 175°F, the chicken begins to feel noticeably drier in the mouth. This is why the thermometer is so valuable—you can hit exactly 165°F and no higher, preserving maximum juiciness.
Some people prefer to pull chicken at 162°F to 164°F and let it finish rising during the resting period, which ensures you never accidentally cook past 165°F. The carryover cooking (the rise in temperature that happens as the meat rests) will typically bring it to 165°F or just above, but this method gives you a safety margin against overcooking.
Final Thoughts on Mastering Juicy Chicken Breast
Cooking perfect chicken breast every single time isn’t magic—it’s the result of understanding a few core principles and following them consistently. Use an instant-read thermometer, pound to even thickness, don’t skip the resting step, and cook with the right method for your situation. These four habits will eliminate 90% of chicken breast cooking problems.
The method you choose depends on your time, equipment, and what you’re in the mood for. The oven-bake method is the most hands-off. The sear-and-bake method delivers the most impressive crust and flavor. The stovetop-with-lid method is fastest. The parchment paper method is nearly foolproof. All of them work beautifully when executed properly.
Once juicy, tender, flavorful chicken breast becomes your reliable baseline, it opens up countless easy dinner possibilities. You’ll stop dreading cooking chicken and start enjoying the versatility and nutrition it brings to your table. Practice these methods a few times and the process becomes automatic—no recipe-checking needed, just confidence and consistently delicious results. That’s when cooking chicken breast shifts from a task to avoid into a weeknight staple you genuinely enjoy preparing.