Homemade baked crab rangoon might sound intimidating, but the truth is, once you nail the technique, you’ll never want takeout again. The best part? These crispy, creamy parcels actually taste better when you bake them instead of frying. Your kitchen stays clean, you use less oil, and you get that golden, crunchy exterior without the greasy aftertaste that comes from a deep fryer that’s been reused one too many times. I’ve been making these for years, and every single time I do, I’m amazed at how restaurant-quality results sit right in your own oven.
The crab rangoon you order from most takeout places is either mass-produced and frozen, or it’s been sitting under a heat lamp long enough that the wrapper has turned tough and chewy. When you make them at home, you control every variable. Fresh crab, perfectly seasoned filling, wonton wrappers that stay pliable until the exact moment they hit the oven—and they emerge with that crackling texture that makes people ask what your secret is. The answer is simpler than you’d think, and it starts with understanding why baking actually outperforms frying for this particular appetizer.
The magic of homemade baked crab rangoon isn’t just about technique; it’s about respecting the ingredients and giving yourself permission to make something fancy-restaurant taste on a weeknight. This is one of those dishes that feels more complicated than it actually is, which means when you pull a batch out of the oven and they look flawless, you’ll feel genuinely accomplished.
Why Baked Is Better Than Fried
Deep frying crab rangoon gets you a certain texture, sure, but it comes with real trade-offs. The wonton wrapper absorbs oil like a sponge, which means by the time it cools, you’ve got a greasy exterior that feels heavy and leaves your fingers oily. Baking, on the other hand, uses a thin brush of oil to coat the outside of the wrapper, so you get the crunch without the grease soak.
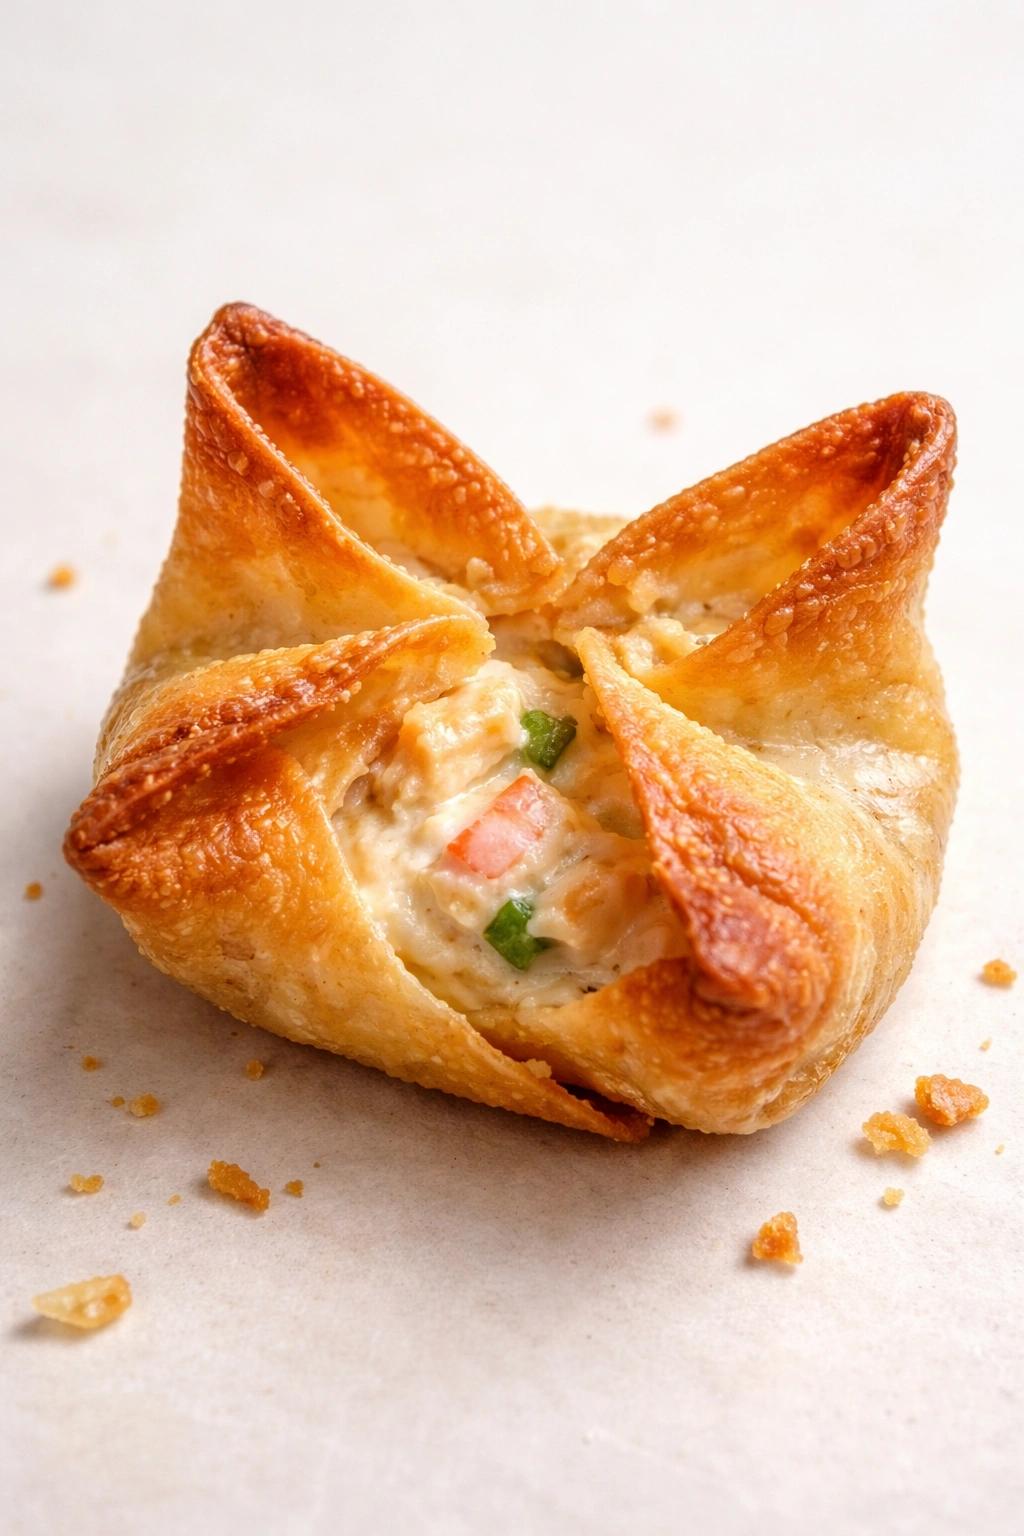
The texture difference is remarkable once you experience it. A baked crab rangoon has a crispy, almost paper-thin exterior that shatters when you bite into it, then gives way to the creamy, savory filling inside. The contrast is textural perfection. Fried versions tend toward uniformly oily and dense, even when they’re made well.
Baking also gives you more control over the final result. You’re not battling oil temperature fluctuations or dealing with uneven browning from crowded fryer baskets. Everything cooks at the same temperature, meaning you get consistent golden-brown color across the entire batch. Plus, you can make these in regular batches without waiting for oil to cool between rounds.
There’s also the practical matter of cleanup and kitchen comfort. After frying a batch of appetizers, your kitchen smells like hot oil for hours. After baking crab rangoon, your kitchen smells like toasted wonton wrapper and crab filling—which is absolutely worth it. You’ll notice the difference the moment you open your oven door.
The Secret to Restaurant-Quality Flavor
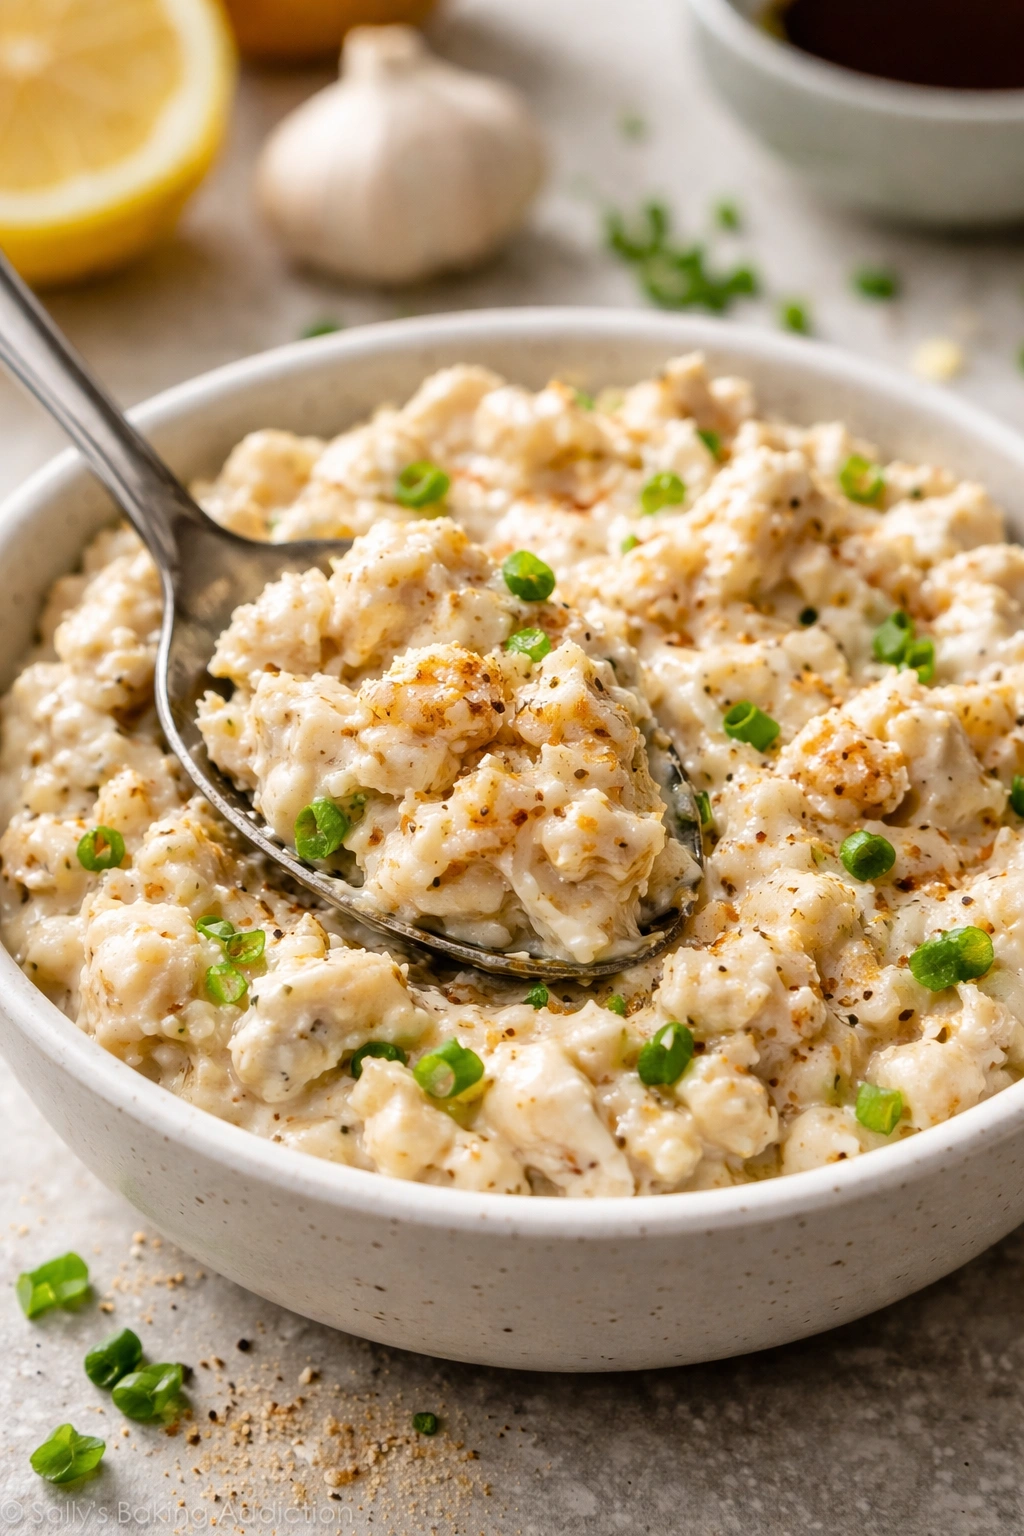
The filling is where you either nail it or fall short. Most people assume that getting restaurant-quality flavor means using expensive ingredients or complicated seasoning blends. The actual secret is much simpler: it’s about balance and using enough seasoning to make a statement.
Start with real crab. This matters more than anything else. If you use imitation crab (the kind made from fish paste), the final dish tastes vaguely fishy and one-dimensional. Real lump crab meat, especially if you can find it fresh or high-quality frozen, gives you sweet, briny depth that’s unmistakable. You don’t need a ton of it—eight ounces mixed with cream cheese and other ingredients is plenty—but it has to be the real thing.
The cream cheese is your binding agent and contributes significant richness. But here’s the part most home cooks skip: you need to season aggressively. I’m talking about generous pinches of garlic powder, white pepper, Worcestershire sauce, and a touch of soy sauce. These aren’t optional flavor notes; they’re what separate a bland filling from one that makes you wonder if you’re eating takeout.
Fresh green onions stirred in at the end add brightness and keep the filling from tasting flat and one-note. A tiny squeeze of fresh lemon juice wakes everything up—just a quarter-teaspoon, enough to add complexity without making it taste obviously lemony. Sesame oil, just a drizzle, gives you that umami depth that makes people say, “What’s in this? It tastes so good.”
Making Your Own Wonton Wrappers vs. Buying Them
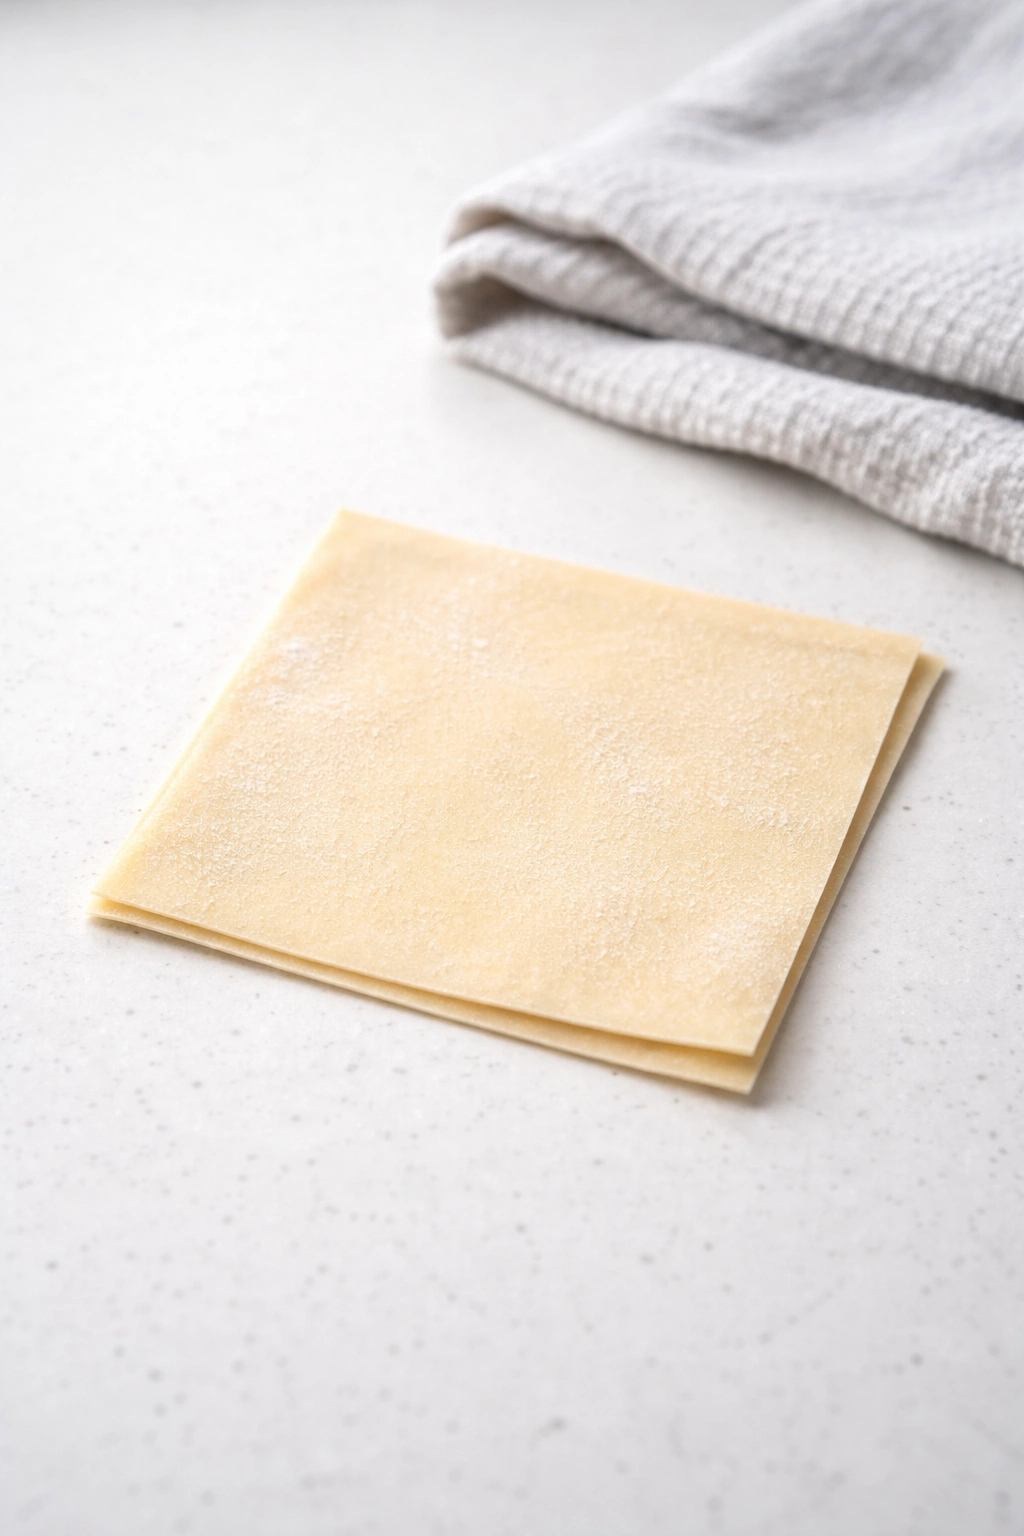
Here’s the practical truth: you don’t need to make wonton wrappers from scratch, and most people shouldn’t attempt it on a first try. Store-bought wonton wrappers are reliably good and will give you excellent results. They’re available in the refrigerated section of most grocery stores, often near the produce or in an Asian foods aisle.
The main thing to know about store-bought wonton wrappers is that they dry out incredibly fast. Once you open the package, you’ve got maybe five to ten minutes before they start curling at the edges and becoming brittle. The solution is dead simple: keep them under a damp kitchen towel while you work. Literally lay them on the counter, put a slightly damp (not soaking wet) kitchen towel on top, and pull out one wrapper at a time as you need it.
If you’re curious about making them from scratch, it’s absolutely possible. The dough is just flour, eggs, salt, and water mixed into a stiff dough, rolled paper-thin, and cut into three-inch squares. The challenge is that it requires a pasta maker or serious rolling skills, and homemade wrappers tend to be slightly thicker than store-bought, which affects both the texture and the baking time. For your first batch, stick with store-bought and get the technique down. Once you’re comfortable wrapping and baking, you can experiment with homemade wrappers if you want.
The quality difference between premium wonton wrappers and budget ones is noticeable. Spend the couple extra dollars for a brand that’s been refrigerated (not frozen) and that looks fresh. You’ll get better texture in the final product.
Choosing Quality Crab and Other Ingredients
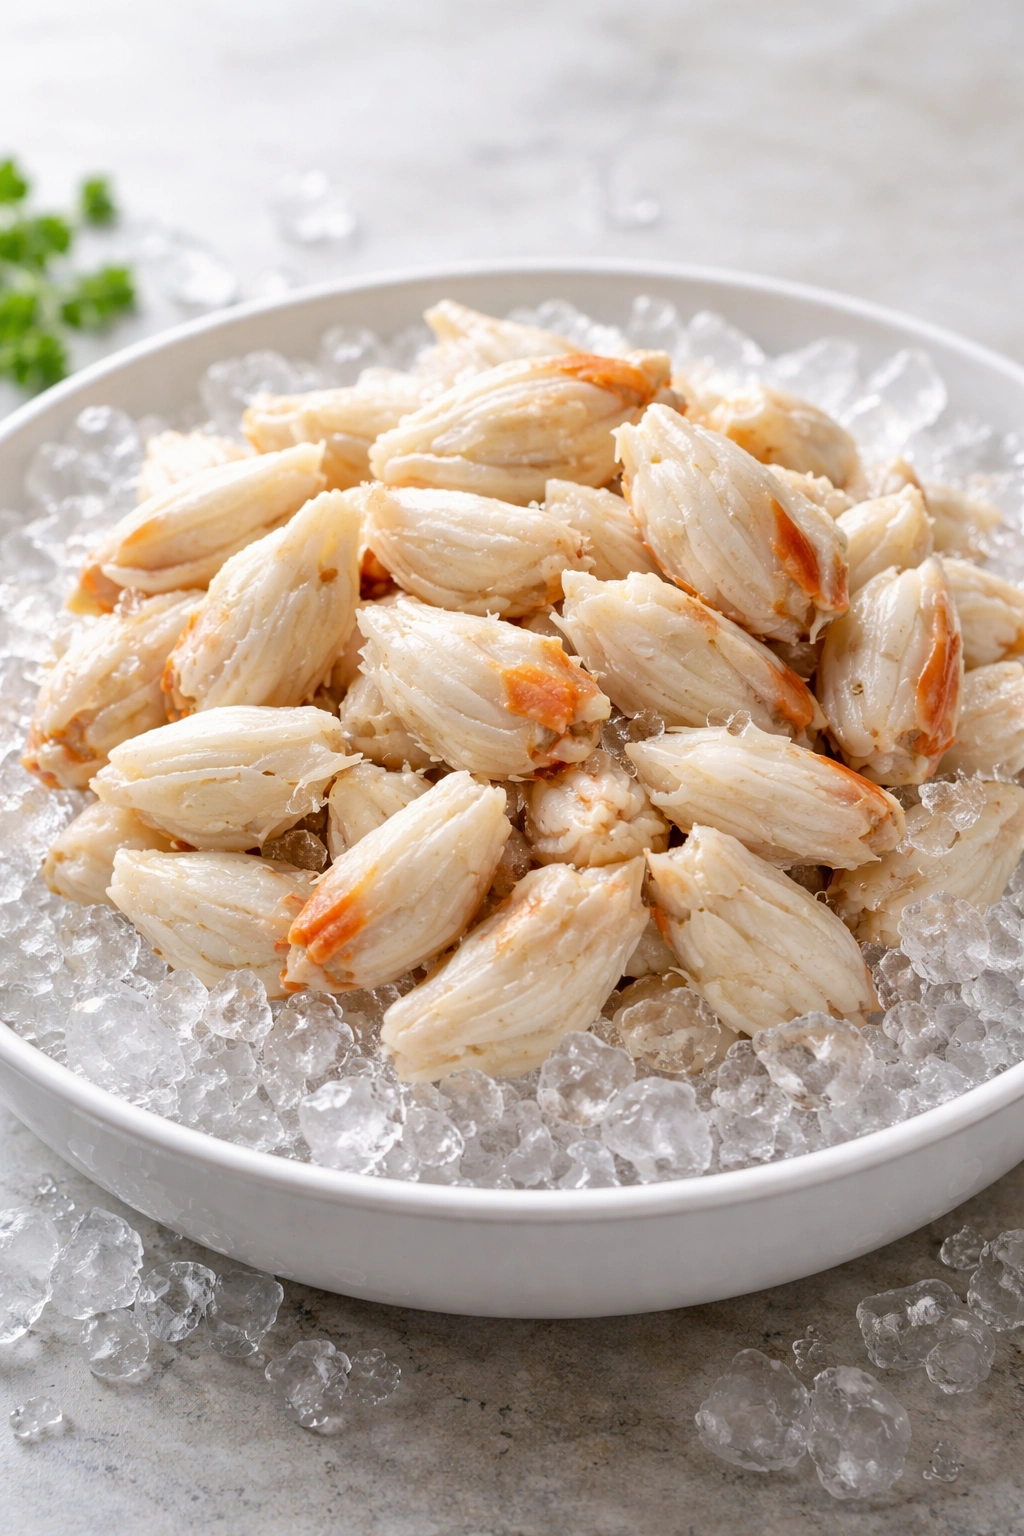
Crab is the star ingredient, so this decision matters. Fresh crab meat is ideal if you can get it from a good seafood counter, but it’s expensive and not always available depending on where you live. High-quality frozen lump crab meat is an excellent substitute and honestly, it works just as well as fresh in a baked crab rangoon application.
Avoid the canned crab in most grocery stores—it tends to be mushy and has an off flavor. If frozen lump crab isn’t available, look for crab that’s labeled “jumbo lump” or “lump” specifically. Avoid “crab cake mix” or “crab blend” because those are stretched with other proteins and filler.
The cream cheese should be full-fat Philadelphia or a similar brand. Reduced-fat or whipped cream cheese won’t give you the same richness and binding power. Let it sit on the counter for thirty minutes before mixing so it’s soft enough to incorporate smoothly with the other ingredients.
Green onions are best when they’re fresh and vibrant, not wilted or brown-spotted. Buy them a day or two before you plan to make the rangoon. Garlic powder is fine—don’t overcomplicate this by trying to use fresh garlic, which will add moisture to the filling and make the wrappers soggy.
For the oil brushing step, use a neutral oil like vegetable, canola, or avocado oil. Extra virgin olive oil has too strong a flavor and will compete with the delicate filling. You need just enough oil to coat the wrappers lightly, not to soak them.
Preparing Your Filling Like a Pro
The filling is best made a few hours ahead or even the night before. This serves two purposes: it gives the flavors time to meld and intensify, and it makes the filling firmer and easier to work with when you’re wrapping.
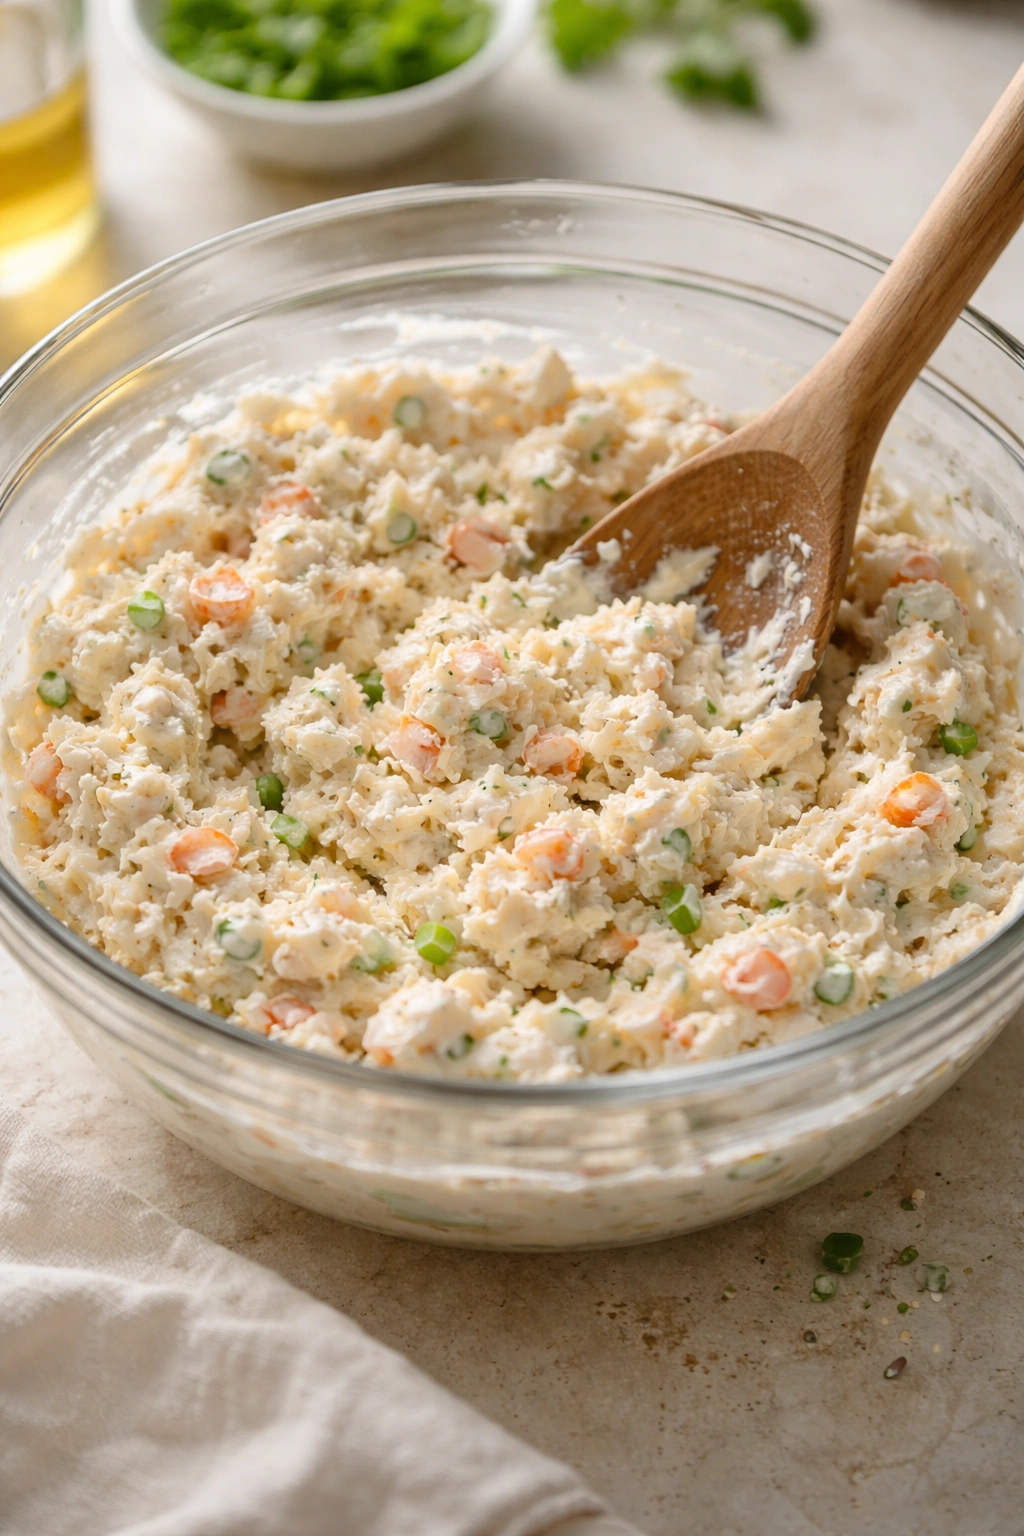
Start by bringing the cream cheese to room temperature by leaving it on the counter for about 30 minutes. Cold cream cheese is nearly impossible to mix smoothly and will leave lumps in your filling. Use a fork to mash it in a bowl until it’s soft and creamy, then fold in the drained crab meat gently. You don’t want to shred the crab into tiny pieces; fold it in just enough to distribute it evenly.
Add the seasonings in this order: white pepper first (about 1/4 teaspoon for eight ounces of crab), then garlic powder (1/4 teaspoon), Worcestershire sauce (1/2 teaspoon), soy sauce (1/4 teaspoon), and a tiny squeeze of fresh lemon juice. Stir after each addition and taste. This is crucial—you want the filling to taste savory and complex, almost slightly salty. It should be more seasoned than you think it needs to be because the wonton wrapper is bland and mild, and it will dilute the flavor perception.
Fold in the sliced green onions last, just before you’re ready to wrap. Finish with a drizzle of sesame oil—just about 1/4 teaspoon, stirred in gently. The filling is now ready and will keep, covered, in the fridge for up to three days.
The Wrapper Technique That Prevents Leaks
This is the single most common problem people encounter: the filling leaks out during baking or the wrapper doesn’t seal properly. The solution starts with using just the right amount of filling and sealing the wrapper correctly.
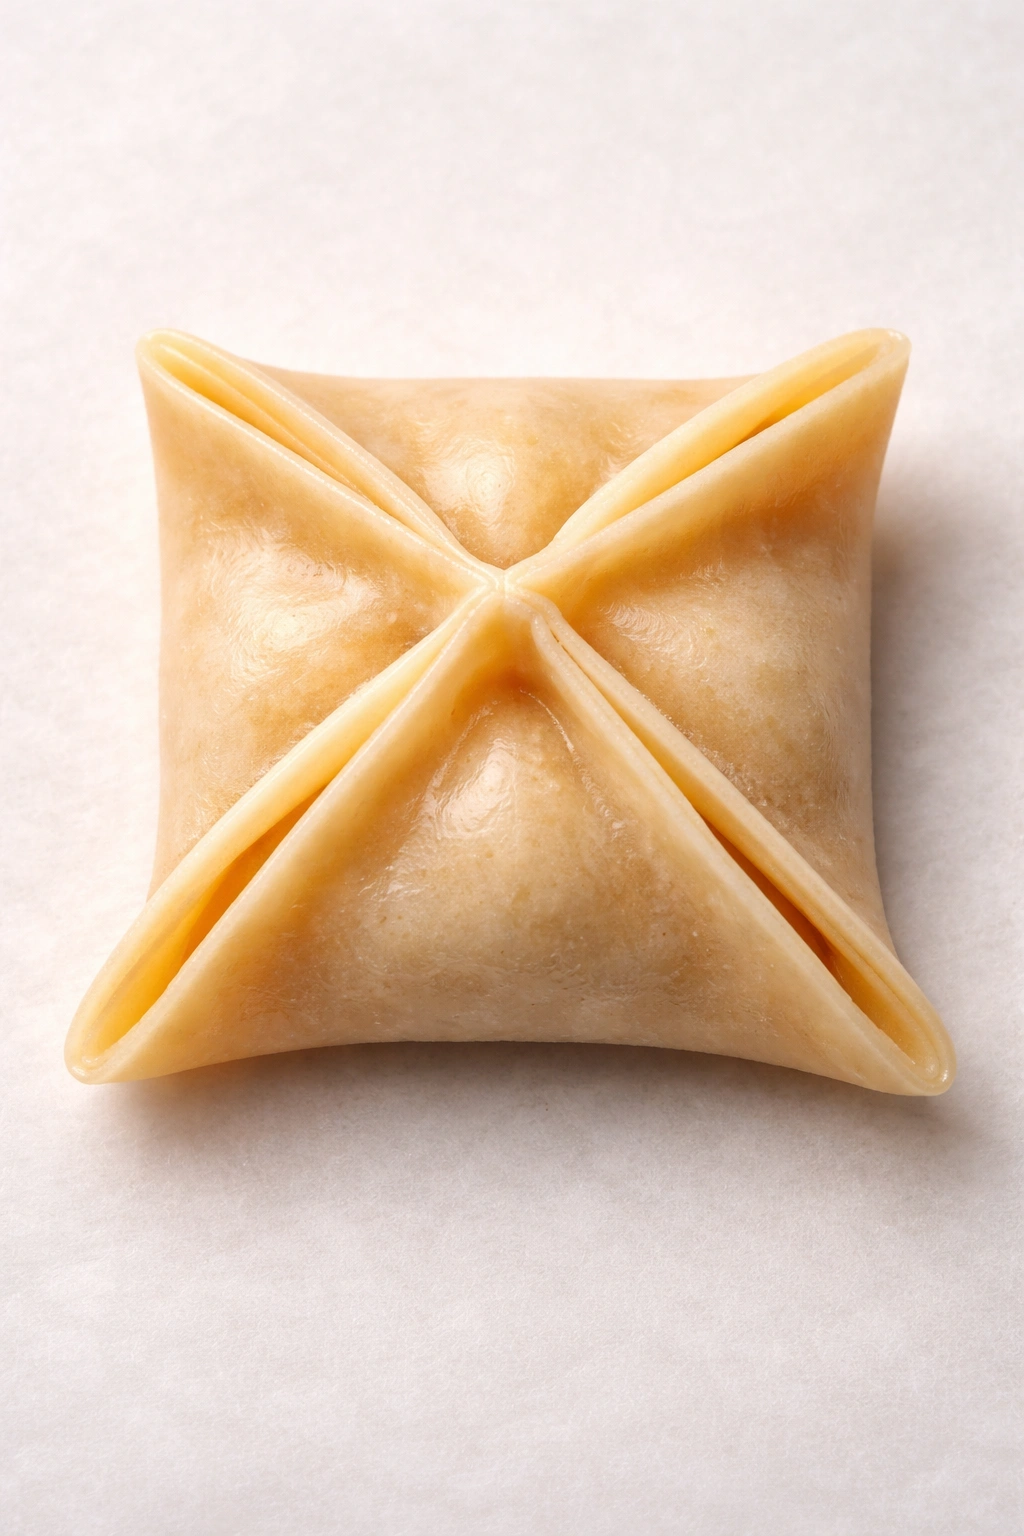
Put about one teaspoon of filling in the center of each wonton wrapper—not more, not less. A teaspoon might sound small, but it’s the perfect amount. Too much filling and the wrapper can’t seal properly; too little and the rangoon looks sad and incomplete.
Wet your finger slightly with water—not dripping wet, just a damp fingertip—and run it along all four edges of the wrapper. This helps the edges stick together and creates a seal. Now fold the wrapper diagonally in half to make a triangle, pressing firmly along the edges to seal out any air pockets.
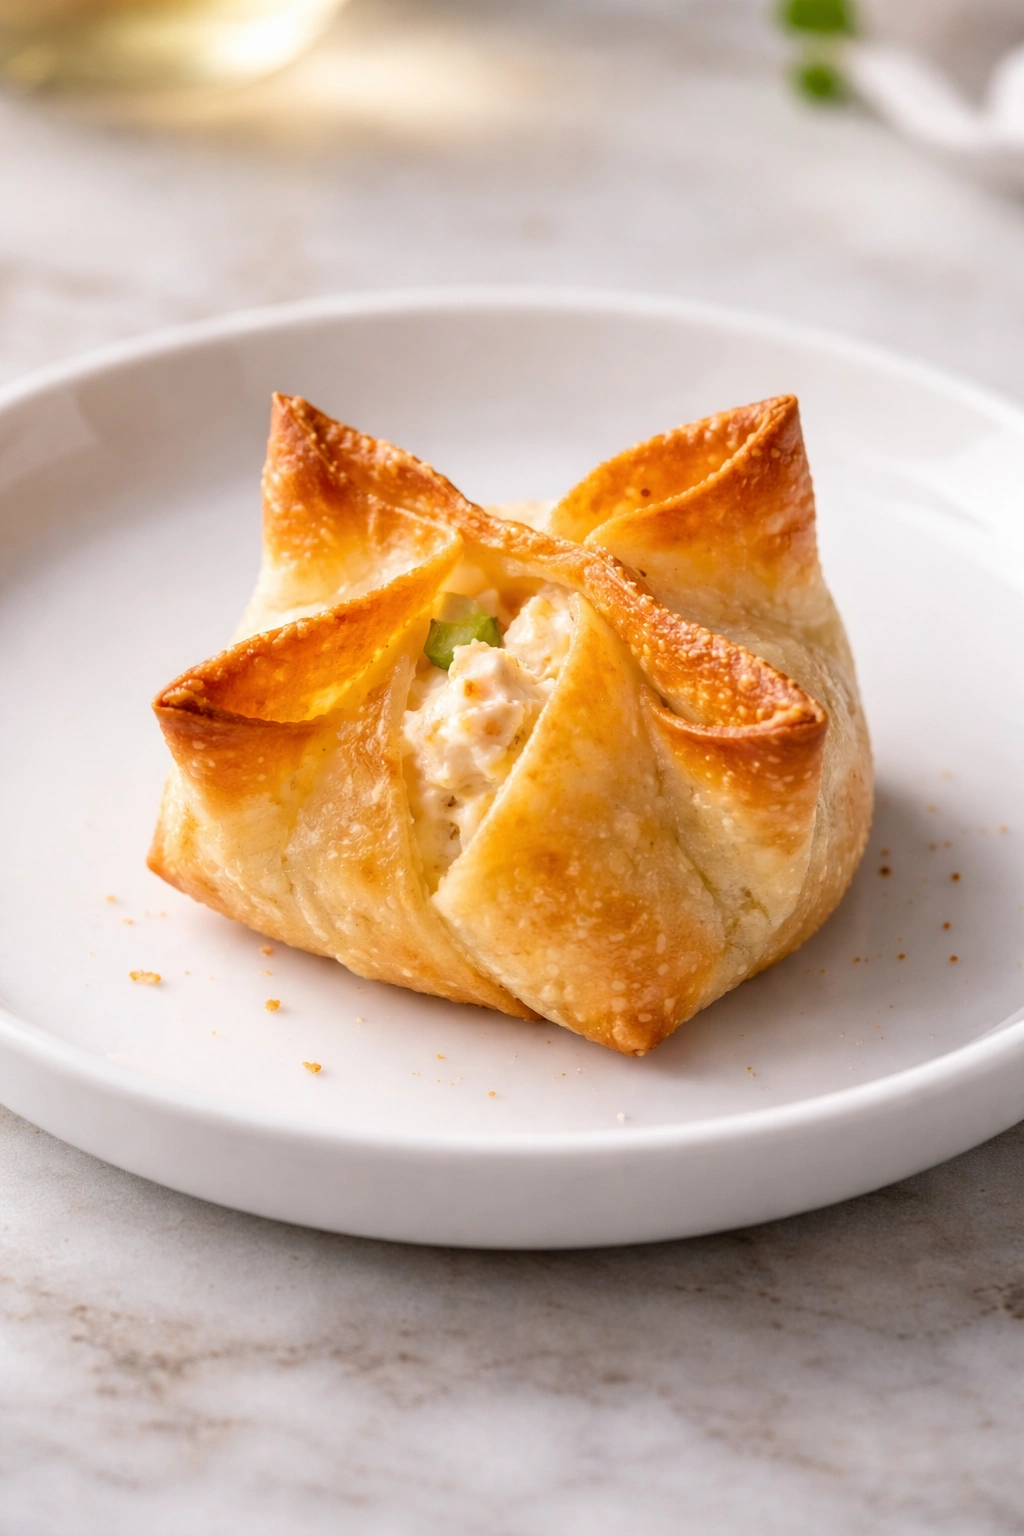
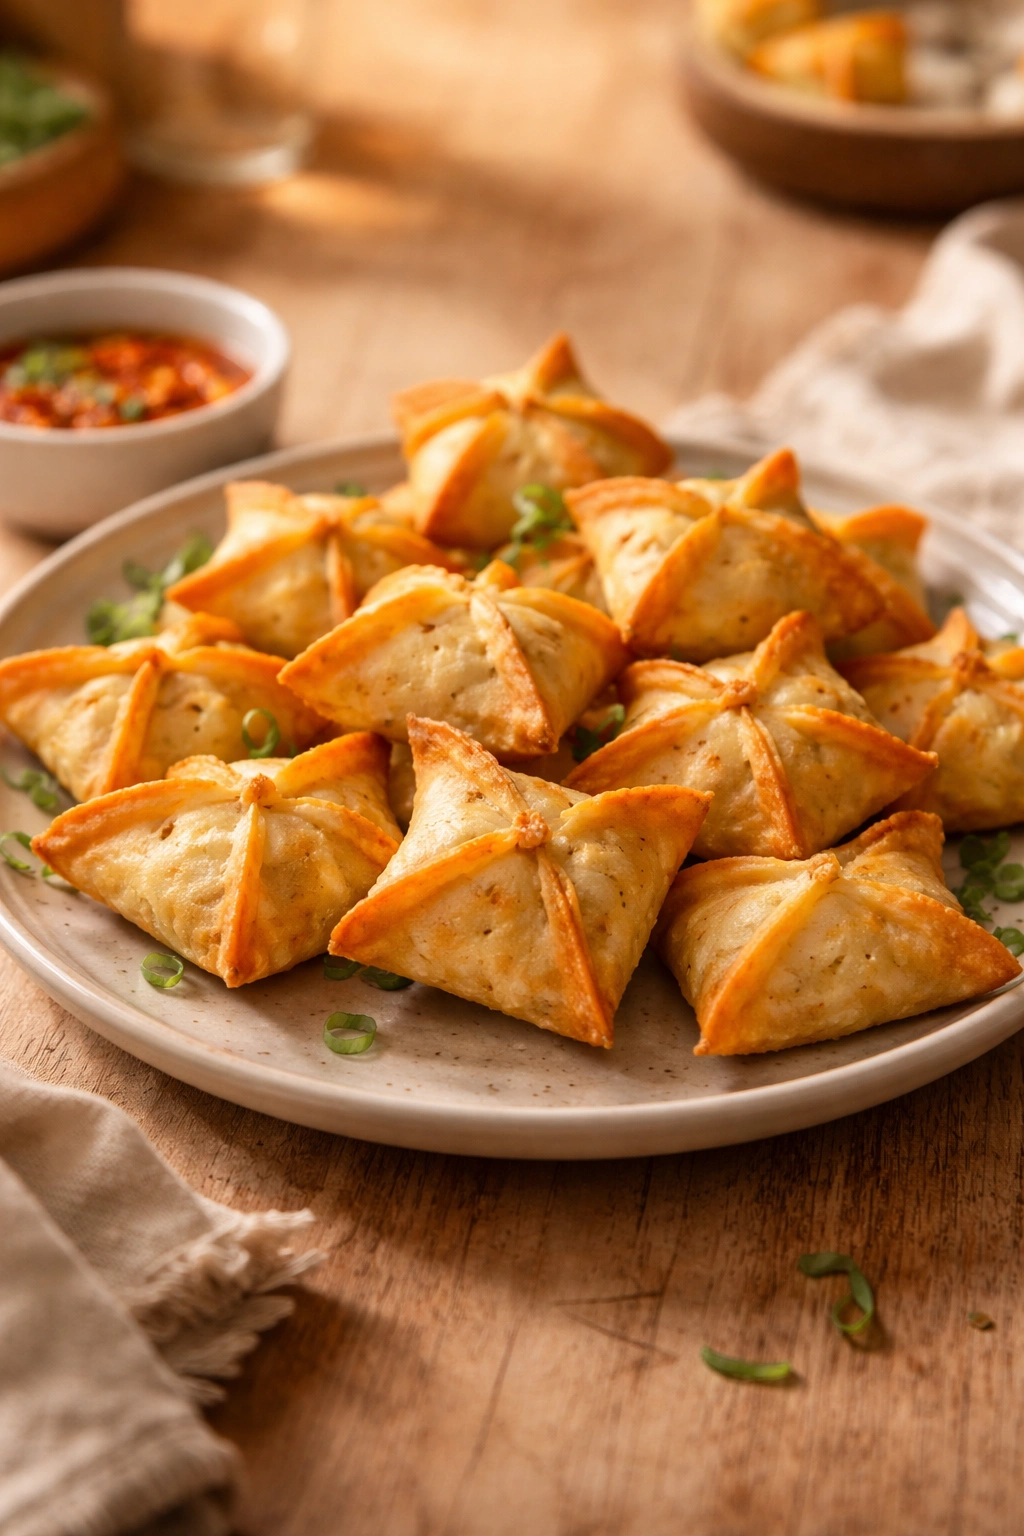
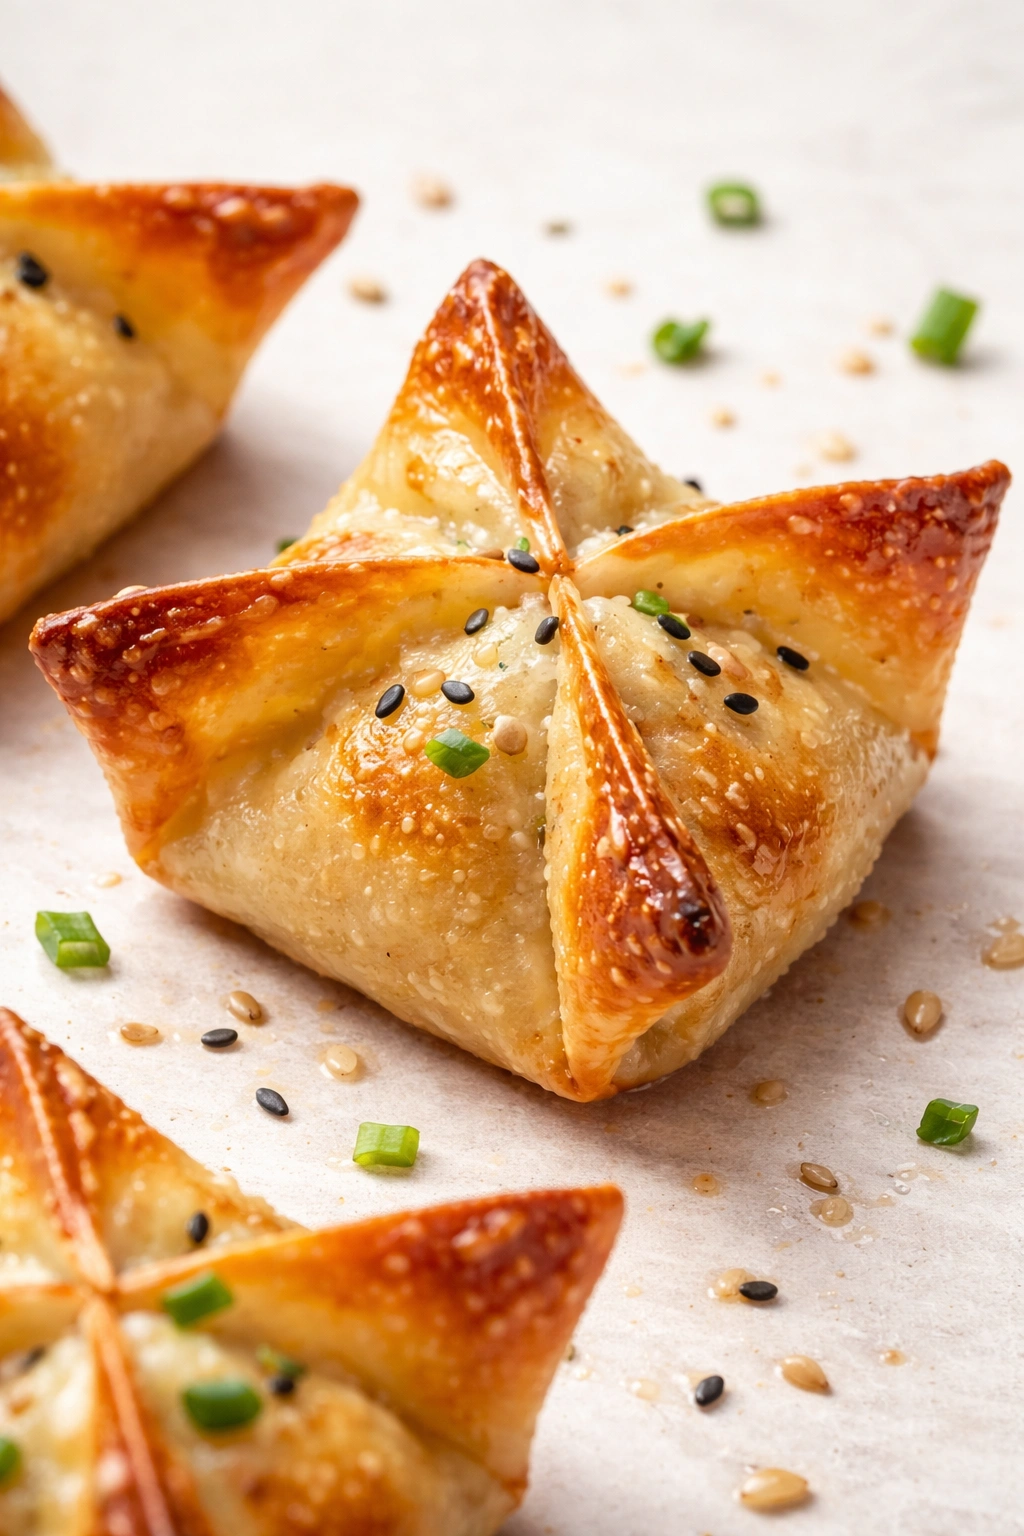
The second fold is what gives crab rangoon its signature shape. Take the two opposite points of the triangle and bring them together, overlapping them slightly, and pinch firmly to seal. You’ve now created a little pouch. This shape is important because it provides structure during baking and gives you that classic restaurant appearance.
If you notice the edges aren’t sticking properly, run your damp finger along the seam again and hold pressure for a few seconds. The water acts as glue for the wrapper. Make sure your hands are relatively dry (not wet, not damp) so you don’t add too much moisture to the wrappers themselves, which will make them soggy.
Arranging on Your Baking Sheet for Even Cooking

The way you arrange your rangoon on the baking sheet directly affects how evenly they bake. Overcrowding is the quickest way to get uneven browning and some pieces that bake faster than others.
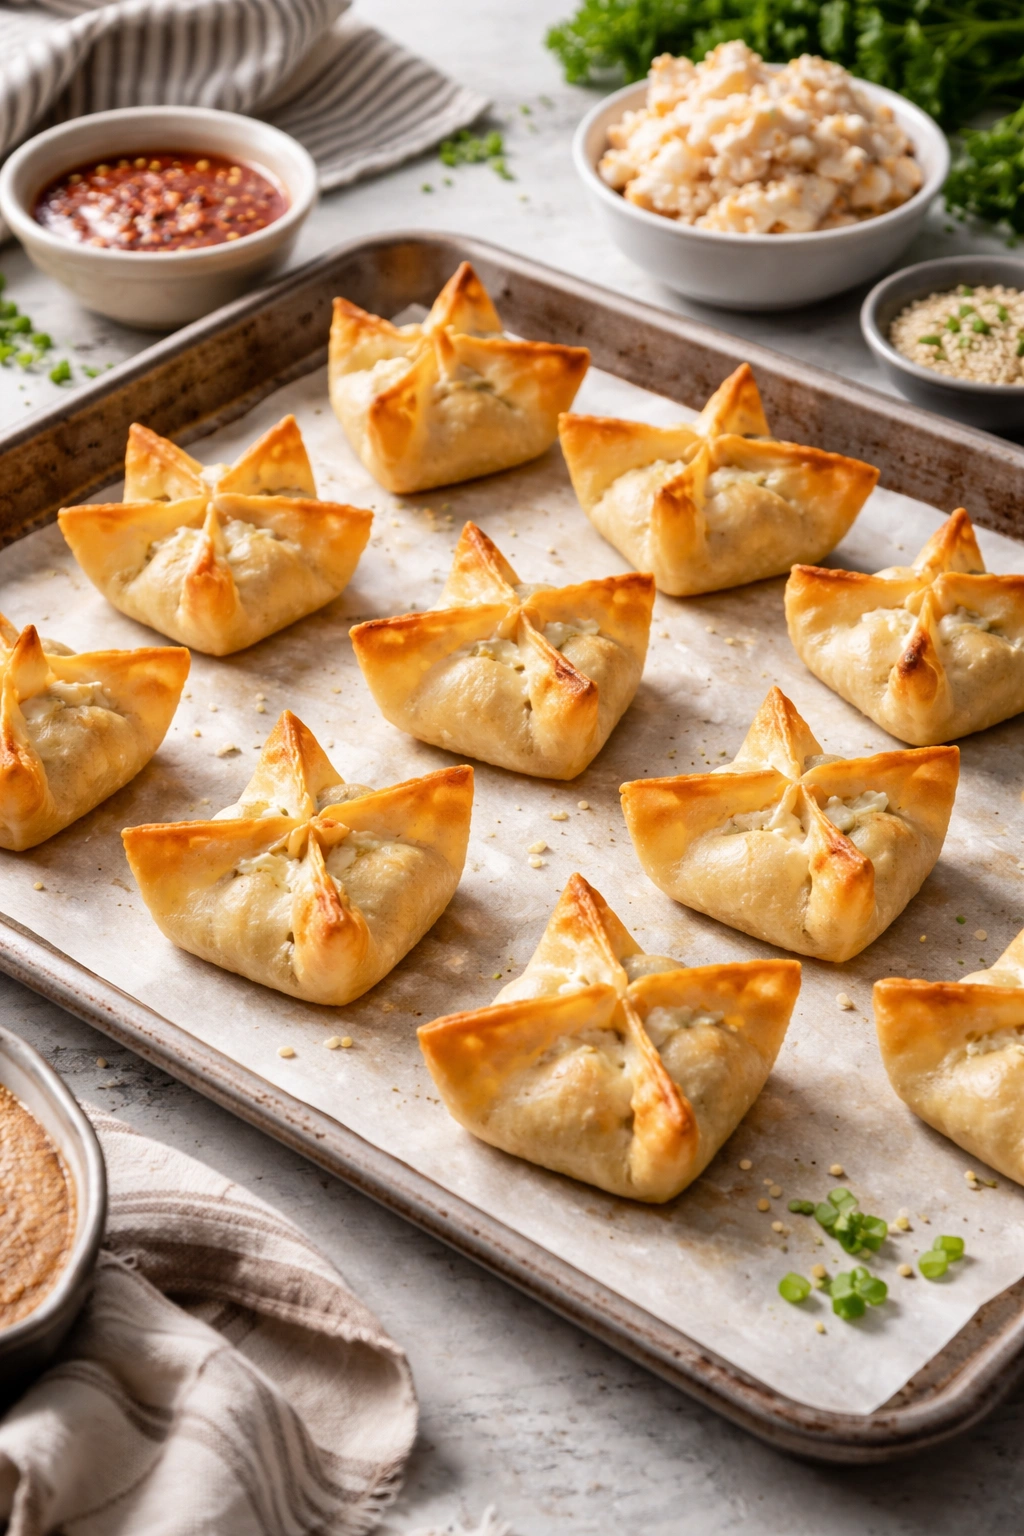
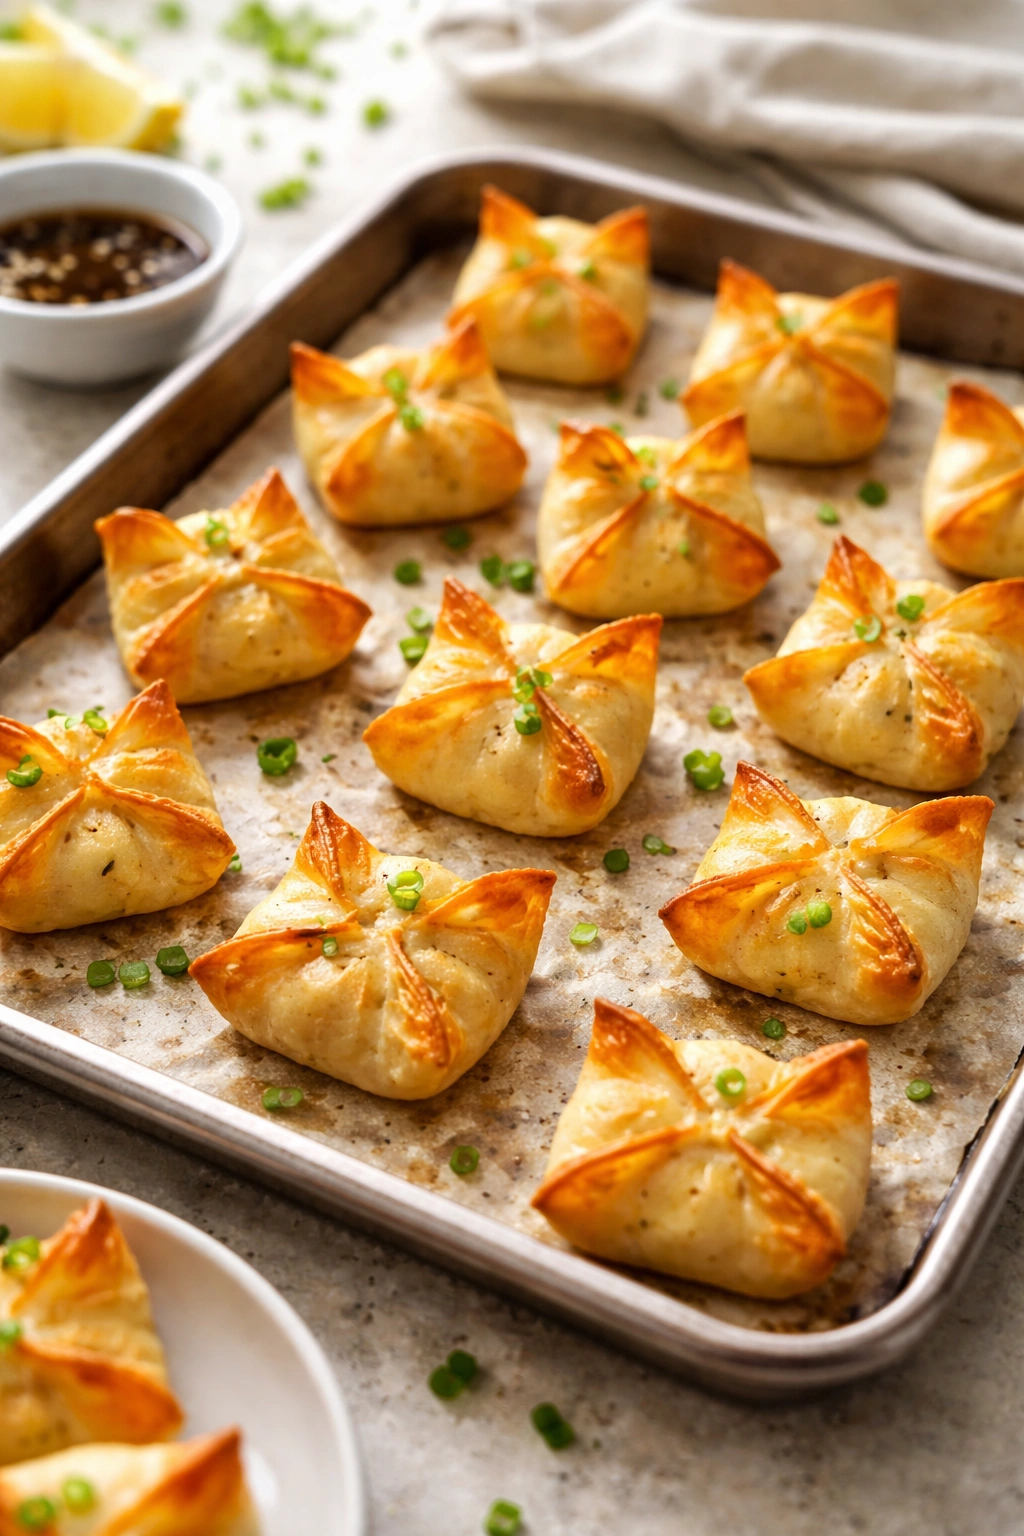
Arrange them on a parchment-lined baking sheet in a single layer, leaving about an inch of space between each one. This space allows hot air to circulate around all sides and ensures even browning. If you have a large batch and don’t have multiple baking sheets, it’s worth baking in batches rather than packing them densely on one sheet.
The parchment paper is essential—it prevents sticking and makes cleanup effortless. If you don’t have parchment, you can very lightly oil a baking sheet with a neutral oil, but parchment is the better choice.
Before baking, brush each rangoon lightly with oil. Use a pastry brush and apply a thin, even coat on the top and sides. You’re not drenching them; you’re giving them a light sheen. This is what creates the golden, crispy exterior. I like to add a tiny sprinkle of sesame seeds on top of each one at this point—it adds visual appeal and a subtle nutty flavor that elevates them noticeably.
The Golden Baking Temperature and Timing
Temperature precision matters here. You want your oven at 400°F (200°C), and it needs to be fully preheated before the rangoon go in. Preheat for at least 15 minutes; don’t skip this step or you’ll get uneven browning.
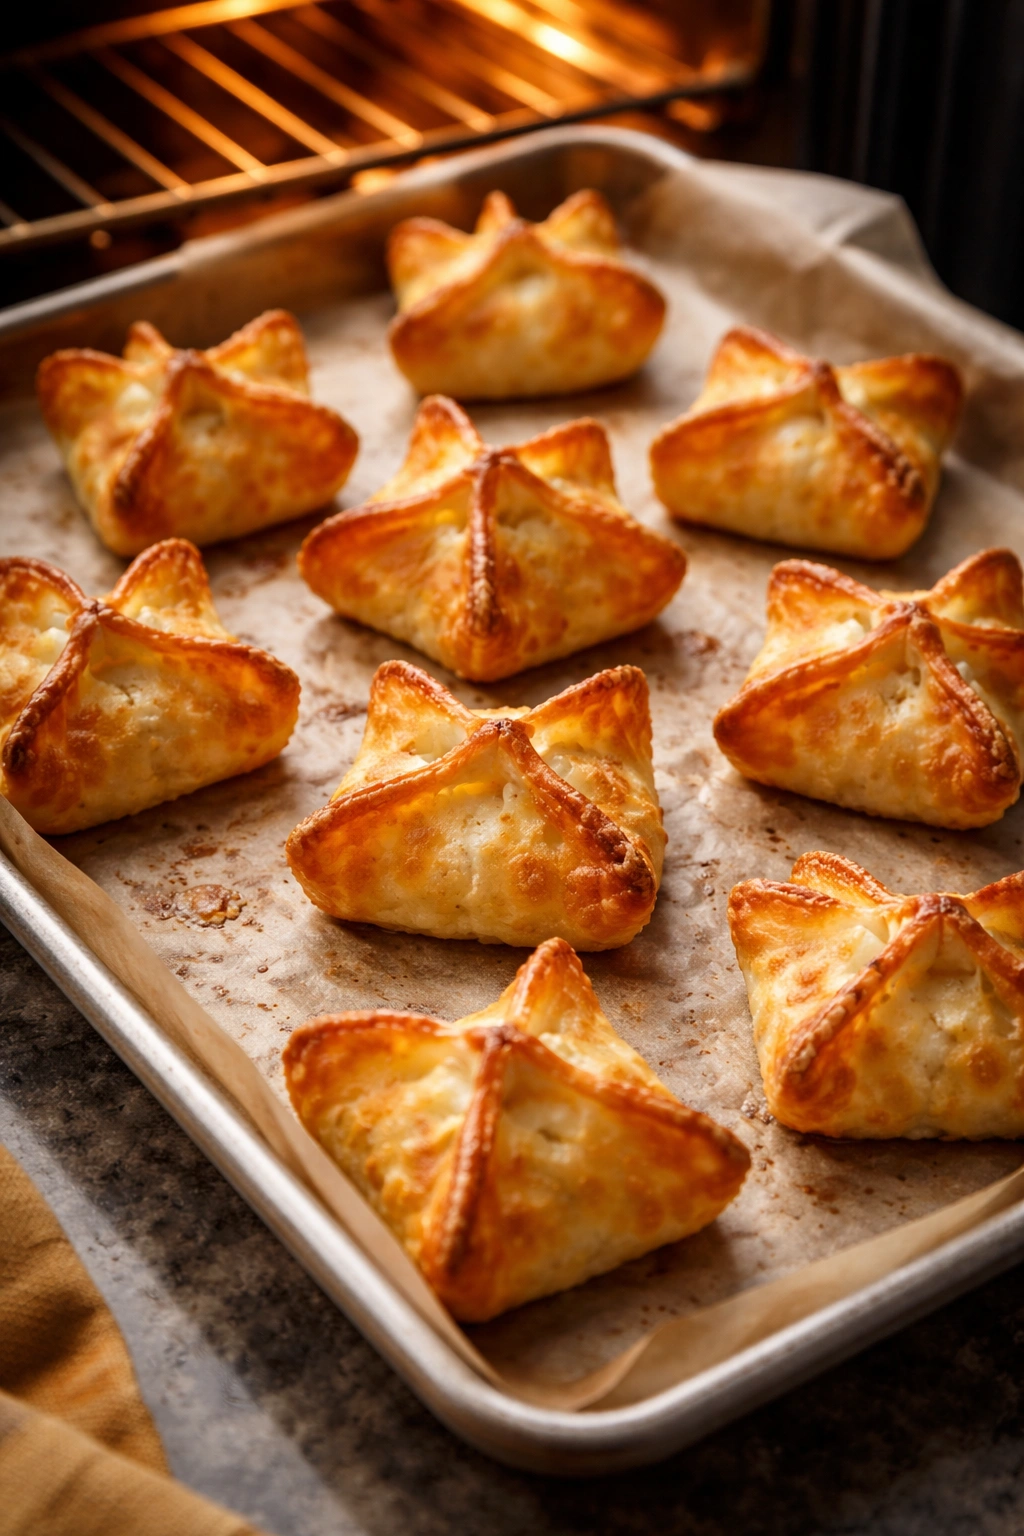
At 400°F, properly filled and wrapped crab rangoon bake for approximately 12 to 15 minutes. They’re done when the wrappers are golden brown on all sides, and the edges have just started to darken slightly. This is where visual checking becomes important; oven temperatures vary, so start checking around the 12-minute mark.
The exact timing depends on how filled your rangoon are and the size of your oven. Smaller, less-filled pieces might be done at 12 minutes. Larger, generously filled ones might need closer to 15 minutes. The key is golden-brown color, not a specific time number.
When they’re done, the wrappers should sound crispy if you gently tap one with a fork. The exterior should be light golden, not pale (underbaked) or dark brown (overbaked). If your oven runs hot, you might need to rotate the baking sheet halfway through to ensure even browning. If your oven runs cool, you might need to add a minute or two.
How to Achieve That Perfect Crispy Exterior
Crispiness comes from three things: the oil coating, the oven temperature, and the post-baking handling. You’ve already controlled the first two. The third part is critical and often overlooked.
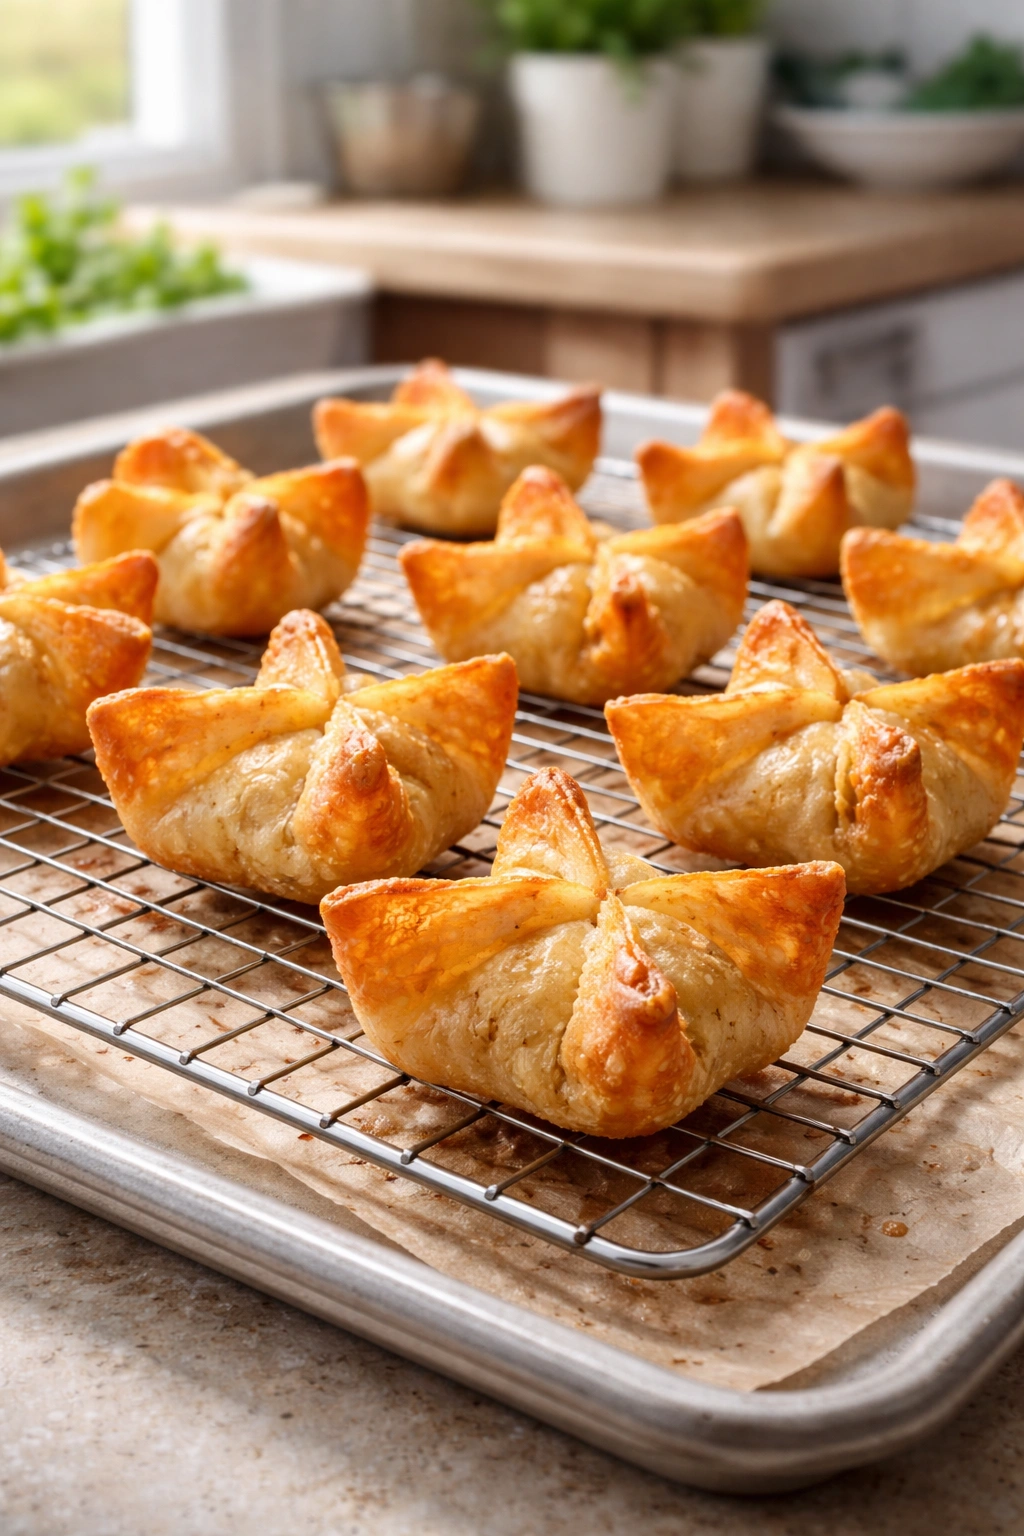
The moment the rangoon come out of the oven, they’re still steam and softening. If you immediately stack them or crowd them together, steam gets trapped and they become chewy. Instead, let them cool on the baking sheet for at least two minutes. This allows the exterior to set and the steam to escape.
After two minutes, you can transfer them to a wire cooling rack or a clean plate. Don’t put them in a covered container immediately—they need air circulation while cooling to maintain that crispiness. If you absolutely must move them somewhere, use a rack or an uncovered plate rather than a covered container.
The creaminess of the filling inside (which naturally produces steam) contrasts beautifully with the crisp exterior. If the exterior isn’t crispy, the whole experience is diminished. This is why the oil coating and oven temperature are non-negotiable—they create the environment for that perfect texture.
One more trick that really works: if you’re serving them a couple hours after baking and they’ve lost some crispness, put them on a baking sheet and into a 350°F oven for two minutes. This re-crisps the exterior without cooking the filling further. This little trick is genuinely magic and makes reheated rangoon taste nearly as good as fresh.
Common Mistakes and How to Avoid Them
The most common mistake is using too much filling. I know it’s tempting to make them really generous, but it causes the wrapper to split during baking or fail to seal properly, and the filling leaks out. Stick with one teaspoon per wrapper and trust that it’s enough. They’ll still be plenty rich and satisfying.
The second mistake is not sealing the edges properly. This comes down to using water to dampen the edges and pressing firmly. Dry edges won’t stick, sealed edges hold everything together. This is a technique issue, and it’s solved by being intentional about the sealing process.
The third mistake is overcrowding the baking sheet. It’s so tempting to fit as many as possible on one sheet, but you end up with some that bake faster than others. Bake in batches if you need to. The extra five minutes is worth the even results.
Fourth mistake: not preheating the oven fully. If you put rangoon into an oven that’s only partially preheated, the bottoms will bake before the tops start browning, or they’ll spread and lose their shape. Preheat for 15 minutes minimum.
Fifth mistake: using imitation crab or low-quality crab. There’s literally no point in making homemade crab rangoon if you’re going to use inferior crab. It’s the one ingredient that truly matters. The difference in the final dish is night and day.
Sixth mistake: not using enough seasoning in the filling. Most home cooks under-season because they’re worried about overdoing it. Season the filling until it tastes almost too salty on its own. When wrapped in the mild wonton wrapper, it’ll be perfectly balanced.
Storage, Make-Ahead, and Freezing
Baked crab rangoon keeps beautifully and is one of the best make-ahead appetizers. Cooked and cooled rangoon will stay fresh in an airtight container in the fridge for up to four days. Reheat them in a 350°F oven for a few minutes to re-crisp the exterior before serving.
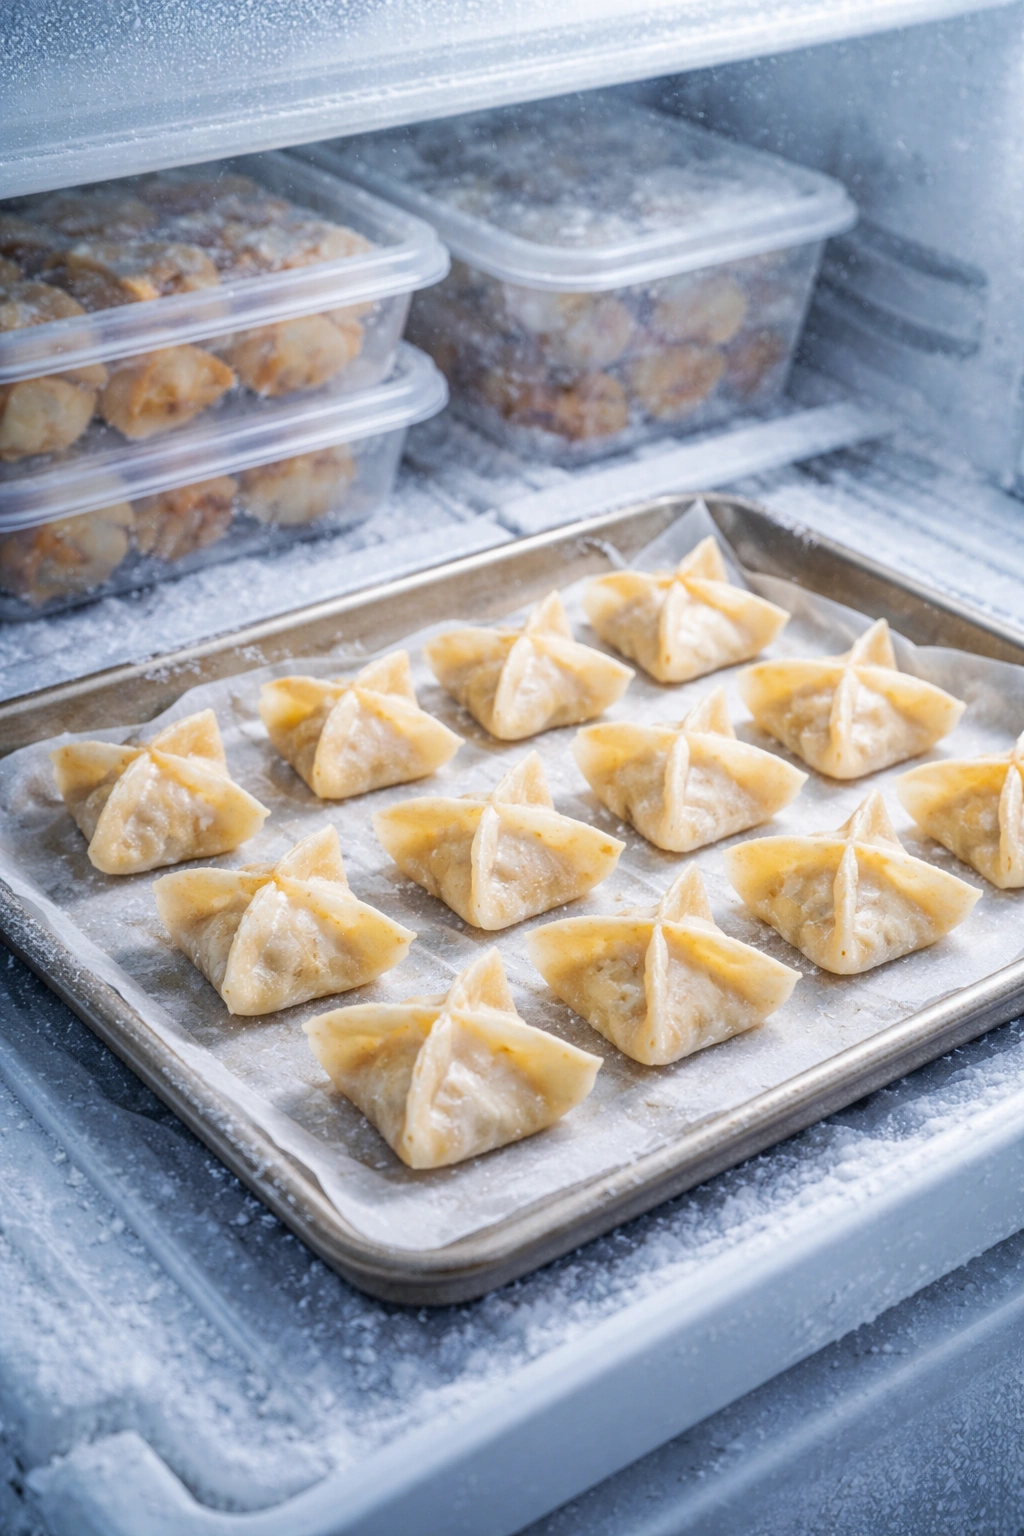
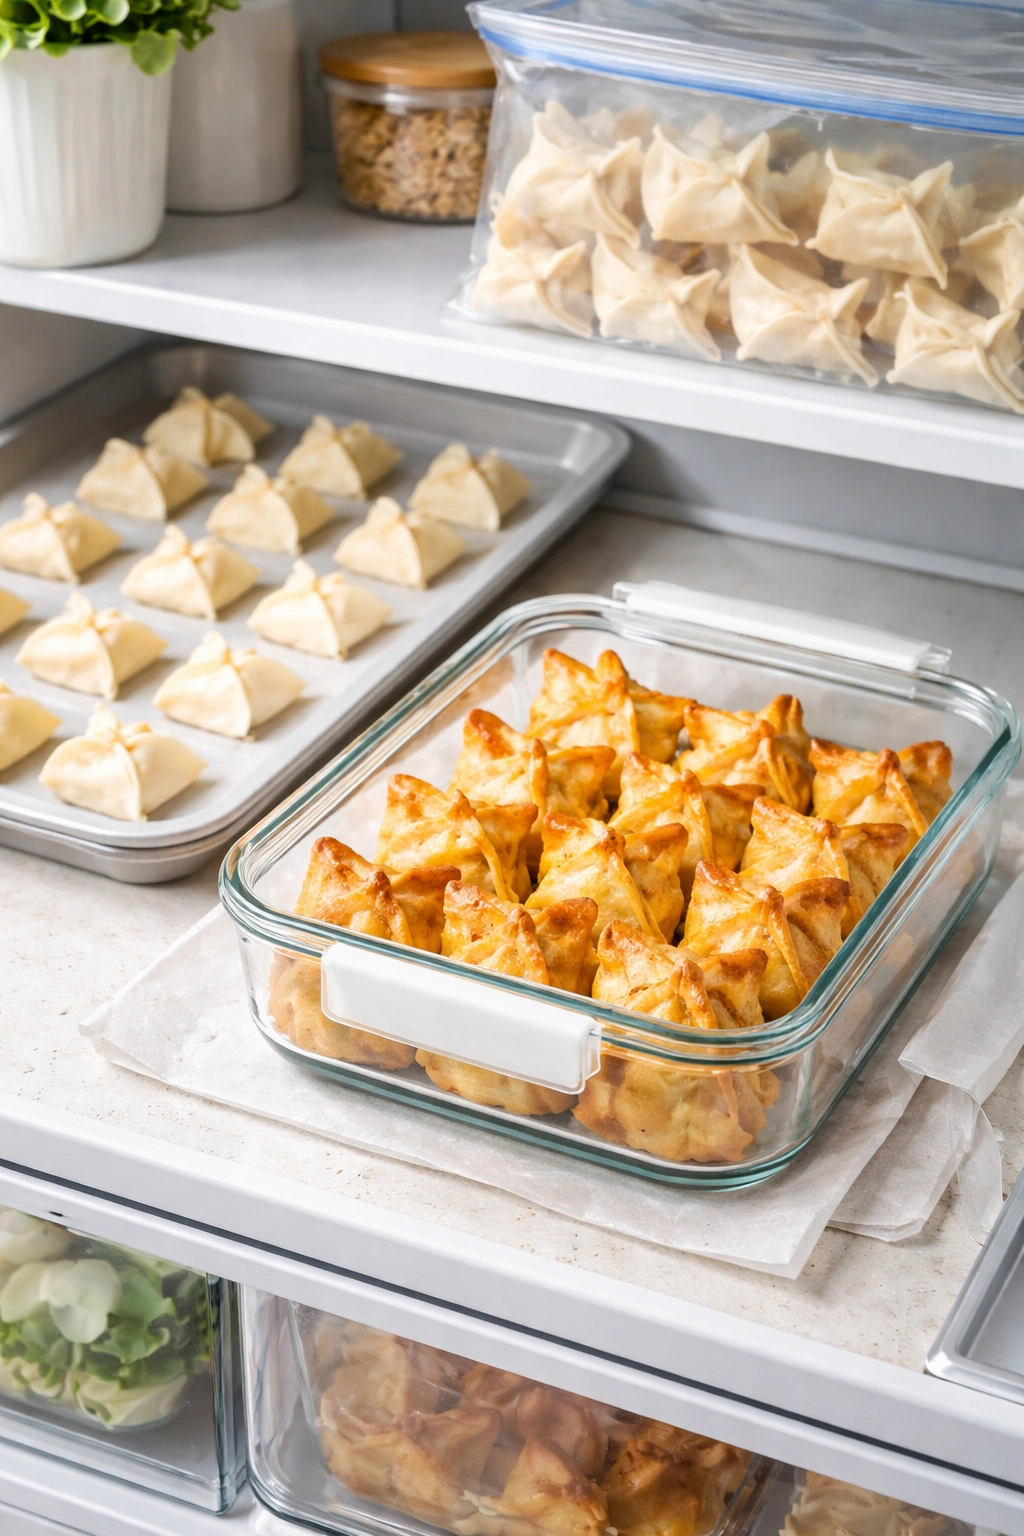
If you want to prepare them for later, you can assemble the entire batch, place them on a parchment-lined baking sheet, and freeze them unwrapped for at least an hour (until solid), then transfer them to a freezer bag where they’ll keep for up to three months. The advantage of freezing them uncooked is that they go straight from freezer to oven—you don’t thaw them. Just add about three to four extra minutes to the baking time. This is such a practical approach because you can pull out exactly as many as you need without planning ahead.
You can also bake them fully, let them cool completely, and freeze the baked rangoon. In that case, reheat them at 350°F for about five minutes (straight from freezer) until they’re warmed through and re-crisped. This works well if you like to have them on hand for unexpected guests or snacking.
The filling, if not cooked with the wonton, keeps in the fridge for about three days. After that, the moisture content increases and it starts to weep slightly. Filled but unbaked rangoon can be refrigerated for one day before baking—any longer and the wrapper starts to absorb moisture from the filling and becomes damp.
Serving Suggestions and Pairings
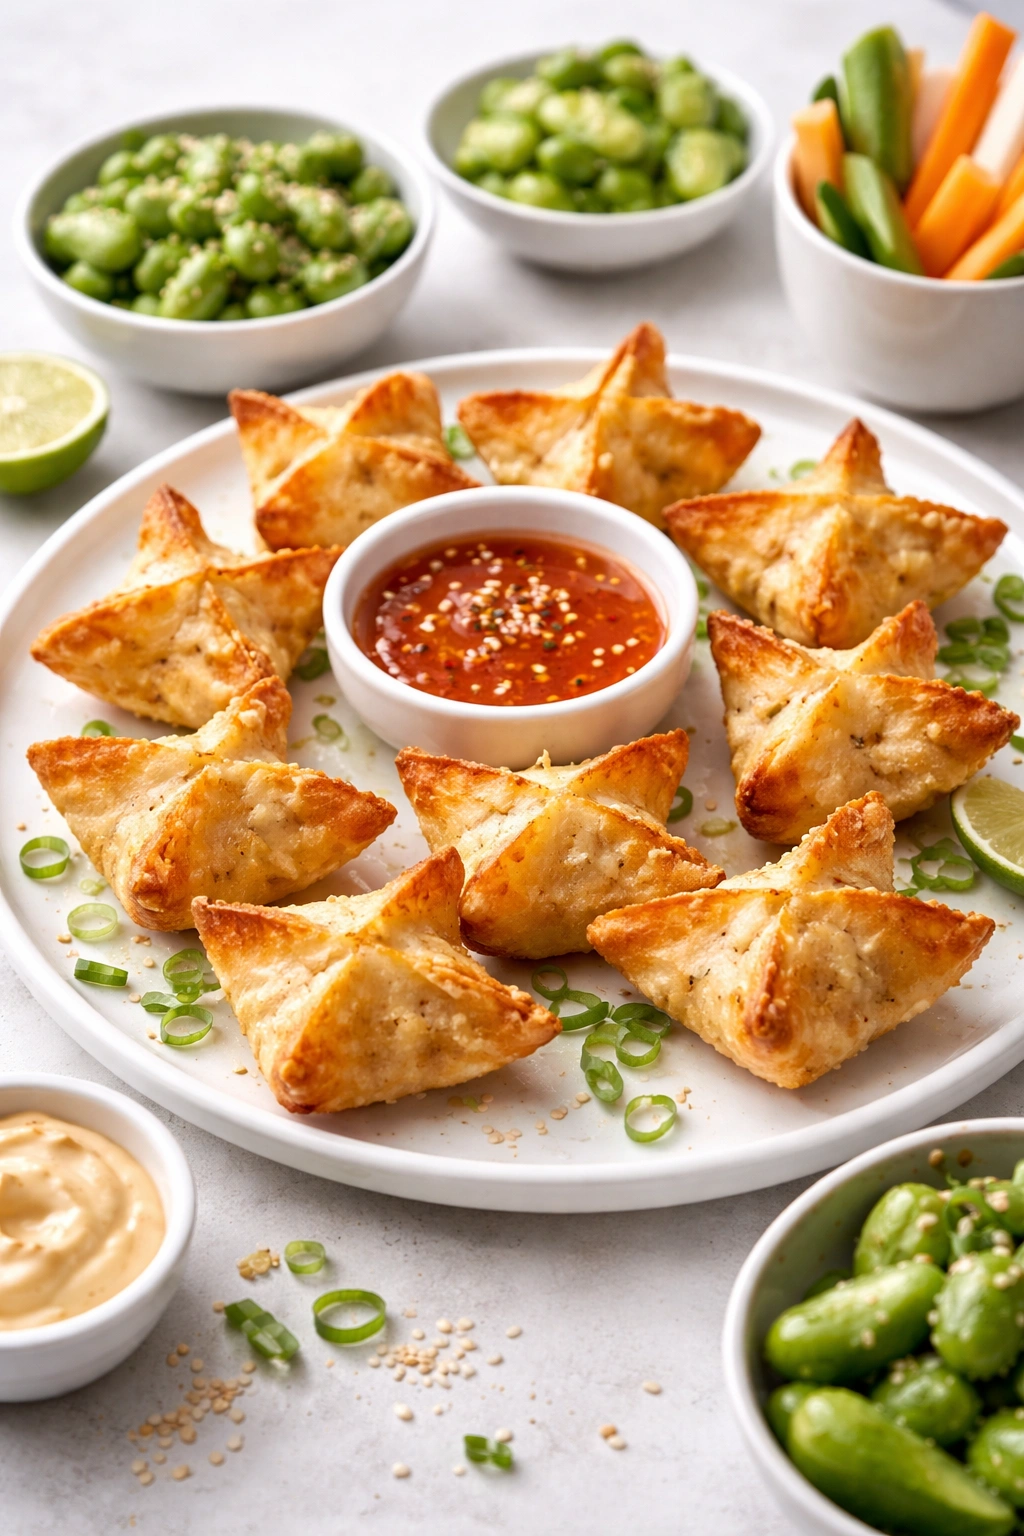
Baked crab rangoon deserves better than being served naked on a plate. These are restaurant-quality appetizers, and they shine when accompanied by the right condiments and served with intention.
A sweet and spicy dipping sauce is the classic pairing. You can buy a decent sweet chili sauce at the grocery store, or make your own by mixing three parts sweet chili sauce with one part sriracha and a squeeze of lime juice. Alternatively, a simple sweet and sour sauce—mixed from equal parts ketchup, white vinegar, and sugar, with a pinch of ginger and garlic—is traditional and works beautifully.
A crispy, cooling contrast comes from serving them alongside a cucumber and avocado salad dressed with rice vinegar and sesame oil, or a simple slaw of shredded purple cabbage and carrots with a ginger-lime dressing. The coolness and brightness balance the richness of the rangoon perfectly.
They’re ideal as part of an Asian-inspired appetizer spread alongside spring rolls, potstickers, or edamame. They also fit beautifully into casual entertaining—set out a platter with a couple different dipping sauces and let people help themselves. They’re substantial enough that a few per person feels like a proper appetizer, not just a nibble.
For main-course entertaining, serve them with steamed jasmine rice, stir-fried vegetables, or alongside a larger Asian-inspired meal. They work as a starter course about 20 minutes before the main dish arrives at the table.
Temperature-wise, they’re best eaten warm, right out of the oven or reheated. Room temperature rangoon loses their appeal—the filling becomes rubbery and the wrapper loses crispness. If you’re making them hours ahead, plan to reheat them shortly before serving.
Easy Variations to Try
Once you’ve mastered the basic crab filling, you can play with variations. The technique stays the same; you’re just adjusting the filling components.
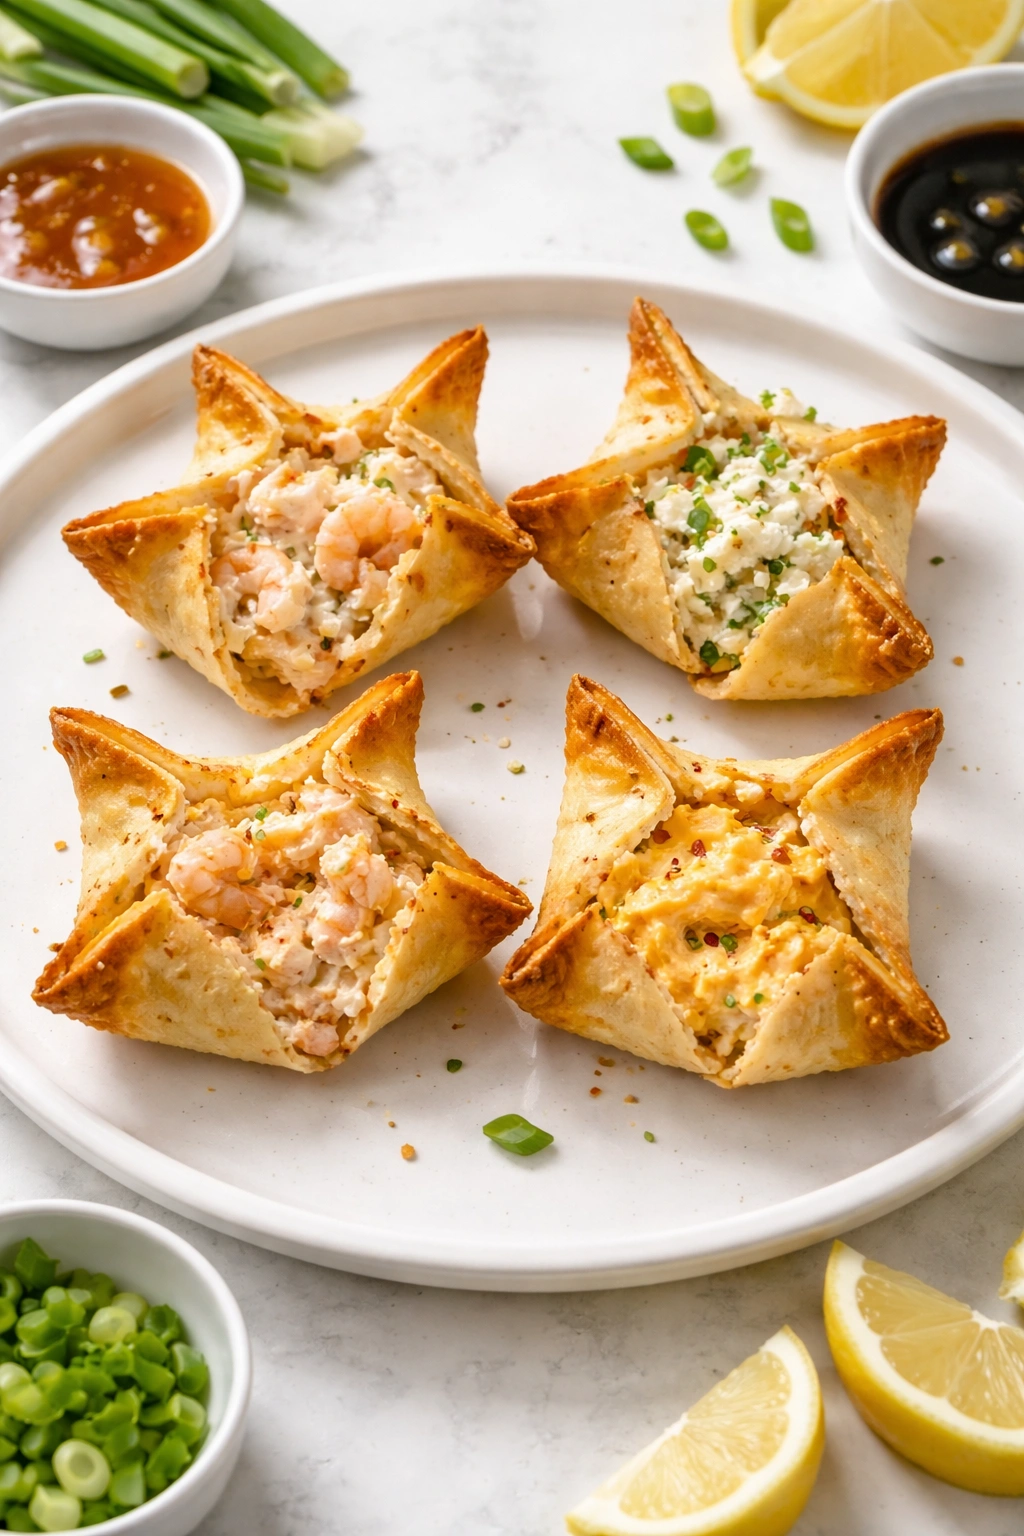
A classic variation is to replace or partially replace the crab with cooked shrimp. Use about six ounces of chopped cooked shrimp mixed with the cream cheese base. Add a tiny squeeze of fresh lemon and keep the sesame oil. This creates a slightly different flavor profile—a bit sweeter and more briny—but follows the same format.
You can make a cream cheese and crab variation that’s less seafood-forward by increasing the cream cheese to ten ounces and using only four ounces of crab, then adding a tablespoon of finely grated Parmesan cheese and a pinch of white pepper. These are slightly less “fishy” and appeal to people who prefer a more subtle seafood flavor.
A vegetarian version skips the crab entirely and fills the wrapper with a mixture of softened cream cheese, finely minced water chestnuts, finely minced shiitake mushrooms (sautéed first to remove moisture), green onion, garlic powder, soy sauce, and a touch of sesame oil. It’s not the same as crab, but it’s genuinely delicious and surprisingly satisfying for a vegetarian option.
For a kick of heat, add a quarter-teaspoon of cayenne pepper to the crab filling or serve with a sriracha mayo for dipping instead of sweet and sour sauce. Some people add a tiny pinch of white pepper directly into the filling itself.
A fusion variation involves mixing just a tablespoon of cream cheese with eight ounces of crab, then adding a tablespoon of finely minced jalapeño, a squeeze of lime juice, and cilantro instead of green onion. These have a completely different flavor profile—bright, spicy, and citrusy—but bake the same way and are absolutely addictive.
Final Thoughts
Making baked crab rangoon at home is one of those cooking experiences that feels fancy but doesn’t require special skills or hard-to-find ingredients. The technique is straightforward, the ingredients are accessible, and the results genuinely outshine takeout. You control the quality of the crab, the intensity of the seasoning, and the crispness of the wrapper in ways that takeout restaurants simply can’t.
The real advantage of making these yourself isn’t just the superior flavor and texture—though that’s meaningful. It’s the confidence you’ll feel pulling a golden, perfect batch out of your oven and knowing you made them. It’s having the ability to make an impressive appetizer on a moment’s notice, especially since the assembled rangoon freeze beautifully and go straight from freezer to oven.
Start with the basic recipe, get comfortable with the wrapping and sealing technique, and then play with variations once you’ve nailed the original. Keep the filling well-seasoned, use quality crab, and never overcrowd the baking sheet. These three things matter more than anything else. Once you’ve made these a couple of times, they become second nature—quick, reliable, and always impressive. Your friends will absolutely ask for the recipe, and you’ll get to drop the casual knowledge that yes, you made them at home, and they’re actually easier than you’d think.
Baked Crab Rangoon Recipe
Yield: Makes 24 to 28 rangoon | Serves 4 to 6 as an appetizer
Prep Time: 30 minutes
Cook Time: 14 minutes
Total Time: 44 minutes
Difficulty: Beginner — the filling comes together quickly, and the wrapping technique is straightforward once you understand the method. No special equipment required, just a pastry brush and your hands.
Ingredients
For the Filling:
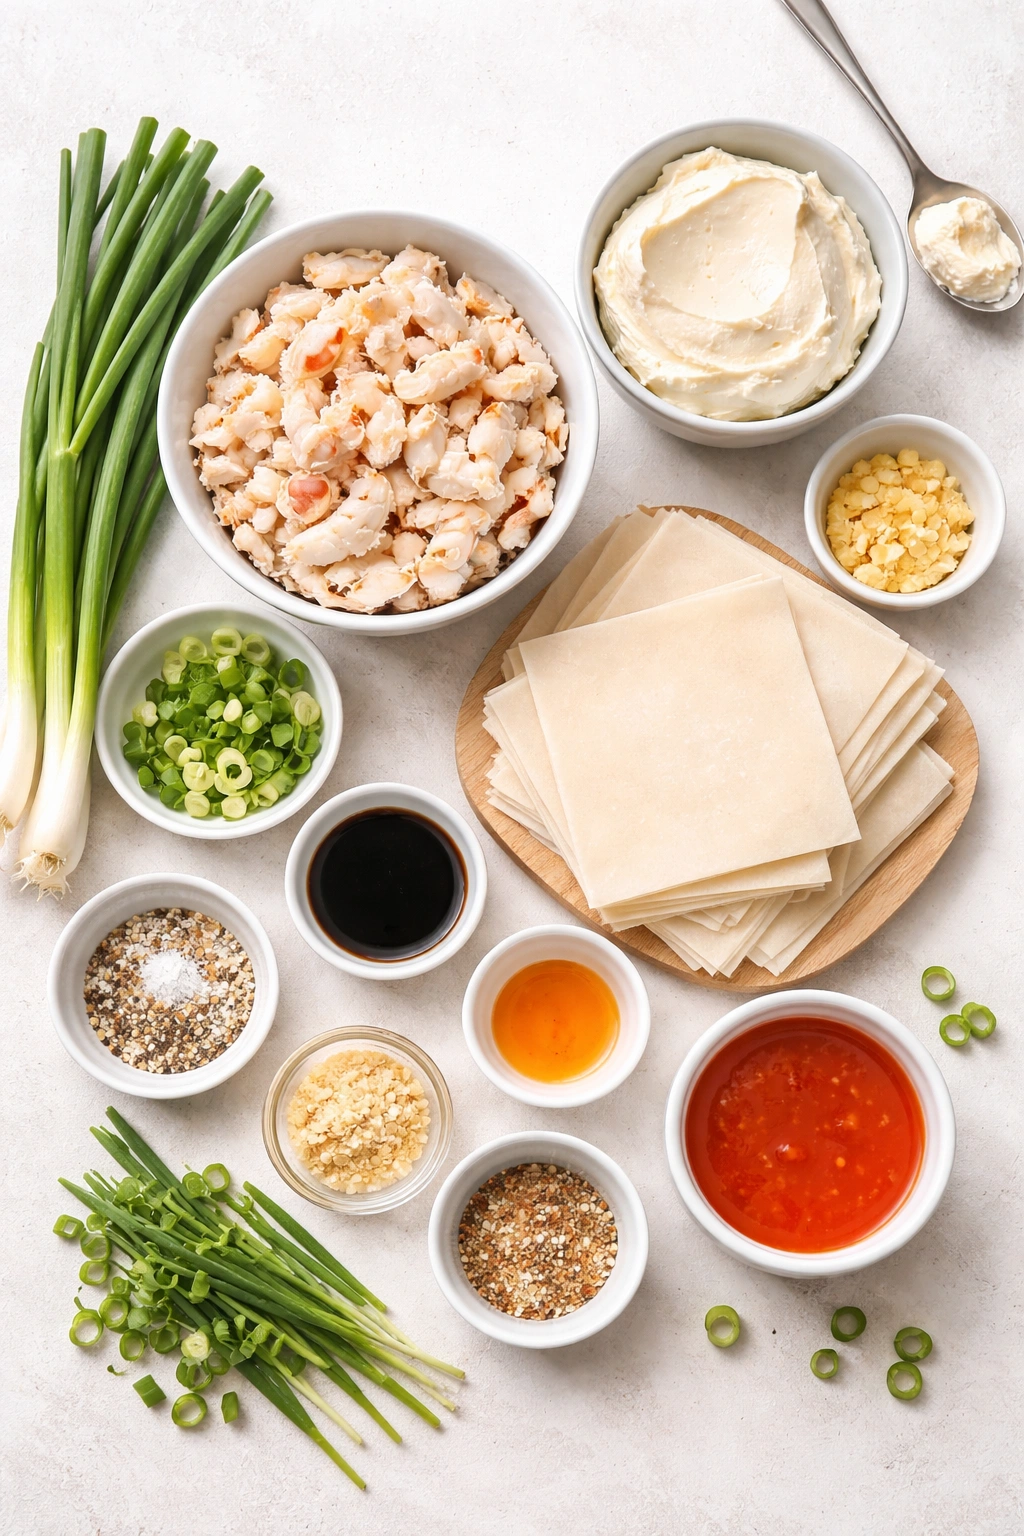
- 8 ounces lump crab meat (fresh or high-quality frozen, drained well and picked through for shell pieces)
- 4 ounces cream cheese (Philadelphia or similar brand, softened to room temperature)
- 3 green onions (white and light green parts only, thinly sliced)
- 1/4 teaspoon white pepper
- 1/4 teaspoon garlic powder
- 1/2 teaspoon Worcestershire sauce
- 1/4 teaspoon soy sauce
- 1/4 teaspoon sesame oil
- Juice from 1/4 fresh lemon (about 1/4 teaspoon)
For Wrapping and Baking:
- One 12-ounce package wonton wrappers (store-bought, kept refrigerated)
- Water (for sealing the wrapper edges)
- 2 tablespoons neutral oil (vegetable, canola, or avocado oil)
- 2 tablespoons sesame seeds (optional but recommended)
Prepare the Filling:
-
Remove the cream cheese from the refrigerator and let it sit at room temperature for 30 minutes until completely soft. This makes it far easier to mix smoothly without lumps.
-
In a medium bowl, use a fork to mash the softened cream cheese against the side of the bowl until it’s creamy and no lumps remain.
-
Add the drained crab meat to the cream cheese and gently fold it together until evenly distributed. Do not over-mix or shred the crab into tiny pieces — keep the lumps intact for better texture.
-
Add the white pepper, garlic powder, Worcestershire sauce, and soy sauce to the crab mixture. Stir well after each addition and taste. The filling should taste savory and quite salty at this point; the bland wonton wrapper will dilute the flavor.
-
Squeeze a quarter-teaspoon of fresh lemon juice into the mixture and stir.
Advertisements -
Fold in the thinly sliced green onions gently.
-
Drizzle in the sesame oil (just about 1/4 teaspoon) and fold gently to incorporate. Taste the filling one more time — it should taste almost too seasoned on its own. Adjust if needed. Cover and refrigerate until you’re ready to wrap.
Prepare the Baking Sheet and Preheat:
-
Preheat your oven to 400°F (200°C) for at least 15 minutes. Position the oven rack in the center. Do not skip preheating — the rangoon need the full heat to brown evenly and set their structure.
-
Line a large baking sheet with parchment paper. Set aside near your wrapping station.
Wrap the Rangoon:
-
Remove the wonton wrapper package from the refrigerator. Lay the wrappers on a clean, dry counter and immediately cover them with a slightly damp (not soaking) kitchen towel. Wonton wrappers dry out within minutes if exposed to air, so keeping them covered is critical.
-
Pull out one wrapper and place it on the counter in front of you in a diamond orientation (one corner pointing toward you). Place approximately one teaspoon of crab filling in the exact center of the wrapper. This amount is precise — too much filling prevents proper sealing; too little looks incomplete.
-
Dampen your fingertip with water (not soaking wet, just damp) and run it along all four edges of the wrapper. This water acts as an adhesive for the dough. Make sure you coat all edges evenly.
-
Fold the wrapper in half diagonally, bringing the bottom corner up to meet the top corner, creating a triangle. Press firmly along the sealed edge, working out any air pockets as you go. Run your damp finger along the edges again if they’re not sticking properly.
Advertisements -
Now take the two opposite points of the triangle (the left and right corners) and bring them together, overlapping them slightly, and pinch firmly to seal. You’ve now created the classic crab rangoon pouch shape. The seal needs to be tight so the filling doesn’t leak during baking.
-
Place the wrapped rangoon seam-side up on the prepared baking sheet. Repeat the filling, wrapping, and placement process with the remaining wonton wrappers and filling. Space the rangoon about 1 inch apart so heat can circulate evenly around each one. Do not overcrowd — if needed, bake in batches rather than packing them densely.
Brush and Prepare for Baking:
-
Using a pastry brush, apply a light, even coat of neutral oil to the top and all sides of each rangoon. You’re creating a thin sheen, not drenching them. This thin oil coating is what creates the golden, crispy exterior.
-
Sprinkle the top of each rangoon with a tiny pinch of sesame seeds if using. This adds visual appeal and a subtle nutty flavor.
Bake:
-
Place the baking sheet in the preheated 400°F (200°C) oven on the center rack.
-
Bake for 12 to 15 minutes, watching carefully after the 12-minute mark. The rangoon are done when the wrappers are golden brown on all sides and the edges have just started to darken slightly. The exact time depends on your oven’s temperature accuracy and how filled each piece is. Start checking visually at 12 minutes.
-
If your oven doesn’t brown evenly, rotate the baking sheet halfway through baking (around the 7-minute mark) to ensure all sides brown consistently.
Cool and Serve:
-
Remove the baking sheet from the oven and set it on a wire cooling rack. Let the rangoon cool on the baking sheet for at least 2 minutes before touching them. This allows the exterior to set and steam to escape, maintaining crispness. If you move them immediately while hot, residual steam will soften the wrapper.
-
After 2 minutes, you can transfer the rangoon to a wire rack, a clean plate, or a serving platter. Do not cover them immediately with a lid or plastic wrap, as this traps steam and softens the crispy exterior.
-
Serve warm or at room temperature alongside sweet and spicy dipping sauce, sweet and sour sauce, or sriracha mayo. Enjoy immediately for the best texture and flavor.
Tips for Restaurant-Quality Results
The most important thing is not skipping the water-sealing step on the wrapper edges. This is what keeps everything together during baking and prevents the filling from leaking out. Some people find it helpful to have a small bowl of water nearby so they can dip their finger as needed rather than trying to dampen their finger from a faucet.
Don’t be afraid to season the filling aggressively. The wonton wrapper is mild and bland, so it will dilute the flavors you add. Taste the filling before wrapping and adjust the seasonings until it tastes almost too salty and savorily intense on its own.
If you notice the bottom of your rangoon browning too quickly before the tops are golden, your oven rack might be too close to the heat source. Move it lower in the oven or place a sheet of aluminum foil loosely on top of the rangoon for the final few minutes to slow the top browning.
The oil coating is essential—don’t try to skip it or reduce it thinking you’ll cut calories. The oil creates the crispy, golden exterior. Without it, the wrappers dry out and become tough instead of crispy.
Common Mistakes to Avoid
Using too much filling is the most common error. One teaspoon is the right amount. More than that and you’ll struggle to seal the wrapper properly, or the filling will leak out during baking.
Overcrowding the baking sheet prevents even air circulation, resulting in some rangoon that bake faster than others. Give them space. Baking in two batches is better than having unevenly cooked rangoon.
Not preheating the oven fully will cause uneven browning and potentially cause the rangoon to spread out of shape. Preheat for at least 15 minutes.
Using low-quality or imitation crab completely undermines the whole point. Real lump crab makes an unmistakable difference in the final dish.
Skipping the cooling period on the baking sheet and immediately transferring the hot rangoon to a covered container traps steam and turns the crispy exterior into chewy softness. Give them at least two minutes to cool and release steam before moving them.
Storage and Make-Ahead Options
Storing Cooked Rangoon: Place cooled, baked rangoon in an airtight container and refrigerate for up to 4 days. To reheat and re-crisp, place them on a baking sheet and bake at 350°F for 3 to 4 minutes until warmed through and the exterior is crispy again.
Freezing Uncooked Rangoon: Assemble the rangoon completely, place them on a parchment-lined baking sheet without touching, and freeze uncovered for at least 1 hour until solid. Transfer to a freezer bag and freeze for up to 3 months. Bake directly from frozen at 400°F for 16 to 18 minutes (add about 3 to 4 minutes to the regular baking time). No thawing needed.
Freezing Cooked Rangoon: Let them cool completely, then place in a freezer bag or airtight container and freeze for up to 3 months. Reheat from frozen at 350°F for 5 minutes until warmed through and crispy. You can also reheat in a toaster oven or air fryer for faster results.
Making the Filling Ahead: The filling keeps in the fridge for up to 3 days. Store it in an airtight container, covered. This makes it convenient to wrap and bake fresh rangoon whenever you want.
Assembling Ahead: You can assemble the rangoon in the morning and refrigerate them uncovered (or on a parchment-lined baking sheet covered loosely with plastic wrap) for up to 8 hours before baking. The wrapper will start to absorb moisture from the filling after about 12 hours, so don’t prepare them much longer than a day ahead.
Serving Ideas and Pairings
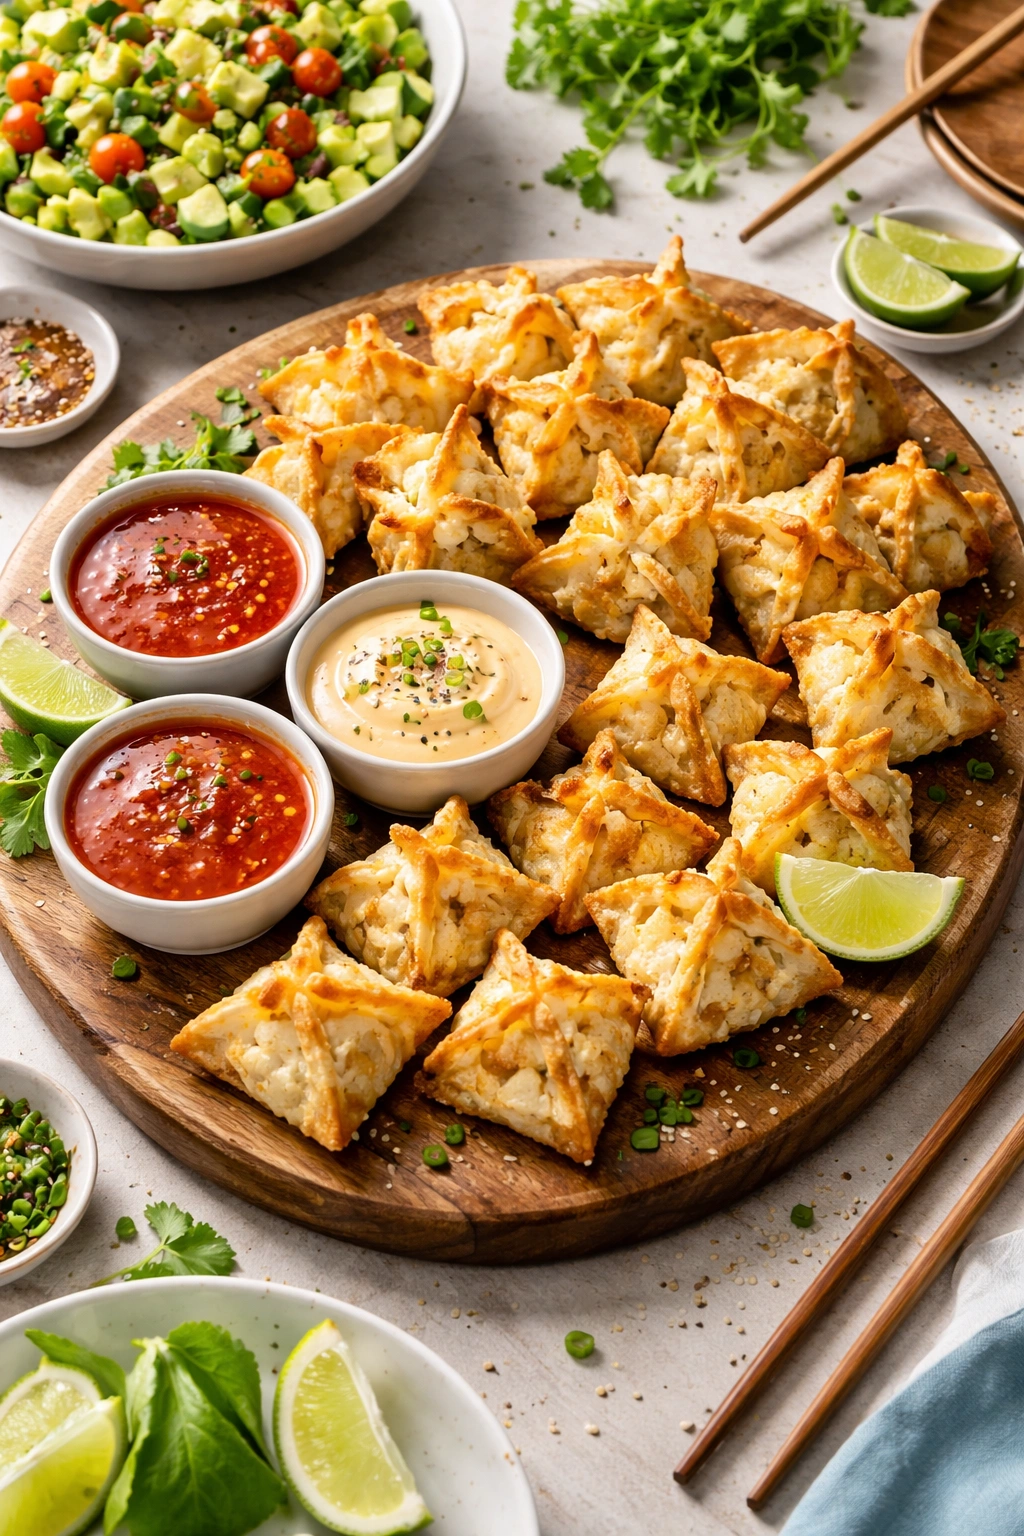
Serve warm with a sweet and spicy dipping sauce made by mixing sweet chili sauce with a touch of sriracha and a squeeze of lime juice. This is the most classic pairing.
A sweet and sour sauce (equal parts ketchup, white vinegar, and sugar with a pinch of ginger and garlic powder) is traditional and works beautifully.
A sriracha mayo made from equal parts mayo and sriracha with a squeeze of lime is a great option if you want something creamy and spicy.
Serve alongside cucumber and avocado salad dressed with rice vinegar and sesame oil for a cool, fresh contrast to the richness of the filling.
A quick slaw made from shredded purple cabbage, carrots, and a ginger-lime dressing brightens the richness perfectly.
For entertaining, arrange them on a platter with a couple different dipping sauce options and let guests help themselves.
They work beautifully as part of an Asian-inspired appetizer spread alongside spring rolls, potstickers, edamame, or cucumber salad.
Flavor Variations to Explore
Shrimp Version: Replace half the crab with 4 ounces of chopped cooked shrimp. Increase the lemon juice slightly to brighten the flavor. The result is sweeter and more briny than pure crab.
Vegetarian: Skip the crab and mix cream cheese with finely minced water chestnuts, sautéed shiitake mushrooms, green onion, garlic powder, soy sauce, and sesame oil. These are genuinely delicious and satisfy vegetarian guests.
Spicy Version: Add 1/4 teaspoon of cayenne pepper to the filling, or serve with sriracha mayo for dipping instead of sweet and sour sauce. You can also add a tiny pinch of red pepper flakes.
Jalapeño-Cilantro: Add 1 tablespoon of finely minced jalapeño to the filling, replace the green onion with fresh cilantro, and use lime juice instead of lemon. These have a bright, citrusy, spicy flavor profile completely different from the original.
Rich and Creamy: Increase the cream cheese to 5 ounces and reduce the crab to 6 ounces, then add 1 tablespoon of grated Parmesan cheese and white pepper. This is less “fishy” and appeals to people who prefer a more subtle seafood flavor.
The beauty of baked crab rangoon is that once you’ve mastered the basic technique, you can make them confidently over and over again. They freeze beautifully, bake quickly, and genuinely taste better than takeout. Keep your pantry stocked with wonton wrappers, quality crab, and cream cheese, and you’re always just 45 minutes away from impressive homemade appetizers.