There’s something deeply satisfying about biting into a perfectly baked potato — crispy skin, fluffy interior, just waiting for butter and toppings to melt into all those steaming crevices. The problem is that a traditional oven bake takes 45 to 60 minutes, and if you’ve already got dinner in the works, that’s precious time you don’t have. The air fryer solves this beautifully. It cuts cooking time nearly in half while delivering results that are somehow even better than the conventional method: the skin gets crispier, the inside stays fluffier, and the edges brown in the most appealing way.
Here’s what makes air fryer baked potatoes actually foolproof: the circulating hot air eliminates all the guesswork. There’s no awkward middle ground where your potato is simultaneously overcooked on the outside and underdone at the core. There’s no question about whether it’s ready. The consistent, intense heat means you get a repeatable result every single time, whether you’re cooking for two people or six. I’ve made hundreds of these over the years — in different air fryer models, with different potato sizes and types — and I’ve landed on the exact approach that works every time.
What I’m sharing here isn’t just a recipe; it’s the accumulated knowledge of many batches, several happy mistakes, and a few learning curves that I’m sparing you from. You’ll understand why each step matters, what sensations to watch for, and exactly how to troubleshoot if something doesn’t go right. By the end of this article, you’ll have a method so reliable that you can make air fryer baked potatoes without thinking twice about it.
Why the Air Fryer Is Actually Perfect for Baked Potatoes
The air fryer succeeds where many cooking methods stumble because of how it actually works. Rather than heating from below (like an oven burner) or using gentle, indirect heat (like a traditional oven), the air fryer blasts your potato with rapidly circulating superheated air from all directions. This creates a Maillard reaction — that beautiful browning and crust development — while simultaneously cooking the interior through convection.
Traditional ovens have uneven heat spots. Your potato might brown beautifully on one side and stay pale on the other. The air fryer’s circulation eliminates that problem entirely. Every surface gets equally intense heat, which means even browning and consistent cooking all the way through.
Temperature control is also noticeably tighter in an air fryer. You’re not fighting heat loss from opening the oven door or waiting for the oven to cycle back up to temperature. The air fryer maintains its set temperature relentlessly, so your cooking time becomes genuinely predictable. A medium potato in a standard air fryer (most are 3.5 to 5.5 quarts) takes exactly 20 to 25 minutes from cold to perfectly done.
The skin development in an air fryer is legitimately different from oven-baked potatoes. Because the air is circulating so aggressively, the skin dries out faster and browns more dramatically. You end up with a crisp, almost papery-thin exterior that shatters when you break into it — something that’s harder to achieve in a conventional oven without making the inside dry.
Choosing the Right Potatoes and Preparing Them Properly
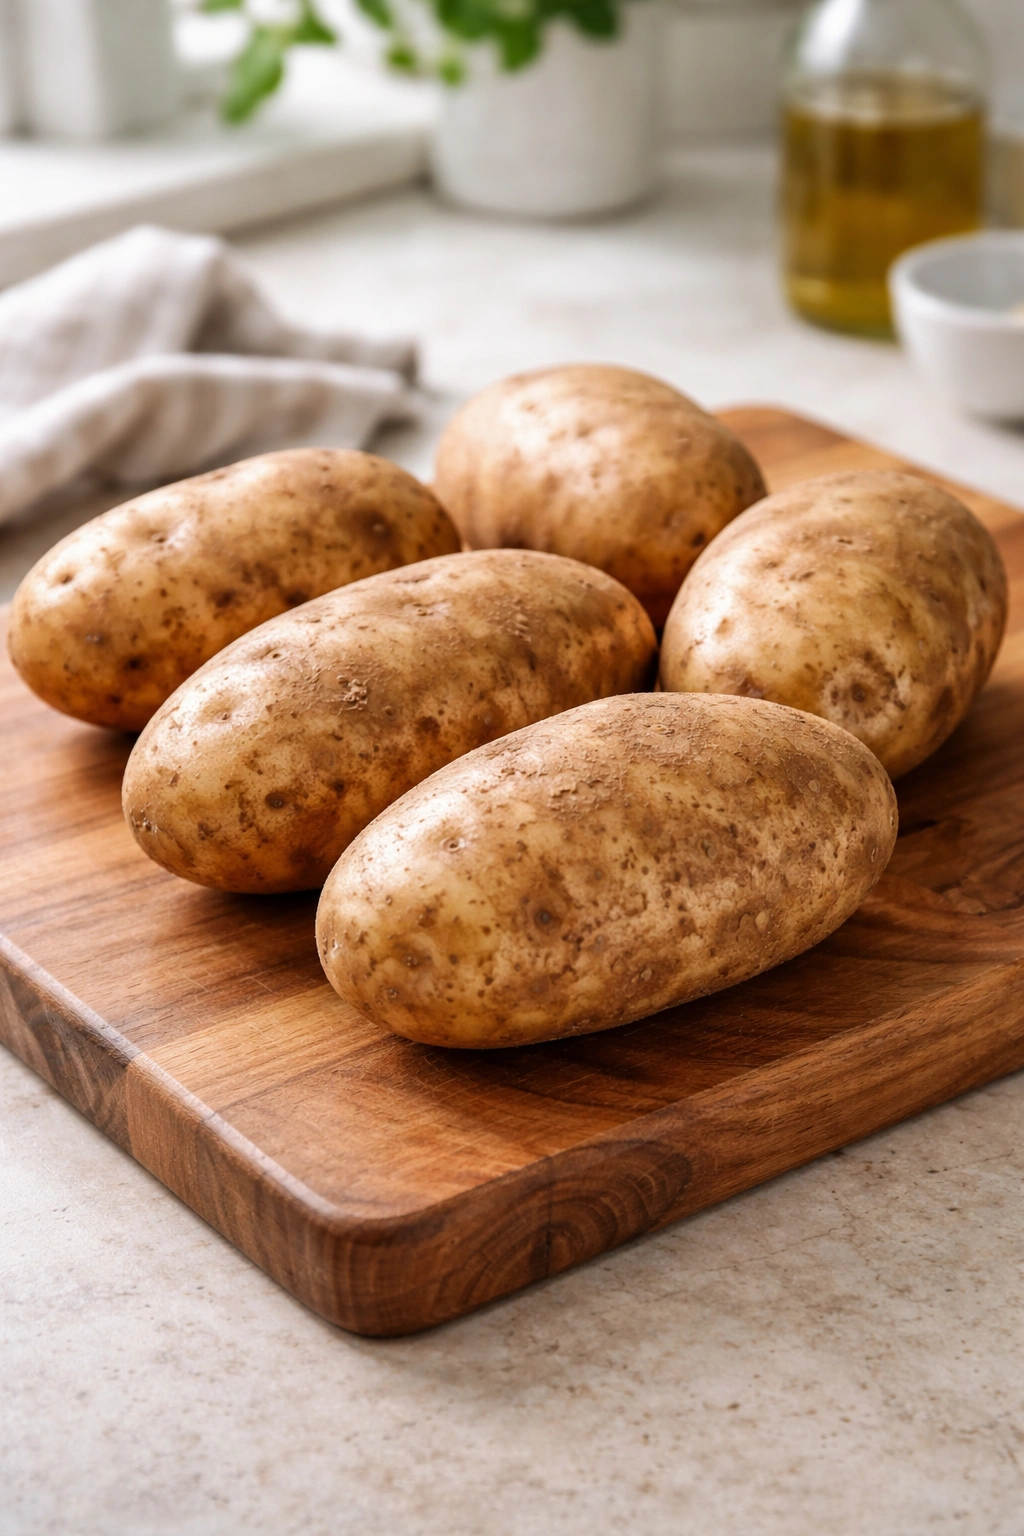
Not all potatoes are created equal when it comes to baking, and the potato type you choose genuinely affects your result. Russet potatoes are your best choice — they have a lower moisture content and higher starch, which gives you that fluffy, slightly grainy interior that everyone expects from a baked potato. Burbanks, Norkotahs, and other russet varieties all work equally well.
Size matters more than you might expect. Aim for medium potatoes that weigh about 5 to 7 ounces each — roughly the size of a large egg or a tennis ball. These cook through perfectly in 20 to 25 minutes without the edges drying out. Very large potatoes (10+ ounces) will cook unevenly; the outside will brown and the inside will still be chalky in the very center. Very small potatoes (under 4 ounces) cook so fast that you risk overcooking them.
Try to select potatoes that are roughly the same size. This ensures they finish cooking at the same time, which matters if you’re cooking multiple potatoes in one batch. If you’re mixing potato sizes, position the larger ones away from any interior walls and the smaller ones closer to the center, where heat is slightly gentler.
Washing and drying your potatoes thoroughly makes a measurable difference. Brush them under running water to remove all soil and grit — don’t skip this step, as dirt-covered potatoes can leave residue in your air fryer basket. Pat them completely dry with a clean kitchen towel. Excess moisture on the skin will steam rather than crisp up, which means you’ll lose that coveted crackling exterior.
The Secret to Crispy Skin and Fluffy Insides
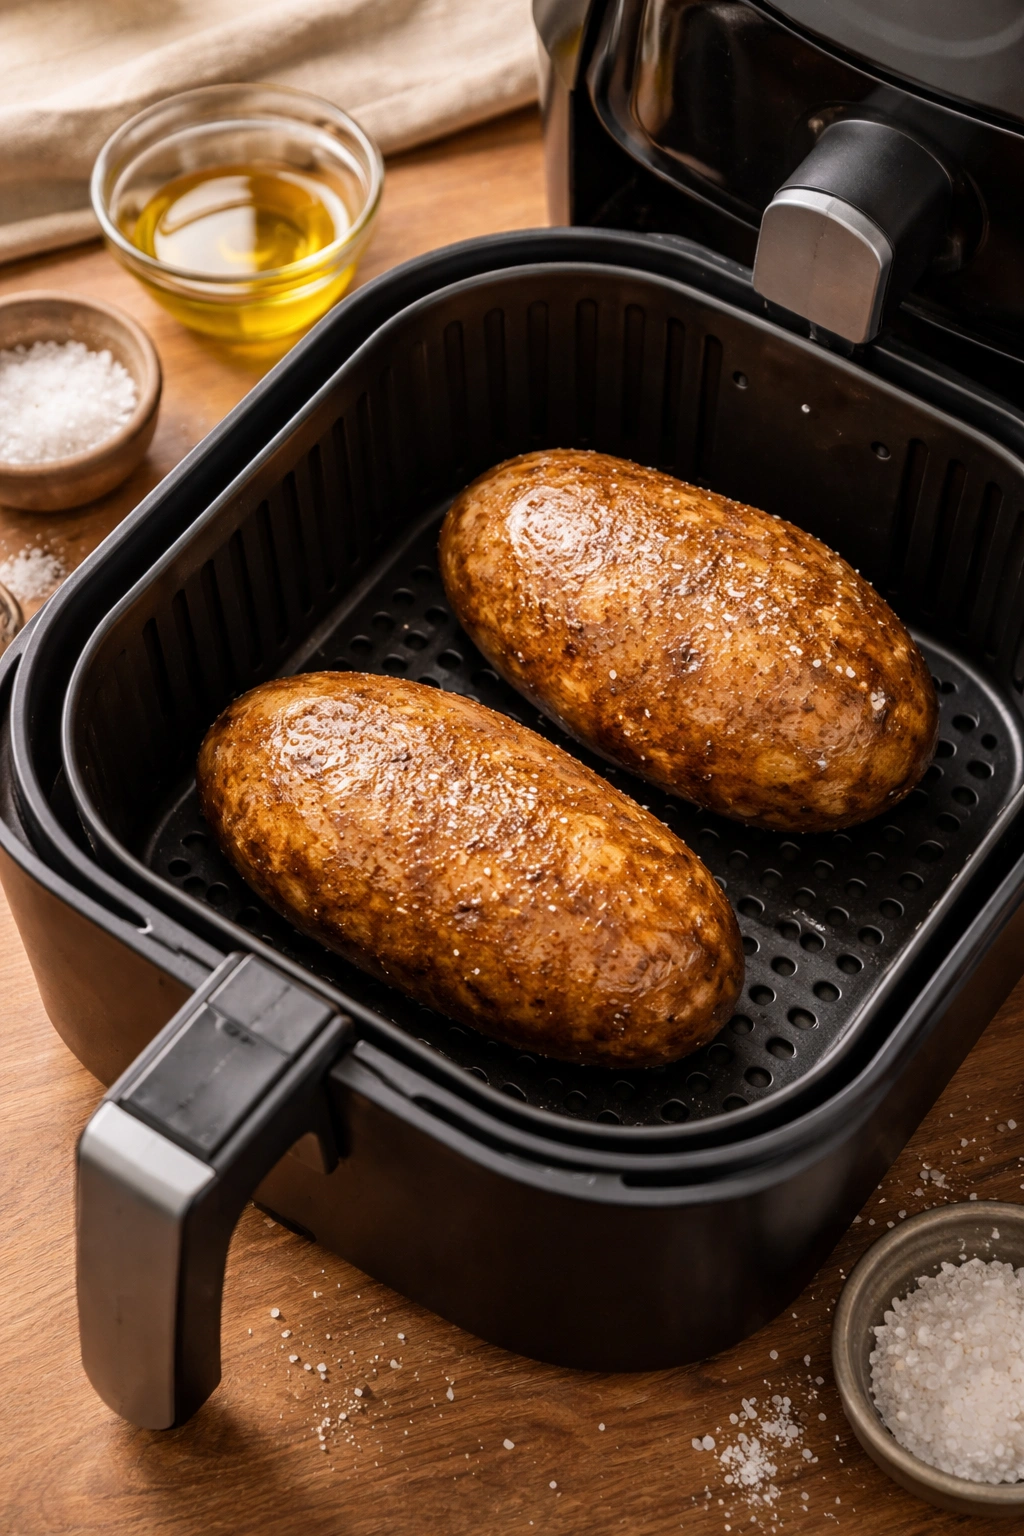
The magic ingredient here is a light coating of oil and salt. This isn’t optional; it’s what transforms a plain baked potato into something genuinely delicious. Rub each potato with about half a teaspoon of olive oil or avocado oil, covering the entire surface evenly. The oil helps the skin crisp up and browns beautifully under the air fryer’s heat.
Immediately after oiling, sprinkle each potato generously with fleur de sel or kosher salt. The salt sticks to the oiled surface and creates a seasoned crust. This is different from the interior seasoning you’ll add later — this salt stays on the outside and becomes part of that crispy shell. Use about half a teaspoon of salt per potato, or roughly a quarter teaspoon if you’re being conservative.
The oil-and-salt combination does something else important: it draws moisture away from the skin and encourages browning. Potatoes are mostly water, and that water wants to escape as steam. Without this surface preparation, the steam just rises up and makes the skin wrinkled and pale. With it, you get a potato that looks like it came from a steakhouse.
Preparing Your Air Fryer for Success
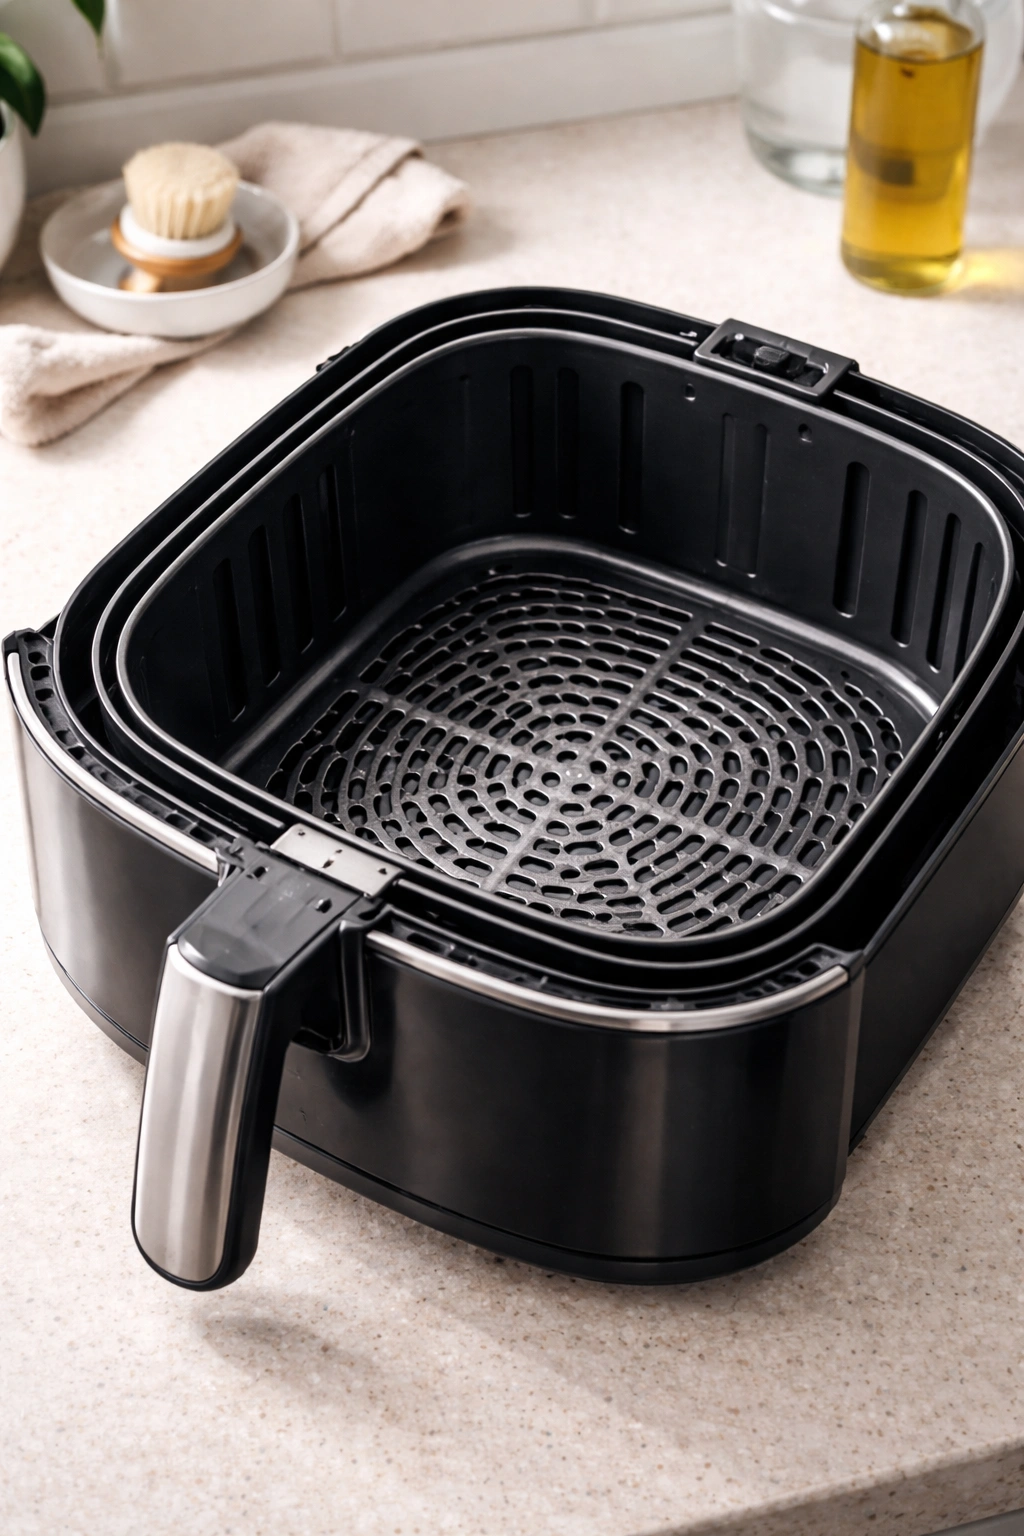
Clean your air fryer basket before you start. Leftover oil or debris from previous cooking can smoke and create an unpleasant flavor. A quick wipe with a damp paper towel is usually sufficient; if there’s stuck-on food, soak the basket in hot soapy water for a few minutes and scrub with a soft brush.
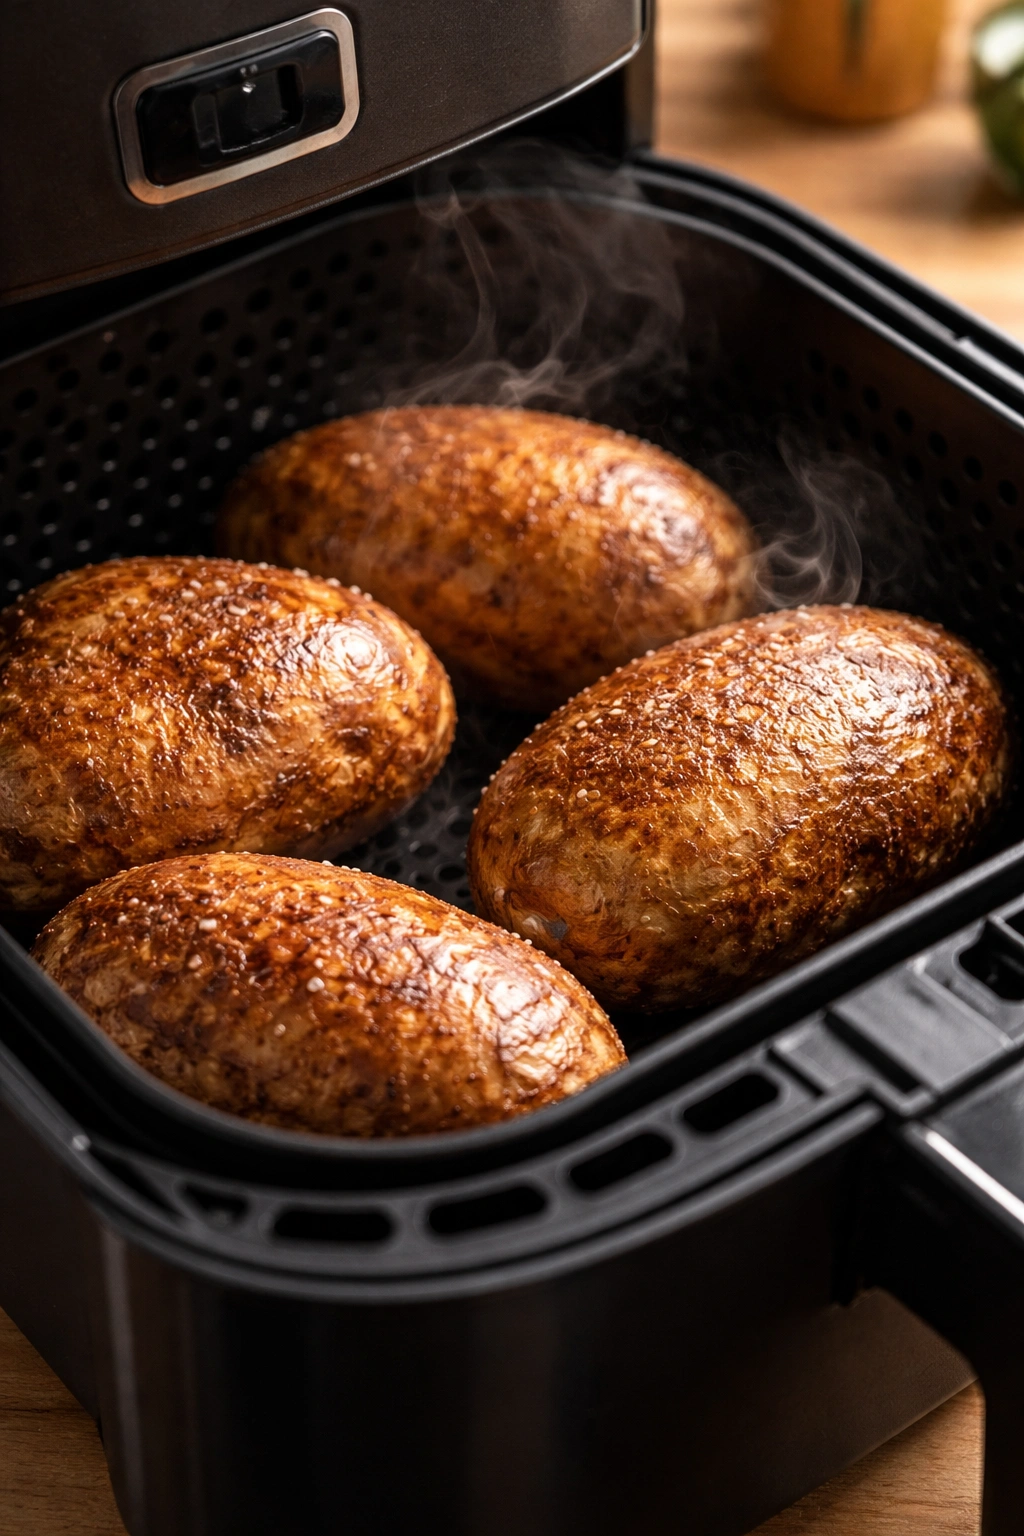
Don’t preheat your air fryer for baked potatoes — this is one of the few recipes where skipping the preheat actually works better. Potatoes benefit from a longer, gentler climb to temperature rather than starting in an already-hot environment. Set your air fryer to 400°F (200°C), place the potatoes in the basket in a single layer (not stacked), and start the timer. This approach prevents the exterior from setting before the interior has a chance to cook through.
If you’re cooking multiple potatoes and your air fryer basket has an interior divider or two levels, you can use the space efficiently. Arrange potatoes in a single layer without overcrowding — they need air circulation on all sides. If your air fryer is very small, you may need to cook potatoes in batches. Never stack potatoes or crowd them together; the air needs to circulate around each one completely.
Master Recipe: Air Fryer Baked Potatoes
Yield: Serves 2 to 6 (depending on appetite and toppings)
Prep Time: 5 minutes
Cook Time: 20 to 25 minutes
Total Time: 25 to 30 minutes
Difficulty: Beginner — no special equipment needed, just potatoes and an air fryer; even a first-time baker will succeed here.
Ingredients
- 2 to 6 medium russet potatoes (5 to 7 ounces each), scrubbed and dried completely
- 1 to 3 teaspoons olive oil or avocado oil (roughly half a teaspoon per potato)
- 1 to 3 teaspoons fleur de sel or kosher salt (roughly half a teaspoon per potato)
- Butter, sour cream, chives, bacon bits, or other toppings of your choice (optional but recommended)
Instructions
Prepare the Potatoes:
-
Scrub each potato under cold running water with a stiff brush or your fingernails to remove all soil and grit. Pay special attention to any crevices or indentations where dirt hides.
Advertisements -
Pat the potatoes completely dry with a clean kitchen towel. Moisture on the skin will prevent crisping, so make sure the surface is genuinely dry to the touch.
-
Place each potato on a cutting board and poke it all over with a fork — aim for 8 to 12 small pricks distributed across the surface. These holes allow steam to escape gradually during cooking rather than building up inside the potato, which prevents it from exploding and helps the inside cook more evenly.
-
Rub each potato evenly with about half a teaspoon of olive oil or avocado oil, using your hands to coat the entire surface. Don’t miss the ends or the bottom.
-
Sprinkle each oiled potato generously with salt — roughly half a teaspoon per potato, distributed evenly over the surface. The salt will stick to the oil and create a seasoned crust.
Cook in the Air Fryer:
-
Arrange the potatoes in your air fryer basket in a single layer. They should not touch each other or the sides of the basket; air needs to circulate completely around each potato. If your air fryer is small and you have more than 3 or 4 potatoes, you’ll need to cook them in batches.
-
Set your air fryer to 400°F (200°C). Do not preheat the air fryer; place the potatoes in the cold basket, close the drawer, and start the timer immediately. Set the cook time for 20 minutes initially.
-
At the 20-minute mark, check one of the middle-sized potatoes by inserting a fork or sharp knife into the thickest part. It should slide through with very little resistance. If you feel significant firmness, the potato needs another 2 to 5 minutes. Return it to the air fryer and check again at 25 minutes.
-
Medium potatoes (5 to 7 ounces) typically finish in 20 to 25 minutes. Larger potatoes may need an extra 3 to 5 minutes; smaller ones may be done in 18 to 20 minutes. The exact time depends on your specific air fryer model and the exact size of your potatoes. The fork-tender test is more reliable than the timer.
-
Once a potato is completely tender all the way through, carefully remove it from the basket using tongs or a fork. The outside will be very hot. Place it on a cutting board or plate and let it rest for 1 to 2 minutes before handling. Never skip the rest period — the potato will continue to cook slightly from residual heat, and it becomes easier to handle once it’s cooled just a bit.
Advertisements -
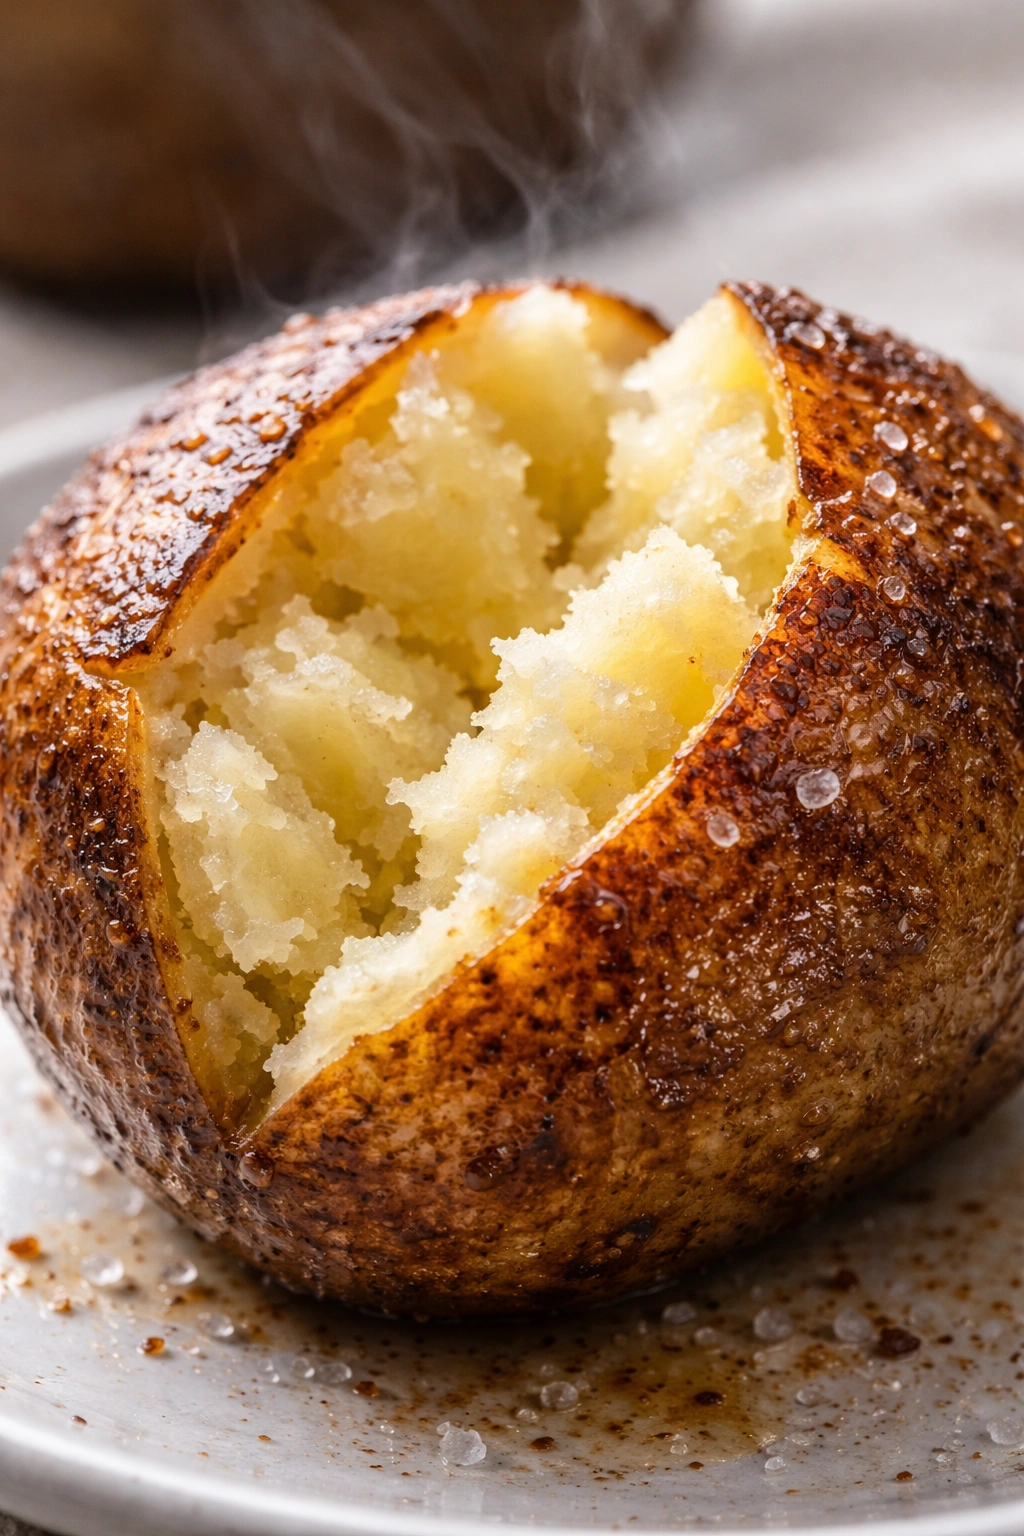
Slit the potato open with a sharp knife, running the blade lengthwise down the center and then across in a cross pattern. The flesh inside should be fluffy and steam should rise from the opening. If the interior is still dense or gummy-looking, the potato wasn’t quite done — this usually only happens if you’ve misjudged the cook time or the potato was extremely large.
-
Fluff the interior with a fork to break it up slightly and release more steam. This also creates pockets where toppings can nestle in more effectively.
Finish and Serve:
- Add your desired toppings immediately while the potato is still hot — butter will melt into all those fluffy crevices, sour cream will soften, and any warm toppings will integrate beautifully with the potato. Serve right away.
Pro Tips That Actually Make a Difference

Prick your potatoes generously. This is one of the most important steps and also the one people rush. Eight to twelve pricks per potato aren’t excessive — they’re necessary. Steam needs a way to escape, and those tiny punctures do the job perfectly. Without them, you risk the skin splitting unevenly or the potato cooking unevenly.
Cook from a cold start rather than preheating. Preheating makes your air fryer more efficient for many foods, but potatoes benefit from a gentler rise in temperature. Starting in a cold basket means the exterior sets and crisps gradually rather than immediately, which helps the inside catch up.
Don’t skip the oil and salt step. Yes, you can technically bake a potato in an air fryer with nothing but the potato itself. Yes, it will be edible. But the difference between a bare potato and one treated with oil and salt is genuinely dramatic. The oil creates that restaurant-quality crispy skin, and the salt seasons it from the outside in.
Check doneness with a fork, not the timer. Every air fryer is slightly different, and potato size varies. The fork test — pressing a fork into the thickest part — is far more reliable than any timer. When the potato is done, the fork goes through almost effortlessly, like going through soft butter.
Let the potato rest briefly before cutting. This isn’t just for comfort (though a 2-minute rest does let the outside cool enough to handle). The brief rest also allows the interior to set very slightly, so when you cut it open, the steam releases more gently and the flesh stays fluffier. Cutting into a potato immediately after removing it from the air fryer can release steam too aggressively and make the interior seem less fluffy.
Common Mistakes That Prevent Perfect Results
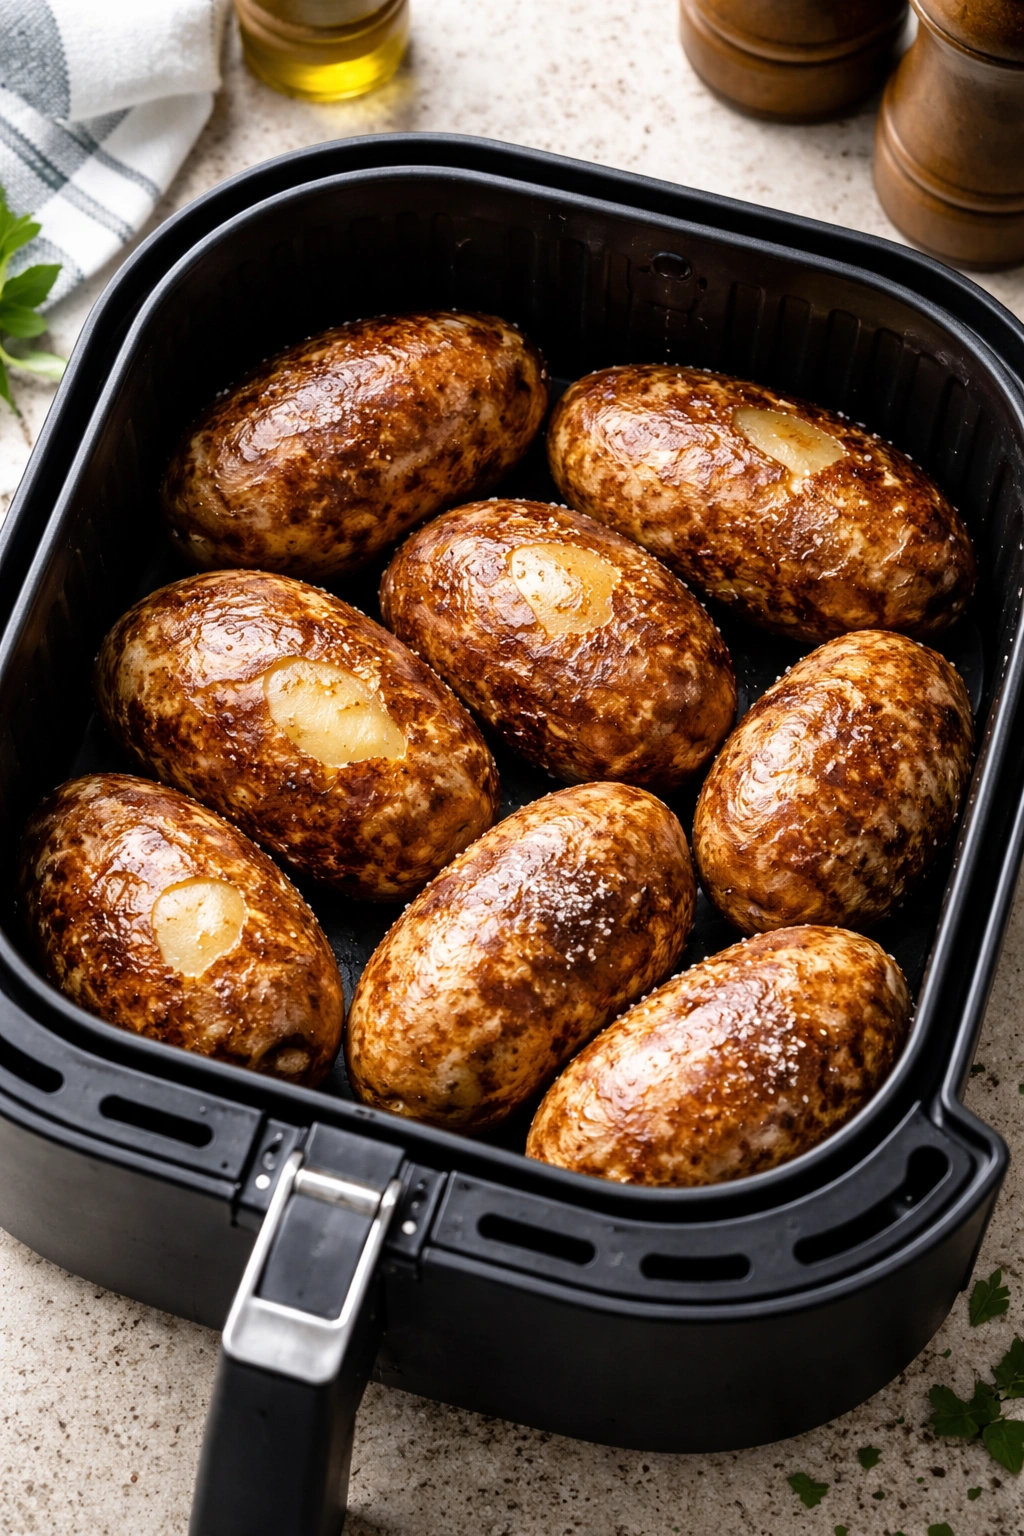
Overloading the basket is the single most common error. When potatoes are crowded together or piled on top of each other, the air can’t circulate evenly. The ones near the center stay pale and take longer to cook, while the ones on the outer edges brown too much. Every potato needs its own space. If your air fryer is small, cook in batches. It takes only 25 minutes per batch anyway.
Using potatoes that are too large causes uneven cooking. A 10-ounce potato in a standard air fryer will have a beautifully crispy, cooked exterior and a still-raw center by the time 25 minutes is up. Stick with medium potatoes (5 to 7 ounces). If you have some large ones you want to use, cut them in half lengthwise to expose more surface area and reduce the cook time slightly.
Skipping the fork pricks is almost always responsible for dramatic skin splitting. Pressure builds up inside an intact potato as the interior heats and water turns to steam. Without escape holes, that pressure has nowhere to go, and eventually the skin cracks. Even if it doesn’t crack during cooking, the potato will be under internal stress that affects the texture.
Not drying the potatoes thoroughly creates steaming rather than crisping. If there’s water clinging to the skin, that water will turn to steam under the air fryer’s heat. Steam is your enemy when you’re trying to crisp something — it softens the exterior. Dry your potatoes completely before oiling them.
Checking doneness too early leads to undercooking. Impatience is understandable when the timer says 20 minutes, but that 20 minutes is just a starting point. You must actually test doneness with a fork. A potato that feels even slightly firm in the very center isn’t ready yet. It will feel chalky and unpleasant to eat.
Variations That Expand Your Possibilities
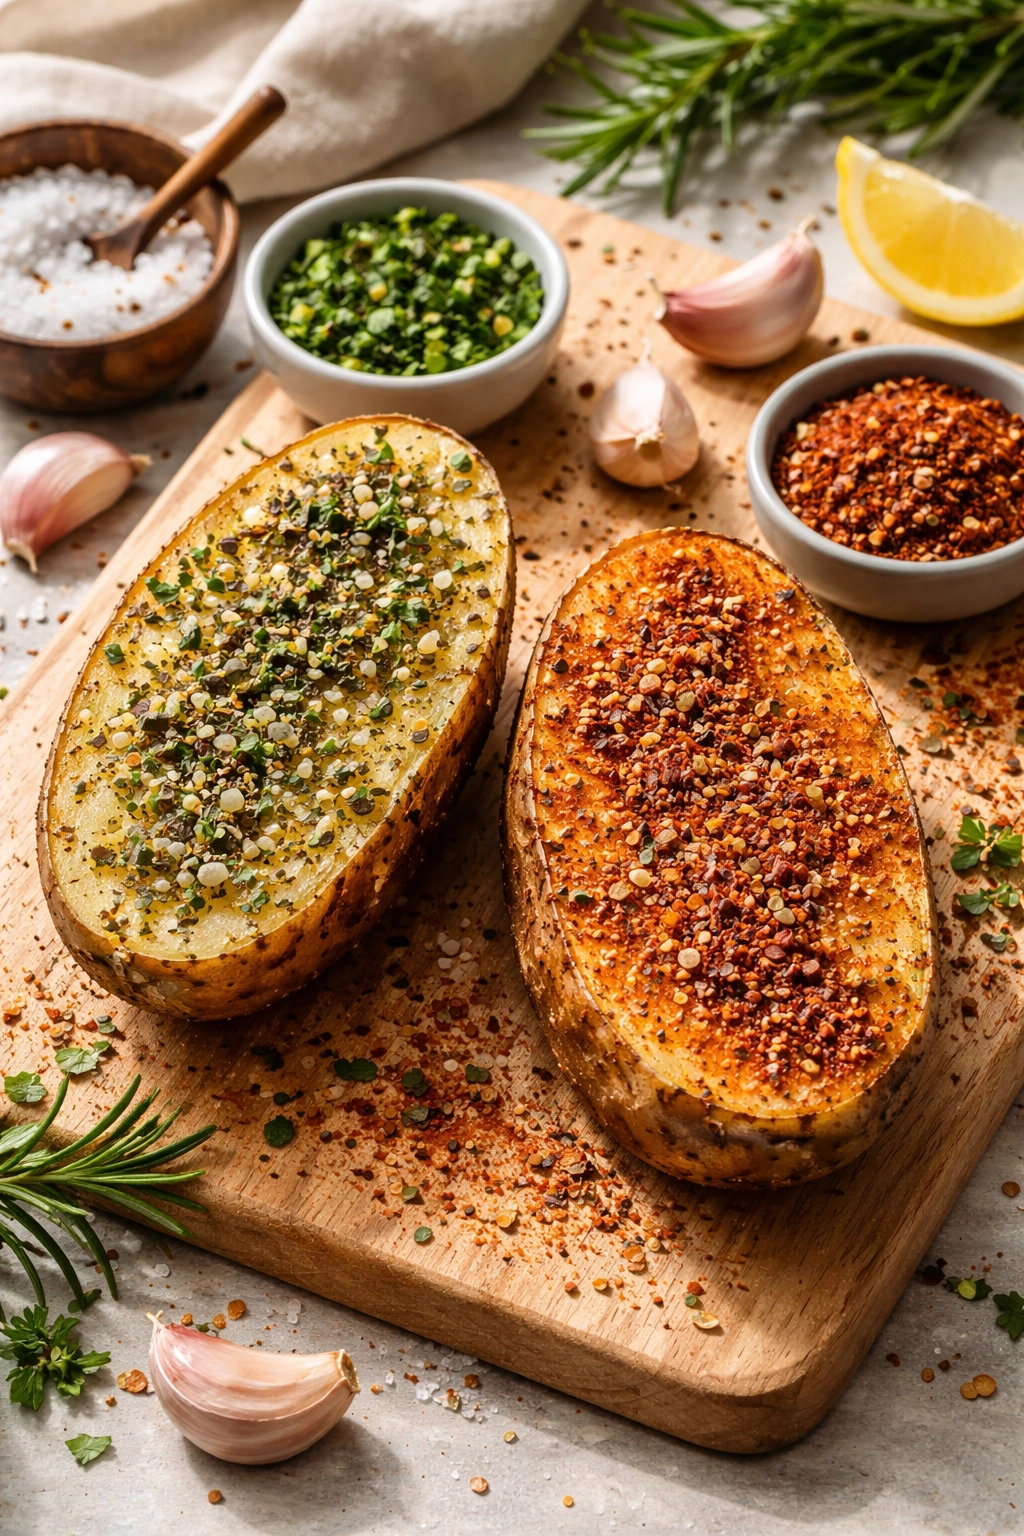
Seasoned Baked Potatoes: Instead of plain salt, mix your kosher salt with dried herbs before sprinkling on the oiled potato. Garlic powder, smoked paprika, dried thyme, dried rosemary, and black pepper all work beautifully. Use about half a teaspoon of the salt mixture per potato.
Garlic and Herb Version: Combine 1 teaspoon of finely minced garlic (fresh or jarred) with 1 tablespoon of softened butter and 1 teaspoon of mixed dried herbs (or 1 tablespoon of fresh chopped herbs). Rub this mixture over each oiled potato before adding the salt. The fresh or jarred garlic will caramelize slightly during cooking.
Cajun-Spiced Potatoes: Create a spice blend with 1 teaspoon of smoked paprika, half a teaspoon of garlic powder, half a teaspoon of onion powder, quarter teaspoon of cayenne pepper, quarter teaspoon of black pepper, and 1 teaspoon of kosher salt. Rub the oiled potato lightly with this blend instead of plain salt.
Extra-Crispy Skin Version: Spray or brush the potatoes with oil instead of rubbing them. This applies a thinner, more even layer of oil, which somehow crisps the skin even more dramatically. Use a spray bottle or a cooking brush for better control.
Sweet Potatoes: This method works beautifully with medium-sized sweet potatoes as well. The cook time is identical (20 to 25 minutes), and they develop the same crispy exterior. Sweet potatoes don’t need salt and oil, though they benefit from it just as regular potatoes do. Test doneness the same way with a fork.
Loaded Potato Topping Mix-Ins: Prepare toppings ahead of time so they’re ready the moment the potatoes finish cooking. Chop fresh chives, crumble cooked bacon, shred sharp cheddar, and measure out sour cream. Have everything ready to go — potatoes are best topped immediately while still steaming.
Storage, Make-Ahead Strategies, and Reheating
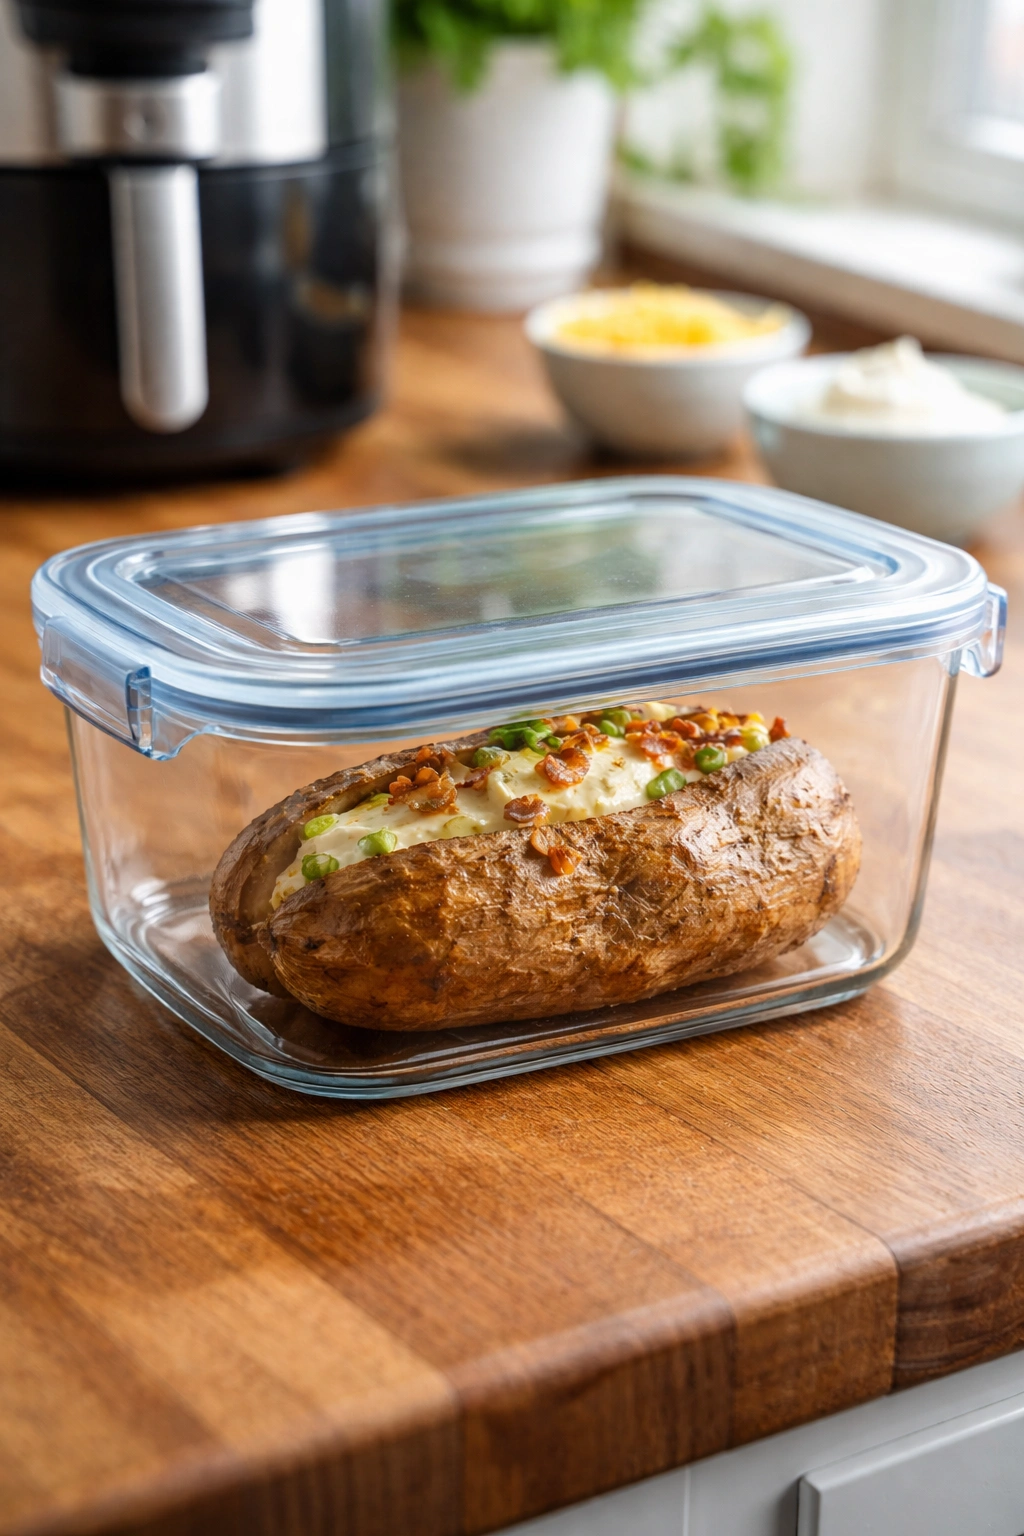
Baked potatoes are best eaten immediately after cooking, but they keep well and reheat effectively. Let any leftover cooked potatoes cool to room temperature, then store them in an airtight container in the refrigerator for up to four days. The skin will soften slightly as they cool, but the flavor remains excellent.
To reheat a refrigerated baked potato, place it back in the air fryer at 350°F (175°C) for about 5 to 8 minutes, until it’s heated through and the skin crisps up again. You can also reheat it in a conventional oven at 350°F for about 15 minutes, or microwave it (though the microwave won’t restore the crispy skin — it will soften the exterior). The air fryer reheating gives you back that crispy texture, so it’s the best method if you have one.
Baked potatoes freeze surprisingly well. Cool them completely, wrap each one individually in plastic wrap, then place them in a freezer bag. They’ll keep for up to two months. To reheat from frozen, place them in a 350°F (175°C) air fryer for about 12 to 15 minutes — longer than a refrigerated potato, since they start from frozen, but they’ll come out perfectly steamed and hot with a crispy exterior.
You can prep potatoes several hours ahead of baking. Wash, dry, prick, oil, and salt them, then store them in a cool place (not the refrigerator) until you’re ready to cook. There’s no need to refrigerate them if you’re cooking within a few hours; cool room temperature works fine. This means you can do all the prep work in the morning and bake them right before dinner.
Serving Suggestions and Topping Ideas

The classic topping is butter and sour cream, and there’s a reason that combination has endured — the cool sourness of the sour cream contrasts beautifully with the fluffy, buttery interior. Add chives for a bit of onion flavor and color.
The Loaded Version: Start with butter and sour cream, then add crispy bacon bits, shredded sharp cheddar, chopped fresh chives, and a crack of black pepper. This is the version you see at steakhouses, and it’s genuinely why potatoes are such a popular restaurant side.
The Vegetable-Heavy Version: Top with sautéed mushrooms, caramelized onions, fresh thyme, and a small dollop of sour cream. This approach works especially well alongside grilled meats or roasted chicken.
The Brunch Version: Top with a fried or poached egg, crispy bacon or sausage, shredded cheese, and a drizzle of hot sauce. Serve these as a hearty component of a brunch meal.
The Simple Herb Finish: A generous pat of butter, a sprinkle of fleur de sel, and torn fresh chives or parsley. Sometimes simplicity is best.
Air fryer baked potatoes pair beautifully with grilled steak, roasted salmon, slow-cooked pulled pork, or roasted vegetables. They’re equally at home at a formal dinner or a casual weeknight meal. Because they cook so quickly, they’re an excellent addition to meals where you need a side dish that doesn’t require advance planning.
Troubleshooting When Things Don’t Go Perfectly

Potatoes Are Done on the Outside But Still Raw Inside: This happens when the potatoes are too large, the basket was overcrowded, or the air fryer was turned up too high from the start. Next time, use smaller potatoes, give them more space, or start at a slightly lower temperature (385°F / 195°C) and add 2 to 3 minutes to the cook time.
Skin Is Still Pale and Wrinkled: You likely skipped the oil or didn’t apply enough. Oil is essential for browning and crisping. Make sure the entire surface is coated evenly, and don’t be shy with it — a generous half teaspoon per potato is correct.
Potato Feels Dense and Gummy Inside: This suggests undercooking or possibly a potato that’s too large for the air fryer’s capacity. Make sure the fork actually goes through with minimal resistance. If it does and the potato still feels dense, it might be a waxy variety rather than a russet — russets are far more reliable for baking.
Potatoes Split Badly During Cooking: You didn’t prick them enough, or you skipped the pricking entirely. Eight to twelve pricks per potato aren’t excessive — they’re insurance against this exact problem. Next time, use more pricks, distributed across the entire surface.
Uneven Cooking Between Potatoes in the Same Batch: Your potatoes are different sizes. Separate them by size — cook all the medium ones together, and cook any larger potatoes separately so you can give them extra time.
Skin Is Burned But the Inside Isn’t Quite Done: Your air fryer runs hot, or you started at too high a temperature. Try 390°F (200°C) instead of 400°F, and cook for an extra 3 to 5 minutes. Every air fryer has its own personality.
Final Thoughts

Air fryer baked potatoes aren’t complicated, but they do benefit from understanding a few fundamental principles: proper sizing, adequate spacing in the basket, the importance of pricking and oil, and learning how your specific air fryer behaves. Once you understand those basics, you’ll make baked potatoes so reliably excellent that you’ll find yourself putting them on the dinner table constantly.
What makes this method genuinely foolproof is that you’re not fighting uneven heat or guessing whether the potato is done. You’re working with an air fryer’s natural strengths — rapid, circulating heat and consistent temperature — and applying simple techniques that play to those strengths. The result is a potato with a crispy, seasoned exterior and a fluffy, perfectly cooked interior, ready for whatever toppings you love in about 25 minutes from start to finish.
The next time you’re planning a meal and thinking “I wish I had a side dish that’s impressive and requires minimal effort,” an air fryer baked potato is the answer. You’ve got everything you need right here to make them perfectly, every single time.