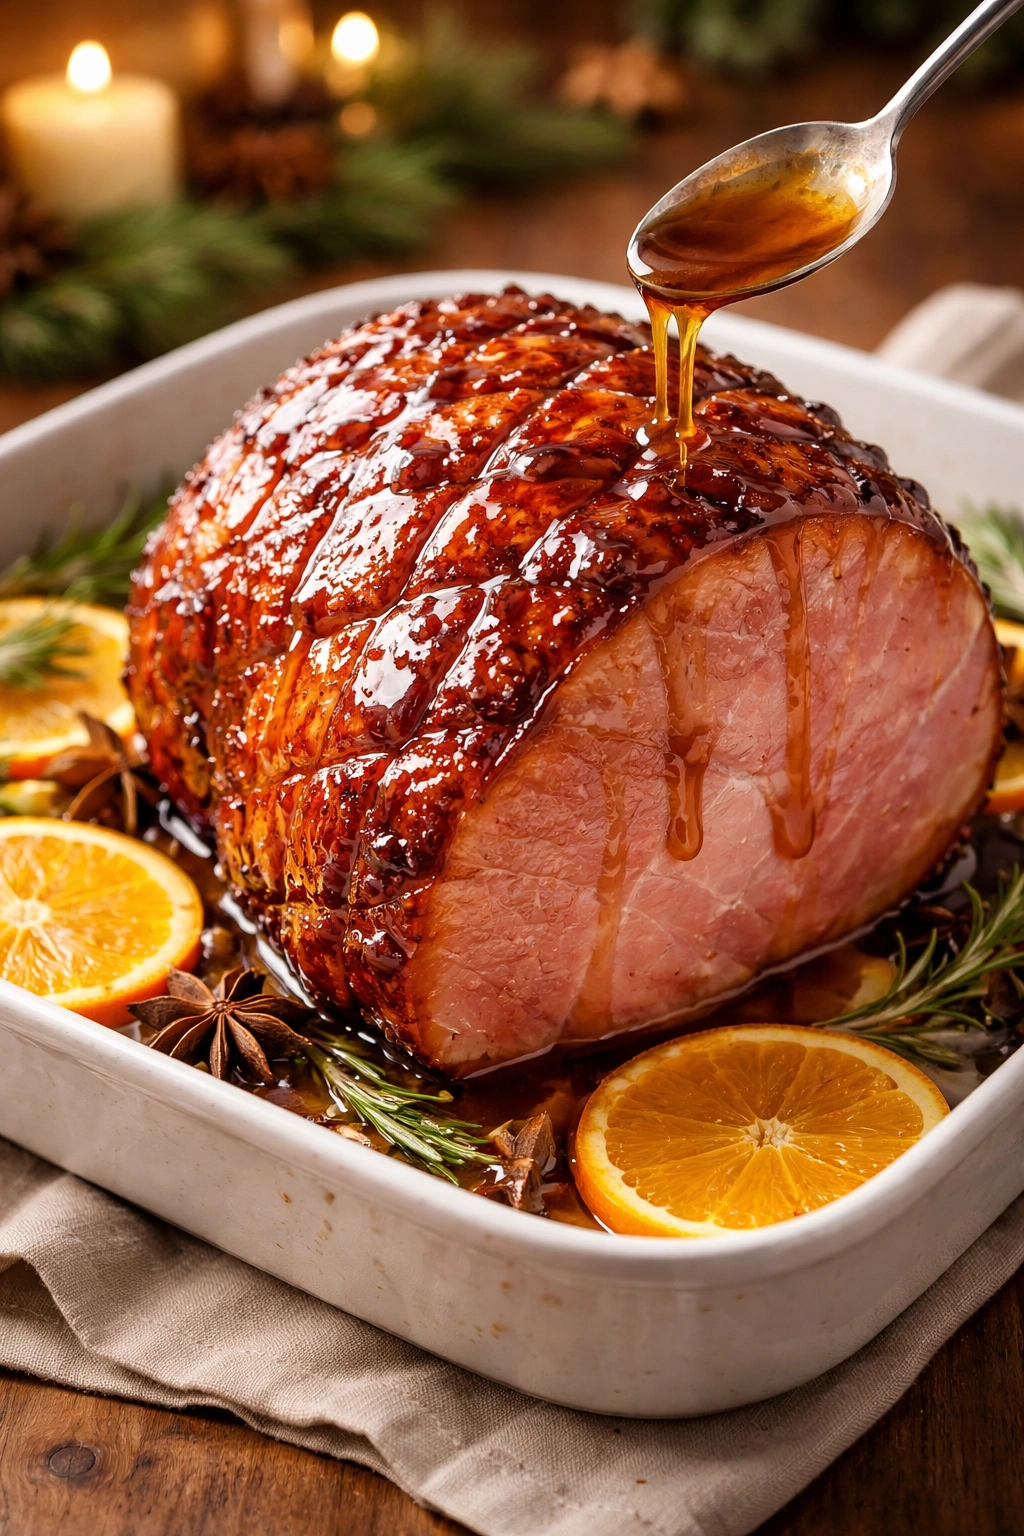
When holiday dinners roll around, there’s one thing that can transform a decent ham into something genuinely memorable—and it doesn’t come from that little packet tucked inside the packaging. A homemade brown sugar ham glaze made right in your kitchen will give you something smoother, richer, and far more impressive than anything mass-produced. The magic happens when the glaze bakes into a sticky, caramelized crust that catches the light like spun sugar and tastes like brown sugar, mustard, and savory ham all came together in a moment of perfect harmony. This recipe takes just minutes to pull together, yet somehow delivers the kind of results that make people ask for the recipe before they’ve even finished their first slice.
The beauty of a brown sugar ham glaze is its simplicity paired with genuine flavor. You’re not spending hours in the kitchen or hunting down unusual ingredients—you’re using pantry staples you likely already have on hand to create something that feels fancy enough for Christmas or Easter, yet easy enough for a regular Sunday dinner. The glaze clings to the meat beautifully, melting into every crevice and scoring, and when it bakes, the sugars caramelize into a shiny, amber-colored crust that’s both sweet and savory. That balance is everything with ham. Too much sweetness, and it becomes candy. Too much savory, and you miss the point. A proper glaze hits that sweet spot (literally) where brown sugar meets mustard, where honey dances with vinegar, and suddenly your ham isn’t just good—it’s the reason people come back for seconds.
Why Homemade Ham Glaze Beats the Packets
That little glaze packet that comes with most store-bought hams? It’s designed to be shelf-stable, not delicious. The packets use a lot of artificial ingredients and strange thickeners that never quite produce the glossy, caramelized coating you’re imagining. A homemade brown sugar glaze starts with real ingredients that actually taste good and actually caramelize properly in your oven. You can control the sweetness, adjust the tanginess, and end up with something that’s honestly better than anything you’d pay extra for at the butcher counter.
Making your own glaze also gives you flexibility. If you want it sweeter, add more honey. If you want more tang, a splash of extra vinegar does wonders. You can toast the ham one way for Christmas (with cinnamon and cloves) and another way for Easter (with citrus zest), using the exact same base recipe. That’s the power of understanding how these ingredients work together instead of just following directions on a packet.
Another real advantage: you’re already in the kitchen cooking the ham anyway, so you might as well make the glaze fresh. It takes maybe five minutes—less time than it takes to set the table. The ingredients are simple enough that even if you’re new to cooking ham, you can’t mess this up. The glaze comes together right on the stovetop, gets brushed onto the ham during the last stretch of baking, and does all the heavy lifting in terms of making your centerpiece look like you spent hours on it.
Understanding the Role of Each Ingredient
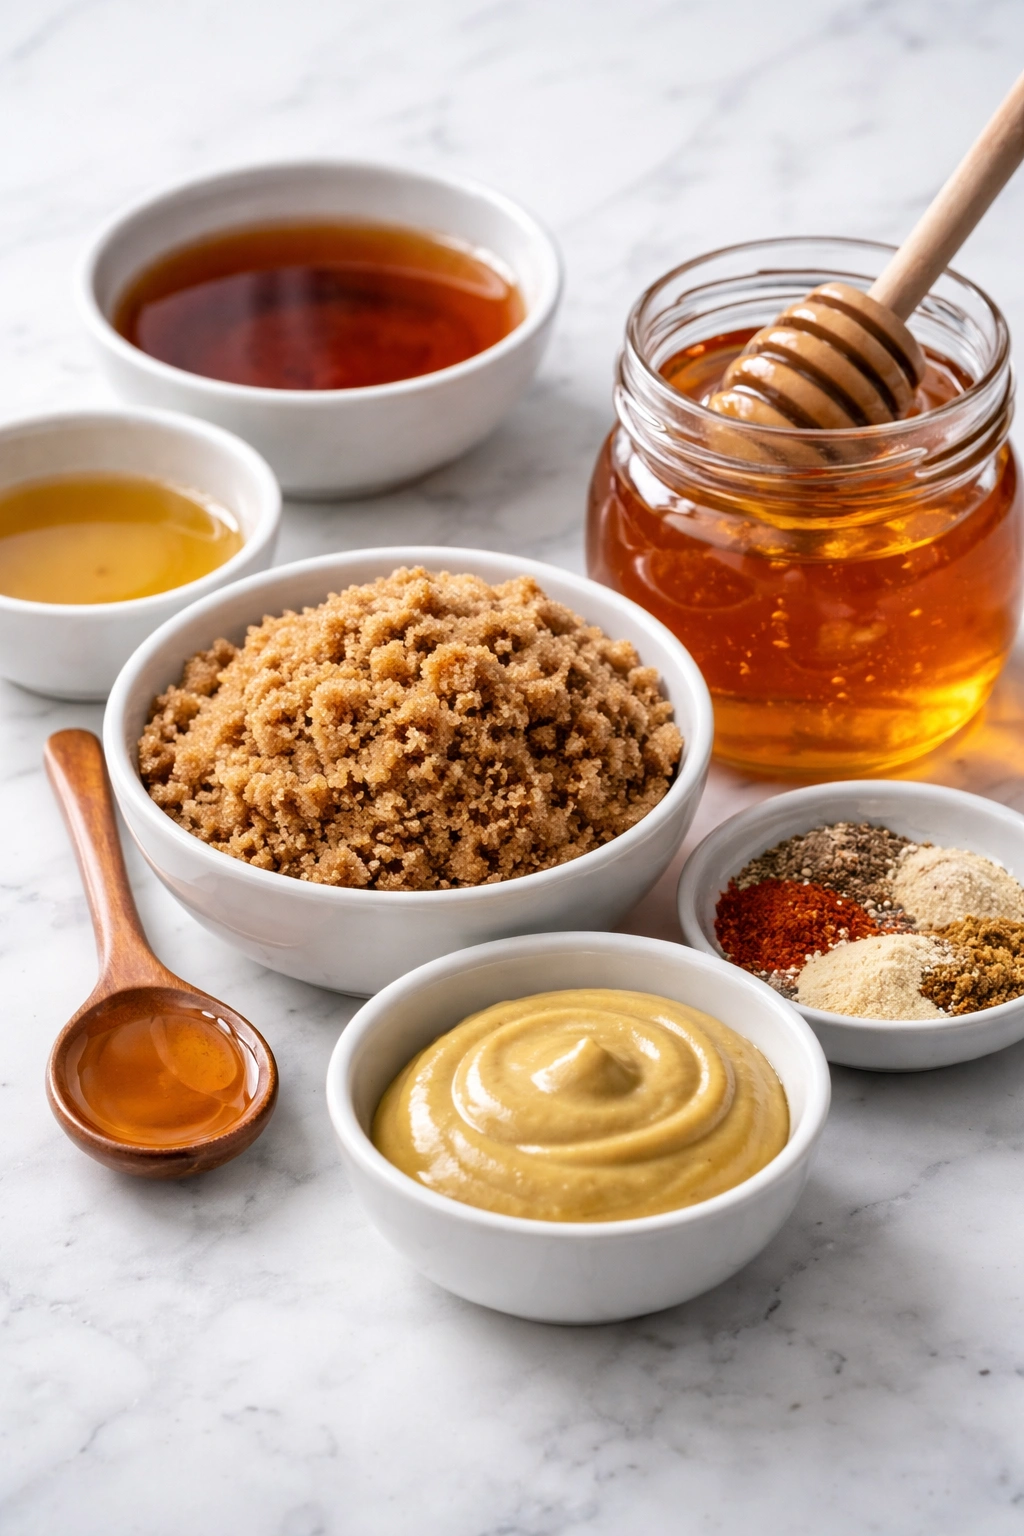
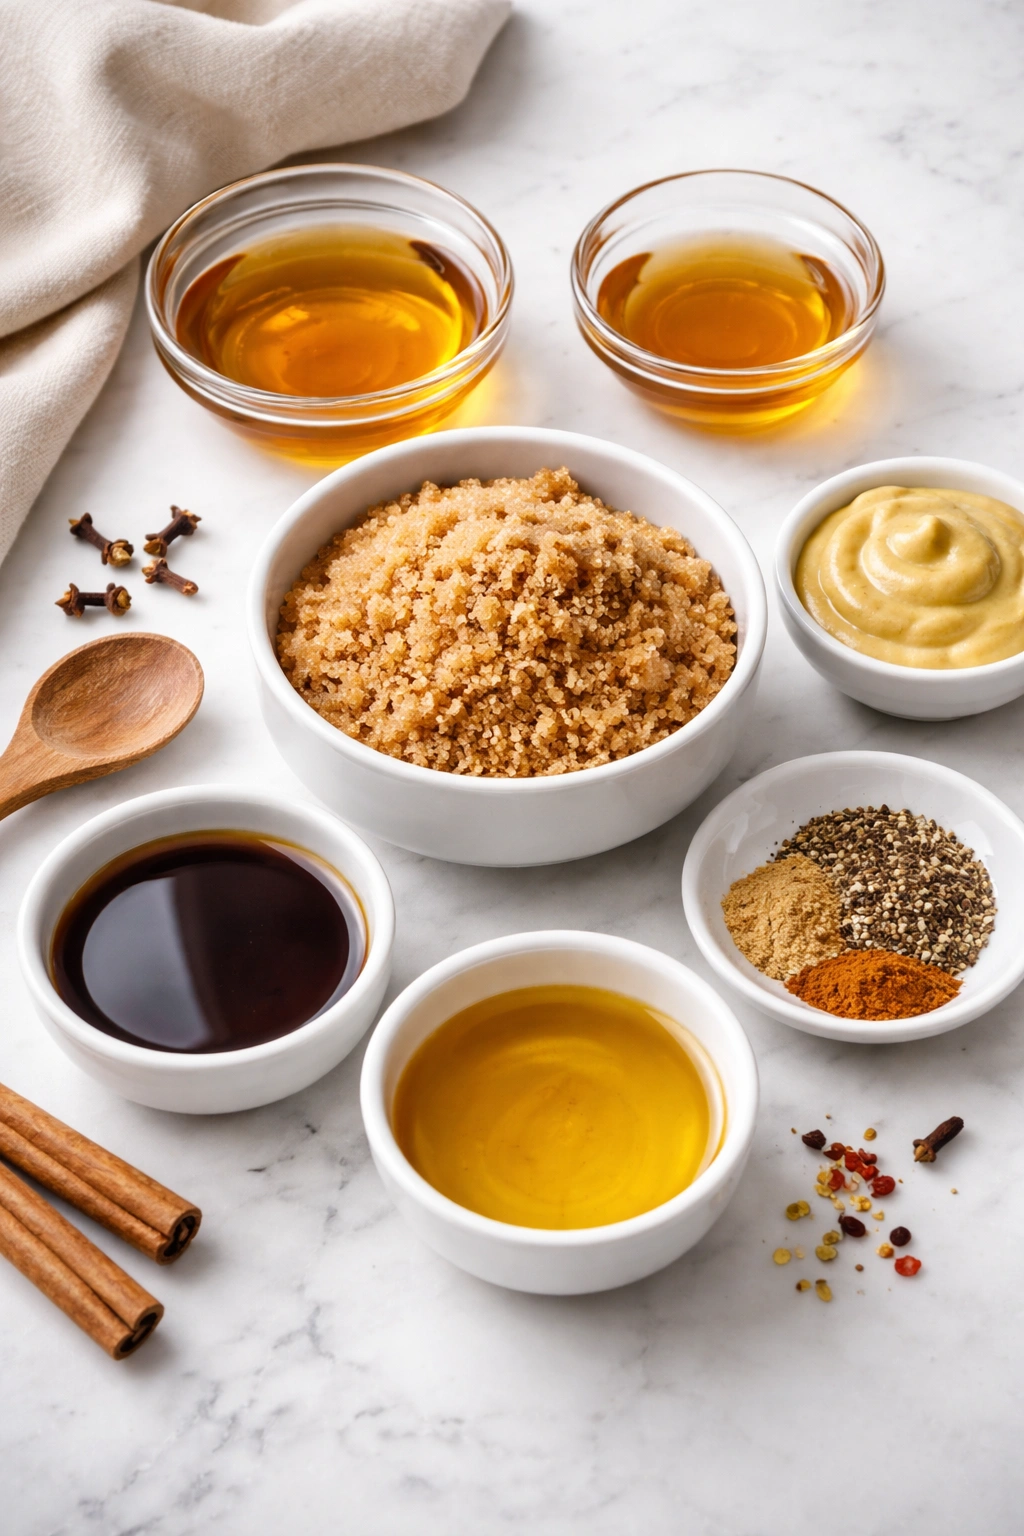
Not every ingredient in a glaze is there just for flavor—they work together to create texture, appearance, and that critical sweet-savory balance. Brown sugar is the foundation, and it’s important that you understand why brown sugar specifically, not white sugar. Brown sugar contains molasses, which brings caramel notes and a subtle depth that plain white sugar just can’t deliver. When brown sugar hits heat, those molasses compounds break down and create that gorgeous amber color and slight smokiness that makes a glazed ham look professional.
Honey or maple syrup adds smoothness and natural sweetness. They also help the glaze stick to the ham and caramelize more evenly than sugar alone would. The stickiness is important—it’s what lets the glaze cling to the meat as it bakes and create that thick, glossy finish. Honey brings a floral note, while maple adds a deeper, slightly woody flavor. Either works beautifully, and some people use a combination.
Dijon mustard is the secret weapon that most people don’t expect. It brings tang and savory depth that balances the sweetness so the glaze doesn’t taste like candy. The mustard also acts as a thickening agent and prevents the glaze from being too runny. Whole grain mustard gives you visible texture; Dijon gives you smoothness. Yellow mustard will work if it’s all you have, but Dijon creates a more sophisticated flavor profile.
Vinegar—whether apple cider, white, or even champagne vinegar—adds brightness and prevents the glaze from being cloying. It’s acidic, which actually helps tenderize the outer edge of the ham slightly while it bakes. Apple cider vinegar brings a sweet note; white vinegar is sharper; champagne vinegar is more delicate. The type you choose subtly changes the flavor, so pick what you have or what sounds good to you.
Spices like cinnamon, allspice, and ground cloves aren’t just decoration—they add warmth and make the glaze feel festive. They’re completely optional, but they’re the difference between a glaze that tastes good and one that tastes like the holidays.
Choosing the Right Ham for Glazing
Not all hams are created equal, and what you start with determines how successful your glaze will be. Bone-in ham is almost always the better choice if you have the space in your oven and the time to cook it. The bone adds flavor to the meat and keeps it juicier as it cooks. The ham will take longer to bake, but that’s actually fine because you want a slow, gentle heat for the glaze to set properly without burning.
A spiral-cut ham is already sliced, which means the glaze can seep between the slices and coat so much more surface area. This is a real advantage in terms of flavor distribution. If you can find a bone-in spiral-cut ham, you’ve hit the jackpot. Boneless hams cook faster and are easier to carve, but they can dry out more quickly and don’t have that rich bone flavor.
The size of the ham matters too. Plan for roughly 0.75 pounds per person if it’s bone-in (the bone takes up space). So a 10-pound ham will serve about 13-14 people with enough leftovers for sandwiches. A 5-pound ham is perfect for smaller gatherings, while a 14-16 pound ham is appropriate for large holiday crowds.
Ready-to-eat hams are what most people buy, and that’s fine—the label will say “fully cooked” or “ready to eat.” These just need to be heated through and glazed. Raw hams (sometimes called gammon in other countries) need longer cooking times and different handling. Check your label carefully and follow the cooking time on the package, then apply the glaze in the final 15-30 minutes of baking.
One more thing: look for a ham that has visible meat texture, not that shiny, rubbery appearance of low-quality deli ham. A good ham from a butcher or quality grocery store will have a meaty texture and a pure ham flavor. The glaze will do the heavy lifting, but starting with decent quality ham means the overall result will be genuinely delicious, not just delicious-looking.
The Science of How Ham Glaze Actually Works
Understanding what happens to your glaze in the oven helps you avoid common mistakes. When you brush the glaze onto the raw ham, it’s a thick, smooth paste. As the oven heats it, the water in the glaze evaporates and the sugar begins to break down. This is caramelization—not burning, but the process where sugars brown and develop complex flavors.
The browning happens slowly and gradually if your oven temperature is moderate (around 325°F is ideal). If your oven is too hot, the exterior of the glaze burns before the interior of the ham finishes cooking. That’s why the standard recommendation is to apply the glaze during the last 15-30 minutes of baking, not at the beginning. You want the ham to get most of its cooking done before the glaze hits the heat.
The repeated basting (brushing the glaze on multiple times during those final minutes) serves several purposes. It keeps the glaze moist so it caramelizes instead of hardening. It builds up layers, creating a thicker, glossier crust. And it helps the glaze stick to the ham by keeping it warm and pliable. Each basting adds another thin layer that sets slightly, then gets another layer on top.
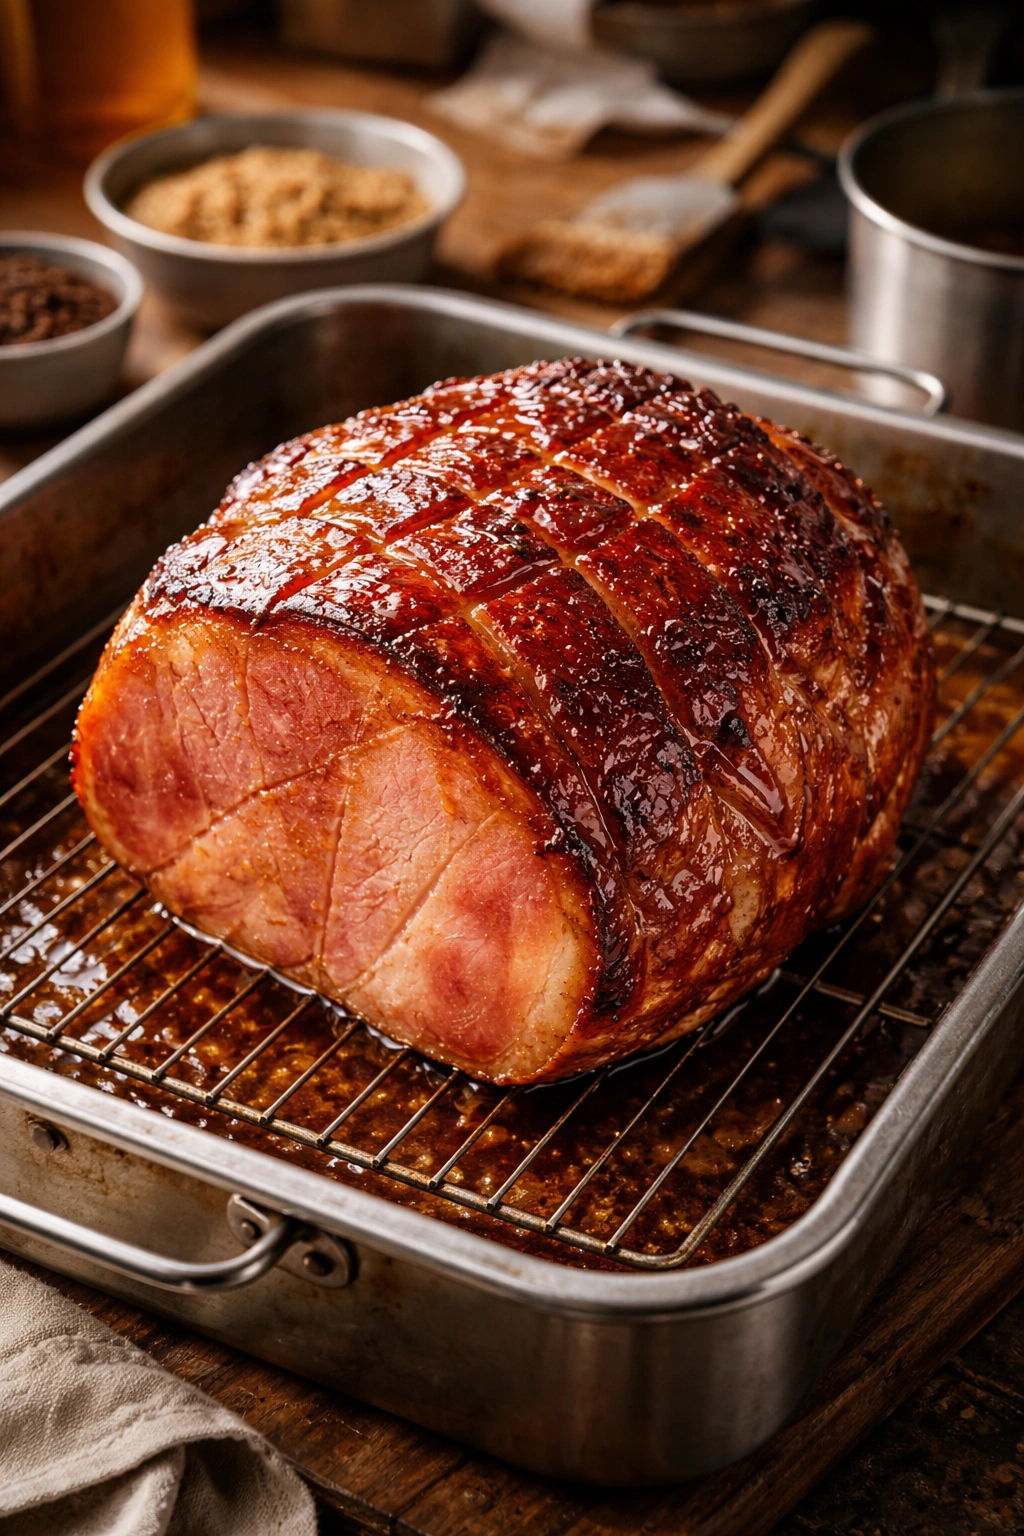
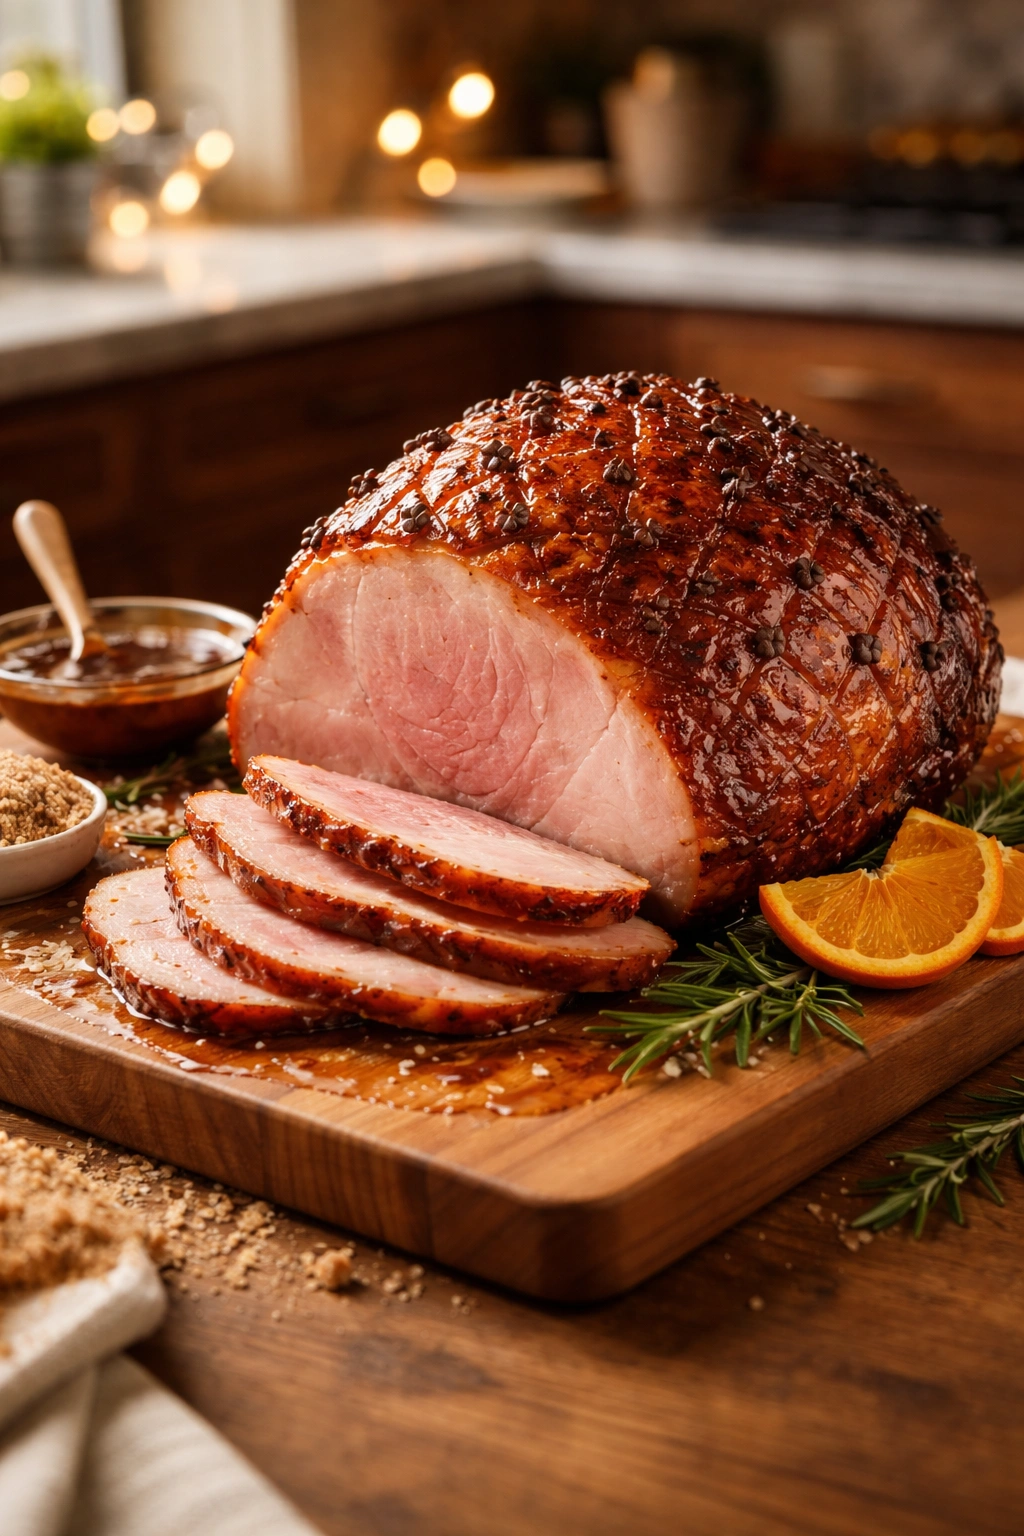
The scoring you do before the glaze goes on creates shallow diamond or crosshatch patterns in the fat cap. These aren’t just for show—they break up that thick layer of fat and let the glaze seep down into those crevices. This means more surface area gets caramelized, more flavor gets into the meat, and your ham looks more impressive. The scoring should be shallow (about 1/4-inch deep), into the fat but not into the meat itself.
Yield: Serves 12-20 people | Makes approximately 1-2 cups of glaze
Prep Time: 10 minutes
Cook Time: 5 minutes (glaze only; ham takes 1.5-2.5 hours depending on size)
Total Time: 2-3 hours (mostly hands-off oven time)
Difficulty: Beginner — The glaze itself is just mixing and simmering; the ham does most of the work in the oven.
The Classic Brown Sugar Ham Glaze Recipe
For the Glaze:
- 1 cup packed brown sugar (light or dark, your preference)
- 1/2 cup honey or real maple syrup
- 1/3 cup Dijon mustard (yellow mustard or whole grain also work)
- 1/4 cup apple cider vinegar (white vinegar or champagne vinegar are fine substitutes)
- 1/4 teaspoon ground black pepper
- Optional spices: 3/4 teaspoon ground cinnamon, 1/2 teaspoon ground allspice, 3/4 teaspoon mustard powder
For the Ham:
- 1 fully cooked bone-in ham (8-16 pounds, depending on your crowd)
- 2-3 cups water or low-sodium broth (for the roasting pan)
- Sharp knife for scoring
Preparing the Ham: The Foundation of Success
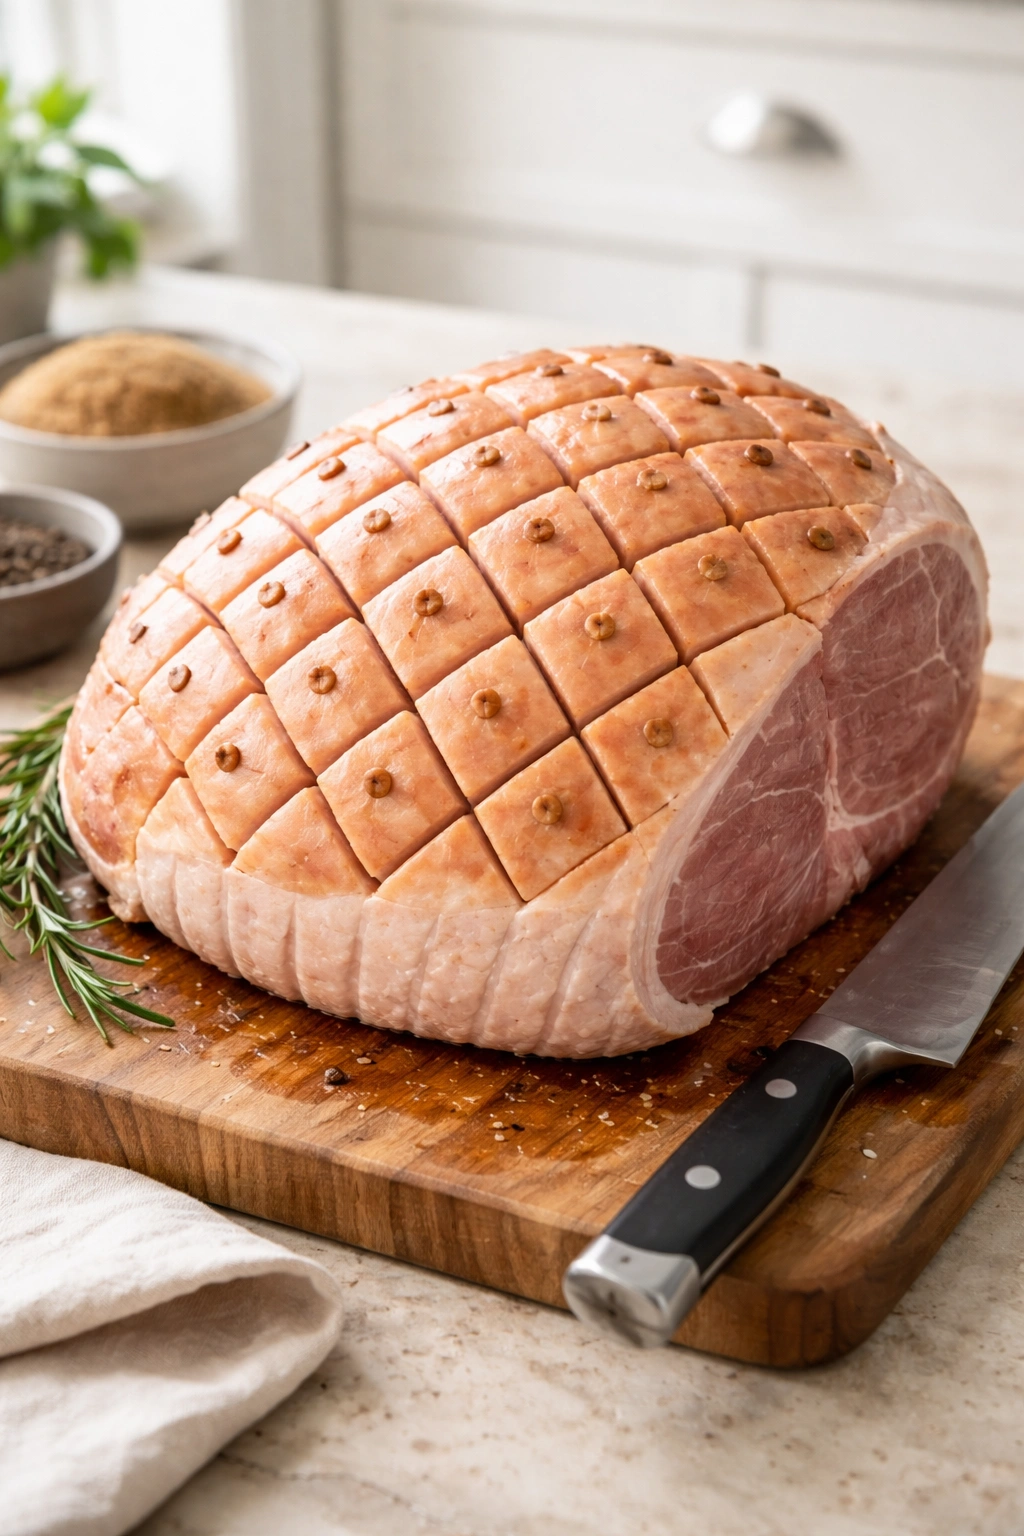
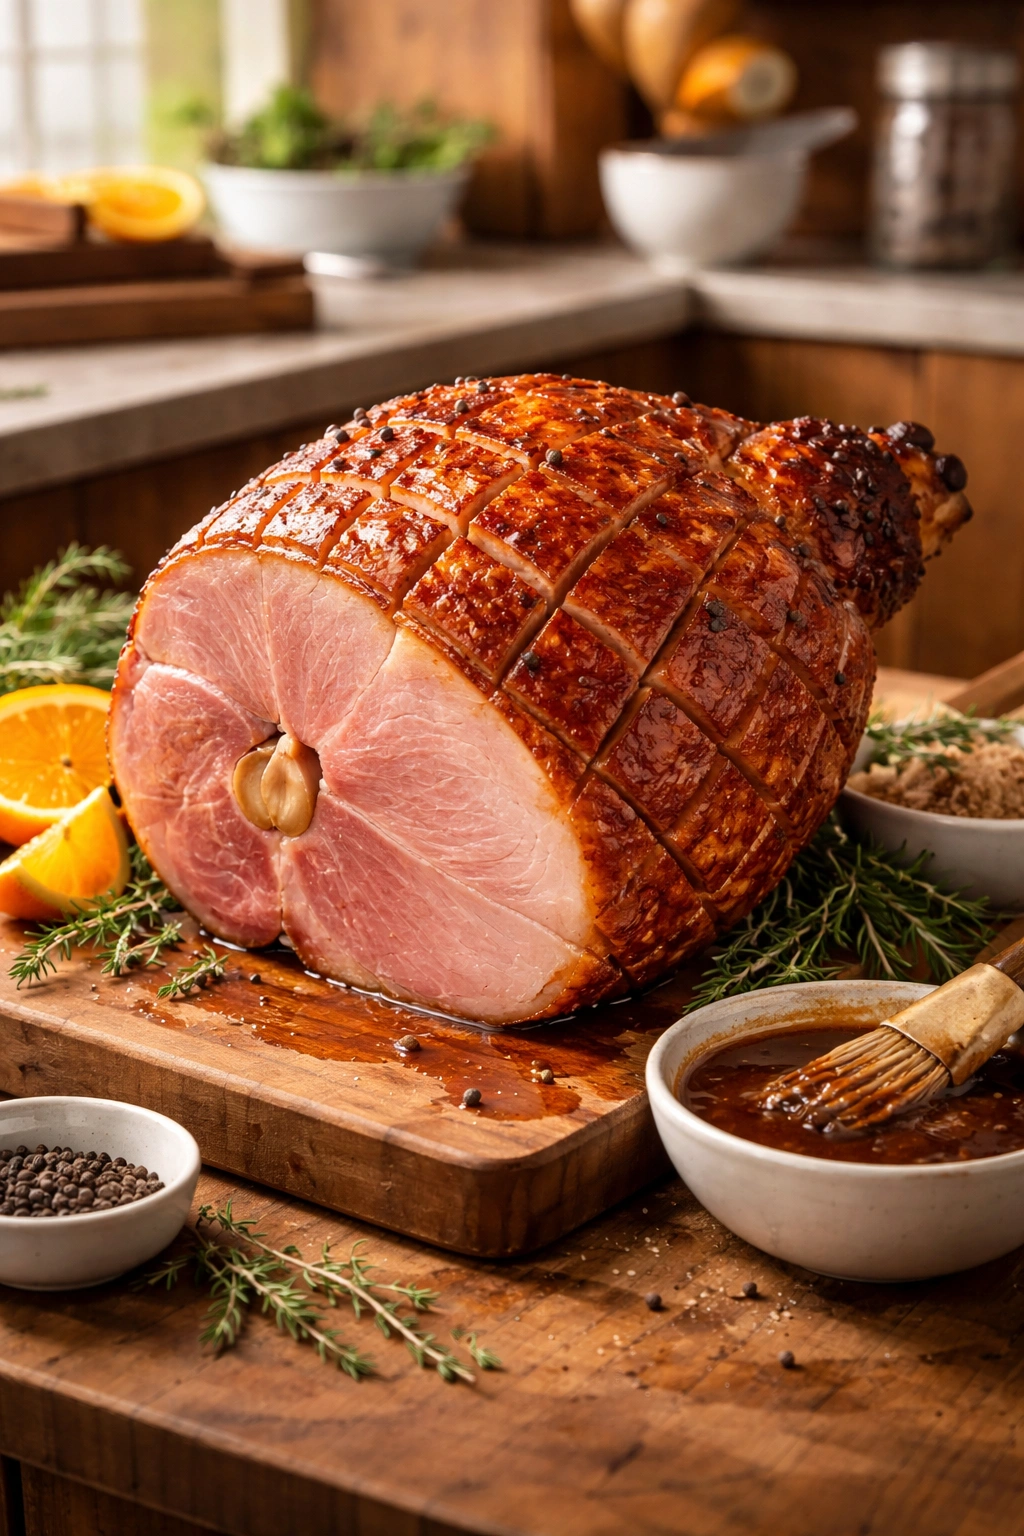
Score the ham before anything else. Remove the ham from the refrigerator about one hour before you plan to start cooking—you want it closer to room temperature so it cooks more evenly. Place it on a cutting board with the curved side up (the side that will be visible on the table). Using a sharp knife, cut shallow diagonal lines about 1/2-inch apart across the entire surface, cutting about 1/4-inch deep into the fat layer. Then rotate the ham and cut lines in the opposite diagonal direction to create diamond shapes all over the surface.
Remove the rind carefully. Some hams come with the rind (the papery skin) still on. You’ll want to remove this because it’s tough and inedible. Run your knife between the rind and the fat layer, then use your fingers to peel it back gently. The rind wants to come off—don’t force it. It’s fine if you have to trim off small pieces as you go. Leave the fat layer on; that’s where the flavor is and where the glaze will caramelize into something beautiful.
Trim excess fat if you prefer, but be strategic. Most hams have a thick layer of fat on top, maybe 1/2-inch or more. This fat doesn’t render (melt) during baking the way you might hope. If you have an aversion to that much fat, trim some of it off with a sharp knife. But leave at least 1/4-inch of fat on the surface—you need some there for the glaze to cling to and for that gorgeous caramelized crust. Without any fat, the glaze won’t stick and the exterior won’t have that shiny, sticky finish.
Making the Glaze: The Five-Minute Formula
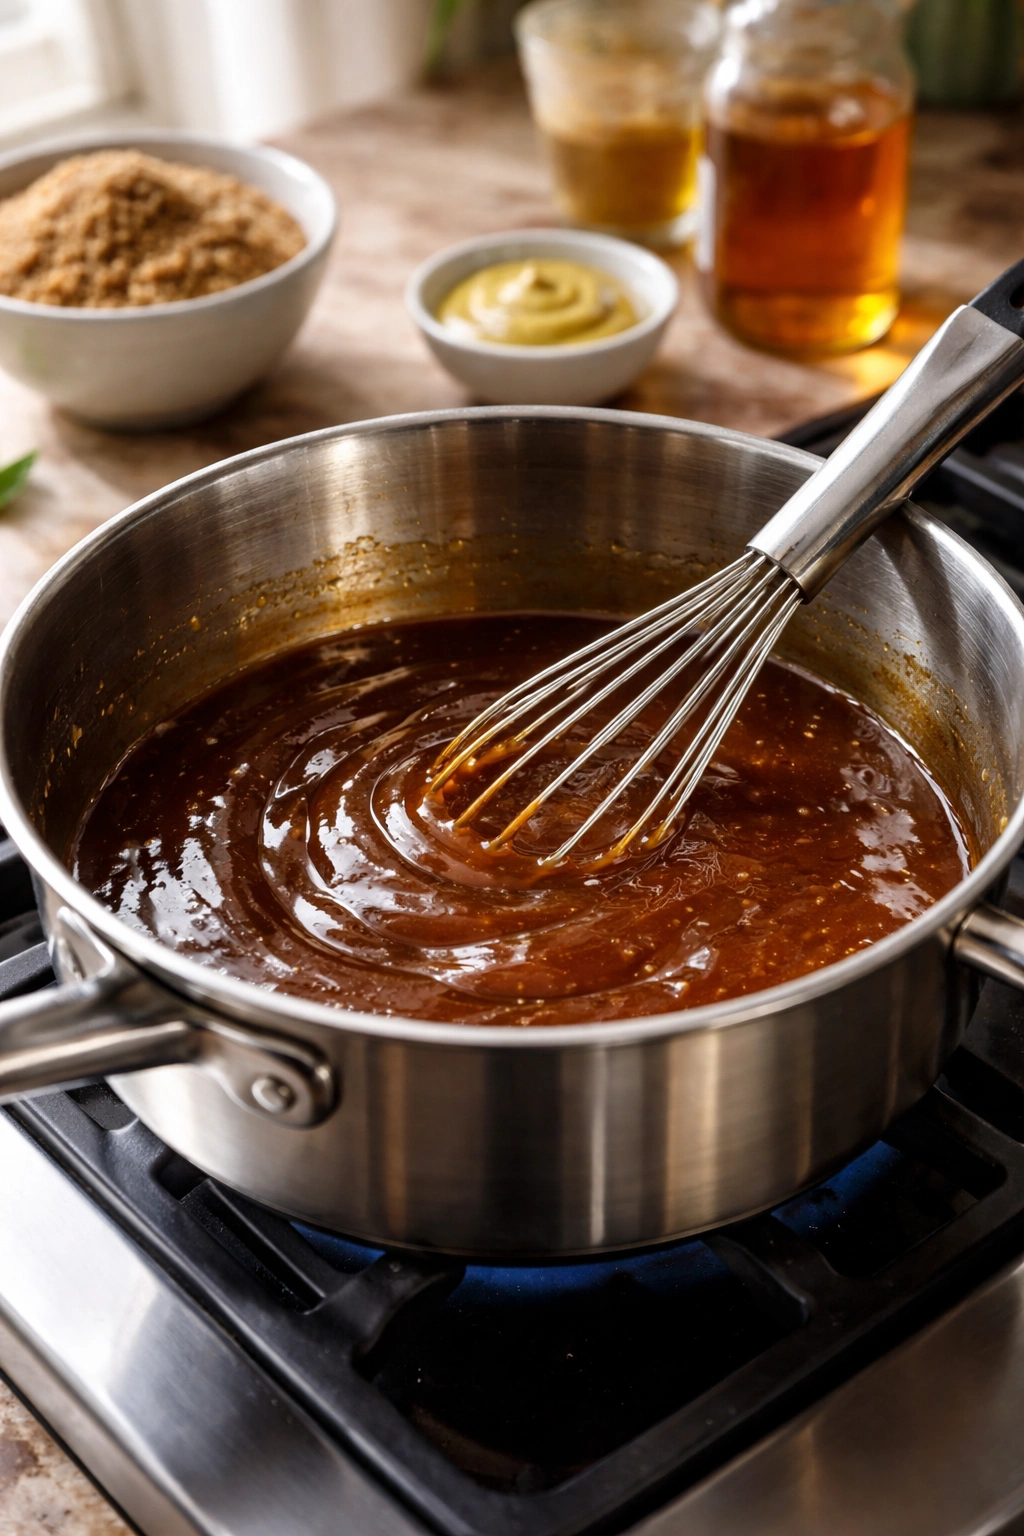
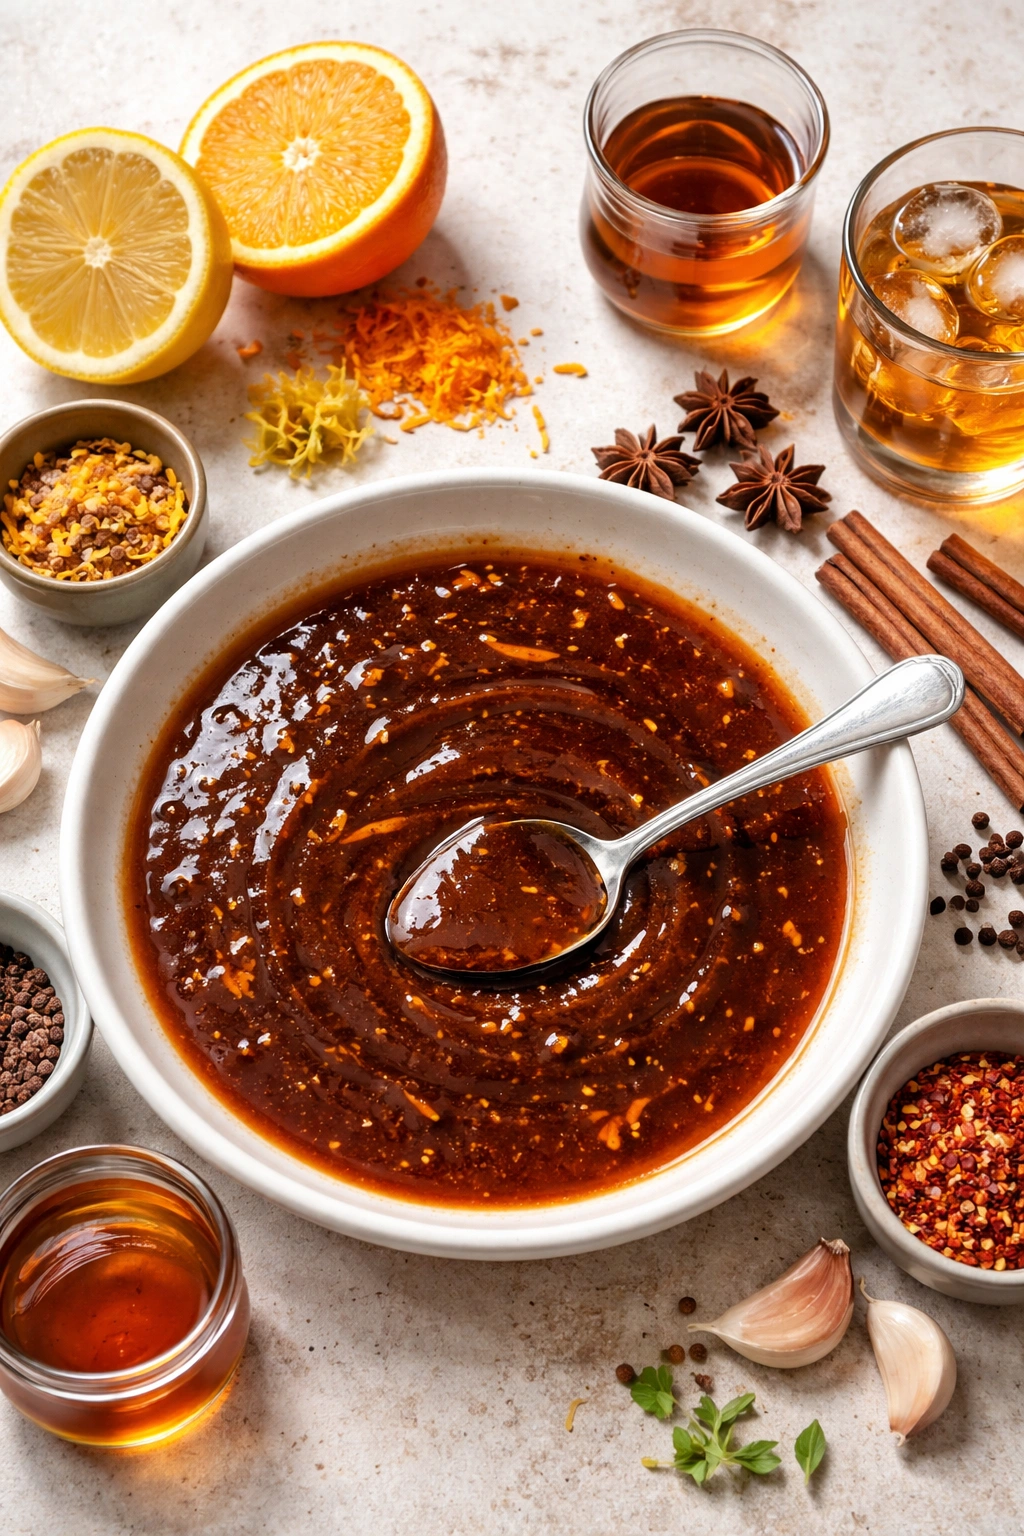
Combine all glaze ingredients in a small saucepan. Add the brown sugar, honey, mustard, vinegar, and black pepper to a saucepan. Don’t fill the pan more than halfway because the mixture will bubble up as it heats. Stir everything together with a whisk until you have a smooth mixture with no lumps of brown sugar.
Heat the glaze over medium heat, stirring frequently. Set the saucepan on medium heat and stir constantly with a whisk. You’re looking for the brown sugar to dissolve completely into the honey and vinegar, creating a smooth, uniform glaze. This takes about 2-3 minutes. You’ll see it go from grainy and thick to smooth and glossy.
Bring to a gentle simmer, then remove from heat. Once the mixture is smooth and the brown sugar is fully dissolved, let it bubble gently for another minute. You’re not trying to reduce it significantly—you just want to bring it to temperature and let it thicken slightly as it cools. Remove the pan from heat and set it aside. The glaze will continue to thicken as it cools, so if it seems too thin right now, that’s perfect. It will reach the right consistency by the time you’re ready to use it.
Taste and adjust if desired. Before you commit to the glaze, dip a clean spoon into it and taste a tiny bit (be careful; it’s hot). Is it sweet enough? Tangy enough? Does it feel balanced? If it’s too thick, whisk in a tablespoon of water. If it seems too sweet, add another teaspoon of vinegar. If it needs more savory depth, whisk in another teaspoon of mustard. Make these adjustments while the glaze is still warm so everything dissolves smoothly.
Step-by-Step Baking Instructions
Preheat and prepare:
-
Preheat your oven to 325°F (163°C) and position the rack in the lower third of the oven so the ham will be centered, not right at the top where it could brown unevenly.
-
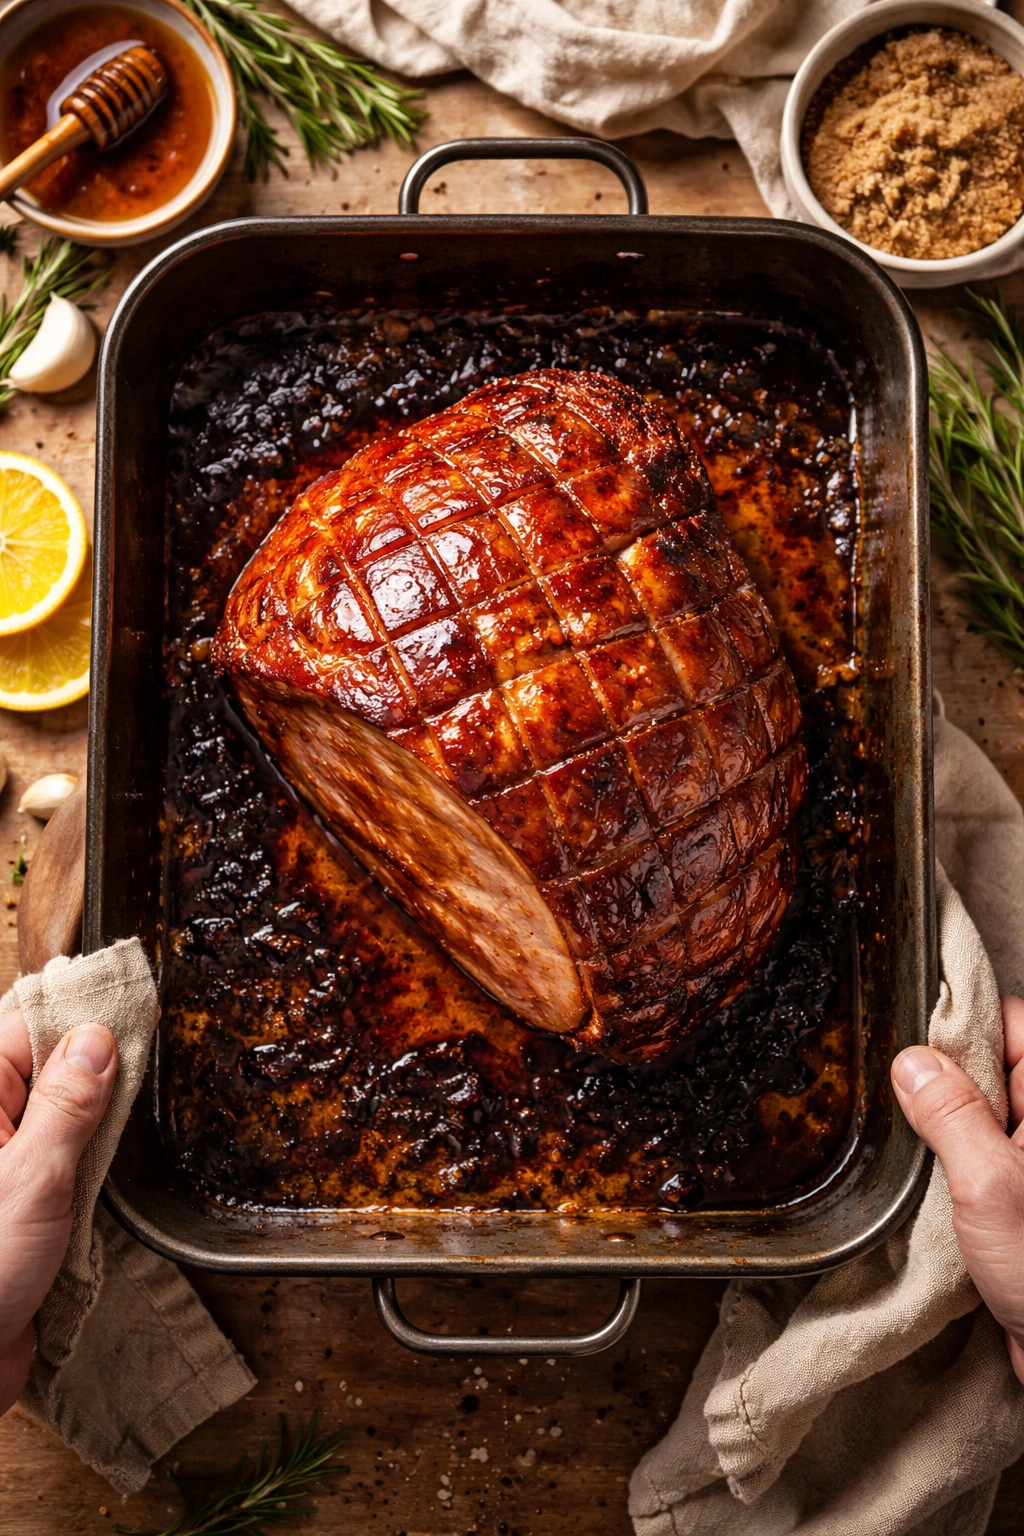
Line a large roasting pan with foil for easy cleanup. Place a wire rack in the bottom of the pan (or create a makeshift rack using crumpled foil balls if you don’t have one). The rack elevates the ham slightly so heat circulates underneath and the glaze doesn’t sit directly on the hot pan.
-
Place the scored and trimmed ham on the rack, flat side down, in the roasting pan.
-
Pour 2-3 cups of water or broth into the bottom of the pan around the ham (not on top of it). The water creates steam, keeps the ham moist as it bakes, and crucially, prevents the glaze drippings from burning onto the pan. Burnt sugar on the pan is nearly impossible to clean. As the water evaporates during cooking, add more if needed to keep at least 1/2-inch of liquid in the bottom.
-
Cover the ham tightly with aluminum foil and place it in the oven.
Bake covered (most of the cooking time):
-
Bake the covered ham for approximately 10-12 minutes per pound, until it reaches an internal temperature of 130°F when you insert a meat thermometer into the thickest part of the meat without touching bone. For an 8-pound ham, that’s about 1.5 hours. For a 12-pound ham, it’s about 2 hours. For a 16-pound ham, plan on 2.5 hours. The ham is already cooked, so you’re really just heating it through and giving it time for the gentle heat to warm it evenly and keep it moist.
-
Resist the urge to open the oven frequently. Every time you open it, you release steam and heat, which makes everything take longer. Trust the process.
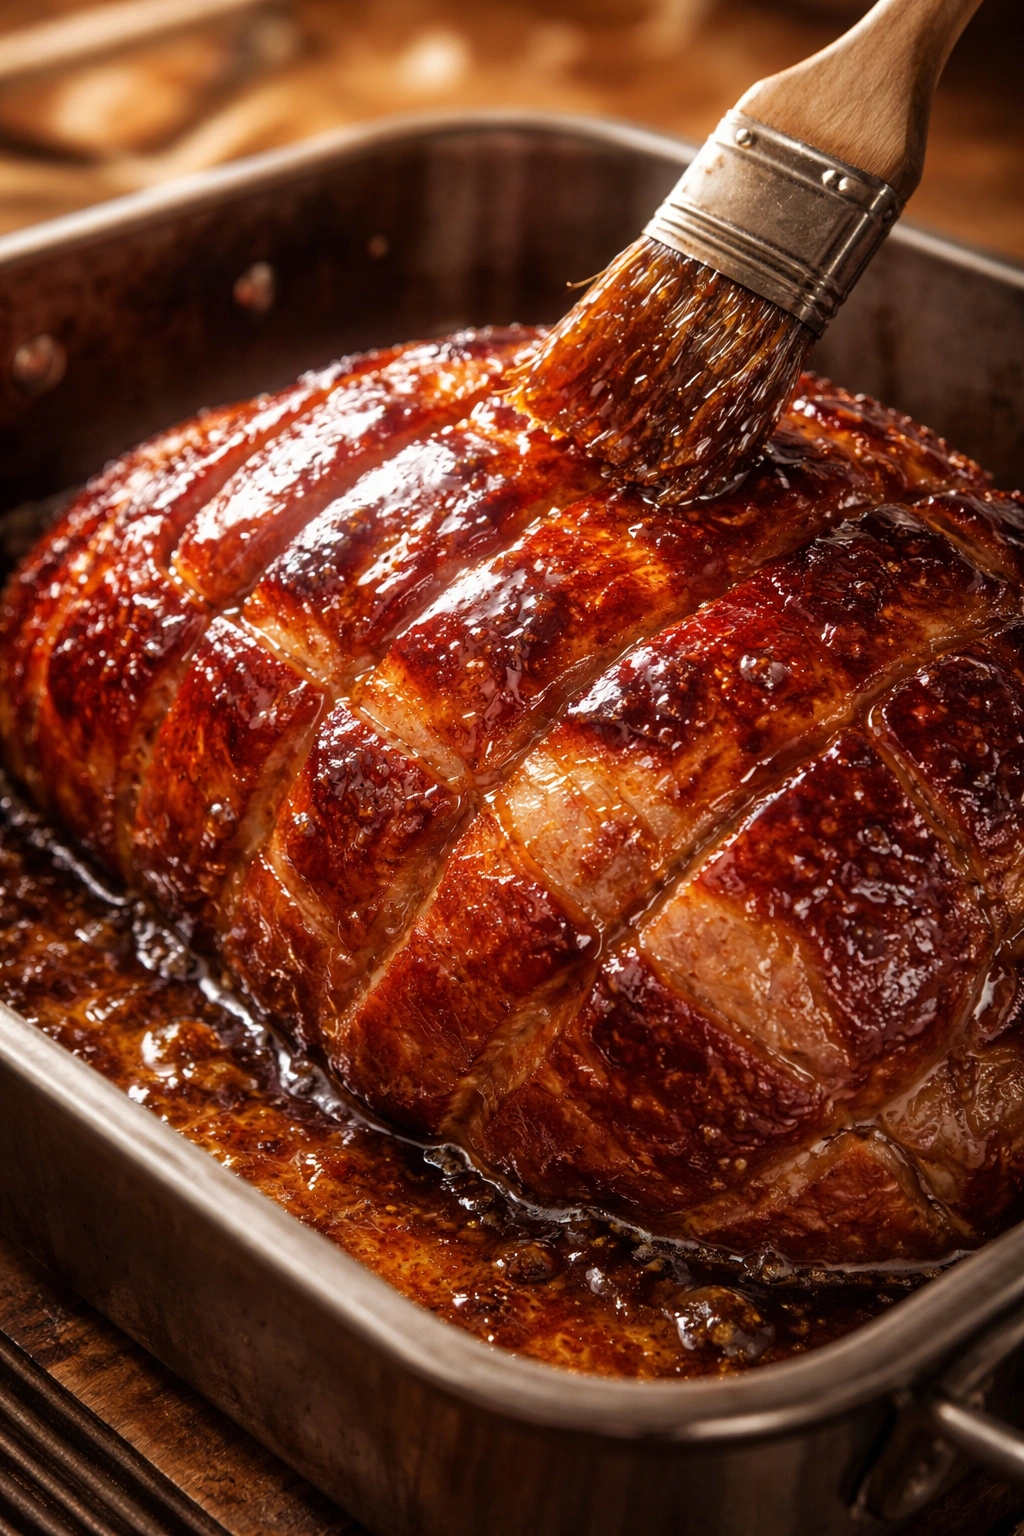
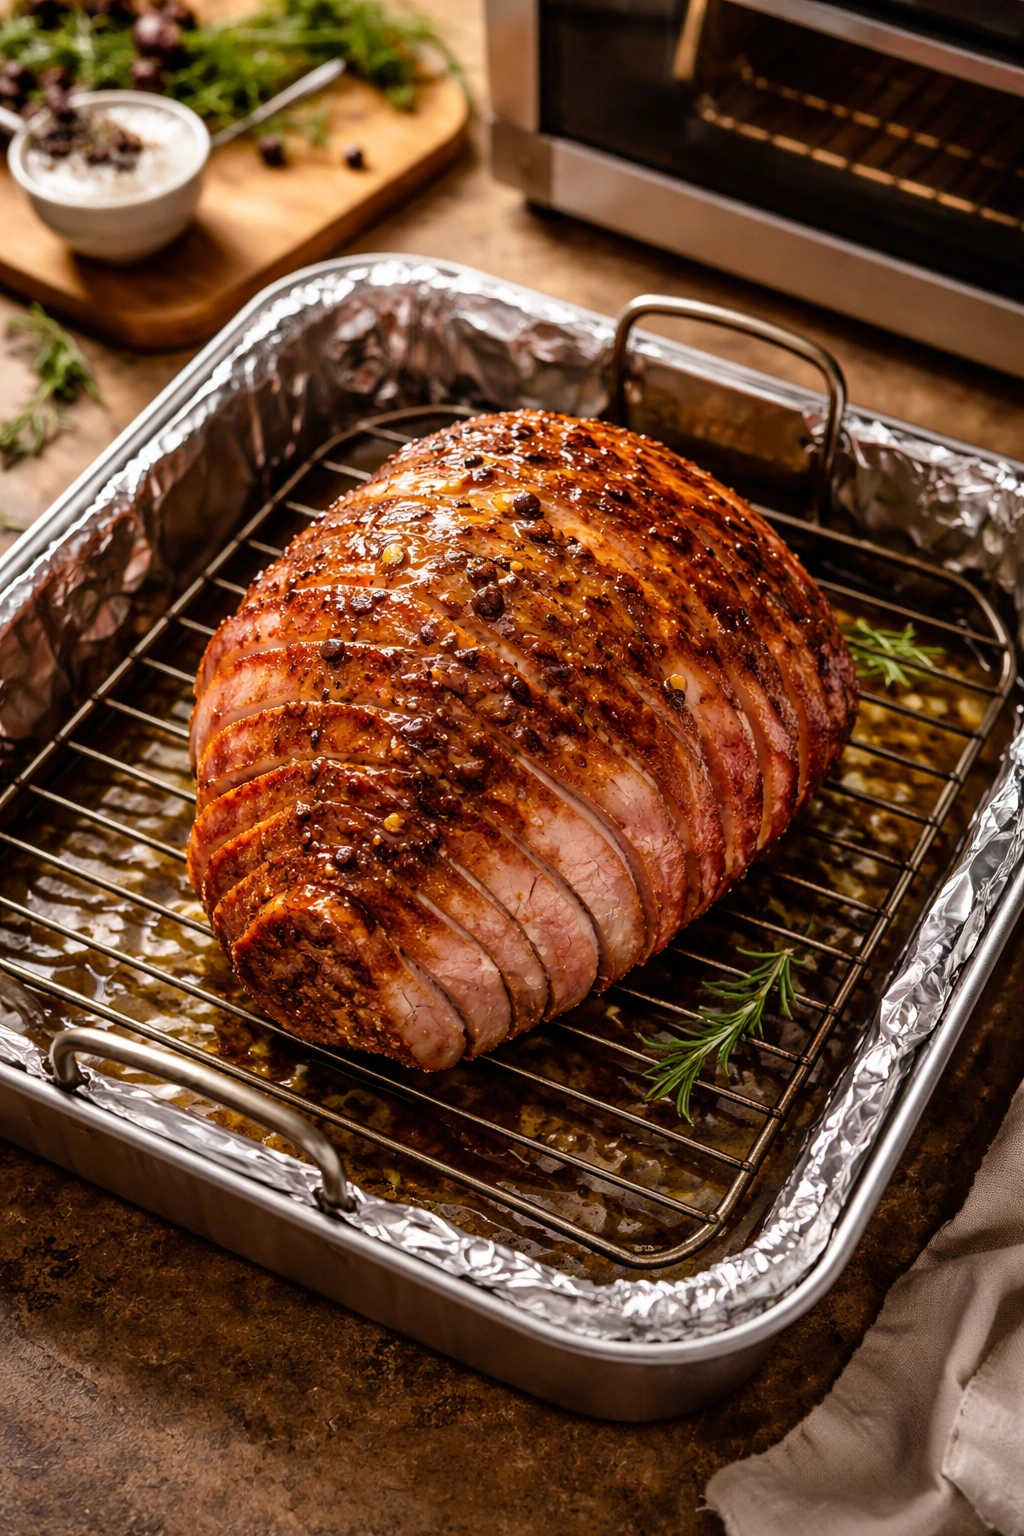
Apply the glaze (final 15-30 minutes):
-
Remove the ham from the oven carefully—the pan is hot and there’s steam under that foil. Peel back the foil and discard it (save a small piece for later if you need to cover spots that brown too quickly).
-
Brush the entire surface of the ham generously with about one-third of your glaze, making sure to work it into the scored areas. The glaze should look thick and sticky coating the ham.
-
Return the uncovered ham to the oven and bake for 15 minutes.
-
Remove the ham, brush with another portion of glaze (about one-third of what remains), and return to the oven. Repeat this every 10-15 minutes, using up all your glaze over the final 15-30 minutes of baking. This layering creates that thick, glossy, caramelized crust.
Watch for burning:
- Keep an eye on the ham during the final minutes. The glaze should be turning a deep amber color and looking glossy, but you don’t want it to turn black or char. If you see spots browning too quickly, tear off a small piece of foil and drape it over that area. It will stick to the glaze and protect the underside from too much direct heat.
Temperature and resting:
-
The ham is done when it reaches an internal temperature of 140°F (ideally 145°F to be safe). Insert the meat thermometer into the thickest part of the meat, away from bone and fat, and wait for the reading to stabilize.
Advertisements -
Remove the ham from the oven and let it rest on the counter, loosely covered with foil, for 15-30 minutes before carving. During this resting time, the meat will relax, the juices will redistribute, and the glaze will firm up slightly, making it easier to carve without everything falling apart.
Pro Tips for a Flawlessly Glazed Ham
Level the ham surface for even caramelization. If your ham is sitting in the pan at an angle, the high point will brown much faster than the low point, leaving you with burnt spots and pale patches. Take a moment to prop up the ham using scrunched-up foil balls under the rounded side so the ham sits level in the pan. This same trick works for perfect pork crackling and is worth doing.
Don’t skip the water in the pan. This seems like an optional detail, but it’s not. Water prevents the drippings from burning and creates a moist environment for your ham. Without it, the sugars from the glaze will caramelize onto the hot pan bottom and burn, turning bitter and dark. You can’t use burnt drippings for sauce or basting, so this one simple step saves you a lot of trouble.
Use a lower oven temperature than you think you need. Most ham recipes call for 350°F, which honestly seems to result in too many burnt patches. Setting your oven to 325°F means the ham cooks a bit slower, but the glaze caramelizes instead of burning. The slightly lower heat also keeps the ham from drying out. If your oven runs hot (and many do), set it to 320°F and just go with it.
Make basting part of your cooking routine. Set a timer for 10-15 minute intervals during the final glazing period and actually show up to baste. Basting isn’t just for flavor—it keeps the glaze from hardening and drying out. Think of each basting as painting a new layer onto your ham. More basting equals a thicker, glossier crust.
Save the ham bone for soup. This is worth mentioning because so many people throw away the bone. After you’ve carved off all the meat, put that bone in a pot with chicken broth, some vegetables, and white beans or split peas, and you have the foundation for an incredible soup. The bone has more flavor than people realize, and it’s a shame to waste it.
Have a meat thermometer you actually trust. Instant-read thermometers are worth their weight in gold here. You want to know for certain that the ham has reached a safe temperature, and checking visually or guessing by timing is just stressful. An instant-read thermometer takes the guesswork out.
Common Mistakes and How to Avoid Them
Applying the glaze too early. If you glaze the ham at the beginning of baking or even at the halfway point, the sugar in the glaze will burn before the ham finishes cooking. You’ll end up with dark, bitter-tasting spots that taste burnt rather than caramelized. The glaze should go on during the final 15-30 minutes only, once the ham is already mostly cooked through.
Not enough liquid in the pan. If you skip the water and glaze drips directly onto the hot pan, it will burn instantly. Burnt sugar smells terrible and tastes bitter, and there’s no salvaging it once it’s stuck to the pan. Keep checking that water level and top it up as needed.
Oven temperature too high. At 350°F or higher, the glaze caramelizes so fast that it chars before it gets glossy. This results in a dark, crusty exterior that tastes acrid rather than sweet. Stick with 325°F and give yourself permission to go even lower (320°F) if your oven runs hot.
Not scoring deeply enough (or scoring too deeply). Shallow scores that don’t penetrate the fat layer won’t let the glaze seep down to where it needs to be. Too-deep scores where you cut into the meat itself will let the juices run out and dry out the ham. Aim for 1/4-inch deep, scoring only the fat layer.
Skipping the rest period. Letting the ham rest for 15-30 minutes after it comes out of the oven is crucial. This is when the residual heat finishes any cooking that needs finishing, when the juices settle back into the meat, and when the glaze firms up so it doesn’t slide off when you carve. Don’t skip this.
Basting too lightly. A half-hearted brushing doesn’t do much. Be generous with your glaze—load it on thickly and make sure it works into all those scored areas. The layers of glaze build up into the thick, sticky crust you’re after.
Variations and Flavor Swaps
The brown sugar glaze is endlessly adaptable. You can keep the core formula (brown sugar + honey + mustard + vinegar) and swap ingredients to match different occasions or flavor preferences.
For a citrus twist, replace some of the honey with orange juice or pineapple juice, or add the zest of an orange or lemon to the finished glaze. This is particularly nice for Easter when you want something a bit brighter and more spring-like. The acidity of citrus also brings extra tang if you find the glaze too sweet.
For warm spice holiday vibes, increase the cinnamon to 1 full teaspoon, add the allspice, and throw in 1/4 teaspoon of ground ginger. This version feels very Christmas or Thanksgiving and is absolutely gorgeous when it caramelizes.
For a maple version, use all maple syrup instead of honey, or use half maple and half honey. You can also add a tablespoon of bourbon or whiskey to the glaze for depth—the alcohol cooks off, leaving just a sophisticated, slightly smoky flavor.
For a spicier glaze, add 1/4 teaspoon of cayenne pepper or a pinch of smoked paprika. This creates a glaze that’s sweet but with a tiny kick at the end. It’s unexpected and interesting.
For a dairy-free or vegan version, the glaze as written is already free of animal products if you use maple syrup instead of honey (though technically honey is sometimes questioned; pure maple syrup is unambiguously vegan). Stick with coconut sugar if you want to avoid refined sugar, and ensure your mustard is dairy-free.
For a lower-sugar version, reduce the brown sugar to 3/4 cup and keep the honey at 1/2 cup. You’ll get less glaze and it’ll be less sweet, but it still caramelizes beautifully. Alternatively, replace some of the sugar with a sugar substitute like erythritol or monk fruit, though the texture won’t be quite as glossy.
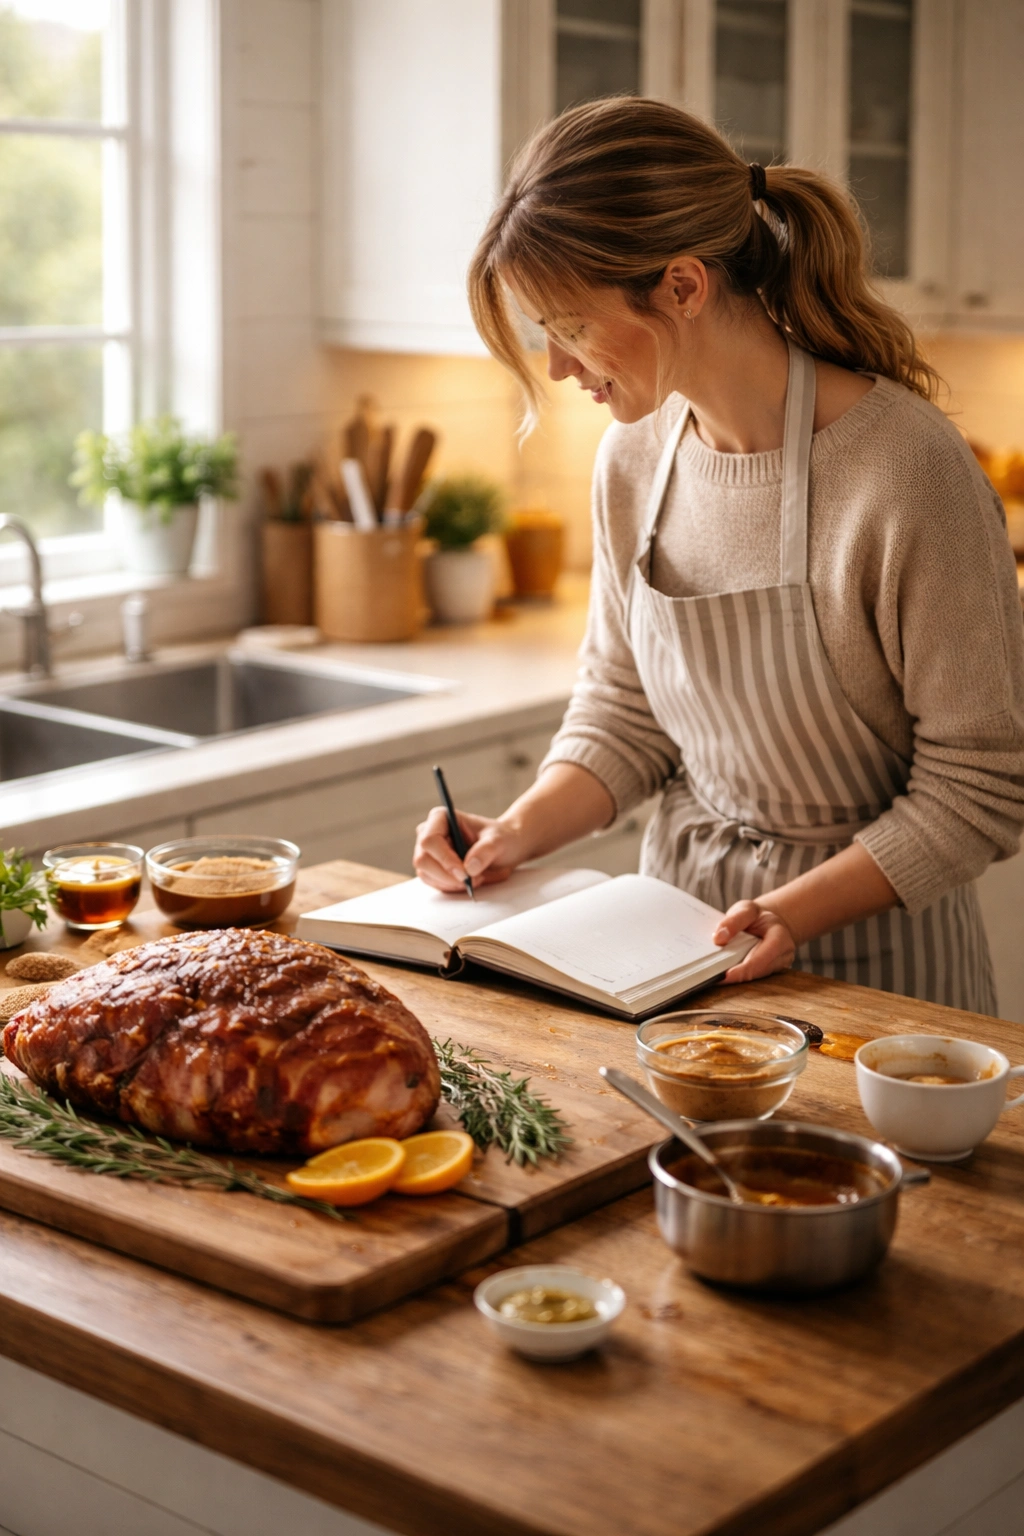
Making Ahead and Saving Time
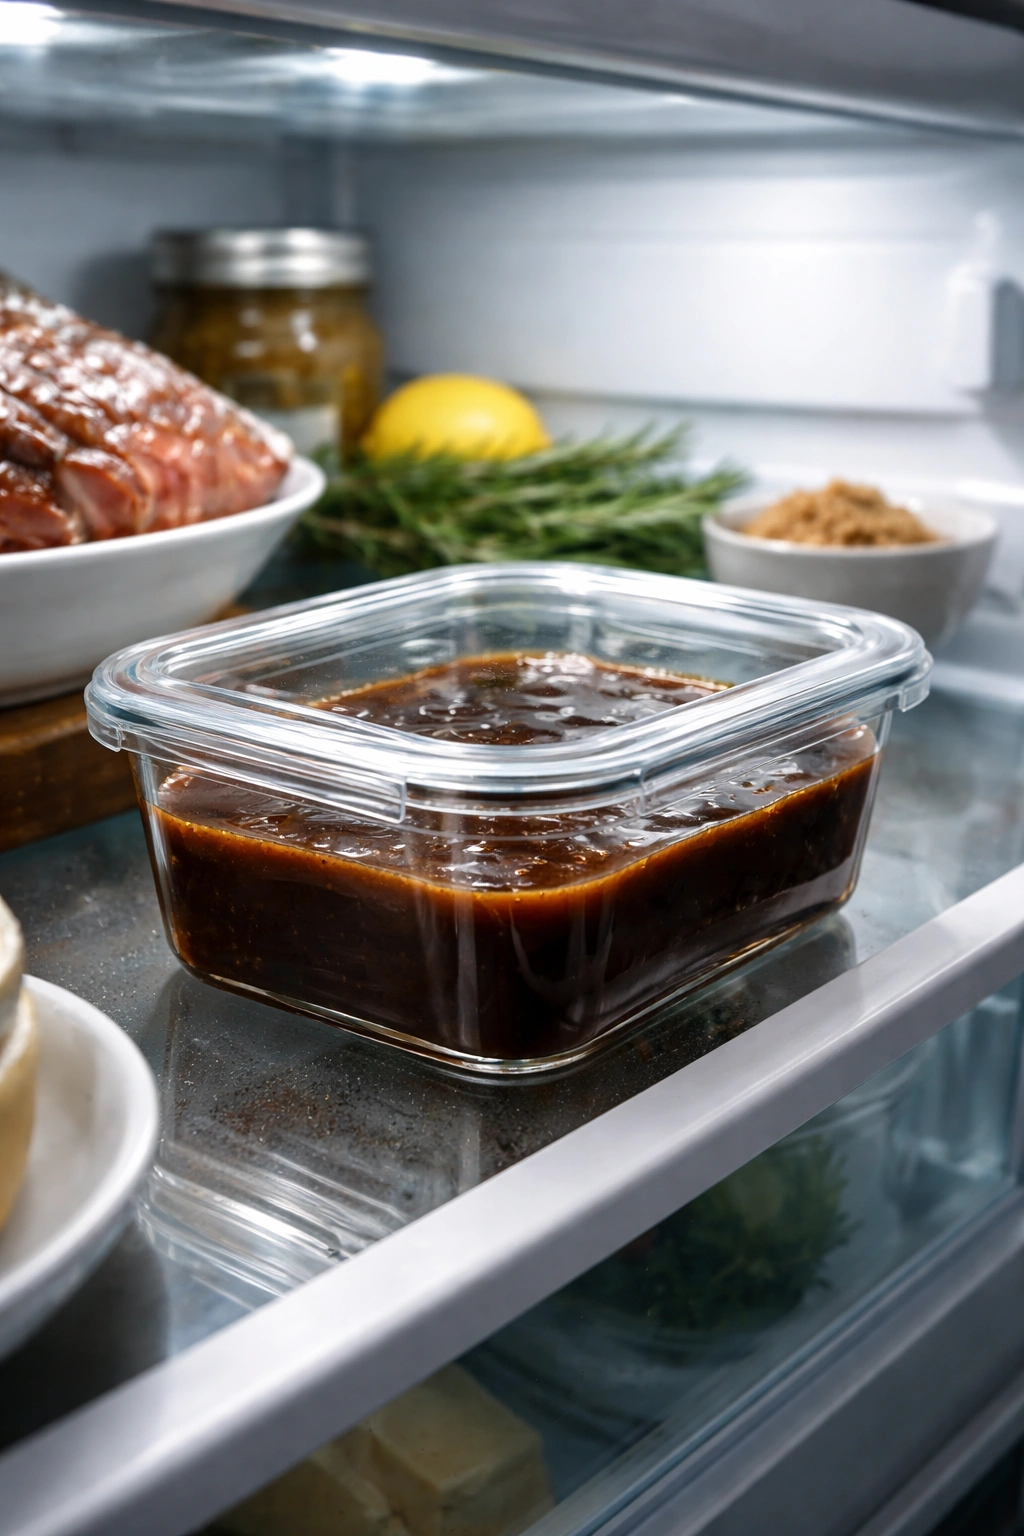
You can make the glaze up to 3 days in advance. Mix it all together in a bowl or saucepan, cover it, and refrigerate it. When you’re ready to use it, gently warm it on the stovetop over low heat, stirring occasionally, until it’s warm and pourable. Don’t bring it to a boil again—just warm it through.
You can prep the ham the day before. Score it, remove the rind, and store it in the fridge in a covered roasting pan. When cooking day arrives, you just need to set it up in the oven. This means less to do on the actual holiday.
You can cook the ham the day before and reheat it. Some people find this less stressful than cooking on the day itself. Cook the ham as usual, let it cool slightly, then wrap it well and refrigerate it overnight. On serving day, reheat it loosely covered with foil at 325°F until warmed through (internal temperature reaches 130°F again). Then apply fresh glaze during the final 15-20 minutes of reheating to resurrect that glossy, caramelized finish. It will look and taste like it just came out of the oven.
Don’t glaze too far in advance. You want to apply the glaze no more than 30 minutes before the ham goes in the oven. If you glaze it and then let it sit at room temperature, the glaze will start to thicken and won’t distribute evenly when you bake it.
Storage and Using Leftover Ham
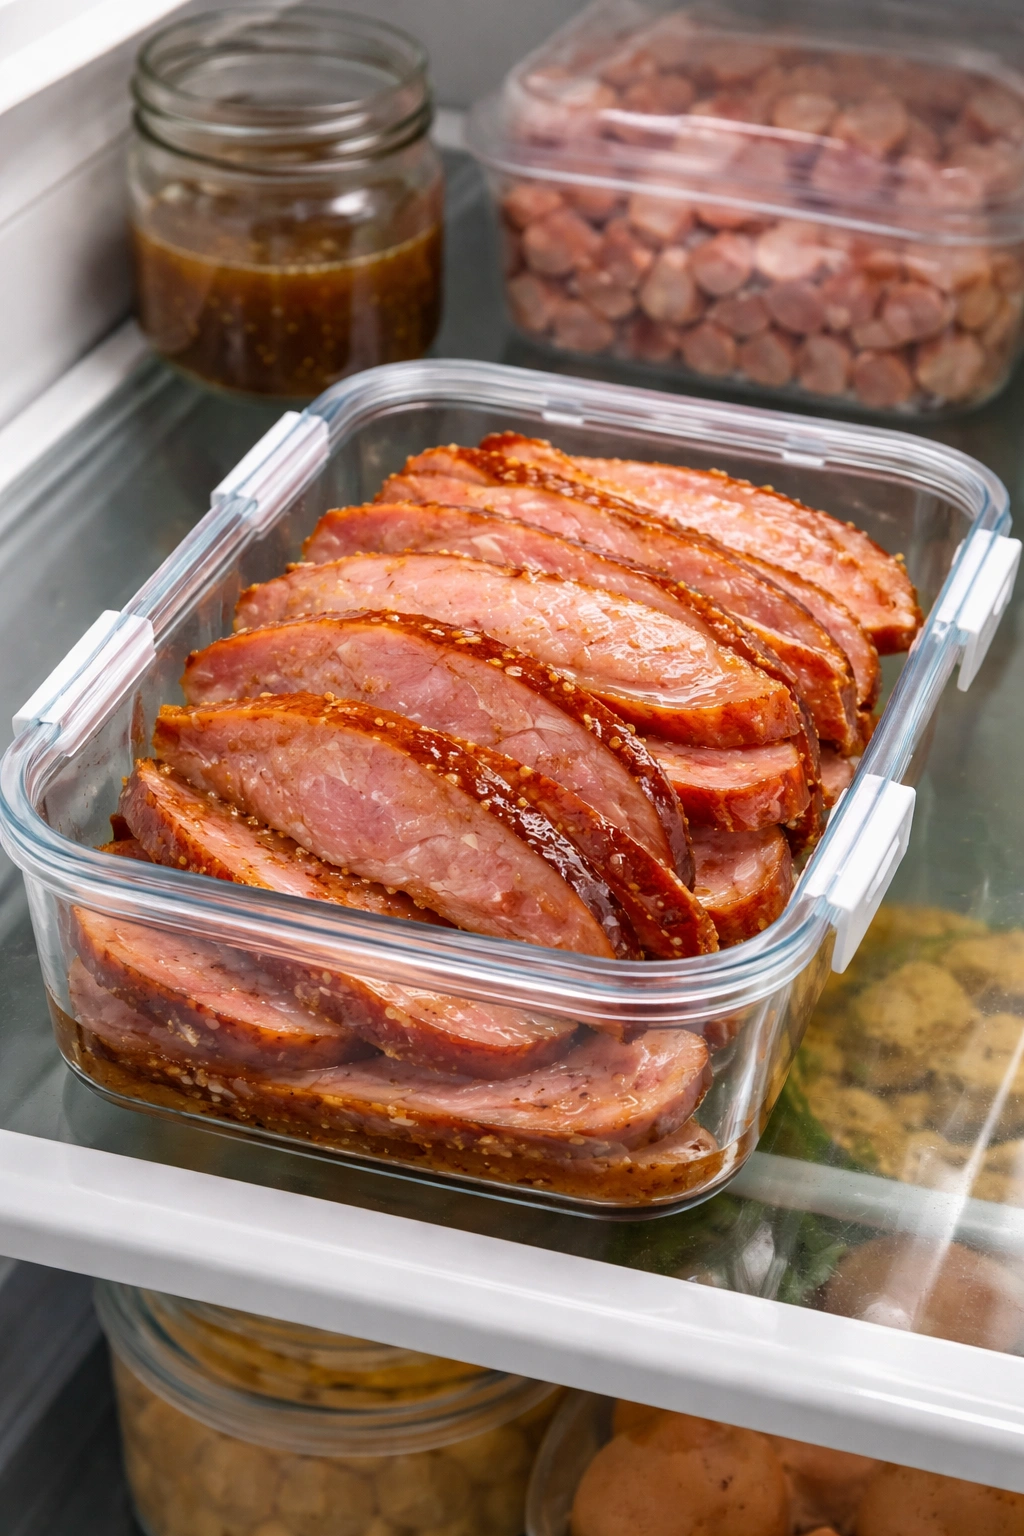
Leftover ham keeps for 3-4 days in the refrigerator if it’s wrapped well. Use plastic wrap, foil, or an airtight container. The glaze may have solidified, but it will soften as the ham comes to room temperature, and you can always reheat the ham slightly to warm the glaze back up.
You can freeze leftover ham for up to 3 months. Wrap it tightly in plastic wrap, then aluminum foil, and label it with the date. Thaw overnight in the refrigerator and reheat at 325°F, loosely covered with foil, until warmed through. The glaze may crack when you reheat frozen ham—just brush it with a little of the pan juices or a thin coat of fresh glaze to fix that.
Save the ham bone and any jellied drippings. Put them in a container in the freezer and use them as the base for ham and split pea soup, ham bone broth, or a Southern-style pot of beans. The bone adds incredible depth of flavor to any broth or long-simmered dish.
Leftover glaze can be refrigerated for 5-7 days in an airtight container. Warm it gently before using it on ham steaks or other dishes. You can also use it to glaze carrots, Brussels sprouts, or other roasted vegetables.
Serving Suggestions and Pairings
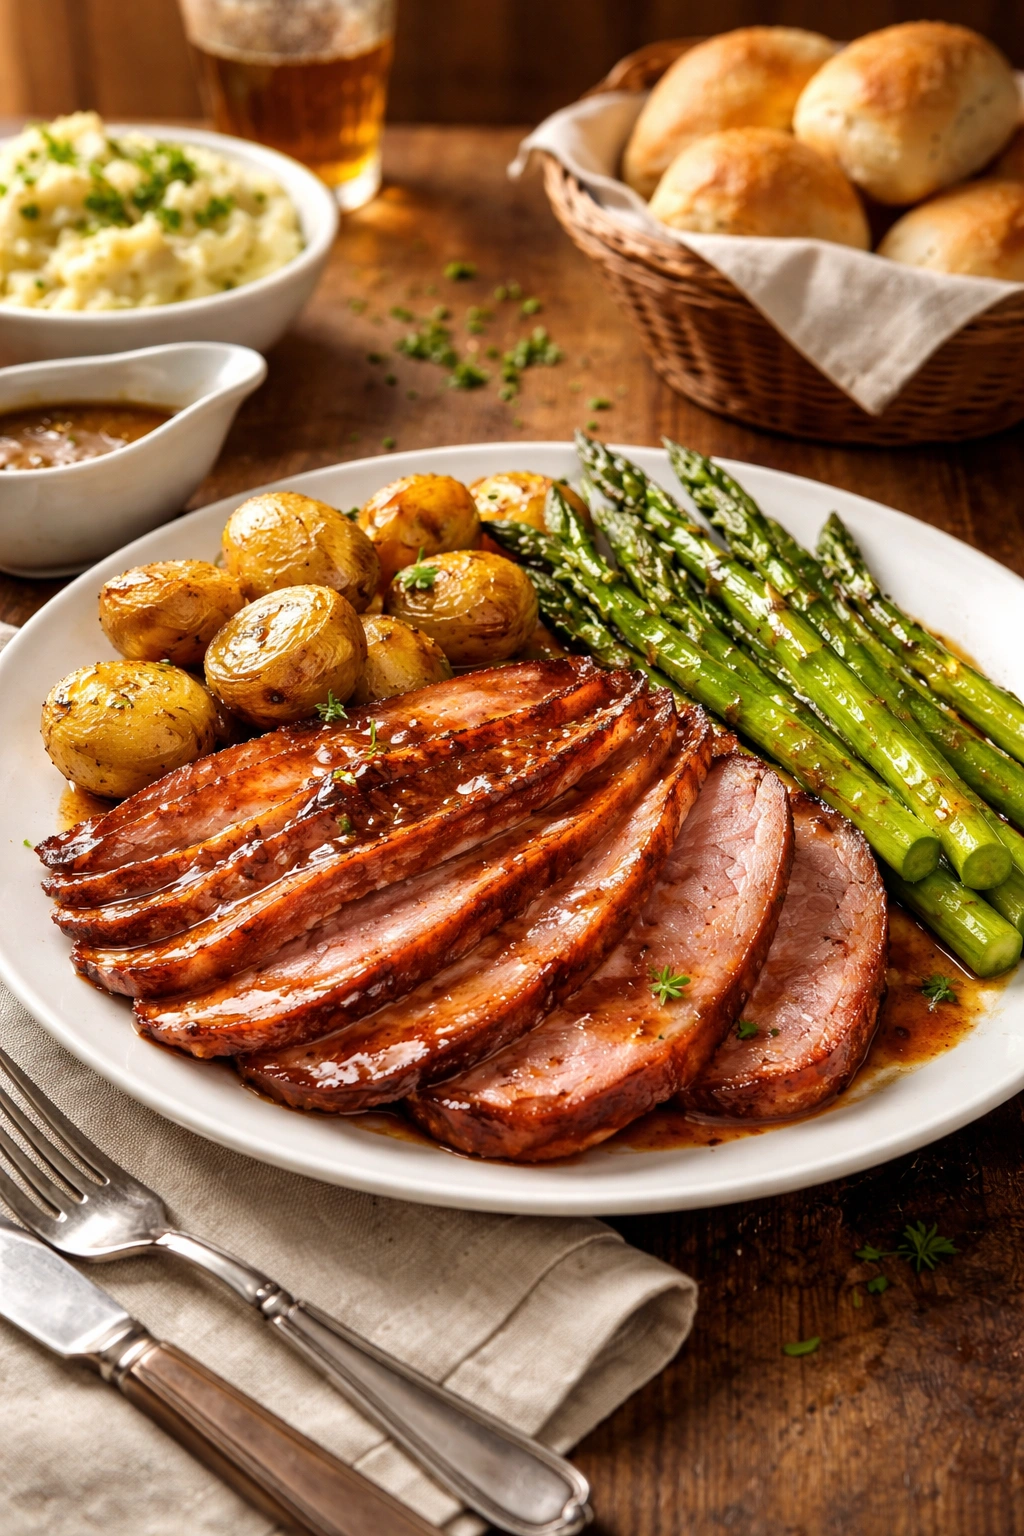
A glazed ham demands to be the centerpiece of the table, and it pairs beautifully with both traditional and creative sides. Roasted or scalloped potatoes are the classic companion—either creamy au gratin potatoes or simple roasted fingerlings with rosemary and garlic. The starch balances the richness of the ham and the sweetness of the glaze.
Fresh vegetable sides cut through the richness. Roasted asparagus with lemon, Brussels sprouts with bacon, glazed carrots, or a simple green salad bring brightness to the plate. Something with acidity (like a salad with vinaigrette) or gentle bitterness (like Brussels sprouts) really helps balance all that sweet and savory ham flavor.
Rolls or bread are essential. Dinner rolls, Hawaiian rolls, or cornbread all soak up the glaze and ham juices beautifully. People will build little ham and glaze sandwiches on their rolls, so don’t skip the bread.
The pan drippings become a sauce. After the ham rests and before you wash the pan, whisk the brown, sticky drippings at the bottom of the pan (where the glaze has caramelized) with a little water or broth. This becomes an incredibly flavorful sauce to drizzle over ham slices and sides. It’s liquid gold—do not waste it.
Mustard, relish, or chutney on the side gives people options. Some folks like a tiny dollop of spicy brown mustard or whole grain mustard with their ham. Others love a fruity chutney or a bright-tasting relish. Offer options and let people customize their plate.
Drinks-wise, consider ham’s flavor profile. A crisp white wine (like a Riesling) complements the sweet glaze. A light beer pairs well with the savory ham. Cider (alcoholic or not) is traditional. Sweet tea, sparkling cider, or fresh lemonade round out the meal nicely.
Frequently Asked Questions
Can I use this glaze on ham steaks? Absolutely. Cut your ham into steaks (about 1-inch thick), score the surface lightly, and bake at 350°F for 15-20 minutes or until heated through. Brush generously with glaze every few minutes toward the end of cooking. You could also pan-sear ham steaks in a skillet and brush them with glaze in the last minute of cooking for a quicker weeknight dinner.
What’s the difference between ham and gammon? Technically, gammon is the hind leg of a pig that hasn’t been cured yet, while ham is the hind leg that has been cured (usually with salt and smoke). In practical terms at the grocery store, if it says “ready to eat” or “fully cooked,” it’s ham and you can glaze it immediately. If it says “raw” or “uncooked,” it’s likely gammon and it needs a longer cooking time.
Can I double this glaze recipe for a larger ham? Yes, absolutely. Double the ingredients if you have a 14-16 pound ham or you’re cooking multiple hams. The glaze comes together just as easily in larger quantities, and you’ll have enough to be generous with your basting.
Why is my glaze burning? The oven temperature is probably too high, or you applied the glaze too early in the cooking process. Set it to 325°F and wait until the final 15-30 minutes of baking to glaze. If spots are burning even then, drape foil over them to block direct heat.
Can I make this glaze with honey from a jar that’s crystallized? If your honey has crystallized (turned grainy and hard), warm the jar gently in hot water until it’s liquid again, then use it. The warmth will dissolve those crystals. Never microwave honey or let it get extremely hot, as high heat can damage the flavor.
Do I have to score the ham? Scoring isn’t strictly necessary, but it really does make a difference. It creates more surface area for the glaze to stick to, allows the glaze to seep down into the meat, and creates those beautiful caramelized edges. If you absolutely don’t want to score, the glaze will still work—it just won’t be quite as impressive.
Is spiral-cut ham better than a whole ham? Spiral-cut ham is more convenient for carving and serves more people per pound (since there’s less waste). A whole ham stays juicier and has better flavor, but requires more carving skill and effort at the table. Either works beautifully with this glaze.
Final Thoughts
A brown sugar ham glaze might seem like a small thing, but it’s genuinely the difference between a ho-hum holiday meal and one people remember. The glaze takes almost no time, costs just a few dollars, and transforms an already-good ham into something that looks glossy and professional and tastes perfectly balanced between sweet and savory. You’ll spend more time setting the table than making this glaze, yet people will ask you for the recipe.
The beauty of this approach is that it works every single time. There’s no special technique required, no unusual ingredients to hunt down, and no complicated steps that could go wrong. You’re mixing five to eight pantry staples, simmering them for two minutes, and brushing them onto ham in the final quarter hour of baking. That’s it. The ham itself does most of the work, and the oven does the rest.
Whether this is your first time cooking a holiday ham or your tenth, this glaze will serve you well. Keep the recipe simple and use the variations to adapt it to whatever flavors appeal to you and whatever occasion you’re cooking for. Make it your own, trust the process, and enjoy watching people’s faces light up when they see that beautiful caramelized ham emerge from the oven.