Filipino chicken adobo is one of those dishes that tastes simple on the surface but reveals layers of technique and intention the moment you start cooking it. The beauty of adobo isn’t in complicated methods or exotic ingredients — it’s in understanding how a few basic components transform into something rich, deeply savory, and completely craveable. The chicken emerges from the pot fork-tender and caramel-dark, the sauce clings to each piece like a glaze, and the whole dish has this savory-salty-slightly-tangy character that makes you want another spoonful before you’ve even finished the first one.
This is the kind of home cooking that doesn’t need a restaurant to justify its existence. Adobo fills a table in Filipino homes because it’s affordable, reliable, and tastes exponentially better than the effort required to make it. Once you master the basic technique, you’ll find yourself making it regularly — for weeknight dinners, for feeding a crowd, for that moment when you want something genuinely satisfying without spending three hours in the kitchen.
The real secret isn’t a secret at all. It’s about respecting the process, using quality ingredients even if they’re humble ones, and understanding that the best adobo comes from low and slow cooking that lets flavors meld and chicken become silky. This recipe is designed for home cooks who want the genuine article — the kind of adobo that tastes like someone who knows the dish made it just for you.
What Makes Filipino Chicken Adobo So Special
Chicken adobo works because it’s built on the principle of contrast and balance. The acid from vinegar plays against the umami depth of soy sauce. The sweetness of caramelized onions softens the salt. The garlic presence is strong but never aggressive when cooked properly. This is food that tastes intentional because every component has a reason for being there.
The sauce is where adobo’s magic happens. As chicken cooks, it releases its own liquid, which mingles with vinegar, soy sauce, and garlic to create a braising liquid that becomes increasingly concentrated and flavorful. By the time the cooking is done, this sauce has transformed into something that coats the chicken and elevates simple white rice into something worth thinking about later.
What separates a forgettable adobo from one that people request is technique. Browning the chicken properly creates deeper flavor through caramelization. Cooking low and slow ensures the meat stays moist while the sauce reduces to the right consistency. Knowing when to stop cooking prevents chicken from becoming rubbery and the sauce from becoming muddy.
The History and Heart of This Beloved Dish
Filipino chicken adobo carries generations of practical home cooking. The dish evolved from necessity — the combination of vinegar and salt preserved meat in tropical heat before refrigeration existed. Spanish colonization brought soy sauce into Filipino cooking, which transformed adobo into the dish we know today. What was originally a preservation method became beloved for its flavor, and families built their own variations based on what they had on hand and what tasted best to their palates.
Adobo exists across the Philippines with subtle regional differences. Some families cook it with potatoes and boiled eggs. Others add coconut milk for richness. Some prefer their adobo drier, with sauce clinging to the meat; others like it brothier. There’s no single “correct” adobo — only the adobo that tastes like home to the person eating it.
Understanding this history matters because it frees you from thinking there’s only one way to make this dish properly. The foundation — chicken, vinegar, soy sauce, garlic, onions — stays consistent. Everything else is open to your preferences and what you have available. This is cooking that trusts the home cook’s instincts.
The History and Regional Variations of This Iconic Dish
Different regions of the Philippines cook adobo according to local preference and ingredient availability. Tagalog-style adobo, from the Manila region, tends toward a darker sauce with more soy than vinegar. Visayan adobo, from the central islands, often includes lemongrass or other local aromatics that give it a fresher note. Some Mindanao versions incorporate coconut milk or peanuts, creating a creamier texture entirely different from the classic braised version.
The beauty of knowing these variations is that it gives you permission to adapt. If you prefer your adobo lighter and brothier, use more vinegar and less soy. If you like it deeply caramelized and dark, extend the cooking time and reduce the liquid further. The technique remains the same; the proportions shift to match your taste.
Key Ingredients That Make This Recipe Work
Every ingredient in chicken adobo serves a specific purpose, and choosing good versions of each one matters more than you might expect. Soy sauce provides umami and saltiness — use good-quality soy sauce, not the cheapest bottle on the shelf. The difference in flavor between quality soy sauce and bargain versions is noticeable and worth the few extra dollars. Vinegar adds brightness and acidity that balances the salt and richness; a good vinegar keeps the flavors sharp instead of muddled.
Garlic and onions form the aromatic base. You’re not adding a pinch of these for flavor — you’re using substantial amounts. The garlic gets gentle treatment, cooked slowly so it softens and sweetens without burning. The onions cook down into the sauce, adding natural sweetness and body. Chicken thighs, never breasts, are the right choice for this dish. Thigh meat stays moist and tender even with extended cooking, while breast meat dries out and becomes stringy. The fat in thighs also contributes to the sauce’s richness.
Water rounds out the braising liquid, though you could substitute chicken broth for slightly deeper flavor. Bay leaves add a subtle herbal note that keeps the sauce from feeling one-dimensional. Black pepper should be freshly ground — pre-ground pepper has lost its volatile oils and contributes only color, not actual flavor.
Yield, Prep Time, and Difficulty

Yield: Serves 4 to 6 | Feeds 2 people as a hearty main with generous leftovers
Prep Time: 20 minutes (mostly chopping onions and garlic, and trimming chicken)
Cook Time: 45 to 50 minutes (browning chicken, then simmering until tender and sauce reduces)
Total Time: 65 to 70 minutes active cooking time. Adobo can also sit overnight and tastes even better the next day, so make-ahead time is flexible.
Difficulty: Beginner to Intermediate — There are no complicated techniques here. The main skills are properly browning chicken without burning the pan, and knowing when the sauce has reduced to the right consistency. If you can brown meat and simmer a pot, you can make excellent adobo. The learning curve comes from tasting and adjusting to your preference, not from technical complexity.
Ingredients for Classic Filipino Chicken Adobo
For the Adobo:
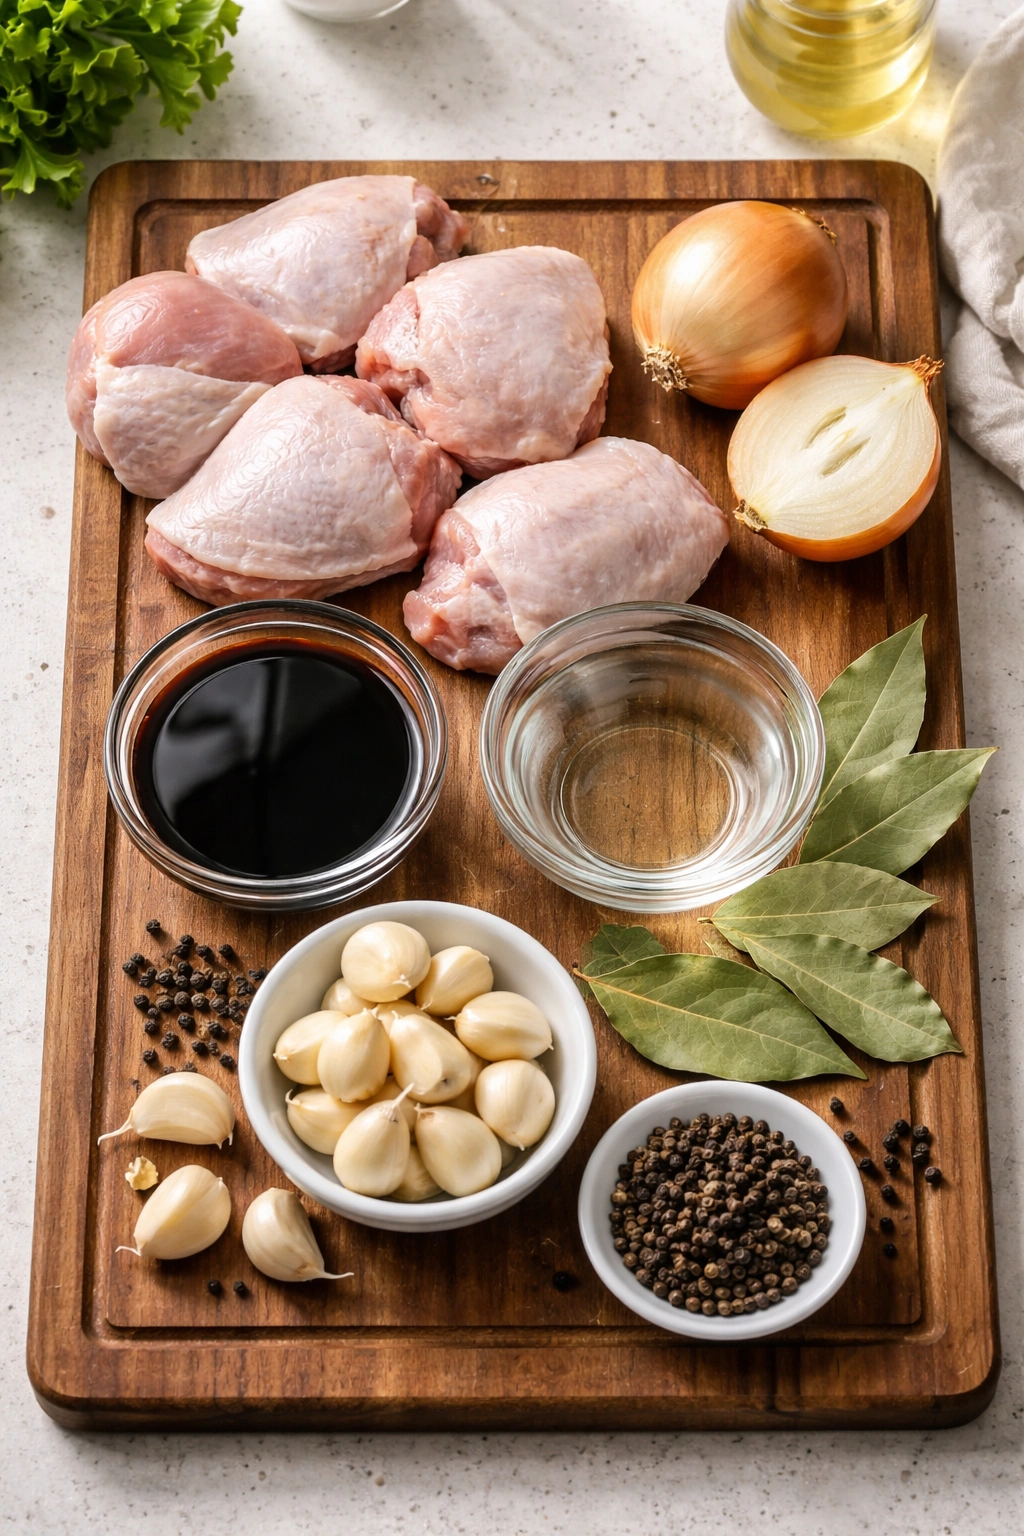
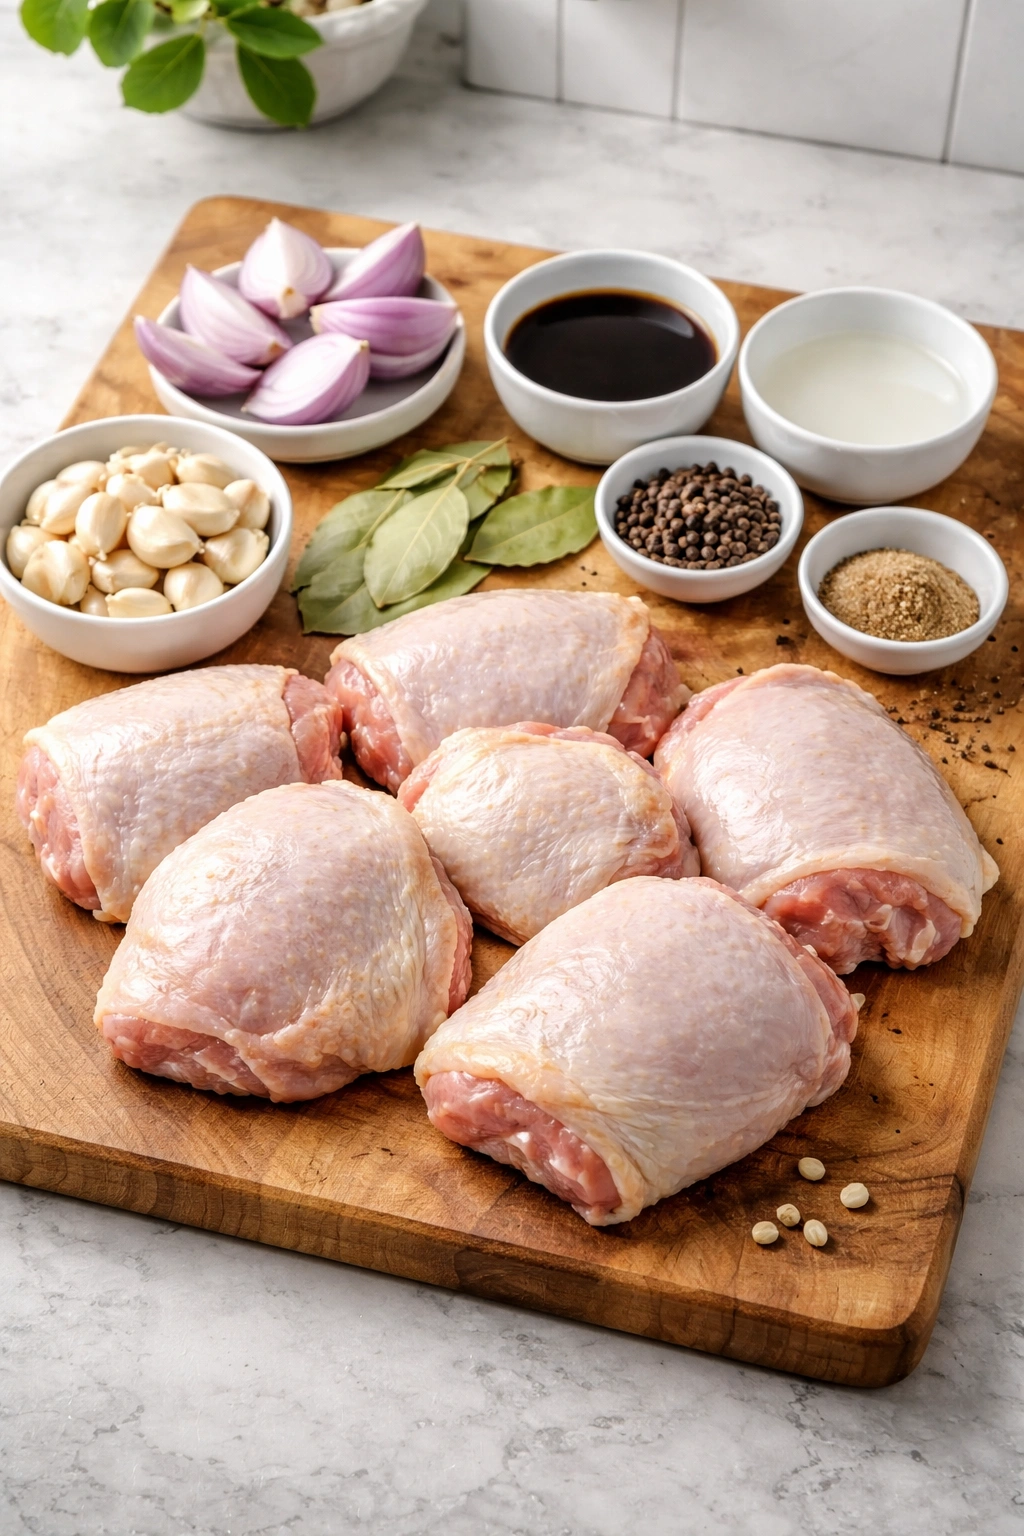
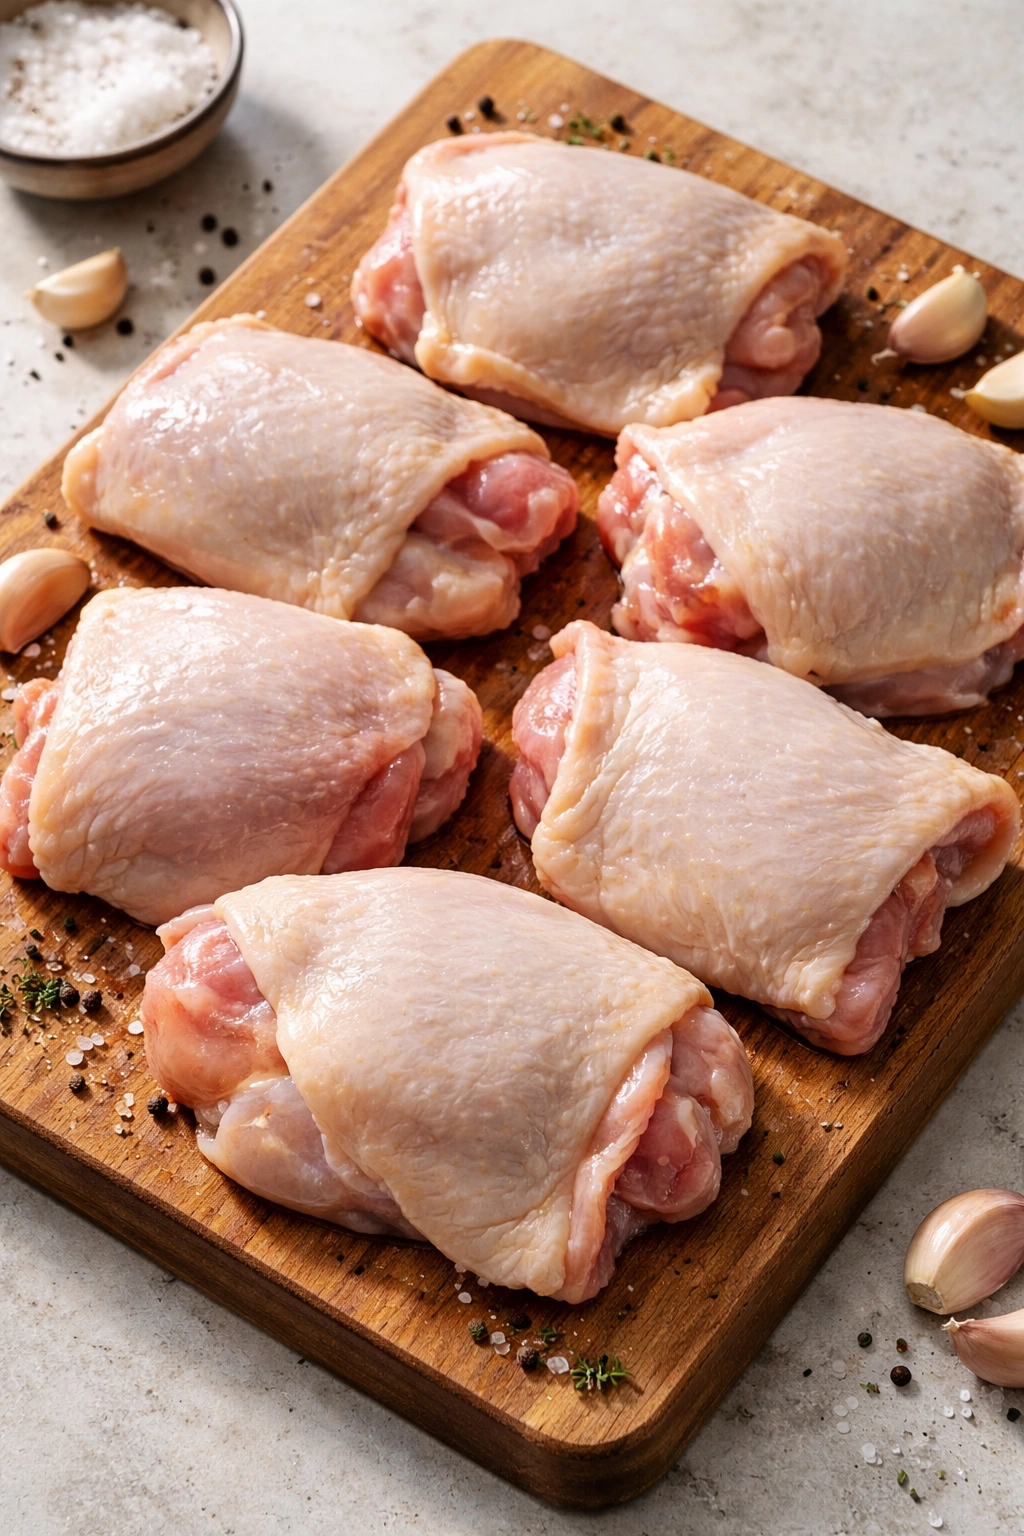
- 3 pounds (1.4 kg) boneless, skinless chicken thighs, cut into roughly 2-inch pieces (about 16-20 pieces total)
- 2 tablespoons neutral oil (vegetable, canola, or light olive oil — use something with a high smoke point)
- 1 large onion, cut into thin half-moons (about 1½ cups sliced)
- 8 to 10 cloves garlic, minced (about 3 tablespoons minced — this is generous on purpose)
- ½ cup good-quality soy sauce (use regular soy sauce, not low-sodium; the salt is intentional)
- ½ cup white vinegar (distilled white vinegar works perfectly; rice vinegar is softer and also good)
- 1 cup water
- 3 to 4 bay leaves
- 1 teaspoon black pepper, freshly ground (not pre-ground if you can help it)
- ½ teaspoon salt (add at the end after tasting; you may not need it if your soy sauce is salty enough)
Optional but genuinely enhancing additions:
- 1 tablespoon brown sugar (takes the sharp edge off the vinegar slightly; start with 1 teaspoon and add more if needed)
- 4 to 5 whole black peppercorns (in addition to the ground pepper; they add a subtle flavor that lingers)
- Pinch of ground cloves or nutmeg (just a whisper; this is not about tasting cloves, it’s about depth)
Step-by-Step Instructions for Perfect Adobo
Prepare the Ingredients:
-
Pat the chicken pieces dry with paper towels, dabbing each piece thoroughly. Dry chicken browns better than wet chicken, and browning creates deeper flavor. Set the dried pieces on a plate and leave them at room temperature for 10 to 15 minutes while you prepare the aromatics.
-
Slice the onion in half lengthwise, then lay each half cut-side down on the cutting board and slice it into thin half-moons about ¼-inch thick. Thin slices cook down into the sauce smoothly instead of remaining chunky.
-
Mince the garlic finely (about ⅛-inch pieces) — not pressed into a paste, but small and uniform. You want pieces that soften as they cook without disappearing entirely. Set all prepared ingredients in small bowls or on a cutting board within arm’s reach of your stove, because once browning starts, you’ll work quickly.
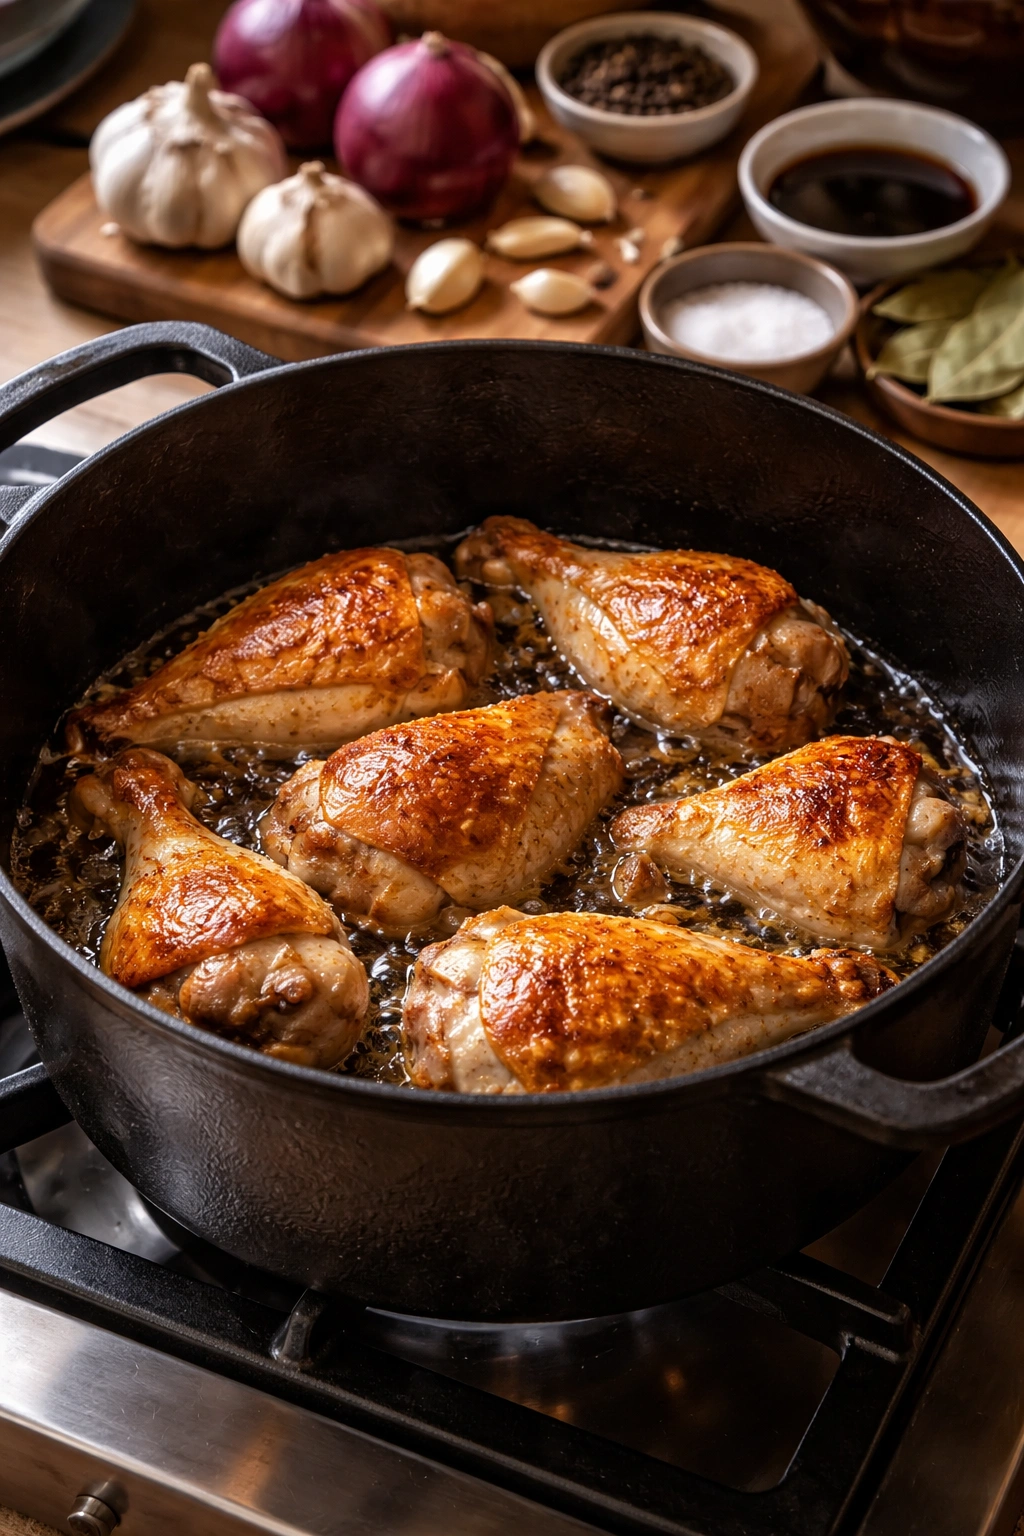
Brown the Chicken:
-
Place a large, heavy pot or Dutch oven (4½ to 5-quart capacity works best) over medium-high heat. Add the neutral oil and let it heat until it shimmers — about 1 to 2 minutes. You should see the oil move easily across the bottom of the pot when you tilt it.
-
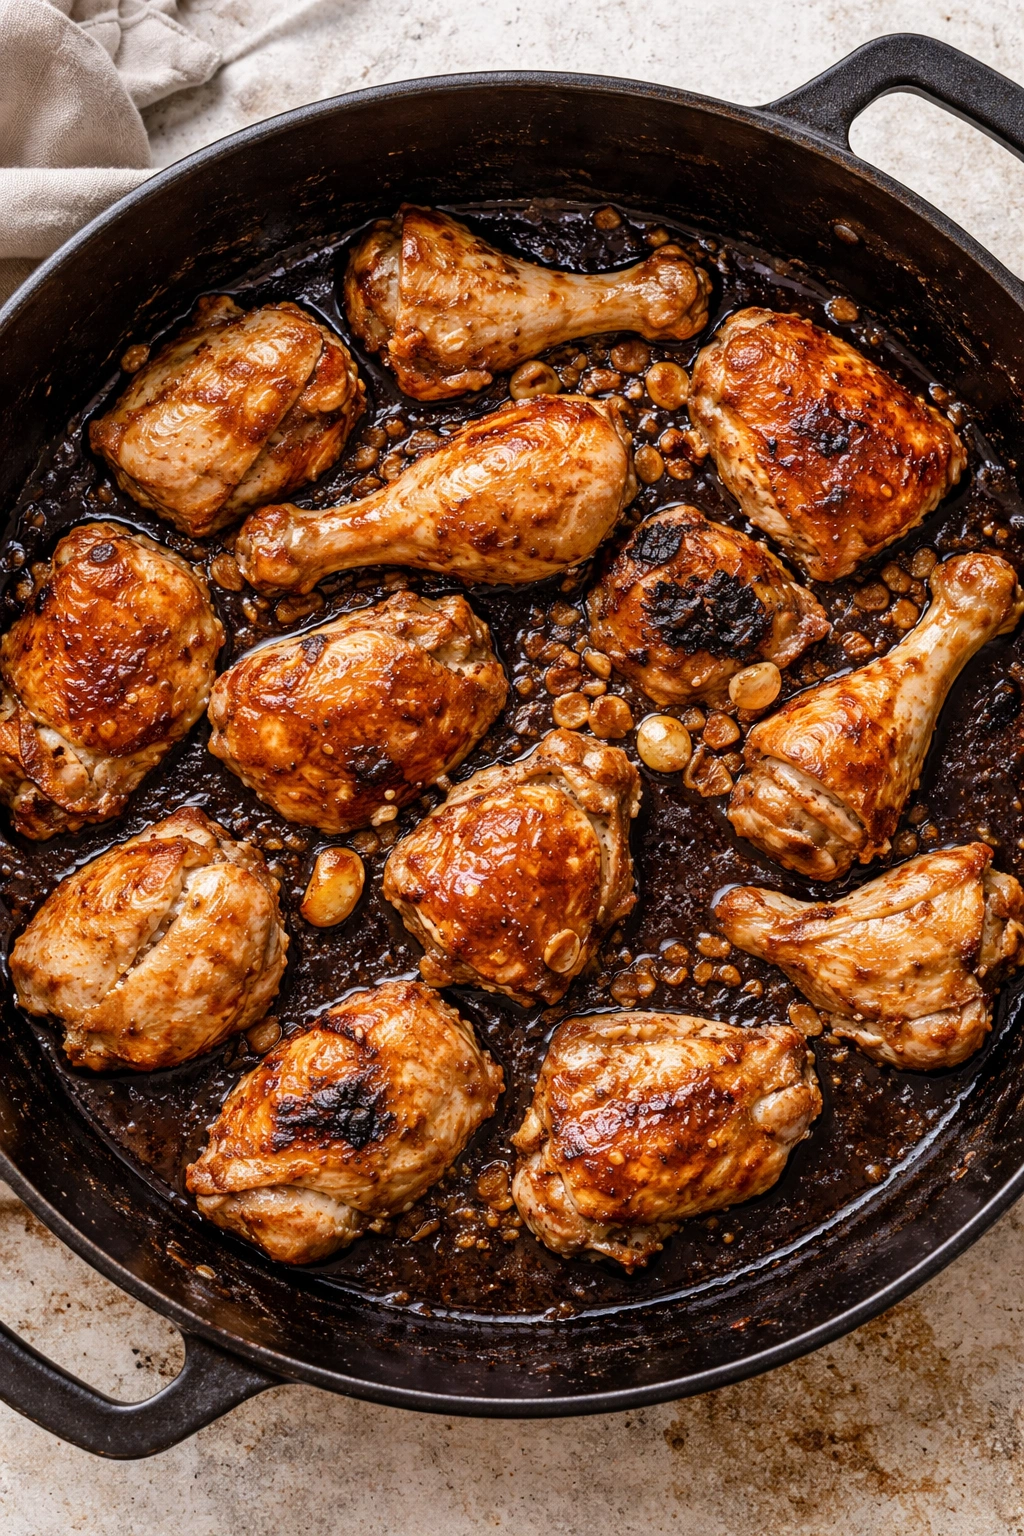
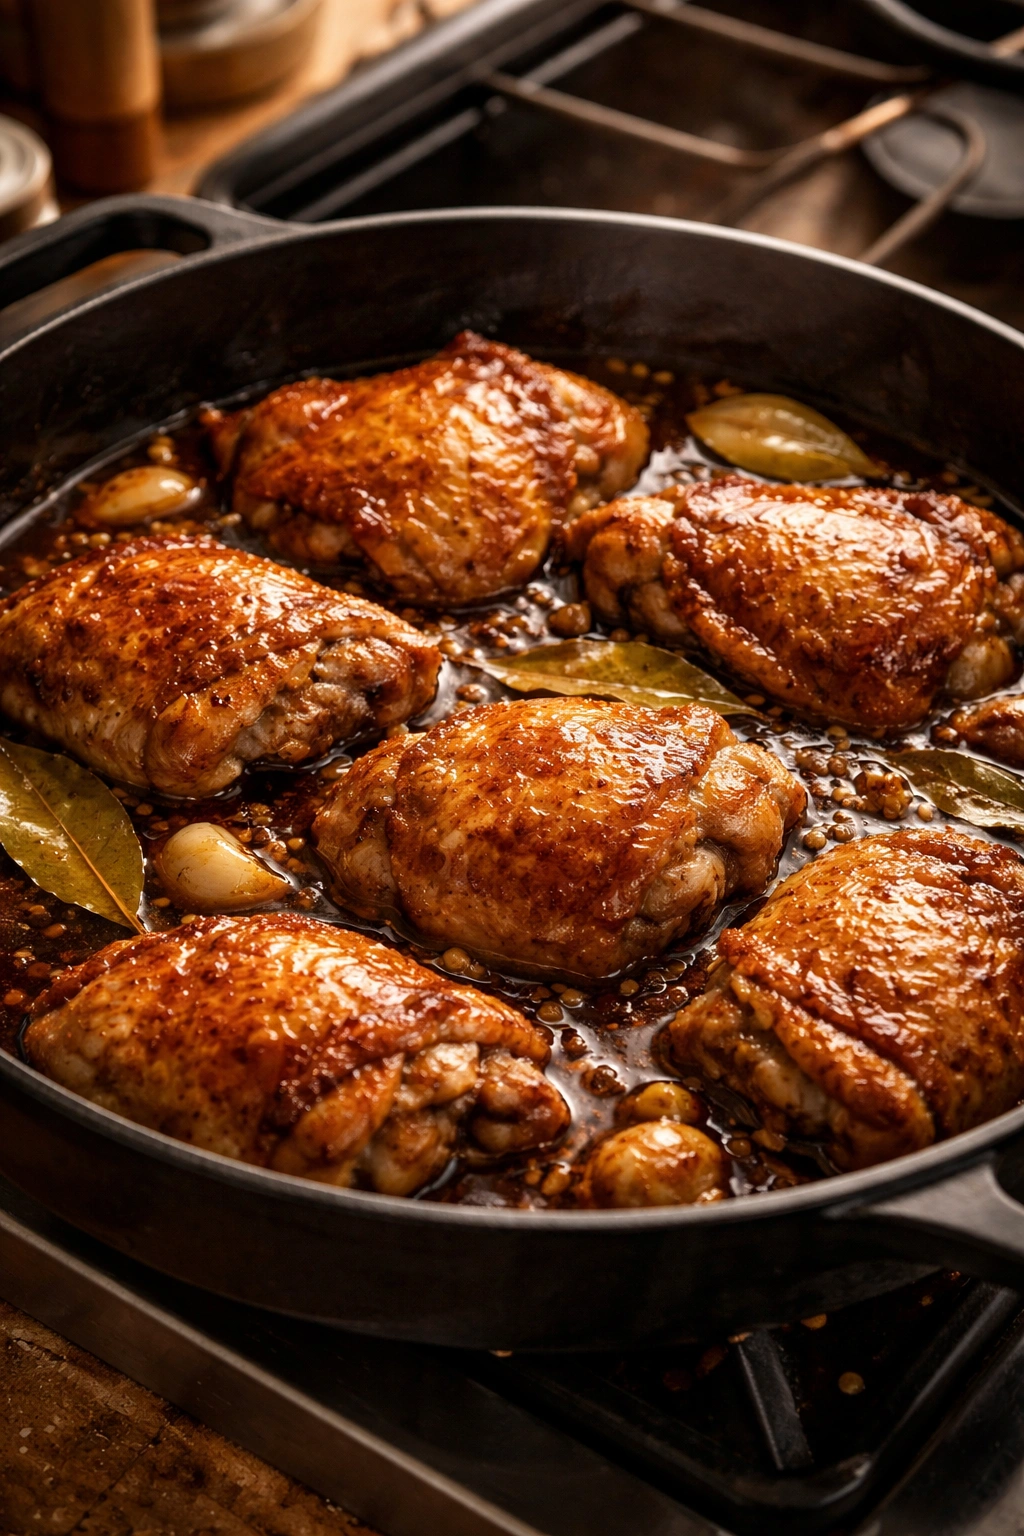
Working in two batches so the pan isn’t crowded, add chicken pieces in a single layer. Don’t stir for at least 2 to 3 minutes — you want the bottom of each piece to develop a golden-brown crust. Once the bottom is a deep golden color, turn the piece over and brown the other side for another 2 to 3 minutes. Do not crowd the pan; overcrowding drops the temperature and the chicken steams instead of browning. If your pan isn’t large enough to fit half the chicken in a single layer, use a smaller pot or brown in smaller batches. Transfer the first batch to a clean plate before starting the second batch.
-
Once all the chicken is browned and set aside, take a moment to look at the bottom of the pot. You’ll see brown, caramelized bits stuck to the surface — this is called fond, and it’s pure flavor. Don’t scrape it off yet; you’ll use it in the next step.
Build the Sauce and Braise:
-
Pour off most of the oil from the pot, leaving just a thin film on the bottom. Add the sliced onions and cook over medium heat, stirring occasionally, for 3 to 4 minutes. The onions will soften and start to soften, and their sugars will caramelize slightly, turning them golden-translucent at the edges. The kitchen will start to smell incredible at this point.
-
Add the minced garlic and cook, stirring constantly, for 30 seconds to 1 minute — just until you smell the garlic’s aroma release into the air. Do not let garlic cook longer; raw garlic cooking more than a few seconds can become bitter instead of sweet and mellow. The surface of the pot will look a bit darker as garlic hits the hot surface.
-
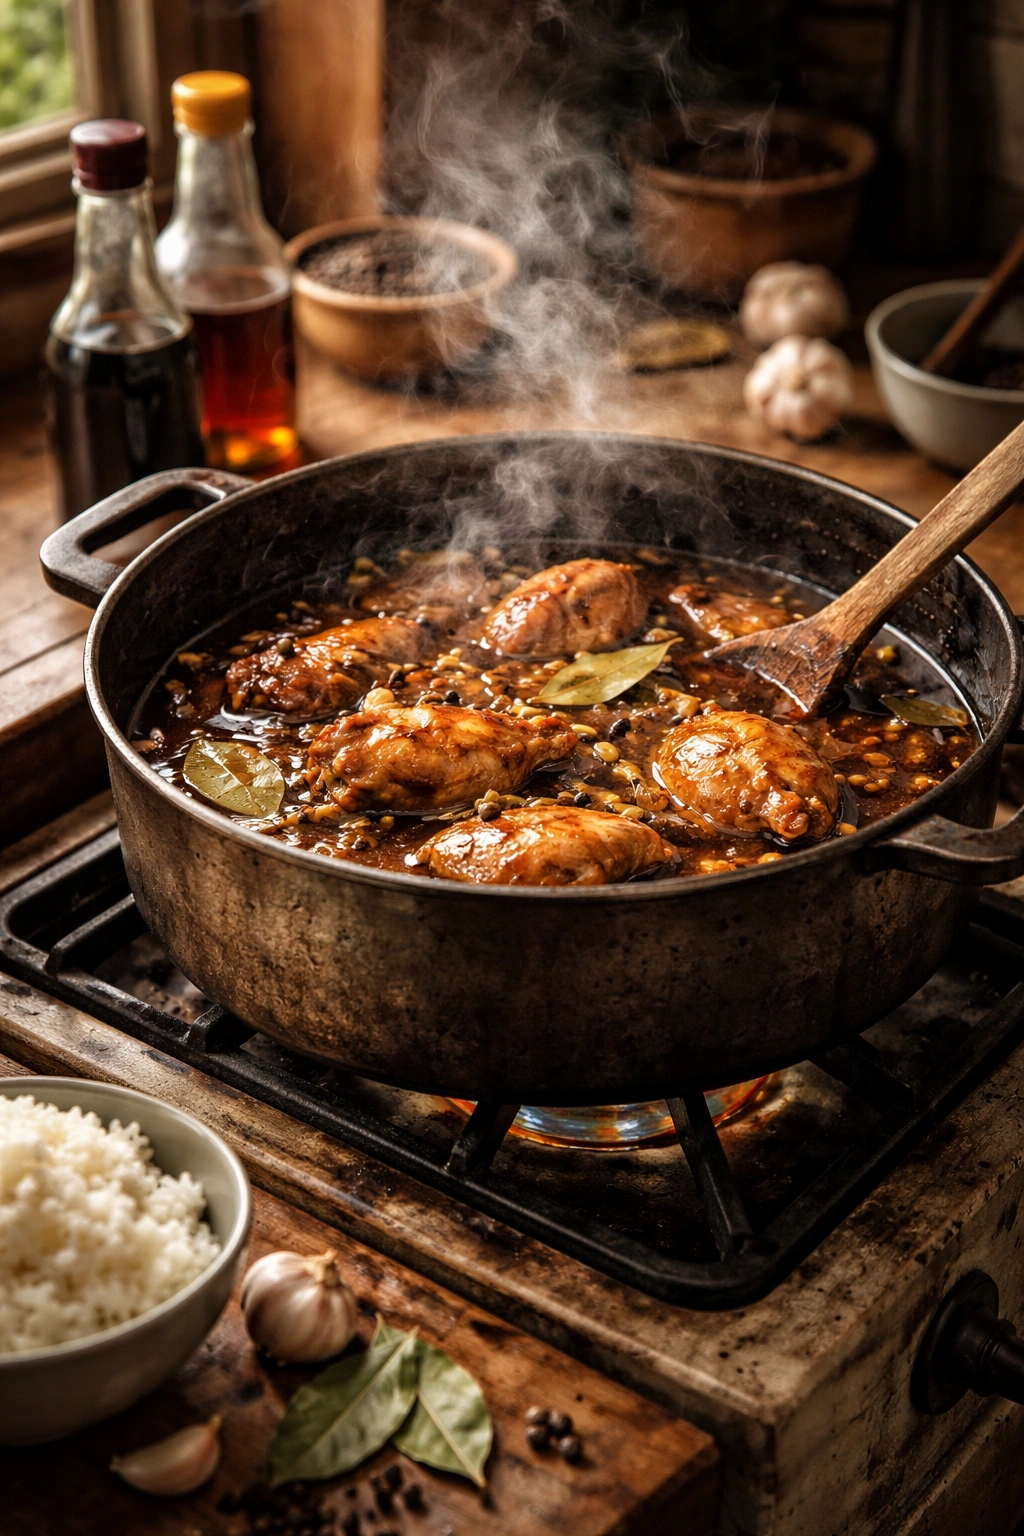
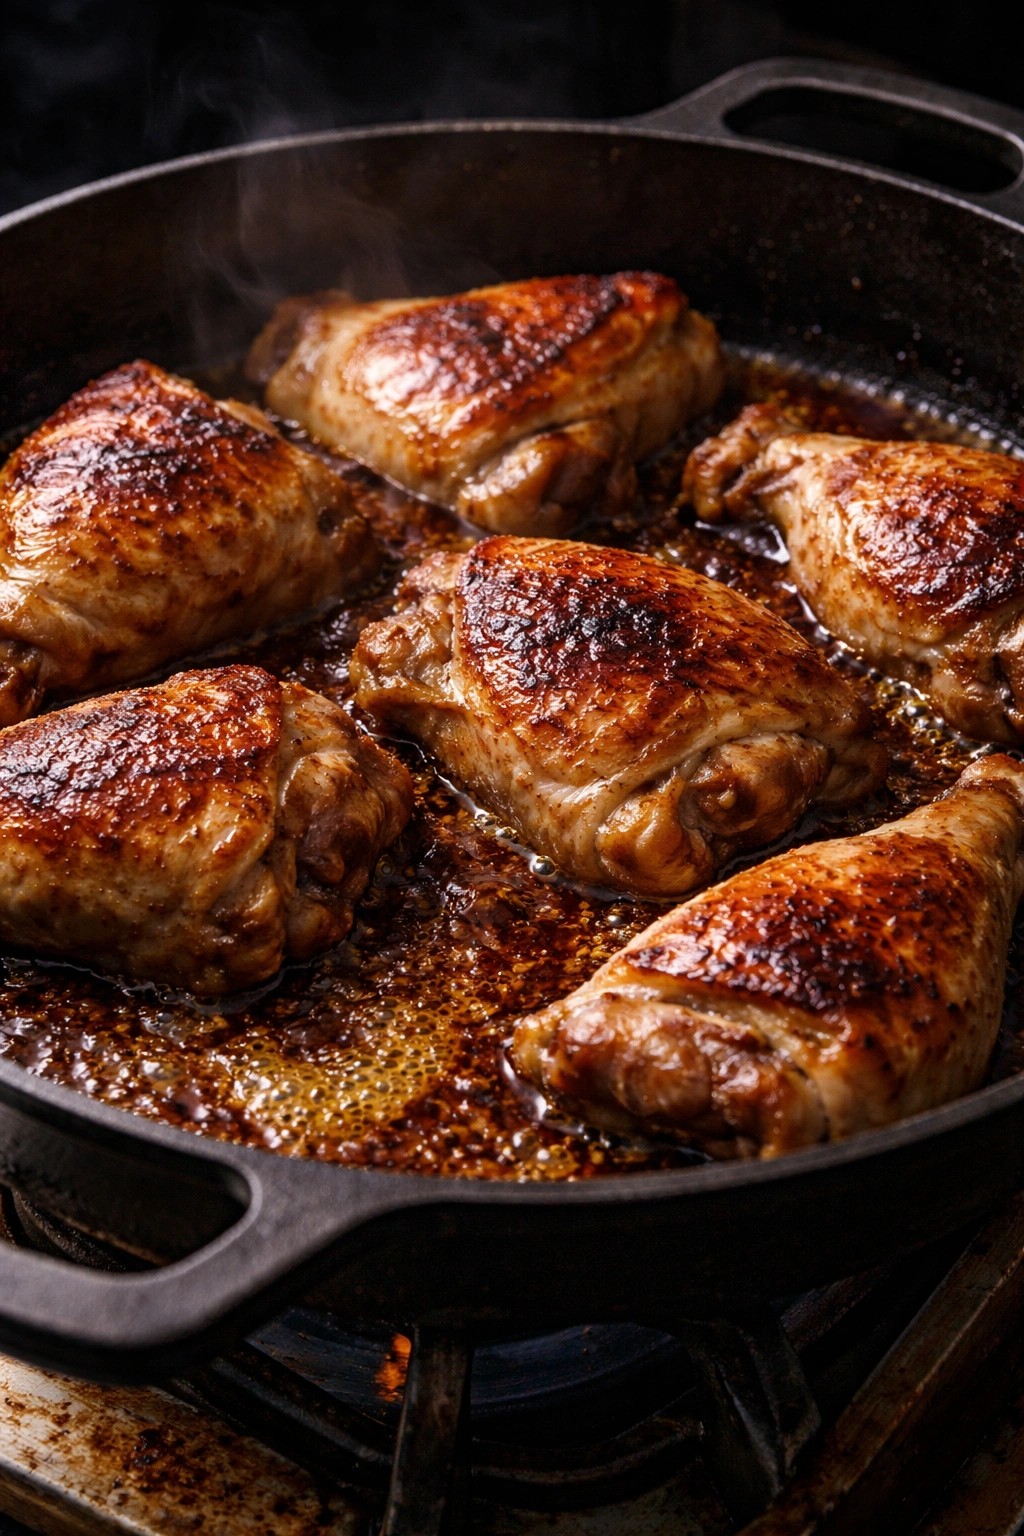
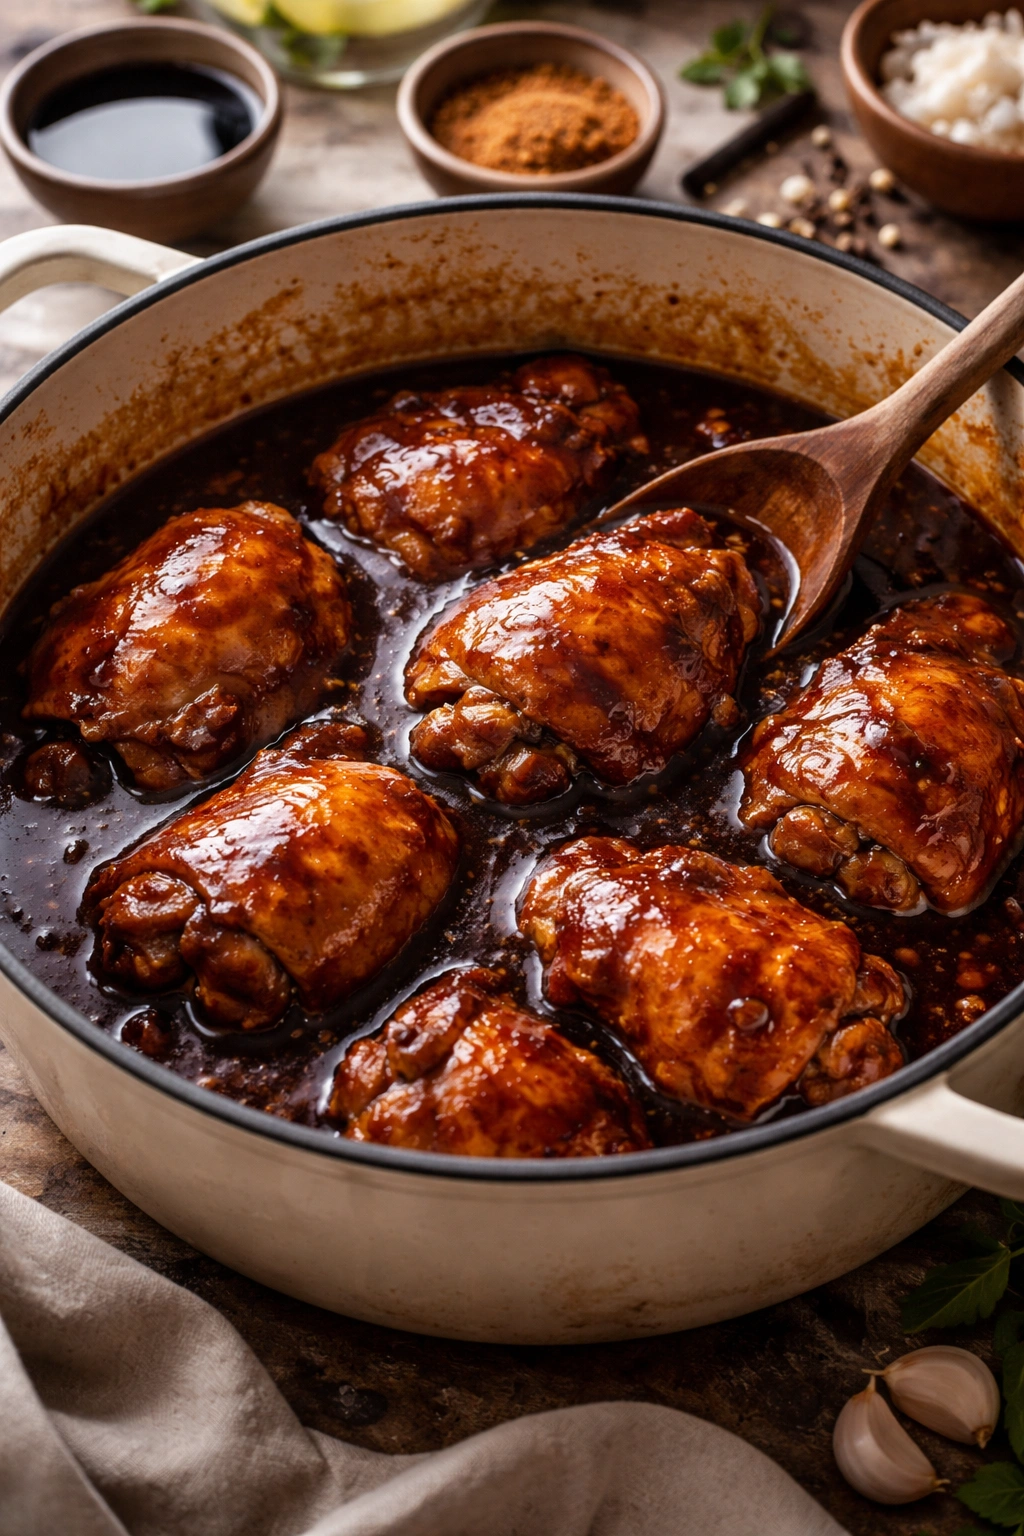
Pour in the soy sauce and vinegar all at once. You’ll hear a sizzle and see steam rise — this is the fond on the bottom of the pot dissolving into the liquid, adding massive depth of flavor. Stir well with a wooden spoon, scraping the bottom to release all the brown bits. The liquid will be a deep amber color with visible onions and garlic suspended in it.
-
Add the water, bay leaves, and freshly ground black pepper. Stir thoroughly. Return the browned chicken to the pot, nestling it into the liquid along with any juices that have collected on the plate. The chicken should be mostly submerged in the braising liquid, though the very top of some pieces might poke above the surface. That’s fine.
-
Bring the liquid to a gentle simmer over medium-high heat — you’ll see steam and small bubbles breaking the surface regularly. Once it reaches a simmer, reduce the heat to medium or medium-low (wherever your stove maintains a gentle, steady simmer without aggressive boiling). Simmer uncovered for 35 to 40 minutes, stirring occasionally.
Cook Until Tender and Sauce Reduces:
-
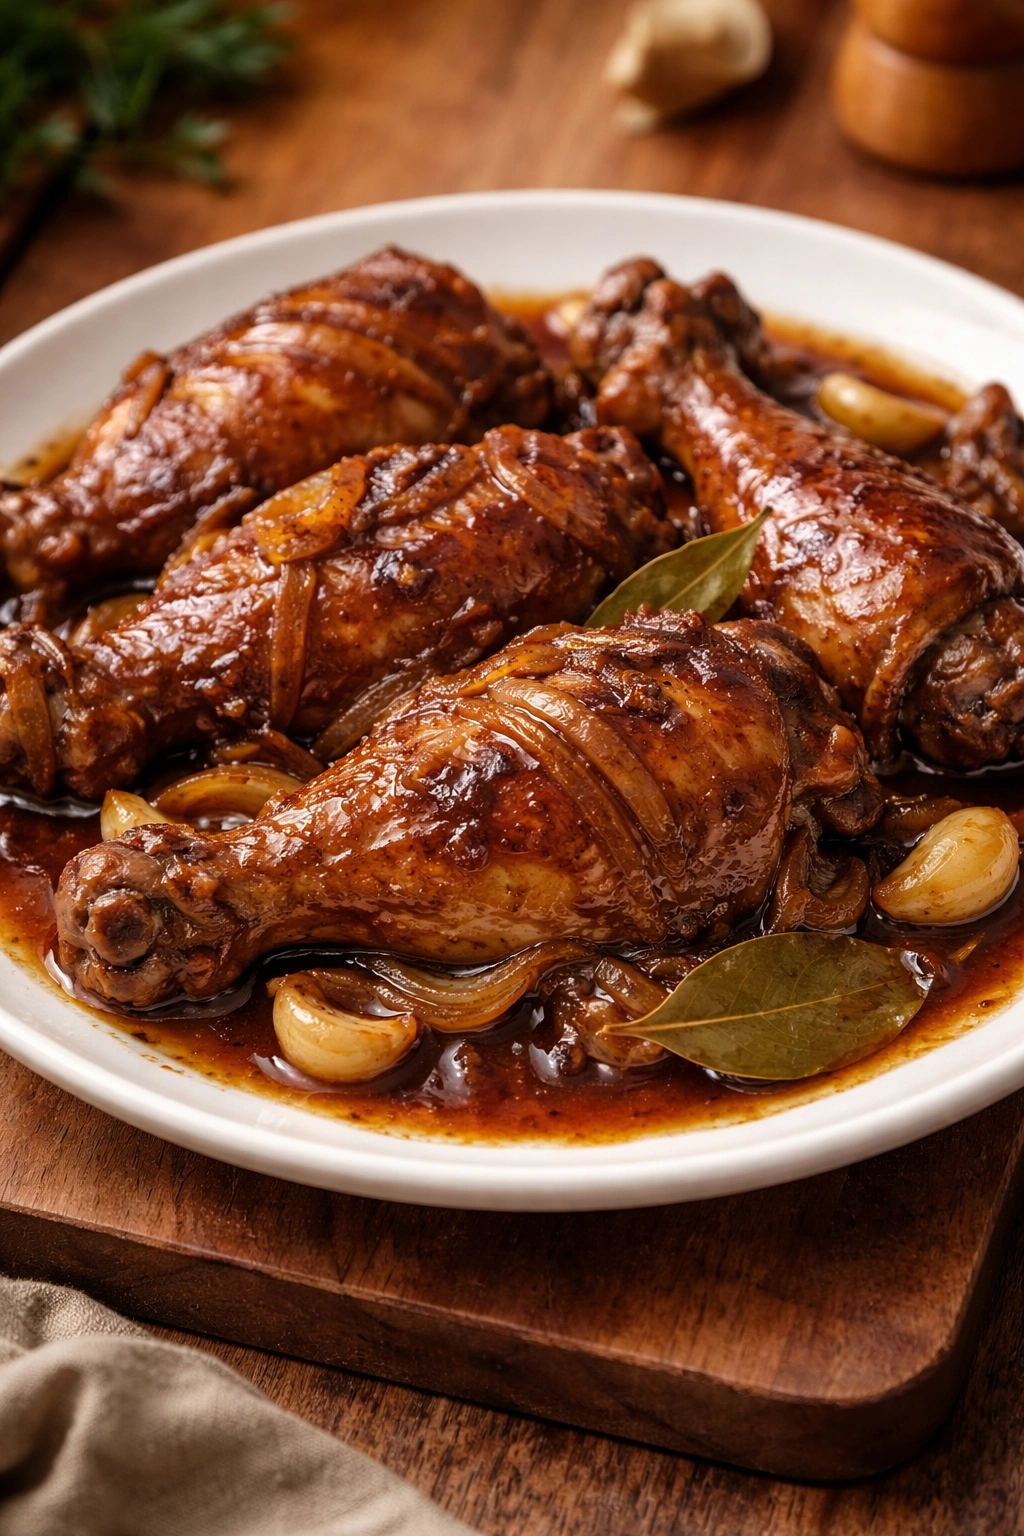
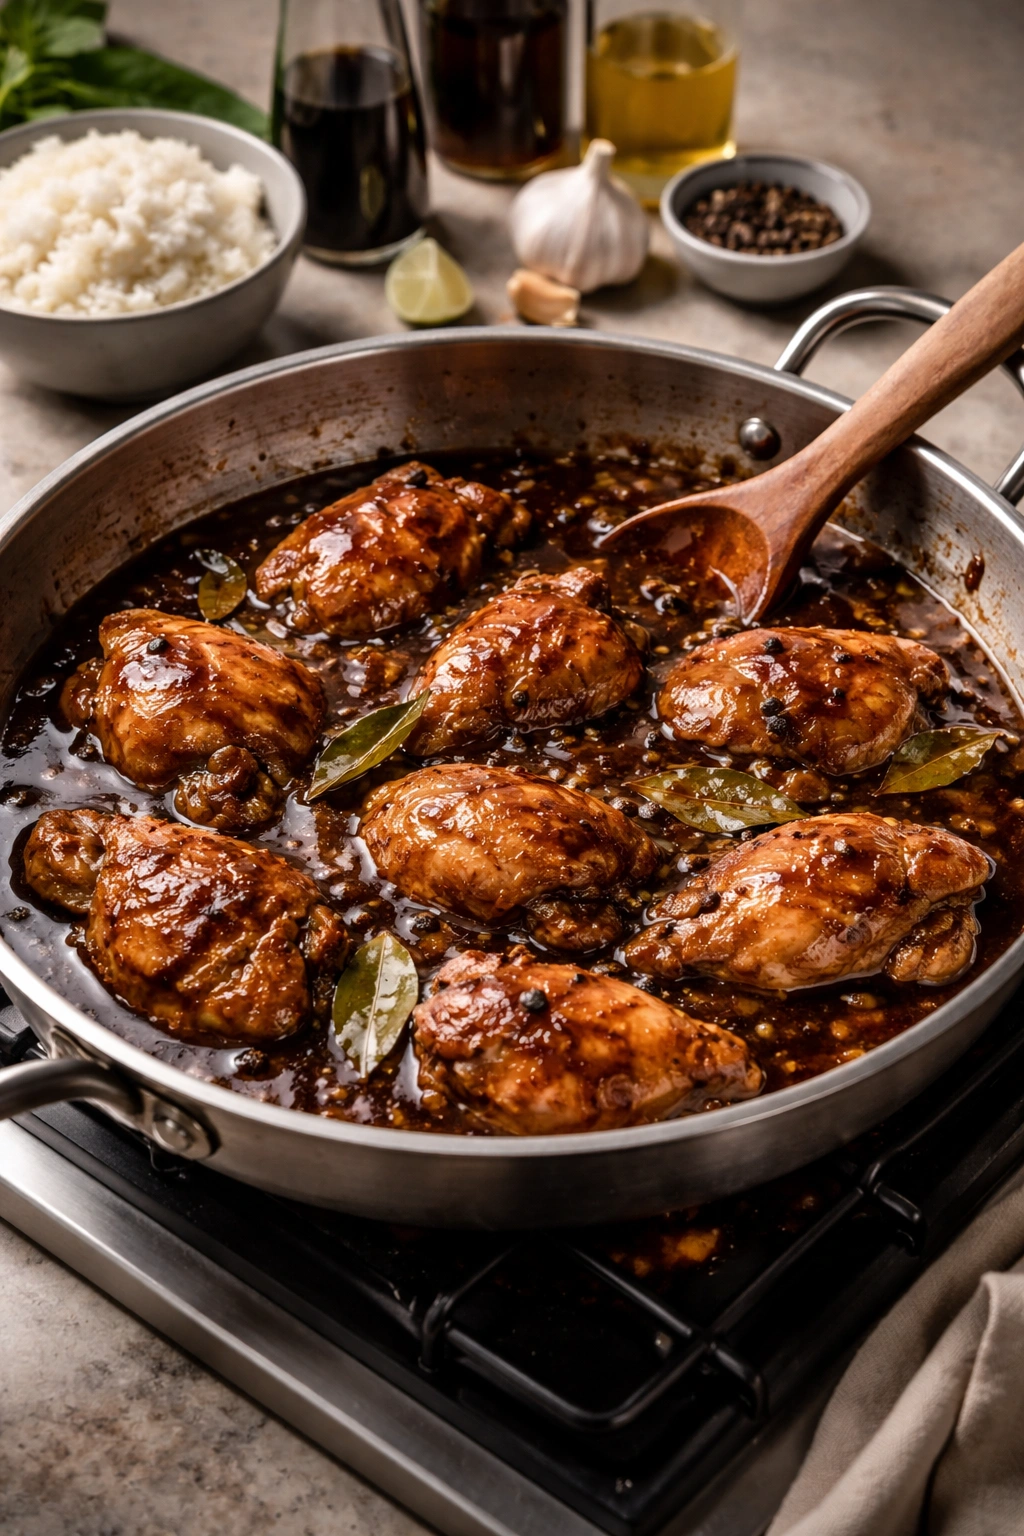
The adobo is done when the chicken is fork-tender (a fork slides through the thickest piece with no resistance) and the liquid has reduced to about half its original volume, creating a thicker sauce that coats the chicken. The sauce should be a dark mahogany color — darker than it started, because the soy sauce has concentrated and deepened. Taste a spoonful of the sauce on a small spoon.
-
At this point, taste the adobo and adjust as needed. If it tastes too salty, you can add a small splash of water to dilute it slightly. If the vinegar feels too sharp and bright, you can add the optional brown sugar (start with 1 teaspoon, stir, and taste before adding more). If it tastes flat or one-dimensional, the adobo likely needs more time on the heat to concentrate further, or it might benefit from a pinch more black pepper. Trust your palate — this is where your personal preference shapes the dish.
-
Once satisfied with the flavor, taste for salt. Depending on how salty your soy sauce is, you may not need any additional salt, or you may want to add just a pinch. Stir and taste again to ensure the salt is distributed.
-
Serve the adobo hot over steamed white rice, ladling plenty of sauce over each portion. The sauce is essential — it’s what makes this dish sing. Crusty bread also works beautifully for soaking up every drop.
Advertisements
The Secret Technique That Gives Adobo Its Deep Flavor
Most home cooks skip browning and go straight to simmering, which creates adequate adobo but misses genuine depth. Browning chicken through a process called the Maillard reaction creates hundreds of new flavor compounds that don’t exist in raw meat. These compounds concentrate in the fond at the bottom of the pot, which then dissolves into the braising liquid and flavors every drop of sauce.
This is why the order of operations matters. Brown the chicken first. Brown the onions second. Only then add the acidic and salty components. If you reversed the order and added soy sauce before browning, the chicken would braise instead of brown, and you’d lose that crucial depth.
The second secret is patience with the simmer. Adobo isn’t a dish that can be rushed. The liquid needs time to reduce and concentrate, the chicken needs time to become tender, and the flavors need time to meld. A rolling boil breaks down the chicken too quickly and creates a broken, cloudy sauce. A gentle simmer is slower and produces cleaner, more integrated flavors and chicken with better texture.
Why This Recipe Uses Thighs, Not Breasts
Chicken breasts contain very little fat and relatively little connective tissue that converts to gelatin during cooking. When braised, breast meat releases its limited moisture quickly and then has nothing to draw on, becoming dry and stringy. You can technically make adobo with breasts, but you’ll need to reduce the cooking time significantly (to about 25 to 30 minutes) and watch constantly to pull them out before they dry out.
Chicken thighs are built differently. The meat contains more fat marbling throughout, plus connective tissue around the bone that slowly converts to gelatin during cooking. This gelatin dissolves into the braising liquid, thickening it slightly and adding a silky mouthfeel. The fat keeps the meat moist even with extended cooking. Thighs remain tender and succulent where breasts would turn rubbery.
If you’ve had dry, disappointing adobo before, thighs are likely the solution. The cut matters as much as technique.
Common Mistakes That Ruin a Batch of Adobo
The most common mistake is not browning the chicken properly — either skipping browning entirely, or browning over too-high heat so the outside burns before the inside browns evenly. Medium-high heat is the target. If your burner runs hot, medium might be right. The browning should take a total of 10 to 12 minutes for two batches, with each piece developing an even golden-brown color.
The second mistake is crowding the pan while browning. When the pan is too full, the chicken steams instead of browning because the temperature drops and moisture accumulates. This creates rubbery chicken and pale, unappetizing meat. Brown in batches, even if it takes longer.
The third mistake is cooking the garlic too long or at too-high a temperature. Raw garlic in a hot pan burns almost instantly, becoming acrid and bitter. Add garlic only after the onions have softened, and keep the heat at medium so the garlic mellow rather than scorch.
A fourth mistake is reducing the sauce too far, creating an overly salty, concentrated dish that tastes one-dimensional. The sauce should coat the chicken and cling to rice, but it shouldn’t be a thick glaze. If it gets too thick, add water a few tablespoons at a time until it reaches the right consistency.
Finally, some cooks make the mistake of using low-quality soy sauce or cheap vinegar. These are the two most important seasoning components in this dish, and poor versions will taste cheap and muddy no matter how perfect the technique is. Spending a couple extra dollars on better versions creates an exponentially better result.
How to Adapt Adobo to Your Taste Preferences
The basic formula is flexible. If you prefer your adobo lighter and brothier, use more water and less soy sauce — try 1⅓ cups water and ⅓ cup soy sauce instead of the standard proportions. The sauce will be thinner and more broth-like, less intensely salty.
If you prefer it darker and more intensely savory, increase the soy sauce to ¾ cup and reduce the water to ¾ cup. This creates a heavier, darker sauce that coats the chicken more thickly.
If the vinegar feels too sharp or aggressive, add the optional brown sugar. Brown sugar is gentler than white sugar and adds warm, caramel-like notes instead of just sweetness. Start with 1 teaspoon and taste before adding more.
Some families add potatoes, boiled eggs, or even liver to their adobo. You can absolutely do this — add peeled and cut potatoes at the same time as the chicken so they cook together, or add hard-boiled eggs in the last few minutes of cooking just to heat them through.
If you want a creamier adobo, whisk in ½ cup of coconut milk at the very end, after the chicken is cooked and the sauce is reduced to your liking. This softens all the flavors and adds richness.
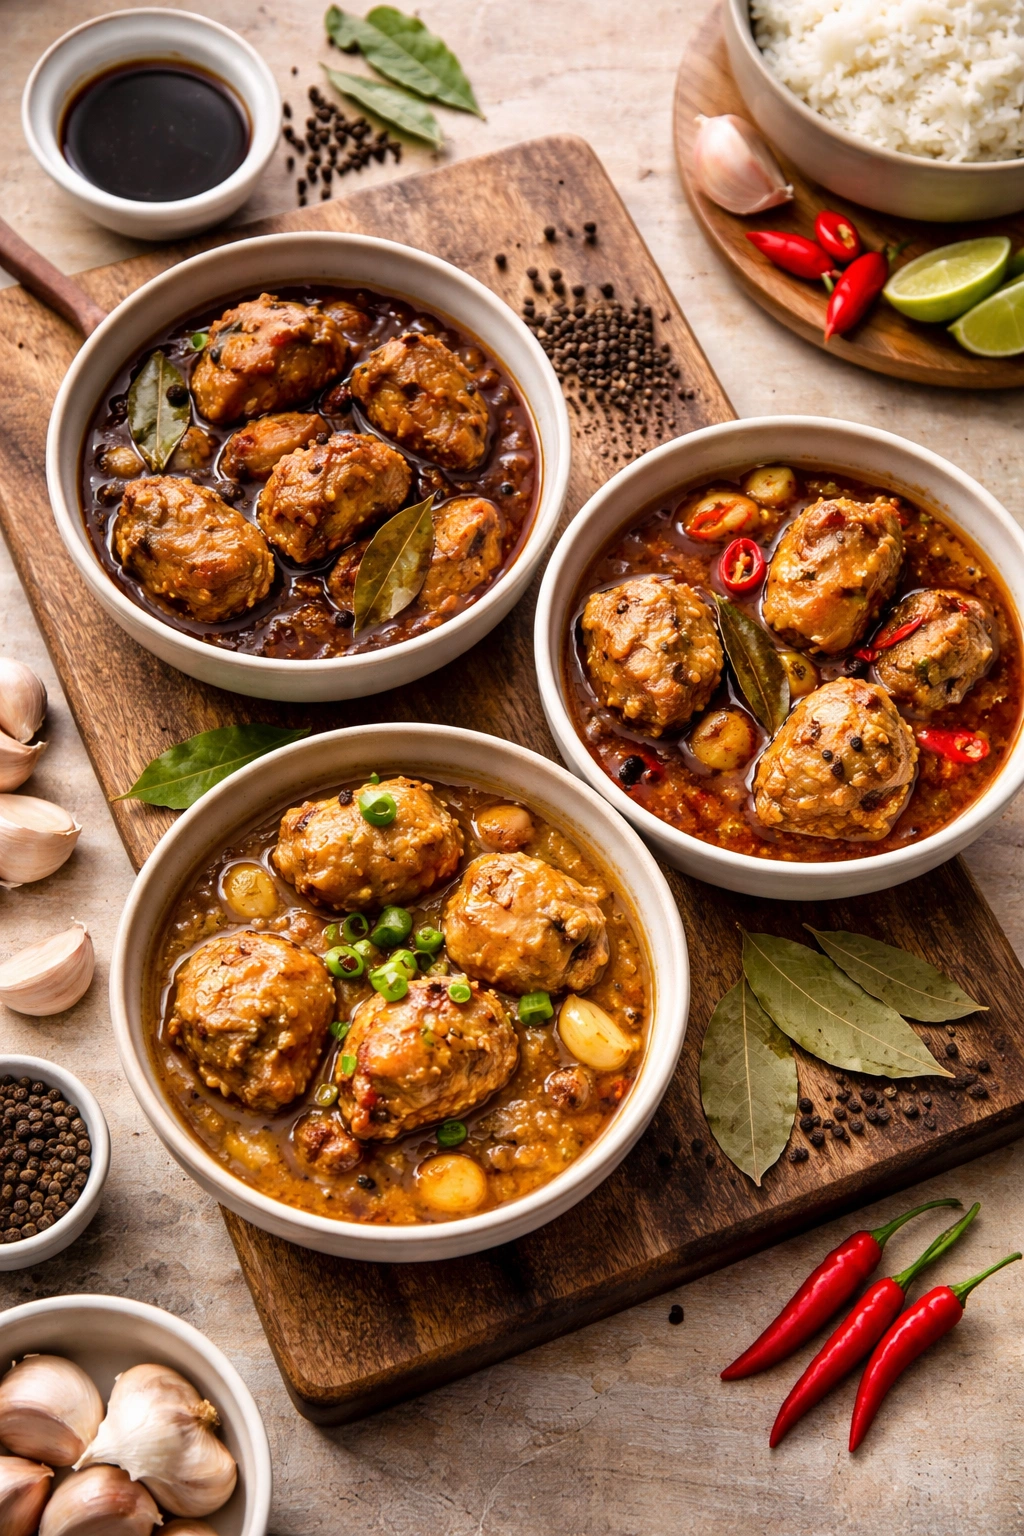
The Best Ways to Serve and Pair Chicken Adobo

White rice is the classic pairing. It’s neutral and absorbent, letting the adobo shine without competing flavors. The starch balances the saltiness of the sauce, and the rice is perfect for soaking up every bit of the dark, savory liquid.
A side of steamed or sautéed vegetables works beautifully — long beans, bok choy, or simple steamed broccoli add freshness and textural contrast to the rich chicken and sauce. Lightly salt the vegetables so they don’t taste flat against the deeply seasoned adobo.
Crusty bread is an unexpected but perfect companion. Tear off pieces and use them to soak up the sauce exactly as you would rice. This is especially nice if you’re serving adobo for a casual, comfortable meal.
A simple cucumber salad (vinegared onions and cucumbers) or a fresh salad with lemon dressing cuts through the richness and cleanses the palate between bites. The acidity provides contrast to the savory, salty adobo.
Fried or crispy rice adds textural interest if you want something beyond plain steamed rice. The contrast between crispy rice and soft, saucy chicken is genuinely appealing.
Storage, Reheating, and Make-Ahead Options
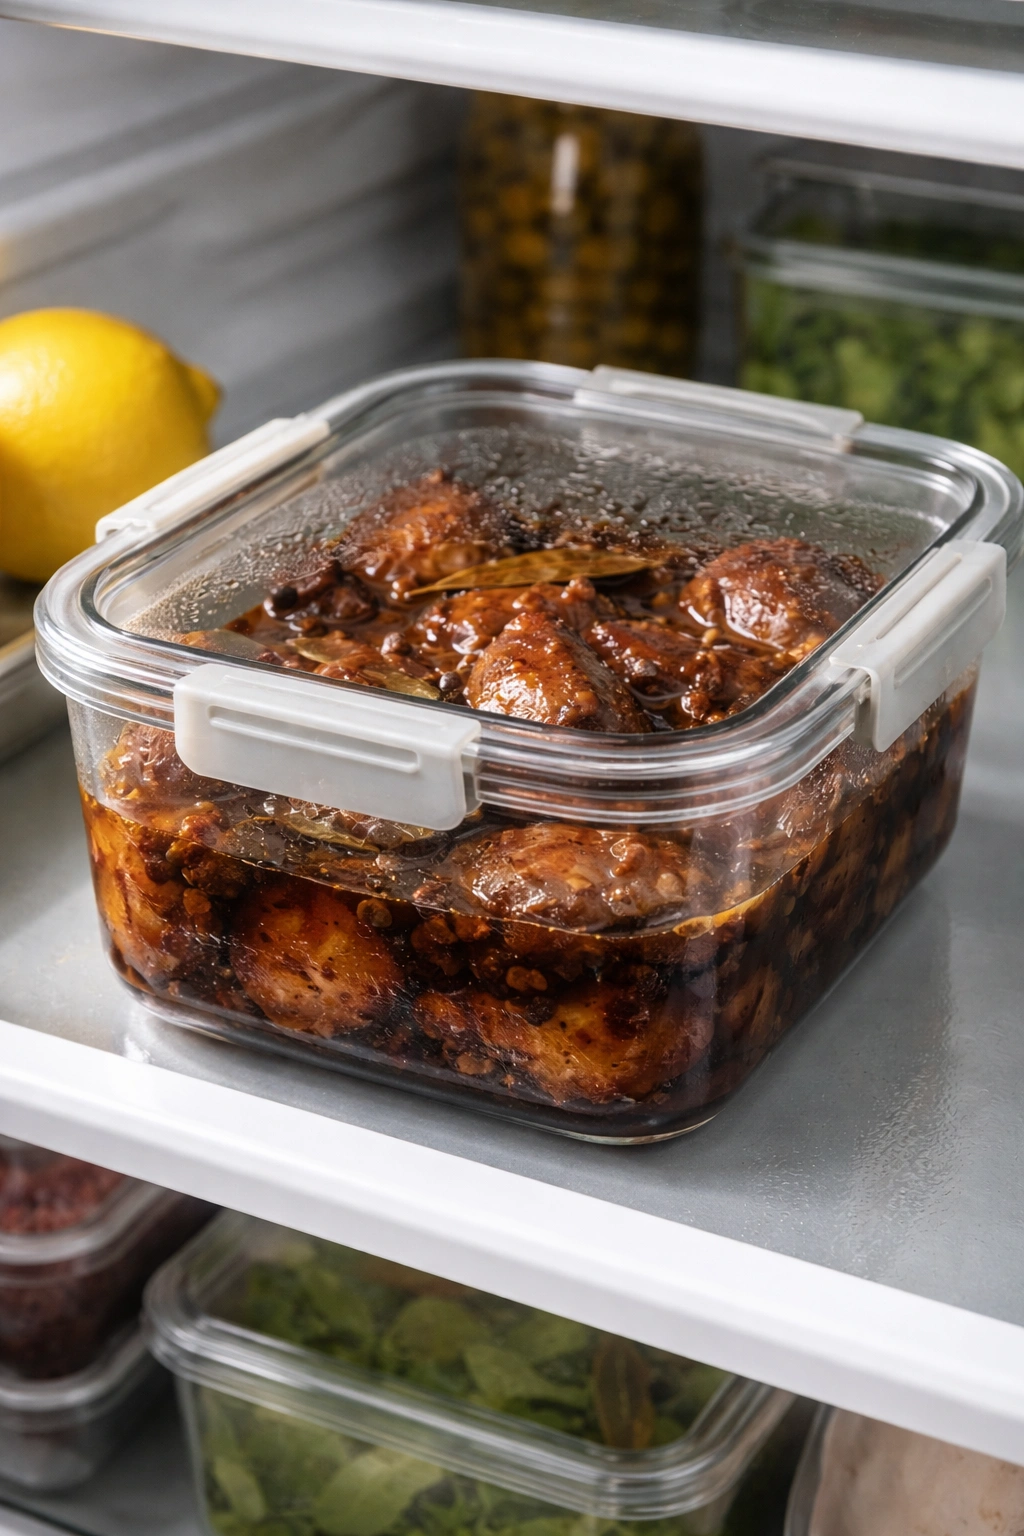
Chicken adobo improves with time. The flavors continue to meld and deepen as it sits, making it one of the best dishes to cook ahead. You can store adobo in the refrigerator in an airtight container for up to 4 days. The sauce will thicken further as it cools; this is perfectly normal and actually desirable.
To reheat, warm it gently over low to medium heat in a pot on the stove, stirring occasionally until heated through (about 5 to 8 minutes depending on the amount). You can also reheat it in the microwave in a microwave-safe container, stirring halfway through, though stovetop reheating is gentler on the texture of the chicken.
For freezer storage, cool the adobo completely to room temperature before transferring to a freezer-safe container. It will freeze well for up to 2 months. Thaw overnight in the refrigerator before reheating, or reheat it from frozen over low heat (it will take longer, maybe 15 to 20 minutes, but the low heat prevents the chicken from drying out).
The best approach for entertaining is to cook the adobo the day before, refrigerate it overnight, and reheat it gently just before serving. The overnight rest improves the flavor, and reheating is quick. You can focus on preparing sides and being present with your guests rather than cooking while they’re there.
Individual components can also be made in advance. You can brown the chicken and set it aside for up to a few hours before adding the braising liquid. You can prep the aromatics hours before cooking. This flexibility is one of the reasons adobo works so well for weeknight dinners — you can do pieces of the work when you have time.
Variations: From Classic to Creative Twists
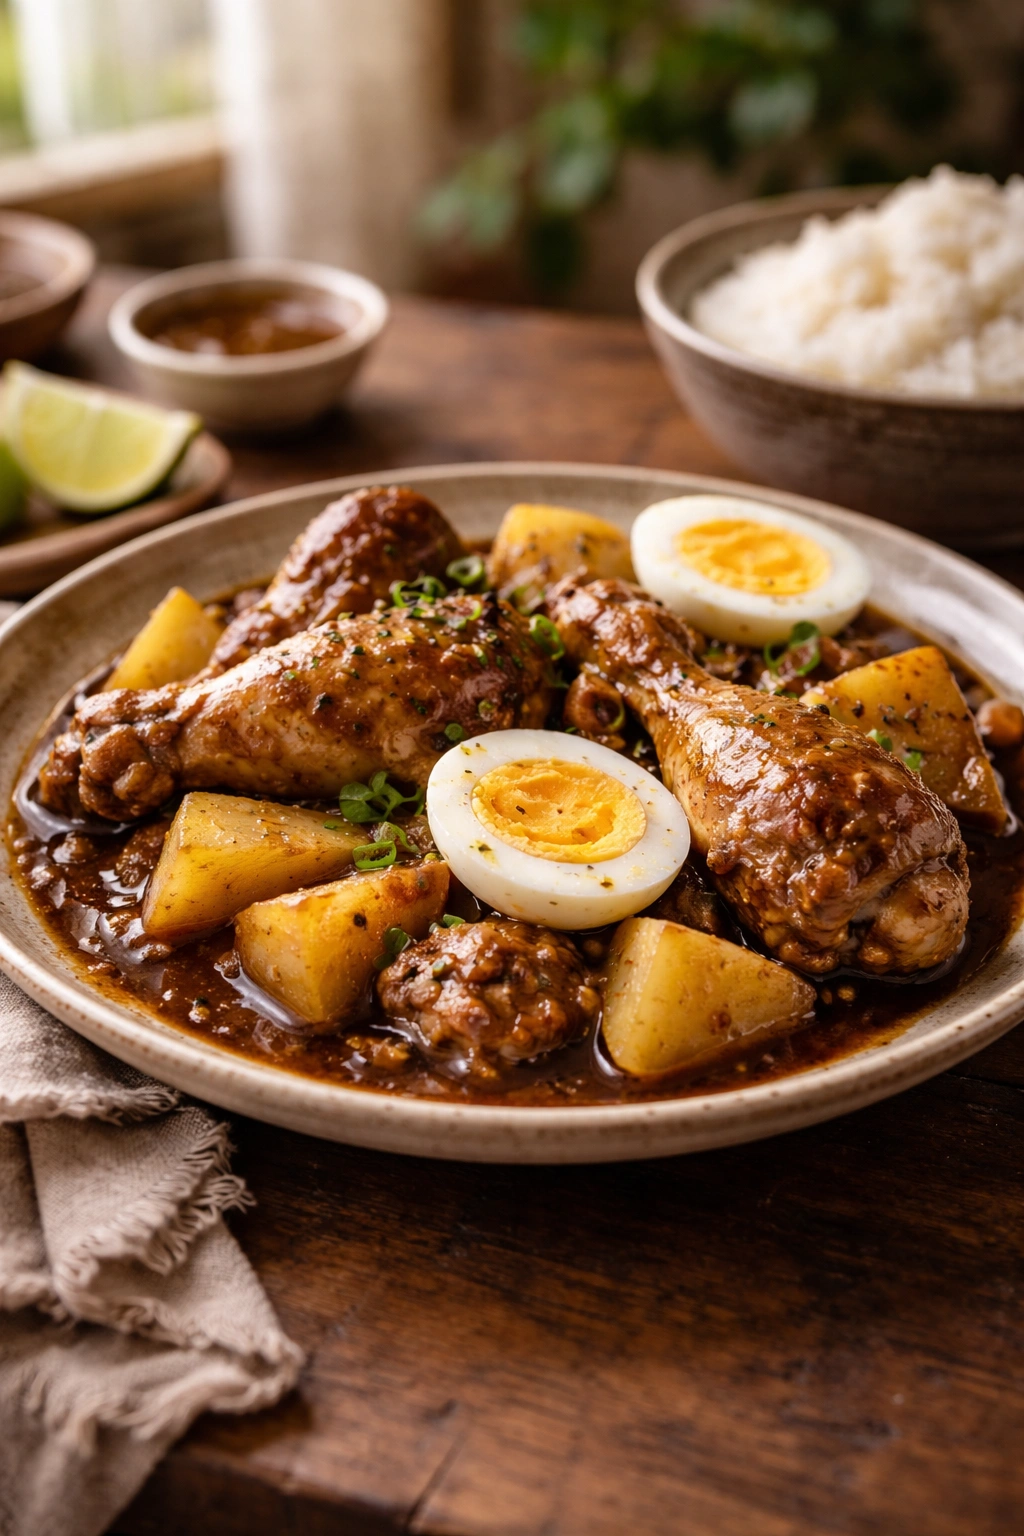
Adobo with Potatoes and Eggs is a popular variation. Add 1 pound of peeled and cut potatoes (about 2-inch chunks) at the same time as the chicken. Add 4 to 6 hard-boiled peeled eggs in the last 5 minutes of cooking, just to heat them through. This makes the dish more substantial and adds different textures.
Coconut Milk Adobo is richer and creamier. Reduce the water to ½ cup and add ¾ cup unsweetened coconut milk at the very end of cooking, after the chicken is fully cooked. Stir gently to combine. This is sometimes called Adobo sa Gata (adobo with coconut).
Pork Adobo substitutes pork shoulder or pork butt cut into pieces instead of chicken. Pork takes slightly longer to become tender — about 50 to 60 minutes instead of 35 to 40. The richer fat in pork creates an even more luxurious sauce. Everything else about the technique remains the same.
Adobo with Liver (Adobo sa Atay) adds chicken liver for an intensely savory, almost offal-like complexity. Add sliced or cubed chicken liver in the last 10 minutes of cooking. The liver cooks quickly and softens the sauce. This is a traditional variation that’s not as common in casual cooking but is worth trying if you’re adventurous.
Dry Adobo reduces the liquid even further, creating a dish where the chicken is coated in a thick, almost glaze-like sauce with minimal extra liquid. This works beautifully if you’re serving adobo as an appetizer or alongside other dishes that have their own sauces. Reduce the water to just ½ cup and cook uncovered until the sauce is syrupy and clings to the chicken.
Adobo with Lemongrass adds a bright, citrusy note. Add 3 to 4 stalks of lemongrass (white and light green parts only, bruised with the side of a knife) along with the bay leaves. Remove the lemongrass before serving. This is closer to a Visayan-style adobo.
Tips for Tender Chicken Every Single Time
Beyond using thighs, the key to tender chicken is respecting the simmer temperature. A gentle, barely-bubbling simmer produces more tender chicken than a rolling boil. Boiling agitates the meat, causing the proteins to contract more forcefully and squeeze out moisture. A gentle simmer heats the chicken gradually, allowing the connective tissue to convert to gelatin without the meat becoming tough.
Pat the chicken dry before browning. Wet chicken creates steam that prevents proper browning and starts the cooking process before you want it to. Thoroughly dried chicken browns faster and more evenly.
Don’t skip the resting time before browning. Letting chicken come to room temperature (or close to it) before cooking helps it brown more evenly and cook more gently throughout.
Remove the chicken from the heat once it’s fork-tender. Overcooked chicken doesn’t get “more” tender; it becomes stringy and dry as the proteins continue to contract. The threshold between perfectly tender and overdone is maybe 5 to 10 minutes, so keep a close eye toward the end.
Consider using bone-in, skin-on thighs if you want even more flavor and a slightly richer sauce. Bones contribute gelatin and flavor to the braising liquid. The skin can be removed before serving if you prefer, or left on. Cooking time will be similar, maybe a minute or two longer.
Bringing Restaurant-Quality Flavor to Your Home Kitchen
The truth about adobo is that there’s no secret ingredient or complicated technique separating homemade adobo from restaurant adobo. The difference is usually attention and time. Restaurants brown their chicken properly. They use quality ingredients. They let the sauce reduce fully. They don’t rush the simmer. You have all the tools to do exactly the same thing.
What restaurants also have is confidence. They’re not second-guessing the recipe or trying to move through it quickly. They taste as they go and adjust. You can bring that same confidence to your kitchen. This recipe gives you the foundation; your palate is the map that tells you whether you need more salt, more vinegar, more time on the heat, or if it’s ready to serve.
Adobo tastes best when made with intention. Set aside an hour, gather your ingredients, turn on some music if you want, and move through the process deliberately. This isn’t cooking that rewards rushing. It rewards paying attention.
Final Thoughts

Filipino chicken adobo is one of those dishes that seems simple until you understand what’s really happening — then you realize it’s a miniature lesson in flavor balance, technique, and the power of cooking something slowly enough to let all the components become something greater than their parts.
Make this adobo once and you’ll have a baseline. Make it twice and you’ll start to understand where your preferences diverge from the basic recipe. By the third time, you’ll be confident enough to adjust as you go. By the fourth time, you might start experimenting with variations. This is how dishes become part of your repertoire instead of just recipes you followed.
The best part is that adobo tastes even better the next day, so you can cook it when you have time and enjoy the results for days. It feeds a family. It’s affordable. It teaches you technique while being forgiving enough for beginners. It’s absolutely worth making at home, not because it’s difficult, but because it’s genuinely delicious and will make your kitchen smell incredible.