There’s something almost magical about the simplicity of homemade chicken soup. A handful of basic ingredients—chicken, vegetables, herbs, and broth—come together to create something that nourishes both body and spirit. Unlike store-bought versions loaded with sodium and preservatives, homemade chicken soup tastes like care itself, with a clean, genuine depth of flavor that no shortcut can replicate.
The best part? It’s genuinely easy. You don’t need culinary training, expensive equipment, or a full day of hands-on cooking. What you need is a little understanding of why certain techniques matter and how to let time and gentle heat do the heavy lifting for you. Once you master this foundational recipe, you’ll have a blueprint for endless variations—add noodles for comfort, rice for substance, or keep it pure and simple with just the healing broth and tender chicken.
This is the soup that teaches you that the most satisfying meals often come from the most straightforward approaches. Let’s build one that tastes like it simmered for hours, even when you’re working with real-world timing constraints.
Why Homemade Chicken Soup Is Worth the Time
Homemade chicken soup isn’t just comfort food—it’s an investment in better flavor and better nutrition. Store-bought broths rely on salt and artificial flavoring to compensate for the absence of real ingredients simmered together over time. When you make it yourself, you’re controlling every component, which means no mystery additives, no off-putting aftertaste, and no sodium overload that leaves you reaching for water an hour later.
The bone structure of a whole chicken or bone-in pieces releases gelatin and minerals into the liquid as it cooks. This isn’t just about taste; it’s about nutrient density. Bone broth has become trendy for good reason—homemade chicken soup made with bones delivers collagen, amino acids, and minerals that support joint health, digestion, and immune function. You get this naturally, without any special effort, just by simmering.
There’s also the economics of it. A whole chicken or a package of bone-in thighs costs far less than multiple cups of quality store-bought broth. One chicken becomes your soup base, your chicken meat, and—if you save the bones—future stock. That’s remarkable value for something this nourishing.
The Secrets to Building Deep Flavor in Your Broth
Many people think the secret to exceptional chicken soup is adding more ingredients or cooking longer. The real secret is understanding what actually builds flavor in broth, and it’s surprisingly straightforward: the interaction between chicken, bones, aromatics, and low, steady heat.
When you start your broth with cold liquid and a whole raw chicken (or raw chicken parts), something called cold-poaching begins to happen. As the temperature gradually rises, the proteins in the chicken denature slowly and evenly, releasing their flavors gradually into the liquid rather than all at once. This produces a cleaner, more refined broth than starting with boiling water, which can shock the proteins and create a cloudy, off-flavored result.
The second secret is aromatic vegetables. Onion, celery, and carrots aren’t just garnish—they’re flavor foundations. As they simmer, they break down and release their sugars and compounds into the broth. These vegetables have already done their job by the time your soup is finished simmering; they become soft and mostly one-note. That’s why the best chicken soup recipes add fresh diced vegetables near the end, after the broth is already rich and flavorful.
Herbs matter, but timing matters more. Fresh herbs lose their bright volatile oils quickly in heat. A bay leaf or fresh thyme can simmer the whole time, but delicate herbs like parsley and dill should be added at the very end, just before serving. This is the difference between a soup that tastes herby-okay and one that tastes like fresh gardens captured in a bowl.
Choosing the Right Chicken for the Best Results
The chicken you choose determines your soup’s texture, flavor, and fat content. Each option has distinct advantages—and trade-offs worth understanding.
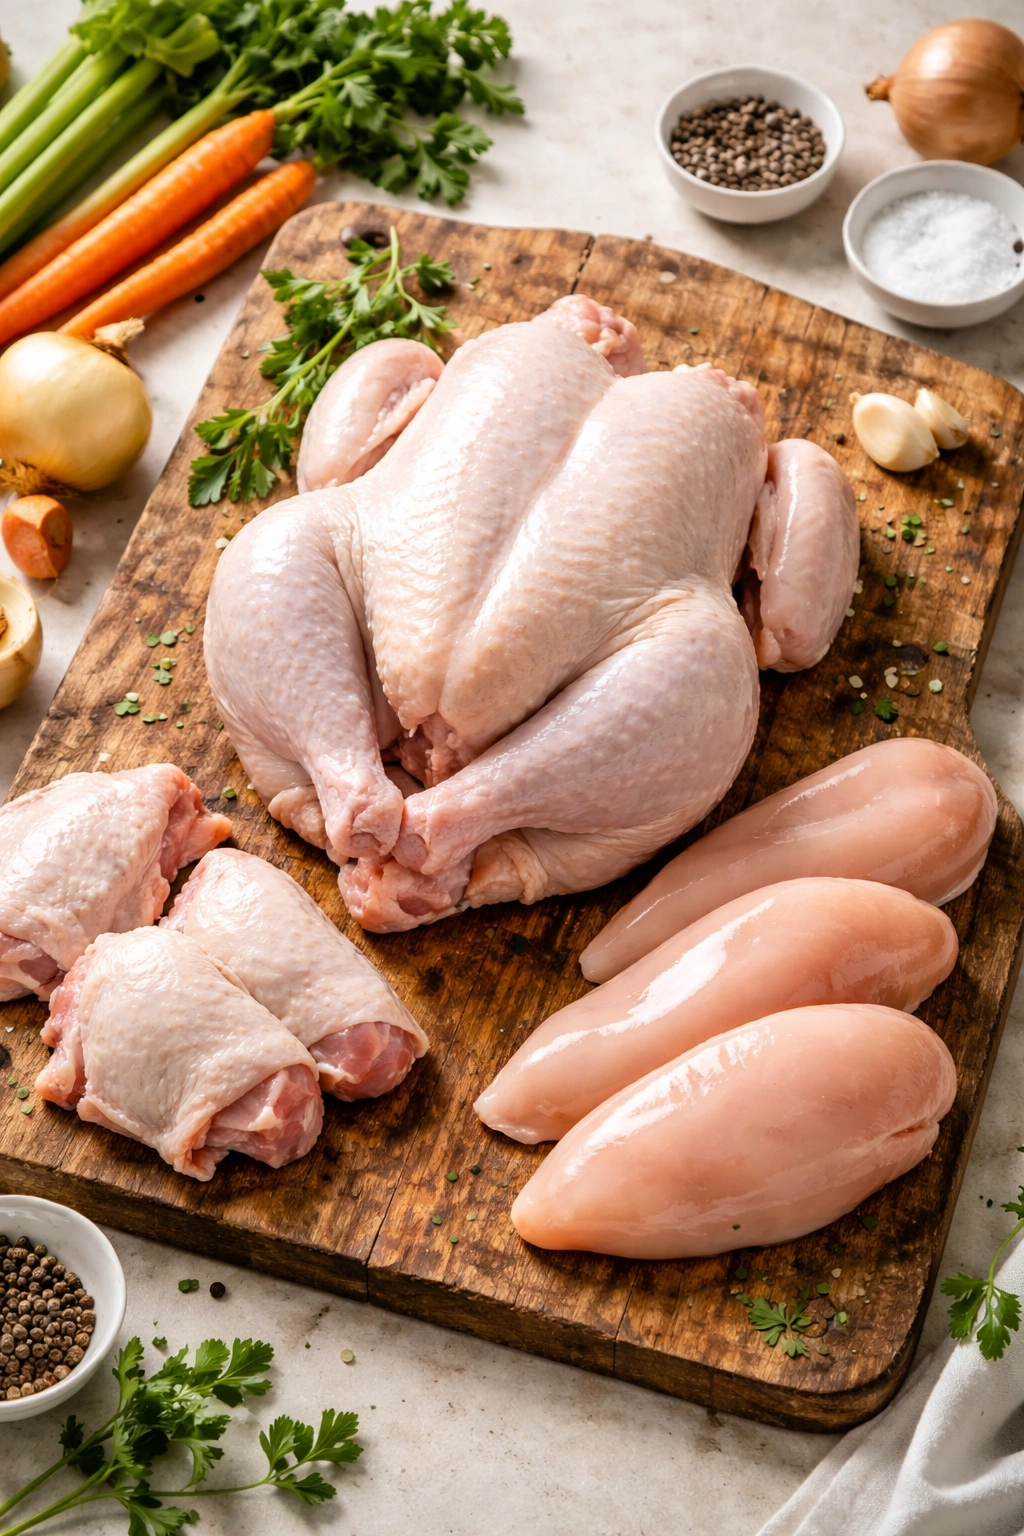
A whole chicken gives you the complete package: white meat, dark meat, skin, and bones all working together. The white meat (breasts) cooks faster than dark meat (thighs and legs), which means if you leave it all simmering together for 90+ minutes, you’ll end up with dry, stringy breast meat. The dark meat, by contrast, gets more tender and flavorful the longer it cooks. The bones and skin contribute tremendous depth. If you’re willing to manage the timing—removing the breasts early, then continuing with the rest—a whole chicken produces the most flavorful result.
Bone-in chicken thighs are the practical champion. Dark meat stays juicy and tender even after extended simmering, which means you can use one simple timing without babysitting the pot. The bones add richness, and thighs have enough fat that they won’t dry out. They’re also typically cheaper per pound than breasts. If you’re choosing between a whole chicken and thighs, and you value simplicity, thighs win.
Boneless, skinless chicken breasts are the quickest option and the lowest-fat choice. They’re perfect if you’re adding them near the end of cooking (in the last 5-10 minutes) or if you’re using pre-cooked rotisserie chicken. Using raw boneless breasts for a full simmer will leave you with overcooked, tough meat that adds flavor but disappoints in texture.
A rotisserie chicken from the grocery store is the shortcut that actually delivers. You get tender, flavorful cooked meat and can use the bones and carcass to make broth if you have time. If you’re starting the soup from scratch with limited time, rotisserie chicken + quality store-bought broth can produce a genuinely delicious soup in 30 minutes.
Essential Vegetables and Aromatics That Make It Work
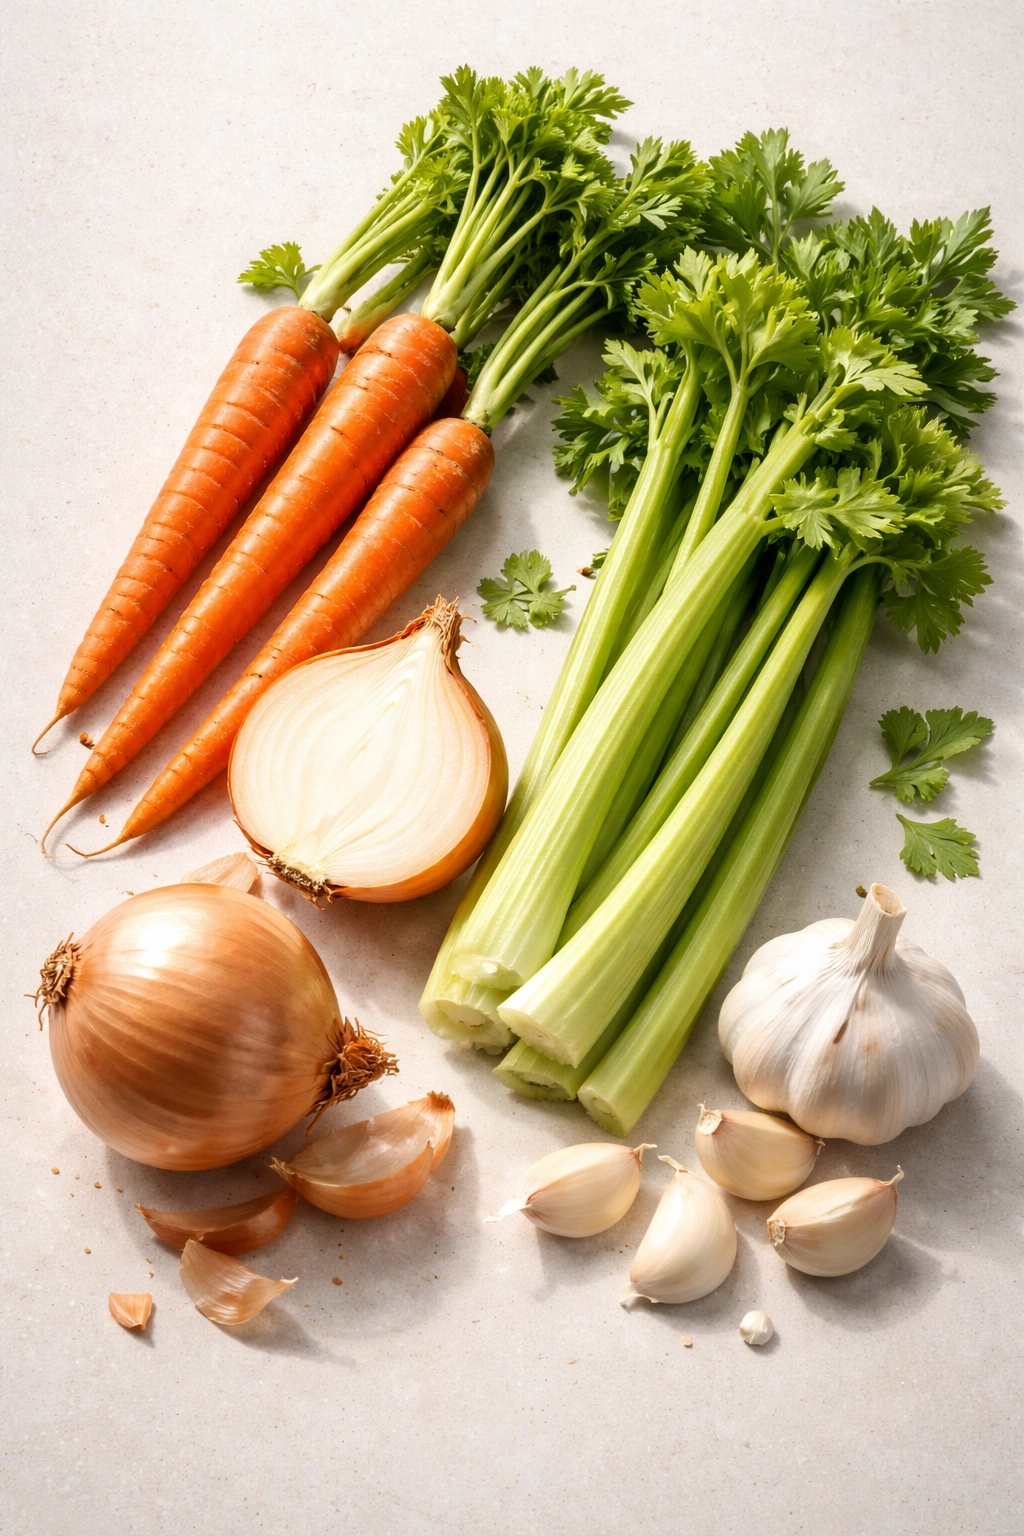
The vegetable base of chicken soup is almost always some version of mirepoix—a French term for the combination of diced onion, celery, and carrot. This trio works because their flavors complement rather than compete. Onion provides sweetness and sulfurous depth. Celery contributes a grassy, mineral quality. Carrot adds brightness and subtle sweetness.
Garlic is non-negotiable. Fresh cloves—minced or whole, depending on your preference—add savory complexity that makes every other flavor in the pot taste more interesting. Never substitute garlic powder for fresh; the chemical profile is completely different.
Beyond the basics, you have room to play. Parsnips add a subtle sweetness and creaminess when they’ve broken down into the broth. Turnips bring an earthy, slightly peppery note. Leeks (white and light-green parts only) are more delicate than onion and add a refined onion flavor without the sharp edge. Green beans, fresh corn, or frozen peas can be added at the end for color and texture. The point is that the basic mirepoix is your foundation, but it’s not your ceiling.
One critical timing note: vegetables added at the beginning of cooking will completely break down and flavor the broth, but they’ll be mushy and less visually appealing by serving time. Many recipes address this by adding fresh diced vegetables in the final 10-15 minutes. This gives you the best of both worlds—broth that’s flavorful from long simmering, and vegetables in the finished bowl that still have texture and color.
Yield: Serves 6 to 8 | Makes approximately 12 cups
Prep Time: 15 minutes
Cook Time: 1 hour 30 minutes to 2 hours
Total Time: 1 hour 45 minutes to 2 hours 15 minutes (mostly hands-off simmering)
Difficulty: Beginner — no special techniques required, and the recipe walks itself through basic, logical steps that are nearly impossible to get wrong. Even your first attempt will taste genuinely good.
The Complete Ingredient List for Homemade Chicken Soup
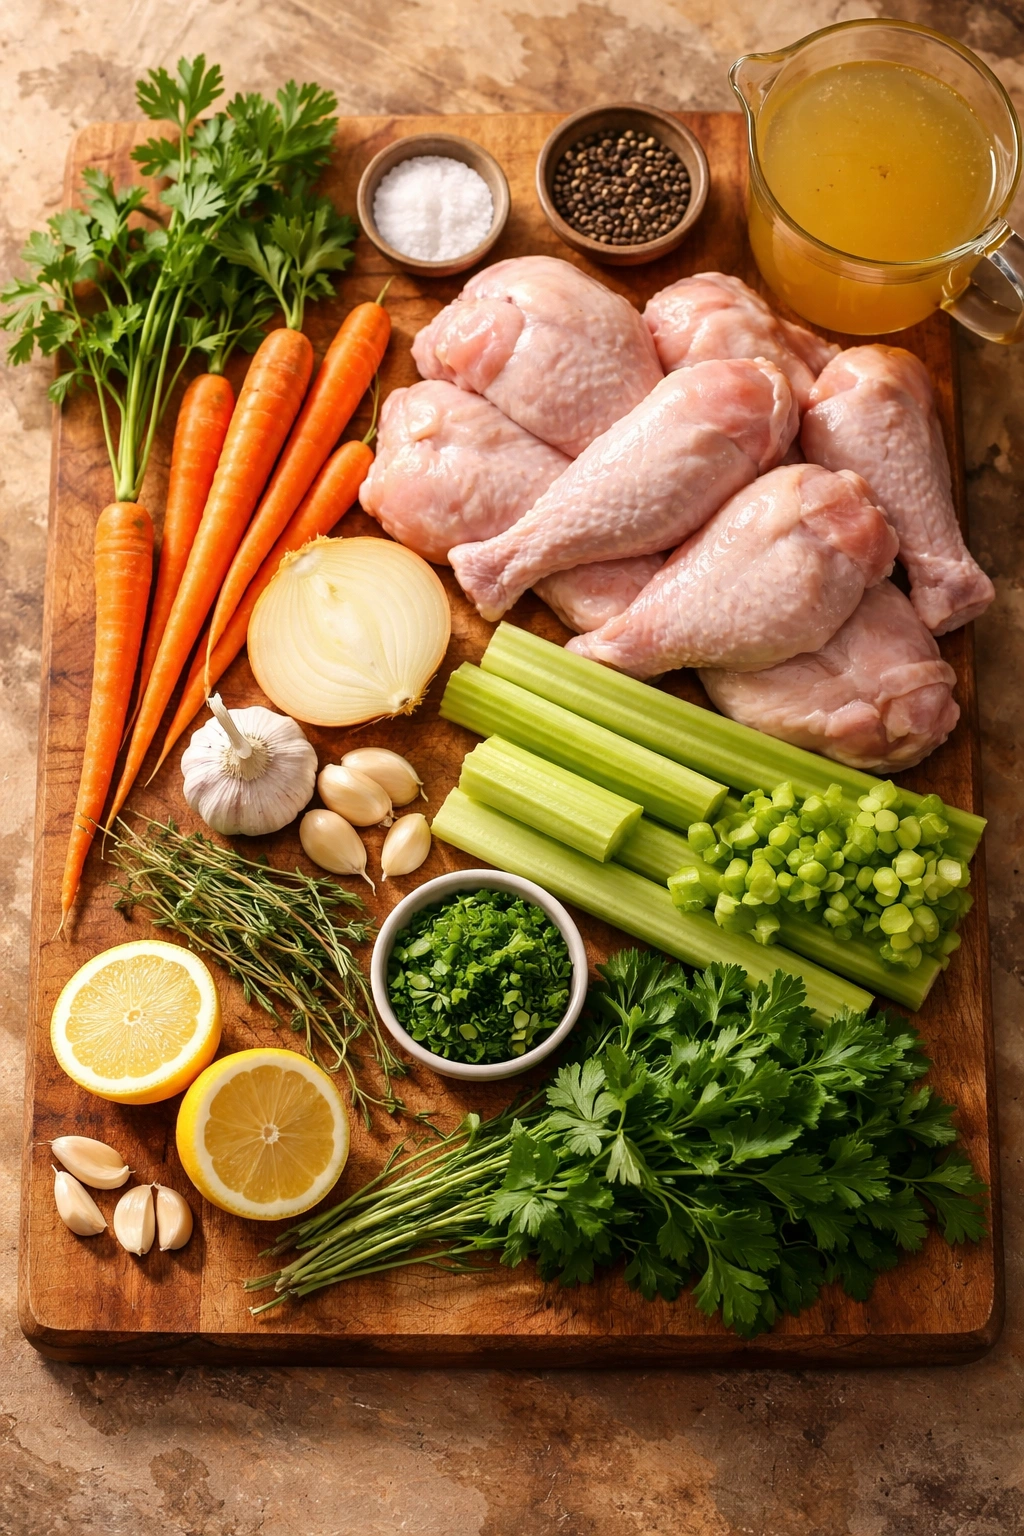
For the Broth Base:
- 1 whole raw chicken (4 to 5 pounds), or 4 to 5 pounds bone-in chicken parts (thighs, breasts with bone attached, or a combination)
- 2 quarts (8 cups) cold water, or a combination of water and unsalted chicken broth
- 1 large yellow onion, peeled and halved (do not chop yet—we’ll discard these after cooking)
- 4 large carrots, peeled and halved lengthwise (again, these go into the pot whole to flavor the broth and are removed later)
- 4 stalks celery, cut in half (include leafy tops for extra flavor)
- 6 whole garlic cloves, lightly crushed with the side of a knife (leaving them whole keeps their flavor subtle and refined)
- 2 bay leaves
- 4 fresh thyme sprigs (or 1 teaspoon dried thyme if fresh is unavailable)
- 1 teaspoon kosher salt (for the broth)
- ½ teaspoon freshly ground black pepper (for the broth)
For the Finished Soup (Added at the End):
- 3 large carrots, peeled and diced into small ¼-inch cubes (approximately 2 cups)
- 3 stalks celery, diced into small pieces (approximately 1 cup)
- 1 medium yellow onion, diced small (approximately 1 cup)
- 2 tablespoons fresh flat-leaf parsley, minced (or more to taste)
- 1 tablespoon fresh dill, minced (optional, but highly recommended—it adds brightness)
- Additional kosher salt and freshly ground black pepper to taste (the broth may already be seasoned, so taste before adding more)
- Optional: juice of ½ fresh lemon (this brings the entire soup into focus with a subtle brightness)
Optional Add-Ins (Choose Based on Your Preference):
- 2 cups cooked egg noodles (added just before serving to prevent them from becoming mushy)
- 1 cup cooked white or brown rice
- Gluten-free pasta if needed for dietary purposes
Step-by-Step Instructions for Making Your Soup
Prepare the Raw Chicken and Build the Broth:
-
If using a whole chicken, remove any packages (giblets, neck) from the cavity and discard or save for stock another time. Rinse the chicken under cold water and pat it dry with paper towels. If using chicken parts, simply rinse and pat dry.
-
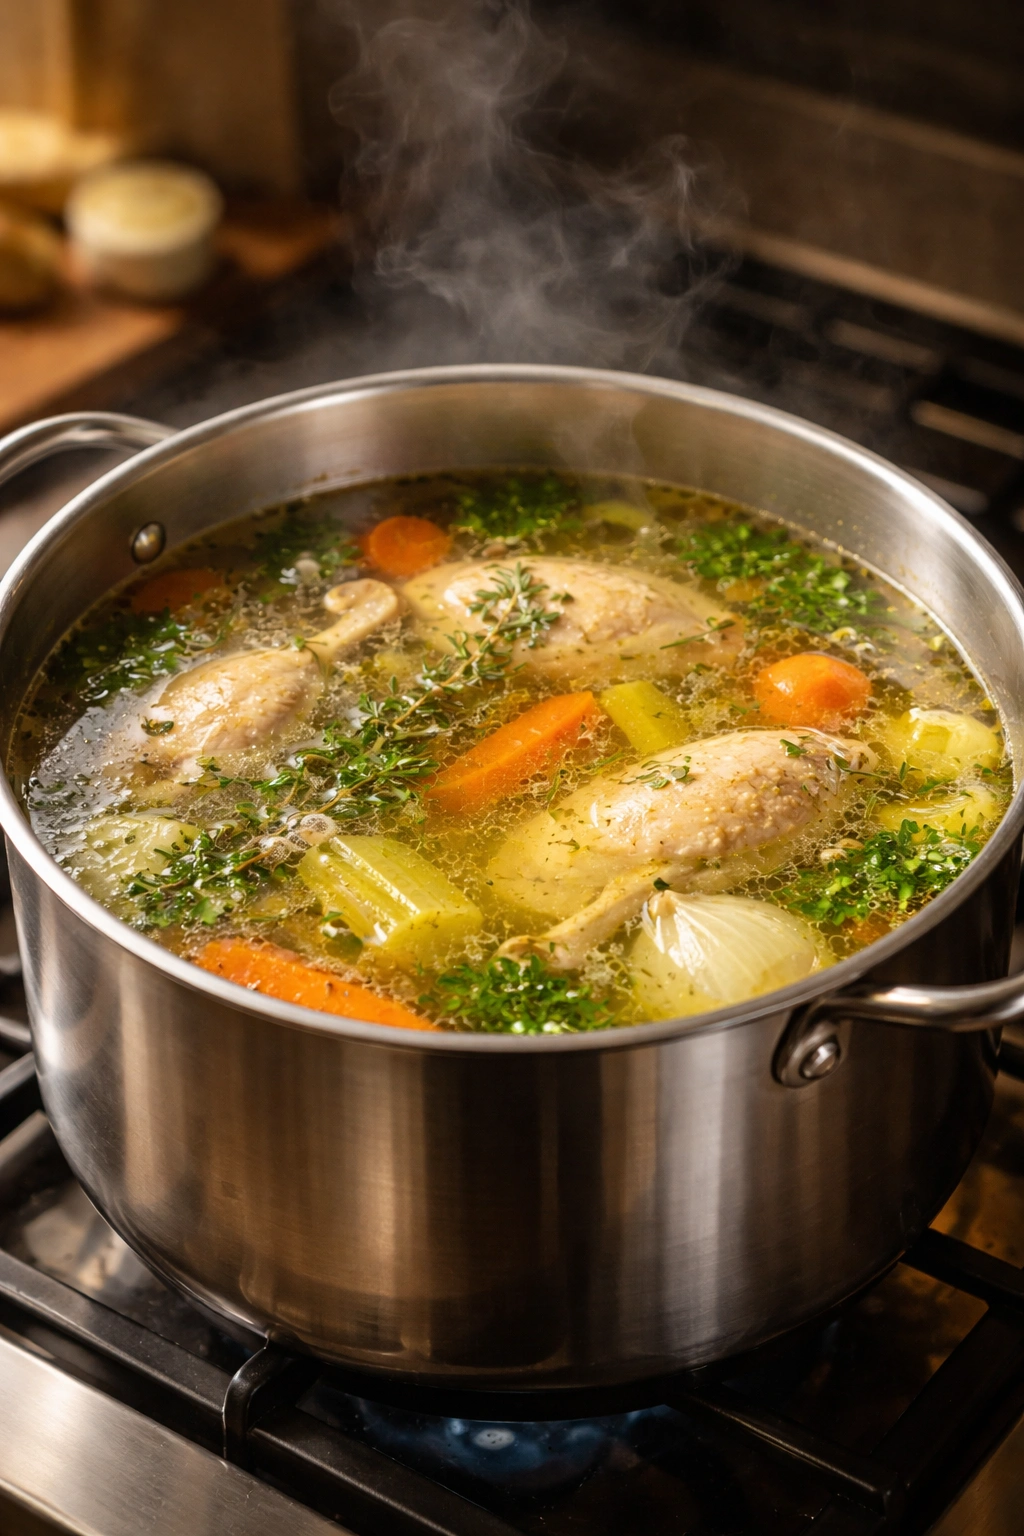
Place the raw chicken (or pieces) in a large stockpot or Dutch oven. Do not brown it or sauté it—we want a clean, clear broth, which means starting with a cold-water poach, not a seared-meat method. Add the cold water (or water and broth combination) until the chicken is completely submerged. You should have approximately 2 inches of liquid above the chicken.
Advertisements -
Add the onion halves (do not dice them—we want large pieces that are easy to remove later), carrot halves, celery pieces, crushed garlic cloves, bay leaves, thyme sprigs, kosher salt, and black pepper to the pot.
-
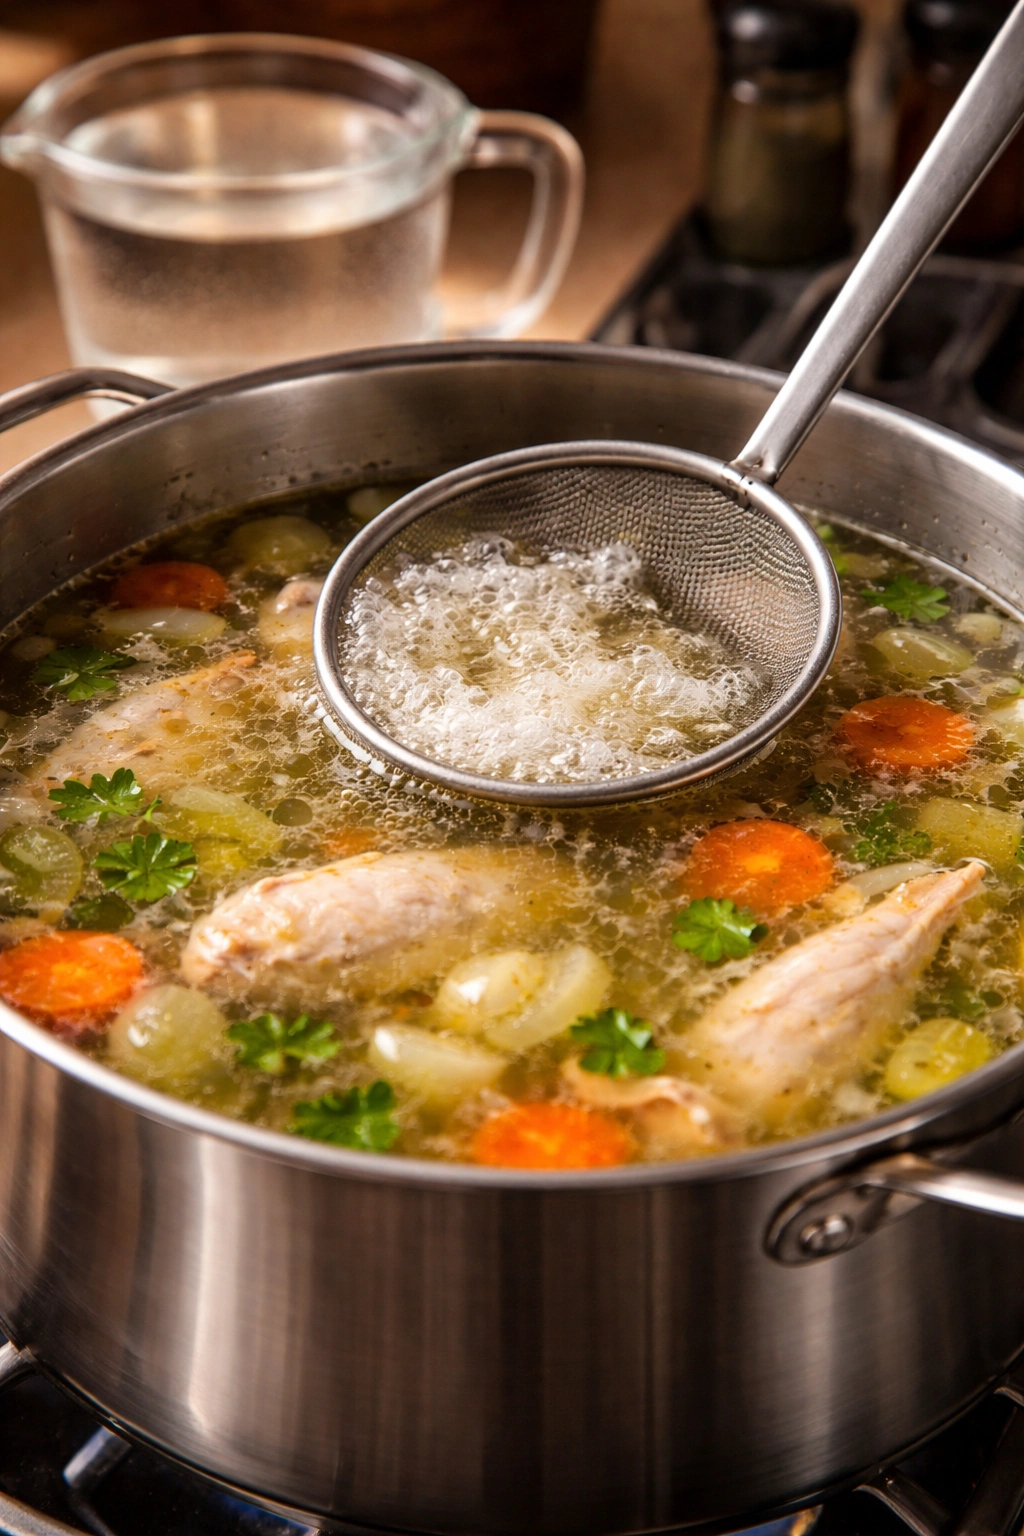
Bring the pot to a boil over medium-high heat. This will take 10-15 minutes depending on your stove and the size of your pot. You’ll notice foam rising to the surface as the chicken proteins coagulate—this is normal and desirable. Skim off this foam with a slotted spoon and discard it. Continuing to skim as needed will give you a clearer, cleaner-tasting broth.
-
Once boiling, immediately reduce the heat to low. The pot should maintain a gentle, barely bubbling simmer—not a rolling boil. Vigorous boiling will make the broth cloudy and can cause the white meat to overcook. Cover the pot with a lid, leaving it slightly ajar so steam can escape.
-
Simmer for 1 hour and 15 minutes to 1 hour and 30 minutes if using bone-in chicken thighs or a combination of parts. If using a whole chicken, begin checking at 1 hour and 15 minutes. The chicken is ready when the thigh meat is very tender and the meat separates easily from the bone. The white breast meat should reach 165°F on an instant-read thermometer, though at this temperature it may be slightly less moist than preferred. Dark meat is forgiving and will remain juicy.
Remove and Prepare the Chicken:
-
Using tongs or a slotted spoon, carefully remove the chicken (or pieces) from the pot and transfer it to a large plate. Set it aside to cool until you can handle it comfortably—about 10-15 minutes. Do not discard the cooking liquid.
-
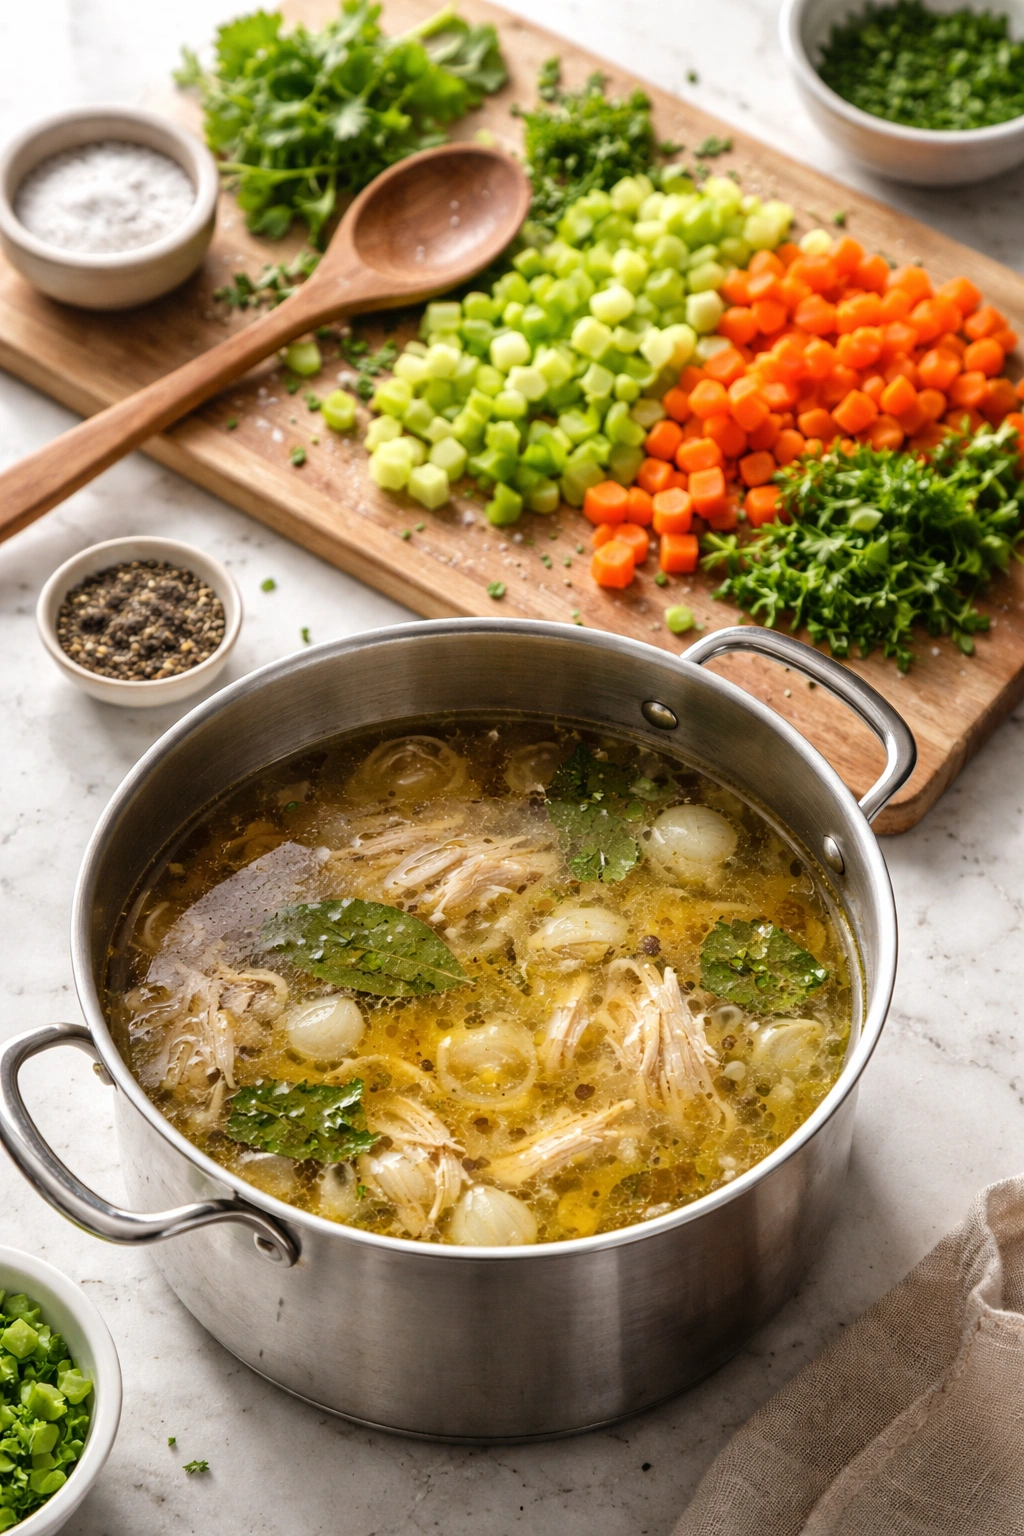
While the chicken cools slightly, strain the broth through a fine-mesh strainer into a clean pot or a large bowl. The cooked vegetables and aromatics have done their job—discard them. You should have approximately 6 to 8 cups of flavorful broth, depending on evaporation.
-
Once the chicken is cool enough to handle, pull the meat from the bones, shredding it into bite-sized pieces with your fingers or two forks. Discard the skin, bones, and any cartilage. You should have approximately 3 to 4 cups of shredded chicken meat. Set it aside on a clean plate.
-
If the broth looks cloudy or has a lot of fat on top and you prefer a cleaner appearance, you can skim some fat off with a spoon or ladle. A little fat is flavorful and helps carry the soup’s aromas—don’t remove all of it. If you have time, refrigerate the broth for a few hours or overnight, and the fat will solidify on top, making it easy to remove if desired.
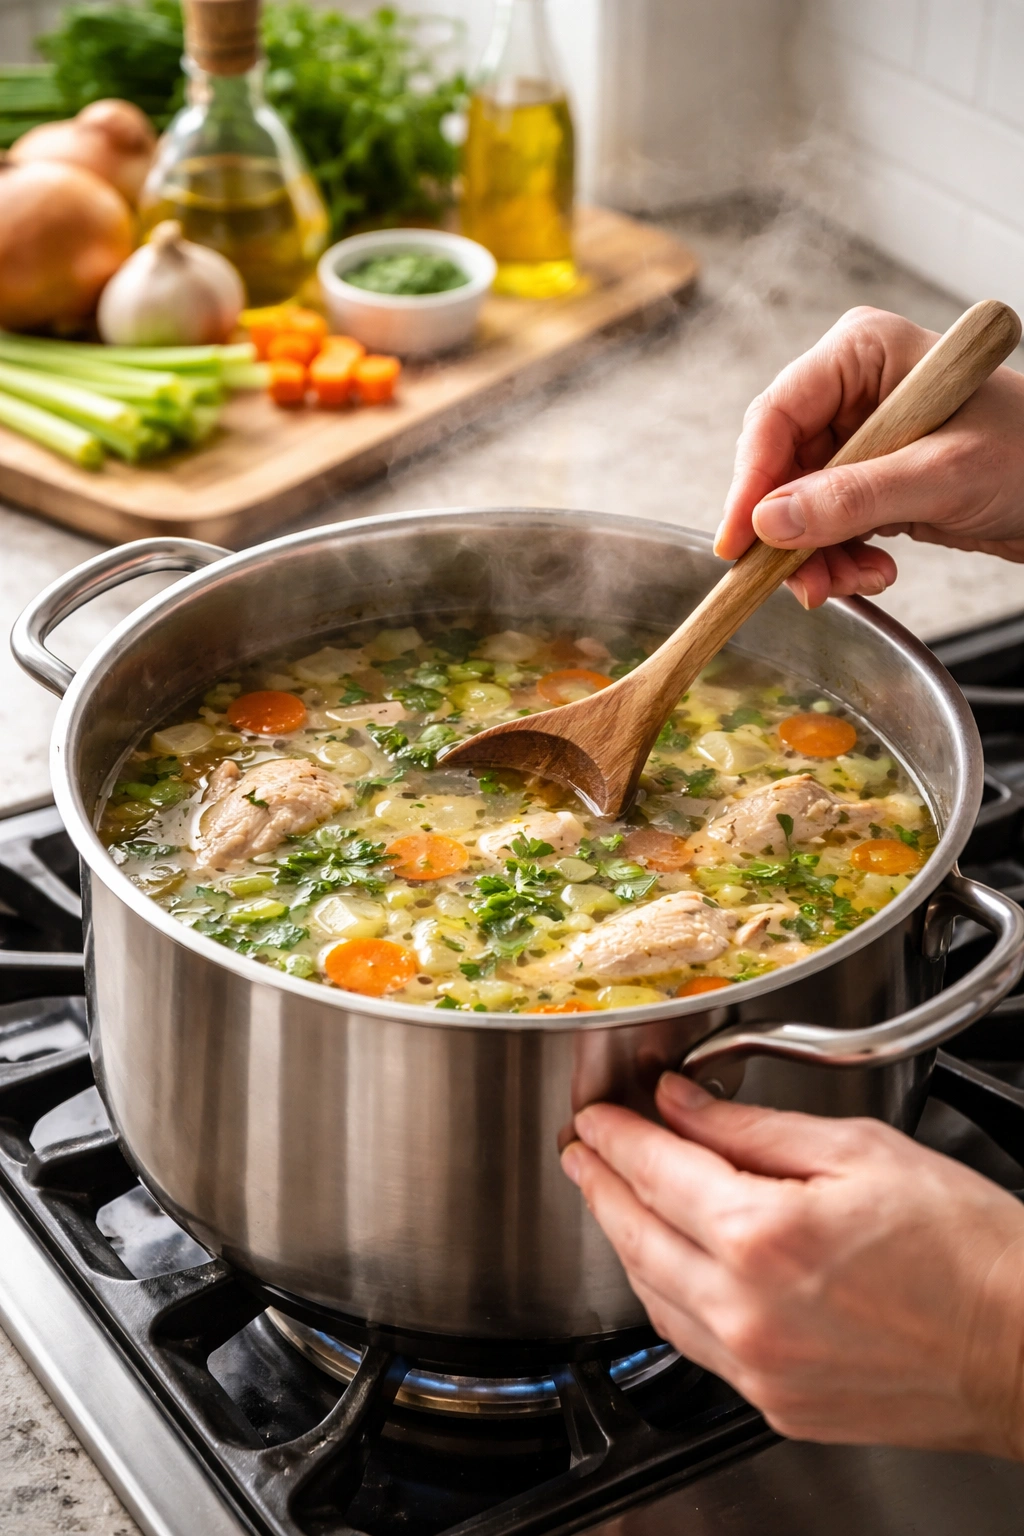
Build the Finished Soup:
-
Return the strained broth to the stove over medium-high heat. Bring it back to a gentle boil.
-
Add the diced fresh carrots, diced celery, and diced onion (these are the fresh vegetables that will maintain their texture in the finished bowl). Reduce the heat to medium and simmer for 10 to 12 minutes, until the vegetables are tender but not mushy. You should be able to pierce them with a fork without resistance, but they shouldn’t fall apart.
-
Return the shredded chicken to the pot and stir to combine. Bring the soup back to a gentle simmer for 2 to 3 minutes, just to warm the chicken through.
-
Remove from heat. Add the minced fresh parsley and minced dill (if using). Taste the broth carefully—it may already be seasoned adequately from the initial cooking, or it may need more salt and black pepper. Add gradually and taste between additions; it’s easier to add salt than to remove it.
-
If you’re using lemon juice, squeeze in the juice of ½ fresh lemon and stir well. The acidity doesn’t make the soup taste lemony—it brightens and sharpens all the other flavors, making them taste more vivid and complete. Taste and adjust.
-
If you’re adding noodles or rice, do it now. If using pre-cooked noodles or rice, simply stir them in and heat through. If using uncooked pasta, add it now and cook according to package directions, tasting for doneness. The soup itself will continue to simmer gently while the pasta cooks.
-
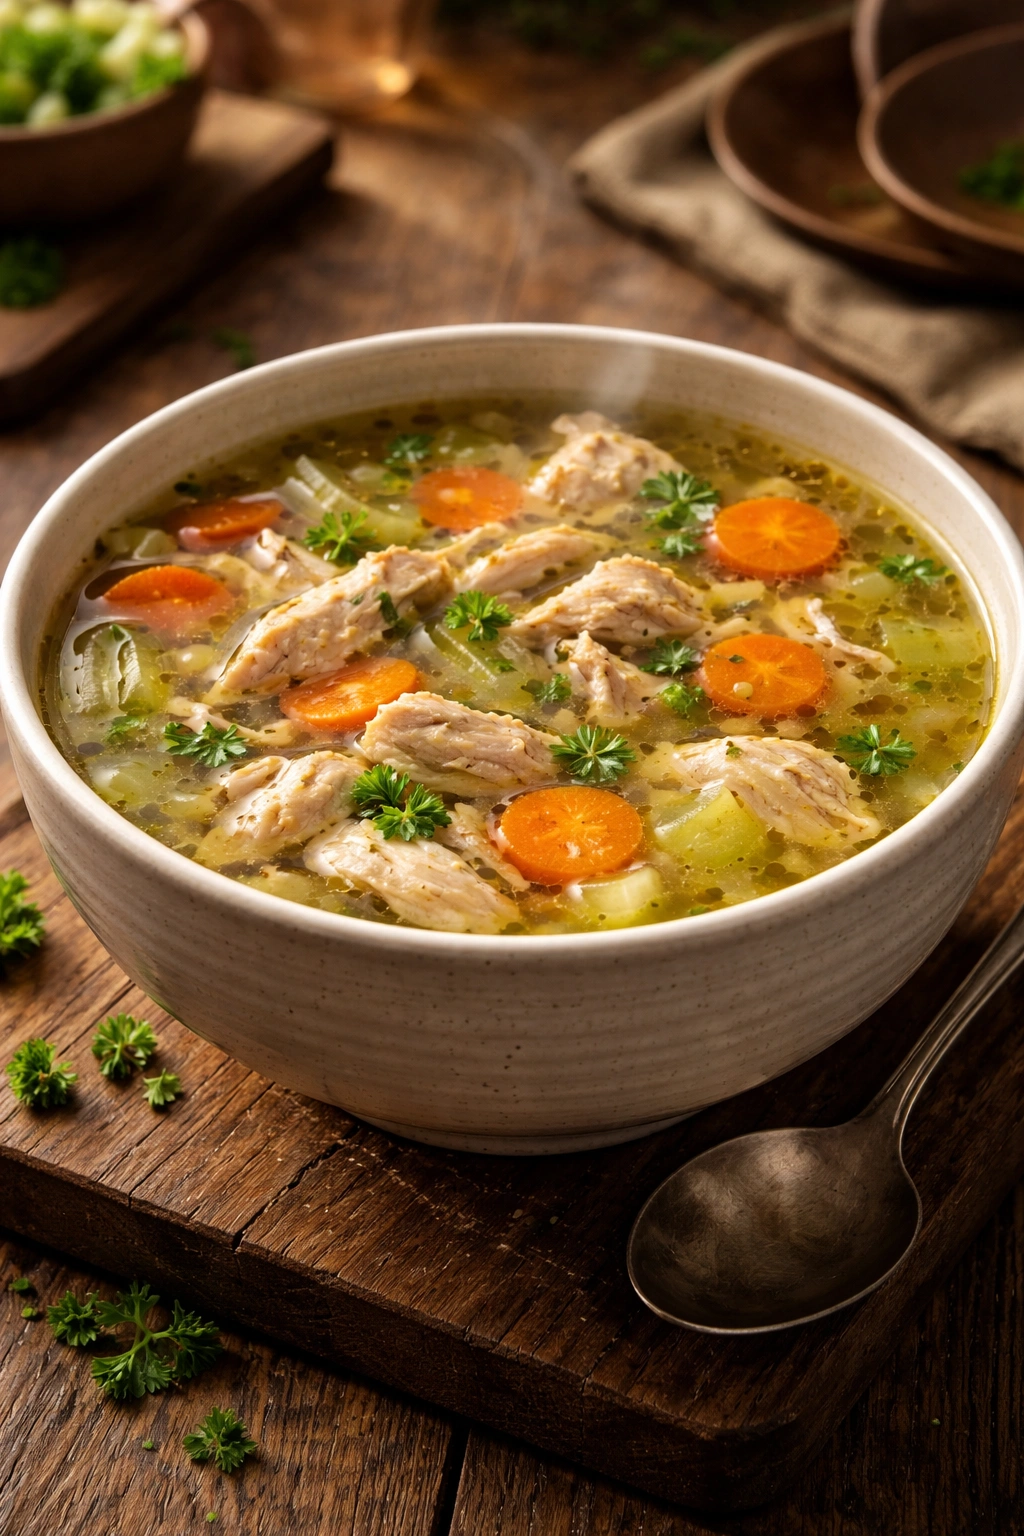
Serve immediately in warmed bowls, ladle the broth generously, and garnish with additional fresh parsley or dill if desired.
The Critical Techniques That Make the Difference
Starting with cold water instead of hot water changes everything about the final broth. When you add raw chicken to cold water and let it heat gradually, the proteins denature slowly and evenly, which means they release their flavors gradually into the liquid. Hot water shocks the proteins, causing them to coagulate too quickly, trapping flavors inside the meat rather than releasing them into the broth. This is why restaurant stocks always start cold.
Skimming the foam in the first 10 minutes of cooking removes the impurities that would otherwise cloud your broth and give it a slightly off flavor. You don’t need to be obsessive about it—just skim once or twice in those early minutes, and you’re done. This single step separates a refined broth from a murky one.
The gentle simmer is non-negotiable. A rolling boil doesn’t cook faster or better—it agitates the liquid so much that the proteins break apart and cloud the broth, and it causes chicken breast meat to overcook and dry out. A gentle simmer (where you see occasional bubbles breaking the surface, not a vigorous roiling) is what extracts maximum flavor while keeping the broth clear and the meat tender.
Separating the broth-building vegetables from the serving vegetables is a technique that seems fussy but completely changes the experience. The halved onions, carrot halves, and celery stalks that simmer for 90 minutes have given everything they have to the broth—they’re soft and bland. Fresh diced vegetables added in the final minutes have color, texture, and personality. You get the best flavor from both by using them strategically.
Finishing with fresh herbs rather than cooking them the whole time preserves their bright, delicate flavors. Similarly, adding a squeeze of lemon juice at the very end acts like a flavor amplifier, making every other taste in the pot more defined and vivid. These aren’t trendy additions—they’re the difference between soup that tastes okay and soup that tastes alive.
Common Mistakes and How to Avoid Them
The most common mistake is cooking everything together with the intention of serving it all. When people skip the step of removing the broth vegetables and replacing them with fresh ones, they end up with mushy vegetables and—paradoxically—a less flavorful final dish. The cooked vegetables break down so much that they lose their textural appeal, and fresh vegetables would have added more brightness. Use the broth-cooking vegetables as a tool for extracting flavor, not as part of the final presentation.
Another frequent error is cooking with too much heat. A boiling pot of broth looks like it’s making progress, but it’s actually breaking apart the proteins and clouding the liquid. Lower heat, longer time, and a gentle simmer always produce better results. If your broth looks cloudy after cooking, this is almost certainly why.
Some people hesitate to use enough salt. Salt doesn’t make food taste salty—it amplifies other flavors and makes the broth taste more of itself. Start conservatively (1 teaspoon for the initial broth), then taste and adjust at the end after all ingredients are in. Different broths have different sodium levels, so you need to taste.
Overcooking the fresh finishing vegetables is easy if you’re distracted. The diced vegetables should simmer for 10-12 minutes, which is just enough time to make them tender but not so long that they lose their color and texture. Set a timer and don’t skip this step.
Don’t skip the fresh herbs at the end. Dried herbs work during the long simmer, but fresh parsley and dill added at serving time completely change the character of the soup, making it brighter and more alive. This is the step that separates homemade soup from canned soup.
Variations and Add-Ins for Every Taste
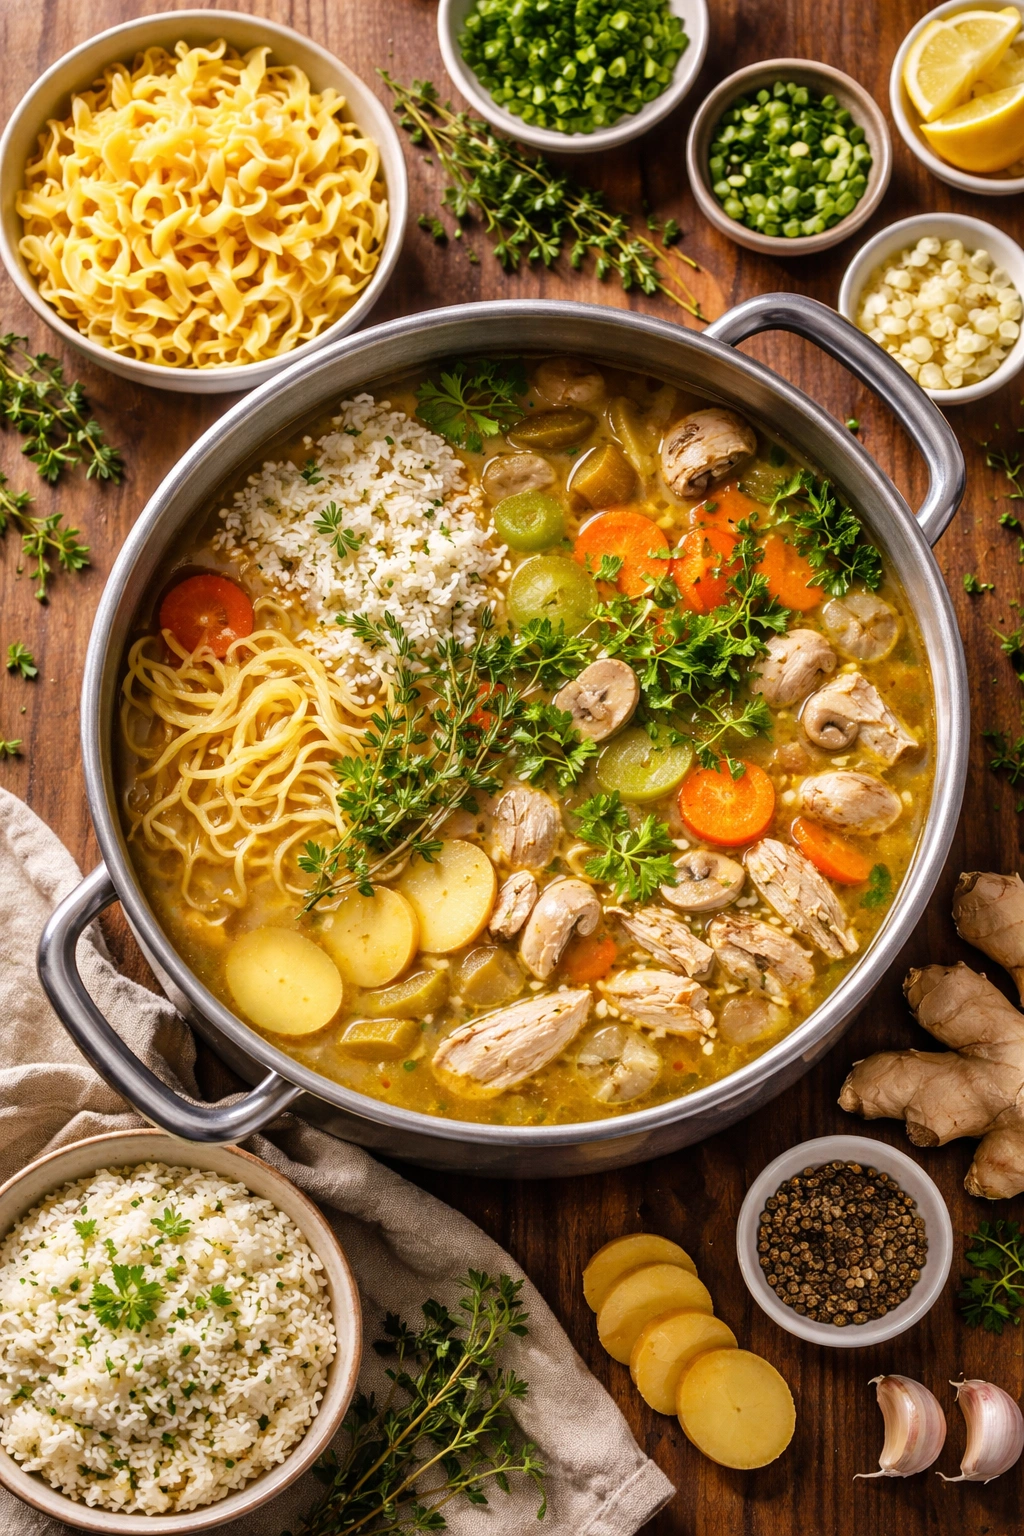
The beauty of chicken soup is its flexibility. The broth and technique stay the same, but you can build in dozens of directions depending on what you’re craving and what you have on hand.
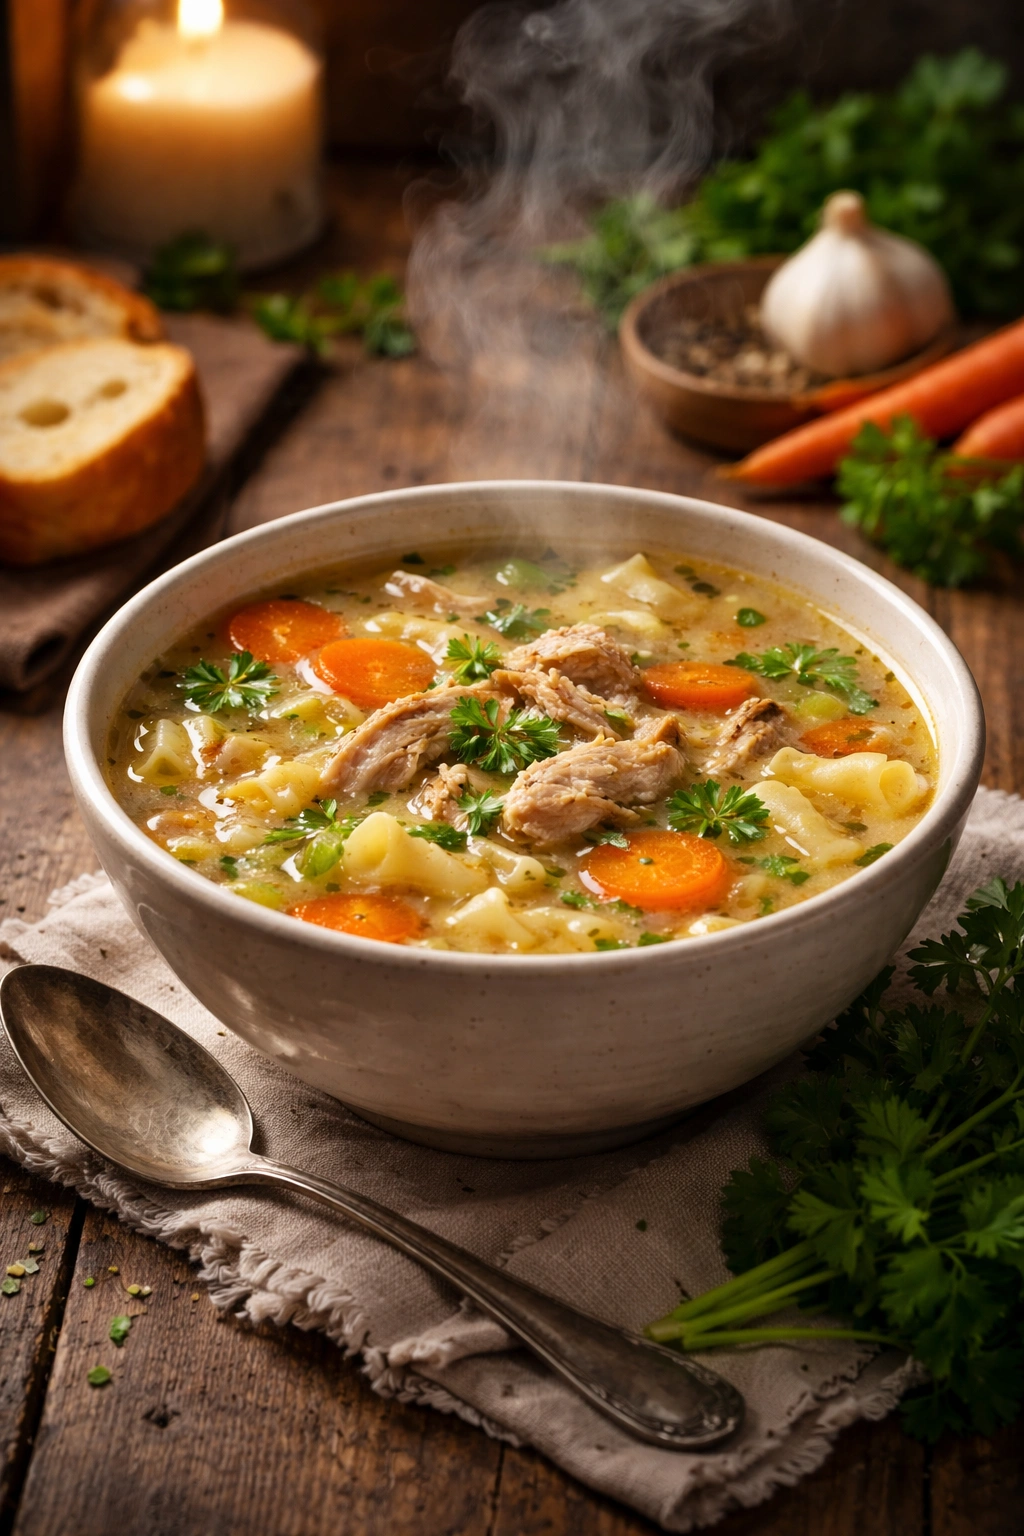
Chicken Noodle Soup: Add 2 cups of cooked egg noodles just before serving, or cook ¾ cup of uncooked dried egg noodles or small pasta shapes separately and stir them in. Egg noodles have a sturdier texture than delicate fresh noodles and won’t disintegrate into the broth.
Chicken and Rice Soup: Stir in 1 cup of cooked white or brown rice in the final few minutes. Wild rice works too, though it’s earthier and slightly chewier. You can also cook the rice in the broth itself for even more flavor, though this adds extra time.
Asian-Inspired Variation: Add a tablespoon of fresh ginger (minced finely) when you add the diced vegetables. Include 1 tablespoon of low-sodium soy sauce or tamari at the end. Top each bowl with a drizzle of sesame oil, thinly sliced scallions, and a pinch of white pepper. This transforms the soup into something lighter and more aromatic.
Creamy Chicken Soup: After the soup is finished, stir in ½ cup of heavy cream or half-and-half. Some versions use a tablespoon of roux (equal parts butter and flour cooked together) stirred in a bit at a time to thicken the broth slightly before adding cream. This becomes a more decadent, comfort-forward soup.
Herbed Variation: Replace the parsley and dill with fresh tarragon (1 tablespoon), which adds an almost anise-like, sophisticated flavor. Or use fresh basil for an Italian-inspired version. Fresh oregano and a squeeze of lemon can point the soup toward Greek flavors.
Slow Cooker Version: Brown the chicken pieces lightly in a skillet with a bit of oil (this adds color and flavor), then transfer to a slow cooker along with the halved broth vegetables, herbs, and enough liquid to cover. Cook on low for 6-8 hours or on high for 3-4 hours. About 30 minutes before serving, remove the chicken to shred it, strain the broth, and return both to the slow cooker. Add the fresh diced vegetables and simmer for those final 30 minutes. This method requires patience but produces excellent results if you’re working with a busy schedule.
Gluten-Free Version: The basic soup is naturally gluten-free when made with broth verified as gluten-free (read labels carefully, as some broths contain malt extract or hidden gluten). If adding noodles, use gluten-free pasta, being careful not to overcook it since many gluten-free noodles become mushy more easily than wheat versions.
Storage, Freezing, and Make-Ahead Tips
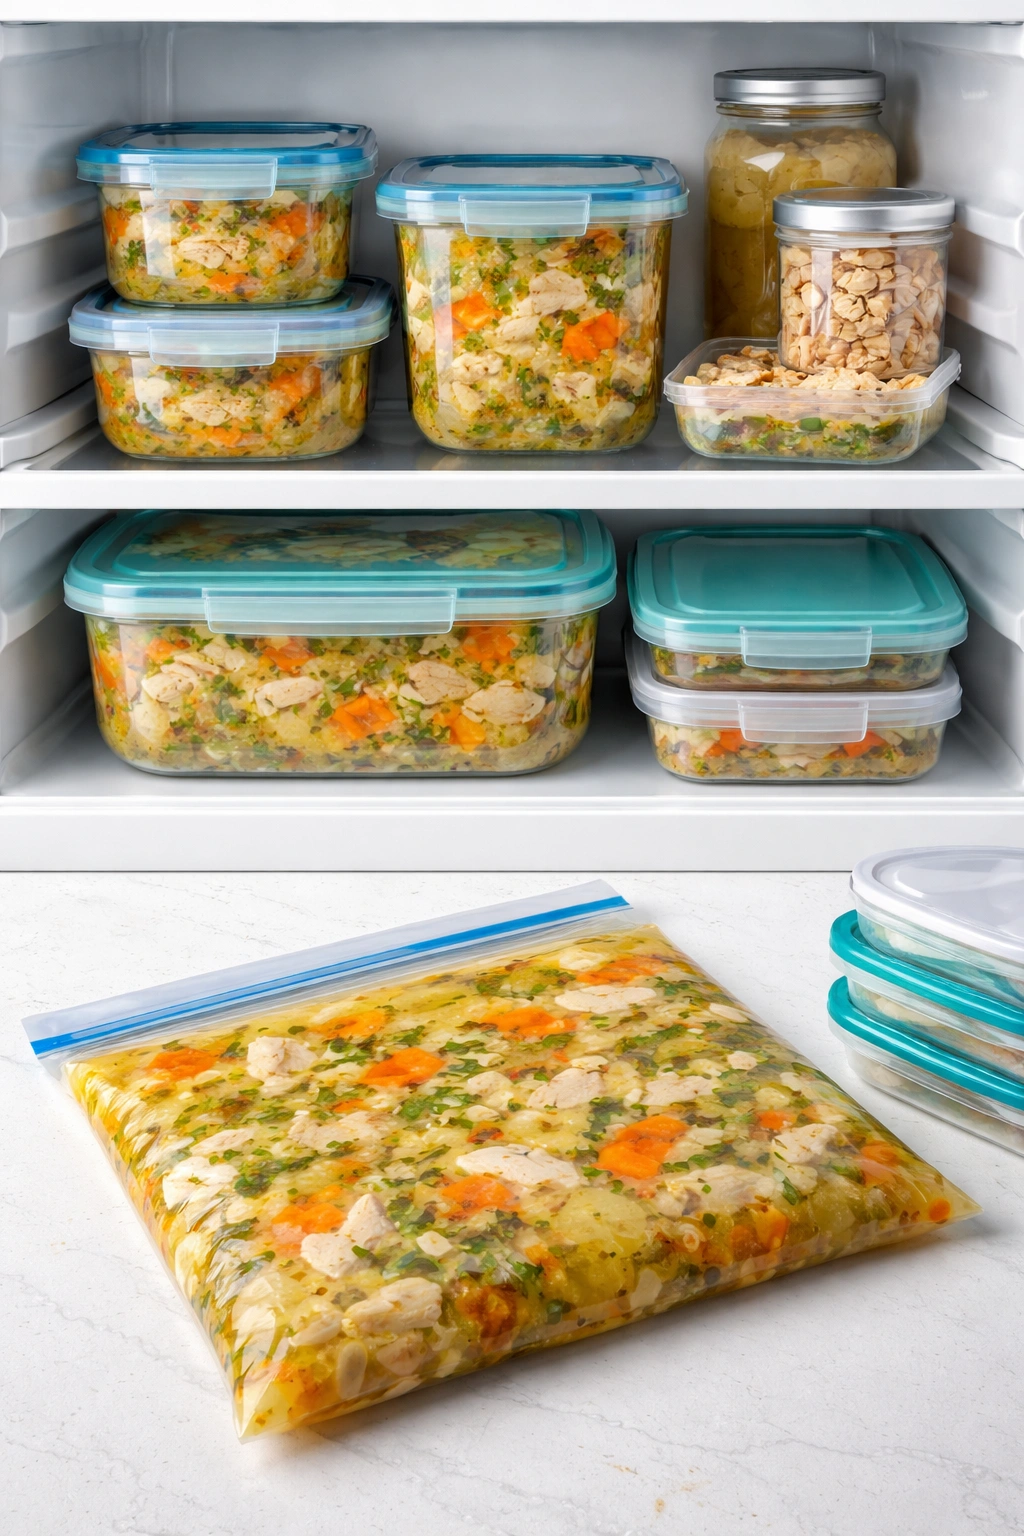
Homemade chicken soup stores beautifully and freezes even better. In the refrigerator, it keeps for 4 to 5 days in an airtight container. The longer it sits, the more the flavors meld and intensify, so many people think it tastes better on day two or three than it does the day it’s made.
If you’ve added noodles or rice to the entire pot, note that they will continue to absorb broth and soften over time. By day three, they’ll be quite soft. If this bothers you, store the broth and shredded chicken separately from any starches, then combine fresh-cooked noodles or rice when you reheat.
To freeze, allow the soup to cool completely at room temperature, then transfer to airtight containers or heavy-duty freezer bags. Leave about ½ inch of space at the top for the liquid to expand as it freezes. The soup will keep for up to 3 months in the freezer. If using bags, lay them flat in the freezer so they take up less space, and once frozen solid, you can stand them upright.
To thaw and reheat: Transfer a frozen container to the refrigerator overnight and let it thaw completely. Then reheat on the stovetop over medium heat, stirring occasionally, until heated through. This usually takes 10-15 minutes. You can also reheat from frozen on low heat on the stovetop, though it takes longer (20-25 minutes). Never microwave soup directly from frozen without thawing first—it heats unevenly.
If your freezer space is limited, freeze the broth separately from the chicken and vegetables. Thaw and reheat the broth, then add fresh cooked chicken and vegetables, or stir in the thawed chicken and vegetables. This approach also gives you flexibility for how you want to build the soup when you reheat it.
Make-ahead strategy: You can prepare the broth up to 3 days in advance and refrigerate it. The morning you want to serve soup, simply reheat the broth, add the fresh diced vegetables and shredded chicken, and you have soup ready in 30 minutes. Or go further: roast your chicken a day ahead, shred it, and refrigerate it separately. On serving day, simmer the broth briefly, add the fresh vegetables, then stir in the pre-cooked shredded chicken. This modular approach makes it simple to fit homemade soup into a busy schedule.
Serving Suggestions and Perfect Pairings
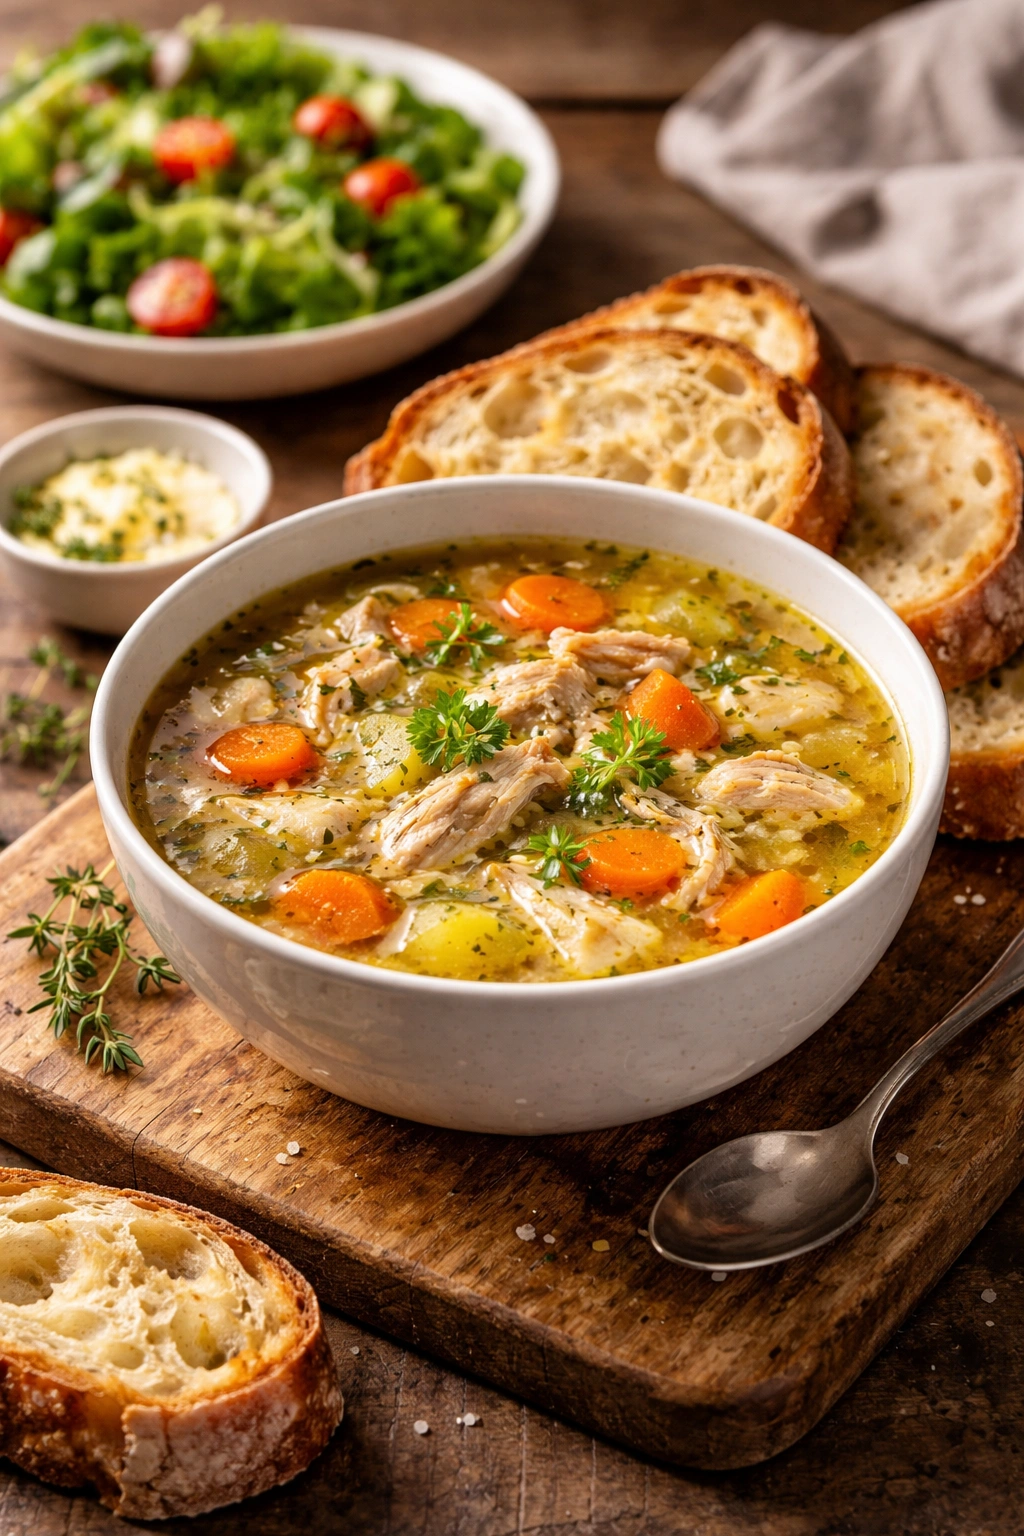
Chicken soup is a vehicle for other flavors. Think about what you’re serving it with, because the right accompaniment makes the whole meal more memorable.
Crusty bread is non-negotiable. A thick slice of sourdough, a chunk of focaccia, or a warm dinner roll transforms soup from a small course into a satisfying meal. Dip the bread directly into the bowl, or tear it into pieces and float it in the broth. The starch balances the broth’s lightness and adds textural contrast.
Oyster crackers, matzo crackers, or saltines offer a crispy, salty contrast if you prefer something lighter than bread. Many people grew up with this pairing and find it comforting exactly because of that familiarity.
Salad is a great counterpoint. A sharp, vinegary green salad with a Dijon vinaigrette cuts through the richness of the broth and brightens the whole meal. This pairing works especially well if you’ve made a creamy chicken soup.
Grilled cheese sandwiches take a simple meal into nostalgic territory. Crispy, buttery bread with melted cheese dunked into warm, savory broth is pure comfort. This is peak cold-weather food.
For serving presentation, warm your bowls first by ladling a bit of hot broth into each one, then emptying it out before filling for real. A warmed bowl keeps the soup hot longer and signals that you’ve cared for the details. Finish each bowl with a small pinch of fresh herbs, a grind of black pepper, and a very slight drizzle of good olive oil if you like.
If you’ve made a clear broth-based soup without noodles or rice, consider it elegant enough for a light first course at a dinner party. It’s warming, nourishing, and doesn’t leave anyone feeling too full before the main course. If you’ve added pasta or rice, it becomes a complete meal on its own.
Final Thoughts
Making homemade chicken soup from scratch gives you something store-bought can never replicate: control over the ingredients, understanding of what’s actually in each spoonful, and the satisfaction of nourishing yourself and your family with something you built with your own hands.
The technique is genuinely simple—raw chicken, vegetables, cold water, low heat, and time. No special equipment. No mysterious steps. Yet the result tastes sophisticated and deeply satisfying. This is what good cooking actually is: not complexity for complexity’s sake, but rather understanding the fundamentals so well that you can execute them flawlessly.
Once you’ve made this soup, you’ll have a foundation for experimenting. Add different herbs. Use different vegetables. Try it with rice, noodles, or nothing but broth and meat. Make it creamy. Make it spicy. The base never changes, and that consistency means you’ll always succeed. Keep the broth straightforward and impeccable, and you can build in whatever direction your mood takes you.
This is the soup for sick days and celebration days, for rushed weeknights and leisurely Sunday afternoons, for feeding a crowd or just yourself. It’s the kind of food that asks very little but gives back tremendously. Make it, freeze it, reheat it, vary it. Make it so often that you stop consulting the recipe and start cooking it from intuition and memory. That’s when you’ll truly know you’ve mastered it.