If you’ve ever driven past an In-N-Out and felt that pang of craving, or if you live nowhere near one of these legendary West Coast burger joints, I have exactly what you need. The good news? You don’t need a fast-food uniform or industrial kitchen to replicate those juicy, thin-patty cheeseburgers at home. In fact, grilling them yourself might just taste better than the real thing—your friends will swear you’ve somehow smuggled patties straight from California.
What makes an In-N-Out burger so iconic isn’t some mysterious culinary magic. It’s the combination of fresh, simple ingredients cooked with precision: ultra-thin beef patties seared until their edges crisp up and caramelize, melty American cheese that’s folded just right, a tangy-sweet special sauce that ties everything together, and pillowy-soft toasted buns. The secret sauce alone—that beloved spread that’s been unchanged since 1948—has inspired countless copycat attempts. Turns out, you can nail it with ingredients you probably already have in your kitchen.
What truly sets this burger apart is the technique, not anything exotic. The thin patties cook fast on high heat, creating that signature crust while staying juicy inside. The griddle or grill does the heavy lifting here. Whether you’re firing up a backyard grill, using a Blackstone griddle, or even cooking on your stovetop cast iron, you can absolutely pull off burgers that rival the chain’s reputation. This isn’t a difficult recipe—it’s just about understanding the why behind each step and executing them with care.
What Makes an In-N-Out Burger So Addictive
The magic of an In-N-Out burger starts with understanding what makes people drive miles out of their way for it. There are no complicated sauces with ten ingredients, no fancy toppings, no pretentious presentations. Instead, the appeal lies in obsessive attention to basic quality and technique. The restaurant uses 100% fresh, never-frozen beef chuck—no fillers, no additives, just pure ground beef. Every patty is made to order and cooked within minutes of the order being placed.
The restraint shown in the menu design is almost rebellious. While most burger chains offer dozens of variations and specialty creations, In-N-Out sticks to a deliberately simple list: hamburger, cheeseburger, fries, and shakes. Everything else comes from their “not-so-secret” menu, which is really just customizations of those core items. This simplicity means each component gets the spotlight. There’s nowhere to hide, so everything has to be excellent.
The sandwich architecture matters too. Fresh lettuce (hand-leafed iceberg, to be specific) provides a cool crunch that contrasts with the hot, salty beef. Tomato slices add brightness and acidity. But it’s the combination of the thin-crust patty, melted American cheese, and that special sauce that creates a flavor profile people crave. The sauce sits somewhere between thousand island dressing and a tangy burger spread—creamy, slightly sweet, with a pickle-forward punch.
The Secret Sauce That Changes Everything
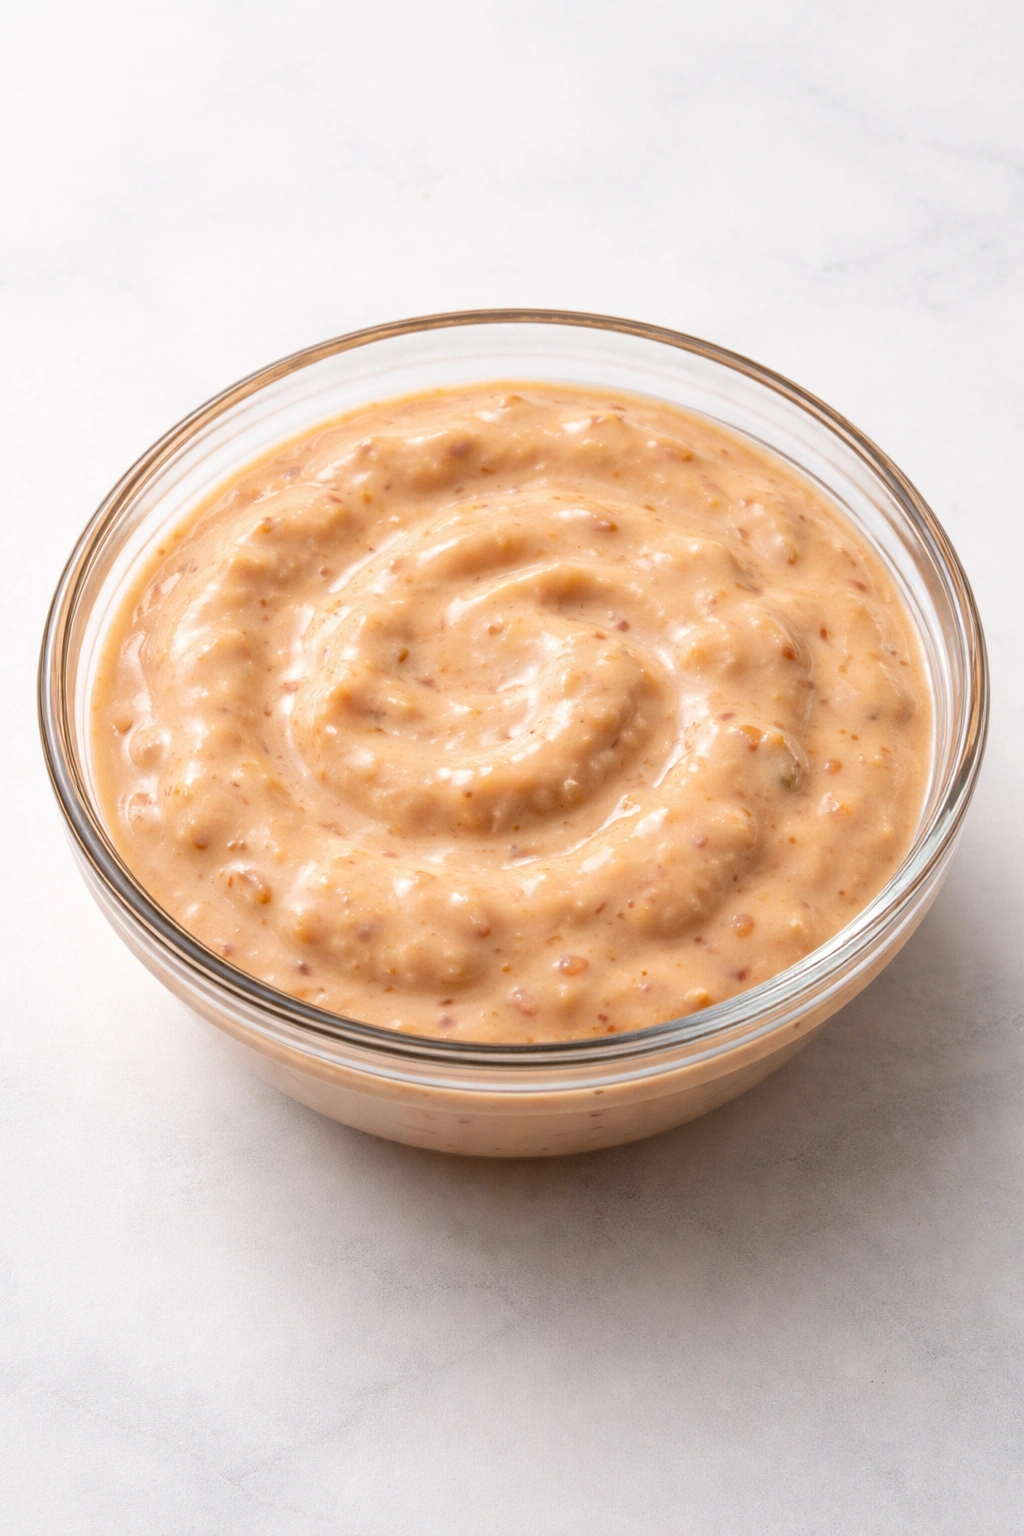
Let’s talk about the real star of this show: the special sauce. In-N-Out has never fully disclosed the recipe, but food scientists and burger enthusiasts have reverse-engineered it to near-perfect accuracy. The consensus? It’s basically a simplified version of thousand island dressing made from mayonnaise, ketchup, pickle relish, and a touch of vinegar.
The beauty of this sauce is that it requires no cooking, no special equipment, and ingredients every home cook already has. Mix mayo, ketchup, sweet pickle relish (or finely minced dill pickles), and a splash of white vinegar in a small bowl. Some versions add a touch of mustard or sugar, and both additions enhance the depth. The key is balancing the creamy mayo base with the tangy pickle and vinegar elements so neither overpowers the other.
Make this sauce at least 30 minutes ahead of serving—or even better, the day before. The flavors meld together beautifully as it sits in the fridge, and you’ll have less to worry about when you’re standing at the grill. A heaping tablespoon per burger is the right amount. Yes, it seems like a lot, and yes, it’s messy to eat. That messiness is authenticity. The sauce should flow over the edges of the bun slightly. That’s how you know you’ve got it right.
Choosing Your Beef and Getting the Fat Ratio Right
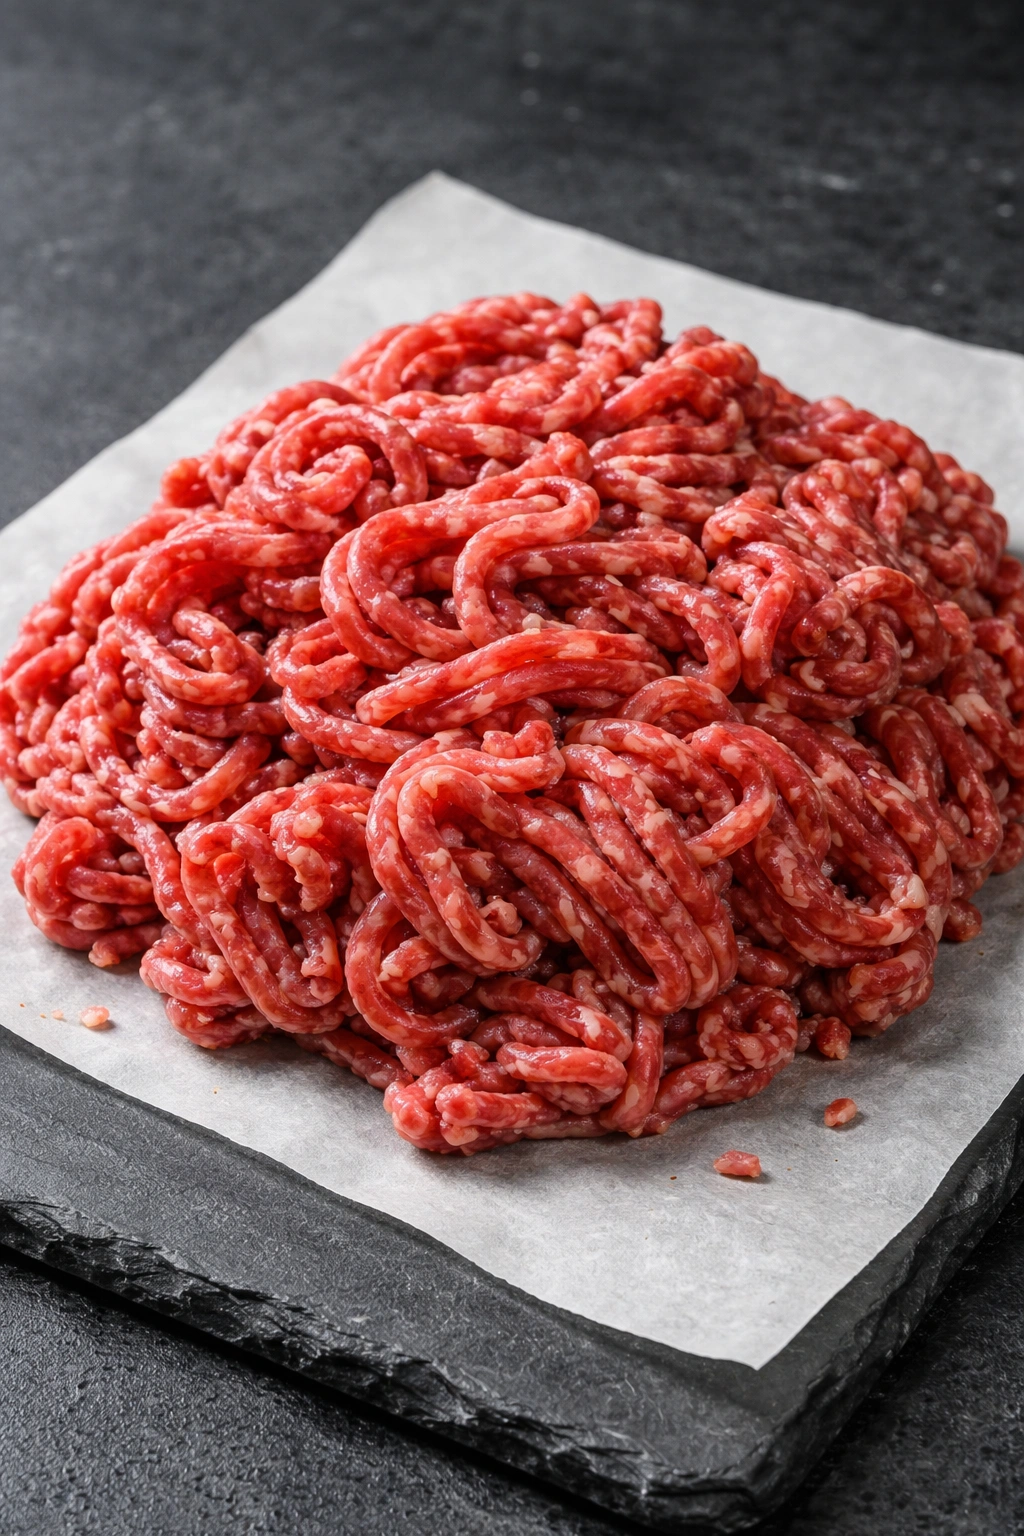
If there’s one ingredient that separates a mediocre copycat from a truly great one, it’s the beef. The fat content in your ground beef directly affects juiciness, flavor, and crust development. Too lean and you’ll end up with a dry, dense patty. Too fatty and the burgers shrink excessively and become greasy.
The sweet spot is 80/20 ground beef—meaning 80% lean meat and 20% fat. This ratio creates juicy burgers while still producing a beautiful sear and crust on the griddle or grill. If your grocery store doesn’t stock 80/20 specifically, 85/15 works fine too. What you don’t want is 90/10 or leaner. The difference in eating quality is noticeable.
Chuck is the ideal cut because it has the right fat distribution for ground beef. If you can find ground chuck specifically (rather than generic ground beef), seek it out. Some specialty butchers or stores that grind meat in-house can grind chuck for you. When you bring it home, keep it cold and handle it minimally. The less you work the meat, the more tender your patties will be.
Form your patties loosely—don’t pack them tightly. The goal is burgers that are incredibly thin (about ¼ inch thick and 4 inches across) and roughly 2 ounces each for single patties, 4 ounces if you’re making doubles. You can form these just before cooking, or shape them hours ahead and refrigerate on parchment paper. If prepping ahead, separate each patty with parchment so they don’t stick together.
Understanding the Grill Setup
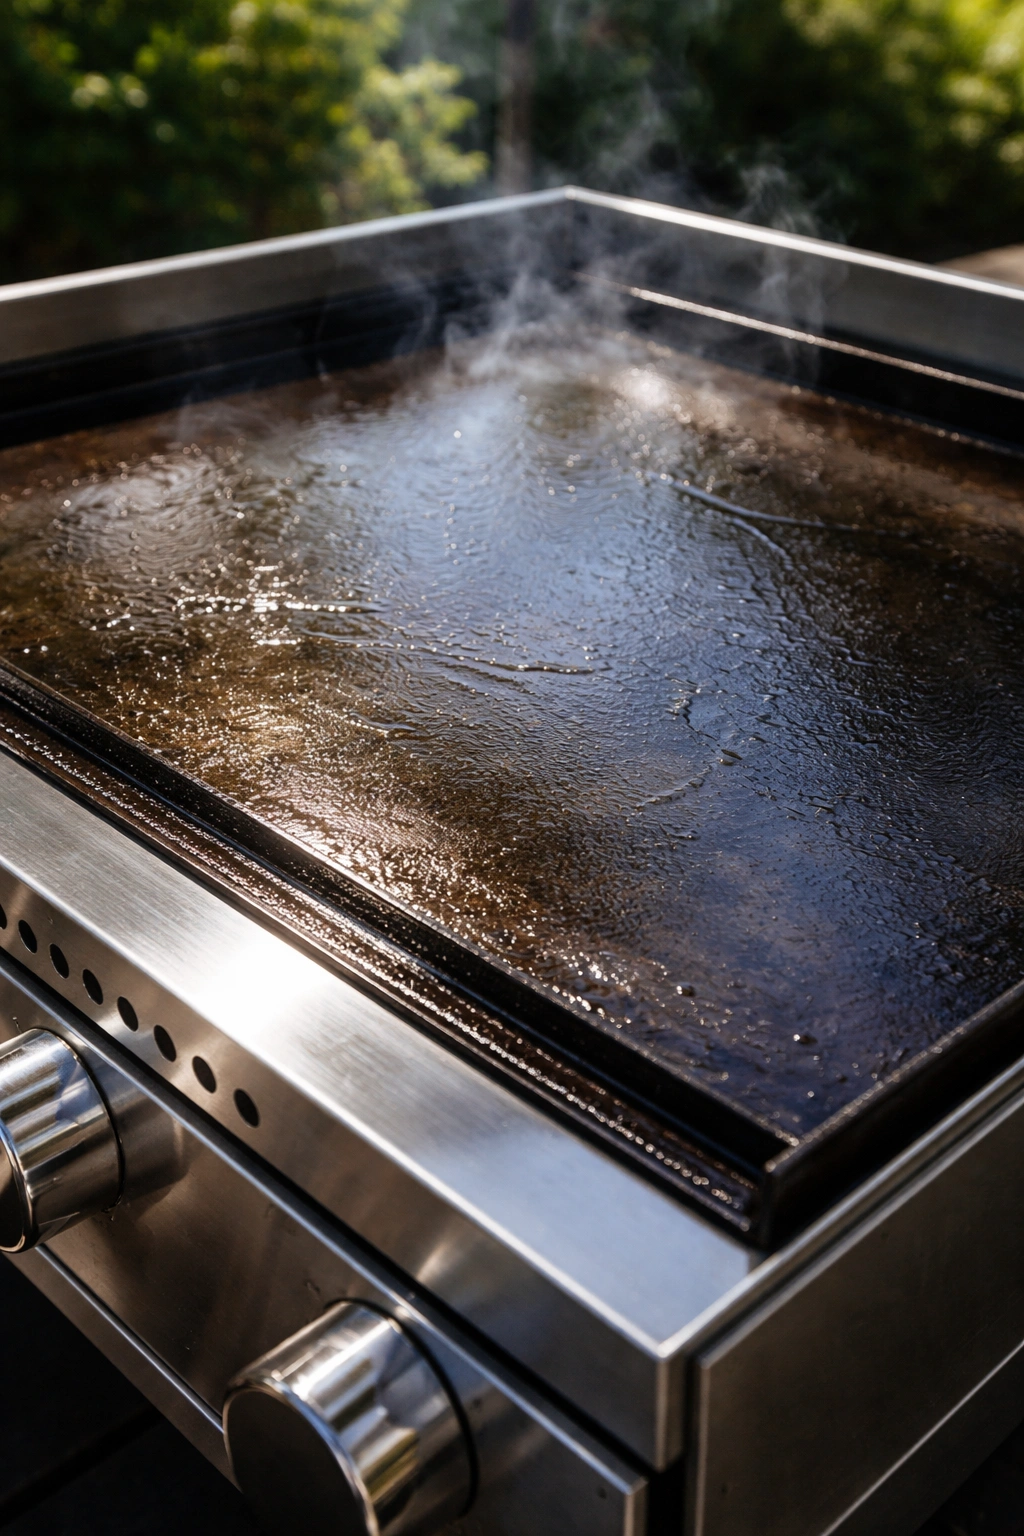
Whether you’re using a traditional backyard grill, a Blackstone griddle, or even a cast-iron skillet on your stove, the principle is the same: you need high heat and a flat cooking surface. In-N-Out cooks their burgers on a flat-top griddle, not a traditional grill with grates, and there’s a reason. The flat surface allows the entire patty to make contact with the heat source, creating an even, crispy crust all over.
If you’re grilling, aim for a medium-high to high temperature (around 375°F to 400°F if you can measure it). The griddle should be hot enough that when you place a wet hand near it, it sizzles immediately. Preheat for at least 5 minutes before cooking begins. A cold griddle will steam the meat instead of searing it, and you’ll lose that prized crust.
Oil your cooking surface lightly with a high smoke-point oil like avocado oil, canola oil, or vegetable oil. You want just enough to prevent sticking—not a slick coating. If you’re using a cast iron skillet, a light coating of oil is perfect. If you’re using a Blackstone, a thin drizzle across the entire surface works.
Yield: Makes 4 cheeseburgers | Serves 2 to 4 people
Prep Time: 20 minutes
Cook Time: 15 minutes
Total Time: 35 minutes
Difficulty: Beginner — No special equipment beyond a grill or skillet required, and the cooking steps are straightforward even for first-time grillers.
Best Served: Immediately while warm, with fresh fries on the side
The Ingredient List for Your Copycat Masterpiece
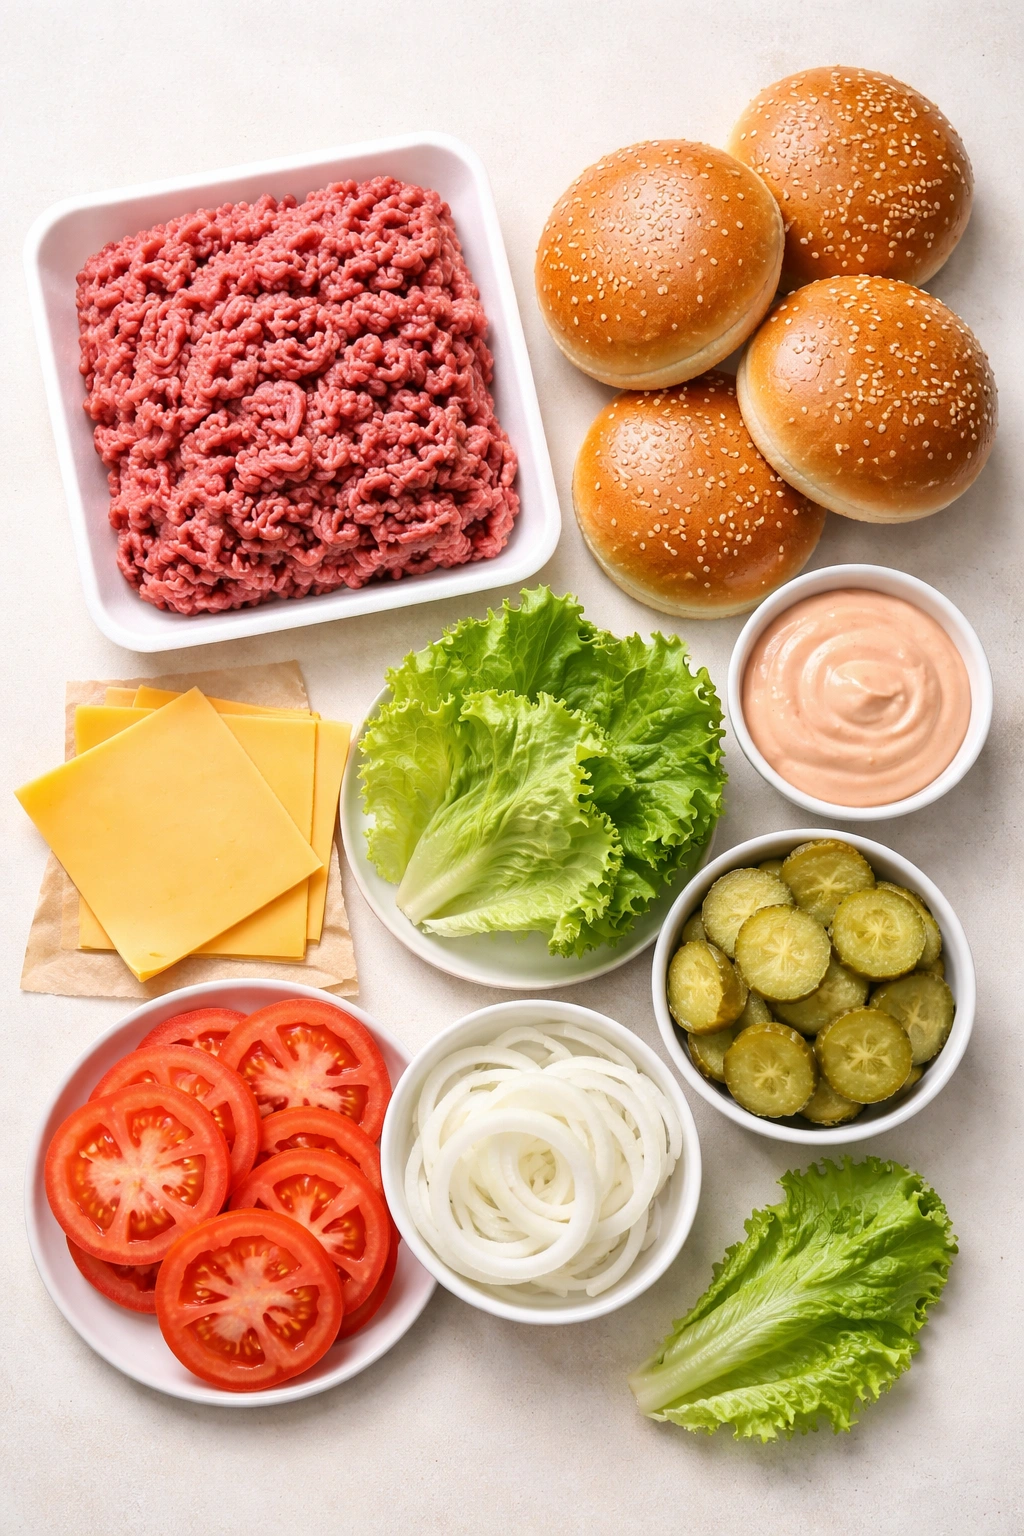
For the Special Sauce:
- ¼ cup mayonnaise (real mayo, not salad dressing)
- 2 tablespoons ketchup
- 1 tablespoon sweet pickle relish (or 1½ teaspoons minced dill pickles)
- ½ teaspoon white vinegar
- Pinch of kosher salt
- Small pinch of black pepper
- ½ teaspoon yellow mustard (optional, but recommended)
For the Burgers:
- 1 pound ground beef (80/20 blend, preferably chuck)
- 4 slices real American cheese from the deli counter
- 4 hamburger buns (soft white or potato buns work best)
- 1 tablespoon unsalted butter (for toasting buns)
- 2-3 teaspoons kosher salt (divided for seasoning patties)
- 1 teaspoon freshly ground black pepper
- High-heat cooking oil (avocado, canola, or vegetable oil)
For Assembly and Serving:
- 1 large ripe tomato, sliced ¼-inch thick
- 4 to 6 leaves iceberg lettuce (torn to burger-sized pieces)
- 1 small white or yellow onion, thinly sliced (optional, for raw onion topping)
- Additional toppings as desired (dill pickle chips, extra mustard)
Making the Special Sauce Like a Pro
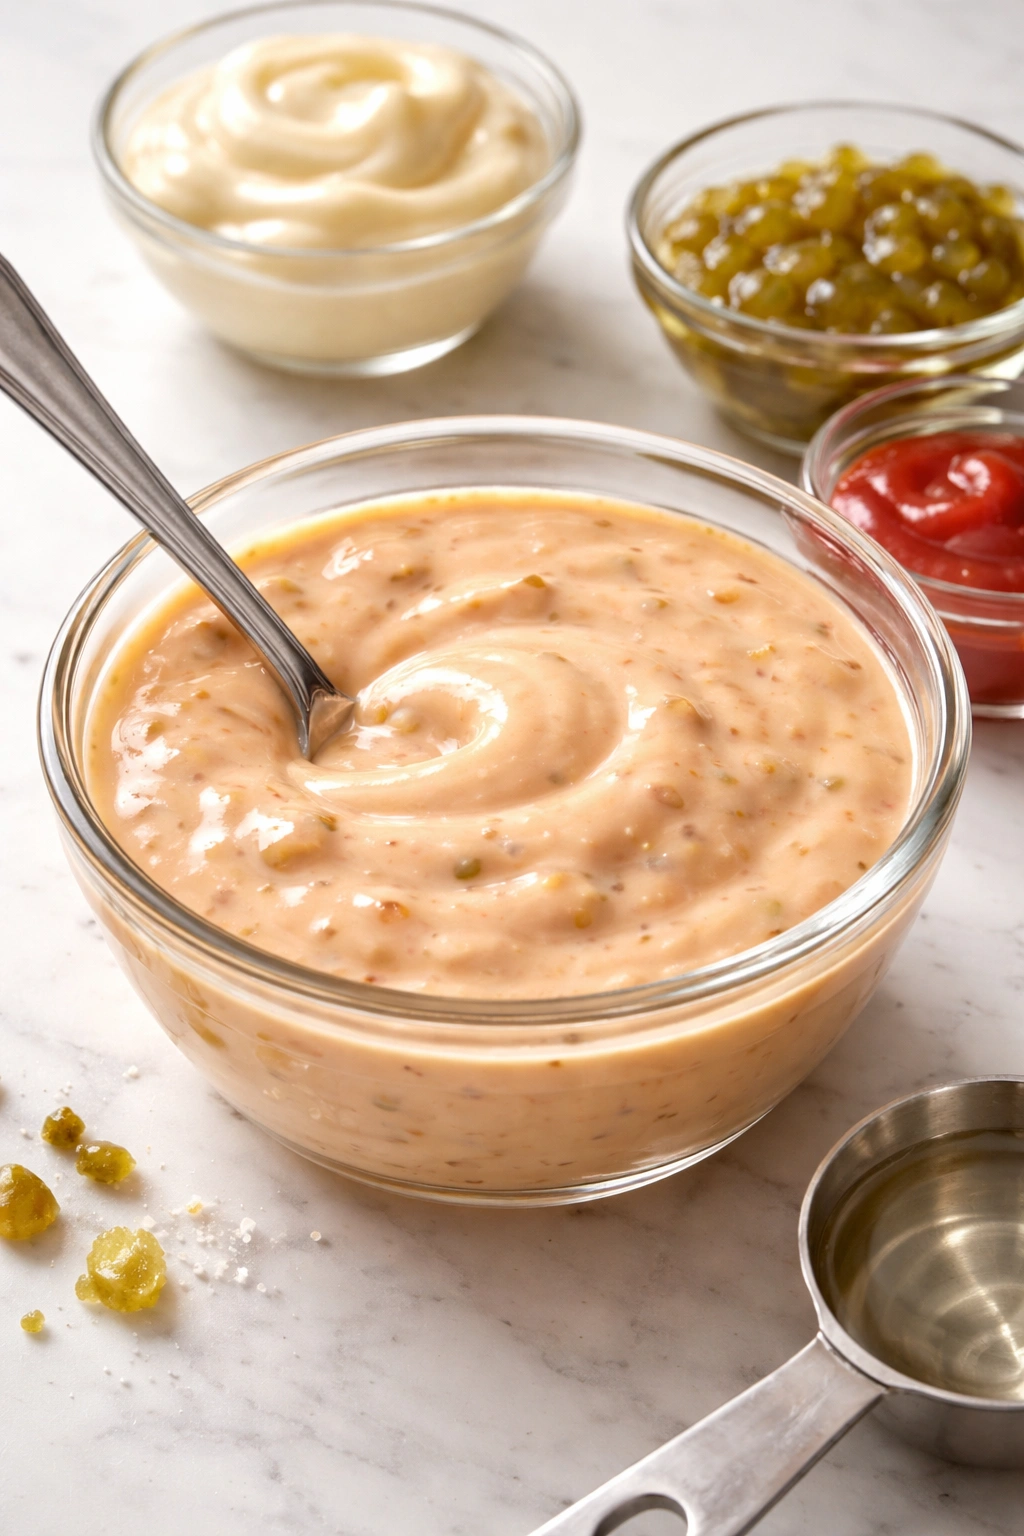
The special sauce deserves its own dedicated time and attention because it’s the bridge connecting every component of your burger into one cohesive flavor. This isn’t something to rush or make while you’re simultaneously managing the grill.
Start by combining ¼ cup mayonnaise in a small bowl. Add 2 tablespoons ketchup and stir until the color becomes uniform and slightly orange-red. Next, add 1 tablespoon of sweet pickle relish (or if you prefer a less-sweet version, finely mince 1½ teaspoons of dill pickles and add those instead). The pickles add both flavor and texture, so don’t skip them.
Now add ½ teaspoon white vinegar—this brings tartness and brightness that keeps the sauce from becoming too heavy or cloying. A pinch of kosher salt and a grind of black pepper round out the base. At this point, taste it. The sauce should be creamy but tangy, with a subtle sweetness that doesn’t overpower the savory elements. If it needs more tang, add a few drops of vinegar. If it needs more sweetness, add a few grains of sugar.
Many excellent copycat versions include ½ teaspoon yellow mustard in the sauce itself, which adds depth and a slight spicy note. This is entirely optional, but I recommend trying it. Cover the bowl and refrigerate for at least 30 minutes—or up to 3 days. The sauce actually improves as it sits because the flavors have time to marry together.
Preparing Your Grill and Toasting Those Buns
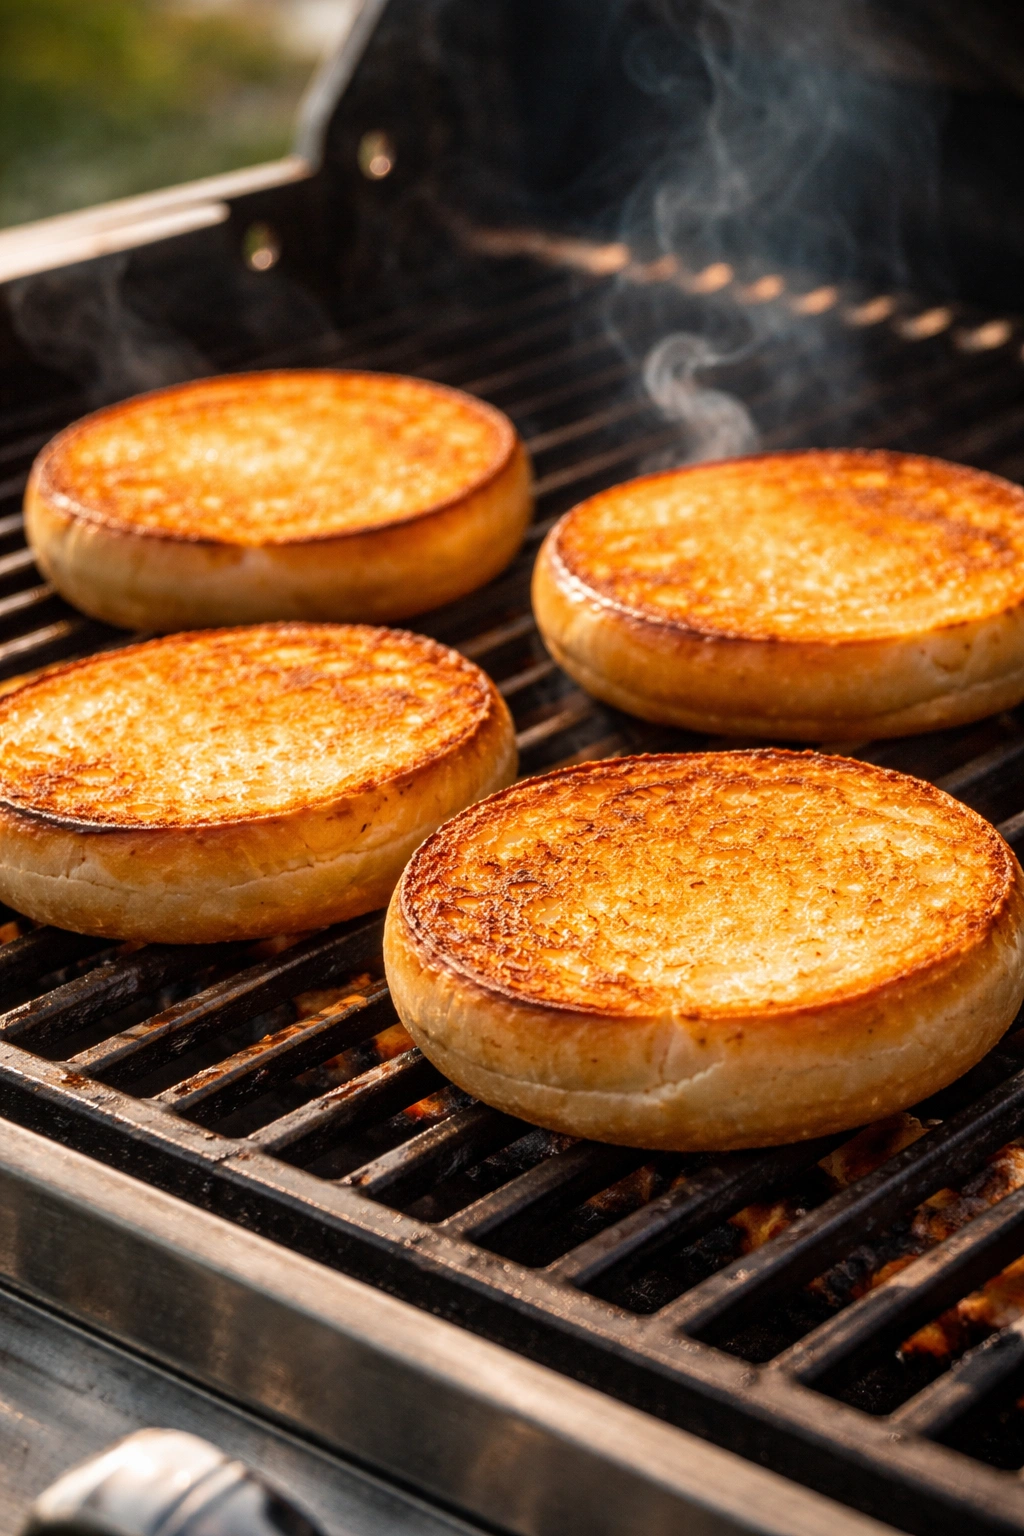
The bun is often overlooked in burger recipes, but it’s absolutely critical to the eating experience. A soft, warm bun that’s been toasted until golden brown on the inside creates the perfect textural contrast with the juicy meat and creamy cheese. Skip this step and your burger falls apart or feels soggy.
About 10 minutes before you plan to cook the burgers, preheat your grill or griddle. If you’re using a gas grill, turn it to medium-high heat. If you’re using charcoal, make sure your coals are white and hot. If you’re using a Blackstone, preheat to 375°F to 400°F. If you’re using a cast-iron skillet on your stovetop, set it to medium-high heat and let it sit for 3-5 minutes.
Once your cooking surface is hot, lightly brush or drizzle oil across it. You want just a thin coating. Now, brush the cut sides (the inside faces) of each hamburger bun very lightly with unsalted butter. Place the buns cut-side down on the hot surface. They’ll toast quickly—usually 1 to 2 minutes. Watch them carefully because the line between golden-brown and burnt is thin. You’re looking for a light golden color with maybe a few slightly darker spots. Remove the buns and set them aside on a clean surface or wrapped loosely in foil to keep them warm.
The toasted buns will stay warm for at least 10 minutes, so you have plenty of time to cook the patties without worrying about them cooling down. Don’t assemble the burgers yet—you want to add the hot patty and cheese right before serving so everything stays at the ideal temperature.
Forming and Cooking Your Thin Patties
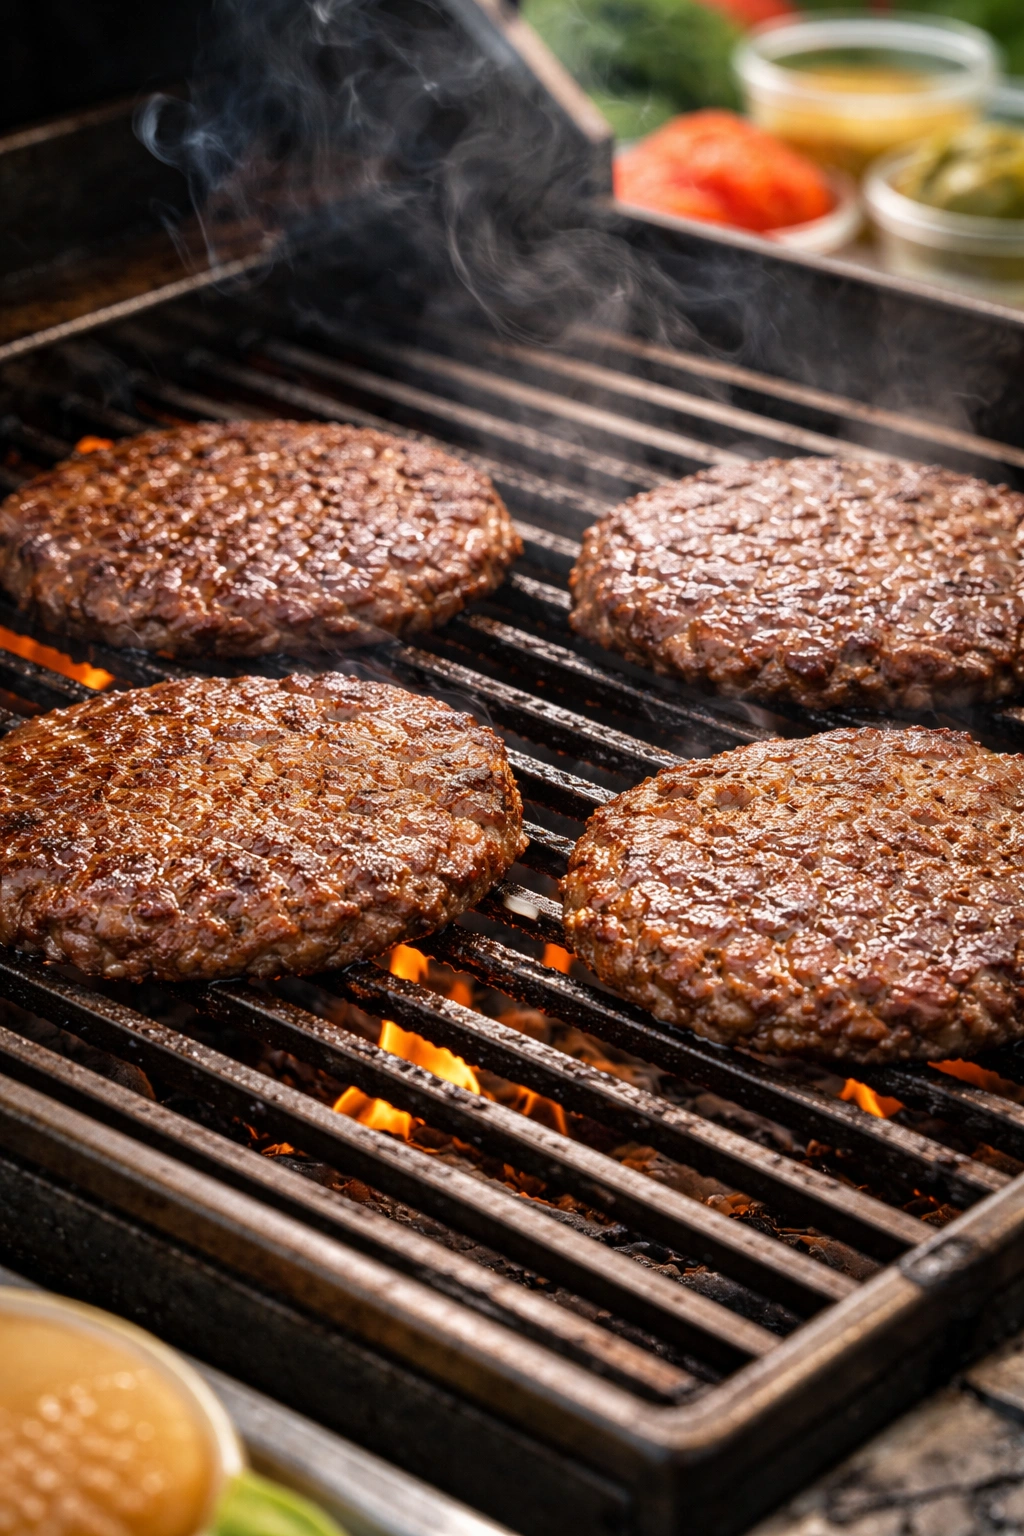
Here’s where the actual magic happens. The thin patty is what creates that signature In-N-Out texture—crispy on the outside, juicy in the middle, and cooked through in just a few minutes. If you’ve formed your patties ahead of time and they’re cold, let them sit at room temperature for about 10 minutes before cooking. Cold meat won’t sear as well as room-temperature meat.
Have all your ingredients prepped and within arm’s reach of the grill before you start cooking. Once the cooking begins, things move fast. You don’t want to be searching for the cheese or the sauce while your patties are on the grill.
Place the first patty (or patties, if your grill is large enough) on the hot surface. It should sizzle immediately and dramatically. If it doesn’t, your grill isn’t hot enough. Don’t move the patty for the first minute. Let it develop that crust. At the 1-minute mark, use a thin metal spatula to gently lift it and check the bottom. You should see a golden-brown, slightly caramelized surface. Flip the patty.
Immediately season the cooked side generously with kosher salt. Yes, salt after flipping. This technique, endorsed by serious cooks and test kitchens, prevents the salt from drawing moisture out of the meat before it has a chance to crust. Now add one slice of American cheese (or fold it in half for that authentic “make the burger smile” look that In-N-Out uses).
Continue cooking for another 1 to 2 minutes on this side, depending on how well-done you prefer your burger. For a medium burger, aim for 1 to 1½ minutes total per side for very thin patties. The cheese should be fully melted by the time you remove the patty from the heat.
Total cooking time: 2½ to 3½ minutes per patty. It’s quick, which is why having everything prepped is so important. Repeat with any remaining patties.
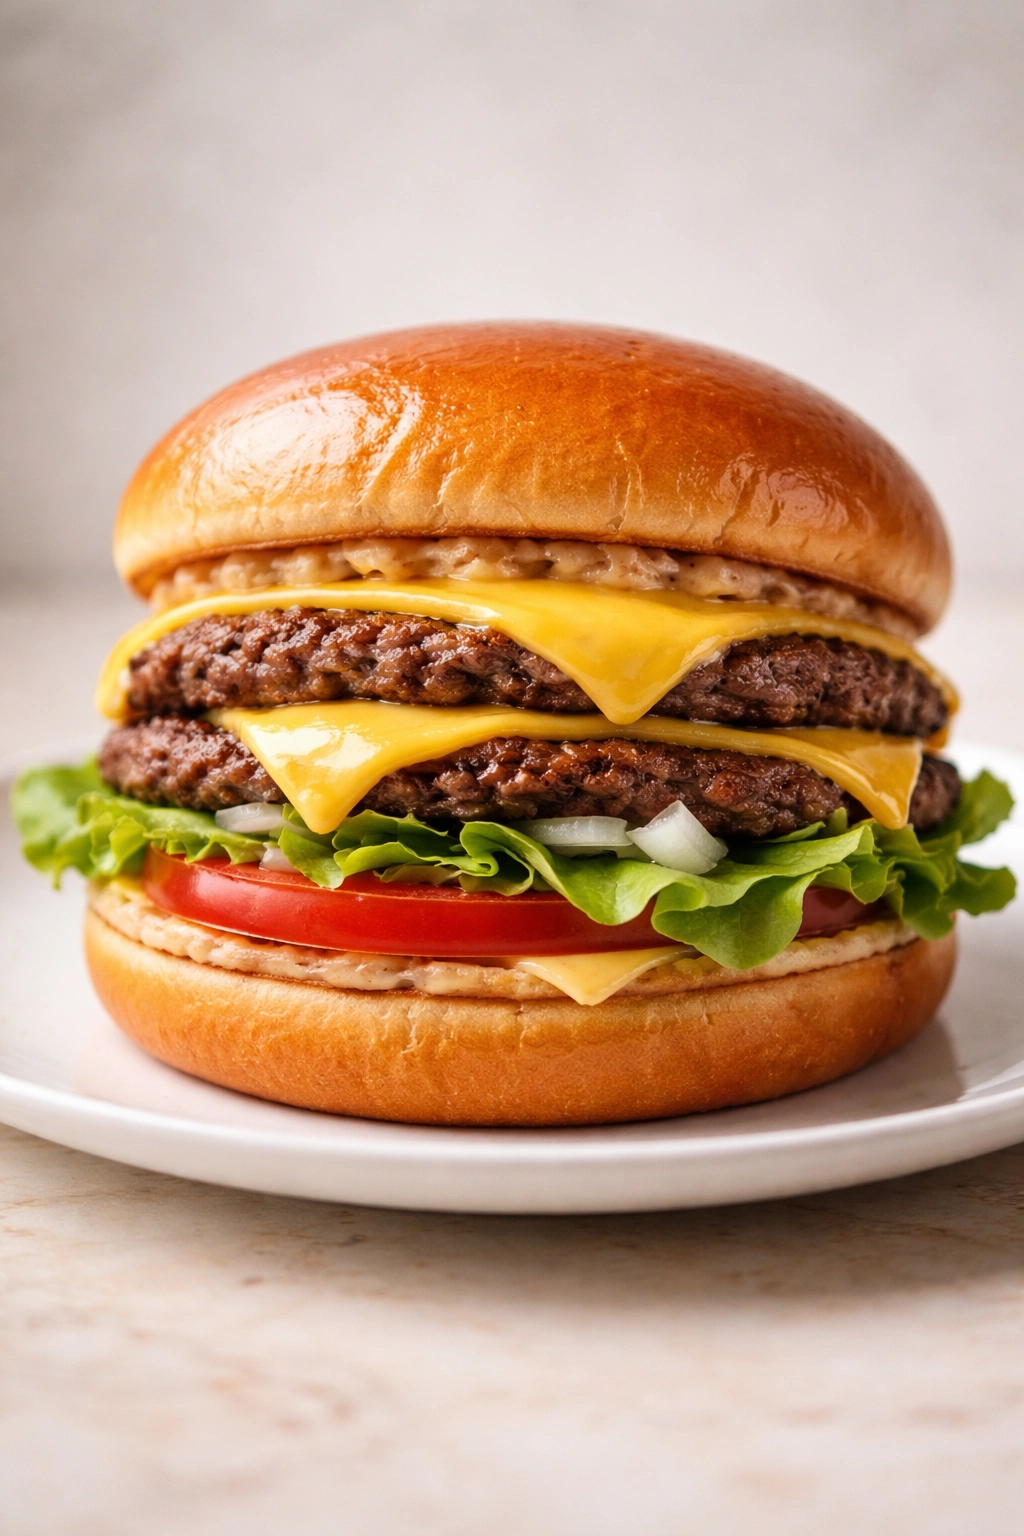
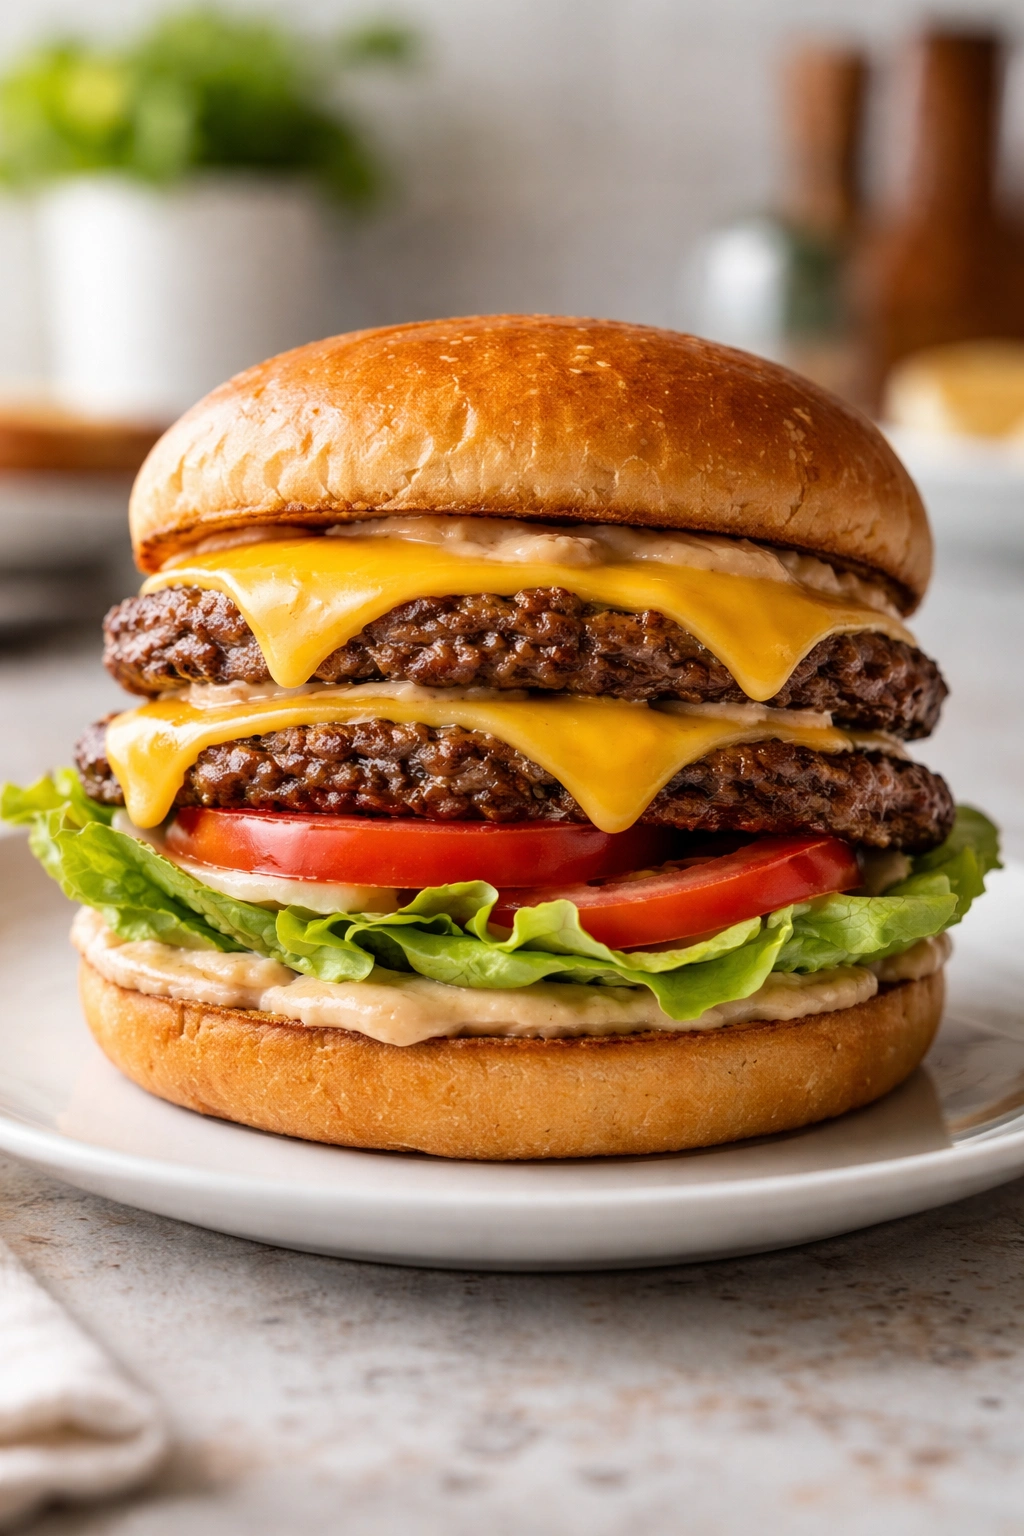
Assembly: Layering Like the Pros
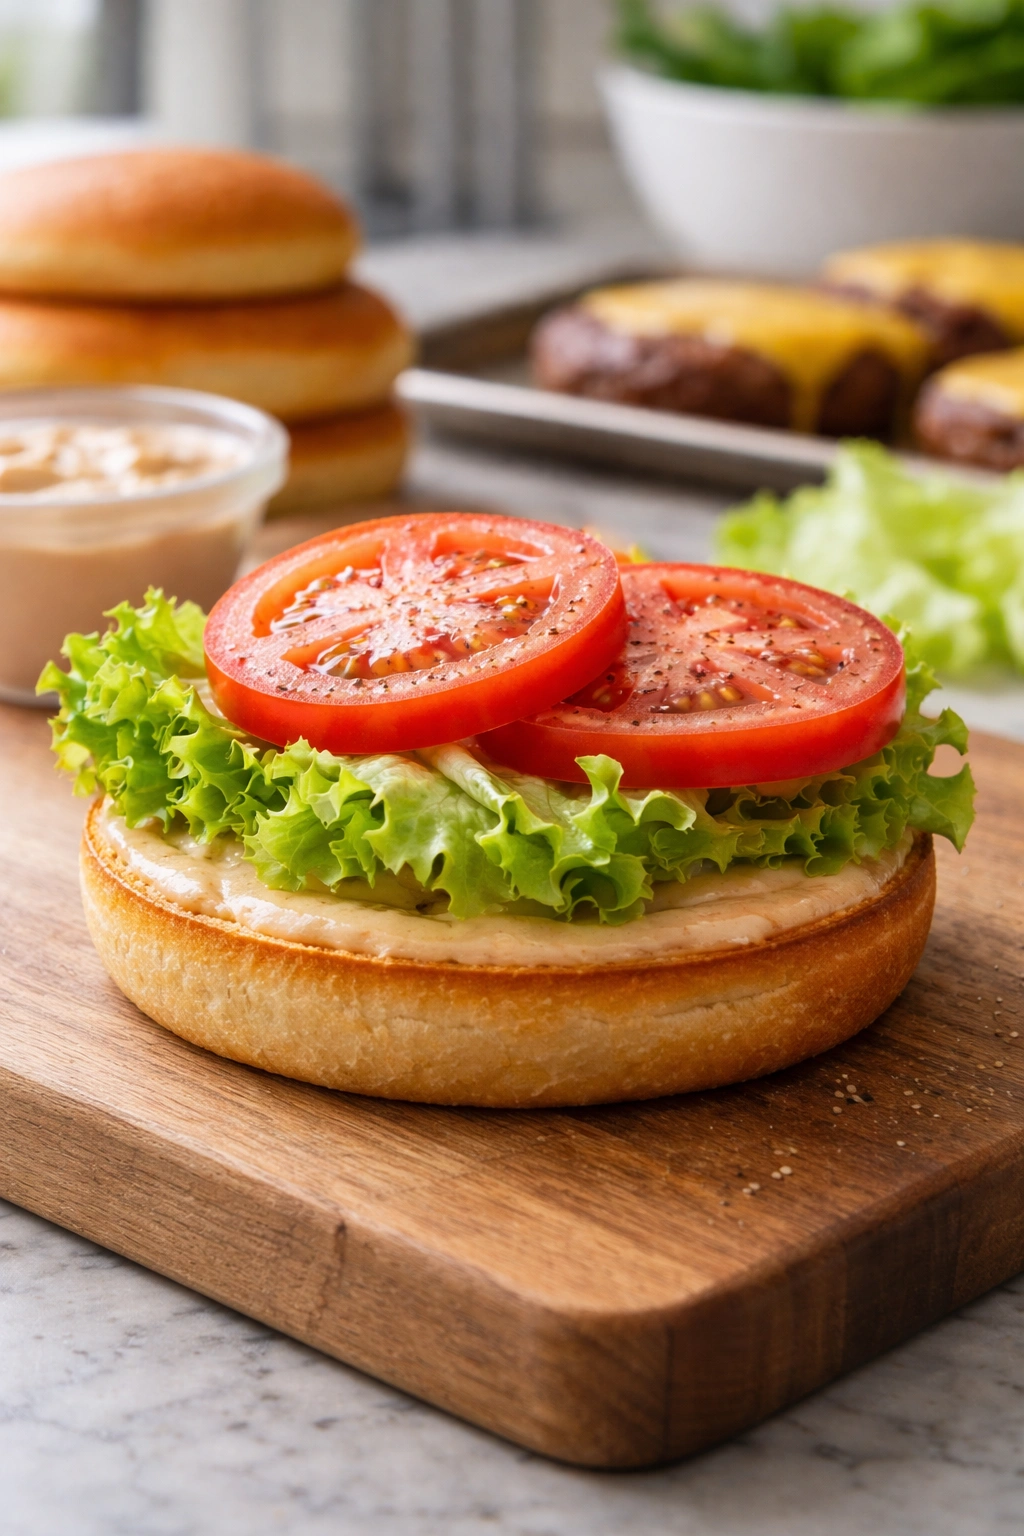
The order in which you layer your burger components matters more than most people realize. Sauce on the bottom bun first acts as a barrier between the bread and the juicy patty, preventing sogginess. This is a crucial step that many home cooks skip.
Start with your toasted bottom bun. Spread roughly 1 tablespoon (or a heaping tablespoon if you like it really saucy) of special sauce directly on the toasted inside surface. Next, layer 1 or 2 leaves of iceberg lettuce. The lettuce creates another layer of insulation and adds that essential cool crunch.
Add a tomato slice directly on top of the lettuce. If your tomato is large, one thick slice (about ¼ inch) is perfect. If it’s smaller, you might want two thinner slices. The tomato should fit roughly within the boundaries of the bun—not hanging way over or too small to matter.
Now place your hot patty with melted cheese on top of the tomato. If you’re making a Double-Double (two patties and two slices of cheese), stack them carefully. The heat from the patties will slightly warm the lettuce and tomato, which is exactly what you want.
Top with raw onion slices if you like them, or skip this for a classic single-patty burger. Some people layer more sauce on top of the patty before adding the top bun. This is entirely up to you—it makes the burger messier to eat but more flavorful. Finish with the top bun, placed gently on top.
Pro Tips for the Perfect Burger Every Time
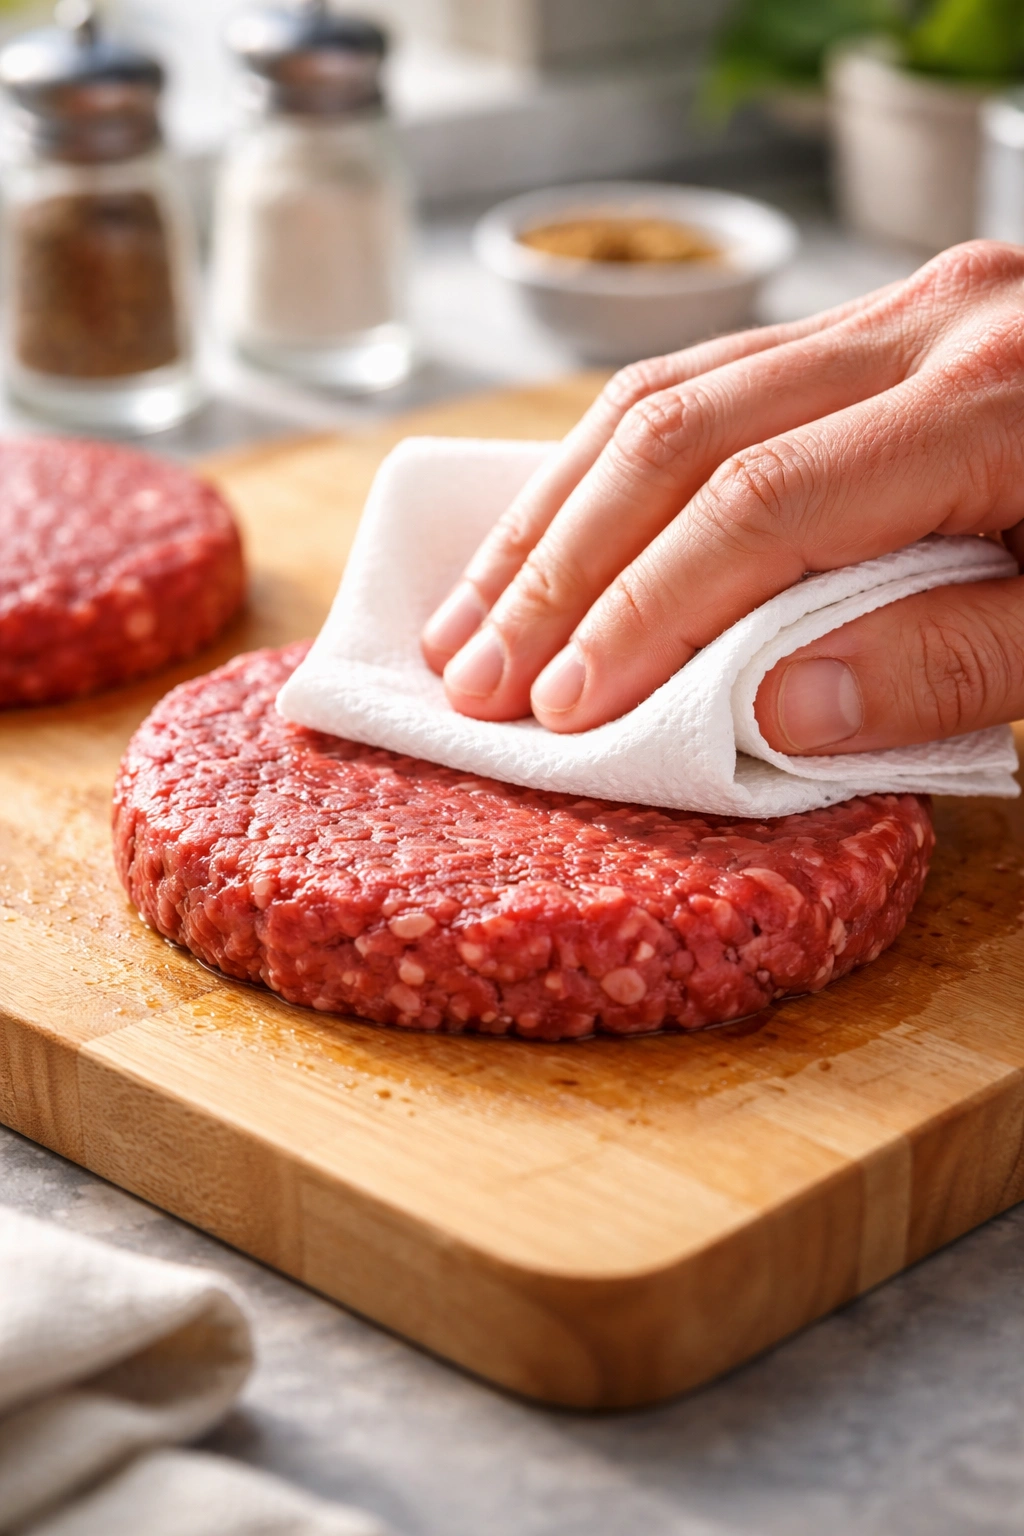
The difference between a good copycat and a great one often comes down to attention to small details. Pat your meat dry before forming patties. Any surface moisture will create steam instead of a crust when it hits the hot grill. If you’ve taken your meat out of the package and it feels wet, blot it gently with paper towels.
Don’t press down on your patties while they cook. This is perhaps the most common mistake home cooks make. Pressing squeezes out the flavorful juices and creates a dense, dry burger. Let the meat cook undisturbed, and it’ll stay juicy. The only exception is if you’re making smash burgers, where you intentionally press the patty into a thin, crispy disc at the beginning of cooking. For this In-N-Out style, resist the urge.
Use real American cheese from the deli counter, not pre-sliced cheese from a package. The difference in melting quality and flavor is significant. Deli counter American cheese melts into a smooth, creamy layer. Pre-sliced cheese often contains anti-caking agents that prevent it from melting as smoothly.
If you’re cooking for a crowd and need to make multiple burgers, cook the buns first, then cook all the patties while the buns stay warm wrapped in foil. This keeps everything on the same timeline. When the last patty is done, you can assemble all the burgers quickly while everything’s still hot.
Creating Animal Style Burgers at Home
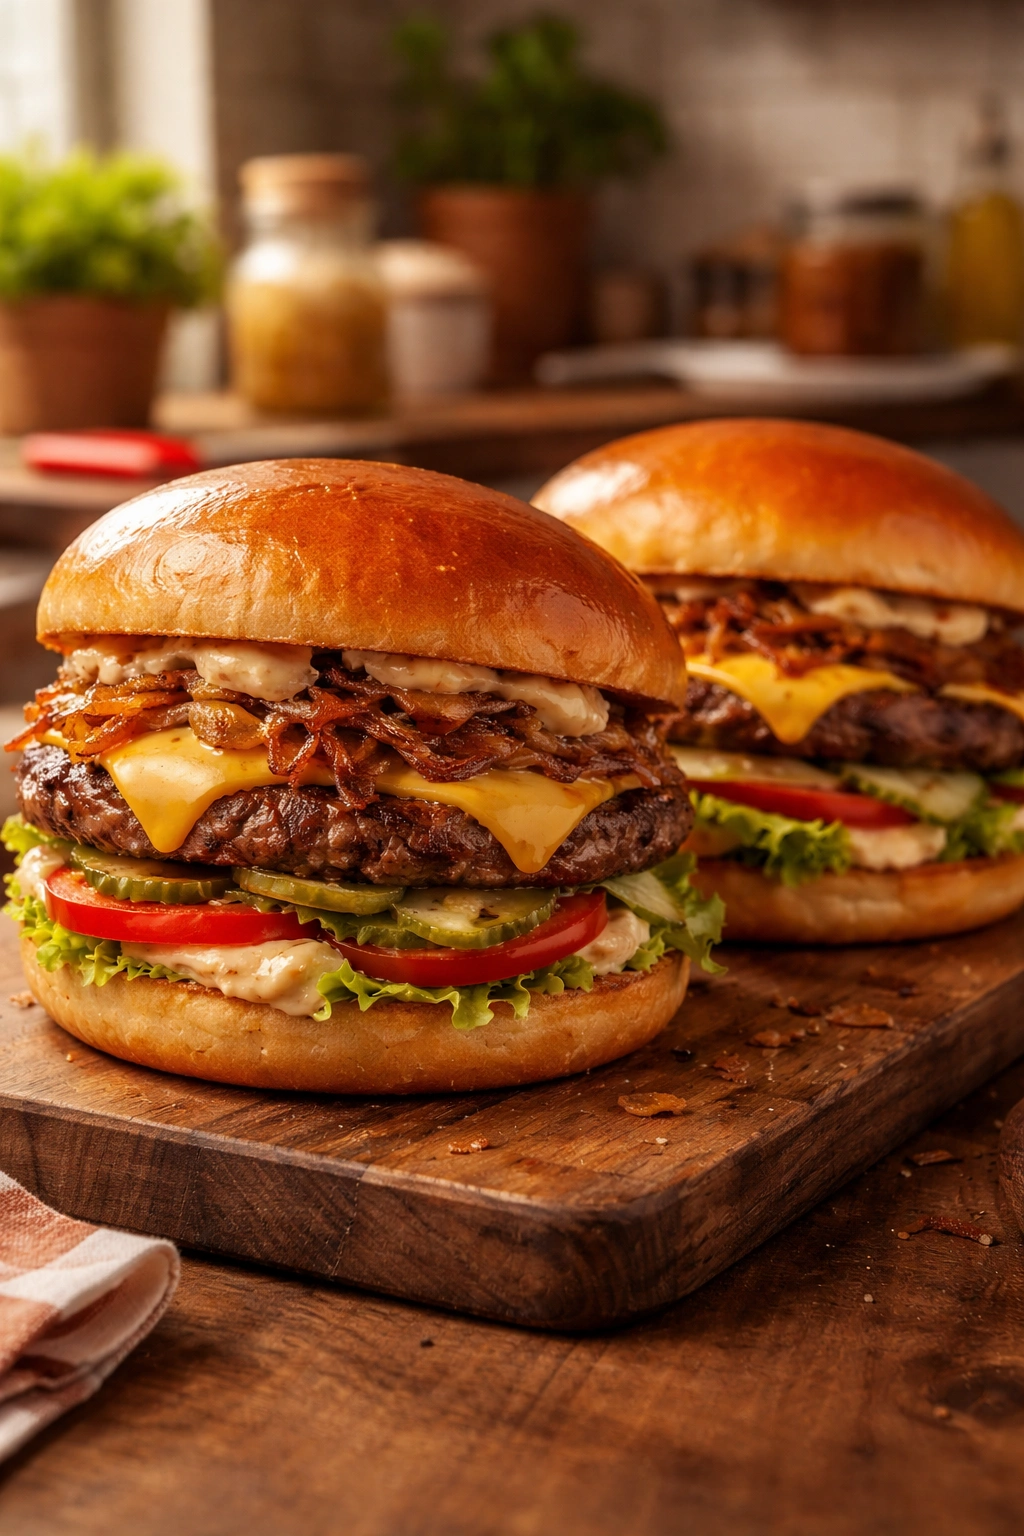
The “Animal Style” burger is In-N-Out’s most famous secret menu item, and it’s easily replicated at home. Instead of raw onions, you use caramelized onions. Instead of mustard on the cooking patty, you use mustard cooked right into the meat. And you add extra special sauce.
To make caramelized onions, slice 1 large yellow or white onion into thin rings or half-moons. Heat 1 tablespoon of oil in a skillet over medium heat. Add the onions and a pinch of salt. Cover the skillet and let the onions cook, stirring occasionally, for about 20 to 25 minutes. They’ll gradually soften and release their moisture. Once they start turning golden (around the 20-minute mark), uncover the skillet and continue cooking for another 5 to 10 minutes until they’re a deep caramel brown and very soft.
For the mustard-cooked patty, spread a thin layer of yellow mustard on your patty before flipping. As the patty cooks, the mustard caramelizes right into the meat, creating a tangy, umami-rich crust. It’s not a strong mustard flavor—it mellows as it cooks.
Assemble Animal Style burgers exactly like regular In-N-Out burgers, but replace raw onions with a generous scoop of caramelized onions, and add extra special sauce both inside and on top. This version is richer and more indulgent, with deeper flavors.
Storage, Leftover Management, and Make-Ahead Strategies
These burgers are absolutely best eaten fresh and hot, straight off the grill. That said, real life doesn’t always allow for perfect timing, so here’s how to handle leftovers.
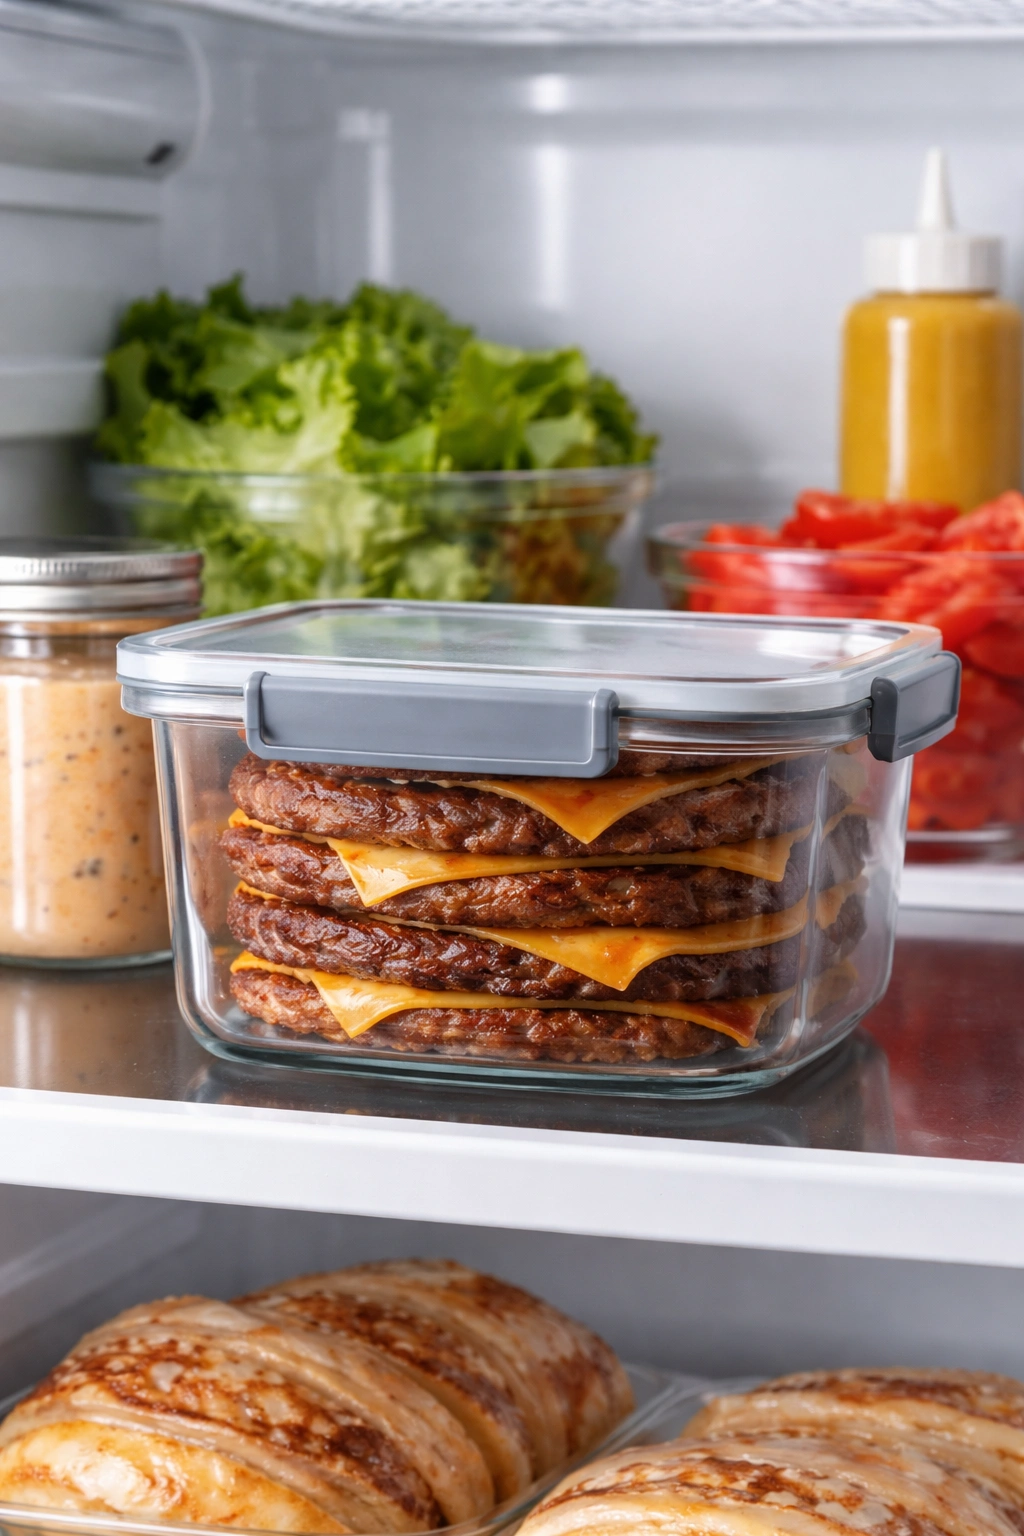
Cooked burger patties can be stored in an airtight container in the refrigerator for up to 4 days. Store them without the cheese and toppings. To reheat, place the patty in a skillet over medium heat for 1 to 2 minutes per side, or wrap it in a damp paper towel and microwave for 30 to 45 seconds. The patty won’t taste quite as good as fresh, but it’s still decent.
The special sauce keeps in a sealed container in the fridge for up to 4 days. Make it the morning of your cookout or even the day before. Raw onions should be sliced shortly before serving. Tomato and lettuce are best used the day they’re cut, but you can prepare them a few hours ahead and store them covered in the refrigerator.
If you form patties and refrigerate them on parchment paper, they’ll keep for up to 24 hours. Actually, chilling the patties for 30 minutes to an hour before grilling can help them hold together better and develop an even better crust. Bring them back to room temperature before cooking.
The best strategy for a burger night? Make the special sauce and caramelize the onions (if using them) earlier in the day. Form your patties and refrigerate them. Toast your buns and slice your tomato about 30 minutes before cooking. Then when you’re ready to eat, grill the patties and assemble everything fresh.
Serving and Pairing Ideas
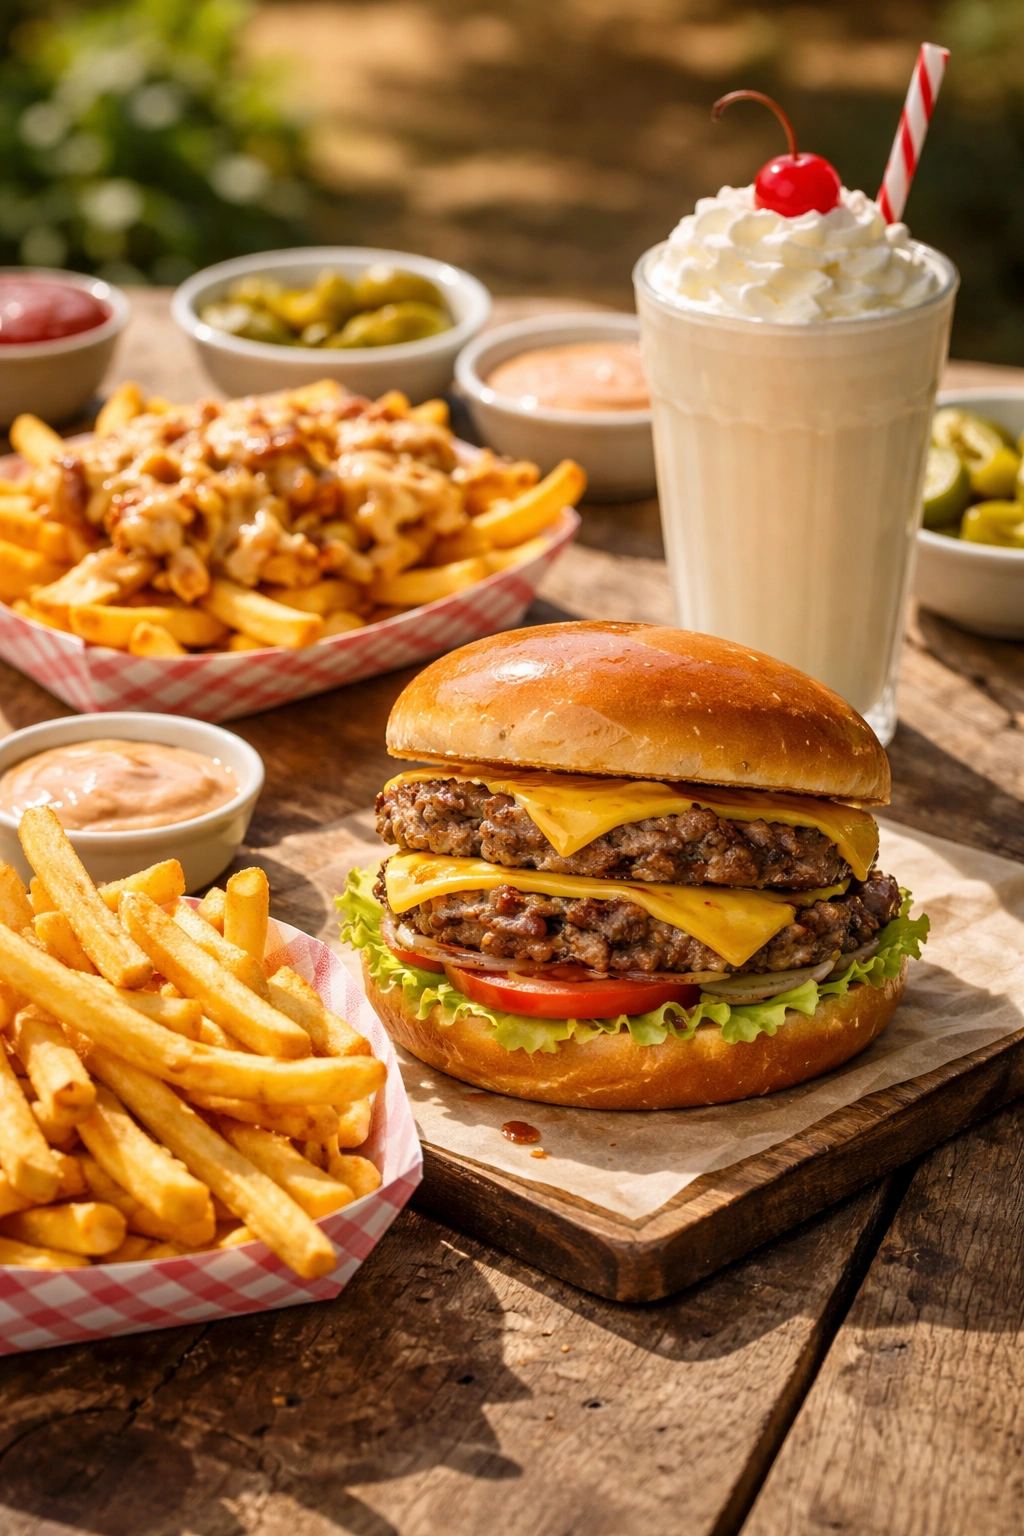
A true In-N-Out experience includes more than just the burger. Pair these cheeseburgers with homemade or store-bought french fries and drizzle extra special sauce over the fries for “Animal Style Fries.” This combination is absolutely iconic.
If you want to get fancy, make a classic milkshake to complete the experience. Vanilla, chocolate, or strawberry all work beautifully. Simply blend 1 cup of vanilla ice cream with ½ cup cold milk and a splash of vanilla extract, and you’re done. It’s pure nostalgia in a glass.
Other great sides include a simple iceberg lettuce salad with vinaigrette to cut through the richness, crispy onion rings, or a fresh fruit salad for brightness. A cold lemonade or iced tea pairs perfectly with the salty, savory burger.
For outdoor gatherings, set up a simple toppings bar and let guests customize their own. Have extra pickles, raw onions, caramelized onions, and additional sauce available so everyone can build their burger exactly how they like it. This adds fun and interaction to the meal.
Making This Recipe Your Own with Variations
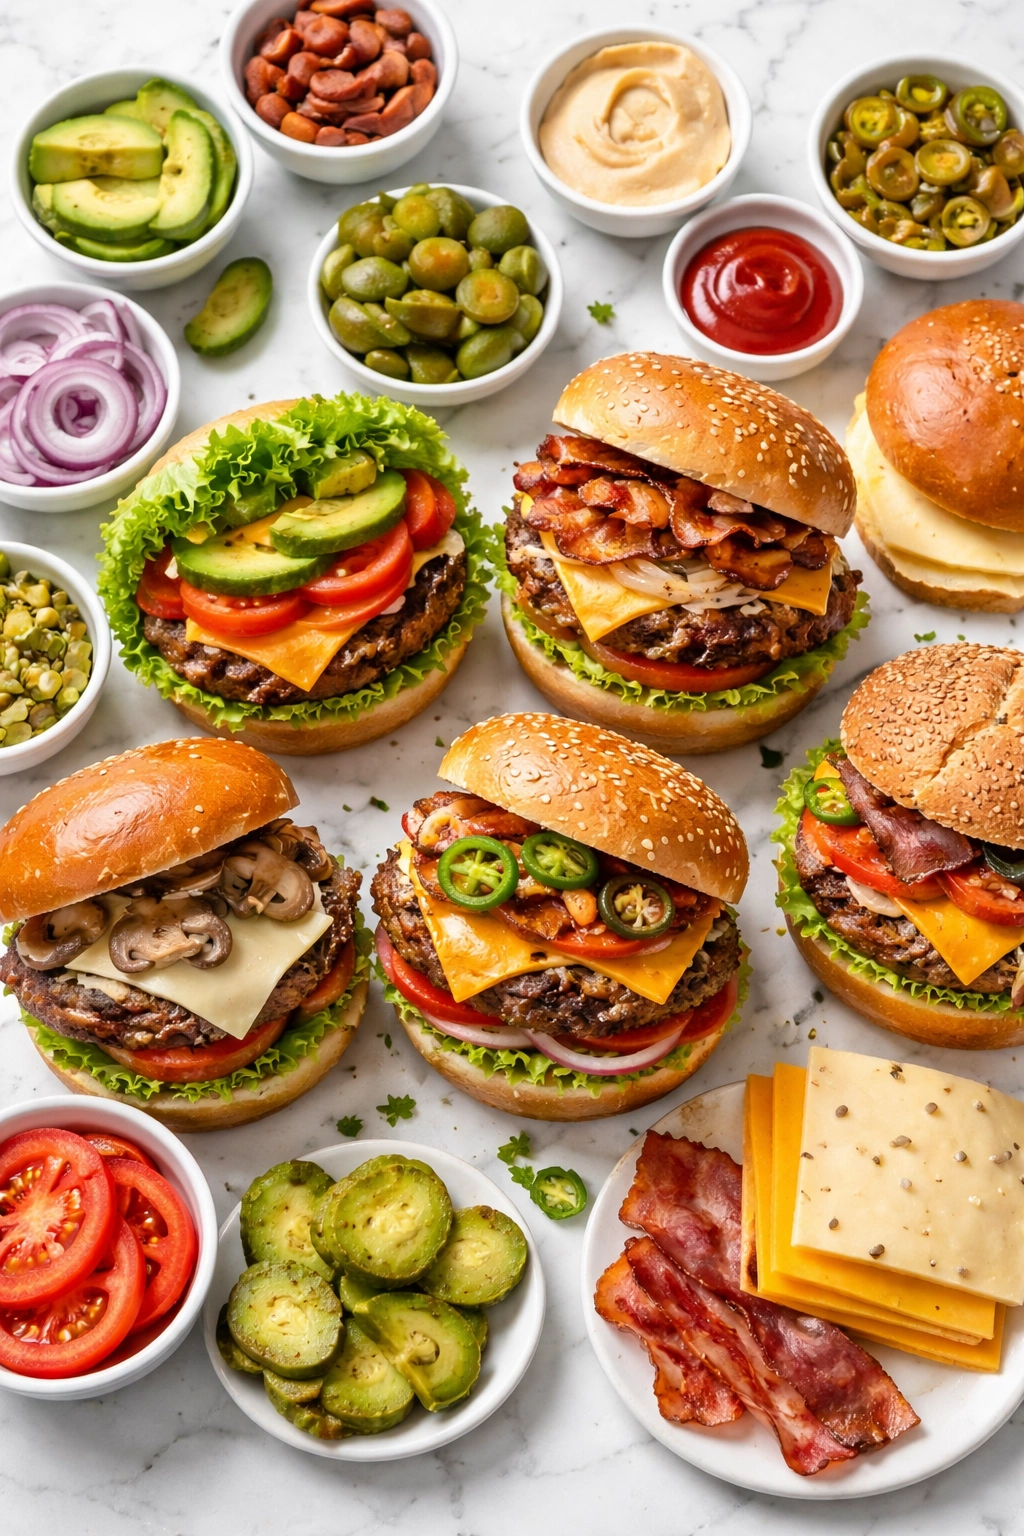
The beauty of a copycat recipe is that you can honor the original while making it uniquely yours. Prefer Swiss cheese to American? Use it. Love crispy bacon? Add a slice. Want to make it vegetarian? Use a high-quality veggie patty.
For a spicy version, add finely minced jalapeños to the special sauce or top the burger with pickled jalapeños. A southwestern twist might include pepper jack cheese and avocado slices. A mushroom version can be created by sautéing sliced mushrooms until golden and adding them as a topping.
If you want to make these low-carb or keto-friendly, skip the bun entirely and wrap the burger in large iceberg lettuce leaves. The result is actually delicious—you get all the burger flavor with a refreshing, crispy vegetable base. This is sometimes called “Protein Style,” which is actually an In-N-Out secret menu option.
Gluten-free versions are easy: simply use gluten-free hamburger buns and make sure your Worcestershire sauce and condiments are certified gluten-free. Dairy-free? Use dairy-free cheese alternatives (though they won’t melt quite as beautifully as real cheese). The special sauce is naturally dairy-free as written.
The Final Word on Homemade In-N-Out Burgers
There’s something deeply satisfying about creating restaurant-quality food in your own kitchen. These burgers prove that you don’t need fancy equipment or hard-to-find ingredients to replicate something iconic. You just need good beef, high heat, and technique.
The first time you take that first bite of your homemade In-N-Out copycat burger—when the creamy special sauce mingles with the tender, juicy beef and the crispy edges of the patty, when the melted American cheese coats your tongue, when the cool crunch of lettuce and tomato provide textural contrast—you’ll understand why people drive miles for these burgers.
And honestly? Your homemade version might be better. You can use higher-quality beef. You can toast your buns to your exact preference. You can make the sauce tangy or creamy based on your taste. You’re not limited by a franchise menu.
So fire up that grill, gather your ingredients, and make some magic happen. These burgers are easier than you think, infinitely more satisfying than drive-thru food, and absolutely worth the effort. Your friends and family will be asking for this recipe, guaranteed.