Chicken scampi sits at that magical intersection where restaurant elegance meets weeknight simplicity—and once you master the technique of building a proper lemon garlic butter sauce, you’ll understand why this dish has earned its place on dinner tables everywhere. The beauty of chicken scampi lies in its deceptive simplicity: tender, golden-seared chicken pieces meet a silky pan sauce that combines the richness of butter, the brightness of fresh lemon, the pungency of garlic, and the complexity that comes from reducing white wine just past the point of raw alcohol. When tossed with al dente pasta and finished with fresh parsley and Parmesan, it becomes something far greater than the sum of its parts.
What makes this version special isn’t a secret ingredient or an overly complicated technique—it’s understanding the why behind each step. The flour coating on the chicken doesn’t just add texture; it helps thicken the sauce naturally as it simmers. The wine reduction isn’t just about cooking off the alcohol; it’s about concentrating flavors and creating a base that’s balanced rather than harsh. The cold butter swirled in at the end isn’t just richness for richness’s sake; it creates that signature silky, velvety sauce that clings to every strand of pasta. This is the kind of meal that makes people ask for the recipe, then express surprise when they realize how straightforward it actually is.
The Story Behind Chicken Scampi and Why It Works
Scampi, in its original Italian context, refers to langoustines—those delicate crustaceans you’d find along Mediterranean coastlines. When Italian-American restaurants adapted the dish for American audiences, shrimp scampi became the standard, prepared in a simple sauce of butter, garlic, white wine, and lemon that let the delicate protein shine. The genius of substituting chicken for shrimp or langoustines isn’t that it’s cheaper (though it is)—it’s that chicken’s mild, slightly sweet flavor actually takes beautifully to this bright, garlicky treatment. Unlike shrimp, which can turn rubbery in seconds if overcooked, chicken pieces give you a bit of forgiveness, and their heartier texture stands up wonderfully to a more robust sauce.
The magic happens in the pan itself. When you sear chicken properly, you’re creating a flavorful brown crust through the Maillard reaction—this is why that golden color matters beyond appearance. When you deglaze the pan with wine and scrape up those browned bits, you’re dissolving all that concentrated flavor into your sauce. This is called fond, and it’s liquid gold in the kitchen. The wine reduces, the alcohol cooks off, the flavors concentrate. Then butter emulsifies into the mixture, lemon brightens everything, and what was a bare pan becomes something extraordinary.
Understanding the Role of Each Ingredient in Your Sauce
The interplay between butter, garlic, lemon, and wine in this sauce is what separates a forgettable dish from one people remember. Butter is the foundation—it’s what carries flavor and creates that luxurious mouthfeel. But it’s not just thrown in at the end; some of it gets used to sear the chicken, which means the pan has already absorbed chicken drippings and developed fond. When you add more butter to make the sauce, you’re building on that existing layer of flavor.
Garlic needs respect. Minced garlic cooks faster than whole cloves and distributes more evenly through the sauce, but it also burns more easily. This is why garlic goes into the pan after the wine has started reducing—adding it to a hot, dry pan would burn it and make the sauce bitter. Fresh garlic is non-negotiable here; garlic powder simply doesn’t have the same bright quality.
Lemon juice and zest do completely different things. The juice adds acidity, which brightens the richness and balances the saltiness. The zest adds aroma and floral notes that juice alone can’t provide. Using both—and using them at the right moment—matters more than you might think. Some recipes add zest early so it infuses, but the best approach is to add it off the heat so the volatile oils that carry the flavor don’t cook away.
White wine contributes depth and complexity that you simply can’t replicate with chicken broth alone. The slight tannins and acidity work with the lemon to cut through the butter. As it reduces, it concentrates—that alcohol isn’t just burning off, it’s taking the wine’s flavor compounds with it and leaving behind something more intense and balanced. A cheap, thin wine will result in a thin, forgettable sauce. A decent, drinkable wine (around $12-15 is the sweet spot) transforms the whole dish.
Selecting Your Chicken and Preparing It Properly
The cut of chicken you choose affects both cooking time and texture. Boneless, skinless chicken breasts are the classic choice—they’re lean, cook quickly, and are what most people have in their freezer. Cut them into bite-sized pieces (about 1-inch chunks) so they cook evenly and pick up sauce more efficiently than larger pieces would. Chicken tenders are an even easier option if you want to skip the cutting step entirely.
Chicken thighs are the dark horse here. They take slightly longer to cook but have more marbling, which means they stay juicier and develop even more flavor when seared. If you use thighs, add an extra minute or two per side when searing, and you’ll end up with a richer, more forgiving dish.
Regardless of which cut you choose, drying the chicken thoroughly before it hits the pan is non-negotiable. Pat it completely dry with paper towels, even if it seems obsessive. Surface moisture prevents browning—it creates steam, and steam keeps the temperature down. Dry chicken browns; wet chicken steams. The difference between a proper golden sear and pale, sad chicken comes down to that paper towel step.
Yield, Prep Time, and Difficulty Level
Yield: Serves 4 | Makes 4 generous servings
Prep Time: 20 minutes (active preparation)
Cook Time: 25 minutes (searing, sauce-making, and final combination)
Total Time: 45 minutes active time
Difficulty: Beginner to Intermediate — The technique is straightforward: sear, deglaze, reduce, combine. Even if you’ve never made scampi before, this recipe walks you through each step with enough precision that you’ll understand exactly what’s happening in the pan and why it matters. The only thing that requires a bit of attention is the wine reduction—you need to watch it and let it reduce by about three-quarters—but it’s not complicated, just requires presence.
The Complete Ingredient List for Lemon Garlic Butter Chicken Scampi
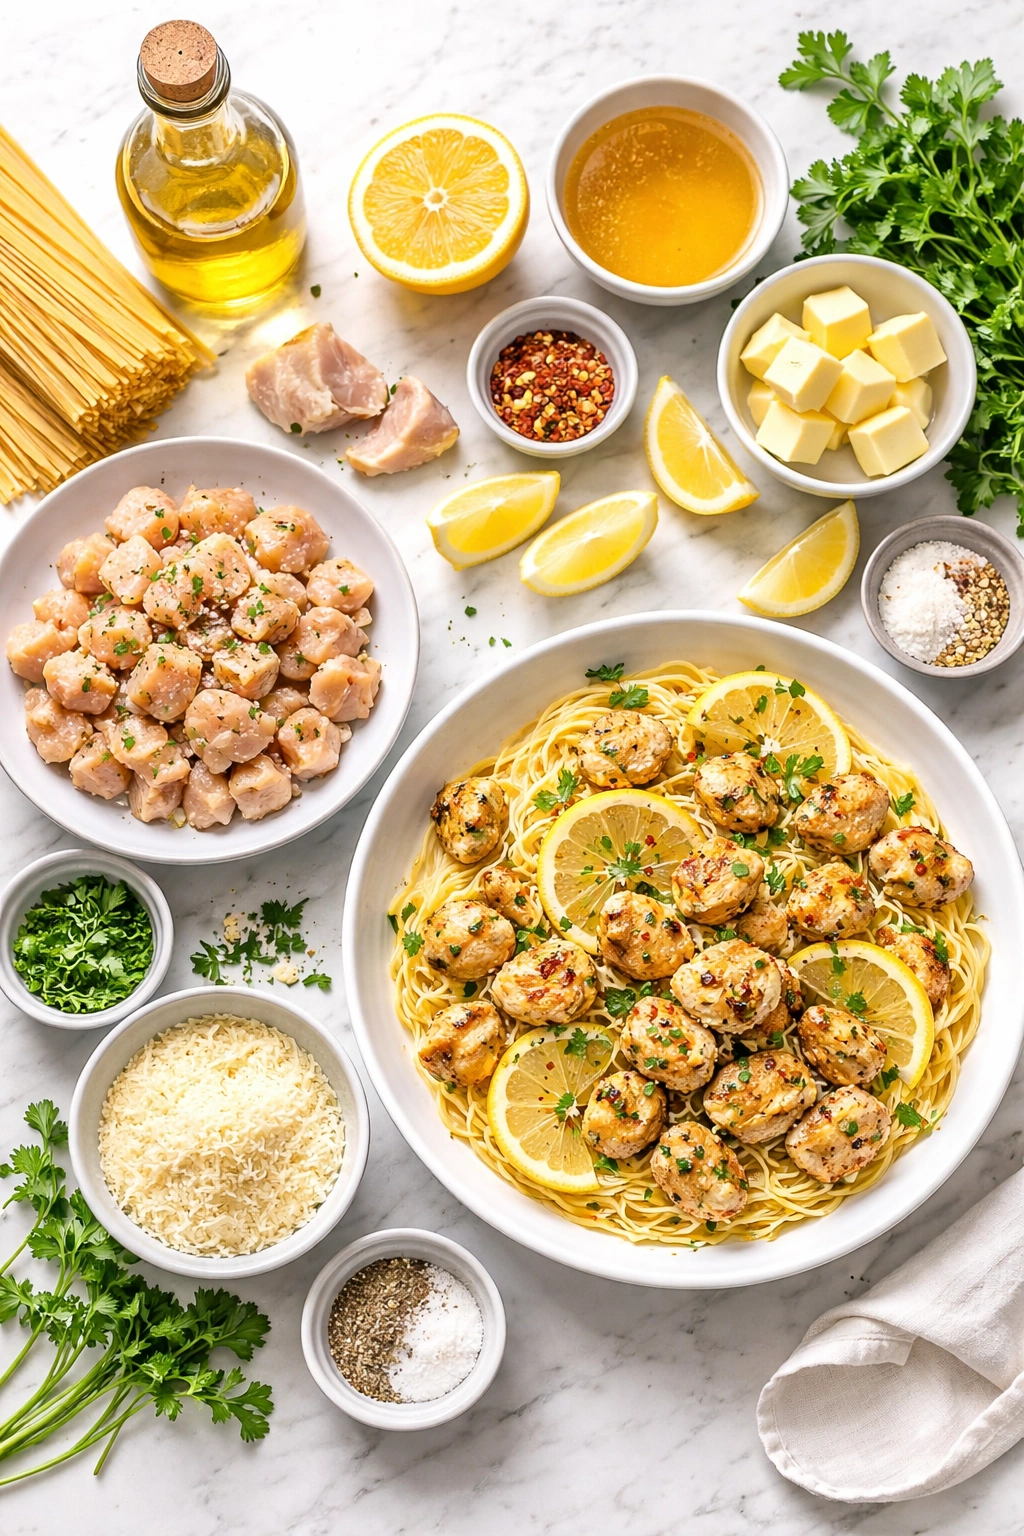
For the Chicken:
- 1½ pounds boneless, skinless chicken breasts, cut into 1-inch bite-sized pieces (or use chicken tenders)
- ½ cup all-purpose flour
- 1 teaspoon fine sea salt
- ½ teaspoon freshly ground black pepper
- ¼ teaspoon Italian seasoning (dried oregano, basil, thyme blend)
For Searing and the Pan:
- 2 tablespoons extra virgin olive oil
- 3 tablespoons unsalted butter, divided (use good quality butter—Kerrygold, Cabot, or Land O’ Lakes make a real difference)
For the Sauce:
- 3 tablespoons unsalted butter (additional, for sauce-building)
- 5 cloves fresh garlic, minced very finely (about 2 tablespoons minced; fresh is essential—not jarred, not powder)
- ¾ cup dry white wine, such as Sauvignon Blanc or Pinot Grigio (something you’d actually drink—”cooking wine” will ruin this)
- 2 tablespoons fresh lemon juice, squeezed from 1 medium lemon (use fresh-squeezed, never bottled)
- 1 teaspoon lemon zest, finely grated from the same lemon (zest before you juice)
- ⅛ to ¼ teaspoon red pepper flakes, to taste (optional but recommended—adds a gentle warmth)
- ½ teaspoon fine sea salt (adjust to taste at the end)
- ¼ teaspoon freshly ground black pepper (adjust to taste)
- 2 tablespoons cold unsalted butter, cut into small pieces (this is separate from the 3 tablespoons above—it goes in at the very end to finish)
For Serving:
- 12 ounces dried pasta (spaghetti, angel hair, linguine, or fettuccine all work beautifully)
- Salt for pasta water
- ⅓ cup fresh flat-leaf parsley, finely chopped
- ½ cup freshly grated Parmesan cheese (or more to taste; shred from a block, not pre-grated)
- Additional Parmesan for garnish
- Additional fresh parsley for garnish
- Lemon wedges for serving
The Perfect Sear: Creating Golden Chicken That Tastes Restaurant-Quality
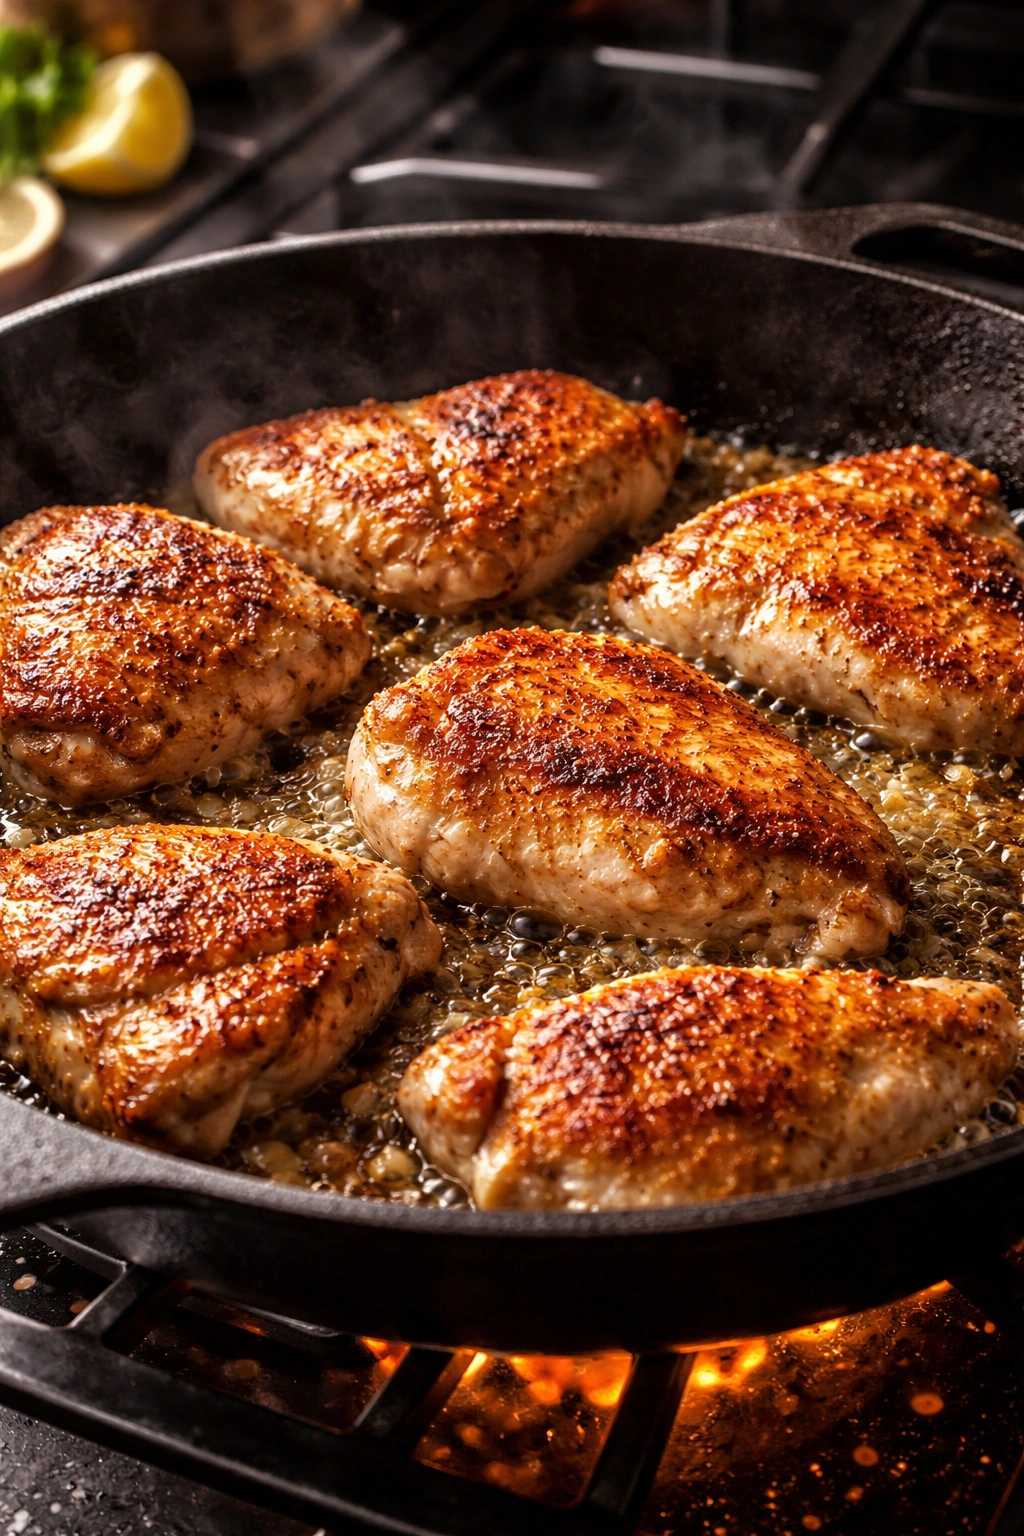
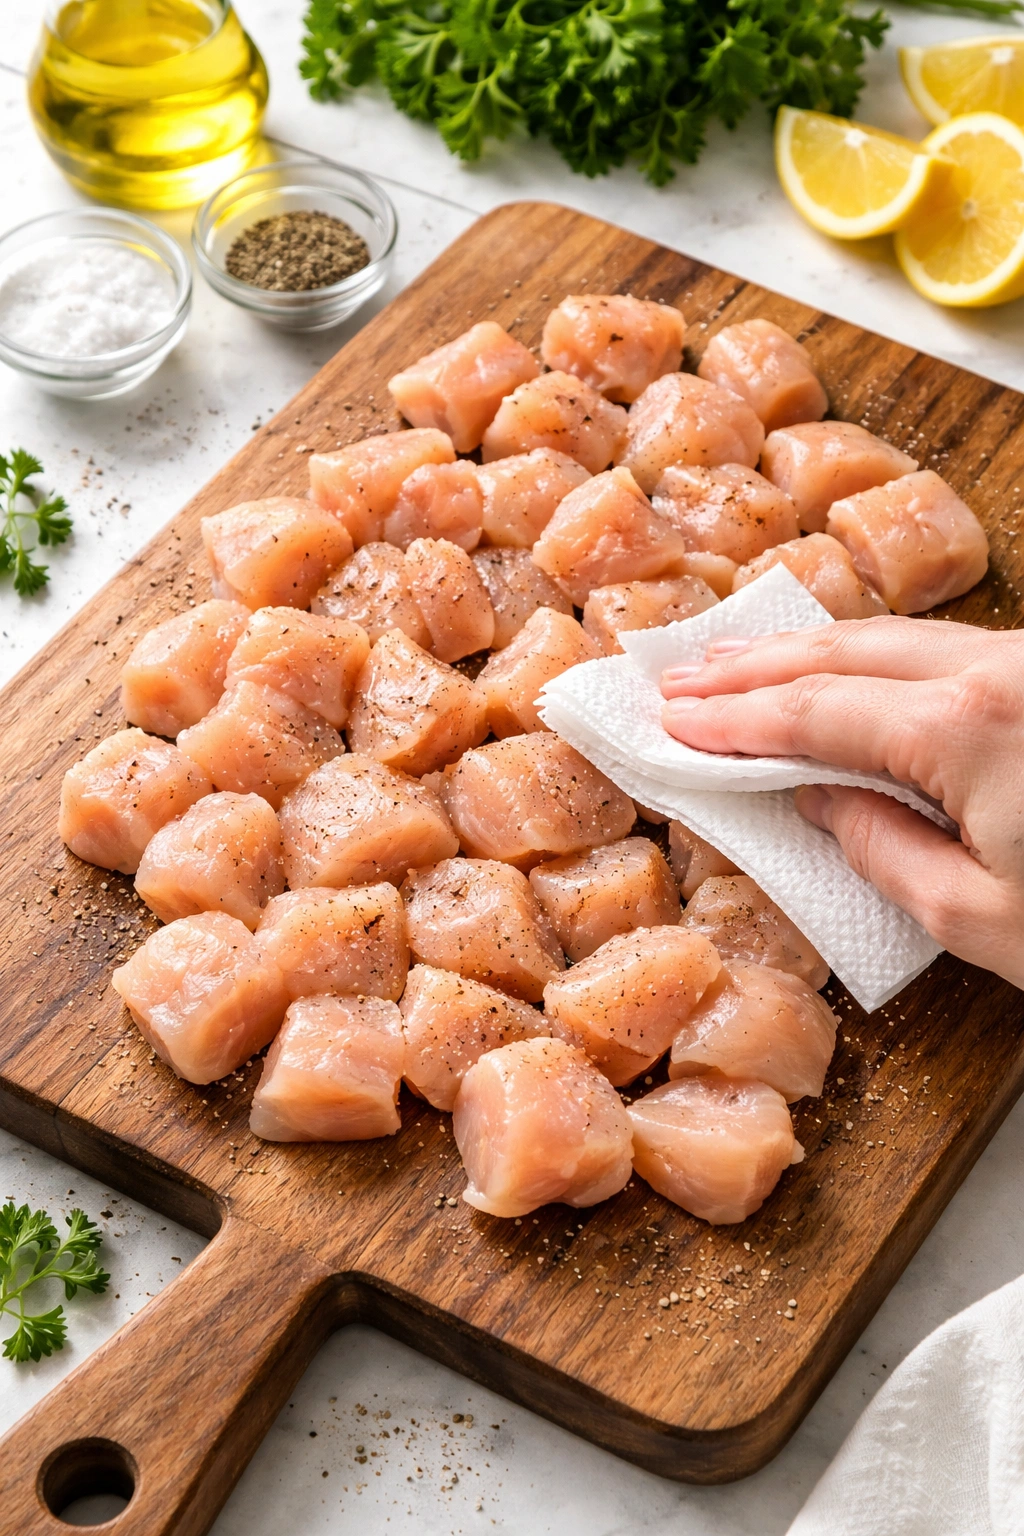
The sear is where this dish either succeeds or falters, which is why it deserves its own focused attention. Pat your chicken pieces completely dry with paper towels. This step matters more than you’d think—any surface moisture prevents browning and creates steam instead of crust. Set the dried chicken aside on a clean plate.
In a small bowl, combine the flour, salt, pepper, and Italian seasoning. Toss your dried chicken pieces in this mixture, coating each piece evenly. Shake off any excess flour; you want a light coating, not a thick crust. This coating will help thicken your sauce naturally and create a delicate, golden exterior.
Place a large, heavy-bottomed skillet (12-inch nonstick or stainless steel) over medium-high heat. Let it heat for about 2 minutes—you want it hot enough that a drop of water sizzles immediately on the surface. Add the olive oil and let it shimmer (about 1 more minute), then add 1½ tablespoons of the butter. Once the butter has melted and combined with the oil, you’re ready.
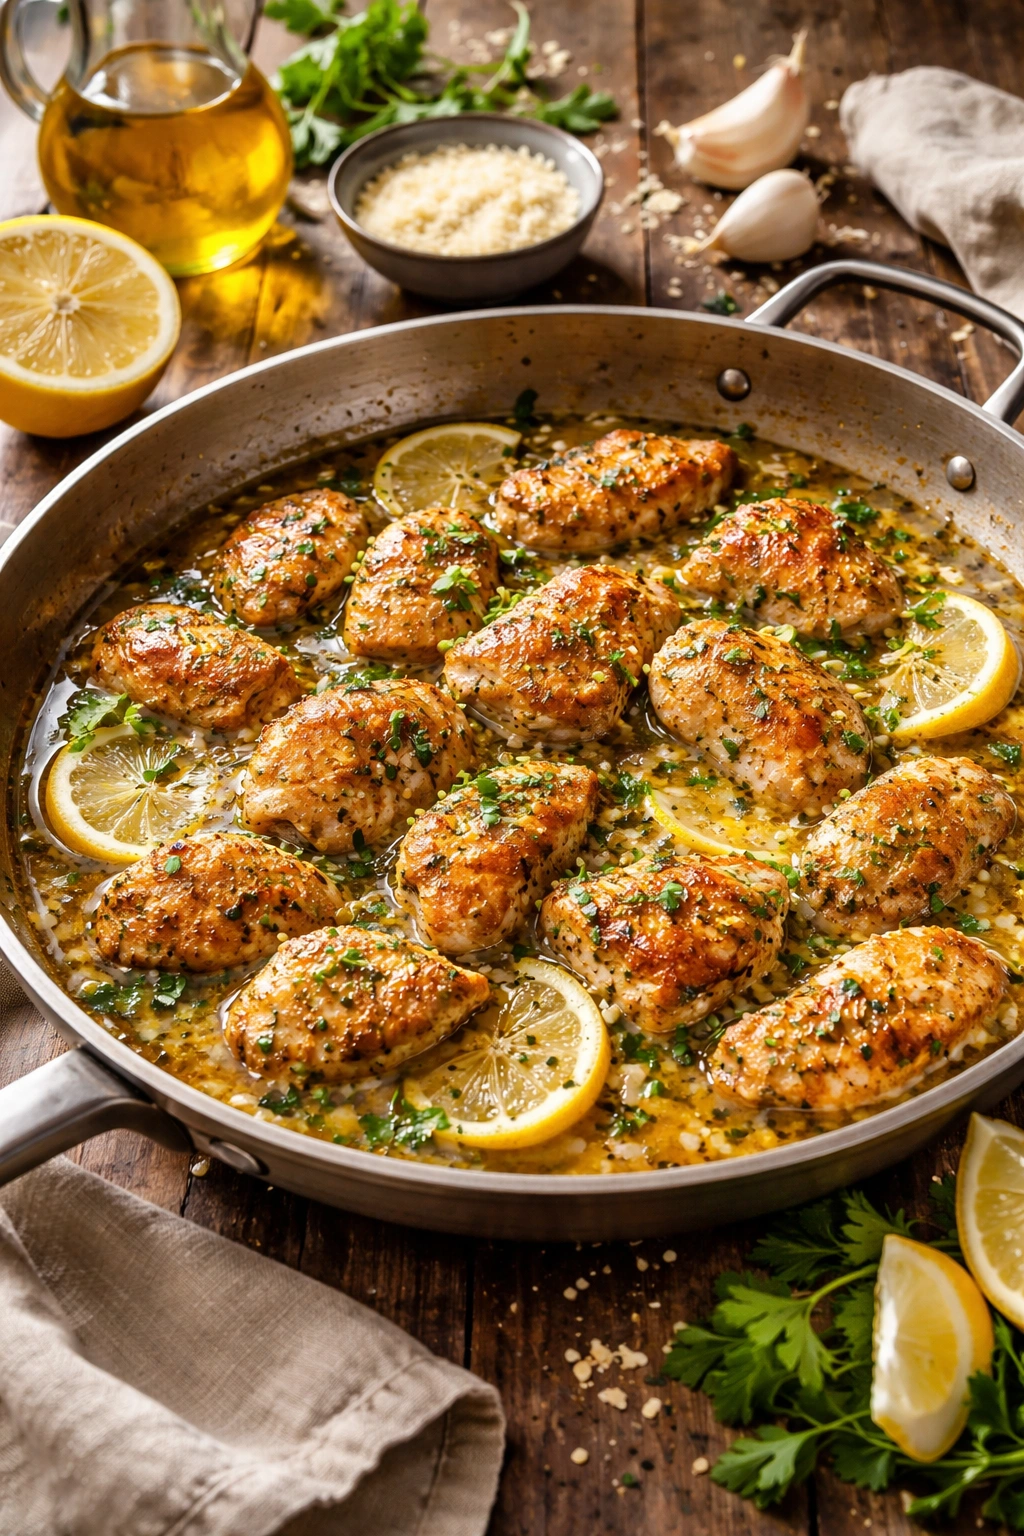
Add the chicken pieces in a single layer. This is crucial: do not crowd the pan. If your pieces are layering on top of each other, you’ll steam instead of sear. Work in batches if necessary. Let the chicken cook undisturbed for 4 to 5 minutes. Don’t move it, don’t flip it, don’t poke it. You’re allowing the Maillard reaction to create a golden brown crust on the bottom. You should hear a gentle sizzle, not aggressive popping.
After 4-5 minutes, flip each piece and cook for another 2 to 3 minutes until the chicken is golden brown on the second side and the internal temperature reaches 165°F on a meat thermometer. Remove the chicken to a clean plate and tent loosely with foil to keep it warm. Don’t cover it completely—you don’t want steam to continue cooking it.
If you had to work in batches, add the remaining 1½ tablespoons butter and repeat with the second batch of chicken. Once all the chicken is seared and resting, wipe out the pan briefly with a paper towel (you want to keep the flavorful browned bits but remove excess fat if there’s a lot).
The Wine Reduction: Building Complexity Through Concentration
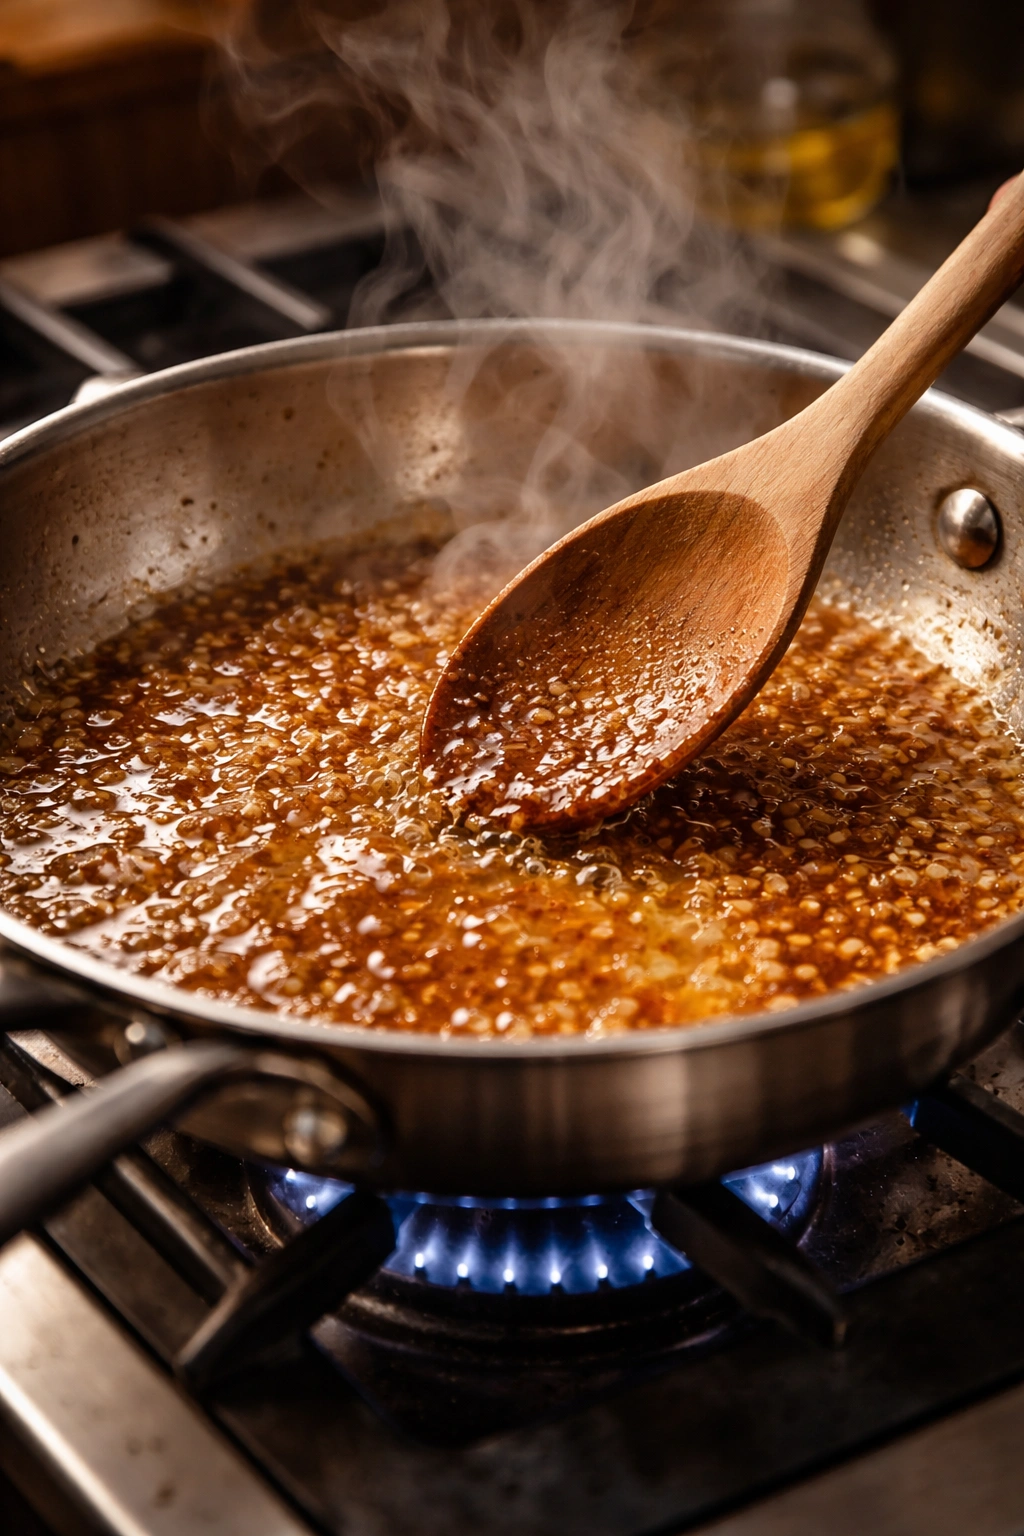
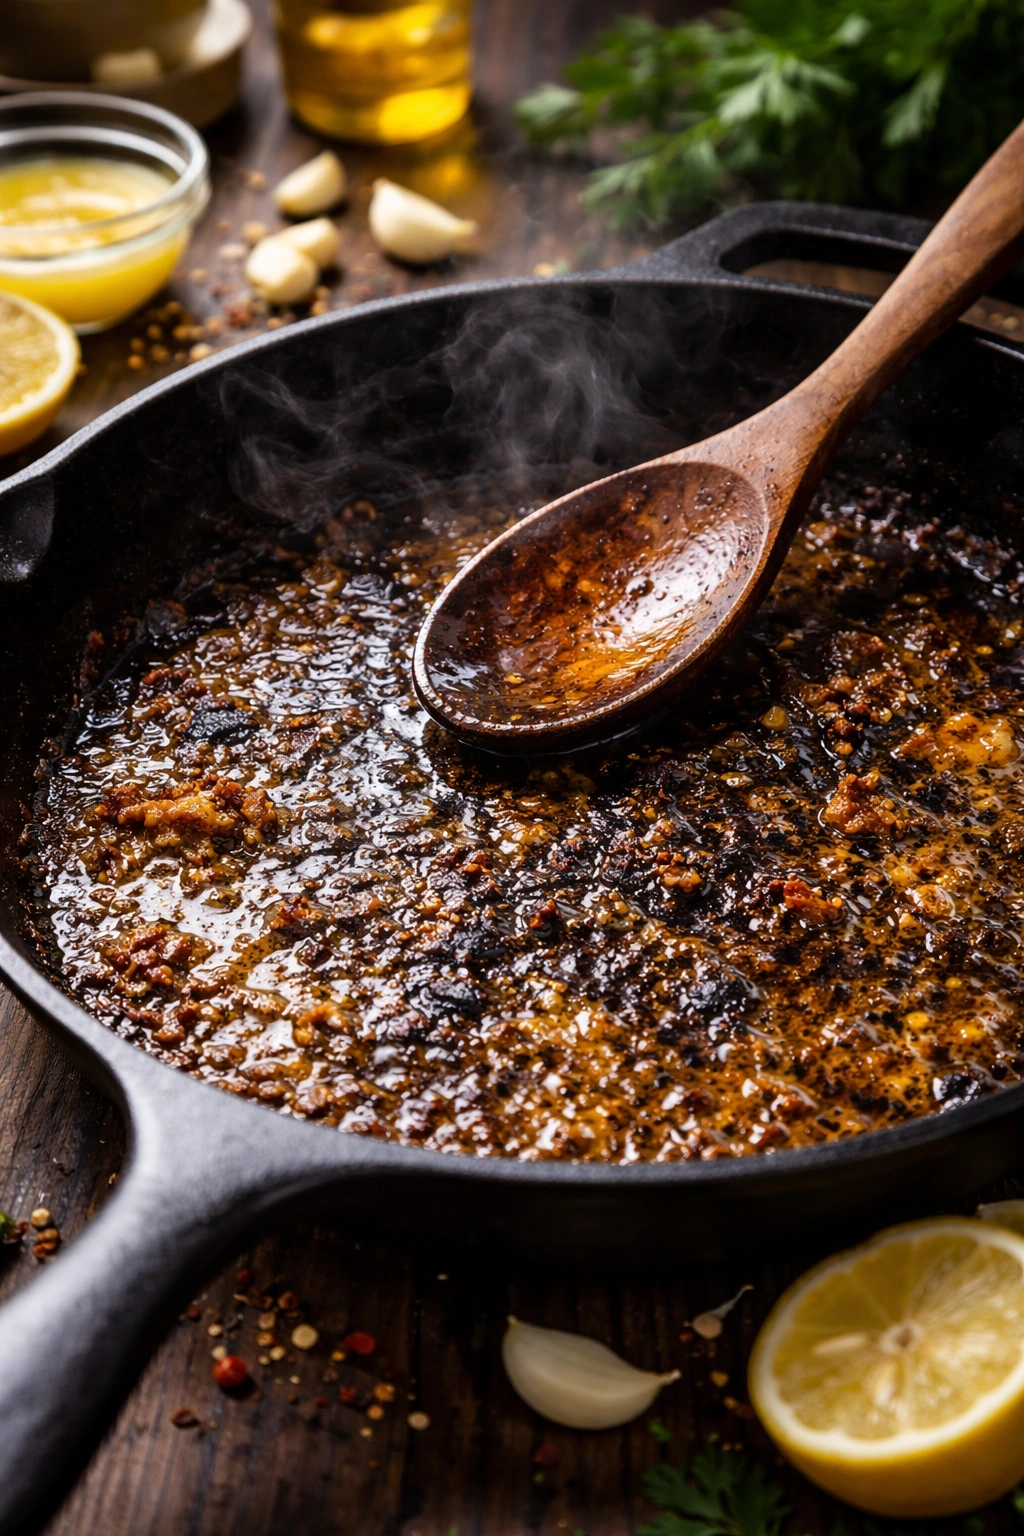
This step is where the magic happens—where a simple pan of browned bits becomes an actual sauce. Return the pan to medium heat. Carefully pour in the ¾ cup white wine. You might hear a sizzle; that’s normal. Using a wooden spoon or silicone spatula, scrape the bottom of the pan vigorously, dissolving all those browned, caramelized bits. This fond is pure flavor, and you’re dissolving it into your sauce.
Let the wine simmer, uncovered, for about 5 to 6 minutes. You’re looking for it to reduce by roughly three-quarters, so if you started with ¾ cup, you should end up with about 3 tablespoons of liquid. The surface will go from very bubbling and aggressive to a quieter, slower bubble. The wine will smell less harsh, less overtly alcoholic. This is what you’re waiting for—the alcohol has burned off, and what’s left is concentrated wine flavor.
You can tell the reduction is done when a wooden spoon dragged across the bottom of the pan leaves a clear trail that takes a moment to fill back in. Smell it—it should smell complex and appealing, not sharp and vinegary.
Building the Lemon Garlic Butter Sauce: The Final Assembly
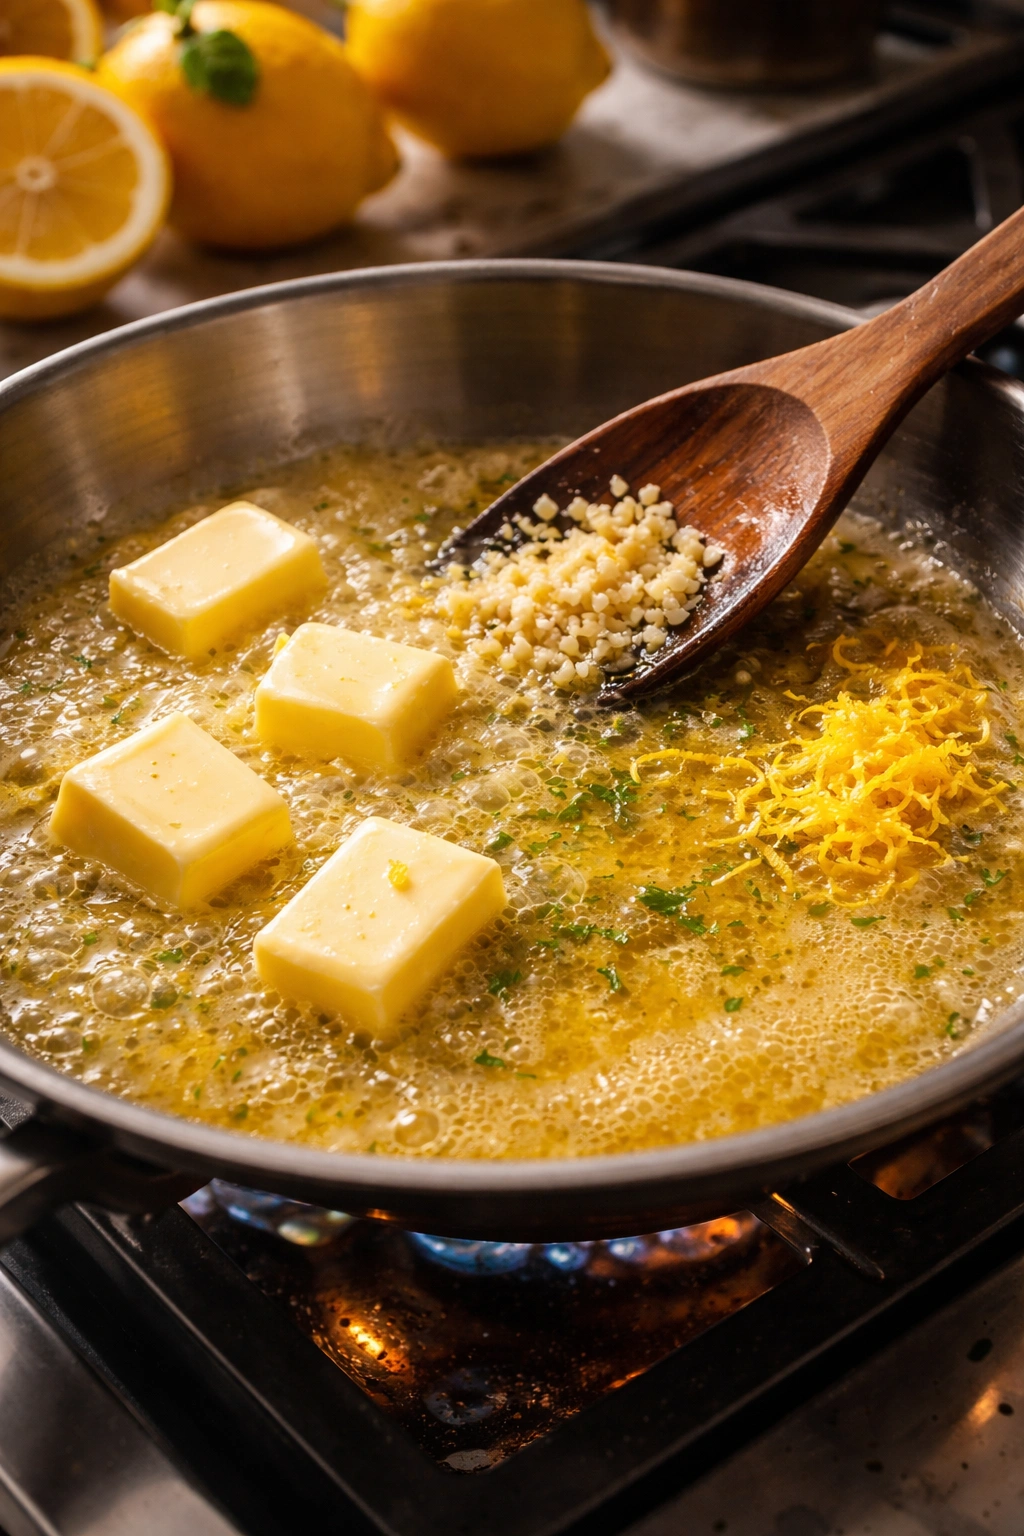
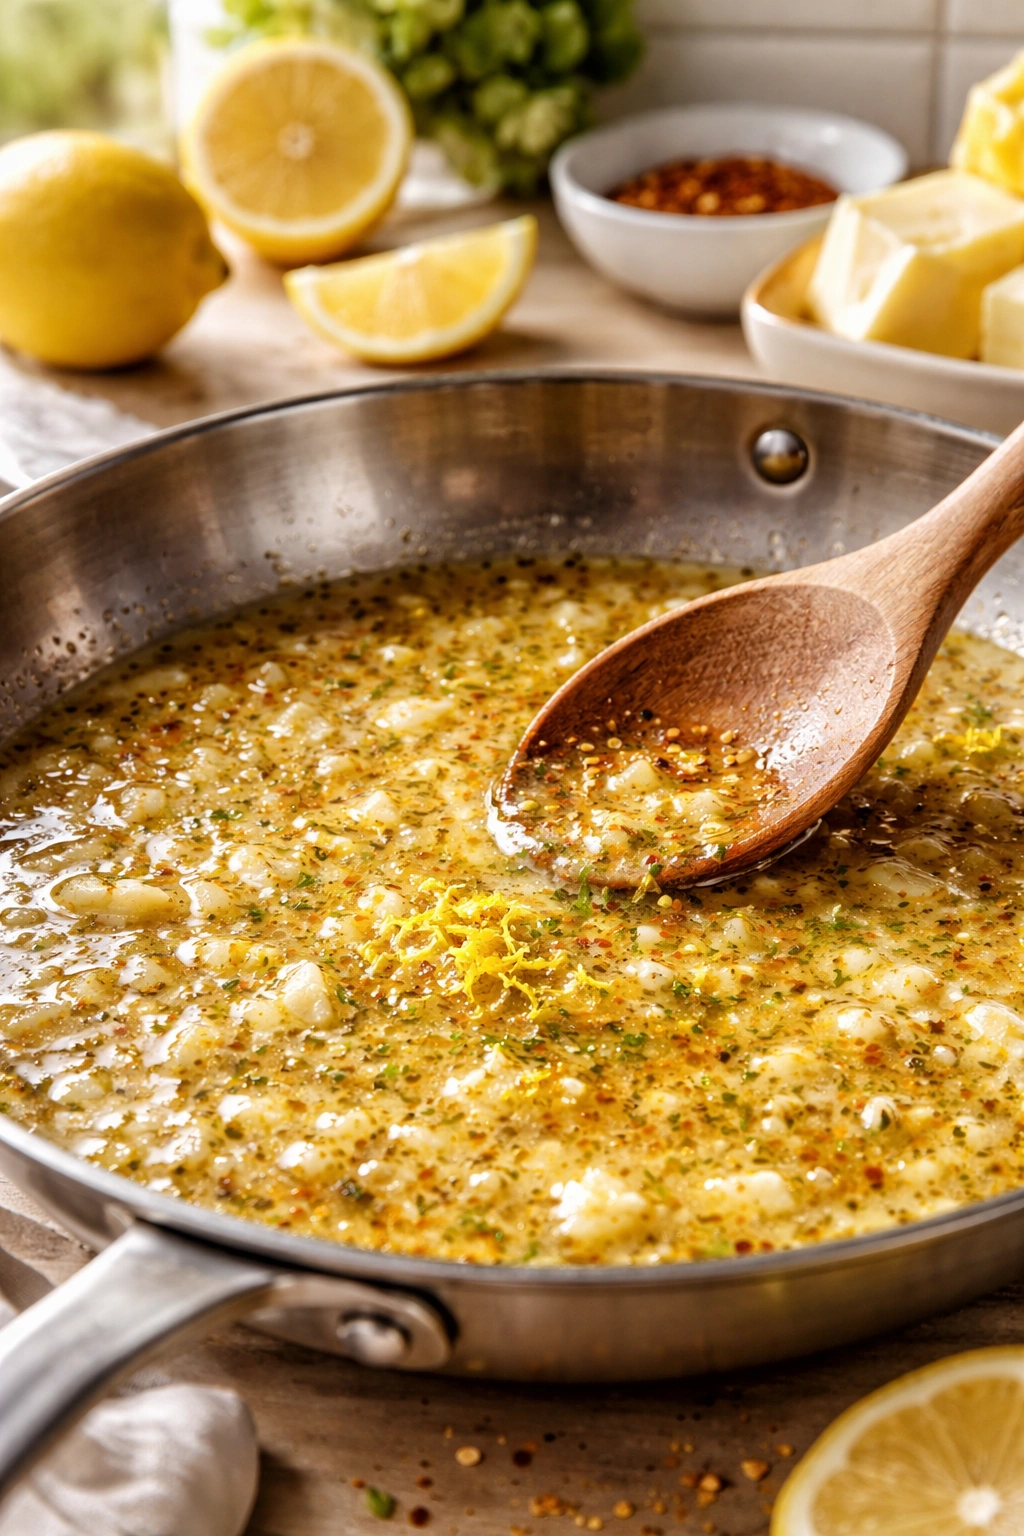
Once your wine is properly reduced, lower the heat to medium-low. This is important because you don’t want things to boil aggressively anymore. Add the 3 tablespoons of butter to the pan in a couple of pieces, stirring gently until fully melted and incorporated. The butter will make the sauce silkier and more voluminous.
Once the butter is melted, add the minced garlic. Stir constantly and let it cook for 30 seconds to 1 minute—just long enough that it becomes fragrant. You’re looking for the smell of cooked, sweet garlic, not raw garlic bite. Be vigilant here: garlic can go from fragrant to burned very quickly at higher heat. If you smell anything approaching burned or bitter, remove the pan from heat immediately.
Now take the pan completely off the heat. This is the moment where you add your lemon juice and zest. By doing it off heat, you preserve the bright, fresh lemon aroma that would cook away if exposed to direct heat. Stir in the lemon juice and zest thoroughly. Taste the sauce and season with the ⅛ to ¼ teaspoon red pepper flakes if using, plus the salt and pepper. Remember that you’ll be combining this with pasta and chicken, both of which will absorb and dilute some of the sauce’s intensity, so taste critically here.
The sauce at this point should taste balanced—you shouldn’t taste raw wine, overwhelmingly tart lemon, or greasy butter. It should taste like all those elements have married into something greater than themselves. If it’s too acidic, a tiny pinch more salt helps. If it’s too buttery, a squeeze more lemon helps. If it tastes thin or one-dimensional, you didn’t reduce the wine enough (this is usually the culprit), so you can put the pan back on medium heat and reduce for another minute or two.
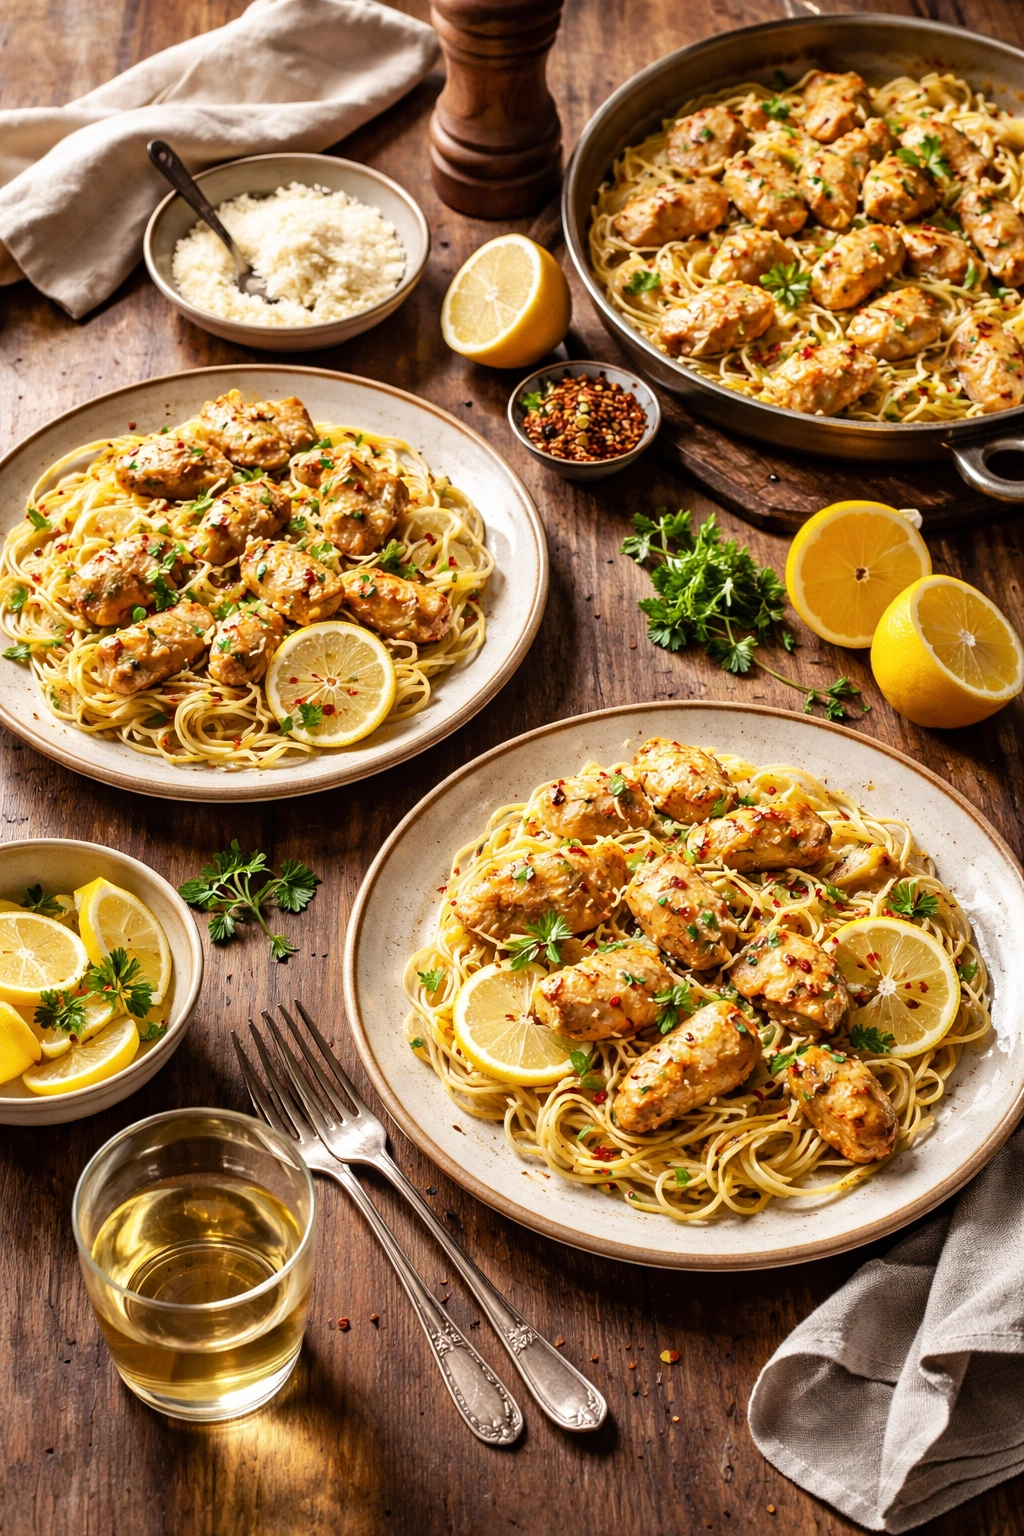
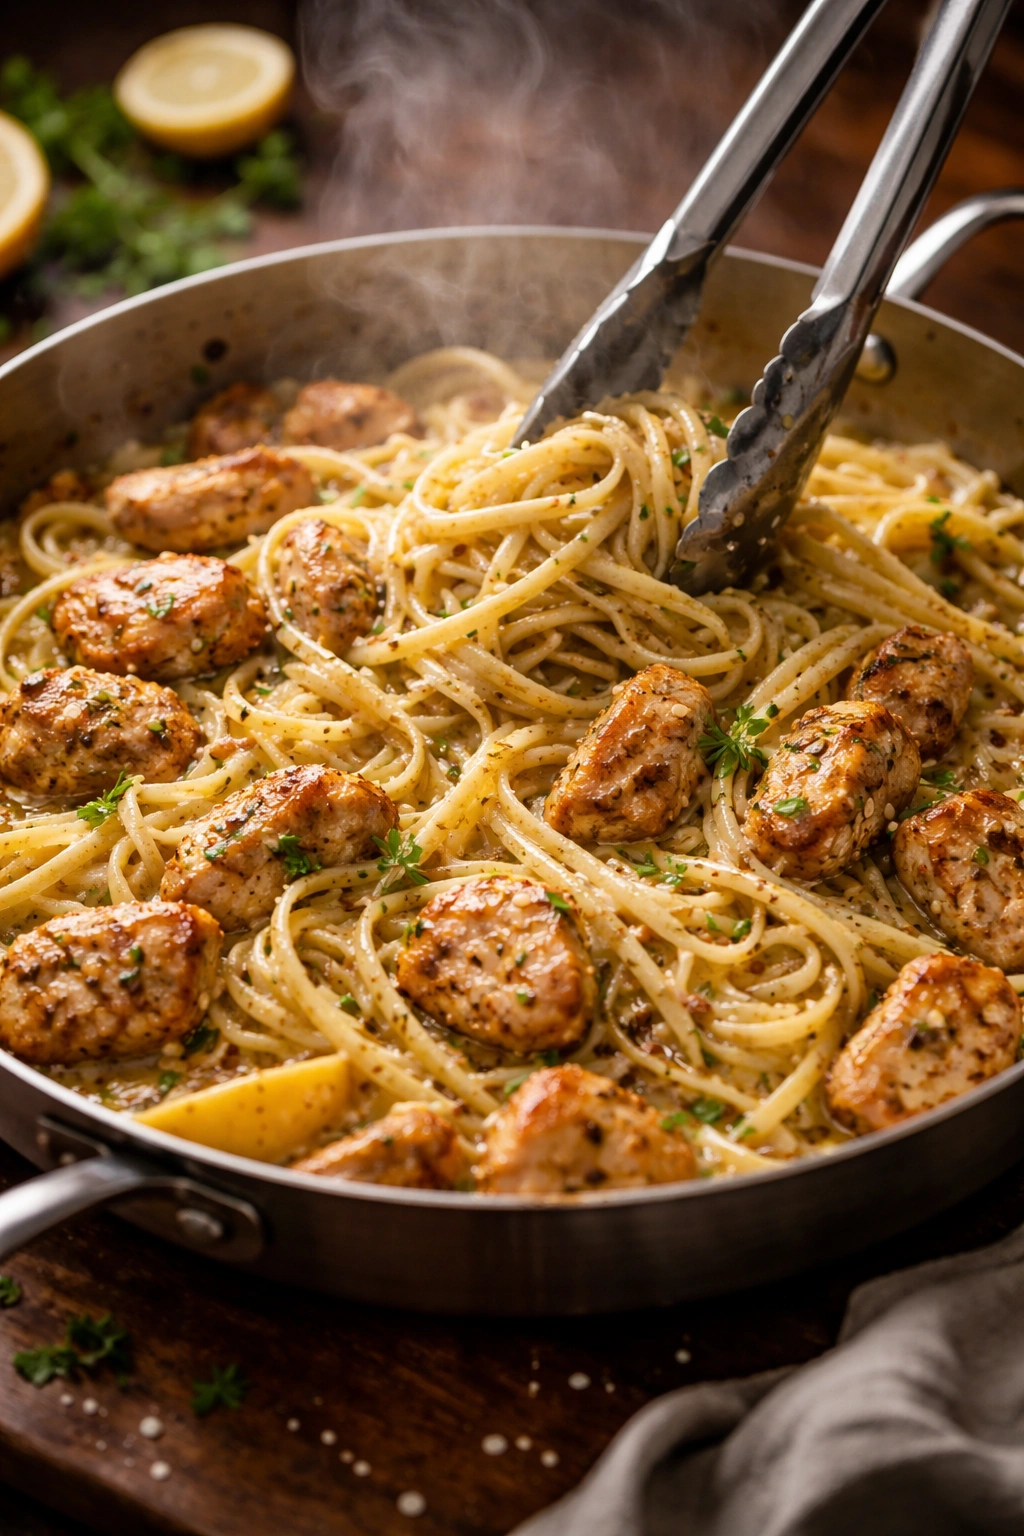
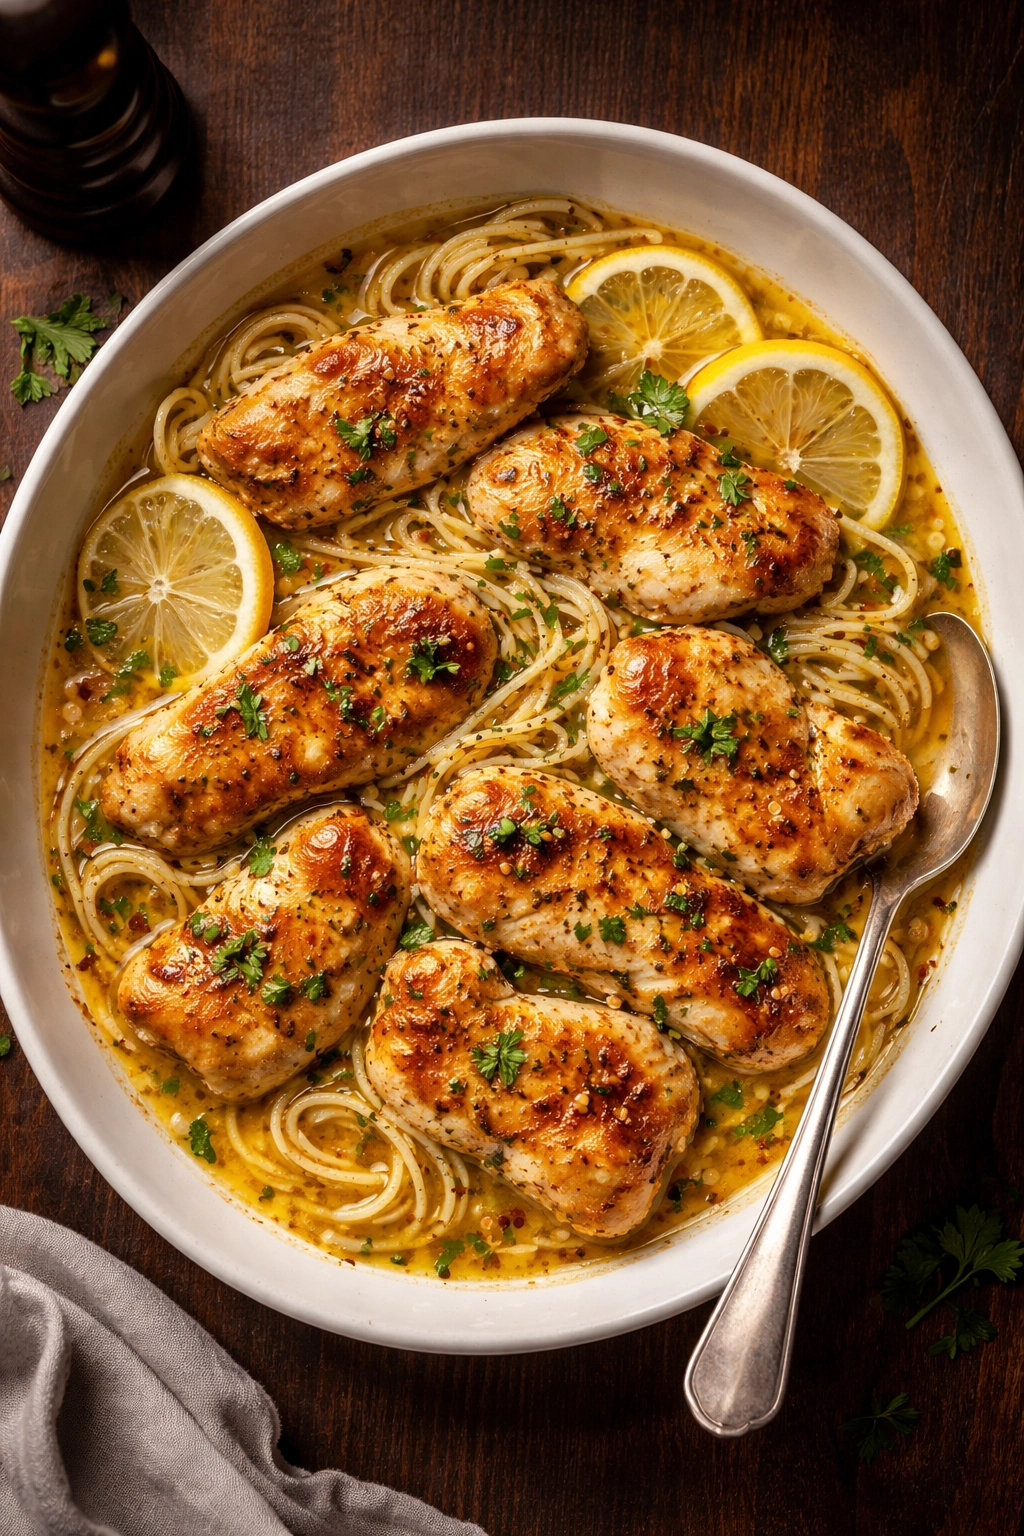
Combining Everything: Bringing the Dish Together
Start the pasta now if you haven’t already. In a large pot of salted boiling water, add your pasta and cook until just al dente—this usually takes 8 to 12 minutes depending on your pasta type. Don’t overcook it; remember it will continue cooking slightly when you combine it with the hot sauce. Reserve about ½ cup of the pasta water before draining. This starchy water is invaluable for adjusting sauce consistency.
While the pasta cooks, return your seared chicken to the pan with the sauce. Don’t put the pan on heat; just let the residual warmth warm the chicken through. Stir gently to coat each piece in the sauce. The chicken is already cooked, and you’re just warming it and getting it coated.
Drain your pasta and add it directly to the pan with the chicken and sauce. Using tongs or a pasta fork, toss everything together gently but thoroughly. The heat from the pasta will warm the sauce slightly, and it will begin to cling to the pasta strands. At this point, add the cold butter pieces to the sauce. As you toss, the cold butter will emulsify into the hot sauce, creating that signature silky, glossy finish. This technique is called monter au beurre.
If the dish looks dry or the sauce doesn’t coat the pasta well, add some of that reserved pasta water a few tablespoons at a time, tossing as you go. The sauce should be luscious and coat every strand without pooling at the bottom of the pan. You’re looking for balance—a dish that’s saucy enough to be luxurious but not so wet that it’s a soup.
Taste and adjust seasoning one final time. Add fresh parsley, toss gently, and transfer to a serving bowl or individual plates.
Pro Tips That Make the Difference Between Good and Exceptional
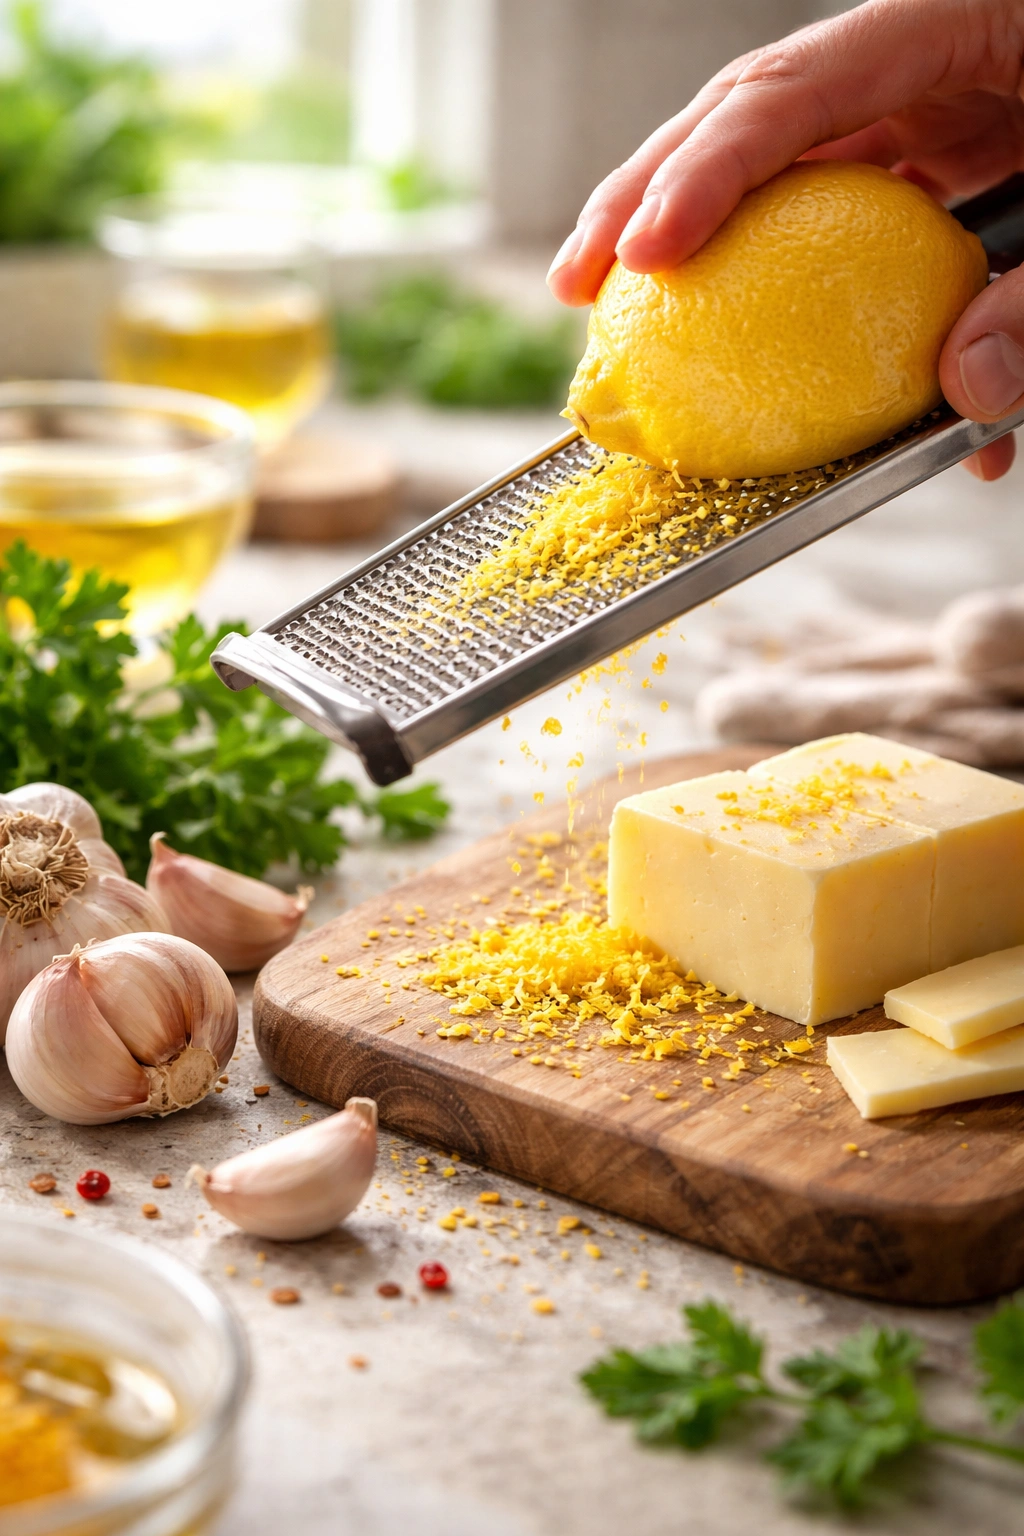
Use whole pieces of garlic zest, not the pre-packaged stuff. Fresh lemon zest has so much more aroma and flavor than anything bottled. Zest your lemon with a microplane grater—you want fine, wispy pieces, not big chunks.
Bring all your ingredients to room temperature before cooking if they’ve been refrigerated. Room temperature ingredients cook more evenly and predictably than cold ones. This is especially true for chicken.
Don’t skip the deglazing step. That fond stuck to the bottom of the pan is pure, concentrated flavor. Scraping it up and dissolving it into your sauce is what separates a thin, boring sauce from one that tastes deeply developed. Some cooks even add a splash of wine or broth to an empty pan just to deglaze it thoroughly.
Taste throughout the cooking process. Your palate is the best guide. If you taste the reduced wine before adding lemon and it seems too harsh, that’s normal—the lemon will balance it. If after adding everything it seems unbalanced, small adjustments matter. A tiny pinch of salt can brighten everything. Another squeeze of lemon can cut through richness. Trust your taste buds.
The quality of your butter truly matters here. Good butter has a different flavor profile than commercial butter—it’s creamier, more complex, sometimes with a slight sweetness. The difference is noticeable in a dish like this where butter is a star ingredient. Kerrygold (with its higher butterfat and golden color from grass-fed cows) or European-style butters genuinely elevate this dish.
Invest in fresh pasta water. So many people drain their pasta and throw away that starchy water, then struggle to get their sauce the right consistency. That water is liquid gold—it has starch that helps emulsify the sauce and gives it body. It’s your secret weapon for achieving that restaurant-quality texture.
Common Mistakes to Avoid on Your First (and Every) Time
Overcrowding the pan when searing the chicken. This is the number one issue. Chicken that’s piled on top of itself steams instead of sears, and you end up with pale, flabby chicken instead of golden, caramelized chicken. Even if it takes an extra 5 minutes to work in two batches, it’s worth it.
Not reducing the wine enough. If your sauce tastes harsh or one-dimensional, it’s usually because the wine didn’t reduce sufficiently. Three-quarters reduction is the target—this takes time, usually 5-7 minutes. Impatience here results in a sauce that tastes raw and alcoholic. Patience pays off.
Adding lemon juice while the pan is still on heat. This cooks away the bright, fresh notes and leaves you with cooked, muted lemon flavor. Off-heat is non-negotiable.
Using pre-minced garlic from a jar. It’s convenient, but it lacks the bright pungency of fresh garlic and often tastes vaguely metallic. Fresh garlic takes 30 seconds to mince, and the difference is remarkable.
Skipping the Parmesan or using pre-grated. Pre-grated cheese has anti-caking agents that make it grainy and prevent it from melting smoothly into a sauce. Real Parmesan, freshly grated, adds a sharp, salty flavor that completes the dish. Don’t skip this.
Cooking the pasta too far ahead. Pasta is best served immediately after cooking. If you cook it too early and it sits, it continues to absorb water and becomes mushy. Time your pasta cooking so it finishes just as you’re finishing the sauce.
Adding the cold butter off-heat. Many recipes have you add cold butter to a hot pan on the stove. This melts it quickly but doesn’t emulsify it properly. Adding cold butter to warm (but not actively hot) sauce off the heat, while tossing vigorously, creates that signature silky emulsified finish.
Variations That Keep This Dish Fresh
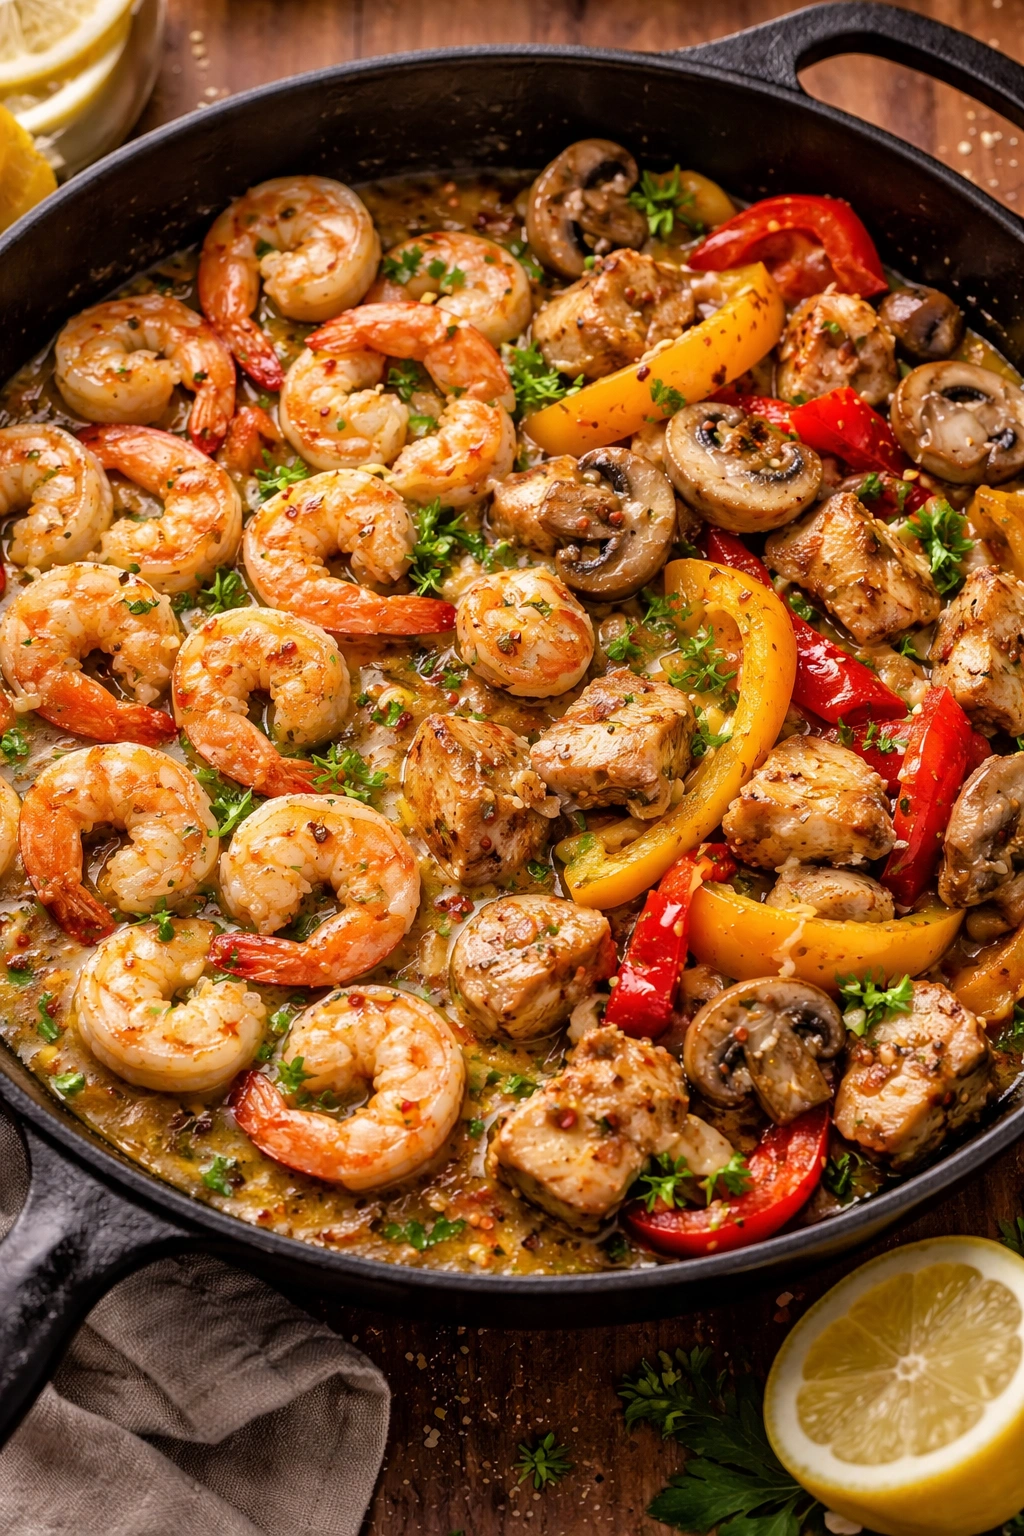
The Shrimp Version. Substitute 1½ pounds of large shrimp (21-30 count), peeled and deveined, for the chicken. Reduce cooking time to 2-3 minutes per side when searing—shrimp cook much faster than chicken. The sauce and pasta preparation stays exactly the same. This is how the dish originated, and it’s equally delicious.
Adding Vegetables for More Body. Slice red or yellow bell peppers and sauté them in a separate small skillet while the chicken sears. You can also add sliced mushrooms, diced fresh tomatoes, or even a handful of fresh spinach right at the end. These vegetables add nutrition, color, and textural variety without compromising the sauce.
A Touch of Cream. If you prefer a richer, less bright dish, substitute 2-3 tablespoons of heavy cream for an equal amount of the lemon juice. This makes the sauce more luxurious and less acidic—perfect if you’re serving to people who find dishes with high acidity unappealing.
Red Pepper Flakes and Heat. If you love heat, don’t be shy with the red pepper flakes. Start with ¼ teaspoon and taste, then add more. Some people go up to ½ teaspoon. The warmth complements the bright lemon beautifully.
Herb Variations. While parsley is classic, fresh basil added right at the end brings a different character (slightly sweet, aromatic). Fresh thyme or oregano added during the sauce-building adds earthiness. You can also keep parsley but add a small amount of fresh tarragon for a more sophisticated, delicate flavor.
Skip the Pasta Entirely. Serve this over creamy polenta, buttered rice, mashed potatoes, or even wilted greens. The sauce is so flavorful that it pairs with almost any neutral starch. Some people serve it over Caulipower or zucchini noodles for a lower-carb version.
Add Capers or Olives. A tablespoon or two of rinsed capers or chopped Castelvetrano olives (the green ones—they’re milder and less intensely salty) added to the sauce bring a briny, complex note that feels more sophisticated.
Storage, Reheating, and Make-Ahead Strategies
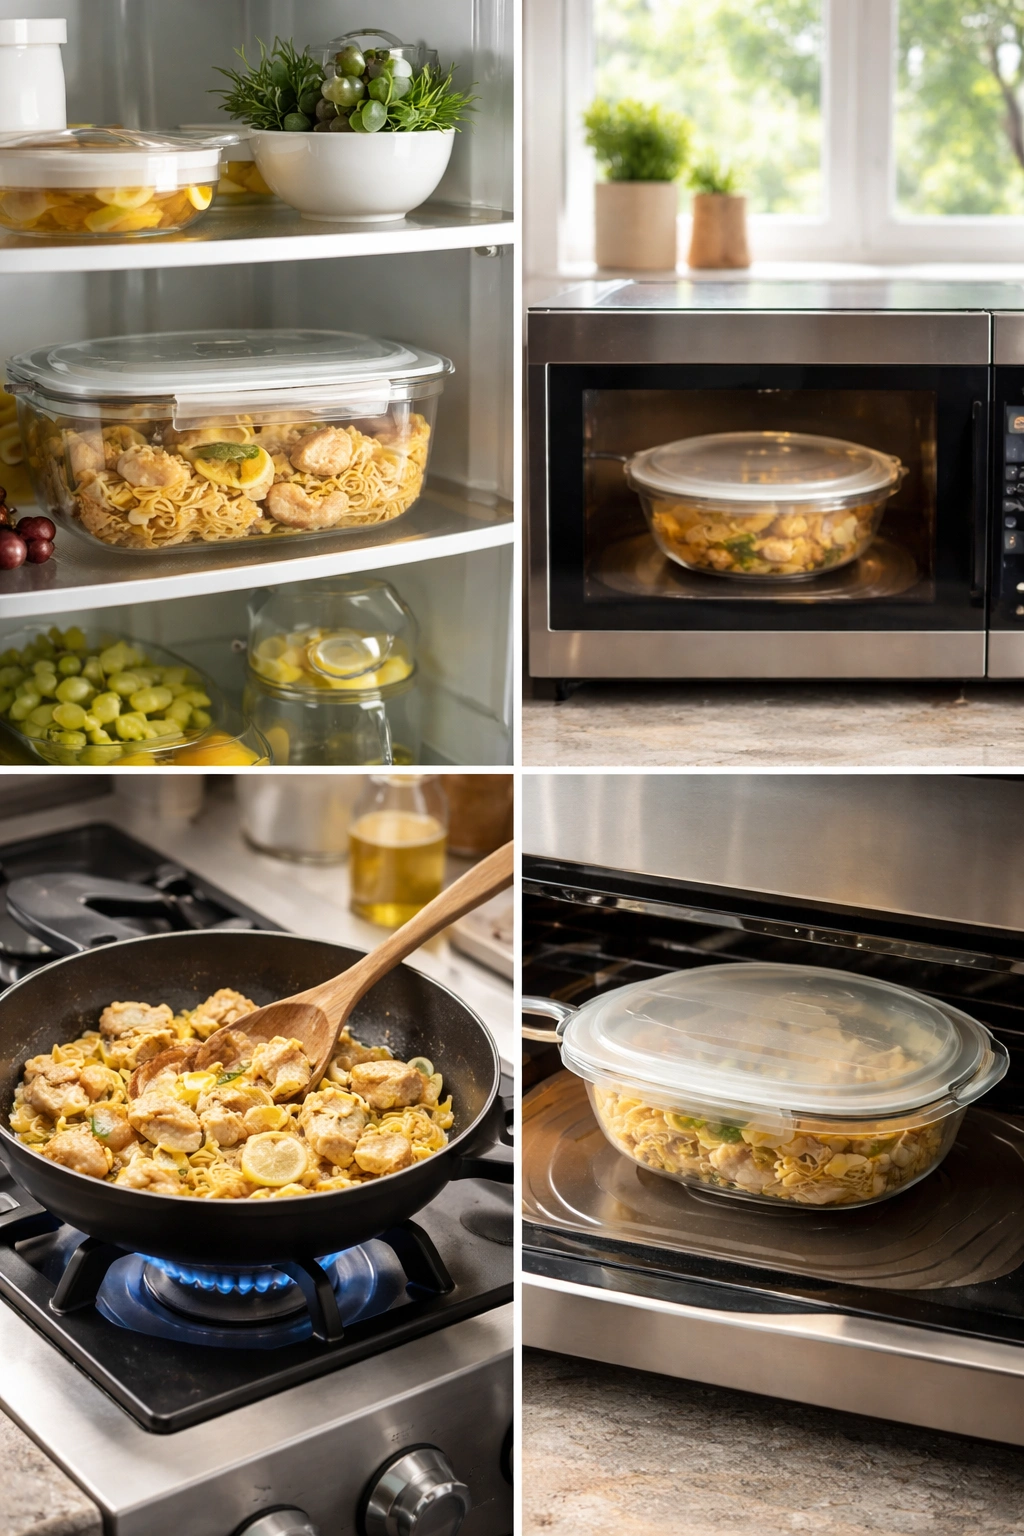
In the Refrigerator. Store leftover chicken scampi in an airtight container for up to 3 days. Keep the pasta and chicken together with the sauce; they’re much better stored that way than separately.
Reheating for Best Results. The best way to reheat is gently on the stovetop. Place the chicken and pasta in a large skillet over medium-low heat, stirring occasionally, for 3-5 minutes until warmed through. If it looks dry, add a splash of water or broth and a small piece of butter to restore the sauce’s silkiness. Never use high heat or you’ll break the emulsion and end up with greasy, separated sauce.
Microwave Reheating. If you must use a microwave, transfer to a microwave-safe bowl, cover loosely with a damp paper towel, and heat in 30-second intervals, stirring between intervals, until warm. The result won’t be quite as silky, but it’s acceptable.
Freezing. This dish freezes reasonably well for up to 2 months. Let it cool to room temperature first, then transfer to a freezer bag or freezer-safe container. Thaw overnight in the refrigerator before reheating on the stovetop using the method above. The pasta’s texture will be slightly softer after freezing, but the flavor remains good.
Make-Ahead Components. You can prepare components in advance to make the final assembly quicker. Cut and dry your chicken up to 4 hours ahead and keep it refrigerated. Mince your garlic and zest and juice your lemons up to 1 hour ahead. You can even sear the chicken several hours ahead, then reheat it gently when you’re ready to make the sauce. The sauce itself should be made fresh, but if you absolutely must, you can make it a few hours ahead and keep it covered at room temperature, then gently reheat on the stove before combining with pasta.
Serving Suggestions and Perfect Pairings
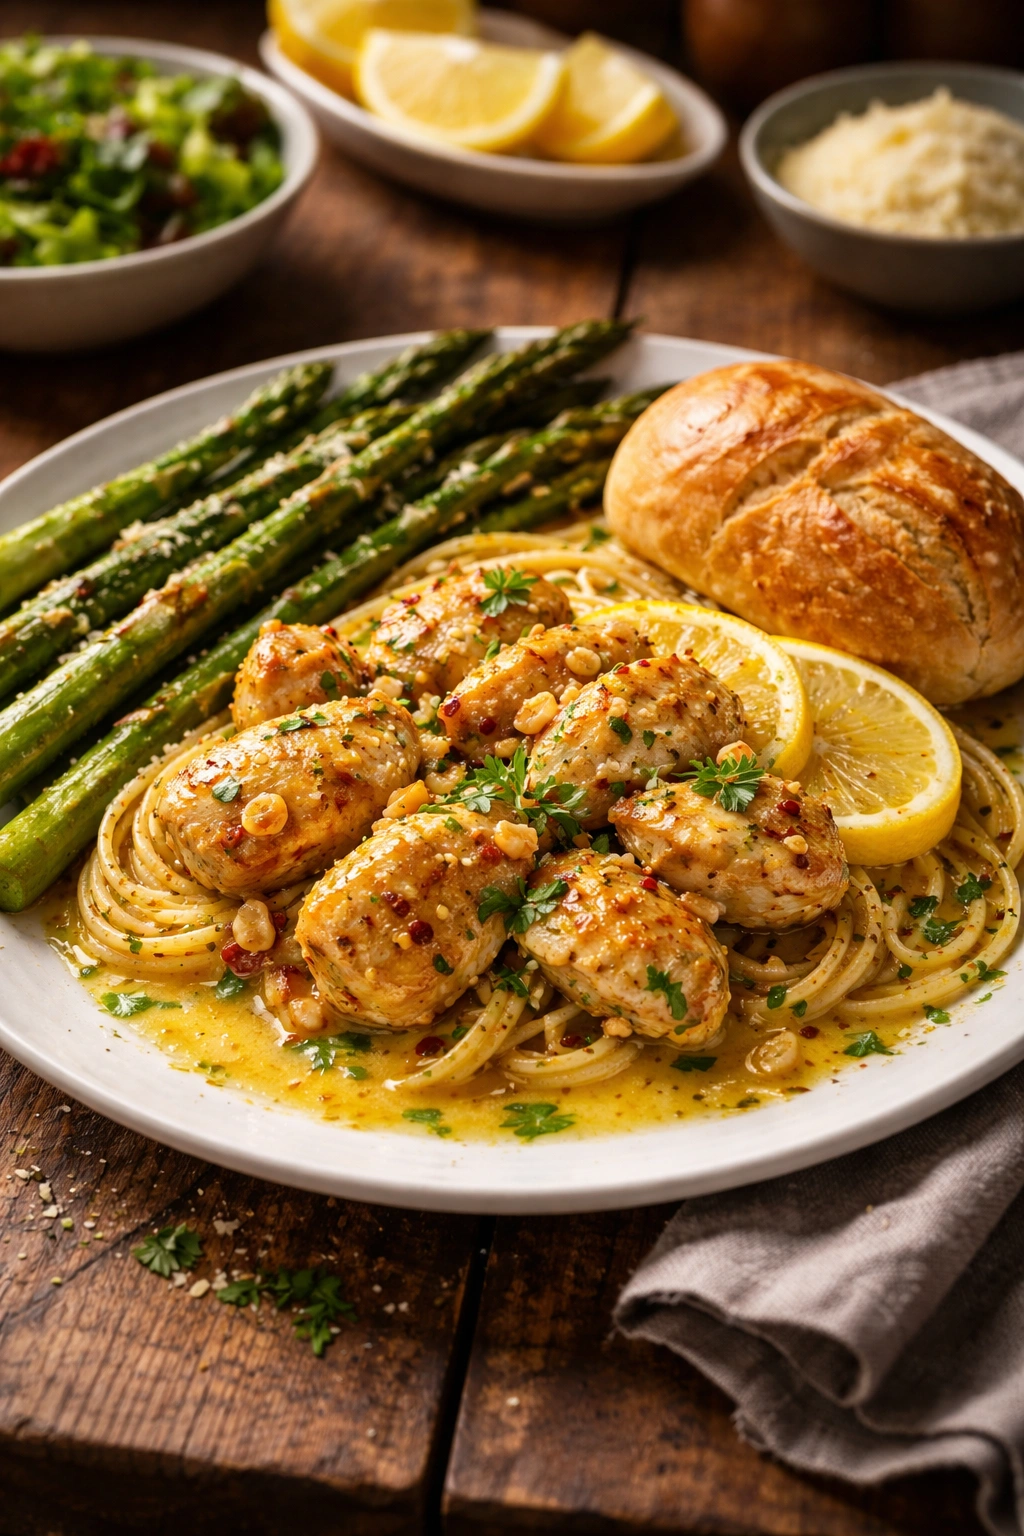
This dish is luxurious and satisfying enough to be the main event, but it benefits from thoughtful sides that complement rather than compete with its bright, buttery richness.
Vegetable Sides. Roasted asparagus with nothing but olive oil and salt is the classic pairing—the slight bitterness provides balance. Sautéed or roasted broccoli, garlicky green beans, or a simple spinach wilted in olive oil all work beautifully. You might also serve a bright Caesar salad with crisp romaine, anchovy dressing, and just a whisper of garlic—the anchovy provides that umami depth that echoes the savory sauce.
Fresh Salads. An arugula salad with a light lemon vinaigrette, shaved Parmesan, and perhaps some toasted pine nuts provides textural contrast and herbaceous freshness. A simple tomato and cucumber salad with fresh basil and a red wine vinaigrette offers brightness without heaviness.
Bread. This is essential. You want something crusty to capture every drop of that luscious sauce. A warmed ciabatta, a slice of focaccia, or even garlic bread (though that risks being redundant with the garlic already in the dish) all work. Some people tear bread into pieces and toss it right into the pasta—I’m not opposed to this approach.
Wine Pairing. Pair with the same white wine you used in the sauce, or a similar dry white. Pinot Grigio, Sauvignon Blanc, Pinot Gris, and Vermentino are all excellent choices. The wine’s acidity and the dish’s richness complement each other perfectly. If you prefer something slightly richer, a Chardonnay (unoaked or lightly oaked) works too.
Dessert Considerations. After a rich, buttery, garlicky main course, serve something light and refreshing. Lemon panna cotta, a simple fruit salad, sorbet, or even just fresh berries with a touch of whipped cream provide the right finishing note without heaviness.
Final Thoughts
The beauty of chicken scampi in lemon garlic butter lies in its apparent simplicity masking genuine technique. Each element—the sear, the wine reduction, the emulsified butter sauce, the final lemon brightness, the fresh pasta—matters individually. But together, when executed with attention and care, they create something that tastes far more sophisticated than the ingredient list suggests. This is a dish that will impress dinner guests but won’t trap you in the kitchen for hours. It’s elegant without being pretentious, rich without being heavy, and luxurious in a way that feels attainable. Once you’ve made it a few times, you’ll understand why scampi has remained a staple of Italian-American cooking for decades. You’ll likely make it again, and each time, you’ll feel more confident in the technique. That’s when cooking becomes genuinely enjoyable.