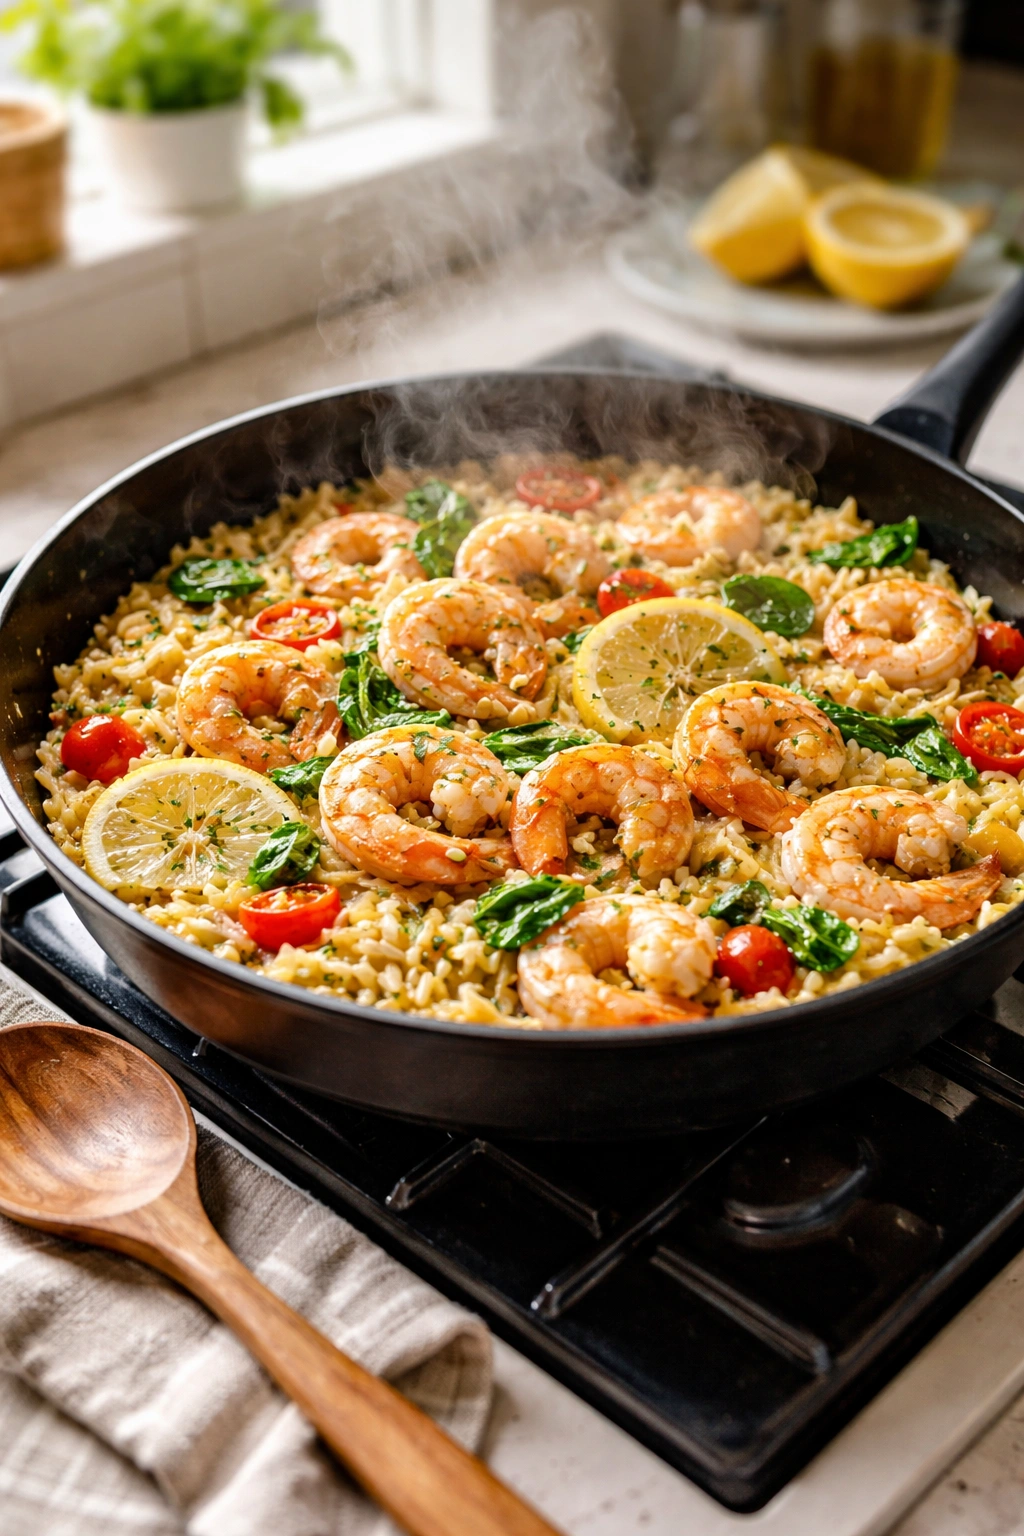
There’s something genuinely magical about the moment a simple weeknight dinner comes together—the kind that looks like you spent hours in the kitchen but somehow made it to the table in less time than it takes to order takeout. This one-pan lemon shrimp orzo is exactly that kind of meal. You’ll have succulent, buttery shrimp with tender orzo that’s absorbed all the bright citrus and savory broth flavors, finished with a whisper of lemon zest and Parmesan. The best part? It’s all cooked in a single skillet in about 20 minutes, which means one less pot to wash and a dinner that feels far more impressive than the minimal effort required.
What makes this dish so irresistible is the combination of speed and sophistication. The orzo cooks directly in the broth instead of boiling in a separate pot, which means it absorbs every ounce of flavor while creating its own creamy, risotto-adjacent sauce without any cream at all. The shrimp get seared until they’re just barely opaque, then added back in at the end so they stay tender and juicy rather than turning rubbery from overcooking. Fresh lemon brings the whole thing to life with brightness that cuts through the richness, while Parmesan and butter add a luxurious, almost velvety quality that makes you wonder why you don’t cook this more often.
This is the kind of meal that works perfectly for a Tuesday night when you’re exhausted, but also impressive enough to serve when you have guests and want them to think you’re far more organized than you actually are. It’s nourishing, with plenty of lean protein and vegetables, yet it doesn’t feel heavy or complicated. Once you understand the fundamental technique—toasting the orzo, simmering it in flavorful broth, and finishing with bright, fresh ingredients—you’ll find yourself making endless variations because the formula is so forgiving and adaptable.
What Makes This One-Pan Dinner So Appealing
The appeal of a true one-pan meal goes way beyond just saving on cleanup, though that’s certainly a welcome benefit. When everything cooks together in the same pot, the flavors meld and deepen in ways that separate cooking methods can never achieve. The starches from the orzo get released into the broth, creating a naturally creamy base that feels indulgent even though there’s no cream involved. The shrimp releases its own subtle flavors into the liquid, seasoning everything around it.
This particular dish has earned its place as a weeknight staple for good reason. Unlike many pasta dishes that rely on heavy cream or complicated techniques, this comes together through basic cooking fundamentals that anyone can master. You’re sautéing aromatics, toasting grains, simmering in liquid, and finishing with fresh ingredients—these are foundational skills that translate to countless other dishes. The timing is genuinely fast. By the time you’ve seared your shrimp, sautéed your garlic and onion, and toasted your orzo, you’re already several minutes in, and from there it’s really just a matter of letting the broth do its thing for about 10 minutes while you relax.
What home cooks consistently notice when they make this recipe is how the orzo absorbs whatever broth you give it, becoming incredibly creamy just from the starch it releases. The texture you get is completely different from traditional pasta that’s boiled and drained—it’s more luxurious, more integrated with all the other components, and more satisfying on the palate.
Why Orzo Is the Perfect Pasta Choice
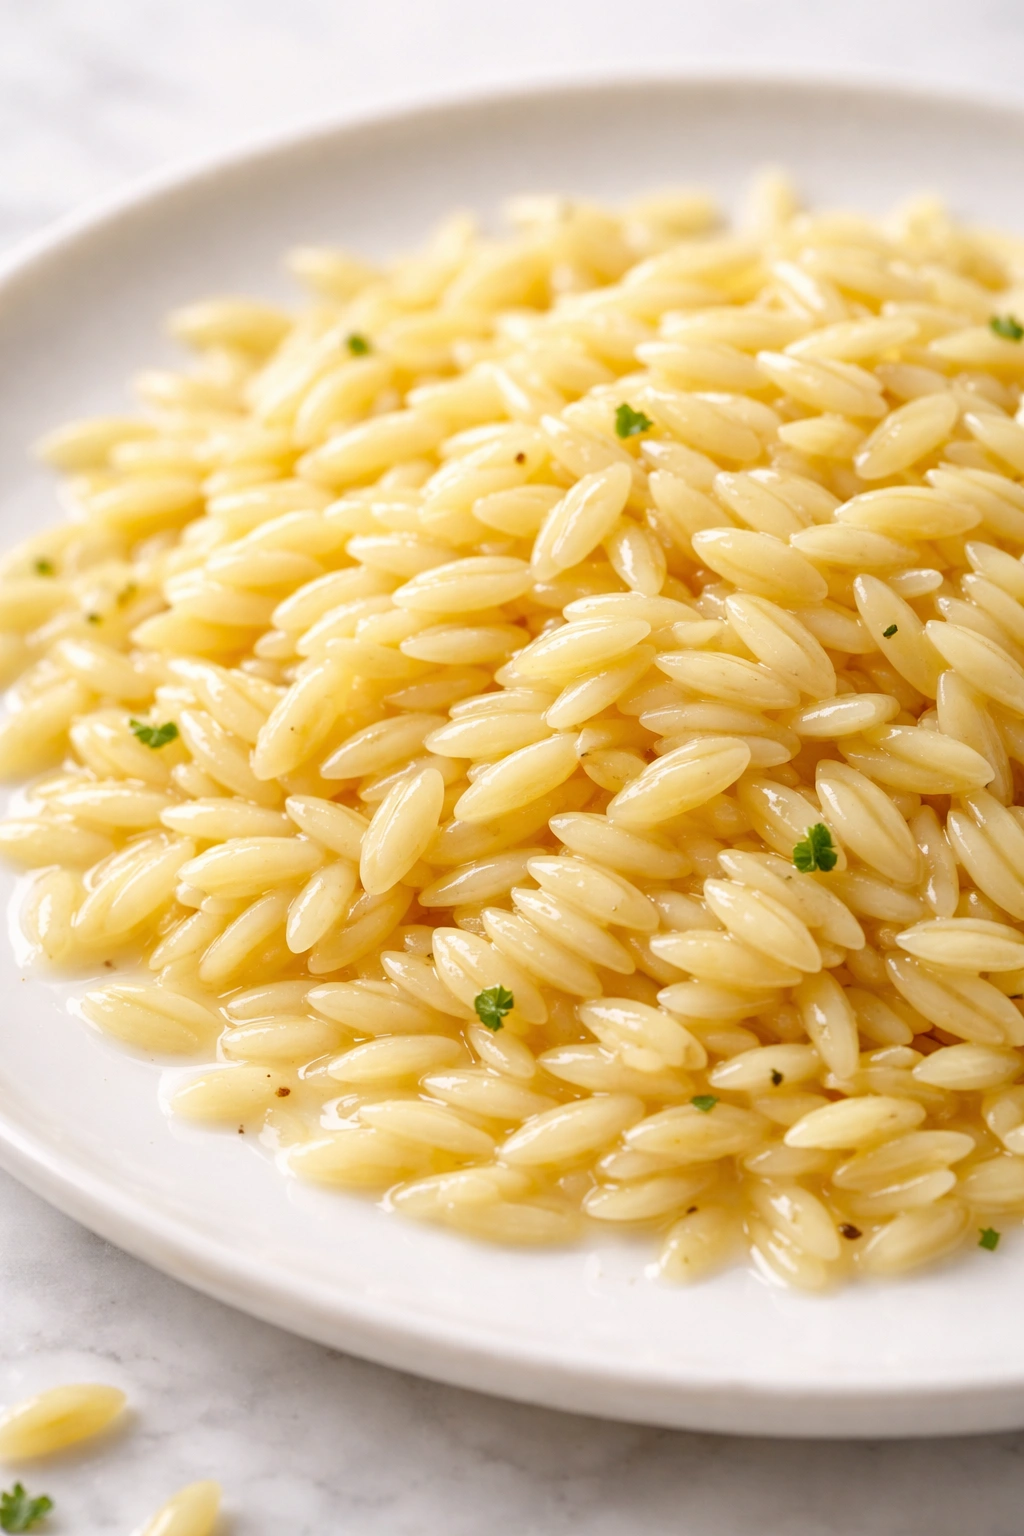
If you’ve never cooked with orzo before, you’re in for a pleasant surprise. Orzo is technically a pasta, not a grain, despite its uncanny resemblance to a grain of rice. It’s made from the same durum wheat flour as traditional pasta, which means it has a slightly higher protein content than rice and cooks in a fraction of the time that larger pasta shapes require. This speed is crucial when you’re aiming for a complete dinner in 20 minutes.
The shape itself is brilliantly practical. Because orzo pieces are small and relatively uniform, they cook evenly, which means no crunchy bits hidden among tender ones. They also absorb broth and sauce beautifully, and they stay on your fork without requiring the skill or attention that longer pastas demand. This is why orzo has become a favorite for both home cooks working on tight timelines and restaurants looking to create elegant, refined dishes quickly.
One often-overlooked advantage of orzo is that it creates creaminess naturally just by cooking in liquid. Unlike risotto, which requires constant stirring and a specific technique, orzo will become naturally creamy as you cook it in broth, especially if you stir it occasionally. The starch that leaches out into the cooking liquid emulsifies with the fat (from butter and olive oil) and creates a sauce that coats each tiny piece of pasta. This is why you don’t need cream to make this dish feel rich and luxurious.
The Magic of Cooking Orzo in Broth
The decision to cook your orzo directly in broth rather than boiling it separately in salted water is what elevates this from a merely functional dinner to something genuinely special. Many recipes go to the trouble of cooking pasta one way and proteins another way, then trying to combine them at the end. Here, everything becomes unified because the pasta is absorbing the same flavors that the shrimp and aromatics are creating.
This technique, sometimes called “risotto-style” cooking, relies on the principle that pasta absorbs whatever liquid surrounds it. When you use water, you get neutral-flavored pasta that depends entirely on sauce for its taste. When you use broth—especially good-quality broth with real depth—the pasta itself becomes flavorful from the inside out. You’re not just coating the surface with sauce; you’re infusing every grain of pasta with savory, herbal, garlicky notes.
The ratio of broth to orzo matters. You’ll want about 2.5 to 3 cups of broth for every cup of uncooked orzo. The orzo will absorb most of this liquid during cooking, so you’re aiming for a finished texture where the pasta is tender and the sauce is creamy but not soupy. This is why stirring occasionally during the simmering phase is important—it helps prevent sticking and encourages more even cooking and creaminess.
The type of broth you choose will directly impact the final flavor of your dish. Chicken broth is the most versatile option and adds a subtle savory depth without overpowering the fresh lemon and shrimp. Vegetable broth works beautifully if you prefer a lighter flavor or have dietary preferences. Avoid beef broth, which would be too heavy and compete with the delicate shrimp. If you only have water available, the dish will still work, but the orzo will have much less inherent flavor, so you’ll need to be more generous with salt and other seasonings.
Essential Ingredients for Maximum Flavor
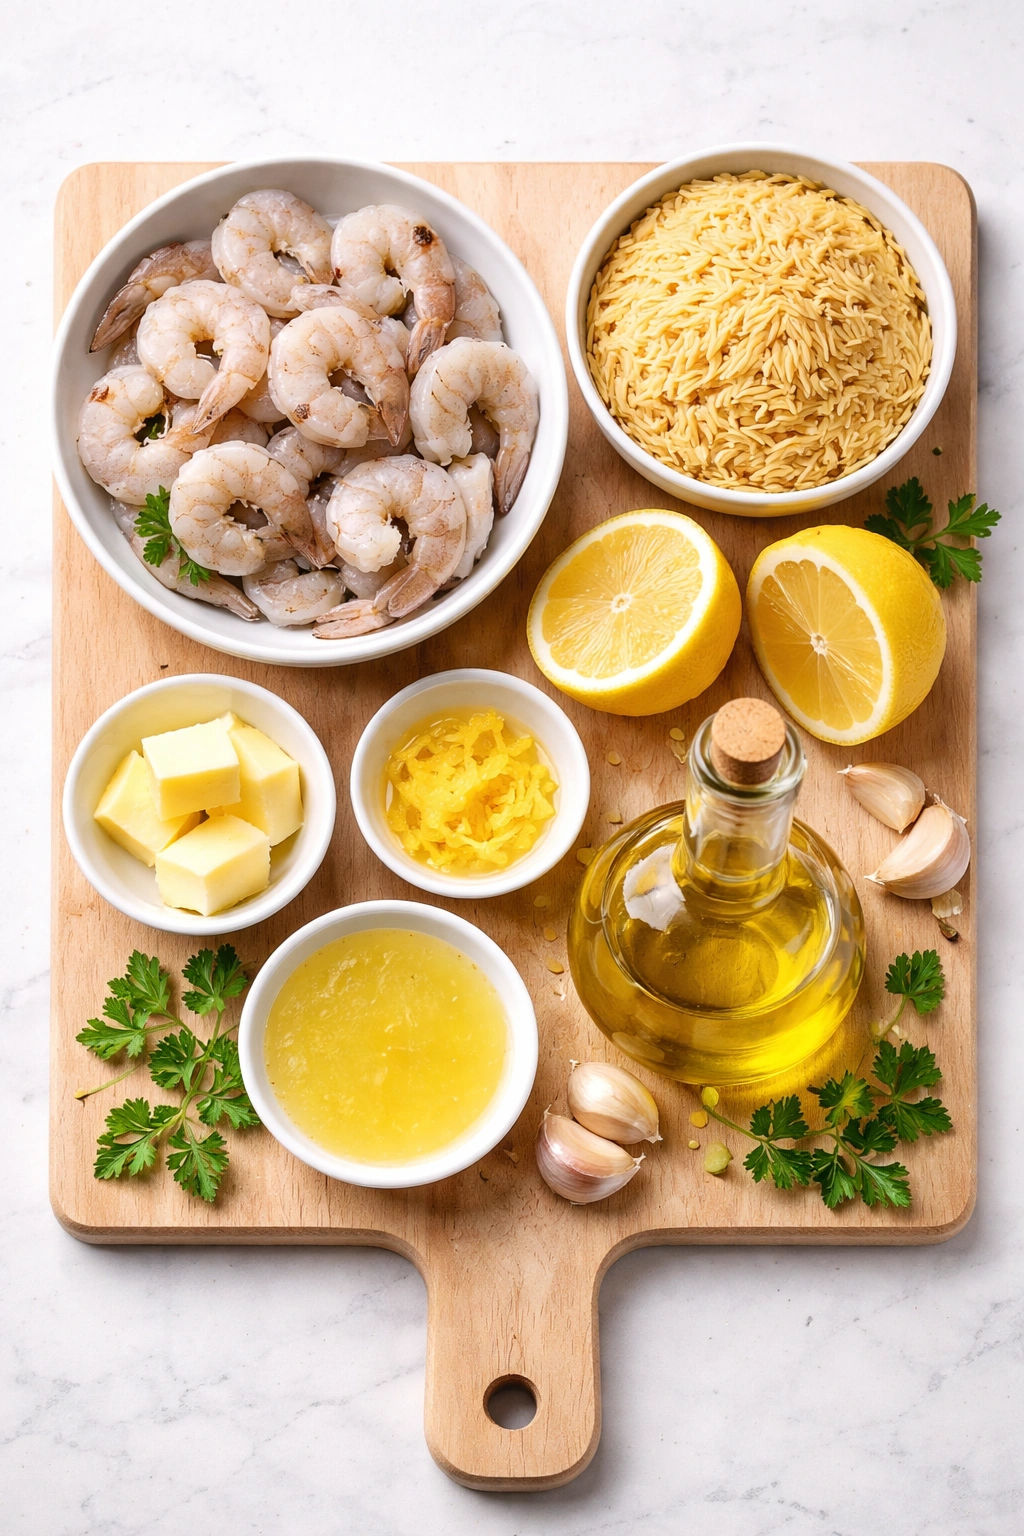
The ingredient list for this dish is refreshingly short, which is one of the reasons it comes together so quickly. You don’t need exotic items or specialty products to make something that tastes restaurant-quality. However, the quality of what you do buy matters considerably.
Shrimp is obviously central to this dish. You want raw shrimp that are already peeled and deveined to save time. The size matters: large shrimp (about 20-30 per pound) or even jumbo shrimp (16-20 per pound) work best here. Smaller shrimp cook so quickly that they can go from perfect to rubbery in the time it takes you to look away. If you’re using frozen shrimp, thaw them completely and pat them dry with paper towels before seasoning. Wet shrimp will steam rather than sear, and you’ll miss out on the flavorful crust that comes from a proper high-heat sear.
Orzo pasta should be regular pasta, not whole wheat (unless you specifically want the nuttier flavor), and definitely not the flavored varieties. Stick to plain orzo so you have a neutral canvas for all the other flavors you’re building.
Butter and olive oil work together in this recipe. Butter adds richness and helps create that luxurious sauce, while olive oil has a higher smoke point and prevents the butter from burning during the initial sear. Extra virgin olive oil is nice for finishing touches, but you can use regular olive oil for cooking.
Garlic and onion form the aromatic base. Don’t skip these even if you’re not a huge fan of onions—they cook down completely and just add savory depth. Garlic should be fresh and minced by hand if possible; pre-minced garlic from a jar can have a slightly off flavor. Shallots can substitute for onion if you prefer their more delicate sweetness, though regular yellow onion works perfectly well.
Lemon should be fresh and ideally organic if you’re going to be using the zest. That bright citrus is what transforms this from a simple pasta dish into something that feels fresh and alive on the palate. You need both the zest and the juice, so plan on having at least one large lemon available.
Parmesan cheese makes a real difference when it’s freshly grated. Pre-shredded Parmesan has anti-caking agents that prevent it from melting smoothly, so it won’t create that creamy sauce you’re after. Spend the 30 seconds to grate it fresh from a block, and you’ll notice the difference immediately.
Chicken or vegetable broth should ideally be low-sodium so you can control the saltiness of your finished dish. Many broths are quite salty already, and you can always add more salt, but you can’t remove it. Good broth with real flavor makes this dish taste homemade and sophisticated, while weak broth results in a final dish that tastes thin and one-dimensional.
How to Choose and Prepare Your Shrimp
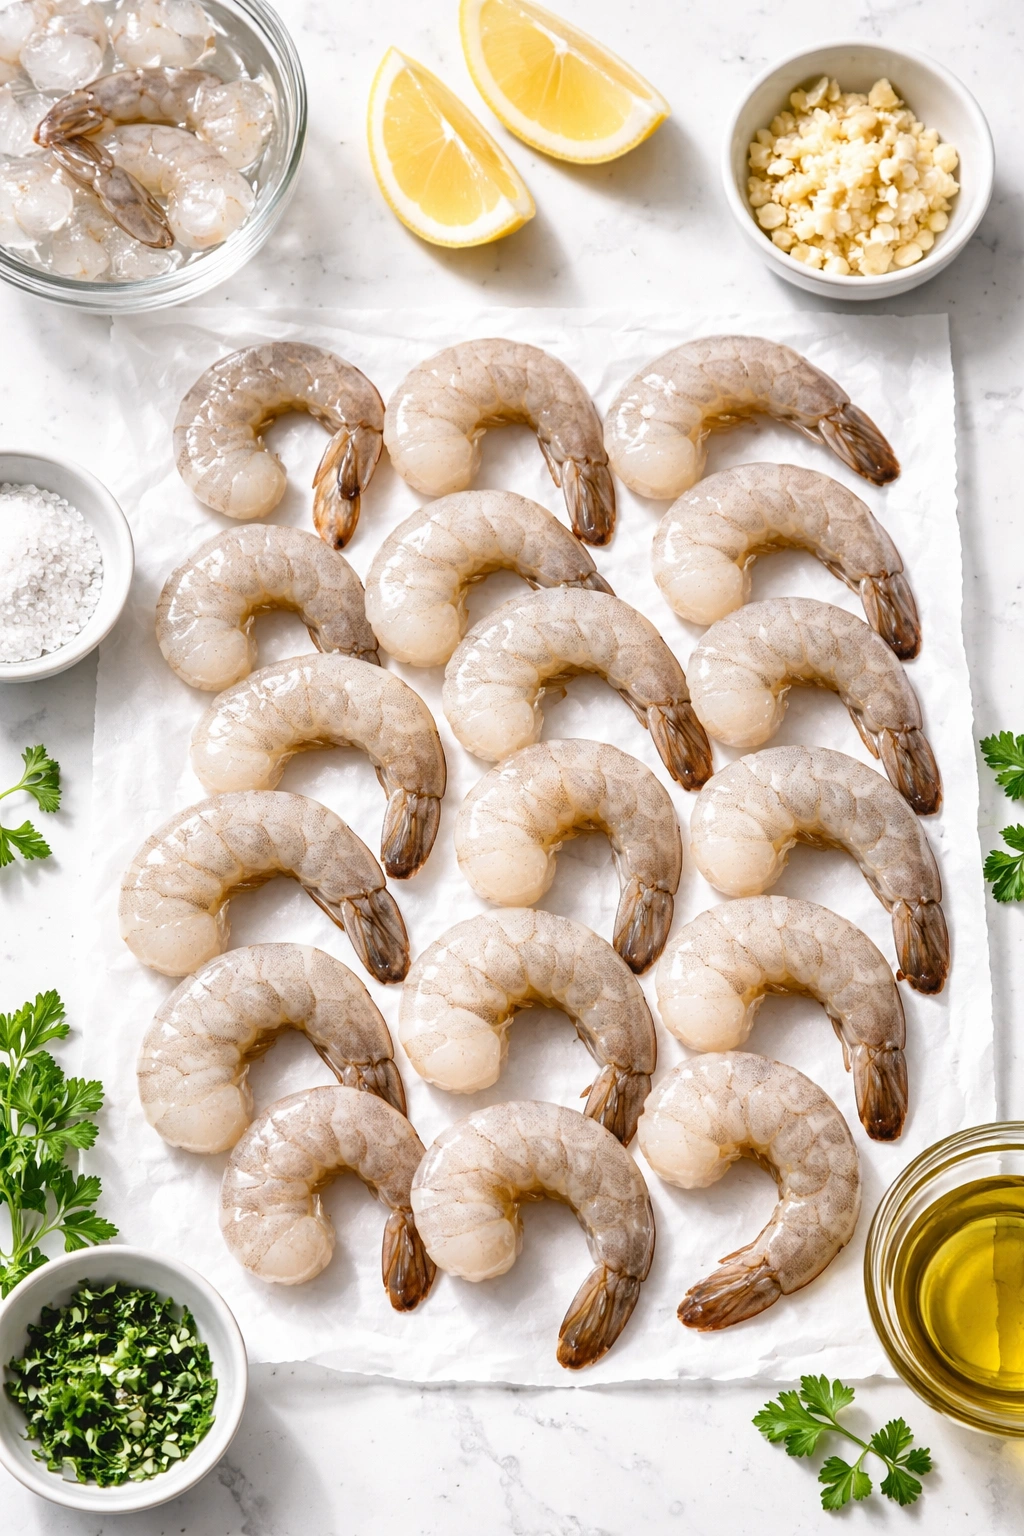
Shrimp quality varies enormously depending on where it comes from and how it’s been handled. The best shrimp for this quick-cooking dish is raw, peeled, deveined shrimp that’s been frozen immediately after harvest. This might seem counterintuitive, but frozen shrimp is often superior to what’s sitting in the seafood case at your local supermarket. Flash-frozen shrimp retains its texture and flavor better than thawed shrimp that’s been sitting around, and it’s typically less expensive.
When shopping, look for shrimp that are uniform in size so they cook evenly. The count per pound tells you the size: 20-30 per pound is large, 16-20 per pound is jumbo, and 31-40 per pound is medium. For this recipe, aim for the larger sizes. In a 20-minute total cooking time, medium shrimp might cook too quickly and become overcooked while you’re finishing other components.
If you’ve bought frozen shrimp, thaw them in the refrigerator overnight, or use the cold-water method if you’re in a hurry: place the sealed bag in a bowl of cold water and swap out the water every 10 minutes or so. They’ll be ready to cook in about 20-30 minutes. Whatever you do, don’t use hot water to thaw them—this will cook the exterior while the interior stays frozen.
Pat your shrimp completely dry with paper towels before seasoning. Any moisture on the surface prevents proper browning and causes the shrimp to steam instead of sear. This is one of those small steps that makes a noticeable difference in the final texture. Season the shrimp lightly with salt and pepper just before cooking, not earlier—early seasoning draws out moisture.
Setting Up Your Workspace for Success
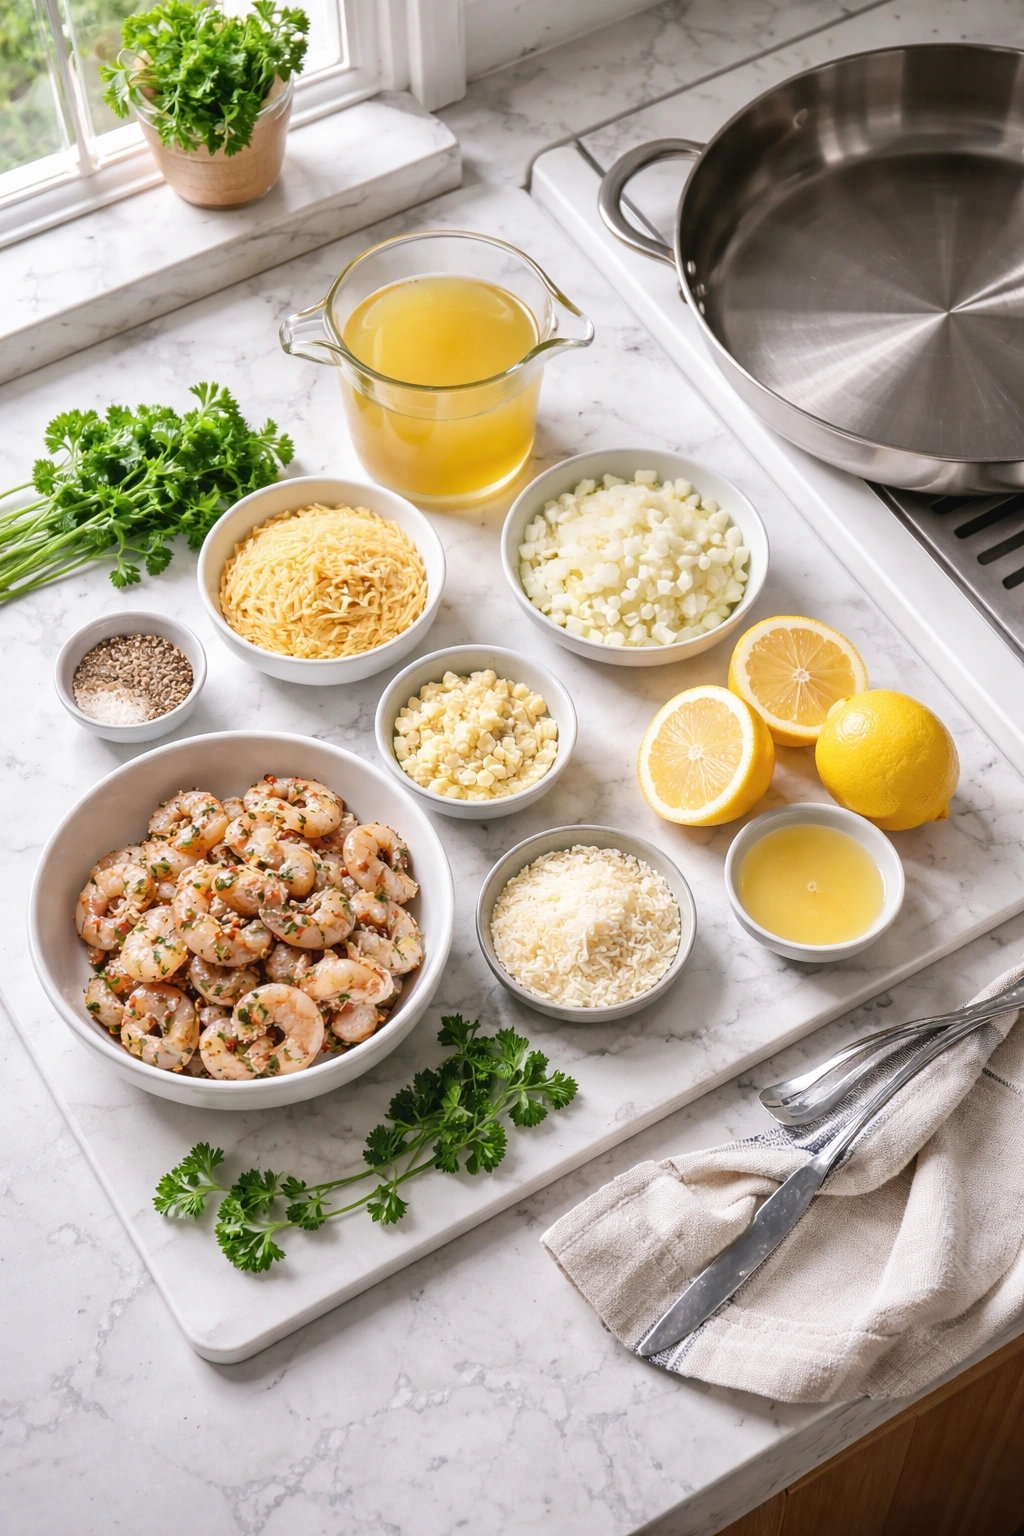
One of the reasons this dinner comes together in 20 minutes is that mise en place—having everything prepared and ready before you start cooking—is absolutely essential. You won’t have time to stop mid-cooking to mince garlic or measure broth. Get organized before you turn on the heat.
Measure out your broth and have it easily accessible. Mince your garlic and finely chop your onion. Pat your shrimp dry and season lightly with salt and pepper. Zest your lemon and set the zest aside, then juice the lemon into a small bowl. Grate your Parmesan cheese fresh and have it ready. Measure out your dry orzo. If you’re adding spinach or other vegetables, prep those too.
Use a large skillet or Dutch oven with a lid—you need at least 12 inches in diameter so the shrimp can cook in a single layer without crowding. The pan should have a heavy bottom so heat distributes evenly and nothing sticks. Cast iron or stainless steel both work beautifully here.
Having everything ready means you can focus entirely on cooking rather than scrambling to find ingredients or do prep work mid-recipe. It sounds like extra work, but it’s actually the secret to making this feel effortless and stress-free.
Searing the Shrimp Perfectly
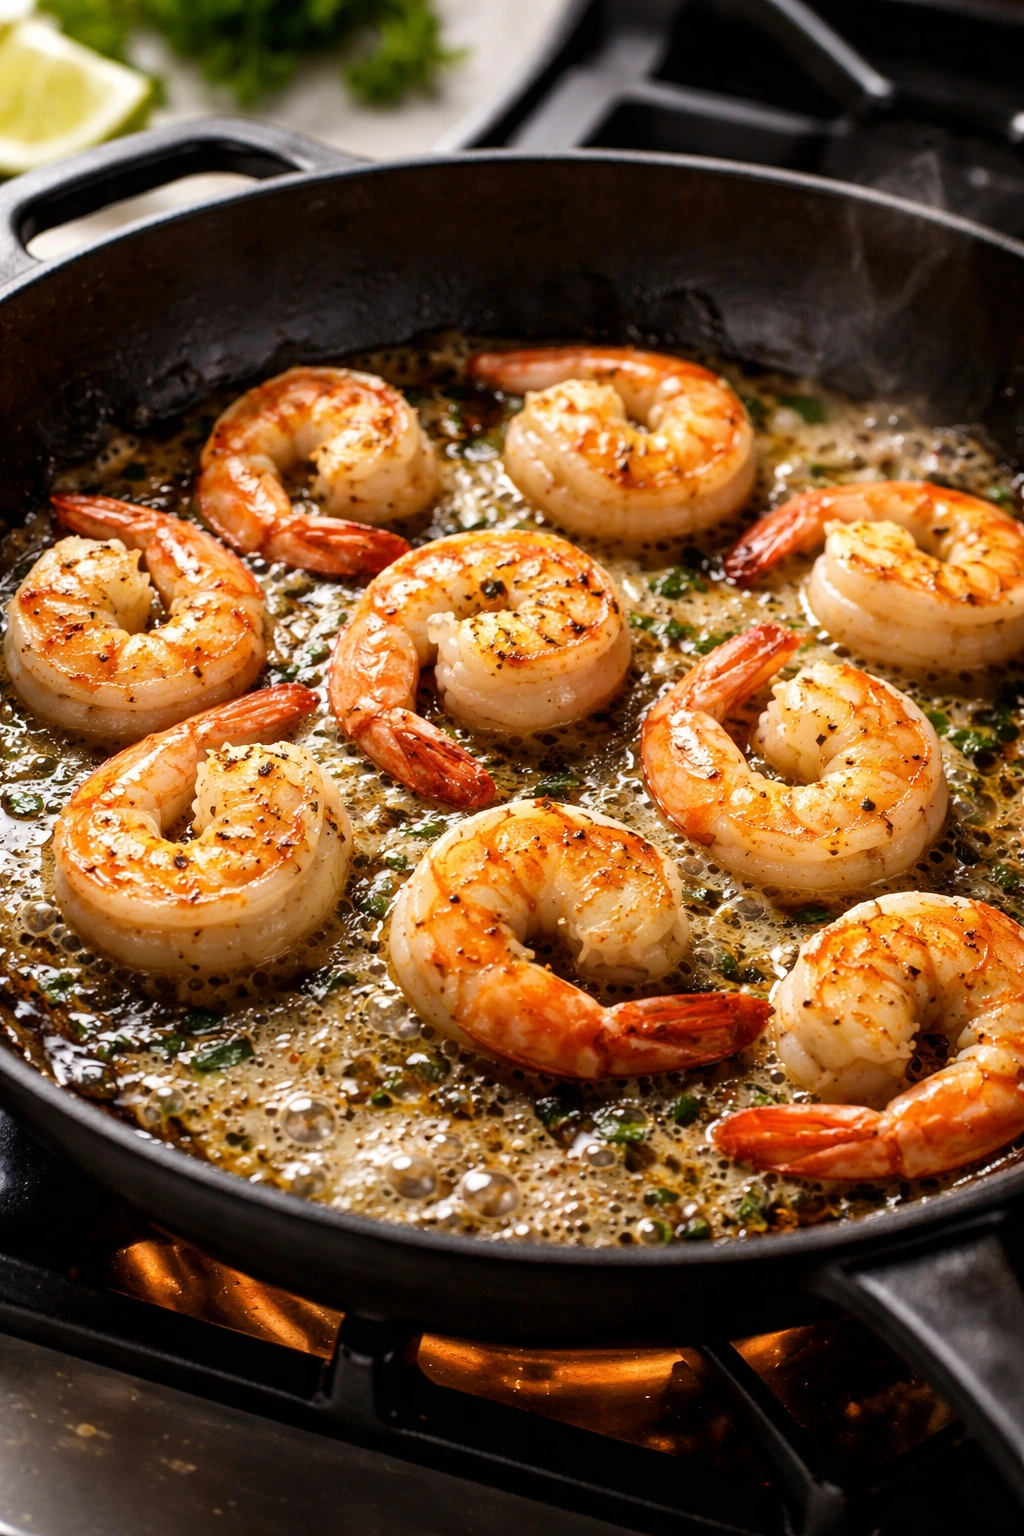
The first step of actual cooking is searing the shrimp, and this is where you establish the flavor foundation for everything else. Heat your large skillet over medium-high heat and add about half a tablespoon each of butter and olive oil. You want the heat high enough that the butter foams and the oil shimmers, but not so hot that it starts to smoke—you’re aiming for a temperature around 375-400°F if you were measuring it.
Once your fat is hot, arrange your seasoned shrimp in a single layer. This is crucial: don’t crowd the pan. If your shrimp are overlapping or stacked, they’ll steam rather than sear. If your pan isn’t large enough for all your shrimp to fit comfortably in a single layer, cook them in batches. It’s an extra minute of time, but the result is worth it.
Let the shrimp cook undisturbed for about 1 to 2 minutes. You should hear a gentle sizzle, and you should see the underside develop a golden color. Don’t resist the urge to peek—you want to catch them at the moment they turn from gray to pink on the edges. Once that color change appears on the underside, flip each shrimp and cook for another minute on the second side.
The goal is shrimp that are just barely opaque in the center and still have a slight curve to their shape—not the tight, fully coiled “C” that indicates they’ve overcooked. Overcooked shrimp turns rubbery and tough, and there’s no fixing it once it’s done. This is actually why cooking shrimp in a quick dish like this is smart: the total cooking time is so short that it’s nearly impossible to overdo them if you’re paying attention.
Once they’re seared, transfer the shrimp to a plate and set aside. The pan will be too hot and you don’t want them cooking further. You’ll add them back in at the very end, just before serving.
Building the Aromatics and Toasting the Orzo
With the shrimp out of the way, add the remaining butter and olive oil to the same unwashed pan (there are fond and flavorful browned bits on the bottom that you want to incorporate). Let the butter melt and foam over medium heat. Add your finely chopped onion and cook for about 3-4 minutes, stirring occasionally, until it becomes soft and translucent at the edges. The onion won’t be completely golden yet—you’re just getting it tender.
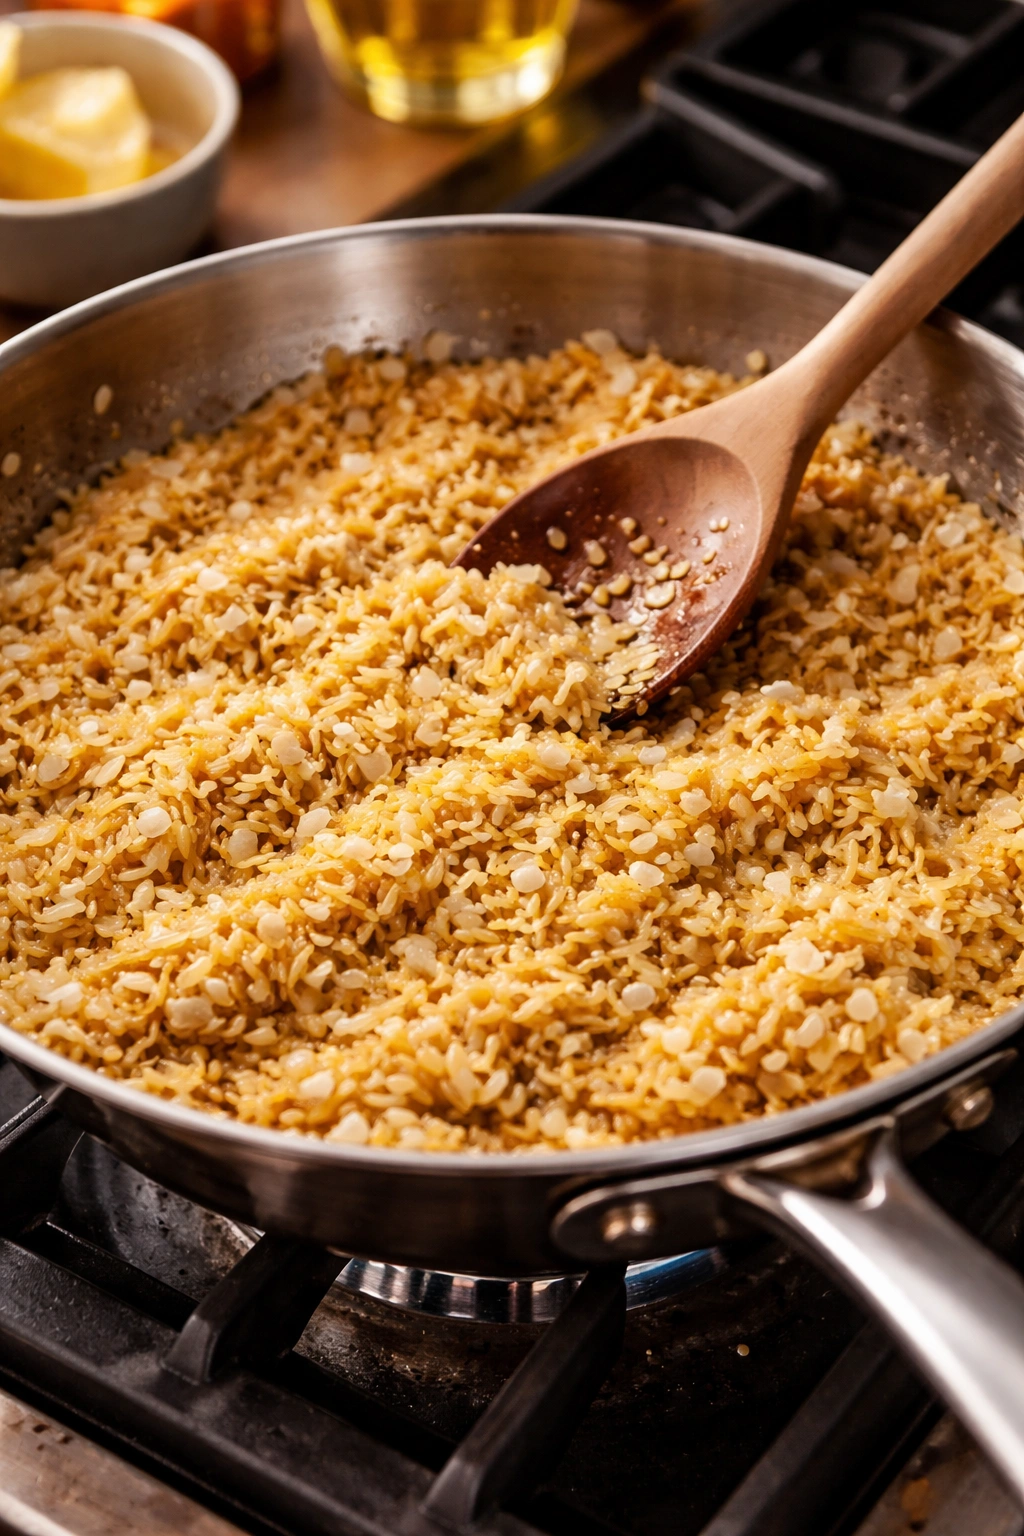
Add your minced garlic and cook for about 30 seconds to a minute, just until it’s fragrant. Fresh garlic goes from smelling wonderful to tasting burnt very quickly, so you’re not looking to cook it until it turns golden. Just until the raw edge is gone and you can smell that garlic aroma filling your kitchen. At this point, add your measured dry orzo and stir well to coat all the pieces with the buttery mixture.
Let the orzo toast for 1 to 2 minutes. You’re looking for it to turn slightly golden and smell nutty and toasted. This step adds an enormous amount of depth and flavor to the orzo and is well worth the couple minutes it takes. The grains will absorb all those garlic-butter flavors before they even hit the broth.
Adding the Broth and Simmering
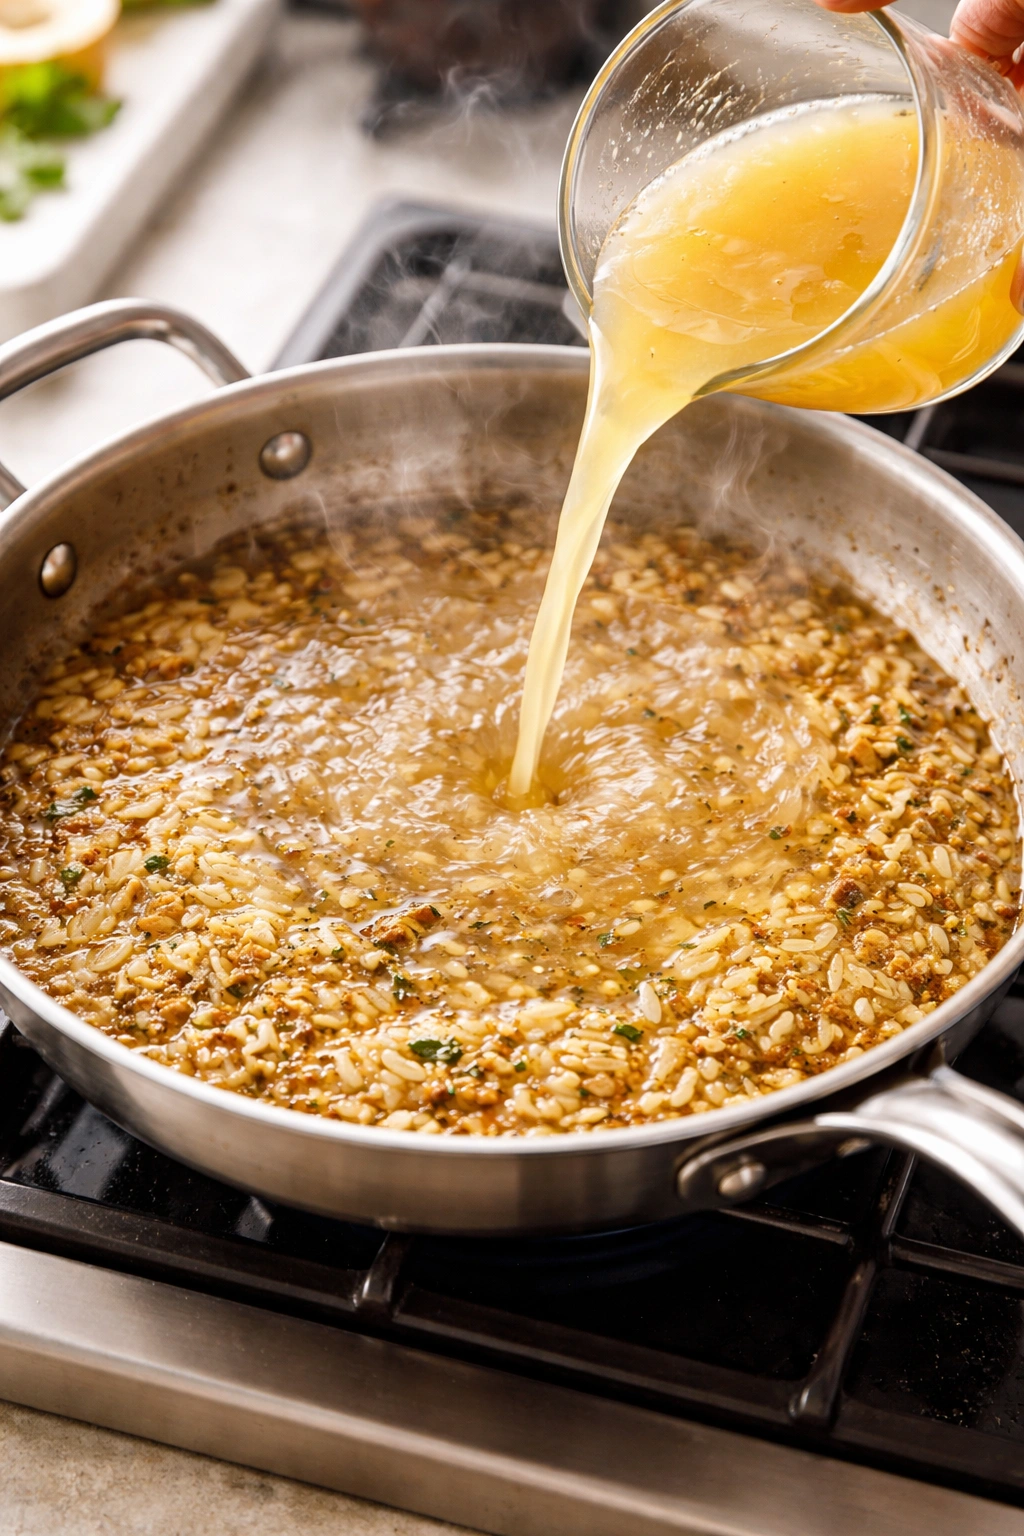
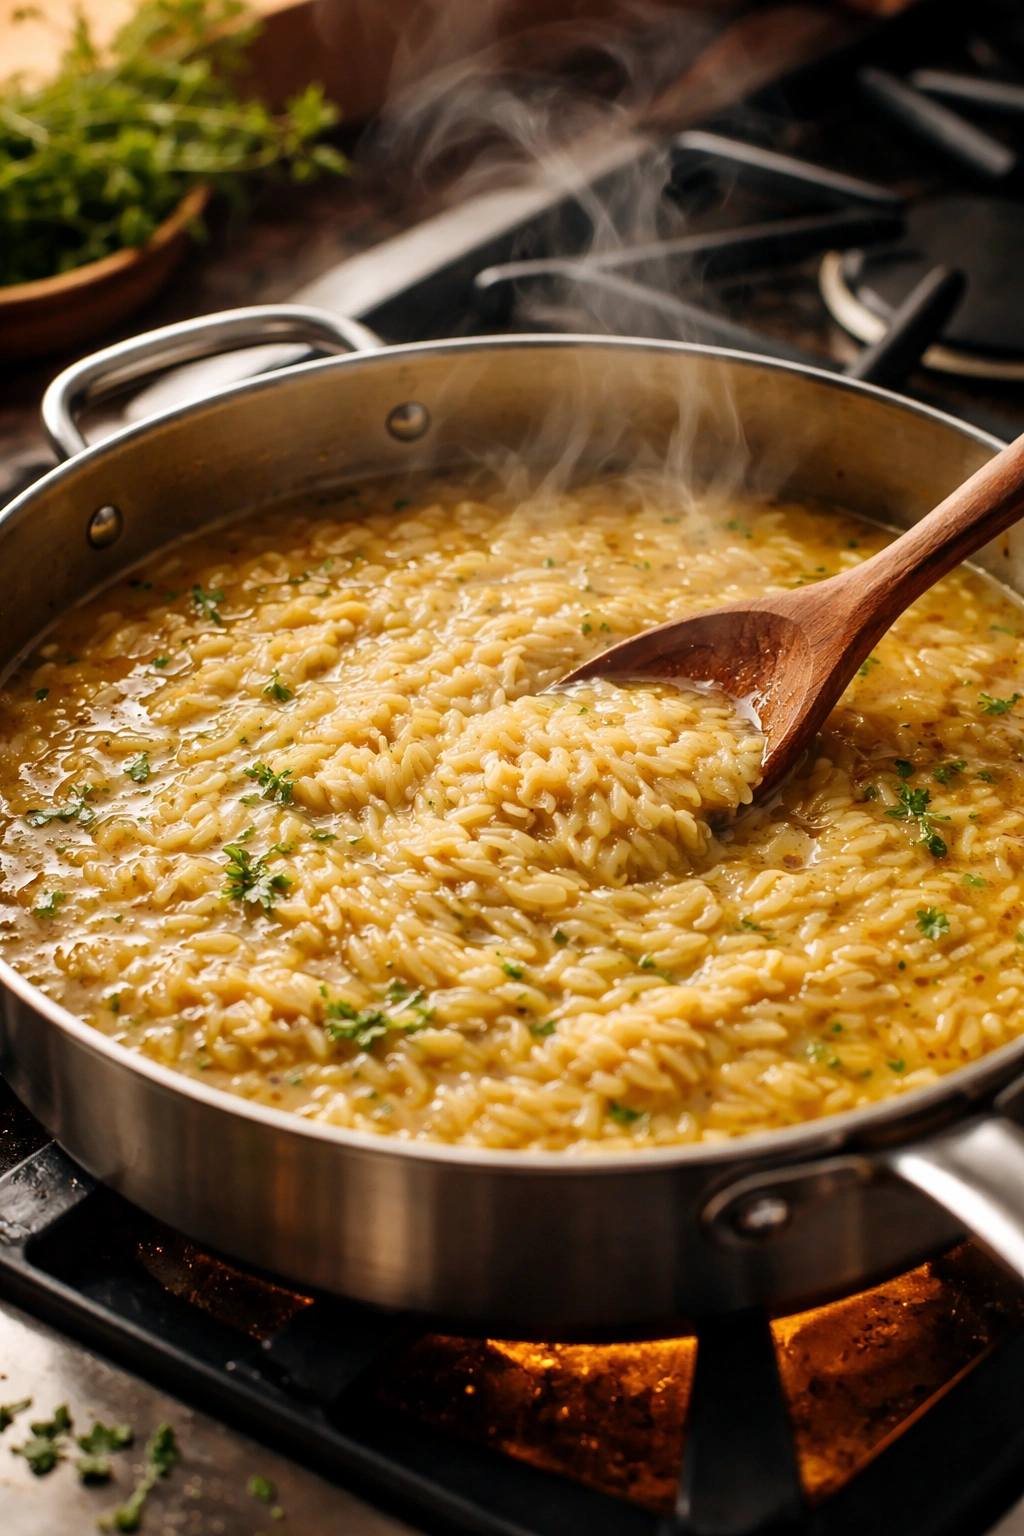
Pour your broth into the pan, making sure you’ve measured it accurately. Stir well with a wooden spoon, scraping the bottom and sides of the pan to release all those flavorful brown bits (fond). This is called deglazing, and those browned bits carry intense savory flavor. Bring the mixture to a boil over medium-high heat, then reduce the heat to medium and cover the pan with a lid.
Let the orzo simmer, uncovered, for about 10-12 minutes, stirring occasionally. The liquid will gradually be absorbed by the pasta, and the starch that leaches out will create a creamy sauce. You’re stirring occasionally to make sure nothing sticks to the bottom and to help distribute the heat evenly. Near the end of cooking, the orzo should be tender, the liquid should be mostly absorbed, and the consistency should be creamy but not soupy.
At this point, taste a grain of orzo. It should be tender all the way through, with no hard, starchy center. If it’s still too crunchy, add a splash more broth or water and continue cooking for another minute or two. If it looks too wet and soupy, just let it simmer uncovered for a bit longer and the liquid will reduce.
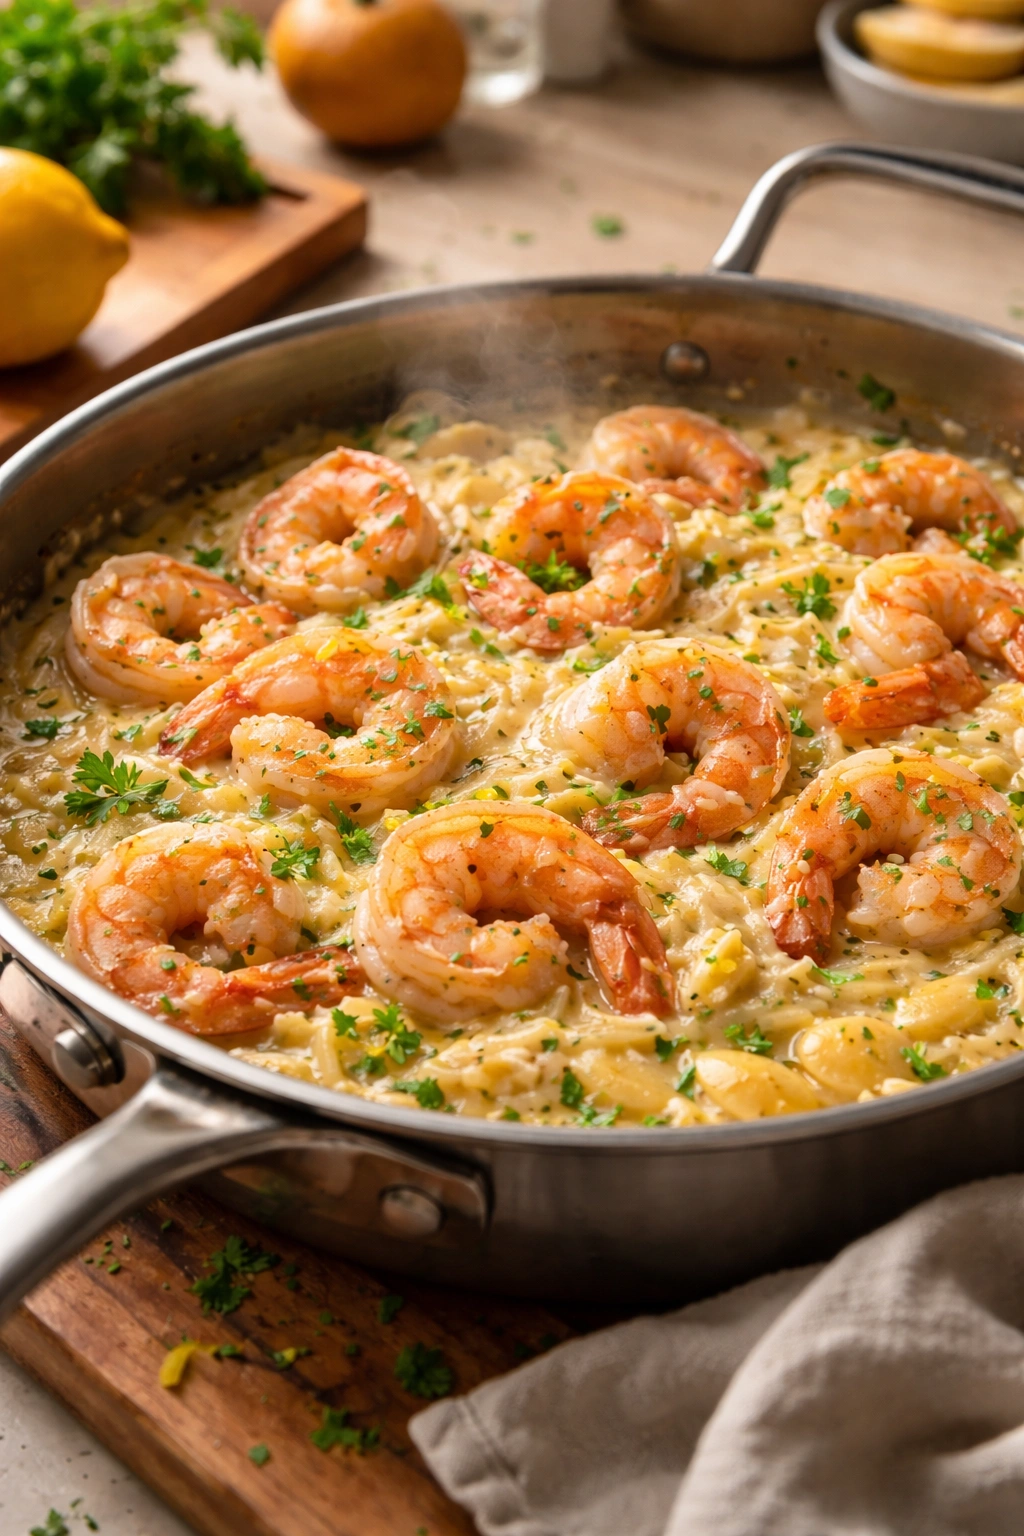
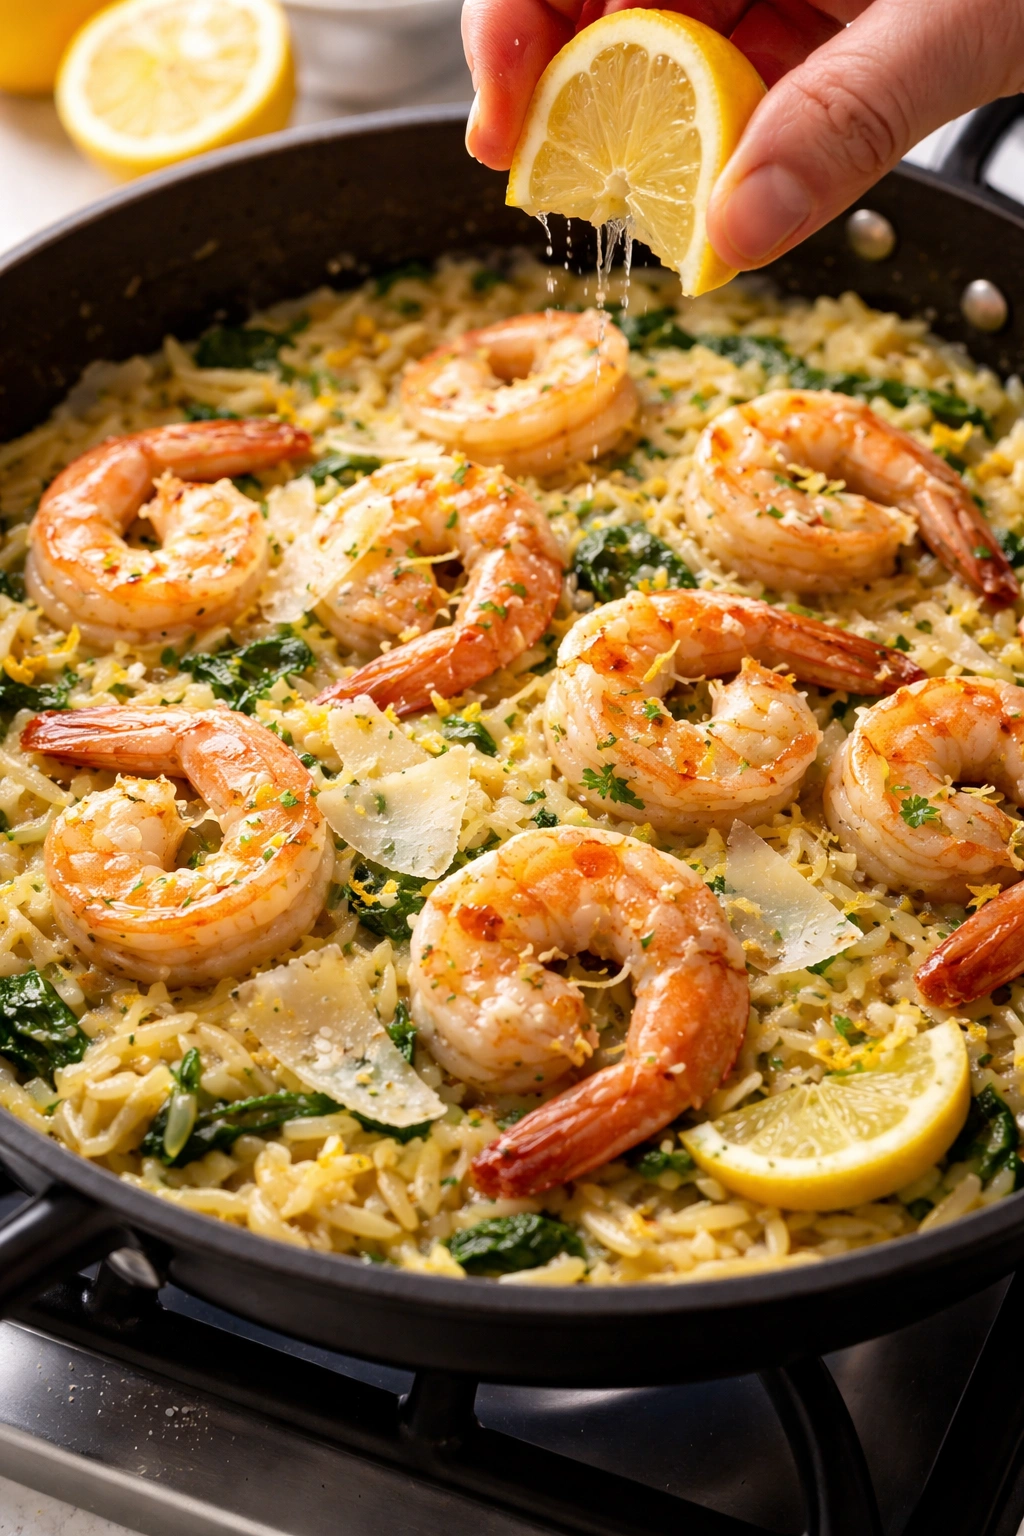
Finishing with Lemon, Parmesan, and Shrimp
Prepare the Pan and Sear the Shrimp:
-
Heat 1 tablespoon butter and 1 tablespoon olive oil in a large skillet over medium-high heat until the butter foams and the oil shimmers.
-
Pat 1 pound of peeled and deveined large shrimp dry with paper towels and season lightly with kosher salt and black pepper.
-
Arrange the shrimp in a single layer in the hot pan—do not overcrowd. If your shrimp are stacked or overlapping, they will steam instead of sear and won’t develop a golden crust.
-
Cook for 1 to 2 minutes until the underside turns pink and golden, then flip each shrimp and cook for another 1 minute until just opaque throughout. The shrimp should still have a slight curve, not be tightly coiled—overcooked shrimp becomes rubbery and tough.
-
Transfer the cooked shrimp to a clean plate and set aside.
Build Aromatics and Toast the Orzo:
-
In the same skillet (no need to wash it—those browned bits add flavor), add the remaining 1 tablespoon butter and 1 tablespoon olive oil over medium heat.
-
Add 1 small finely chopped onion and cook for 3 to 4 minutes, stirring occasionally, until the onion is soft and translucent at the edges.
-
Stir in 4 to 5 minced garlic cloves and cook for 30 seconds until fragrant. Do not cook the garlic longer than this—it burns quickly and will taste bitter if overcooked.
Advertisements -
Add 1 cup dry orzo and stir constantly for 1 to 2 minutes until the grains turn slightly golden and smell toasty and nutty. This toasting step adds tremendous depth of flavor.
Simmer the Orzo in Broth:
-
Pour in 2.5 to 3 cups chicken or vegetable broth and stir well with a wooden spoon, scraping the bottom and sides of the pan to release all the flavorful browned bits (fond). Stir in 1/2 teaspoon kosher salt and 1/4 teaspoon freshly ground black pepper.
-
Bring the mixture to a boil over medium-high heat, then immediately reduce the heat to medium. Cover the pan with a lid and let it simmer.
-
Simmer uncovered for 10 to 12 minutes, stirring occasionally. The broth will gradually be absorbed by the pasta, creating a naturally creamy sauce as the orzo releases its starch. Stir every 2-3 minutes to prevent sticking and to help release more starch, which creates creaminess.
-
The orzo is done when it’s tender throughout (bite a grain to check—there should be no hard, starchy center), most of the liquid is absorbed, and the mixture looks creamy. If it’s still too crunchy, add a splash more broth and cook for another minute. If it looks too watery, let it simmer uncovered for a minute or two more to reduce.
Finish with Lemon, Cheese, and Shrimp:
-
Remove the skillet from heat. Stir in 1 tablespoon freshly grated Parmesan cheese, the zest of 1 large lemon, and the juice of 1 lemon (about 2-3 tablespoons). Add the Parmesan off the heat—if the pan is too hot, the cheese can become grainy instead of melting smoothly into the sauce.
-
Return the seared shrimp to the pan and stir gently to combine and warm through, about 1 to 2 minutes. Taste and adjust salt and pepper to your preference. Often the broth and cheese bring enough salt, but you might want a tiny pinch more or an extra squeeze of lemon juice for brightness.
-
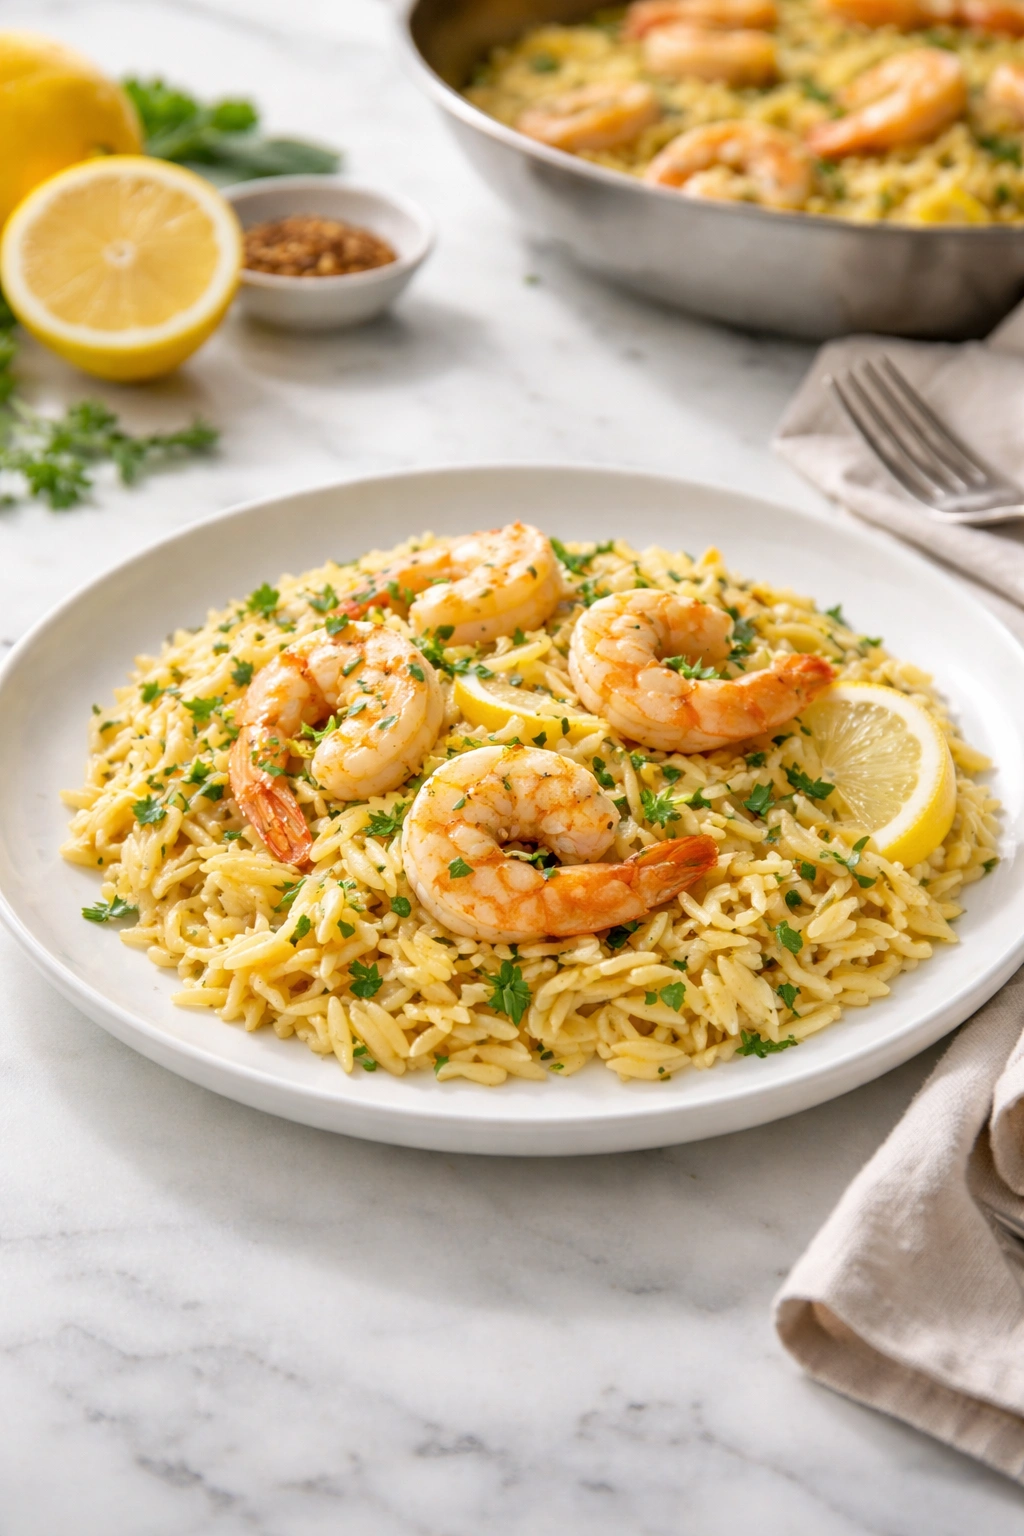
Divide among serving bowls and serve immediately while everything is hot. Garnish with additional fresh Parmesan, fresh parsley if you have it, and lemon wedges for squeezing.
Advertisements
Pro Tips for Perfect Results Every Time
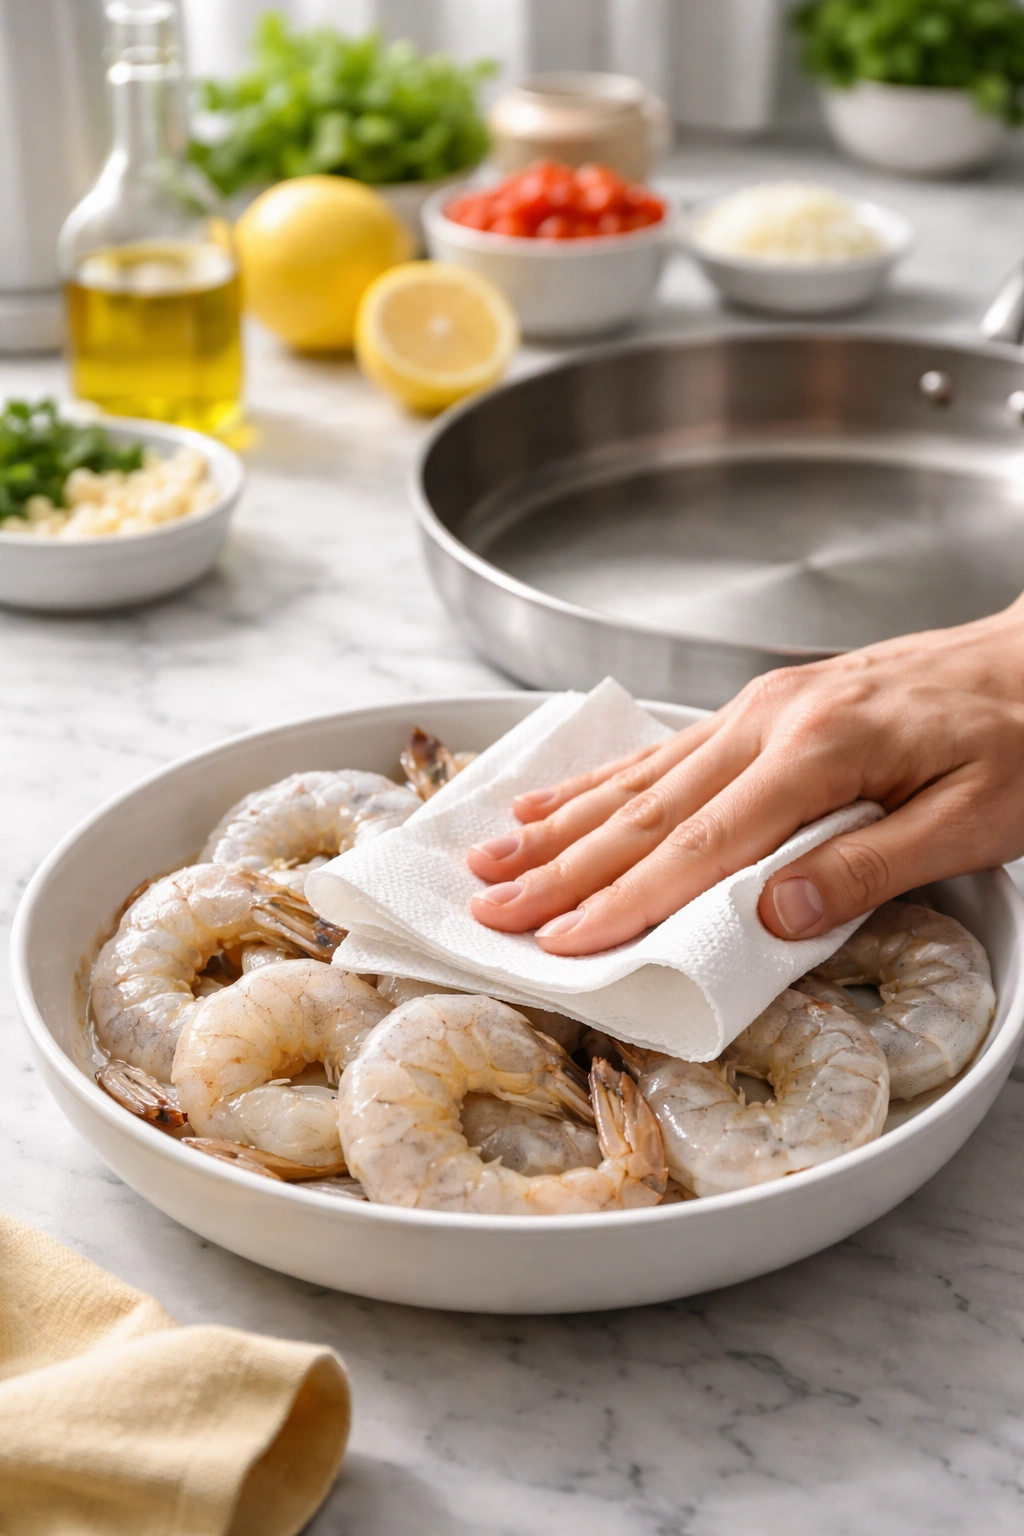
Pat your shrimp completely dry. This single step makes an enormous difference in whether your shrimp develops a golden crust or steams in its own moisture. Use paper towels and really dry them off.
Don’t overcrowd the shrimp. I know I’ve mentioned this multiple times, but it’s truly the most common mistake that affects results. If your skillet isn’t large enough, cook them in two batches. It takes an extra 90 seconds and results in dramatically better texture.
Stir the orzo occasionally during cooking. Just like risotto, stirring helps release the starch that creates creaminess, and it prevents sticking. You don’t need to stir constantly, but every couple of minutes is perfect.
Toast the orzo. Those 1-2 minutes of toasting in the buttery mixture adds a surprising amount of depth and nutty flavor that completely justifies the time spent.
Use fresh lemon, not bottled juice. Fresh lemon juice is so much brighter and more vibrant than bottled. It makes a real difference in this simple dish where lemon is a star ingredient, not just a supporting player.
Grate your Parmesan fresh. Pre-shredded Parmesan contains anti-caking agents that prevent it from melting smoothly. Fresh-grated melts beautifully and creates that creamy sauce.
Add cheese off heat. If the pan is too hot when you stir in the cheese, it can separate and become grainy instead of melting into a smooth sauce. Removing from heat first solves this problem completely.
Taste and adjust at the end. This is your chance to dial in the salt, lemon, and cheese to your exact preference. Some people love it very lemony and bright; others prefer more savory. Trust your palate.
Common Mistakes and How to Avoid Them
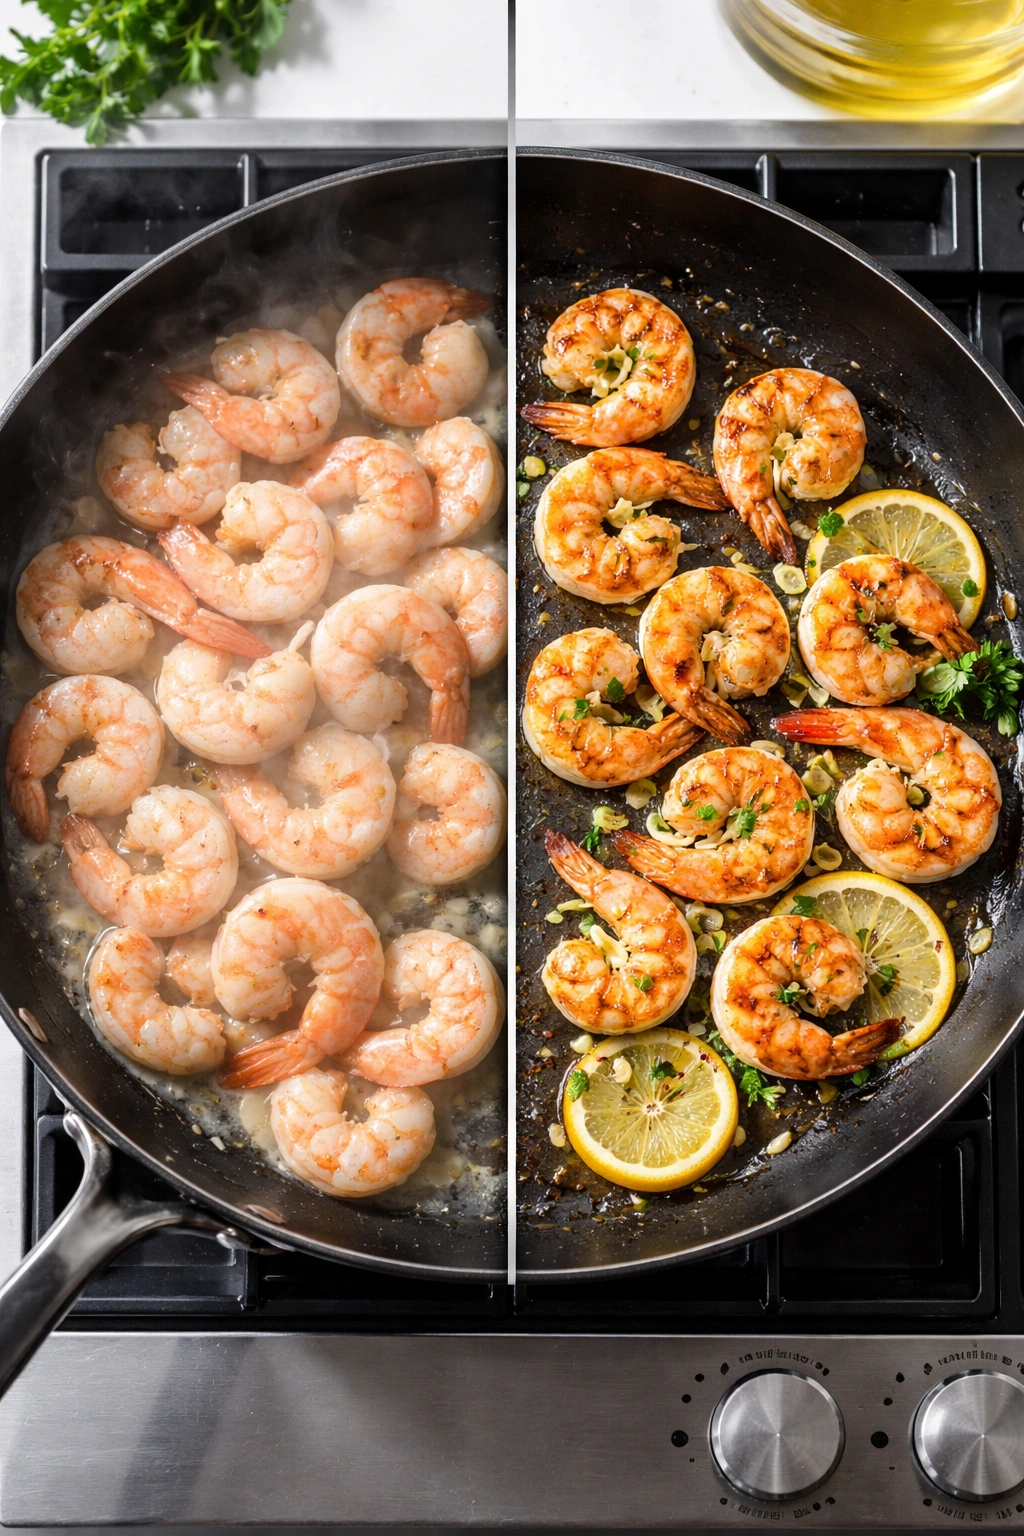
The most frequent mistake home cooks make with this dish is overcooking the shrimp. Even an extra 30 seconds can be the difference between tender and rubbery. Setting a timer for exactly 2 minutes for the first side and 1 minute for the second side helps enormously. Shrimp is finicky, and it’s much better to have it slightly undercooked than overcooked—it’ll continue cooking slightly as it sits in the hot pan and broth anyway.
Another common error is measuring the broth inaccurately. Too much broth and your finished dish will be soupy instead of creamy. Too little and the orzo won’t cook through. Use a liquid measuring cup and measure carefully. The ratio should be about 2.5 to 3 cups of broth for 1 cup of dry orzo.
Some cooks skip the step of toasting the orzo, thinking it will save time. Don’t do this. Those 2 minutes add so much flavor and depth that skipping them is false economy. The time difference is negligible, but the flavor difference is substantial.
Failing to let the pan rest when you add the Parmesan can result in grainy, separated cheese instead of a smooth, creamy sauce. The solution is simple: turn off the heat before stirring in the cheese. This doesn’t significantly extend your cooking time, but it dramatically improves the texture of your final dish.
Forgetting to season the shrimp before cooking is another error that affects the final flavor. The salt and pepper you add at the beginning create a better crust and flavor than just relying on salt in the broth. Season generously but not excessively.
Variations You Can Try
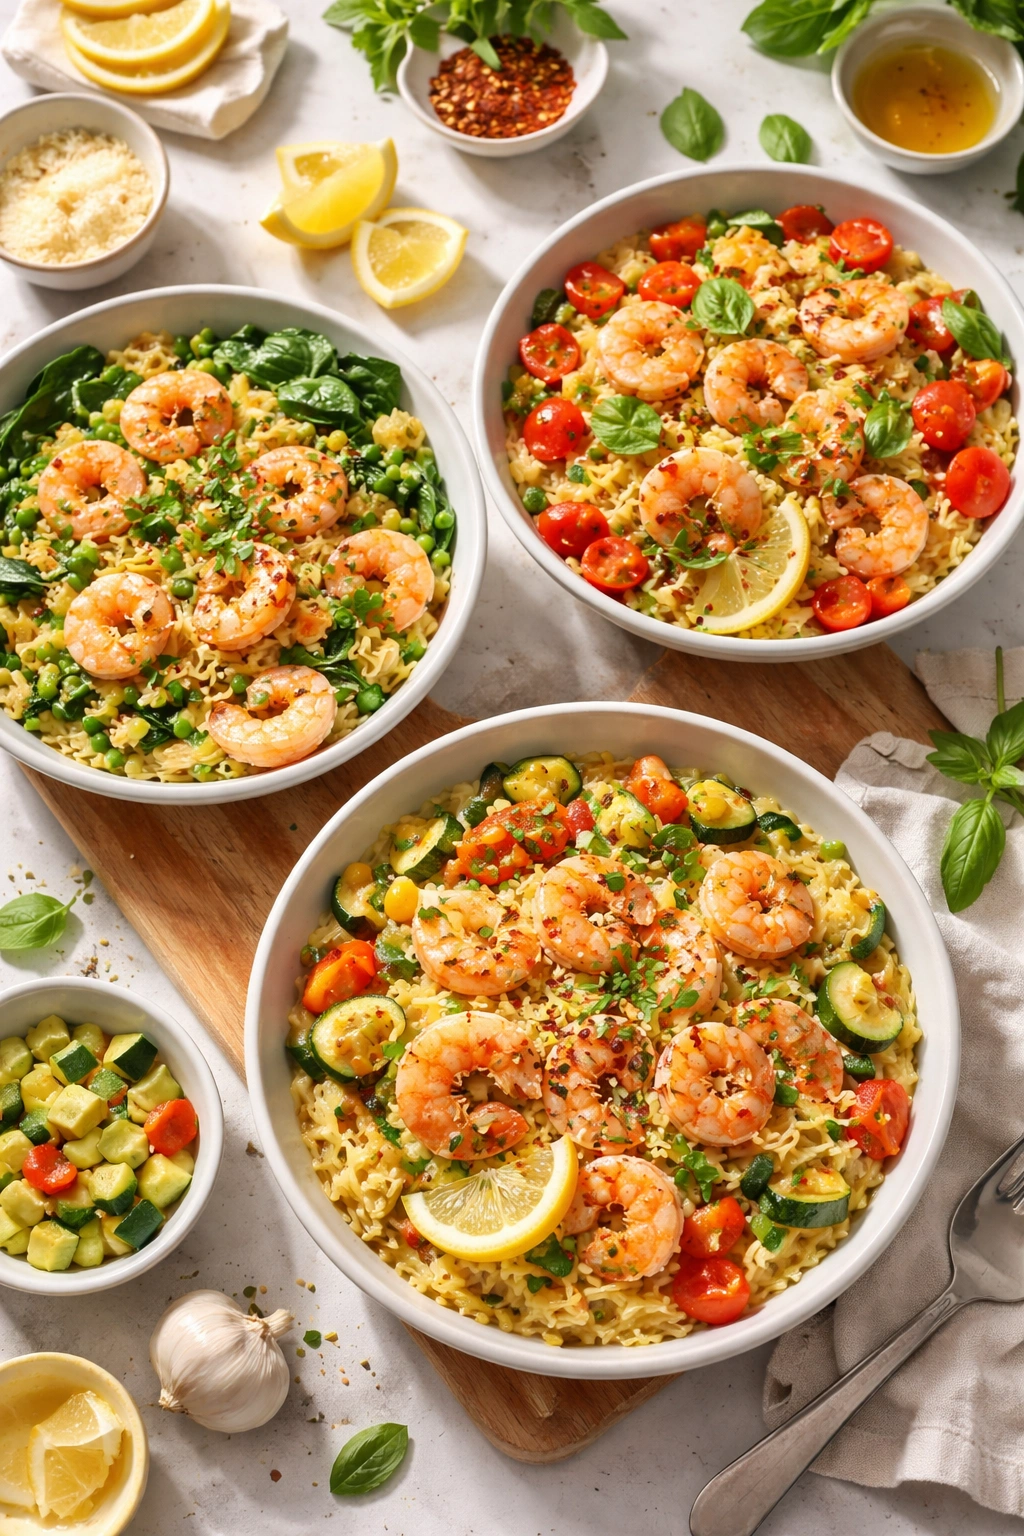
Once you master the basic formula, you can riff on it endlessly. Add vegetables by stirring in baby spinach, fresh peas, or halved cherry tomatoes during the last minute of cooking. Diced zucchini or bell pepper can go in with the onion so they cook along with everything else.
Change the cheese by using crumbled feta instead of Parmesan for a Greek-inspired version, or try pecorino Romano for a sharper, saltier finish. Goat cheese stirred in off heat creates an entirely different, creamier sauce.
Swap the protein by using scallops (which cook even faster than shrimp, so add them in the last 2 minutes), diced chicken breast (which needs to cook longer, so add it with the broth), or simply leaving the protein out entirely for a vegetarian version.
Play with herbs by finishing with fresh basil instead of parsley, or adding Italian seasoning to the broth. A pinch of fresh thyme works beautifully too. Red pepper flakes add heat if that’s your preference.
Try different broths by using seafood broth for extra depth, or vegetable broth for a lighter flavor. You could even use a combination of broth and white wine (use about 1 cup wine and 1.5-2 cups broth so you don’t add too much acidity).
Storage and Reheating
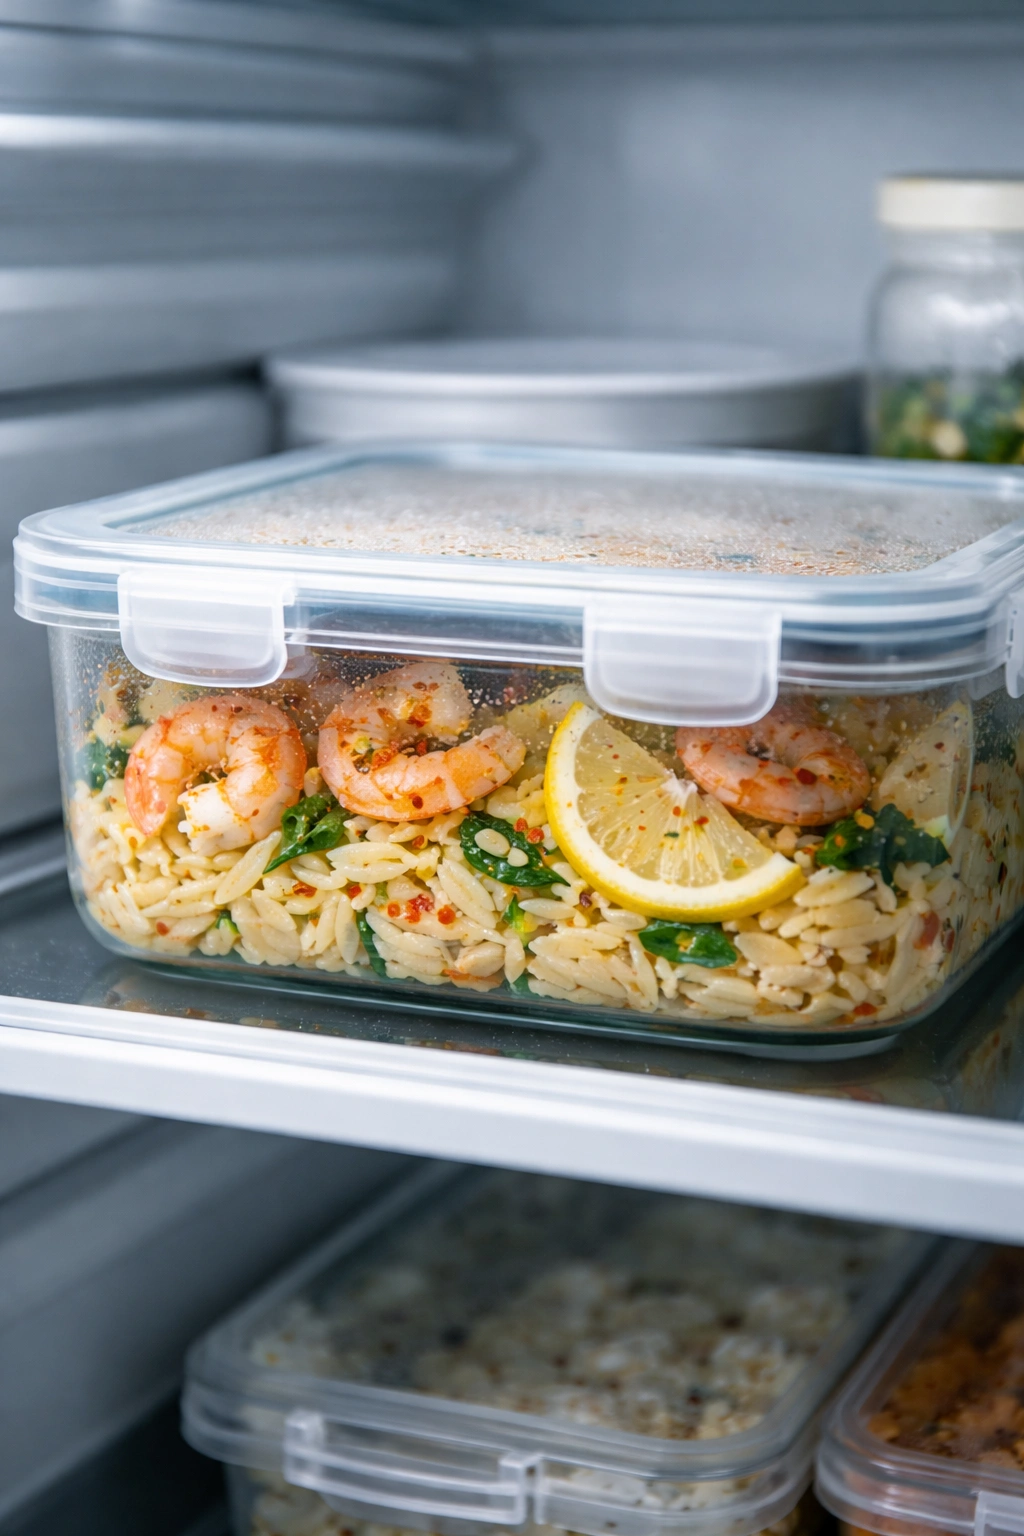
This dish is best eaten fresh and hot, but leftovers still taste quite good. Store any extra in an airtight container in the refrigerator for up to 3 days. The orzo will thicken as it cools because the starch sets, which is completely normal.
To reheat, place leftovers in a skillet over medium heat with a splash of broth or water—about 1/4 cup for every 2 cups of leftovers. Heat gently, stirring occasionally, until warmed through. You can also reheat in the microwave in 30-second intervals, stirring between each interval, until warm.
Don’t freeze this dish. Both the shrimp and the orzo texture change unpleasantly after freezing, and reheating never fully restores them to their original quality.
Serving Suggestions and Pairings
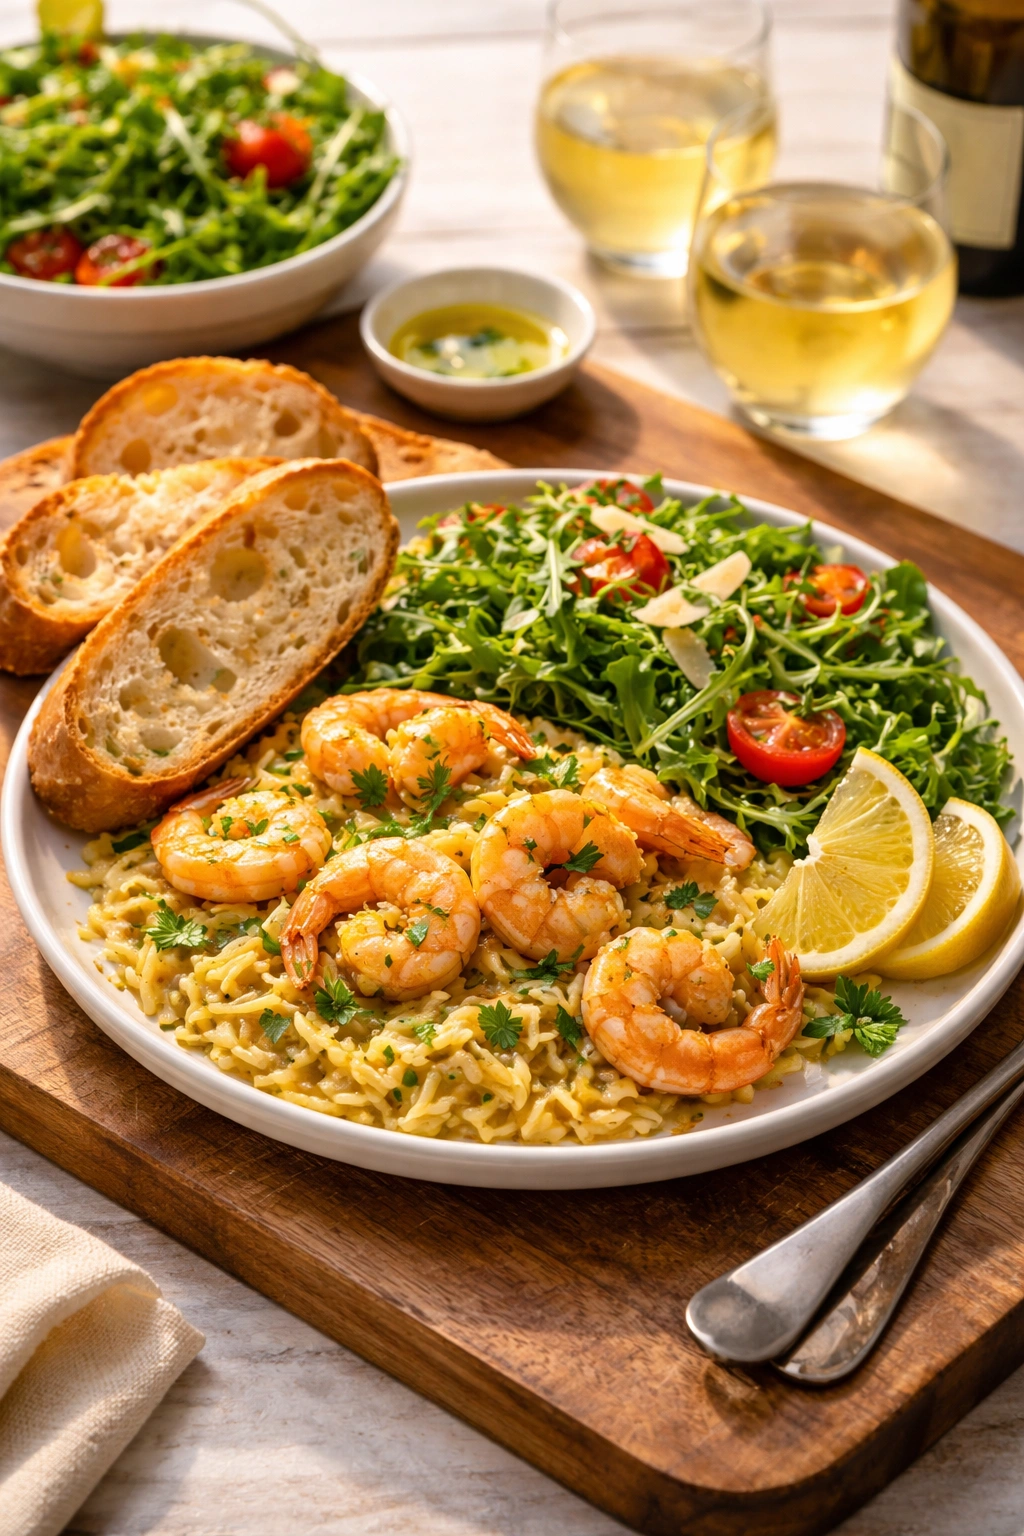
This dish is lovely on its own, but it pairs beautifully with simple side dishes. A fresh green salad with a light vinaigrette is perfect—the acidity complements the creamy orzo and bright lemon. Arugula with lemon vinaigrette is particularly nice.
Crusty bread is almost essential for soaking up every last bit of sauce. Garlic bread, herb bread, or even plain grilled bread works well. A simple loaf of focaccia would be lovely.
If you want to be more casual, serve it as-is in bowls with extra Parmesan and fresh parsley on top. If you’re serving it for company, plate it individually and finish with a lemon wedge and a small handful of fresh herbs.
A crisp white wine is the natural pairing—Sauvignon Blanc, Pinot Grigio, or Vermentino all complement the lemon and shrimp beautifully. If you prefer red wine, a light Pinot Noir works surprisingly well. A sparkling wine or prosecco is also excellent, especially if you’re serving this for a special dinner.
Frequently Asked Questions
Can I use frozen shrimp? Absolutely. Frozen shrimp is often fresher than what’s in the seafood case. Thaw them completely and pat them dry before cooking. Don’t thaw in warm water—use the refrigerator overnight or the cold-water method.
What size shrimp should I use? Large shrimp (20-30 per pound) or jumbo (16-20 per pound) work best for this 20-minute timeline. Medium shrimp cook very quickly and can easily overcook while you’re finishing the dish.
Can I use a different pasta? Yes, though orzo is ideal because of its small size and quick cooking time. Small pasta shapes like stelline, ditalini, or even broken spaghetti noodles work. Adjust cooking times slightly if using a pasta that typically takes longer.
What if I don’t have white wine? This recipe doesn’t use wine, so no worries there. If you’re looking for a different flavor profile, some versions use a splash of white wine instead of some of the broth, but straight broth works perfectly.
Can I make this dairy-free? Yes. Skip the Parmesan cheese or use a dairy-free alternative. The broth and the natural starch from the orzo will still create creaminess. It won’t be quite as rich, but it will still taste very good.
How do I know when the orzo is done? Bite a grain and make sure there’s no hard, starchy center. It should be tender throughout. The liquid should be mostly absorbed, and the mixture should look creamy.
Can I use store-bought garlic instead of fresh? Fresh garlic is noticeably better, but in a pinch, jarred minced garlic works. Use about 2 teaspoons instead of 4-5 cloves. Pre-garlic powder is less ideal but works if that’s all you have—use about 1/4 teaspoon.
What if my orzo looks too soupy at the end? Let it simmer uncovered for another minute or two. The liquid will reduce and it’ll reach the right consistency. Don’t worry if it seems a bit loose right when you take it off heat—it will continue to thicken slightly as it sits.
Key Takeaways
This simple one-pan dinner proves that restaurant-quality food doesn’t require complicated techniques or extensive ingredient lists. The magic comes from understanding the basics—searing protein properly, toasting grains to build flavor, cooking pasta in flavorful liquid instead of plain water, and finishing with bright, fresh ingredients.
The 20-minute timeline is genuinely achievable with minimal prep and maximum flavor. Everything happens in one skillet, which means you’re building layers of flavor from the very beginning. The seared shrimp leaves fond in the pan, the onion and garlic infuse butter with their flavors, the orzo toasts and absorbs all of that richness, and the broth brings everything together into a cohesive, creamy sauce.
The beauty of this recipe is that once you understand the formula, you can make it with whatever you have on hand and it will still taste wonderful. Different vegetables, different cheeses, different herbs—everything works because the foundation is solid and the technique is forgiving. It’s the kind of recipe that gets better the more you make it because you start to understand where to adjust based on your preferences and what looks good at the market that day.
Most importantly, this is the kind of meal that reminds you why cooking at home is so worthwhile. You’ve created something genuinely delicious, spent less than half an hour on it, used only one pan, and fed yourself something that makes you feel nourished and satisfied. That’s a win any way you look at it.