Dump-and-go slow cooker recipes are a lifesaver for busy weeknights when you want a home-cooked dinner waiting on the table without the stress of actual cooking. These meals require minimal prep work in the morning — just toss ingredients into your slow cooker, set it on low or high heat, and you’re done. By evening, your kitchen smells incredible and dinner is already made. The best part? Most of these recipes improve over several hours of gentle cooking, so the flavors deepen while you’re focused on work, errands, or family obligations. If you’re looking to reclaim weeknight sanity without sacrificing real food, these ten recipes will become your new go-to dinner rotation.
1. Beef Stew With Root Vegetables
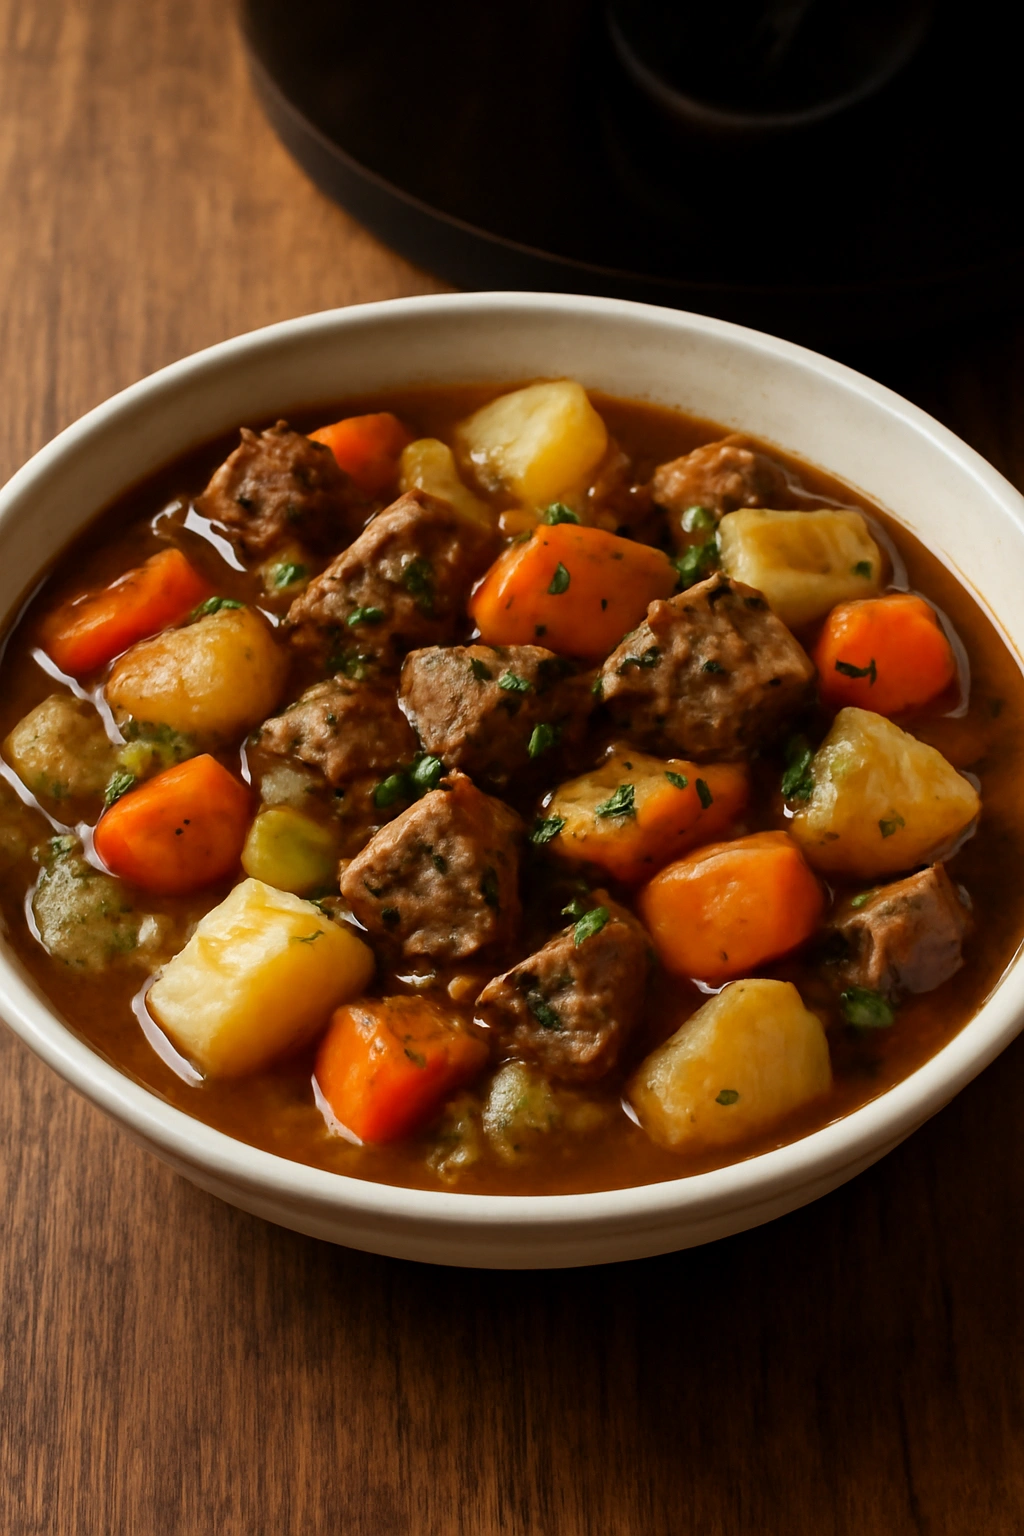
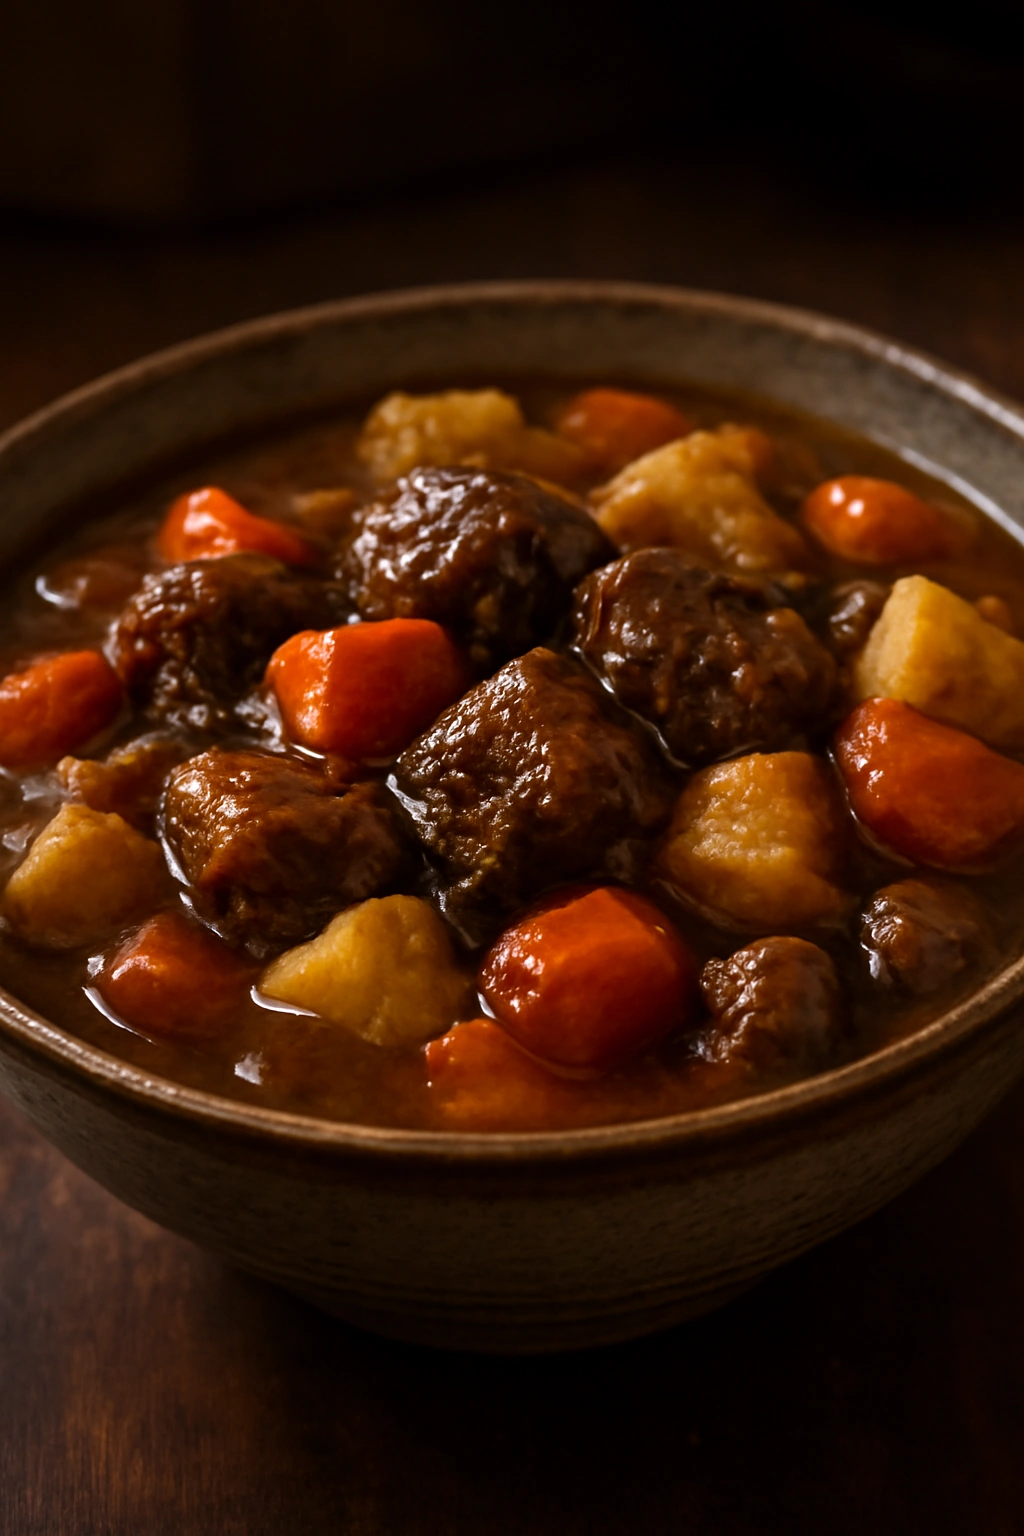
A proper beef stew is the definition of slow cooker comfort — tender chunks of beef that fall apart with a spoon, earthy vegetables, and a rich, glossy broth that tastes like it simmered for hours. This particular version uses a combination of carrots, potatoes, parsnips, and celery to build layers of flavor, with tomato paste and Worcestershire sauce deepening the savory notes. The magic of the slow cooker is that tougher, cheaper cuts of beef become buttery and tender under gentle, prolonged heat. You’ll dump everything in raw in the morning and come home to a complete, warming dinner that tastes like someone’s been cooking all day.
Yield: Serves 6 to 8 | Prep Time: 20 minutes | Cook Time: 8 to 10 hours on low (or 5 to 6 hours on high) | Total Time: 8 to 10 hours active cooking | Difficulty: Beginner — Just chop vegetables and brown the beef, then everything goes in the slow cooker. No fancy techniques required.
For the Stew:
- 2.5 pounds beef chuck roast, cut into 1-inch cubes
- 3 tablespoons all-purpose flour
- 1 teaspoon fine sea salt
- ½ teaspoon freshly ground black pepper
- 3 medium carrots, peeled and cut into 1-inch rounds
- 4 medium Yukon Gold potatoes, peeled and cut into 1-inch cubes
- 2 medium parsnips, peeled and cut into 1-inch chunks
- 3 ribs celery, cut into ½-inch pieces
- 1 medium yellow onion, peeled and cut into large chunks
- 4 cloves garlic, minced
- 3 cups beef broth
- 1 cup dry red wine (or additional beef broth)
- 3 tablespoons tomato paste
- 2 tablespoons Worcestershire sauce
- 2 bay leaves
- 1 teaspoon fresh thyme leaves (or ½ teaspoon dried)
- 1 teaspoon fresh rosemary leaves (or ½ teaspoon dried)
Prepare the Ingredients:
- Pat the beef chuck cubes completely dry with paper towels — this step matters because dry meat browns far better than wet meat, and browning builds flavor that carries through the entire stew.
- In a shallow bowl, combine the flour, salt, and pepper. Toss the beef cubes in the flour mixture until evenly coated, then shake off any excess.
- Heat 2 tablespoons of olive oil in a large skillet over medium-high heat until it shimmers and just begins to smoke. Working in two batches, sear the beef cubes for 2 to 3 minutes per side until they develop a deep golden-brown crust. Do not move the beef around the pan — let it sit undisturbed so it browns properly. Transfer the browned beef to a slow cooker.
- To the same skillet, add the garlic, tomato paste, and onion, cooking for 2 minutes until fragrant and the tomato paste begins to caramelize slightly. Pour in the wine (if using) and scrape the bottom of the pan with a wooden spoon to deglaze it, releasing all the browned flavor bits that stick to the bottom.
Cook the Stew:
- Pour the deglazing liquid and tomato mixture into the slow cooker with the beef.
- Add the beef broth, Worcestershire sauce, bay leaves, thyme, and rosemary to the slow cooker and stir to combine.
- Add the carrots, potatoes, parsnips, and celery, stirring everything together so the vegetables are partially submerged in the liquid.
- Cover the slow cooker and cook on low heat for 8 to 10 hours, or on high heat for 5 to 6 hours. The stew is done when the beef is fork-tender and breaks apart easily, and the potatoes are completely soft.
- Remove and discard the bay leaves before serving. Taste and adjust seasoning with additional salt and pepper if needed.
Why This Recipe Works as a Dump-and-Go Meal
The browning step at the beginning (step 3) takes maybe 10 minutes and transforms the entire flavor profile. Most slow cooker stew recipes skip browning the meat, which is why they taste flat and one-note. This version browns the beef first, then adds the other ingredients raw. The result is a stew with actual depth and restaurant-quality flavor, not something that tastes like it was boiled all day.
Slow Cooker Stew Tips and Variations
- Make it gluten-free: Replace the all-purpose flour with cornstarch or a gluten-free flour blend in a 1:1 ratio for coating the meat.
- Add heartiness: Stir in 1 cup of mushrooms (cremini, button, or a mix), sliced or chopped, along with the other vegetables. Mushrooms add umami and texture.
- Red wine swap: If you don’t have red wine or prefer not to use alcohol, simply use 1 cup of additional beef broth instead — the stew will still be delicious.
- Make ahead: Prep all the vegetables and store them in containers in the refrigerator the night before. Brown the beef in the morning while your coffee brews, then assemble everything.
- Fresh herbs at the end: For a brighter taste, stir in 2 tablespoons of fresh parsley at the very end, just before serving. Fresh herbs add a pop that slow-cooked food sometimes needs.
Storage and Reheating
This stew keeps beautifully in the refrigerator for up to 4 days in an airtight container. Reheat gently on the stovetop over medium heat, or in the slow cooker on low for 1 to 2 hours, stirring occasionally. The stew also freezes exceptionally well for up to 3 months — it actually tastes even better the second or third time around as flavors continue to meld. Thaw overnight in the refrigerator before reheating.
2. Salsa Chicken With Black Beans and Rice
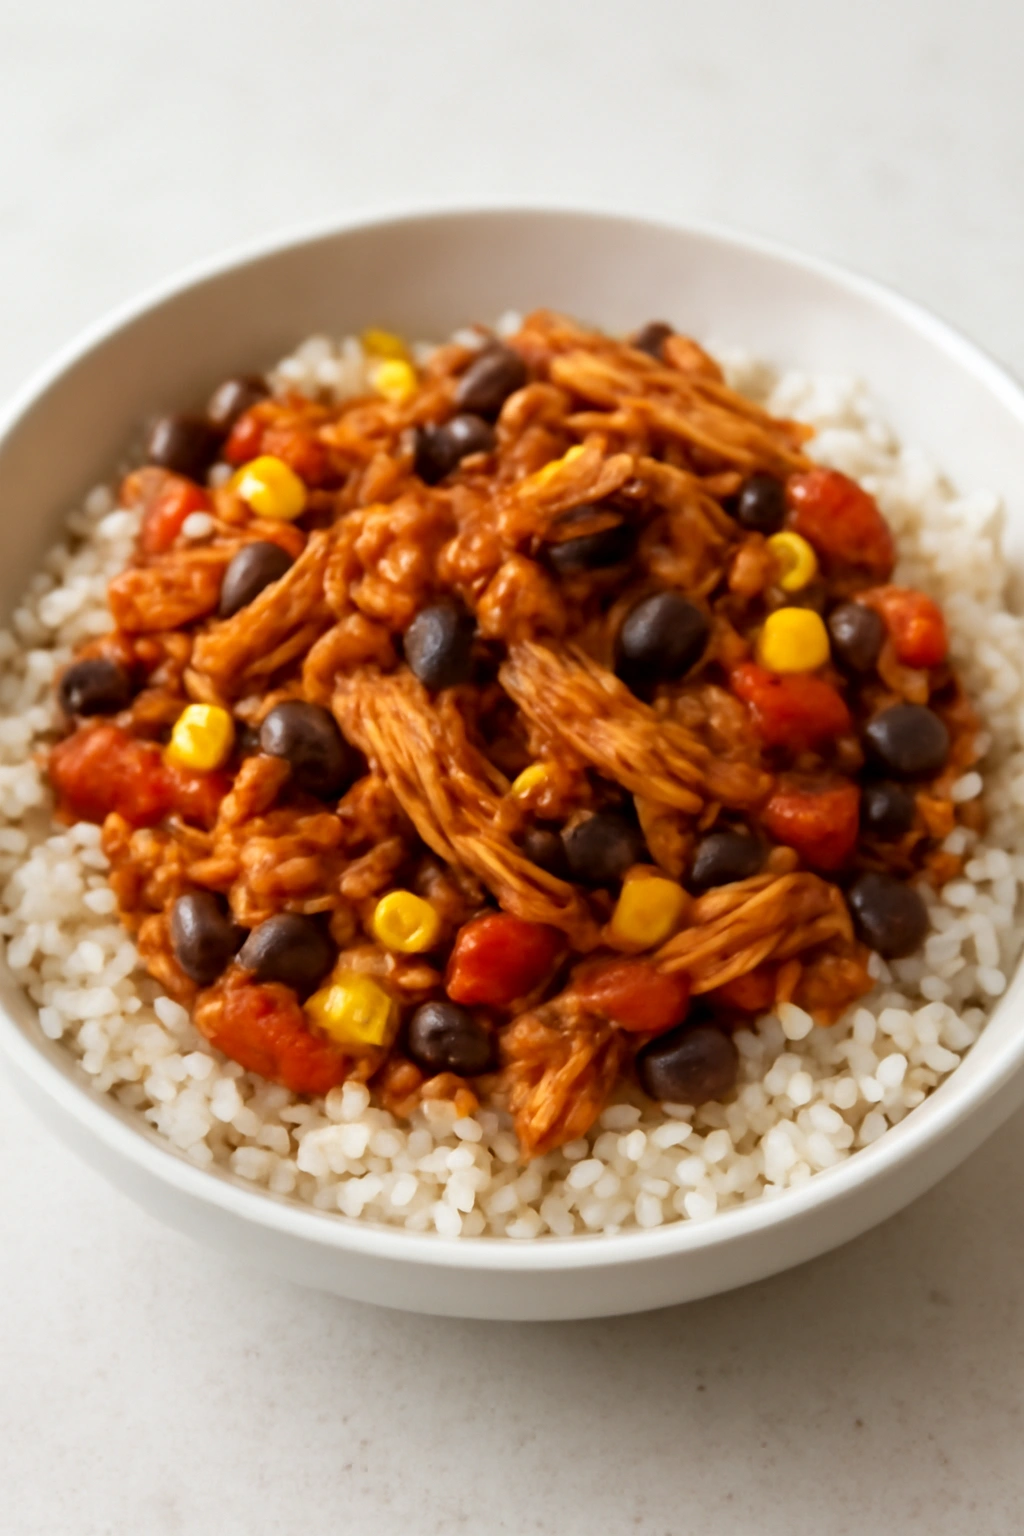
Salsa chicken is the ultimate dump-and-go meal: just layer chicken breasts, salsa, and black beans in the slow cooker, and eight hours later you have the foundation for tacos, burrito bowls, quesadillas, or shredded chicken nachos. This version starts with mild or medium salsa (adjust heat to your preference) and adds black beans, corn, and spices that build flavor without requiring any additional chopping or cooking steps. The chicken comes out so tender it shreds with a fork, and the cooking liquid becomes a sauce that clings to the shredded meat.
Yield: Serves 6 | Prep Time: 10 minutes | Cook Time: 7 to 8 hours on low (or 4 to 5 hours on high) | Total Time: 7 to 8 hours active cooking | Difficulty: Beginner — This is genuinely as simple as it sounds. Everything goes in raw. Nothing needs browning or extra steps.
For the Chicken:
- 6 boneless, skinless chicken breasts (about 2 pounds total)
- 2 cups mild or medium salsa, fresh or jarred (see note below)
- 1 can (15 ounces) black beans, drained and rinsed
- 1 cup frozen corn kernels
- 1 medium red bell pepper, diced
- 1 medium yellow onion, diced
- 2 cloves garlic, minced
- 1 tablespoon ground cumin
- 1 teaspoon chili powder
- ½ teaspoon smoked paprika
- ½ teaspoon fine sea salt
- ¼ teaspoon freshly ground black pepper
- Juice of 1 lime
- Fresh cilantro for garnish (optional)
Layer and Cook:
- Arrange the chicken breasts in a single layer on the bottom of your slow cooker.
- In a large bowl, combine the salsa, black beans, corn, red bell pepper, onion, garlic, cumin, chili powder, smoked paprika, salt, and black pepper. Stir everything together until the spices are evenly distributed.
- Pour the salsa mixture over the chicken breasts, ensuring the liquid covers them by at least halfway. Do not stir the chicken into the mixture — let it sit on the bottom so it cooks evenly.
- Cover the slow cooker and cook on low for 7 to 8 hours, or on high for 4 to 5 hours. The chicken is done when it’s completely cooked through (165°F at the thickest point) and shreds easily with two forks.
- Carefully transfer the cooked chicken to a cutting board and shred it using two forks, pulling in opposite directions until the meat breaks apart into bite-sized pieces.
- Return the shredded chicken to the slow cooker and stir it back into the salsa-bean mixture. Squeeze the lime juice over the top and stir gently to combine. Taste and add additional salt if needed.
- Let the shredded chicken sit in the warm liquid for 5 minutes before serving — this allows it to absorb even more flavor.
Why This Works as a Dump-and-Go Recipe
The beauty here is that boneless, skinless chicken breasts cook through evenly in the moist environment of a slow cooker, and they won’t dry out even if you leave them on low for 8 hours because the salsa and liquid keep them hydrated. You’re not watching the clock — you can leave this cooking all day without fear of overdrying the chicken.
Salsa Chicken Tips and Variations
- Fresh salsa matters: If you have access to good fresh salsa from your grocery store’s prepared foods section, it tastes noticeably better than jarred. But jarred works perfectly fine — just taste it before you buy and pick a brand you actually enjoy eating straight from the jar.
- Make it creamy: Stir in 1 cup of cream cheese (cut into small cubes) or ½ cup of sour cream in the last 30 minutes of cooking for a creamier, richer sauce. Perfect over rice or in burrito bowls.
- Add spice: Use hot salsa instead of mild, or add 1 teaspoon of cayenne pepper and 1 diced jalapeño (seeds removed for less heat) to the mixture.
- Stretch the meat: If serving 8 people instead of 6, add ½ cup of chicken broth to the mixture so there’s more sauce, and the shredded chicken stretches further.
- Cook it on time: This recipe is forgiving on timing — you can cook it on low for 6 hours or 8 hours and it’ll taste essentially the same.
Serving Ideas
Shred the chicken and serve it over white or brown rice with lime wedges, diced avocado, sour cream, and fresh cilantro on the side. Or use it as the filling for tacos, burritos, burrito bowls, or loaded nachos. Make quesadillas by stuffing the shredded chicken between flour tortillas with shredded cheese and cooking in a skillet until golden. Layer it on salads for a quick lunch that tastes like a restaurant burrito bowl.
Storage and Make-Ahead
Store leftovers in an airtight container in the refrigerator for up to 4 days. This freezes beautifully for up to 3 months — freeze it in individual portions so you can grab what you need for quick lunches or easy dinners. Thaw in the refrigerator overnight before reheating. Reheat gently on the stovetop over medium heat, or in the microwave, stirring occasionally.
3. Pot Roast With Mushrooms and Pearl Onions
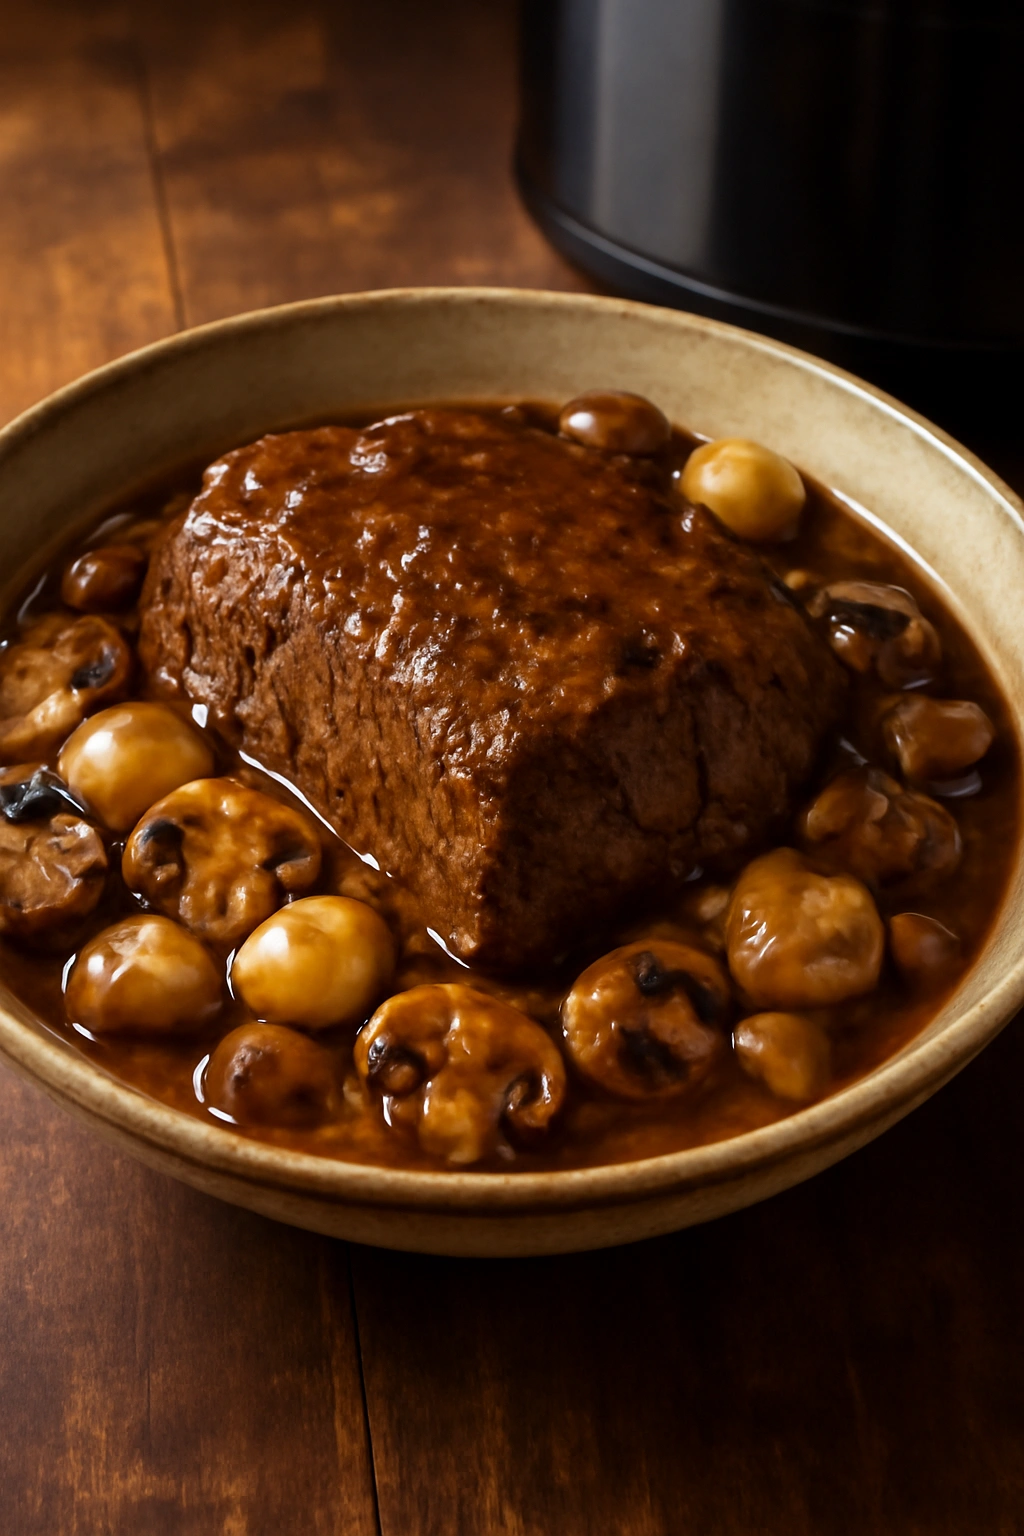
This is a streamlined, more elegant version of beef stew — a whole chuck roast that becomes incredibly tender, surrounded by mushrooms and pearl onions in a silky, reduced gravy. Unlike beef stew with its cubed meat, pot roast keeps everything together, making it feel more like a traditional Sunday dinner. The mushrooms release their moisture as they cook, deepening the broth, and the pearl onions turn sweet and mellow. This is the recipe you make when you want it to feel like you actually cooked something special, but the slow cooker did all the work.
Yield: Serves 6 to 8 | Prep Time: 20 minutes | Cook Time: 8 to 10 hours on low | Total Time: 8 to 10 hours active cooking | Difficulty: Intermediate — Brown the roast first, which takes attention but only 10 minutes. Everything else is hands-off.
For the Pot Roast:
- 1 beef chuck roast (3 to 4 pounds)
- 2 tablespoons olive oil
- 1 teaspoon fine sea salt
- ½ teaspoon freshly ground black pepper
- 1 large yellow onion, peeled and quartered
- 4 cloves garlic, crushed
- 2 cups beef broth
- 1 cup dry red wine
- 3 tablespoons tomato paste
- 2 tablespoons balsamic vinegar
- 1 tablespoon Dijon mustard
- 2 bay leaves
- 1 teaspoon fresh thyme (or ½ teaspoon dried)
- 1 teaspoon fresh rosemary (or ½ teaspoon dried)
- 1 pound baby Bella or cremini mushrooms, halved if large
- 12 ounces pearl onions, peeled (fresh or frozen)
- 2 tablespoons unsalted butter mixed with 2 tablespoons all-purpose flour (beurre manié for thickening)
Brown the Roast:
- Pat the chuck roast completely dry with paper towels. Season generously on all sides with the 1 teaspoon of salt and ½ teaspoon of pepper.
- Heat the olive oil in a large Dutch oven or heavy-bottomed skillet over medium-high heat until it shimmers. Carefully place the roast in the hot oil and sear for 4 to 5 minutes without moving it, until it develops a deep brown crust on the bottom. Turn the roast and sear the other sides for another 3 to 4 minutes each, until all major surfaces are browned. The goal is a rich golden crust, not burned spots.
- Transfer the browned roast to your slow cooker.
- In the same skillet, add the quartered onion and crushed garlic, cooking for about 2 minutes until fragrant. Add the tomato paste and cook for another minute, stirring, until the tomato paste turns darker and slightly caramelized. Pour in the wine and use a wooden spoon to scrape up all the browned bits stuck to the bottom of the pan — this is liquid gold for flavor.
Cook the Roast:
- Pour the wine mixture, beef broth, balsamic vinegar, and Dijon mustard into the slow cooker around the roast.
- Add the bay leaves, thyme, and rosemary. The roast should be about three-quarters submerged in the liquid. If needed, add ½ cup of additional broth to ensure adequate liquid.
- Cover and cook on low for 8 to 10 hours. About 1 hour before the roast is done (so at the 7 to 9-hour mark), add the halved mushrooms and pearl onions to the slow cooker, stirring them into the liquid.
- The roast is done when a fork easily pierces the meat and it’s fall-apart tender. Transfer the cooked roast to a cutting board and tent it loosely with foil to keep it warm.
- Strain the cooking liquid through a fine-mesh sieve into a large saucepan, pressing on the solids to extract all the liquid. Discard the bay leaves and the cooked quartered onion. Return the mushrooms and pearl onions to the pot.
- Bring the strained liquid to a gentle boil over medium heat. To thicken the gravy, whisk the beurre manié (the butter-flour mixture) into the boiling liquid in small amounts, stirring constantly until the gravy reaches your desired thickness. It should coat the back of a spoon.
- Taste the gravy and adjust seasoning with additional salt and pepper. Slice the pot roast and arrange it on a serving platter, pouring the gravy with mushrooms and pearl onions over the top.
Why This Becomes a Show-Stopping Dinner
Browning the roast isn’t optional — it’s what separates a pot roast that tastes restaurant-quality from one that tastes boiled and dull. This step takes 15 minutes and transforms the entire dish. The mushrooms and pearl onions don’t go in until the last hour, so they stay intact and don’t turn to mush during the long cooking time. When you slice into that tender roast and spoon the silky gravy over it, everyone at the table thinks you’ve been cooking all day.
Pot Roast Variations and Tips
- Vegetable additions: In the last hour of cooking, add 2 cups of chopped Brussels sprouts (halved), 3 medium carrots (cut into thick coins), or 1 pound of baby potatoes, or any combination. They’ll cook just right in that final hour.
- Wine-free version: If you prefer not to use alcohol, replace the red wine with 1 additional cup of beef broth. The dish will taste slightly less complex, but still delicious.
- Make it dairy-free: Skip the beurre manié and instead thicken the gravy by whisking 2 tablespoons of cornstarch with 3 tablespoons of cold water to form a slurry, then stirring that into the simmering gravy.
- Leftover transformation: Shred any leftover pot roast, toss it with the mushrooms and gravy, and serve it over egg noodles or mashed potatoes the next night.
Storage
Pot roast keeps for up to 4 days in an airtight container in the refrigerator. The gravy will thicken further as it cools — this is normal and actually desirable. Reheat gently on the stovetop over low heat, stirring occasionally. Add a splash of broth if the gravy has become too thick. Freezes beautifully for up to 3 months.
4. Chili Con Carne
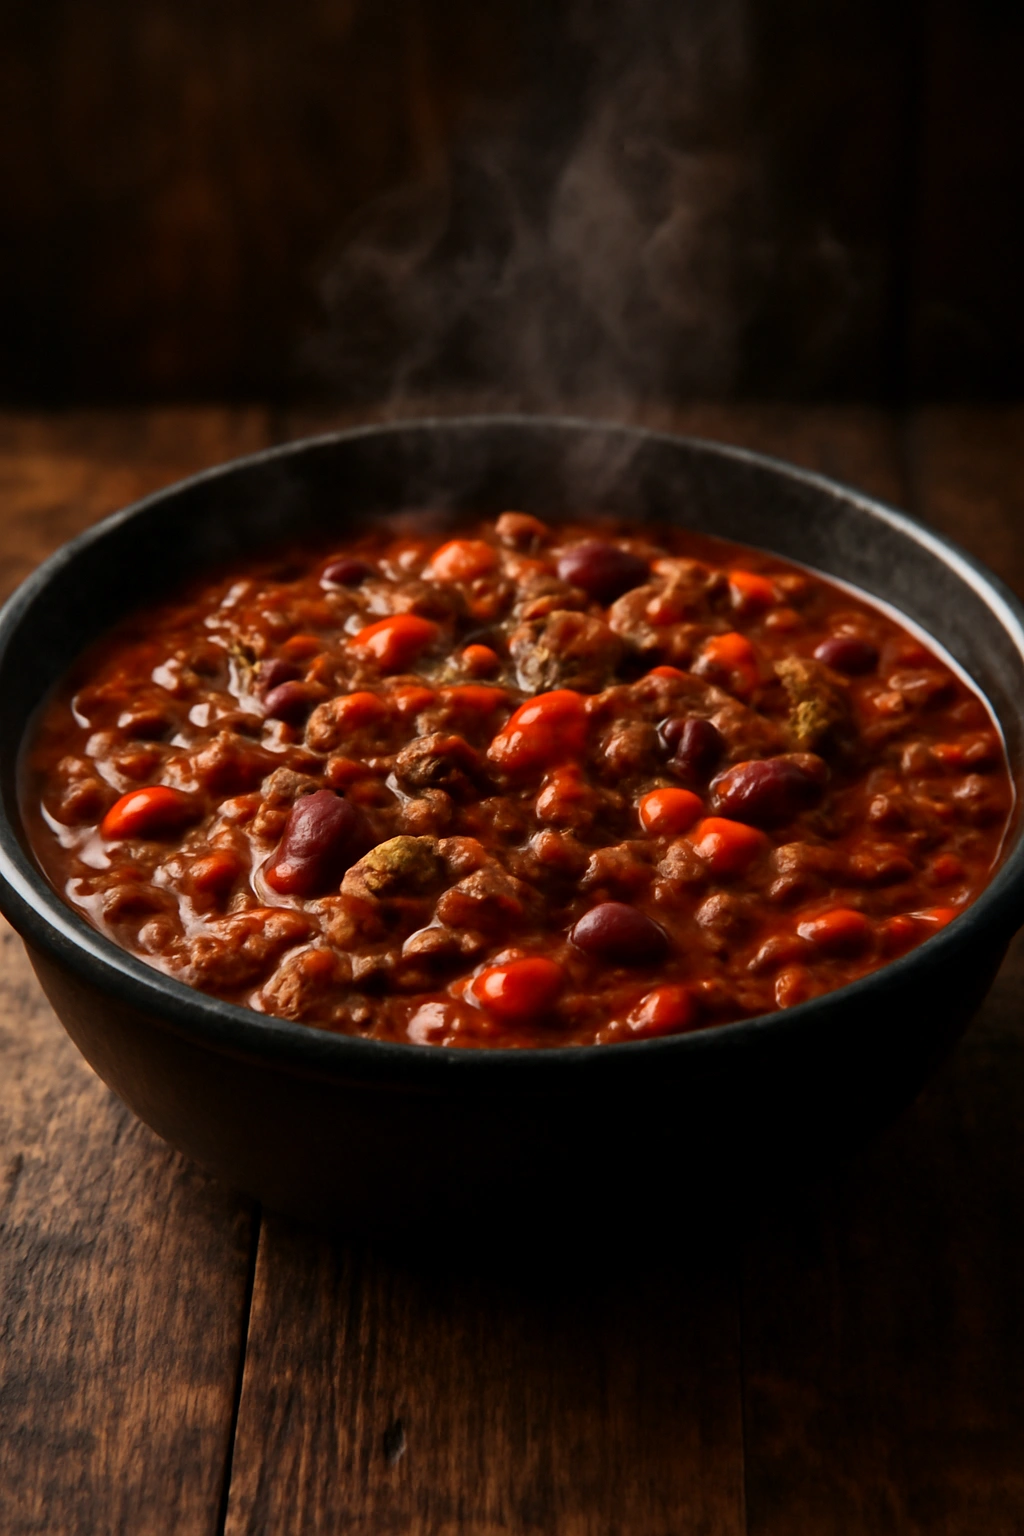
A proper chili is more than a soup — it’s a deeply flavored, meat-forward dish where the spices, the beef, and the beans meld into something complex and satisfying. This version uses two types of dried chiles (for nuanced heat rather than sharp spice), ground beef for texture, and a blend of spices that includes smoked paprika, cumin, and a tiny pinch of cinnamon for depth. The slow cooker is perfect for chili because hours of gentle heat allow all those spices to bloom and develop, and the beef becomes incredibly tender despite being ground.
Yield: Serves 8 | Prep Time: 20 minutes | Cook Time: 6 to 8 hours on low (or 4 to 5 hours on high) | Total Time: 6 to 8 hours active cooking | Difficulty: Beginner to Intermediate — You’ll brown the beef and sauté onions and garlic, which takes 10 minutes. Then everything goes in the slow cooker.
For the Chili:
- 2 pounds ground beef (80/20 blend is ideal)
- 2 tablespoons olive oil
- 1 large yellow onion, diced
- 1 red bell pepper, diced
- 4 cloves garlic, minced
- 3 tablespoons tomato paste
- 2 tablespoons chili powder (mild or medium, depending on heat preference)
- 1 tablespoon ground cumin
- 1½ teaspoons smoked paprika
- 1 teaspoon dried oregano
- ¼ teaspoon cayenne pepper (optional, for more heat)
- ¼ teaspoon ground cinnamon (really — this adds depth, not sweetness)
- 1 teaspoon fine sea salt
- ½ teaspoon freshly ground black pepper
- 2 cans (15 ounces each) kidney beans, drained and rinsed
- 1 can (15 ounces) black beans, drained and rinsed
- 2 cans (14.5 ounces each) crushed tomatoes
- 1 can (6 ounces) tomato paste (double dose for richness — optional but recommended)
- 1 cup beef broth
- 2 tablespoons unsweetened cocoa powder (adds complexity and slight richness)
- 1 tablespoon balsamic vinegar
Brown the Beef:
- Heat the olive oil in a large skillet over medium-high heat. Add the ground beef and cook, breaking it apart with a wooden spoon as it cooks, until it’s no longer pink and has developed some brown color, about 5 to 7 minutes. Drain off excess fat if needed.
- Add the diced onion and bell pepper to the beef, cooking for 3 to 4 minutes until slightly softened. Add the minced garlic and tomato paste, stirring constantly, and cook for 1 to 2 minutes until fragrant and the tomato paste begins to darken slightly.
- Reduce heat to medium and add the chili powder, cumin, smoked paprika, oregano, cayenne (if using), cinnamon, salt, and black pepper. Stir constantly for 1 minute so the spices become fragrant and bloom in the oil.
Cook the Chili:
- Transfer the seasoned beef mixture to your slow cooker.
- Add the kidney beans, black beans, crushed tomatoes, the extra can of tomato paste (if using), beef broth, cocoa powder, and balsamic vinegar. Stir everything together thoroughly, making sure the spices are evenly distributed and the cocoa powder doesn’t sink to the bottom in clumps.
- Cover and cook on low for 6 to 8 hours, or on high for 4 to 5 hours. The longer you cook it, the more the spices develop and meld. Stir occasionally if you’re home and think of it, but it’s not required.
- About 30 minutes before serving, taste the chili and adjust seasoning. Add more salt if needed, or another pinch of chili powder if you want more heat. Remember that flavors will intensify slightly as the chili cools, so don’t over-season.
- Serve hot with your choice of toppings.
Why This Chili Is Different
The cocoa powder is a secret weapon — it adds a subtle richness and slight bitterness that deepens the chili’s flavor without anyone tasting chocolate. The cinnamon does something similar. Together, they transform this from “standard chili” into something with real complexity. The smoked paprika adds a layer of warmth. The balsamic vinegar at the end adds a subtle tang that makes all the flavors pop. These are the kinds of details that separate good chili from restaurant-quality chili.
Chili Variations and Customizations
- White chili: Replace the kidney and black beans with 2 cans (15 ounces each) of white beans. Replace the chili powder with 2 tablespoons of ground cumin and 1 tablespoon of dried oregano. Use chicken broth instead of beef broth and add 2 pounds of diced chicken breasts instead of ground beef. Cook on high for 4 hours. Finish with ½ cup of heavy cream or sour cream stirred in at the end. Garnish with fresh cilantro, lime wedges, and crispy tortilla strips.
- Three-alarm heat: Add 2 diced jalapeños, increase the cayenne to ½ teaspoon, and use hot chili powder instead of mild. Add 1 teaspoon of hot sauce at the end if you want even more punch.
- Vegetarian chili: Omit the beef and add 2 additional cans of beans (pinto, chickpea, or whatever you like). Increase the tomato paste to 4 tablespoons total. Add 2 cups of diced mushrooms and 1 cup of diced sweet potato for heartiness and body. Cook on low for 6 hours.
- Stretch it: Add 2 to 3 cups of additional beef broth to make a brothier, soupier chili that stretches to 10 servings.
Toppings and Serving Ideas
Serve chili with a variety of toppings so everyone can customize theirs: shredded cheddar cheese, diced onions, sour cream, fresh cilantro, lime wedges, crispy tortilla strips, diced jalapeños, and cornbread on the side. Chili is also the perfect topping for hot dogs, baked potatoes, or rice. Leftovers make exceptional burrito filling or nachos.
Storage and Make-Ahead
Chili tastes even better the next day after flavors have had time to meld. Store in airtight containers in the refrigerator for up to 5 days. Freezes beautifully for up to 3 months in freezer bags or containers. To thaw, leave in the refrigerator overnight, then reheat on the stovetop over medium heat, stirring occasionally and adding a splash of broth if it’s too thick.
5. Honey Garlic Chicken Thighs

Chicken thighs are the best cut for slow cooking — more forgiving than breasts, they stay moist and flavorful even after hours of gentle heat. This honey garlic version uses a combination of soy sauce, honey, garlic, and ginger to create a sweet-savory glaze that coats the meat and reduces into a silky sauce. Thighs have enough fat to stay juicy, and the skin crisps beautifully if you finish them in the oven or under the broiler, though that’s optional.
Yield: Serves 6 | Prep Time: 10 minutes | Cook Time: 6 to 7 hours on low (or 3 to 4 hours on high) | Total Time: 6 to 7 hours active cooking | Difficulty: Beginner — Dump everything in and you’re done. No browning required.
For the Chicken:
- 8 boneless, skin-on chicken thighs (about 2.5 pounds total)
- ¾ cup low-sodium soy sauce
- ½ cup raw honey
- 6 cloves garlic, minced
- 1 tablespoon grated fresh ginger (or 1 teaspoon ground ginger)
- 1 tablespoon rice vinegar
- 1 tablespoon sesame oil
- ½ teaspoon freshly ground black pepper
- 1 teaspoon red pepper flakes (optional, for a little heat)
- 2 tablespoons cornstarch mixed with 3 tablespoons cold water (for thickening)
- 2 green onions, sliced (for garnish)
- 1 teaspoon toasted sesame seeds (for garnish, optional)
Cook the Chicken:
- Arrange the chicken thighs skin-side up in your slow cooker, trying to fit them in a relatively even layer.
- In a bowl, whisk together the soy sauce, honey, minced garlic, ginger, rice vinegar, sesame oil, black pepper, and red pepper flakes (if using). Pour this mixture over the chicken thighs, making sure to coat them.
- Cover and cook on low for 6 to 7 hours, or on high for 3 to 4 hours. The chicken is done when it’s completely cooked through (165°F at the thickest part).
- Carefully transfer the cooked chicken thighs to a serving platter and tent with foil to keep them warm.
- Strain the cooking liquid into a large saucepan. Skim off and discard excess fat from the surface of the liquid if there’s a lot (a little is fine — it adds flavor).
- Bring the liquid to a gentle boil over medium-high heat. Whisk the cornstarch slurry (cornstarch mixed with water) and slowly drizzle it into the simmering liquid while stirring constantly. Continue whisking until the sauce reaches the consistency of a light glaze — it should coat the back of a spoon.
- Taste and add a splash more soy sauce if you want more saltiness, or a drizzle more honey if you want more sweetness.
- Pour the sauce over the chicken thighs and garnish with sliced green onions and sesame seeds if using.
Why Thighs Over Breasts
Chicken thighs contain more fat than breasts, which keeps them from drying out during long cooking. They also taste more flavorful — darker poultry meat has more depth than white meat. After 6 hours in the slow cooker, thighs are fork-tender and delicious, while breasts can become stringy if overcooked.
Optional Crispy-Skin Finish
For crispy skin, after cooking, transfer the chicken thighs skin-side up to a baking sheet and broil them 4 to 6 inches from the heat for 2 to 3 minutes until the skin crisps and browns. Watch carefully so they don’t burn. This step transforms the texture from soft to crispy-tender, though it’s entirely optional if you’re happy with the slow-cooker texture.
Honey Garlic Chicken Variations
- Add vegetables: About 1 hour before the chicken is done, add 3 cups of diced vegetables — broccoli, bell peppers, snap peas, carrots — so they cook just enough but don’t turn mushy.
- Make it spicier: Increase the red pepper flakes to 1 to 2 teaspoons, or add 1 diced Thai chili or jalapeño to the sauce mixture.
- Add heat with richness: Stir in 1 tablespoon of Sriracha or chili sauce into the glaze after straining.
- Orange angle: Replace ¼ cup of the soy sauce with fresh orange juice and add the zest of 1 orange for a citrus-forward version.
Serving Ideas
Serve the honey garlic chicken and sauce over steamed white or brown rice, with a side of steamed broccoli or sautéed bok choy. Use it in grain bowls with quinoa, roasted vegetables, and a fried egg on top. Shred the meat and use it in lettuce wraps or rice bowls. The leftover sauce is exceptional over simple steamed vegetables or fried rice.
Storage and Reheating
Store in an airtight container in the refrigerator for up to 4 days. Reheat gently on the stovetop over medium heat, or in the slow cooker on low for 30 minutes to 1 hour. Freezes for up to 3 months — thaw in the refrigerator overnight before reheating. The sauce will thicken as it cools, so add a splash of water when reheating if it becomes too thick.
6. Mexican Pork Carnitas
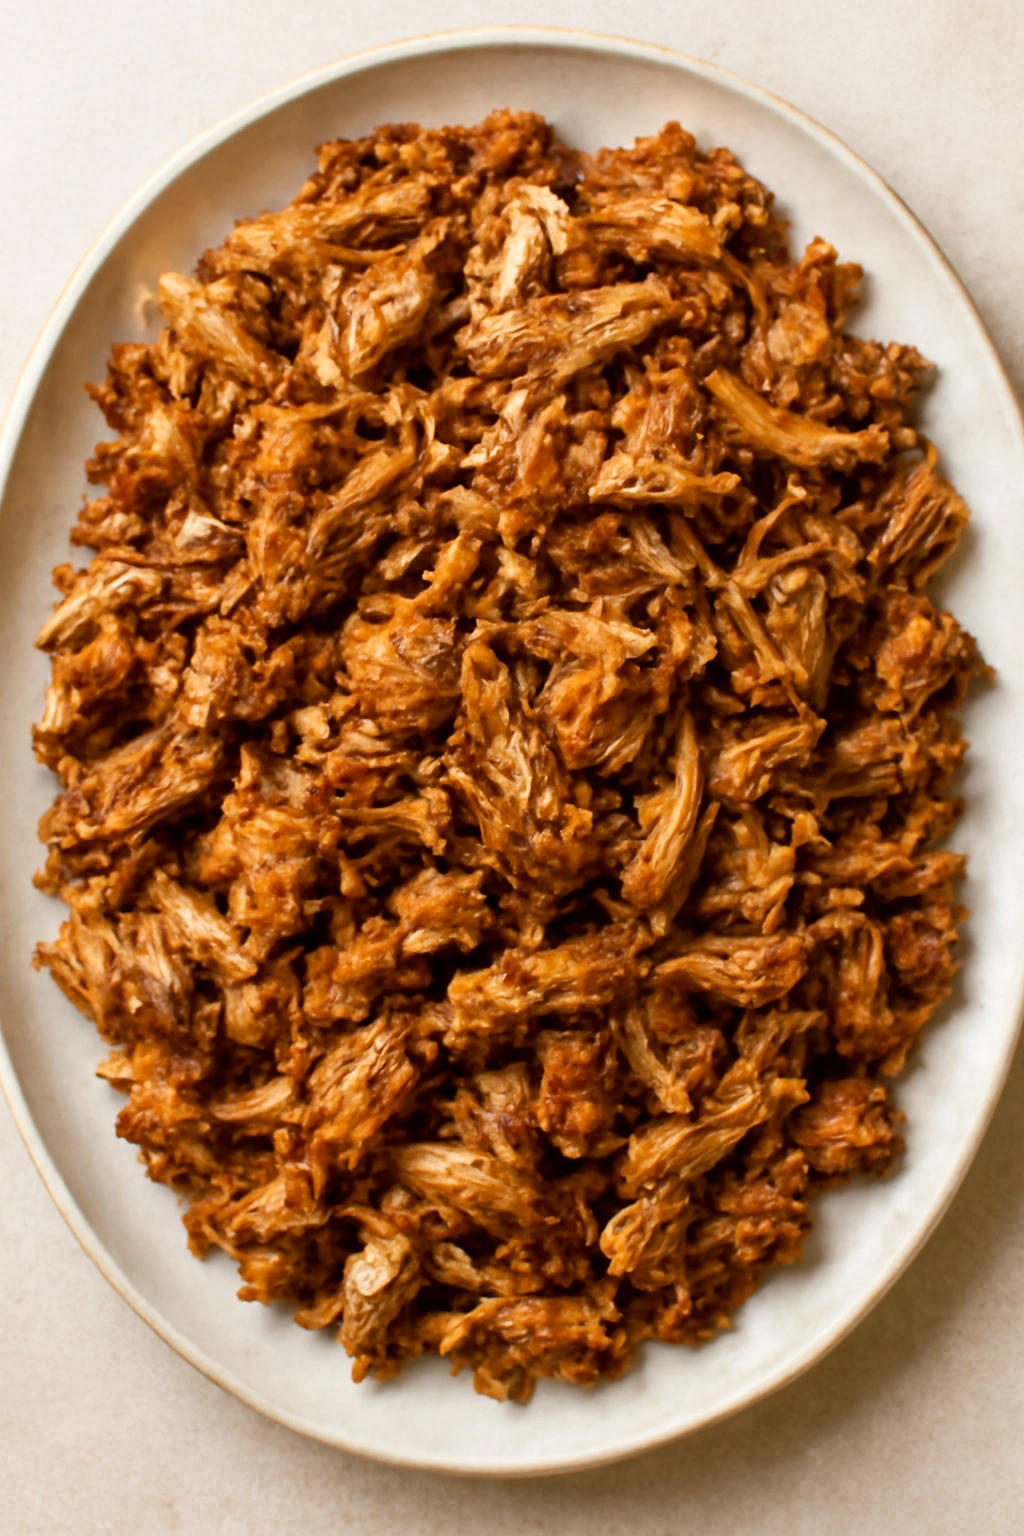
Carnitas are slow-roasted pork shoulder that becomes so tender it shreds with a spoon, flavored with citrus, spices, and bay leaves. Traditional carnitas are cooked in lard, but this slow cooker version gets deep flavor and incredible tenderness without the extra fat. The meat is perfect for tacos, burrito bowls, nachos, or pulled apart and piled onto tostadas.
Yield: Serves 8 | Prep Time: 15 minutes | Cook Time: 8 to 9 hours on low (or 5 to 6 hours on high) | Total Time: 8 to 9 hours active cooking | Difficulty: Beginner — Just season the pork, layer it with aromatics, and let the slow cooker do the work.
For the Carnitas:
- 1 pork shoulder (also called pork butt), about 4 pounds, cut into 2 to 3-inch chunks
- 1 large yellow onion, peeled and quartered
- 6 cloves garlic, crushed
- 2 dried ancho chiles, stemmed and seeds removed (or use 2 tablespoons chili powder if dried chiles aren’t available)
- 2 bay leaves
- 1 teaspoon ground cumin
- 1 teaspoon dried oregano
- ½ teaspoon ground coriander
- ¼ teaspoon ground cloves
- ½ teaspoon freshly ground black pepper
- 1 teaspoon fine sea salt
- Zest of 2 oranges (about 2 tablespoons)
- Juice of 2 oranges (about ½ cup)
- Juice of 1 lime
- 1 cinnamon stick (optional but adds nice warmth)
- ½ cup pork or chicken broth
Layer and Cook:
- Arrange the pork chunks in your slow cooker, skin-side down if any pieces have skin.
- Scatter the quartered onion and crushed garlic around the pork.
- If using whole dried ancho chiles, add them now. If using chili powder, hold off and add it with the spices in the next step.
- In a small bowl, combine the ground cumin, oregano, coriander, cloves, black pepper, and salt.
- Sprinkle this spice mixture evenly over the pork. Add the bay leaves, orange zest, orange juice, lime juice, cinnamon stick (if using), and broth.
- Cover and cook on low for 8 to 9 hours, or on high for 5 to 6 hours. The pork is done when it’s completely tender and shreds easily with two forks. (If using whole dried chiles, they should be completely softened by the end of cooking time.)
- Turn off the heat and allow the pork to cool in the liquid for about 15 minutes so you can handle it safely.
- Using tongs, carefully transfer the cooked pork to a cutting board. Using two forks, shred the meat into bite-sized pieces, pulling in opposite directions. Discard any large chunks of fat or gristle.
- Strain the cooking liquid into a saucepan, pressing gently on the solids to extract as much liquid as possible. Discard the bay leaves, cinnamon stick, onion, garlic, and dried chiles. You should have 1 to 1.5 cups of liquid.
- If using whole dried chiles, blend them with the cooking liquid until smooth, then strain through a fine-mesh sieve to remove seeds and skins. This creates a richer sauce.
- Return the shredded pork to the slow cooker and pour the liquid over it. Stir to combine, taste, and add additional salt or lime juice if needed.
Why Citrus and Spices Matter Here
The combination of orange juice and lime juice is essential — it adds brightness and prevents the pork from tasting heavy and one-note. The spice combination (cumin, oregano, coriander, cloves) creates a complex, layered flavor that tastes like restaurant carnitas. The dried chiles add an almost-smoky depth if you take the time to blend them into the sauce.
Carnitas Variations and Tips
- Skip the chiles: If you can’t find dried ancho chiles or prefer a simpler version, omit them and use 2 tablespoons of chili powder instead. It’ll taste delicious and is still very much carnitas.
- Brown the pork first (optional): For even more intense flavor, pat the pork dry and brown it in batches in a hot skillet before adding to the slow cooker. This adds 15 minutes but elevates the final dish.
- Make it spicier: Add 1 to 2 diced jalapeños and increase the chili powder or use hot chiles instead of ancho.
- Serve with crispy edges: After shredding, spread the carnitas on a baking sheet and broil for 2 to 3 minutes until the edges crisp up and brown, then transfer to a serving dish.
Serving and Toppings
Warm corn or flour tortillas, top with shredded carnitas, and add diced onion, fresh cilantro, lime wedges, avocado, and a spoonful of salsa. Build nachos by layering tortilla chips with warm carnitas, melted cheese, jalapeños, and sour cream. Or serve in burrito bowls with rice, black beans, roasted vegetables, and all the toppings. The meat is also excellent on tostadas, in quesadillas, or on loaded nachos.
Storage and Make-Ahead
Carnitas actually improve overnight as flavors continue to meld. Store in an airtight container in the refrigerator for up to 5 days. Freezes beautifully for up to 3 months — freeze in portions so you can grab what you need. To reheat, warm gently on the stovetop over medium heat, stirring occasionally and adding a splash of water if needed.
7. Creamy Tuscan Chicken

This Italian-inspired slow cooker dish is elegant enough for dinner guests but simple enough for a weeknight. The chicken cooks in a creamy tomato and garlic sauce with sun-dried tomatoes, spinach, and fresh basil, resulting in something that tastes like it came from a restaurant kitchen. Boneless, skinless chicken breasts stay tender and moist when surrounded by the creamy sauce.
Yield: Serves 6 | Prep Time: 15 minutes | Cook Time: 6 to 7 hours on low (or 4 to 5 hours on high) | Total Time: 6 to 7 hours active cooking | Difficulty: Beginner — Everything goes in at once. No browning, no complicated steps.
For the Chicken:
- 6 boneless, skinless chicken breasts (about 2 pounds)
- 1 can (14.5 ounces) diced tomatoes with Italian herbs
- ½ cup sun-dried tomatoes packed in oil, chopped (plus 1 tablespoon of the oil)
- ½ cup chicken broth
- 4 cloves garlic, minced
- 1 medium yellow onion, diced
- 1 teaspoon Italian seasoning
- ½ teaspoon fine sea salt
- ¼ teaspoon freshly ground black pepper
- ⅛ teaspoon red pepper flakes (optional)
- 4 ounces cream cheese, cut into small cubes
- ½ cup heavy cream
- 3 cups fresh baby spinach
- ¼ cup fresh basil, roughly chopped (or 1 tablespoon dried basil if fresh isn’t available)
- ¼ cup grated Parmesan cheese
Cook the Chicken:
- Arrange the chicken breasts in the bottom of your slow cooker.
- In a bowl, combine the canned diced tomatoes (with their juice), chopped sun-dried tomatoes, the tablespoon of oil from the sun-dried tomato jar, chicken broth, minced garlic, diced onion, Italian seasoning, salt, black pepper, and red pepper flakes if using. Pour this mixture over the chicken, ensuring the breasts are at least halfway submerged.
- Cover and cook on low for 6 to 7 hours, or on high for 4 to 5 hours. The chicken is done when it’s completely cooked through (165°F at the thickest part).
- Carefully transfer the cooked chicken to a cutting board and cut it into bite-sized pieces or leave it whole, depending on preference.
- In the slow cooker with the cooking liquid, add the cubed cream cheese, stirring frequently until it melts completely into the sauce. This will take 2 to 3 minutes of stirring.
- Add the heavy cream and stir to combine. Taste and adjust seasoning with additional salt or pepper if needed.
- Stir in the fresh spinach, allowing it to wilt into the sauce, about 1 to 2 minutes of stirring.
- Add the chopped fresh basil (if using fresh; if using dried, you can add it before cooking) and stir gently.
- Return the chicken pieces to the slow cooker and stir gently to coat with the creamy sauce. Let it warm through for 2 to 3 minutes.
Why This Tastes Like a Restaurant Dish
Sun-dried tomatoes add concentrated tomato flavor and slight tang that canned tomatoes alone can’t provide. The combination of cream cheese and heavy cream creates a sauce that’s velvety without being heavy. Fresh basil added at the very end (instead of during cooking) provides brightness and aromatic punch that complements the deep tomato flavors perfectly.
Tuscan Chicken Variations
- Add vegetables: About 30 minutes before the chicken is done, add 1 cup of sliced mushrooms, 1 cup of diced bell peppers, or 1 cup of artichoke hearts.
- Make it lighter: Use half-and-half instead of heavy cream, and use only 2 ounces of cream cheese. The sauce will be thinner but still creamy and delicious.
- Add caramelized onions: For deeper flavor, caramelize 1 large onion separately in a skillet for 15 minutes before adding to the slow cooker with the sauce.
- Make it gluten-free: This recipe is naturally gluten-free, but double-check your canned tomatoes and broth labels to ensure they’re not thickened with flour.
Serving Ideas
Serve the creamy Tuscan chicken over pappardelle or fettuccine pasta, with a side of garlic bread for soaking up the sauce. Or serve over creamy mashed potatoes, cauliflower rice, or a bed of rice. Pair with a simple green salad dressed with lemon vinaigrette to balance the richness.
Storage and Reheating
Store in an airtight container in the refrigerator for up to 3 days. Reheat gently on the stovetop over medium-low heat, stirring occasionally. Add a splash of broth or cream if the sauce seems too thick. Can be frozen for up to 2 months, though the texture of the cream sauce may be slightly grainier after thawing (still delicious, just less silky).
8. Korean Beef Bulgogi

Bulgogi is thinly sliced beef in a sweet and savory marinade featuring soy sauce, brown sugar, ginger, and garlic. In a slow cooker, it becomes absurdly tender, and the marinade reduces into a glossy glaze. This version is perfect for serving over rice with steamed vegetables, or tucked into lettuce wraps, or piled onto sandwiches.
Yield: Serves 6 to 8 | Prep Time: 15 minutes | Cook Time: 5 to 6 hours on low (or 3 to 4 hours on high) | Total Time: 5 to 6 hours active cooking | Difficulty: Beginner — No browning required. Just assemble ingredients and let the slow cooker work.
For the Bulgogi:
- 3 pounds beef sirloin or flank steak, sliced as thin as possible (ask your butcher to slice it, or partially freeze for 1 hour then slice)
- ¾ cup low-sodium soy sauce
- ⅓ cup brown sugar, packed
- 4 cloves garlic, minced
- 1 tablespoon grated fresh ginger (or 1 teaspoon ground ginger)
- 2 tablespoons rice vinegar
- 1 tablespoon sesame oil
- ¼ teaspoon freshly ground black pepper
- ¼ teaspoon red pepper flakes (optional)
- 1 small onion, thinly sliced
- 3 green onions, white and light green parts, chopped
- 1 teaspoon toasted sesame seeds
- 2 tablespoons cornstarch mixed with 3 tablespoons water (for optional thickening)
Cook the Beef:
- Layer the sliced beef in your slow cooker, breaking up any clumps so the pieces are relatively separated.
- In a bowl, whisk together the soy sauce, brown sugar, minced garlic, ginger, rice vinegar, sesame oil, black pepper, and red pepper flakes (if using) until the sugar dissolves.
- Pour this marinade over the beef and scatter the sliced onion throughout. Stir gently to coat the beef in the marinade.
- Cover and cook on low for 5 to 6 hours, or on high for 3 to 4 hours. The beef is done when it’s completely tender and has absorbed the flavors.
- If you prefer a thicker, more glaze-like sauce, strain the cooking liquid into a saucepan, bring it to a boil, then whisk in the cornstarch slurry. Cook until the sauce thickens and becomes glossy, about 2 minutes. Return the thickened sauce to the slow cooker with the beef.
- Garnish with chopped green onions and toasted sesame seeds.
Why Thin-Sliced Beef Works So Well
Thinly sliced meat has a much higher surface area, which means the marinade penetrates quickly and evenly. The thin pieces become incredibly tender during slow cooking because there’s less muscle fiber to break down. Ask your butcher to slice the meat for you, or buy flank steak and partially freeze it (about 1 hour in the freezer) so it’s firm enough to slice thinly with a sharp knife.
Bulgogi Variations and Serving Ideas
- Serve in lettuce wraps: Place a piece of lettuce (butter lettuce, romaine, or leafy green lettuce) on a plate, fill with bulgogi and rice, add kimchi if you have it, and roll it up like a taco.
- Rice bowl: Serve over steamed white or brown rice with steamed vegetables like broccoli or bok choy.
- Sandwich: Pile the bulgogi onto a toasted bun with pickled vegetables and a drizzle of sesame mayonnaise.
- Add vegetables: About 1 hour before the beef is done, add 3 cups of diced bell peppers, mushrooms, or zucchini so they cook just right and stay firm.
- Make it spicier: Add 1 tablespoon of gochujang (Korean chili paste) or increase the red pepper flakes to ½ teaspoon.
Storage and Make-Ahead
Store in an airtight container in the refrigerator for up to 4 days. Freezes beautifully for up to 3 months. Thaw in the refrigerator overnight and reheat gently on the stovetop over medium heat or in the slow cooker on low for 30 minutes.
9. Chicken Shawarma
Shawarma is a Middle Eastern spiced meat that’s traditionally cooked on a rotisserie but works perfectly in a slow cooker. The chicken absorbs flavors from a warming spice blend of turmeric, cumin, coriander, and paprika, plus garlic, lemon, and yogurt. Serve it in warm pita bread with tahini sauce, cucumber, tomatoes, and red onion for a restaurant-quality meal at home.
Yield: Serves 6 to 8 | Prep Time: 15 minutes | Cook Time: 6 to 7 hours on low (or 4 to 5 hours on high) | Total Time: 6 to 7 hours active cooking | Difficulty: Beginner — Mix the spices, coat the chicken, and let it cook.
For the Chicken:
- 2.5 pounds boneless, skinless chicken thighs, cut into bite-sized pieces (thighs are better than breasts here — they stay moister)
- 6 cloves garlic, minced
- ¼ cup olive oil
- 3 tablespoons fresh lemon juice
- 2 tablespoons plain Greek yogurt
- 1 teaspoon ground turmeric
- 1 teaspoon ground cumin
- 1 teaspoon ground coriander
- 1 teaspoon smoked paprika
- ½ teaspoon cayenne pepper (adjust to taste)
- ½ teaspoon freshly ground black pepper
- 1 teaspoon fine sea salt
- ½ teaspoon ground cinnamon (adds warmth)
- 1 medium onion, sliced
- ½ cup chicken broth
For Serving:
- Warm pita bread
- Tahini sauce (¼ cup tahini mixed with 2 tablespoons lemon juice, 1 clove minced garlic, ¼ teaspoon salt, and 2 to 3 tablespoons water until pourable)
- Sliced cucumbers
- Diced tomatoes
- Thinly sliced red onion
- Fresh cilantro or parsley
Cook the Chicken:
- In a bowl, combine the minced garlic, olive oil, lemon juice, Greek yogurt, turmeric, cumin, coriander, smoked paprika, cayenne, black pepper, salt, and cinnamon to form a paste.
- Add the chicken pieces to the slow cooker and pour the spice paste over them, stirring until all pieces are evenly coated.
- Scatter the sliced onion throughout and add the chicken broth.
- Cover and cook on low for 6 to 7 hours, or on high for 4 to 5 hours. The chicken is done when it’s completely tender and cooked through.
- Taste and adjust seasoning with additional salt or lemon juice if needed.
About the Spice Blend
This combination of spices is warming, fragrant, and not spicy — the cayenne just adds a background tingle. The turmeric gives everything a slightly golden hue and earthy flavor. The cinnamon adds a subtle sweetness and warmth without making the dish taste like dessert. If you can’t find all these spices, you can buy a pre-made shawarma spice blend and use about 3 tablespoons instead.
Making Tahini Sauce
Tahini sauce is essential to shawarma — it’s the creamy, tangy component that balances the spiced chicken. Make it fresh right before serving by whisking tahini with lemon juice, minced garlic, salt, and water until it reaches a pourable consistency, like salad dressing. It should coat a spoon lightly and drip slowly.
Shawarma Assembly
Warm a pita bread in a dry skillet for 30 seconds per side until soft and pliable. Spread a layer of tahini sauce on the inside, add a generous handful of shredded chicken, top with sliced cucumbers, diced tomatoes, thinly sliced red onion, and fresh cilantro. Wrap the warm pita around the filling and serve immediately.
Shawarma Variations
- Add roasted vegetables: Roast 2 cups of cubed vegetables (bell peppers, zucchini, eggplant, cauliflower) in a 425°F oven with olive oil, salt, and the same spice blend for 25 to 30 minutes, then serve alongside or mixed into the chicken.
- Make it vegetarian: Use chickpeas or cauliflower instead of chicken. Cut cauliflower into florets, coat in the spice paste, and cook for 4 hours on low.
- Serve over rice: Skip the pita and serve the shawarma over fluffy rice with all the fresh toppings scattered on top, drizzled with tahini sauce.
Storage
Store the cooked chicken in an airtight container in the refrigerator for up to 4 days. Store the tahini sauce separately. Freezes for up to 3 months. Reheat gently on the stovetop or in the slow cooker on low.
10. Beef and Guinness Stew
This is a dark, rich, deeply flavored Irish-style stew made with beef, stout beer, and plenty of caramelized vegetables. The Guinness adds a subtle bitterness and roasted depth that regular beef broth can’t provide. The meat becomes fall-apart tender, and the gravy is dark and glossy. Serve it with crusty bread or over mashed potatoes for soaking up every last drop of sauce.
Yield: Serves 8 | Prep Time: 25 minutes | Cook Time: 8 to 10 hours on low | Total Time: 8 to 10 hours active cooking | Difficulty: Intermediate — You’ll brown the beef and caramelize the vegetables, which takes 20 minutes. Everything else is hands-off.
For the Stew:
- 3 pounds beef chuck roast, cut into 1-inch cubes
- 3 tablespoons olive oil
- 1 teaspoon fine sea salt
- ½ teaspoon freshly ground black pepper
- 3 large carrots, peeled and cut into 1-inch pieces
- 4 large Yukon Gold potatoes, peeled and cut into 1.5-inch cubes
- 2 medium parsnips, peeled and cut into 1-inch pieces
- 1 large yellow onion, cut into large chunks
- 6 cloves garlic, minced
- 3 tablespoons tomato paste
- 2 tablespoons all-purpose flour (in addition to coating the beef)
- 1.5 cups Guinness stout beer (or any dark stout)
- 2 cups beef broth
- 2 tablespoons balsamic vinegar
- 2 bay leaves
- 2 teaspoons fresh thyme leaves (or 1 teaspoon dried)
- 1 teaspoon fresh rosemary (or ½ teaspoon dried)
- 2 tablespoons unsalted butter mixed with 2 tablespoons all-purpose flour (beurre manié, for thickening)
- 1 tablespoon fresh parsley, chopped (for garnish)
Brown the Beef:
- Pat the beef cubes completely dry with paper towels. Season with 1 teaspoon of salt and ½ teaspoon of pepper.
- Heat 2 tablespoons of olive oil in a large Dutch oven or heavy skillet over medium-high heat until it shimmers. Working in two batches, sear the beef cubes for 3 to 4 minutes per side until they develop a deep golden crust. Don’t move them around — let them sit and brown. Transfer the browned beef to your slow cooker.
- In the same skillet, heat the remaining 1 tablespoon of olive oil. Add the onion chunks and cook for 4 to 5 minutes, stirring occasionally, until they begin to caramelize and turn golden at the edges. Add the minced garlic and tomato paste, stirring and cooking for 1 to 2 minutes until fragrant and the tomato paste darkens slightly.
- Sprinkle the 2 tablespoons of flour over the vegetable mixture and stir constantly for 1 minute to cook out the raw flour taste, creating a paste that will help thicken the stew later.
- Pour the Guinness into the skillet and use a wooden spoon to scrape the bottom, loosening all the browned bits. Let it simmer for 1 to 2 minutes, then pour the entire mixture into the slow cooker with the beef.
Cook the Stew:
- Add the beef broth, balsamic vinegar, bay leaves, thyme, and rosemary to the slow cooker. Stir well.
- Add the carrots, potatoes, and parsnips, stirring them into the liquid.
- Cover and cook on low for 8 to 10 hours. About 1 hour before the stew is done, check that the beef is nearly fall-apart tender and the vegetables are almost done.
- The stew should be finished when the beef is fork-tender and breaks apart easily, and the potatoes are completely soft.
- Remove the bay leaves. To create a silkier, more luxurious gravy, whisk the beurre manié (butter-flour mixture) into the stew in small amounts, stirring constantly, until you reach the desired thickness. The gravy should coat the back of a spoon.
- Taste and adjust seasoning with additional salt and pepper. Garnish with fresh chopped parsley.
Why Guinness Instead of Wine
Dark stout beer adds a roasted, slightly bitter depth that’s different from red wine. The flavors meld beautifully with beef and root vegetables. You don’t taste “beer” in the finished stew — instead you taste a dark, complex richness that makes people ask for the recipe.
Beef and Guinness Stew Variations
- Add mushrooms: Stir in 1 pound of halved button, cremini, or portobello mushrooms about 2 hours before the stew is done. Mushrooms add umami and texture.
- Make it gluten-free: Replace the flour coating and the flour in the beurre manié with cornstarch in a 1:1 ratio.
- Dairy finish (optional): For a richer, silkier finish, stir in ½ cup of heavy cream or sour cream just before serving. This adds luxurious texture.
- Beer substitute: If you don’t want to use alcohol, replace the Guinness with 1.5 cups of additional beef broth plus 2 teaspoons of molasses or brown sugar to mimic the roasted flavor of the beer.
Serving Suggestions
Serve the stew in deep bowls with crusty bread for soaking up the gravy, or over creamy mashed potatoes. A simple green salad with acidic vinaigrette balances the richness of the stew. This is the kind of food that pairs perfectly with a glass of red wine or a pint of the same stout you cooked with.
Storage and Reheating
This stew tastes even better the next day after flavors have melded overnight. Store in an airtight container in the refrigerator for up to 4 days. Freezes beautifully for up to 3 months. Reheat gently on the stovetop over medium heat, stirring occasionally. If the gravy has thickened too much after refrigerating or freezing, add a splash of broth when reheating.
Final Thoughts

Dump-and-go slow cooker recipes are a game-changer for anyone juggling a busy life but unwilling to sacrifice real, home-cooked food. These ten recipes represent a range of flavors and cuisines — from Italian to Mexican, Korean to Irish — so you never get bored cycling through them week after week. The key to success is prepping your ingredients the night before if mornings are chaotic, investing in a quality slow cooker (at least 5-6 quarts for family-sized portions), and always reading through the full recipe once before you start, so you understand the flow.
The difference between a slow cooker meal that tastes flat and one that tastes restaurant-quality often comes down to those extra 10 minutes spent browning meat or caramelizing vegetables before everything goes into the pot. That step builds flavor through the Maillard reaction, creating depth that low, slow cooking alone can’t achieve. It’s worth the small investment of time upfront.
Start with one or two recipes that appeal to you most, make them a few times until they become routine, then gradually add more to your rotation. Before long, you’ll have a repertoire of weeknight meals that require almost no hands-on time, feed your whole family, and taste like you’ve been cooking all day. That’s the real magic of the slow cooker.