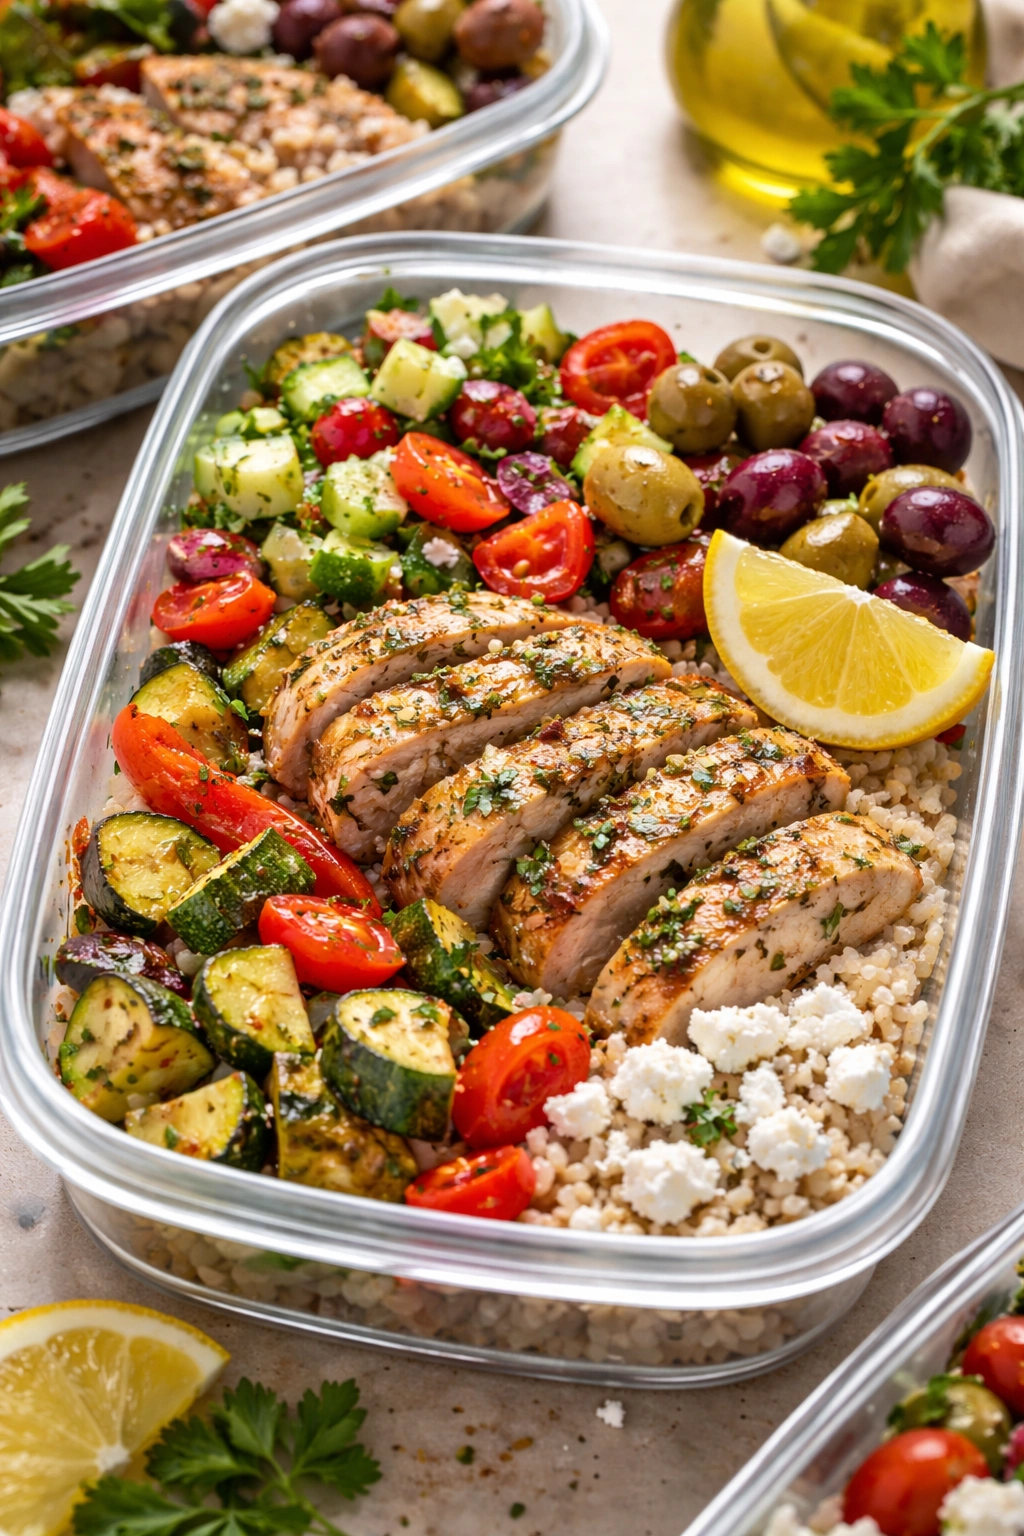
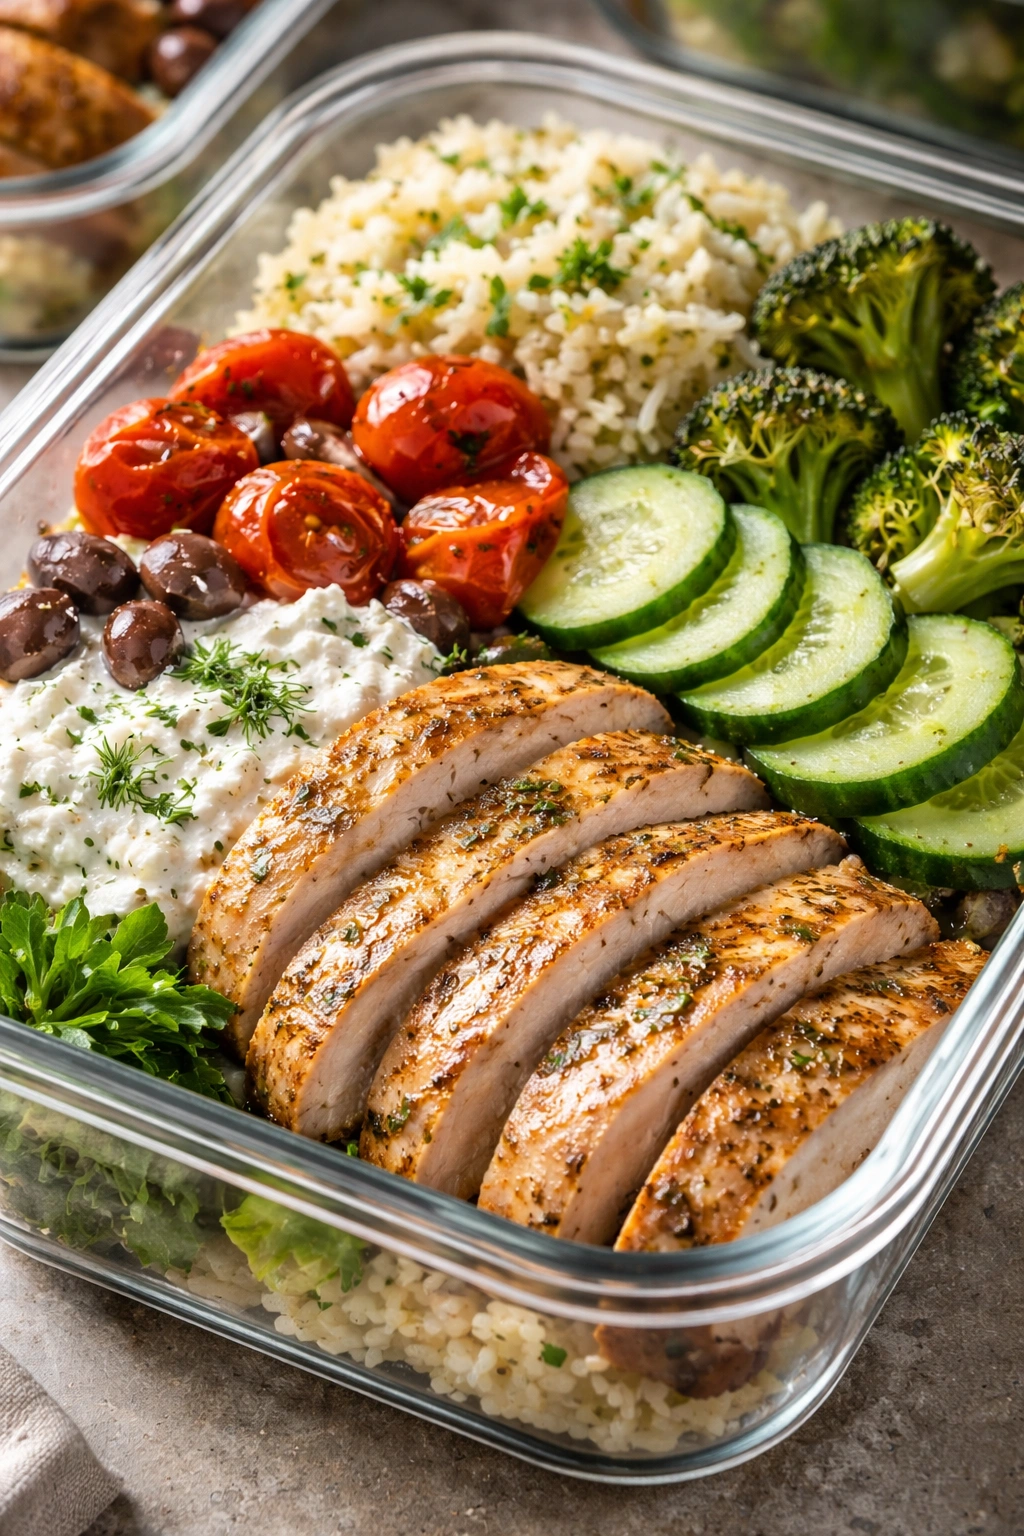
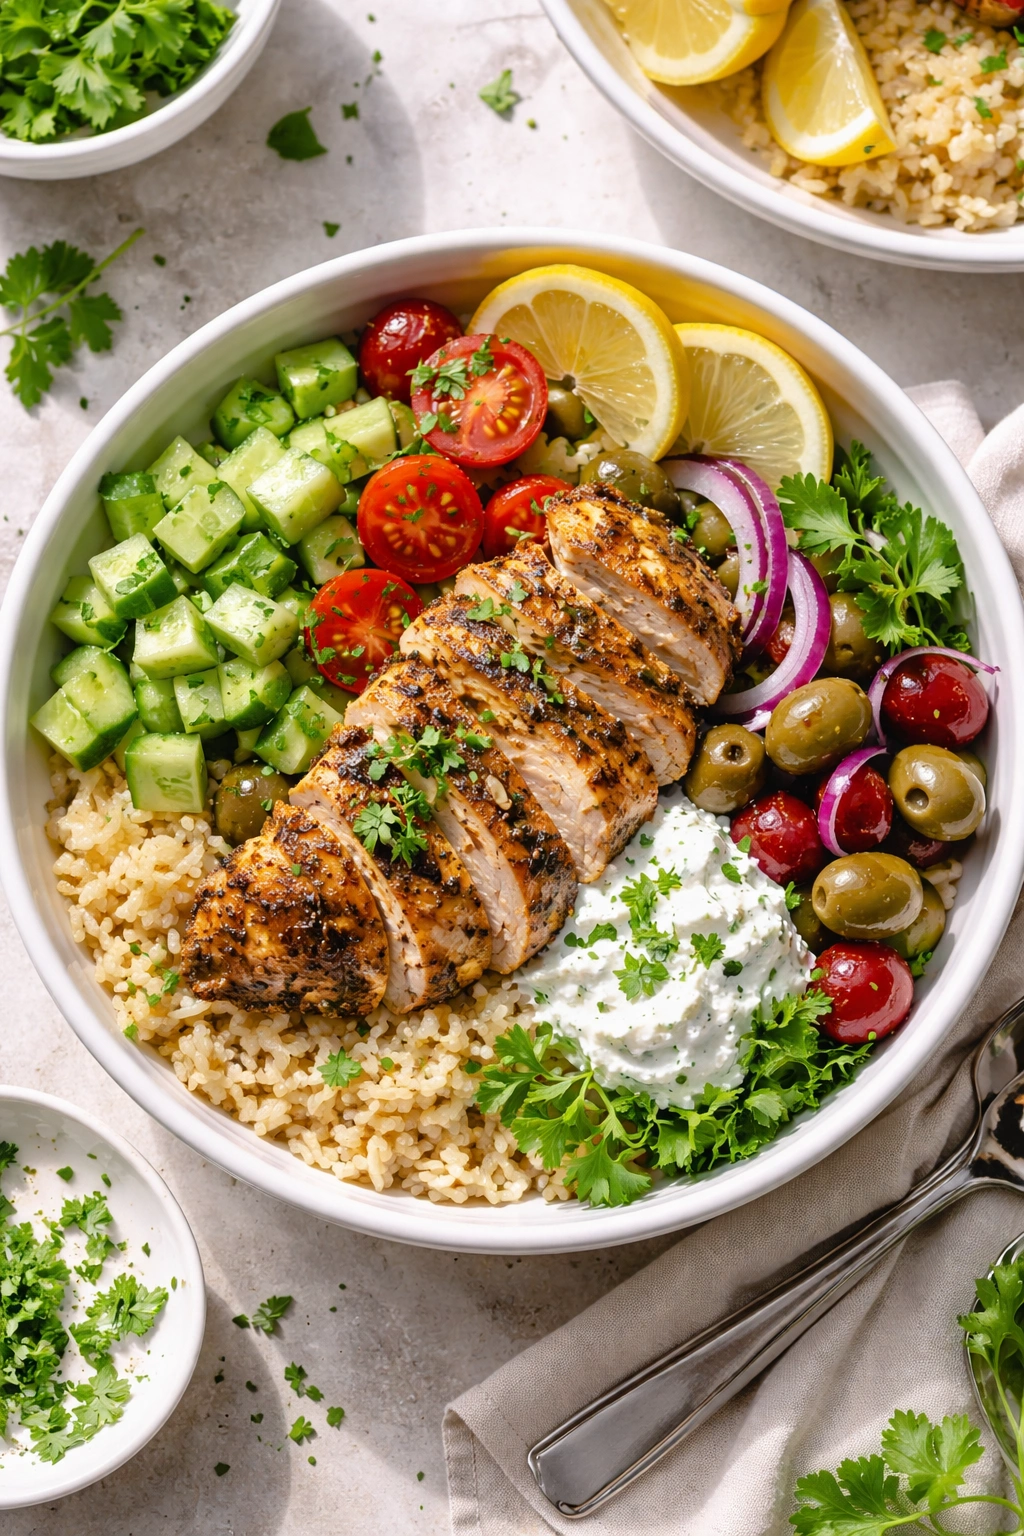
Meal prep gets a bad reputation for being bland, repetitive, and something you force yourself to eat Monday through Friday out of sheer discipline. But Greek chicken bowls? They’re genuinely craveable, built on fresh Mediterranean flavors that actually taste better after a few days in the fridge as everything melds together. The combination of herb-marinated chicken, warm grains, roasted vegetables with caramelized edges, creamy yogurt sauce, and briny olives creates something that tastes far more restaurant-quality than “meal prep food” has any right to be.
The real magic of this approach is that it solves the biggest meal prep problem: fatigue. You’re not eating the same beige protein and rice every single day. Instead, you’ve got layers of flavor and texture that keep your palate interested throughout the week. The chicken gets marinated in oregano, lemon, and garlic — flavors that deepen during storage. The roasted vegetables caramelize in the oven, turning slightly sweet and complex. The grain base absorbs all those flavors. By Wednesday, the bowl tastes better than it did on Monday.
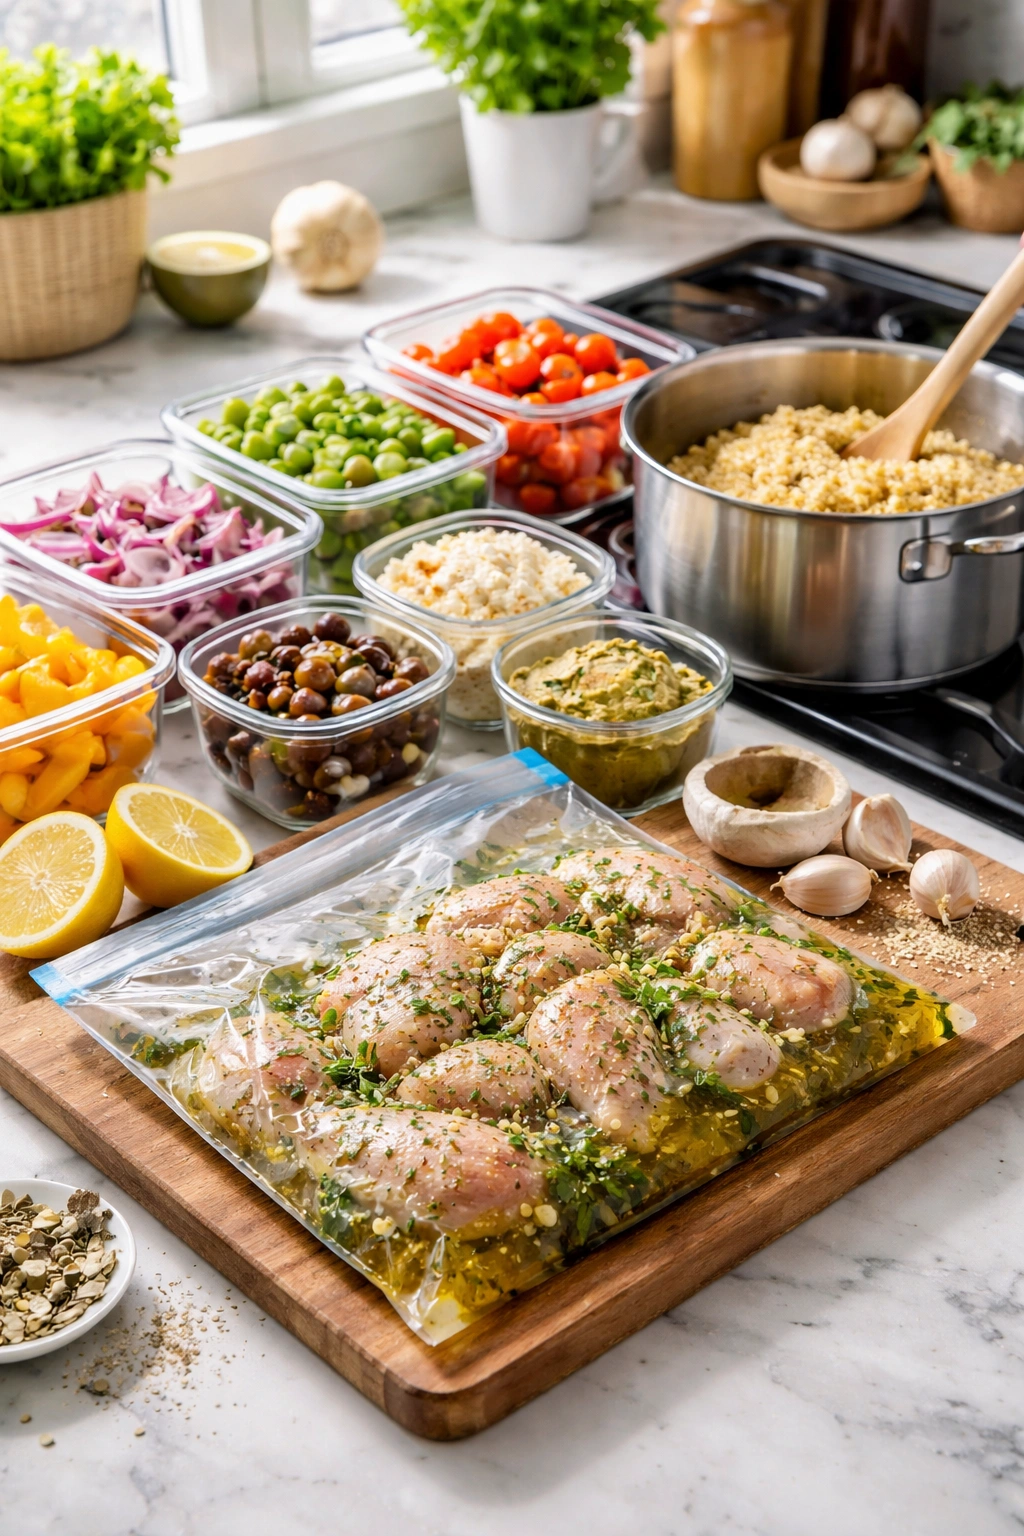
This isn’t complicated cooking, either. Everything happens on sheet pans and in one pot, with minimal active hands-on time. You’ll spend maybe 20 minutes prepping ingredients, 5 minutes getting things into the oven, and while they roast, you’re free to do something else entirely. Then you spend another 15 minutes assembling everything into containers. That’s it. Five days of lunch sorted in under an hour of actual work.
Why Greek Bowl Meal Prep Changed My Weekday Routine
The first time I made these bowls, I was skeptical. I’d done meal prep before — chicken breast, brown rice, steamed broccoli, repeat five times. Healthy? Yes. Something I actually looked forward to eating? Absolutely not. By Thursday I was scraping the insides of the container thinking about anything else I could eat instead.
Greek bowls are different because they’re built on the principles of Mediterranean cooking, which is fundamentally about making simple ingredients taste spectacular through good technique and flavor layering. You’re not drowning chicken in sauce or trying to trick yourself into thinking plain food is exciting. You’re actually creating something delicious that happens to be healthy and meal-preppable.
The way these bowls work structurally matters too. You’ve got warm elements (the chicken and roasted vegetables), cool elements (the fresh toppings and yogurt), and a grain base that acts like a flavor sponge. Nothing gets soggy because you store wet and dry components separately until you’re ready to eat — something I’ll explain in detail later. This is what separates meal prep that actually works from meal prep that turns into a sad, limp disappointment by day four.
What Makes This Approach Worth Your Time
This system addresses the three biggest meal prep failures. First, flavor doesn’t fade because the proteins and vegetables are genuinely delicious on their own, not dependent on soggy grain or a sauce to be tolerable. Second, texture stays interesting because you’re combining multiple elements rather than eating a monolithic protein-grain-vegetable plate. Third, it’s genuinely faster than most people think — the actual hands-on work lands somewhere between 40 and 50 minutes, with most of that time being the oven doing the heavy lifting while you do literally anything else.
You’ll also eat better throughout the week because these bowls are right there waiting in your fridge. No excuses about not having time for lunch. No impulse to grab fast food because you forgot to defrost something or didn’t feel like dealing with meal prep containers. It’s already done, already delicious, ready to eat.
The Power of Mediterranean Flavors for Batch Cooking
Mediterranean cooking was essentially invented for feeding groups of people with fresh, simple ingredients — which makes it absolutely perfect for meal prep. The flavor profile is built on herbs (oregano, parsley, thyme, dill), acid (lemon, red wine vinegar), good olive oil, and garlic. These are all flavors that actually improve when they’ve been sitting together for a few days, not flavors that fade or go stale.
Think about brined olives, aged feta, marinated peppers — these are foods from Mediterranean cuisine that benefit from sitting. That’s fundamentally different from, say, a steak that declines in quality as it sits in your fridge. The marinated chicken works the same way. The flavors don’t degrade; they deepen and integrate. By day four or five, the chicken tastes like it’s been marinating for a week even though it’s only been three or four days.
The vegetable selection matters too. You’re not dealing with delicate greens or raw vegetables that wilt in a fridge. Instead, you’re roasting hearty vegetables that actually develop more flavor through the Maillard reaction (the browning that happens in high heat). Zucchini, bell peppers, red onions, and cherry tomatoes all benefit from this. They caramelize, concentrate their sugars, and actually taste more interesting cold than they did fresh.
Why These Flavors Persist
Oregano is one of the most storage-stable herbs you can use. Unlike fresh basil or cilantro, which fade and darken in the fridge, oregano seems to get stronger — the dried herb that’s present in the marinade intensifies as the marinade penetrates the chicken. The garlic similarly mellows and becomes more integrated with time. Lemon juice won’t spoil; it actually acts as a preservative and prevents oxidation in the chicken and vegetables.
The feta cheese benefits from this flavor development too. When you eat it the first day, it’s creamy and salty. By day three or four, it’s absorbed some of the lemon and oregano flavors from the marinade and dressing, and it’s become even more integral to the bowl rather than just a salty accent. This is genuinely better than eating fresh feta with bland chicken.
How to Choose Your Protein and Build Flavor from the Start
Chicken breasts are the most practical choice for meal prep because they’re affordable, shelf-stable, and cook evenly. But — and this is critical — you can’t just season them minimally and expect great results. The marinade is where the entire flavor profile of these bowls is built, and it needs to be substantial enough that the chicken absorbs the flavors without drying out.
You want bone-in, skin-on chicken thighs if you have the budget and time for slightly longer cooking. Dark meat is significantly more forgiving than white meat, and the fat content means the chicken stays tender even if you leave it in a warm container for a few hours. If you go this route, you’ll need to increase your cooking time by about 10 to 15 minutes depending on thickness. Thighs also taste noticeably better than breasts — richer, more forgiving, more flavorful. The trade-off is that they’re slightly more expensive and take longer to cook.
For maximum convenience and cost-effectiveness, go with chicken breasts. Buy them from the chicken counter if possible rather than pre-packaged — they’re usually fresher, and you can ask the butcher to trim excess fat. Pound them to an even thickness (about three-quarters of an inch) so they cook evenly. This prevents dry, overcooked edges while you’re waiting for the center to cook through.
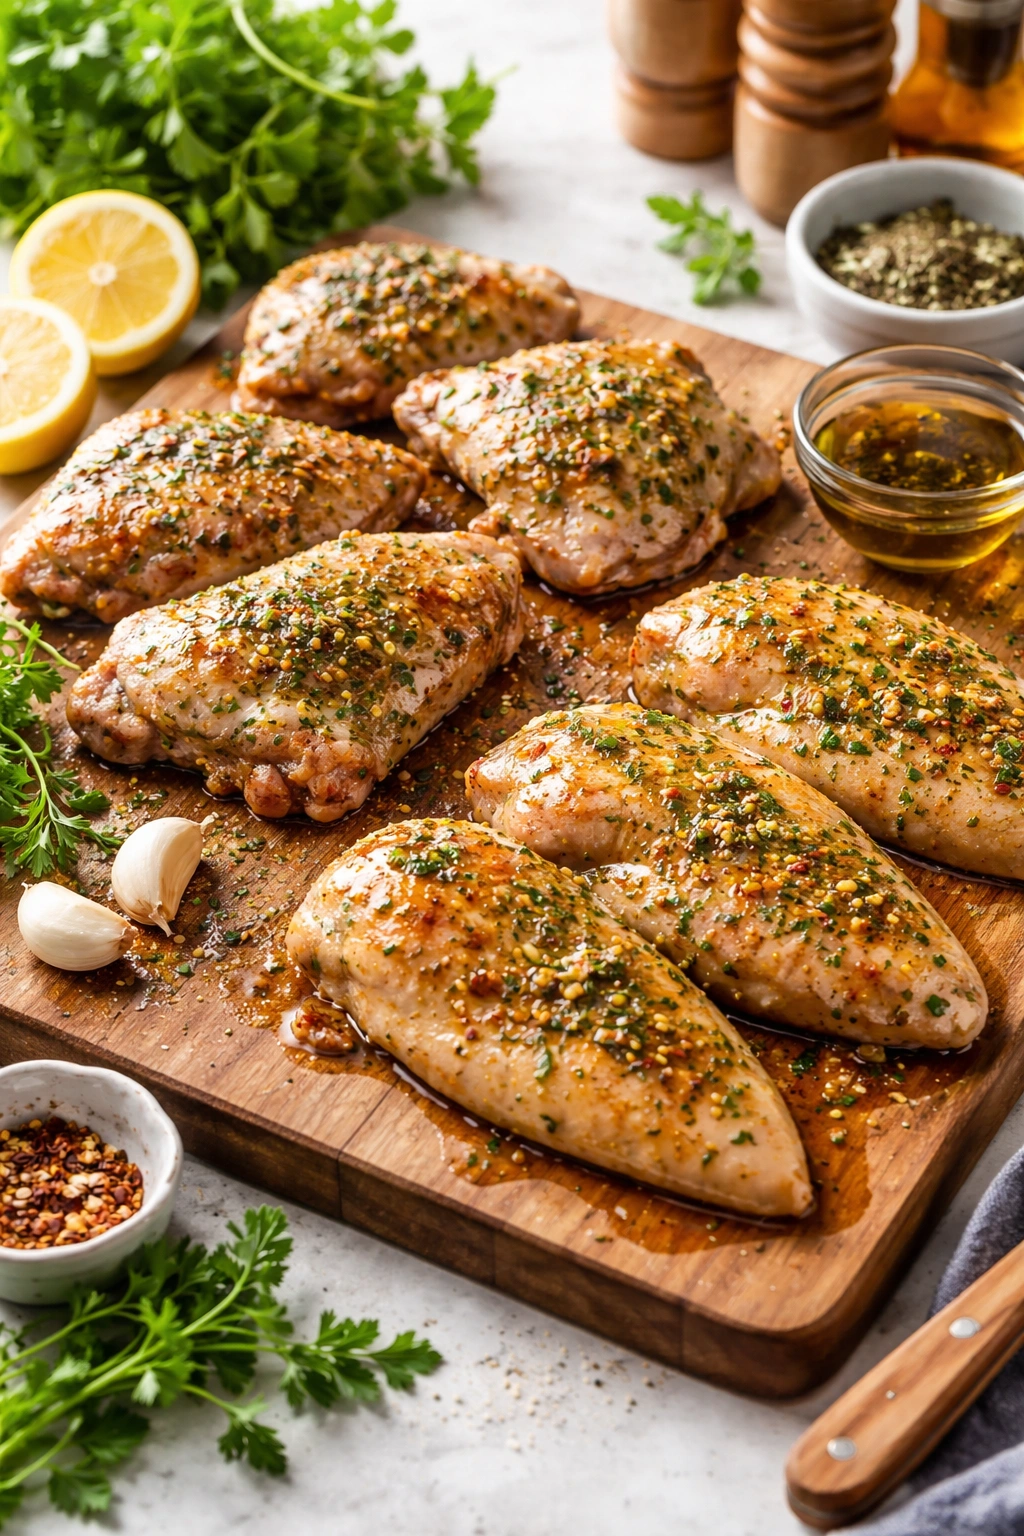
Building the Marinade for Maximum Penetration
The olive oil in your marinade serves a crucial function: it carries fat-soluble flavor compounds into the chicken and prevents moisture loss during cooking. Fresh lemon juice acidifies the surface of the chicken, which accelerates browning and also helps the proteins retain moisture through a process called denaturation. The garlic and oregano are flavor layers that intensify over time.
Combine three tablespoons of olive oil, juice of one large lemon, four minced garlic cloves, one tablespoon of dried oregano, one teaspoon of Dijon mustard (which acts as an emulsifier and helps the marinade stick to the chicken), salt, and pepper. Reserve half this marinade to make your dressing later — more on that in a moment. The remaining half goes on the chicken, and you’ll want the chicken to sit in this marinade for at least two hours before cooking, ideally overnight. The extended time isn’t just about flavor; it actually makes the chicken cook more evenly and helps prevent the common meal prep problem of dry, stringy chicken.
The Perfect Grain Base for Weekly Meal Prep
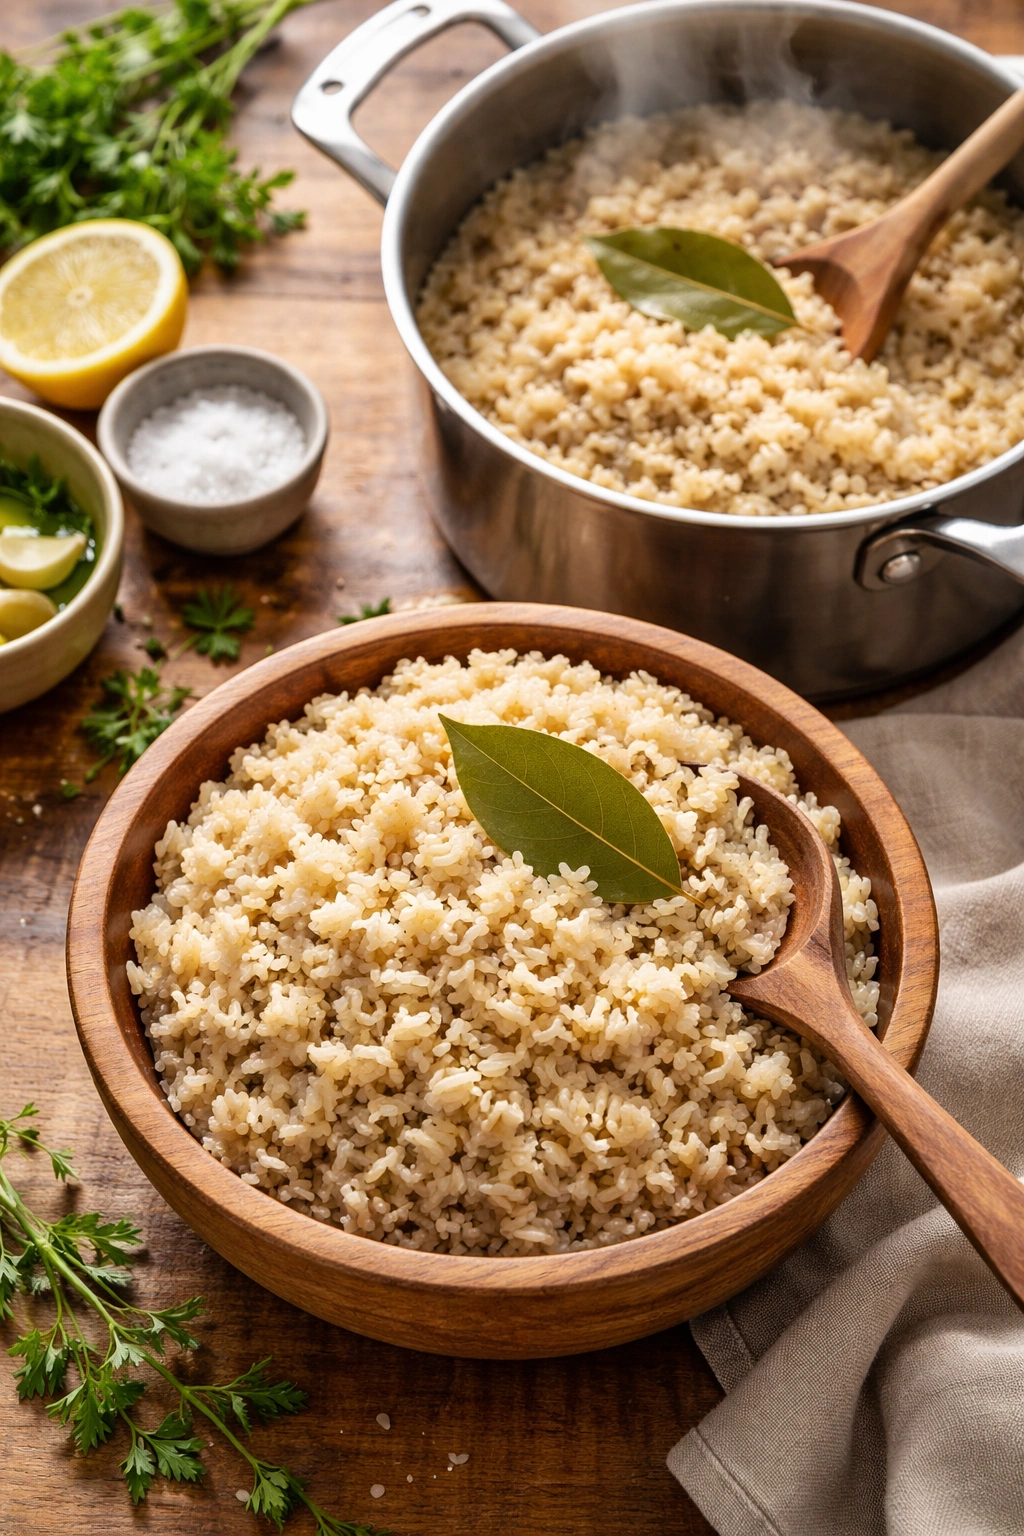
Your grain choice is the foundation that everything else sits on, so it matters more than you might think. Brown rice is the traditional choice — it’s nutty, chewy, and absorbs flavors well. But farro, barley, and millet all work beautifully too. Avoid white rice and quick-cook grains; they break down by day three or four and turn mushy.
Cook your grain in chicken or vegetable broth rather than plain water. This is one of the simplest flavor upgrades that most people skip. The same broth becomes more flavorful as it cooks the grain, and the grain absorbs those flavors in a way that plain water can’t provide. Add a pinch of salt and a bay leaf. This takes the same amount of time as cooking in water, but the resulting grain tastes significantly more interesting.
The proper ratio for brown rice is one part rice to two and a half parts broth. Bring the broth to a boil, add the rice, stir once, reduce heat to low, and cover. Set a timer for 40 to 45 minutes. Don’t lift the lid and peek — that releases steam and extends the cooking time. When the timer goes off, all the liquid should be absorbed and the rice should be tender with a slight chew. Let it sit for five minutes, then fluff with a fork.
Making Your Grain Last All Week
The secret to grain that stays fluffy and doesn’t dry out is to store it with a little bit of olive oil tossed through it. This prevents the grains from drying out and also adds a subtle richness that makes the grain taste like more than just grain. Use about one tablespoon of olive oil per two cups of cooked grain. A squeeze of fresh lemon juice and a pinch of salt does wonders too.
If you’re using farro or barley, increase the liquid ratio slightly (one part grain to three parts broth) and increase the cooking time to about 45 to 50 minutes for farro, 60 minutes for pearl barley. These grains are chewier and heartier than rice, which actually makes them better for meal prep — they hold up to a few days in the fridge without softening at all. They also absorb flavors more aggressively, so your bowl will taste even more integrated by day four or five.
Roasting Vegetables Until They Caramelize
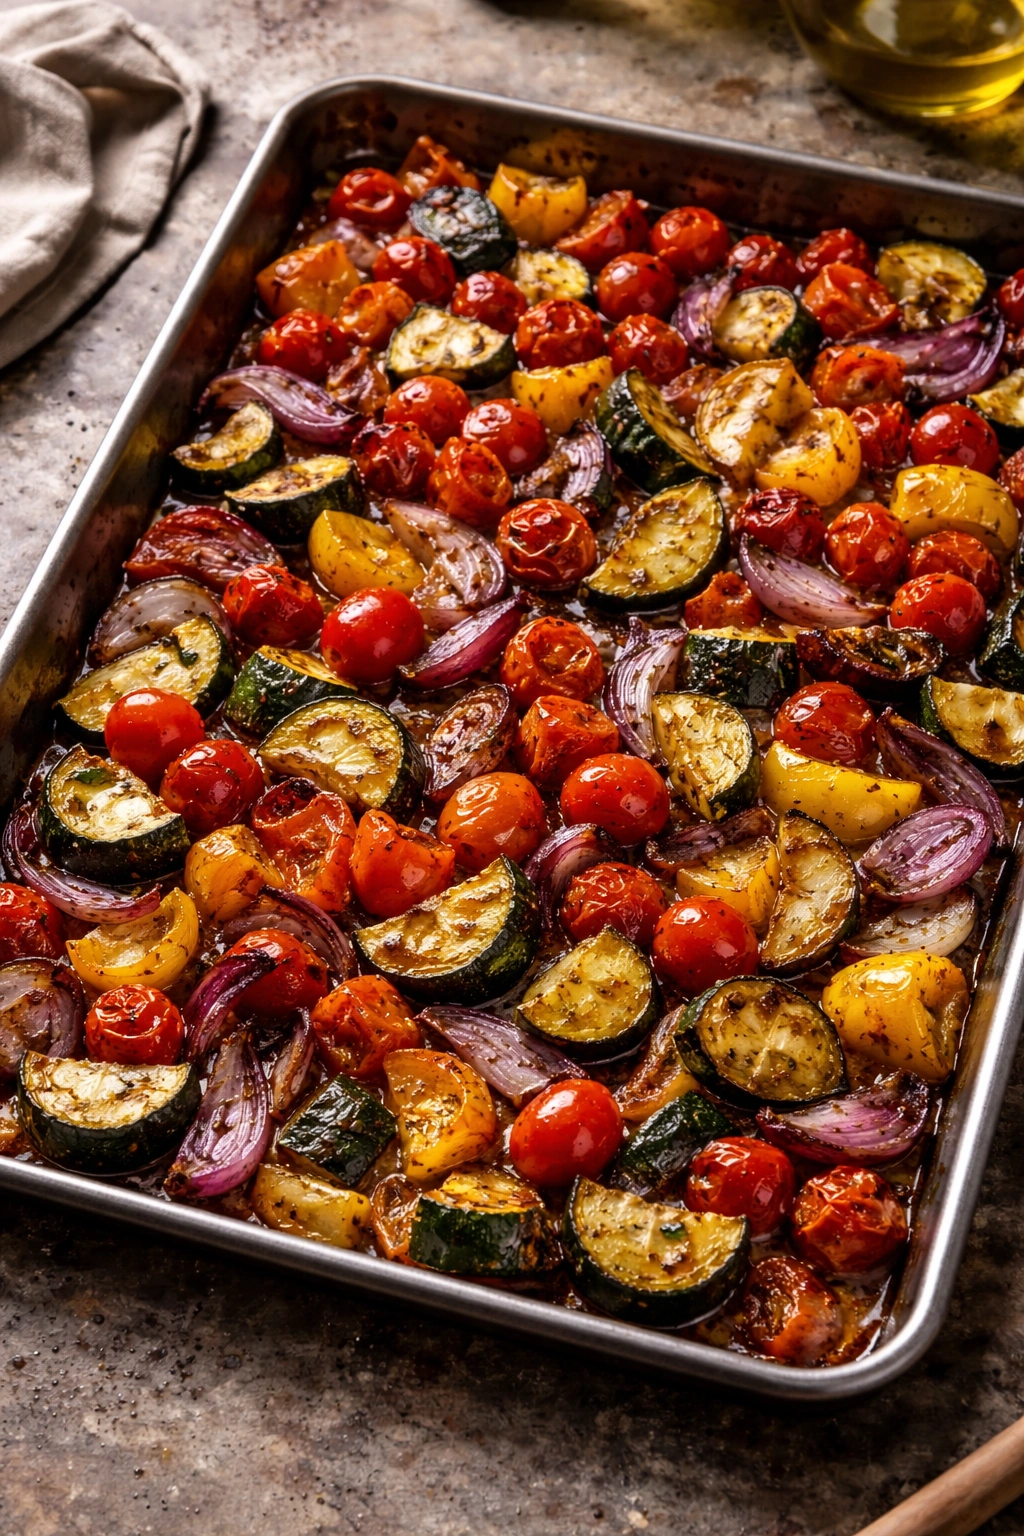
This is where the magic happens. The vegetables become the reason you actually want to eat this bowl, not the thing you’re forcing down alongside chicken and rice. The goal is deep, uneven browning — some pieces should be nearly charred at the edges while others are just tender. This creates flavor complexity and actual textural interest.
You want a high oven temperature: 425°F (220°C) is the sweet spot. Any hotter and the outside burns before the inside cooks; any cooler and you don’t get proper caramelization. Pat your vegetables very dry before tossing with oil — moisture is the enemy of browning. The chicken releases some liquid as it roasts, so consider giving the vegetables a head start on a separate pan. They can roast for the first 10 to 15 minutes without the chicken.
Cut your vegetables into pieces that are roughly the same size (about one-inch chunks for peppers and zucchini, halved for cherry tomatoes, wedges for red onions). Toss them with olive oil, salt, pepper, and a sprinkle of dried oregano. Spread them in a single layer on a large sheet pan — don’t crowd them. Overcrowding means they steam rather than roast, and you don’t get the caramelization you’re after. If you don’t have room, use two pans.
Timing the Roasting Process
The vegetables should take about 25 to 30 minutes at 425°F to become properly caramelized. Toss them halfway through, about 12 to 15 minutes in. This ensures even browning on all sides. If you’re roasting the chicken on the same pan, add the chicken when you add the vegetables, and the timing will work out naturally — the chicken takes 20 to 25 minutes depending on thickness, and the vegetables will finish at approximately the same time.
Some vegetables cook faster than others. If you’re using a mix, cut the faster-cooking ones (like bell peppers) slightly larger than the slower-cooking ones (like red onion). Cherry tomatoes can go on the pan halfway through roasting to prevent them from shriveling into leather. Zucchini should be cut slightly thicker than other vegetables to prevent it from becoming mushy.
The real test of doneness is visual — you’re looking for caramelization on at least 30 to 40 percent of the surface area of each vegetable piece. The edges should be dark and slightly crispy, the centers tender. This usually happens right around the 25-minute mark. If your oven runs cold, it might take 30 to 35 minutes. If it runs hot, you might be done in 20 to 22 minutes.
Making Your Own Greek Dressing

Store-bought Greek dressing is usually stabilized with gums and thickeners, tastes weirdly sweet, and doesn’t build flavor over time the way homemade dressing does. Making your own takes five minutes and results in something infinitely better. You’re already making a marinade for the chicken; this is just a variation on the same base.
Take the reserved marinade (the half you set aside earlier), and whisk it with a few tablespoons of plain full-fat Greek yogurt until you have a smooth, creamy dressing. The yogurt adds richness and helps the dressing coat the other components. Add one teaspoon of Dijon mustard if you didn’t already include it in the marinade (the mustard helps emulsify everything and keeps it from separating). Taste it. It should taste bright and lemony with strong oregano and garlic notes.
If the dressing seems too thick, thin it with a little more lemon juice or a touch of water. If it seems too thin, add a bit more yogurt. The dressing should be pourable but with enough body to coat the other components. This dressing gets better as it sits — the garlic mellows, the oregano intensifies, and the flavors become more integrated. By day three or four, it’s genuinely better than it was on day one.
Why Yogurt Changes Everything
Full-fat Greek yogurt contains casein and whey proteins that bind with the oil and acid in the dressing, creating an emulsion that’s thick, creamy, and luxurious without any added gums or stabilizers. The yogurt also adds a subtle tanginess that amplifies the lemon flavor. Dairy-free yogurt works if you need it to be vegan, but the mouthfeel isn’t quite the same — it tends to be slightly thinner and less luxurious.
You can also make a purely olive oil–based dressing if you prefer (skip the yogurt and just use the reserved marinade straight), but the yogurt version is significantly better for meal prep because it’s less likely to separate and weep over time. The oil in a purely oil-based dressing can eventually separate from the acid, making the dressing appear curdled even though it’s perfectly fine to eat.
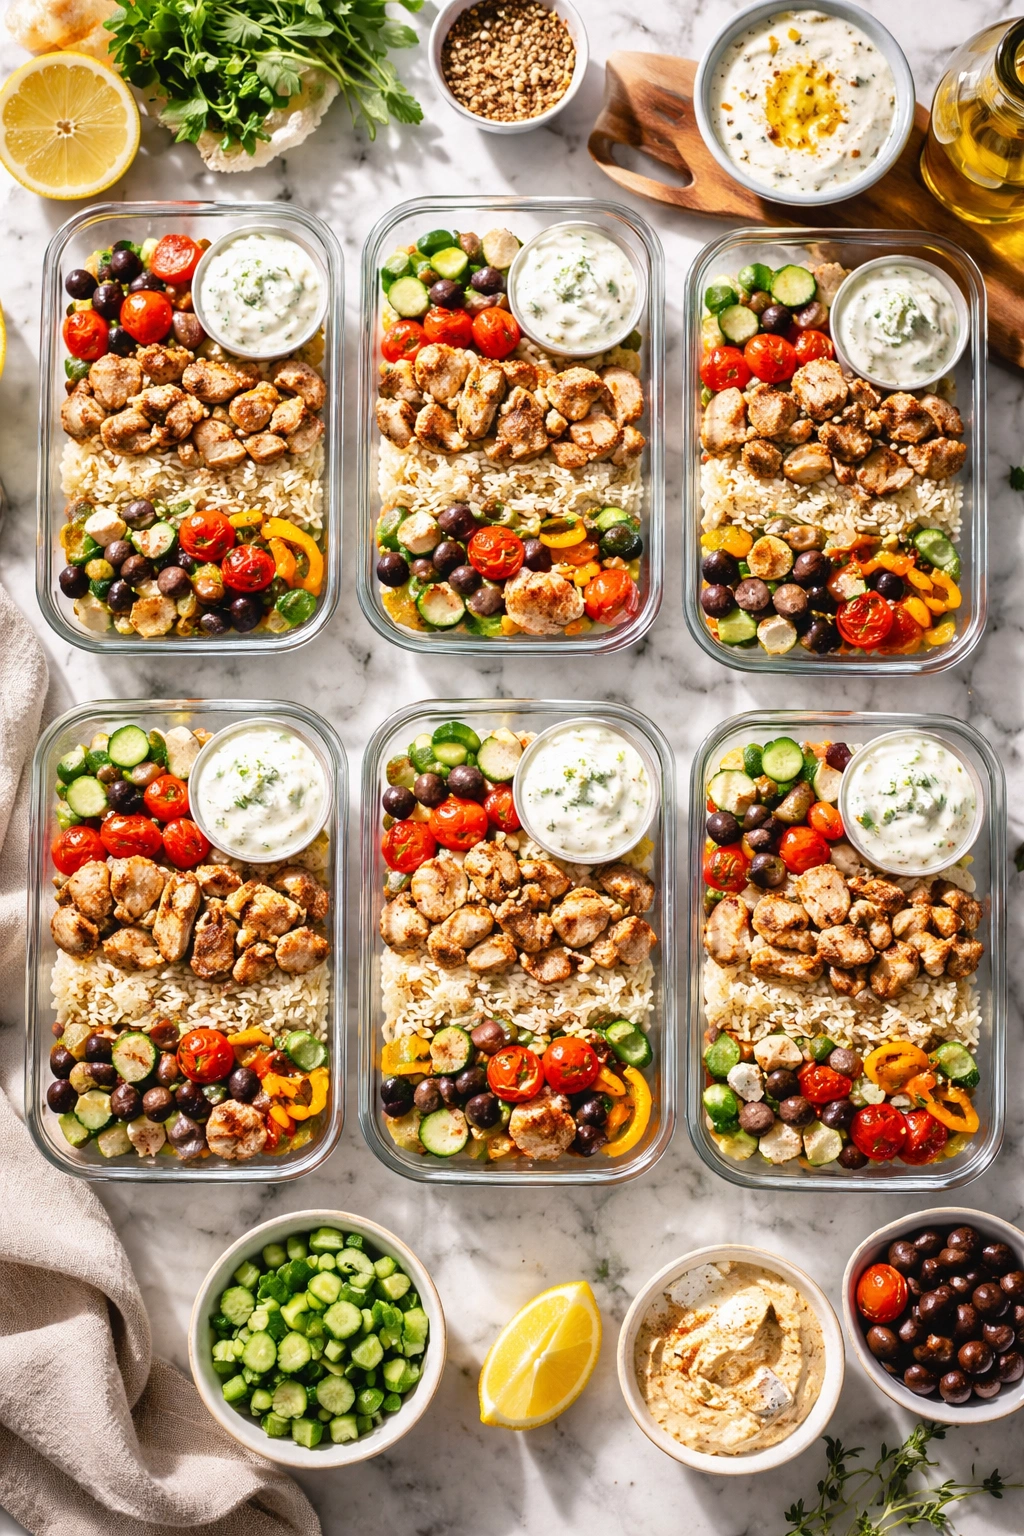
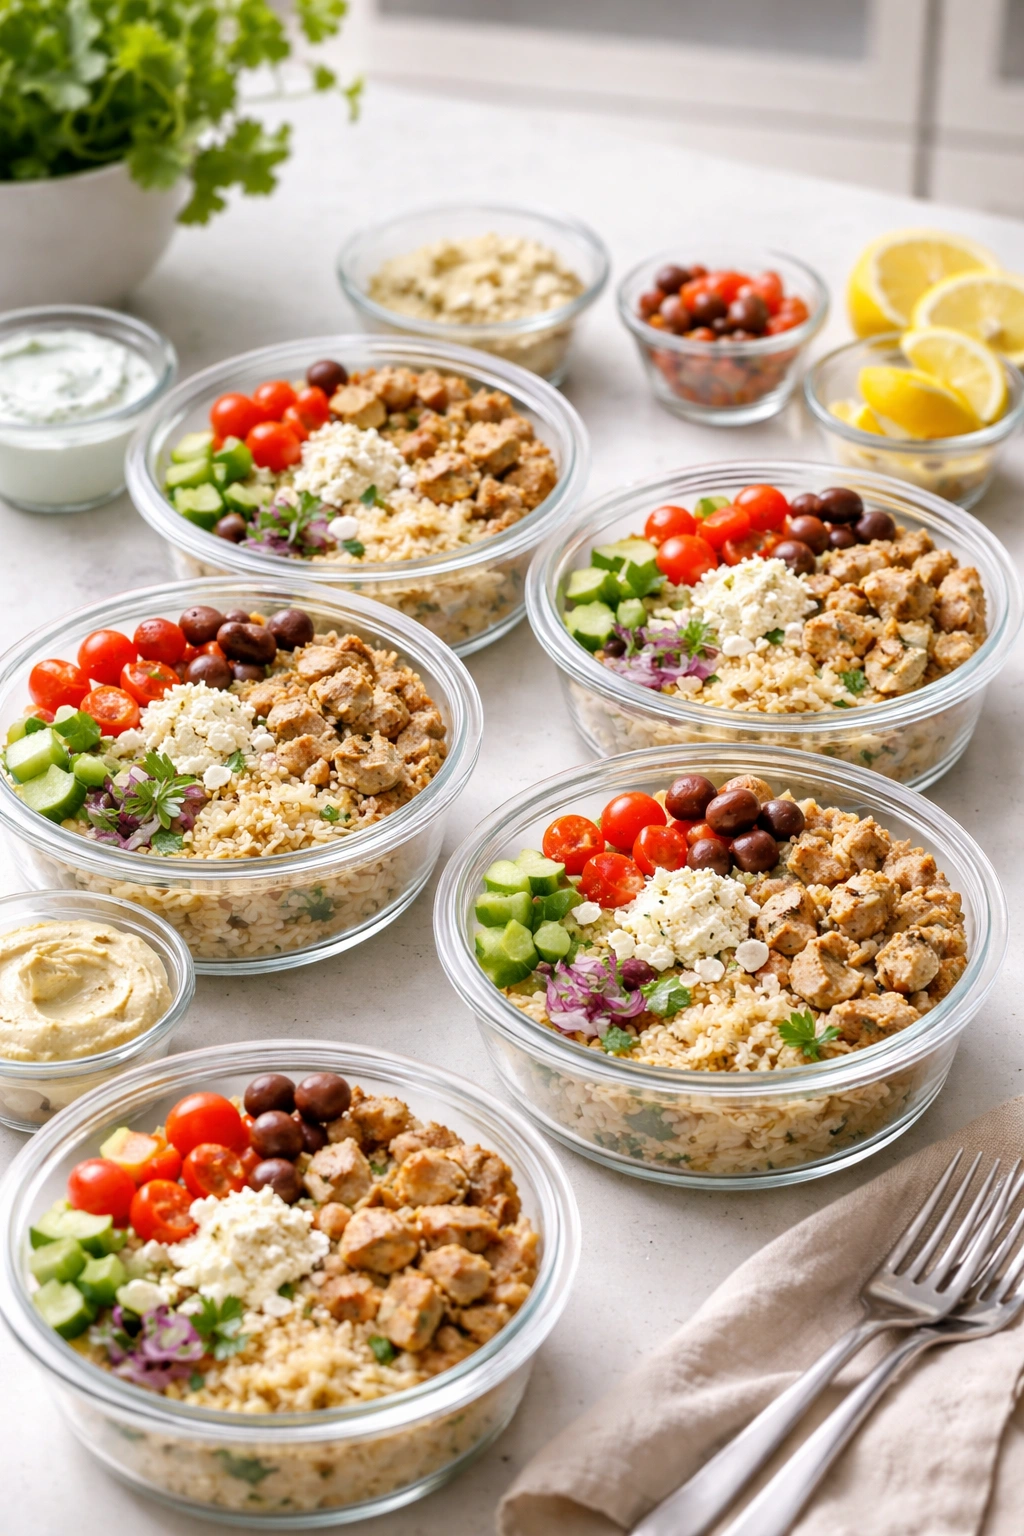
Assembling Your Bowls for Maximum Freshness
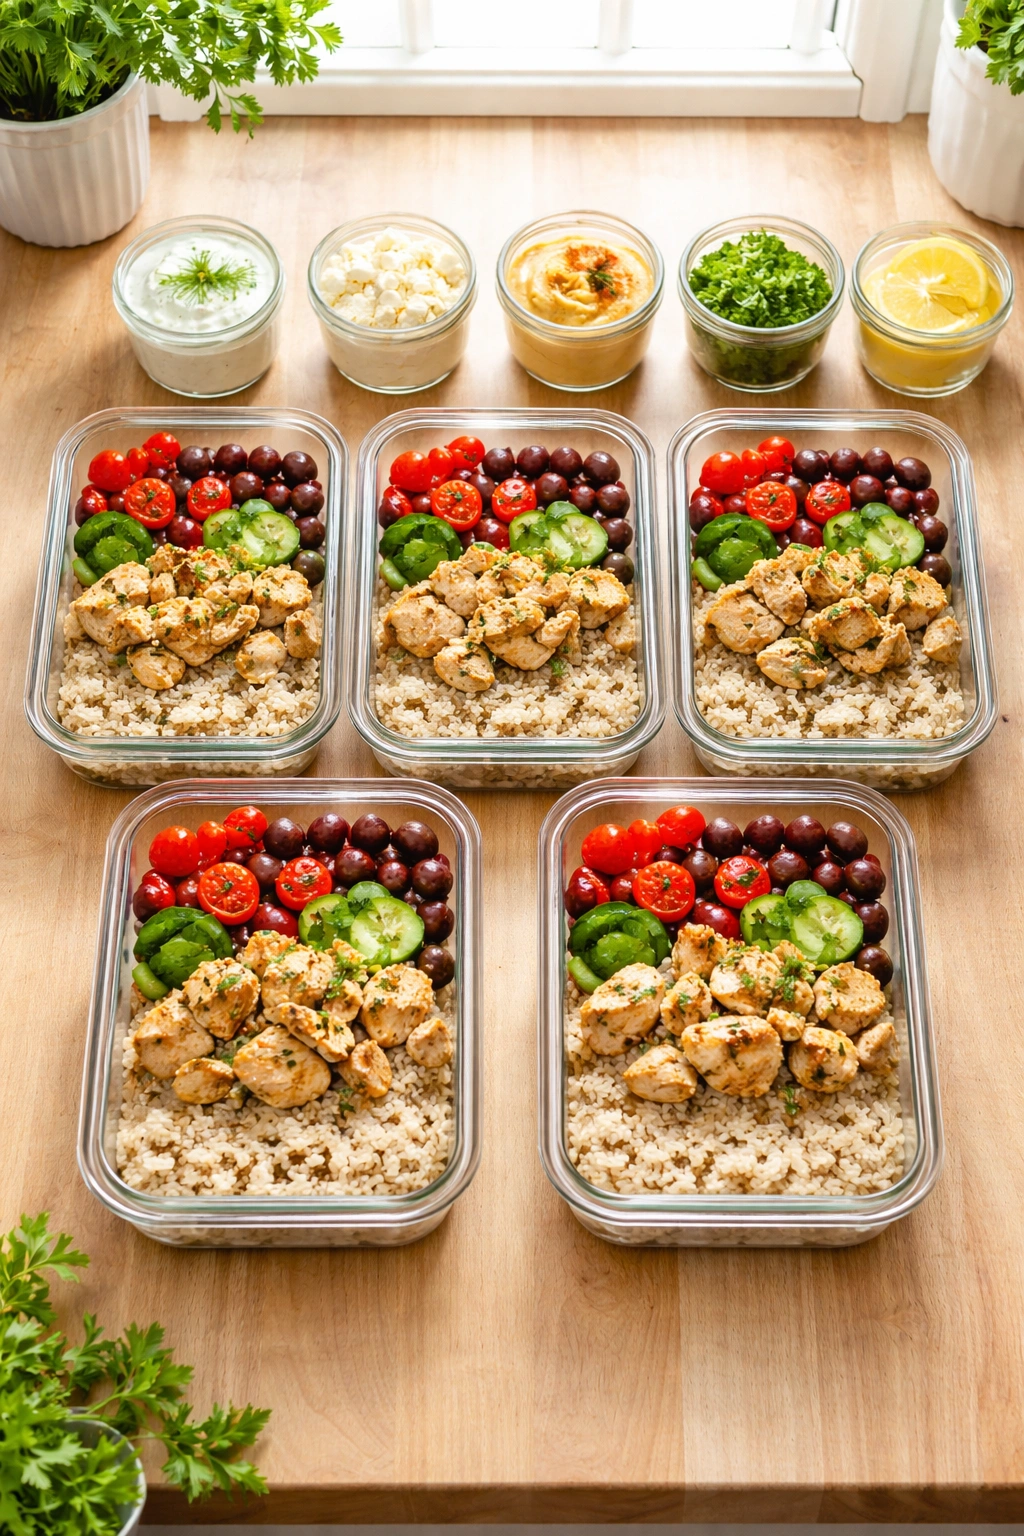
This is where most meal prep goes wrong. People load everything into containers together, and by day two or three, the grain is soggy, the vegetables have turned soft, and the whole thing is a disappointing mess. You prevent this by keeping wet and dry components separate until you’re ready to eat.
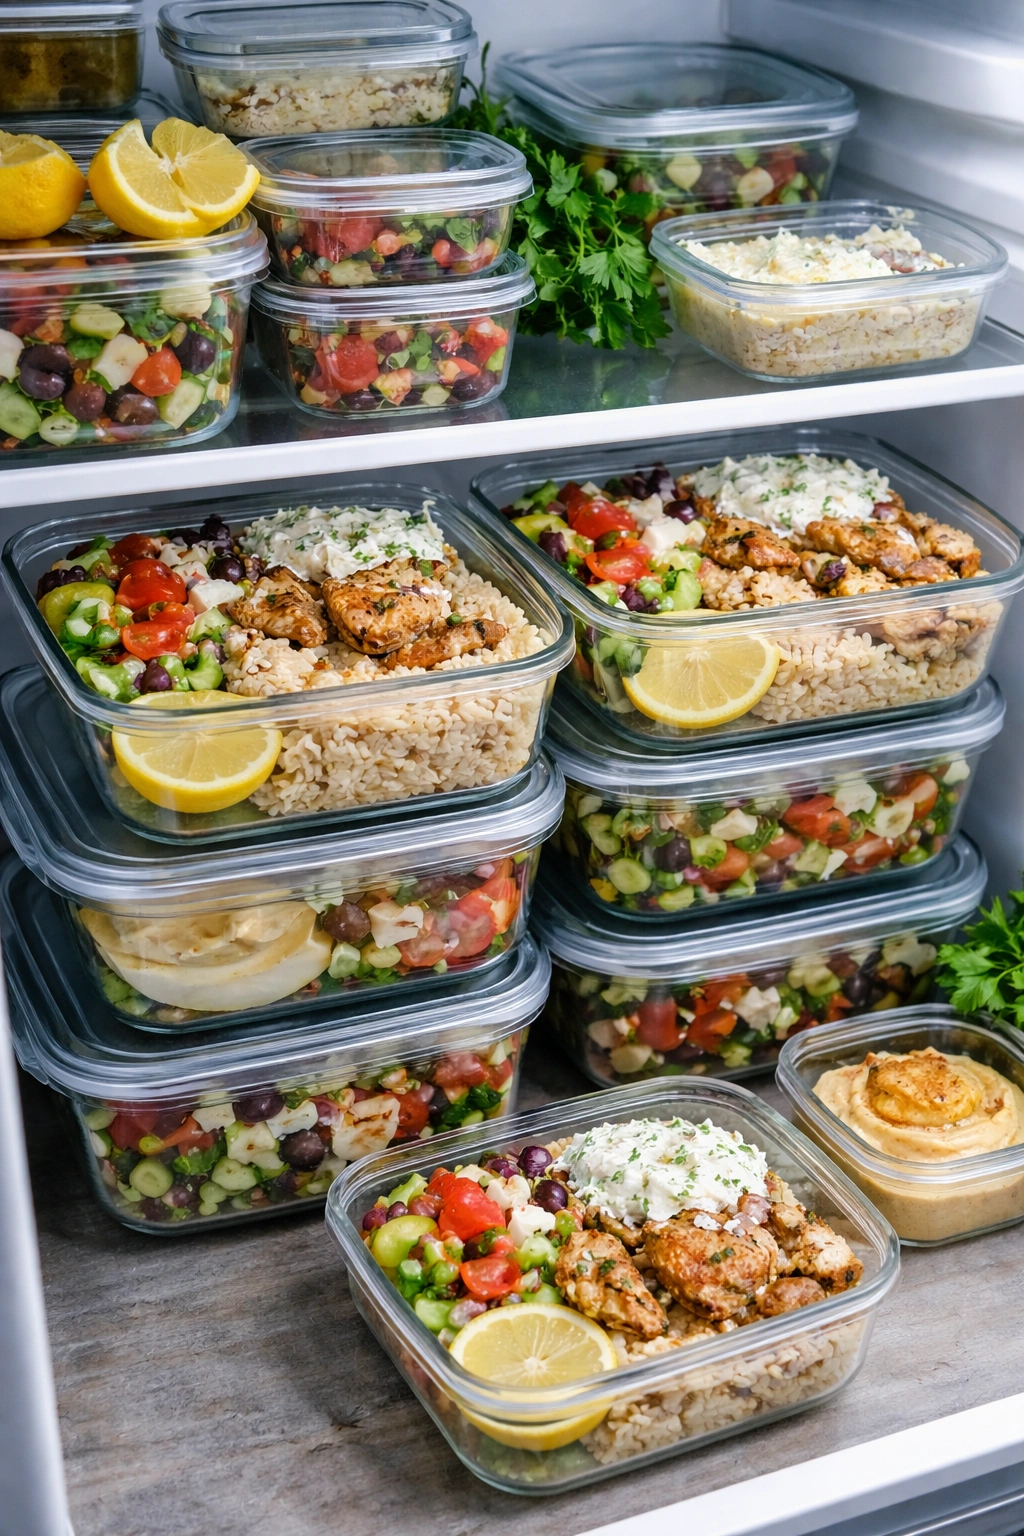
Use five identical meal prep containers with good lids. Pour about one cup of the cooked grain into the bottom of each container. Don’t pack it down; you want it relatively loose. Top the grain with a portion of roasted vegetables (about one and a half cups per container), but don’t mix them together yet. These components will touch at the bottom of the container, which is fine, but you want them to remain in distinct layers for now.
In a separate small container (or one of those tiny condiment containers if you have them), place the dressing for each bowl. In another small container, place the fresh toppings: crumbled feta, sliced red onion, pitted Kalamata olives, fresh parsley, and anything else that’s not cooked. If you’re adding cucumber, cherry tomatoes, or other fresh vegetables, keep those in their own container too. The chicken goes in a separate compartment or a different container altogether.
Why Separation Matters for Freshness
Grain is porous and absorbs liquid readily. If you top the grain with dressing immediately, by day two, the dressing has migrated through the entire grain and everything is soggy. By separating the components, you keep everything fresh until the moment you’re ready to eat. The grain remains fluffy, the vegetables remain crispy-edged, the fresh ingredients remain fresh, and the chicken stays moist.
When you’re ready to eat, it takes 30 seconds to assemble the bowl: warm the container if you want (the chicken is already cooked, so you’re just warming it, not cooking it), dump the grain and vegetables into a bowl, top with fresh components, drizzle the dressing over everything, and eat. The assembly cost is trivial compared to the benefit of ingredients that actually taste fresh and interesting.
Serving and Timing Information
Yield: Makes 5 meal prep bowls (approximately 1 generous serving per bowl, or can be split into 10 half-portions)
Prep Time: 25 minutes (washing and cutting vegetables, pounding chicken, making marinade, measuring grains and broth)
Cook Time: 40 minutes (grain cooks simultaneously with the roasting)
Total Time: 65 minutes active + 30 to 40 minutes assembly and storage time = approximately 2 hours from start to having everything portioned and in containers
Difficulty: Intermediate — no special equipment required (a sheet pan, a pot for the grain, and basic kitchen knives are all you need), but the process involves multiple components cooking simultaneously, which requires attention and basic coordination.
Complete Ingredients List
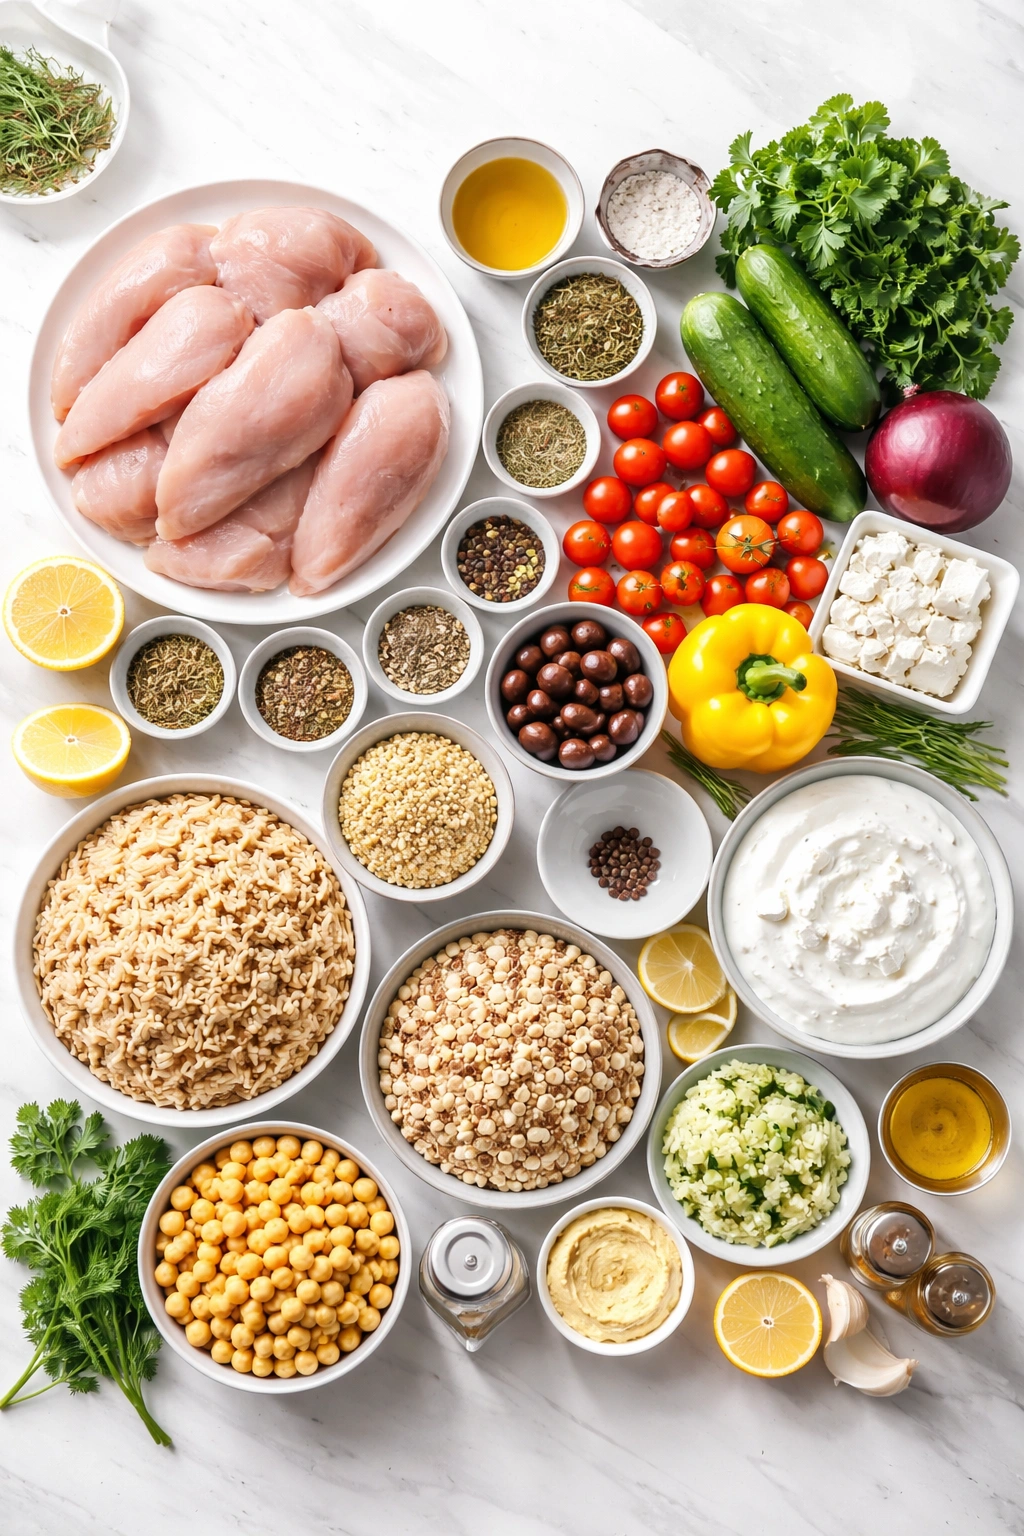
For the Chicken and Marinade:
- 2 pounds boneless, skinless chicken breasts (about 4 medium breasts)
- ¼ cup extra-virgin olive oil, divided (3 tablespoons for the chicken, 1 tablespoon reserved for finishing)
- 3 tablespoons fresh lemon juice
- 4 garlic cloves, minced very fine
- 1 tablespoon dried oregano
- 1 teaspoon Dijon mustard
- ¾ teaspoon fine sea salt
- ½ teaspoon freshly cracked black pepper
For the Grain Base:
- 2 cups long-grain brown rice (or farro, pearl barley, or millet)
- 5 cups low-sodium chicken or vegetable broth
- 1 bay leaf
- ½ teaspoon fine sea salt
- 1 tablespoon extra-virgin olive oil (for tossing the finished grain)
- 1 tablespoon fresh lemon juice (for tossing the finished grain)
For the Roasted Vegetables:
- 4 cups mixed vegetables (1 large zucchini sliced into half-moons, 2 large bell peppers cut into 1-inch chunks, 1 large red onion cut into wedges, 2 cups cherry tomatoes halved)
- 3 tablespoons extra-virgin olive oil
- 1 teaspoon dried oregano
- ½ teaspoon fine sea salt
- ¼ teaspoon freshly cracked black pepper
For the Yogurt-Herb Dressing:
- 3 tablespoons reserved chicken marinade (from above)
- ½ cup full-fat Greek yogurt
- 1 teaspoon Dijon mustard (if not already in the reserved marinade)
- Salt and pepper to taste
- 2 to 3 tablespoons fresh lemon juice to thin if needed
For the Toppings and Assembly:
- 1½ cups crumbled feta cheese (approximately 6 ounces)
- 1 cup pitted Kalamata olives, halved
- ½ cup fresh flat-leaf parsley, chopped
- ½ red onion, thinly sliced
- Fresh cucumber sliced into rounds (about 2 cups if desired)
- Lemon wedges for serving
Step-by-Step Instructions

Prepare the Chicken and Marinade:
-
Pat the chicken breasts dry with paper towels — this is critical for browning later. Place them on a cutting board and cover with plastic wrap. Using the bottom of a heavy pot or meat mallet, pound each breast to an even thickness of approximately three-quarters of an inch. Work from the center outward to avoid tearing the meat.
-
In a small bowl, whisk together 3 tablespoons of olive oil, the fresh lemon juice, minced garlic, dried oregano, 1 teaspoon of Dijon mustard, salt, and pepper. Divide this marinade in half — you’ll use half on the chicken and reserve the other half for making the dressing later.
-
Place the pounded chicken breasts in a gallon-size zip-top bag or a bowl. Pour the first half of the marinade over the chicken, making sure every surface is coated. Seal the bag (pressing out as much air as possible) or cover the bowl with plastic wrap. Refrigerate for at least 2 hours, or ideally overnight. This time is essential — it allows the flavors to penetrate the chicken and helps keep it moist during cooking.
Cook the Grain:
-
Bring 5 cups of chicken or vegetable broth to a boil in a medium pot. Add the brown rice (or your grain of choice), 1 bay leaf, and ½ teaspoon of salt. Stir once, then reduce the heat to the lowest setting on your stove. Cover with a tight-fitting lid.
-
Set a timer for 40 to 45 minutes (45 to 50 minutes if using farro, 60 minutes if using pearl barley). Do not lift the lid during cooking — this releases steam and extends the cooking time. When the timer goes off, all the liquid should be absorbed. Remove from heat and let the grain sit covered for 5 minutes.
-
Fluff the cooked grain with a fork. Drizzle with 1 tablespoon of fresh olive oil and 1 tablespoon of fresh lemon juice, then toss gently to combine. This prevents the grain from drying out and adds subtle richness. Taste and adjust salt if needed — you want it well-seasoned but not overly salty. Set aside to cool slightly.
Prepare and Roast the Vegetables:
-
Preheat your oven to 425°F (220°C) and position a rack in the upper-middle position. While the oven heats, prepare your vegetables: slice the zucchini into half-moons about ½ inch thick, cut the bell peppers into 1-inch chunks, cut the red onion into wedges (leaving some root attached so the layers stay together), and halve the cherry tomatoes.
-
Pat all the prepared vegetables dry with a clean kitchen towel or paper towels — moisture prevents proper browning. Place them in a large bowl (not the cherry tomatoes yet, they’ll go on halfway through), and drizzle with 3 tablespoons of olive oil. Add 1 teaspoon of dried oregano, ½ teaspoon of salt, and ¼ teaspoon of black pepper. Toss very thoroughly, making sure every piece of vegetable is coated with oil.
Advertisements -
Spread the vegetables in a single layer on a large sheet pan — or use two sheet pans if you don’t have room. Do not crowd the pan. Crowded vegetables steam rather than roast and won’t develop the deep caramelization you want. Roast at 425°F for 12 to 15 minutes.
Roast the Chicken:
-
Remove the chicken from the marinade and pat it dry with paper towels — excess moisture on the surface prevents browning. Reserve the remaining marinade for making the dressing. Add the chicken to the roasting pan with the vegetables (or to a separate sheet pan if your pan is full), arranging the breasts in a single layer without touching.
-
Return the sheet pans to the oven and roast for an additional 12 to 15 minutes, until the chicken is cooked through (internal temperature of 165°F at the thickest point) and the edges are golden and slightly caramelized. The vegetables will be tender with deep brown, slightly crispy edges. About halfway through this phase, toss the vegetables with a spatula to encourage even browning.
-
Add the halved cherry tomatoes to the roasting pan with the other vegetables about 2 minutes before everything finishes cooking (if you add them too early, they shrivel). Remove everything from the oven and let cool for 5 to 10 minutes.
-
Slice each roasted chicken breast on a slight bias into 4 to 5 slices. This makes the bowls easier to eat and distributes the chicken more evenly. Set aside to cool.
Make the Yogurt-Herb Dressing:
-
In a medium bowl, whisk together the reserved marinade (3 tablespoons) with ½ cup of full-fat Greek yogurt. Whisk until very smooth with no lumps. Add 1 teaspoon of Dijon mustard if you didn’t already include it in the original marinade. Taste the dressing.
-
The dressing should taste bright, garlicky, and herbal with a creamy richness. If it’s too thick, thin it with a splash of fresh lemon juice (1 to 2 tablespoons) or water. If it seems too thin, add another tablespoon or two of yogurt. Taste again and adjust the seasoning with salt and pepper if needed. The dressing will develop deeper flavor over the next day or two as the garlic mellows and the oregano intensifies.
Assemble the Meal Prep Containers:
-
Divide the cooked, cooled grain evenly among 5 meal prep containers, using approximately 1 heaping cup per container. Don’t pack it down — the grain should be relatively loose.
-
Top each container of grain with the roasted vegetables, dividing them evenly (approximately 1½ cups of vegetables per container). The vegetables will rest on top of the grain but shouldn’t be mixed in yet. If you’re using smaller containers and need to stack components, that’s fine — the key is that they remain somewhat separate.
-
Divide the sliced roasted chicken evenly among the containers, placing it on top of or beside the vegetables.
-
In 5 small containers or condiment cups, divide the yogurt-herb dressing evenly (about 3 tablespoons per serving). Seal these and place them beside their corresponding grain containers.
-
In 5 additional small containers or compartments, combine the fresh toppings: crumbled feta cheese, pitted and halved Kalamata olives, fresh chopped parsley, and thinly sliced red onion. Divide these evenly so each container gets a portion of each topping. If using fresh cucumber, you can include a few slices in each topping container.
-
Seal all containers and refrigerate immediately. These bowls will keep for 4 to 5 days in the refrigerator as long as the wet and dry components remain separated.
Prep Ahead Strategies That Actually Save Time
The biggest time-saver is to marinate the chicken overnight. Yes, this means you need to start the evening before, but it’s literally zero additional work on meal prep day — you just remove the marinated chicken from the fridge and it’s ready to roast. If you forget overnight, even two hours makes a noticeable difference.
You can also cook the grain a day or two in advance. Store it in an airtight container in the fridge with that coat of olive oil and lemon juice, and it stays fluffy and fresh. When assembly day arrives, you skip an entire pot and one of your major cooking tasks. The grain can even be brought to room temperature before assembly, or you can assemble the bowls and eat them cold or gently warmed.
Vegetables can be prepped and cut the day before — wash them, cut them, pat them completely dry, and store them in containers in the fridge. When assembly day arrives, you literally just toss them with oil and seasonings and roast them. This cuts assembly day prep time by at least 10 minutes.
The Secret Sequence for Speedy Assembly
If you’re cooking everything on the same day, here’s the most efficient order: start the grain first (it takes the longest), then make the marinade while the grain cooks, add the chicken to marinate, prep the vegetables, and put the vegetables in the oven. About 12 to 15 minutes into the vegetables roasting, add the chicken. While everything roasts, make the dressing and get all your containers ready. The moment everything comes out of the oven, you assemble immediately while components are still slightly warm and easier to handle.
The dressing can be made at any point — I usually make it while the grain is cooking, since I have nothing else to do. Chopping fresh herbs and slicing red onion can happen while everything roasts. The actual assembly process (dividing grain and vegetables into containers) takes maybe 15 minutes if you’re working at a reasonable pace.
Storage and Reheating for Peak Freshness
Stored properly in airtight containers with all components separated, these bowls last four to five days in the refrigerator. The chicken stays moist, the grain stays fluffy, and the vegetables stay edible. The feta won’t get weird and slimy, the olives won’t dry out, and the fresh parsley won’t turn black and unpleasant.
When you’re ready to eat, you have options. You can eat the bowl completely cold, which is genuinely refreshing and delicious — the grain is cool, the chicken is cool, everything tastes bright and fresh. Or you can warm up the grain, chicken, and vegetables while leaving the fresh toppings and dressing cold. This creates a nice contrast in temperatures and is more satisfying if you’re not in the mood for a cold salad.
To warm a bowl, transfer the grain, vegetables, and chicken to a microwave-safe bowl and microwave for 60 to 90 seconds, or until everything is warm to your liking. This is actually better than microwaving the entire assembled container because you preserve the texture of the fresh toppings and prevent the yogurt dressing from getting too hot (which can make it separate slightly).
Making These Bowls Last Even Longer
If you want to extend the shelf life beyond five days, freeze the chicken, vegetables, and grain separately. Keep them in freezer bags or containers for up to three months. When you want to eat them, thaw overnight in the refrigerator and assemble as usual. The texture won’t be quite as good as fresh (the vegetables will be slightly softer), but it’s still genuinely delicious and immeasurably better than frozen tv dinners.
The dressing and fresh toppings don’t freeze well, so make those fresh when you thaw your meal or double-batch them right before you freeze components. Fresh dressing tastes infinitely better than thawed dressing anyway, and the feta gets weepy and unpleasant if frozen, so this isn’t really a sacrifice.
You can also make half-batches if you don’t want to commit to five days of the same bowl. This recipe easily scales down to make two or three bowls instead of five, which means you can make these twice a week with different vegetable combinations if you want more variety.
Creative Variations and Dietary Swaps
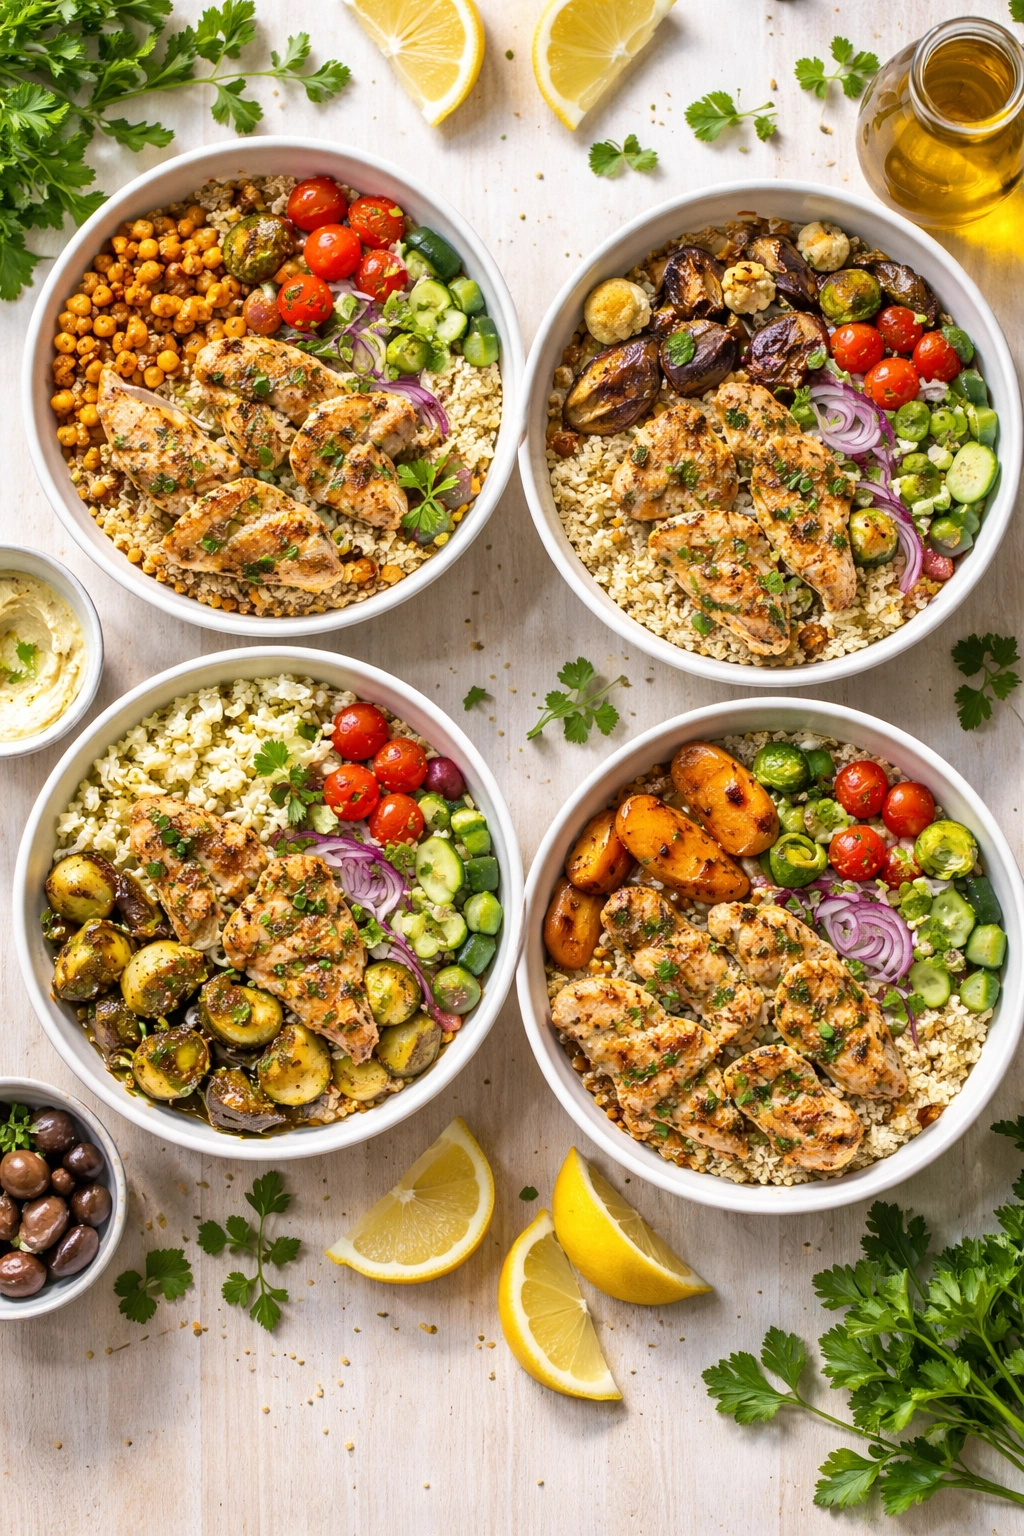
For Vegetarian and Vegan Versions: Replace the chicken with roasted chickpeas (toss them with the same olive oil, lemon, and oregano mixture and roast them on a separate pan for 25 to 30 minutes at 425°F until crispy) or with extra roasted vegetables like thick slices of eggplant or cauliflower steaks. The rest of the bowl remains exactly the same except you’d swap dairy feta for dairy-free feta or simply skip the cheese and add extra olives and fresh herbs.
For a Lighter, Lower-Carb Version: Swap the grain for cauliflower rice, which becomes delicious when tossed with a bit of olive oil and roasted briefly. Or use half the regular grain with half cauliflower rice to reduce calories while keeping the satisfaction factor high.
For Fall and Winter Adaptations: Use roasted sweet potato cubes, Brussels sprouts, and butternut squash instead of zucchini and bell peppers. The same marinade and dressing work beautifully with these heartier vegetables.
For Summer Simplicity: Add more fresh components — raw cucumber, cherry tomatoes, fresh mint (instead of or alongside the parsley), and dill. These lighter additions make the bowl feel more like a salad appropriate for hot weather.
Spice It Up: Add a teaspoon of smoked paprika and a pinch of red pepper flakes to the marinade, and drizzle the finished bowl with a squeeze of hot honey (honey mixed with red pepper flakes). This keeps all the Mediterranean vibes but adds genuine heat.
Mediterranean Protein Swaps: Use salmon fillets instead of chicken (reduce cooking time to 12 to 14 minutes), or use firm tofu that’s been pressed and cubed, then tossed with the marinade and roasted alongside the vegetables.
Serving Suggestions and Pairings
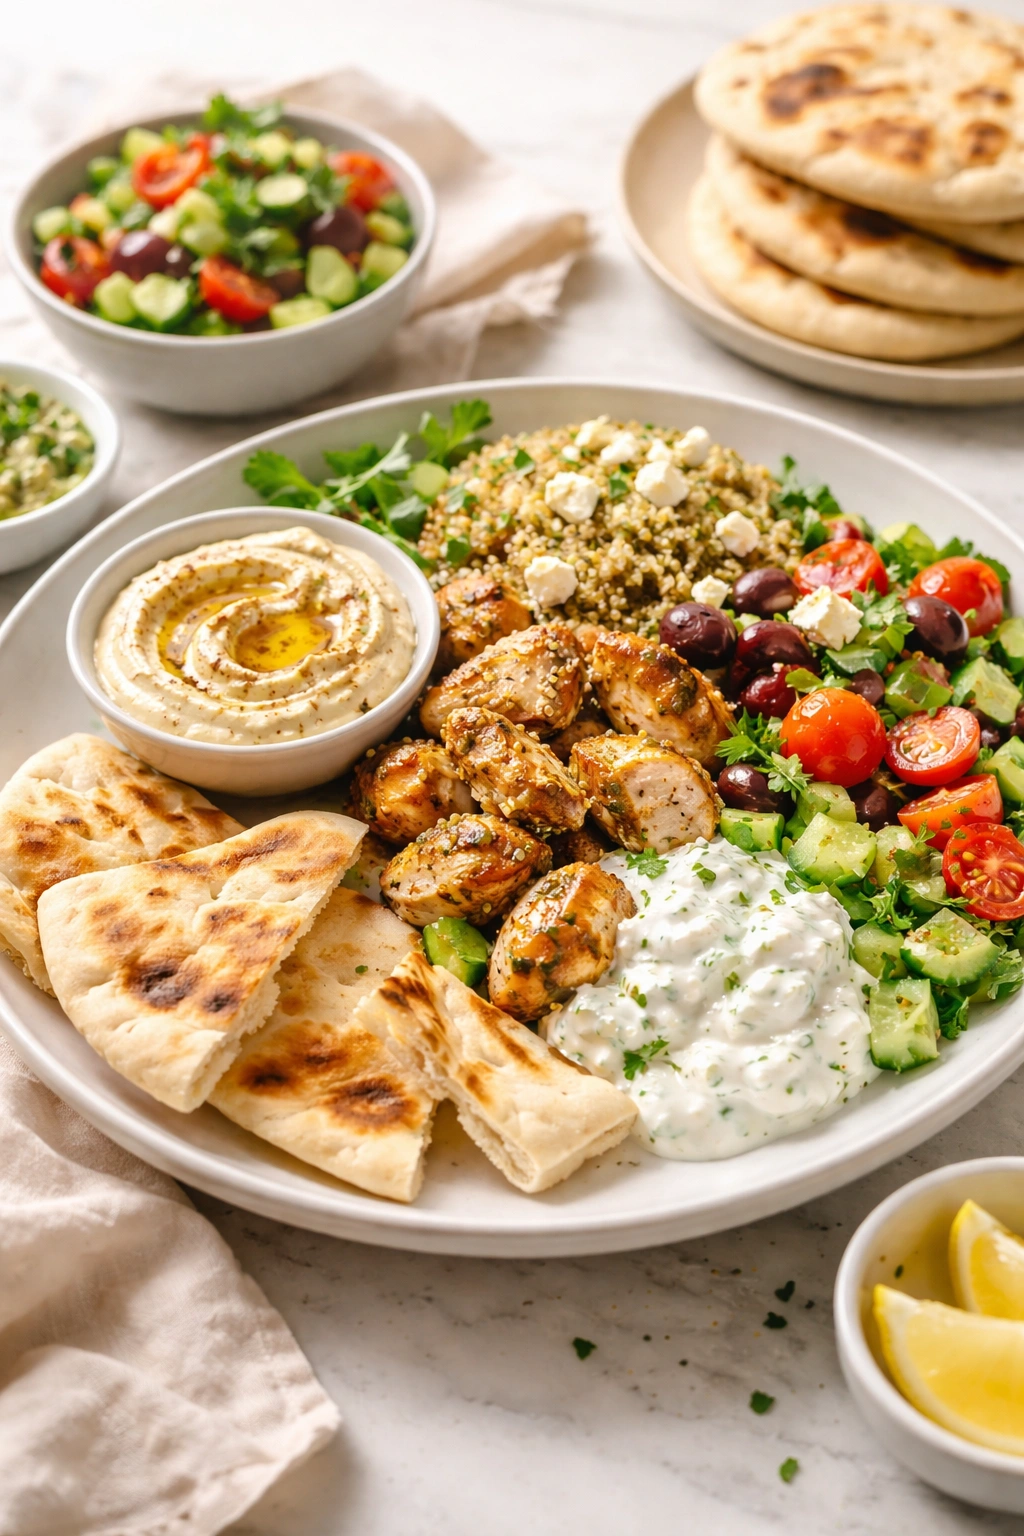
These bowls are genuinely complete meals that don’t need accompaniments — they’re balanced in protein, carbs, healthy fats, and vegetables. But if you want to make them more of an occasion, a side of warm flatbread or pita is lovely for scooping. Make or buy some hummus and pair it with the bowl; the chickpea flavor bridges beautifully to the Greek flavors of the bowl itself.
A simple side salad of mixed greens dressed with extra lemon-oregano dressing adds freshness and volume if you want a bigger meal. Or pair the bowl with a simple tomato-cucumber salad dressed with olive oil, red wine vinegar, and fresh herbs.
For beverages, these bowls pair beautifully with crisp white wines (a sauvignon blanc or Assyrtiko) if you’re in the mood for wine. Otherwise, sparkling water with fresh lemon, unsweetened iced tea, or even a simple lemon-herb infusion works perfectly.
If you’re bringing these bowls to work, assemble them right before eating rather than eating them right out of the container. Transfer everything to a regular bowl and mix it all together — the grain will soak up the dressing, the fresh toppings will stay fresher, and the overall experience is significantly more enjoyable than eating from plastic.
Troubleshooting Common Meal Prep Mistakes
Dry, stringy chicken: This happens when chicken is overcooked or when it’s cooked at too high a temperature without the protection of the marinade. The fix is to always marinate for at least two hours, pound your breasts to even thickness so they cook at the same rate, and use a meat thermometer to check doneness (165°F is the target, not anything higher). Watch the chicken during roasting — it only needs 20 to 25 minutes at 425°F depending on thickness. If your oven runs hot, start checking at 18 minutes.
Soggy grain by day three: The grain is absorbing moisture from the vegetables and dressing. The solution is absolute separation of components until the moment you eat. Make sure your containers have tight-fitting lids and that water doesn’t pool anywhere. Also make sure you toss the finished grain with olive oil — this creates a slight water barrier and keeps moisture from migrating into the grain.
Vegetables that are soft and steamed instead of caramelized: You’re probably crowding the pan. Every piece of vegetable needs to touch the hot pan directly, not sit on top of other vegetables. Use two sheet pans if necessary. Also make sure your vegetables are completely dry before roasting — moisture prevents browning. Finally, make sure your oven is fully preheated to 425°F. If it’s cooler, the vegetables won’t caramelize properly.
Dressing that separates and looks curdled by day three: This usually means your yogurt wasn’t thick enough or you used Greek yogurt that was too watery. Use the thickest, creamiest Greek yogurt you can find. You can also add a tablespoon of olive oil to the dressing, which prevents separation. The dressing is still fine to eat — just stir it back together.
Fresh toppings that have wilted or turned dark: The fresh components are sitting in containers with the cooked components, absorbing their moisture. Keep the fresh toppings completely separate in their own sealed container. If your parsley is turning dark, make sure it’s completely dry before storing it, and consider making the chopping step happen the morning you want to eat the bowl rather than the day before.
Final Thoughts
The real power of these bowls is that they’re genuinely delicious without requiring any willpower to eat. You’re not choking down bland “healthy food” because it’s good for you. You’re actually looking forward to lunch because the combination of flavors and textures is satisfying and interesting every single day.
The Mediterranean approach to cooking — building flavor through quality ingredients and proper technique rather than heavy sauces and loads of added salt — is fundamentally compatible with meal prep. These flavors improve over time. The bowls taste better on day four than they do on day one, which is the opposite of what usually happens with meal prep food.
Start with the basic version exactly as written. Once you’ve made them once or twice and understand how the process works, the variations and adaptations become obvious. You’ll start experimenting with different vegetable combinations based on what’s in season, different grains based on what you’re in the mood for, different proteins based on what looks good at the market. That’s when meal prep stops feeling like a chore and starts feeling like something you genuinely want to do.