When the doorbell’s about to ring and you haven’t even started on snacks, panic doesn’t have to set in. The eight snacks below prove you don’t need hours in the kitchen or restaurant-level skills to impress guests with homemade, delicious bites. Each one comes together in 20 minutes or less from start to finish, which means you can have elegant, crowd-pleasing appetizers ready while still looking put-together yourself.
The secret isn’t complicated shortcuts or mediocre results — it’s choosing recipes that are genuinely simple, using ingredients most kitchens already have on hand, and understanding which preparation steps can happen simultaneously to maximize your time. These snacks range from savory to slightly sweet, warm to cold, and they all deliver the kind of “wow, you made this?” response that makes hosting feel less stressful and more enjoyable.
Why Quick Snacks Make Better Parties

Here’s something most people don’t realize: guests don’t expect homemade everything to appear magically before they arrive. What they do notice is when food is fresh, tastes intentional, and shows someone cared enough to prepare it specifically for them. A homemade snack made 15 minutes before guests arrive tastes noticeably better than something assembled days earlier and reheated, no matter how fancy the original recipe was.
Quick snacks also give you mental space to actually enjoy your own party. When you’re not stressed about timing or wrestling with a complicated recipe, you can greet guests warmly, keep conversations going, and adjust plans on the fly if someone brings unexpected people along. The twenty-minute window is generous enough to handle real cooking tasks without feeling rushed, but short enough that you’re done before the party truly begins.
1. Crispy Garlic Parmesan Chickpea Bites

These golden, crunchy chickpeas are impossibly satisfying — they taste like addictive snack-food but deliver the protein of a real ingredient. Most people eat an entire handful without realizing they’re not eating something deep-fried and processed.
Yield: Serves 6 to 8 | Prep Time: 5 minutes | Cook Time: 15 minutes | Total Time: 20 minutes | Difficulty: Beginner — draining and tossing are the only techniques involved.
Ingredients:
- Two 15-ounce cans chickpeas, drained and thoroughly dried with a paper towel
- 2 tablespoons olive oil
- 3 cloves garlic, minced very finely
- 1 teaspoon garlic powder
- ½ teaspoon smoked paprika
- ¼ teaspoon cayenne pepper (optional, for gentle heat)
- ½ teaspoon fine sea salt
- ¼ teaspoon black pepper
- ½ cup grated Parmesan cheese, finely grated
- 1 tablespoon chopped fresh rosemary (or 1 teaspoon dried)
- Zest of one lemon (about 1 teaspoon)
Start by patting your drained chickpeas completely dry with paper towels — this is the critical step that makes them crispy rather than steamed. Wet chickpeas will steam in the pan instead of developing that satisfying crunch. In a large bowl, whisk together the olive oil, minced garlic, garlic powder, smoked paprika, cayenne, salt, and black pepper. Add the chickpeas and toss until every single one is evenly coated.
Spread them in a single layer on a rimmed baking sheet and roast at 400°F for 12 to 15 minutes, stirring halfway through, until they’re deeply golden brown and you can crack one between your teeth without it feeling soft. This takes longer than you might expect, but the wait is essential — undercooked chickpeas will be grainy and disappointing.
While the chickpeas roast, combine the grated Parmesan, fresh rosemary, and lemon zest in a small bowl. The moment the chickpeas come out of the oven, transfer them to a clean bowl and immediately sprinkle the Parmesan mixture over the top, tossing continuously so the heat helps the cheese adhere. The residual warmth will slightly melt the cheese and marry all the flavors together.
Why They Work: Chickpeas are inexpensive, naturally protein-rich, and transform completely in the oven. The garlic and Parmesan combination is foolproof — it’s the flavor profile people crave but rarely make at home because roasted chickpeas seem more complicated than they actually are.
Make-Ahead Tip: These are best served warm from the oven, but they hold beautifully at room temperature for up to 4 hours. If you need them to stay crispy longer than that, store them in an airtight container and re-crisp them in a 350°F oven for 3 minutes before serving.
2. Burrata and Tomato Crostini with Basil Oil
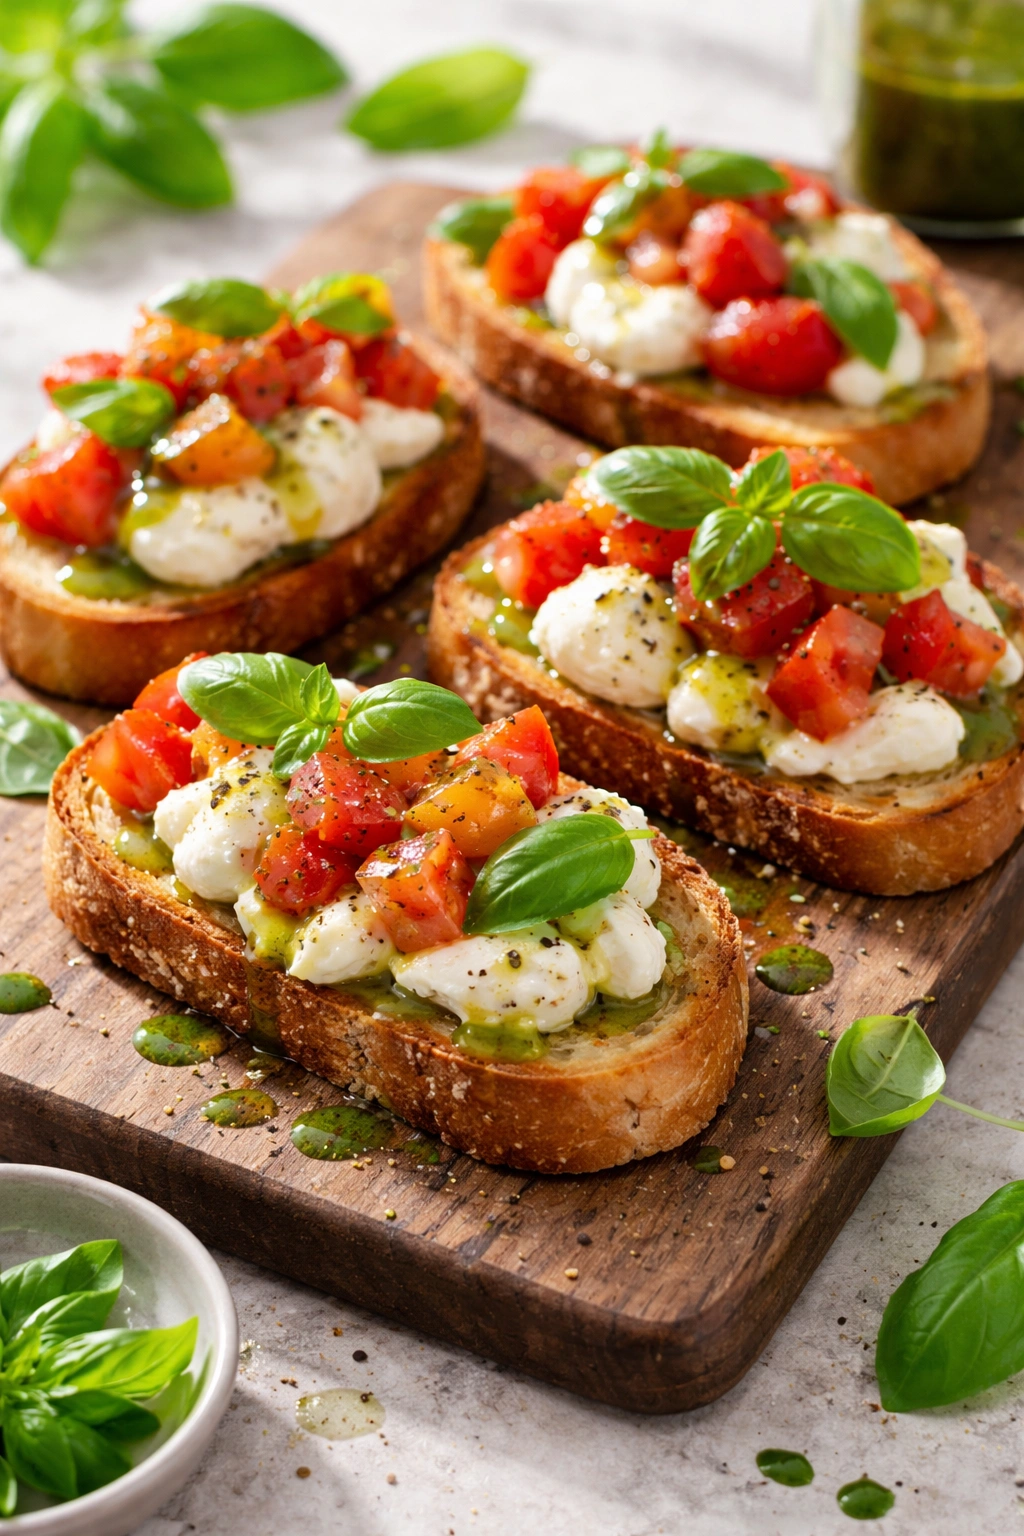
Crostini seem like they require effort, but toasting bread takes five minutes and building the toppings takes another five. The result looks like something from a trattoria but tastes like summer captured on bread.
Yield: Makes 12 crostini, serves 4 to 6 | Prep Time: 10 minutes | Cook Time: 5 minutes | Total Time: 15 minutes | Difficulty: Beginner — no cooking experience needed, just assembly.
Ingredients:
For the Crostini:
- 1 baguette, sliced on a diagonal into ½-inch-thick pieces (about 12 slices)
- 3 tablespoons olive oil
- ½ teaspoon fine sea salt
- Pinch of black pepper
For the Topping:
- Two 4-ounce balls fresh burrata, torn into bite-sized pieces (or fresh mozzarella if burrata is unavailable)
- 4 to 5 medium vine tomatoes, cored and cut into ½-inch chunks
- ¼ cup fresh basil leaves, roughly torn
- 2 tablespoons excellent olive oil (use your best bottle here — quality matters)
- 2 tablespoons fresh lemon juice
- ½ teaspoon fleur de sel or finishing salt
- Freshly cracked black pepper to taste
- Optional: 12 fresh basil leaves for garnish
Arrange your baguette slices on a baking sheet. Mix the three tablespoons of olive oil with a pinch of salt and pepper, then brush both sides of each slice lightly with this mixture. Toast at 425°F for 4 to 5 minutes, until the edges are golden and the interior is still tender enough to bite through without struggling. You want a crispy exterior and a slightly yielding center.
While the bread toasts, prepare the topping. In a bowl, gently combine the torn burrata, tomato chunks, torn basil, excellent olive oil, lemon juice, salt, and black pepper. This is deliberately underdressed — you’re looking for a light coating rather than a dripping mess. The tomato will release more liquid as it sits, so it’s better to underseasoned than overseasoned.
The moment the crostini come out of the oven (while they’re still warm), top each piece with a spoonful of the burrata mixture. The warmth of the toast will slightly soften the burrata, creating a luxurious texture. Finish with a single fresh basil leaf on top if you want visual appeal, then serve within five minutes while the bread is still warm and crispy.
Why They Work: Burrata is rich and creamy enough that it feels indulgent, but since you’re using only a small amount per crostini, it remains elegant. The acidity from the tomato and lemon prevents the whole thing from feeling heavy.
Smart Swap: If fresh burrata isn’t available, fresh mozzarella works beautifully — the texture is slightly less luxurious but the flavor profile remains exactly right. In a pinch, ricotta also works and creates a slightly different but equally delicious result.
3. Spicy Honey Sriracha Mozzarella Bites

These are cheese-pulls in bite form — the stretchy, molten center surrounded by a crispy exterior makes people reach for another one immediately. They hit all four taste notes: salty, spicy, sweet, and rich.
Yield: Makes 12 bites, serves 4 to 6 | Prep Time: 8 minutes | Cook Time: 8 minutes | Total Time: 16 minutes | Difficulty: Beginner — basic assembly and frying, no special skills required.
Ingredients:
For the Bites:
- 12 ounces fresh mozzarella, cut into 12 roughly equal cubes (about 1 inch each)
- ½ cup all-purpose flour
- 2 large eggs, beaten in a shallow bowl
- ¾ cup panko breadcrumbs mixed with ¼ teaspoon fine sea salt
- Vegetable oil for frying (about 1½ cups)
For the Honey Sriracha Glaze:
- 3 tablespoons honey
- 2 tablespoons sriracha (adjust to your heat preference — start with less if you’re sensitive)
- 1 tablespoon unsalted butter
- ½ teaspoon lime juice
- Pinch of salt
Set up your breading station: one shallow bowl with flour, one with beaten eggs, and one with seasoned panko. Pat each mozzarella cube completely dry with paper towels — moisture prevents the breading from adhering properly. Working quickly (because you don’t want the cheese to warm up), coat each cube in flour first, shaking off excess, then dip in egg, then roll in panko, pressing gently so the breadcrumbs adhere. Set the breaded cubes on a plate and work through all 12 immediately.
While you’re breading, heat your oil to 350°F in a heavy-bottomed pot or deep skillet. Use a thermometer — oil that’s too cool will produce greasy bites, and oil that’s too hot will burn the outside before the coating crisps properly. Working in batches of four to avoid overcrowding, fry each bite for 60 to 90 seconds total, turning halfway through, until the outside is deep golden brown. The cheese inside should not be completely liquid — you’re aiming for the moment when the edges are starting to melt but the center still has structure.
Transfer the fried bites to paper towels immediately. While they’re still hot, prepare the glaze: warm honey, sriracha, butter, lime juice, and salt in a small saucepan over low heat just until the butter melts. Drizzle this glaze over the warm mozzarella bites — it will cling to the hot surface and create a beautiful glossy finish.
Why They Work: The contrast between crispy exterior and molten interior is impossible to resist. Sriracha and honey together is a flavor combination that tastes more sophisticated than the two ingredients separately.
Critical Timing: These are best served within 5 minutes of frying, while they’re still hot and the cheese is still slightly flowing. If you need to make them further ahead, reheat them in a 325°F oven for 3 to 4 minutes until the cheese softens again.
Make-Ahead Option: You can bread the mozzarella cubes up to 2 hours ahead and refrigerate them until ready to fry. Cold cheese takes slightly longer to heat through — fry for 90 to 120 seconds instead of 60 to 90 seconds. This also helps prevent the cheese from leaking out of the breading.
4. Tuna Salad Endive Boats with Crispy Capers
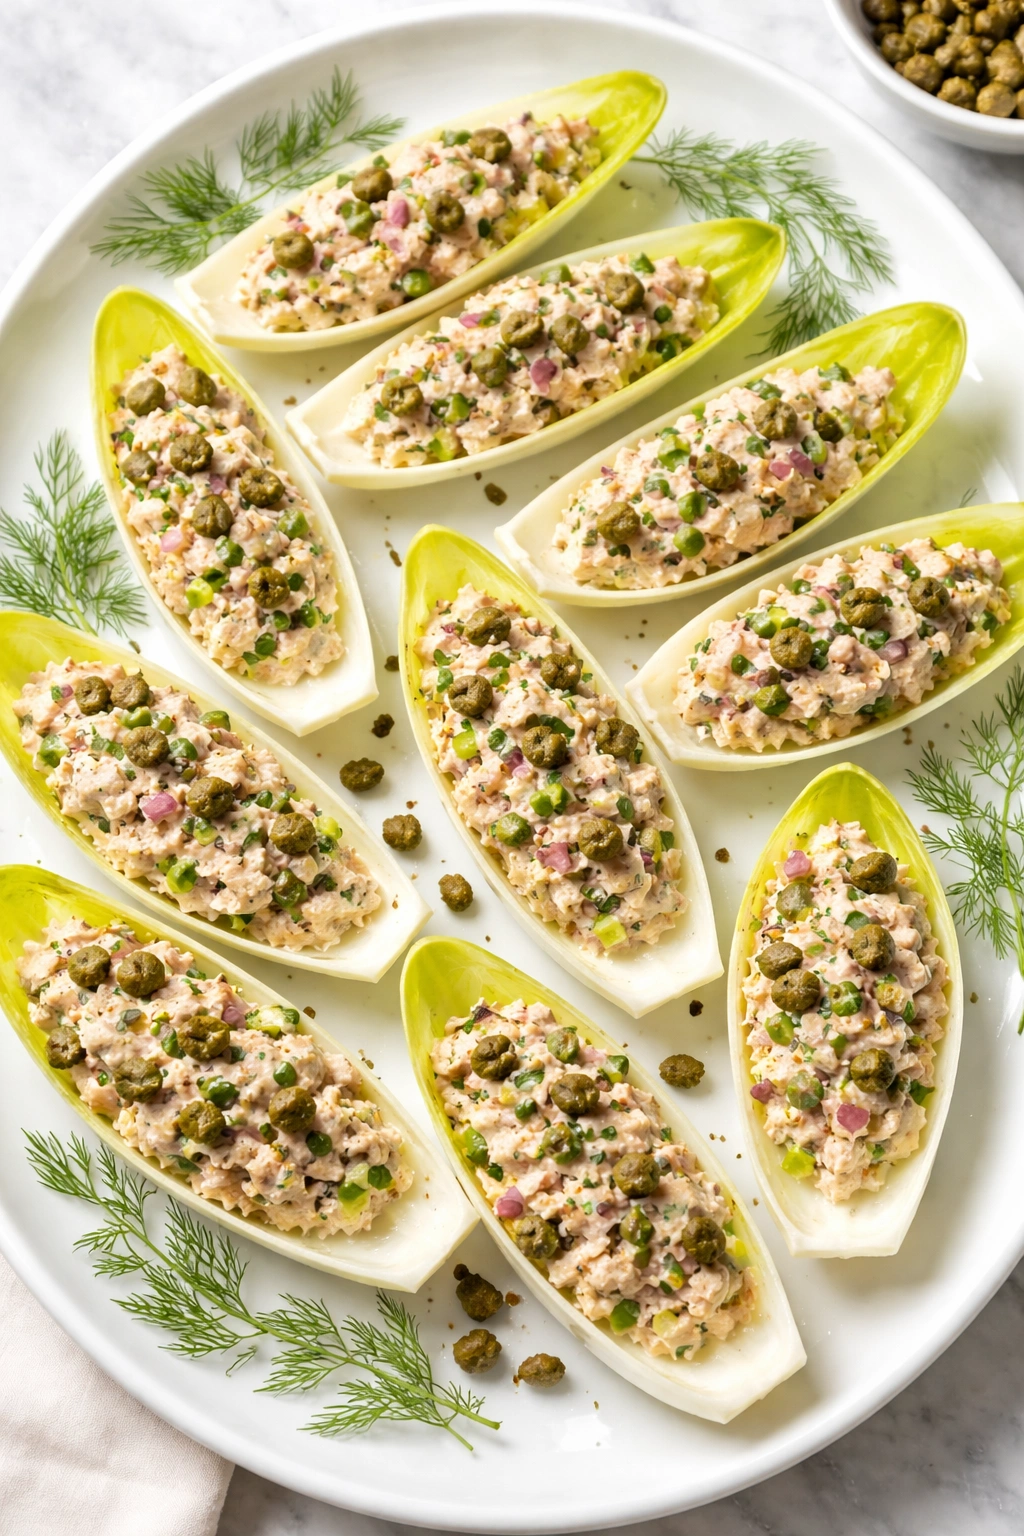
Endive leaves are the perfect snack vessel — sturdy enough to hold filling without tearing, elegant without trying, and they stay fresh and crispy throughout a whole party. This filling is brighter and more interesting than standard tuna salad.
Yield: Makes 16 to 20 boats, serves 6 to 8 | Prep Time: 12 minutes | Cook Time: None | Total Time: 12 minutes | Difficulty: Beginner — chopping and mixing are the only techniques.
Ingredients:
For the Tuna Salad:
- Two 5-ounce cans high-quality tuna in water, drained very thoroughly (squeeze between paper towels to remove excess liquid)
- ¼ cup mayonnaise
- 1 celery stalk, minced very finely
- ¼ red onion, minced finely
- 2 tablespoons fresh parsley, minced
- 1 tablespoon capers (packed in salt or brine), rinsed and chopped
- 1 tablespoon fresh lemon juice
- ½ teaspoon Dijon mustard
- ¼ teaspoon fine sea salt
- Pinch of black pepper
For Assembly:
- 2 heads Belgian endive (about 16 to 20 leaves total), separated and rinsed
- 2 tablespoons capers (for frying)
- 2 tablespoons olive oil
- Fresh dill or microgreens for garnish (optional but adds visual appeal)
The tuna salad comes together quickly: combine the drained tuna, mayonnaise, minced celery, red onion, parsley, chopped capers, lemon juice, mustard, salt, and pepper in a bowl. Mix gently but thoroughly — you want everything evenly distributed without aggressively breaking up the tuna. Taste and adjust the lemon juice or salt if needed. The salt in capers varies, so season thoughtfully at the end.
To crisp the capers for garnish, heat the olive oil in a small skillet over medium heat. Add the whole capers and cook for 2 to 3 minutes, stirring occasionally, until they’ve popped open slightly and the oil is fragrant. Transfer to a paper towel to cool and crisp up.
Arrange your endive leaves on a serving platter in a sunburst pattern — it looks beautiful and intentional. Just before serving, spoon about a tablespoon of tuna salad into the base of each leaf, then top with a single crispy caper and a tiny pinch of fresh dill or a single microgreen leaf. Serve immediately.
Why They Work: Endive is sophisticated but still casual — it bridges the gap between “light snack” and “fancy appetizer.” The crispy capers add a textural element and a salty punch that makes the tuna salad taste more interesting than it has any right to be.
Flavor Variations: Add a tiny pinch of fresh tarragon instead of parsley for a more French approach. Or substitute chopped fresh dill for the parsley and add a tablespoon of pickle relish instead of plain capers for a brighter, more pickle-forward version.
5. Caprese Skewers with Balsamic Glaze
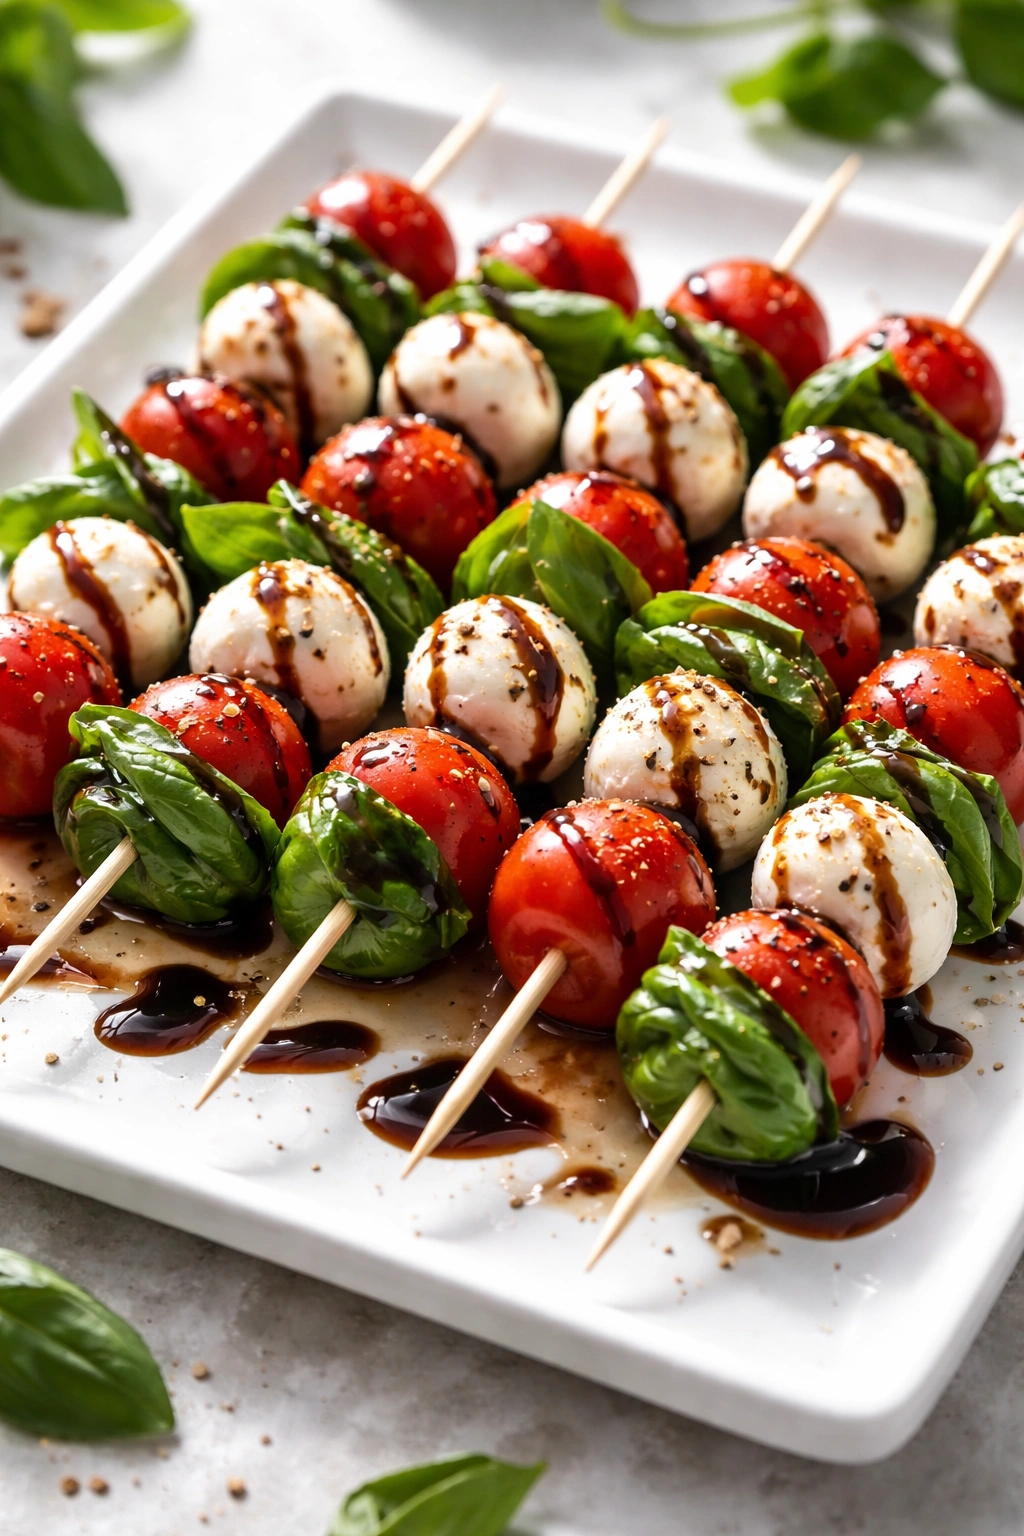
These are summer in edible form — the holy trinity of fresh mozzarella, tomato, and basil on a single skewer, finished with a dark, syrupy balsamic reduction. They’re elegant enough for a formal party and easy enough to assemble while wearing casual clothes.
Yield: Makes 12 skewers, serves 4 to 6 | Prep Time: 8 minutes | Cook Time: 5 minutes | Total Time: 13 minutes | Difficulty: Beginner — assembly only, no cooking involved if using store-bought glaze.
Ingredients:
For the Skewers:
- 12 cherry tomatoes (roughly the same size)
- 12 fresh mozzarella balls (about ¾-inch diameter) or 6 ounces fresh mozzarella cut into 12 cubes
- 12 large fresh basil leaves (the most tender, unblemished ones)
- 12 toothpicks or small wooden skewers, soaked in water for 10 minutes
- 1 tablespoon excellent olive oil
- Fine sea salt and freshly cracked black pepper
For the Balsamic Glaze (or use store-bought if short on time):
- ½ cup balsamic vinegar
- 2 tablespoons honey
If you’re making the glaze from scratch, combine the balsamic vinegar and honey in a small saucepan over medium heat. Bring to a simmer and reduce for 4 to 5 minutes, stirring occasionally, until the mixture is dark, syrupy, and reduced to about ¼ cup. It should coat the back of a spoon and run slowly when tilted. Remove from heat and set aside to cool slightly.
To assemble: thread each toothpick with a tomato, then a basil leaf (fold it gently so it threads through), then a mozzarella ball. Arrange on a serving platter, drizzle lightly with excellent olive oil, season with a pinch of salt and black pepper, then finish with thin drizzles of the balsamic glaze. The glaze should be delicate — you want flavor, not drowning.
Why They Work: These require zero cooking skills but deliver maximum visual and flavor impact. The warm tomato against cool mozzarella and fresh basil is a flavor combination that never gets old because it’s fundamentally delicious.
In a Pinch: If you don’t have cherry tomatoes, cut larger tomatoes into chunks and use the same method. If you only have regular basil that’s too large, simply use smaller pieces — it won’t affect the taste.
6. Whipped Feta and Herb Crudités with Crispy Pita Chips
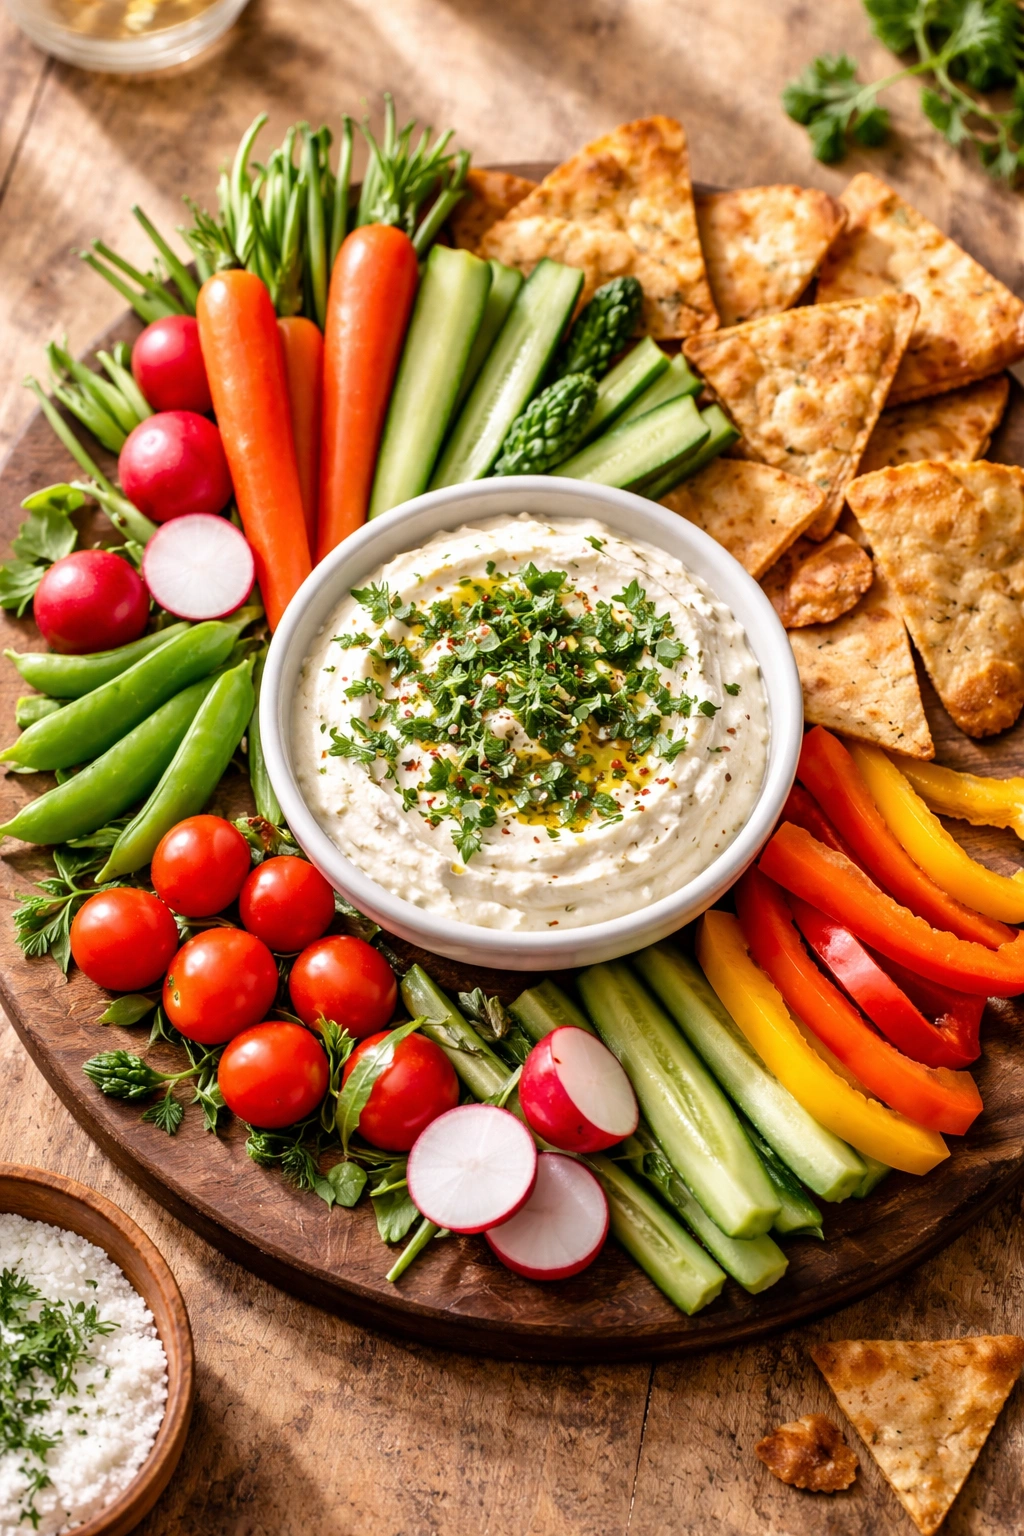
Whipped feta is sophisticated but approachable — it takes five minutes and transforms a simple cheese into something that tastes like you spent hours on it. Serve it with raw vegetables and homemade pita chips for an entirely homemade spread that costs less than store-bought alternatives.
Yield: Serves 6 to 8 | Prep Time: 10 minutes | Cook Time: 8 minutes | Total Time: 18 minutes | Difficulty: Beginner — chopping and blending are the only skills needed.
Ingredients:
For the Whipped Feta:
- 8 ounces feta cheese, crumbled
- ¼ cup Greek yogurt (or sour cream)
- 2 tablespoons excellent olive oil, plus more for drizzling
- 1 tablespoon fresh lemon juice
- 1 tablespoon honey
- 2 cloves garlic, minced
- ¼ cup fresh dill, finely chopped
- 2 tablespoons fresh mint, finely chopped
- 2 tablespoons fresh parsley, finely chopped
- Pinch of red pepper flakes (optional)
- Salt and pepper to taste
For the Pita Chips:
- 3 pita breads (6-inch diameter)
- 2 tablespoons olive oil
- ½ teaspoon fine sea salt
- ¼ teaspoon dried oregano
- ¼ teaspoon garlic powder
For Crudités:
- 2 cups cherry tomatoes
- 1 cucumber, sliced into rounds or spears
- 1 bell pepper (any color), cut into strips
- 1 cup snap peas or snow peas
- ½ cup radishes, sliced thinly
Start the pita chips first: separate each pita into two thin rounds and brush both sides lightly with olive oil. Mix the salt, oregano, and garlic powder, then sprinkle evenly over all the pieces. Cut each round into triangles and arrange in a single layer on a baking sheet. Bake at 400°F for 6 to 8 minutes, stirring halfway through, until they’re golden brown and crispy. They’ll crisp further as they cool.
While the pita chips bake, prepare the whipped feta: add the crumbled feta, Greek yogurt, olive oil, lemon juice, honey, and minced garlic to a food processor. Blend until completely smooth, scraping down the sides as needed. The mixture should be light, fluffy, and spreadable — this takes 2 to 3 minutes of continuous blending. Transfer to a serving bowl and fold in the chopped fresh herbs and red pepper flakes by hand.
Arrange the whipped feta in the center of a large platter, create a shallow well in the top with the back of a spoon, and drizzle additional olive oil around the top. Surround with the crudités and warm pita chips (serve the chips immediately while they’re still crispy).
Why They Work: Whipped feta feels special because it’s creamy and luxurious, but it’s actually cheaper than many store-bought dips. The fresh herbs brighten it, and the Greek yogurt makes it less heavy than feta would be alone.
Flavor Variations: Add a tablespoon of pomegranate molasses or dried sumac for a brighter, Middle Eastern angle. Or skip the mint and parsley and substitute za’atar (a spice blend of thyme, sumac, and sesame) mixed into the top for an earthier flavor.
7. Prosciutto-Wrapped Dates with Goat Cheese and Walnuts

These are almost absurdly easy but taste like you hired a caterer. The combination of salty, sweet, creamy, and crunchy hits every pleasure point simultaneously, and they come together faster than you’d think possible.
Yield: Makes 12 dates, serves 4 to 6 | Prep Time: 10 minutes | Cook Time: 8 minutes | Total Time: 18 minutes | Difficulty: Beginner — assembly and roasting, no technique required.
Ingredients:
- 12 large Medjool dates, pitted
- 4 ounces fresh goat cheese, at room temperature
- ½ cup roasted walnuts, finely chopped
- 6 slices prosciutto, cut in half lengthwise (so you have 12 long strips)
- 1 tablespoon honey
- ¼ teaspoon fine sea salt
- Pinch of black pepper
Using a small spoon, stuff each date cavity with about a teaspoon of goat cheese. Top the goat cheese with a pinch of chopped walnuts, pressing gently so they adhere. Wrap each stuffed date with a strip of prosciutto, tucking the ends under slightly so they don’t unravel during roasting.
Arrange the wrapped dates on a parchment-lined baking sheet seam-side down. Roast at 400°F for 8 to 10 minutes, until the prosciutto is crispy and slightly darkened. While they roast, warm the honey slightly in a small bowl and stir in a tiny pinch of salt and black pepper.
Remove the dates from the oven and arrange on a serving platter. Drizzle lightly with the seasoned honey and serve warm or at room temperature. They’re best served within 15 minutes while the prosciutto is still crispy.
Why They Work: These taste luxurious because they are luxurious — prosciutto and goat cheese aren’t budget ingredients. But since you’re using small amounts, the cost per bite stays reasonable. The natural sweetness of the date means you don’t need much sugar.
Make-Ahead Magic: You can stuff and wrap the dates up to 4 hours ahead, cover them with plastic wrap, and refrigerate. Roast them about 10 minutes before guests arrive for maximum crispiness.
Flavor Swaps: Substitute crispy bacon for prosciutto if you prefer a smokier flavor. Or use blue cheese instead of goat cheese for a more assertive, pungent taste.
8. Crispy Chickpea Lettuce Cups with Sriracha Mayo

These feel substantial enough to be a small meal but light enough that people don’t feel overstuffed. Crispy chickpeas provide a satisfying crunch without deep-frying, and sriracha mayo takes five minutes to make.
Yield: Makes 12 lettuce cups, serves 4 to 6 | Prep Time: 10 minutes | Cook Time: 12 minutes | Total Time: 22 minutes | Difficulty: Beginner — roasting and assembly, no special skills.
Ingredients:
For the Crispy Chickpeas:
- One 15-ounce can chickpeas, drained and thoroughly dried
- 1½ tablespoons olive oil
- 1 teaspoon curry powder (or garam masala)
- ½ teaspoon smoked paprika
- ¼ teaspoon cayenne pepper
- ½ teaspoon fine sea salt
- Pinch of black pepper
For the Sriracha Mayo:
- ¼ cup mayonnaise
- 1½ teaspoons sriracha
- ½ teaspoon lime juice
- ¼ teaspoon honey
For Assembly:
- 12 large butter lettuce or romaine lettuce leaves (choose the crispest, most unblemished ones)
- ¼ cup shredded carrots (julienned for visual appeal)
- ¼ cup cucumber, thinly sliced
- 2 tablespoons fresh cilantro, roughly chopped
- 2 green onions, sliced into thin rings
Pat your drained chickpeas completely dry with paper towels — this is essential for crispiness. In a bowl, toss them with olive oil, curry powder, smoked paprika, cayenne, salt, and black pepper until evenly coated. Spread on a baking sheet and roast at 400°F for 12 to 14 minutes, stirring halfway through, until they’re golden and crispy. They should be crunchy enough that a hard bite doesn’t yield.
While the chickpeas roast, prepare the sriracha mayo: whisk together mayonnaise, sriracha, lime juice, and honey in a small bowl until smooth. Taste and adjust the heat level — add more sriracha if you want more kick.
Lay out your lettuce leaves on a cutting board. Spread each leaf with about ½ teaspoon of sriracha mayo, then top with a small handful of roasted chickpeas, a few shreds of carrot, a couple of cucumber slices, a pinch of cilantro, and a ring or two of green onion. Serve immediately while the chickpeas are still warm and crispy.
Why They Work: These are hearty enough that they feel like a real snack or light appetizer, not a token bite. The curry spice is warm and comforting without being overwhelming, and the fresh vegetables keep things bright.
Flavor Variations: Skip the curry and use everything bagel seasoning instead for a completely different flavor profile. Or use Japanese togarashi (a spicy chile-based seasoning) for a sharper, more complex heat.
The Strategy That Makes Quick Snacking Actually Work
The reason these eight snacks come together in 20 minutes isn’t magic — it’s strategy. Most of them use ingredients that don’t require much prep: canned chickpeas, store-bought pita, pre-washed lettuce, cherry tomatoes that need only rinsing. The ones that require cooking (the crispy chickpeas, the pita chips) bake unattended while you assemble other components.
Start with any snack that needs oven time first, set a timer, then move on to assembly-only items while the oven is working. This parallel processing is how you stay ahead of the clock. If a recipe needs five minutes to roast and ten minutes to assemble, those twenty minutes overlap — you’re not waiting around watching things cook.
Making These Snacks Your Own
The beautiful thing about these eight options is that they’re genuinely adaptable. The spice level in the chickpea bites can be dialed up or down depending on your crowd. The whipped feta can shift from Mediterranean to Middle Eastern depending on which fresh herbs you choose. The tuna salad can go French with tarragon or Asian-influenced with sesame oil and soy sauce.
These aren’t recipes carved in stone — they’re frameworks that work because they’ve been tested. Feel confident adjusting them based on what you have, what your guests like, and what you’re in the mood to make.
Wrapping Up

Twenty minutes is genuinely enough time to go from empty kitchen to a spread of homemade, impressive snacks. These eight options prove you don’t need a catering background or overnight prep to feed people well. You need good ingredients, simple techniques, and a plan that lets you work efficiently. Pick one or two of these, spend fifteen minutes in the kitchen, and enjoy the disproportionately large amount of credit you’ll receive for food you barely broke a sweat making. That’s the real value of understanding how to snack smart.