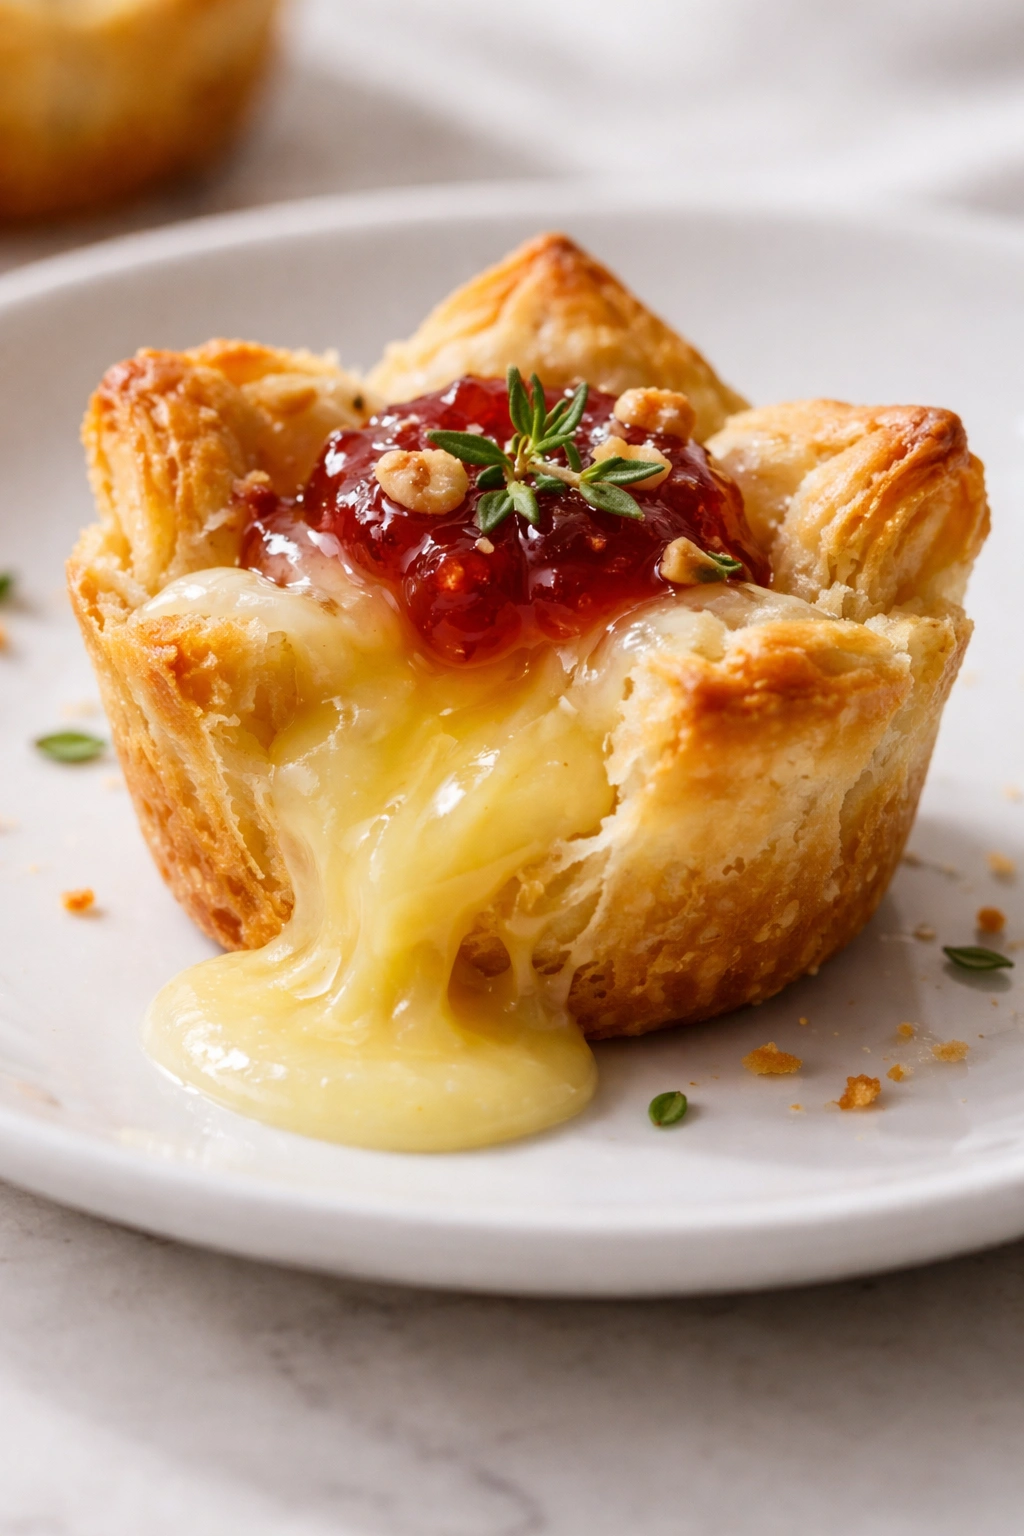
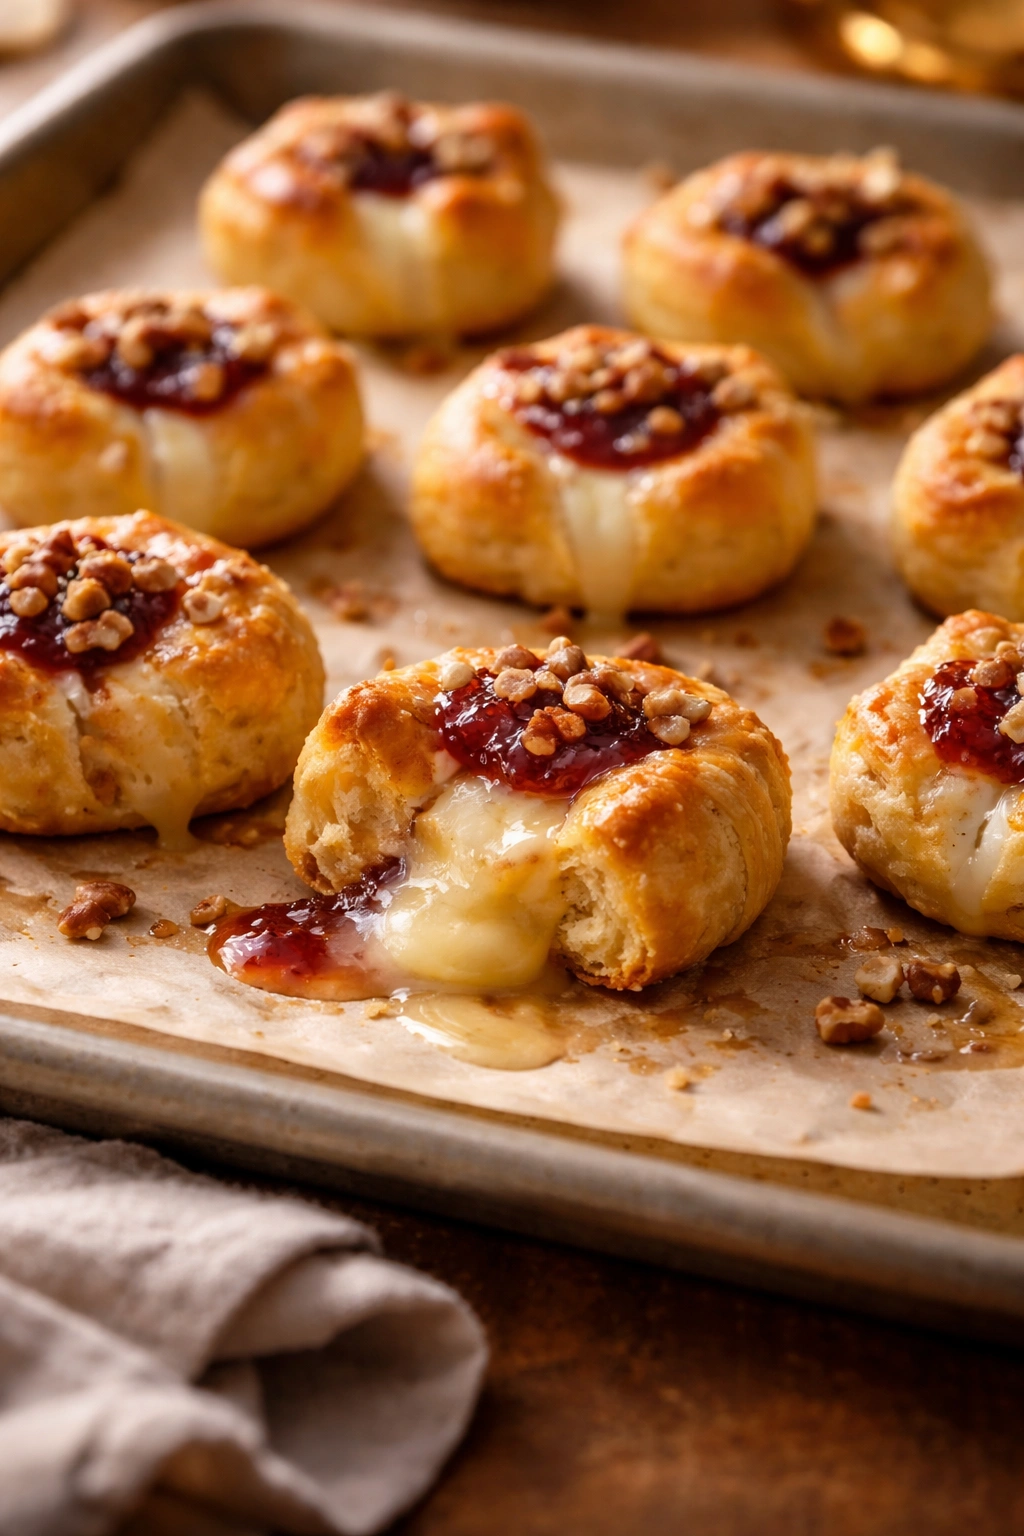
There’s a particular magic in watching guests’ faces light up when they bite into a warm, molten baked brie. That moment when the perfectly crispy exterior gives way to oozing cheese studded with whatever flavor combination you’ve chosen—it never gets old. Baked brie bites are the kind of appetizer that feels far more impressive than the actual effort required to make them. They look elegant enough for a dinner party, yet they’re casual and forgiving enough that even a novice cook can pull them off with confidence.
What makes these bites so special isn’t just the flavor—though that creamy, buttery cheese is definitely part of the appeal. It’s the fact that they transform a simple block of brie into something that feels almost fancy without requiring you to fuss in the kitchen while guests arrive. You can prep them hours ahead, slide them into the oven just before people arrive, and have them ready to serve hot and gooey within minutes. For anyone who’s ever felt stressed about entertaining, these bites solve a real problem: how to serve something delicious without spending your entire evening cooking.
What I love most is how endlessly adaptable they are. Craving something sweet? Add fig jam and walnuts. Want savory and herbaceous? Try thyme and crispy prosciutto. Prefer a spicy kick? Top them with jalapeños and hot honey. The beauty of baked brie bites is that the base recipe is your blank canvas—and once you understand how they work, you can customize them based on whatever’s in your pantry or whatever flavor profile your gathering calls for. Whether you’re hosting an elegant wine tasting, a casual game night, or a holiday cocktail party, these bites adapt effortlessly.
Why Baked Brie Bites Work for Entertaining

There’s a reason baked brie has become such a go-to entertaining option for seasoned hosts and kitchen novices alike. The appeal goes way beyond just how good they taste.
The timing works in your favor like almost no other appetizer. You can assemble them in the morning, cover them, and refrigerate until your guests arrive. Then—just 12 to 15 minutes in a hot oven—they’re ready to serve. That means you’re not stuck in the kitchen during the most important part of entertaining, which is actually connecting with the people you’ve invited. You get to greet guests, pour drinks, and make conversation while those bites finish their final cook.
They’re also visually stunning without looking like you’ve stressed over them. A golden, bubbling wheel of brie studded with herbs and maybe some nuts or fruit is the kind of thing that photographs beautifully and makes your spread look intentional and thoughtful. That said, they’re forgiving enough that even if the presentation isn’t perfect, the taste will carry the moment.
The flavor and texture combination is the other piece of the puzzle. Warm, melted brie is pure comfort—that creamy, rich, slightly tangy cheese becomes almost liquid at the perfect temperature. When you pair it with the crispy, buttery exterior from puff pastry or phyllo dough, you get this incredible textural contrast that makes every bite satisfying. And because brie is a mild, elegant cheese on its own, it acts as a perfect base for whatever flavor profiles you want to build on top.
Cost-wise, baked brie bites are remarkably efficient too. A wheel of quality brie isn’t expensive, and when you cut it into smaller portions, you get plenty of servings from a single wheel. The toppings—jam, nuts, herbs—use small amounts that you likely have on hand. This is an appetizer that looks generous and feels special without breaking the budget.
The Anatomy of the Perfect Baked Brie Bite
Understanding what actually happens when brie bakes helps you nail the technique every time.
Brie is primarily composed of fat and water, which means it doesn’t have a super high melting point. It softens and becomes creamy around 120°F, and by the time you reach 160°F to 170°F (the range most recipes target), it’s fully melted but still holds its shape enough to serve on crackers or in pastry. The key is getting it warm enough to be truly luxurious without letting it heat so much that the cheese separates and becomes greasy.
The pastry crust you wrap it in creates texture and structure. Puff pastry gives you the most impressive rise and crispness—those golden, flaky layers are pure indulgence. Phyllo dough, by contrast, creates a thinner, more delicate shell that’s equally delicious and perhaps slightly less heavy, which some people prefer. Wonton wrappers are a wonderful shortcut option that you’ll see in some recipes; they crisp up beautifully in a hot oven and reduce your total prep time significantly since they’re much thinner than traditional pastry sheets.
The toppings serve multiple purposes. Obviously, they add flavor. But they also protect the cheese slightly as it bakes, helping it heat evenly without the exterior browning too much before the inside reaches the perfect melty state. Sweet toppings like jam or honey caramelize slightly in the heat, creating this beautiful contrast with the savory, tangy cheese underneath.
Essential Ingredients for Perfect Baked Brie
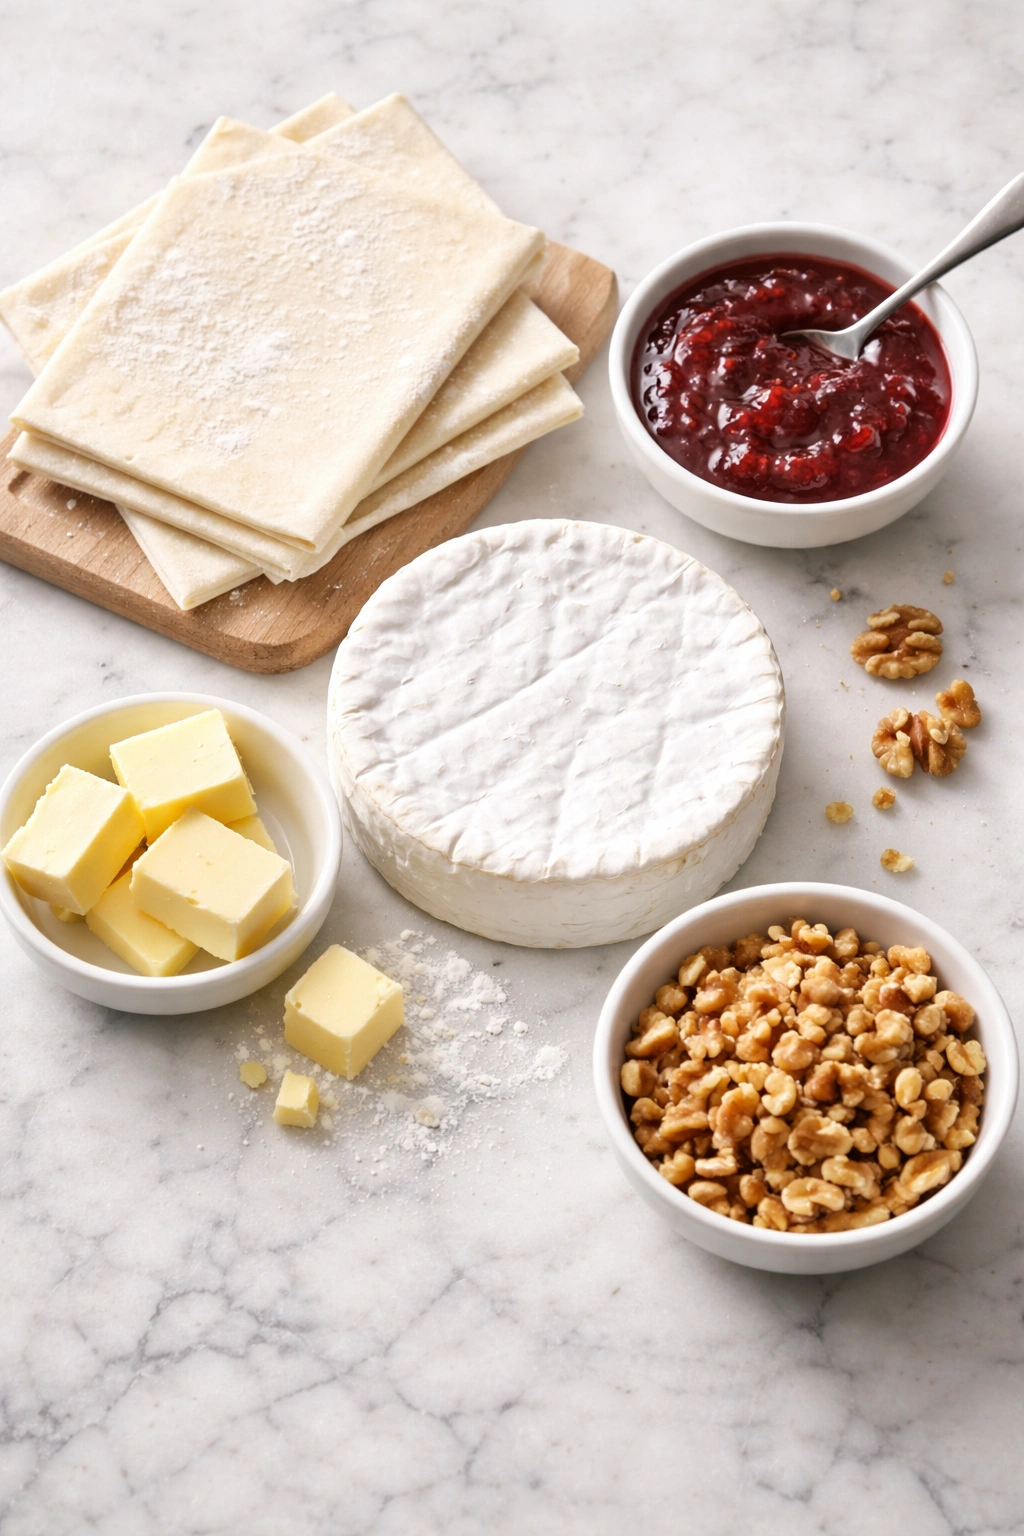
The beauty of this recipe is that you probably have most of these components on hand already.
The brie itself is non-negotiable, of course. A standard 8-ounce wheel is the perfect size—large enough to feel generous, small enough to fit neatly into individual servings. Look for brie that’s ripe but not overly soft when you buy it. A brie that’s already slightly soft at room temperature will be easier to work with when it bakes, but avoid ones that feel almost liquidy in the wheel. You want structure until it hits the heat.
The pastry wrapper can be puff pastry, phyllo, or wonton wrappers depending on your preference and what you have available. Puff pastry (thawed if frozen) gives you the most dramatic, impressive result. Phyllo is elegant and less heavy. Wonton wrappers are a fantastic time-saving option that still delivers excellent results—they crisp up beautifully and cut your prep time significantly.
Butter binds everything together and helps the pastry brown and crisp. You’ll need just enough to brush or rub on your pastry layers, typically 2 to 3 tablespoons for a standard wheel wrapped in puff pastry.
The toppings are where you get to customize. If you’re going sweet, think jam (fig, apricot, or raspberry work beautifully), honey, or candied nuts. For savory, consider fresh herbs (thyme, rosemary, or chives), crispy prosciutto, caramelized onions, or roasted garlic. The rule of thumb is about 2 to 3 tablespoons of topping per wheel—enough to flavor and protect the cheese, but not so much that it overwhelms it.
Salt and pepper seem obvious, but don’t skip them. A tiny pinch of sea salt over the top right before baking enhances all the other flavors and keeps everything from tasting flat.
Optional additions that take these bites to another level include toasted nuts (walnuts, pecans, or almonds), fresh thyme or rosemary sprigs, crispy bacon bits, sautéed mushrooms, or a touch of balsamic glaze. These aren’t necessary—baked brie is delicious in its purest form—but they elevate the bites into something truly memorable.
Choosing Puff Pastry, Phyllo, or Wonton Wrappers
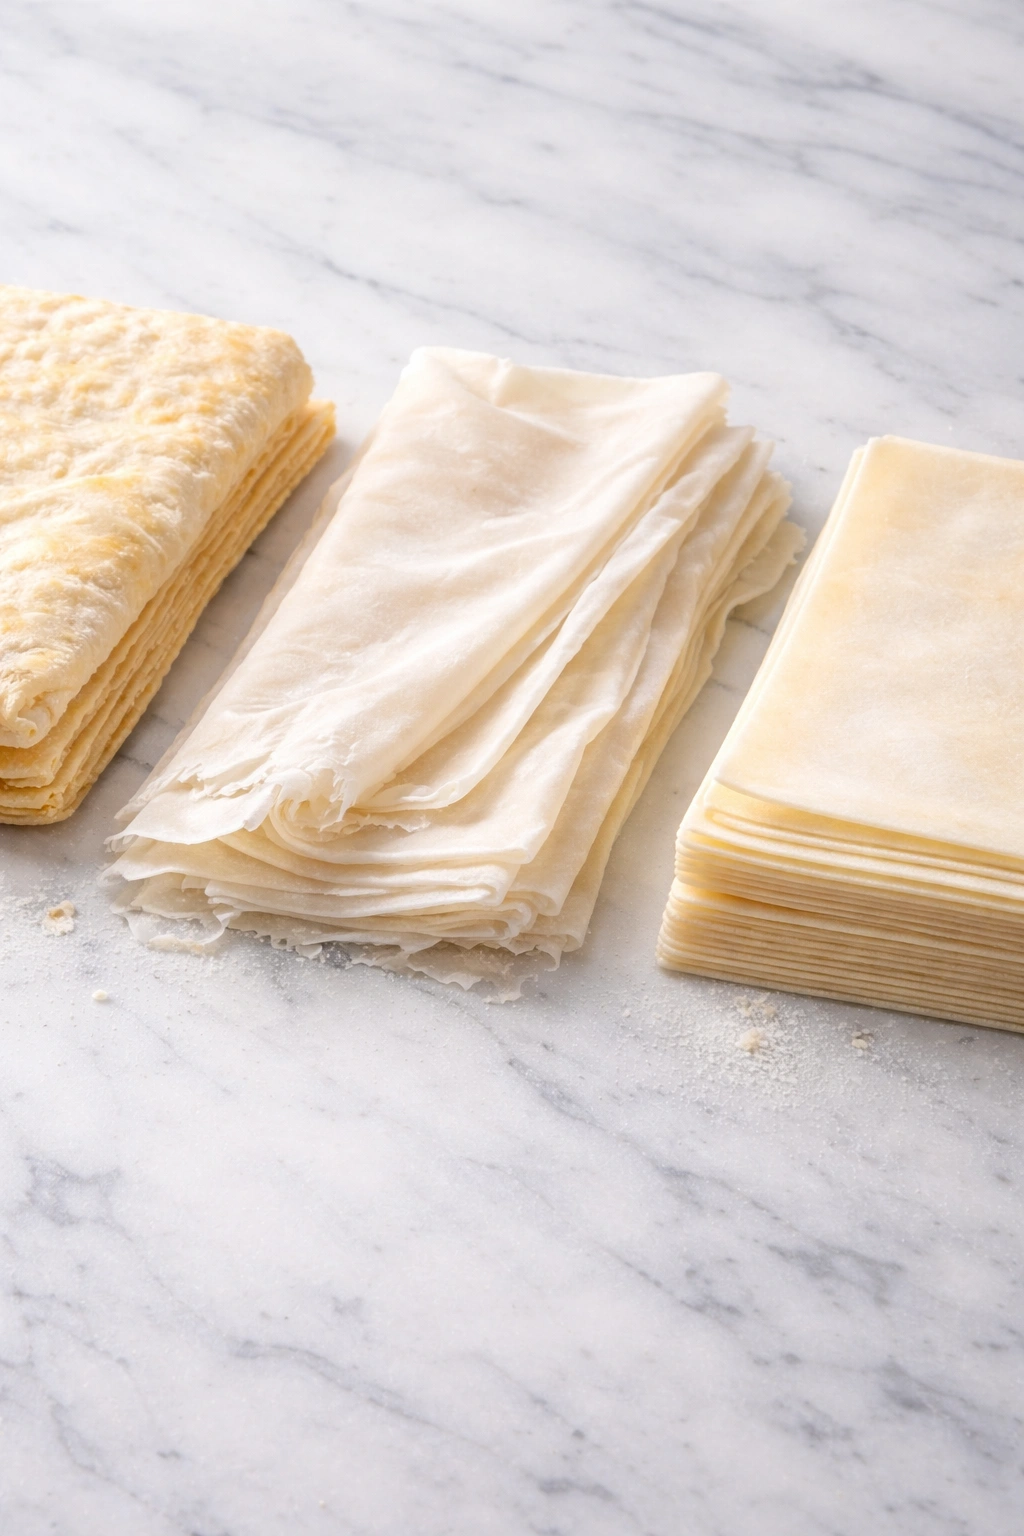
Each pastry option brings something different to the table, and the choice often depends on what you have on hand and how much time you want to spend.
Puff pastry is the classic choice, and for good reason. It creates those gorgeous, flaky, golden layers that really impress. A standard sheet thawed from frozen works perfectly. The downside is that it requires slightly more careful handling—you need to let it sit at room temperature to thaw properly (never try to work with frozen puff pastry), and it can tear if you’re too rough with it. That said, even if your pastry tears a bit, you can patch it with another piece, and once it bakes, those imperfections disappear. For 8 individual bites, you’ll need about one thawed puff pastry sheet, cut into 8 pieces.
Phyllo dough creates a more delicate, crispy result that’s lighter and slightly less rich than puff pastry. It requires more moisture to work with—you’ll brush each sheet with melted butter or oil before layering. The advantage is that it’s actually less forgiving of uneven handling, which some people find easier because it’s so thin that small imperfections don’t matter. You’ll layer about 2 to 3 sheets per bite, which sounds like more work but goes quickly. Phyllo is also wonderful if you want to reduce calories slightly—each sheet is thinner, so you use less butter.
Wonton wrappers are a brilliant shortcut if you want to minimize prep time. They’re already portion-sized, already thin enough to crisp beautifully in a hot oven, and they thaw in minutes if frozen. You get less of that dramatic puff and flake, but you still get a crispy, golden exterior that contrasts beautifully with the melted cheese inside. These are my choice when I’m making baked brie for a casual gathering and want to focus my energy on flavorful toppings rather than pastry technique.
The cooking temperature and time shift slightly depending on which pastry you choose. Puff pastry needs a moderate 375°F to give it time to puff and brown throughout. Phyllo can handle a slightly higher temperature—400°F—because the layers are thinner and crisp quickly. Wonton wrappers are fastest at 400°F and done in about 10 to 12 minutes. We’ll get into exact timings and temperatures in the cooking section.
Serving and Timing Information

Yield: Serves 8 as an appetizer | Makes 8 individual bites (or 1 shared wheel)
Prep Time: 15 minutes
Cook Time: 12 to 15 minutes (depending on pastry type)
Total Time: 27 to 30 minutes
Difficulty: Beginner — No special technique required. The most challenging part is wrapping the brie neatly, and even imperfect wrapping works fine once it bakes. This is genuinely one of the most forgiving appetizers you can make.
Make-Ahead: Fully assembles up to 8 hours in advance. Refrigerate covered until ready to bake.
Best Served: Immediately after baking while the cheese is still warm and creamy—ideally within 5 minutes of coming out of the oven.
The Classic Baked Brie Bites Recipe: Fig and Walnut Version

This version is my go-to because it’s elegant enough for any occasion, the flavors are naturally balanced, and the walnuts add a crucial textural element.
For the Bries:
- 1 (8-ounce) wheel of brie cheese, cold
- 4 sheets thawed puff pastry (or 12 sheets phyllo dough, or 8 wonton wrappers)
- 2 tablespoons unsalted butter, melted
- ⅓ cup fig jam (or apricot jam, or a combination)
- ⅓ cup toasted walnuts, finely chopped
- ¼ teaspoon fine sea salt
- Pinch of freshly cracked black pepper
- 1 teaspoon fresh thyme leaves (optional but recommended)
For serving:
- Crackers, crostini, or sliced apple and pear (your choice)
- Fresh thyme sprigs (optional)
Step-by-Step Instructions for Baked Brie Bites

Prepare Your Pan and Workspace:
-
Preheat your oven to 375°F (190°C). Line a baking sheet with parchment paper—this prevents any drips from sticking and makes cleanup effortless.
-
Remove the brie from the refrigerator and let it sit for 5 minutes at room temperature, just until it’s slightly less cold. Cold brie will hold its shape better while you wrap it, so don’t let it warm too much. You want it cool enough to handle, but not warm.
-
If you’re using puff pastry, thaw it according to package directions (typically 30 to 40 minutes at room temperature). It should be soft enough to fold and shape without cracking. If you’re using phyllo, remove it from the package and let it sit uncovered for 10 minutes so it hydrates slightly—phyllo that’s too dry will crack and shatter.
Wrap and Assemble:
-
Cut the brie wheel into 8 equal pieces using a hot, damp knife—running the knife under warm water before each cut prevents sticking and makes cleaner slices. Place the pieces on a cutting board.
Advertisements -
For puff pastry: Cut each thawed sheet into 4 equal squares (you’ll use roughly 1 sheet per 2 bites). Place one piece of brie in the center of each square, cut-side up so the interior of the cheese faces up (this lets your toppings nestle into the opening). Brush the pastry edges lightly with melted butter. Fold the corners up and over the brie, overlapping them slightly at the top—you’re aiming for a rough pouch shape where the brie is still slightly visible in the center. The pastry doesn’t need to completely enclose the brie; a little of the cheese showing in the center is actually desirable because your toppings will sit there.
-
For phyllo dough: Lay one sheet flat on your workspace and brush it lightly with melted butter. Layer a second sheet on top and brush again. Layer a third sheet and brush one more time. Cut the stacked sheets into 4 equal squares. Place one piece of brie in the center of each stack, again cut-side up. Fold the corners up and over, overlapping at the top just as with puff pastry. The phyllo layers will create a beautiful, delicate package.
-
For wonton wrappers: Place one wrapper in front of you as a diamond shape (one point facing you). Set one piece of brie in the center, cut-side up. Brush the edges of the wrapper with a tiny bit of water (this helps it seal). Fold the bottom point up over the brie, then fold the left and right points in, overlapping slightly at the top, then fold the top point down and tuck it under. You’ll end up with a neat little envelope with the cheese slightly visible in the center. This takes about 10 seconds once you get the rhythm.
Add Your Toppings:
-
Once all your bites are wrapped, arrange them on the prepared baking sheet, seam-side down (the overlapped pastry should be on the bottom). Spread or dollop about 2 teaspoons of fig jam into the center of each bite, right on top of the brie where it’s visible. Then sprinkle the chopped toasted walnuts over the jam, pressing them gently so they stick.
-
Sprinkle the finest pinch of sea salt over each bite, followed by a tiny grind of black pepper. If you’re using fresh thyme, scatter a few leaves on top of each one. If your jam has not covered the exposed pastry completely, you can brush the visible pastry edges very lightly with additional melted butter—this helps them brown beautifully, though it’s not strictly necessary.
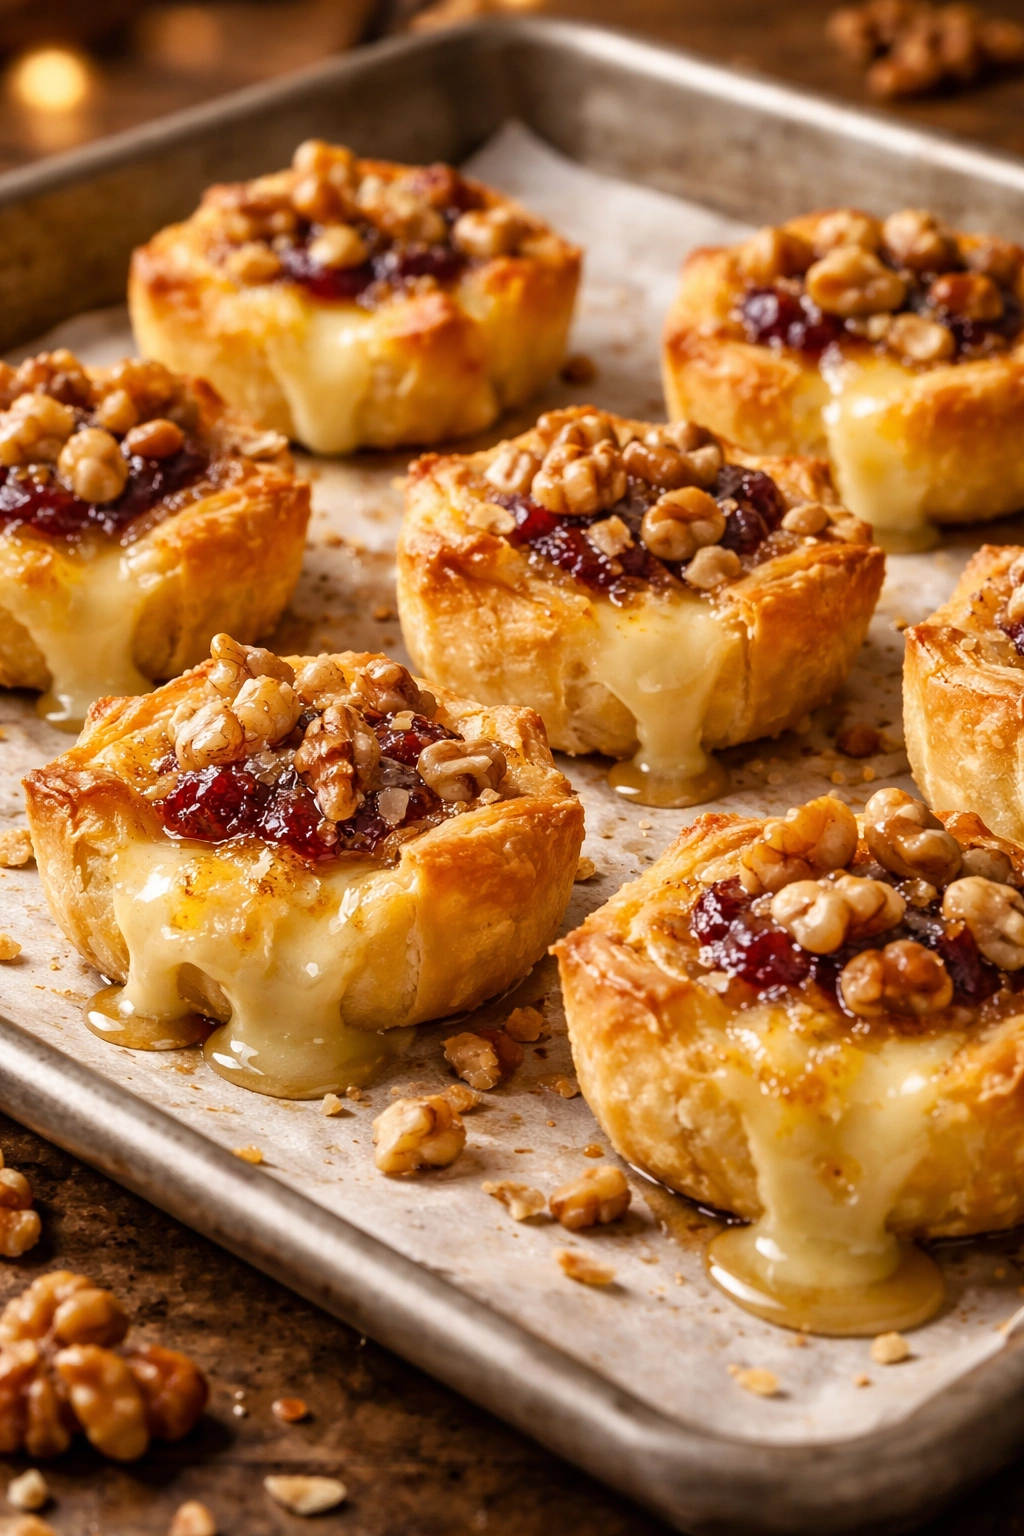
Bake:
-
Bake for 12 to 15 minutes at 375°F (190°C), depending on your oven and how thick the pastry is. You’re looking for the pastry to turn golden brown and crispy, and the cheese to be visibly soft and starting to ooze slightly around the edges. The brie won’t melt completely and pool out—that’s overcooked. You want it warm, creamy, and slightly yielding when you press it gently, but still holding the pastry package together.
-
Remove from the oven and let the bites rest on the baking sheet for just 2 to 3 minutes. This lets the cheese set up slightly so it doesn’t immediately melt all over your crackers or your guests’ hands when they pick one up.
Serve:
- Transfer the warm baked brie bites to a serving platter. Arrange crackers or crostini around them, or serve alongside sliced fresh fruit if you prefer. Garnish with fresh thyme sprigs if desired. Serve immediately while the cheese is still warm and creamy.
Tips for Perfect Baked Brie Bites Every Time
Temperature matters more than timing. Every oven bakes differently, so don’t watch the clock—watch the cheese. You’ll see it start to soften and bulge slightly at the sides when it’s done. That visual cue is more reliable than any timer.
Keep everything cold until the final moment. Assemble your bites and refrigerate them on the baking sheet until just before baking. This helps the pastry puff evenly in the oven and prevents the brie from starting to melt during assembly.
Don’t skimp on topping. About 2 to 3 tablespoons per wheel of topping isn’t just flavor—it’s insurance. The topping layer helps insulate the brie and prevents it from overheating. Without enough topping, the cheese can get too hot and separate slightly. With a proper topping layer, the brie stays creamy and luxurious.
Toast your nuts if they’re not already. If you’re using walnuts, pecans, or almonds, toasting them first brings out their natural oils and deepens the flavor dramatically. Toss them in a dry skillet over medium heat for 3 to 4 minutes, stirring frequently, until fragrant. This takes 5 minutes and transforms the entire bite.
Use parchment paper on your baking sheet. Any drips or toppings that escape won’t stick to the sheet, and cleanup is genuinely effortless. It’s a small detail that makes a real difference when you’re hosting.
Brush pastry with butter, not egg wash. While some recipes suggest egg wash for browning, melted butter gives you a better color and—more importantly—a better flavor. Egg wash creates a shiny, smooth surface; butter creates a richer, more appetizing golden tone.
If you’re making more than one batch, keep the first batch warm. Slide finished bites onto a plate and loosely cover them with foil to keep them warm while you bake the next batch. They’ll stay perfectly creamy for 10 to 15 minutes covered this way.
Common Mistakes and How to Avoid Them
The brie leaks everywhere. This usually means you either wrapped it too loosely (so the pastry didn’t contain it properly) or the oven temperature was too low, causing the brie to leak before the pastry could set and crisp. Solution: Wrap firmly enough that the pastry folds overlap noticeably, and use an oven thermometer to verify your oven is at the correct temperature. Most ovens are slightly inaccurate.
The pastry is soggy or greasy. Brie releases some liquid as it melts, and if the pastry isn’t on a proper baking sheet with parchment or if it’s baked at too low a temperature, it absorbs that liquid instead of crisping. Solution: Always use parchment paper, and ensure your oven is fully preheated before the bites go in. A hot oven crisps the pastry quickly before it can absorb moisture.
The cheese is completely liquid and won’t stay on the cracker. Overcooked. This happens when brie bakes for too long or at too high a temperature. At a certain point, the fat and water in the cheese separate, and you get liquid pooling around slightly broken pastry. Solution: Check doneness at the 10-minute mark if you’re new to making these. You want the brie warm and soft, not completely melted.
The pastry is golden but the cheese inside isn’t warm yet. Undercooked, usually because the oven wasn’t quite hot enough or the brie was too cold when it went in. You might have thick layers of pastry that insulate the cheese. Solution: Make sure your oven is properly preheated, and let wrapped bites sit at room temperature for just 5 minutes before baking to slightly warm the cheese so it heats more evenly.
The toppings burn before the pastry browns. This happens with very delicate toppings like fresh herbs or finely chopped nuts, especially if the oven is running hot. Solution: If you have delicate toppings, you can brush them on after the bites are half-baked—slide them out at 6 to 7 minutes, quickly add your fresh herb topping, and return them to the oven for the final few minutes.
The brie seems to be separating (getting greasy). This usually means the brie is too hot or has baked too long. Brie should stay creamy when properly baked, not greasy. Solution: Lower your oven temperature by 25°F and check for doneness earlier than the recipe suggests. You’re aiming for warm and soft, not hot and liquidy.
Creative Flavor Variations

Once you’ve made the classic fig and walnut version once or twice, you’ll naturally want to experiment. The beauty of baked brie is that almost any flavor combination works beautifully.
Spicy Honey and Jalapeño
Swap the fig jam for raw honey (about 1 tablespoon per bite) and skip the walnuts. Instead, top with thinly sliced fresh jalapeños and a tiny pinch of red pepper flakes. After baking, drizzle a small amount of hot honey over the top. The contrast between the creamy, melting brie and the spicy, floral honey is electric. This version pairs beautifully with savory crackers or fresh corn tortilla chips.
Herbed Garlic and Prosciutto
Skip the sweet topping entirely and go savory. Mix together 3 tablespoons of crispy, crumbled prosciutto with 1 tablespoon finely minced fresh thyme and 1 tablespoon minced roasted garlic (from a jar is fine). Distribute this mixture on top of each bite before baking. Add a grind of black pepper but no salt—the prosciutto provides all the salt you need. This version is perfect for a cocktail hour or casual gathering.
Sun-Dried Tomato and Basil
Use sun-dried tomatoes packed in oil—about 3 tablespoons total, finely chopped. Scatter the tomatoes over each bite, then add a small basil leaf or a pinch of fresh basil. The acidity of the tomatoes plays beautifully against the rich brie. Serve with water crackers or alongside a simple green salad.
Apple, Cheddar Crust, and Thyme
This one’s slightly different because you’re mixing a small amount of sharp cheddar into your pastry layer for extra flavor. Sprinkle about ½ teaspoon of finely grated sharp cheddar onto your puff pastry square before folding it up around the brie. Then top with thinly sliced fresh apple and a pinch of fresh thyme. The cheddar and apple combination is pure autumn charm.
Caramelized Onion and Crispy Shallot
If you have leftover caramelized onions, this is a perfect use. Top each bite with about 1½ teaspoons of caramelized onions and a sprinkle of crispy fried shallots (from the Asian section of your grocery store). Add a pinch of fresh thyme. The sweet, savory onions and the crispy, salty shallots create incredible textural and flavor contrast.
Cranberry, Pistachio, and Rosemary
Swap fig jam for cranberry sauce or whole-berry cranberry sauce (mashed slightly so it’s spreadable). Top with finely chopped roasted pistachios instead of walnuts, and add one tiny sprig of fresh rosemary per bite. This combination screams holiday gathering and pairs well with almost any savory cheese course.
Olive and Artichoke Tapenade
For a Mediterranean vibe, use olive tapenade (store-bought is fine) instead of jam. Top with finely chopped roasted red peppers and a tiny basil leaf. No nuts needed here—the tapenade is flavorful enough on its own. Serve with herb crackers or alongside a simple salad.
Make-Ahead and Storage Guide
This is where baked brie bites really shine for entertaining purposes.
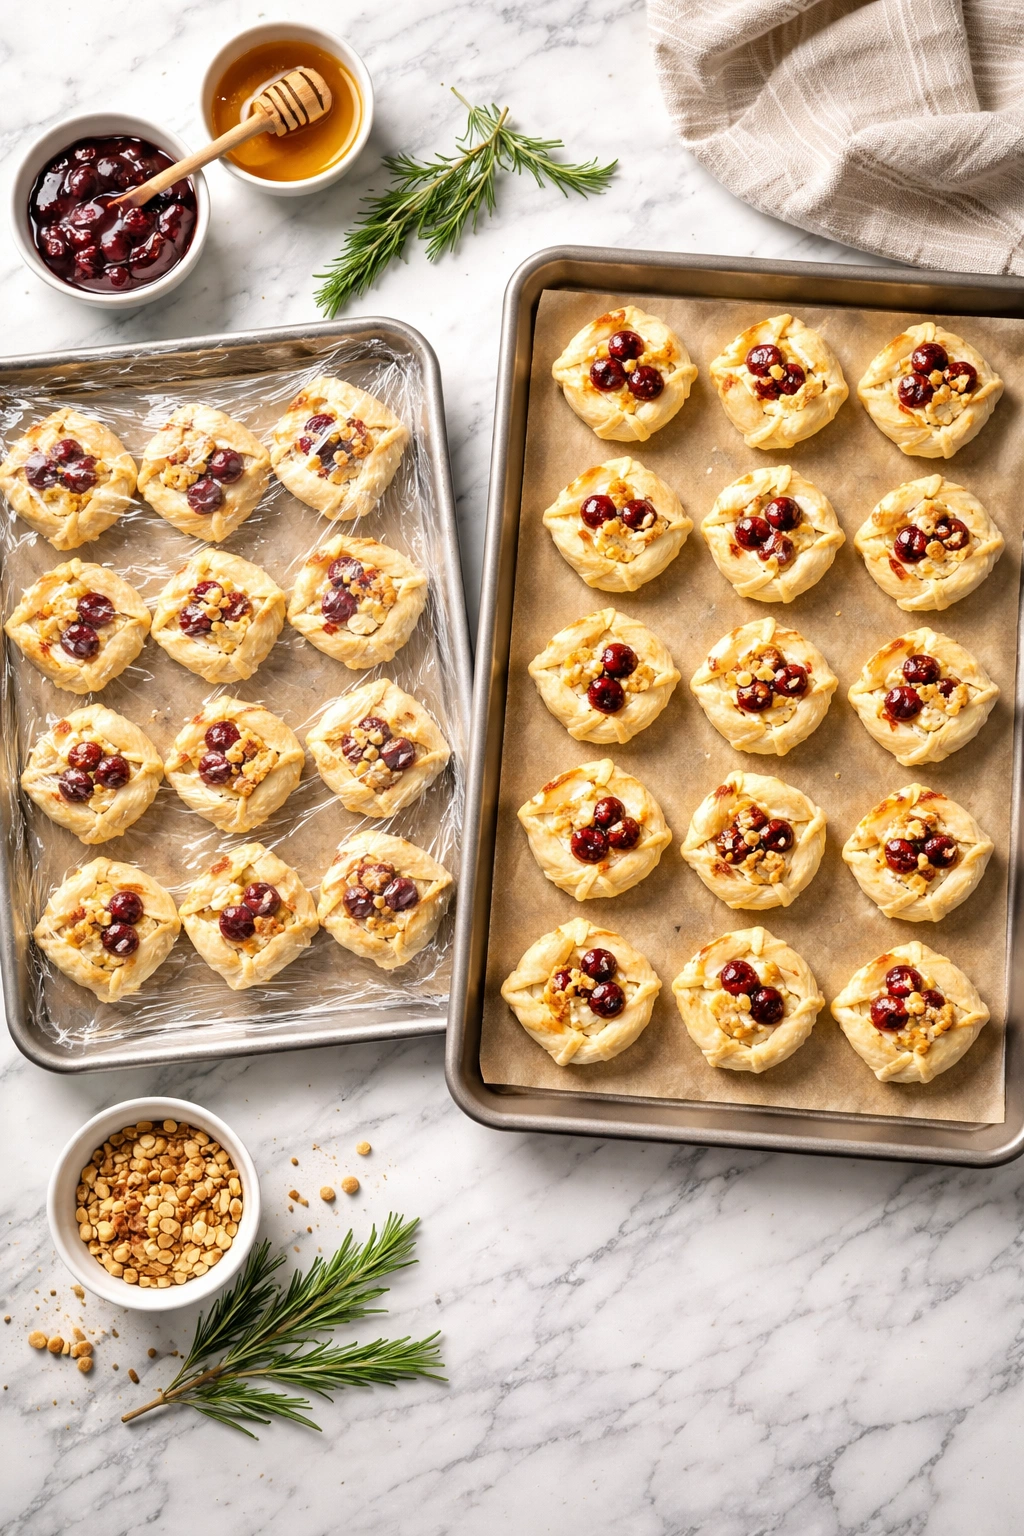
Fully assembled bites can be made up to 8 hours ahead. Wrap them carefully on a baking sheet with plastic wrap (place the wrap loosely so it doesn’t stick to the toppings) and refrigerate. When you’re ready to serve, simply remove them from the fridge, let them sit at room temperature for about 5 minutes (this brings them closer to room temperature so they bake evenly), and pop them directly into a preheated oven. The baking time might be 1 to 2 minutes longer than with room-temperature bites, but it’s not significant.
Partially assembled bites (wrapped but not topped) can be made up to 24 hours ahead. This is helpful if you want to add very fresh toppings (like fresh herbs) at the last minute. Wrap the brie in pastry, cover the baking sheet with plastic wrap, and refrigerate. Add your toppings and bake as usual whenever you’re ready.
Baked bites don’t keep their best quality very long after baking. They’re most delicious served within 5 minutes of coming out of the oven. However, they’ll stay perfectly warm for about 10 to 15 minutes covered loosely with foil if you need to work through multiple batches or if some guests are running late.
Storing leftovers: If you somehow have leftover baked bries (and honestly, this is rare—people demolish these), refrigerate them in an airtight container for up to 2 days. Reheat gently in a 300°F (150°C) oven for 8 to 10 minutes, covered with foil so the pastry doesn’t over-brown. They won’t be quite as crispy as fresh ones, but they’ll still be delicious. Don’t microwave them—the microwave makes the pastry soggy and tough.
Freezing uncooked bites: Fully assembled and topped baked brie bites can be frozen on a baking sheet for up to 2 months. Freeze them unwrapped for about 1 hour until solid, then transfer to a freezer bag. Bake directly from frozen, adding 3 to 4 minutes to the baking time. This is genuinely wonderful for entertaining—you can make a huge batch when you have energy and time, then pull them out whenever you need them.
The jam or topping makes a difference in freezing success. Very liquid toppings (like plain jam without nuts or herbs mixed in) can sometimes leak slightly during freezing. Toppings that are more textured—with nuts, herbs, or crispy elements—freeze more reliably. If you’re planning to freeze bites, I’d recommend using toppings with more texture and substance.
Serving Ideas and Pairings

Baked brie bites work in an astonishing range of settings. The key is thinking about what’s around them—what crackers, drinks, or other foods will complement the bites themselves.
For wine pairings: These bites are genuinely wine-friendly. Fig and walnut version pairs beautifully with a light Pinot Noir, a dry rosé, or a crisp white like Albariño or Pinot Grigio. The herbed, savory versions work with almost any wine, though I’m particularly fond of pairing them with Sauvignon Blanc or a light-bodied Riesling. Sparkling wine or Prosecco works across all versions.
For beer pairings: Don’t overlook beer. Baked brie’s rich, creamy quality pairs beautifully with lighter beers—a wheat beer, a pale ale, or even a crisp lager. The carbonation cuts through the richness and refreshes your palate between bites.
For non-alcoholic pairings: Sparkling apple cider, sparkling lemonade, or even a good ginger ale complement the richness of melted brie nicely. The bubbles and slightly acidic or spiced notes are exactly what you want alongside something this rich.
Cracker selections matter more than people realize. For sweet versions (fig, cranberry, apple), choose subtle crackers that won’t compete—water crackers, plain rounds, or delicate herb crackers. For savory versions, slightly more robust crackers work—olive oil crackers, whole grain, or rosemary rounds. Avoid intensely flavored crackers that might overwhelm the brie.
Serve alongside fresh fruit. Sliced apple, pear, and grapes provide a refreshing contrast to the warm, creamy brie. A small wooden board with bites on one end and fruit on the other looks beautiful and gives guests options.
Add a simple salad alongside for a more substantial appetizer course. A light green salad with lemon vinaigrette, or a simple arugula salad with shaved Parmesan, bridges the gap between appetizer and a light meal.
Build an entire cheese board around the baked bries as the warm element. Include hard cheeses (cheddar, Manchego), cured meats, nuts, dried fruit, and your baked bies as the warm, luxurious centerpiece. This transforms a simple appetizer spread into something genuinely memorable.
Serve as part of a soup-and-appetizer evening. A warm, creamy soup paired with baked brie bites feels elegant and somewhat luxurious without actually being complicated to execute.
Scaling Up for Larger Groups
The wonderful thing about baked brie bites is that they scale beautifully. You’re not stuck with one wheel—you can make as many as you need, limited only by your oven space and prep time.
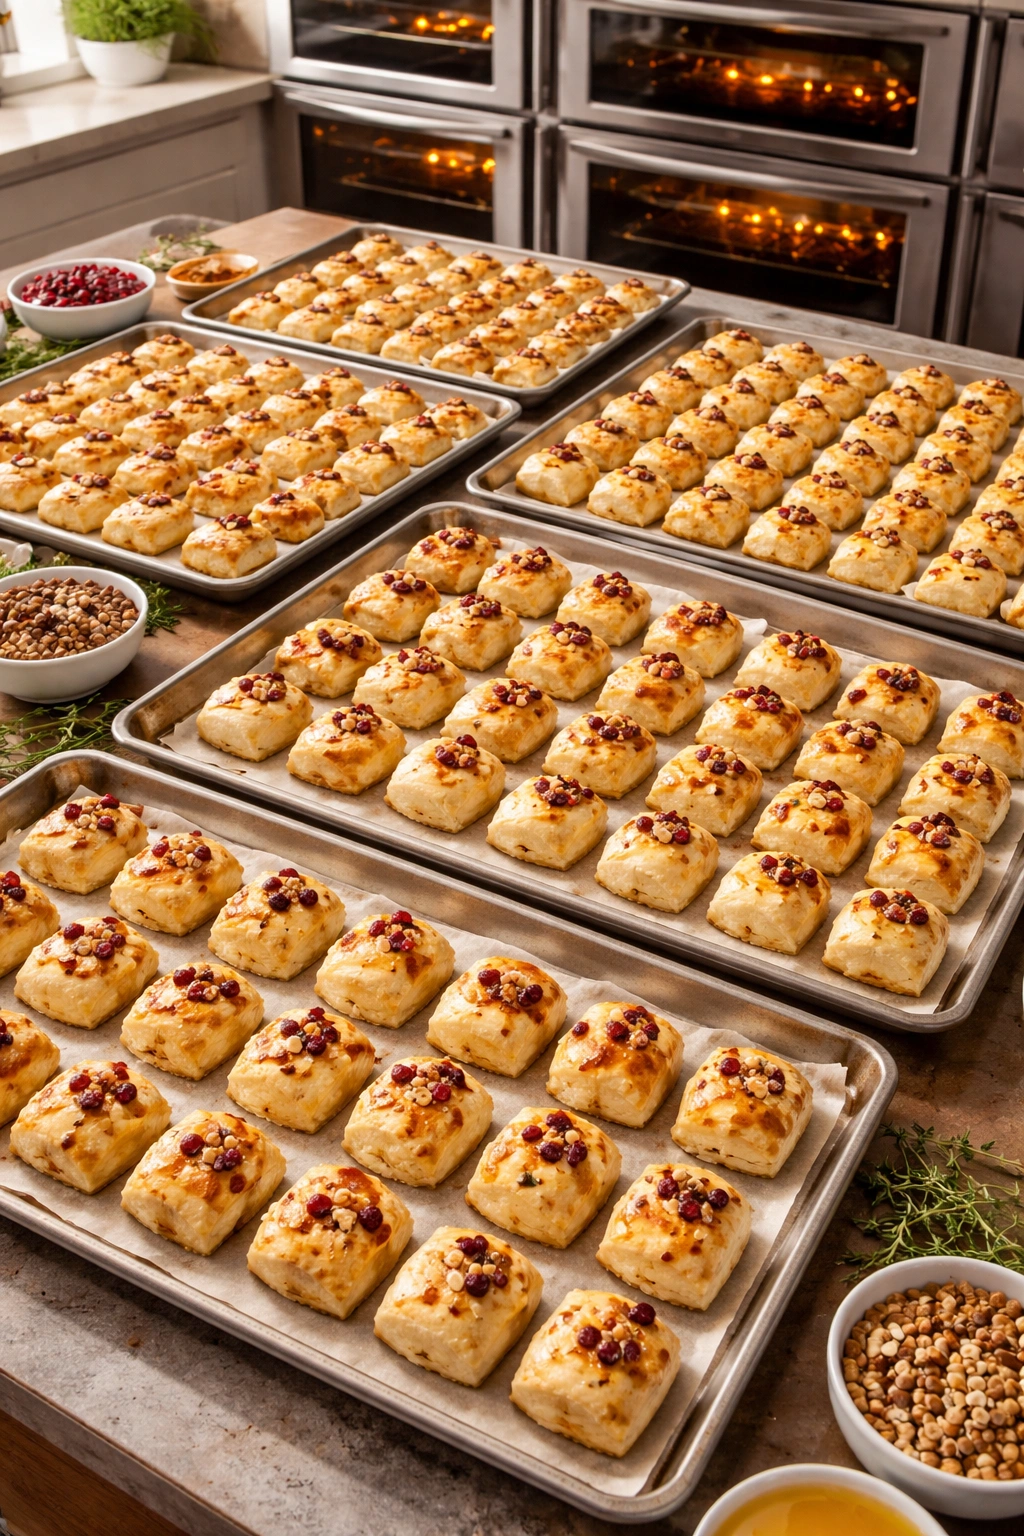
For 16 guests: Make 2 wheels of brie (16 pieces). You can comfortably fit 12 to 16 bites on a standard baking sheet depending on size, which means you’ll likely need 1 to 2 batches. Prep them all ahead—wrap, top, and refrigerate everything on baking sheets. Then bake them in whatever order works with your timeline.
For 24 to 30 guests: Make 3 wheels of brie. You’ll want to assemble these in batches if you’re working alone—maybe 8 at a time—to keep track of what you’re doing. Refrigerate each batch before moving on to the next. Baking happens in 2 to 3 batches, which actually works well because you’re serving them warm throughout the event, not all at once.
For larger parties: The math is simple—plan on 1 to 2 bites per person as part of a larger appetizer spread, or 3 to 4 bites if they’re the main event. At a party for 50 people where you’re serving multiple appetizers, 3 wheels of brie (24 bites) is usually perfect. If baked brie bites are the star, go with 4 to 5 wheels.
Batch baking strategy: The beauty of having them fully assembled and refrigerated is that you can pull them out in batches and bake them fresh throughout your event. Guests always prefer warm bakes to ones that have been sitting for an hour. If you’re making a large quantity, bake them every 20 to 30 minutes so you’ve always got fresh ones available.
Oven space matters. If you have two ovens, use them—you can double your output. If you’re working with one oven, batching them is just fine. The baking time is short enough that the total time remains manageable even with multiple batches.
Final Thoughts

Baked brie bites are proof that some of the most impressive entertaining moves are also the simplest. A wheel of brie, some pastry, a few quality toppings, and 15 minutes in the oven transform into something that feels far more special than the effort required.
What I genuinely love about these bites is how they shift the dynamic of entertaining. You’re not stressed, because the recipe is forgiving and can be prepped completely ahead. Your guests feel genuinely thoughtful because you’ve served them something warm and delicious that clearly took intention to create. And everyone leaves happy because that combination of creamy, warm cheese, crispy pastry, and thoughtful flavor pairings is just inherently delicious.
The variations ensure you’ll never get bored with them. Once you’ve made them a few times and understand how they work, you’ll start seeing them less as a single recipe and more as a framework—a reliable vehicle for whatever flavors are speaking to you in that moment. Fig and walnut for an elegant dinner. Jalapeño and honey for a casual game night. Prosciutto and herbs when you’re feeding a crowd and want something savory and sophisticated.
Keep a wheel of brie in your fridge and some pastry in your freezer, and you’ve got an impressive appetizer ready to pull together whenever friends drop by or your schedule suddenly fills with entertaining. That’s the real magic of baked brie bites—they’re genuinely effortless, yet they never fail to impress.