There’s something genuinely magical about dumping a handful of ingredients into a baking dish and walking away knowing that in about an hour, you’ll have a warm, bubbling fruit cobbler with a golden-brown topping that tastes like you spent all afternoon in the kitchen. This dump and bake blueberry cobbler delivers exactly that kind of promise — and actually keeps it. Unlike traditional crisps or cobblers that require multiple bowls, careful layering, or finicky pastry work, this version asks almost nothing of you except the willingness to let the oven do the real work.
The genius of the dump and bake method is that you’re not actually skipping any steps; you’re just rearranging them. The cake-like topping bakes directly into place while your fruit releases its juices at the bottom, and the two meet in the middle to create that perfect balance of tender fruit and soft, buttery cake. No special skills required. No recipe anxiety. Just straightforward baking that works reliably, every single time.
What makes this blueberry version particularly rewarding is that fresh blueberries need almost nothing to shine. A little sugar, a whisper of lemon, and that’s it. The berries stay distinct and bright rather than collapsing into jam, and they perfume the whole cobbler with a subtle tartness that cuts through the richness of the topping. This isn’t a heavily spiced dessert trying to hide behind cinnamon and nutmeg — it’s an honest cobbler that lets the main ingredient be the star.
Why Dump and Bake Cobbler Works So Well
The reason this method is so reliable comes down to pure chemistry. When you pour batter directly over fruit in a baking dish, something wonderful happens as the oven heats up. The batter starts to set from the bottom up, but before it fully firms, the fruit releases liquid that rises around the edges and creates a kind of hydration system. That liquid keeps the batter moist and tender while also creating pockets of jammy fruit sauce throughout.
Traditional cobbler recipes separate these elements — fruit filling goes in first, then biscuit dough on top — which means you’re managing two different cooking rates and hoping they finish simultaneously. Dump and bake removes that gamble entirely. Everything bakes as one unified system, which actually produces better texture all around. The bottom of your cobbler has this wonderful cake-like quality where the berries have partially sunken into the batter, while the top stays light and golden.
You also bypass the most intimidating part of traditional cobbler-making: getting your topping evenly distributed without disturbing the fruit underneath. Here, you just mix batter, pour it where it goes, and let gravity and heat handle the rest. The batter naturally finds its way around the berries as it bakes, creating this organic pattern that looks far more sophisticated than the effort required.
What You Need for This Blueberry Cobbler
This cobbler is built on a remarkably short ingredient list, which is partly why it works so well. You’re looking at everyday pantry staples plus fresh blueberries — nothing you’ll need to hunt down at a specialty store or order online. The topping is essentially a simple cake batter that happens to bake on top of fruit, so it relies on good technique and proportion rather than exotic ingredients.
The blueberries are your star, so their quality genuinely matters here. Fresh blueberries in their prime taste bright and distinct, and that clarity carries through to your finished cobbler. If fresh blueberries aren’t available, frozen ones work beautifully too — there’s no need to thaw them; just measure them directly from the freezer. They release their moisture as they bake, which is exactly what you want.
Beyond the berries, you’re working with butter, sugar, flour, baking powder, salt, milk, vanilla, and eggs. That’s it. No cream cheese, no fancy extract, no unusual spices that require a shopping trip. These are ingredients you probably keep on hand already, which makes this recipe perfect for the kind of spontaneous dessert craving that hits on a random Tuesday evening.
Ingredients for Dump and Bake Blueberry Cobbler
For the Fruit Base:
- 3 cups fresh blueberries (or frozen blueberries, measured straight from the freezer with no thawing)
- ¼ cup granulated sugar
- 2 tablespoons fresh lemon juice (about ½ of a medium lemon)
- ½ teaspoon grated lemon zest (finely grated directly from the lemon)
- Pinch of fine sea salt
For the Cobbler Topping:
- 1 cup all-purpose flour
- ¾ cup granulated sugar
- 1½ teaspoons baking powder
- ¼ teaspoon fine sea salt
- ¼ teaspoon vanilla extract (optional but recommended for depth)
- 1 large egg
- ½ cup whole milk
- 4 tablespoons unsalted butter, melted
Optional Finishing:
- 1 tablespoon coarse sugar for sprinkling on top (such as demerara or sanding sugar — this creates a subtle crunch)
Yield: Makes one 9×13-inch cobbler | Serves 6 to 8
Prep Time: 15 minutes
Cook Time: 50 to 60 minutes
Total Time: 1 hour 10 minutes (plus cooling time)
Difficulty: Beginner — No special equipment required beyond a baking dish and a whisk. The steps are straightforward and forgiving even for a first-time baker.
A Quick Look at the Method Before You Begin
The entire process breaks into three distinct phases: mixing your filling, preparing your topping, and the baking itself. Because each phase is genuinely simple, you can work through this recipe in about 15 minutes of hands-on time, then let the oven take over.
First, you’ll combine your blueberries with a small amount of sugar, lemon juice, and salt in your baking dish — this takes maybe three minutes. Then you’ll make a quick batter for the topping by whisking together dry ingredients, then combining them with wet ingredients. This is almost exactly the speed and simplicity of making a pancake batter. Finally, you’ll pour that batter over the berries and slide everything into the oven.
The baking process is where patience becomes essential. You’re not checking on this constantly or poking it with a toothpick. You let it bake undisturbed for about 50 to 60 minutes until the top is golden and the fruit is bubbling at the edges. That’s genuinely it.
Preparing Your Pan and Gathering Your Ingredients
Before you do anything else, position your oven rack to the center of the oven and preheat to 350°F (175°C). This matters because you want even, gentle heat surrounding your cobbler as it bakes — not direct heat from the bottom that might brown the edges too quickly before the center is done. Center rack positioning gives you the most forgiving environment for baking.
While the oven preheats, grab a 9×13-inch baking dish. Glass or ceramic works beautifully here; metal works too, though it conducts heat a bit more aggressively so you might finish cooking a few minutes earlier. Don’t grease it — that’s not necessary for this recipe and can actually create a less-than-ideal bottom crust.
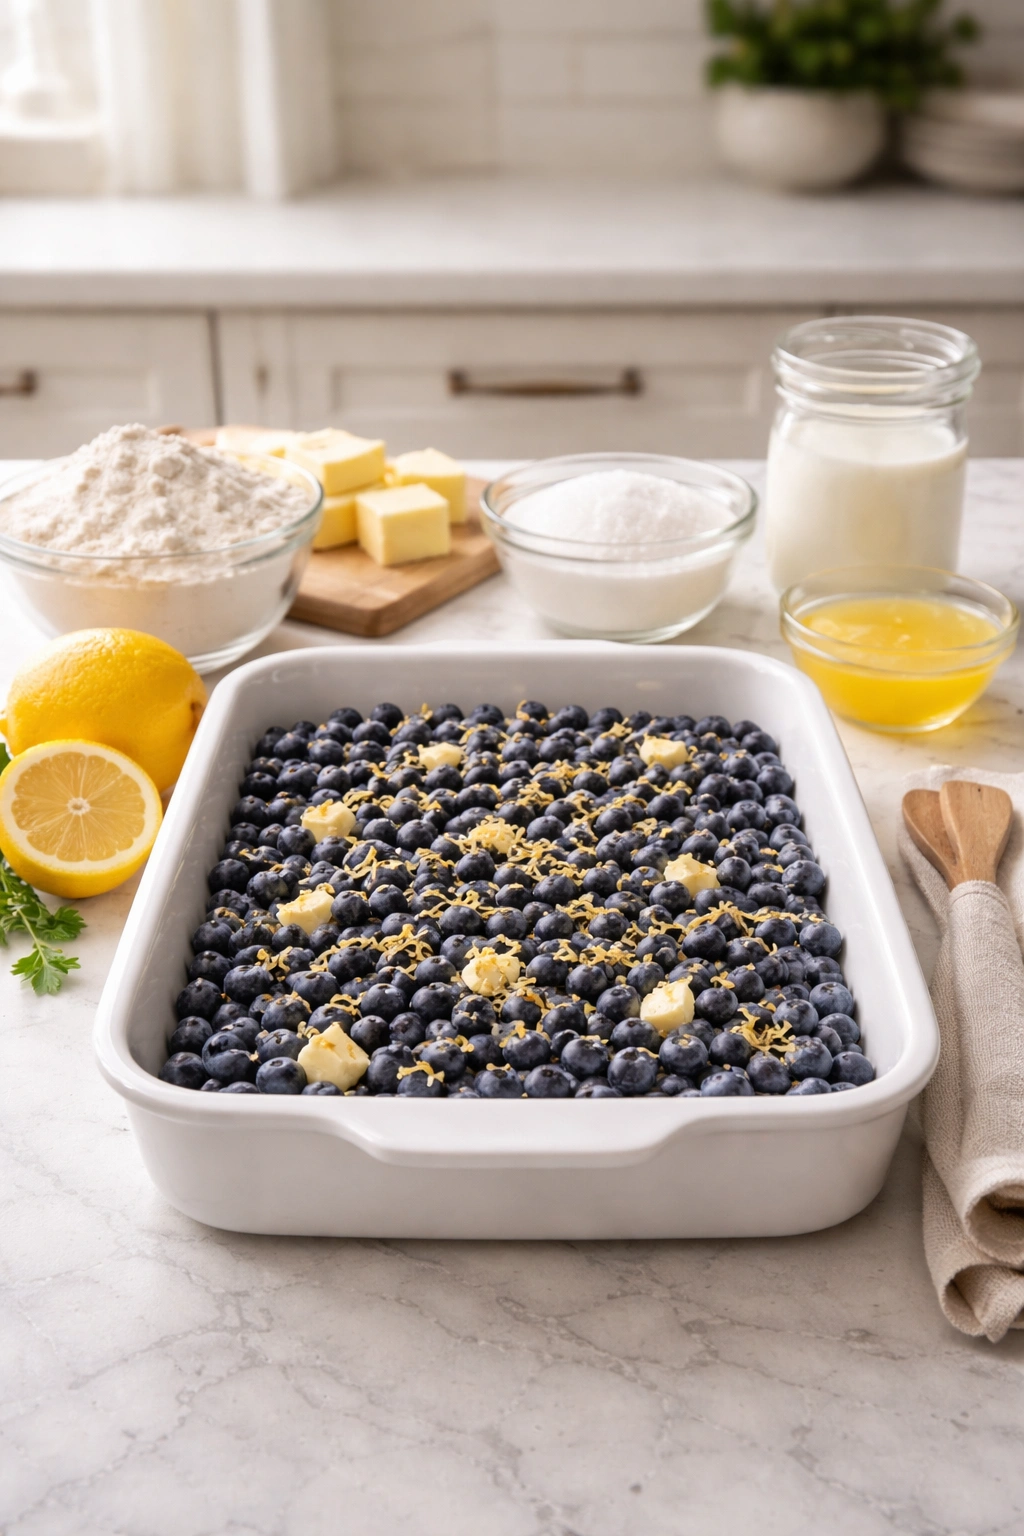
Measure out your ingredients and set them within arm’s reach. This is where things get easy because your ingredient list is so short. Having everything ready means you won’t be hunting through the pantry mid-stream and losing momentum. Measure your blueberries into the baking dish directly (whether they’re fresh or frozen — truly, no thawing needed). Grate your lemon zest on a fine grater directly into a small dish. Have your milk measured and your butter melted.
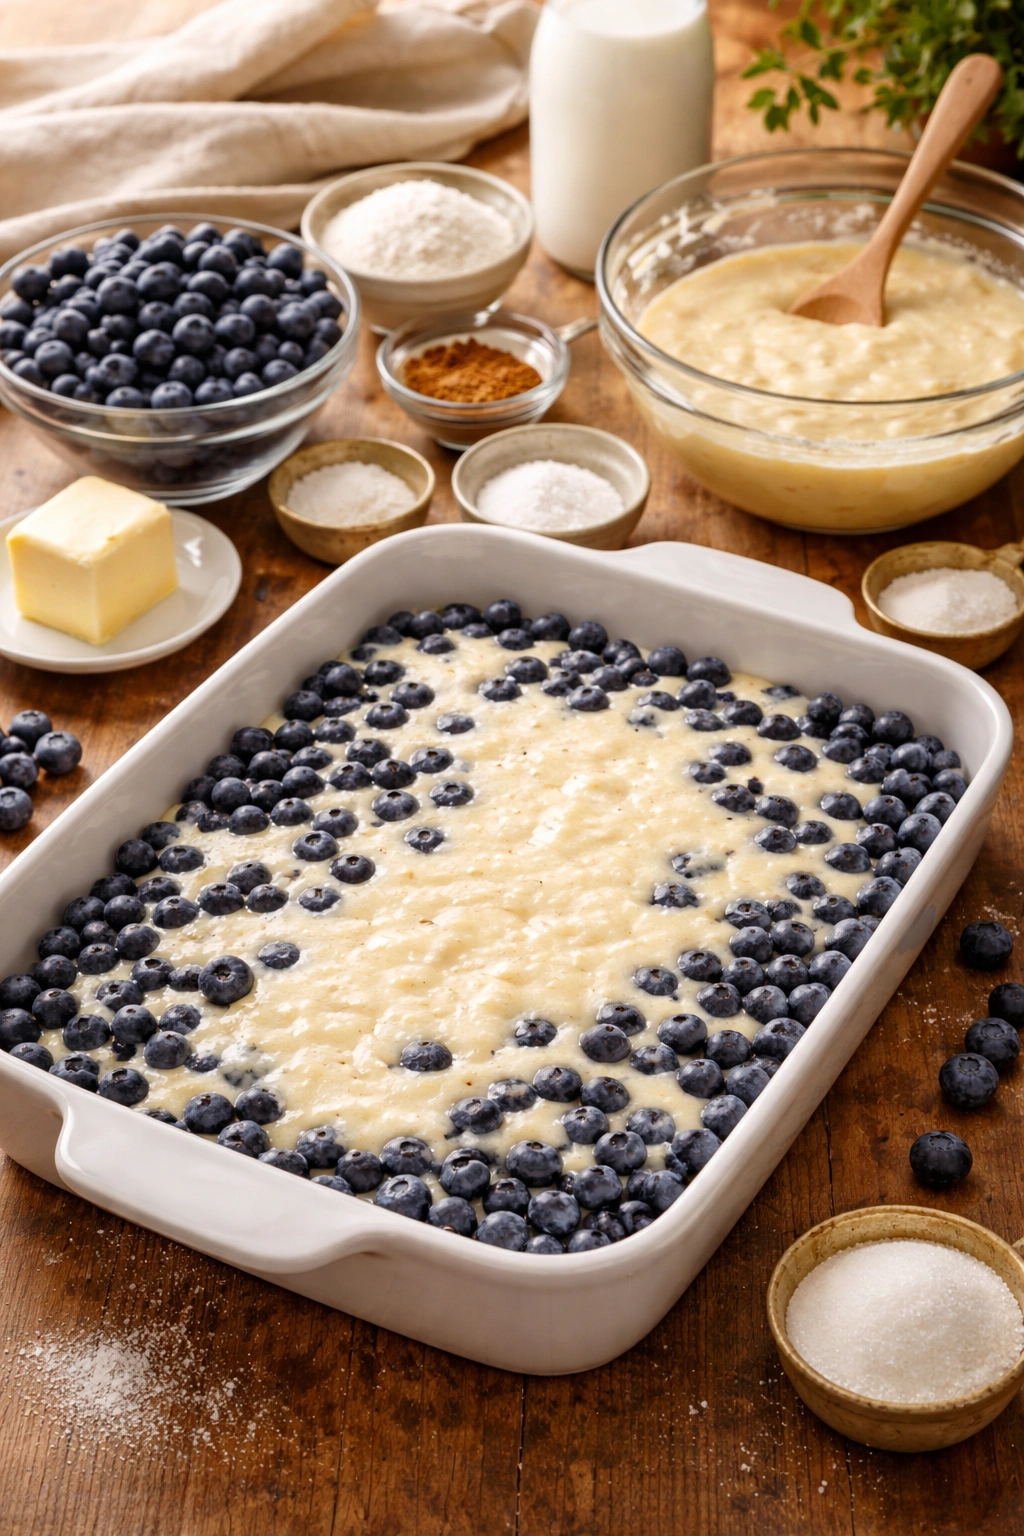
How to Layer Your Cobbler (The Dump Part)
This step is so simple it almost feels like cheating, which is exactly the point. Pour your measured blueberries directly into your baking dish. They don’t need to be in a perfectly even layer — just tip the berries out and let them settle where they land.
Sprinkle the granulated sugar evenly over the berries. Use your fingers or a fork to gently toss everything together for about 15 seconds. You want the sugar distributed throughout the berries so it can start drawing out their juice, but you’re not trying to crush or damage the berries. Keep your touch light.
Drizzle the lemon juice across the top and sprinkle the lemon zest. Toss everything together gently one more time, then add the pinch of salt. The salt might seem optional, but it genuinely amplifies the flavor of the blueberries and prevents them from tasting one-dimensional. It’s a small addition that makes a noticeable difference.
Set the baking dish aside while you prepare your topping. The berries will start releasing their juices immediately, which is perfect — you want them to have about five minutes to begin that process before the batter goes on top.
Making the Batter for Your Topping
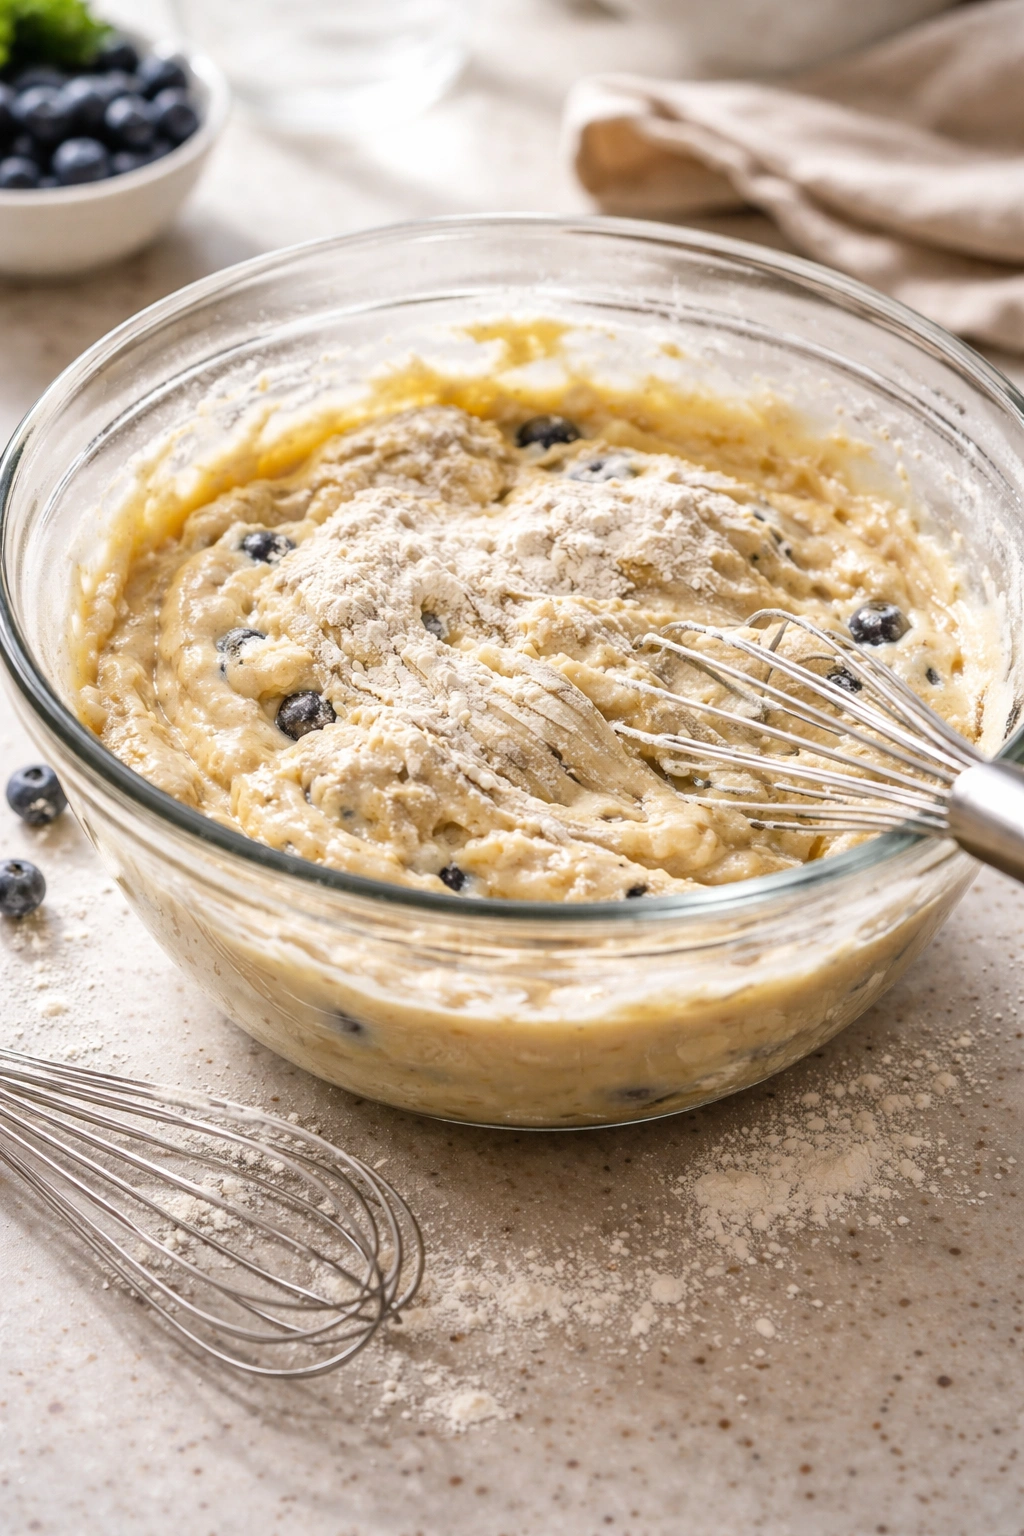
In a medium bowl, whisk together the flour, sugar, baking powder, and salt. Whisking these dry ingredients together distributes the baking powder evenly, which ensures your topping rises uniformly rather than puffing in some spots and staying dense in others.
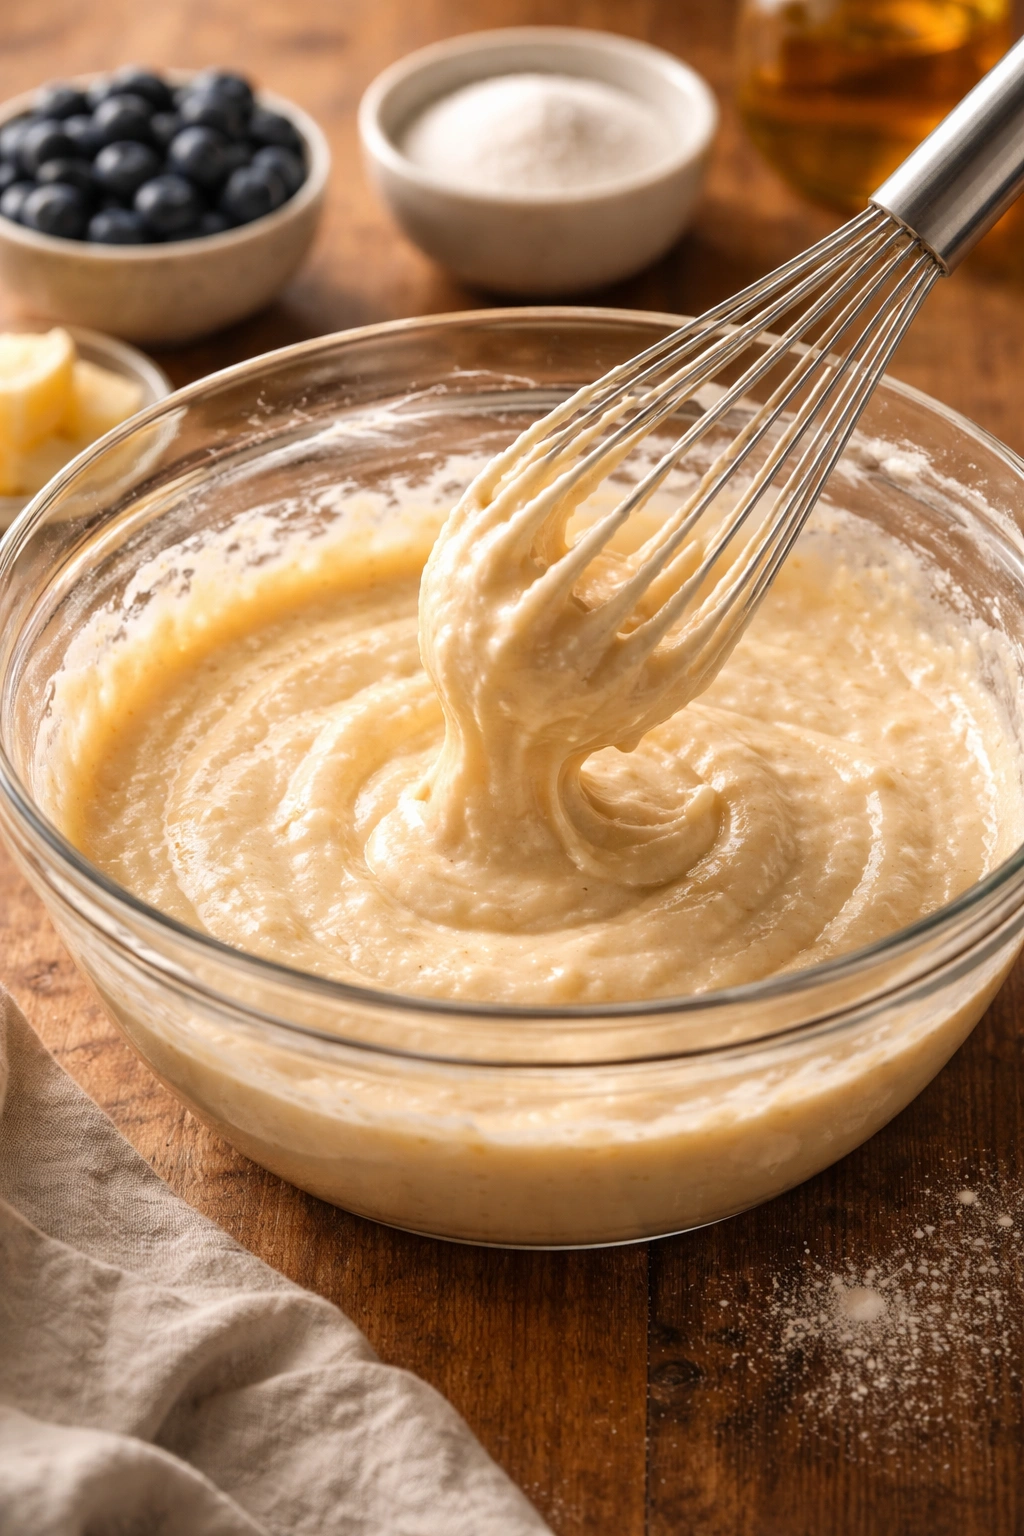
In a separate bowl, whisk together the egg, milk, melted butter, and vanilla extract (if using). Whisk this mixture for about 30 seconds to ensure the egg is fully incorporated and the ingredients are combined. You want this mixture to be fully homogeneous so every part of your batter has the same ratio of dry to wet ingredients.
Pour the wet ingredients into the dry ingredients and whisk gently until just combined. This is crucial: Do not overmix. You’re aiming for a batter that’s just barely combined, with a few small flour streaks still visible. Overmixing develops gluten and creates a tough, dense topping rather than the tender cake texture you want. The overmixing happens in about 10-15 seconds of gentle stirring — then stop immediately.
The batter should be thick but pourable, roughly the consistency of thick pancake batter. It should fall slowly from a spoon rather than plopping in a stiff blob, but it shouldn’t be thin or runny either. If your batter seems too thick, add another tablespoon of milk. If it seems too thin, add a tablespoon of flour.
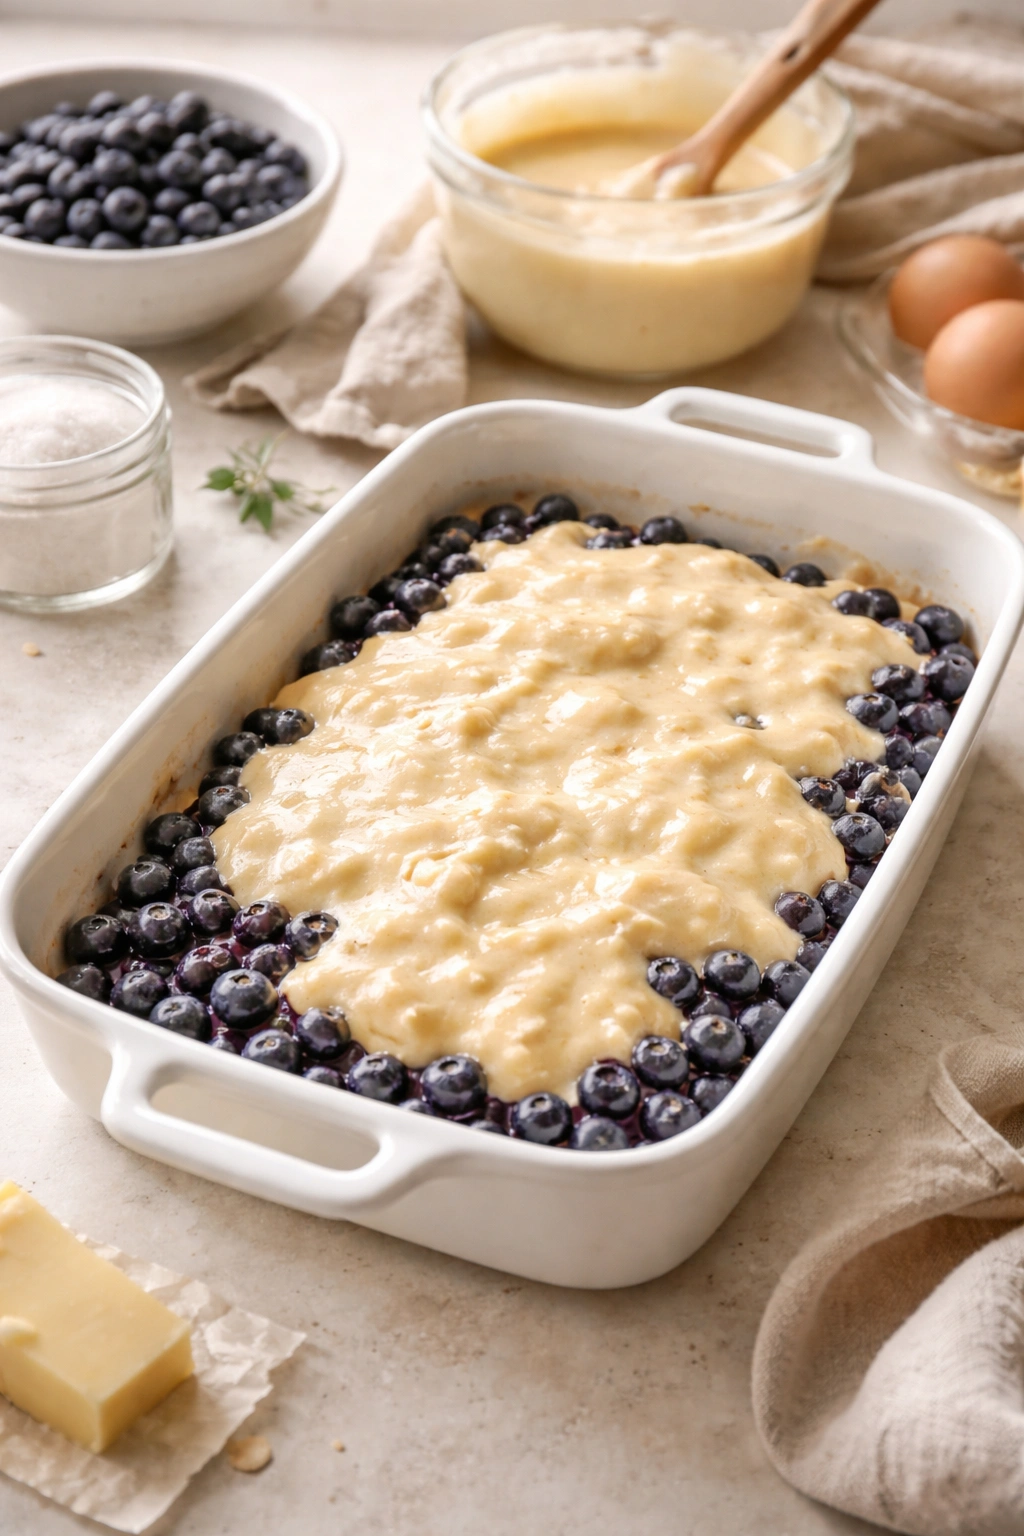
Pouring the Batter Over Your Berries
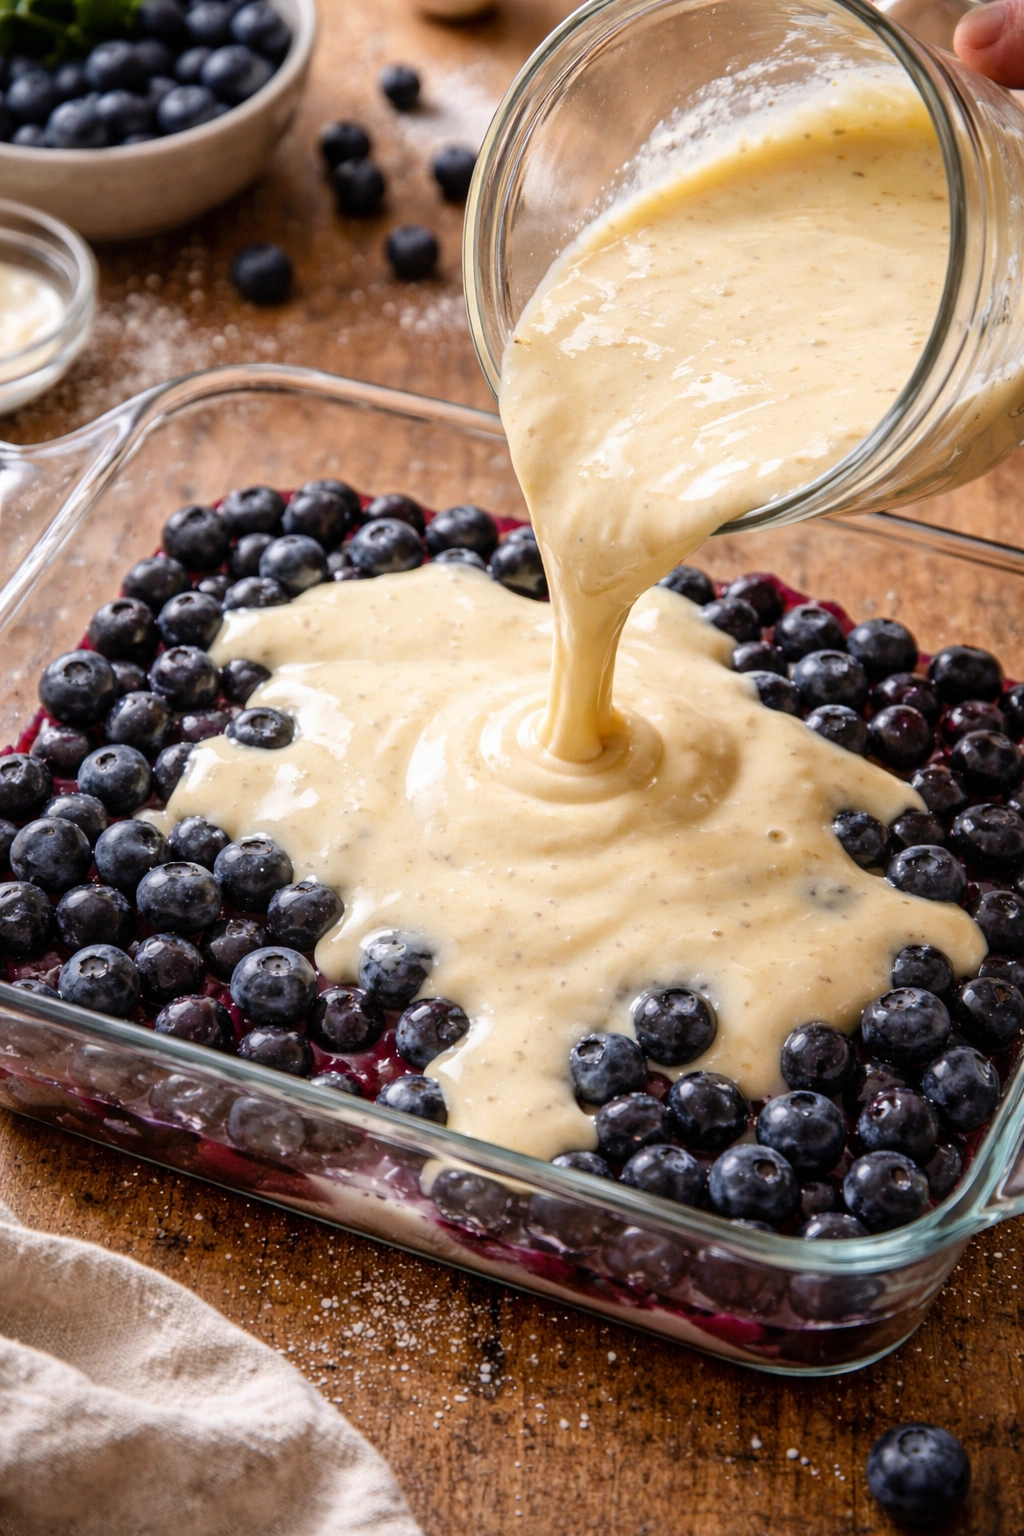
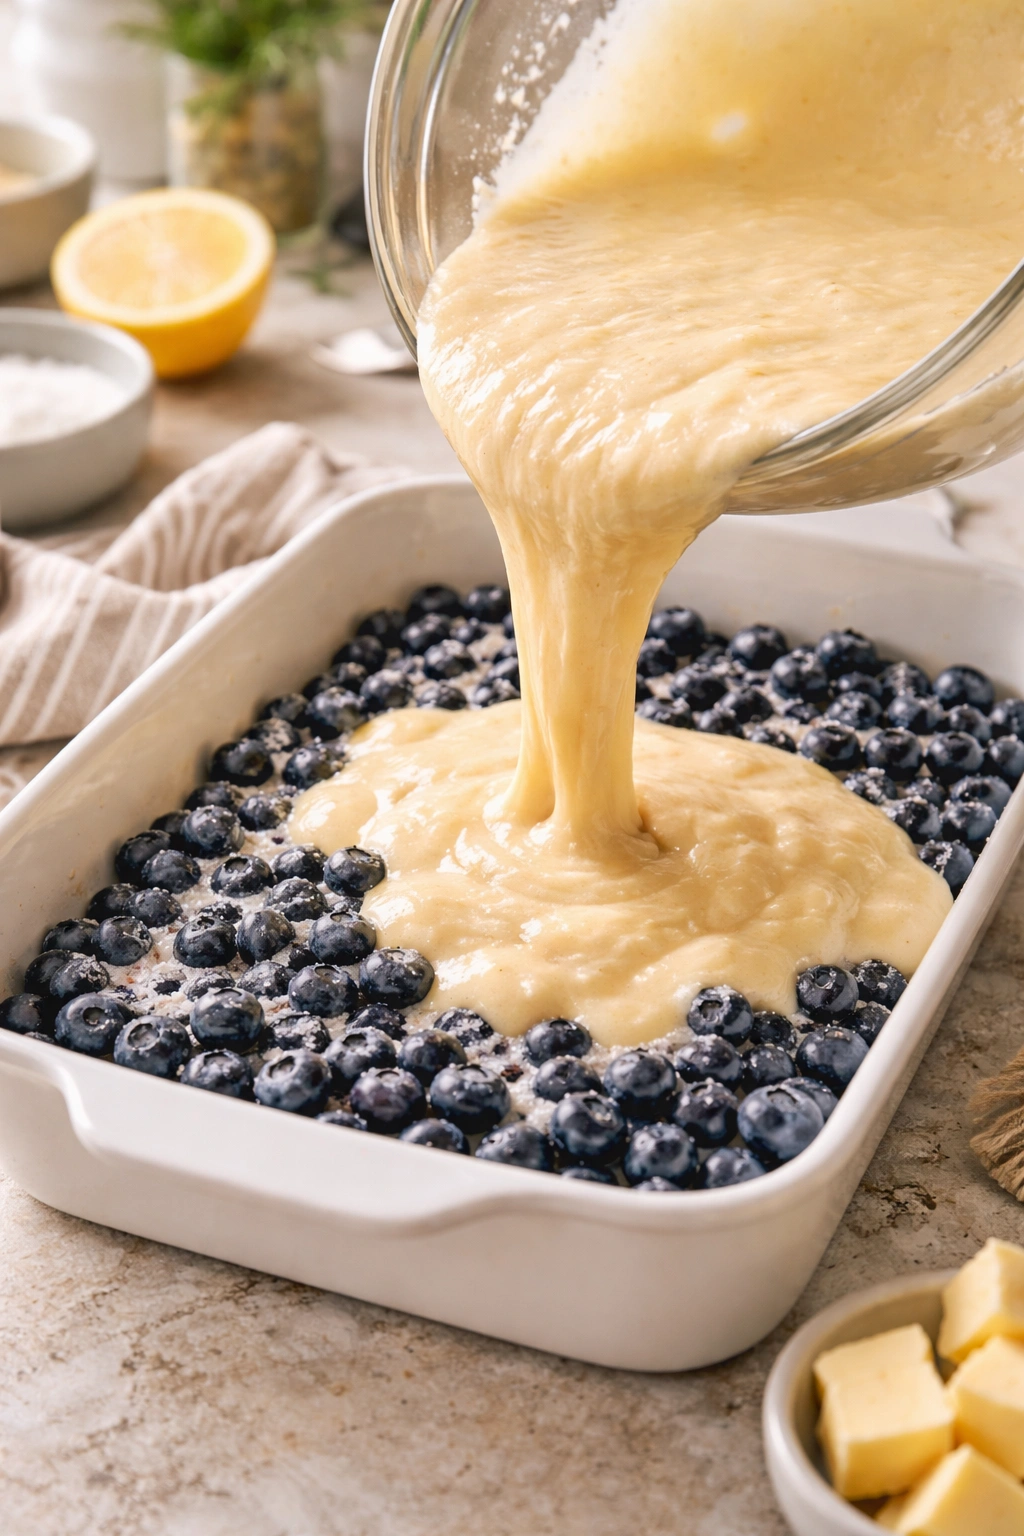
By now, your berries will have been sitting for about five minutes and will have released a modest amount of juice — you should see a little liquid pooled around them. This is exactly what you want.
Pour your prepared batter over the berries, starting from one corner of the baking dish and pouring slowly so the batter spreads evenly. You don’t need to smooth it out or distribute it perfectly — the batter will flow naturally as it bakes and will create its own uneven, rustic-looking surface. That’s actually the ideal look for a cobbler.
If you’ve chosen to use the coarse sugar for finishing, sprinkle about a tablespoon of it evenly across the top of the batter now. This adds a subtle texture and a touch of sparkle to the finished cobbler, plus a hint of crunch in every bite. This step is optional but genuinely worth doing if you have coarse sugar on hand.
The Baking Process and What to Expect
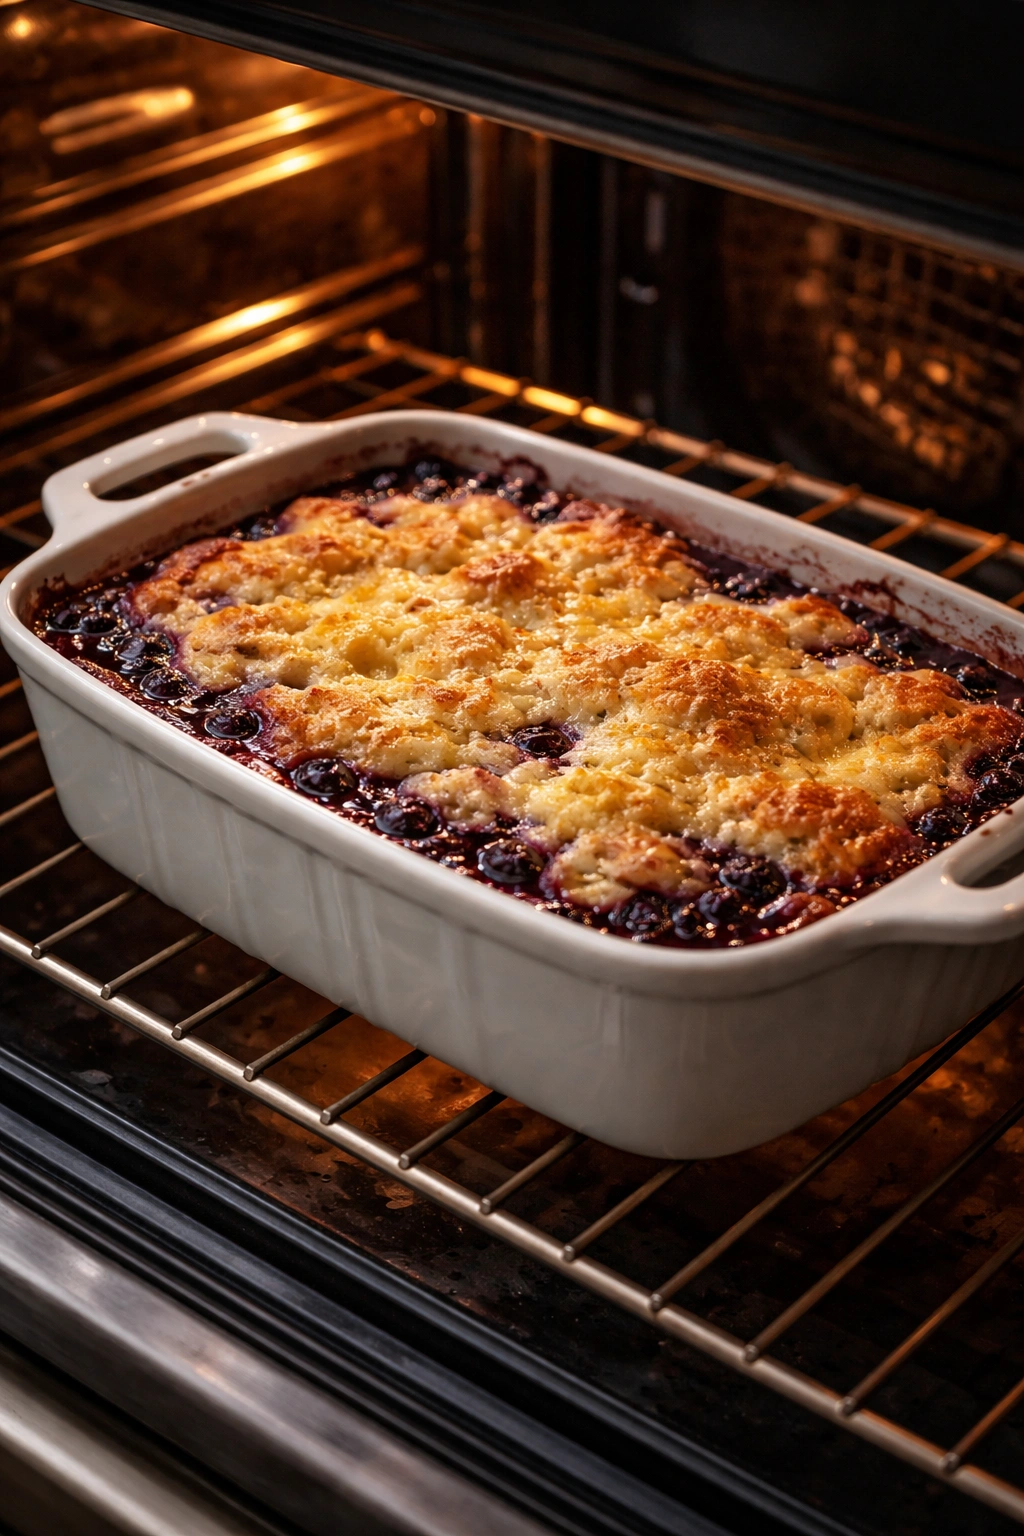
Slide your baking dish into the preheated oven and set your timer for 50 minutes. Close the oven door and walk away. Do not open the oven or check on this cobbler for at least 40 minutes. Every time you open the oven door, you release heat and disrupt the baking environment. Trust the process.
As the cobbler bakes, you’ll start noticing aromas from the kitchen — that’s the butter in the batter browning and the blueberries releasing their flavor. That smell is actually a reliable indicator that things are on track. Around the 30-minute mark, if you peek through the oven window (without opening the door), you should see the edges of the baking dish starting to show some bubbling fruit juice.
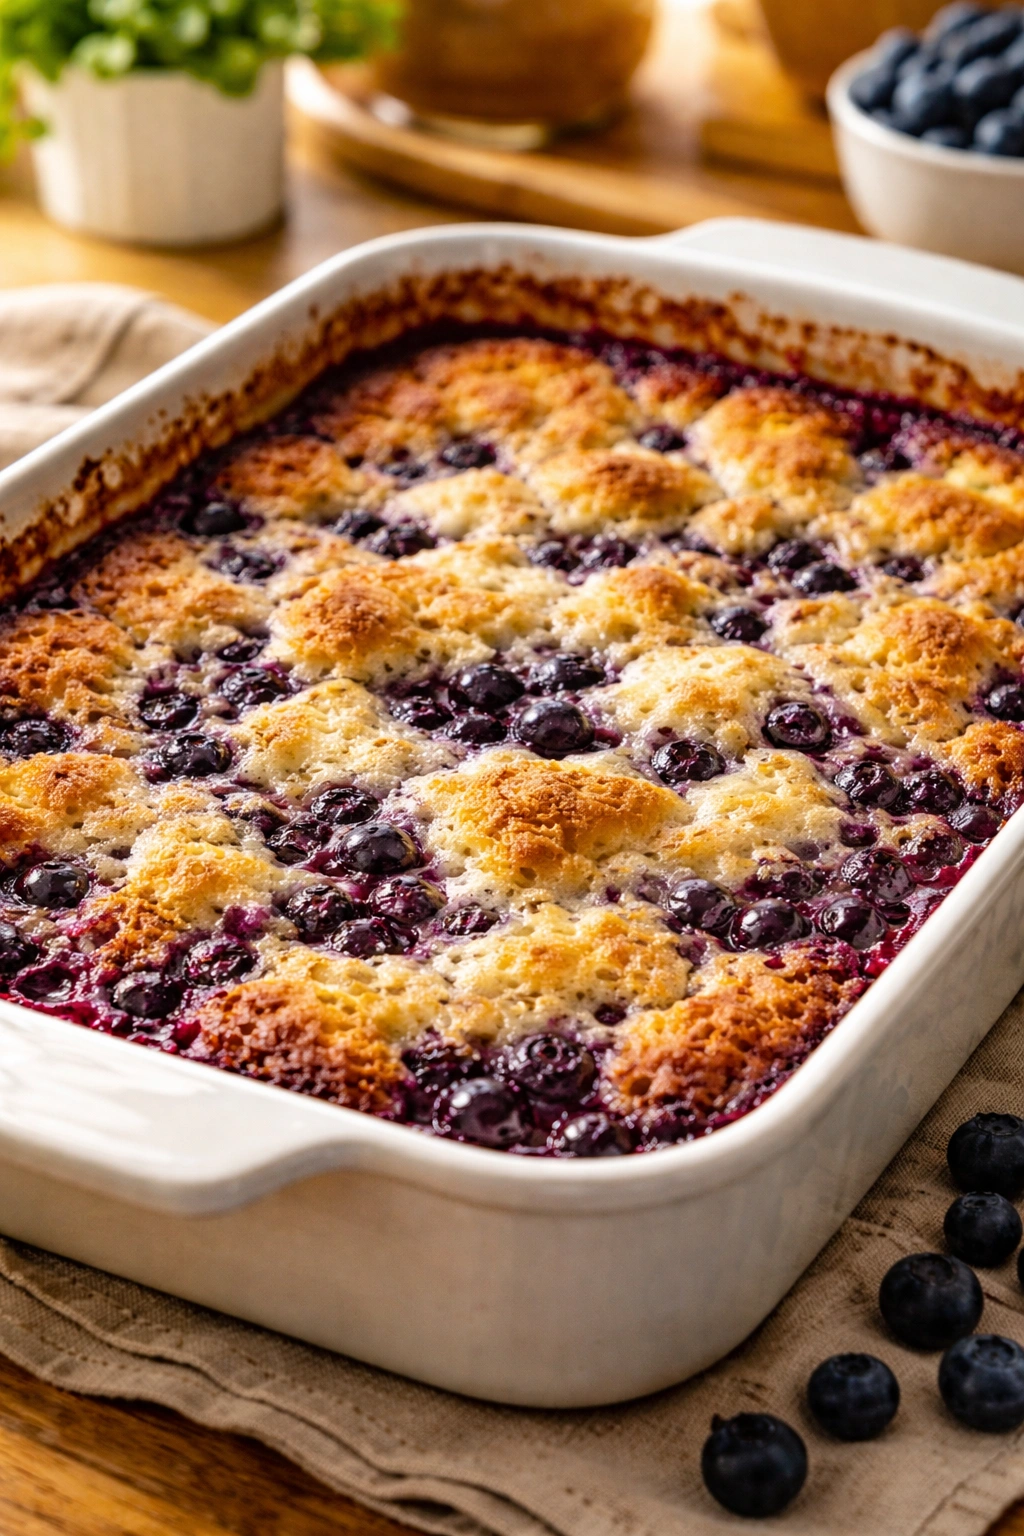
By 40 to 45 minutes, the top should be light golden brown. The batter will have risen and set, and the juices from the berries should be bubbling visibly around the edges where the batter meets the fruit. This is completely normal and exactly what you want to see.
How to Know When It’s Perfectly Baked
At 50 minutes, open your oven and take a look. The top should be golden brown — not pale and underbaked, but not dark brown either. If it still looks quite pale, close the door and check again in 5 minutes. If it’s already deep brown, pull it out — you’re done.
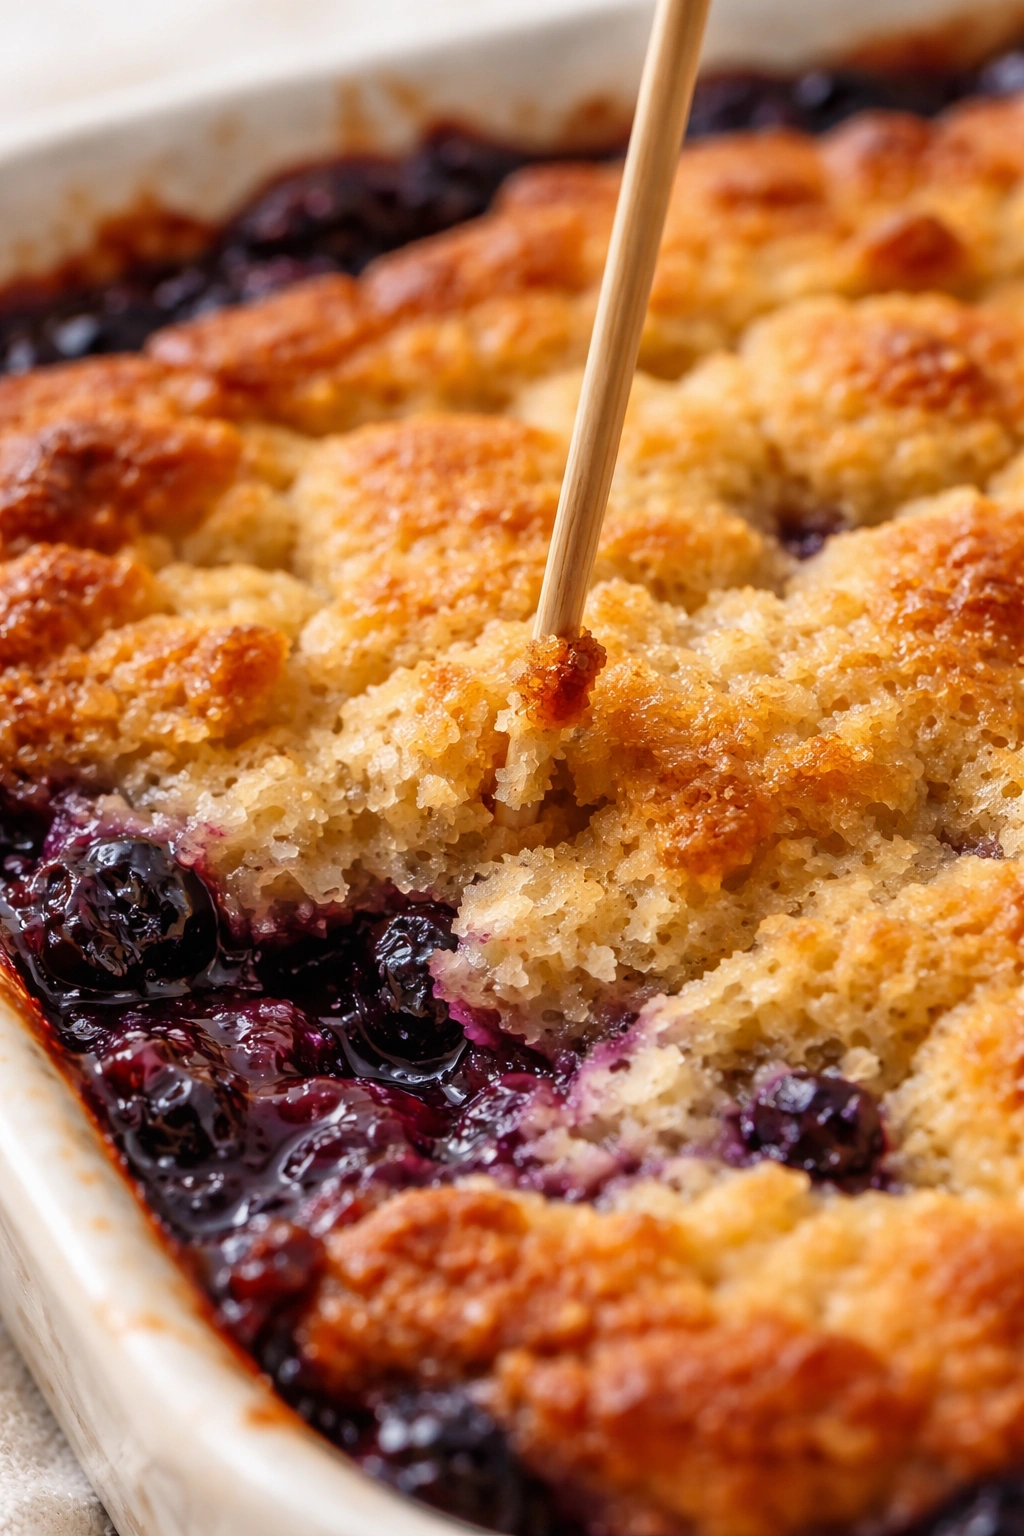
A gentle touch test is your most reliable indicator. Insert a toothpick into the thickest part of the cake topping (not into the fruit). It should come out clean or with just a few moist crumbs clinging to it — not batter. If wet batter comes out on the pick, the center needs another 5 to 10 minutes.
You should also see fruit juices bubbling noticeably around the edges of the dish. This bubbling tells you the fruit has released its moisture and the batter has fully set. If the edges look dry and still, you need a few more minutes.
The finished cobbler should smell intensely of blueberries and butter, with the top having a clear golden-brown color that’s noticeably deeper than the pale batter you poured in. The top might have a few little cracks in the surface, which is perfectly normal — the cobbler continues cooking and settling as it cools, and those cracks actually let steam escape gracefully.
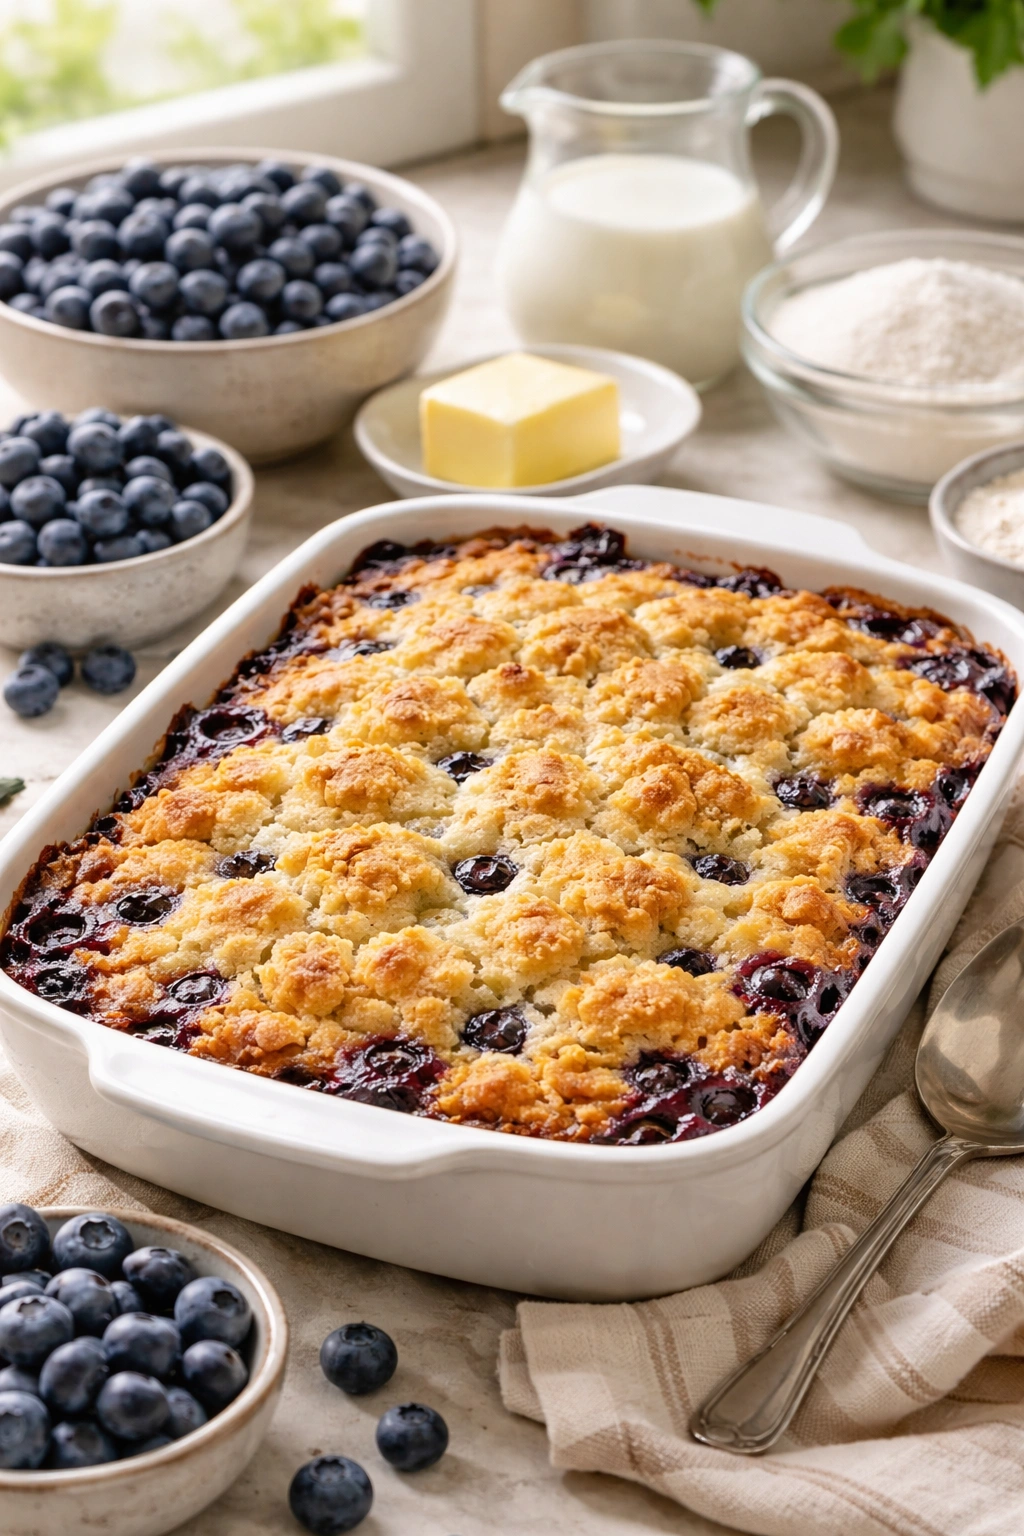
Cooling and Resting Your Cobbler
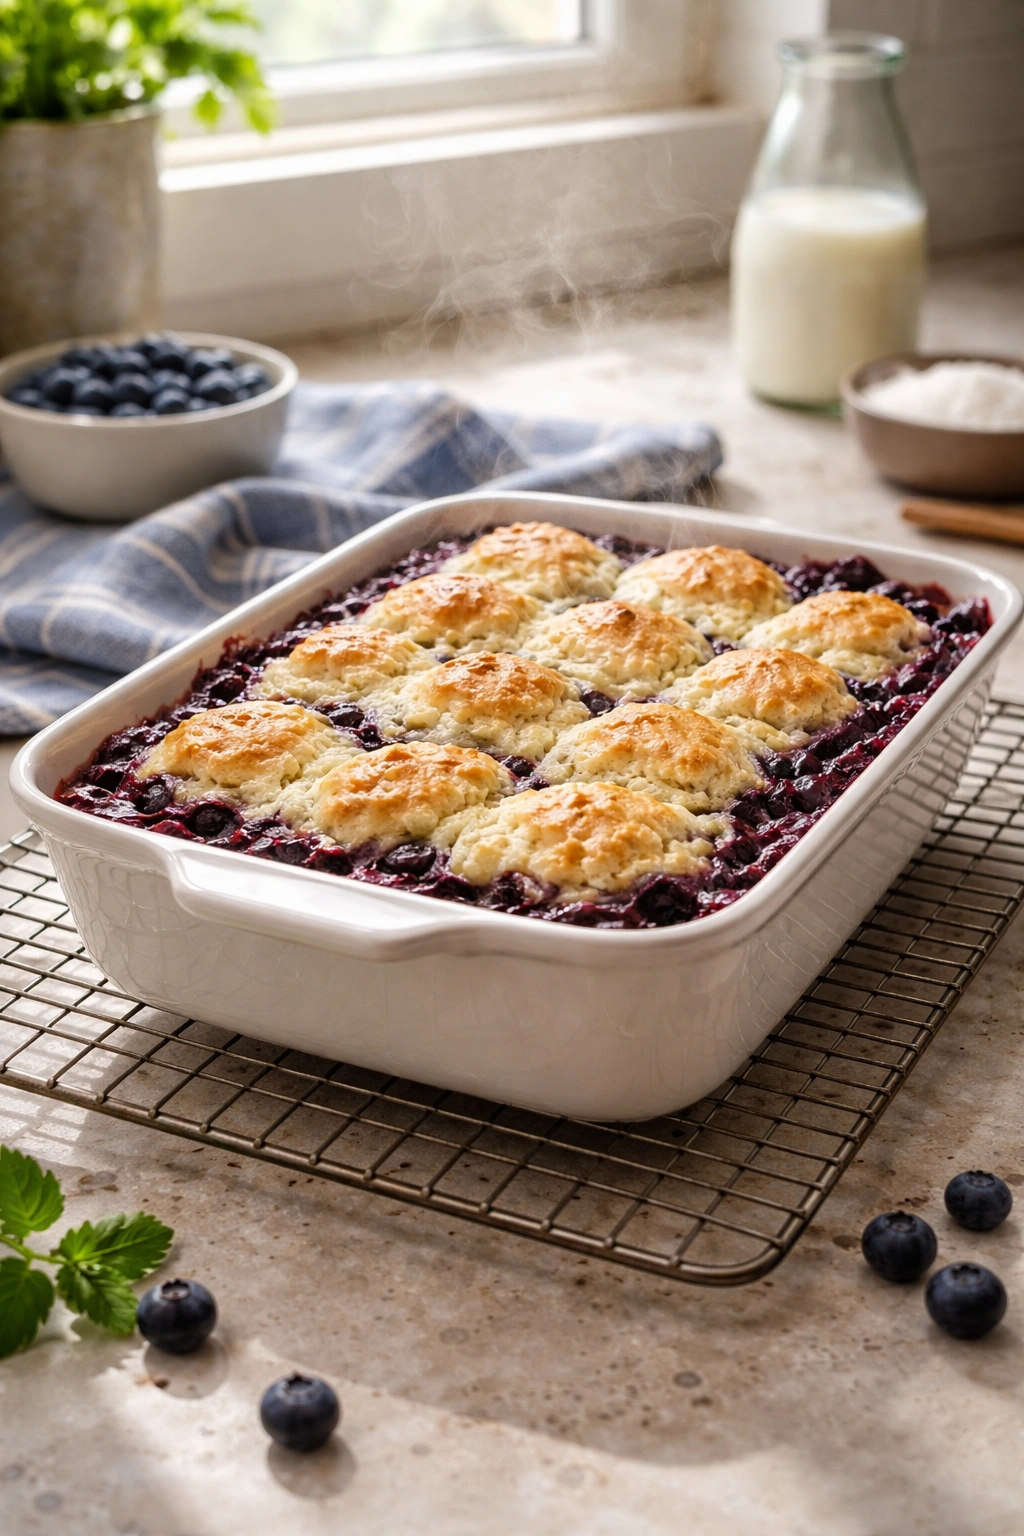
Remove the baking dish from the oven using oven mitts — it will be extremely hot. Set it on a wire cooling rack if you have one; if not, a countertop trivet works fine. Do not cut into this cobbler immediately. This is the hardest part of the whole recipe because it smells absolutely incredible and you’ll want to dive in right away.
Let the cobbler cool at room temperature for at least 20 minutes, though 30 minutes is even better. This resting time allows the fruit juices to set slightly and the entire cobbler to firm up. If you cut into it while it’s still too warm, the fruit layer will ooze out in a runny mess rather than maintaining its shape on your plate. The wait transforms the texture from molten to just perfectly warm and scoopable.
After the initial rest, you can serve it warm. Some people prefer their cobbler at room temperature, which is also lovely. Frankly, this cobbler is delicious at any temperature — even straight from the refrigerator the next morning, though warming it gently before serving brings back all the original appeal.
Common Mistakes and How to Avoid Them
The most frequent mistake is overmixing the batter. This happens because mixing feels like something you should do thoroughly — we’re all conditioned to think more mixing means better results. With cobbler topping, the opposite is true. Mix the dry and wet ingredients together just until no flour streaks are visible, then stop. About 10-15 seconds of gentle stirring is all you need. Overmixing develops gluten, which makes the topping tough and cake-like in a bad way rather than tender and delicate.
Another common pitfall is opening the oven too frequently. Every peek releases precious heat and disrupts the gentle, even cooking environment. Set your timer for 40 minutes before you even look. Patience here directly translates to better texture in your finished cobbler.
Some people try to make this cobbler with all-purpose flour substitutions or gluten-free flour. All-purpose flour works beautifully in this recipe, and it’s not worth experimenting with alternatives if you have access to it. If you must use gluten-free flour, use a 1:1 baking blend that includes xanthan gum, and add about a tablespoon extra liquid to your batter since gluten-free flour absorbs more moisture.
Using too much sugar in the fruit layer throws off the balance. Three-quarters of a cup might seem stingy, but blueberries are naturally sweet, and the sugar in the batter provides additional sweetness above the fruit. More sugar than called for makes the cobbler cloying and masks the delicate blueberry flavor.
Thawing frozen blueberries before baking actually works against you here. Frozen berries stay more intact during baking and create better texture in your finished cobbler. Fresh berries are perfect, but frozen berries don’t need thawing — measure them directly from the freezer.
Smart Tips for the Best Results
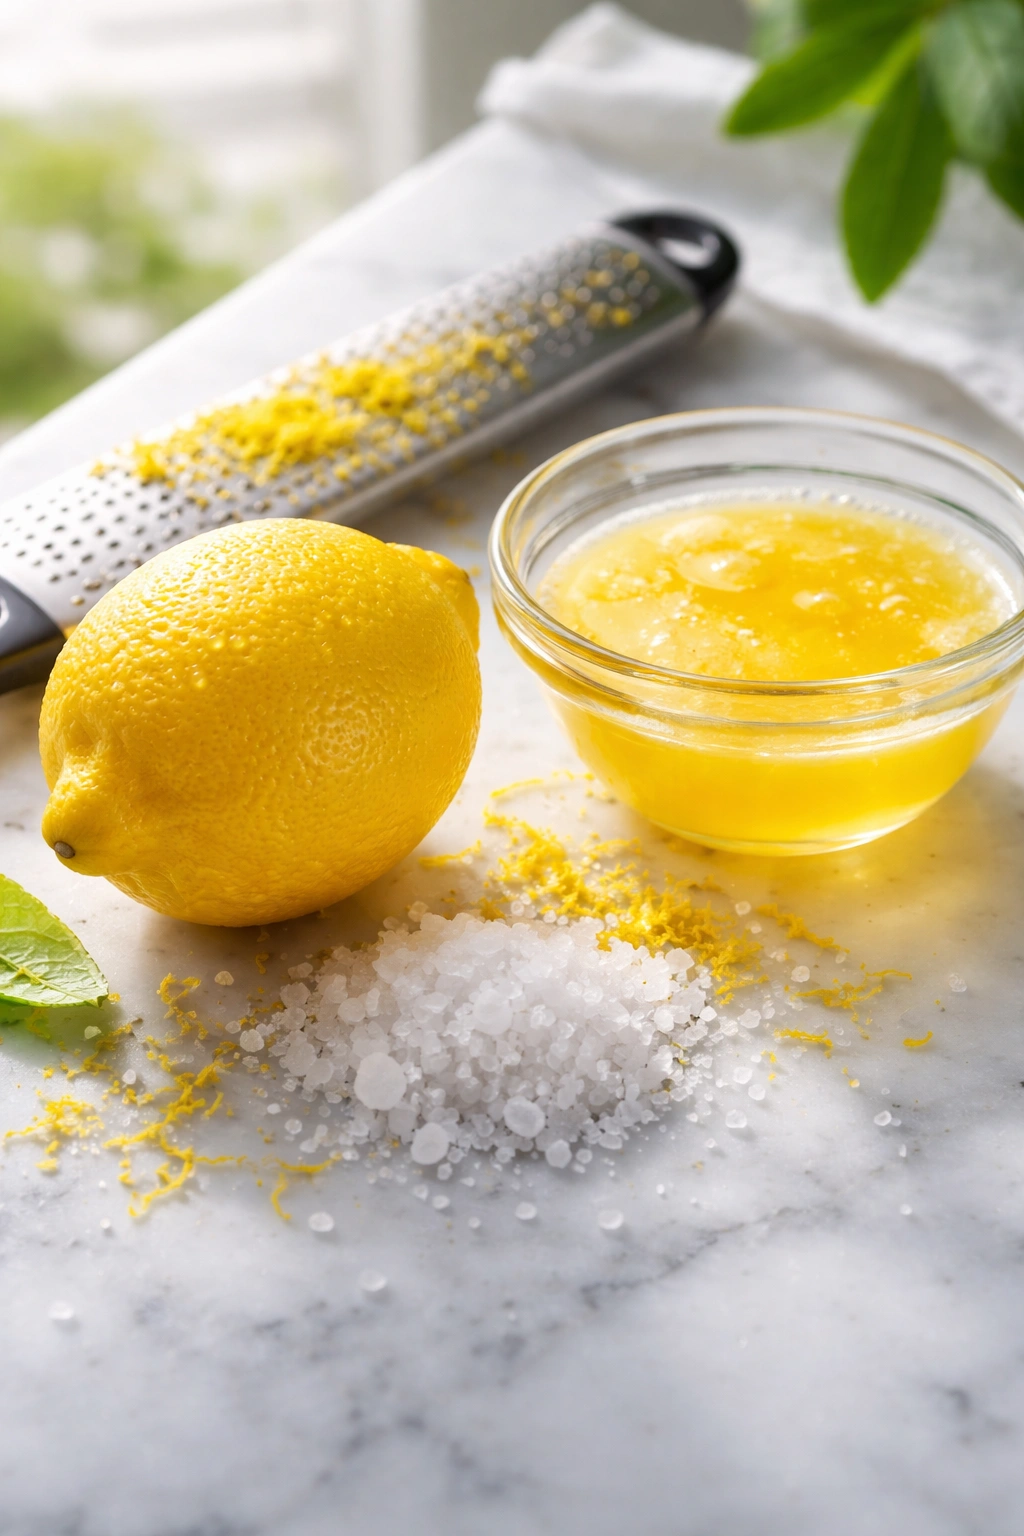
Use fresh lemon rather than bottled juice. The difference is noticeable. Fresh lemon brings brightness and complexity that bottled juice can’t match. A whole lemon costs less than a dollar, and one lemon yields more juice and zest than you need for this recipe.
Make sure your butter is fully melted but not hot when you add it to your wet ingredients. If the butter is too hot, it’ll cook the egg before it combines with the other ingredients. Pour your melted butter and let it cool for about a minute while you’re mixing your dry ingredients, then add it to the milk and egg mixture.
Don’t skip the salt in the fruit layer. Blueberries have a gentle, subtle flavor that salt actually amplifies rather than making salty-tasting. The salt highlights the berry flavor and balances any tartness from the lemon. You won’t taste salt specifically — you’ll just notice that the blueberries taste more like blueberries.
Grate your lemon zest directly into the baking dish rather than prepping it beforehand. The zest releases aromatic oils as soon as you grate it, and those oils dissipate over time. Zesting right into the dish captures all that fresh lemon essence.
If your cobbler seems to be browning too quickly on top, tent it loosely with aluminum foil for the last 10 minutes of baking. This prevents the top from overdarkening while the center finishes cooking. This is rarely necessary at 350°F, but if you’re in a particularly hot kitchen or your oven runs hot, this safety measure is helpful.
Variations and Flavor Twists
Blueberry and Lemon with Fresh Herbs: Add one small sprig of fresh thyme or basil leaves (about three leaves, minced very finely) to your fruit layer. Herbs pair beautifully with both blueberries and lemon. You want just enough to add subtle depth without making the cobbler taste herbal.
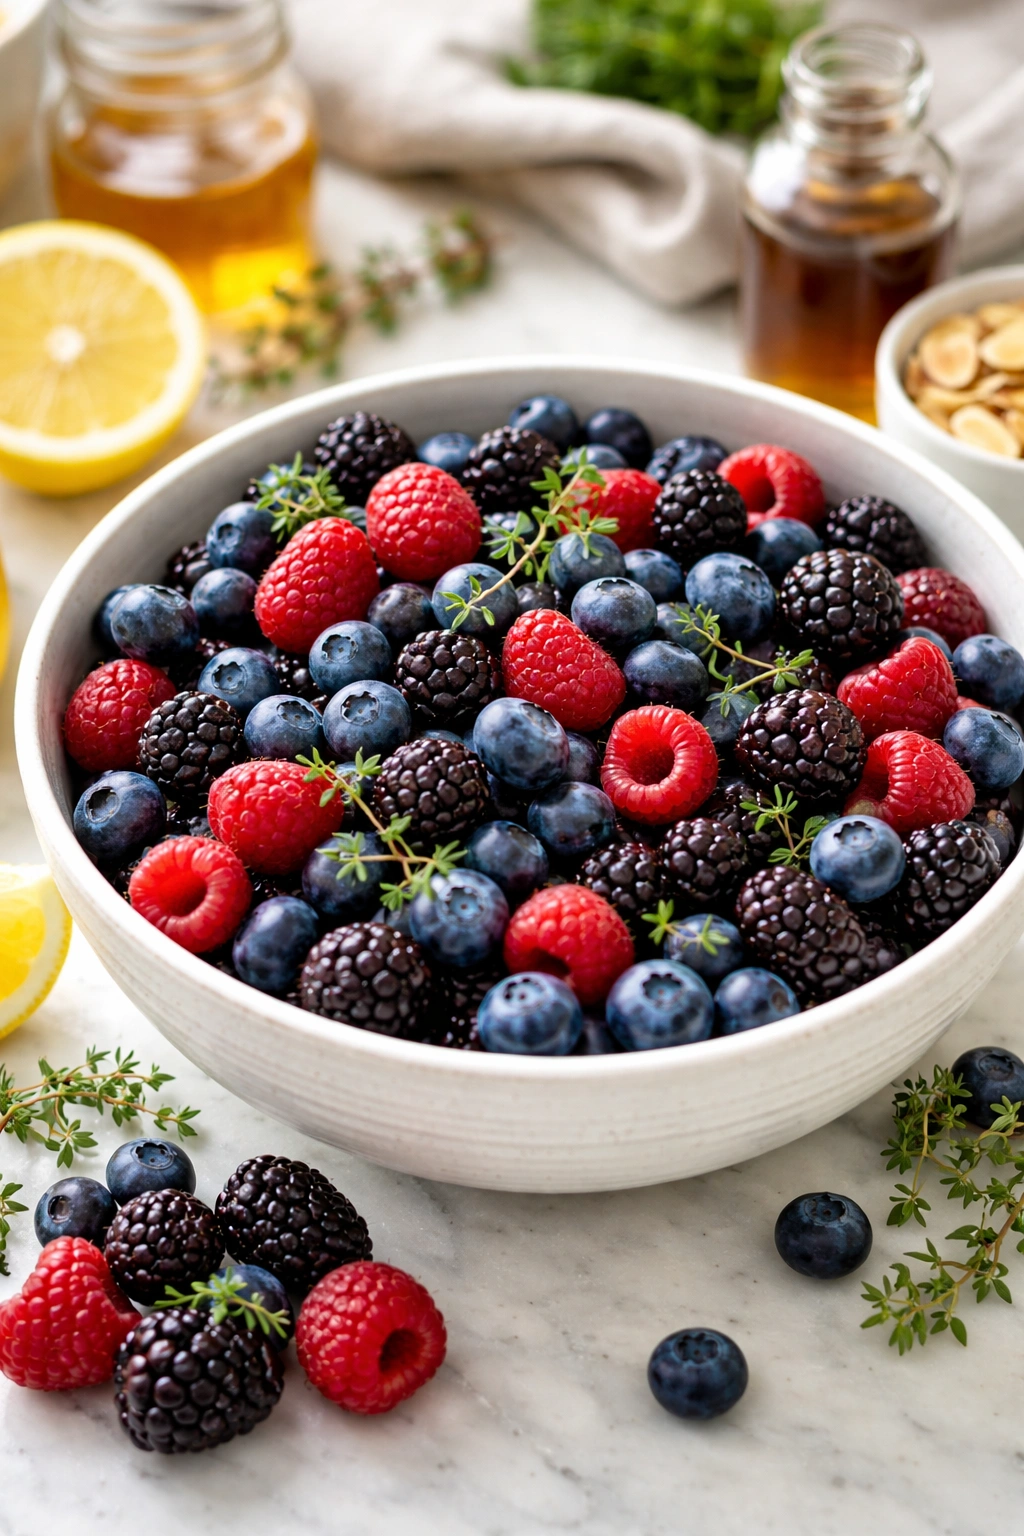
Mixed Berry Version: Replace half the blueberries with blackberries or raspberries. The tartness of blackberries and raspberries complements the sweetness of blueberries, and you get a more complex berry flavor profile. Keep the lemon juice the same.
Blueberry with Vanilla and Almond: Add ½ teaspoon of almond extract to your topping batter (in addition to the vanilla). Replace ¼ cup of the flour with ground almonds. This creates a subtle almond undertone that pairs gorgeously with blueberries. The topping will be slightly more delicate with this substitution, so handle it gently.
Orange and Blueberry Twist: Replace the lemon zest and juice with orange zest and juice from a fresh orange. Orange adds a warmer, sweeter note than lemon and creates a sophisticated flavor combination. Use the same amounts — the acidity is similar enough.
Cobbler with Cardamom: Add ¼ teaspoon of ground cardamom to your dry ingredients for the topping. Cardamom is subtle and exotic, and it adds a gentle warmth that makes the blueberry flavor pop. Don’t increase the amount — too much cardamom overpowers everything else.
Bourbon Blueberry Version: Add one tablespoon of bourbon whiskey to your fruit layer. This adds a warm undertone and slightly deepens the berry flavor. If bourbon isn’t your thing, dark rum works beautifully too.
Storage, Make-Ahead, and Reheating
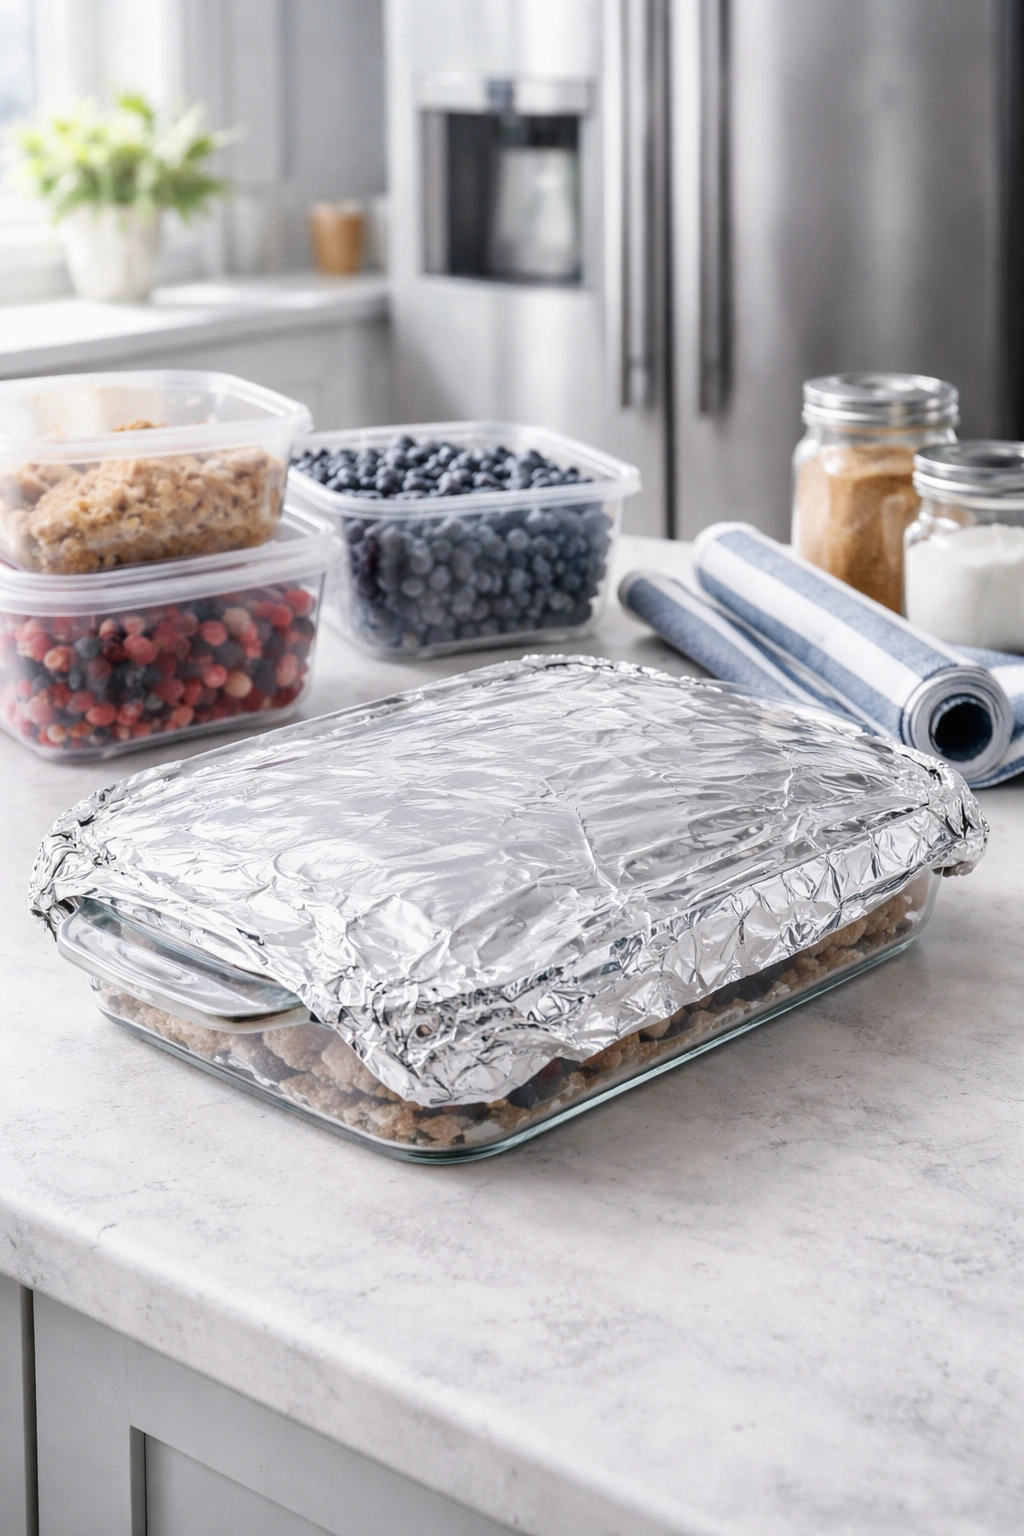
This cobbler keeps well at room temperature for about 24 hours, loosely covered with foil or plastic wrap. After that, move it to the refrigerator, where it stays fresh for up to four days. The topping will gradually soften as it sits, which isn’t a flaw — it’s actually delicious. The cobbler becomes more like a cake-textured dessert than a crisp topping, and many people prefer it this way.
Freezing works beautifully. Once the cobbler is completely cool, cover the entire baking dish tightly with plastic wrap and then foil. It freezes for up to three months. When you want to serve it, thaw it completely in the refrigerator overnight, then rewarm gently in a 300°F oven for about 15 to 20 minutes, covered loosely with foil. The reheated cobbler tastes virtually identical to fresh-baked.
Baking ahead and storing the components separately is also an option. You can prepare the fruit layer up to one day ahead — combine your blueberries with sugar, lemon, and salt in the baking dish, cover it loosely, and refrigerate. Right before baking, prepare your topping batter, pour it over the cold fruit, and bake as directed. The baking time might be 5 to 10 minutes longer since you’re starting with cold fruit, but you’ll still end up with perfect results.
If you want to freeze the unbaked assembled cobbler: combine the fruit and batter in your baking dish, cover it tightly with plastic wrap and foil, and freeze for up to two months. To bake, don’t thaw — bake the frozen cobbler directly from the freezer at 350°F for 65 to 75 minutes, checking for doneness using the toothpick test described above.
To reheat leftovers, loosely cover with foil and warm in a 300°F oven for 15 to 20 minutes. You can also reheat individual portions in the microwave in about 30 seconds, though oven reheating preserves the texture better.
Serving Suggestions and Pairings
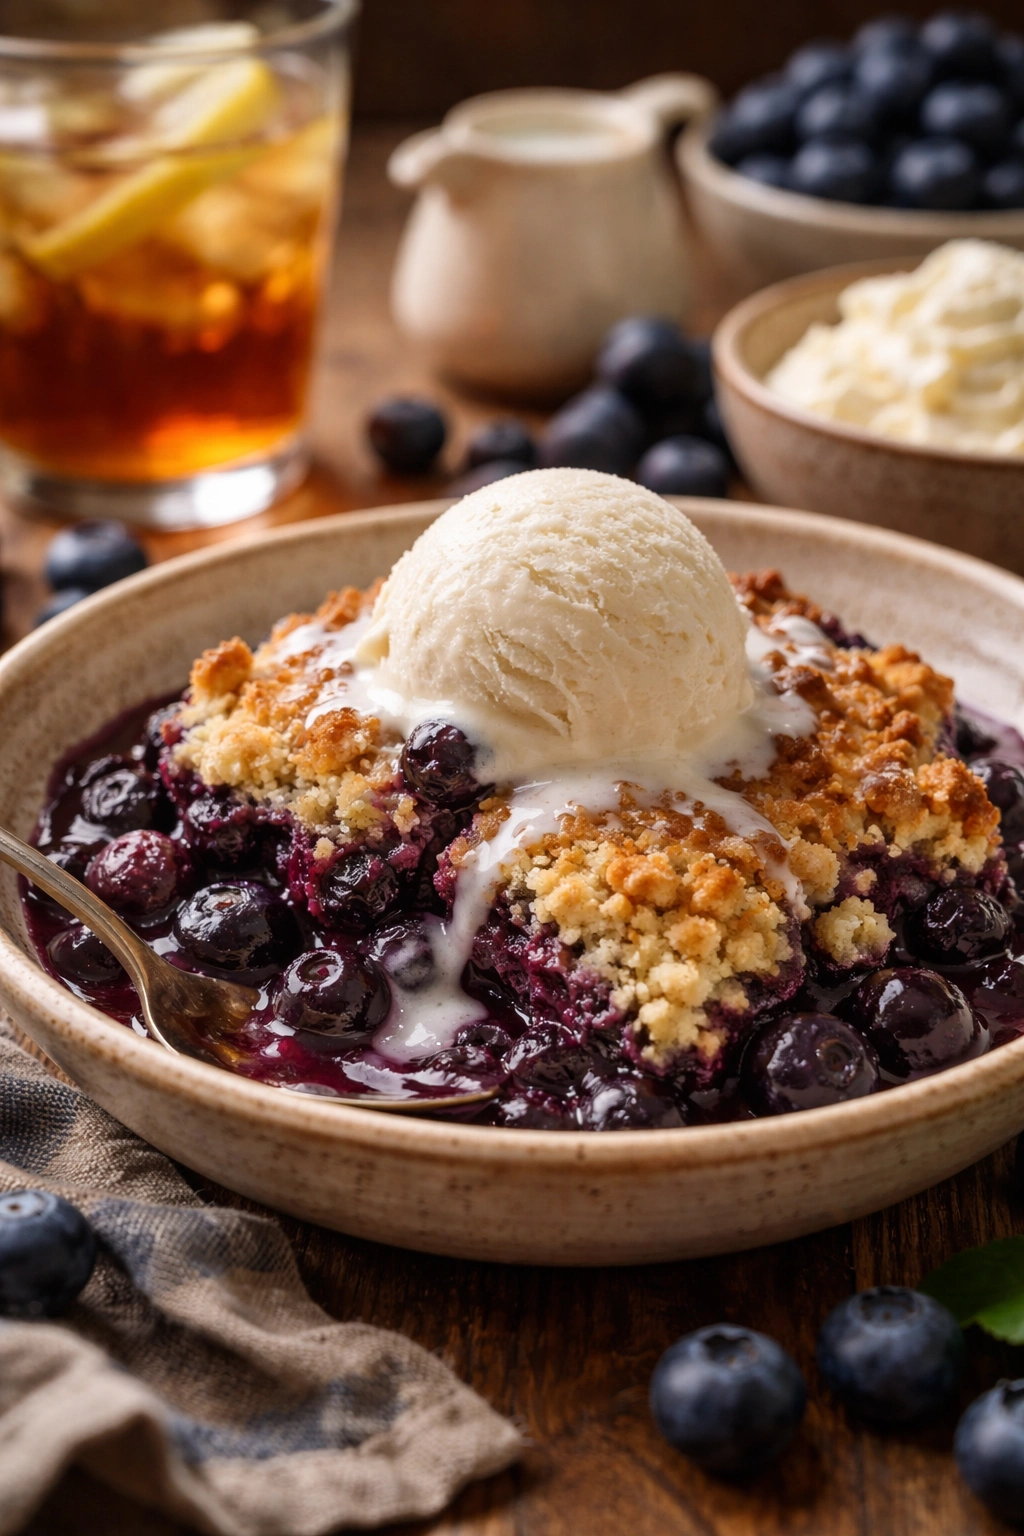
Serve each generous portion warm (not hot, but pleasantly warm) with a scoop of vanilla ice cream or a dollop of whipped cream. The cold cream against the warm cobbler creates a beautiful temperature contrast and adds richness. Vanilla is the classic pairing, though you could also try Greek yogurt mixed with a touch of honey, or homemade whipped cream sweetened lightly with powdered sugar and vanilla.
Serve this cobbler as the centerpiece of a simple summer or early fall dessert, or as a satisfying afternoon snack on its own. A slice with black coffee the next morning tastes even better than the evening it’s baked.
This dessert pairs beautifully with shortbread cookies on the side — the buttery crunch complements the soft cobbler perfectly. It also works wonderfully after a lighter meal where you want dessert without anything overly heavy.
For beverage pairings, strong tea (black or herbal) complements the cobbler’s fruit flavors beautifully. Cold milk is always classic. If you want something more festive, a glass of chilled Riesling or Moscato echoes the cobbler’s fruit-forward character.
Final Thoughts

This dump and bake blueberry cobbler proves that the simplest desserts are often the most rewarding. There’s no secret technique, no special equipment, and no reason to feel anxious about the outcome. You combine a handful of ingredients, pop it in the oven, and let your kitchen fill with the smell of buttery cake and warm blueberries.
What makes this recipe work isn’t any culinary trickery — it’s the reliability of the method itself. By baking the topping directly over the fruit, you eliminate the guesswork about timing. The batter and berries cook as one integrated system, each element supporting the others. The fruit releases moisture that keeps the topping tender; the topping shields the fruit from direct heat so it softens gently rather than collapsing.
Bake this cobbler once and you’ll understand why it works. Make it twice and you’ll have the method internalized for life. After that, you’ll start making it spontaneously on random afternoons, knowing you have less than 20 minutes of hands-on time before something genuinely impressive comes out of your oven. That’s the real magic of this recipe — not that it’s complicated or special, but that it’s dependable and delicious every single time.