You probably haven’t made this dip yet, but once you do, it’ll become a fixture in your entertaining rotation. Baked feta dip is one of those rare appetizers that feels simultaneously elegant and impossibly easy—it comes together in minutes, bakes into something creamy and complex, and tastes like you spent actual time on it. The magic is in the restraint: just five ingredients at their best can create something more interesting than a dip loaded with ten mediocre components.
What makes this version worth bookmarking isn’t just the simplicity, though that’s certainly part of the appeal. It’s that a block of good feta cheese, when combined with the right supporting players, transforms into something warm, slightly browned, and utterly craveable. The edges caramelize just slightly while the inside stays creamy. It’s the kind of dish that works for casual weeknight snacking, impromptu entertaining, or as an unexpected contribution to a potluck that somehow steals the show. Guests always ask for the recipe, and when you tell them it’s five ingredients, they’re genuinely surprised.
The best part? There’s no special equipment needed, no advanced techniques to master, and no ambiguous instructions to decode. If you can assemble ingredients on a baking sheet and operate an oven, you can make this. Let’s walk through exactly what you need to know to make restaurant-quality baked feta dip at home, every single time.
What Is Baked Feta Dip and Where It Comes From
Baked feta dip, sometimes called whipped feta or feta saganaki, draws inspiration from Mediterranean and Middle Eastern appetizer traditions. The concept of serving warm, soft cheese with bread and vegetables has been around for centuries, but the modern baked feta dip trend found its way into everyday entertaining through the revival of simple, ingredient-forward cooking. There’s something almost archaic about its simplicity: take good cheese, season it, warm it, and serve it with something to dip.
What appeals so deeply about this dip is that it proves you don’t need complexity to create something memorable. The feta itself provides the richness and tang; the olive oil carries fat-soluble flavors and creates that luscious mouthfeel; and the bread acts as the vehicle for getting feta into your mouth as efficiently as possible. It’s fundamentally honest food—there’s nowhere for inferior ingredients or lazy technique to hide. When you’re working with just five components, each one matters.
The dip works across different serving contexts too. Serve it warm as part of a Mediterranean appetizer spread, spoon it over grilled bread, dollop it onto crackers, or surround it with vegetables. It’s equally at home at a casual gathering or a more formal appetizer hour. That versatility is why this recipe has staying power.
Why This Five-Ingredient Version Actually Works
The instinct when making a dip is often to keep adding—more herbs, more cheese, more flavor boosters. This version resists that impulse, and that discipline is exactly why it succeeds. Five ingredients might sound reductive, but they’re five ingredients chosen specifically to build on each other rather than compete.
Feta cheese is naturally salty and tangy, which means you don’t need extra salt or acidic components to make it interesting. The olive oil adds richness and a subtle fruity undertone. The other three ingredients provide texture, a base note of warmth, and visual appeal—they’re not filler. Each one contributes something the others can’t.
There’s also a practical advantage to this minimalist approach: it’s incredibly easy to scale up. Making this for two people? Make the full recipe anyway—it keeps beautifully. Making it for a crowd of twenty? Simply double or triple it using the same proportions. No complicated conversions, no guesswork about how flavors will scale. That’s the beauty of a well-formulated simple recipe.
Understanding the Flavor Profile This Dip Delivers
The initial taste when you try this dip is richness—that creamy, almost buttery sensation from the warmed feta and olive oil combination. That richness hits first, softening the usual sharp edges of feta cheese and making it feel almost indulgent.
The second layer is salty, but not aggressively so. Feta is naturally quite salty, but when it’s diluted with olive oil and warmed, that saltiness becomes part of the overall flavor rather than a punch that overshadows everything else. Think of it as a seasoning that’s built into the texture rather than sprinkled on top.
Then comes a subtle sweetness from the honey or other aromatics, which provides contrast and keeps the dip from feeling one-dimensional. That sweetness also balances the natural funkiness of feta, the way a drizzle of honey balances a sharp cheese board. The warmth—the actual temperature of just-baked feta—transforms how your palate perceives these flavors. Warm feta feels luxurious and soft; cold feta feels dense and aggressive.
What’s absent is just as important as what’s present. There’s no burn of raw garlic, no heat from chili flakes, no herbal intensity. This is a dip that lets the feta be the star, with every other ingredient playing a supporting role.
How to Choose Your Feta Cheese
Feta quality directly determines dip quality, so this deserves a moment of attention. Not all feta cheeses are identical, and the differences matter when you’re working with only five ingredients.
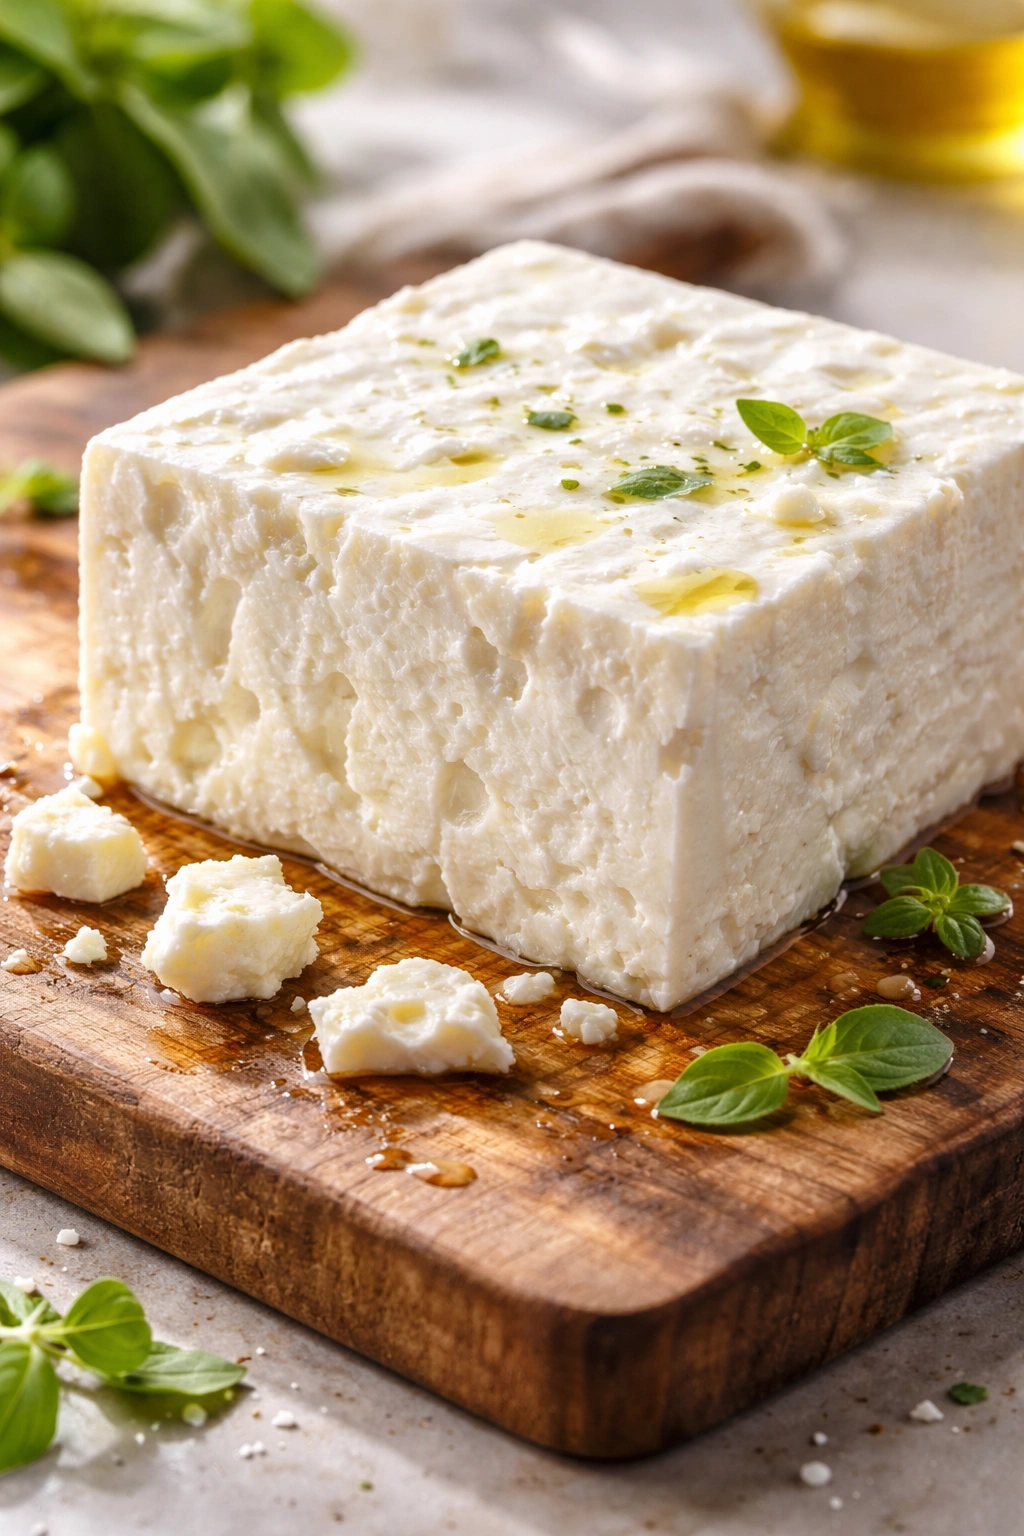
Brined vs. Crumbled: Buy feta that comes packed in brine, not crumbled feta in a package. Brined feta (usually sold in blocks or large chunks) has better moisture content and a creamier texture when warmed. Crumbled feta tends to have a drier, grainier texture that doesn’t warm into the same luxurious creaminess. A block of brined feta is also easier to control—you get exactly what you want, and you can crumble it yourself.
Cow’s Milk, Sheep’s Milk, or a Blend: Traditionally, feta is made from sheep’s milk or a blend of sheep and goat milk. These versions have more complexity and a richer flavor. Cow’s milk feta is milder and creamier, which works well if you prefer a gentler flavor. Try both and see which you prefer—there’s no wrong answer, just different flavor profiles.
Origin Matters More Than You’d Expect: Greek feta, Bulgarian feta, Danish feta, and American feta all taste noticeably different. Greek feta tends to be tangier and more mineral; Bulgarian feta is often slightly creamier. American versions vary widely. Once you find a brand you like, stick with it, because consistency matters when you’re relying on ingredient quality.
How Much to Buy: For this recipe, you’ll need 8 ounces of feta cheese. Buy slightly more than you think you need—often some liquid clings to feta, and you want the full amount of solid cheese for your dip. It’s also good to have a little extra for tasting as you go.
The Secret to Perfectly Baked Feta
The actual baking process is where most people either nail this or wish they’d paid more attention. It’s not complicated, but there are a few things worth understanding.
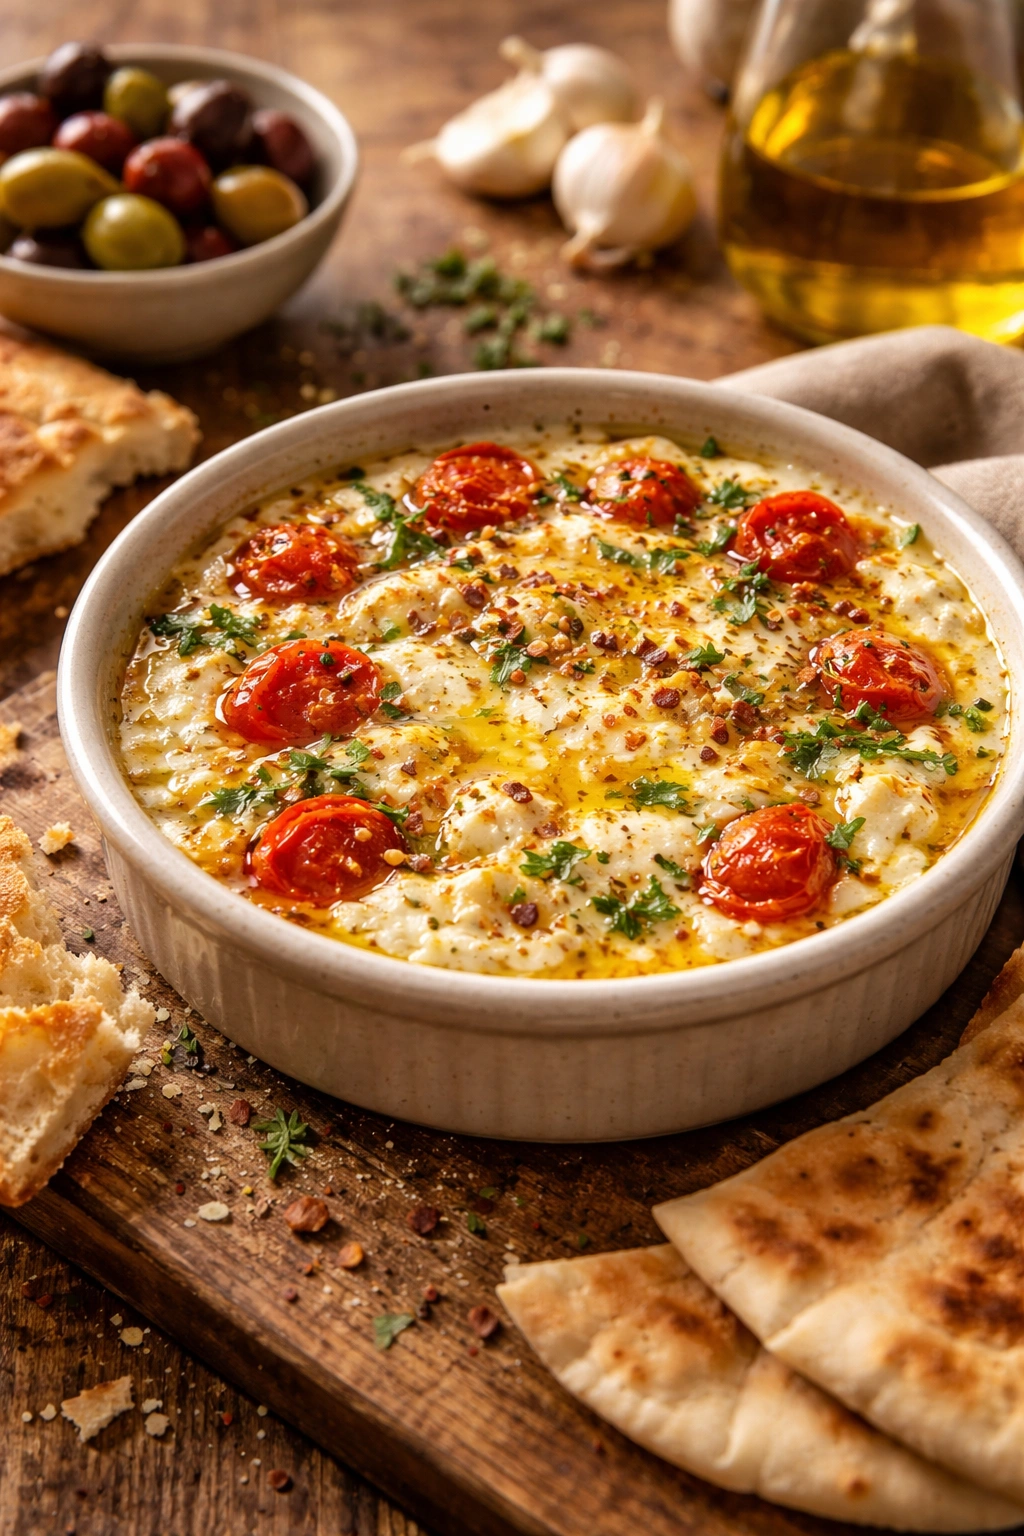
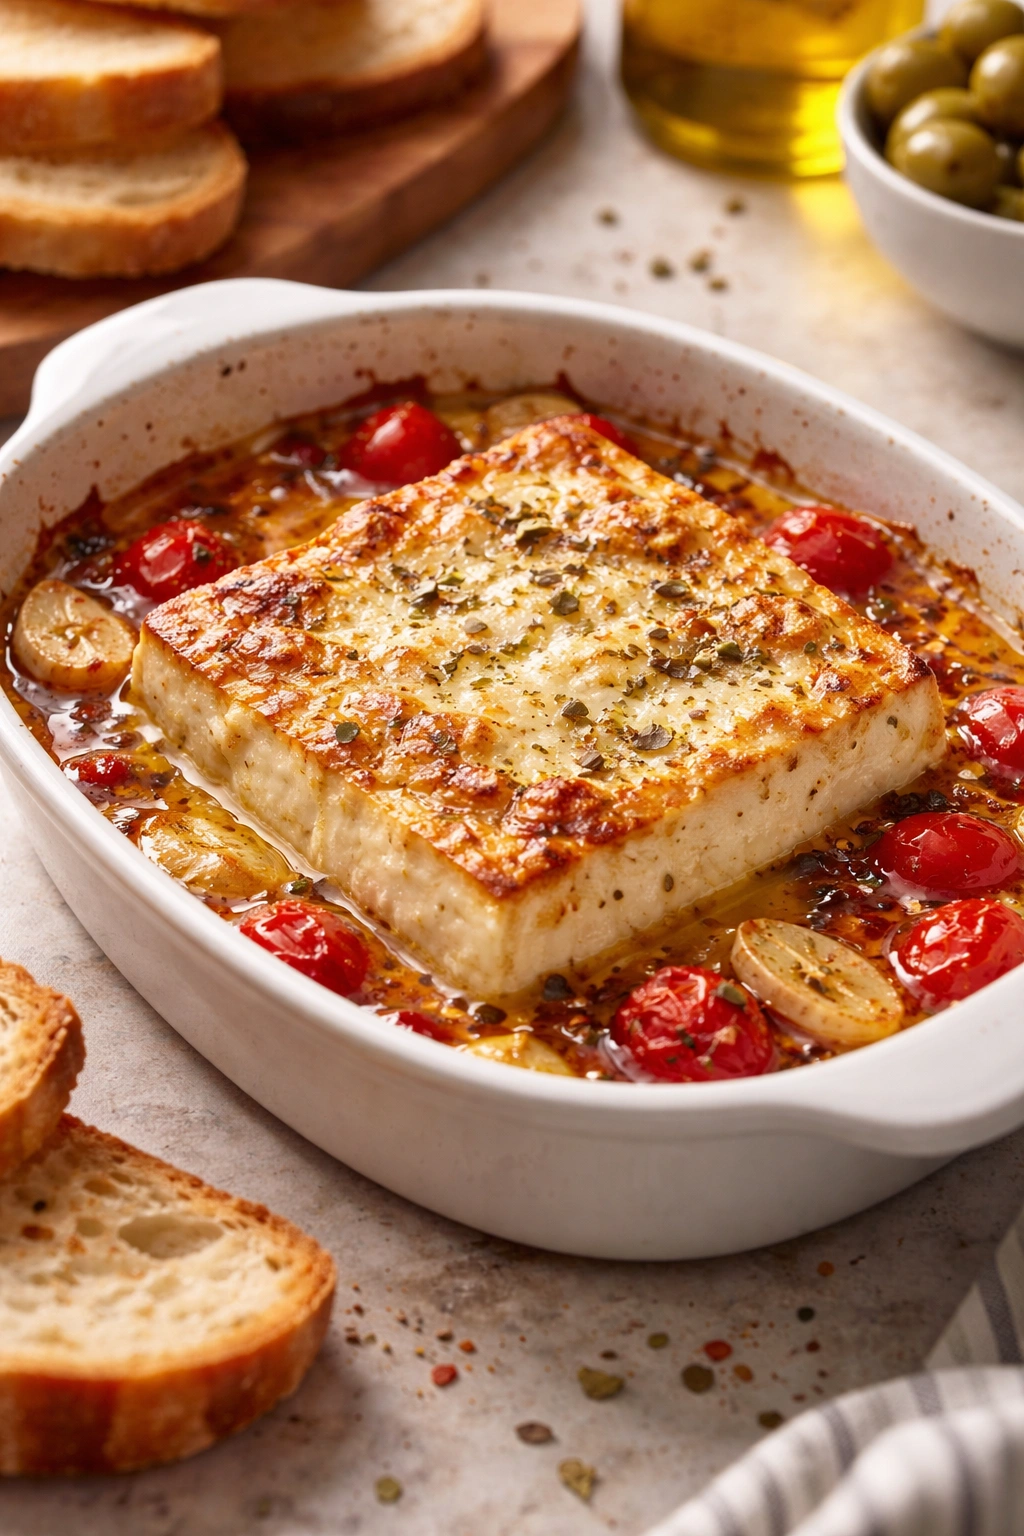
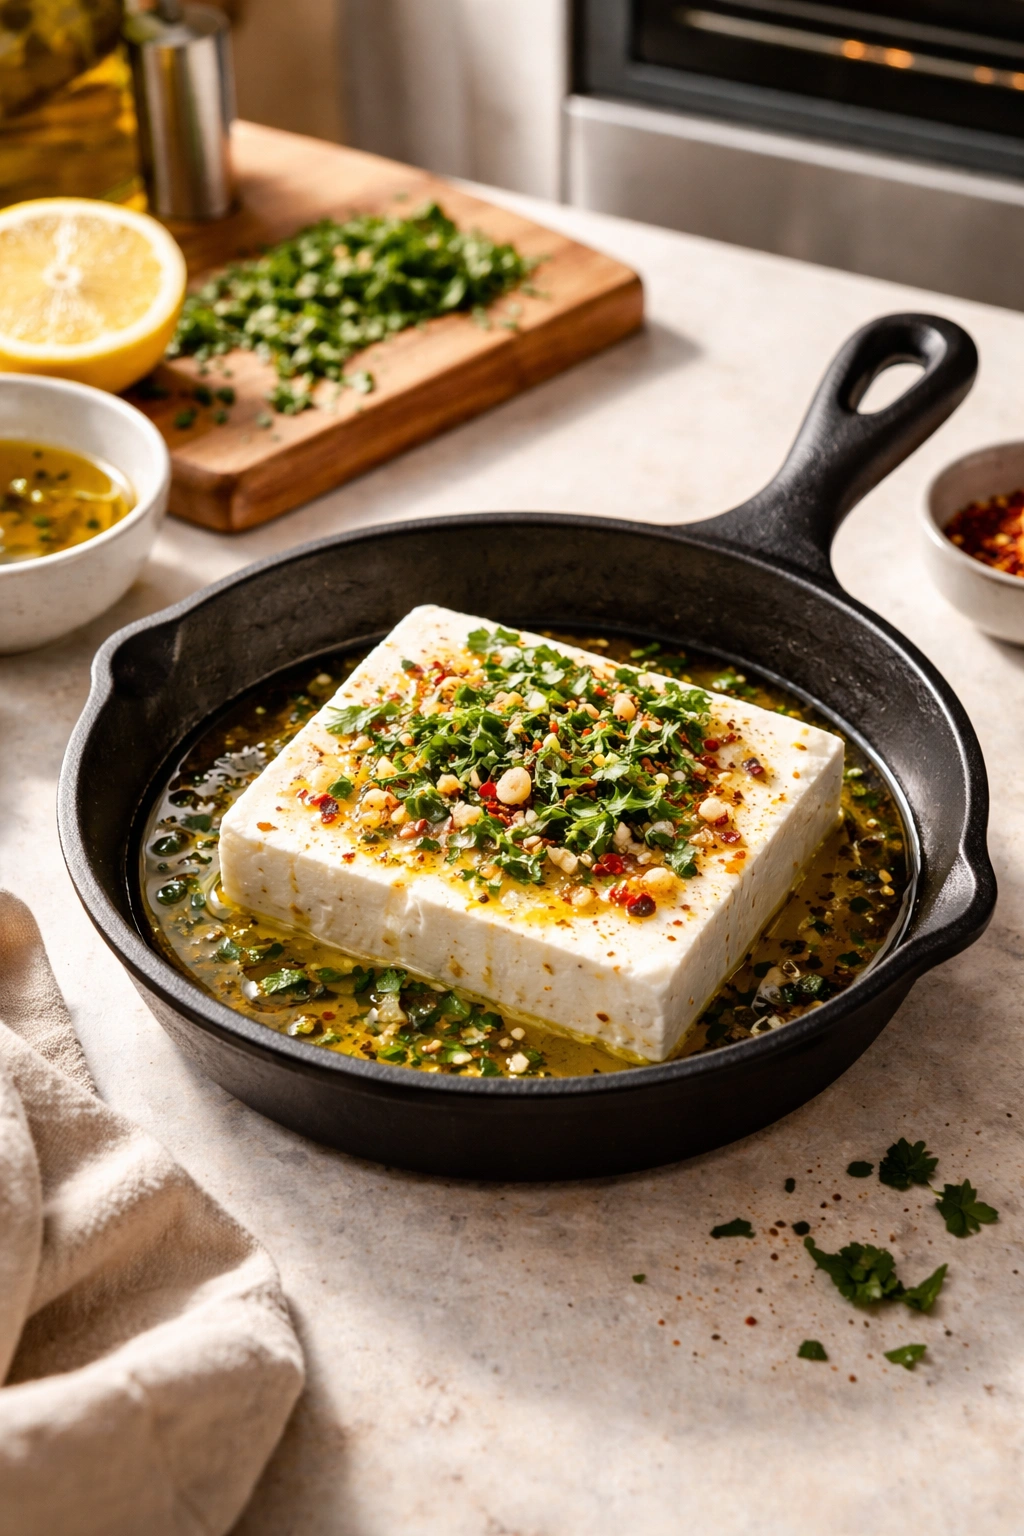
First, the temperature matters. Too low and the feta won’t warm through and soften evenly—you’ll get a warm surface with a cold, crumbly center. Too high and the exterior can brown too aggressively while the interior lags behind. 375°F is the sweet spot. At this temperature, the feta starts to soften after about 8 minutes, and by 12-15 minutes, it’s reached that ideal state: warm throughout, slightly browned at the edges, creamy in the center.
The other critical factor is the baking vessel. A small ovenproof skillet (like an 8-inch cast iron) or a shallow baking dish concentrates the heat and helps the feta warm evenly. If you spread feta out on a large baking sheet, it cooks unevenly and the edges can brown before the center is warm. Think vertically stacked rather than spread out thin.
Oil coverage is worth attention too. The olive oil isn’t just there for richness—it conducts heat, preventing the feta from drying out. Make sure every surface of the feta is coated or surrounded by oil. As it bakes, the oil heats and gently steams the cheese from every direction, which is what creates that creamy interior texture.
Finally, the timing window is shorter than you might expect. There’s about a 3-minute window between “perfectly baked” and “overcooked.” Start checking around the 12-minute mark. The feta should yield slightly when pressed with a spoon, and the edges should be just starting to turn golden. Pull it out at the right moment and you get that ideal balance; wait too long and the texture shifts toward waxy rather than creamy.
Essential Ingredients Explained
Before we move to the actual ingredient list and instructions, it helps to understand what each of these five components contributes.
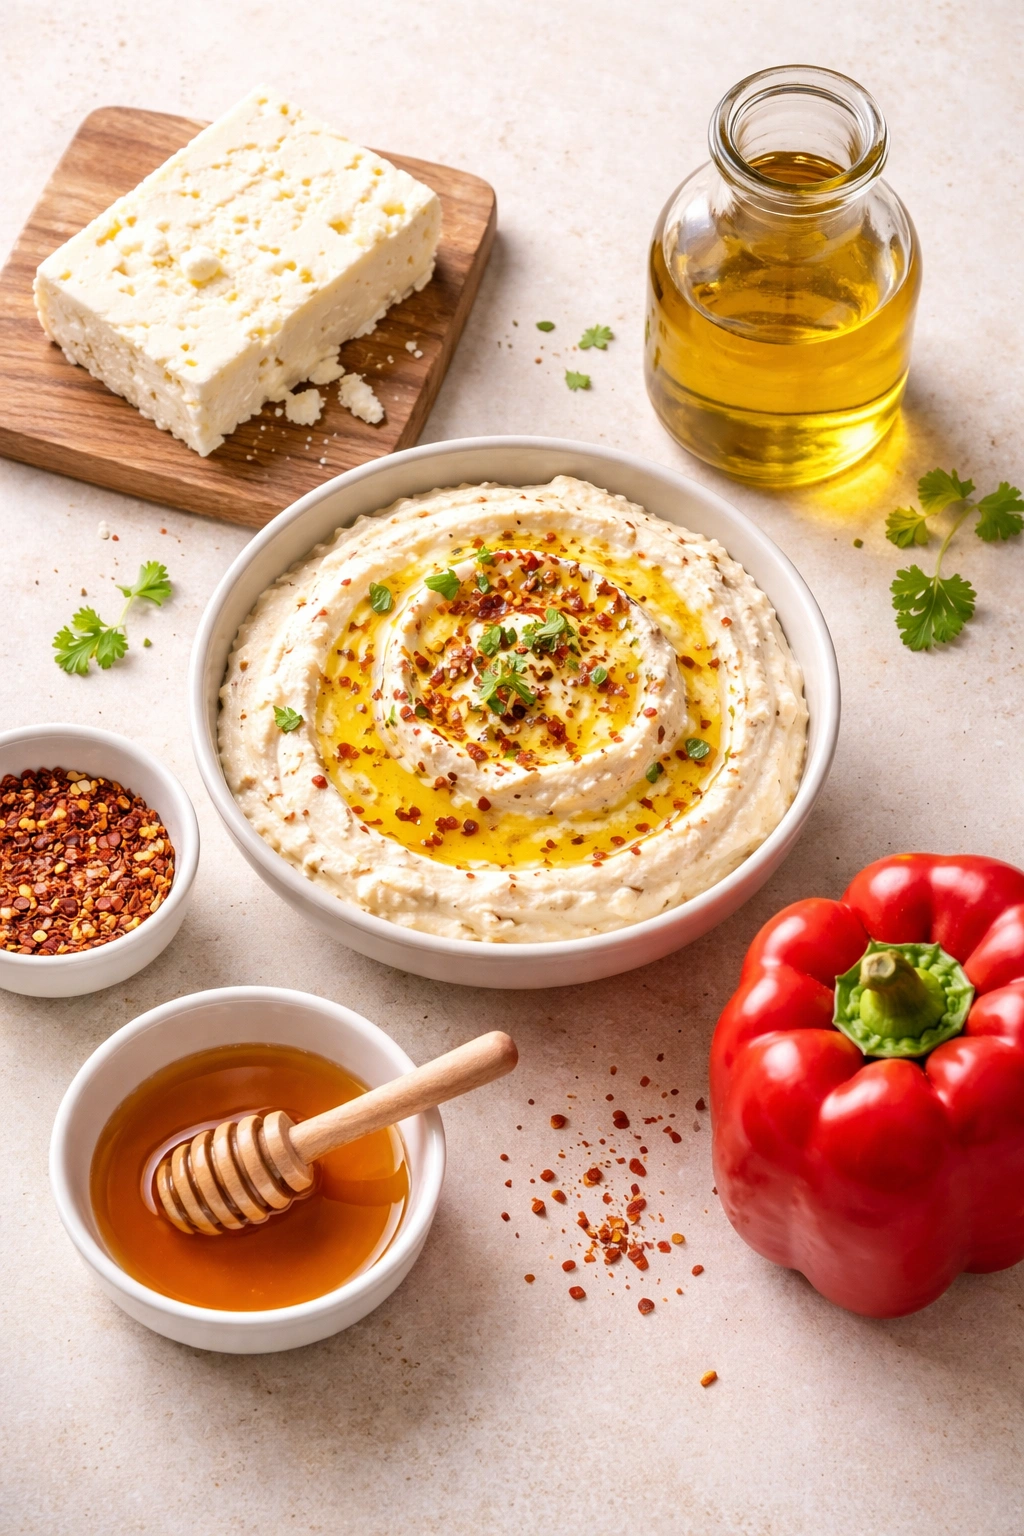
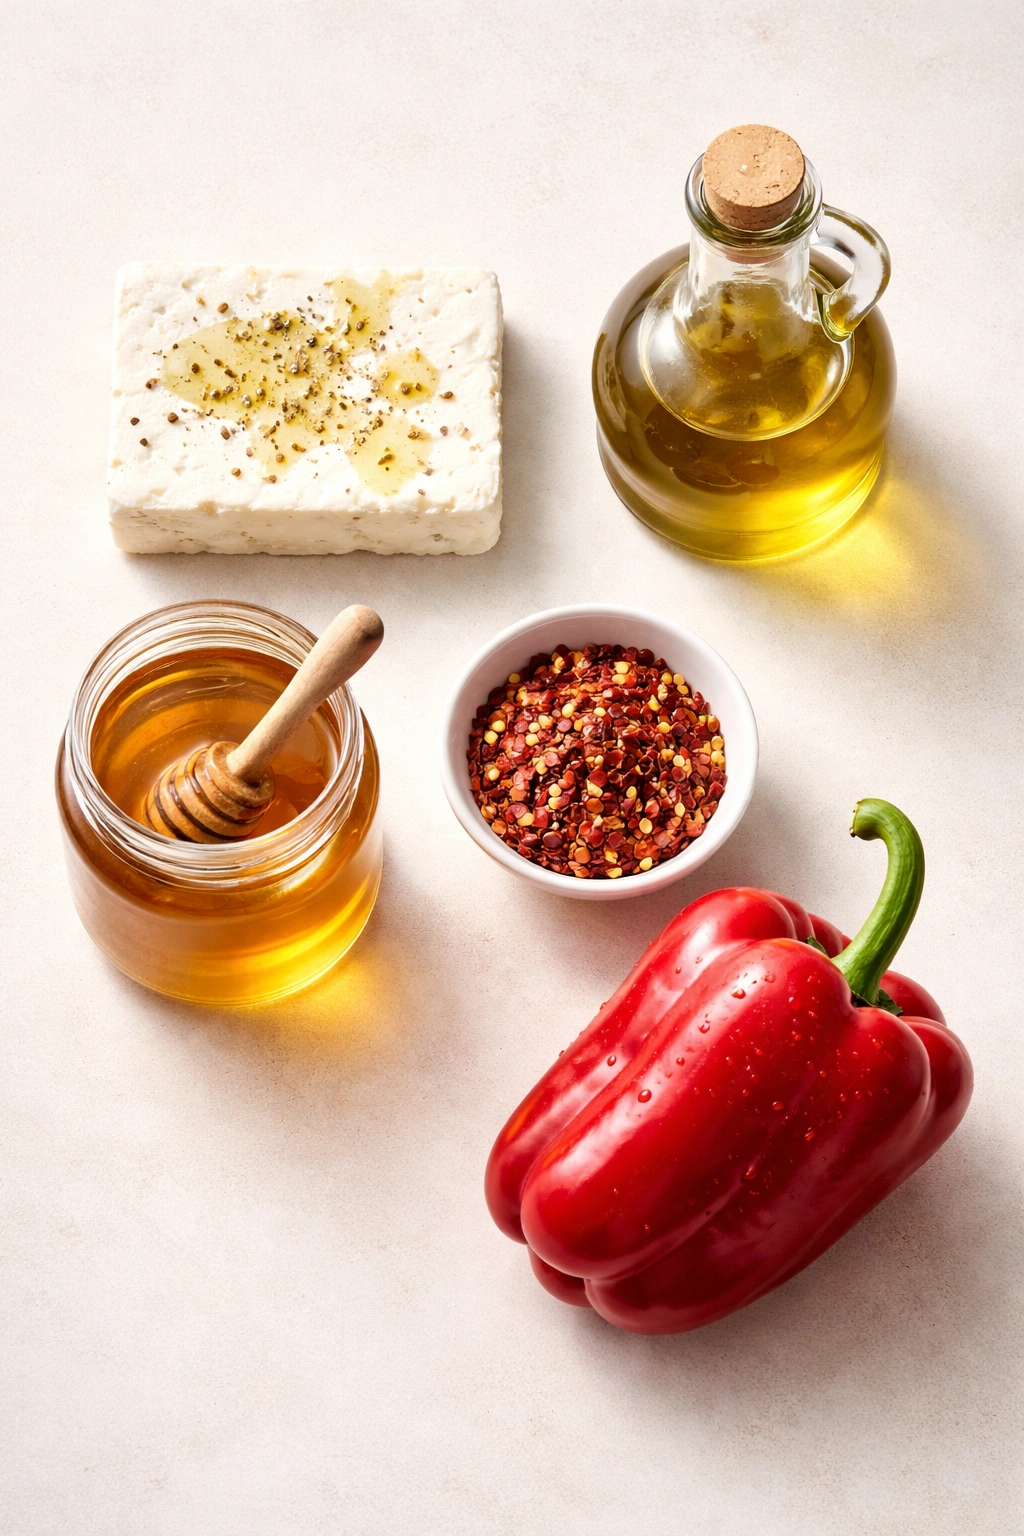
Feta Cheese (8 ounces): This is the foundation. Feta provides the creamy, tangy base and more than half the volume of the finished dip. Quality matters here because feta is front and center—there’s no place to hide inferior cheese. Buy it packed in brine, not crumbled.
Olive Oil (3 tablespoons): This carries flavor, adds richness, and most importantly, conducts heat evenly during baking. Use a good-quality olive oil—it’s a main ingredient here, not a background player. A robust, fruity oil adds depth; a mild oil lets the feta shine. Pick whichever aligns with your preference.
Honey (2 teaspoons): The slight sweetness provides contrast to the tanginess of the feta and creates a more rounded flavor profile. It also helps balance the saltiness. Use raw honey if you prefer, though any honey works. This is a small amount, so it flavors rather than sweetens.
Red Pepper Flakes or Fresh Red Pepper (¼ to ½ teaspoon): This is your warmth and visual element. Red pepper flakes provide heat and a subtle fruity note; fresh red pepper diced small provides similar heat with a slightly brighter flavor. Use red pepper flakes if you want consistency; use fresh pepper if you want to see the color in the finished dip. Adjust the amount based on your heat tolerance.
Fresh Herbs (1 to 2 tablespoons): This is where personalization comes in. Fresh oregano is the most traditional choice and provides an earthy, slightly floral note. Fresh thyme, fresh dill, or fresh mint all work beautifully too. Dried herbs are an acceptable substitute at about one-third the amount, though fresh is noticeably better.
Yield: Serves 4 to 6 | Makes about 1 cup of dip
Prep Time: 5 minutes Cook Time: 12-15 minutes Total Time: 20 minutes Difficulty: Beginner — absolutely no special equipment or techniques required; this is one of the easiest appetizers to pull off.
Complete Ingredient List
For the Dip:
- 8 ounces feta cheese (a block packed in brine, not crumbled)
- 3 tablespoons high-quality olive oil
- 2 teaspoons raw honey (or any honey you have)
- ¼ to ½ teaspoon red pepper flakes (adjust to your heat preference) or 1 tablespoon finely diced fresh red bell pepper
- 1 to 2 tablespoons fresh herbs (oregano, thyme, dill, or mint all work beautifully)
For Serving:
- Crusty bread, pita chips, crackers, or raw vegetables (cucumber slices, bell pepper strips, grape tomatoes)
Step-by-Step Instructions
Prepare the Feta:
- Preheat your oven to 375°F (190°C) and position the rack in the center.
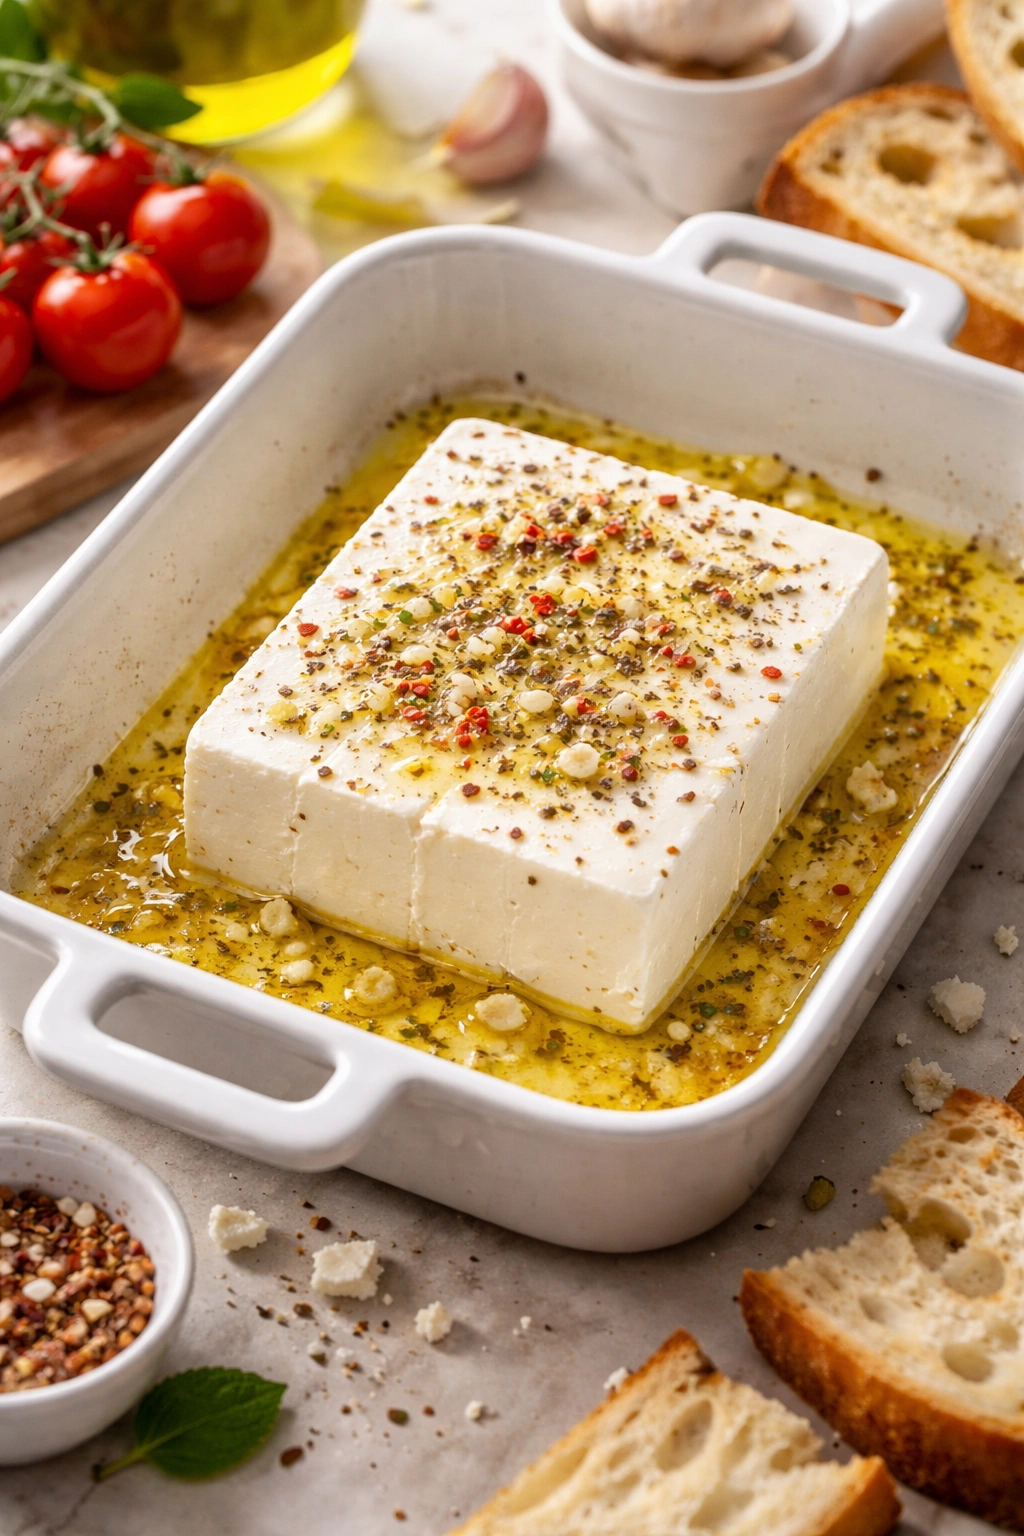
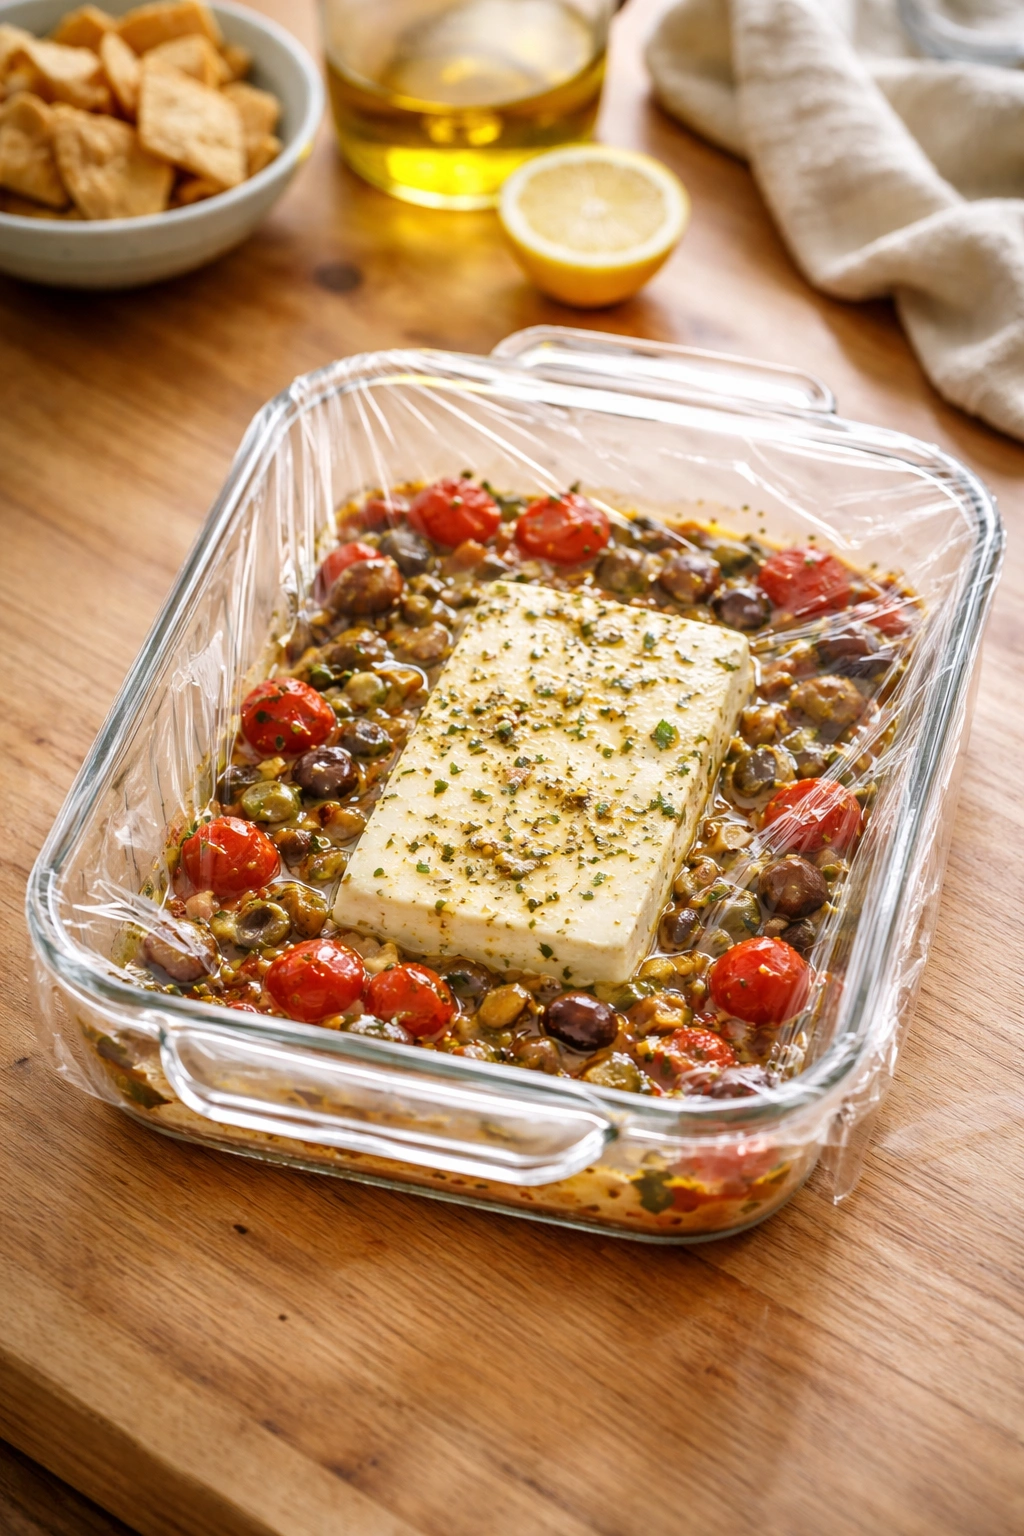
- If your feta came in a large block, cut it into a single slab about ¾-inch thick, or break it into 2-3 large chunks. The goal is to create one cohesive mass that will warm evenly, not individual crumbles scattered across the dish. Pat the feta dry with paper towels if there’s excess brine clinging to it.
- Place the feta in a small ovenproof skillet (an 8-inch cast iron works beautifully) or a shallow 6×8-inch baking dish. If you don’t have a small vessel, use whatever ovenproof dish you have—it just won’t concentrate the heat quite as efficiently.
Add the Oil and Aromatics: 4. Drizzle the olive oil evenly over and around the feta, making sure every surface is coated or surrounded by oil. This is important—the oil conducts heat and prevents the feta from drying out. 5. Scatter the red pepper flakes or fresh diced red pepper over the top of the feta. If using fresh pepper, toss it lightly in the oil so it doesn’t scorch directly under the heat. 6. Sprinkle the fresh herbs directly over the top and sides of the feta. Gently press some of the herbs into any crevices so they stay in contact with the cheese as it bakes rather than sliding off. 7. Drizzle the honey over the top in a thin stream, letting it settle into the natural texture of the feta and pool slightly with the oil. Don’t stir—you want the ingredients to stay layered on the surface so they brown slightly and caramelize as the feta bakes.
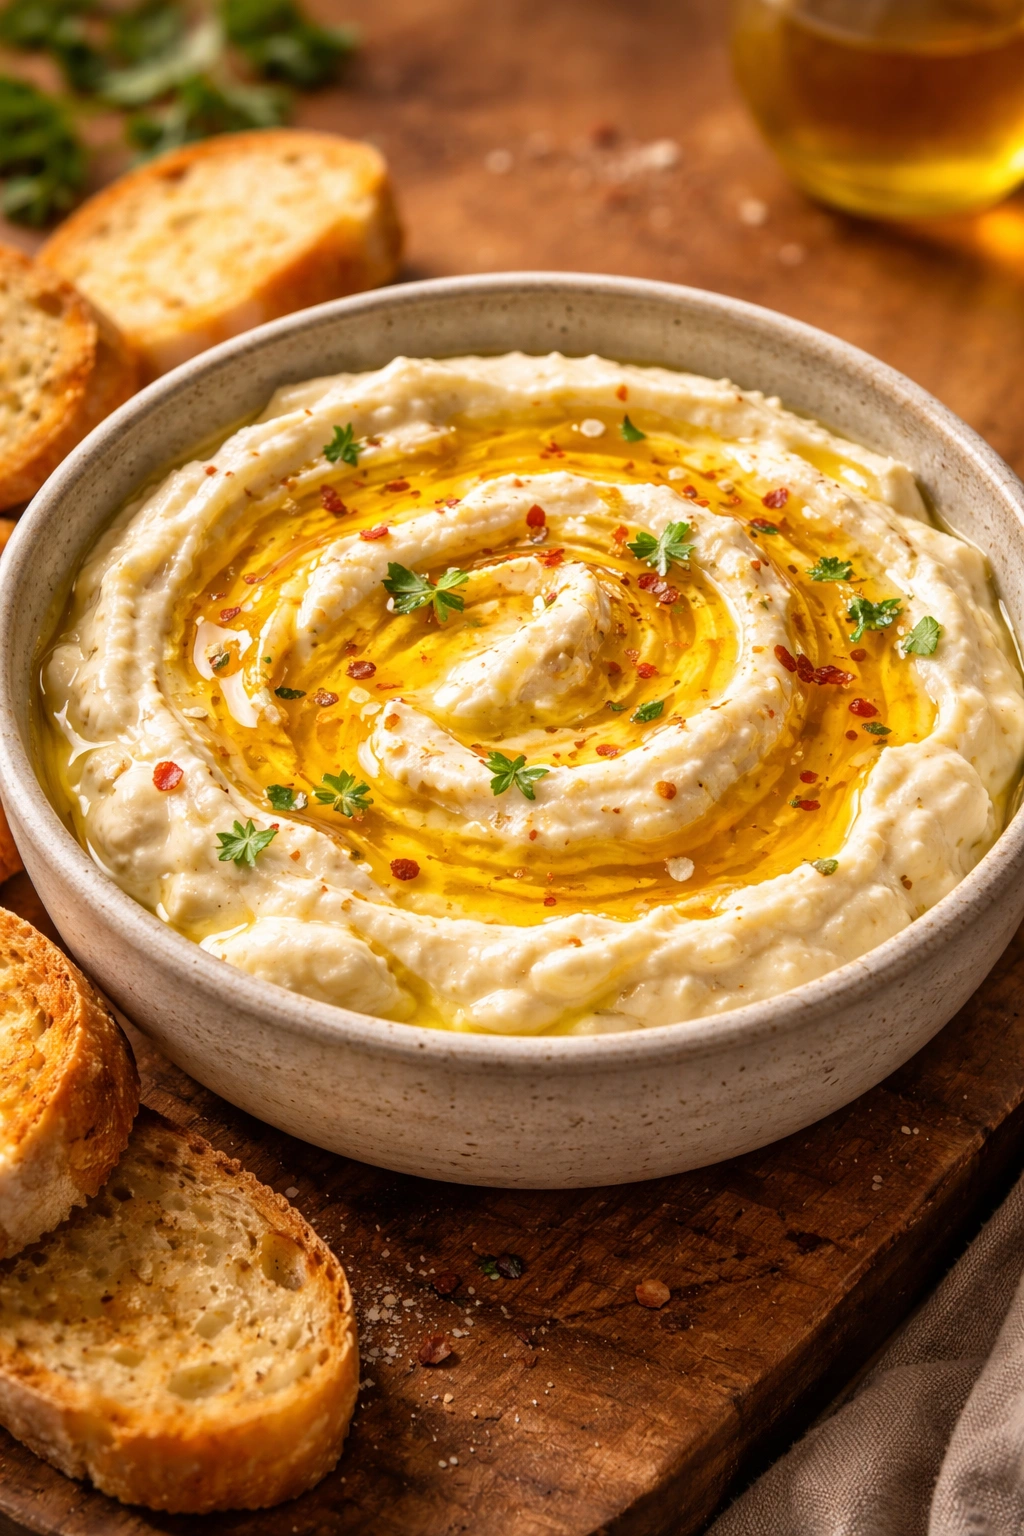
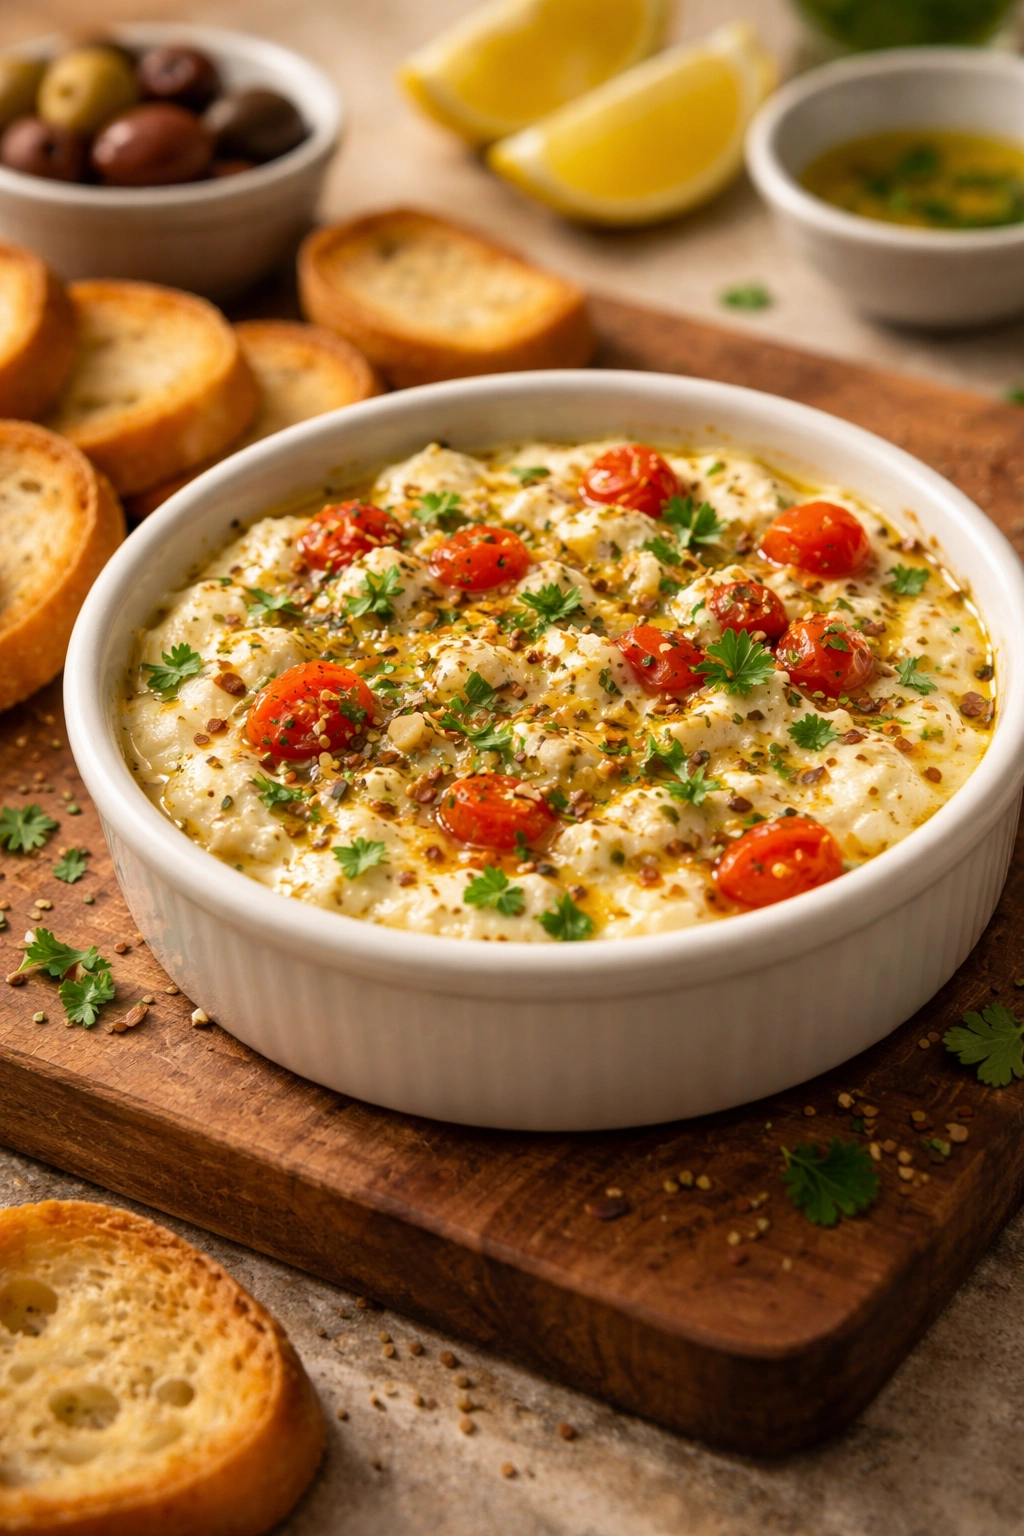
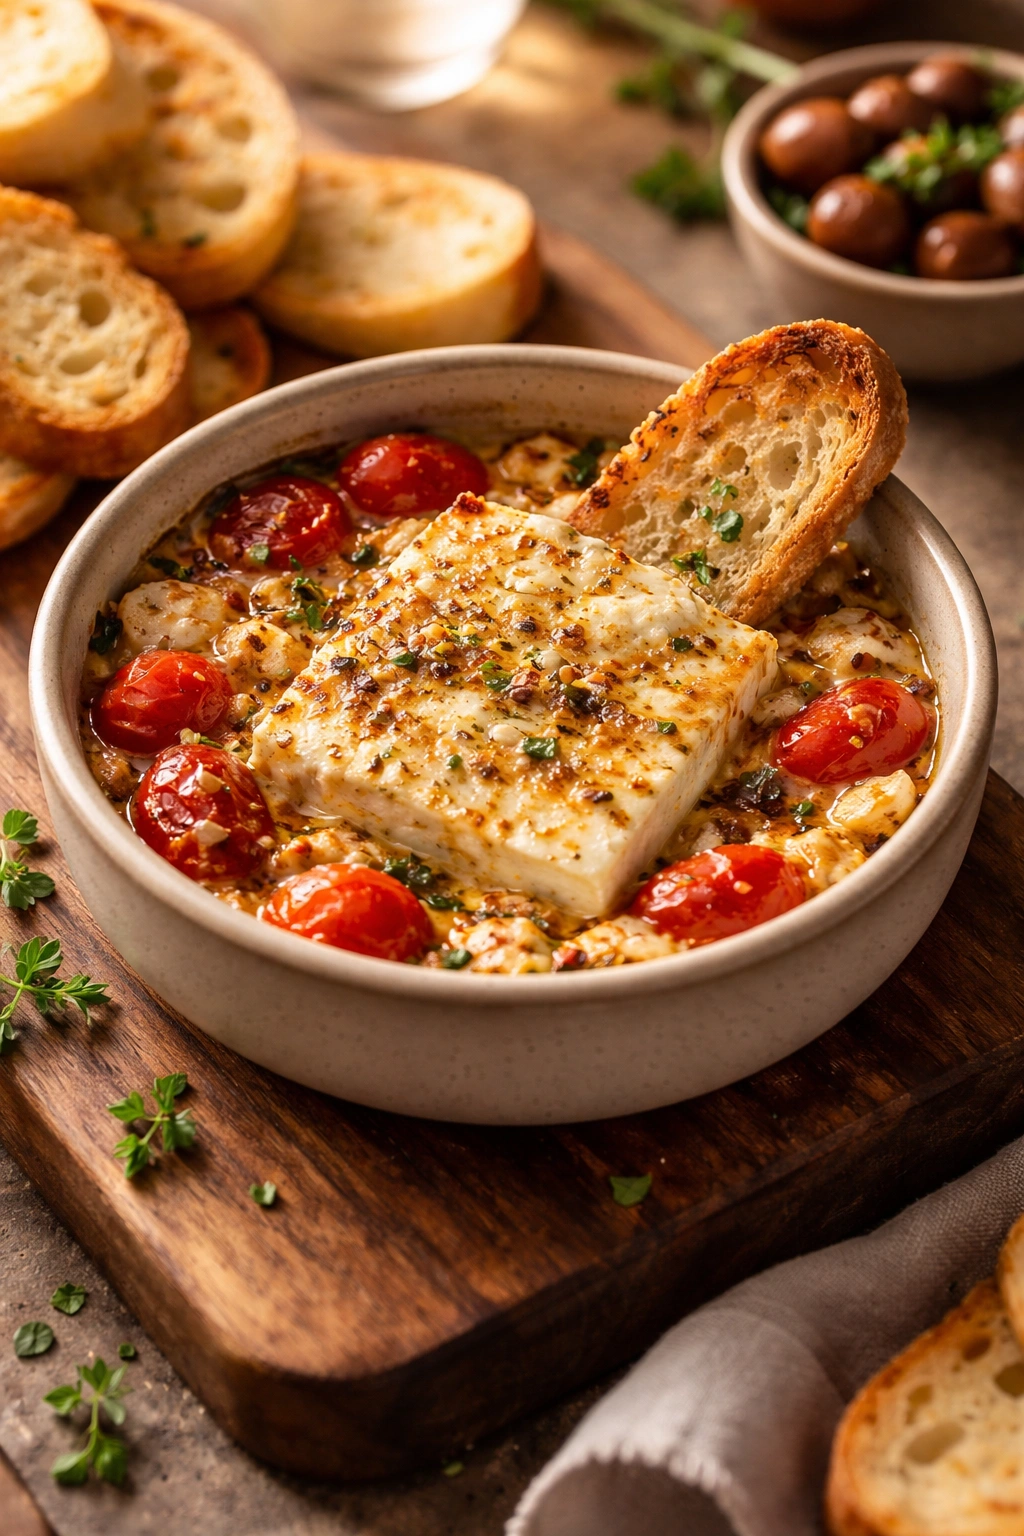
Bake: 8. Transfer the skillet or baking dish to the preheated oven. Set a timer for 12 minutes and plan to check at that point. Every oven runs slightly differently, so 12-15 minutes is your target window, but you’ll need to look. 9. The feta is perfectly baked when it’s noticeably soft throughout (press it gently with the back of a spoon and it should yield easily), the edges are starting to turn a light golden brown, and the oil is shimmering. The honey will have melted into the oil, and the herbs will have released their aroma. Pull it out of the oven at this moment.
Cool Slightly and Serve: 10. Let the dip cool for 2-3 minutes out of the oven—it will be quite hot. This brief rest time also allows the feta to set up just slightly, so it holds its shape better when you dip bread into it (otherwise it’s so soft it might crumble). 11. Serve in the same vessel you baked it in, or transfer to a serving bowl if you prefer. The residual heat will keep it warm during serving for about 20-30 minutes. Serve with bread, crackers, vegetables, or pita chips for dipping.
Expert Tips to Get It Right Every Time

The Baking Vessel Matters More Than You Think: A small skillet or shallow baking dish concentrates the heat and ensures even baking. If you use a large sheet pan, the feta will bake unevenly with burnt edges and a cold center. Cast iron is especially good because it heats evenly and holds heat long after coming out of the oven.
Don’t Open the Oven Door to Peek: Resist the urge to check before 12 minutes. Opening the door drops the temperature and disrupts the heat distribution. Set a timer and trust the process. You can look quickly at the 12-minute mark to see where things stand.
Quality Oil Makes a Real Difference: Since oil is one of only five ingredients, use something you’d actually enjoy tasting. A peppery Greek olive oil creates a different vibe than a smooth Italian oil, but both work. Taste your oil before adding it if you’re unsure—if you wouldn’t spread it on bread, it might not be the right choice here.
Temperature Is More Important Than Time: Ovens vary, so the actual baking time might be 11 minutes or 16 minutes depending on your equipment. The visual cues matter more than the clock: feta should be soft, edges starting to brown, oil shimmering. Start checking at 12 minutes and pull it out when you see those signs.
Fresh Herbs Make a Noticeable Difference: If you use dried herbs, they won’t distribute as visually and won’t provide quite the same fresh brightness. But honestly, dried herbs still work fine if fresh isn’t available. Use one-third the amount of dried herbs compared to fresh (so about ½ to ¾ teaspoon dried instead of 1-2 tablespoons fresh).
Make It Ahead, Then Bake Just Before Serving: You can assemble the entire dip up to the point of baking several hours ahead. Cover and refrigerate. When guests are about to arrive, bake it fresh. This is actually better than trying to keep it warm for extended periods.
The Honey Acts as a Flavor Balancer: That small amount of honey isn’t there to make the dip sweet—it’s there to balance the saltiness and tanginess of the feta. If you skip it, the dip tastes sharper and one-dimensional. Don’t shortcut this ingredient.
Common Mistakes to Avoid
Crumbling the Feta Too Much: If you break the feta into tiny pieces, they won’t warm evenly and the texture becomes gritty rather than creamy. Keep the feta in larger chunks or a slab so it maintains a cohesive, creamy texture.
Using Feta That’s Too Dry: Crumbled feta from a package or feta that’s been sitting open in your fridge tends to be drier. Buy a block packed in brine and use it soon after opening. The moisture content changes how it bakes.
Skipping the Oil or Using Too Little: The olive oil is essential—it conducts heat, prevents drying, and creates that luxurious mouthfeel. If you don’t coat the feta thoroughly, the edges can brown too much while the center stays cool.
Baking Too Long: There’s a brief window where baked feta is perfect—creamy, soft, lightly browned. Five minutes too long and it starts to separate and becomes waxy. Watch for those visual cues (soft feta, golden edges, shimmering oil) rather than trusting time alone.
Forgetting to Taste the Honey on Its Own: If you’ve never tasted the honey you’re using, try a tiny bit first. Some honey has flavors (like buckwheat or chestnut) that might not pair well with feta. Mild, floral honey works best.
Using Dried Herbs Without Adjusting the Amount: Dried herbs are more concentrated than fresh, so using the same volume makes the dip taste aggressively herbal. Use about one-third the amount if substituting dried for fresh.
Flavor Variations and Adaptations
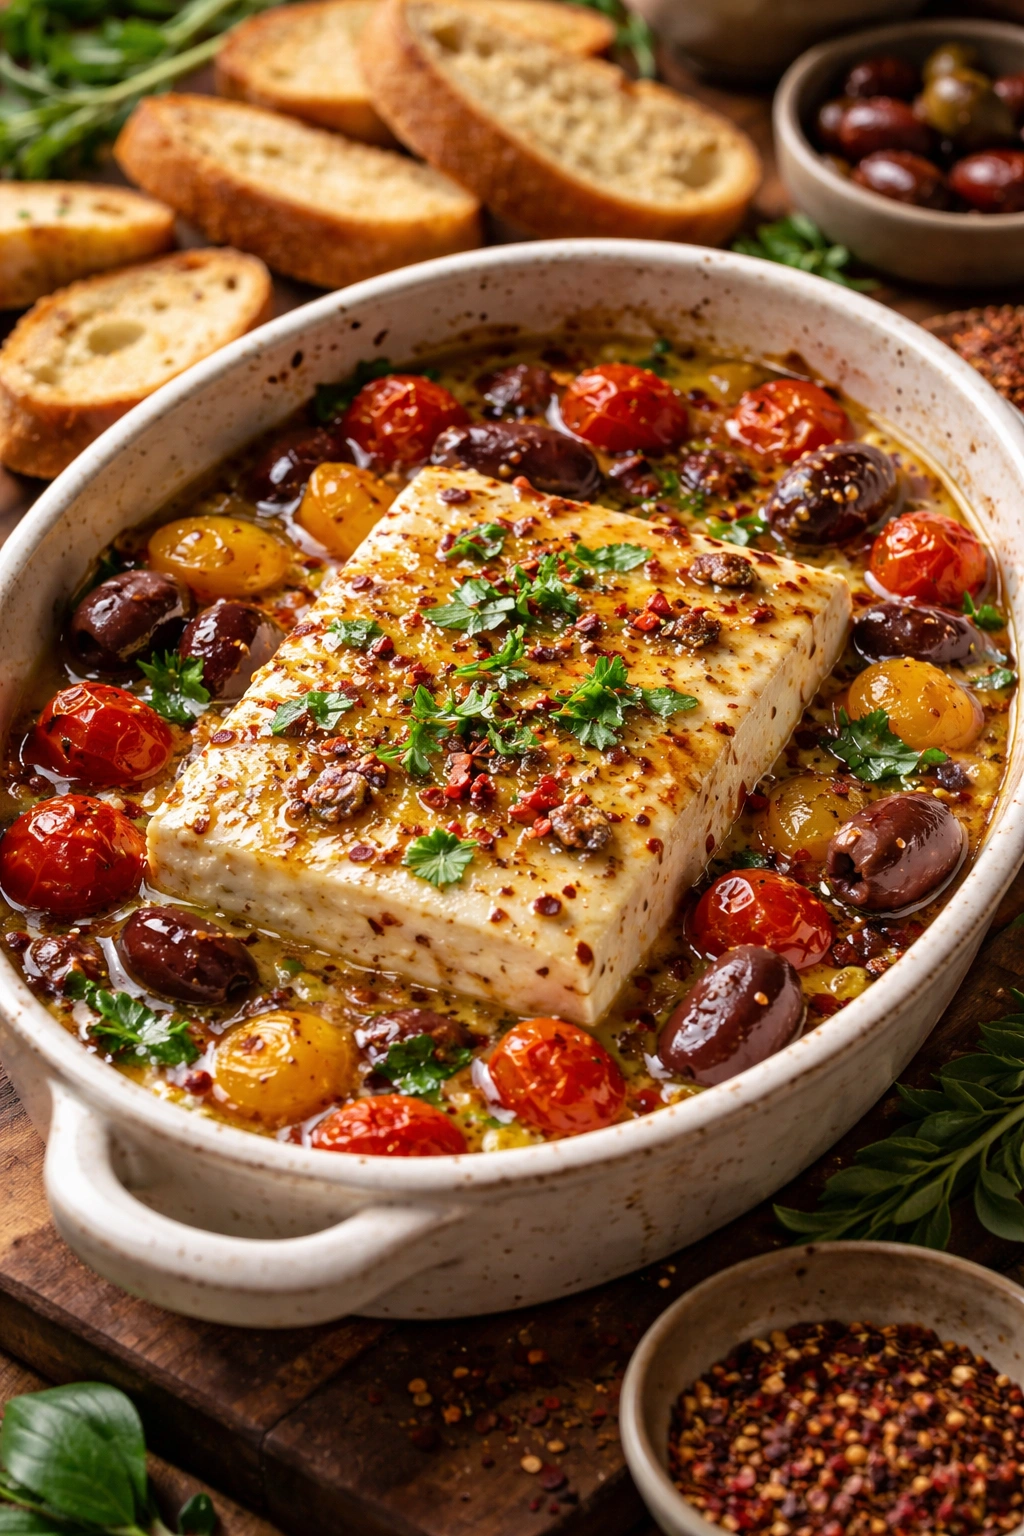
Mediterranean Version: Add a tablespoon of kalamata olives (pitted and roughly chopped), a teaspoon of capers, and fresh dill instead of oregano. This version pairs beautifully with pita chips.
Spicy Honey Version: Infuse your drizzle of honey with a tiny pinch of cayenne or a touch of harissa paste mixed in. This adds complexity and warmth without overwhelming heat.
Herb Garden Version: Use a combination of fresh herbs—oregano, thyme, and mint all together—instead of just one. This creates a brighter, more complex herbal note.
Everything Bagel Version: Top the feta with a pinch of everything bagel seasoning (a blend of sesame seeds, poppy seeds, dried garlic, and dried onion) for texture and savory depth. This is unexpectedly delicious.
Roasted Garlic Version: Add a small clove or two of roasted garlic (or a teaspoon of roasted garlic paste) mixed into the oil. This adds richness without the harsh bite of raw garlic.
Preserved Lemon Version: Add a tiny amount of finely minced preserved lemon with the herbs. Just a teaspoon adds brightness and a sophisticated edge.
Za’atar Version: Instead of red pepper flakes, use za’atar (a Middle Eastern spice blend of dried herbs and sumac) for a nutty, tangy flavor shift.
Simple Vegetable Variation: If your guests don’t eat honey, you can omit it and add an extra tablespoon of olive oil and a squeeze of fresh lemon juice instead. The brightness of lemon provides similar balance.
How to Serve This Dip
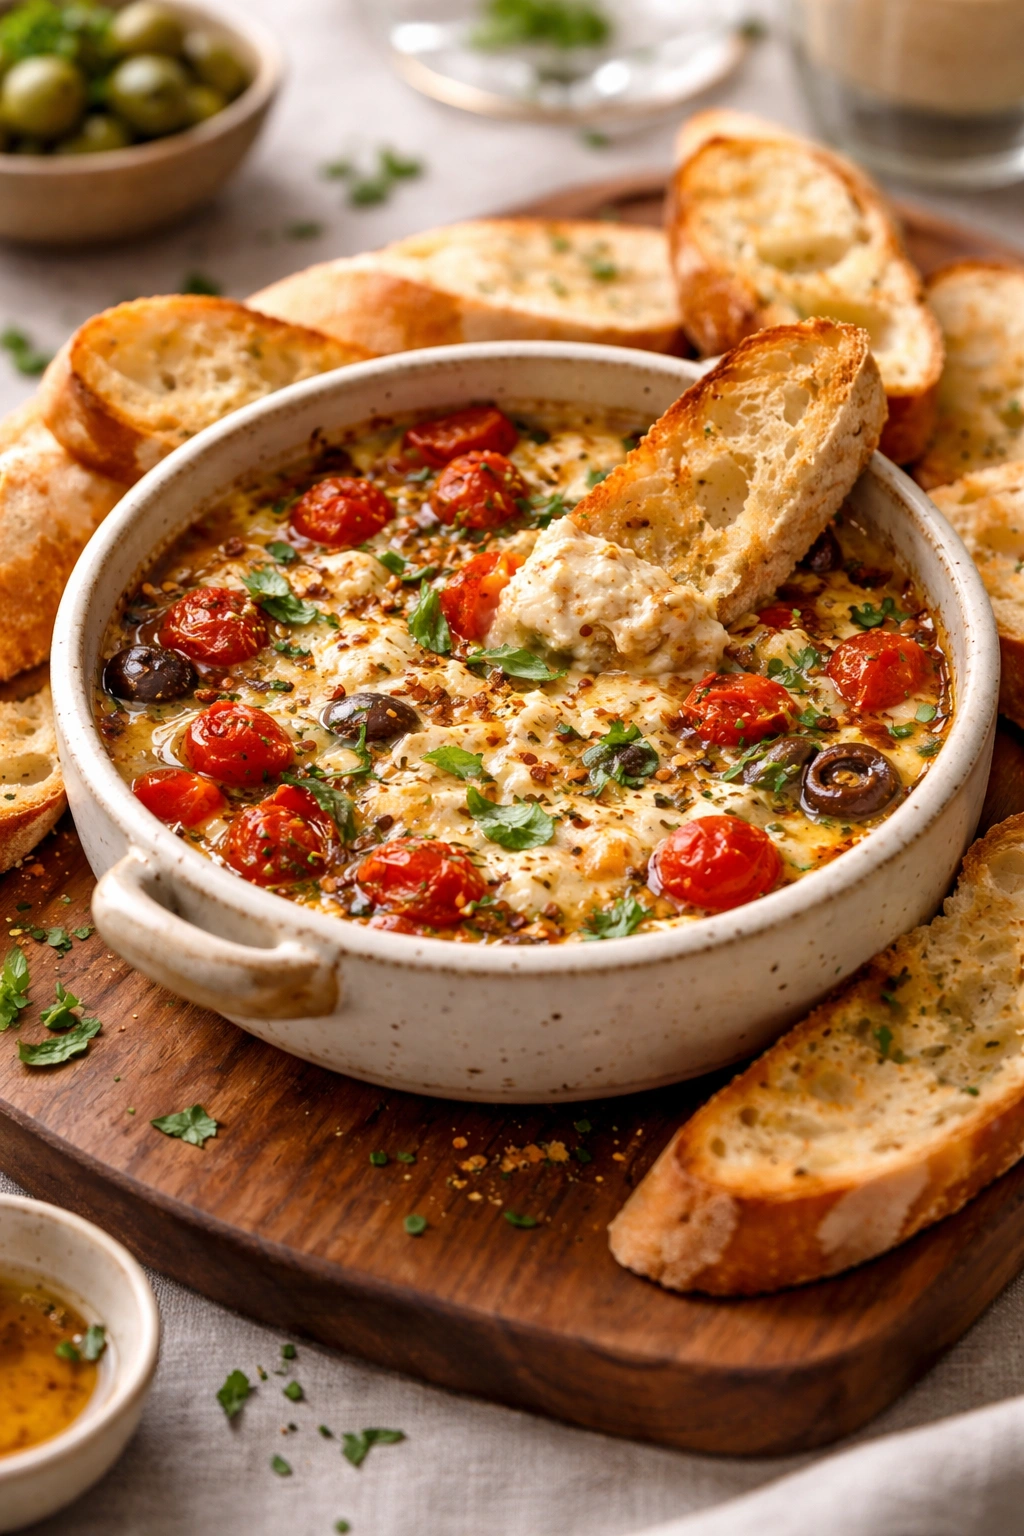
This dip works beautifully alongside Mediterranean ingredients. Serve it with crusty bread broken into dipping pieces—sourdough, ciabatta, or pita bread all work. The warm, creamy dip coating crispy or chewy bread is the dream pairing.
Vegetable options that pair well include sliced bell peppers (red, yellow, or orange), cucumber rounds, cherry tomatoes halved, celery sticks, and carrot sticks. The cool, crisp vegetables contrast nicely with the warm, soft dip. Radish slices add a peppery crunch too.
Crackers offer another option—particularly sturdier crackers that won’t disintegrate when loaded with warm dip. Thin, crispy crackers work better than soft ones.
For a more composed appetizer spread, surround the warm dip with cheese, cured meats, olives, and vegetables. The dip becomes the warm, creamy centerpiece that draws people in.
If you’re serving this as part of a formal appetizer hour, transfer it to a small serving bowl for a cleaner presentation, or let it stay in the skillet if you like the rustic aesthetic. Either works.
Serving Temperature: The dip is most luxurious when served warm, right out of the oven. It can stay appetizingly warm for about 20-30 minutes after baking. If it cools beyond that, you can reheat it gently: place the covered dip in a 350°F oven for 3-5 minutes until just warmed through again. Don’t blast it with high heat or the feta can separate.
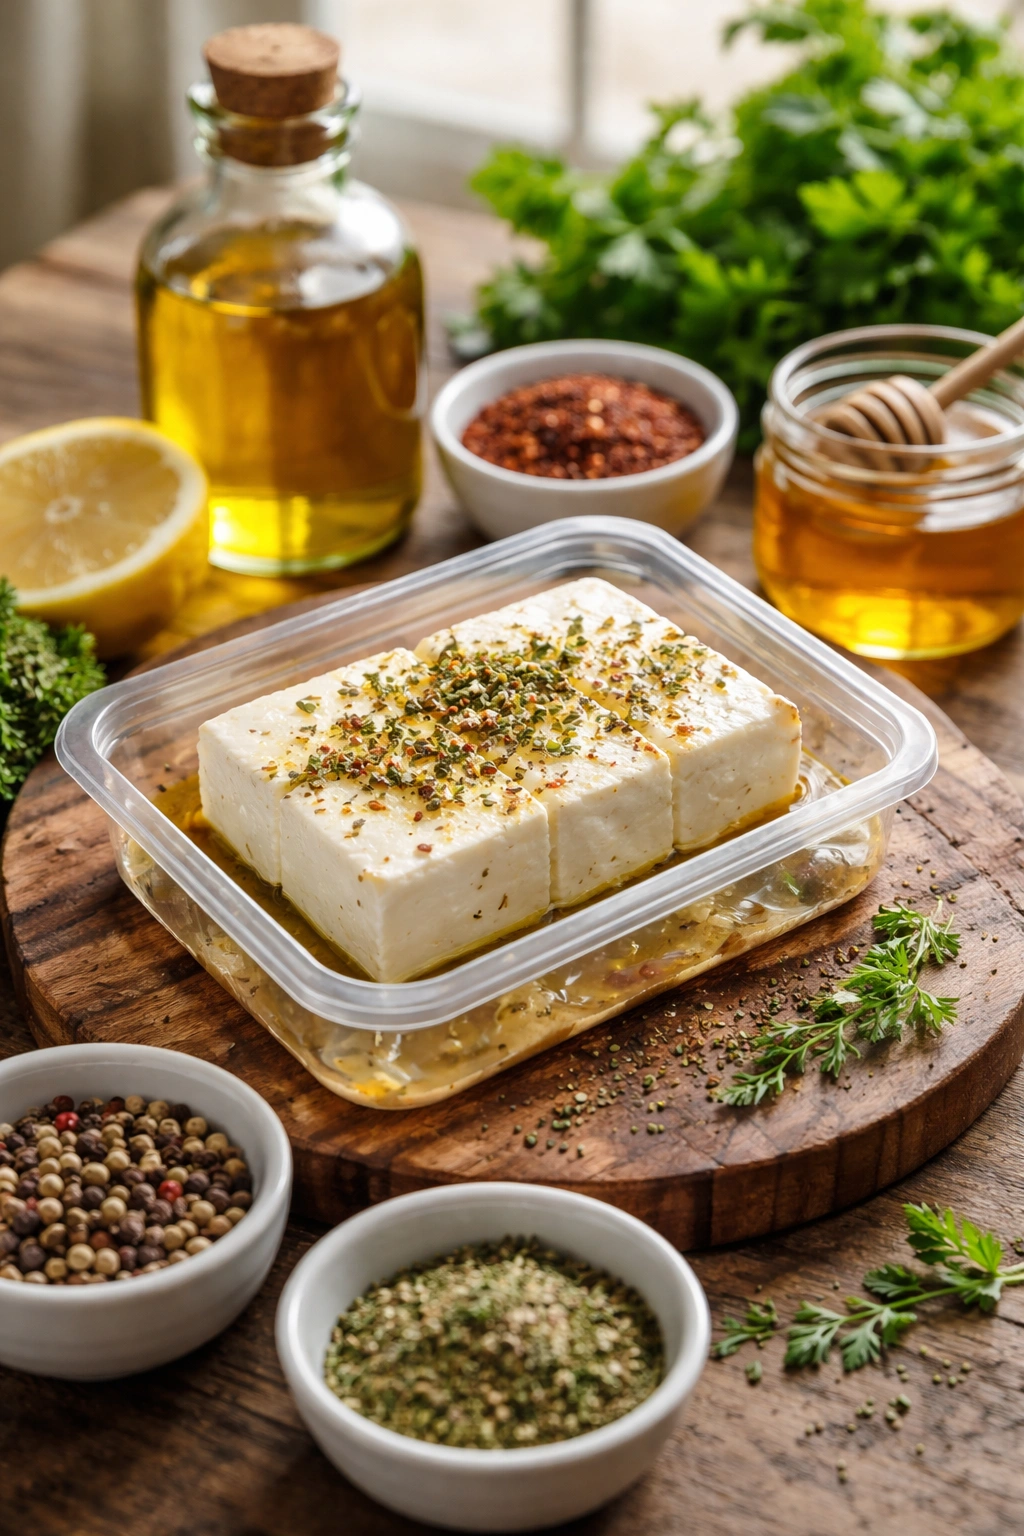
Make-Ahead and Storage Guide
Before Baking: Assemble the entire dip in your baking vessel up to 8 hours ahead. Cover it loosely with plastic wrap or foil and refrigerate. When you’re ready to serve, let it come to room temperature for 5 minutes, then bake as directed. It might take an extra 2-3 minutes to bake from cold, but the timing is otherwise the same.
Leftover Storage: If you have leftover baked feta dip (and honestly, this usually gets finished), store it in an airtight container in the refrigerator for up to 3 days. The texture will firm up as it cools, becoming more spreadable and less creamy. This is still delicious—serve it at room temperature or gently warmed.
Reheating: Reheat leftovers gently in a 350°F oven, covered, for 3-5 minutes until warmed through. Alternatively, you can microwave it in short 20-second bursts, stirring between each, until it reaches the warmth you want. Microwaving is less ideal because the texture can become slightly separated, but it works in a pinch.
Freezing: This dip doesn’t freeze beautifully because the texture of feta changes when frozen and thawed. I wouldn’t recommend freezing the finished product. However, you can assemble the raw dip, freeze it in the baking vessel, then bake directly from frozen—add about 5 extra minutes to the baking time.
Best Uses for Leftovers: Leftover baked feta makes a wonderful spread for sandwiches. Dollop it onto toast with tomato slices. Spoon it over salads. Stir it into hot pasta (it melts into a creamy sauce). Use it as a topping for roasted vegetables. The flavor is good for days—it just loses some of the warm, creamy appeal.
Final Thoughts
Baked feta dip is proof that cooking doesn’t require elaborate techniques or an extensive ingredient list to impress. What it requires is good ingredients chosen for quality, a simple method executed with attention, and confidence that sometimes less is genuinely more.
Make this dip when you want something that tastes sophisticated without the work. Make it for gatherings where you want to contribute something warm and special. Make it when you want to remind yourself that the best dishes are often the simplest ones.
Once you’ve made it once, you’ll have the blueprint locked in your memory. Five ingredients, one baking dish, 15 minutes of your time. That’s all it takes to create something people remember and ask about. Start with this classic version, then play with variations once you understand how the core recipe works. This is the kind of recipe that deserves a permanent home in your entertaining rotation.