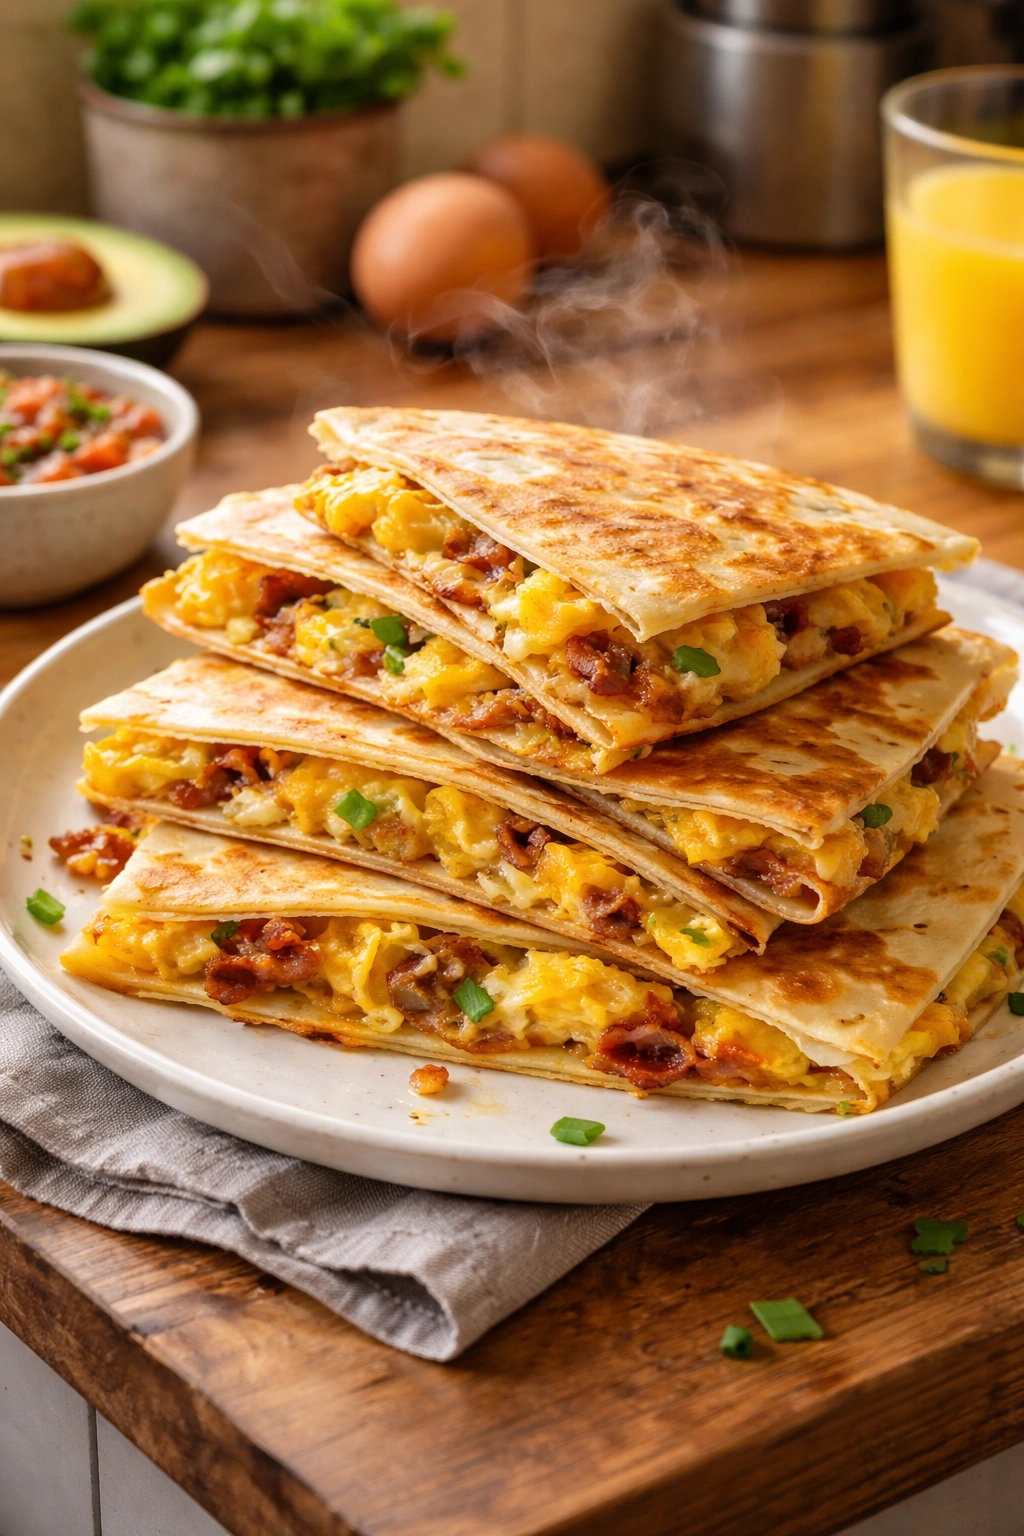
When you’re juggling morning obligations and hungry family members, breakfast quesadillas become your secret weapon. They’re flexible enough to work with whatever’s in your fridge, impressive enough to feel special, and genuinely fast once you understand the technique. A perfectly crispy quesadilla stuffed with melted cheese, scrambled eggs, and your favorite fillings comes together in under ten minutes of active cooking time, making them one of the most practical solutions to the weekday breakfast puzzle.
The beauty of breakfast quesadillas lies in their forgiving nature. Unlike French toast or pancakes, which demand precise timing and constant attention, quesadillas reward you for keeping things simple. You’re not building layers or managing multiple pans—you’re assembling, cooking, and serving. Even better, the technique scales effortlessly. Cooking for one? Make a single quesadilla while your coffee brews. Feeding a household? You can have four quesadillas coming off the griddle while people are still settling at the table. There’s an honest efficiency here that transforms a simple breakfast into something that feels both home-cooked and stress-free.
Why Breakfast Quesadillas Beat the Morning Rush
Most breakfast foods force you to choose between speed and satisfaction. Scrambled eggs cook fast but feel incomplete without toast, fruit, and something more substantial. Pancakes deliver satisfaction but require thirty minutes of prep and active cooking. Breakfast burritos provide complete nutrition but demand careful assembly and wrapping technique. Quesadillas occupy a perfect middle ground—they combine protein, carbs, vegetables, and dairy in a single, crispy vessel that takes less time than brewing a pot of coffee.
The quesadilla also adapts instantly to what you’re craving. Some mornings you want savory breakfast meat, hash browns, and jalapeños. Other mornings call for something vegetarian built on roasted peppers, spinach, and caramelized onions. You can swing toward savory-spicy with chorizo and hot sauce, or lean into comfort-food territory with bacon and avocado. The same basic cooking method works for all of it—the variables are just what’s inside the tortilla.
Another underrated advantage: quesadillas look and taste substantial enough that no one will complain about breakfast being “quick.” There’s something inherently satisfying about a golden, crispy quesadilla with cheese literally oozing from the edges. It doesn’t feel like a rushed meal, even though you’ve genuinely only spent eight minutes cooking it. That combination of speed and perceived care is something most breakfast options can’t deliver.
The Right Tortillas Make an Enormous Difference
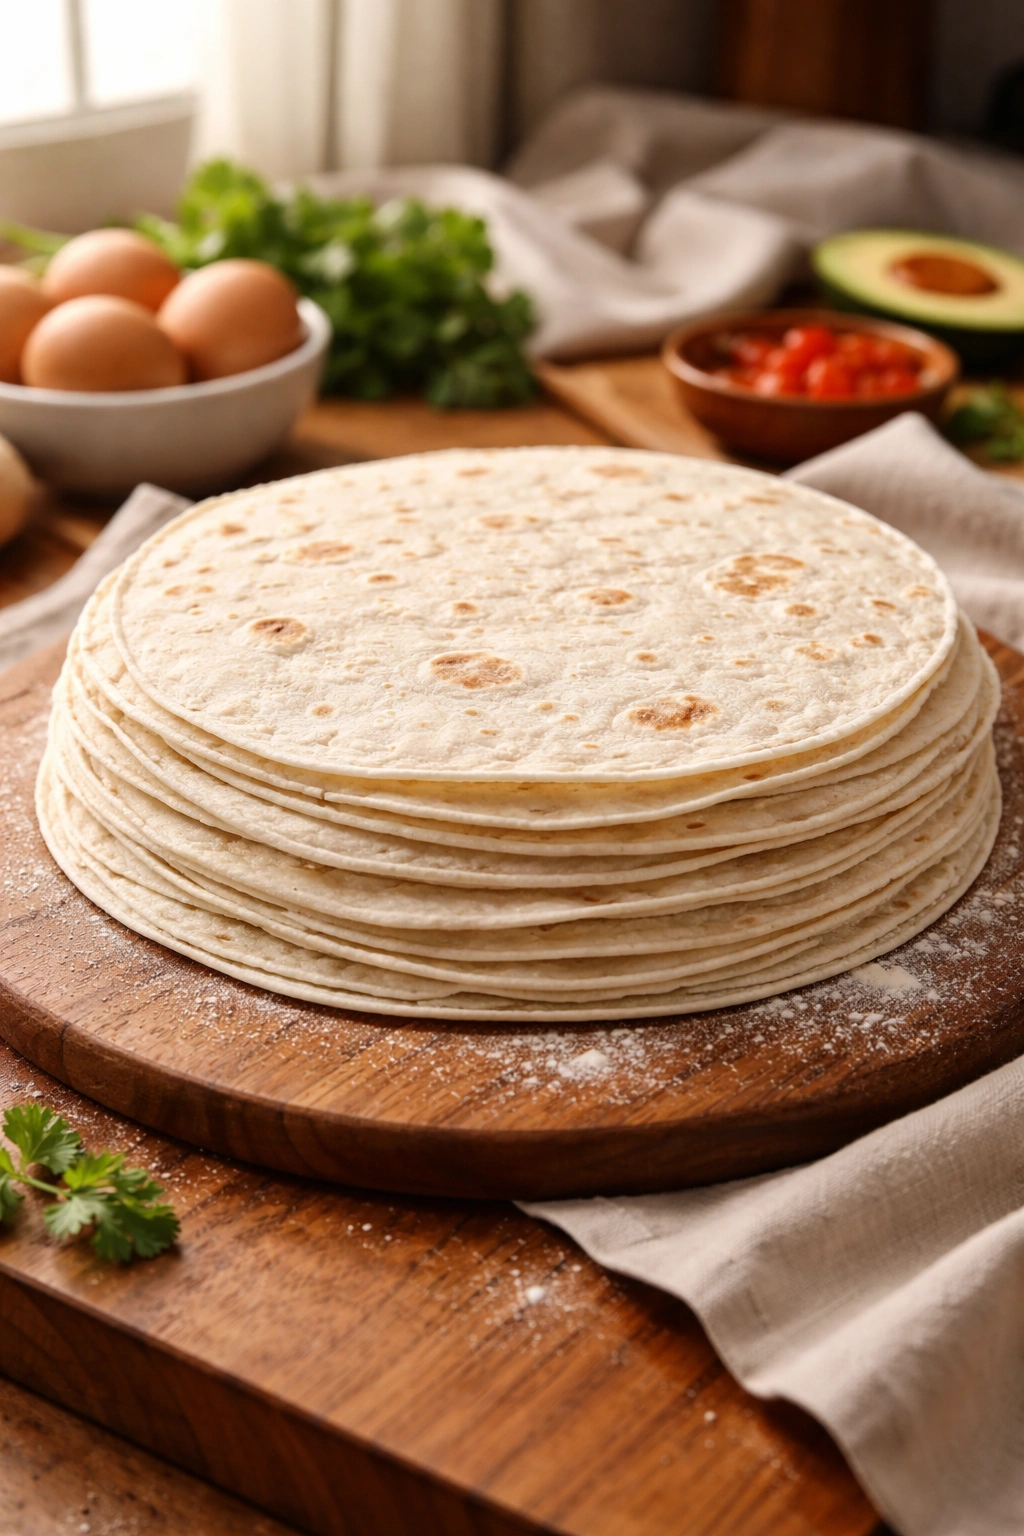
Your choice of tortilla shapes the entire experience, and this is worth getting right. Flour tortillas in the eight-inch range are the standard for a reason—they’re large enough to hold meaningful fillings without becoming floppy, but small enough that they cook through before the exterior burns. Corn tortillas work if you prefer their flavor, but they’re slightly more fragile and require a gentler touch. Whatever you choose, buy the softest, freshest tortillas you can find; stale or dried-out tortillas will split under the heat or refuse to crisp properly.
Look for tortillas with minimal ingredients—just flour (or corn meal), water, salt, and fat. Some brands add preservatives that change the texture or flavor profile, and honestly, the difference between a fresh tortilla from a good bakery and a supermarket package can be notable. If you have a local Mexican market nearby, their fresh flour tortillas are usually dramatically better than anything in the standard grocery store, and often cheaper too.
One practical hack: if your tortillas are drying out or becoming slightly brittle, wrap them in a damp kitchen towel for ten minutes before you cook with them. They’ll become pliable again, and you’ll get that gorgeous, flexible quesadilla rather than a cracked, torn one.
Choosing Your Cheese and Why It Matters
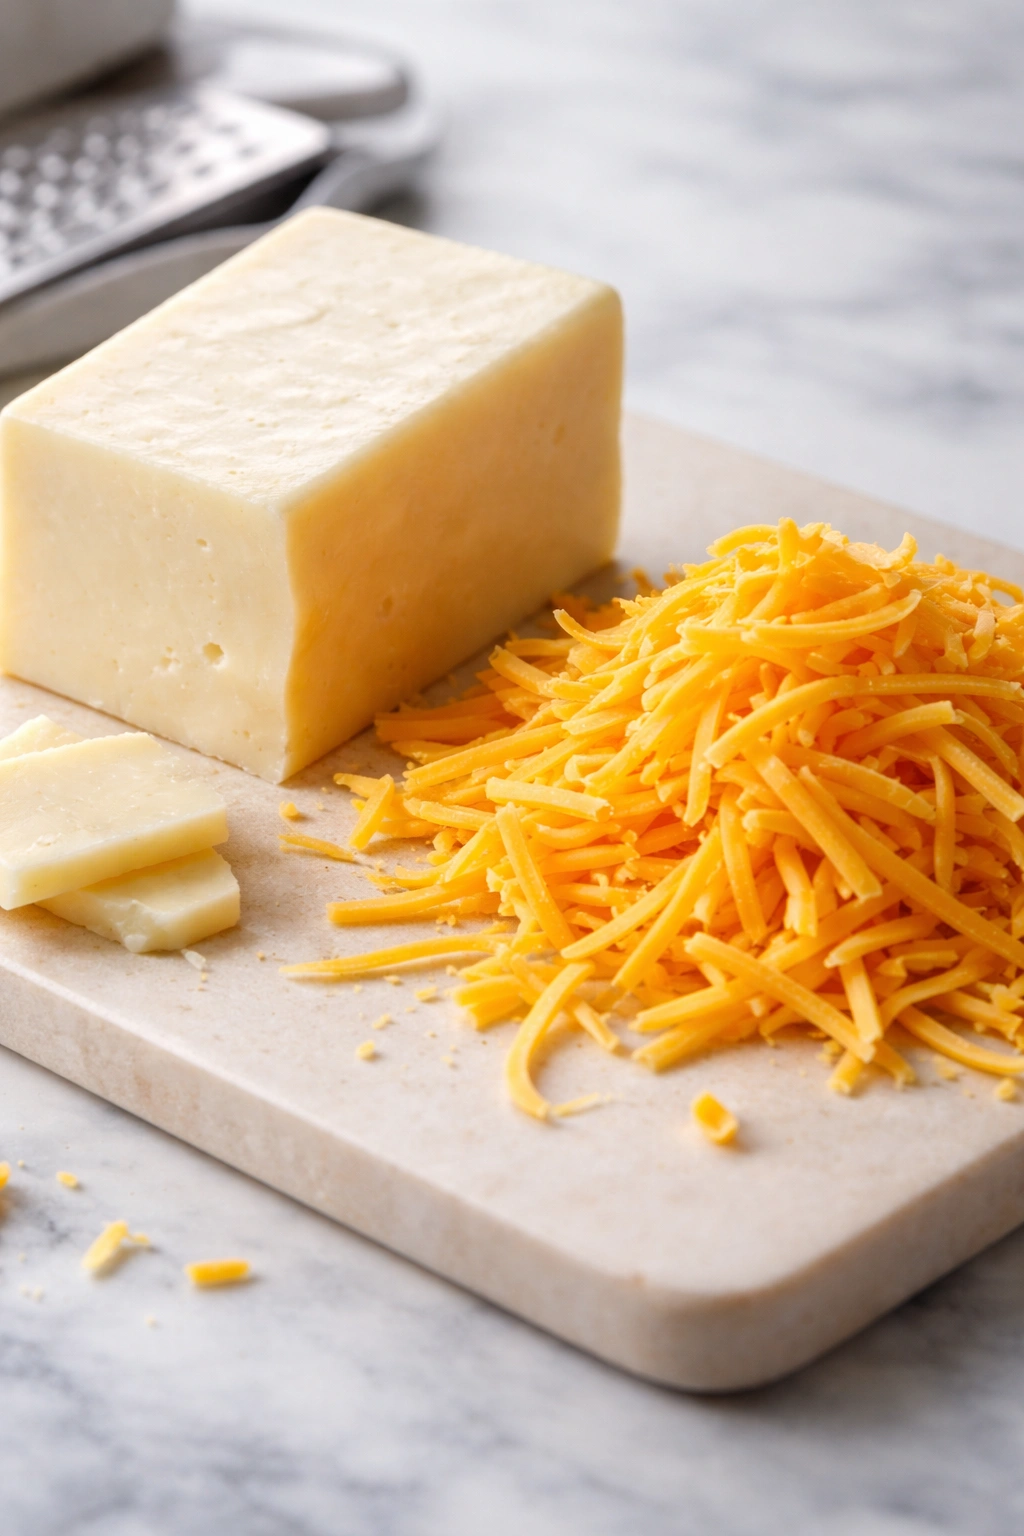
Not all cheeses melt the same way, and choosing the wrong one will give you a quesadilla with separated, greasy filling instead of a smooth, creamy interior. Monterey Jack melts cleanly and has a mild flavor that doesn’t overpower other ingredients—it’s the workhorse cheese for quesadillas. Oaxaca is the traditional Mexican choice and melts into an almost luxurious, stretchy texture that feels restaurant-quality. Sharp cheddar works and adds more flavor, but use it as half your cheese blend rather than the entire filling, or it’ll become oily.
Skip pre-shredded cheeses coated in cellulose (that anti-caking powder). It prevents the cheese from melting smoothly. Shred a block of cheese yourself—it takes two minutes and transforms the final result. A one-to-one mix of Monterey Jack and sharp cheddar gives you flavor complexity plus clean meltability.
Plan on roughly three-quarters to one cup of shredded cheese per quesadilla. That sounds like a lot, but you need enough so that when it melts, you get that satisfying, cheesy pull when you tear into it. Skimp on cheese and the quesadilla feels dry and empty, no matter what else is inside.
The Best Fillings Beyond Eggs and Cheese
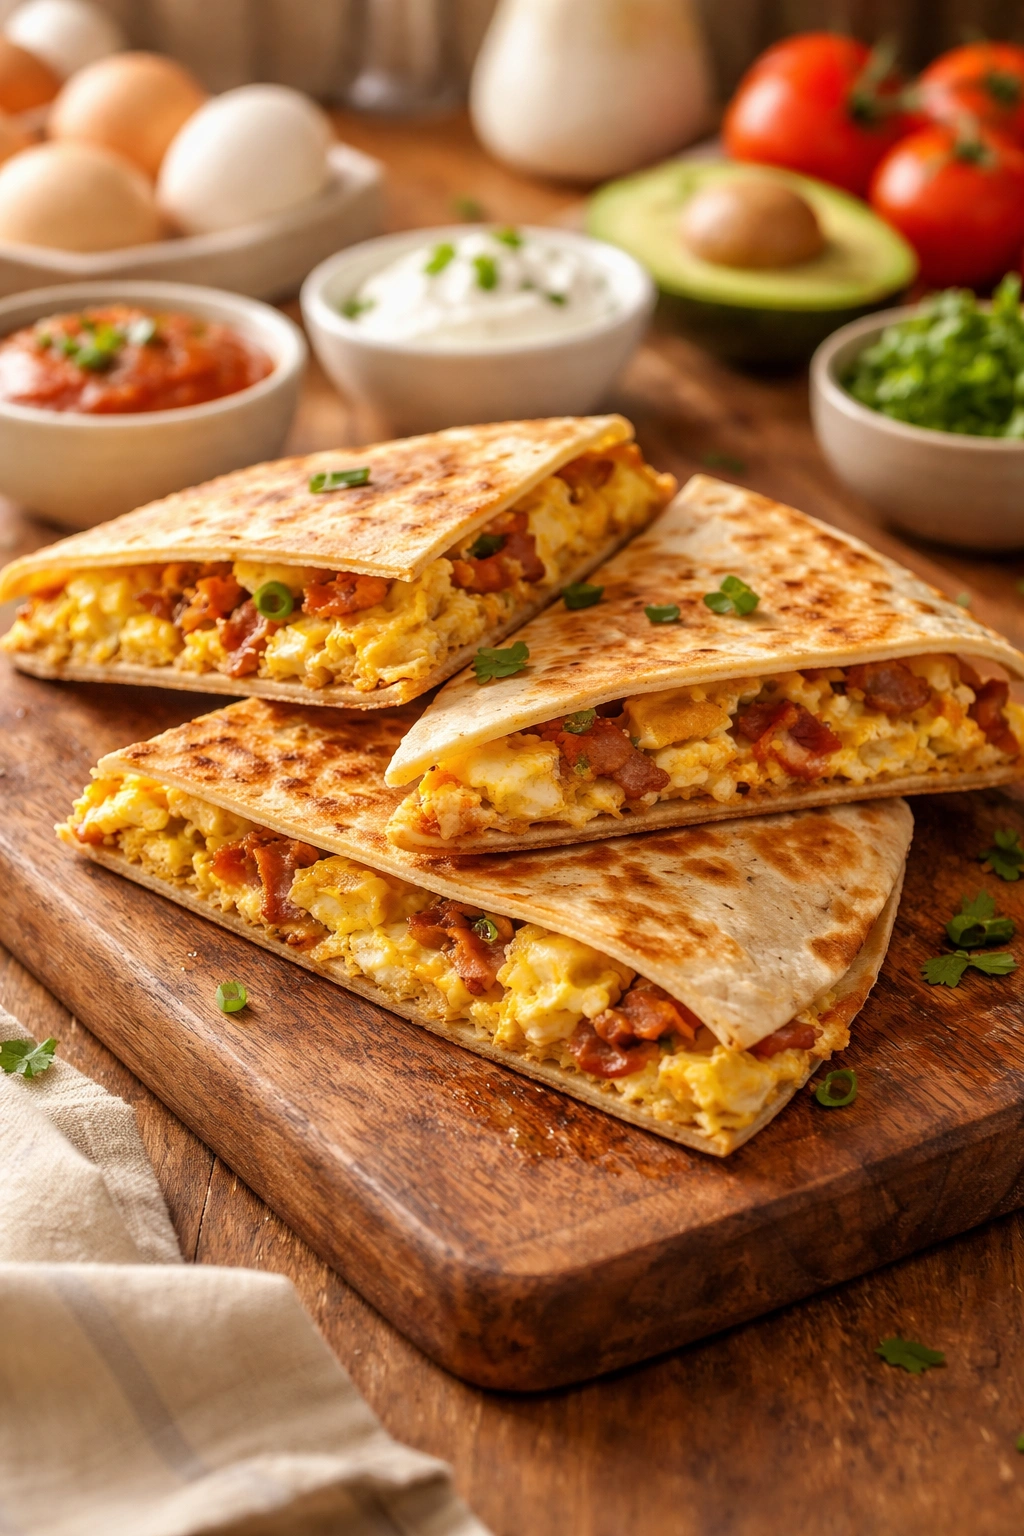
Scrambled eggs are the foundation, but they’re just the beginning. Plan on two lightly beaten eggs per quesadilla, cooked just until barely set—they’ll continue cooking slightly once you assemble everything and put it on the griddle. But what you combine with those eggs determines whether you’re making a simple breakfast or something genuinely craveable.
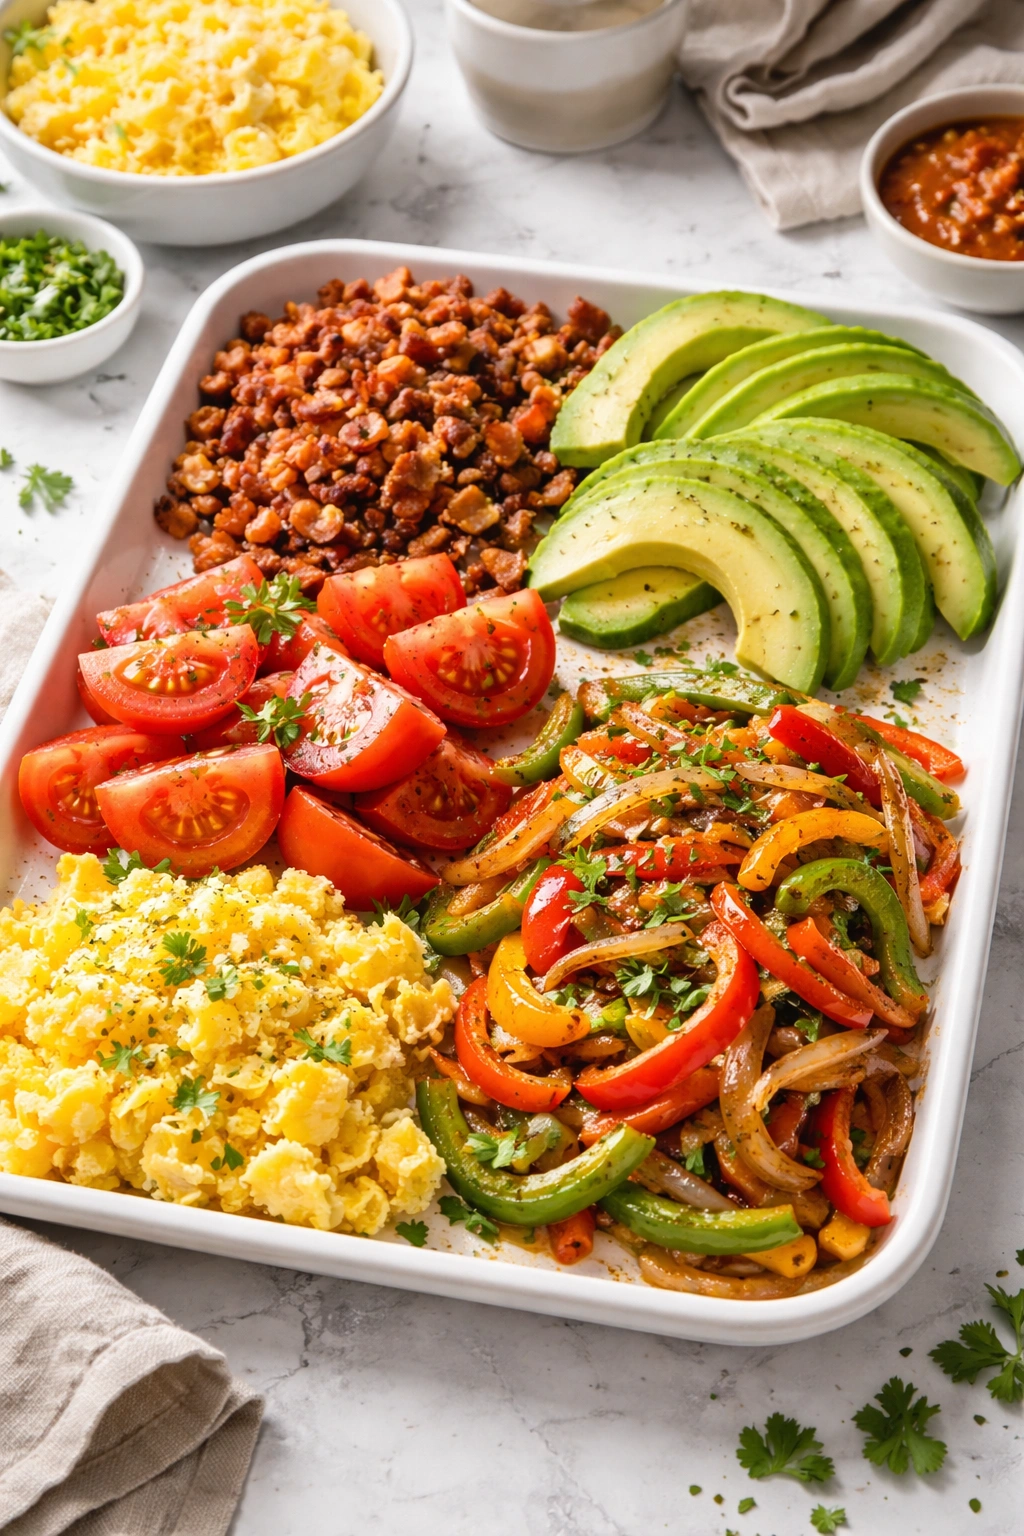
Crispy bacon (crumbled), fresh avocado, and a thin slice of tomato create a balanced, classic combination. Chorizo or spicy breakfast sausage brings heat and richness. Sautéed peppers and onions add caramelized sweetness and make it feel vegetable-forward. A handful of fresh spinach or chopped cilantro adds brightness. Jalapeños (fresh or pickled) or a sprinkle of hot sauce bring spice. Even something as simple as caramelized onions makes a noticeable difference—they add sweetness and depth that plain onions can’t match.
The key is restraint. More filling doesn’t automatically mean better—it means a harder time getting the quesadilla to cook through evenly, and a higher chance of it bursting open on the griddle. A half-cup of filling total (between the eggs, cheese, and all the extras) per quesadilla keeps everything in balance. You want to taste each element, not fight with a overstuffed shell that refuses to crisp.
Preparing Your Ingredients for Speed
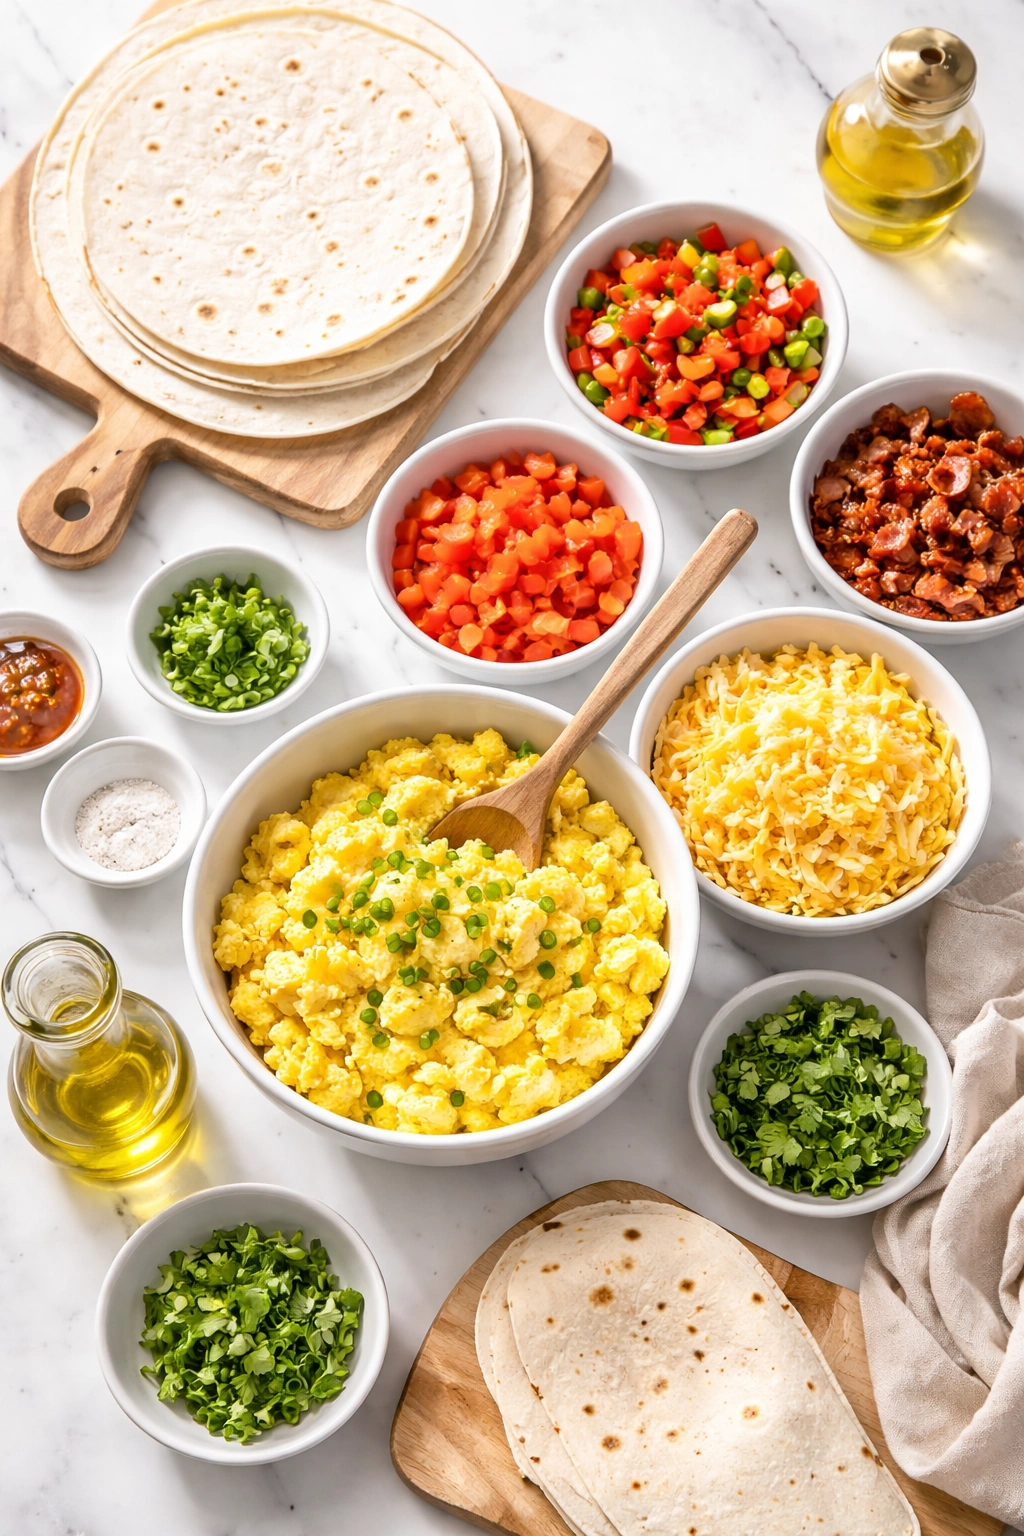
This is where breakfast quesadillas move from “decent option” to “genuinely faster than cereal.” Do your prep before you turn on the heat, and assembly takes ninety seconds. Scramble your eggs and set them aside. If you’re adding cooked proteins (bacon, sausage, chorizo), have them ready and broken into small pieces. Chop your vegetables—peppers, onions, tomatoes—and, if they’re not already cooked, give them a quick sauté in a separate pan so they’re tender and hot, not raw and watery.
Shred your cheese. Slice your avocado or tomato. Gather any sauces or additions you want. Have your tortillas within arm’s reach. This staging takes five minutes and transforms everything that comes next.
The speed comes from having zero decision-making during actual cooking. You’re not wondering what to add next or hunting through your fridge for ingredients. You’re simply assembling, cooking, and serving. This is why breakfast quesadillas actually work for busy mornings—the time investment shifts to prep, which you can absolutely do while coffee brews.
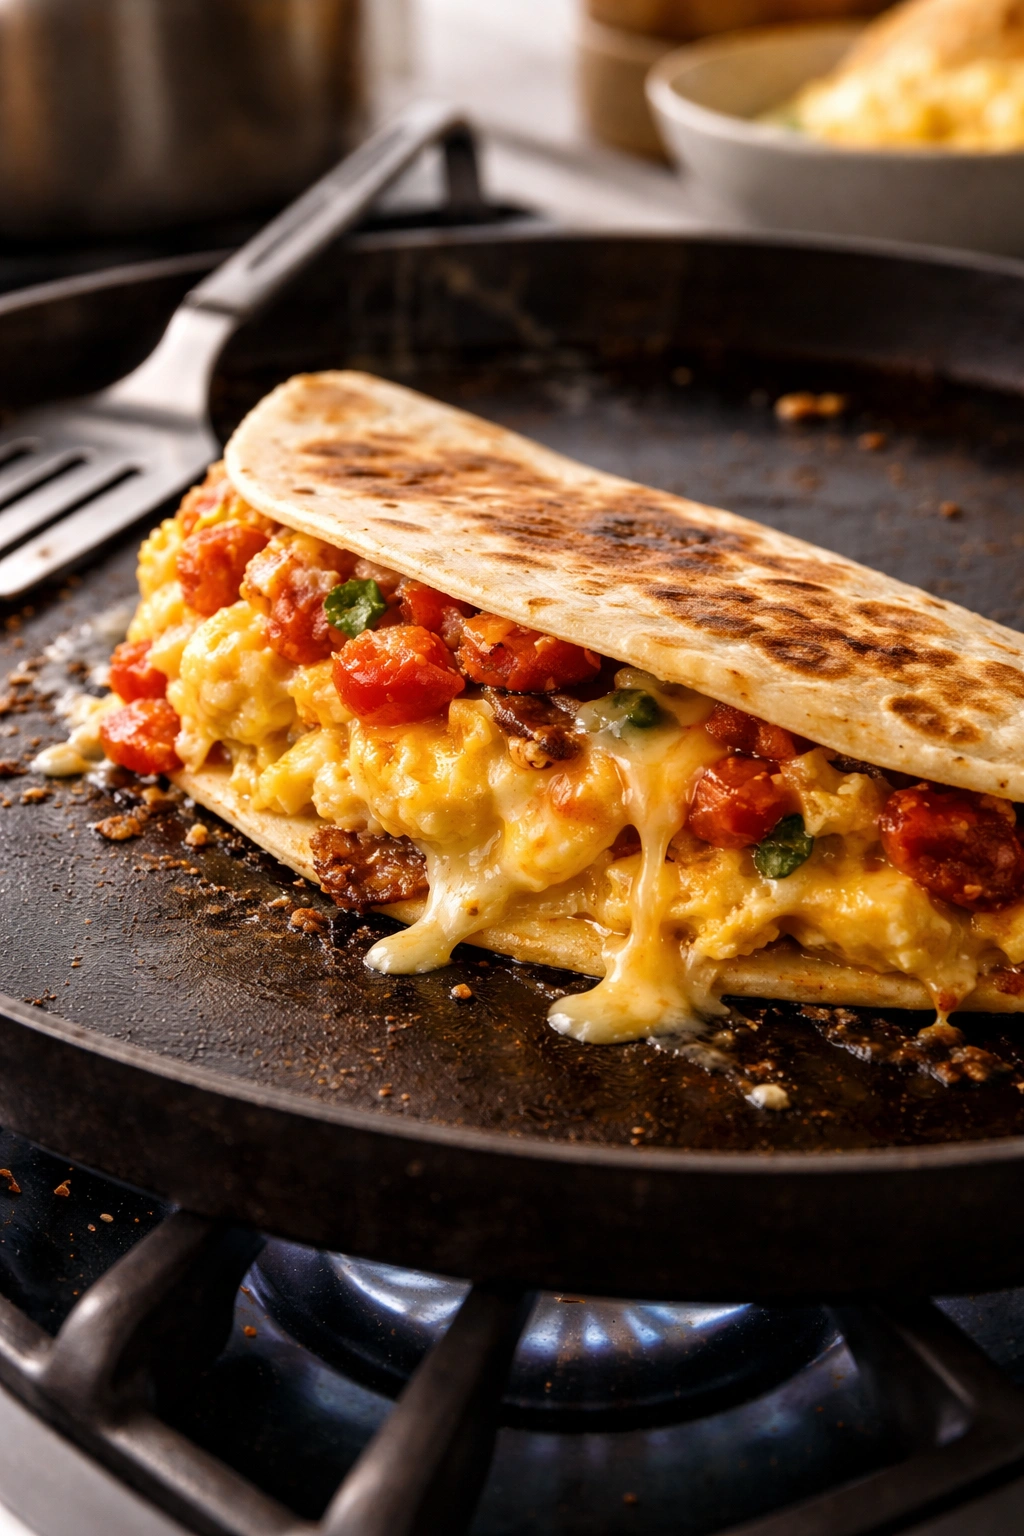
How to Crisp a Quesadilla Perfectly
This is the technique that separates a limp, soggy quesadilla from one that’s genuinely crispy on the outside and creamy on the inside. You need medium heat, a flat griddle or large skillet, and butter. Some people use oil, and it works fine, but butter gives better browning and flavor. One tablespoon of butter per quesadilla is the right amount—enough to crisp the tortilla without creating a greasy final product.
Heat your griddle over medium heat for two to three minutes. You want it hot enough that butter foams immediately when it hits the surface, but not so hot that it burns. Test the temperature by dropping a tiny piece of butter on it—it should sizzle gently and foam right away without turning brown instantly.
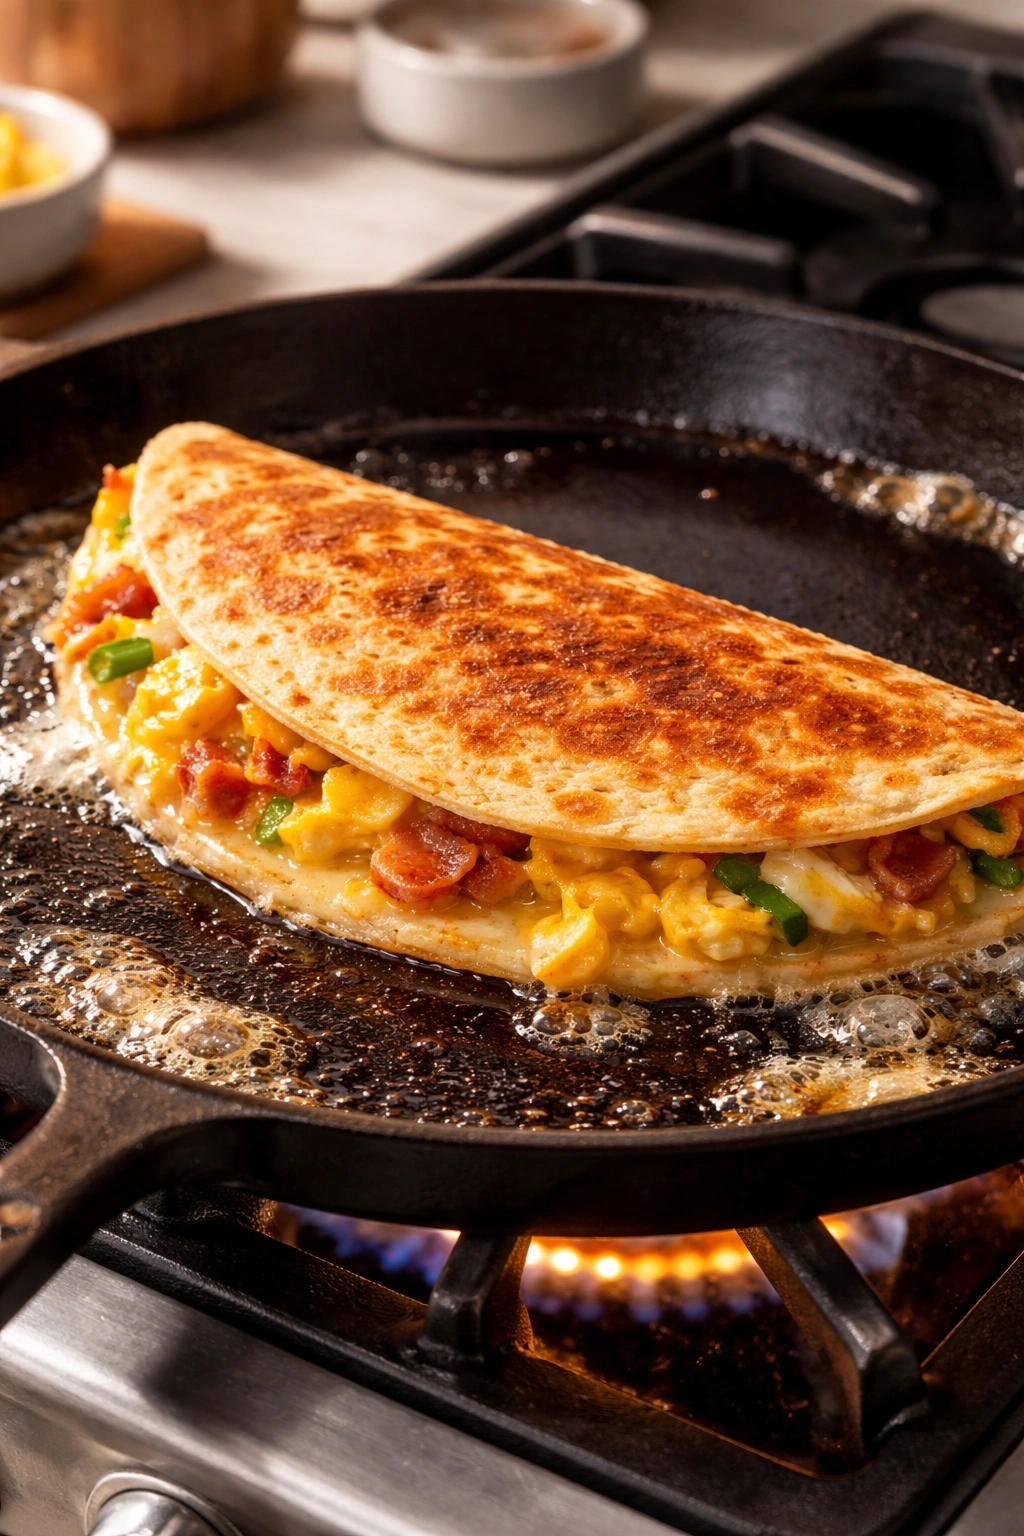
Place your assembled quesadilla on the griddle and cook for two to three minutes on the first side, until it’s golden brown and the cheese has started to melt slightly (you’ll see it peeking out the edges). Flip it carefully—a thin, sturdy spatula helps here—and cook the second side for another two to three minutes until it’s equally golden and crispy. The entire cooking process is about five minutes total, and you’re done.
The cheese isn’t fully melted when you flip it, which seems wrong. Trust the process. Once you flip it and cook the second side, the residual heat finishes melting everything into a smooth, integrated filling. If you tried to make the cheese completely molten before flipping, the first side would be burnt by the time you’re ready to serve.
The Step-by-Step Cooking Process
Yield: Makes 1 quesadilla | Serves 1
Prep Time: 5 minutes
Cook Time: 5 minutes
Total Time: 10 minutes
Difficulty: Beginner — No special equipment required. The only skill needed is a confident flip, and even that becomes second nature after making your first quesadilla.
For the Quesadilla:
- 2 large eggs
- 1 tablespoon unsalted butter, divided
- Salt and black pepper to taste
- 1 flour tortilla (8-inch)
- ¾ cup shredded Monterey Jack cheese
- ⅓ cup cooked filling (options: crispy bacon bits, cooked sausage, sautéed peppers and onions, or a combination)
- Optional additions: fresh avocado slices, fresh cilantro, sliced tomato, jalapeños, sour cream for serving
Prepare Your Ingredients:
-
Crack the eggs into a small bowl and beat them lightly with a fork until the yolks and whites are fully combined. Season with a small pinch of salt and a few grinds of black pepper.
-
If you’re using fresh vegetables like bell peppers or onions, dice them into small, bite-sized pieces. If they’re raw, cook them quickly in a separate skillet over medium-high heat with a touch of butter until they’re tender and any excess moisture has evaporated—about three to four minutes. Raw vegetables will release water inside the quesadilla and make it soggy. Set all your fillings aside in small bowls or on a plate so they’re ready to grab.
-
Shred your cheese directly from a block using the large holes of a box grater—do not use pre-shredded cheese. Spread it out on a small plate so you can grab handfuls easily.
Cook the Eggs:
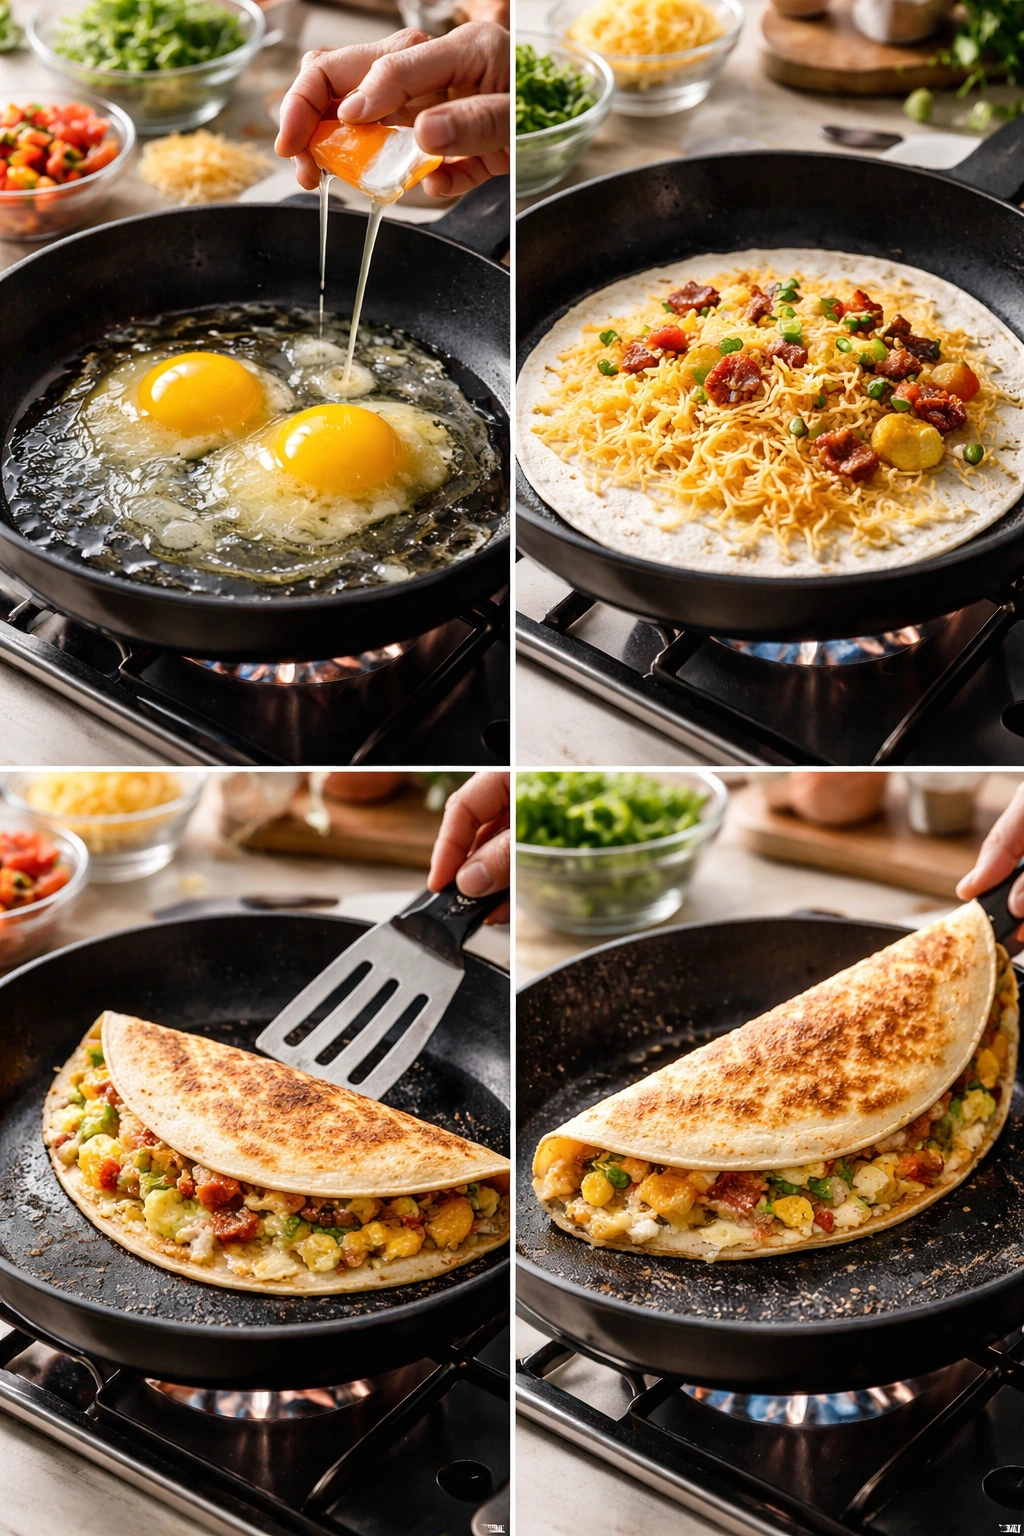
-
Heat a small nonstick skillet or griddle over medium heat. Add ½ tablespoon of butter and let it foam gently.
-
Once the butter is foaming, pour in your beaten eggs. Let them sit for about ten seconds, then gently push them toward the center with a spatula, tilting the pan so uncooked egg flows to the edges. Repeat this gentle pushing every fifteen seconds or so. The eggs should be soft, creamy, and only barely set—they’ll look slightly underdone, which is exactly what you want. This takes about two to three minutes total.
Advertisements -
The moment the eggs are no longer wet but still look a bit tender, transfer them to a plate. They’ll continue cooking slightly from residual heat, and you’ll finish cooking them more when you assemble and cook the quesadilla.
Assemble and Cook the Quesadilla:
-
Wipe out your cooking surface or use a larger griddle or skillet for the next step. Heat it over medium heat and add the remaining ½ tablespoon of butter, letting it foam gently.
-
Once the butter is foaming and hot, place your tortilla on the griddle. Let it cook for about fifteen seconds just to warm it slightly, then carefully flip it.
-
Working quickly, spread half your shredded cheese over the tortilla (roughly ⅜ cup). Top the cheese with your scrambled eggs, spreading them in an even layer. Add your fillings on top of the eggs—the cooked bacon or sausage, sautéed vegetables, jalapeños, avocado, or cilantro. Finish with the remaining cheese (the other ⅜ cup) on top. The top layer of cheese acts as a glue that holds everything together when you fold the quesadilla, so don’t skip it.
-
Cook this assembled quesadilla for one more minute, just until the cheese on the bottom starts to melt and releases a little liquid—you’ll see it pooling slightly around the edges.
-
Carefully flip the entire quesadilla in one swift motion. The cheese you added to the tortilla is now partially melted and acts as an adhesive, so everything will hold together. Don’t hesitate when flipping—a confident, decisive flip is much safer than a tentative one.
-
Cook the second side for two to three minutes until the tortilla is golden brown and crispy and the cheese underneath has fully melted. A slight char on the tortilla is wonderful and adds flavor—don’t be afraid of a little browning.
-
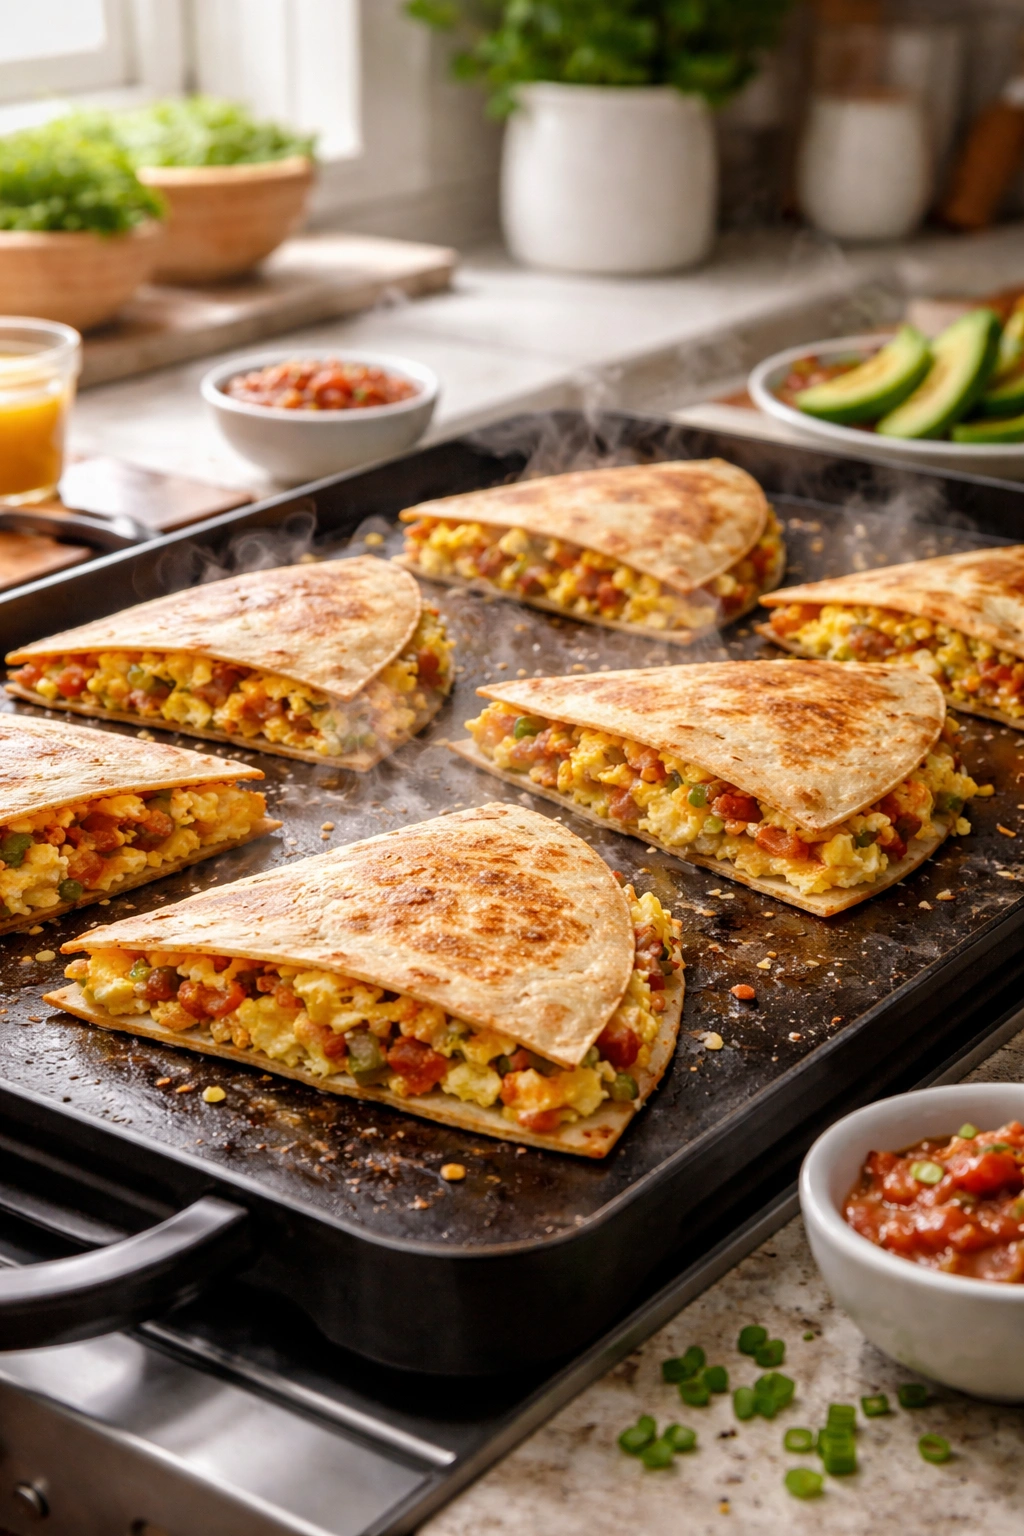
Transfer the quesadilla to a cutting board and let it rest for one minute. This allows the cheese to set slightly so it won’t ooze out everywhere when you cut it. Cut it in half diagonally and serve immediately with sour cream, salsa, guacamole, or hot sauce on the side.
Timing Tips to Keep Breakfast from Getting Cold
When you’re cooking for more than one person, the challenge shifts from “can I cook it fast enough” to “can I coordinate so everything’s hot when it hits the table.” This is where assembly-line thinking helps. If you’re making three quesadillas, get all your fillings prepped and assembled before you cook the first one.
Then, cook them sequentially rather than trying to manage multiple pans simultaneously. Your first quesadilla will rest for one minute before cutting—that’s your window to start the second one. By the time you’ve finished cooking quesadilla number two, quesadilla number one is cut and ready to serve, and you’re cooking number three. The timing cascades naturally: the first person to arrive at the table gets their quesadilla fresh off the griddle, the second person’s arrives moments later, and the third person’s is ready almost immediately after.
If you’re feeding a group and need everything at once, cook all your eggs at once, assemble all your quesadillas on the griddle or griddles simultaneously (you can fit two on a standard nine-inch skillet if you’re careful, or use two smaller skillets), and flip them together. It sounds chaotic, but it actually works—you’re just managing a bigger cooking surface, not more complexity. The entire cook time remains about five minutes.
Common Mistakes That Ruin a Breakfast Quesadilla
The most common error is overfilling. When you look at a tortilla and think “I could fit more cheese” or “let me add another handful of fillings,” that’s the moment to stop. More than half a cup of total filling, plus the cheese, creates a quesadilla so packed that it either refuses to cook through evenly, bursts open on the griddle, or becomes structurally unstable when you try to flip it. Restraint actually makes a better, more manageable quesadilla.
Using raw vegetables is the second major mistake. Raw onion, raw peppers, and raw tomato release water inside the quesadilla during cooking, creating a steamed, soggy result instead of a crispy one. If you want vegetables, cook them first in a separate pan with a little butter until they’re tender and any moisture has evaporated. The only exception is fresh avocado, which should be added right before serving.
Cooking on heat that’s too high will burn the tortilla before the inside cooks through or the cheese melts properly. Medium heat is correct. Test it: the butter should foam immediately when it hits the griddle, but it shouldn’t turn brown instantly. If it’s browning too fast, your heat is too high.
Flipping with hesitation causes the first side to stick or tear. Be confident. A quick, deliberate flip with a sturdy spatula works every single time. Tentative, slow flipping gives you a 50% chance of cheese leaking everywhere.
Adding too much cheese is impossible—go generous with cheese. The common mistake is using pre-shredded cheese coated with anti-caking powder, which doesn’t melt smoothly. Always shred cheese from a block yourself.
Variations and Dietary Adaptations
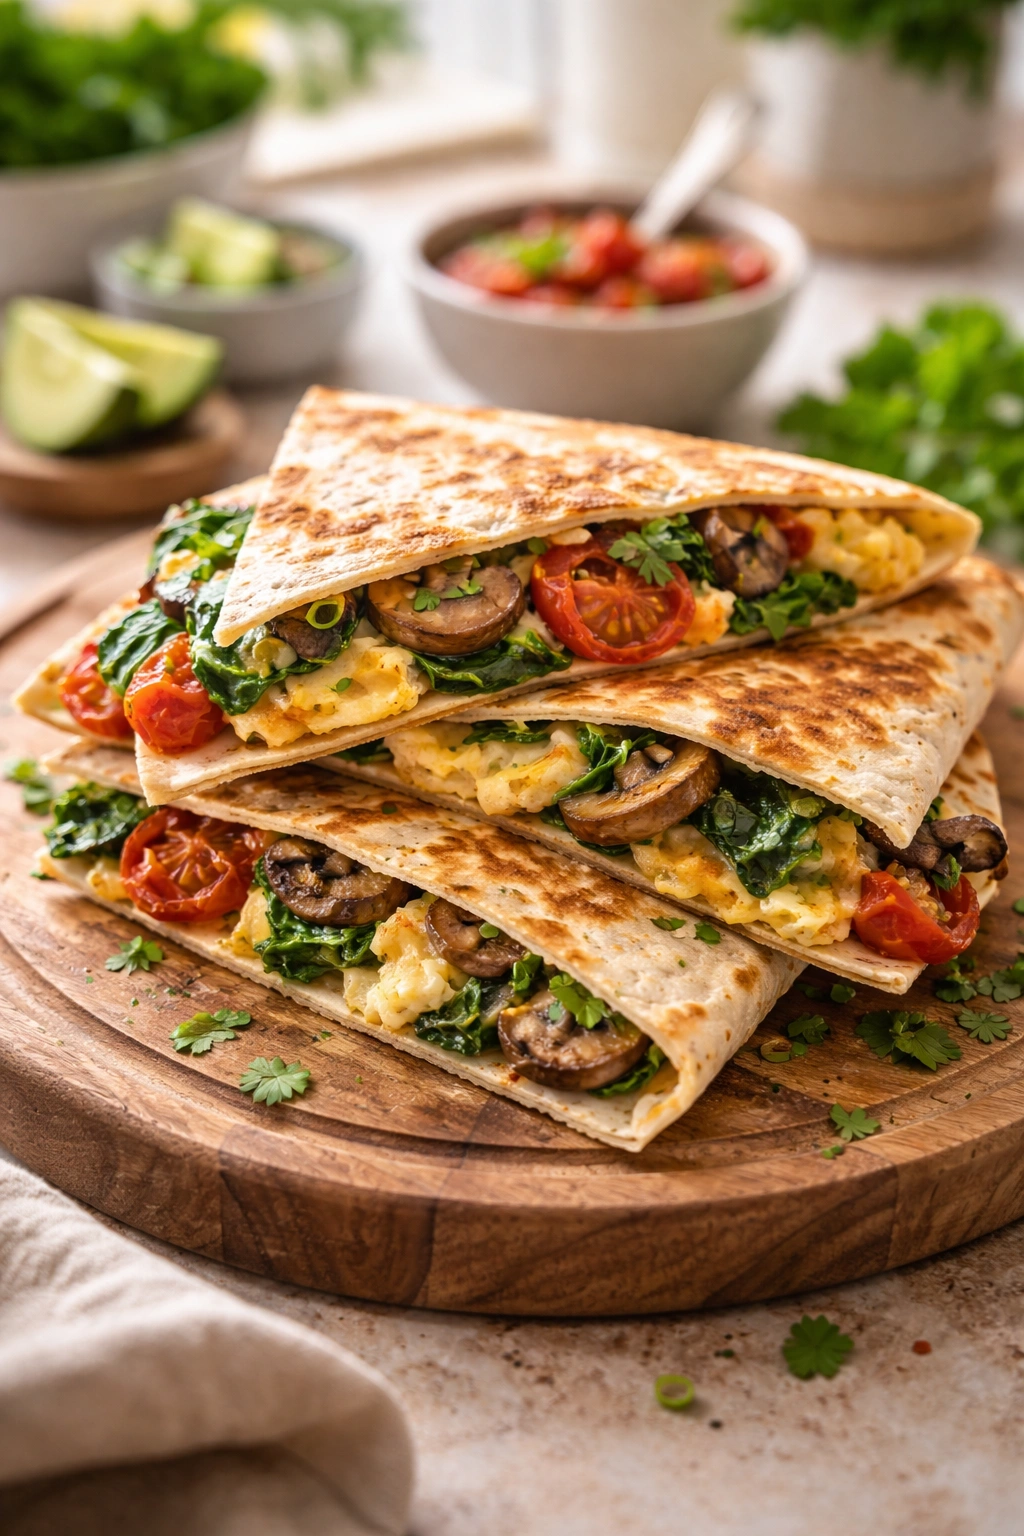
The breakfast quesadilla framework adapts to almost any preference or dietary need. For a vegetarian version, skip the meat entirely and bulk up with sautéed mushrooms, spinach, roasted cherry tomatoes, and caramelized onions. Add a handful of fresh herbs—cilantro, chives, or parsley—and you’ve got something genuinely delicious that doesn’t feel like a compromise.
For a vegan quesadilla, use a dairy-free cheese that actually melts (many don’t, so test before committing). Replace eggs with mashed avocado, seasoned tofu crumbles, or a chickpea scramble. The cooking method stays identical—the filling just changes.
If you’re avoiding carbs or doing a low-carb approach, use a low-carb tortilla. They don’t crisp quite as dramatically as regular flour tortillas, but they work, and they let you keep the quesadilla format you love.
For a breakfast quesadilla that’s more lunch or dinner than morning, load it with pulled chicken or shredded beef, add caramelized onions, roasted peppers, and fresh cilantro. It becomes a different meal entirely while using the exact same cooking technique.
A Southwest version uses chorizo, pepper jack cheese instead of Monterey Jack, black beans mixed into the eggs, fresh cilantro, and a dollop of salsa inside. Serve it with lime crema (sour cream mixed with lime juice and cilantro) on the side.
For something closer to a “breakfast classic” style, use bacon or ham, mild cheddar along with the Monterey Jack, a thin slice of tomato, and fresh spinach wilted into the eggs. It feels familiar and comforting but stays completely fast.
Make-Ahead Strategies for Busier Mornings
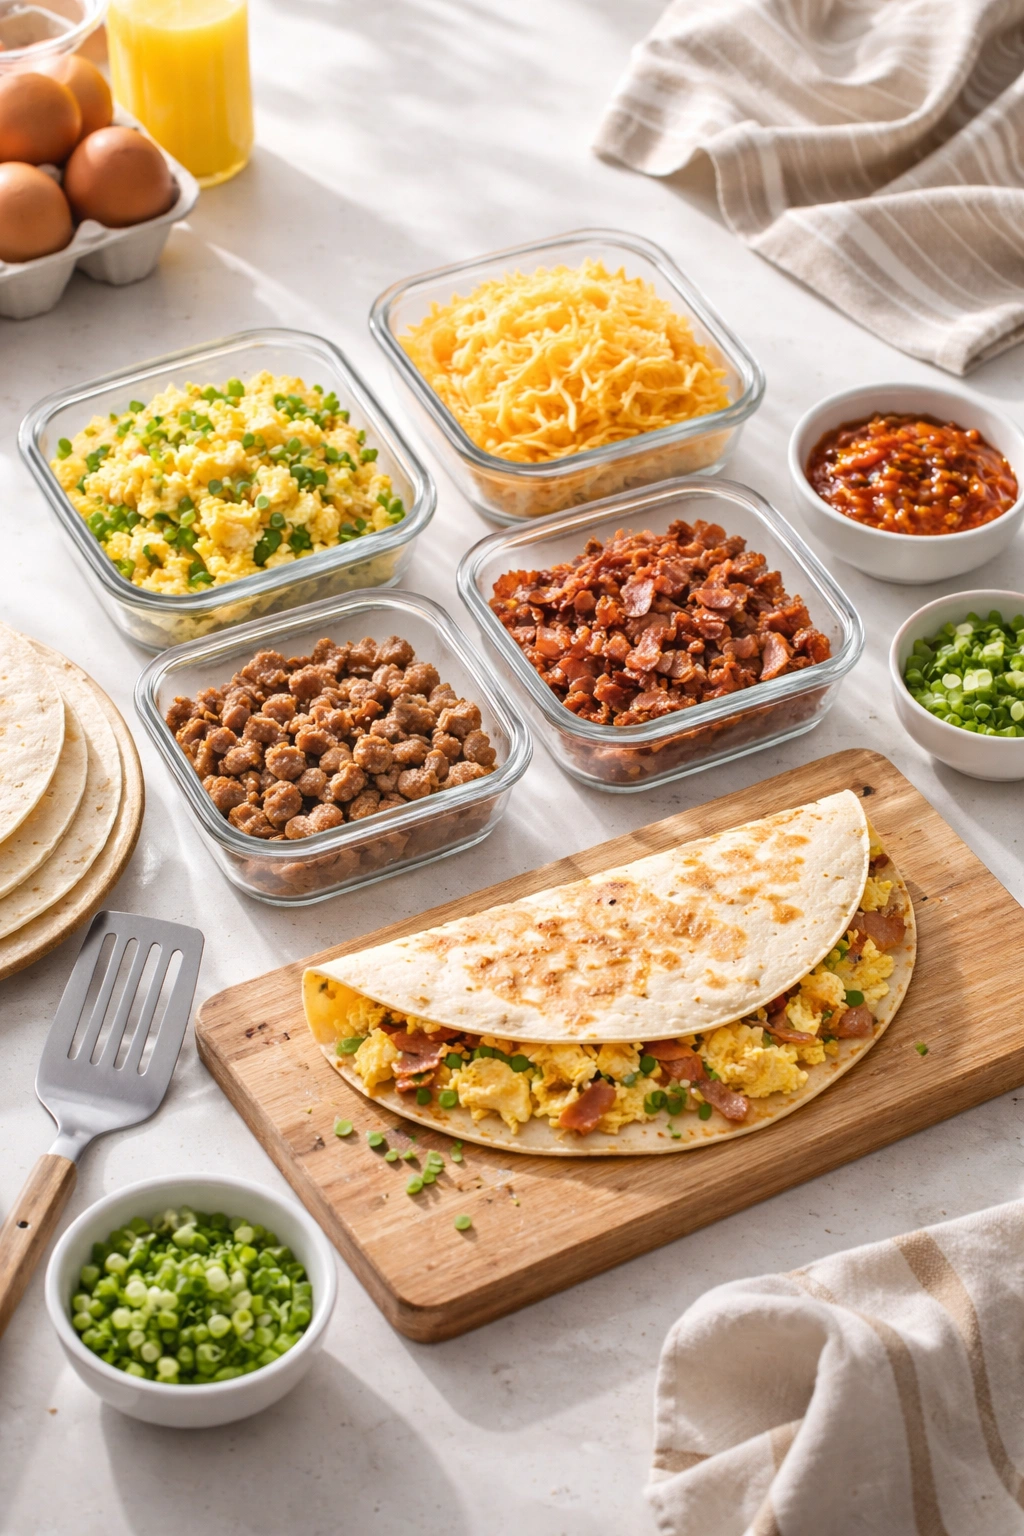
You can’t make a quesadilla completely ahead of time and reheat it without it becoming tough or soggy, but you can do almost all the prep work the night before. Cook your bacon or sausage. Sauté your vegetables. Scramble your eggs. Shred your cheese. Store everything in separate containers in the fridge overnight. In the morning, you’re genuinely just assembling and cooking—no prep at all.
Here’s what works even better: make a quesadilla in full, cut it in half, and store it in an airtight container in the fridge for up to two days. In the morning, reheat it gently in a skillet over medium-low heat for one to two minutes per side, or wrap it loosely in a damp paper towel and microwave it for thirty seconds. It won’t be quite as crispy as a freshly made quesadilla, but it’ll be warm and perfectly fine.
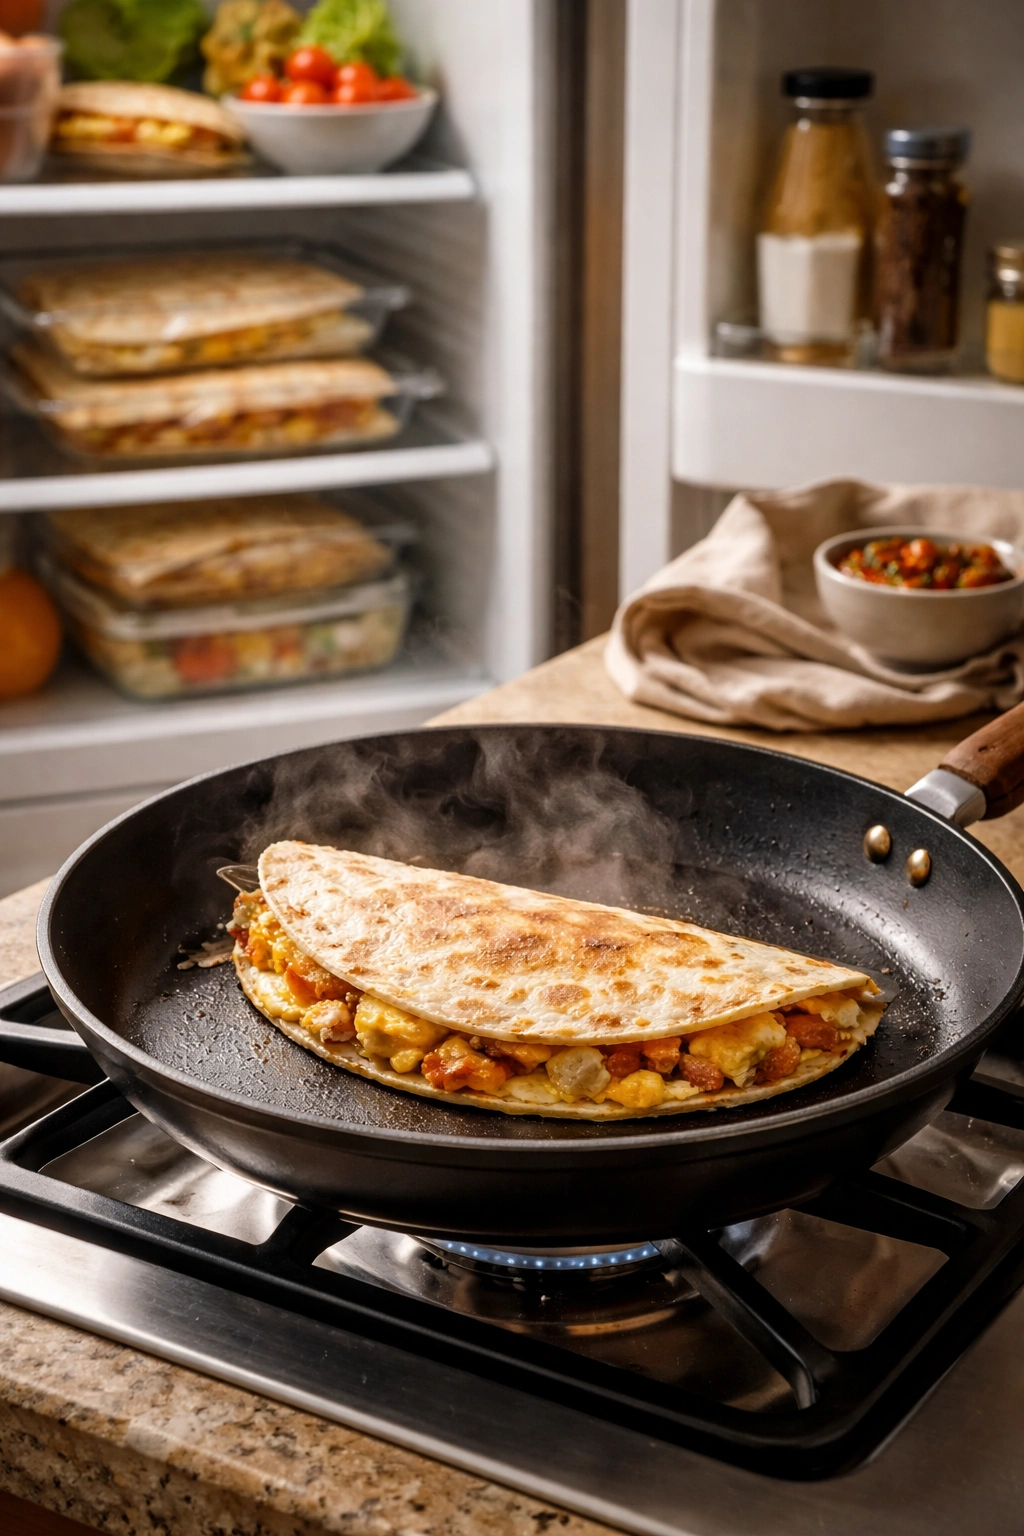
Another strategy for genuinely busy mornings: make a double batch on a less hectic weekend day, slice them into quarters, and freeze them in individual airtight containers. You can reheat a quarter or half a quesadilla in the toaster oven at 350°F (175°C) for five minutes, or microwave a quarter for forty-five seconds until it’s warm. It’s not gourmet, but it’s genuinely faster than making anything from scratch.
Storage and Reheating Without Drying It Out
A freshly made quesadilla is best eaten immediately, but leftovers keep well. Store it in an airtight container in the fridge for up to two days. Keep it whole rather than cutting it, which helps prevent the edges from drying out.
When you’re ready to reheat, gentle heat is essential. A skillet over medium-low heat for one to two minutes per side warms it through without toughening the tortilla. A toaster oven at 350°F (175°C) for five to eight minutes works well for a whole quesadilla—it reheats evenly and crisps the outside slightly without overdrying it.
The microwave is fastest but creates a slightly chewy texture. If you must use it, wrap the quesadilla loosely in a damp paper towel and heat it for thirty to forty-five seconds. The damp towel adds a bit of moisture that helps prevent it from becoming tough.
Freezing works if you’re willing to accept slightly softer texture. Cool the quesadilla completely, wrap it tightly in plastic wrap, then place it in a freezer bag. It’ll keep for up to one month. Reheat from frozen in a skillet over medium-low heat for three to four minutes per side, or in a 350°F (175°C) toaster oven for twelve to fifteen minutes.
Serving Ideas and Pairing Suggestions
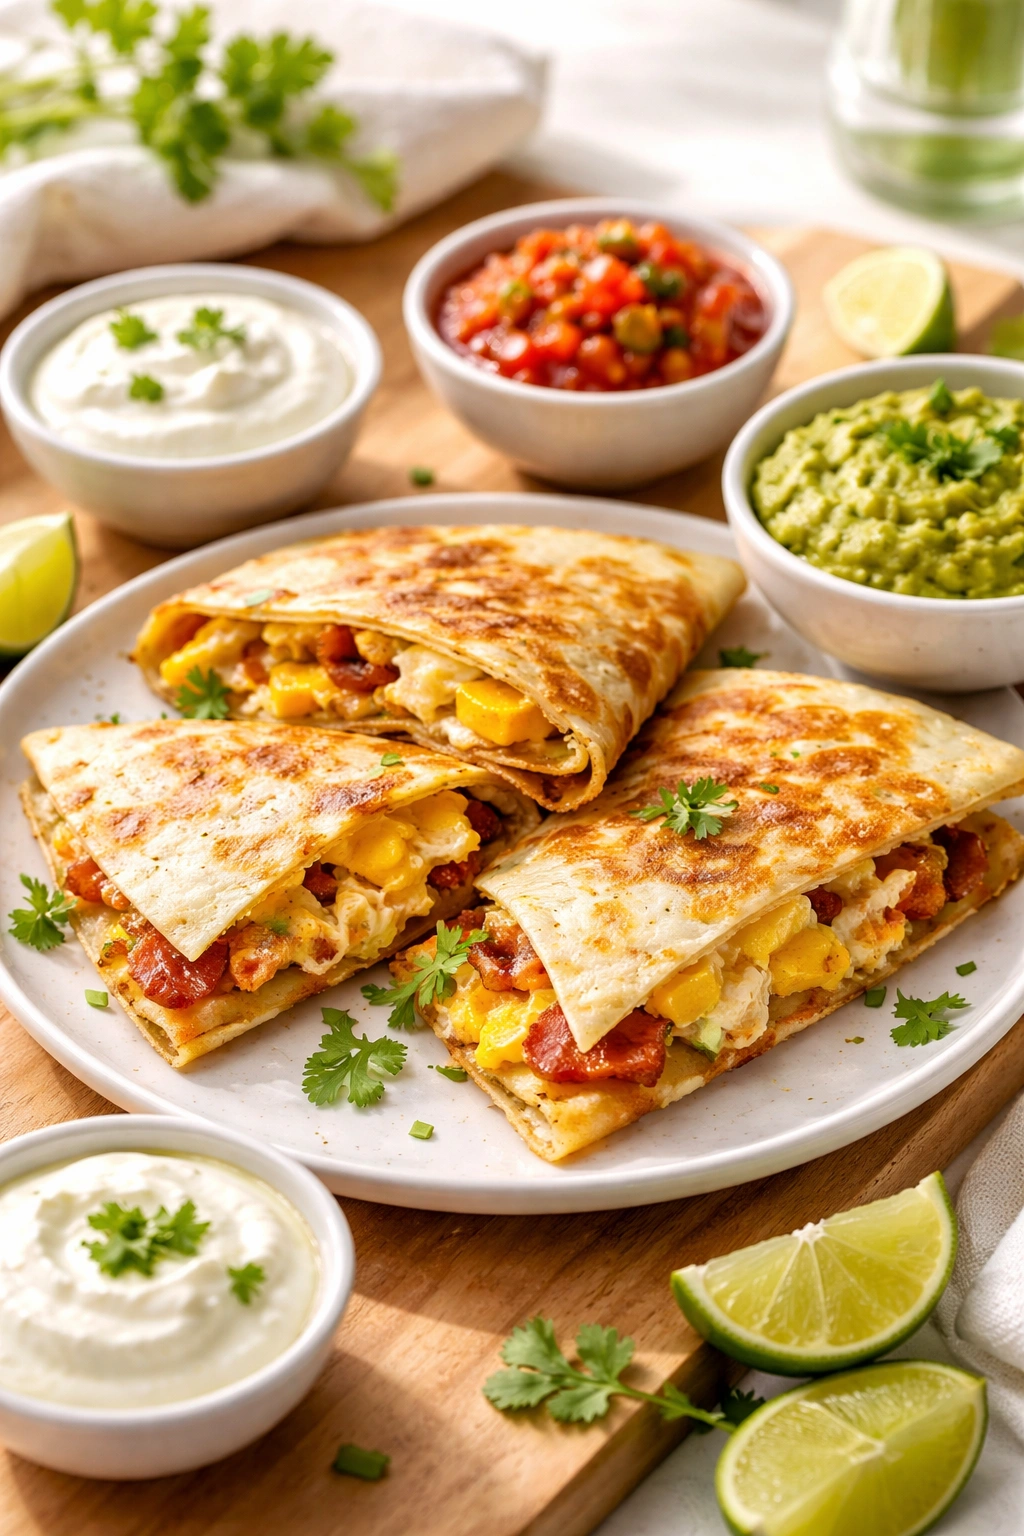
Breakfast quesadillas pair beautifully with cooling condiments. Sour cream or Mexican crema alongside salsa or pico de gallo is the classic setup. A simple guacamole (just mashed avocado, lime juice, salt, and fresh cilantro) feels more luxurious without adding much effort. Hot sauce is always welcome—choose one that matches your spice preference, from mild pico to genuinely spicy habanero.
A simple lime crema transforms everything: mix sour cream with fresh lime juice, a pinch of salt, and minced cilantro, then dollop it generously over your quesadilla. It adds brightness and creaminess simultaneously.
For beverages, breakfast quesadillas pair well with strong coffee (their richness handles it), fresh juice (the citrus and sweetness balance the savory, cheesy quesadilla), or horchata (a sweet, milky rice drink that’s incredible with Mexican breakfast foods). Even a simple glass of milk or a fruit smoothie works.
If you’re serving quesadillas as part of a larger meal, add a simple side salad with lime vinaigrette, some black beans refried with garlic, or a small plate of fresh fruit. Quesadillas are filling, so sides should be light and bright rather than heavy.
For a weekend brunch scenario, breakfast quesadillas work alongside scrambled eggs, breakfast potatoes, fresh fruit, and maybe some Mexican sweet bread or pastries. They’re fancy enough to feel special but casual enough to serve in a relaxed morning setting.
Final Thoughts
Breakfast quesadillas deserve a spot in your regular rotation precisely because they solve so many morning problems simultaneously. They’re faster than you’d expect, more customizable than almost any other breakfast option, and impressive enough that serving them feels like you’ve made effort rather than a quick meal. The technique is straightforward and forgiving—even your first quesadilla will be better than most diner versions.
What makes them truly valuable is their scalability. Cook one for yourself while getting ready, make three for a family, prepare several on Sunday for grab-and-go mornings all week. The same basic method works for every scenario. Once you’ve made your first half-dozen, you’ll have the muscle memory to assemble and cook a quesadilla without thinking, turning what seems like a restaurant dish into genuine weekday breakfast.
The versatility means you’ll never get bored. Rotate your fillings based on what you have, what you’re craving, and what’s in season. Monday might be bacon and avocado. Wednesday could be chorizo and peppers. Friday might bring roasted mushrooms and fresh herbs. The framework stays identical while the experience stays fresh and interesting.