Going gluten-free doesn’t mean settling for bland, disappointing dinners or feeling like you’re eating “diet food” while everyone else enjoys real meals. The truth is that many of the most satisfying, restaurant-quality dinners don’t rely on gluten at all — and once you know how to approach them, you’ll discover that removing gluten often means simplifying your cooking while doubling down on flavor.
The problem most people run into is that they try to recreate their old favorite meals using gluten-free approximations — gluten-free pasta that tastes like mushy cardboard, or chicken dishes that feel oddly flat. That approach is backward. Instead, the secret is to lean into dinners where gluten was never a key player to begin with. Think grilled proteins with buttery sauces, rice-based dishes with complex layering, vegetable-forward meals with bright acid and heat, and naturally gluten-free cuisines that happen to be absolutely delicious.
The dinners on this list taste incredible because they’re built on technique, quality ingredients, and flavor combinations that have nothing to do with flour or wheat. Many of them are actually easier to execute than their traditional counterparts because you’re not juggling multiple components or worrying about texture. They feel indulgent and restaurant-caliber, and nobody at your table will be thinking about what’s missing — they’ll just be enjoying genuinely good food.
1. Crispy-Skinned Salmon with Roasted Root Vegetables
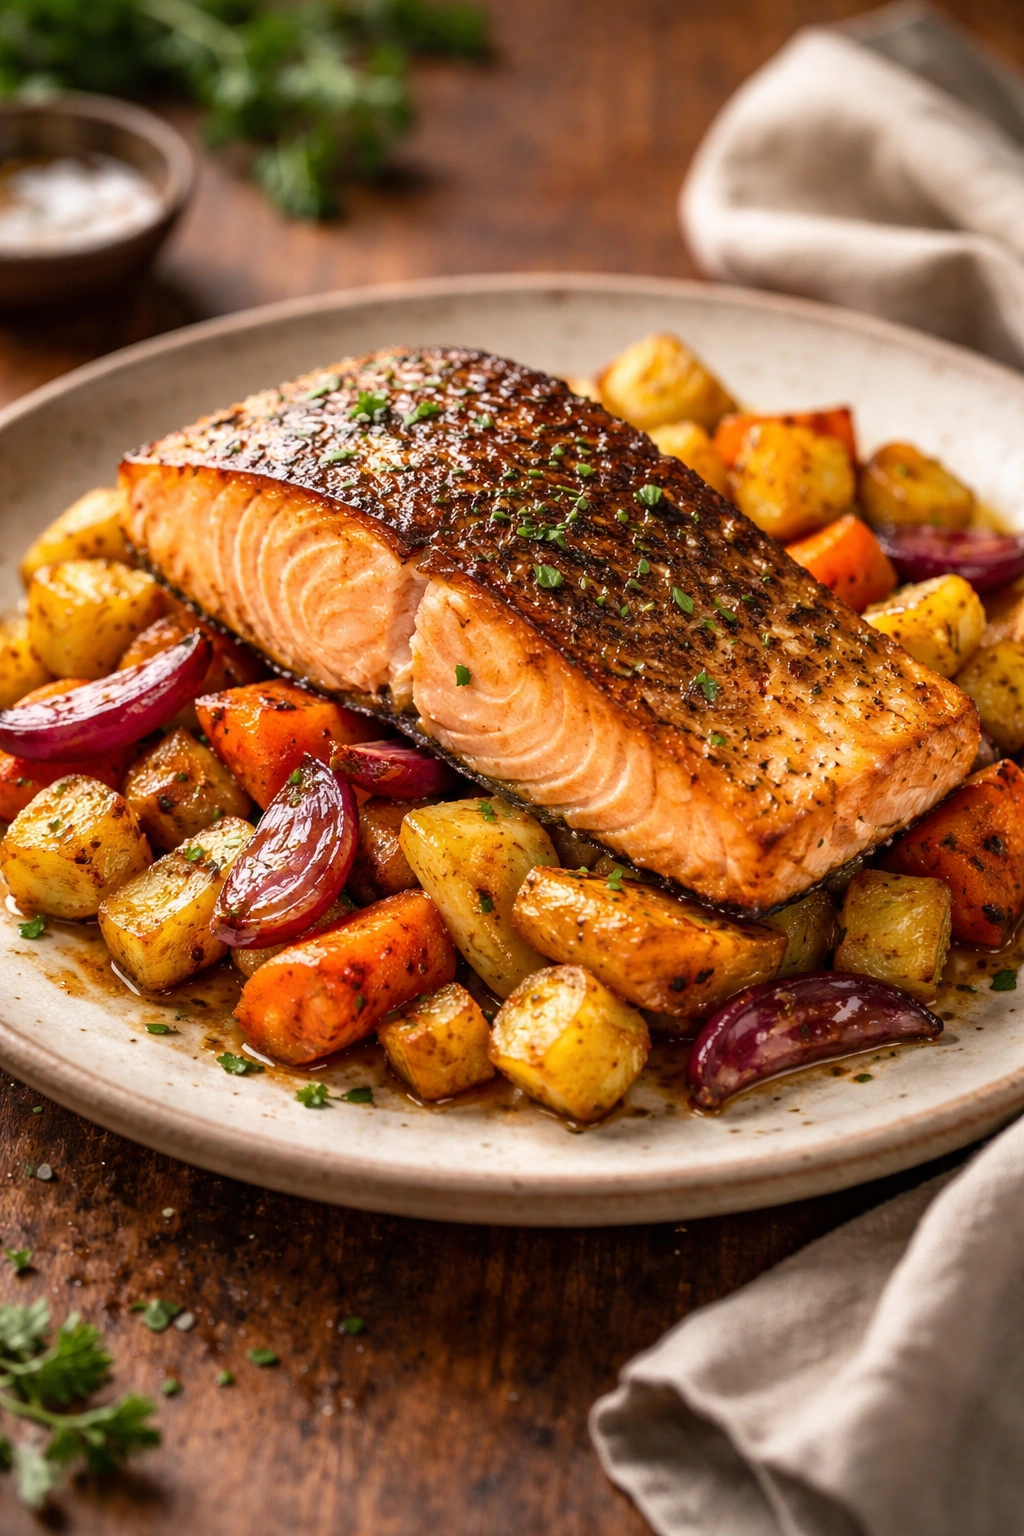
Salmon is the ultimate gluten-free protein because its rich, buttery fat carries so much flavor that it doesn’t need any flour-based component to feel substantial and satisfying. The key to nailing this dish is getting that skin absolutely crispy — and that’s entirely about technique, not gluten.
Why This Works as a Gluten-Free Dinner
Salmon’s natural oils create a complete eating experience without any grain-based filler. The crispy skin provides textural contrast, the tender flesh underneath delivers richness, and roasted root vegetables add earthiness and natural sweetness. This is a dinner that feels elegant and restaurant-quality, not like you’re eating “gluten-free food.” The whole meal comes together in under 40 minutes, and the flavors only deepen if you let it sit together for a few minutes before eating.
The Critical Technique for Crispy Skin
- Start with completely dry salmon skin — moisture is the enemy of crispiness, so pat it dry with paper towels and let it sit uncovered in the refrigerator for 30 minutes before cooking
- Use a cast-iron skillet over medium-high heat, and don’t move the salmon once it hits the pan — let it sit undisturbed for 5-6 minutes to allow the skin to render and crisp up
- The flesh will cook perfectly through carryover heat once you flip it; you only need 2-3 minutes skin-side down to finish
- Season generously with fleur de sel just before cooking — fine table salt draws out moisture, while larger crystals stay on the surface and create texture
Simple Sides That Complete the Dish
Toss cubed beets, carrots, and parsnips with olive oil, rosemary, and garlic, then roast at 425°F for 25-30 minutes until the edges are caramelized and the insides are tender. Finish with a squeeze of lemon and a pinch of Maldon salt. The natural sugars in these vegetables caramelize in the heat, creating a rich, almost nutty sweetness that balances the salmon’s richness perfectly.
Pro tip: Make extra roasted vegetables — they’re wonderful cold in salads the next day, or reheated alongside eggs for breakfast.
2. Chicken Piccata with Gluten-Free Pasta
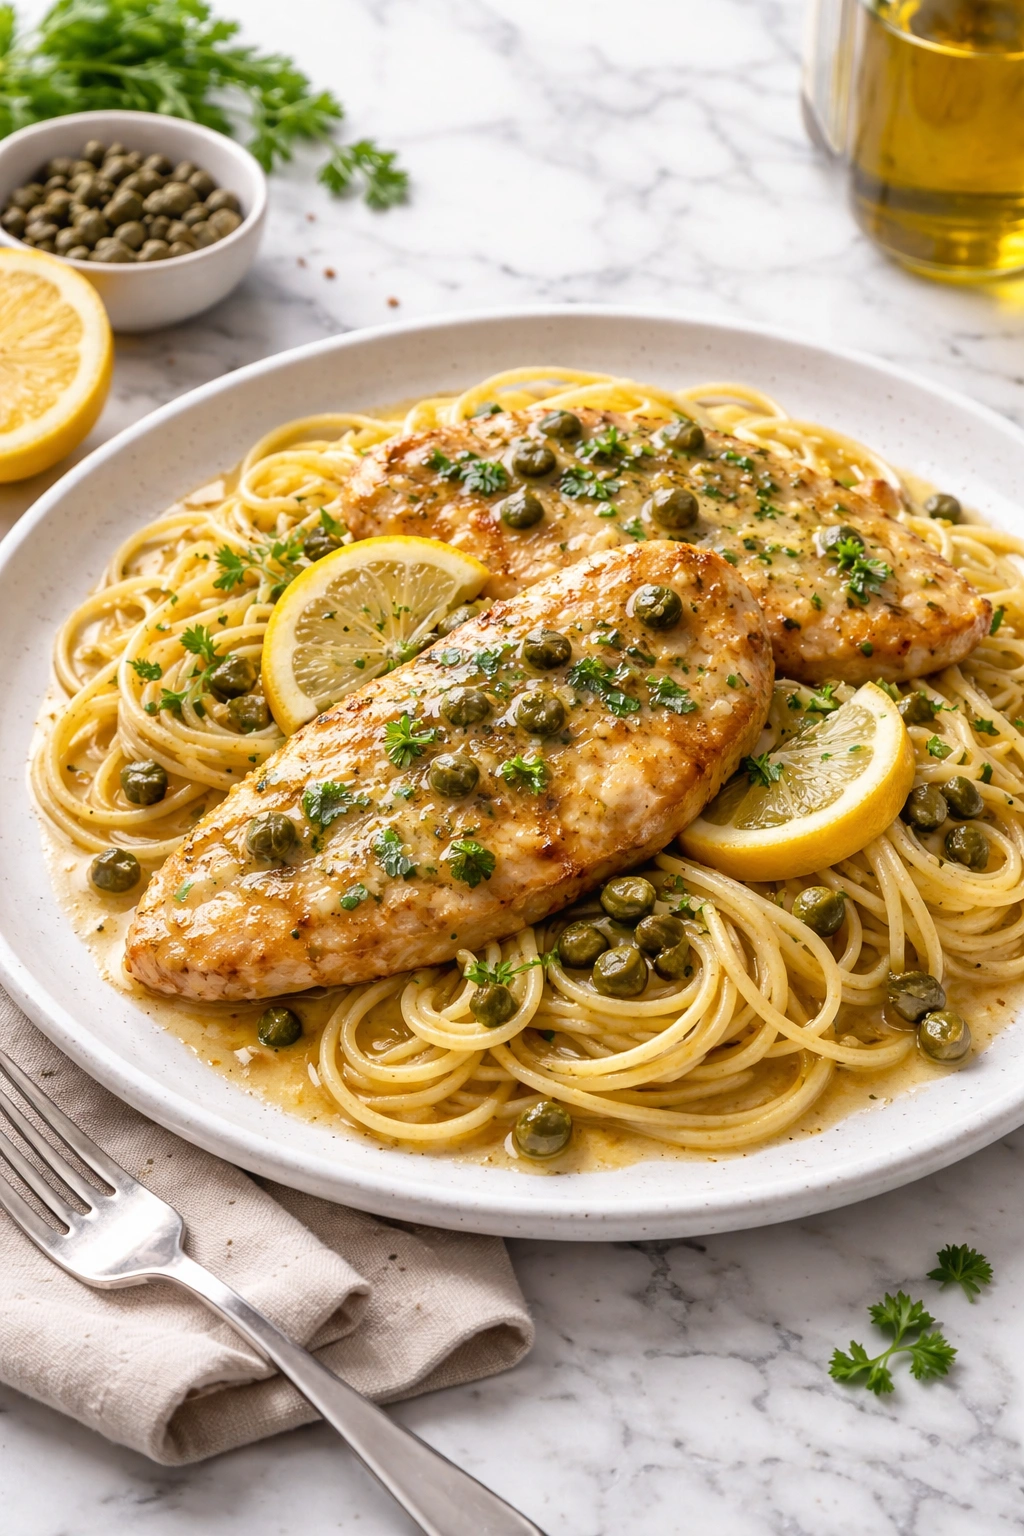
Piccata is actually one of the easiest dishes to make gluten-free because the sauce is built on acid, butter, and briny capers — not a flour-thickened gravy. This Italian classic proves that you don’t need bread crumbs or a heavy roux to create something deeply satisfying.
What Makes Piccata Inherently Gluten-Free
The magic of piccata is the bright, acidic pan sauce made from white wine, lemon juice, and briny capers. This sauce coats thin chicken cutlets beautifully without any need for flour. The acidity cuts through the richness of the butter, and the capers add a sophisticated salty-briny punch that makes this feel like restaurant food. You’re working with maybe five ingredients for the sauce — lemon, white wine, capers, butter, and a pinch of salt — but they combine into something that tastes like it required hours of fussing.
Using the Right Pasta
Gluten-free pasta has gotten genuinely good in recent years, but success depends on your choice of brand and cooking technique. Look for pasta made from chickpea flour, lentil flour, or a blend with corn rather than pure rice or corn — these plant-based pastas hold their shape better and taste less obviously “different.” Cook the pasta 30 seconds shorter than the package recommends, drain it before it’s fully tender, then finish cooking it in the chicken and sauce in the pan for the last minute. This helps it absorb flavor and prevents the mushiness that happens when gluten-free pasta sits in liquid too long.
Assembling the Dish
Pound chicken breasts thin, season generously with salt and pepper, and sear them briefly in olive oil — just enough to get some color and cook them through. Set the chicken aside, then deglaze the hot pan with white wine and lemon juice, scraping up all those flavorful browned bits. Whisk in butter, add capers and fresh parsley, then return the chicken to the pan with your almost-cooked pasta. Everything finishes together in the pan, absorbing all those bright flavors.
Worth knowing: If you’re cooking for a crowd, this scales beautifully — just work in batches so you’re not crowding the pan, which prevents proper browning.
3. Korean Beef Bulgogi with Cauliflower Rice
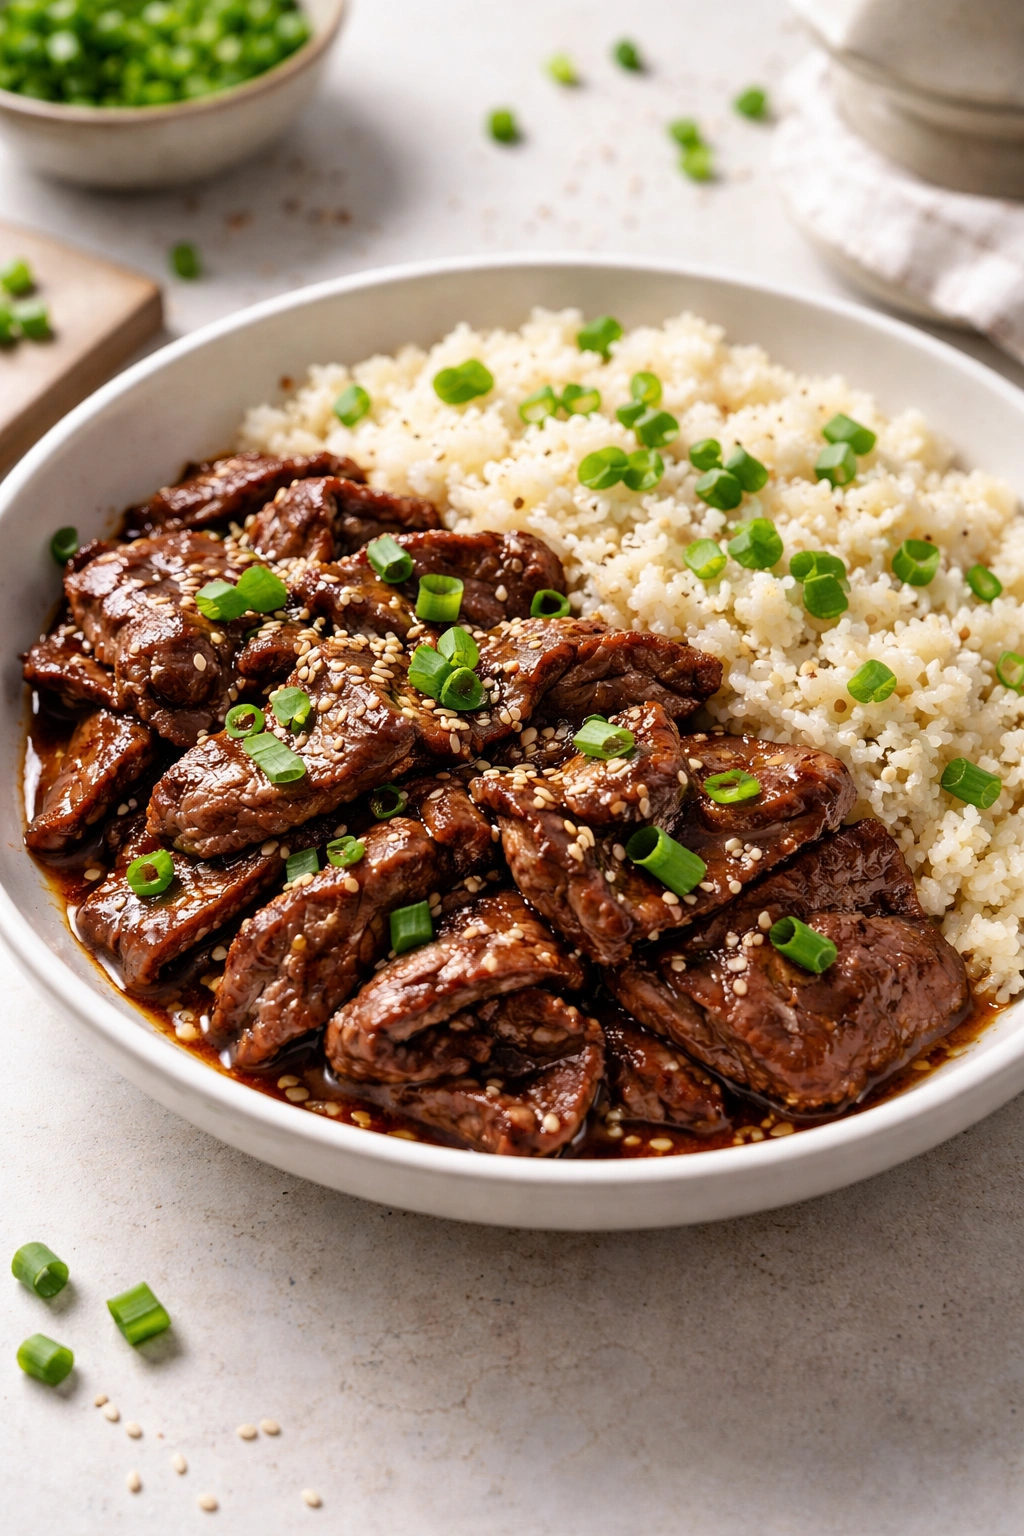
Bulgogi is already naturally gluten-free in its truest form, though many restaurant versions sneak in soy sauce that contains wheat. Making it at home means you control every component, and you get to decide whether to serve it with traditional rice or a lighter cauliflower rice.
Why Beef Bulgogi Is Restaurant-Quality at Home
Bulgogi depends entirely on the marinade — a balance of soy sauce, sesame oil, garlic, ginger, brown sugar, and pear or apple juice. The pear juice (or a grated apple) is crucial because it contains natural enzymes that tenderize the beef while adding subtle sweetness. Thinly sliced beef (flank or sirloin work beautifully) marinated for at least 4 hours absorbs all this flavor and becomes deeply savory and slightly caramelized when seared quickly over high heat.
The Marinade Formula
- 1/3 cup gluten-free tamari or coconut aminos (not regular soy sauce, which contains wheat)
- 3 tablespoons sesame oil (toasted, for deeper flavor)
- 2 tablespoons brown sugar
- 1/2 cup pear or apple juice (fresh is better than bottled)
- 4 cloves garlic, minced
- 1 tablespoon grated fresh ginger
- 1 tablespoon rice vinegar
- A pinch of white pepper
Whisk this together and submerge your thinly sliced beef. The longer you marinate (ideally overnight), the more tender and flavorful it becomes. Cook it in a screaming-hot cast-iron skillet or on a charcoal grill in a single layer — don’t crowd the pan. The meat will caramelize on the outside while staying tender inside.
Why Cauliflower Rice Works Here
Cauliflower rice is often a “diet food” substitute that people tolerate rather than enjoy, but bulgogi is different. The rich, savory beef and charred edges mean you’re not missing rice at all. The cauliflower acts more as a neutral bed that soaks up the juices from the meat. If you’re serving this to people who aren’t gluten-free, make both regular rice and cauliflower rice — everyone gets what they want, and the bulgogi itself becomes the star.
Pro tip: Slice your beef while it’s partially frozen (about 30 minutes in the freezer) — this makes paper-thin slicing incredibly easy and more consistent.
4. Herb-Crusted Pork Chops with Creamed Mushrooms
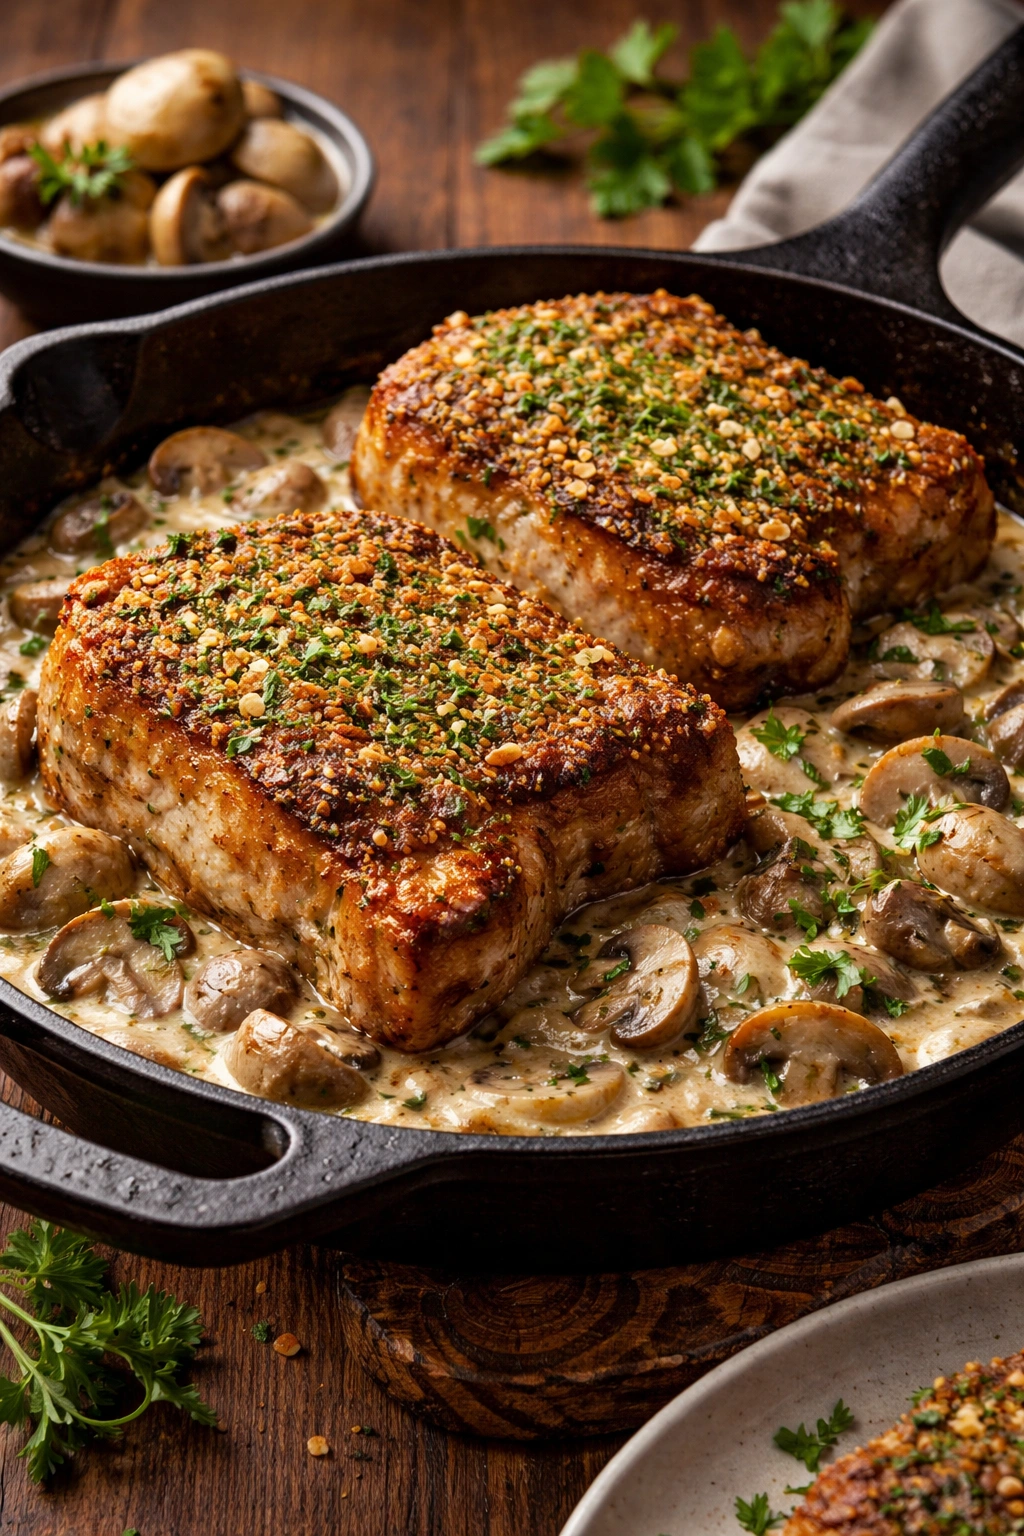
Pork chops are an underrated gluten-free dinner option, especially when you build a crust from fresh herbs, ground almonds, and Parmesan cheese instead of breadcrumbs. Paired with a silky mushroom cream sauce, this becomes a dinner that feels indulgent without being heavy.
Building a Flavorful Crust Without Gluten
The crust on these chops comes from finely minced fresh herbs (parsley, thyme, sage), grated Parmesan cheese, finely ground blanched almonds, and a whisper of lemon zest. Mix these together with a splash of olive oil to create a paste, then press it firmly onto the surface of bone-in pork chops. Sear them skin-side down first to anchor the crust, then flip and finish in the oven at 400°F until they’re cooked through but still slightly juicy.
The Creamed Mushroom Sauce
Simultaneously, sauté mushrooms (cremini, shiitake, or oyster — whatever you can find) in butter until they release their liquid and the pan is nearly dry. Add shallots, a splash of brandy or dry sherry if you have it, then cream and fresh thyme. Simmer gently until the mushrooms are silky and the sauce is rich enough to coat the back of a spoon. The earthy umami of mushrooms paired with pork is a combination that’s been beloved for centuries.
Why This Tastes Like Fine Dining
It’s the combination of crust texture, juicy pork, and rich sauce that creates sophistication here. Each component serves a purpose — the herb crust adds crunch and flavor interest, the pork is the protein anchor, and the creamed mushroom sauce ties everything together. This is exactly the kind of dinner you’d order in a nice restaurant and wonder how to recreate at home.
Worth knowing: Pork chops can dry out quickly, so aim for 1.5-inch thickness and don’t cook them past 145°F internal temperature. The carryover heat will bring them to a safe temperature while keeping them tender.
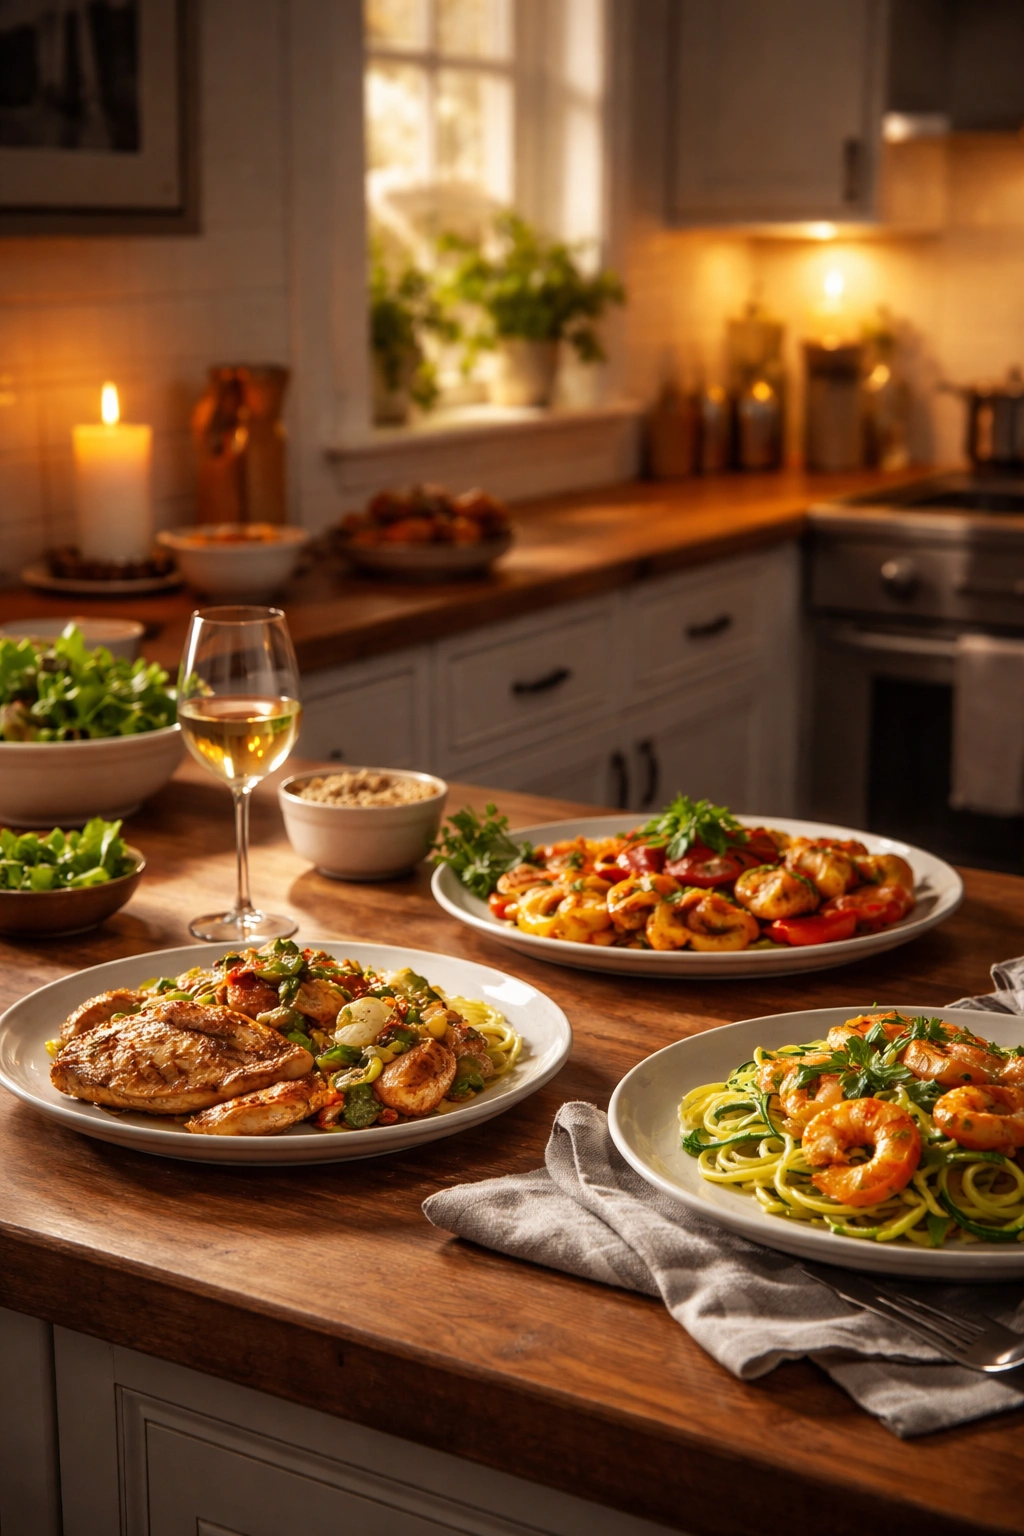
5. Shrimp Scampi Over Zucchini Noodles
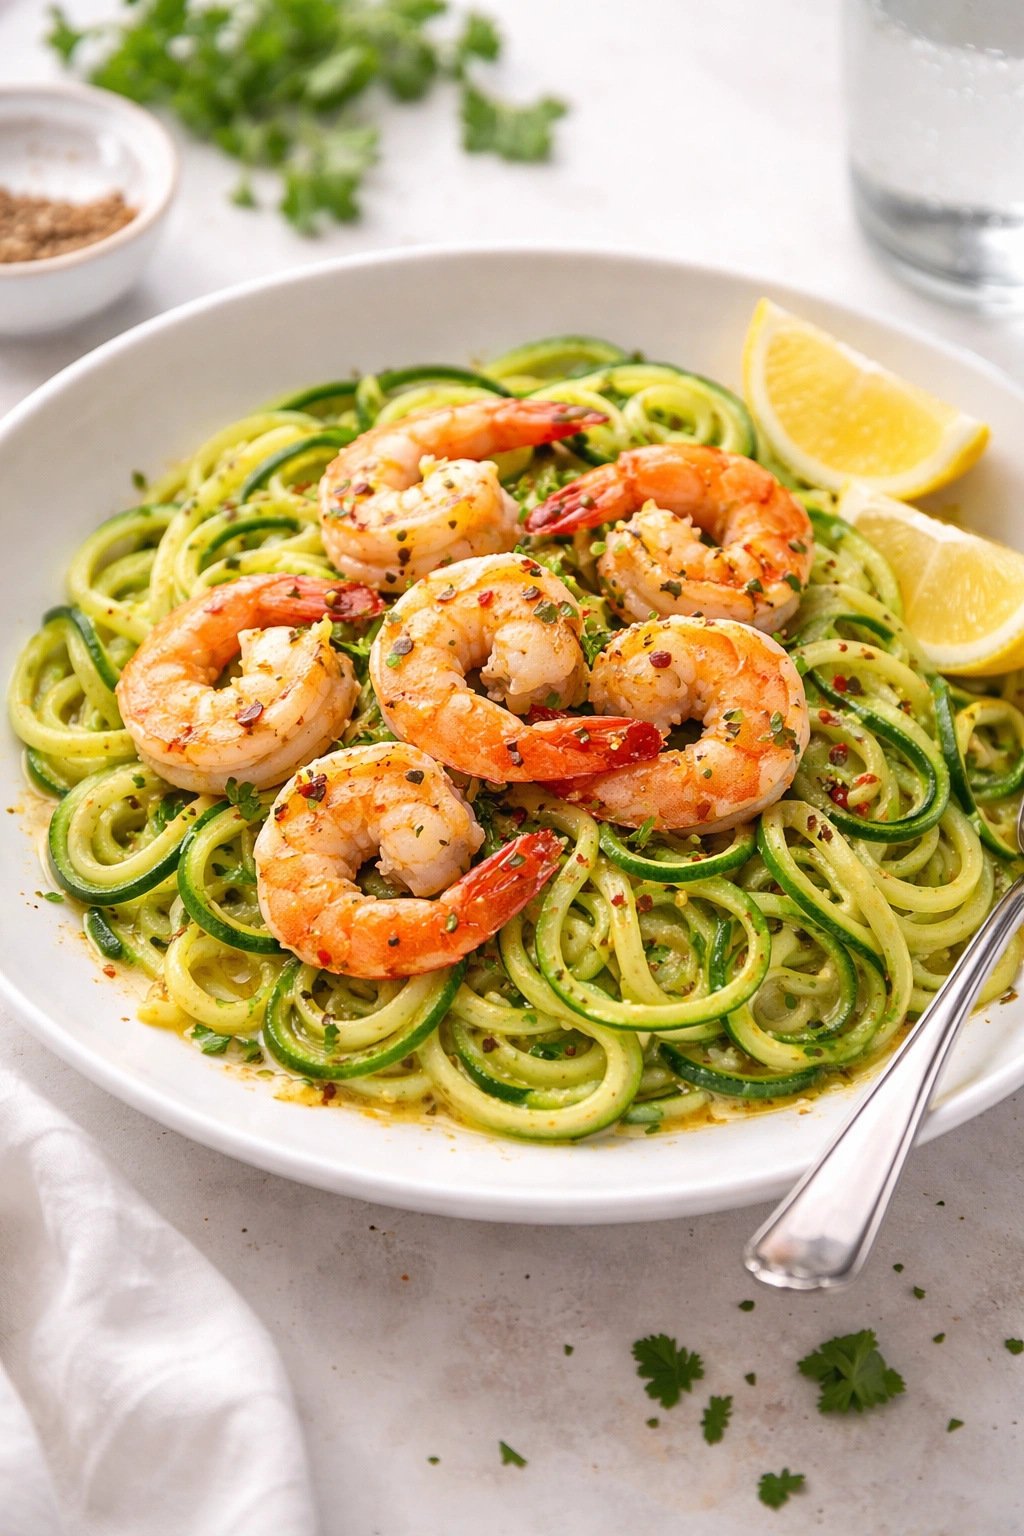
Scampi is perhaps the simplest gluten-free dinner you can make, yet it tastes refined and restaurant-worthy. The sauce is essentially butter, garlic, white wine, and lemon — just five minutes of cooking. Zucchini noodles provide an elegant carb-light option that absorbs all those bright flavors beautifully.
The Actual Technique Behind Shrimp Scampi
Most home cooks overcomplicate this dish. The trick is to have everything ready before you start cooking, because it moves fast. Slice garlic very thin, have your wine and lemon juice measured and ready, and pat the shrimp completely dry so they sear rather than steam.
Heat olive oil and butter together in a large skillet over medium-high heat. Add the garlic and cook for maybe 30 seconds — just until fragrant. Add the shrimp in a single layer and sear undisturbed for 90 seconds on each side. Remove the shrimp to a plate. Deglaze the pan with white wine and lemon juice, scraping up all the flavorful bits. Whisk in cold butter off the heat so it emulsifies into a silky sauce. Taste and season with fleur de sel. Return the shrimp to the pan for just a moment to warm through, then pour everything over your zucchini noodles. Finish with fresh parsley and red pepper flakes.
Making Perfect Zucchini Noodles
Use a spiralizer to create long, thin noodles from firm zucchini. Don’t cook them — toss them in the hot pan sauce just before serving so they warm through but stay crisp and fresh. The heat will soften them slightly without making them mushy. The bright, delicate flavor of raw zucchini contrasts beautifully with the rich, garlicky sauce.
Adding Depth to a Simple Dish
While the core recipe is simple, you can easily elevate it by adding fresh breadcrumbs (for non-gluten-free eaters) toasted in brown butter, finishing with a pinch of Aleppo pepper, or stirring in a handful of cherry tomatoes at the very end. Each addition brings something new without complicating the fundamental simplicity.
Pro tip: Buy shrimp that’s already been peeled and deveined, but frozen — it’s cheaper than fresh and easier to portion. Thaw it and dry it very thoroughly before cooking.
6. Thai Green Curry with Jasmine Rice
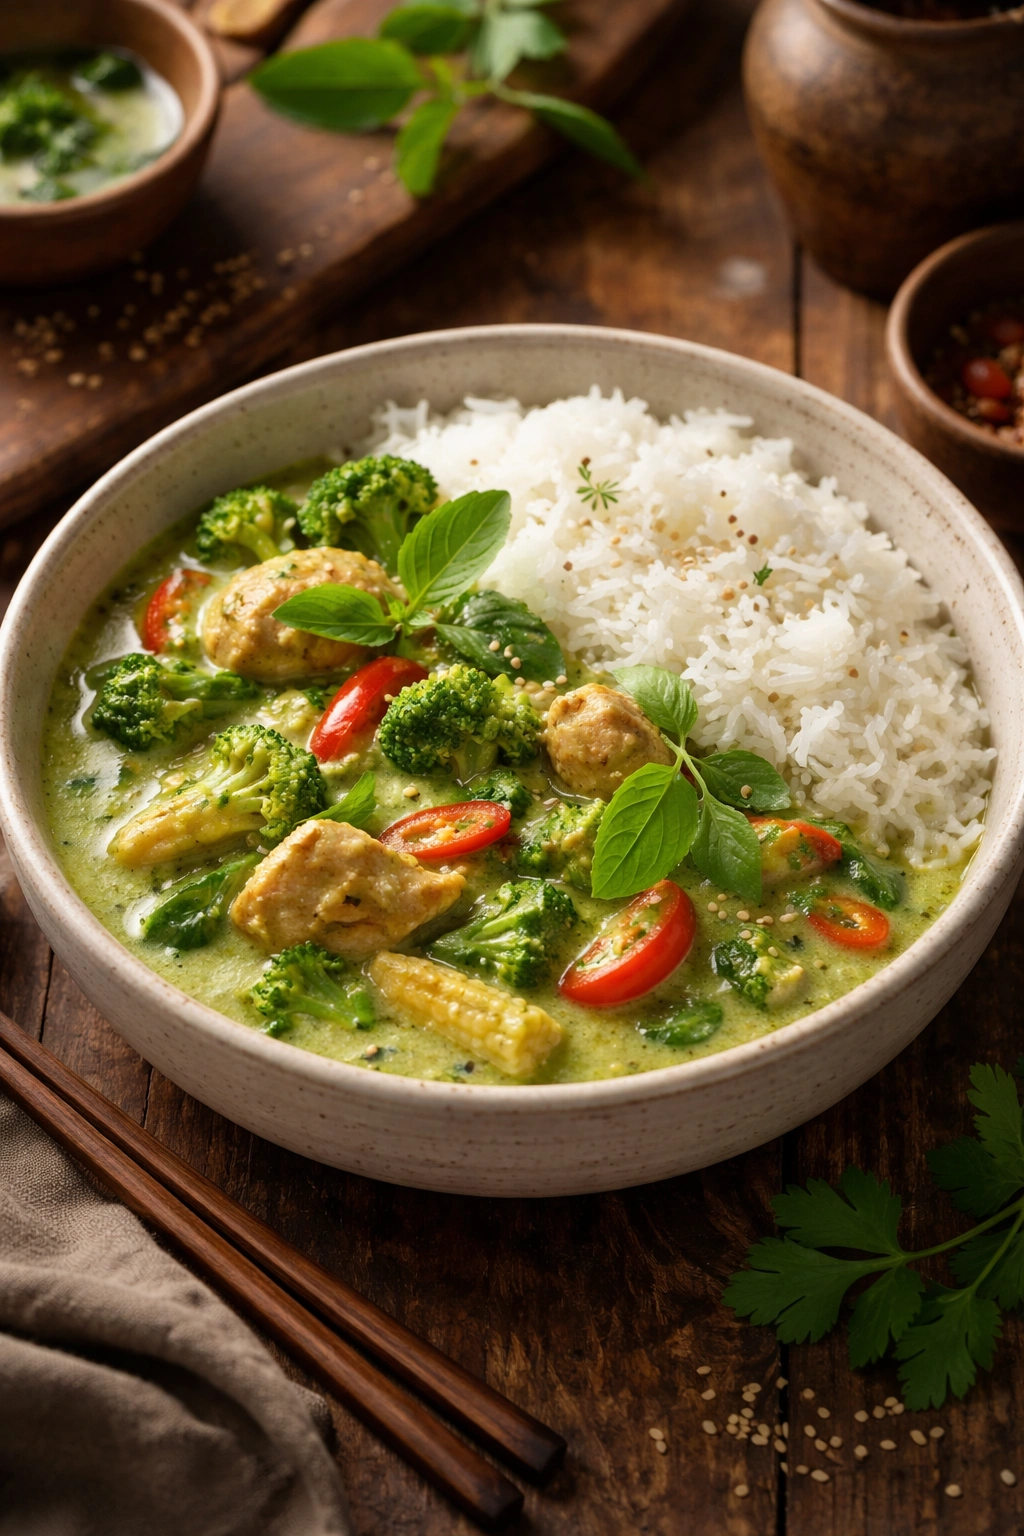
Thai cuisine is naturally full of gluten-free options because it relies on fish sauce, coconut milk, fresh herbs, and spices rather than soy sauce or wheat. A proper green curry tastes complex and layered, with heat, richness, and bright herbal notes all playing together.
Building Flavor With Curry Paste
The foundation of a great green curry is curry paste — and homemade is absolutely worth the small effort. Blend fresh green chilies, garlic, ginger, lemongrass, shallots, cilantro roots (if you can get them), and a small amount of shrimp paste into a rough paste. Toast this paste in coconut oil for a few minutes to develop its flavors before adding your protein and vegetables.
The shrimp paste is the secret ingredient that most home cooks skip — it adds an umami depth that makes people say “something tastes incredible in here” without being able to identify it. You need very little, and it disappears into the sauce rather than tasting fishy.
Creating Depth Through Technique
Add your protein (chicken, shrimp, or beef all work beautifully), then pour in coconut milk and simmer gently. The curry should cook low and slow so flavors meld and the sauce reduces slightly. Add vegetables that can handle the simmering — bell peppers, long beans, Thai eggplant if you can find it, or fresh basil leaves at the very end. Finish with a squeeze of lime juice and a pinch of fish sauce, which brightens everything without tasting fishy.
Why Jasmine Rice Is Essential
Jasmine rice has a naturally floral, delicate aroma that pairs perfectly with curry’s complex spice profile. Cook it separately using the absorption method — one part rice to 1.5 parts water, brought to a boil, then simmered covered until the water is absorbed. The rice becomes fragrant and slightly fluffy, perfect for soaking up the curry sauce.
Worth knowing: Make curry paste in batches and freeze it in ice cube trays — you’ll have convenient portions ready whenever you want to make this dinner in 30 minutes.
7. Beef Stir-Fry with Rice Noodles

Stir-fry is the gluten-free dinner that bridges the gap between fast weeknight cooking and restaurant-quality results. The key is proper technique, quality ingredients, and refusing to crowd the pan.
The Secret to Great Stir-Fry
Home stir-fry often fails because people try to cook everything at once in a crowded pan, which steams the vegetables rather than searing them. The right approach is to cook components separately, then combine them at the end. This takes maybe 20 minutes total but produces entirely different results.
Slice your beef thin, toss it with a small amount of gluten-free tamari, cornstarch, and sesame oil, and let it rest while you prep everything else. Heat oil in a wok or large skillet until it’s smoking. Add the beef in batches, searing each piece for just 60-90 seconds on each side, then set aside. Repeat with vegetables in order of cooking time — start with harder items like broccoli and carrots, finish with tender items like bell peppers and snap peas. Everything should have a slight char and still be crisp, never soft.
The Sauce That Ties Everything Together
Make a simple sauce from gluten-free tamari, rice vinegar, garlic, ginger, and a pinch of sesame oil. You can thicken it with a small amount of cornstarch whisked with water if you prefer a glossy sauce, or leave it thinner. Pour this over your cooked beef and vegetables, add a handful of sliced scallions and fresh cilantro, and toss quickly to combine.
Rice Noodles vs Rice
Rice noodles provide a lighter, more delicate vehicle for the stir-fry sauce than rice. Soak them in hot water for 5-8 minutes until they’re pliable, drain them, then give them a quick toss in a little oil so they don’t stick. You can even do a final pan-fry of the noodles if you want them slightly crispy on the edges — they taste wonderful this way.
Pro tip: Have all your ingredients prepped and lined up before you start cooking — stir-fry moves so fast that you don’t have time to chop once you begin.
8. Risotto with Mushrooms and Truffle Oil
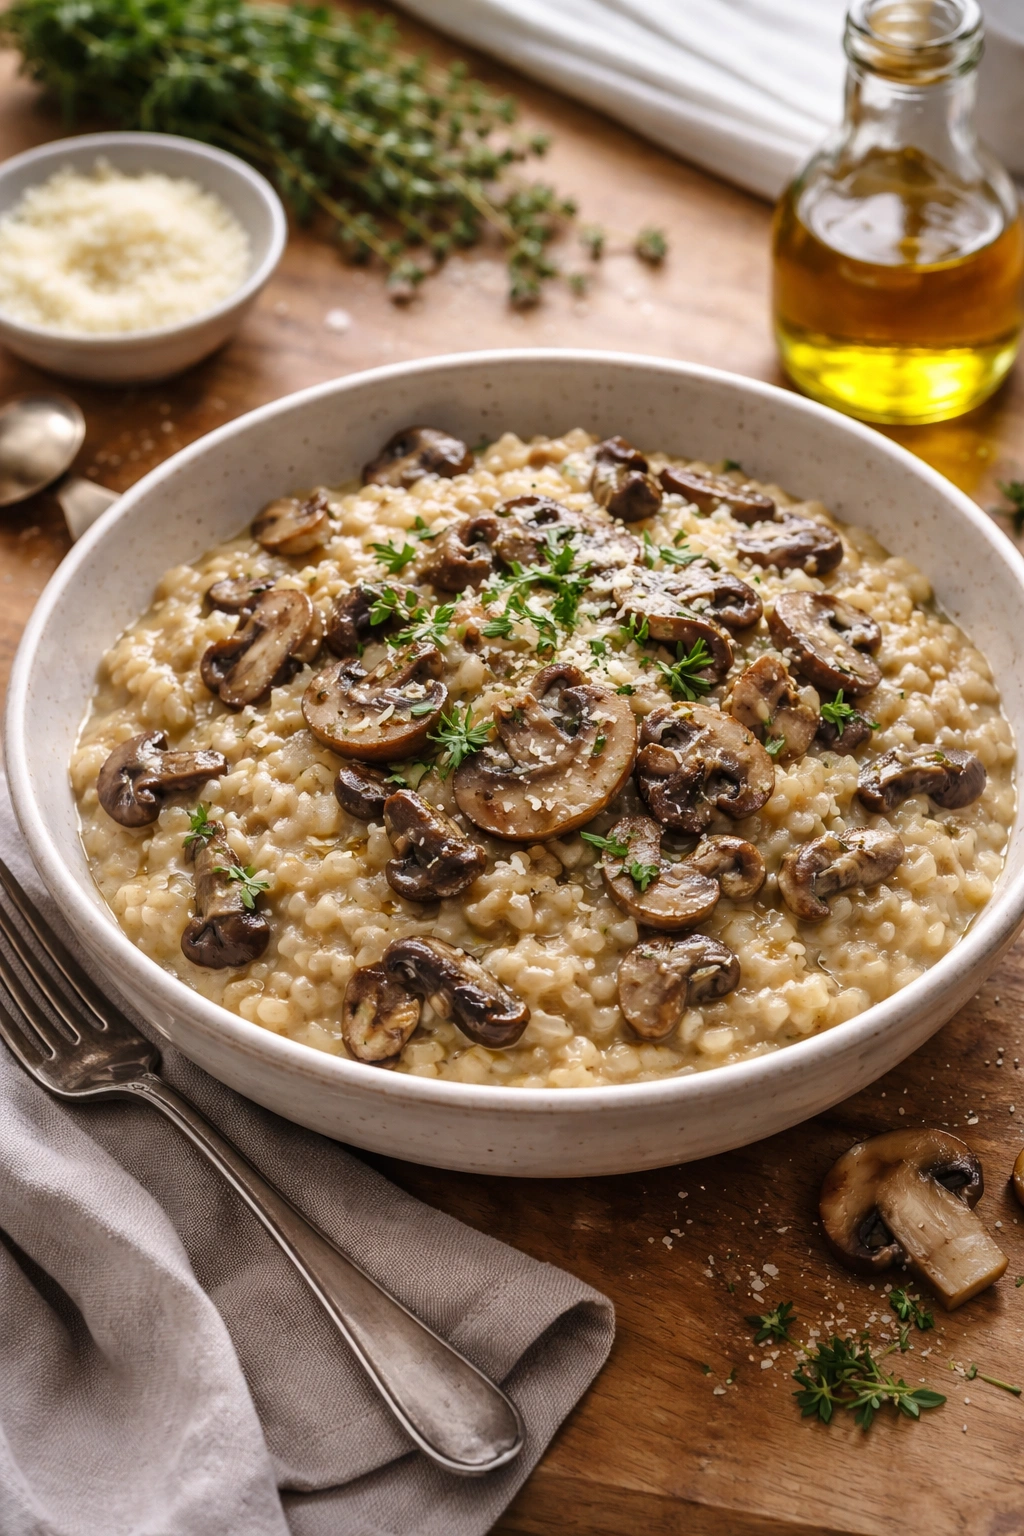
Risotto is naturally gluten-free and feels like pure comfort and luxury in a bowl. The key is patience and technique — this is a dinner where you can’t rush things, but the results are worth every minute of standing at the stove.
Understanding the Risotto Technique
Risotto depends on gradually adding warm broth while stirring constantly, allowing the rice to release its starches, which create a creamy, luxurious sauce without any cream or flour. Arborio or Carnaroli rice are both excellent choices because they have enough starch to create this creamy texture while still maintaining a slight firmness in the center — what Italians call “al dente.”
Toast your rice briefly in butter and shallots, then add wine and let it absorb. Begin adding warm vegetable or chicken broth one ladle at a time, stirring constantly. Each ladle should be mostly absorbed before you add the next. This process takes about 18-20 minutes and is actually meditative once you accept that you’re standing at the stove. The constant stirring is what breaks down the rice and creates that signature creamy texture.
Building Flavor Through Quality Ingredients
Meanwhile, sauté mushrooms separately — cremini, shiitake, and oyster mushrooms all bring different earthy notes. Cook them in butter until they’re golden and concentrated. Add a splash of dry sherry or Madeira if you have it, then set aside.
When the rice is almost done (still with a slight bite to it), stir in the cooked mushrooms, a splash of truffle oil, fresh thyme, and grated Parmesan cheese. The risotto should flow on the plate — it’s not stiff or stodgy, but creamy and luxurious. A final shaving of Parmesan and a whisper of Maldon salt finish it.
Why Risotto Satisfies Without Gluten
The creamy texture of properly made risotto satisfies the same craving that creamy pasta dishes do, but it’s created entirely through technique, not flour or cream. It’s hearty, warming, and feels like you’ve been cooking all day — even though the total time is about 45 minutes.
Worth knowing: Risotto doesn’t hold well — it’s one of the few dishes worth cooking to order. But it’s fast enough that you can have dinner on the table in under an hour from the moment you start.
9. Pan-Seared Chicken with Roasted Asparagus and Lemon Butter
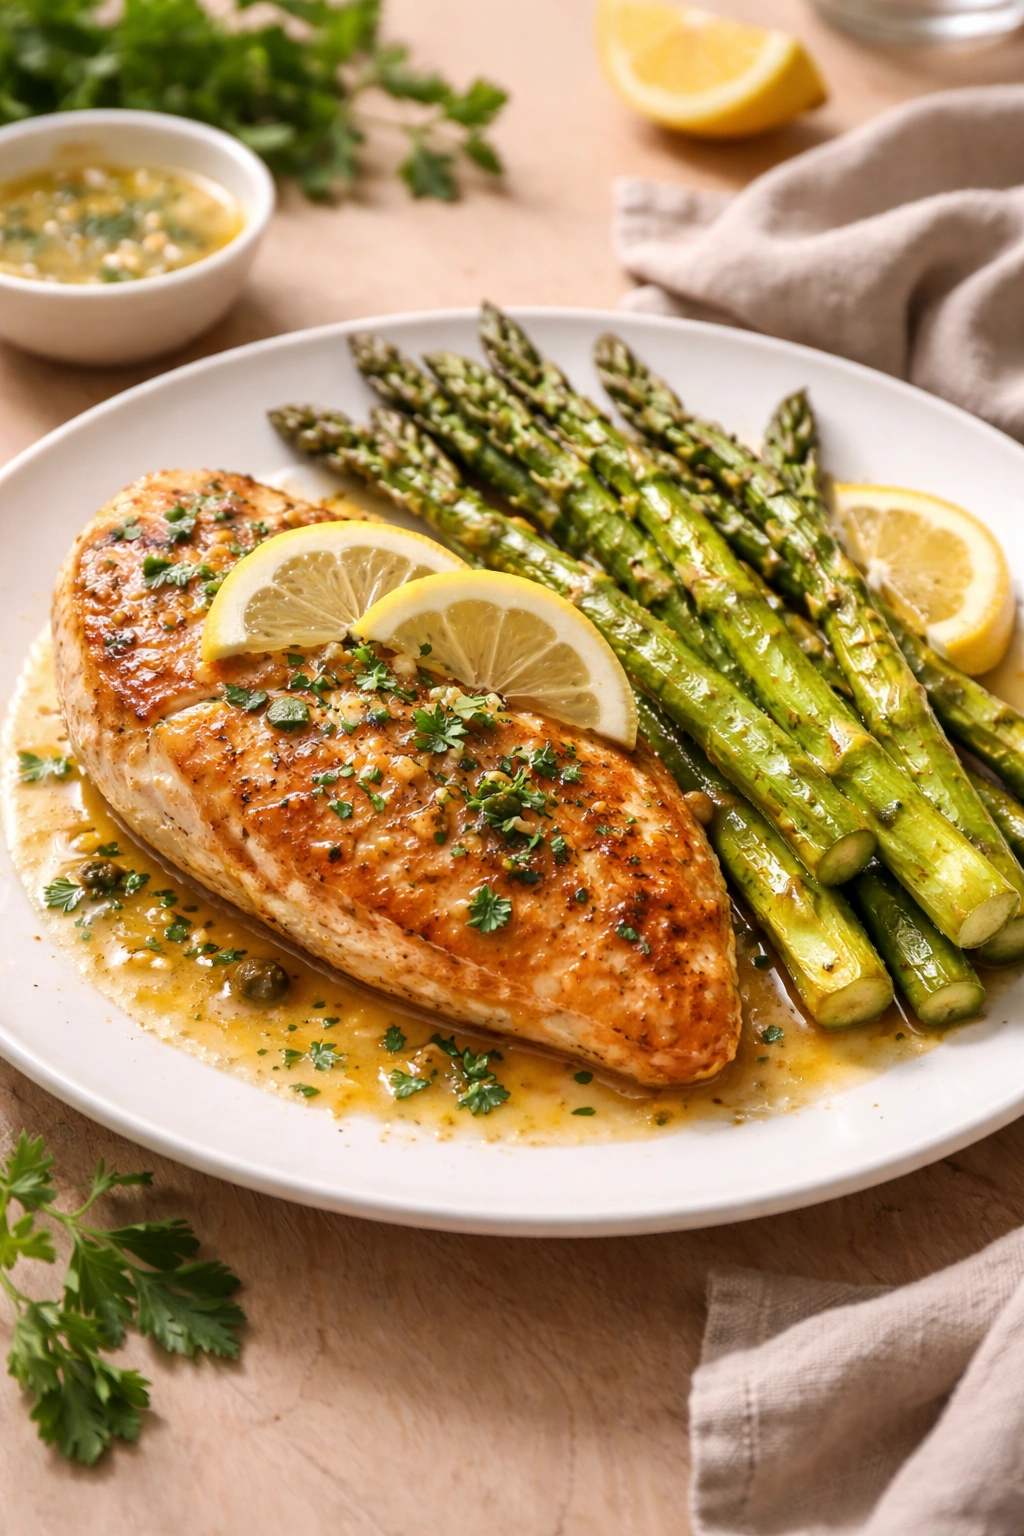
Sometimes the best gluten-free dinners are the simplest ones — perfectly cooked chicken, vegetables roasted until they’re caramelized, and a silky lemon butter sauce that ties everything together. This dinner tastes elegant without any fuss.
Achieving Perfectly Cooked Chicken Breasts
The secret to moist, tender chicken breasts is to pound them to an even thickness and cook them to exactly 165°F internal temperature, no higher. Heat a skillet with olive oil and butter over medium-high heat. Season your chicken generously with salt and pepper. Sear it for 5-6 minutes on the first side without moving it — this creates a golden crust. Flip and sear the other side for 3-4 minutes, then check the temperature with an instant-read thermometer. The time varies depending on thickness, but don’t rely on guessing.
Roasting Vegetables While the Chicken Cooks
Toss asparagus with olive oil, salt, pepper, and sliced garlic, then roast at 400°F while your chicken cooks. The asparagus should be tender but still have a slight firmness, with charred edges. About 12-15 minutes depending on the thickness of your spears.
The Simplest Sauce That Makes Everything Better
Once your chicken is cooked, set it aside. Add a splash of dry white wine to the hot pan, scraping up all the browned bits, then whisk in cold butter off the heat. Finish with fresh lemon juice, fresh parsley, and a pinch of salt. This sauce is so simple that it seems impossible it tastes this good.
Why This Tastes Like Restaurant Food
It’s because each component is done perfectly — the chicken is moist, the vegetables are caramelized, and the sauce tastes bright and rich. There’s no overcomplification, no trying to hide mediocre ingredients or technique. It’s what all of cooking should be: good ingredients handled well.
Pro tip: Let your chicken rest for a few minutes after cooking before slicing into it. This allows the juices to redistribute through the meat, keeping it tender.
10. Taco Bowls with Cilantro-Lime Cauliflower Rice
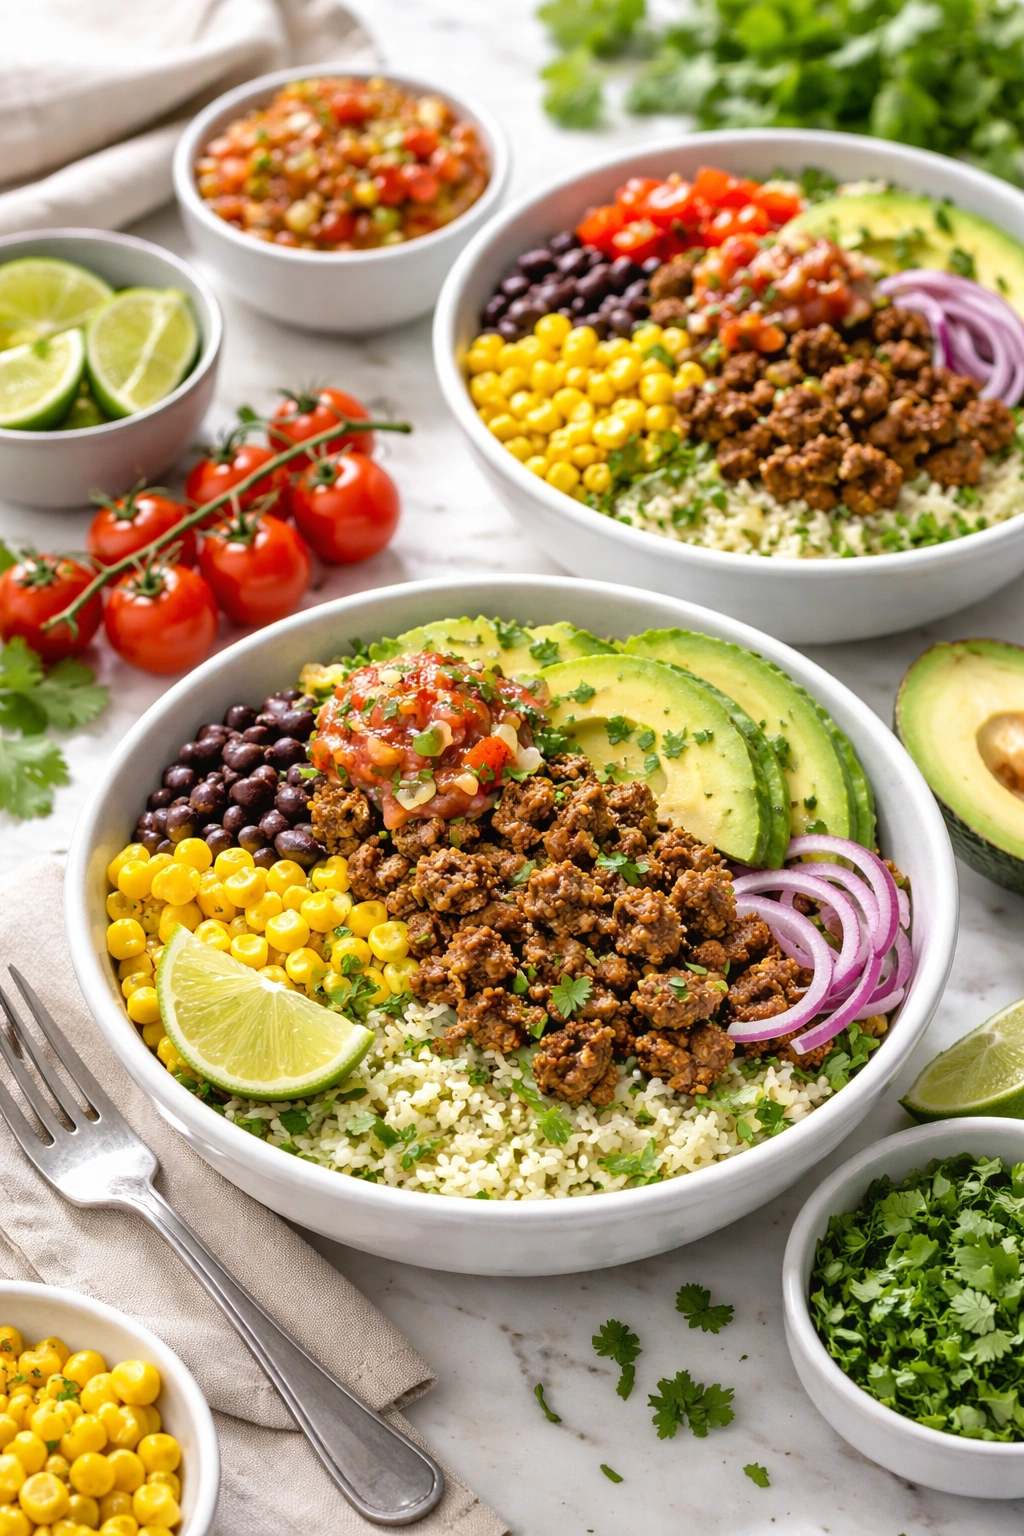
Taco bowls let you skip the tortilla entirely and create a satisfying, colorful dinner that’s actually lighter than traditional tacos but feels just as indulgent. Everything is naturally gluten-free, and you can customize toppings however you like.
Building a Better Cauliflower Rice
Cauliflower rice often tastes like you’re eating steamed cauliflower, which nobody wants. Instead, give it actual flavor by ricing raw cauliflower (or buying pre-riced), then sautéing it quickly in olive oil and butter with garlic and jalapeño. Add fresh cilantro and lime juice at the end. The cooking breaks down the cauliflower slightly, the butter and oil add richness, and the cilantro-lime dressing makes it taste intentional and delicious rather than like a substitution.
Seasoning Meat Properly
Brown your ground beef or turkey with proper taco seasoning — this is where you want to make your own spice blend rather than using a packet with mystery ingredients and sometimes gluten. Toast whole cumin seeds and chili powder in a dry skillet for 30 seconds, then add to your meat along with minced garlic, oregano, paprika, and a pinch of cayenne. Let it simmer for a few minutes so the spices bloom and develop flavor.
Components That Build the Bowl
Create a taco bar with your cilantro-lime cauliflower rice as the base, seasoned ground meat, fresh toppings (diced tomatoes, red onion, avocado, radish), crispy taco shells for non-gluten-free eaters, cheese, sour cream, and fresh cilantro. Everyone builds their own bowl with their preferred proportions. The beauty of bowls is that they’re infinitely customizable and come together quickly.
Making It Feel Complete
Without the tortilla acting as a binding element, you need enough components that each forkful has multiple flavors and textures. The cilantro-lime rice is the silent hero here — it tastes bright and alive, which prevents the whole bowl from feeling like a sad salad. Add cheese for richness, avocado for creaminess, crispy taco shells for people who want them, and you’ve got something satisfying.
Worth knowing: Make the cilantro-lime cauliflower rice in the morning and let it cool — it actually tastes better at room temperature or slightly chilled than piping hot.
Final Thoughts
The thread connecting all of these dinners is that they taste fantastic because of technique, flavor building, and quality ingredients — not because of what goes into them or what’s been taken away. None of them feel like compromises, and nobody needs to know they’re gluten-free unless you tell them. They’re dinners you’d make even if you weren’t avoiding gluten, because they’re genuinely delicious.
The real shift in thinking comes when you stop trying to replicate traditional wheat-based versions of dishes and start cooking things that don’t need gluten in the first place. A perfectly seared salmon with crispy skin, a silky risotto created through technique, a curry layered with bold flavors — these are complete dinners that happen to be naturally gluten-free. Once you have a handful of reliable, actually-delicious gluten-free dinners in your rotation, the whole process becomes less about restriction and more about cooking food you genuinely want to eat.