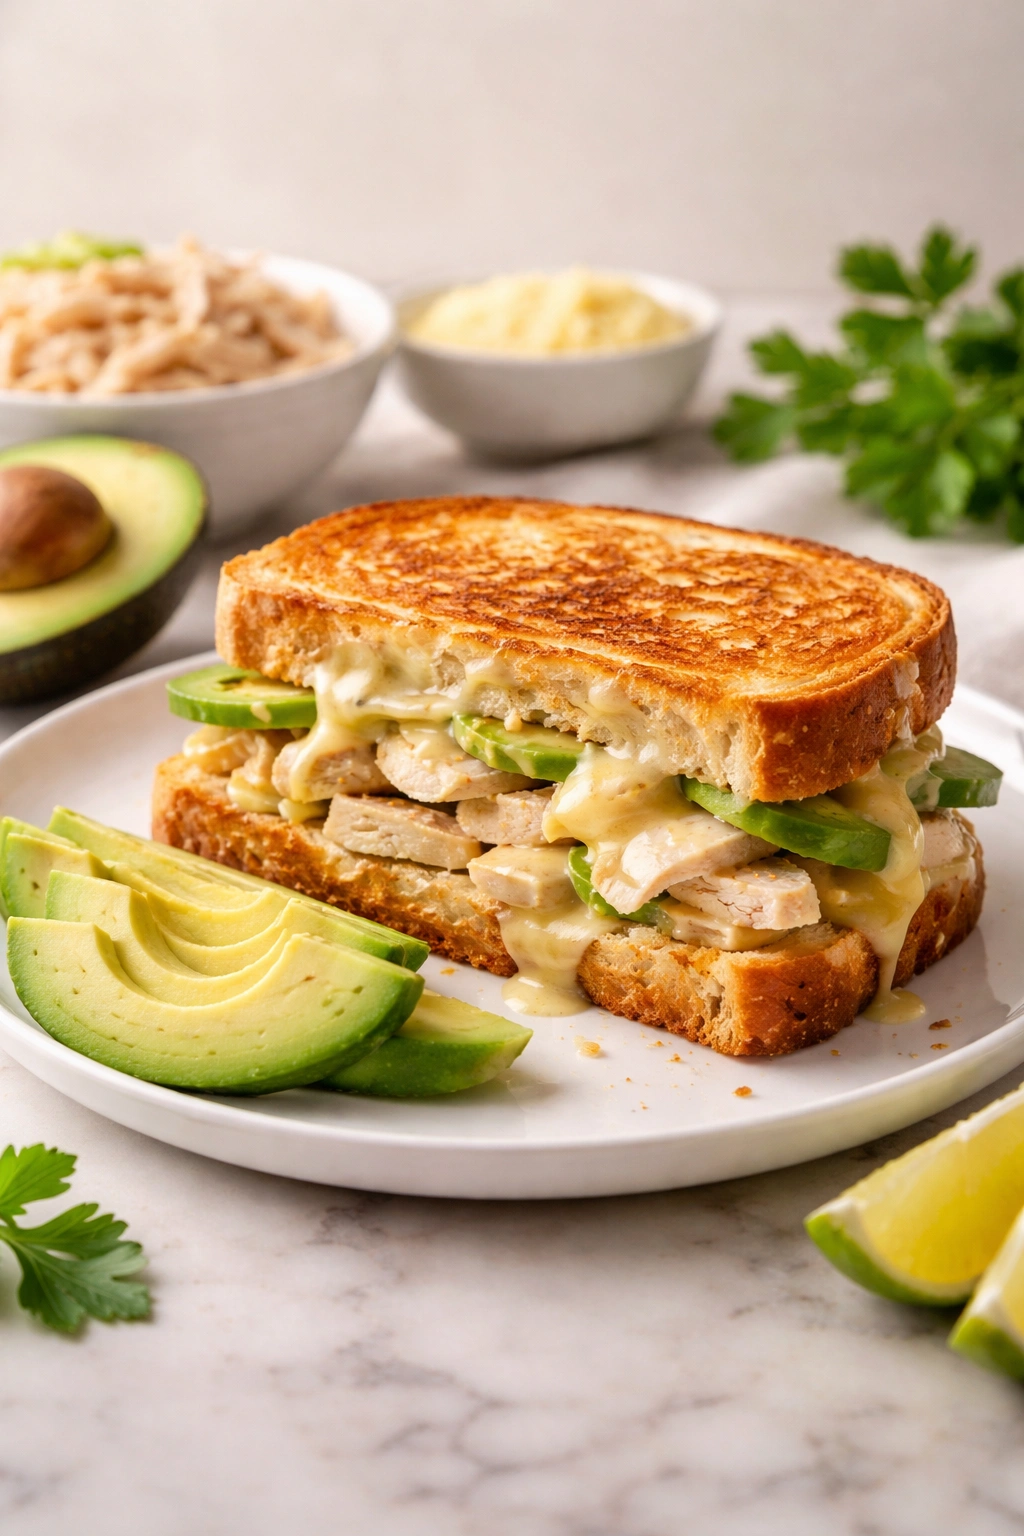
There’s nothing quite like the moment you bite into a perfectly toasted, butter-golden sandwich loaded with creamy avocado, tender chicken, and melted cheese. It’s restaurant-quality comfort food that takes less time to prepare than ordering takeout—and costs a fraction of the price. The chicken avocado melt isn’t a complicated dish; it’s actually one of the easiest ways to turn basic pantry staples into a meal that feels genuinely indulgent. If you’ve ever found yourself standing in front of your fridge at 5:30 p.m. wondering what on earth you’re going to cook for dinner, this is your answer.
What makes this sandwich so perfect for weeknight dinners is that it requires almost no planning. You probably already have most of the ingredients at home right now. A piece of chicken (cooked or uncooked), an avocado, some cheese, and bread—that’s legitimately all you need. Everything comes together in under 20 minutes, yet it’s the kind of meal that makes you feel like you actually put in effort. Your family will wonder why restaurant sandwiches taste so much worse, and honestly, after you make this once, you’ll never understand why people pay $12 to $15 for something this simple to execute at home.
Beyond the convenience and speed, this sandwich hits all the nutritional notes that actually matter. The chicken provides lean protein to keep you satisfied, the avocado delivers heart-healthy fats and a buttery richness that makes every bite feel luxurious, and the cheese adds that irresistible melted element that transforms the whole thing into comfort food. It’s substantial enough to feel like a real meal, not just a snack, but it won’t leave you feeling overstuffed or sluggish. This is the kind of dinner that works equally well on a frantic Tuesday when you barely have time to breathe, or on a lazy Sunday when you want something special without the cooking drama.
Why This Melt Beats Your Regular Weeknight Rotation
Let’s be honest: weeknight cooking can feel repetitive. You’ve made pasta three times this week, grilled chicken breasts until they’re borderline boring, and you’re reaching that point where you’d genuinely consider just ordering pizza out of sheer fatigue. The chicken avocado melt breaks that cycle without requiring you to learn any new techniques or hunt down obscure ingredients. It’s the definition of approachable, yet it feels special enough that you won’t feel like you’re phoning in dinner.
The sandwich format is actually genius for busy nights. Unlike cooking a multi-component meal where you’re juggling timing—trying to get the protein done at exactly the same moment as the vegetables and the rice—this comes together in one pan. You’re not managing multiple burners or oven temperatures. You toast, you assemble, you grill, and you’re done. The entire process is forgiving too; if your cheese doesn’t melt perfectly on the first attempt, you just cover the pan for an extra minute. There’s very little that can actually go wrong.
Another reason this melt deserves a permanent spot in your weeknight rotation is its flexibility. You can make it as simple or as gourmet as your mood dictates. Some nights, you might just want the classic version: chicken, cheese, avocado, bread. Other nights, you might pile on roasted red peppers, crispy bacon, fresh cilantro, or a spread of chipotle mayo. The base recipe is consistent, but the possibilities for personalization are genuinely endless. It grows with your energy level and your pantry’s contents.
Creating the Perfect Seasoned Chicken Base
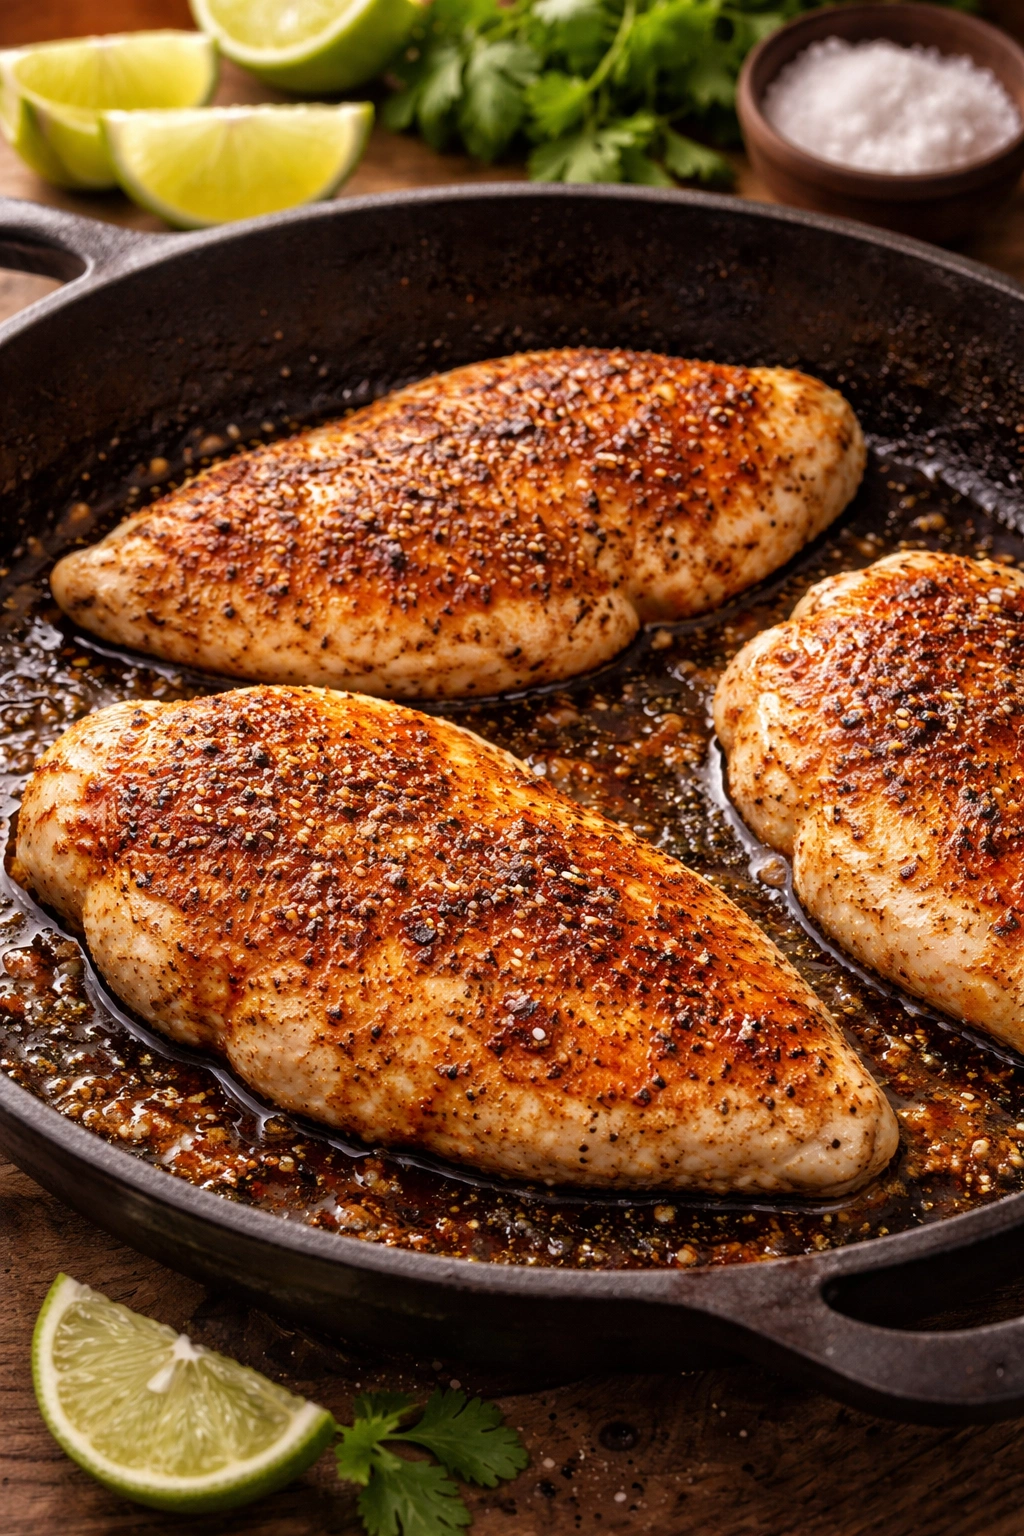
The chicken is honestly the most important element, so it’s worth spending just a few extra minutes to season it properly. This isn’t about complicated techniques; it’s about ensuring your chicken actually tastes like something. Start with either boneless, skinless chicken breasts or thighs—both work beautifully, though thighs have more inherent flavor and moisture, which some people prefer. Pat the chicken dry with paper towels; this small step makes a surprising difference in how nicely it browns.
Season generously with salt and black pepper on both sides. Then add a pinch of garlic powder, a light dusting of paprika (smoked paprika is even better if you have it), and a tiny squeeze of fresh lime juice. You’re not looking for an intense marinade here; you just want enough seasoning that the chicken tastes interesting on its own. If you have 15 minutes to let the seasoned chicken sit in a bowl before cooking, even better—this allows the seasonings to penetrate the meat. But honestly, you can skip this step on nights when you’re really rushing and still end up with a delicious result.
Heat a skillet over medium-high heat with just a drizzle of olive oil. When the oil shimmers slightly, add the chicken and let it sit undisturbed for about 5 to 6 minutes. Resist the urge to poke at it or move it around; this resting period is what creates that golden, flavorful crust. Flip and cook the other side for another 5 to 6 minutes, until the internal temperature reaches 165°F (74°C) if you’re checking with a meat thermometer. If you’re cooking thin cutlets, you might need less time. Let the cooked chicken rest for a few minutes on a plate before slicing or shredding it; this helps it stay juicy.
Preparing Your Avocado with Purpose
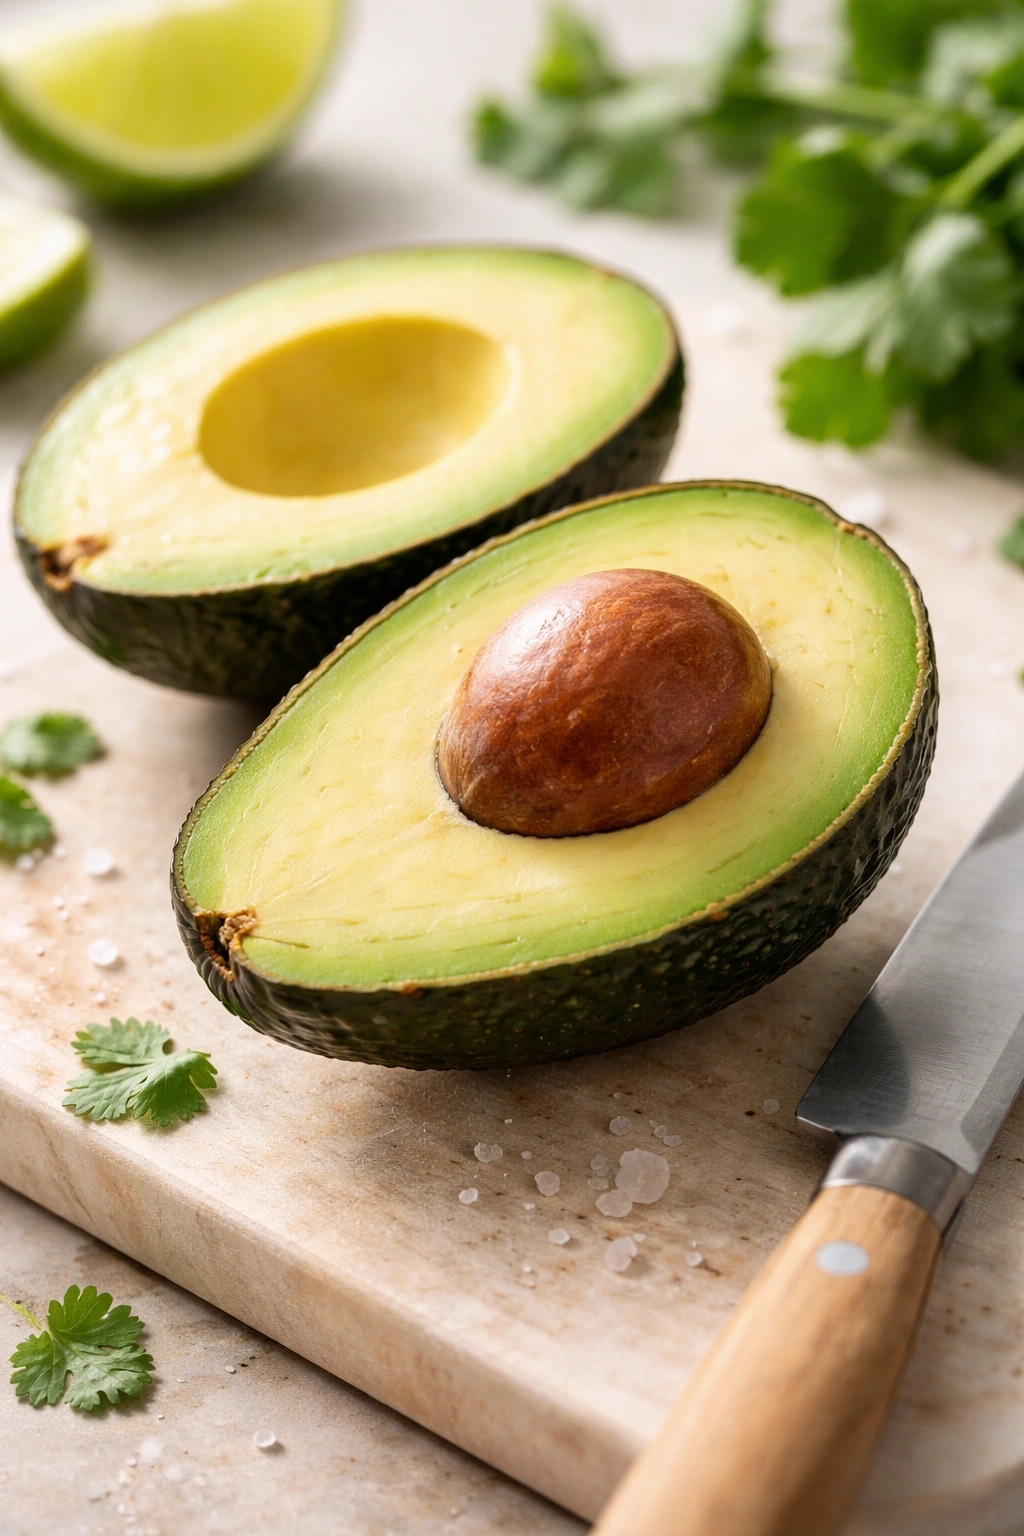
Here’s where most people make a small mistake with avocados: they prepare them too far in advance and then watch helplessly as the flesh turns brown. The solution is simple—don’t cut your avocado until you’re actually ready to assemble the sandwich. However, if you need to prep ahead, there’s a trick: cut it, leave the pit in one half, cover it tightly with plastic wrap, and keep it in the refrigerator. The pit actually does help prevent browning. When you’re ready to use it, just scoop out what you need from the half still containing the pit.
Choose an avocado that yields slightly to gentle pressure but isn’t mushy. If it’s too firm, it won’t mash smoothly or spread easily. If it’s too soft, it’ll have brown spots and an off flavor. The sweet spot is an avocado that feels like it has a little give but still maintains its shape. Cut it in half lengthwise, twist the two halves apart, and use a spoon to scoop out the flesh. You can either slice it thinly for this sandwich or mash it with a fork—both approaches work great. If you mash it, add a tiny squeeze of lime juice and a pinch of salt; this prevents browning and elevates the flavor.
Selecting and Layering Your Cheese
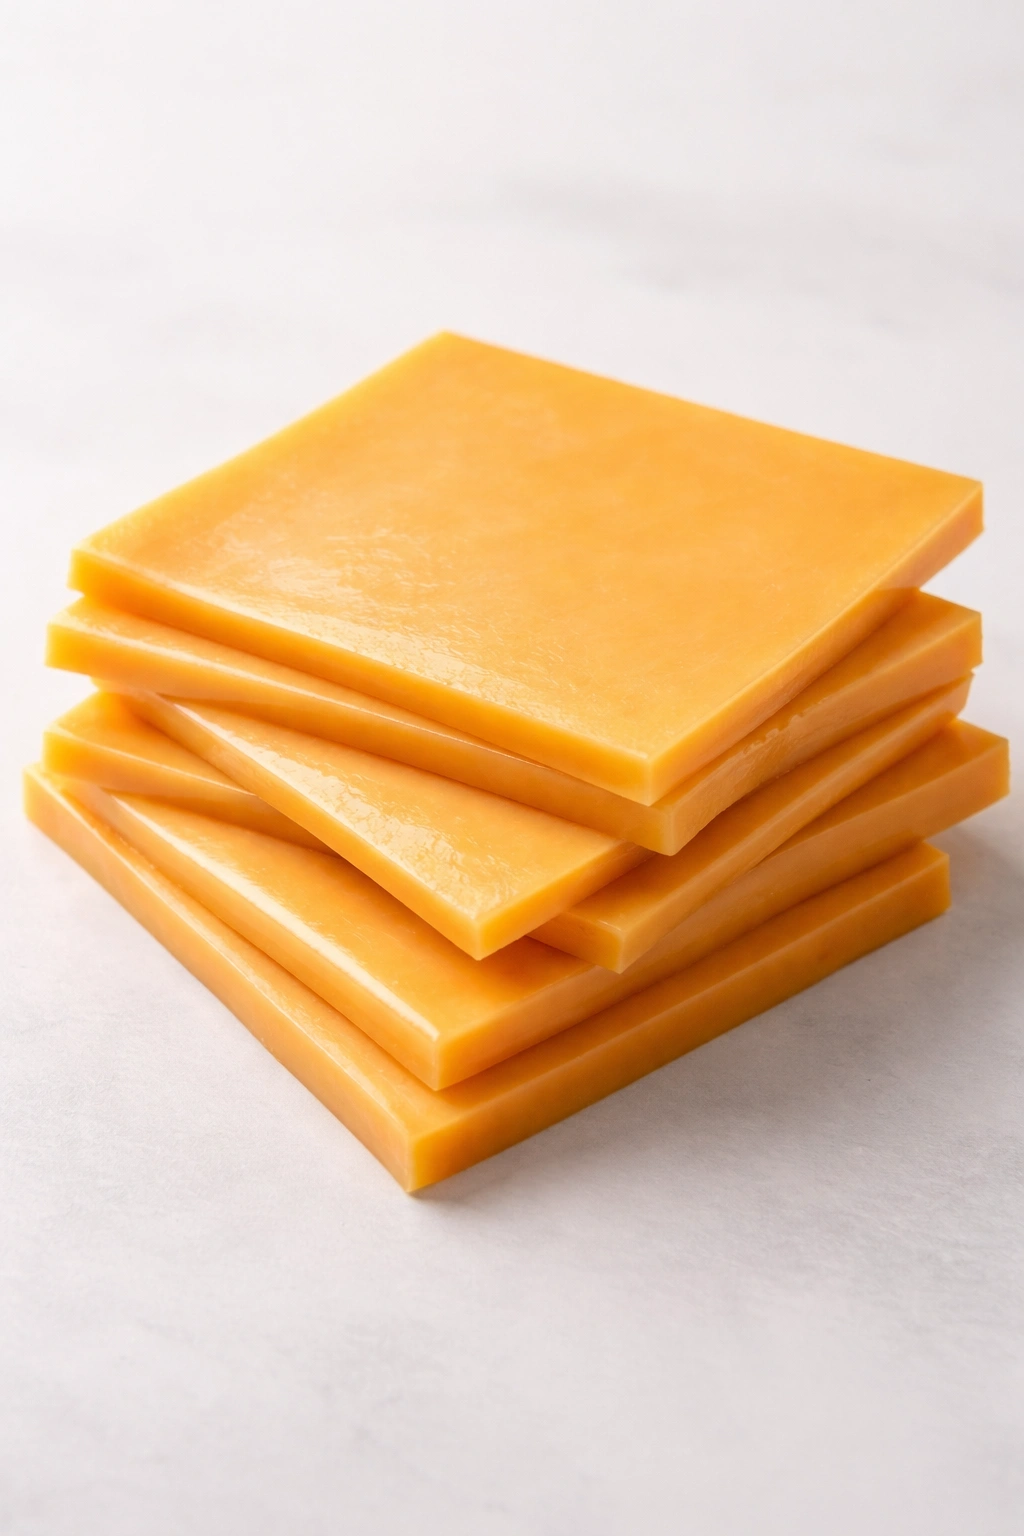
The cheese is your melting agent and flavor driver, so choose something that actually melts well. Sharp cheddar is the classic choice and delivers real flavor. Smoked gouda is phenomenal if you want something a bit more sophisticated and smoky. Pepper jack adds a subtle heat. Monterey Jack is creamy and forgiving. Swiss or provolone are buttery and mild. Avoid low-moisture mozzarella if you can help it; it’s fine, but it doesn’t add as much flavor as other options. The key is that your cheese should be sliced or shredded—if you use pre-sliced cheese from a block, make sure it’s actually cheese and not the rubbery kind that comes individually wrapped.
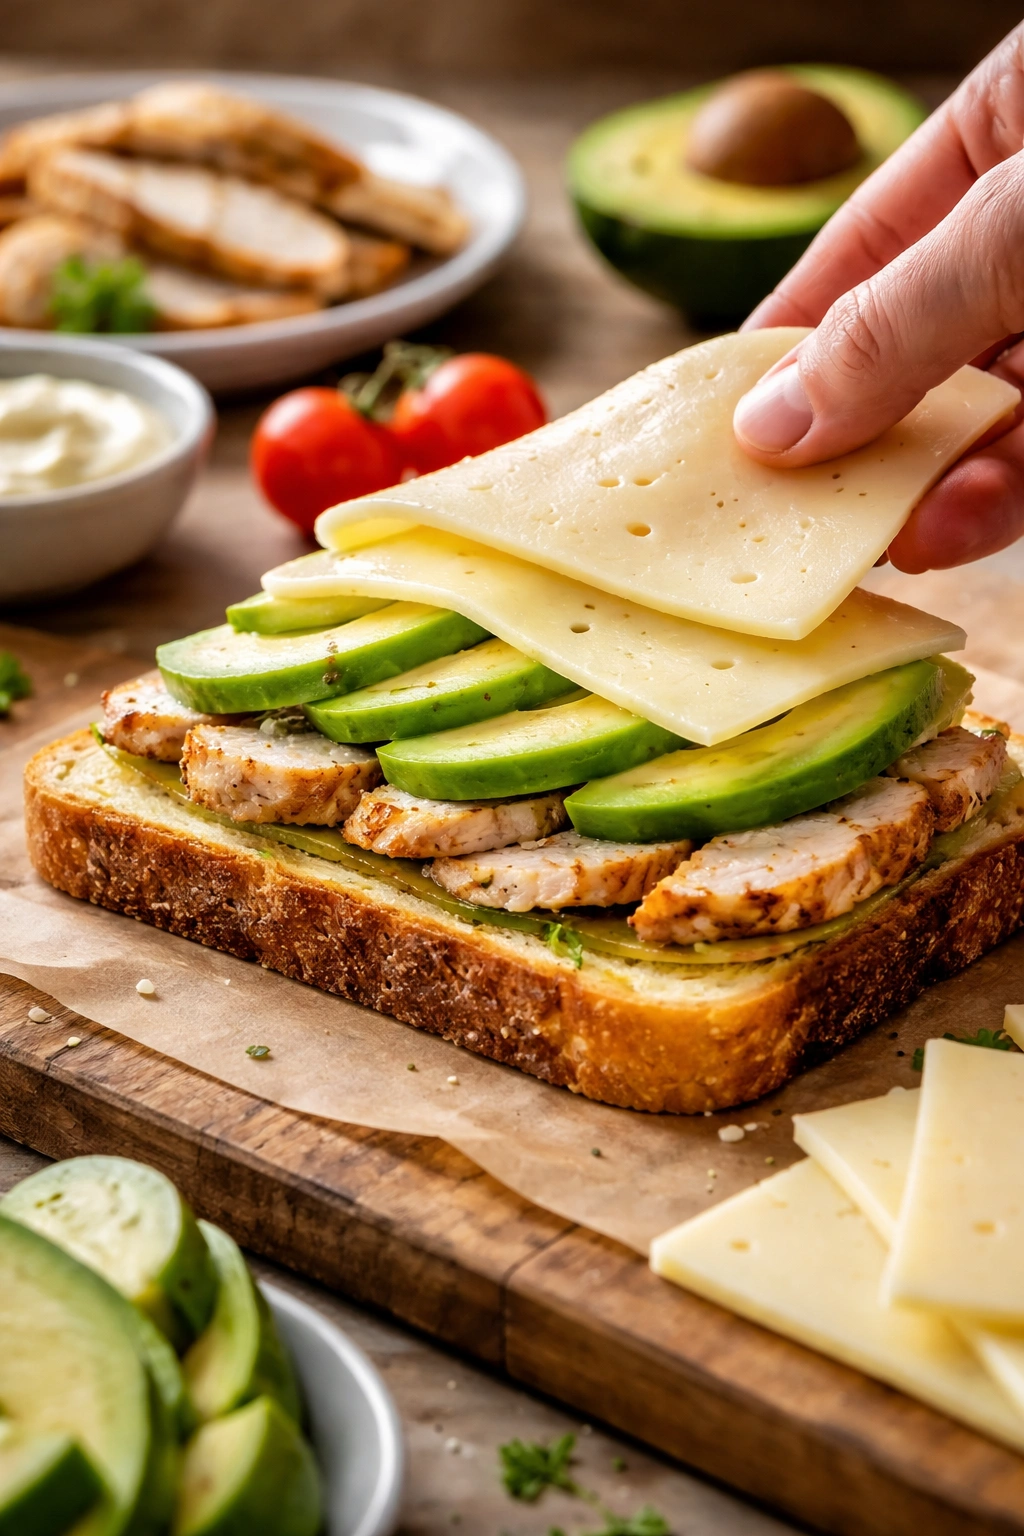
Here’s a crucial layering tip that genuinely makes a difference: put cheese directly against the bread rather than directly against the chicken. When the bread is in the pan and starting to toast, place a slice of cheese on the untoasted side. This creates a barrier that helps prevent the bread from getting soggy while the cheese melts and creates a wonderful golden layer. If you’re using multiple cheese slices, you can place one under the chicken and one on top, creating what some people call a “cheese lock” that holds everything together beautifully.
Assembling Your Sandwich Components
Organization is key for a smooth assembly process. Before you even start cooking anything, gather all your ingredients in one place. Have your bread ready, your chicken prepped and cooked, your avocado sliced or mashed, your cheese within reach, and any additional toppings (bacon, cilantro, pickled peppers, whatever you’re using) prepared. This sounds like a restaurant hack because it is—professional kitchens call this “mise en place,” and it genuinely eliminates stress.
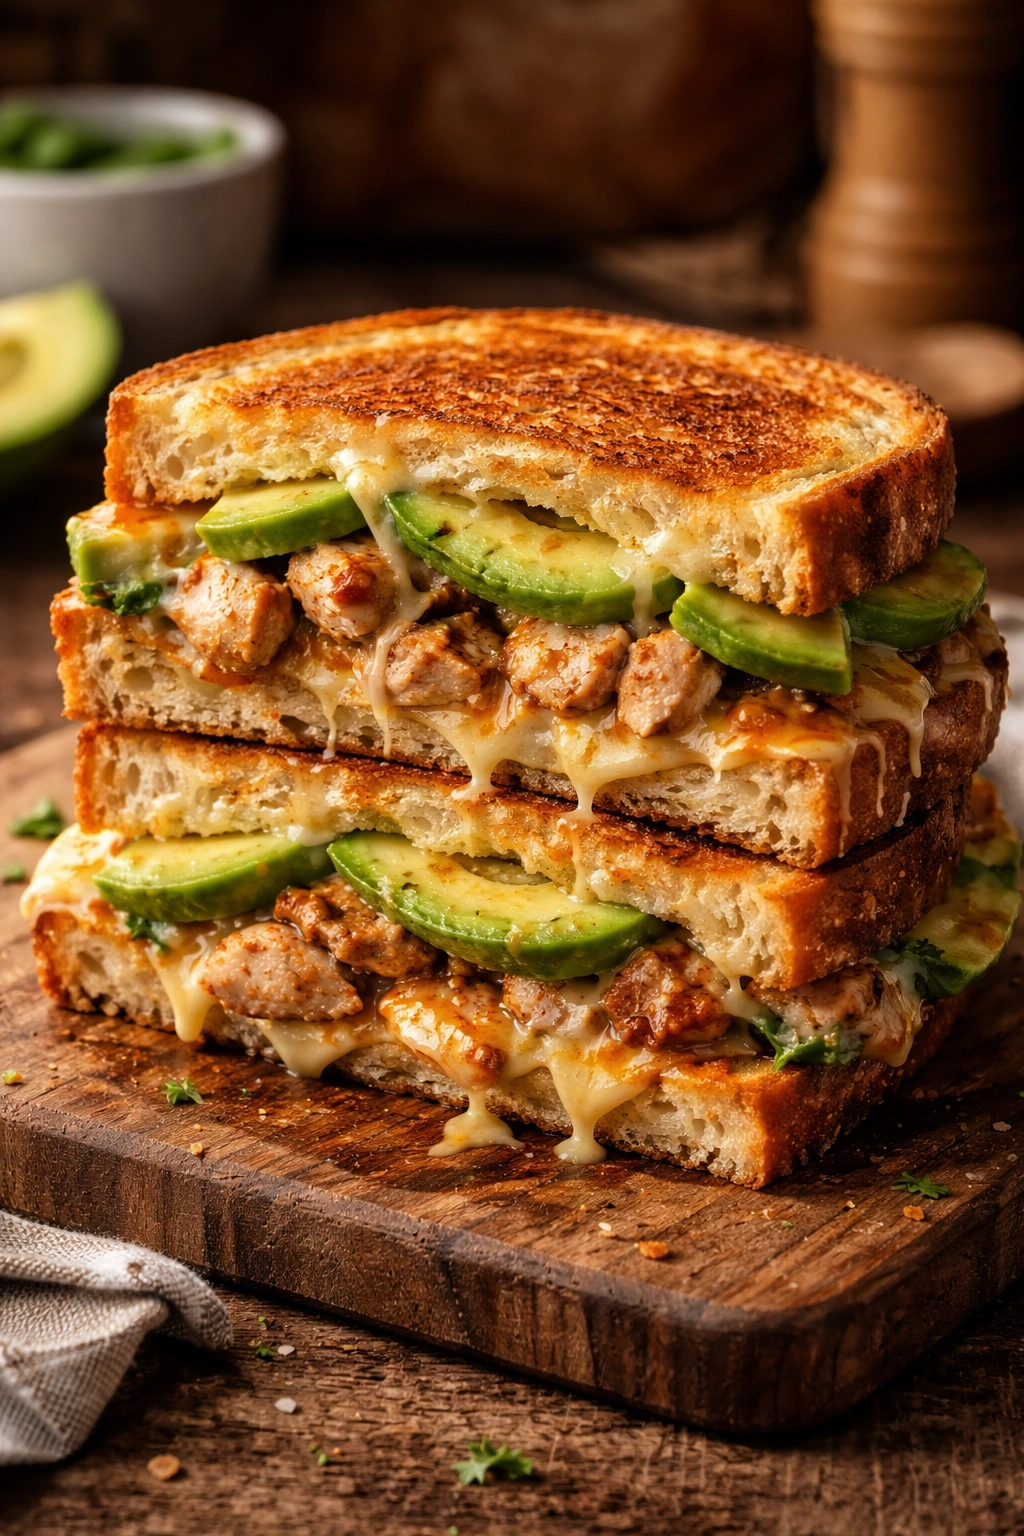
The classic sandwich builds in this order: bottom slice of bread, thin layer of your chosen spread (if using one—mayo, chipotle sauce, mustard, whatever you like), then chicken, then avocado, then cheese, then the top slice of bread. Some people prefer to reverse the avocado and chicken so the avocado is directly against the cheese, which does make the whole thing a bit more cohesive. Others add crispy bacon between the chicken and avocado. There’s no wrong way; this is where you make the sandwich yours. Just remember that the more ingredients you stack, the more carefully you need to press the sandwich together when it hits the pan, so it doesn’t slide apart mid-flip.
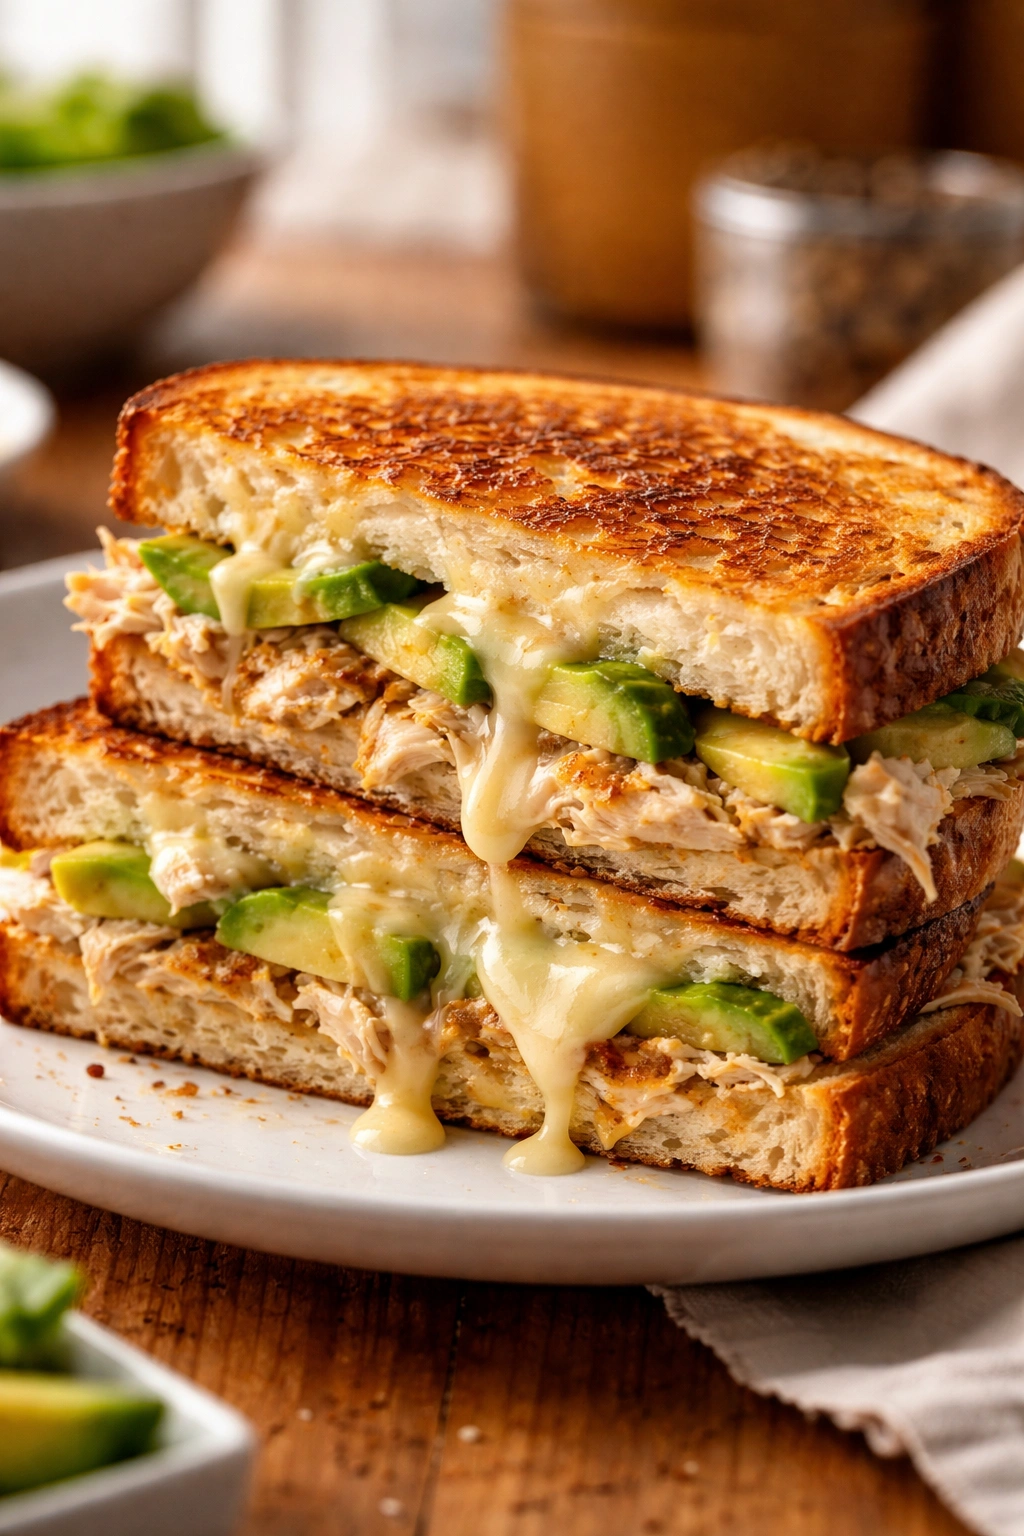
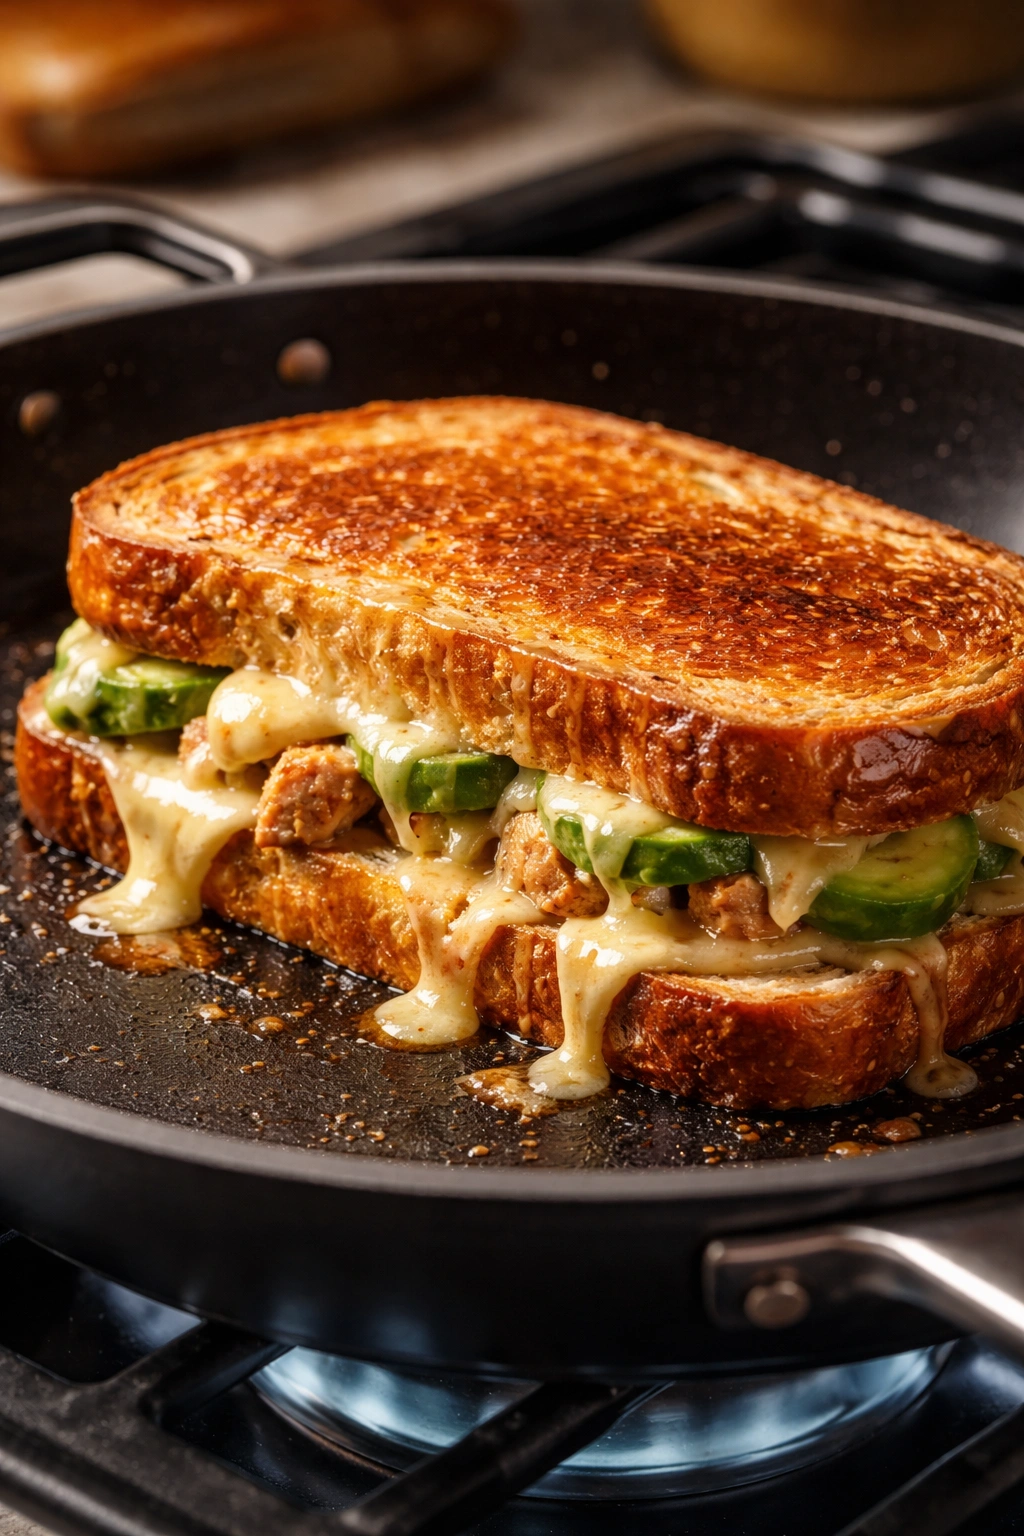
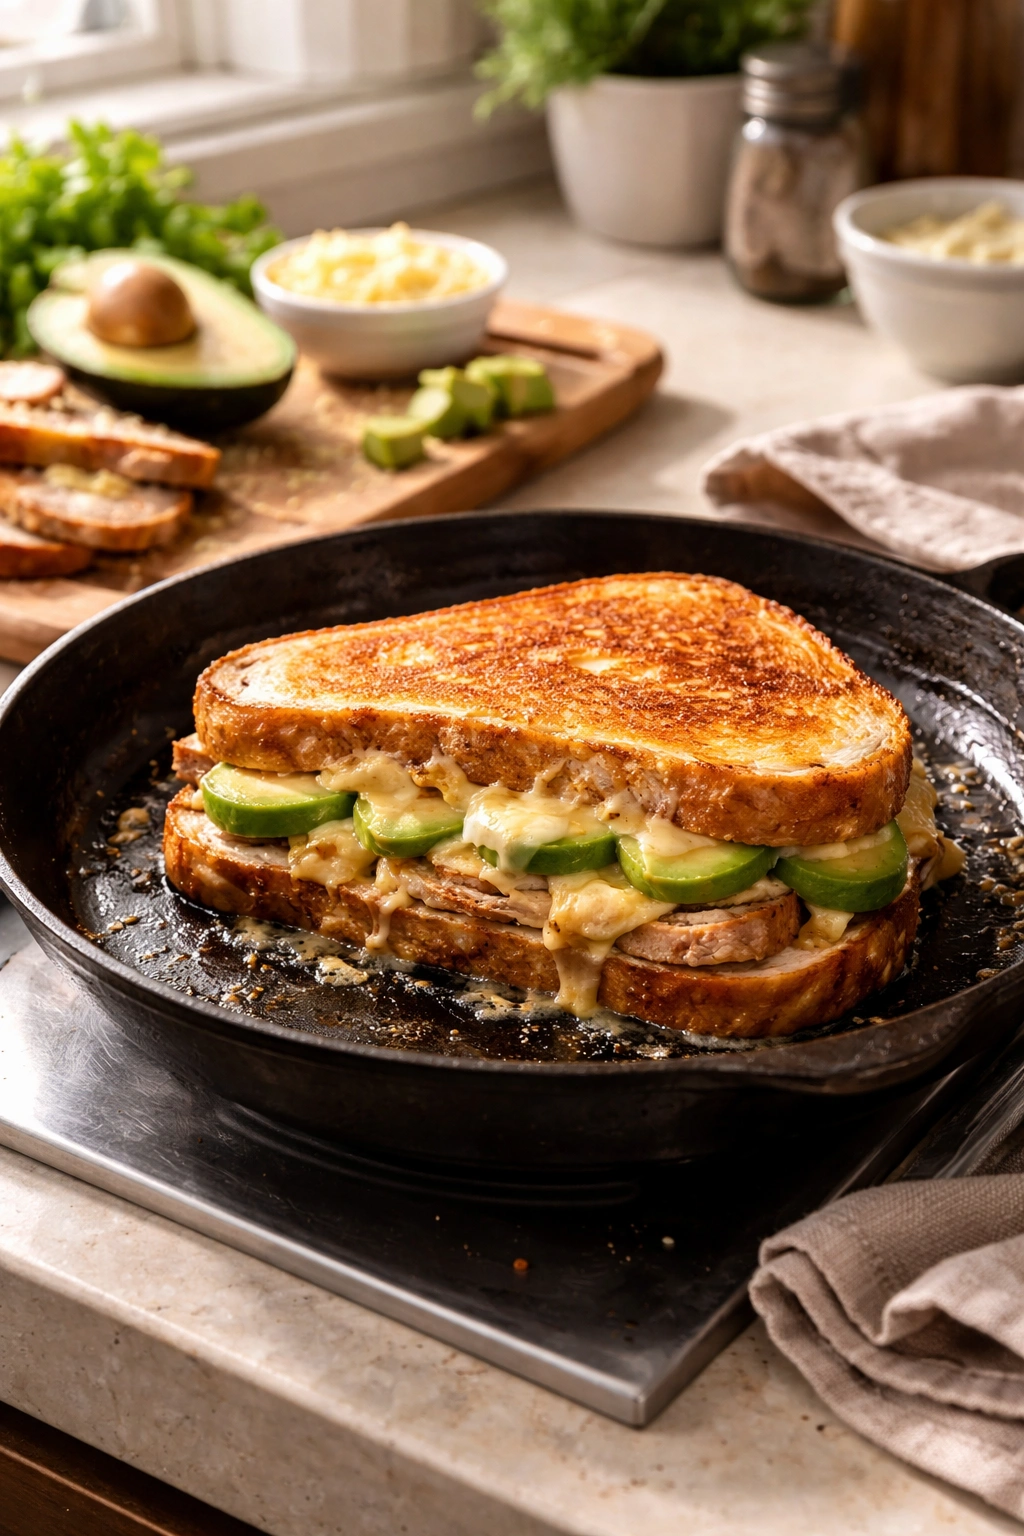
Grilling Your Sandwich to Golden Perfection
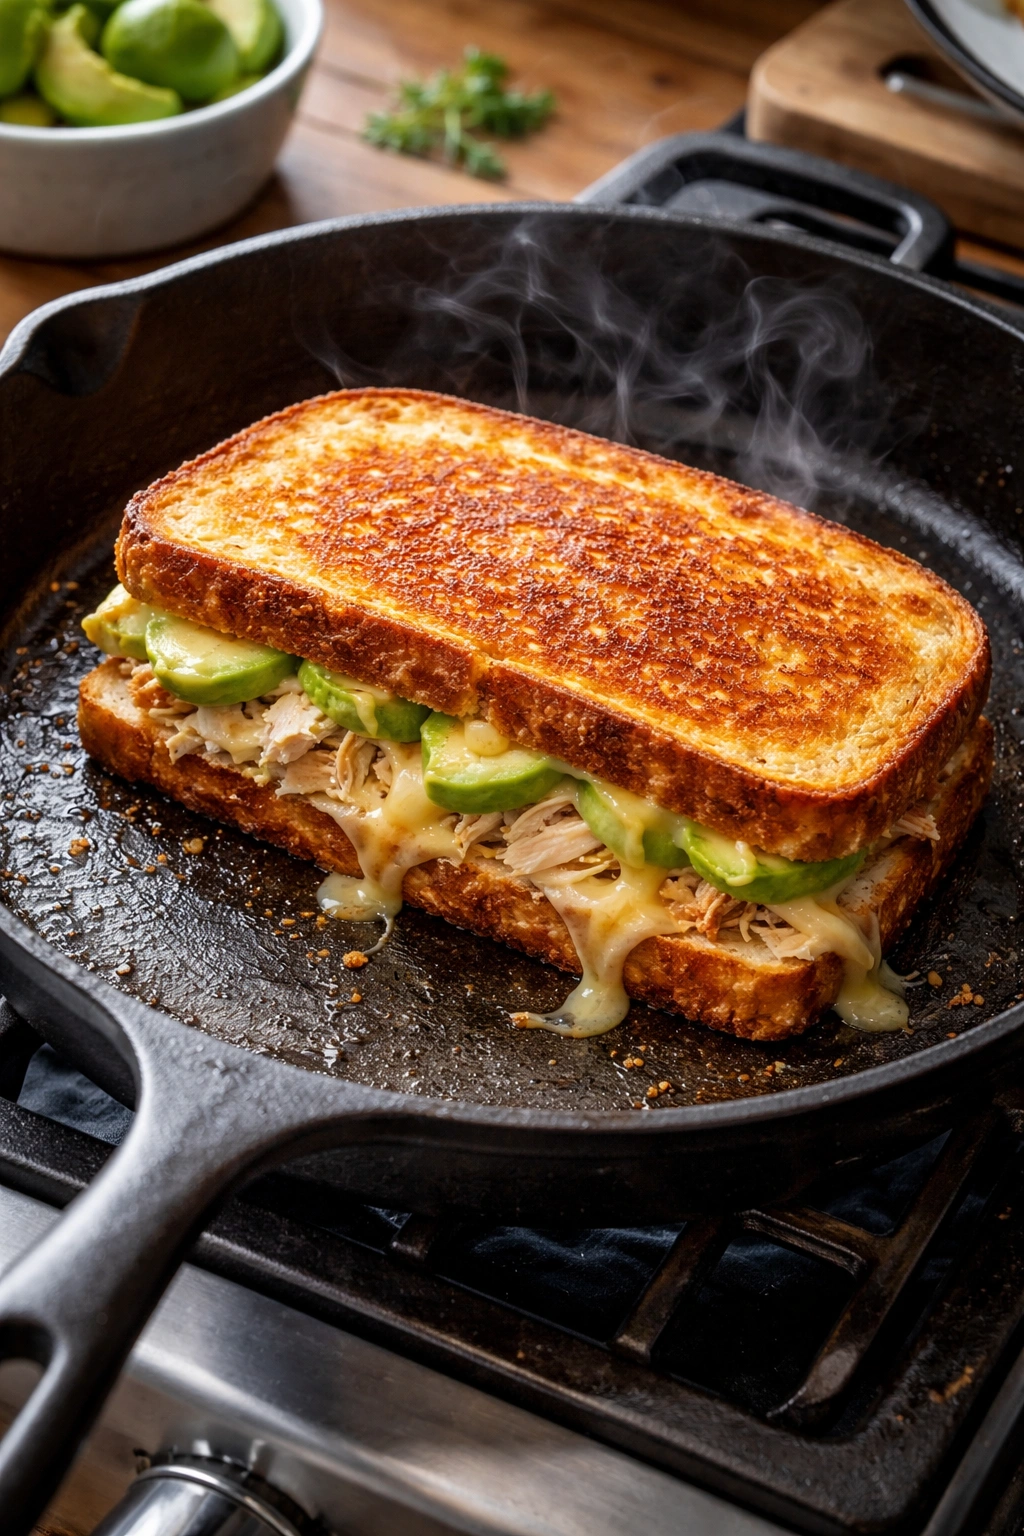
This is where your sandwich transforms from good to genuinely exceptional. The goal is a perfectly golden-brown, crispy exterior with melted cheese on the inside. Heat your skillet (cast iron is ideal, but any skillet works) over medium heat. Some people use butter on the outside of the bread, which creates a richer crust and tastes wonderful. Others use mayonnaise, which also works beautifully and has a slightly lower smoke point than butter, reducing the risk of burning. Whichever you choose, spread it generously on the outside of both bread slices.
Place your assembled sandwich in the skillet and resist the urge to immediately start flipping it around. Let it sit undisturbed for 3 to 4 minutes. You’ll hear it sizzle slightly, and you should smell that toasted bread aroma. This is the bread developing color and the cheese starting to melt. If you’re curious about progress, you can carefully lift one edge with a spatula to peek—the bottom should be golden brown. Once you’re satisfied, flip it with confidence and cook the other side for another 3 to 4 minutes.
If your cheese hasn’t fully melted by the time both sides are golden, simply cover the pan with a lid (even a baking sheet works) for the last minute. The steam trapped under the lid will help melt everything without overdoing the bread. When you remove the sandwich from the pan, the cheese should be fully melted and slightly oozy—that’s exactly what you’re aiming for. Let it rest for just a minute before slicing; this gives the cheese a chance to set slightly so everything stays together when you bite into it.
Building Your Perfect Chipotle Chicken Melt Variation
If you want to take this sandwich in a slightly spicier, more flavorful direction, a chipotle mayo version is absolutely transformative. The smoky heat of chipotle pairs beautifully with both chicken and avocado, and it’s remarkably easy to make. In a small bowl, combine half a cup of mayonnaise with 2 to 3 teaspoons of adobo sauce (the sauce from a can of chipotle peppers in adobo) and a squeeze of lime juice. If you want it spicier, chop up one or two of the actual chipotle peppers and mix them in. Start with less than you think you need; you can always add more, but you can’t take it back.
Spread this chipotle mayo on both sides of your bread before assembling. The mayo acts as a barrier against sogginess, and the chipotle flavor permeates every layer. You can add diced peppadew peppers (those sweet, slightly spicy pickled peppers) if you can find them, or simply use roasted red peppers. Fresh cilantro sprinkled on before you close the sandwich adds brightness. Some people add a few slices of crispy bacon, which brings a salty crunch that contrasts beautifully with the creamy avocado. If you go the chipotle route, smoked gouda is an especially good cheese choice because it echoes the smoky notes of the chipotle.
Yield: 2 sandwiches
Prep Time: 10 minutes
Cook Time: 15 minutes
Total Time: 25 minutes
Difficulty: Beginner — No special equipment required, and the cooking process is straightforward and forgiving even for a first-time sandwich maker.
Ingredient List for Classic Chicken Avocado Melt
For the Chicken:
- 2 boneless, skinless chicken breasts (or 4 thighs)
- 1 teaspoon kosher salt
- ½ teaspoon black pepper
- ¼ teaspoon garlic powder
- ¼ teaspoon smoked paprika (or regular paprika)
- ½ teaspoon fresh lime juice
- 1 tablespoon olive oil for cooking
For Assembly:
- 4 slices sturdy bread (sourdough, ciabatta, or thick-cut artisan bread)
- 1 ripe avocado
- ½ teaspoon fresh lime juice (additional, for avocado)
- Pinch of fine sea salt (for avocado)
- 4 ounces shredded or sliced cheese (sharp cheddar, smoked gouda, pepper jack, or your preference)
- 2 tablespoons butter or mayonnaise (for grilling the outside of bread)
Optional Add-ins:
- 4 slices crispy bacon
- Fresh cilantro leaves
- 2 tablespoons chipotle mayo (if making the spicy version)
- Roasted red peppers or peppadew peppers
- Fresh spinach or arugula
- Sliced red onion
- Thin slices of tomato
Step-by-Step Instructions

Prepare the Chicken:
-
Pat the chicken breasts or thighs completely dry with paper towels, which helps them brown nicely and develop a flavorful crust.
-
In a small bowl, combine the kosher salt, black pepper, garlic powder, and smoked paprika, stirring together with a fork until evenly mixed.
-
Season both sides of the chicken pieces generously with this spice mixture, pressing the seasonings gently onto the meat so they adhere. Add the lime juice and let the chicken sit for 5 to 10 minutes if you have time, allowing the flavors to penetrate.
-
Heat 1 tablespoon of olive oil in a large skillet over medium-high heat until the oil shimmers slightly.
-
Place the seasoned chicken in the hot skillet and resist moving it for 5 to 6 minutes—this creates that golden, flavorful crust. Do not poke at the chicken or flip it early; patience is key here.
Advertisements -
Flip the chicken carefully and cook for another 5 to 6 minutes, or until the internal temperature reaches 165°F (74°C) when measured at the thickest part with a meat thermometer.
-
Transfer the cooked chicken to a cutting board and let it rest for 2 to 3 minutes. This resting period allows the juices to redistribute, keeping the meat moist and tender.
-
Slice or shred the chicken into bite-sized pieces, depending on your preference. If you’re using thighs, shredding with two forks works beautifully.
Prepare Your Avocado:
-
Cut the avocado in half lengthwise, working around the large pit in the center.
-
Twist the two halves gently in opposite directions to separate them, then carefully scoop the flesh from each half using a spoon.
-
If you prefer sliced avocado, arrange thin slices on the bread. If you prefer mashed, place the avocado in a small bowl and mash it gently with a fork until it reaches your desired consistency—some people like it perfectly smooth, others prefer a few small chunks for texture.
-
Season the avocado lightly with a squeeze of fresh lime juice and a tiny pinch of fine sea salt. The lime juice prevents browning and brightens the flavor dramatically.
Assemble and Grill:
-
Preheat your skillet (the same one used for chicken, which still has wonderful flavorful bits stuck to it) over medium heat.
Advertisements -
Spread butter or mayonnaise lightly on the outside of all four bread slices—this is what creates that perfect golden-brown crust when the sandwich grills.
-
Place one slice of buttered bread in the skillet, buttered side down, and allow it to toast for about 30 seconds until the bottom is just starting to make contact with the heat.
-
On the unbuttered (inside) side of this bread slice, layer your sandwich: start with one slice of cheese, then the cooked chicken, then the avocado, then any additional toppings you’re using (bacon, peppers, cilantro), and finally another slice of cheese on top.
-
Place the second slice of bread on top, buttered side facing up, pressing down gently so all the layers stay together.
-
Allow the sandwich to grill undisturbed for 3 to 4 minutes. You’re looking for the bottom to develop a golden-brown color. You can carefully peek under one edge with a spatula if you’re unsure about progress.
-
Using a wide spatula or two regular spatulas for extra support (if it’s a big sandwich), flip the entire sandwich carefully. Be confident with the flip; hesitation can cause it to fall apart. A quick, decisive motion is better than a tentative flip.
-
Grill the other side for another 3 to 4 minutes until it’s also golden brown and the cheese is melted throughout.
-
If the cheese still hasn’t fully melted by the time both sides are golden, cover the pan with a lid or even a baking sheet for the last minute. The steam will help melt everything perfectly.
-
Transfer the grilled sandwich to a cutting board or plate and let it rest for 1 to 2 minutes before cutting it in half—this allows the cheese to set slightly and everything to stay together when you bite into it.
-
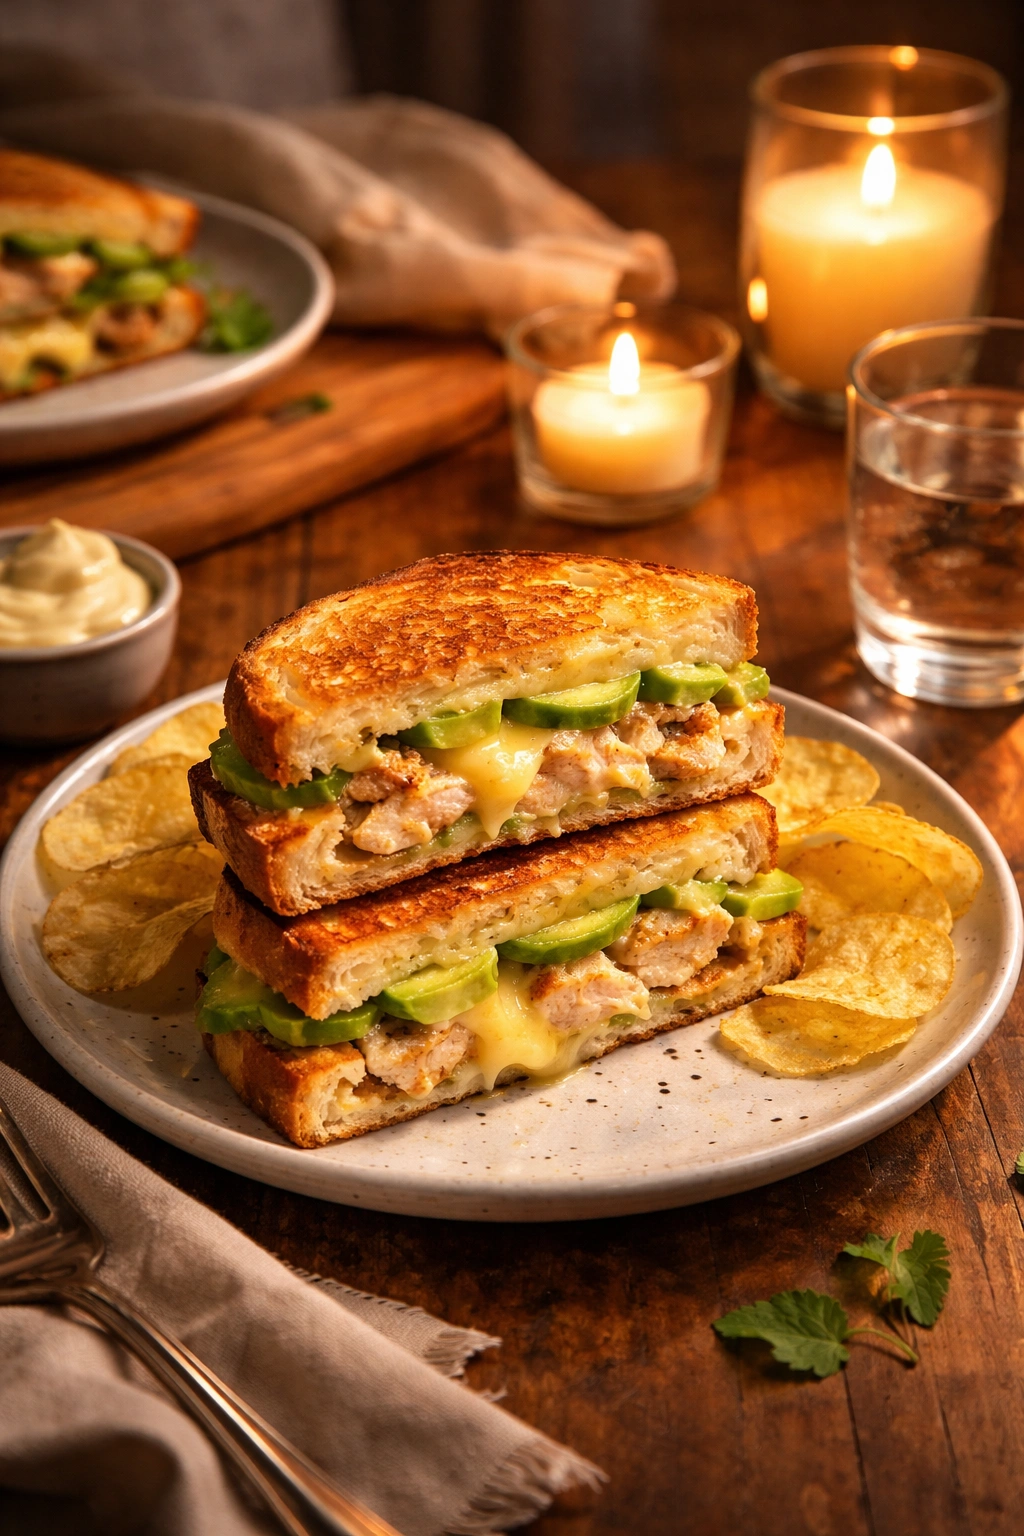
Slice diagonally (optional, but it does make it easier to hold and more visually appealing) and serve immediately while still warm and the cheese is at its most luxurious.
Advertisements
Expert Tips for Success
The most important tip for any melt sandwich is heat management. Many people make the mistake of cooking over medium-high or high heat, which burns the bread before the cheese has time to melt. Medium heat is your friend—yes, it takes a few extra minutes, but you’re guaranteed golden bread and perfectly melted cheese instead of burnt bread and half-melted cheese. If your kitchen runs hot or your stovetop seems particularly aggressive, even medium-low heat is acceptable.
Another game-changer is using room-temperature or slightly warm cheese. If your cheese slices come straight from the refrigerator, they take considerably longer to melt, which means your bread is cooking longer than ideal. Let cheese sit on the counter for 5 to 10 minutes before you assemble the sandwich, or warm the slices in the pan for 30 seconds before building. This small adjustment shaves time off your cooking and prevents overbrowned bread.
For the absolute crispiest exterior, use mayonnaise instead of butter on the outside of the bread. Mayo has a unique composition that creates an incredibly crispy, golden crust while also preventing burning because of its slightly lower smoke point. It sounds strange, and you might worry about tasting mayo on the crust, but you genuinely won’t notice the mayo flavor—you’ll just notice the perfect crispness.
If your bread is on the thinner side, you can toast just the insides of both bread slices in the pan for 30 seconds before assembling. This creates a light barrier that prevents sogginess from the cheese and fillings. Some people skip the butter or mayo entirely and do this pre-toasting step instead, which works especially well if you’re making multiple sandwiches and want to control the browning more carefully.
Delicious Variations to Keep Things Interesting
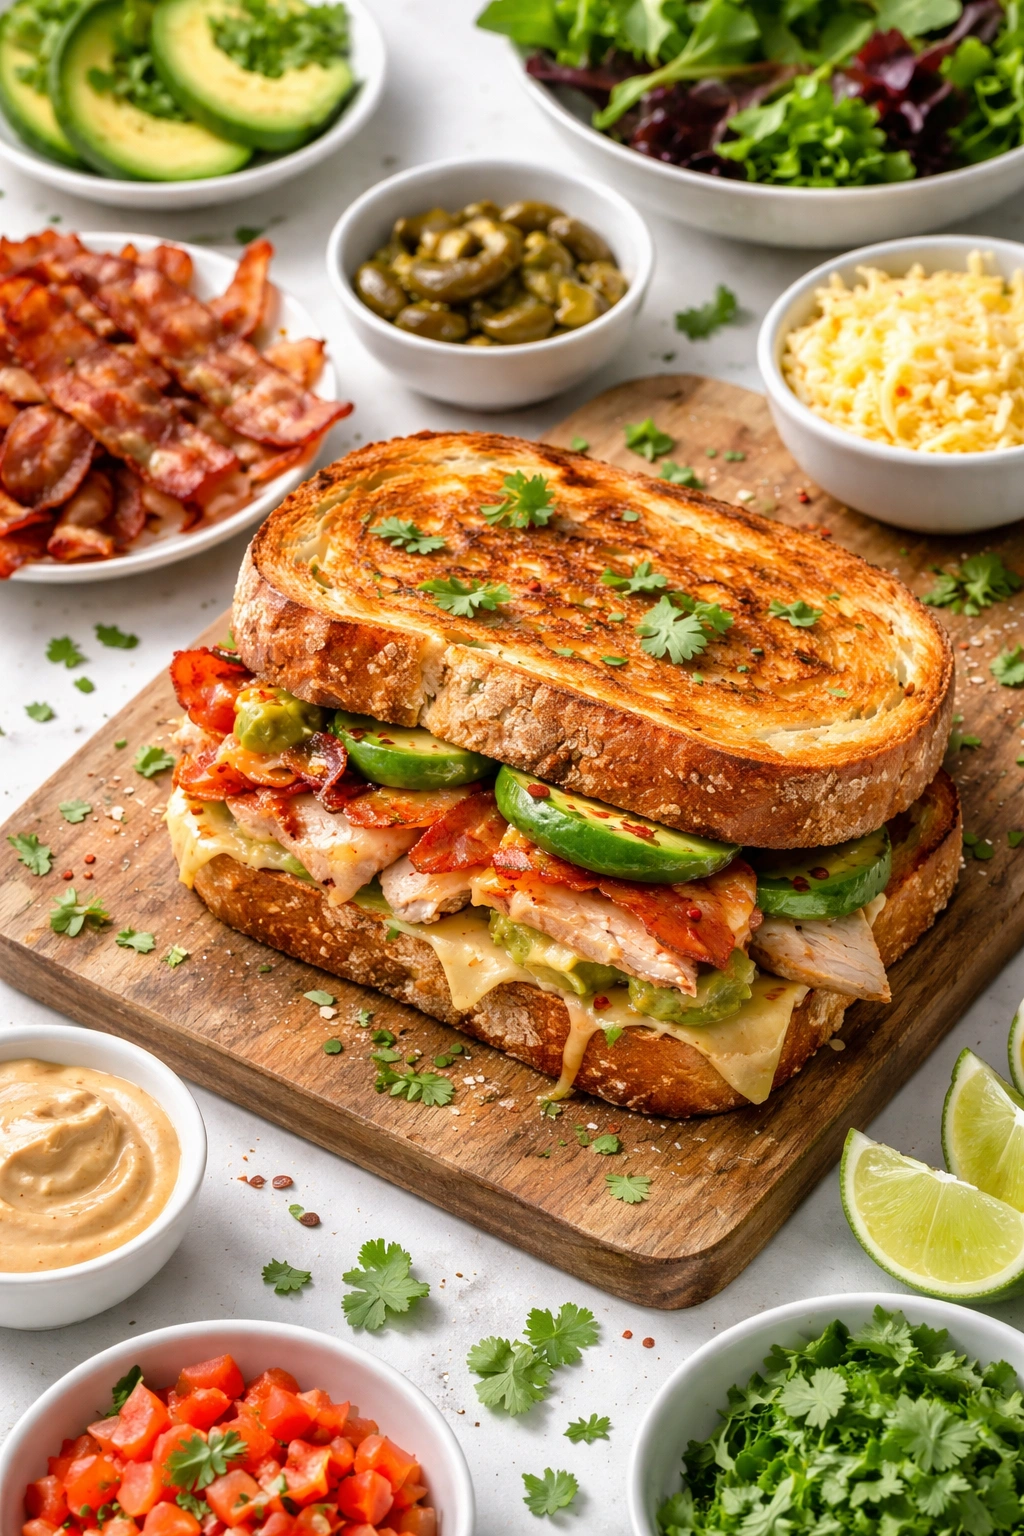
The beauty of this sandwich is how easily it adapts to whatever you have on hand or whatever you’re craving. If you want to go the gourmet route, layer in crispy bacon (which you can make in the oven while your chicken cooks), fresh cilantro, and chipotle mayo. The smoky, spicy version is perfect when you’re craving something with more personality. Use smoked gouda instead of regular cheddar, add peppadew peppers, and you’ve essentially elevated this into restaurant-territory comfort food.
For a lighter, more summery version, skip the cheese entirely (or use just a thin slice) and add fresh spinach, thinly sliced cucumber, and a garlic aioli instead of mayo. The crunch of the cucumber and the brightness of the spinach create a refreshing contrast with the creamy avocado and tender chicken. Some people add a thin slice of tomato to this version, which is wonderful as long as you pat it very dry so it doesn’t release water and make the bread soggy.
If you have fresh herbs in your kitchen, experiment with them. Fresh basil creates an almost Italian-feeling sandwich, especially if you pair it with roasted red peppers. Tarragon or dill mixed into mayo creates an herbaceous, sophisticated flavor that’s absolutely delicious. Fresh cilantro (unless you’re one of the people who finds it tastes like soap) is phenomenal, especially if you’re also using lime and chipotle. The point is that the base recipe is so solid that you can honestly add almost anything and it works.
For a vegetarian version, simply skip the chicken and add grilled or roasted vegetables: eggplant, zucchini, roasted mushrooms, or portobello caps all work beautifully. The cheese, avocado, and seasonings deliver enough flavor and richness that you don’t miss the chicken at all. Add some toasted nuts for crunch and you’ve got something genuinely special.
Storage and Reheating Guidance
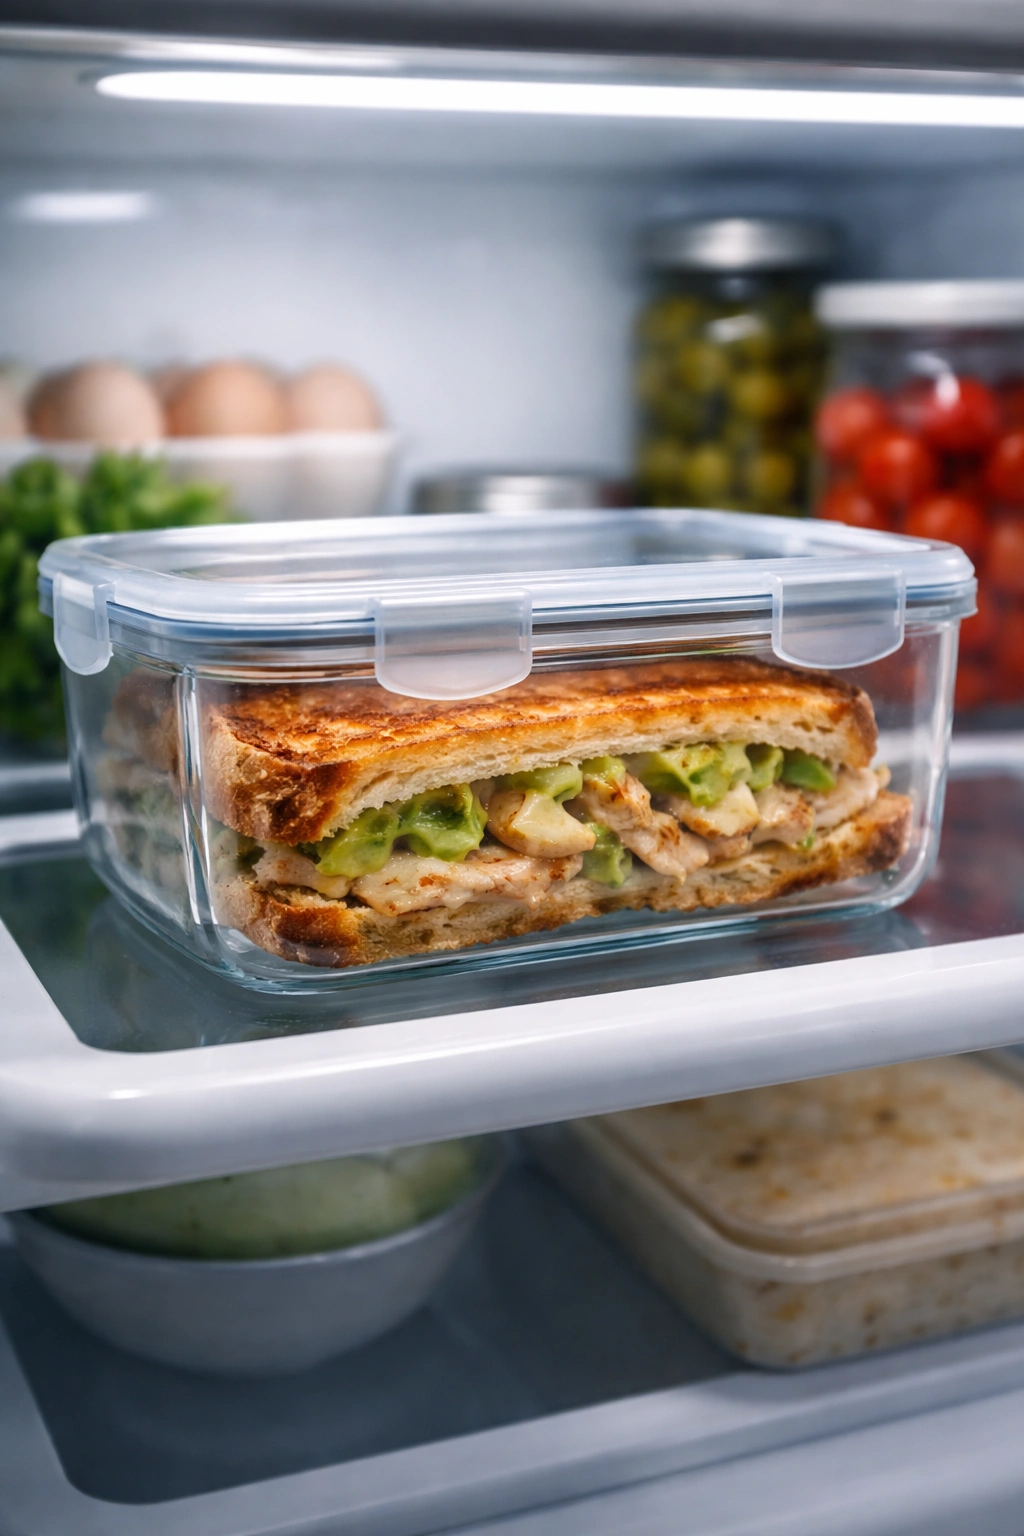
These sandwiches are genuinely best enjoyed fresh and warm, straight from the pan. The bread is crispest immediately, the cheese is at its most luxurious, and the whole thing is at its optimal textural perfection. That said, you can store leftovers in an airtight container in the refrigerator for up to 24 hours. Any longer and the bread starts to get stale, and while that’s not dangerous, it’s not ideal.
To reheat, avoid the microwave if possible—it makes the bread soft and soggy and the avocado somewhat unpleasant. Instead, wrap the sandwich loosely in foil and warm it in a 325°F (163°C) oven for about 5 to 10 minutes, or until warmed through. You can also place it in a skillet over medium-low heat for a couple of minutes per side, which actually re-crisps the bread nicely.
If you’re meal prepping and want to have components ready for quick assembly during the week, you can absolutely cook the chicken ahead of time and store it in an airtight container in the refrigerator for up to 4 days. You can also make the chipotle mayo or any other spread in advance. The only component you shouldn’t prep too far ahead is the avocado—it browns too quickly. Slice or mash it just before assembling and eating.
Serving Suggestions and Perfect Pairings
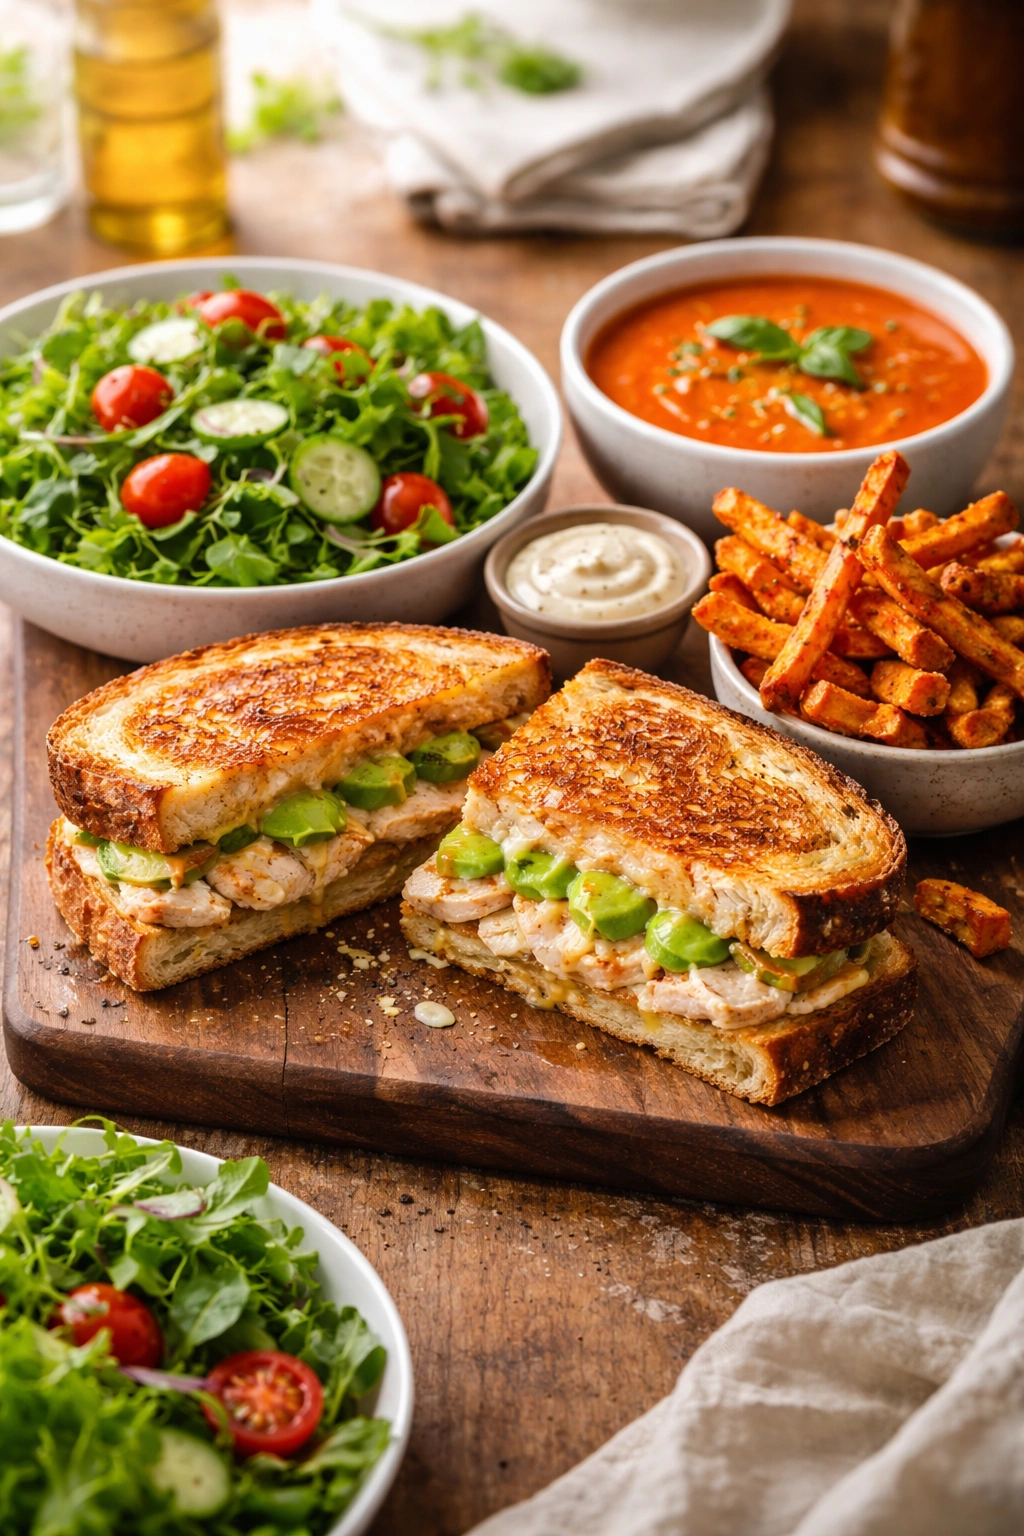
The chicken avocado melt is substantial enough to be a complete meal on its own, but pairing it with sides elevates the experience and makes dinner feel more intentional. A simple side salad with a light vinaigrette is perfect—something like mixed greens with lemon vinaigrette or a basic balsamic mixture. The acidity of the dressing cuts through the richness of the cheese and avocado beautifully and adds a textural contrast.
Sweet potato fries or regular crispy oven fries are fantastic alongside this sandwich. The slight sweetness and the crispy exterior provide a nice counterpoint to the creamy, savory sandwich. If you’re making fries, get them started in the oven when you start cooking the chicken, and they’ll be ready at almost exactly the same time as your sandwich.
A warm soup is perfect if you want something more substantial and comforting. Tomato soup is the classic pairing—there’s a reason people love grilled cheese and tomato soup together, and this sandwich works similarly well. Butternut squash soup, a simple vegetable broth, or even a light chicken broth all complement this sandwich nicely. The warmth and the savory broth balance the richness of the melt.
For lighter fare, fresh fruit—apple slices, grapes, or a small citrus salad—provides refreshing brightness without making you feel overstuffed. A side of coleslaw or a crunchy salad with lots of raw vegetables also works well. The key is choosing something that adds textural or flavor contrast to the soft, rich sandwich rather than doubling down on similar flavors.
Nutritional Profile and What You’re Getting
A classic chicken avocado melt sandwich sits in a comfortable place nutritionally. A typical serving (one sandwich) provides approximately 550 to 650 calories, depending on your exact ingredients and portion sizes. The bulk of this comes from the cheese (which is about 110 calories per ounce) and the avocado (about 240 calories for a whole avocado, so half an avocado is roughly 120 calories).
The protein content is solid—you’re looking at about 35 to 40 grams of protein per sandwich, mostly from the chicken and cheese. This makes it a genuinely satiating meal that will keep you full and satisfied through an evening. The carbohydrates come primarily from the bread, usually in the range of 35 to 45 grams, depending on the bread type. If you use thick-cut bread, you might be at the higher end; if you use thinner slices, you’ll be at the lower end.
The fat content is around 30 to 35 grams per sandwich, split between the cheese, the avocado, and whatever you used to grill the bread (butter or mayo). Most of the fat from the avocado is actually heart-healthy monounsaturated fat, which is genuinely good for you. The cheese contains some saturated fat, but in the context of a whole meal, this is perfectly reasonable and nutritionally acceptable.
There’s also fiber from the avocado (about 6 to 7 grams per whole avocado, so you’re getting roughly 3 to 3.5 grams per sandwich) and the bread (depending on whether you’re using whole grain or white bread). The overall nutritional profile is actually quite balanced—protein, healthy fats, carbohydrates, and some fiber. It’s a genuinely nourishing meal, not just empty calories.
Why This Should Be in Your Regular Weeknight Rotation
After cooking this sandwich once or twice, you’ll start to understand why it’s worth making regularly. It hits that sweet spot of being fast enough for genuinely busy nights, impressive enough that you feel like you cooked something real, and delicious enough that you’re actually excited to eat it rather than just checking off a box on your to-do list. Most weeknight dinners fall into one of two categories: quick but uninspiring, or delicious but time-consuming. This sandwich is genuinely both quick and delicious.
The best part is that it requires virtually no skill or special knowledge. You don’t need to understand sauce-making or complex cooking techniques. You’re just seasoning chicken, slicing avocado, and grilling a sandwich. If you can do those three things, you can make this. There’s no mysterious technique that separates success from failure. This is accessible, achievable, and truly foolproof cooking.
Once you start making this regularly, you’ll also start noticing how the quality of the meal directly correlates to the quality of your ingredients. If you use mediocre chicken, you’ll notice. If you use a really good avocado, it transforms the whole thing. This creates a positive feedback loop where you become more invested in choosing good ingredients, and your cooking gets noticeably better. It’s a surprisingly powerful effect for such a simple sandwich.
Final Thoughts
The chicken avocado melt is the answer to the “what’s for dinner” question that appears nearly every evening. It’s the kind of meal that makes you wonder why you ever spend money at restaurants or get caught in takeout spirals when you can make something this good at home in less time than a delivery driver would take to arrive. Your family will ask for it repeatedly. Your friends will request the recipe. You’ll find yourself making it on nights when you’re not even that hungry because sometimes the craving for something warm, cheesy, and utterly comforting is just too strong to resist.
The real magic of this sandwich isn’t in any secret ingredient or complicated technique. It’s in the combination of simplicity and satisfaction. You’re taking basic components and assembling them in a way that’s greater than the sum of its parts. You’re creating something that feels special and intentional and genuinely delicious. In a world where weeknight cooking often feels like a chore, that’s genuinely something worth celebrating.