There’s something magical about pressing a ball of ground beef onto a screaming hot griddle and watching it transform in seconds. The meat sizzles, hisses, and develops this incredible caramelized crust with crispy, lacy edges—all while the interior stays juicy and tender. That’s the smash burger experience, and once you understand how to execute it properly, you’ll stop making regular burgers altogether.
Unlike thick, traditional patties that require careful handling and longer cooking times, smash burgers are the weeknight dinner miracle we all need. They cook in under five minutes total, require zero special ingredients beyond 80/20 ground beef, and somehow taste better than burgers from restaurants charging fifteen dollars a plate. The technique seems to break every classical burger rule—and yet it creates the most flavorful, satisfying burger possible.
What makes this approach so powerful isn’t just speed; it’s the science. When you smash thin beef onto a hot surface, you’re maximizing contact area, which triggers the Maillard reaction at an accelerated pace. That’s the chemical magic that creates deep, savory, browned flavors we all crave. The fat renders out and essentially fries the edges of the patty while simultaneously cooking back into the meat, keeping it surprisingly juicy despite the thin profile. It’s the perfect balance of crispy exterior and tender, flavorful center—achieved in a fraction of the time a traditional burger demands.
The best part? This technique works whether you’re cooking for yourself on a weeknight or feeding a crowd at a backyard gathering. You don’t need special equipment, expensive meat cuts, or elaborate seasonings. Just understand the fundamentals, keep your griddle hot, and trust the process. Let’s build the perfect smash burger.
What Makes Smash Burgers So Irresistible
Smash burgers occupy a unique place in burger culture. They’re not the thick, lovingly grilled steakhouse burger designed to showcase perfectly aged beef. They’re not the gourmet craft burger loaded with house-made condiments and artisanal toppings. They’re something simpler and somehow more satisfying—a thin, crispy, deeply browned patty that prioritizes flavor and texture over everything else.
The appeal starts with speed. Most people don’t have thirty minutes to grill a burger. But smash burgers? They’re ready in the time it takes to toast a bun. This makes them genuinely practical for busy weeknights, last-minute dinner decisions, or those moments when you suddenly crave a really good burger but don’t want to spend the entire evening cooking.
The flavor profile is what converts skeptics into believers. Because the patties are so thin and pressed onto a super-hot surface, they develop maximum browning. That means maximum Maillard reaction, which means maximum savory depth. Combined with the 20% fat content in 80/20 ground beef, you get a burger that tastes beefy, rich, and completely satisfying—without being heavy or overwhelming.
There’s also something deeply satisfying about the texture contrast. The edges are crispy, almost lacy, with charred bits that add textural interest and concentrated flavor. Meanwhile, the center stays tender and juicy thanks to the fat content and quick cooking time. Every bite delivers both crunch and tenderness, making the whole experience more interesting than a uniformly cooked burger.
The Science Behind Those Crispy, Craggy Edges
Understanding why smash burgers work so well requires understanding two fundamental principles: the Maillard reaction and the role of fat in cooking.
The Maillard reaction happens when amino acids and reducing sugars in food are exposed to heat above about 300°F. When this chemical reaction occurs, it creates hundreds of new flavor compounds and browns the food surface, developing that rich, savory, complex taste we find so appealing. It’s what makes toast taste malty, grilled chicken have appetizing char marks, and a perfectly seared steak taste exponentially better than a steamed steak.
Here’s the crucial difference with smash burgers: a traditional thick patty has minimal surface area in contact with the hot cooking surface, which means limited browning happens. Even if it cooks for several minutes, most of the meat never gets hot enough to trigger significant Maillard reactions. A smash burger, pressed to roughly ¼-inch thickness, has dramatically increased surface area. Nearly the entire patty contacts the hot griddle, maximizing browning and creating far more flavorful compounds in a fraction of the time.
Then there’s the fat component. Ground chuck at 80/20 contains enough fat to render and fry the edges of the patty while it cooks. This fat has two effects: it carries flavor molecules that make the burger taste more beefy and rich, and it creates the crispy texture we love. When you smash the burger down, the fat can’t escape straight up and out of the patty. Instead, it stays in the meat or renders into the gaps between the thin patty and the griddle surface, creating those lacy, crispy edges. The burger essentially deep-fries itself.
A leaner beef ratio—say 85/15 or 90/10—simply won’t deliver the same results. Without enough fat, you lose the juiciness, the browning, and those signature crispy edges. The budget difference between 80/20 and leaner beef is usually just a dollar or two, making this an easy trade-off for dramatically better results.
Essential Equipment and Ingredients
You don’t need much to make excellent smash burgers, but the few tools you do use matter tremendously.
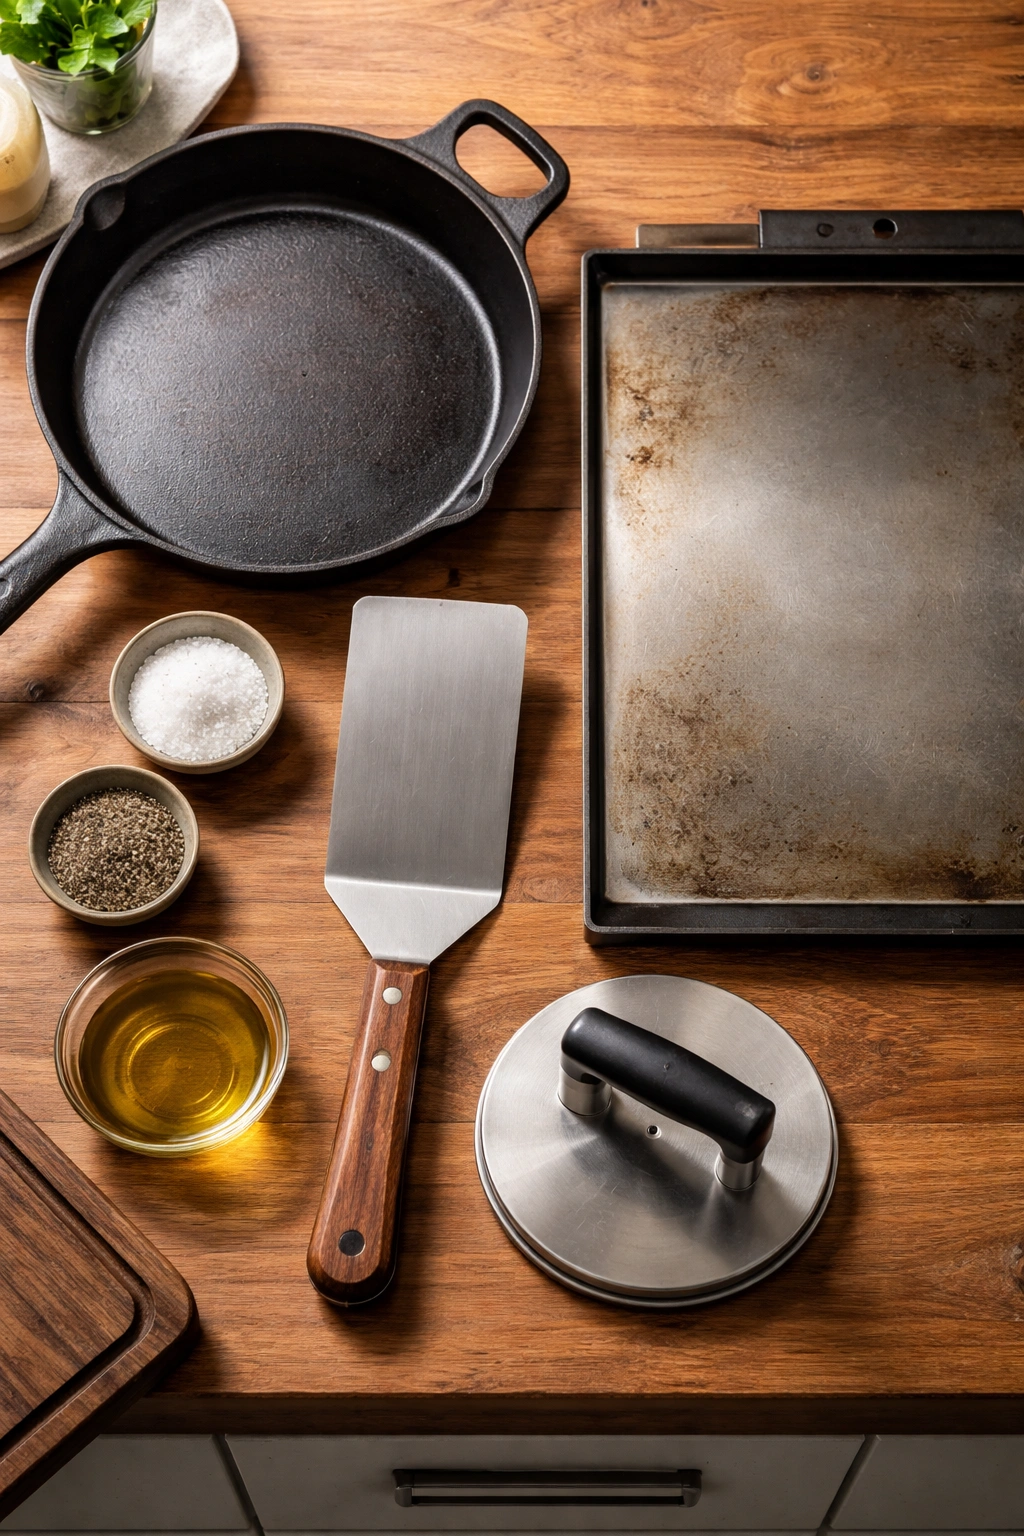
The cooking surface is everything. Cast iron skillets and griddles work beautifully and are affordable. If you have access to a flat-top griddle or Blackstone-style cooktop, even better—they hold and distribute heat exceptionally well. Some people use stainless steel, which works but doesn’t retain heat quite as effectively as cast iron. Whatever you choose, make sure it’s large enough to cook multiple burgers simultaneously without crowding, which drops the temperature.
A sturdy metal spatula is non-negotiable. You need something rigid enough to get under the cooked patty without bending or warping, allowing you to scrape up all those crispy browned bits. A thin, flimsy spatula will bend under pressure and leave the best parts behind. Dexter Russell makes excellent burger turners, or you can use any stiff metal spatula designed for griddle work.
A burger press or heavy-duty spatula helps you smash the patty firmly and consistently. You can technically use the back of a heavy pan or a meat mallet, but a dedicated burger press makes the job easier and more controlled. Some cooks use parchment paper between the meat and the press to prevent sticking—this is a game-changer if you’ve struggled with meat clinging to your press.
For ingredients, you really need only four core elements: ground beef (80/20 fat ratio), salt, pepper, and cheese. Everything else is optional enhancement. That said, many excellent smash burger techniques incorporate flavored butter, Worcestershire sauce, fish sauce, or seasonings mixed into the meat before cooking. We’ll explore those variations later, but the foundational burger needs nothing except quality beef and salt applied at the right moment.
How to Make Crispy, Juicy Smash Burgers
Yield: 4 double-patty burgers (8 individual patties)
Prep Time: 15 minutes
Cook Time: 8 minutes
Total Time: 23 minutes
Difficulty: Beginner — The technique is straightforward, the cooking time is minimal, and there’s no specialized skill required. Even first-time smash burger makers get excellent results by following the steps carefully.
For the Burgers:
- 1¼ pounds ground beef (80/20 fat ratio), divided into 8 loose balls (about 2.5 ounces each)
- 1 teaspoon kosher salt, plus extra for seasoning the cooked patties
- ½ teaspoon freshly ground black pepper
- 4 slices American cheese (deli-sliced works best) or your favorite melting cheese
- 4 hamburger buns (brioche or potato buns are ideal, lightly buttered)
- Vegetable oil for the griddle (about ½ tablespoon), if needed
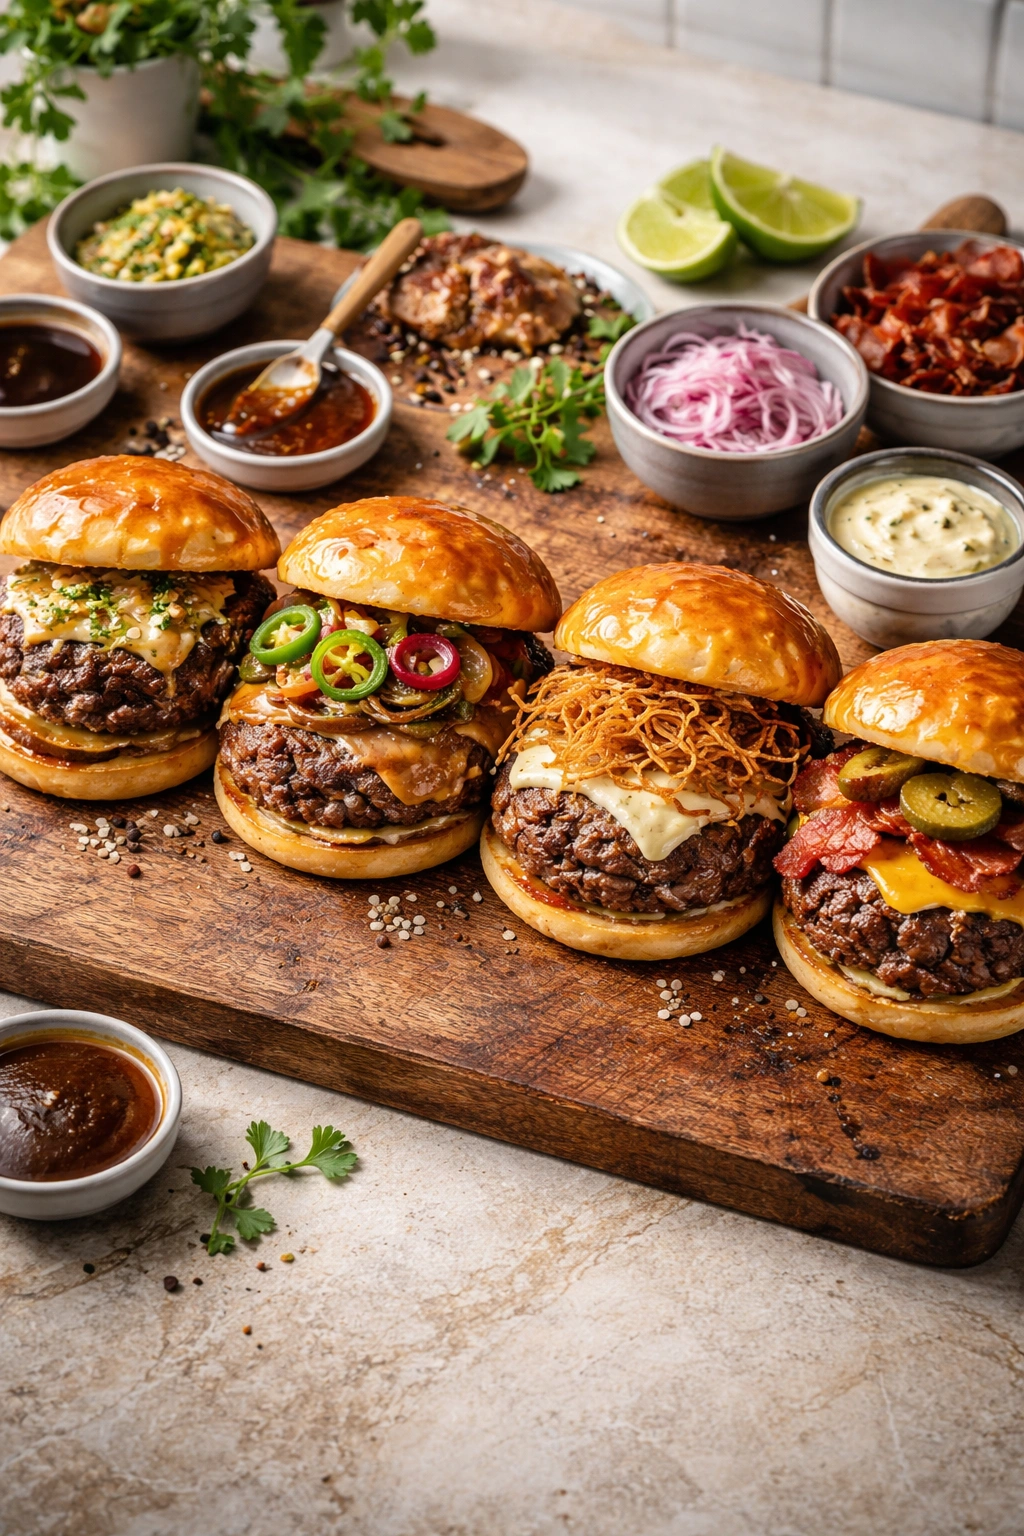
Optional Toppings & Condiments:
- Dill pickle slices or chips
- Shredded iceberg or butter lettuce
- Tomato slices
- Thin-sliced red or yellow onion
- Mayonnaise mixed with mustard (or your favorite burger sauce)
- Ketchup and yellow mustard
- Diced pickled jalapeños
- Crispy bacon strips
- Sautéed mushrooms or caramelized onions
- Smash burger special sauce (see recipe below)
Special Sauce (Optional but Recommended):
- ⅓ cup mayonnaise
- 1 tablespoon yellow mustard
- ½ tablespoon sweet pickle relish
- ½ teaspoon Worcestershire sauce
- Pinch of garlic powder
- Tiny dash of paprika (optional)
Prepare the Meat Portions:
-
Divide the ground beef into 8 equal portions (about 2.5 ounces each). Gently form each portion into a loose ball—do not pack the meat tightly. Loose, airy meatballs will produce more tender, juicy patties than densely packed ones. Keep the meat cold by refrigerating the portions on a plate or baking sheet covered with plastic wrap while you prepare everything else. Cold meat sears better and retains juices more effectively than room-temperature meat.
-
If making the special sauce, whisk together the mayonnaise, mustard, relish, Worcestershire sauce, garlic powder, and paprika in a small bowl. Set aside.
-
Prepare all your toppings and have them ready on a cutting board or platter. The key to smash burger success is speed—once the burgers hit the griddle, everything happens very quickly. You won’t have time to chop lettuce or slice tomatoes mid-cooking, so complete all prep work first.
-
Lightly butter the cut sides of the buns and set them aside. If you prefer toasted buns (recommended), you can toast them on the griddle or in a toaster just before assembling the burgers.
Heat the Griddle:
-
Place your cast iron griddle, skillet, or flat-top cooking surface over medium-high to high heat. This is the single most important step. You need the surface screaming hot—aim for at least 375°F, ideally 450°F or higher if your equipment can handle it. A super-hot surface is what creates the deep browning and crispy edges.
Advertisements -
Let the griddle preheat for at least 10 minutes if it’s cast iron, or 5-7 minutes if it’s a thin pan. Test the temperature by carefully sprinkling a few drops of water on the surface—if they immediately evaporate and sizzle, you’re ready. If they just sit or slowly steam, keep heating.
Smash and Cook the Burgers:
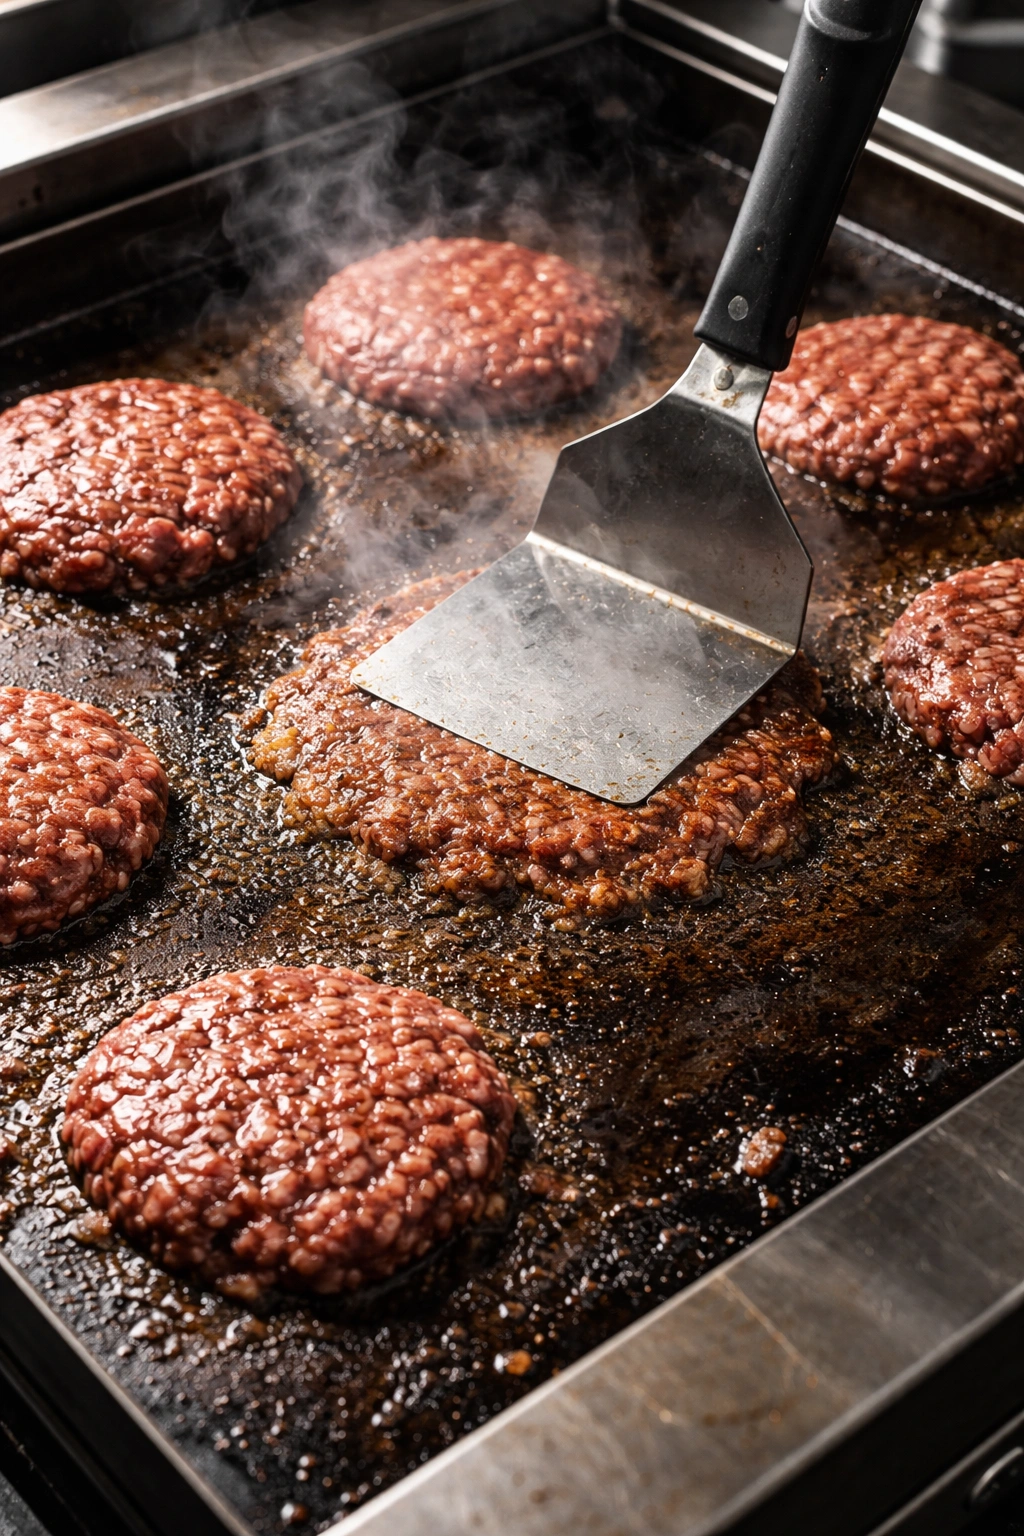
-
Once the griddle is properly hot, place 2 to 4 loose beef balls directly onto the griddle surface (depending on how many you’re cooking at once and your griddle size). Do not add oil unless your griddle is sticking excessively—the beef will render enough fat to prevent sticking.
-
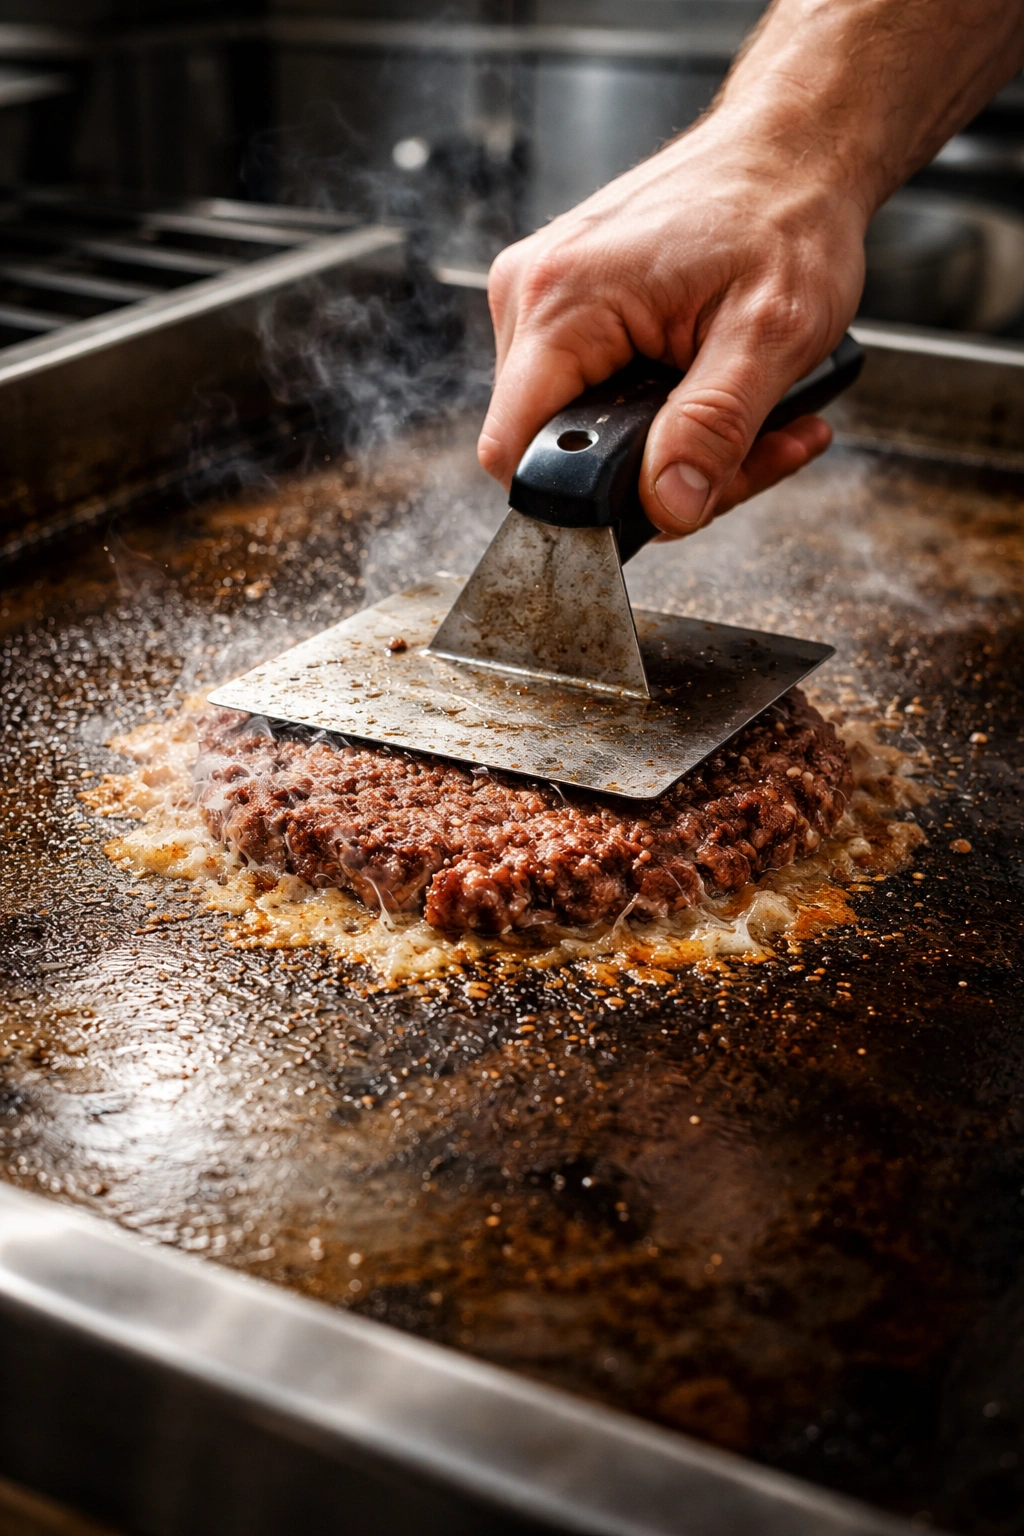
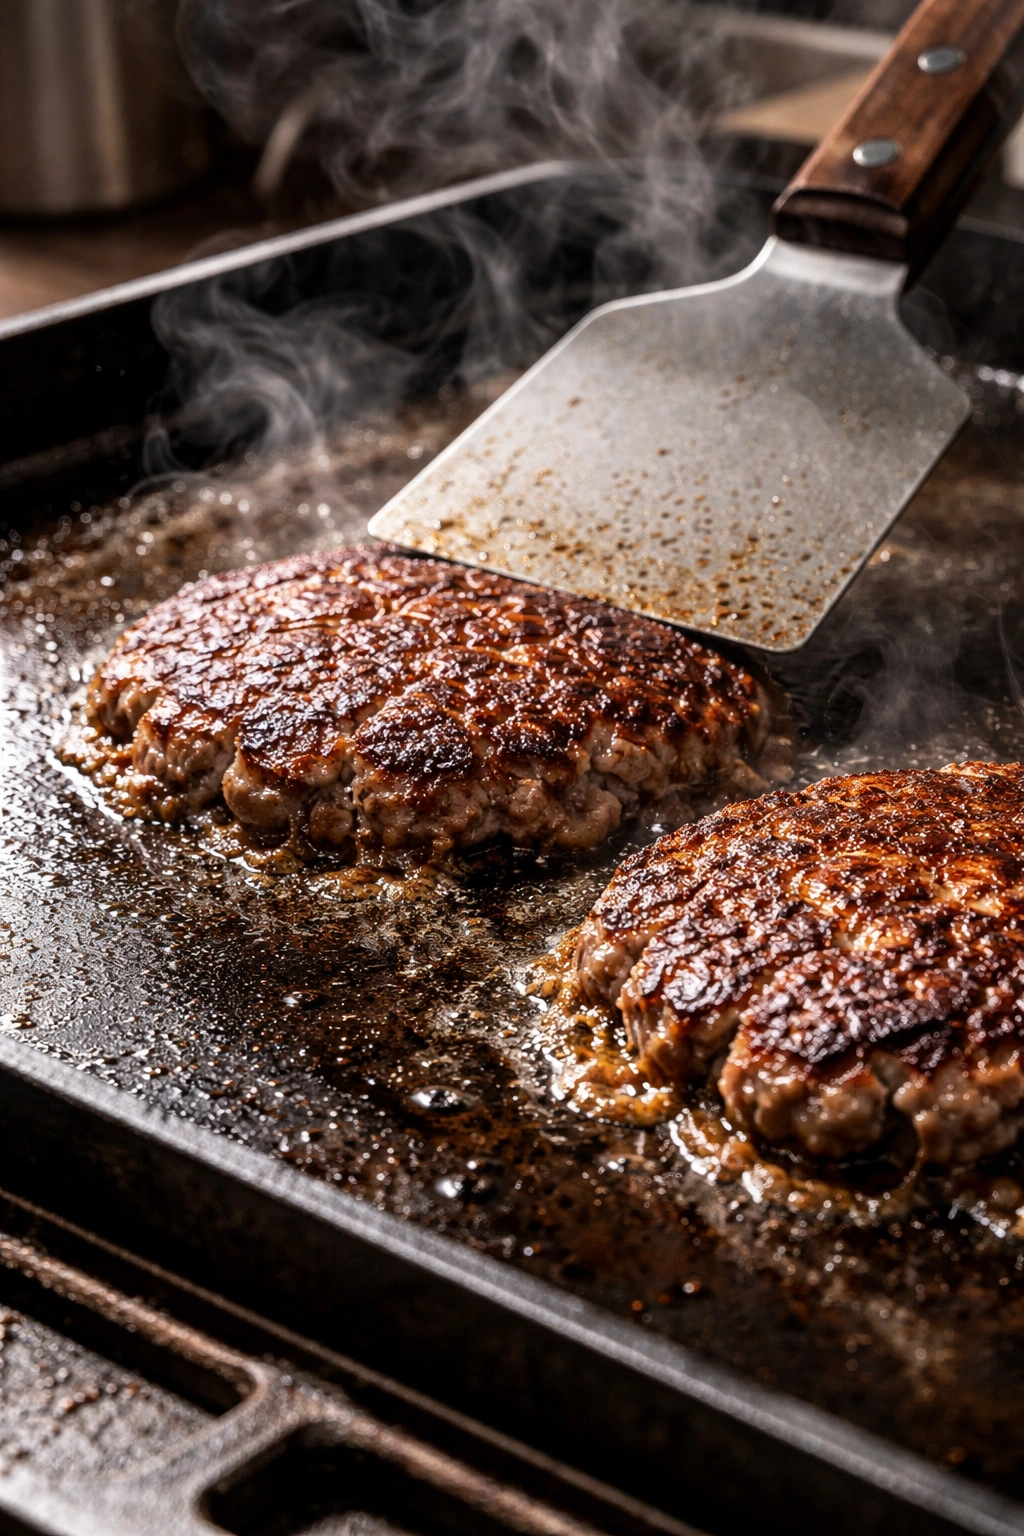
Immediately and firmly smash each meatball into a thin, flat patty. This is the signature move that defines smash burgers. Using a burger press, a sturdy metal spatula, or the bottom of a heavy pan, press down with force, flattening the beef to roughly ¼-inch thickness. Hold the pressure for about 2-3 seconds to ensure good contact with the hot griddle. Some cooks place a small square of parchment paper between the meat and the press to prevent sticking—this is entirely optional but helpful if you’re using a burger press.
-
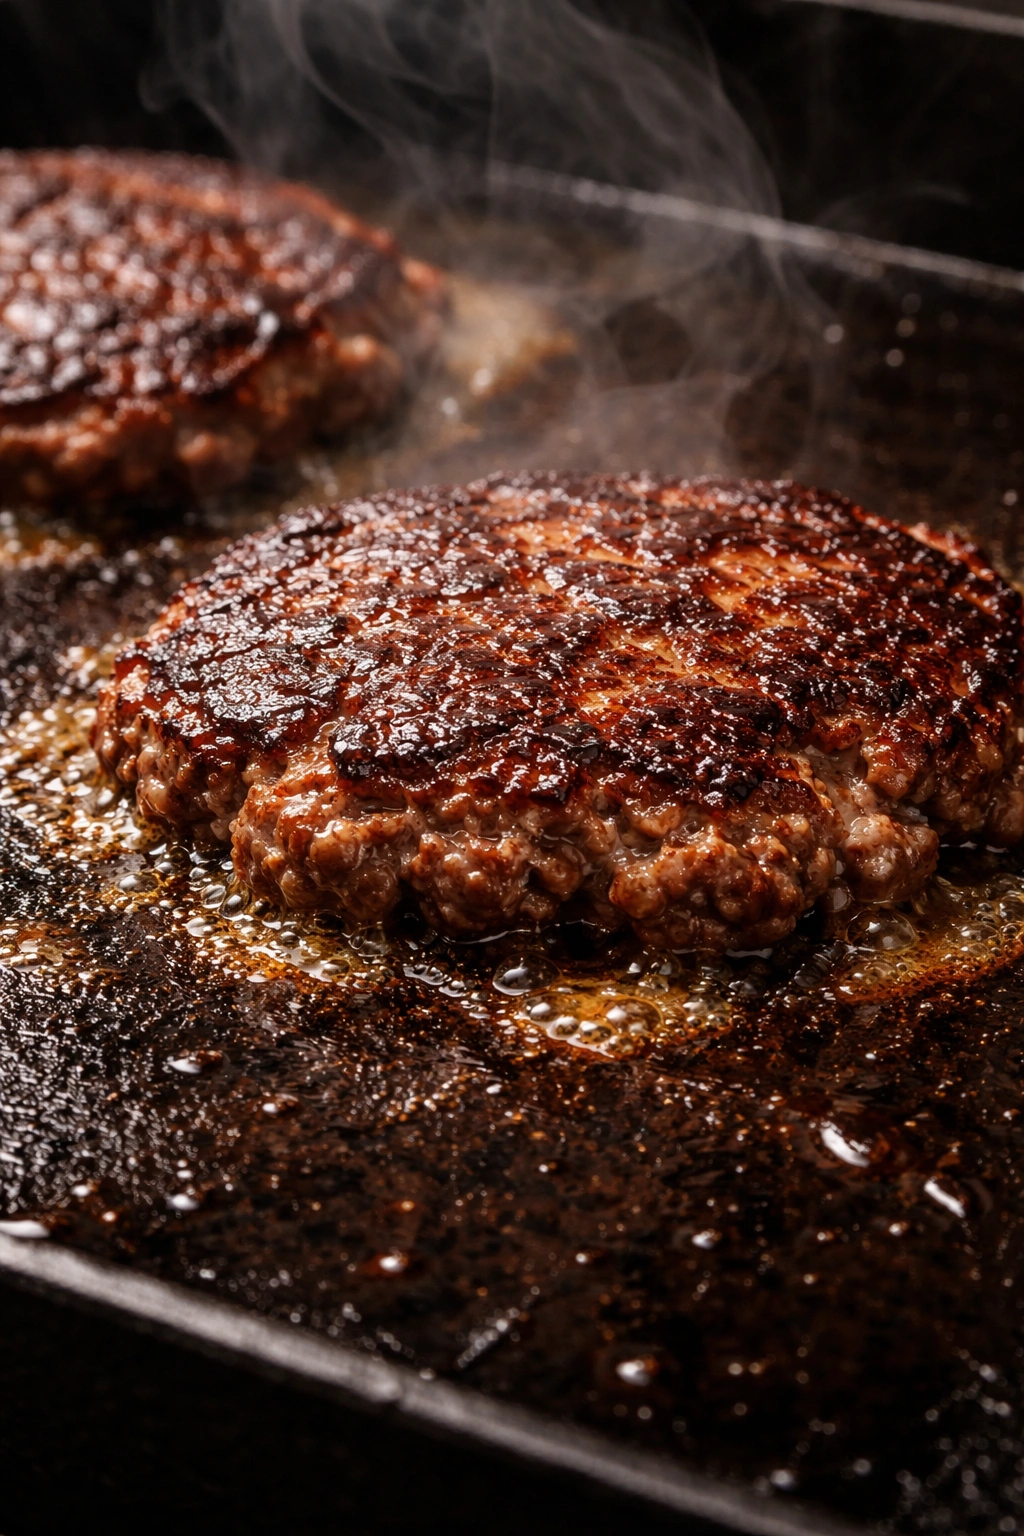
Once smashed, immediately remove the parchment paper (if using) and season the exposed top surface with salt and pepper. Don’t move the burgers or press them again—let them sit undisturbed on the griddle. This is where the magic happens. The bottom surface is now searing and developing that incredible crust.
-
Cook for 60 to 90 seconds on the first side. You’re looking for the edges of the patty to turn golden brown and crispy. You’ll see a color creeping up the sides as the browning develops. Under no circumstances should you poke, flip, or move the patty during this time. Disturbance breaks the Maillard crust that’s forming.
-
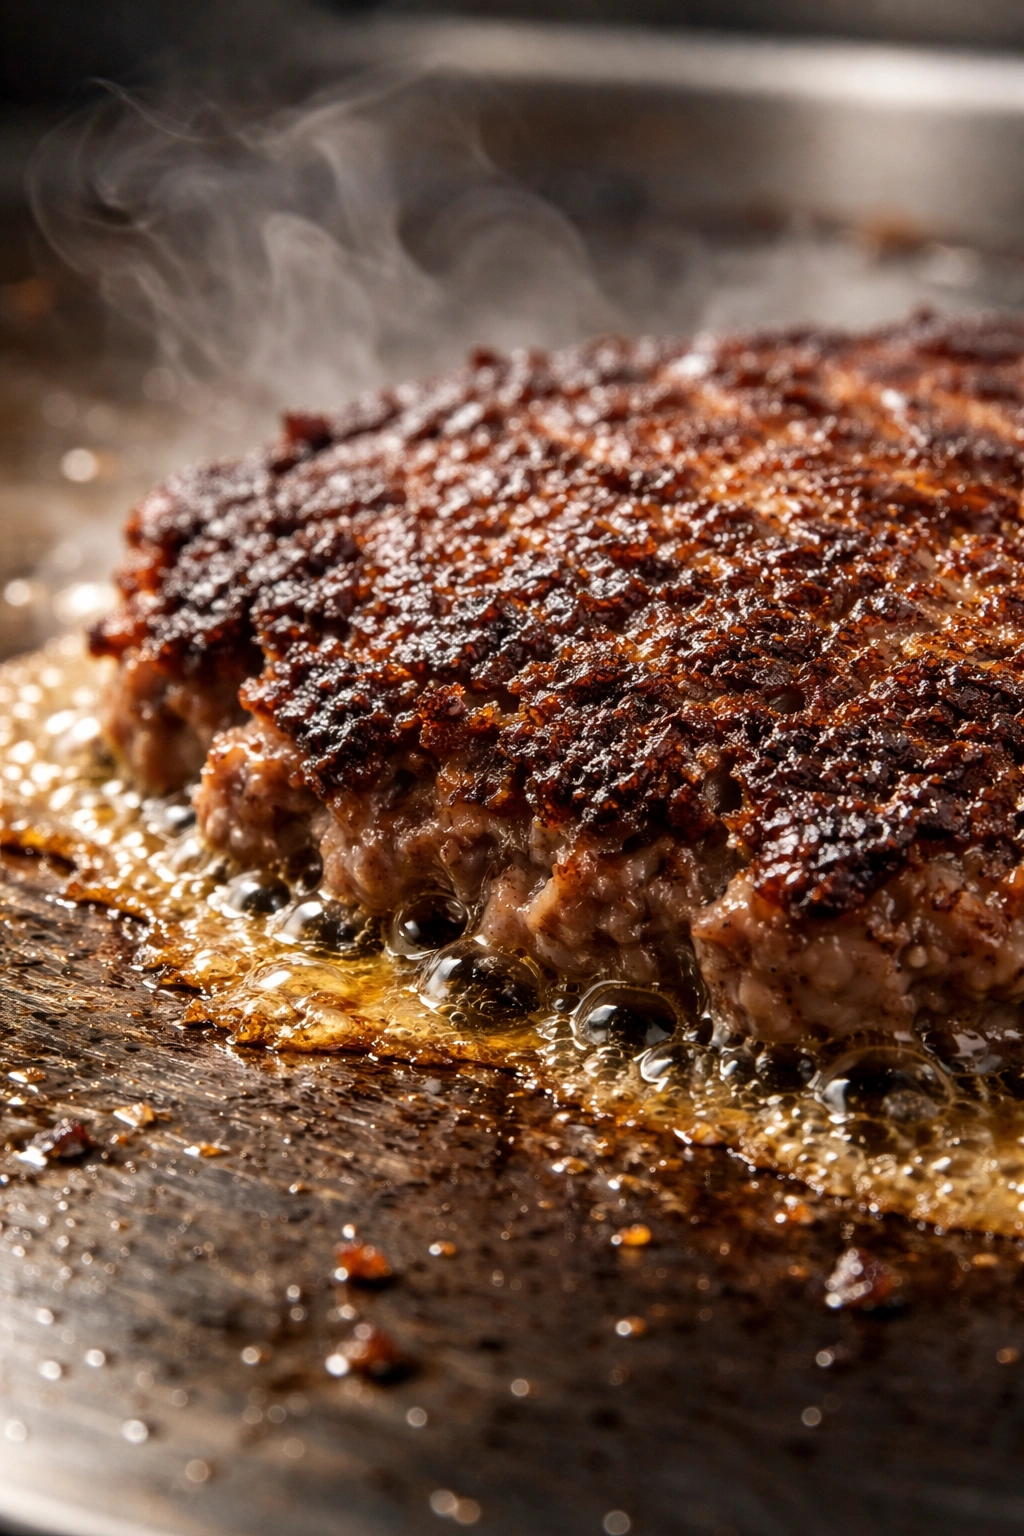
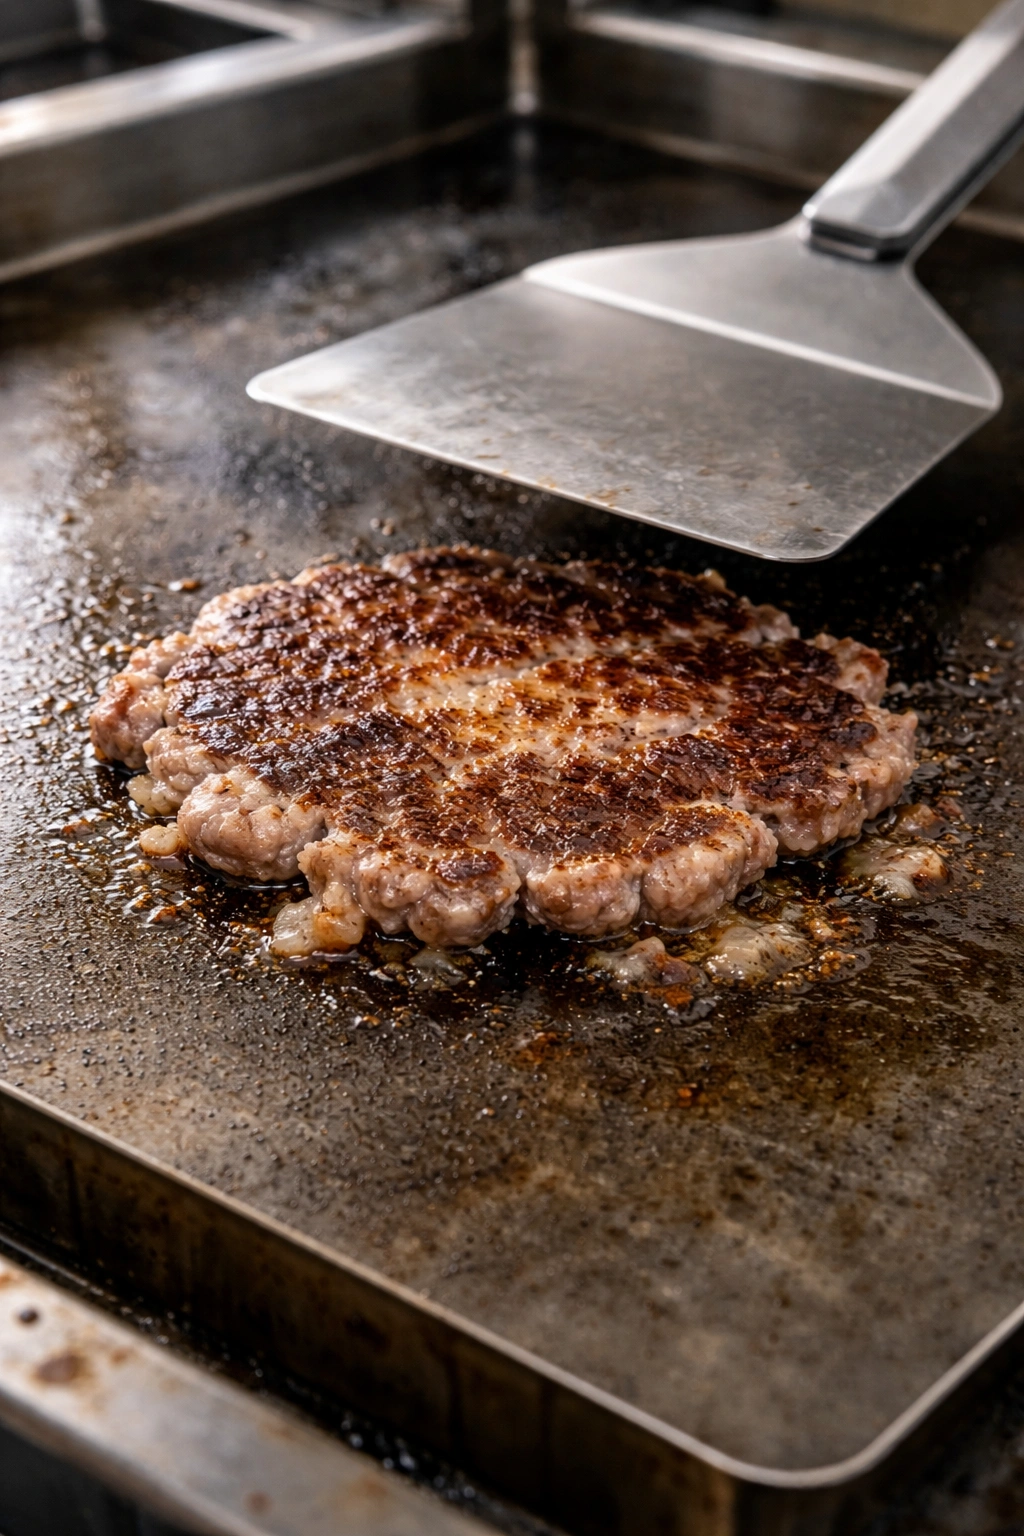
Using a sturdy metal spatula held at a slight angle, scrape firmly under the burger to release it from the griddle. There will be some resistance from the crust—that’s exactly what you want. Work quickly and precisely to get the spatula completely under the patty, then flip it over in a quick, confident motion.
-
Marvel at the crust for just a moment—it should be deep golden brown, crispy, and possibly a bit lacy with crispy edges. This is the payoff for the high heat and proper smashing.
-
Season the second side with salt and pepper. Immediately place a slice (or two if you love cheese) on top of the cooked surface.
-
Cook for another 30 to 60 seconds on the second side. You don’t want to overcook the cheese or dry out the burger. Once the cheese is starting to melt, the burger is done. If you’re stacking two patties together to make a double burger, place the second patty directly on top of the melted cheese while both are still on the griddle for 10-15 seconds so the heat helps them stick together.
Advertisements
Toast the Buns and Assemble:
-
While the final patties finish cooking, place the buttered buns on a cooler part of the griddle or in a toaster. Toast until golden brown—this takes just 30 to 60 seconds and makes a tremendous difference in preventing sogginess.
-
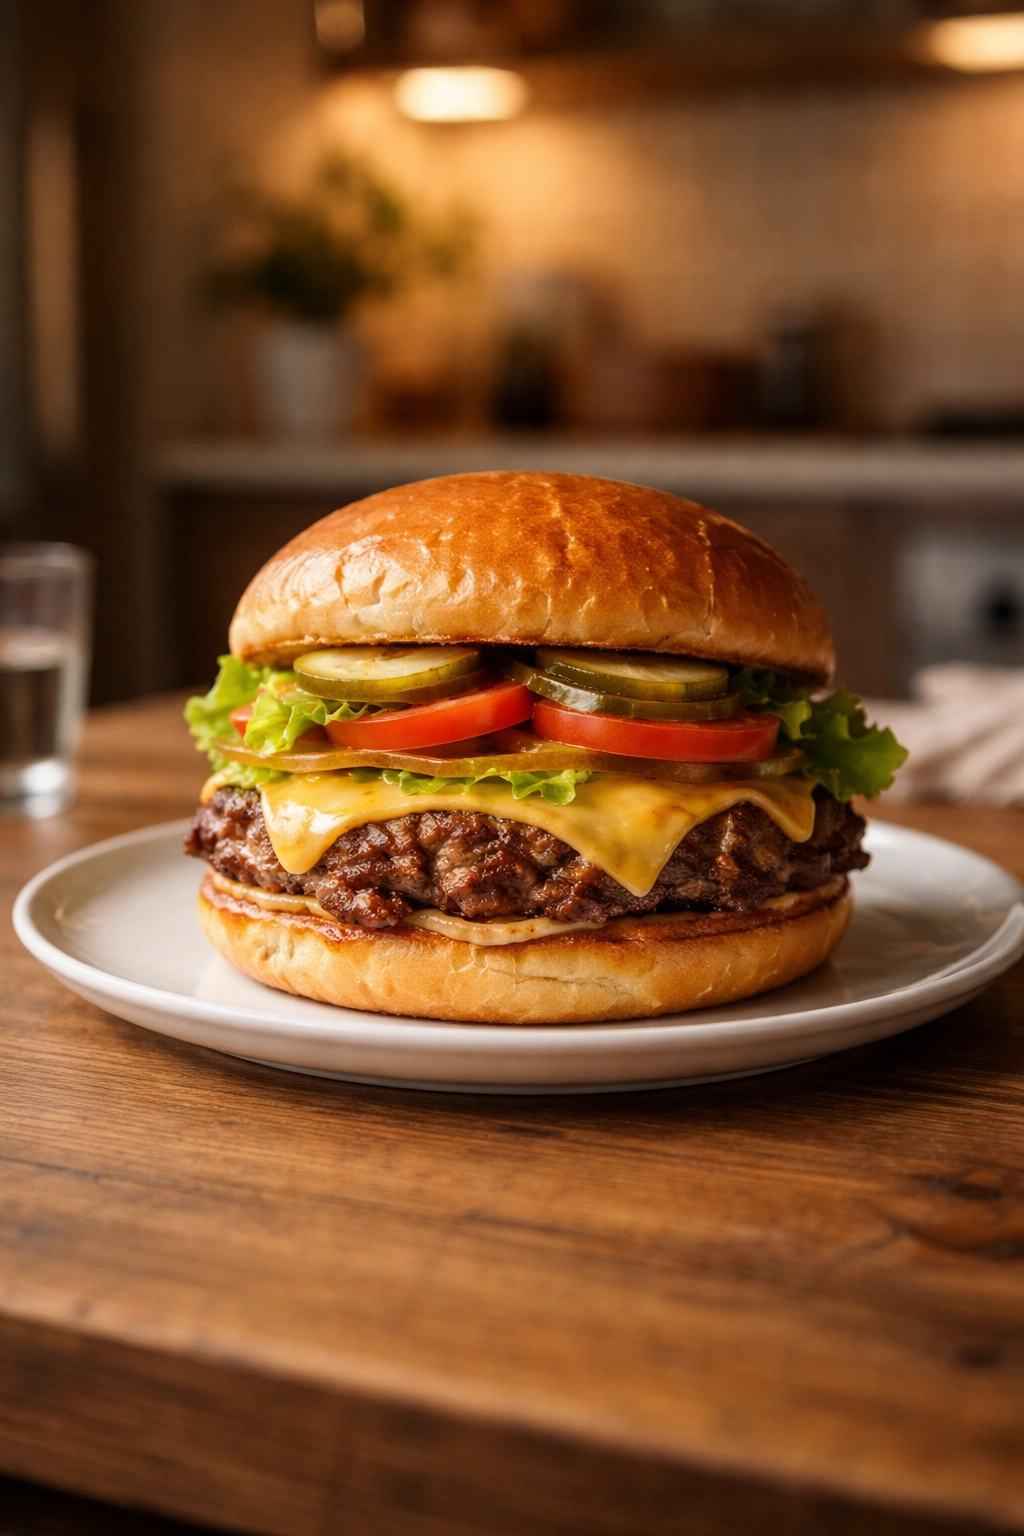
Assemble immediately while the patties are hot. Place a thin layer of special sauce or condiment on the bottom bun, followed by your toppings in this traditional order: pickles first (they hold up better and won’t slide), then a bed of shredded lettuce, then tomato slices and onion if using, then the hot burger patties, then more sauce on the top bun.
-
Serve right away with crispy fries, chips, or your favorite sides.
Pro Tips That Make the Difference
The griddle temperature is everything. Restaurant-quality smash burgers come from a super-hot cooking surface. If your burgers aren’t browning enough or developing crispy edges, your griddle probably isn’t hot enough. Keep it cranked up and preheat properly.
Form loose meatballs, not tight ones. This seems counterintuitive, but tightly packed meat becomes dense and chewy when cooked. Loose, airy formations yield more tender results because the meat isn’t overworked before cooking. You want the gluten in the meat to stay relaxed, not activated.
Keep meat cold until it hits the griddle. This is actually crucial. Cold beef doesn’t render fat as quickly, allowing the exterior to sear and brown before the interior cooks through. Room-temperature meat cooks faster all the way through without developing as much crust. Refrigerate your portions right until cooking time.
Don’t skip the scraping when you flip. That crust is where all the flavor lives. When you flip, use firm, confident scraping motions with your metal spatula, keeping it close to the griddle surface. This ensures you’re bringing all the browned bits along with the patty instead of leaving them stuck to the griddle.
Season after smashing, not before. If you add salt to the raw meat mixture before forming patties, the salt draws out moisture and makes the cooked burger texture mushy. Adding salt after smashing ensures it adheres to the surface and seasons properly without affecting texture.
Cook fast and serve faster. These burgers are best eaten immediately while they’re hot, the cheese is melted, and the crust is still crispy. More than a few minutes off the griddle and the crust loses some of its magic. Have your toppings ready and your buns toasted before the burgers finish cooking so you can assemble instantly.
Toast your buns no matter what. This seems like an optional embellishment, but toasted buns prevent sogginess from condiments and create a protective barrier that absorbs juices without disintegrating. Untoasted buns feel cheap in comparison.
Use American cheese if you can find it sliced from the deli counter. It melts faster and more smoothly than pre-packaged singles. While cheddar, Swiss, and other cheeses are delicious, American cheese has been engineered to melt evenly and beautifully—perfect for smash burgers’ fast cooking timeline.
Common Mistakes to Avoid
Moving or pressing the burgers while they cook is the most common error. New smash burger makers often feel anxious about the patties sticking or cooking unevenly, so they flip them early or press them again mid-cook. This breaks the crust and disrupts browning. Trust the process. Let them sit untouched until it’s time to flip.
Using beef that’s too lean creates dry, flavorless burgers. The 20% fat in 80/20 ground beef is essential, not optional. Leaner beef at 85/15 or 90/10 simply doesn’t have enough fat to render, sear, and keep the burger juicy. Don’t try to cut calories here—the taste difference is dramatic.
Overworking the meat before cooking builds gluten structure that makes burgers dense and tough. Gently form loose balls; don’t knead or pack the meat aggressively. The goal is to barely hold the meat together, not create a tight, compressed ball.
Seasoning the raw meat mixture seems convenient but creates mushy texture. Salt draws out moisture and activates gluten before cooking, resulting in a texture that’s neither desirable. Always salt after smashing.
Cooking on a cool griddle is like trying to develop a crust on a cold pan—it won’t happen. Your griddle needs to be smoking hot. If your burgers are turning gray and steamed-looking rather than deeply browned and crispy, increase the heat and preheat longer.
Oversaucing drowns out the beefy flavor you worked hard to develop. A thin layer of special sauce or simple condiments is perfect. These aren’t overstuffed sandwich burgers; they’re about the beef and that crust.
Stacking toppings too high creates a structural nightmare. Keep toppings reasonable so you can actually bite through without the patty sliding out sideways. Pickles, lettuce, and tomato are perfect; adding bacon, fried eggs, and three other things becomes unwieldy.
Flavor Variations Worth Trying
Once you’ve mastered the basic smash burger, there are countless delicious directions to take the technique.
The Worcestershire Butter Smash Burger incorporates umami depth by mixing a tablespoon of Worcestershire sauce and two tablespoons of softened butter into the meat before forming patties. This adds savory complexity without making the meat mushy (since you’re not using salt in the mixture). The butter helps the meat brown beautifully and adds richness.
The Fish Sauce Burger sounds unusual until you taste it—then you’ll be hooked. Mix one teaspoon of fish sauce (Southeast Asian-style, not the Western grocery store fish sauce) into the meat along with the butter and Worcestershire. The fish sauce adds an almost meaty depth that makes people say “wow, what is that secret ingredient?” without necessarily identifying fish sauce.
The Onion-Infused Smash Burger borrows from the classic Oklahoma burger technique. Thinly slice yellow onions and place a handful directly onto each beef ball before smashing. The onions cook into the patty, adding sweetness and aroma. This requires the same flattening and cooking approach but transforms the burger completely.
The Bacon Upgrade is straightforward but effective. Cook bacon separately until crispy, crumble it, and add to your toppings. Some people go further and render bacon fat on the griddle before cooking the burgers, adding a subtle smoky undertone.
The Jalapeño and Cheese Situation pairs sliced fresh jalapeños (not pickled) placed on the beef ball before smashing with pepper jack or sharp cheddar instead of American cheese. The jalapeños char slightly, mellowing their heat while adding complexity.
The Double-Smash takes the technique to the extreme. Instead of two separate patties stacked with cheese in the middle, you smash a thin patty, cook it briefly, top with cheese, then place a second raw beef ball right on top and smash again. This creates one incredibly thin, ultra-crispy patty with melted cheese built into the layers. It’s dramatic and delicious.
The Mushroom and Garlic Version adds sautéed mushrooms and roasted garlic to the meat mixture (about ¼ cup finely chopped mushrooms per pound of beef). This adds earthiness and depth, especially if paired with Swiss cheese and caramelized onions.
The Smoked Paprika and Garlic Route adds Spanish flair. Mix one teaspoon smoked paprika and one teaspoon garlic powder into the meat along with Worcestershire and butter. Serve with a mayo-based sauce for richness.
The Keto/Low-Carb Lettuce Wrap skips the bun entirely and wraps the burger in a large butter lettuce or romaine leaf. It’s lighter, lower in carbs, and still satisfying—particularly if you use extra cheese and bacon.
Storage, Make-Ahead, and Reheating
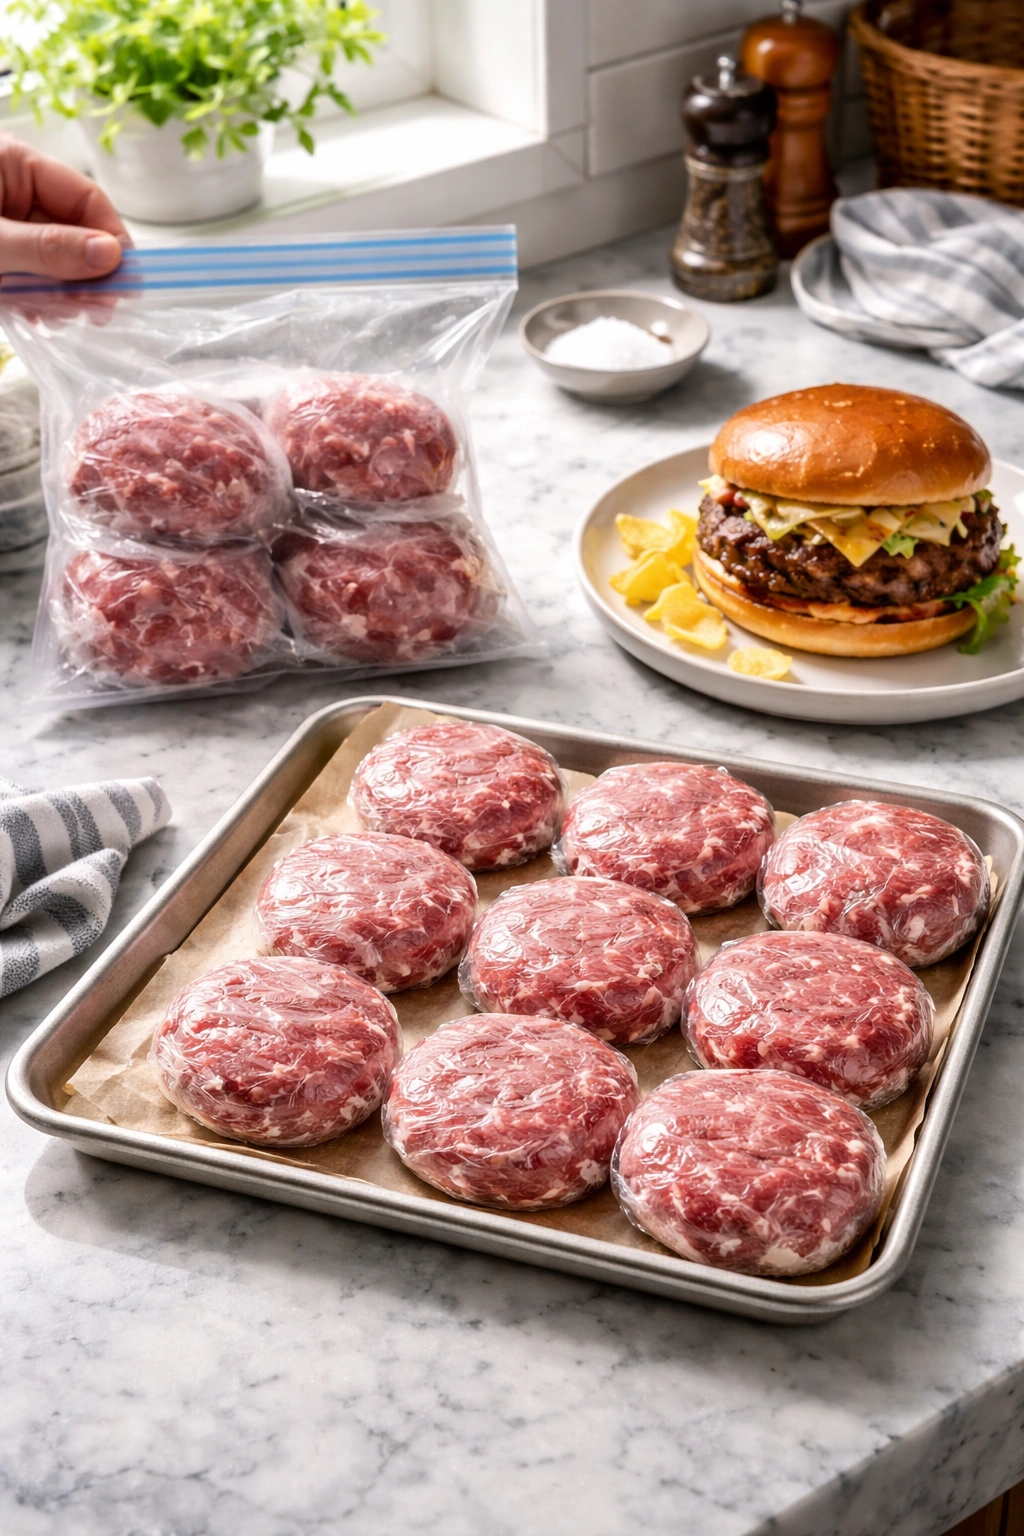
The uncooked beef portions can be formed into loose balls, covered with plastic wrap, and refrigerated for up to two days. This is incredibly convenient for weeknight cooking—do the portioning work on a weekend, then cook fresh burgers midweek with minimal effort.
The beef portions can be frozen for up to three months. Freeze them on a baking sheet so their shape sets, then transfer to a freezer bag for storage. Defrost overnight in the refrigerator before cooking. Do not cook from frozen—the exterior will brown before the interior cooks through.
Cooked smash burgers don’t store well. They’re genuinely best eaten immediately while hot and crispy. That said, if you have leftovers, wrap them (bun and patty together) in parchment paper or aluminum foil and refrigerate for up to two days.
Reheating cooked burgers requires care. The best method is to place the wrapped burger directly on a griddle or skillet over medium heat for 1-2 minutes per side, allowing the crust to crisp back up and the cheese to remelt slightly. Don’t use a microwave, which destroys the crust texture.
Component storage: If you’ve made special sauce, it keeps refrigerated in an airtight container for up to one week. Toppings should be prepped fresh or stored according to their individual needs (lettuce in a container with paper towels to absorb excess moisture, tomatoes in a cool place but not refrigerated, onions sliced just before serving, pickles in their brine).
The make-ahead advantage of smash burgers over traditional burgers is significant. You can form portions days ahead, prep all toppings the morning of, and still have hot, fresh burgers on the table in under ten minutes of active cooking. This makes feeding a crowd remarkably efficient.
Perfect Sides and Serving Ideas
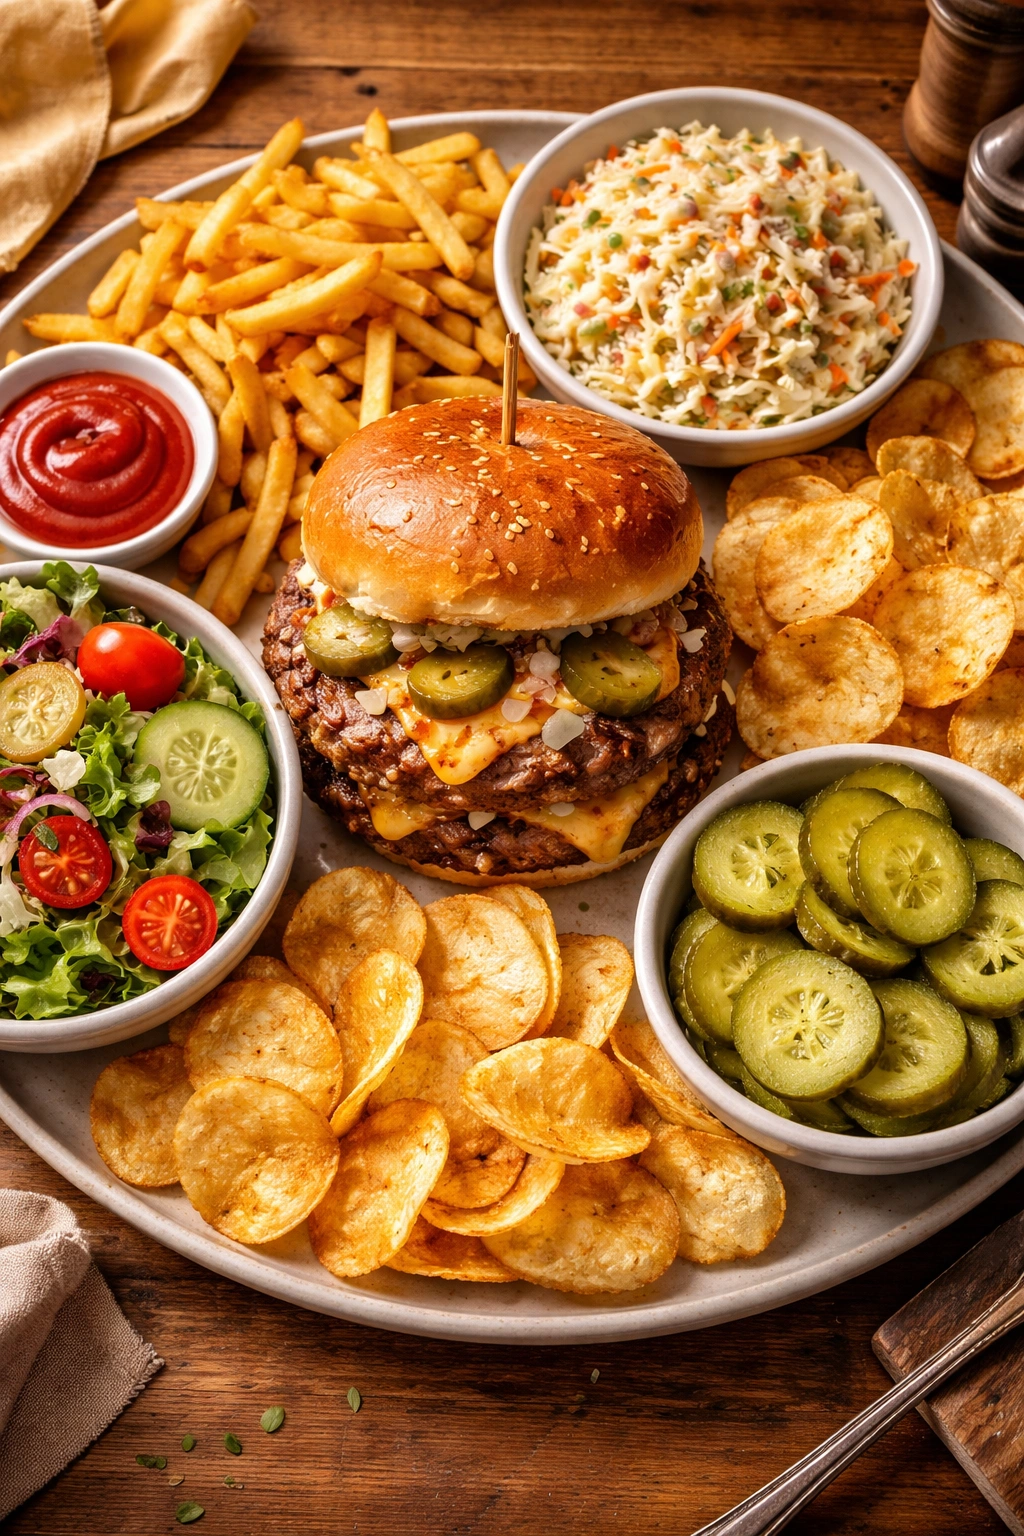
Smash burgers are stripped-down, flavor-focused, and best served with complementary sides that don’t overshadow the burger itself.
Crispy French fries or steak fries are the classic pairing. Their salty crispiness balances the rich burger beautifully. Homemade fries or quality frozen versions both work.
Potato chips or kettle-cooked chips offer similar textural contrast with less effort. They’re perfect for weeknight burgers when you want to keep things simple.
Coleslaw with a tangy dressing adds brightness and a cool contrast to the warm, rich burger. The acidity cuts through the fat in a satisfying way.
A simple garden salad with vinaigrette provides freshness without competing for attention. Stick to mild greens and a basic dressing.
Grilled corn on the cob with butter and salt pairs beautifully if you’re cooking outdoors. The sweetness complements the savory burger.
Dill pickle spears or chips aren’t just a topping—they’re a perfect side dish, especially if you’re making multiple burgers for a group. The vinegar and salt are refreshing alongside beef and cheese.
Baked beans in a tomato sauce add heartiness to a burger meal, especially for casual cookouts or family gatherings.
Grilled onions or caramelized onions deserve their own mention. While you can caramelize onions separately and use as a topping, preparing extra to serve on the side means guests can choose their own quantity.
Beverages matter more than you’d think. Cold lemonade, iced tea, or crisp beers pair perfectly. Avoid heavy or overly sweet drinks that compete with the burger.
For plating and presentation, wrap the burger in parchment paper or foil to contain drips and juice. This serves both practical and aesthetic purposes—it looks like a restaurant burger and actually prevents mess on the plate.
Troubleshooting Your Smash Burgers
If your burgers aren’t developing a deep brown crust: Your griddle isn’t hot enough. This is the most common problem. Increase the heat significantly and preheat longer. The surface should be nearly smoking before beef hits it. Use an instant-read thermometer if you have one—aim for 450°F or higher.
If the patties are sticking to the griddle: Cast iron well-seasoned and hot doesn’t stick. If you’re experiencing this, try increasing heat (which creates better browning), or lightly oil the griddle surface. Some griddles simply require a bit of oil for non-stick performance.
If the burgers are coming out dry or tough: You’re likely using beef that’s too lean, or cooking them too long on the second side. Verify you’re using 80/20 ground beef, and cook the second side for no more than 60 seconds. Also check that you’re not overworking the meat before cooking—keep those portions loose.
If the cheese isn’t melting properly: Your griddle temperature is dropping too much before you flip. Make sure the surface is sufficiently hot before adding burgers. You can also place a cover (a baking sheet or spatula) over the burger for 15-20 seconds after adding cheese to trap heat and accelerate melting.
If you’re losing the crust when you flip: Your spatula isn’t sturdy enough or you’re not scraping firmly enough. Use a rigid metal spatula and don’t be timid—press down hard as you scrape under the burger, keeping the spatula nearly flat to the griddle surface. This requires a bit of assertiveness.
If the edges of the patty are burnt-black rather than golden-brown: Your heat is too high or the griddle surface is dirty with charred debris. Clean the griddle between burgers with a ball of foil while it’s hot, which scrapes away debris without cooling it significantly. Reduce heat slightly if needed, though burnt edges usually indicate a heat source that’s too intense rather than a timing issue.
Final Thoughts
Smash burgers represent everything we love about good cooking: simplicity that delivers excellence, technique that prioritizes flavor, and speed that fits actual life. They prove that you don’t need expensive ingredients, fancy equipment, or complicated recipes to create restaurant-quality results at home.
Once you nail the fundamentals—hot griddle, loose meat portions, immediate smashing, proper seasoning, and a confident flip—you’ll find yourself making smash burgers constantly. For weeknight dinners when you need something satisfying in minutes. For casual outdoor gatherings where you can cook dozens without fuss. For moments when you crave a genuinely good burger but don’t want to spend the evening grilling.
The beauty of this technique is how customizable it becomes once you understand the core method. Flavor the meat or cook it plain. Stack toppings high or keep it minimal. Use American cheese or experiment with others. Every version works because the foundation is solid.
You’ve now got everything needed to make smash burgers that rival any restaurant version. The techniques work, the science is sound, and the results speak for themselves. What started as a quick cooking method has become a beloved burger style precisely because it delivers on every front: speed, flavor, texture, and juiciness. Stop reading and fire up that griddle.