Chicken Penne Pasta Ready in Under 30 Minutes
The beauty of this chicken penne pasta lies in its simplicity and speed without sacrificing restaurant-quality flavor. You’re looking at roughly 10 minutes of prep work and 20 minutes of cooking time, which means you can have a complete, satisfying dinner on the table before your family even asks what’s for supper. What makes this dish so reliable is that every component cooks simultaneously — pasta boils, chicken sears, and sauce comes together in the same pan, all without requiring any special techniques or hard-to-find ingredients.
This isn’t one of those quick meals that tastes rushed or tastes like you cut corners. The creamy sauce clings beautifully to each piece of penne, the chicken stays juicy and tender because you’re not overthinking it, and the whole dish tastes like you spent your afternoon simmering something on the stove. That’s the real magic of mastering a 30-minute meal: it feels indulgent and special while your actual time investment is laughably small.
Busy weeknight dinners don’t have to mean takeout or boxed meals. With this recipe in your rotation, you’ll have a go-to that satisfies cravings for creamy, cheesy comfort food while respecting your time constraints. Whether you’re cooking for a family, a date night for two, or meal prepping for the week ahead, this chicken penne pasta adapts beautifully and delivers every single time.
Why This Recipe Works for Busy Dinners
The true brilliance of this dish is how it eliminates unnecessary steps without losing flavor. Traditional pasta dishes often require making a separate sauce, cooking proteins in advance, and then assembling everything last minute. This recipe collapses all those stages into one efficient workflow. You’re building flavor as you go, not starting from cold ingredients.
Most rushed dinners fail because they’re underseasoned or the textures feel separated and disjointed. This recipe avoids that trap by ensuring every ingredient touches the flavorful cream sauce, so the pasta absorbs the richness, the chicken stays moist, and even the residual sauce coats everything evenly. It’s the difference between a meal and a good meal, accomplished in the same 30-minute window.
The recipe also offers genuine flexibility. If you have rotisserie chicken in the fridge, you can cut your active cooking time to barely 15 minutes. If you want to add vegetables, there’s room without disrupting the timing. If you prefer a red sauce over cream, the foundation stays the same and adapts instantly. That flexibility is what keeps this dish on repeat, rather than something you make once and forget.
The Secret to Perfectly Cooked Chicken
Overcooking chicken is the single biggest enemy of a fast pasta dish, and it’s completely avoidable with the right approach. The key is cutting your chicken into bite-sized pieces before cooking, not after. When you cook whole breasts or large chunks, the outside dries out before the inside finishes cooking. Bite-sized pieces cook evenly in 6-8 minutes, which fits perfectly into your 30-minute timeline.
Pat your chicken dry with paper towels before it hits the pan — this small detail makes a massive difference. Wet chicken steams instead of sears, and steamed chicken tastes bland. Dry chicken gets a golden crust that seals in moisture and adds a layer of savory depth that elevates the entire dish. You’ll notice the difference immediately, and it costs you exactly 20 seconds.
Season your chicken generously with salt and pepper right before cooking, not hours in advance. Fresh seasoning at the moment of cooking tastes brighter and more vibrant than salt that’s been sitting on raw meat. Use medium-high heat and let each piece sit undisturbed for the first minute or two — resist the urge to move it around constantly. That initial contact with the hot pan is what creates that golden exterior everyone loves.
Choosing Your Sauce Style
You have essentially two directions to take this dish, and both are genuinely excellent. A creamy Parmesan sauce feels luxurious and coats every strand of pasta in silky richness — this is the version that makes people close their eyes and sigh contentedly while eating. It uses heavy cream (or half-and-half for a lighter option), chicken broth, butter, and freshly grated Parmesan cheese, all simmered together for about 5 minutes until it reaches the perfect consistency.
The alternative is a creamy tomato-based sauce that adds brightness and tang while still delivering that rich, satisfying texture. This version includes sun-dried tomatoes, fresh tomatoes, or a quality marinara sauce mixed with cream and Parmesan — the tomato acid cuts through the richness and makes the dish feel less heavy while tasting just as indulgent. If you’re serving this on a warm evening or want something that feels slightly fresher, the tomato route is your answer.
Neither option is objectively better; it purely depends on your mood and what you have on hand. The beauty is that both versions use the exact same cooking method and timing, so you can choose based on your craving rather than logistical constraints. Some cooks rotate between them weekly to prevent pasta fatigue and keep the dish feeling fresh and exciting.
Why Penne Is the Pasta of Choice

Penne isn’t just traditional for this dish — it’s actually the mechanically superior choice, and understanding why will help you appreciate every bite. The shape itself is a short tube with diagonally cut ends, and those ridges along the outside create countless tiny pockets that trap and hold sauce. When you twirl a fork through penne pasta, the sauce clings to every surface, giving you a creamy bite every single time.
Compare that to long pasta like spaghetti or fettuccine, where the sauce often slides off and pools at the bottom of the bowl, or shorter shapes like elbow macaroni, which can disappear into the sauce and become almost invisible. Penne hits a sweet spot between grabbing sauce and remaining visible and appetizing on the plate. It also has enough body that it doesn’t get lost in a creamy sauce the way delicate angel hair would.
The thickness of penne also matters for timing. It cooks reliably in 8-12 minutes, giving you a predictable window that syncs perfectly with your chicken and sauce cooking times. Thinner pastas can turn mushy in minutes if you’re not watching constantly, while very thick shapes might need more cooking time than your 30-minute window allows. Penne is the reliable middle ground that’s hard to mess up.
The 30-Minute Chicken Penne Pasta
Yield: Serves 4 to 6 | Makes approximately 6 cups
Prep Time: 10 minutes
Cook Time: 20 minutes
Total Time: 30 minutes
Difficulty: Intermediate — The recipe involves managing multiple components simultaneously, but each step is straightforward. If you’ve cooked chicken and made a basic sauce before, you’ll handle this confidently.
Complete Ingredient List
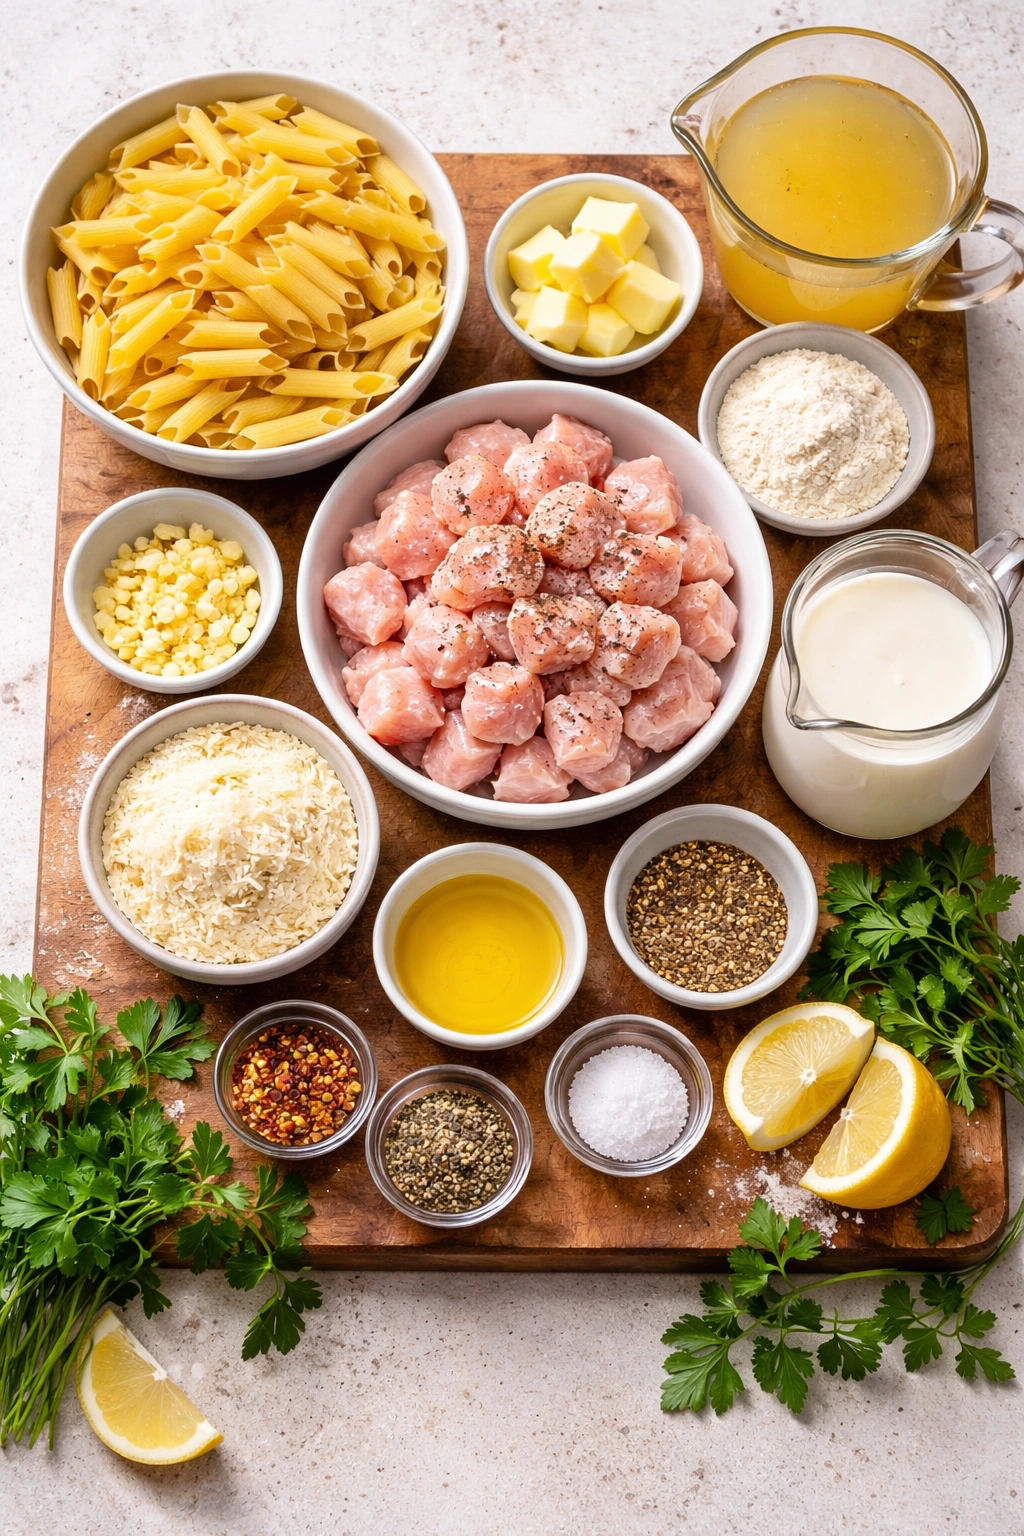
For the Pasta:
- 1 pound penne pasta (about 4 cups uncooked)
- 1 tablespoon salt (for pasta water)
- Water (about 4 quarts for boiling)
For the Chicken:
- 1¼ pounds boneless, skinless chicken breasts
- ½ teaspoon kosher salt
- ¼ teaspoon freshly ground black pepper
- 1 tablespoon olive oil
For the Creamy Parmesan Sauce:
- 3 tablespoons unsalted butter
- 4 cloves garlic, minced (or 2 teaspoons garlic powder in a pinch)
- 3 tablespoons all-purpose flour
- 1 cup chicken broth (or reserved pasta water for a lighter version)
- 1 cup heavy cream (or half-and-half for a lighter version)
- 1 cup freshly grated Parmesan cheese (about 3 ounces, not pre-shredded)
- ½ teaspoon dried Italian seasoning
- ¼ teaspoon red pepper flakes (optional, for gentle heat)
- Salt and freshly ground black pepper to taste
Optional Garnish:
- Fresh basil leaves, chopped
- Extra grated Parmesan cheese
- Red pepper flakes
- Fresh lemon zest
Step-by-Step Cooking Instructions
Prepare and Start the Pasta:
-
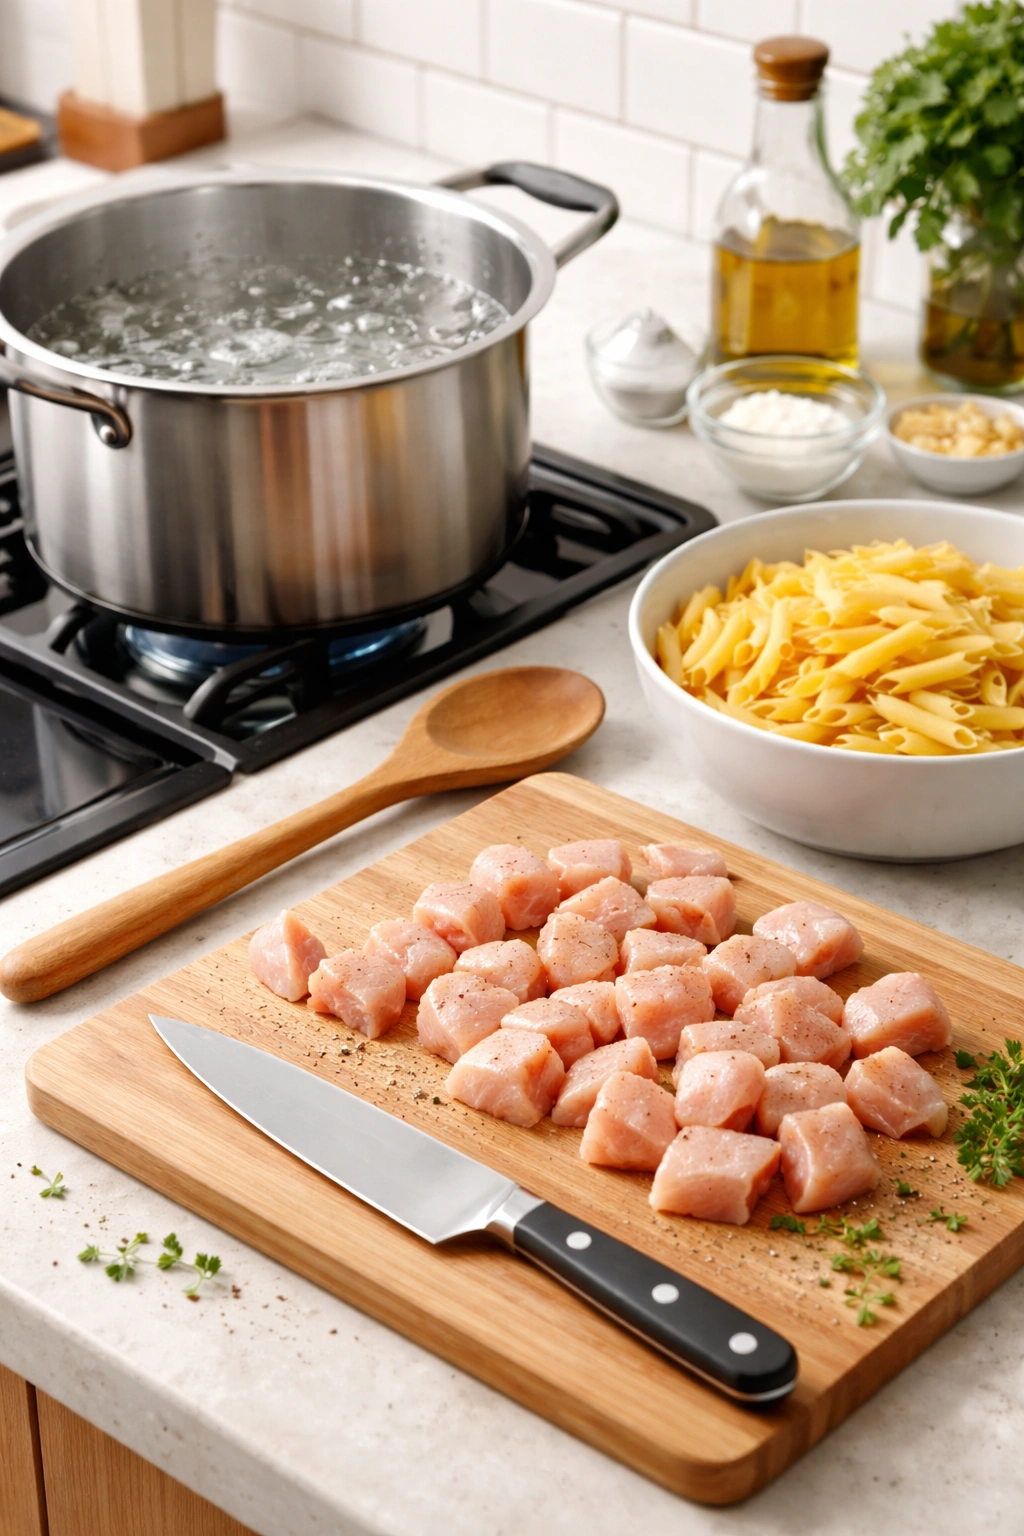
Fill a large pot (at least 6 quarts) with 4 quarts of cold water and set it over high heat. This head start is crucial — getting the water boiling is often the longest single step, so start this immediately before anything else.
-
While the water heats, prepare your chicken: place the boneless chicken breasts on a cutting board and cut them into bite-sized pieces, roughly ¾ to 1 inch each — aim for relatively uniform sizes so everything cooks at the same rate. Uneven pieces will result in some dry and some undercooked chicken, which defeats the purpose of this quick meal.
-
Once the water reaches a rolling boil, add the 1 tablespoon salt and stir. The water should taste noticeably salty, similar to seawater. This is the only opportunity to season the pasta itself, so don’t skip this step. Add the penne and stir immediately to prevent sticking.
-
Cook the pasta according to package directions, usually 8 to 10 minutes, until it reaches al dente — tender but with a slight firm bite when you test a piece. Remember that the pasta will continue cooking slightly when you combine it with the hot sauce, so undercooking by 1 minute is smarter than overcooking by even 30 seconds. Set a timer and check at the earlier end of the range.
Sear the Chicken:
-
While the pasta cooks, heat the 1 tablespoon olive oil in a large skillet (12 inches is ideal) over medium-high heat. Allow the oil to heat for about 1 minute — when you can smell it and it shimmers across the pan, it’s ready. If the oil starts smoking, your heat is too high; reduce it slightly.
-
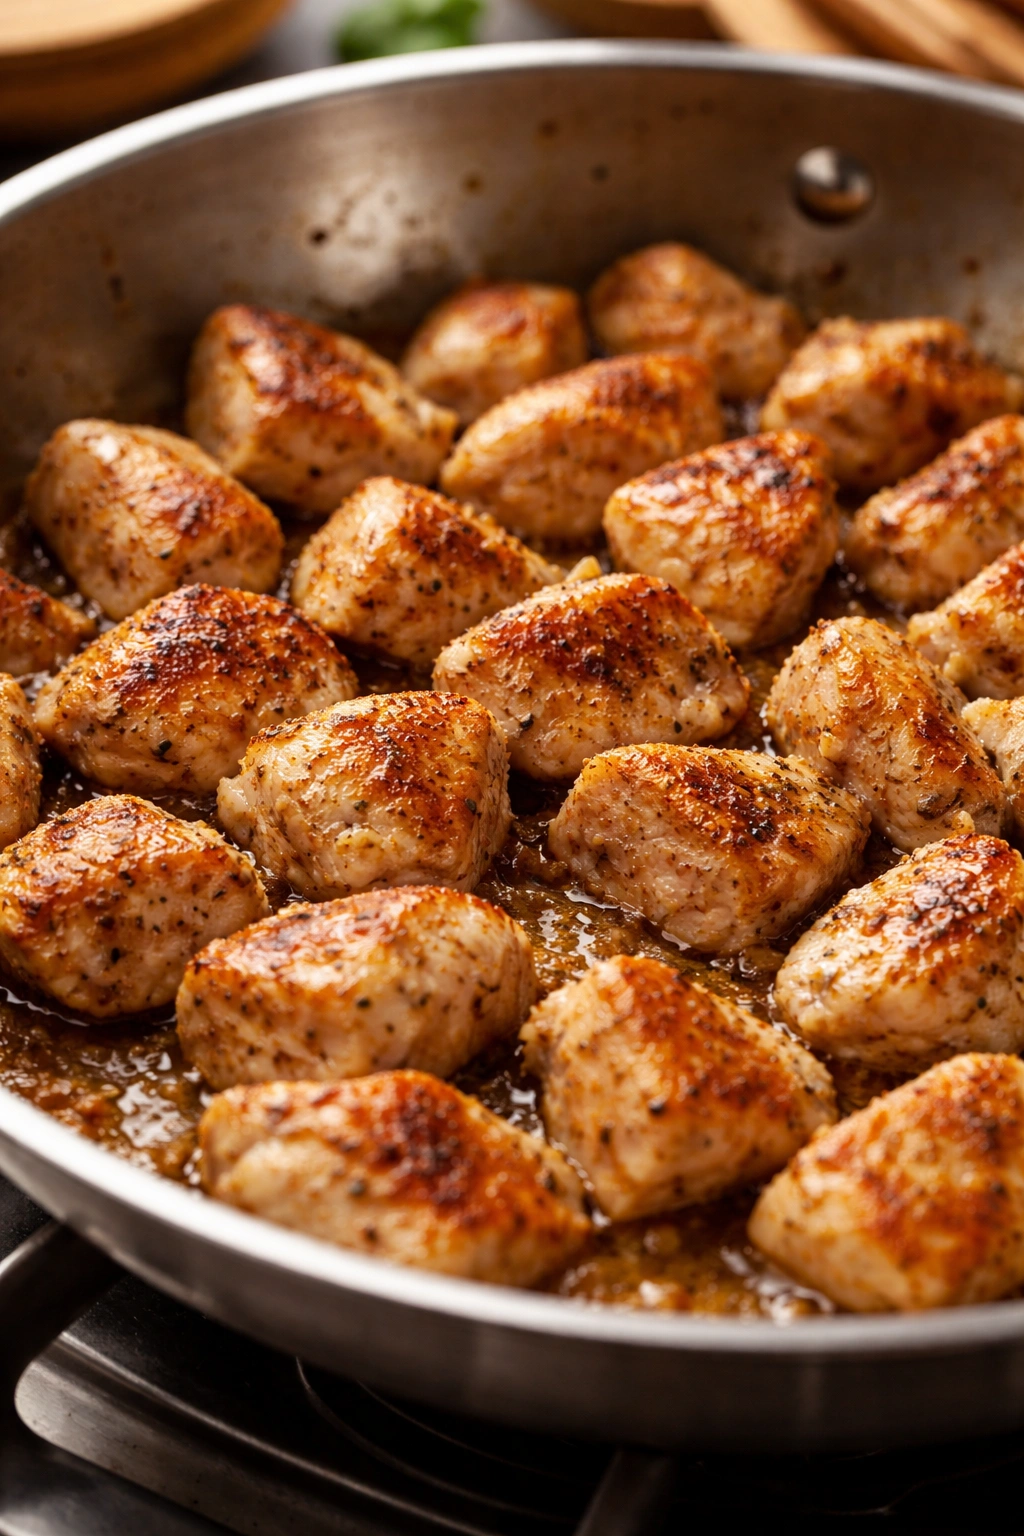
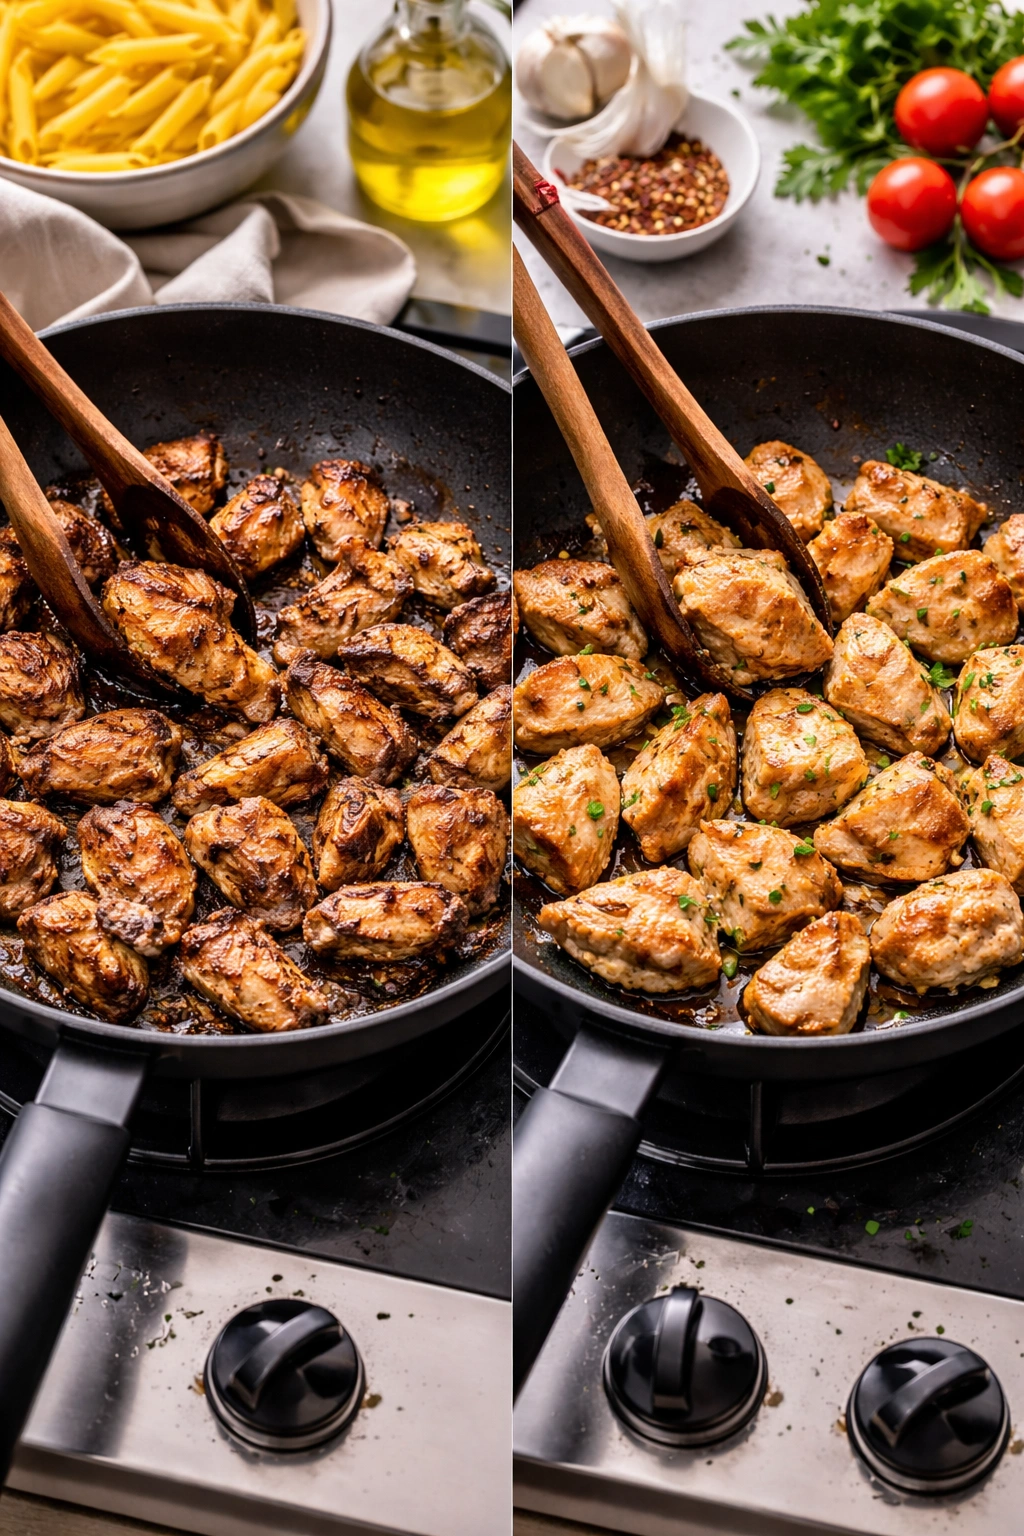
Season your prepared chicken pieces with the ½ teaspoon kosher salt and ¼ teaspoon black pepper. Add the chicken to the hot pan in a single layer, arranging the pieces so they’re not crowded — they should have direct contact with the hot skillet, not pile on top of each other. If your skillet is small or your chicken doesn’t fit comfortably, work in two batches; crowding the pan creates steam instead of a sear, and you’ll sacrifice texture and flavor.
-
Let the chicken sit undisturbed for 2 to 3 minutes — resist the urge to stir or flip constantly. This contact time creates a golden-brown exterior that seals in the juices. After 2-3 minutes, stir the chicken and cook for another 3 to 4 minutes until no pink remains and the internal temperature reaches 165°F (74°C) when measured with a meat thermometer. The chicken should be just cooked through, not dried out from overcooking. Once done, transfer the chicken to a clean plate and set it aside.
Build the Creamy Sauce:
-
In the same skillet (don’t wash it — all those browned bits stuck to the bottom are pure flavor), melt the 3 tablespoons butter over medium heat. Once the butter is foaming, add the minced 4 cloves garlic and sauté for exactly 30 to 45 seconds, stirring constantly. The garlic should become fragrant but not brown — burnt garlic tastes bitter and ruins the entire sauce. If it starts to brown, remove from heat immediately.
-
Sprinkle the 3 tablespoons flour evenly over the melted butter and garlic. Stir constantly for about 1 minute to combine into a smooth paste (this is called a roux). This flour will thicken your sauce and prevent it from being watery and thin. If lumps form, keep stirring — they’ll smooth out as you add the liquid.
-
Slowly pour in the 1 cup chicken broth while whisking constantly. Whisk continuously — this is not optional. If you dump the broth in and don’t whisk, you’ll have lumps that won’t dissolve. Keep whisking for about 1 minute until the mixture is completely smooth and the flour is fully incorporated. Any lumps at this stage will remain lumps in your final sauce.
-
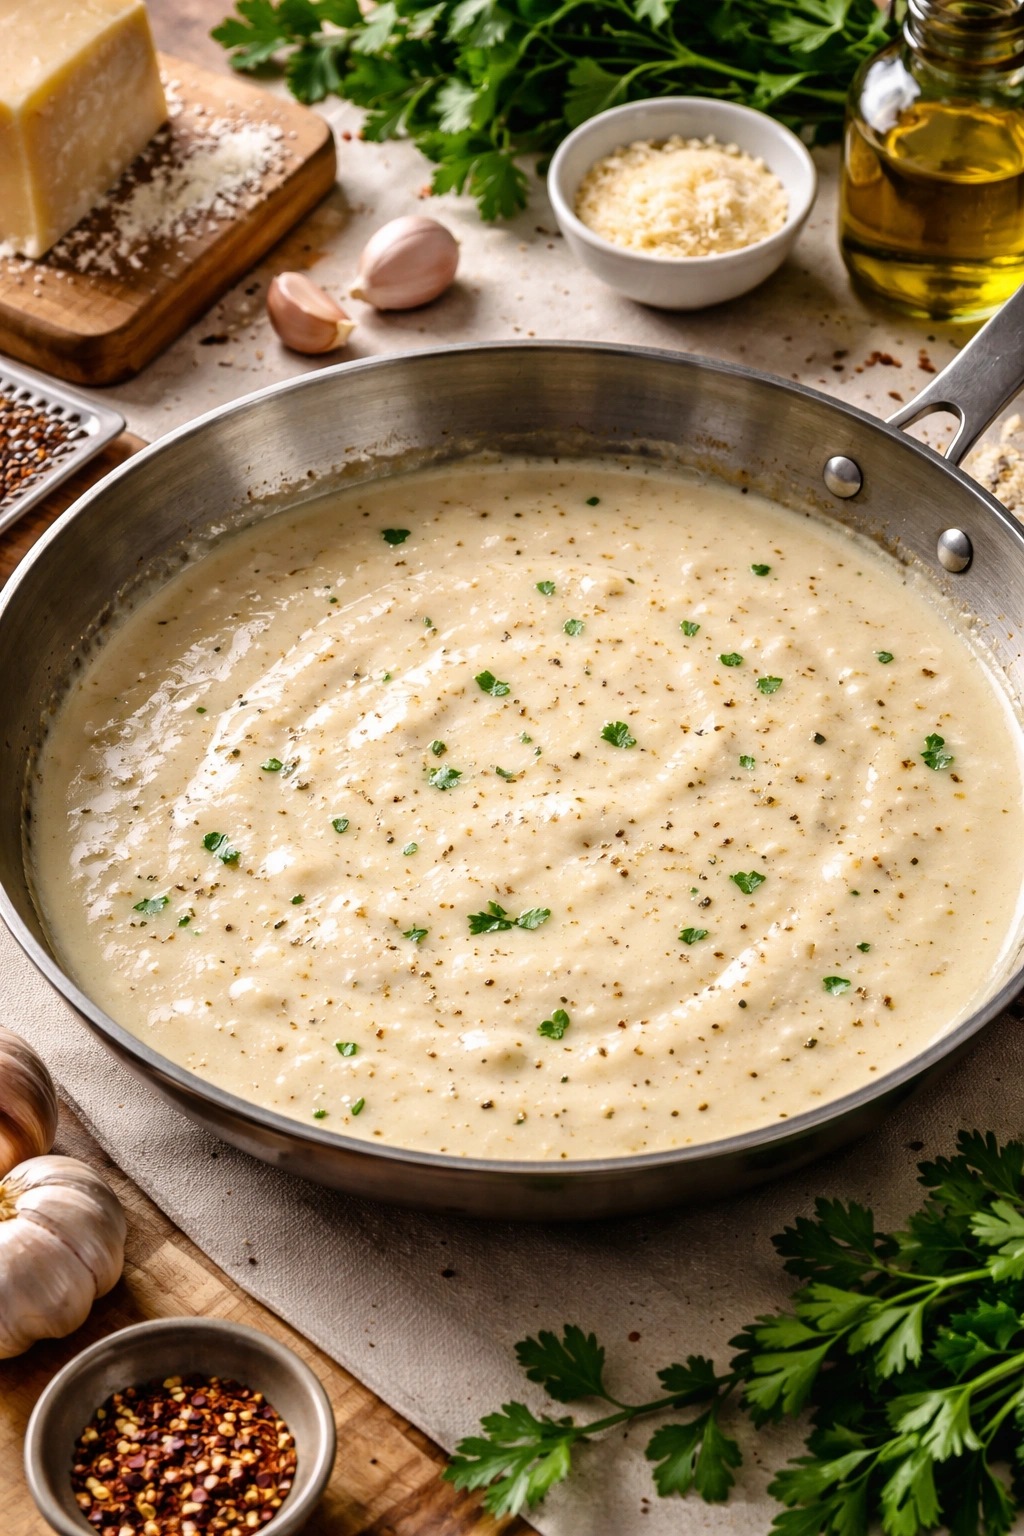
Pour in the 1 cup heavy cream while continuing to whisk. Keep the heat at medium and bring the mixture to a gentle simmer — small bubbles breaking across the surface — rather than a rolling boil. Do not boil the cream aggressively, as this can cause the sauce to break or separate. Simmer for 2 to 3 minutes, stirring occasionally, until the sauce thickens noticeably and coats the back of a spoon. You should be able to draw a line through the sauce on the spoon that holds for a moment.
-
Remove the pan from heat and stir in the 1 cup freshly grated Parmesan cheese, the ½ teaspoon Italian seasoning, and the ¼ teaspoon red pepper flakes if using. Stir until the cheese is completely melted and the sauce is smooth. Taste the sauce and adjust seasonings — add more salt, pepper, or red pepper flakes to your preference. The sauce should taste bold and flavorful, not bland, because it’s about to be diluted slightly by the pasta and its cooking water.
Combine Everything:
-
By now, your pasta should be cooked and drained. Drain the pasta in a colander, but reserve ½ cup of the hot pasta water in case your sauce needs thinning later. Starchy pasta water is liquid gold in a cream sauce — it helps the sauce cling to the noodles and creates a silkier texture.
-
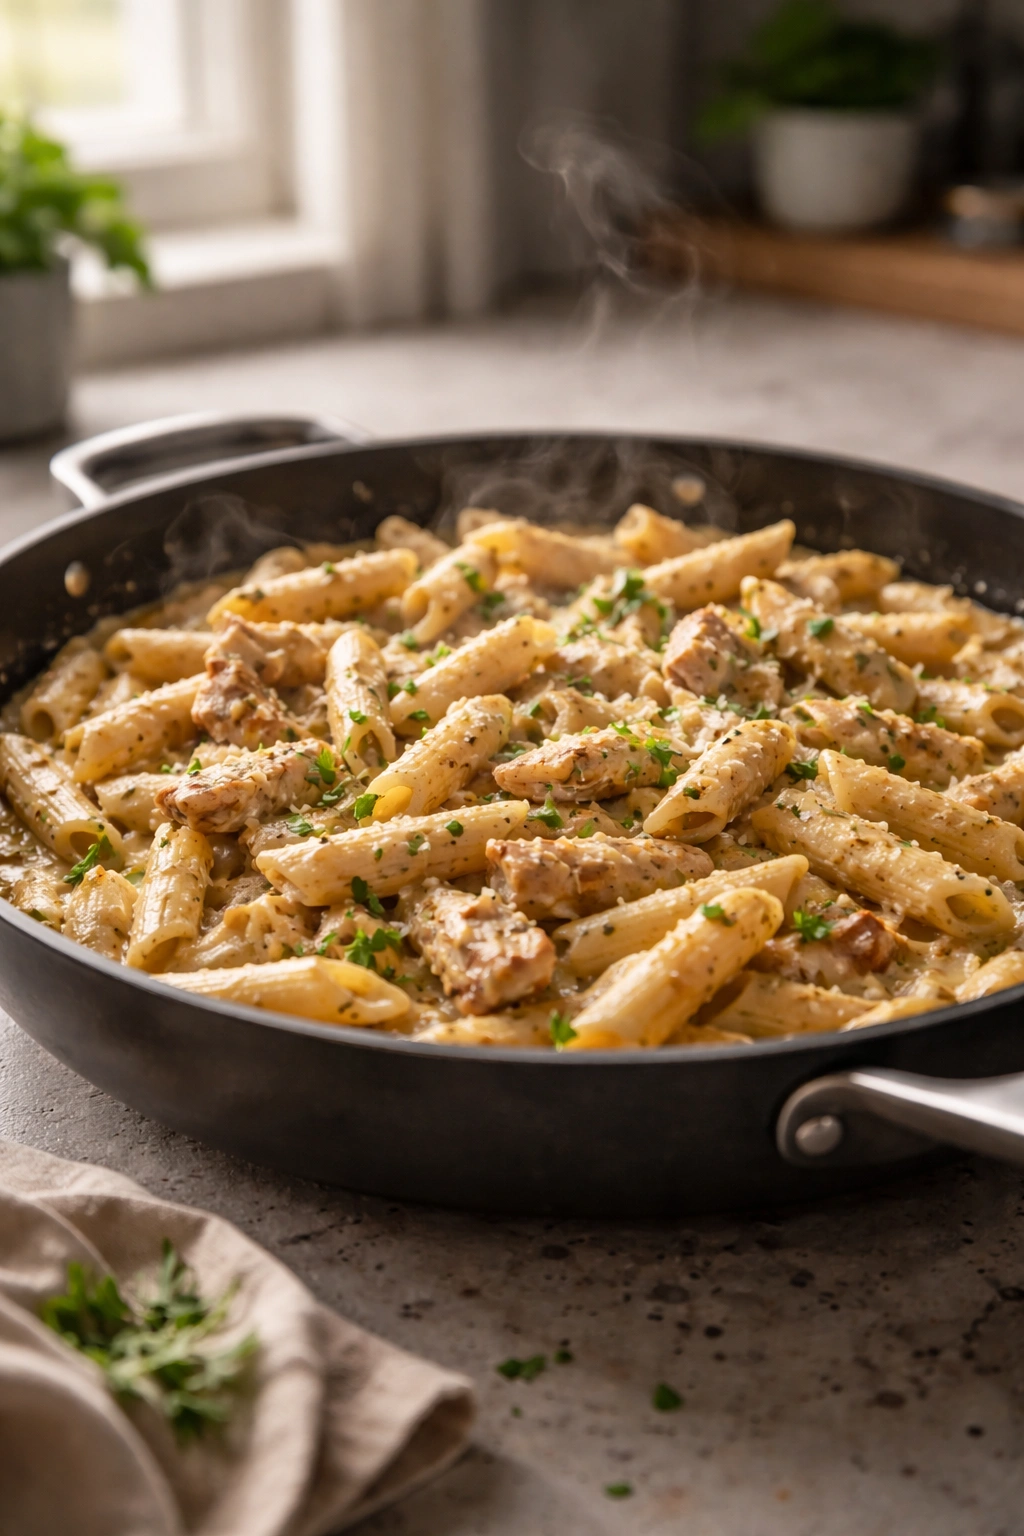
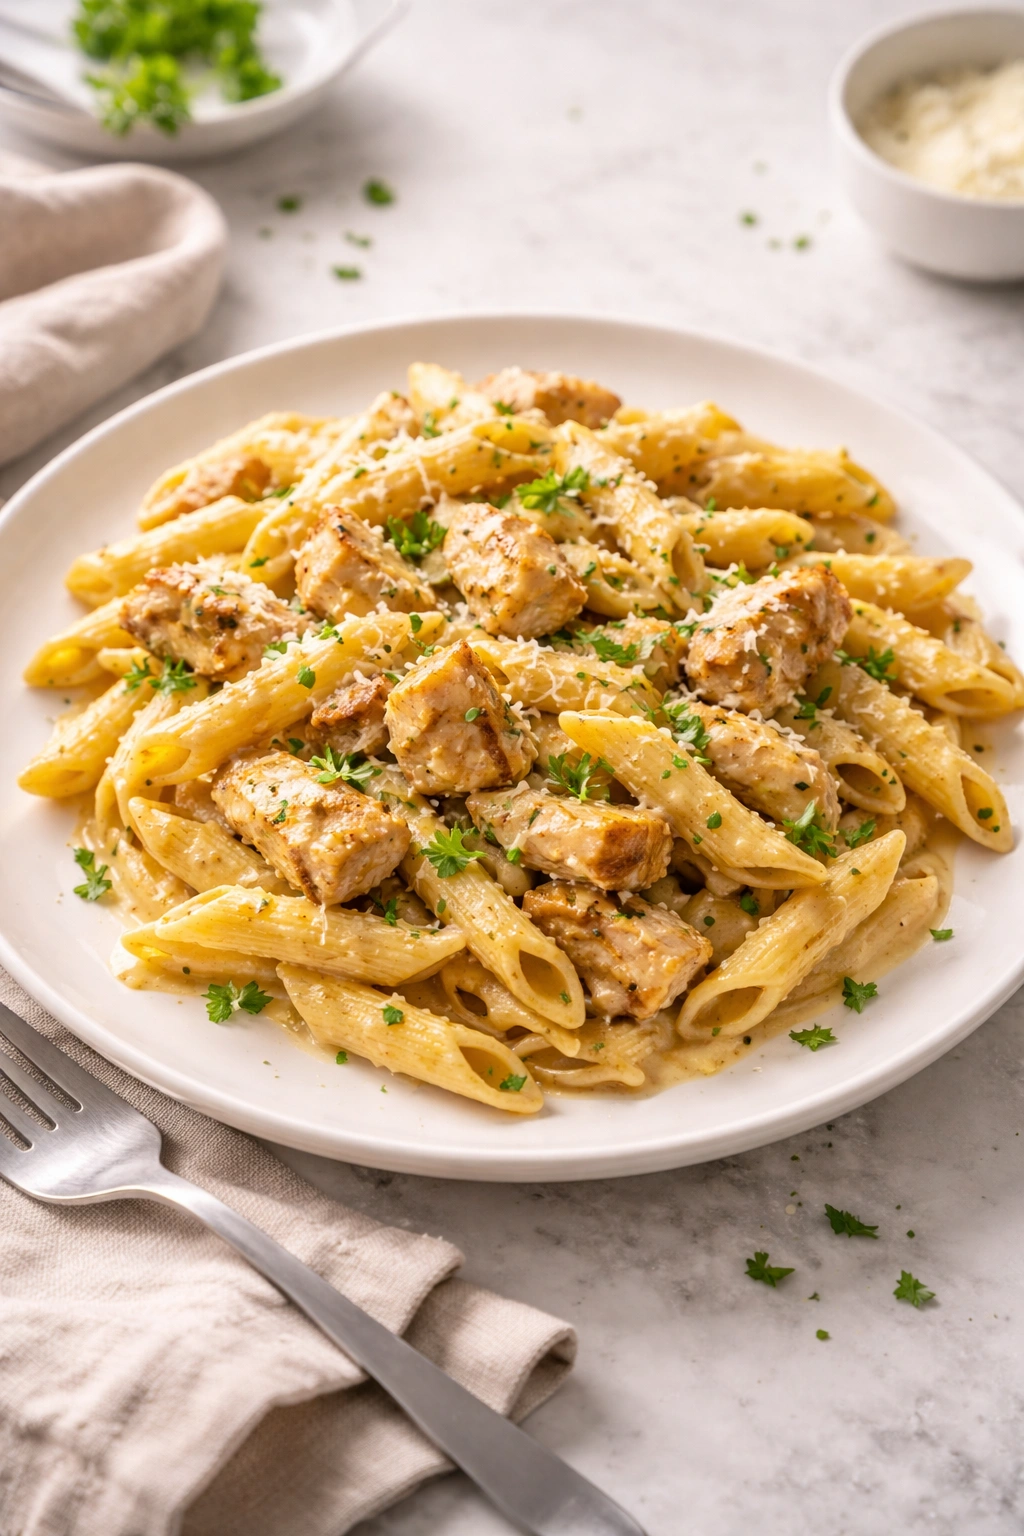
Return the drained pasta to the skillet with the sauce. Add the cooked chicken back to the pan as well. Toss everything together over medium-low heat for about 1 minute, ensuring the pasta and chicken are evenly coated in the creamy sauce. If the sauce seems too thick or doesn’t coat the pasta smoothly, add the reserved pasta water a tablespoon or two at a time until you reach the desired consistency. The sauce should be creamy and coat everything, but not be soupy.
-
Remove from heat immediately once everything is combined and heated through. Oversaucing only happens in this final minute, so act quickly. Transfer the pasta to serving bowls or plates.
Serve and Garnish:
- Serve the pasta immediately while it’s hot — creamy pasta dishes are best eaten fresh and warm. Top each serving with extra grated Parmesan cheese, a sprinkle of fresh basil if you have it, and a tiny pinch of red pepper flakes if you like heat.
Pro Tips for Creamy Pasta Success
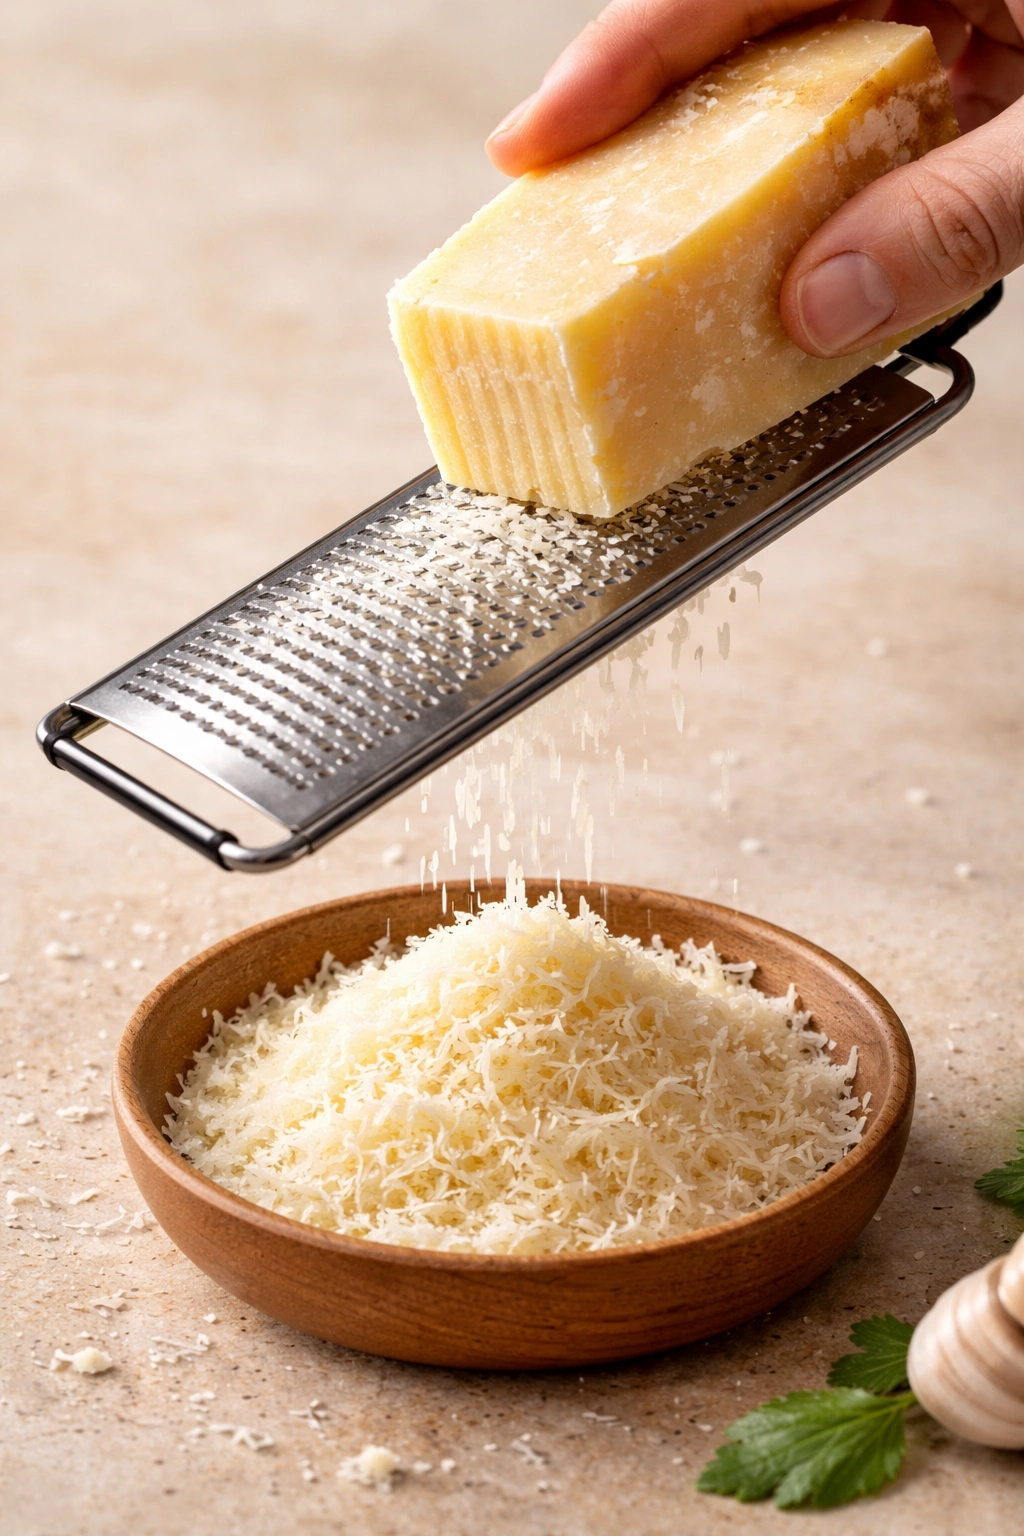
Use freshly grated Parmesan, never pre-shredded. This is non-negotiable for this recipe. Pre-shredded cheese contains anti-caking agents that prevent it from melting smoothly into the sauce, resulting in graininess and a waxy texture. Buy a wedge of Parmigiano-Reggiano and grate it yourself using the small holes of a box grater — the extra 2 minutes is worth the dramatic difference in flavor and texture. Freshly grated Parmesan melts into the sauce and creates that silky, clinging consistency that makes this dish special.
Don’t rush the roux step. The flour needs to cook in the butter for a full minute before you add liquid — this cooking process removes the raw flour taste and allows the starch to properly thicken the sauce. Skipping this step or rushing through it results in a sauce that either tastes floury or stays thin and watery no matter how long you cook it.
Whisk constantly when adding liquid to avoid lumps. Seriously, this is where most creamy sauces fail. If you pour in the broth and cream without whisking, the flour seizes up and creates lumps that won’t dissolve. These lumps then persist into your final dish, creating an unpleasant grainy texture. Whisk like your life depends on it — your arm might get tired, but your sauce will be silky and smooth.
Temperature control matters more than you’d think. Once you add the cream, keep the heat at medium and simmer gently rather than boiling hard. High heat can cause the cream to break or separate, leaving you with a sauce that looks broken and curdled. Low-and-slow is the way to create a stable, silky sauce that tastes rich and luxurious.
Cook your pasta al dente, deliberately. Most home cooks overcook pasta because they’re uncertain whether it’s done. Cook it 1 minute less than the package suggests — the pasta will finish cooking gently when you combine it with the hot sauce. This residual cooking prevents mushy, overcooked pasta that falls apart in your mouth. Al dente means the pasta should have a slight firmness in the center, almost imperceptibly.
Taste and adjust before serving. Creamy sauces can sometimes taste underseasoned once you’ve combined everything because the bland pasta dilutes the flavors. Taste a bite of plain pasta with sauce before plating, and add more salt, pepper, or red pepper flakes if needed. It’s much easier to adjust at this point than after everyone’s already eating.
Variations to Make It Your Own
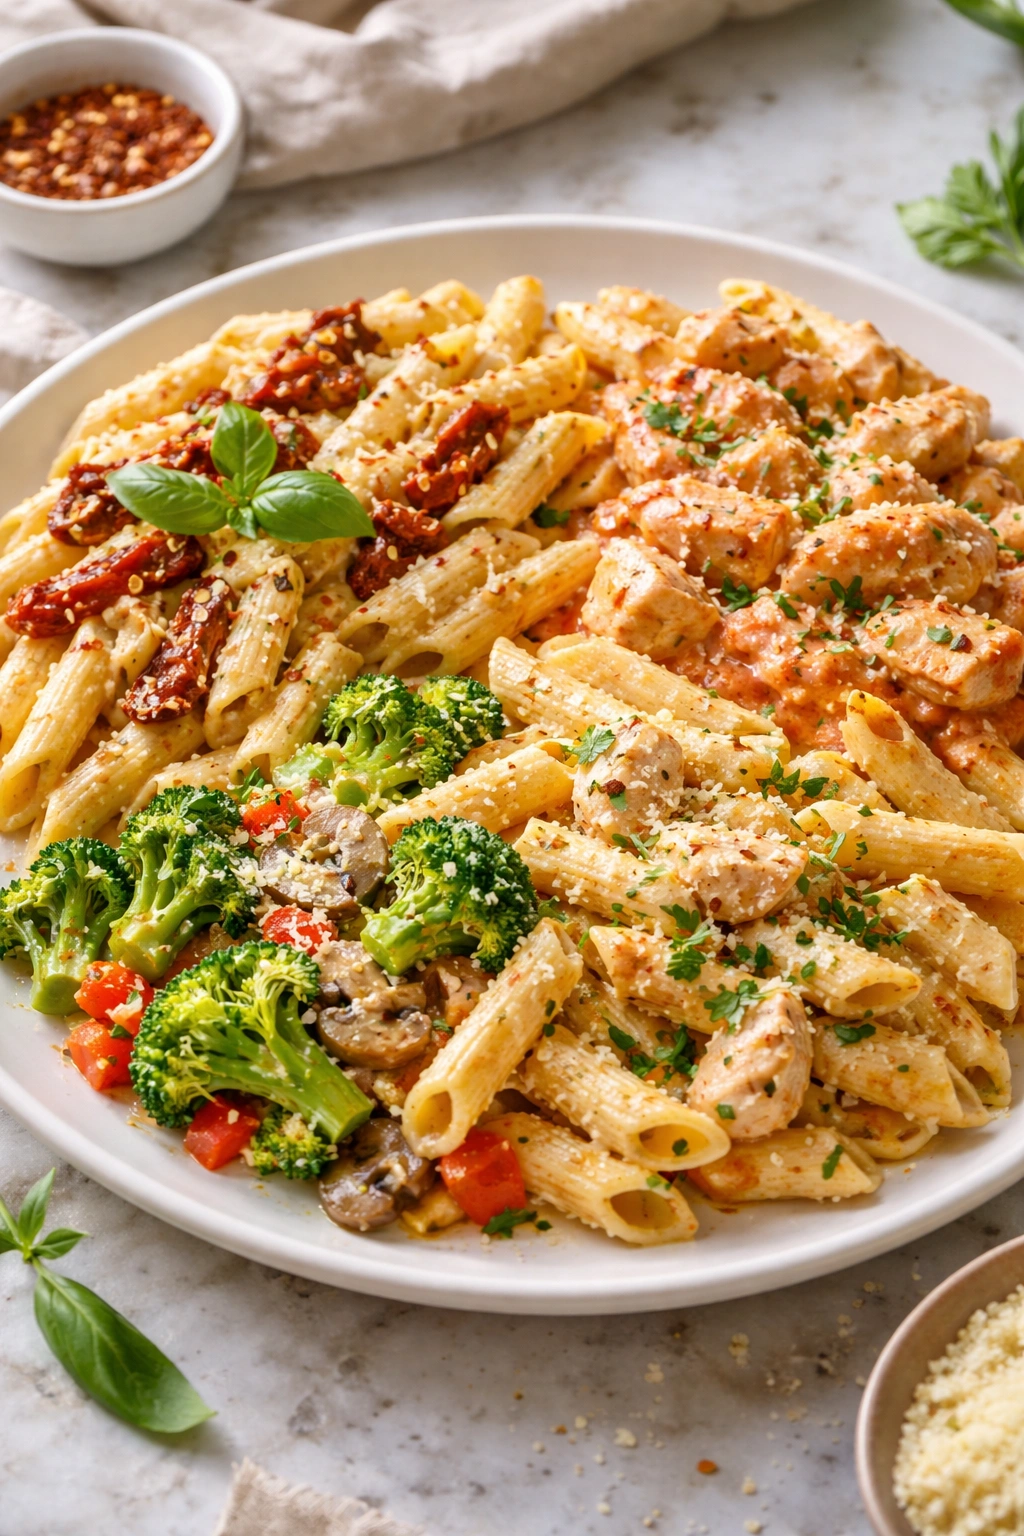
Tuscan-Style with Sun-Dried Tomatoes: Add 1 cup sun-dried tomatoes packed in oil (drained and chopped) to the sauce after the Parmesan melts. The sweet-tart tomatoes add brightness and cut through the richness of the cream beautifully. Fresh basil becomes essential with this variation — add a generous handful of chopped basil at the very end. This transforms the dish from pure cream comfort food into something with more complexity and Mediterranean flair.
Light and Fresh Red Sauce Version: Replace the heavy cream with 1 cup heavy cream mixed with 1 can (15 ounces) crushed tomatoes and add 2 tablespoons tomato paste to the flour mixture before adding liquid. This creates a pink sauce — a beautiful blend of creamy and tomatoey that’s lighter on the stomach than pure cream but richer than straight tomato sauce. Add fresh basil and red pepper flakes for a finish that feels fresh and bright.
Garden Vegetable Version: While the sauce simmers, sauté 2 cups chopped broccoli florets or 8 ounces sliced mushrooms separately in a bit of olive oil (3-4 minutes) until just tender, then add them to the sauce before combining with pasta. You could also add a couple handfuls of fresh baby spinach, which wilts into the hot sauce instantly. Vegetables add nutrition and texture without extending your cooking time if you multitask efficiently.
Lower-Fat Lighter Version: Replace heavy cream with half-and-half or even whole milk — the sauce will be thinner, so use only 2 tablespoons flour instead of 3, and increase the heat slightly to help it thicken. Add an extra ½ cup grated Parmesan to compensate for lost richness. The result is genuinely creamy and satisfying without the heavier feeling.
Protein Swaps: Rotisserie or shredded cooked chicken cuts your prep time dramatically — just skip the searing step and add the shredded chicken directly to the sauce to warm through. Ground turkey or lean ground chicken (browned first, just like the chicken pieces) works beautifully. For a seafood version, use medium shrimp (adjust cooking time to 2-3 minutes only) or flaked white fish stirred gently into the warm sauce to prevent breaking apart.
Spicy Kick Version: Add 1 teaspoon red pepper flakes to the garlic before making the roux, or use hot Italian sausage in place of half the chicken for a naturally spiced, meaty version. Fresh jalapeños (minced and added with the garlic) also add heat without overwhelming heat.
Herb Variations: Swap Italian seasoning for fresh thyme (½ teaspoon dried, or 1 tablespoon fresh), or add ½ teaspoon dried oregano plus a pinch of dried rosemary for an earthier flavor profile. Fresh herbs added at the very end (basil, parsley, chives) brighten the dish noticeably.
Storage and Make-Ahead Options

Storing Leftovers: Allow the pasta to cool to room temperature in the skillet or a shallow container with the lid off — this prevents condensation from making it soggy. Once cool, transfer to an airtight container and refrigerate for up to 4 days. The sauce will thicken significantly when cold, which is completely normal.
Reheating for Maximum Creaminess: Reheat gently on the stovetop over medium-low heat, stirring frequently and adding a splash of heavy cream, milk, or pasta water to loosen the thickened sauce back to a pourable consistency. Microwave works too, but heat it in 30-second intervals, stirring between, to avoid hot spots and separation. Never reheat creamy pasta at high temperature — the cream breaks and the sauce becomes grainy and unpleasant.
Make-Ahead Components: You can prepare individual components in advance to save time on busy days. The chicken can be cut and seasoned up to 6 hours ahead — store it in an airtight container in the fridge. Garlic can be minced several hours in advance (store in a small container). Parmesan can be grated several hours ahead — place it in a container with the lid cracked to prevent it from drying into a brick. The pasta water is the only thing you cannot prepare in advance — it must be boiled fresh when you’re ready to cook.
Freezing Considerations: Creamy pasta doesn’t freeze as well as red-sauce dishes because the cream tends to separate when thawed. If you must freeze, separate the pasta and sauce into different containers. Thaw both in the refrigerator overnight, then reheat the sauce gently with a splash of cream to restore smoothness before tossing with the pasta. Honestly, this dish is so quick that making it fresh is usually easier than dealing with frozen components.
Batch Cooking: The recipe doubles easily if you’re meal prepping for the week. Make two complete batches and store them separately — they’ll last 3-4 days in the fridge and can be reheated in portions throughout the week. Your weeknight self will thank you for having a ready-made elegant dinner waiting.
The Best Sides to Serve Alongside
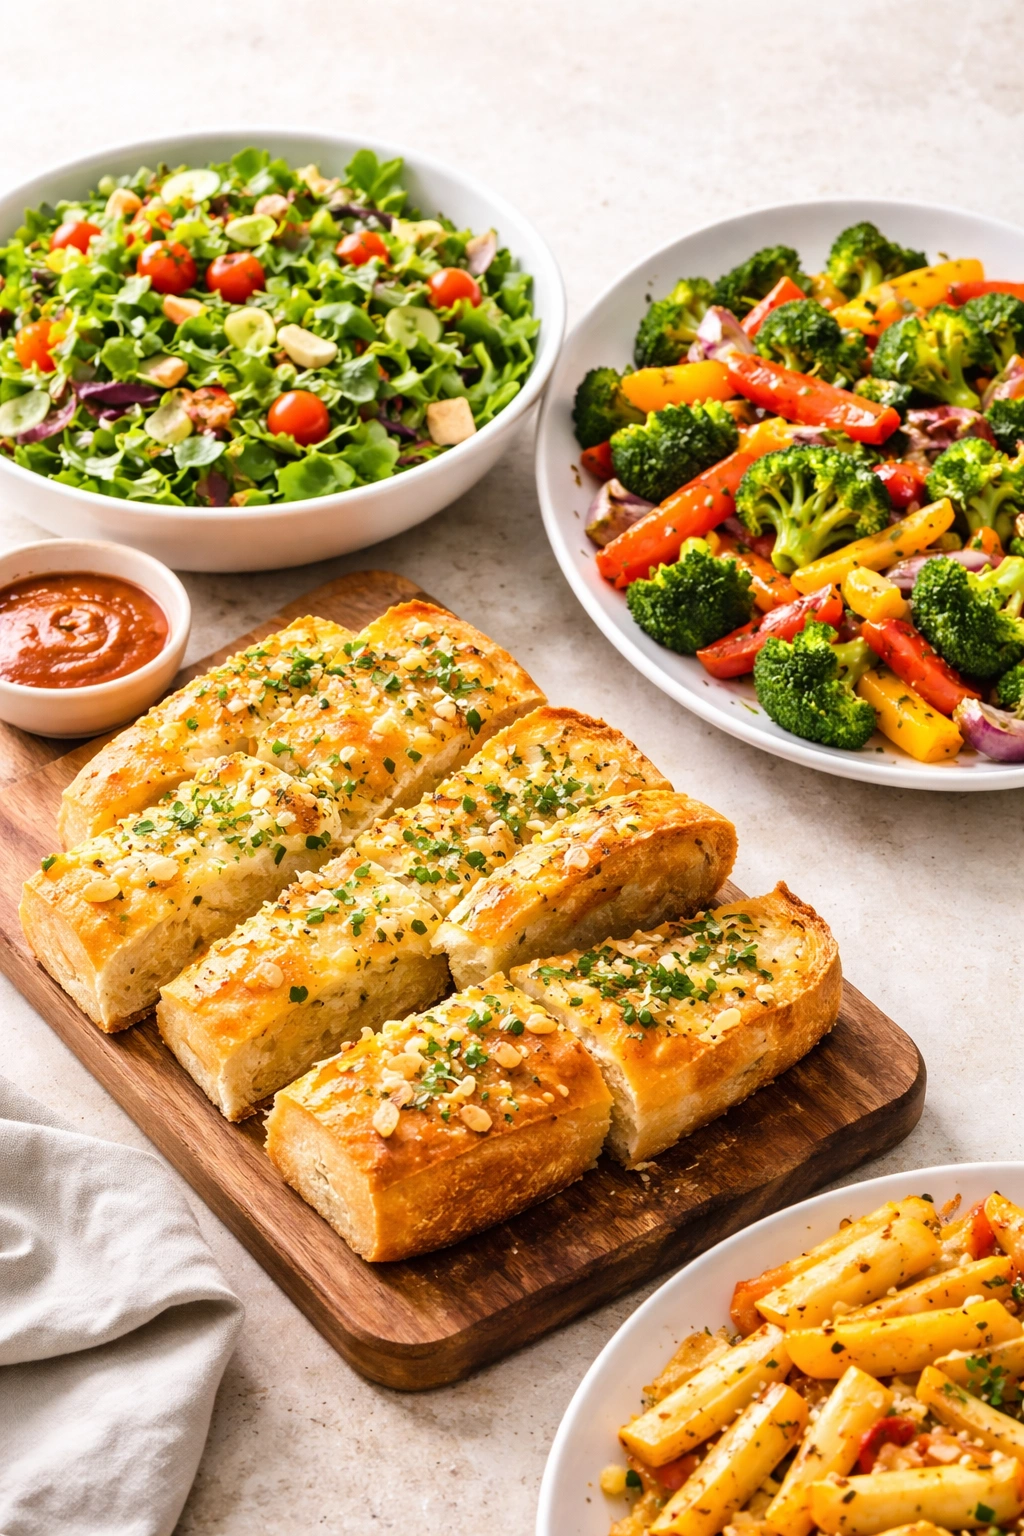
Garlic Bread is Non-Negotiable: Crusty bread for soaking up every drop of sauce transforms this meal from good to unforgettable. Toast slices of Italian or French bread and rub them with a cut garlic clove, then brush generously with olive oil and sprinkle with salt. Broil for 2-3 minutes until the edges are golden and crispy. Alternatively, spread softened butter mixed with minced garlic and fresh parsley on bread slices, wrap in foil, and warm in a 350°F oven for 10 minutes while your pasta cooks. That sauce is too good to leave on the plate.
A Simple Green Salad: Nothing heavy — just mixed greens (arugula, spinach, and romaine work beautifully) tossed with a light lemon vinaigrette (lemon juice, good olive oil, Dijon mustard, salt, and pepper shaken in a jar) or a basic balsamic vinaigrette. The acidity and crispness of fresh salad balance the richness of the creamy pasta perfectly. Serve the salad on the side, not under the pasta — you want the contrast of cold, fresh greens next to warm, creamy noodles.
Roasted Vegetables: While your pasta cooks, you can roast vegetables at a high temperature. Toss broccoli florets, asparagus, or green beans with olive oil, salt, and pepper, spread on a sheet pan, and roast at 425°F for 12-15 minutes until lightly charred at the edges. The caramelized edges add sweetness and flavor that complements the savory pasta beautifully. Brussels sprouts, cherry tomatoes, or zucchini work equally well.
Caprese Salad: Layer fresh tomato slices, fresh mozzarella, and fresh basil leaves; drizzle with good olive oil and balsamic vinegar; and finish with salt and pepper. This is bright, fresh, and elegant without any cooking, and it provides the perfect palate-cleansing contrast to the rich cream sauce.
Chilled White Wine: A glass of Chardonnay, Sauvignon Blanc, or Pinot Grigio pairs beautifully with this dish. The wine’s acidity cuts through the creaminess, and the subtle fruit notes enhance the herb flavors in the sauce. This is genuinely how Italian restaurants balance the richness of their cream-based pasta dishes.
Garlic and Herb Focaccia: If you want something more substantial than plain garlic bread but don’t have time to make it, quality store-bought focaccia brushed with olive oil and warmed in the oven is a respectable shortcut that feels homemade.
Common Mistakes to Avoid
Overcooking the Chicken is the most common sabotage. Bite-sized pieces should be cooked through but still moist — about 6-8 minutes total, not the 15-20 minutes people often spend trying to get it perfectly golden. Your chicken isn’t the star of this show; it’s a supporting player that adds protein and substance. Use a meat thermometer if you’re uncertain — 165°F (74°C) is done. Remove it immediately at that temperature, not when it reaches 175°F.
Making the Sauce Too Thick or Too Thin happens when people don’t measure flour correctly or don’t whisk properly. Three tablespoons of flour is specific for a reason. Use a measuring spoon, level it off, and don’t pack it down. If your sauce is too thin after simmering, you either didn’t cook it long enough or didn’t use enough flour — don’t try to fix it by adding more flour at the end; that creates lumps. If it’s too thick, that’s what the reserved pasta water is for — add it a tablespoon at a time until you reach the right consistency.
Overcooking the Pasta because you’re distracted or uncertain about timing. Set a timer and start testing 1-2 minutes before the package time. Al dente pasta will continue cooking slightly when you mix it with the hot sauce, and that residual cooking is intentional. Overcooked pasta that started mushy will turn to mush in the sauce.
Using Pre-Shredded Parmesan instead of freshly grated. Yes, we’ve mentioned this multiple times — that’s how important it is. Pre-shredded cheese doesn’t melt smoothly, resulting in a grainy, separated sauce instead of a silky one. Two minutes of grating time makes a difference night and day in the final texture.
Skipping the Salt in the Pasta Water. Unsalted pasta boiled in unsalted water tastes like cardboard. The salt seasons the pasta from within as it cooks, and there’s no way to fully season it afterward. This is your only chance. The water should taste noticeably salty — like seawater, not just vaguely salty.
Adding Cream to a Boiling Sauce instead of a gently simmering one. Aggressive boiling breaks the cream and creates a separated, curdled-looking sauce that can’t be salvaged. Reduce heat as soon as you pour in the cream, and maintain a gentle simmer.
Not Tasting Before Serving. The pasta dilutes the sauce flavors, so what tastes perfectly seasoned while making the sauce might taste underseasoned once combined. Taste a bite before plating, and adjust seasoning at that point. Salt, pepper, and red pepper flakes can be added instantly and make all the difference.
Why Penne Specifically Works for This Approach

The mechanics of penne pasta make it mechanically superior to other shapes for this particular dish. The short tube shape means sauce gets inside the pasta as well as coating the outside, creating a bite where the interior is as flavorful as the exterior. Long pasta shapes like spaghetti rely solely on sauce clinging to the outside, which means the center often tastes plain and starchy.
Penne’s diagonal-cut edges and ridged surface create thousands of tiny crevices that grip sauce physically — the sauce doesn’t slide off the way it does from smooth shapes like rigatoni or ziti. When you twirl your fork through a plate of penne in cream sauce, you’re essentially capturing sauce in dozens of little pockets and ridges. That’s why every bite tastes saucy and satisfying, not like you’re eating naked pasta with sauce on top.
The cooking time for penne also fits perfectly into a 30-minute timeline. It’s thick enough to hold its structure through the cooking process and sauce mixing without becoming mushy, but thin enough that it cooks in the 8-12 minute range. Thicker shapes like rigatoni take longer, thinner shapes cook so fast you’re walking a tightrope between perfect and overcooked.
This is why restaurant cooks choose penne for creamy sauces specifically — it’s not tradition for tradition’s sake, it’s physics. The shape performs. Using a different pasta won’t ruin the dish, but penne genuinely does the job best.
Final Thoughts

Mastering this 30-minute chicken penne pasta is about understanding that speed and quality aren’t mutually exclusive — you can make something genuinely impressive without spending half your evening in the kitchen. The secret is working efficiently, not cutting corners. You’re using good-quality ingredients, real Parmesan cheese, fresh chicken, and proper technique. The speed comes from eliminating wasted steps and managing timing so everything finishes together.
Once you’ve made this recipe a few times, it becomes automatic. You’ll understand exactly how long each component takes, you’ll develop intuition about sauce consistency, and you’ll know instinctively whether your chicken is done. That’s when cooking becomes genuinely relaxing instead of stressful — you’re executing a familiar process with confidence, not following a recipe step by step and hoping it works out.
Keep this recipe in your regular dinner rotation, experiment with variations, and don’t hesitate to make it again when you need a meal that tastes like you put in effort but respects your limited time. That’s the sweet spot that separates recipes that genuinely earn their place on your table from ones you try once and forget. This is a keeper.