When a craving for chili hits and the thermometer is dropping, the last thing you want is a recipe that demands hours of babysitting on the stove. Yet somehow, we’ve all been conditioned to believe that great chili requires patience—multiple hours of simmering, layers of complex technique, and a pantry full of specialty ingredients. The truth? That’s completely backward. You can have a pot of genuinely delicious, deeply flavorful chili on the table in 30 minutes flat, and it will rival anything that’s been simmering since morning. The secret isn’t magic; it’s strategy. It’s understanding which ingredients do the heavy lifting, which techniques create maximum flavor in minimum time, and which shortcuts are worth taking without compromising taste. This approach to quick chili has evolved from years of testing—from busy weeknight dinners to last-minute crowd-pleasing meals—and what I’ve learned is that speed and flavor aren’t mutually exclusive. In fact, when you build your chili right from the start, the intensity of flavors can be every bit as complex as the slow-cooked version.
Why This 30-Minute Chili Recipe Works So Well
The trick to making exceptional chili in half an hour starts with understanding what actually develops flavor. Most of us assume that long cooking times are what make chili taste incredible, but that’s not entirely true. The real flavor comes from proper browning of the meat, the right combination of spices, quality ingredients, and adequate time for those flavors to marry together—and 30 minutes is absolutely enough time for all of that to happen if you approach it correctly.
When ground beef hits a hot pan, the proteins and fats undergo something called the Maillard reaction, which creates hundreds of new flavor compounds in just a few minutes. This browning process is what gives your chili its deep, savory, complex backbone. Skip this step or rush through it, and your chili will taste flat no matter how long it simmers. Brown it properly—until you see actual caramelization on the bottom of the pan—and you’ve just created a flavor foundation that rivals hours of slow cooking.
The other critical element is using enough seasoning and letting those spices bloom in fat. When you add chili powder, cumin, and garlic to the pan after the meat is browned, they immediately absorb into the fat and begin releasing their essential oils and flavor compounds. Within minutes, your kitchen will smell like an incredible bowl of chili is already finished. That aroma isn’t deceptive—it’s proof that the chemistry is working.
Quality canned tomatoes also matter far more than you’d expect. A good can of diced tomatoes (ideally fire-roasted for extra depth) or tomato sauce already has a concentrated, developed tomato flavor that would take hours to create from scratch. You’re essentially borrowing the manufacturer’s simmering time, which is exactly the kind of smart shortcut that makes 30-minute chili possible.
Choosing the Right Ground Meat for Best Flavor
The type of ground meat you select will directly influence both the flavor and texture of your finished chili. Ground beef at 80/20 or 85/15 is the gold standard for this recipe because it contains enough fat to brown beautifully and stay moist during cooking, but it’s not so fatty that you’re left with a greasy pot. The fat is essential—it’s where flavor lives, and it’s what allows your spices to bloom properly when you add them to the pan.
If you’ve bought lean ground beef (90/10 or higher), you’ll need to add an extra tablespoon of olive oil when browning to compensate. Don’t skip this step; without adequate fat, the meat will steam rather than sear, and you’ll lose that caramelized flavor that makes chili taste rich and complex.
Ground turkey and ground chicken are legitimate alternatives if you’re watching calories, and honestly, the spice blend is robust enough that most people won’t notice the difference. The same applies to ground pork or a combination of ground beef and Italian sausage, which adds a subtle herbal note that’s actually quite pleasant in chili. Whatever meat you choose, focus on breaking it into small, uniform pieces as it cooks. Large chunks will look chunkier in the finished dish, but they won’t brown as efficiently, and unbrowned surfaces mean lost flavor.
The Essential Pantry Ingredients You’ll Need
Building a chili that tastes like it took all day requires understanding which pantry staples are non-negotiable and which are flexible. The core ingredients—ground meat, canned tomatoes, beans, and spices—form the backbone, but there are a few strategic additions that elevate a basic chili into something genuinely special.
Canned diced tomatoes should ideally be fire-roasted for that extra layer of smoky depth, though regular diced tomatoes absolutely work. The key is using a full 30 ounces (two 15-ounce cans or one 28-ounce can) so you have enough tomato product to create a rich broth base. If you want even more tomato intensity, add a couple tablespoons of tomato paste, which concentrates the tomato flavor without requiring extra cooking time.
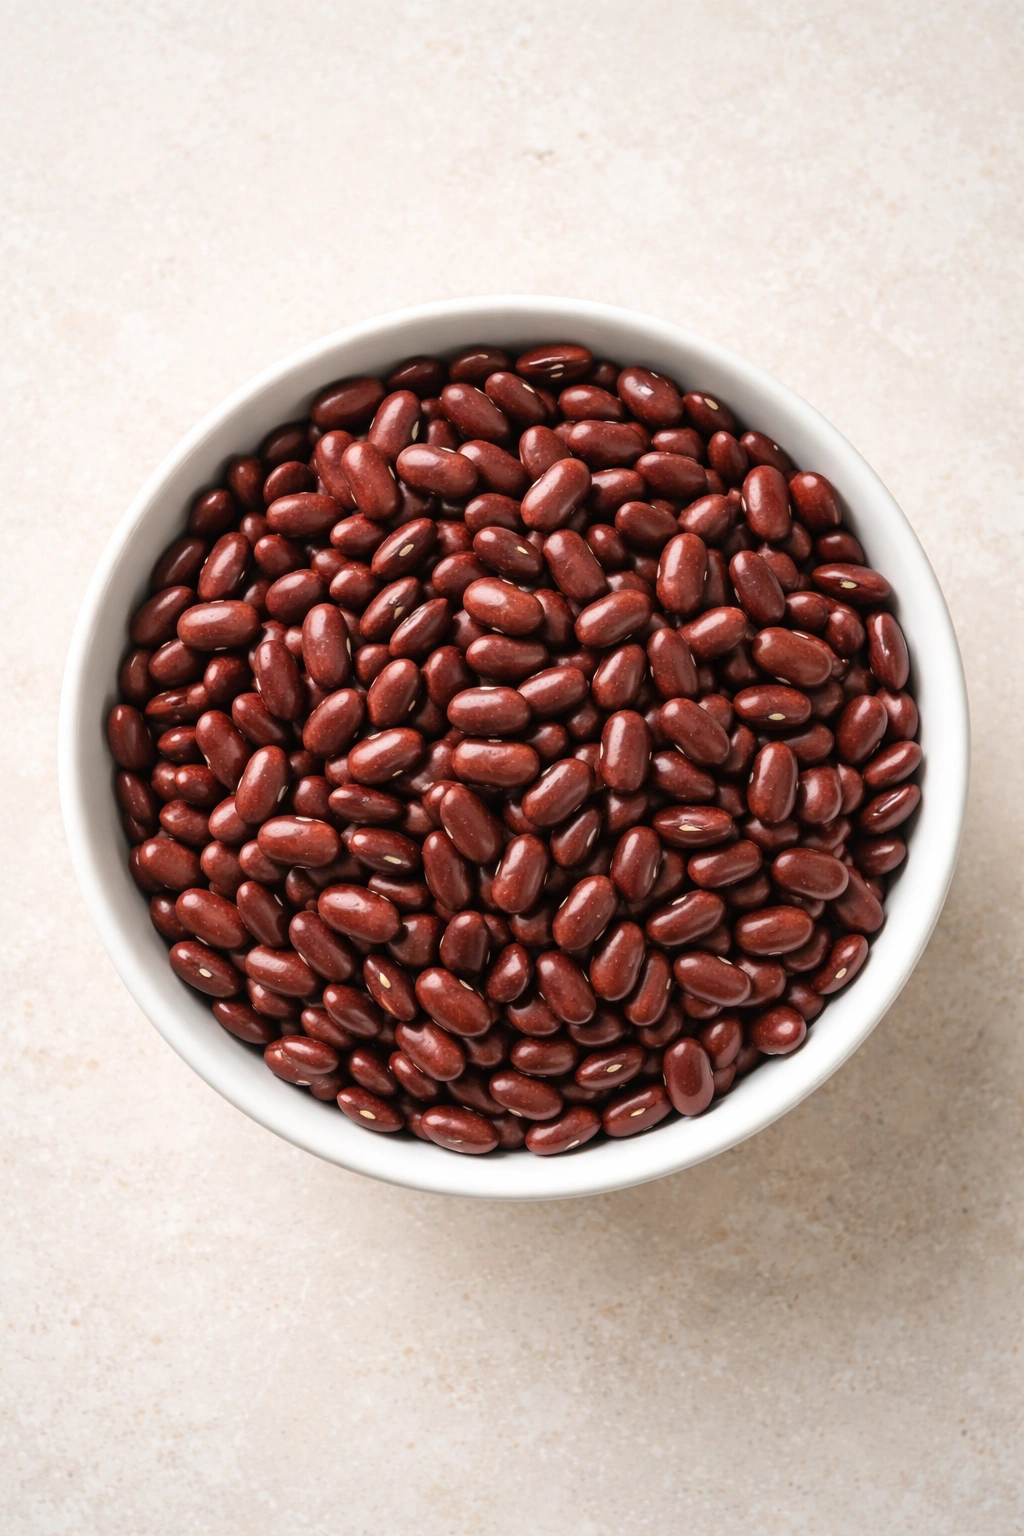
Beans deserve consideration. Chili beans in chili sauce are convenient because they’re already seasoned and come with extra broth, but kidney beans (light or dark), pinto beans, black beans, or a mix are equally valid. The main thing is to drain and rinse canned beans before adding them so you control the sodium level and the thickness of your final chili. Two cans (about 32 ounces drained) provides plenty of heartiness.
Here’s where many quick chili recipes get clever: V-8 vegetable juice or beef broth. V-8 adds extra vegetable depth and a little sweetness that balances the spices beautifully, plus it saves you the time of chopping additional vegetables. Some recipes use it to adjust thickness, others use straight broth. Either works, though V-8 adds a layer of flavor you won’t get from broth alone.
Onions and garlic are non-negotiable for building a proper flavor base. Half a medium onion, diced, and 3-6 cloves of minced garlic (depending on how much you love garlic) create an aromatic base when sautéed. For speed, buy pre-minced garlic in a jar if it means you’ll actually sauté rather than skip this step.
The Secret Seasoning Blend That Makes It Taste Homemade

This is where the actual magic happens. A 30-minute chili tastes like it took hours because the spice blend is bold, balanced, and complex, using techniques that pull maximum flavor from individual seasonings rather than relying on time to develop taste.
The foundation is chili powder—use 2 to 3 tablespoons for a well-spiced pot. If you want deeper, smokier flavor, look for ancho or chipotle chili powder specifically, which adds a layer beyond the standard red chili powder. Ground cumin (1 to 2 teaspoons) is equally important; it provides an earthy warmth that ties all the flavors together. Garlic powder and onion powder add concentrated savory depth that fresh versions won’t provide in the time you have. Paprika contributes subtle sweetness and color. Oregano—dried works fine, just make sure it’s not stale—adds a Mediterranean herbaceousness that’s traditional to chili.
Here’s the secret ingredient that most recipes don’t mention: a pinch of ground cinnamon. Don’t worry; it won’t make your chili taste sweet. Instead, it adds warmth and rounds out all the other spices, creating a more complex, complete flavor profile. It’s the ingredient people taste and can’t identify—they just know it’s delicious.
For heat, add cayenne pepper or fresh diced jalapeños according to how spicy you like things. Start small; you can always add more heat, but you can’t take it away.
If you prefer not to mix individual spices, a high-quality chili seasoning blend works well, though store-bought packets sometimes contain sugar and fillers. Many cooks skip the packets entirely and use 2 to 3 tablespoons of homemade Southwestern seasoning, which gives you complete control over every component and ensures fresher, more vibrant flavor.
Why Proper Browning Takes 30 Minutes From Start to Finish
A lot of home cooks underestimate how quickly a proper pot of chili comes together when you commit to each step. Let’s walk through the timeline: browning the meat takes 5 to 7 minutes if you break it into small pieces and don’t crowd the pan. Sautéing the aromatics (onion, garlic, peppers) takes another 4 to 5 minutes. Blooming the spices in fat—adding them to the pan after the meat is browned and letting them cook for 1 to 2 minutes—takes just a couple minutes but is absolutely critical. Adding your canned ingredients, broth, and beans, then bringing it to a simmer takes maybe a minute. From that point, 15 to 20 minutes of gentle simmering allows the flavors to marry and the consistency to thicken to the perfect texture. That’s your 30 minutes—every step has a purpose, and nothing is wasted motion.
Yield: Serves 6 to 8 (about 1.5 cups per serving)
Prep Time: 10 minutes
Cook Time: 20 minutes
Total Time: 30 minutes
Difficulty: Beginner to Intermediate — This recipe requires basic knife skills for chopping onions and garlic, but all cooking is done in one pot over straightforward stovetop heat. Even a first-time cook can achieve excellent results by following the steps in order and paying attention to browning the meat properly.
Ingredients for 30-Minute Chili
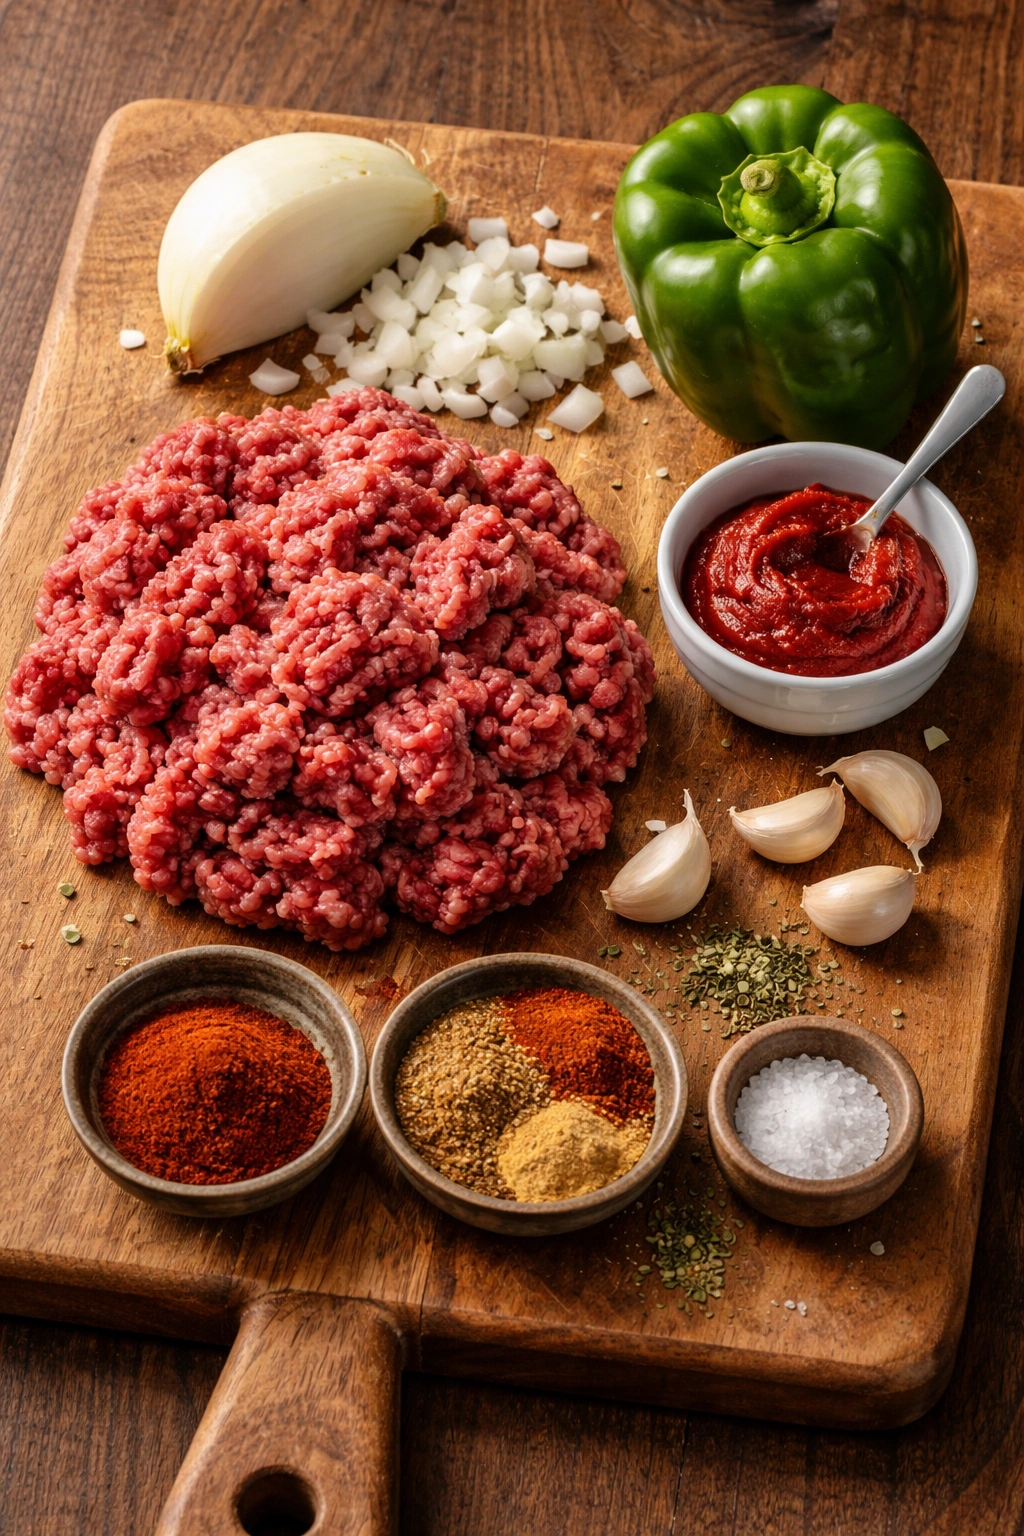
For the Base:
- 1 pound ground beef (80/20 is ideal, but 85/15 or 90/10 work—if using very lean beef, add 1 extra tablespoon olive oil)
- 1 tablespoon olive oil
- ½ medium onion, diced
- 1 cup green bell pepper, diced (or ¾ cup if you prefer less vegetable texture)
- 3 to 4 cloves garlic, minced (or 1 teaspoon jarred minced garlic)
For the Chili:
- 1 can (28 ounces) diced tomatoes with juice, or two 14.5-ounce cans (fire-roasted if you can find them)
- 1 can (15 ounces) chili beans in chili sauce, drained and rinsed (or 1 can kidney beans/pinto beans/black beans, drained and rinsed)
- 1 can (14.5 ounces) kidney beans, drained and rinsed (optional second bean for variety)
- 3 tablespoons tomato paste (or 2 tablespoons if you prefer less concentrated tomato flavor)
- 1 to 1.5 cups beef broth, chicken broth, or V-8 vegetable juice (start with 1 cup; you can add more if you prefer a soupier chili)
For the Seasoning:
- 2 to 3 tablespoons chili powder (start with 2 if you’re sensitive to spice)
- 1.5 teaspoons ground cumin
- 1 teaspoon garlic powder
- ½ teaspoon onion powder
- 1 teaspoon paprika
- ½ teaspoon dried oregano (or ¼ teaspoon if your oregano is old)
- ¼ to ½ teaspoon cayenne pepper (adjust to desired heat level; start with ¼ teaspoon)
- 1 teaspoon ground cinnamon (this is the secret ingredient—don’t skip it)
- ½ teaspoon kosher salt (plus more to taste at the end)
- ¼ teaspoon freshly ground black pepper
- ½ tablespoon granulated sugar (balances the acidity of the tomatoes)
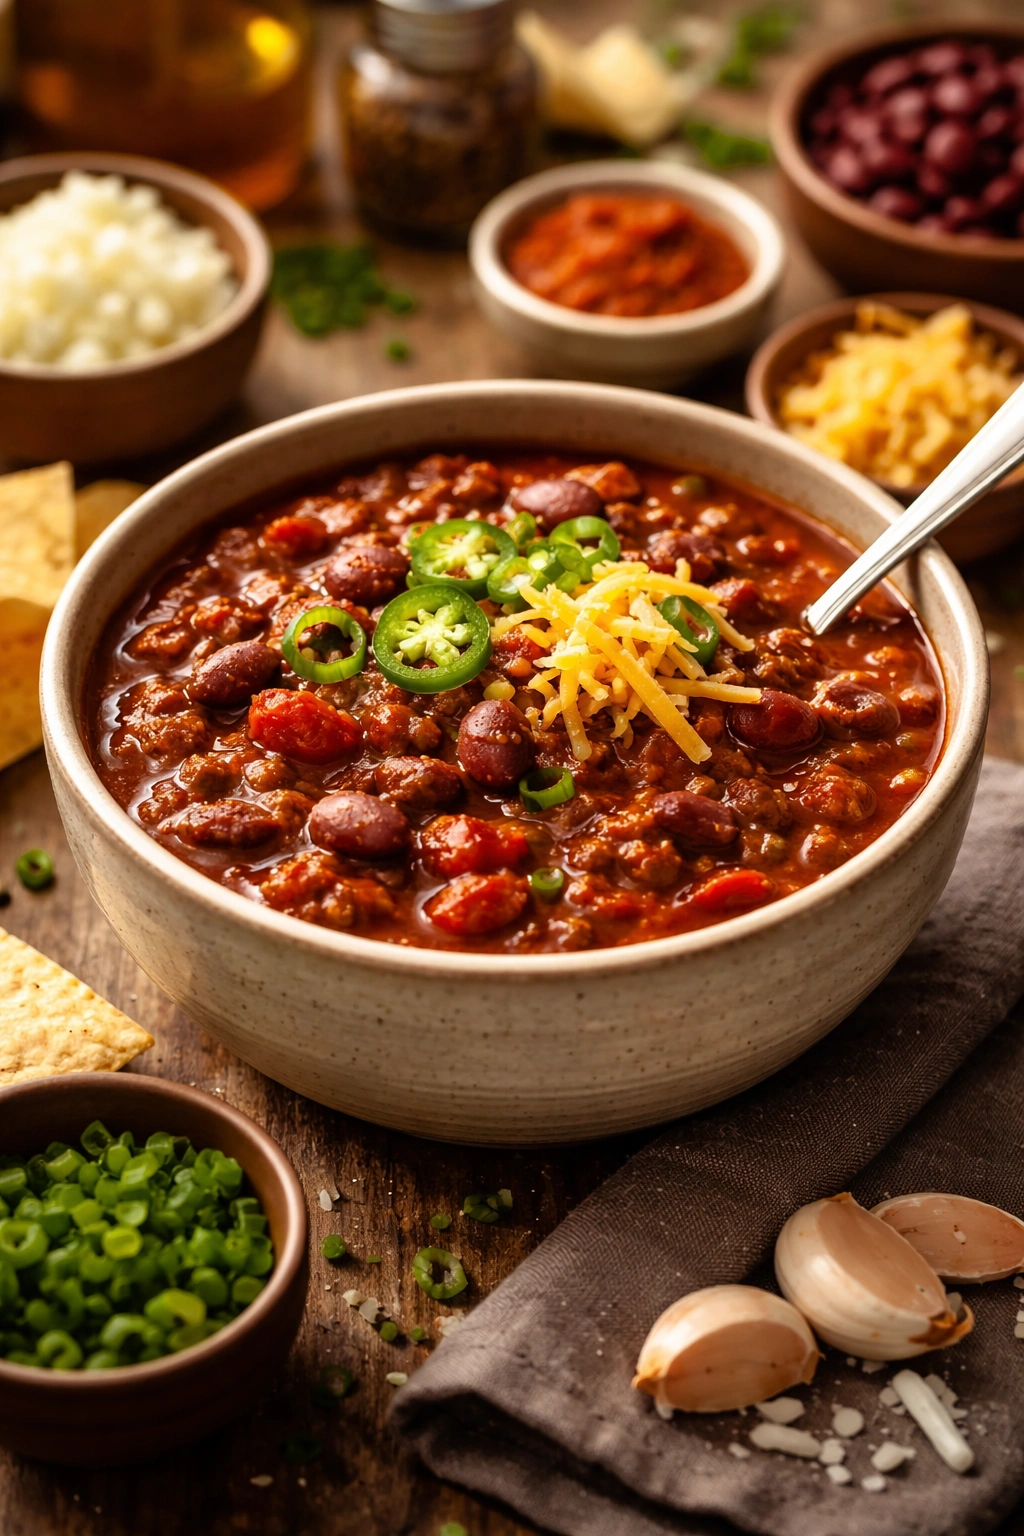
For Serving (Optional Toppings):
- Shredded sharp cheddar cheese
- Sour cream or plain Greek yogurt
- Diced red onion or sliced green onions
- Fresh cilantro, roughly chopped
- Diced fresh jalapeños or pickled jalapeño slices
- Diced avocado
- Crushed tortilla chips or corn chips
- Fresh lime wedges
- Hot sauce (your favorite variety)
- Cornbread or oyster crackers for serving alongside
How to Make 30-Minute Chili: Step-by-Step
Prepare Your Workspace:
-
Gather all your ingredients and place them within arm’s reach of your cooking station. Having everything ready (a technique chefs call mise en place) means you won’t lose momentum or miss a critical step once you start cooking.
Advertisements -
Dice your onion and bell pepper, mince your garlic, and set them in small bowls or on a cutting board. If you’re using fresh cilantro or other fresh toppings, chop those now too so you can focus entirely on cooking once you begin.
Brown the Ground Beef:
-
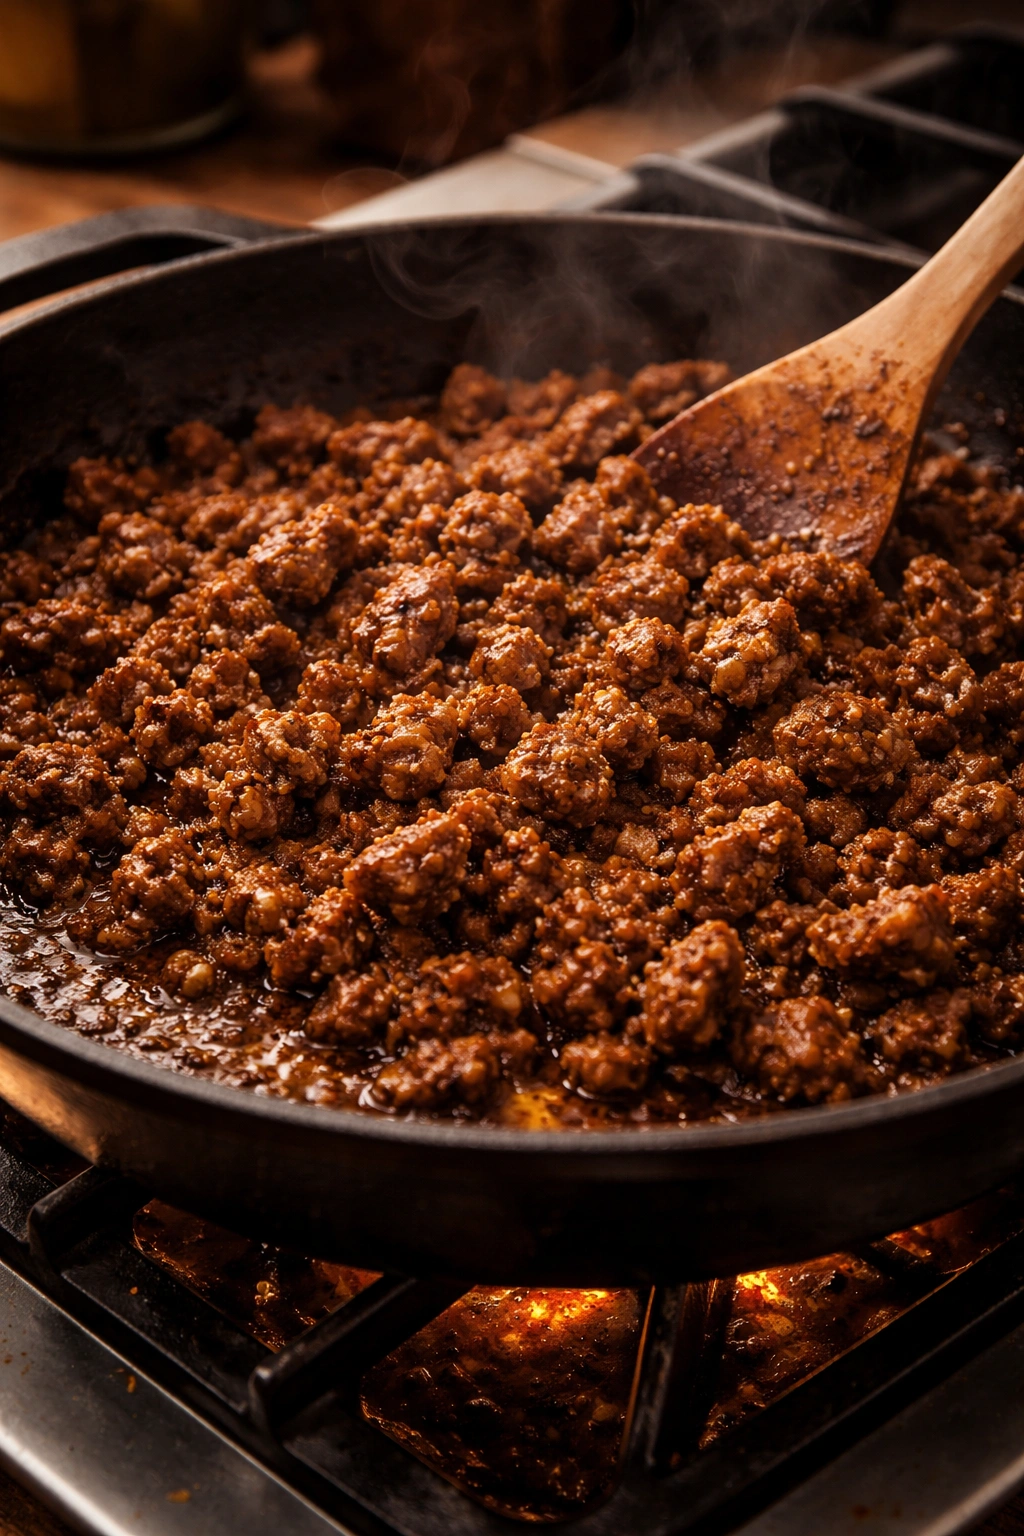
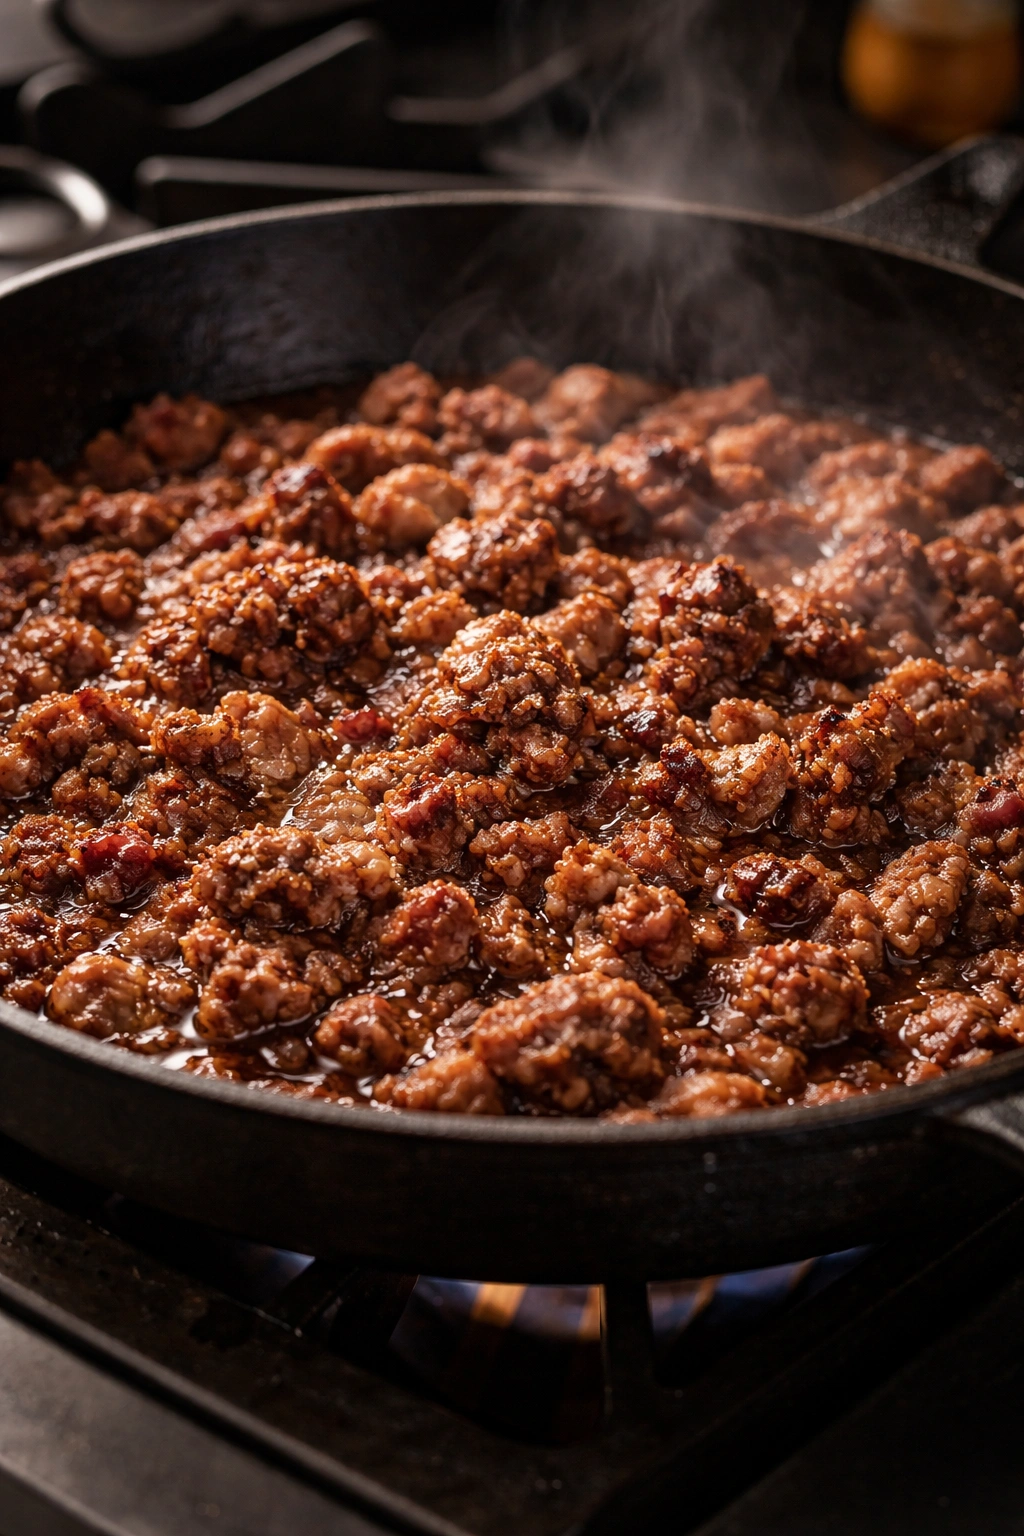
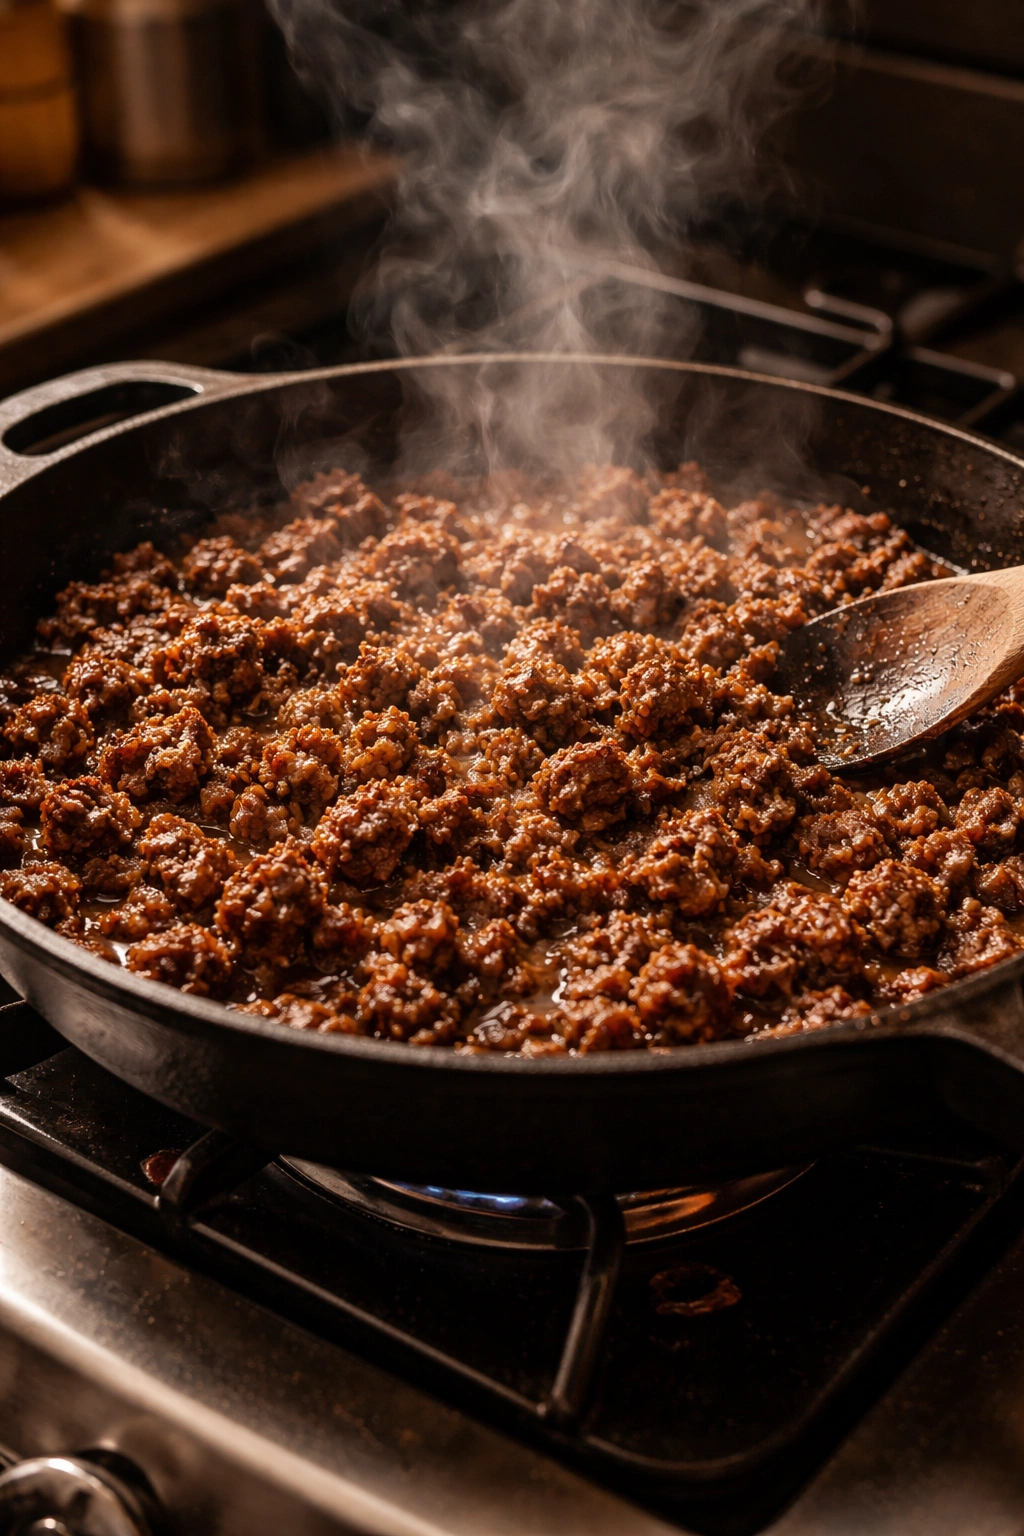
Place a large pot or Dutch oven (at least 5-quart capacity) over medium-high heat for about 1 minute, until the pan is hot. Add 1 pound ground beef directly to the dry pan and do not stir for the first 2 minutes. Let the meat make contact with the hot surface and begin to brown. This initial searing step creates flavorful caramelization on the meat’s surface.
-
After 2 minutes, use a wooden spoon to break the meat into small, uniform pieces, stirring and scraping the bottom of the pan where the most flavorful browned bits collect. Continue cooking for another 3 to 5 minutes, breaking the meat into smaller and smaller pieces, until no pink remains and you see caramelization on the pieces and the bottom of the pan. Don’t skip this browning process; it’s non-negotiable for flavor.
-
If your beef released a lot of fat (more than 1 tablespoon pooling in the pan), carefully spoon some of it out and discard. You want a light coating of fat in the bottom for flavor, not a greasy layer.
Build the Flavor Base:
-
Add the diced onion and bell pepper to the pot with the browned beef. Stir to combine and cook for 4 to 5 minutes over medium heat, stirring frequently, until the onion becomes translucent and just barely begins to turn golden at the edges, and the garlic becomes fragrant. Don’t let it brown too much; you want softness, not char.
-
Add the minced garlic and cook for exactly 30 seconds, stirring constantly. Be careful not to burn the garlic; raw garlic can taste acrid, but burnt garlic tastes bitter and will ruin your chili. The moment you smell that raw garlic aroma transform into something sweeter and more fragrant, move to the next step.
Bloom the Spices:
-
Sprinkle all the dry spices directly over the meat and vegetables: chili powder, cumin, garlic powder, onion powder, paprika, oregano, cayenne pepper, cinnamon, salt, and pepper. Do not skip this step or add spices later; blooming them in the fat creates deep, developed flavor that you cannot achieve by simply stirring them into a cold pot.
Advertisements -
Stir thoroughly and constantly for 60 to 90 seconds, coating every piece of meat and vegetable with the spices. You will smell the spices release their essential oils—that aroma is proof the blooming is working. Once the spices are fragrant and well distributed, immediately move to the next step before they can burn.
Build the Chili:
-
Add the strained tomato paste to the pot and stir well to combine with the spices. Cook for 1 minute, stirring occasionally. The tomato paste will darken slightly and become more fragrant.
-
Add the canned diced tomatoes (with their juice) to the pot, scraping up any browned bits stuck to the bottom of the pan with your spoon. These browned bits are pure flavor and should be incorporated into the chili. Stir to combine.
-
Add 1 can of drained and rinsed beans (your choice of type: chili beans, kidney beans, pinto, or black beans) and a second can of beans if desired for variety. Stir well.
-
Pour in 1 to 1.5 cups beef broth or V-8 vegetable juice. Start with 1 cup; the chili will thicken as it simmers, and you can always add more liquid if you prefer a soupier consistency. Stir everything together until well combined.
Simmer and Develop Flavor:
-
Turn the heat up to medium-high and bring the chili to a gentle boil, stirring occasionally. You’re looking for visible bubbling around the edges and a few bubbles breaking the surface, not a violent rolling boil.
-
Once the chili is boiling, reduce the heat to medium-low (somewhere around 3 or 4 on a dial if your stove has numbers). Place a lid on the pot and let the chili simmer gently for 15 to 20 minutes, stirring occasionally (every 3 to 4 minutes). During this time, the flavors will marry together, the chili will thicken, and the beans will heat through completely.
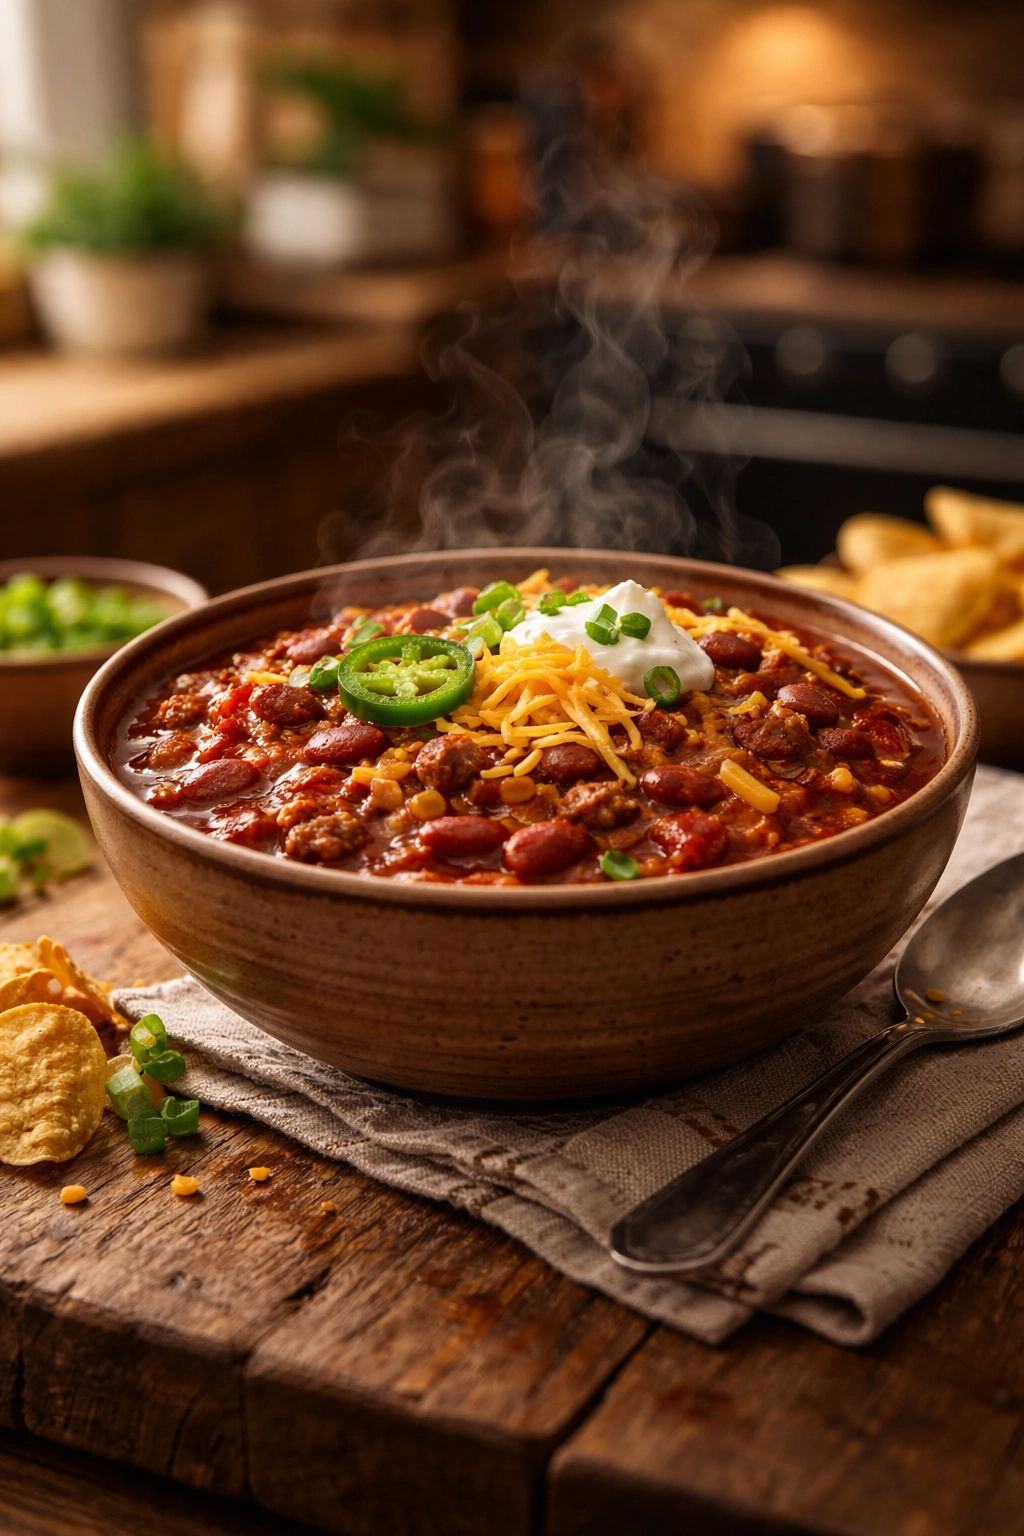
-
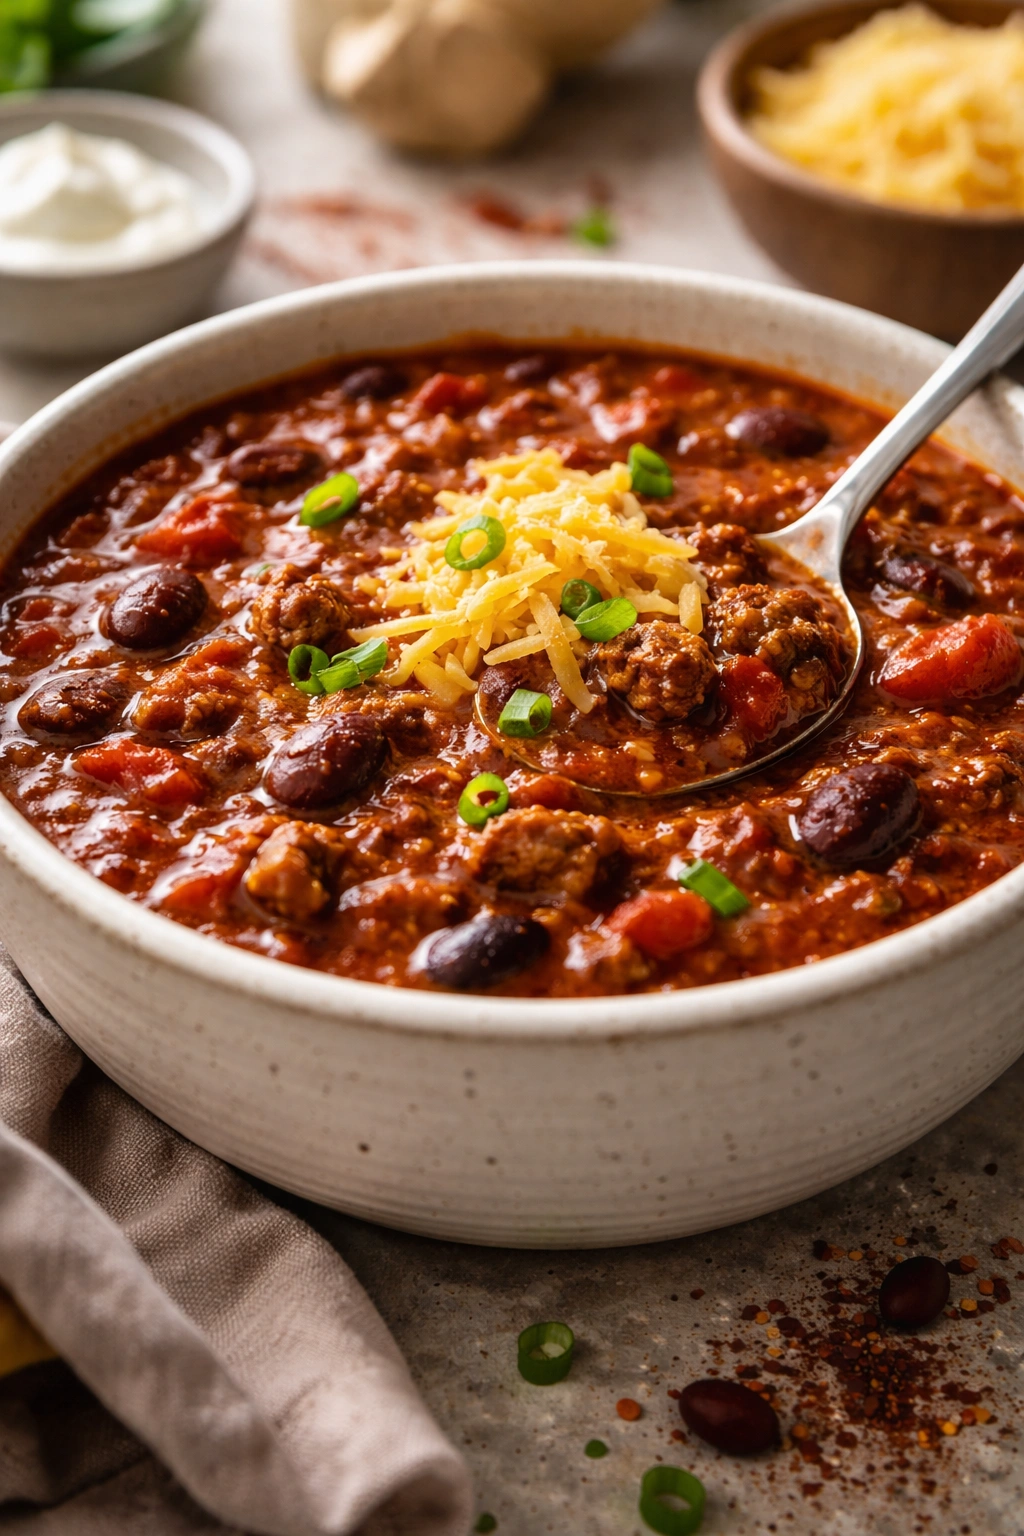
You’ll know the chili is ready when it has visibly thickened and looks like chili rather than soup—the liquid should coat the back of a spoon, and the overall texture should be thick and hearty. If after 15 minutes your chili still looks too soupy, remove the lid and continue simmering uncovered for another 5 minutes to allow more liquid to evaporate.
Advertisements
Finish and Adjust:
-
Remove the pot from heat and carefully remove the lid (steam will be hot). Taste the chili carefully. Your palate might detect that it needs a touch more salt, a pinch more chili powder for heat, or a squeeze more lime juice (if you have it) for brightness. Make any adjustments now.
-
Ladle the hot chili into bowls and set out your favorite toppings in small bowls so each person can customize their serving. The toppings are not optional extras—they’re essential to the chili experience, providing textural contrast and additional flavor. A bowl of plain chili is good; a bowl of chili topped with sharp cheddar, sour cream, cilantro, and a crunch of tortilla chips is exceptional.
Pro Tips for Chili That Tastes Like It Simmered All Day

Brown the meat until you see actual caramelization on the bottom of the pan. This is the difference between good chili and exceptional chili. Many cooks brown meat until it’s cooked through but still pale—that’s not browning, that’s cooking. You want the meat to turn deep brown and the pan bottom to have a layer of flavorful browned bits. That’s what transforms your chili from one-dimensional to complex.
Don’t skip the cinnamon. I know it sounds strange, and you won’t taste it specifically, but it’s the ingredient that makes people say “wow, what IS that?” Cinnamon adds warmth and depth that balances the spices and makes the overall flavor feel more developed. Start with a teaspoon; if you hate it, you’ll know, but almost everyone is surprised at how well it works.
Chili actually improves as it sits. If you have time, make it a few hours ahead or even a day ahead, refrigerate it, and reheat it before serving. The flavors continue to meld and deepen, and many home cooks swear their chili tastes even better the next day. This also means if you’re short on time the day you want to serve it, you can make chili the evening before without stress.
Taste and adjust at the very end, not during cooking. Different brands of chili powder, beans, and canned tomatoes vary in salt content and spice level. Adding more seasoning halfway through means you might end up with too much by the end. Cook the full recipe first, then taste and make adjustments.
Quality ingredients matter more than quantity of time. Buy the best ground beef you can afford, use fire-roasted tomatoes if you can find them, and make sure your spices haven’t been sitting in your cabinet for five years. The difference between fresh spices and stale spices is dramatic—stale spices taste dusty and flat, while fresh ones are bright and aromatic.
Common Chili Mistakes and How to Avoid Them
Rushing the browning stage: Some cooks skip proper browning because they think it takes too long. It doesn’t—it takes 5 to 7 minutes—but skipping it costs you in flavor for the remaining 25 minutes of cooking. Don’t do it.
Adding cold spices to the pot: Pouring spices into liquid or adding them without blooming them first means they won’t release their essential oils properly. They’ll taste muted and flat. Always bloom spices in fat.
Overcrowding the pan when browning meat: If you dump all the meat in at once and it’s piled high, it will steam instead of brown. Let it hit the hot pan in a single layer (you may need to brown it in two batches if your pot is small), and don’t stir for the first couple minutes.
Using too much liquid: A common instinct is to add more broth than necessary because you want a generous amount of chili. But remember, canned tomatoes and beans release liquid as they cook. Start with 1 cup of broth and add more if you actually need it. You can always thin it out; you can’t thicken it quickly without simmering longer.
Forgetting the acid balance: Chili should be balanced between savory, spicy, and slightly acidic (from the tomatoes). If it tastes flat or one-dimensional, it often needs a pinch more salt or a squeeze of fresh lime juice to brighten it. Acid is what makes flavor pop.
Burning the garlic: This happens in seconds if you’re not paying attention. Once you add garlic, don’t walk away. Keep your eyes on it and your spoon moving until you’re ready to add the next ingredient.
Adjusting the Heat Level to Your Preference

This recipe creates a medium-heat chili that most people find perfectly balanced—flavorful and warming without being painful. But spice tolerance is completely individual, so here’s exactly how to adjust.
For milder chili: Reduce the cayenne pepper to ⅛ teaspoon (half the recipe amount), omit the green bell pepper if you prefer (it adds subtle heat), use regular diced tomatoes instead of fire-roasted, and skip any fresh jalapeños. You can always serve hot sauce on the side for those who want more heat.
For spicier chili: Increase the cayenne pepper to ¾ teaspoon (or more, depending on your heat tolerance), add 1 to 2 diced fresh jalapeños during the browning stage, or stir in 1 to 2 tablespoons of your favorite hot sauce at the end. Some people add a pinch of red pepper flakes for even more kick. The advantage of adding heat at the end (rather than during cooking) is that you can taste and adjust as you go, which prevents accidentally making it too spicy.
For smoky, complex heat: Use smoked paprika instead of regular paprika, look for chipotle chili powder instead of standard chili powder, or add 1 tablespoon of tomato paste to deepen the overall flavor profile.
Delicious Variations to Keep It Fresh
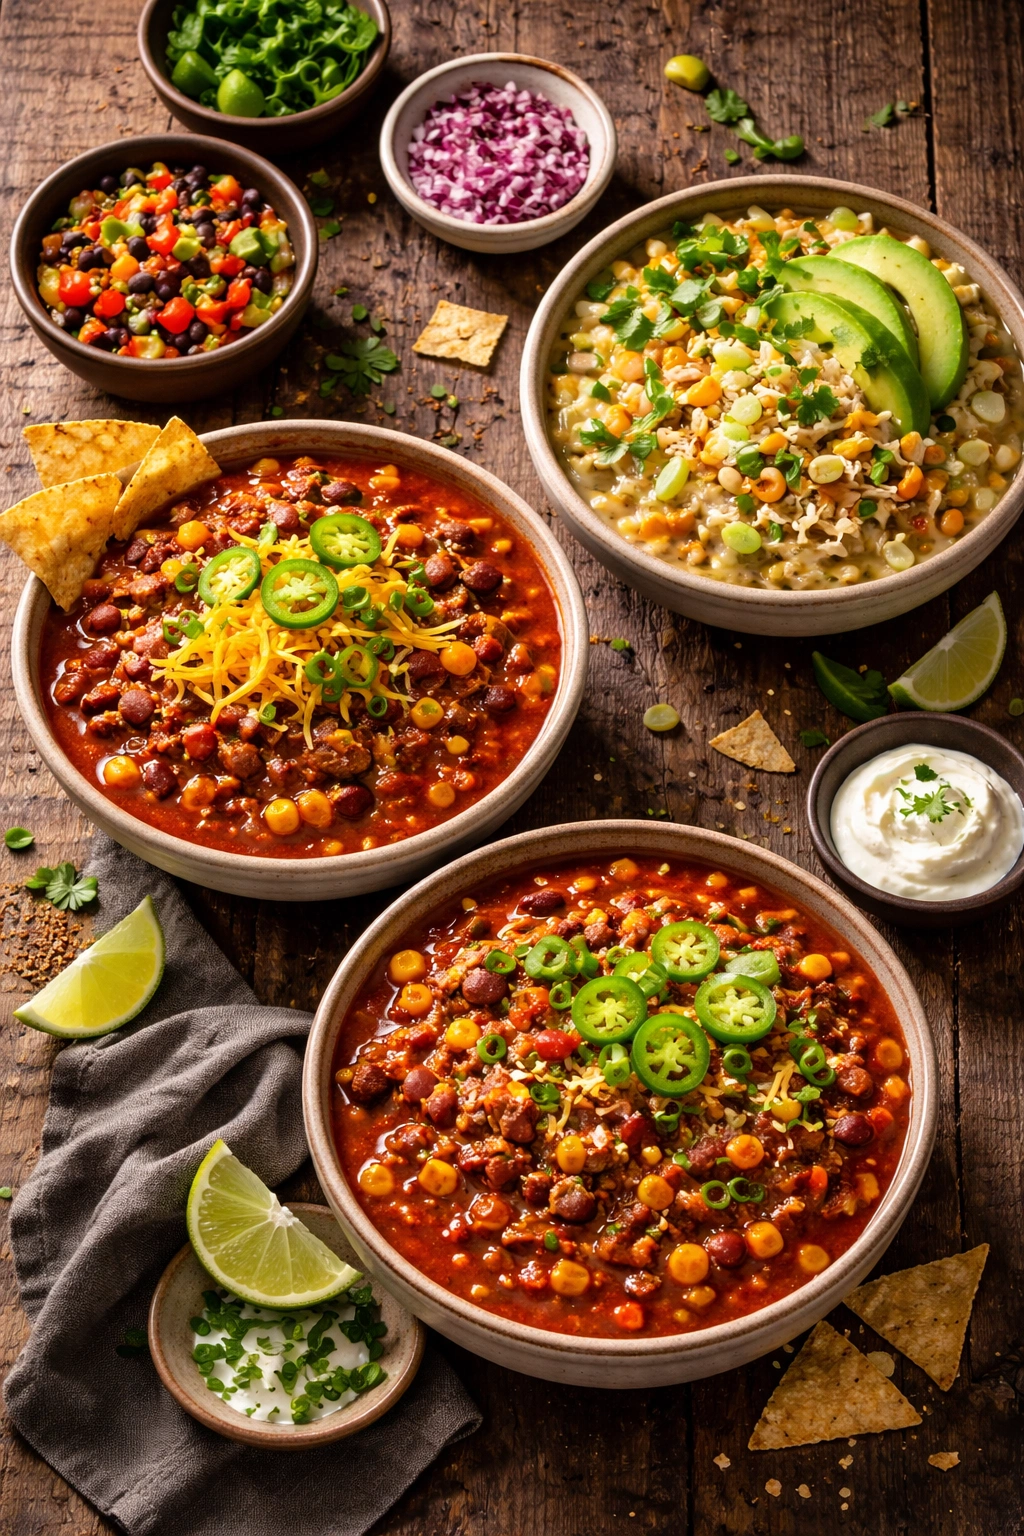
The beauty of this chili is its flexibility. Once you nail the basic technique, you can create endless variations by swapping ingredients and additions.
Meaty chili with sausage: Brown 8 ounces of ground beef and 8 ounces of Italian sausage together instead of using all beef. The sausage adds herbal notes and richness that feel more complex.
Vegetable-loaded chili: Add 1 diced jalapeño (removing seeds if you want less heat), 1 cup of diced zucchini, and 1 cup of corn kernels when you add the beans. This adds nutrition and texture without requiring extra cooking time.
Texas-style no-bean chili: Some chili purists believe beans have no place in traditional chili. Omit the beans entirely and increase the ground beef to 1.5 pounds. You may need to add an extra ½ cup of broth to maintain proper consistency.
White chicken chili: Replace the ground beef with ground chicken (1.5 pounds since it’s leaner), use white beans instead of kidney beans, swap the tomatoes for 2 cups chicken broth, reduce the chili powder to 1 tablespoon, and add 1 cup heavy cream or half-and-half at the very end (don’t boil after adding cream, or it may curdle). This variation is creamier, milder, and feels almost like a chowder.
Turkey chili for lighter eating: Swap ground turkey for the beef (add 1 extra tablespoon olive oil since turkey is very lean), and follow the recipe exactly. Many people find they can’t taste the difference, especially when the chili is topped generously.
Vegetarian or vegan chili: Omit the meat and use 3 to 4 cans of beans (a mix of kidney, black, and pinto for variety), or use 2 cans beans plus 1 cup of cooked lentils. Add 1 extra cup of diced bell pepper and ½ cup of diced mushrooms (mushrooms add umami depth that mimics meat). Use vegetable broth instead of beef broth, and the cooking time and technique remain exactly the same.
Perfect Toppings and Garnish Ideas
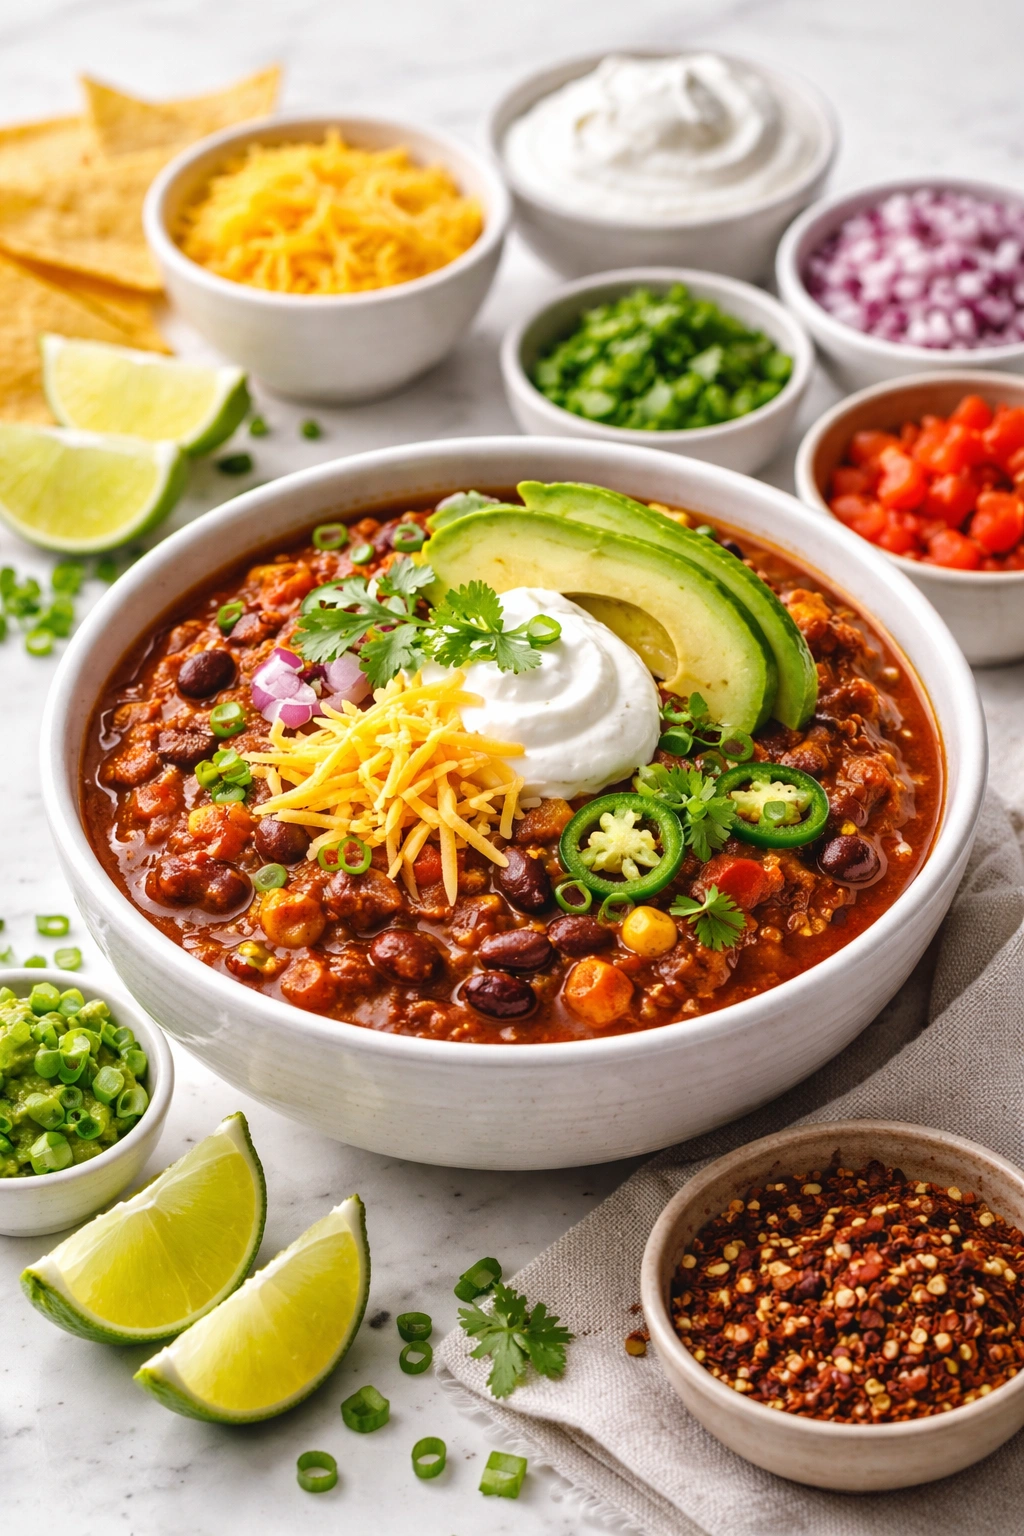
The toppings are where chili becomes truly customizable and infinitely more interesting. Set up a topping bar and let everyone build their own bowl.
Creamy and cooling toppings offset the heat and spice beautifully. Sour cream or plain Greek yogurt adds tangy coolness. Fresh avocado contributes richness and healthy fats. Crumbled feta or goat cheese adds unexpected brightness.
Crunchy toppings contrast with the soft, thick chili base. Crushed tortilla chips, corn chips, or even potato chips add texture and a slight saltiness that enhances the overall dish. Toasted pepitas (pumpkin seeds) provide nutty crunch. Crushed saltines or oyster crackers work wonderfully too.
Fresh, bright toppings add acidity and freshness that make the entire bowl feel more complete. Fresh cilantro (if you like it), sliced green onions, diced red onion, and fresh lime wedges all brighten the rich, heavy chili. A pinch of fresh parsley also works beautifully.
Cheese is non-negotiable for most people. Sharp cheddar is classic for a reason. Some people prefer pepper jack for a spicy kick, others like smoked gouda for depth, and still others use a Mexican blend cheese with cumin and chili notes already built in.
Hot sauce on the side lets those who want more heat add exactly how much they prefer. Set out a couple varieties so people can choose their own adventure.
The best chili bowls are loaded with at least 4 different toppings—one creamy, one crunchy, one bright, and cheese. That’s where the magic of eating chili happens: in the interplay of temperatures, textures, and flavors with each spoonful.
How to Store and Reheat Leftovers

Chili is one of those rare dishes that actually improves the next day as the flavors continue to meld and develop. This makes it an ideal recipe for meal planning and batch cooking.
To store leftovers, allow the chili to cool to room temperature (about 30 minutes on the counter, or faster if you spread it in a shallow container). Transfer to an airtight container and refrigerate for up to 4 days. The chili will thicken more as it sits, which is fine—just add a splash of broth when you reheat if you prefer a looser consistency.
For longer storage, chili freezes beautifully for up to 3 months. Cool it completely, transfer to a freezer-safe container or heavy-duty freezer bag (if using a freezer bag, lay it flat so it takes up less space and thaws faster), and label it with the date. To thaw, move the chili from the freezer to the refrigerator the night before you want to reheat it, or reheat it directly from frozen over low heat on the stovetop, stirring frequently.
To reheat: Thaw in the refrigerator overnight if frozen. Transfer to a pot and reheat over medium heat, stirring occasionally, until heated through (about 5 to 8 minutes). You can also reheat individual portions in the microwave in a microwave-safe bowl for 1 to 2 minutes, stirring halfway through. Add a splash of broth or water if the chili has thickened too much during storage.
Making This Chili in Different Cooking Methods
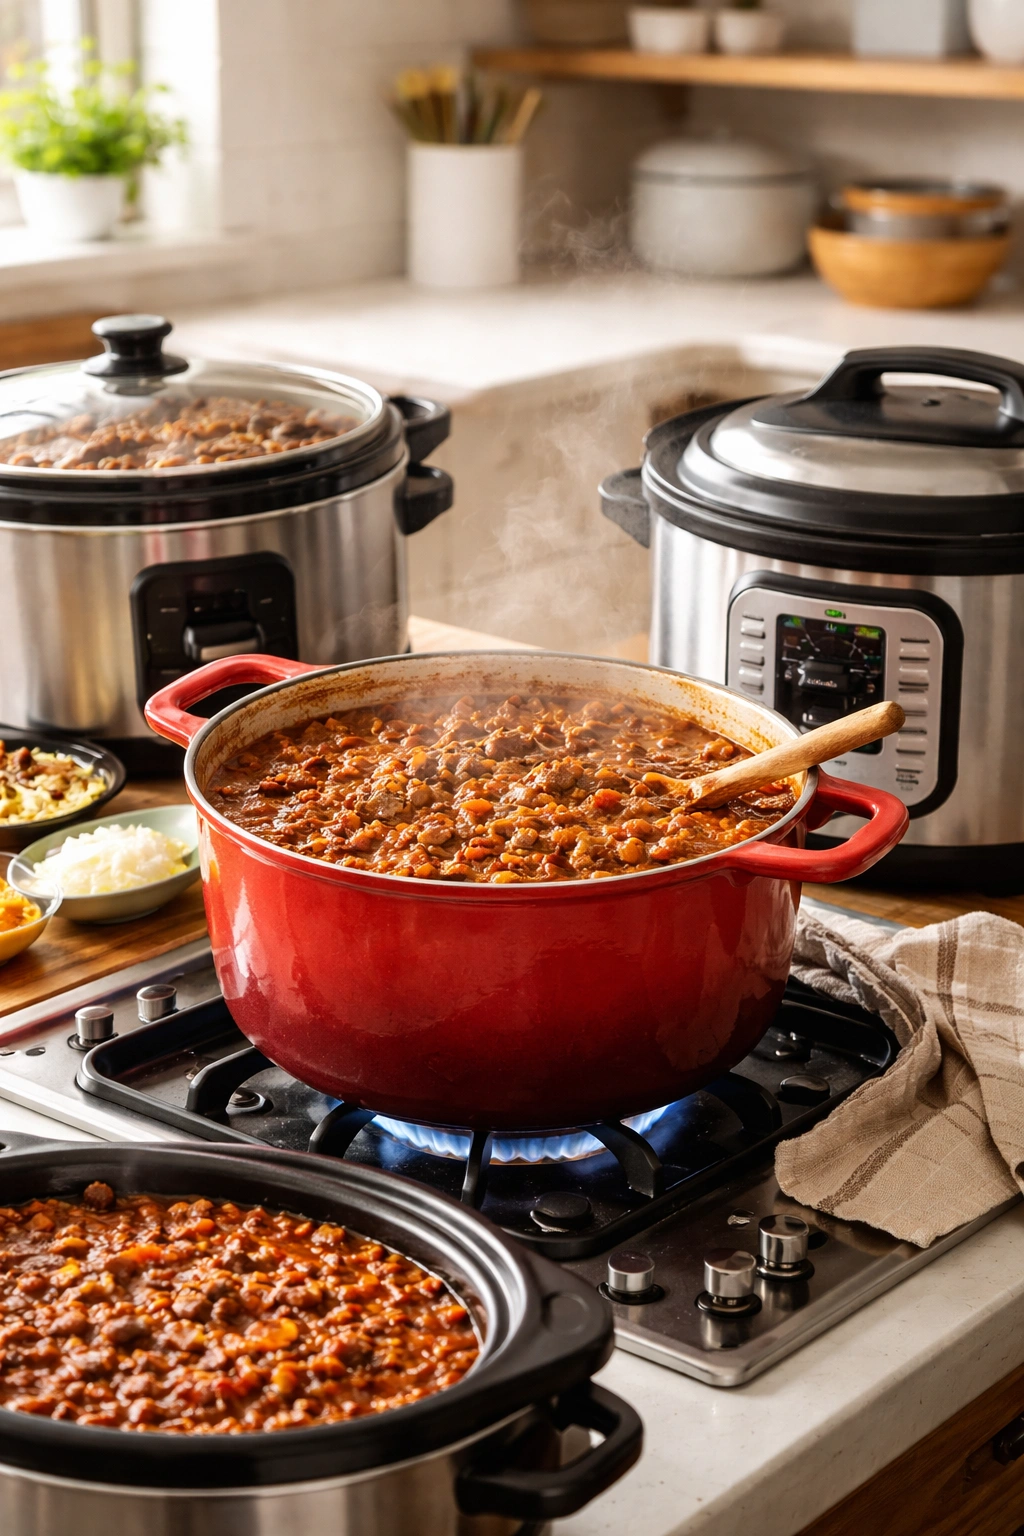
While this 30-minute method is stovetop-based, the same chili translates beautifully to other cooking appliances if you prefer a different approach.
Slow cooker method: Brown the meat and sauté the vegetables on the stovetop (this takes about 10 minutes), then transfer everything to your slow cooker along with all the remaining ingredients. Cook on LOW for 6 to 8 hours or on HIGH for 3 to 4 hours. The longer, slower cooking will allow flavors to develop even more deeply, though you’ll obviously be trading the quick timing for hands-off convenience. The advantage is that your kitchen smells like chili for hours.
Instant Pot method: Use the sauté function to brown the meat and vegetables, then sauté the spices as described above. Add all remaining ingredients and secure the lid. Cook on high pressure for 10 minutes, then allow natural pressure release for 10 minutes before carefully releasing any remaining pressure. This method takes about 30 minutes total (including time to come to pressure and release), so it’s comparable to the stovetop method but with less hands-on time.
Dutch oven in the oven: Brown the meat on the stovetop, sauté vegetables and spices, then transfer the entire pot to a 325°F oven for 30 minutes uncovered. The gentle, even heat of the oven creates beautiful flavor development. This method is excellent if you’re cooking for a crowd and want to free up your stovetop.
Pairing Your Chili With Sides and Drinks
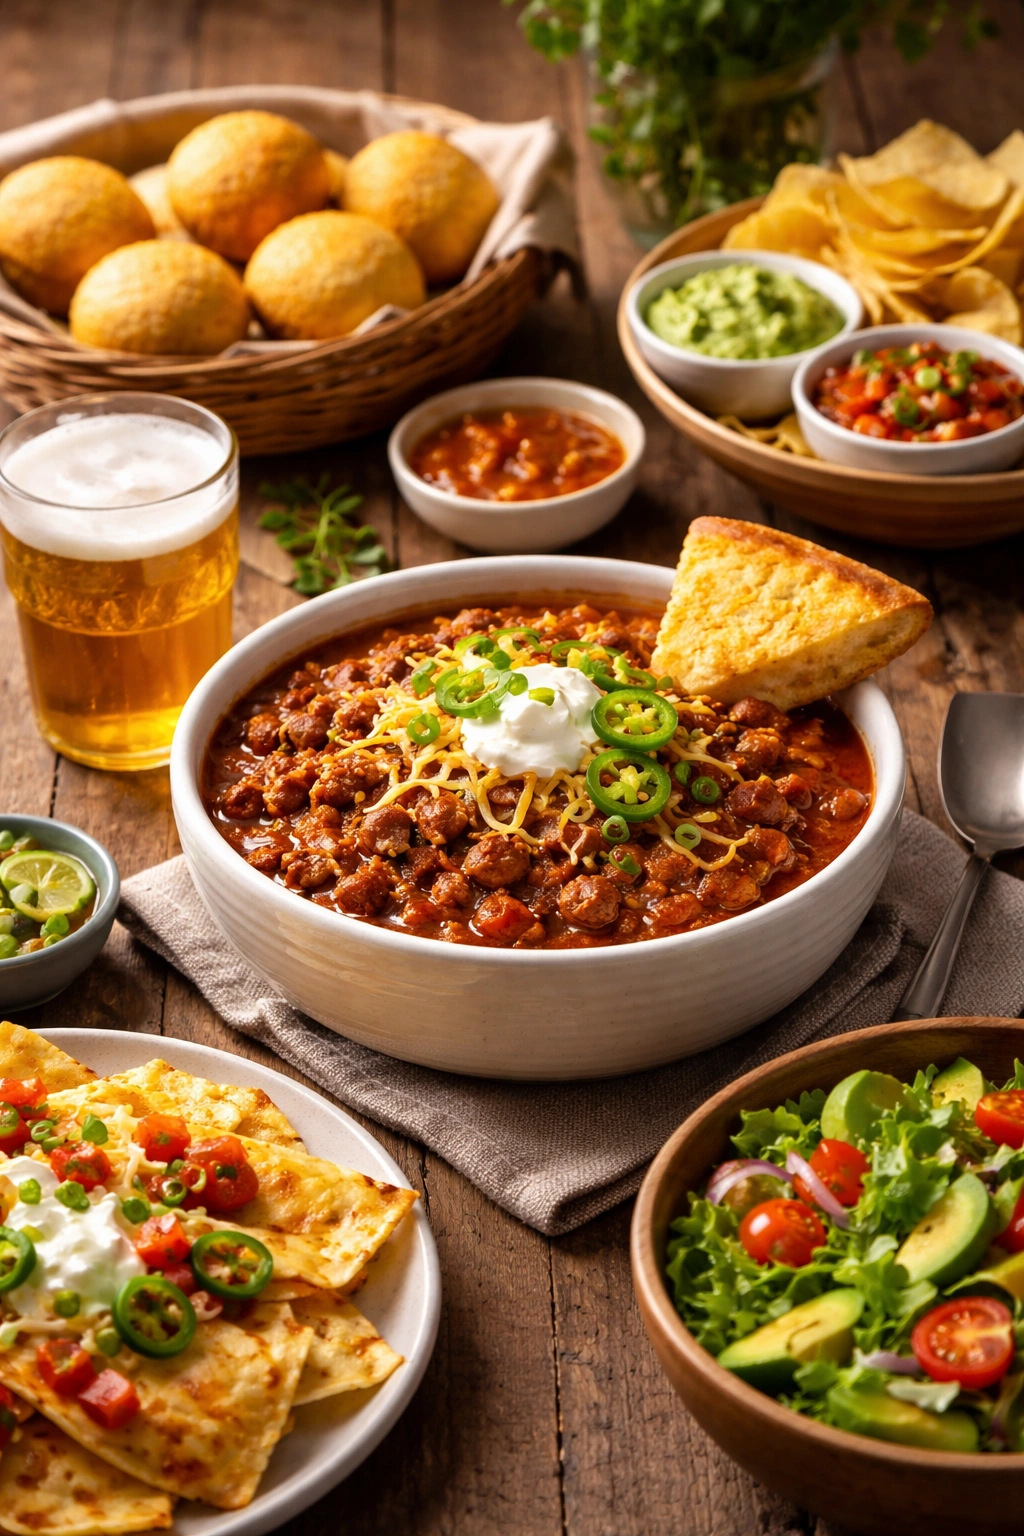
Chili doesn’t need accompaniment to be satisfying, but the right sides and drinks can elevate the entire meal into something truly special.
Bread and carbs are the traditional pairing. Cornbread is the classic choice—its slight sweetness balances the savory, spicy chili beautifully. Jalapeño cornbread adds an extra kick. Warm flour tortillas, flour-based crackers, or even simple garlic bread all work well for soaking up chili and adding textural variety. For those eating gluten-free, cornbread made with corn flour or gluten-free flour blends works perfectly.
Salads provide cooling, crisp contrast. A simple green salad with a bright vinaigrette (lemon or lime juice, olive oil, salt, and pepper) cuts through the richness of the chili. A coleslaw with creamy dressing also works beautifully, adding crunch and cool creaminess. A shredded cabbage slaw with lime juice and cilantro mirrors the flavors of the chili while providing textural contrast.
Rice or grains add substance if you want to stretch the chili to feed more people or make the meal even heartier. Serve chili over white rice, brown rice, cilantro-lime rice, or even cauliflower rice for a lighter option. Some people serve chili over pasta (particularly with spaghetti or penne), creating a Chili Mac situation that feels almost like a different dish entirely.
Potato-based sides also pair well. Serve chili over baked potatoes, sweet potatoes, or loaded french fries for heartiness. Chili cheese fries are a legitimate meal on their own.
Drinks should complement the heat and richness. Cold beer is a classic pairing—light lagers work beautifully, while IPAs provide hoppy bitterness that contrasts with the chili’s spice. Cold iced tea, lemonade, or agua fresca (a refreshing Mexican drink made from fruit, water, and a touch of sugar) all provide cooling relief. Margaritas, if you’re inclined toward cocktails, actually work surprisingly well.
Final Thoughts
The experience of getting a genuinely delicious pot of chili on the table in 30 minutes is transformative. It removes the excuse that great comfort food requires hours of planning and babysitting. All that’s required is understanding which steps actually matter (proper browning, spice blooming, adequate simmering), using quality ingredients that do the heavy lifting for you, and building in enough seasoning that the flavors feel developed and complete rather than thin and one-dimensional.
Once you’ve made this chili once, you’ll find yourself returning to it constantly—on nights when you’re short on time but long on appetite, when unexpected guests show up and you need to feed a crowd quickly, or simply when you’re craving comfort food that tastes homemade and feels like it was made with care. The beauty is that it tastes like you spent the entire evening cooking, when really you’ve been done in under 30 minutes. That’s the definition of a recipe worth keeping.