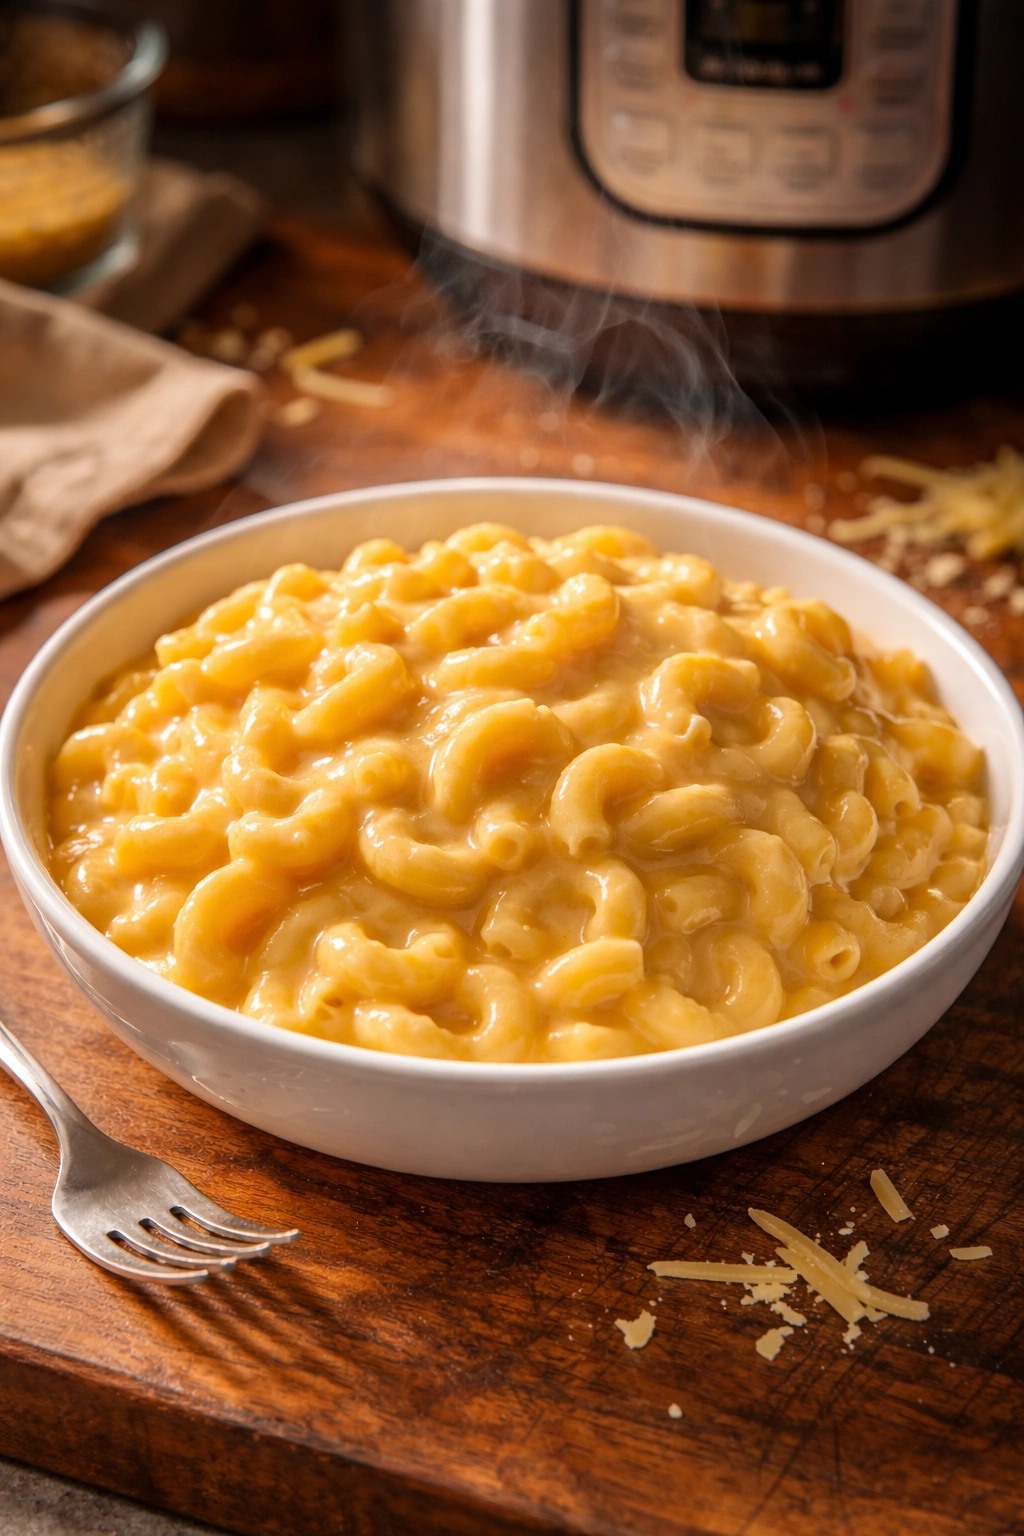
When you’re standing in front of the stove at 6 PM with hungry faces staring at you and the mental energy of planning dinner completely depleted, there’s something almost magical about dropping pasta, water, and butter into an Instant Pot, closing the lid, and walking away for five minutes. Yet that’s exactly what makes Instant Pot mac and cheese one of the most underrated weeknight dinners—it’s not just fast, it’s actually good. No watery sauce, no dry noodles, no standing over a pot stirring endlessly. Just creamy, deeply satisfying comfort food that tastes homemade and tastes like you spent way more effort than you actually did.
The best part? You genuinely can have a full, serve-it-straight-from-the-pot meal of creamy mac and cheese in about fifteen minutes from start to finish. That includes prep time. The pressure cooker doesn’t just speed up cooking—it fundamentally changes how the pasta absorbs liquid and how the sauce comes together, creating a texture that’s genuinely difficult to replicate on the stovetop. It’s become the go-to method for home cooks who’ve discovered that boxed mac and cheese isn’t the only option anymore, and homemade doesn’t have to mean complicated.
Why Instant Pot Mac and Cheese Is Different from Stovetop Versions
There’s real food science happening in your pressure cooker that doesn’t occur on the stove. Traditional stovetop mac and cheese requires you to boil pasta separately, drain it, and then make a cheese sauce in a separate pot—then combine everything together and hope the sauce clings to the noodles. With the Instant Pot method, the pasta cooks directly in the liquid that will become your sauce, absorbing flavor from the start and carrying starch into the liquid that acts as a natural thickener.
The pressure cooking environment changes everything about texture. The pasta comes out perfectly tender without becoming mushy, and the starch release creates a sauce consistency that feels more luxurious than when you’re just heating milk and cheese together. It’s not that the individual ingredients are different—it’s that the pressure cooker coaxes them into a texture that feels richer and creamier than the sum of their parts.
You’re also saving mental space and kitchen real estate. No draining pasta over a sink (where half of it probably ends up in the drain anyway), no balancing multiple pots on a small stove, no actual babysitting. You set the timer and disappear. For parents cooking after a long day, shift workers making meals on borrowed time, or anyone honestly just tired of the usual evening rush, this is the difference between “I’ll just order delivery” and “I can actually make this myself.”
The cleanup is genuinely minimal too. One pot, one lid, maybe a wooden spoon. That’s it. Everything happens in the inner pot—no crusty pan stuck to the stovetop, no strainer full of starchy pasta water that somehow splashes everywhere. This is the kind of practical advantage that doesn’t sound revolutionary until you’re actually living it on a Tuesday night at six.
The Secret Behind Truly Creamy Instant Pot Mac and Cheese

Creaminess isn’t just about how much dairy you add—it’s about fat content, starch, and how all three components actually emulsify together. The Instant Pot naturally creates better emulsification because the pressure cooking breaks down starch granules slightly differently, and that starch is crucial for binding fat and liquid into a smooth sauce instead of a greasy, separated mess.
Start with the right milk. Whole milk creates the silkiest sauce, but don’t stress if you only have 2% milk on hand—it absolutely works. Some cooks swear by evaporated milk because it has less water content and creates a naturally thicker sauce (you can use about ½ to ¾ cup evaporated milk instead of 1 cup whole milk). Half-and-half works beautifully if you’re feeling indulgent. What doesn’t work quite as well is skim milk, which has so little fat that the sauce ends up tasting thin no matter how much cheese you add.
The butter might seem optional, but it’s doing real work here. It adds richness, yes, but it also helps distribute heat evenly during pressure cooking and prevents the pasta from sticking together in one giant clump. Use good butter—unsalted is better because you’ll control the final salt level yourself. Cut it into small pieces so it distributes evenly, rather than tossing in one large chunk.
Timing your ingredient additions matters more than you’d think. Add milk and cheese after the pasta has pressure cooked, not before. If you add them to the cooking liquid, the milk can curdle under pressure and the cheese can break or get chalky. The beauty of this method is that you only pressure cook the pasta and seasoning, then stir in the dairy and cheese after, when the heat is lower and gentler on these delicate ingredients. This is why the finished sauce is so velvety—the cheese melts into already-hot pasta without being stressed by sustained high heat.
Choosing Your Cheese Combination for Maximum Flavor
The cheese you use is genuinely the most important ingredient decision you’ll make. A single block of sharp cheddar will work fine, but a combination of cheeses with different melting properties and flavor profiles creates something noticeably more interesting. Sharp cheddar gives you bold cheese flavor and melts smoothly. Adding a white cheese like Gruyère, Havarti, Fontina, or Swiss cheese contributes creamy meltiness and a slightly nutty complexity that makes the whole dish taste less one-dimensional.
Parmesan adds salty umami depth without adding much bulk. A quarter cup of grated Parmesan mixed into 2.5 cups of other cheese changes the entire flavor profile, adding a savory complexity that makes people think you’ve done something special. It’s the secret weapon that makes homemade mac and cheese taste different from what you’ve made before.
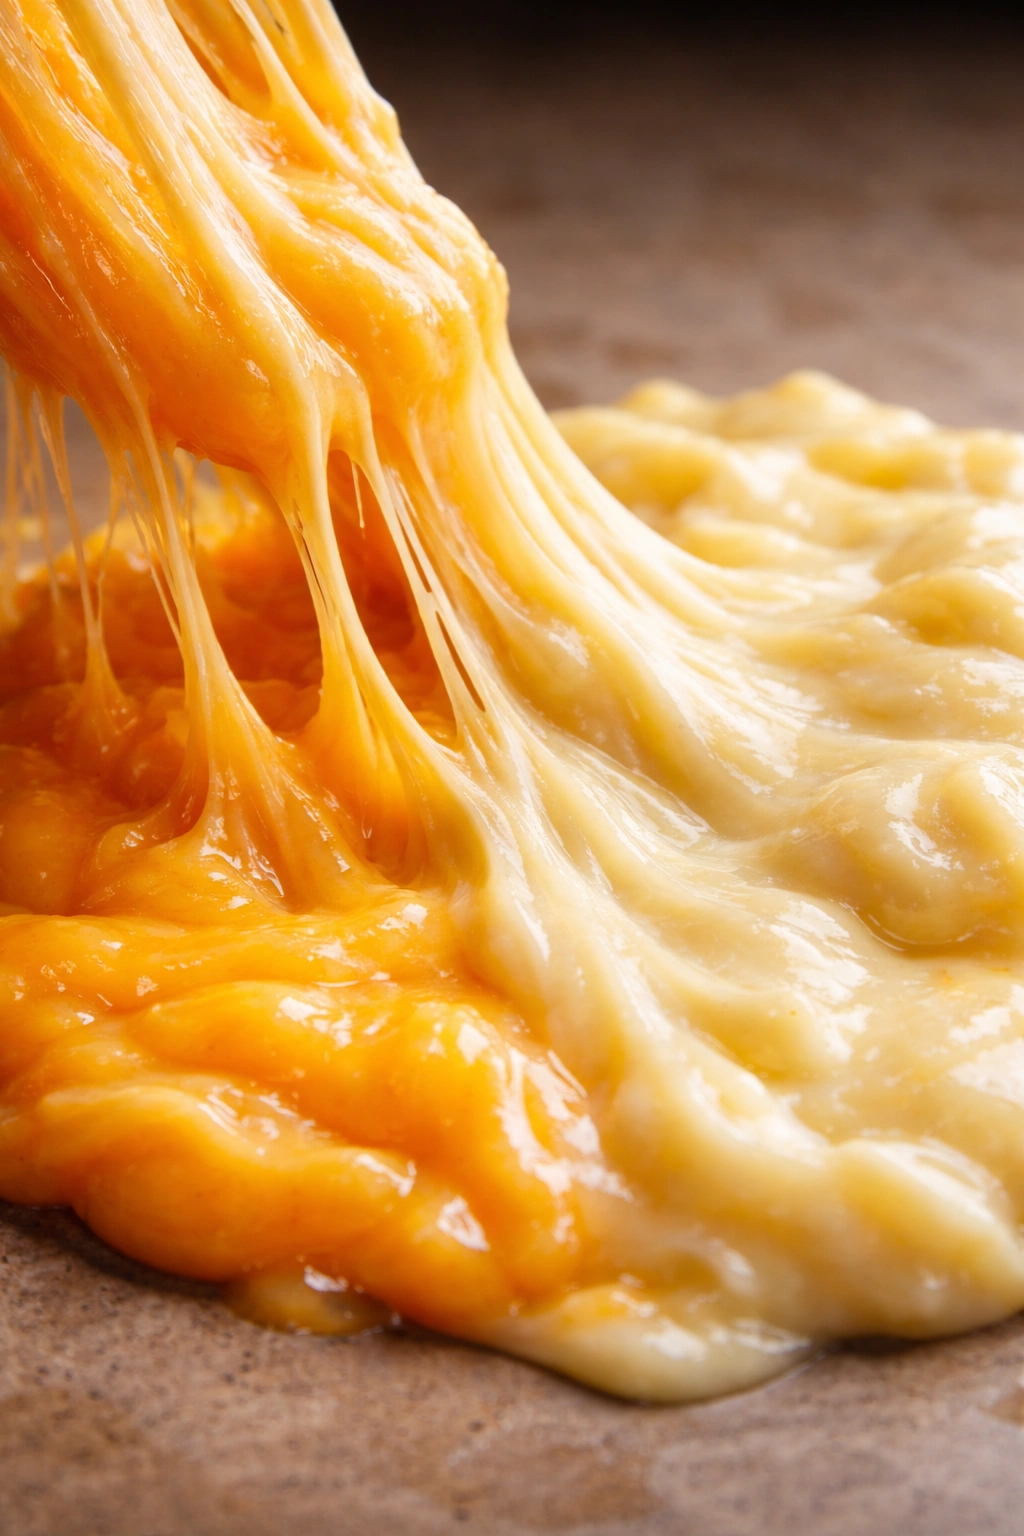
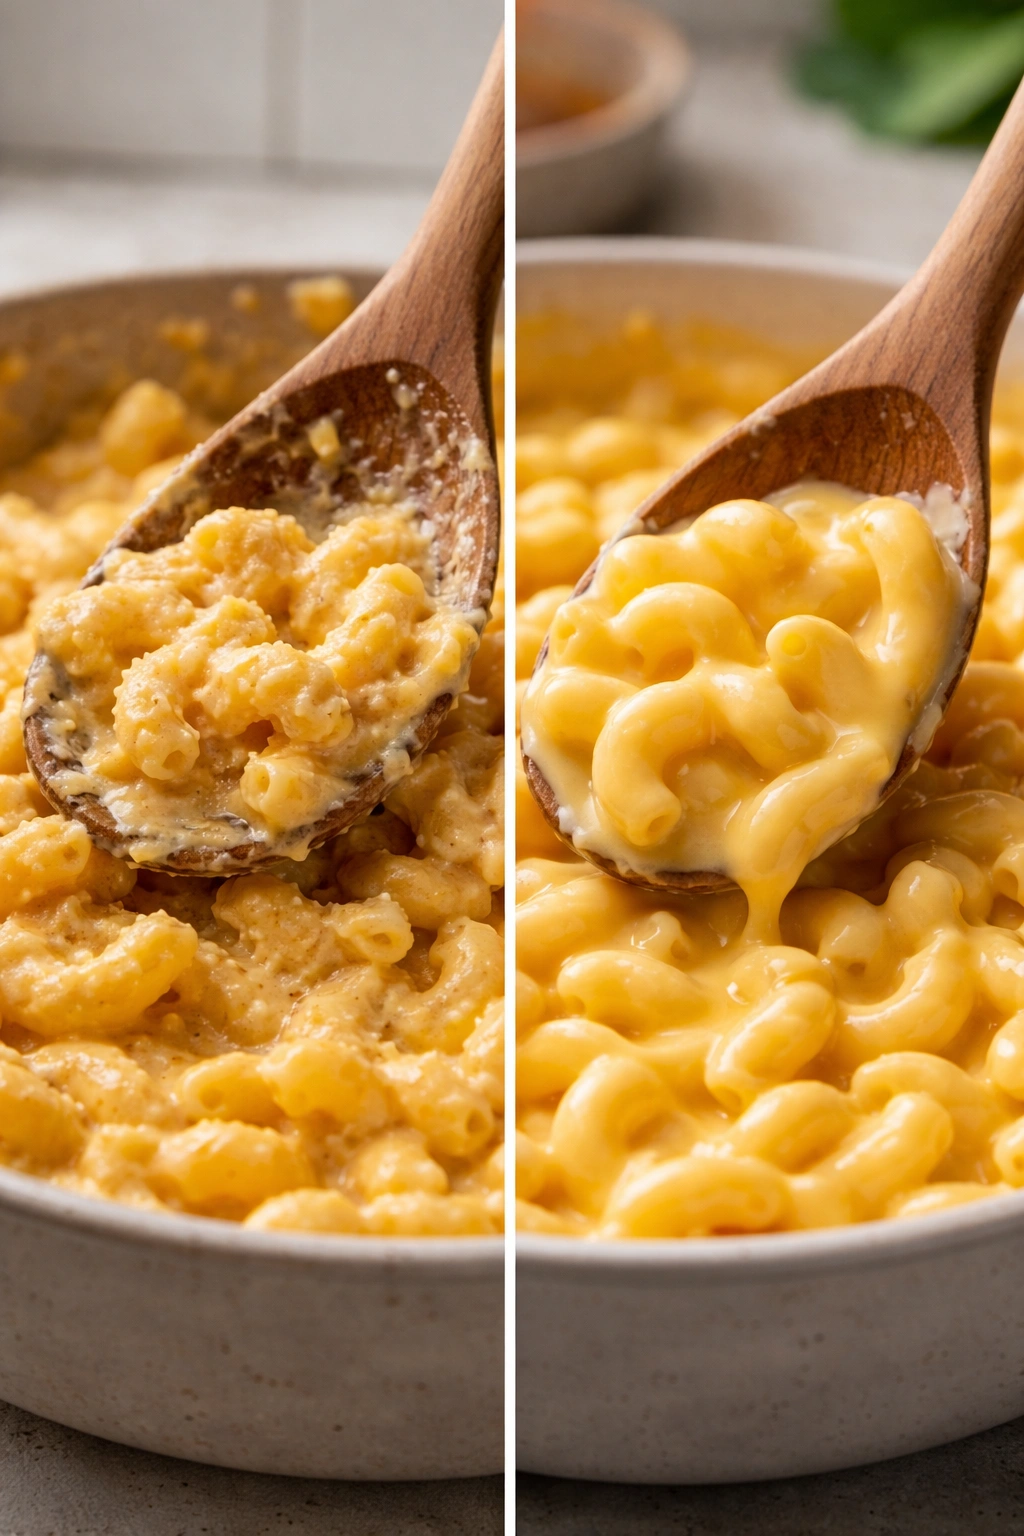
Pre-shredded cheese is the enemy of smooth sauce. Those little bags have anti-caking agents coating each shred, and when the cheese melts under pressure, those additives don’t melt—they remain suspended in your sauce, creating a grainy, gritty texture. The texture difference between sauce made from pre-shredded cheese and sauce made from cheese you’ve grated yourself is shocking. Buy a block, use a box grater, or if you have a food processor with a shredding disc, shred your cheese while the pasta is pressure cooking. This takes literally three minutes and changes everything.
The temperature of cheese when you add it makes a small but noticeable difference. If your cheese comes straight from the fridge, it’ll be cold and will take longer to melt into the hot pasta, during which time it can clump. Let cheese sit at room temperature for five minutes before adding it, or shred it an hour in advance. If your cheese does start to clump, stir vigorously for another minute or two—the residual heat of the pasta will eventually melt everything into smoothness. Don’t panic if it looks imperfect at first.
Understanding the Perfect Liquid-to-Pasta Ratio
This is genuinely the most important technical skill for making mac and cheese in the Instant Pot. Unlike traditional stovetop pasta cooking where you boil pasta in a huge pot of water and then drain it completely, the Instant Pot method involves cooking pasta in a specific amount of liquid that the pasta will absorb and that will become your sauce. Get the ratio wrong, and you’ll either end up with crunchy pasta or with soup.
The rule of thumb is approximately 1 cup of liquid to 4 ounces of pasta. A standard 1-pound box of elbow macaroni is 16 ounces, so you’re looking at 4 cups of liquid total. Some recipes use all water, some use all broth, and many use a combination. Chicken broth adds flavor but makes the dish taste slightly savory rather than purely cheesy—which some people prefer, others don’t.
The type of pasta matters slightly. Elbow macaroni is the standard, and the recipes here are timed for standard dried elbow macaroni. If you’re using shells, cavatappi, or other shapes, the cooking time might shift by a minute or so depending on thickness. Whole wheat pasta can be tricky because it absorbs liquid differently and sometimes needs slightly less time. Gluten-free pasta is genuinely difficult in the Instant Pot and doesn’t cook evenly in most cases—if you need to go that route, stick with specialty brands specifically designed for pressure cooking, or just make it on the stovetop instead.
After pressure cooking, the pasta will look noticeably watery. This is completely normal. When you stir in the cheese, the starch from the pasta thickens the liquid into sauce. If it seems too thin even after stirring in cheese, you can let it sit for another minute or two on the “warm” setting of the Instant Pot, during which time the pasta will continue absorbing liquid and the sauce will thicken. You can always add more milk if it’s too thick, but you can’t really remove excess liquid, so it’s better to err on the side of slightly too thin.
Fresh-Grated Versus Pre-Shredded Cheese: Why the Difference Matters So Much

This deserves its own section because it’s the single most common complaint people have about their mac and cheese turning out watery or grainy. The difference isn’t subtle, and it’s not a matter of opinion—it’s chemistry. Pre-shredded cheese has cellulose or similar anti-caking agents added by manufacturers. These additives prevent the cheese from clumping together in the bag, but they also don’t dissolve when the cheese melts. Instead, they remain suspended in your sauce as tiny particles.
When you grate cheese from a block, you’re getting pure cheese. Nothing else. When it melts, it becomes smooth and silky because there’s nothing preventing it from bonding with the fat and liquid around it. The emulsification that happens as you stir creates a genuinely different texture—glossy, creamy, velvety.
The time difference is minimal. A standard box grater and a block of cheese takes maybe two to three minutes of active work. Many people do this while the pasta is pressure cooking, so it’s not really adding to the total prep time. If you have a food processor with a shredding blade, it’s literally ten seconds. The payoff is such a noticeably better sauce that once you do it this way once, you’ll probably never go back to the bagged stuff.
That said, if you only have pre-shredded cheese on hand, the dish will still be edible and tasty—it just won’t have that silky, restaurant-quality texture. If you’re committed to making this regularly, keeping a block of sharp cheddar and a block of a white melting cheese (Gruyère or Havarti are perfect) in your fridge makes this a genuinely foolproof dinner. These cheeses keep for weeks, and you’ll use them for other things too.
The Complete Instant Pot Mac and Cheese Recipe

Yield: Serves 6–8 as a main course, or 8–10 as a side dish | Makes approximately 8 cups
Prep Time: 10 minutes
Cook Time: 5 minutes (plus 10–12 minutes for pressure to build and release)
Total Time: 25–27 minutes
Difficulty: Beginner — This recipe requires only basic kitchen tools and straightforward steps. The hardest part is waiting for the pressure cooker to come to pressure.
For the Mac and Cheese:
- 1 pound (16 ounces) uncooked elbow macaroni
- 4 cups water or low-sodium chicken broth (or a mix of both)
- 3 tablespoons unsalted butter, cut into small pieces
- 1 teaspoon kosher salt
- ½ teaspoon garlic powder
- ¼ teaspoon ground mustard powder (optional but genuinely helpful—don’t skip it)
- Pinch of cayenne pepper (optional, adds subtle depth without heat)
- 2 cups freshly grated sharp cheddar cheese (from a block, not pre-shredded)
- 1 cup freshly grated Gruyère, Havarti, or Swiss cheese (or another melting white cheese)
- ¼ cup freshly grated Parmesan cheese
- 1 cup whole milk (start with this amount; you can add more if needed)
- Fine sea salt and freshly cracked black pepper, to taste
Combining Your Ingredients and Pressure Cooking
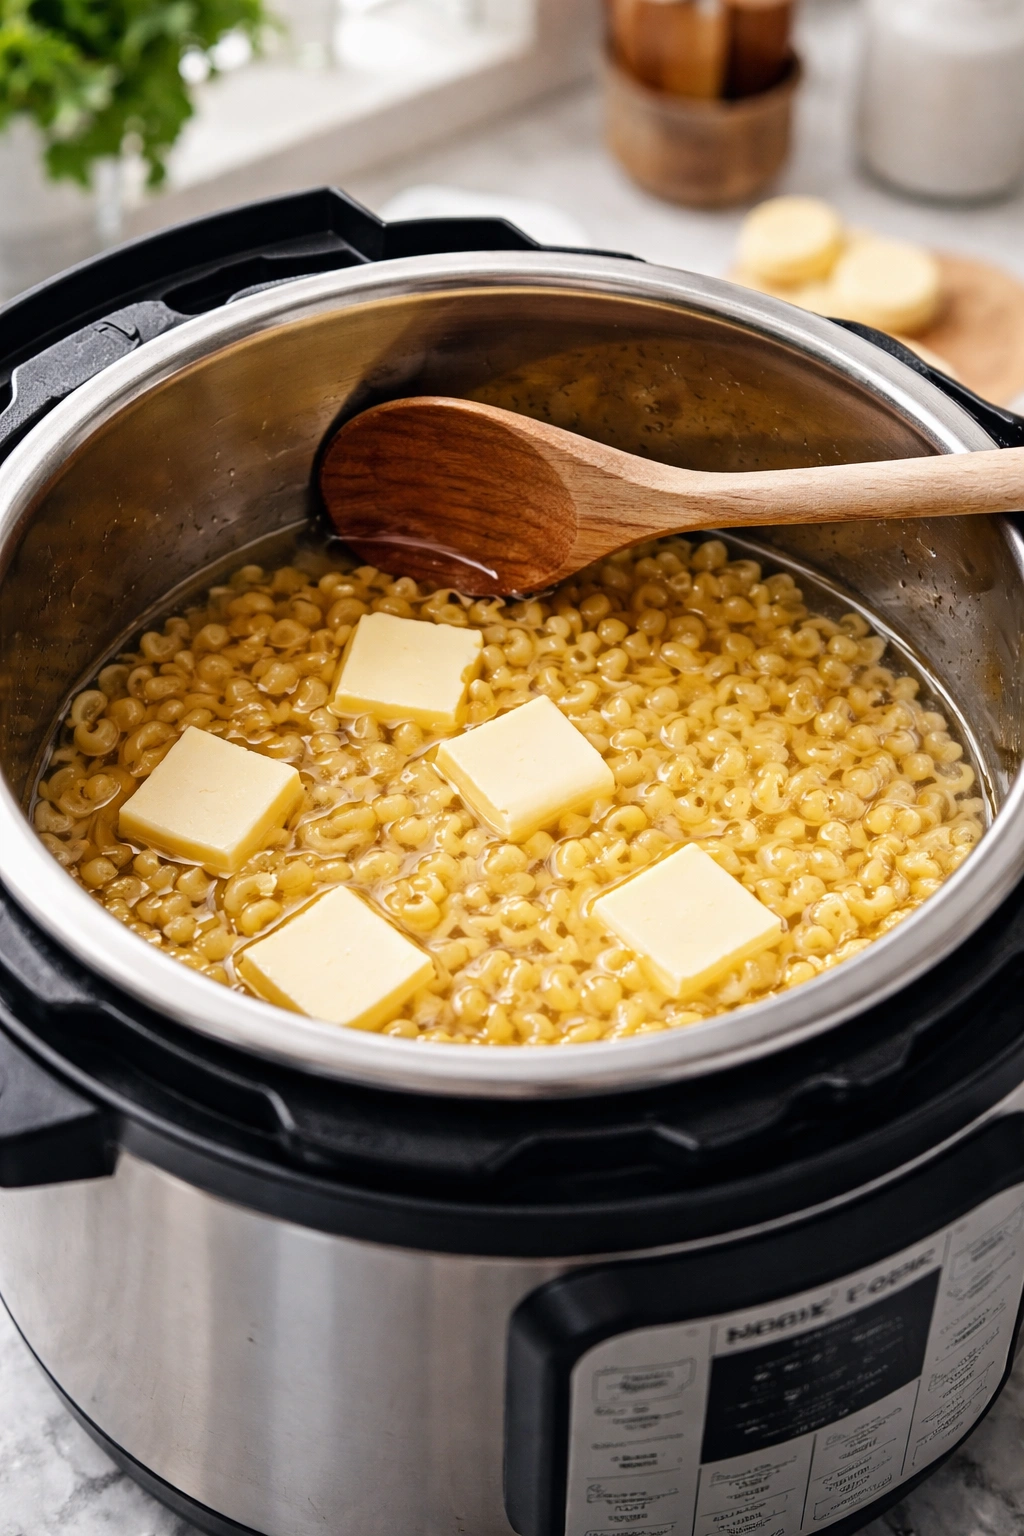
Add the water or broth to the inner pot of your Instant Pot. Stir in the kosher salt, garlic powder, ground mustard, and cayenne if using—these seasonings dissolve into the liquid and flavor the pasta as it cooks. Add the elbow macaroni and the butter pieces.
Use a wooden spoon to stir everything together, ensuring the pasta is mostly submerged in the liquid. If a few pieces are floating above the surface, that’s fine—they’ll cook, but you want the majority of the pasta surrounded by liquid. This even cooking is crucial for avoiding a mix of crunchy and mushy noodles.
Close the lid and make sure the steam release valve is set to Sealing (not Venting). Press the Manual or Pressure Cook button and use the +/- arrows to set the time to 4 minutes on high pressure. The Instant Pot will take about 6–8 minutes to build pressure, during which time you can grate your cheese (if you haven’t already) and measure out your milk.
When the cooking time ends, do not let it naturally release. Immediately move the steam release valve to Venting to release pressure quickly. Use a wooden spoon or silicone spatula to do this, and stand back to avoid steam burns. Let the pressure release completely before opening the lid. If you see liquid starting to spray out with the steam, that’s the starch being released—it’s normal, though if it’s happening vigorously, you can release the steam in short bursts instead of all at once.
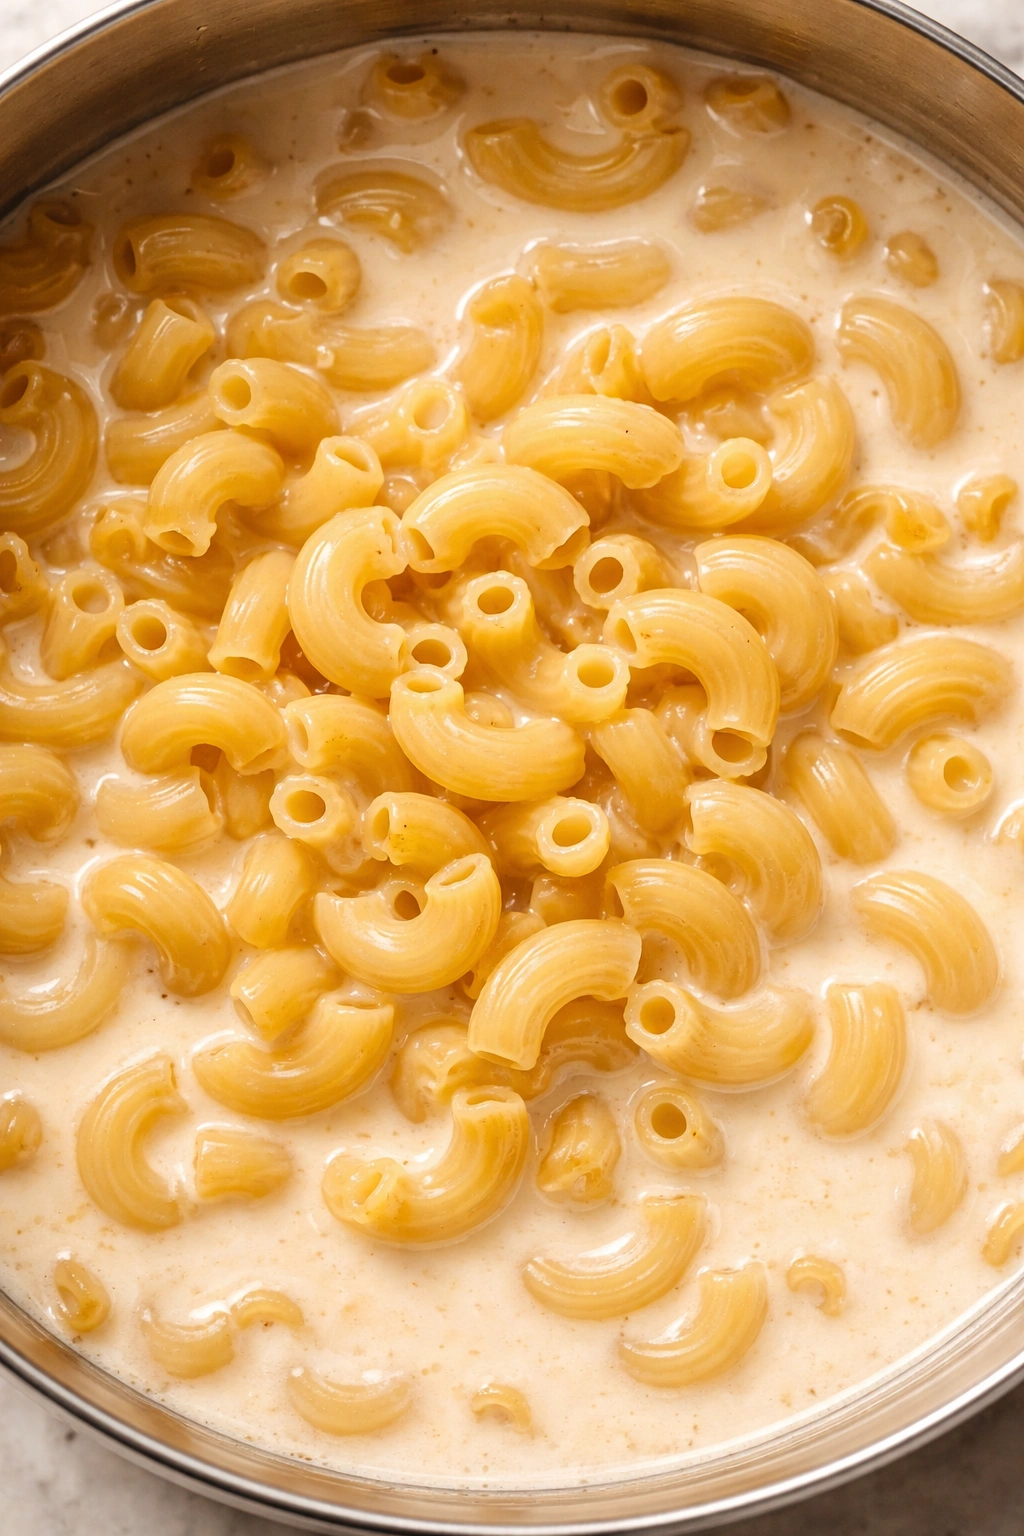
Open the lid carefully (steam is still hot), and give the pasta a gentle stir. The mixture will look noticeably watery at this point—this is completely normal and expected. The pasta has absorbed some liquid, but the true sauce isn’t made yet. You’ll see some liquid pooled around the pasta.
Making the Creamy Cheese Sauce

Pour in the 1 cup of milk and stir gently to distribute it throughout the pasta. Now add the cheese, but do this gradually. Add about a quarter of the cheese mixture (the combined shredded cheddar, Gruyère, and Parmesan) and stir vigorously until it completely melts. Keep stirring; this usually takes 1–2 minutes. Once that first batch is fully melted, add the next quarter and repeat.
This gradual cheese-adding method prevents clumping. If you dump all the cheese in at once, some of it will cling to other cheese particles instead of properly emulsifying with the sauce. Adding it in batches and stirring well between additions ensures every piece of cheese melts smoothly into the sauce.
The sauce should look glossy and coat the pasta evenly. If it seems too thick—where the pasta looks more mounded than saucy—stir in extra milk one tablespoon at a time until you reach your preferred consistency. Conversely, if it looks too thin and soupy after all the cheese is melted, let the mac and cheese sit in the Instant Pot on the Warm setting for 2–3 minutes. The residual heat and the pasta’s continued absorption of liquid will thicken it noticeably.
Taste the mac and cheese and season with additional salt and freshly cracked black pepper to your preference. Don’t skip this step—a pinch of salt and a crack of pepper genuinely make a difference. Let the mac and cheese rest for a minute or two before serving so the sauce thickens slightly.
Common Mistakes and How to Fix Them
The most frequent issue is forgetting to do a quick release and instead letting the pressure naturally release, which takes 15+ minutes. During this time, the pasta continues to cook and becomes mushy. If this happens, you’re still eating mac and cheese—just slightly softer pasta. It’s still tasty, but the texture won’t be quite as ideal.
Cheese clumping is entirely preventable. Add cheese gradually, stir vigorously, and use freshly shredded cheese from a block. If it does clump, just keep stirring over the warm residual heat of the pasta for another 1–2 minutes. The clumps will eventually break down and melt.
Adding too much milk creates soup rather than sauce. Start with 1 cup and add more only in tablespoon increments. Remember that the pasta is still absorbing liquid as the dish sits, so something that looks slightly thin right after adding cheese will thicken up significantly in just a couple of minutes.
Not seasoning the pasta water is a missed opportunity. The seasoning (garlic powder, mustard, salt) goes into the cooking liquid so it flavors the pasta itself, not just the sauce. This is why the finished dish tastes more balanced than if you just salted the cheese sauce at the end.
Cooking at the wrong pressure setting matters. High pressure is correct for this recipe. Low pressure will take longer to come to pressure, and the timing will be off. Always verify you’ve selected High before starting the cook cycle.
Elevating Flavor with Seasonings and Additions
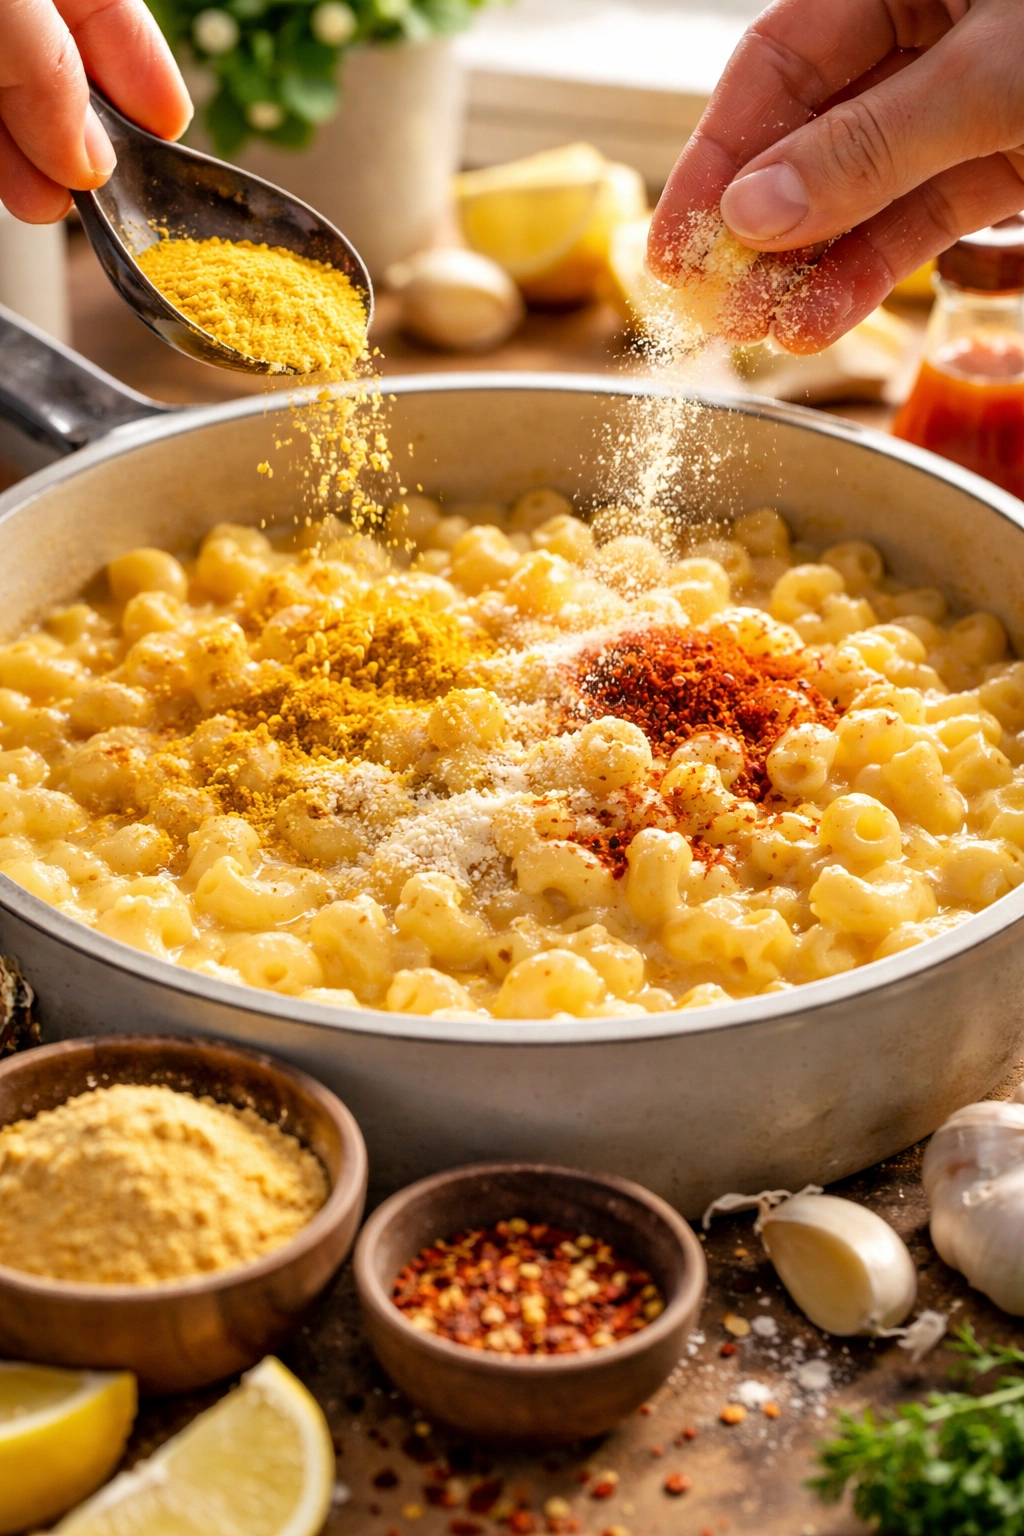
Mustard powder is genuinely magical in mac and cheese. It doesn’t make the dish taste mustardy—it simply rounds out and deepens the cheese flavor, making it taste more like something you spent hours on. A quarter teaspoon is all you need. This is a trick borrowed from classic French cooking, where Dijon mustard has been added to mac and cheese for generations.
Garlic powder adds subtle savory depth without making the dish overly garlicky. Fresh garlic would burn under pressure, so powder is the right choice. If you want bolder garlic flavor, add it after cooking—stir in a quarter teaspoon of fresh minced garlic or a tiny splash of garlic powder at the very end.
A pinch of cayenne doesn’t make the mac and cheese spicy if you use just a tiny amount—it adds warmth and complexity that makes people think, “This tastes restaurant-quality,” without realizing what you did differently. Start with a pinch (⅛ teaspoon), taste, and add more if you want.
Hot sauce is an underrated addition. A teaspoon or so of Frank’s RedHot, Cholula, or Tabasco stirred into the finished dish adds brightness and subtle heat that doesn’t register as spicy but makes the cheese flavor pop. This is especially good if you’re making a batch for serving to a group.
Smoked paprika (¼ teaspoon) adds a subtle smokiness that works beautifully with sharp cheddar. It’s particularly good if you’re going to mix in bacon or smoked sausage.
Fresh cracked black pepper is non-negotiable. Pre-ground black pepper has lost much of its volatile oils and tastes flat. Whole peppercorns cracked fresh right before serving taste noticeably spicier and more aromatic.
A tiny squeeze of fresh lemon juice at the end brightens everything and cuts through the richness of the cheese and butter. Just a quarter teaspoon, right before serving. Lemon is subtle but genuinely makes a difference, especially if you’re serving this alongside something rich like roasted meats.
Easy Variations and Mix-Ins to Make It Your Own
The basic mac and cheese is perfect on its own, but here’s where you can make it yours. The beauty of the Instant Pot base recipe is that it comes together so quickly that you can customize it without creating extra work.
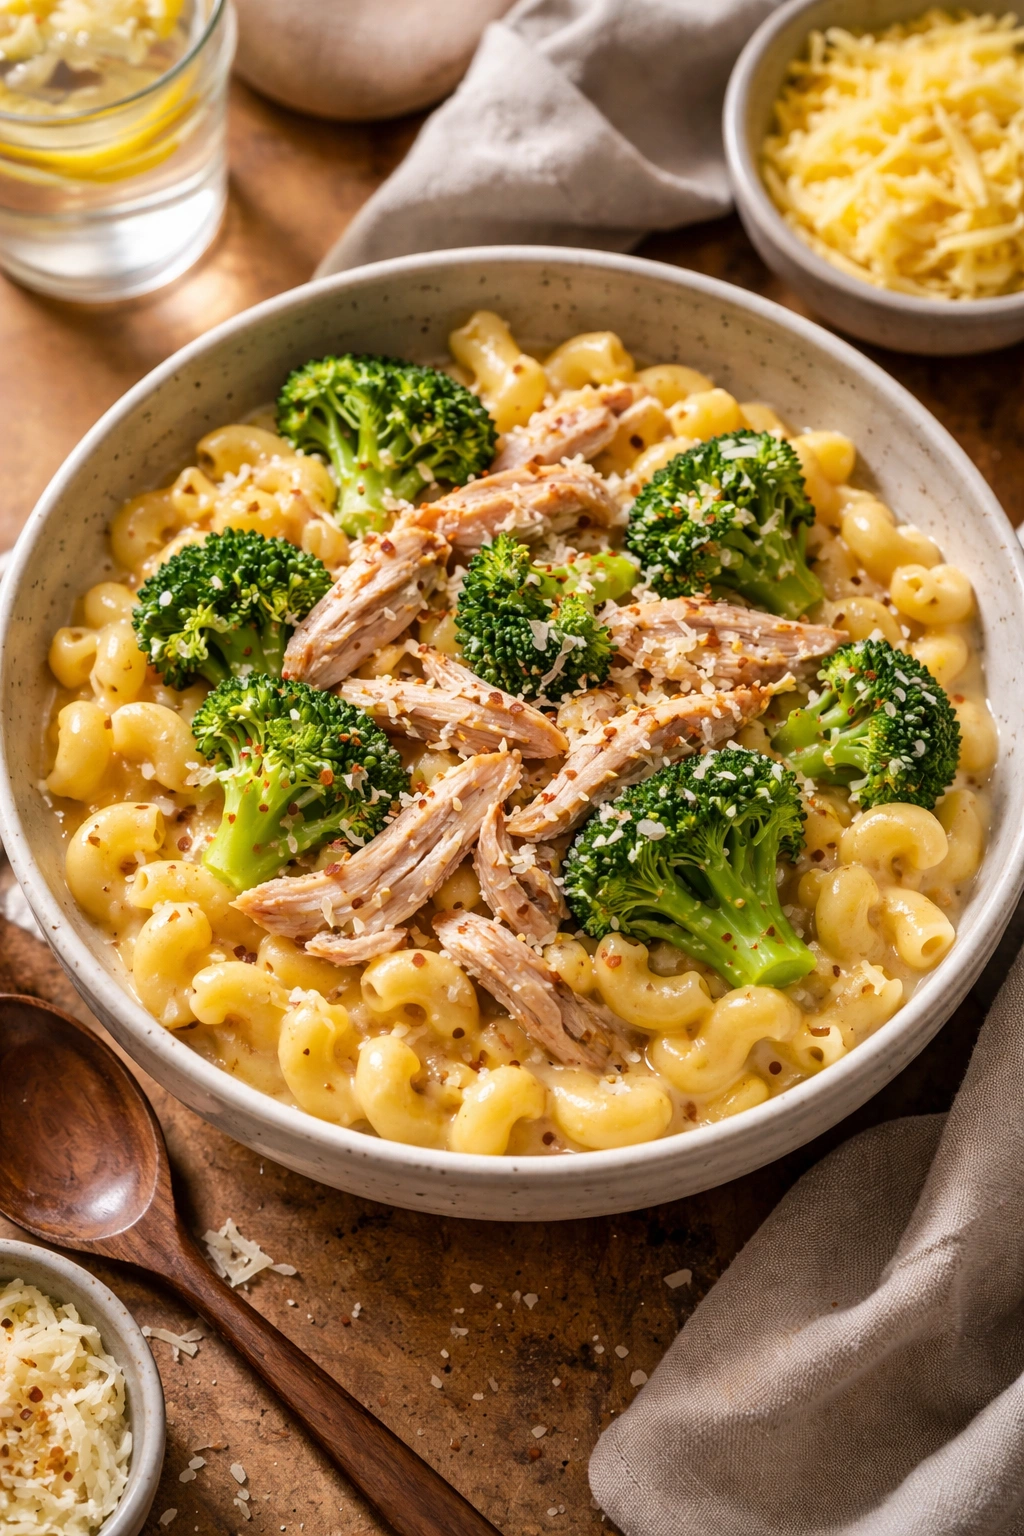
Buffalo Chicken Mac and Cheese: Shred 1.5 cups of cooked rotisserie chicken and toss it with 3 tablespoons of Frank’s RedHot sauce and 1 tablespoon of melted butter. Stir this into the finished mac and cheese along with ¼ cup of crumbled blue cheese stirred in gently at the end. Serve immediately with a drizzle of ranch dressing if you like.
Broccoli and Cheddar: Toss in 2 cups of finely chopped raw broccoli (or lightly steamed) right before serving. The residual heat of the mac and cheese will soften the raw broccoli slightly while keeping it tender-crisp. This adds vegetables without actually requiring you to cook anything else.
Caramelized Onions and Crispy Fried Sage: While the pasta is pressure cooking, thinly slice a large onion and cook it slowly in a separate skillet with 2 tablespoons of butter and a pinch of salt, stirring occasionally until deep golden and caramelized (about 15 minutes). Top the finished mac and cheese with the warm onions and a handful of fresh sage leaves that you’ve fried briefly in a little oil until crispy. It sounds fancy; it’s actually quite simple.
Pesto Mac and Cheese: Stir 2–3 tablespoons of fresh basil pesto (store-bought or homemade) into the finished cheese sauce. Add a squeeze of fresh lemon juice and some cracked black pepper. Optional: top with toasted pine nuts.
Smoky Bacon and Jalapeño: Fry 6 slices of bacon until crispy, crumble it, and stir into the finished mac and cheese along with 1–2 thinly sliced jalapeños (seeds removed for less heat, seeds intact for more), and a teaspoon of smoked paprika.
Mac and Cheese with Crispy Breadcrumbs: Toast ½ cup of panko breadcrumbs in a skillet with 3 tablespoons of melted butter and a big pinch of salt until golden and crispy. Scatter this over the top of each serving just before eating—it adds a textural contrast that feels intentional.
Lobster or Crab Mac and Cheese: Fold in 1–1.5 cups of fresh lump crab meat or cooked lobster meat after making the cheese sauce. Add a squeeze of fresh lemon and maybe a pinch of Old Bay seasoning. This elevates it from weeknight dinner to company-worthy special occasion meal with almost no extra work.
Truffle Mac and Cheese: Drizzle a little truffle oil over each serving and finish with finely shaved Parmesan. Truffle oil is expensive, so save this for special occasions, but the impact is significant for very little effort.
Storage, Reheating, and Make-Ahead Strategies
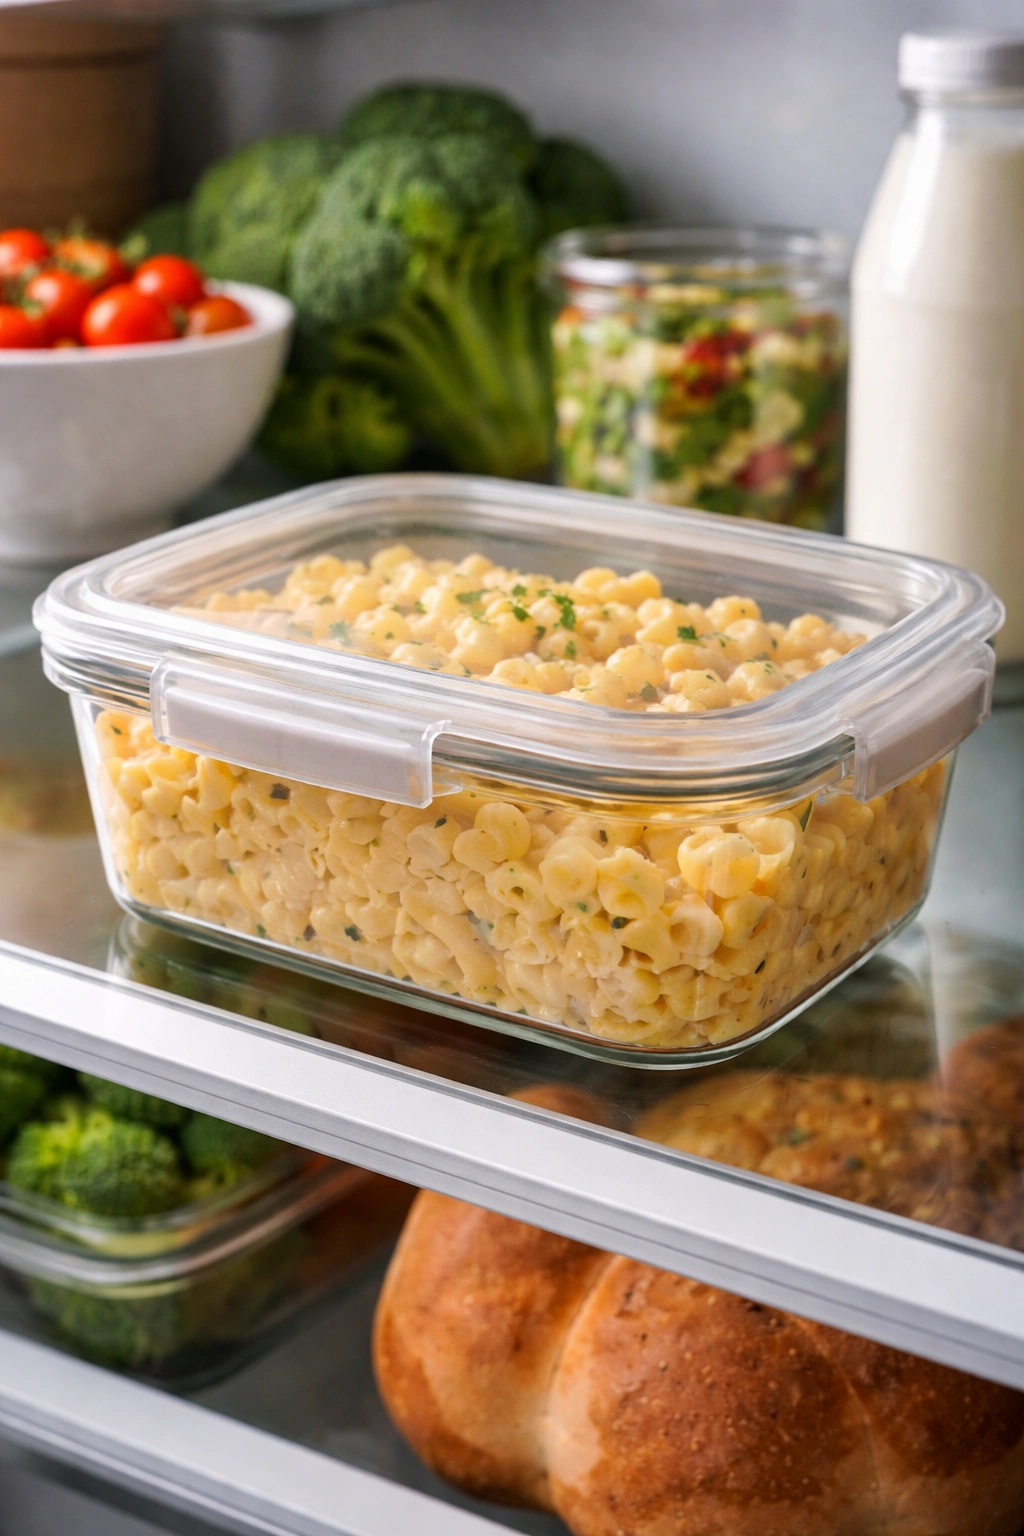
Leftover mac and cheese keeps beautifully in an airtight container in the refrigerator for up to 4 days. After that, it starts to develop off-flavors or the cheese can become grainy. It does not freeze well—freezing breaks the emulsification of the sauce, and when you thaw and reheat it, the sauce separates into greasy pools of fat and watery liquid. So plan to eat leftovers fresh rather than banking on month-old frozen portions.
To reheat, place a portion in a microwave-safe bowl and microwave for 1–2 minutes, stirring halfway through. If it seems thick or dry, add a tablespoon of milk and stir before reheating. The small addition of milk helps loosen it back up to the original creamy texture.
Stovetop reheating works too if you have time. Transfer the leftover mac and cheese to a pot over medium-low heat, add a splash of milk, and stir occasionally until warmed through, about 5 minutes. This method gives you more control over the final texture and feels slightly less harsh to the delicate emulsion.
Do not reheat in the Instant Pot using the pressure cooking function again—this will break the sauce. The warm setting for reheating is fine if the pot is already hot, but a microwave or stovetop is more reliable.
You can make the mac and cheese ahead if you’re serving a crowd, reheating it just before people arrive. It actually holds really well on the warm setting of the Instant Pot for 30 minutes or so, staying creamy without drying out. This makes it genuinely useful for parties.
Serving Suggestions and What Pairs Well With It

Mac and cheese can be the main event or a supporting player. As a main course, serve it with a bright salad (arugula with lemon dressing cuts beautifully through the richness, or a simple green salad with vinaigrette), some crusty bread for soaking up every last bit of sauce, and maybe some roasted or steamed vegetables on the side.
For a crowd, it’s exceptional as a side dish alongside grilled chicken, roasted pork, smoked brisket, or pulled pork sandwiches. The creaminess and richness balance beautifully against smoke and char.
With hot dogs, it’s a nostalgic, fun meal that adults and kids both love. Slice the hot dogs, warm them in a separate skillet, and serve alongside or mixed into the mac and cheese.
Garlic bread is the obvious companion—buy good quality bread, slice it, brush with garlic butter, and toast it while the mac and cheese is cooking. It’ll be ready right as the food hits the table.
A cold beverage is essential. Iced tea, lemonade, or a crisp white wine (Sauvignon Blanc or Pinot Grigio pair nicely without overpowering the dish) all work well.
Texture contrast matters too. If you’re serving very soft main dishes, add something with crunch—roasted chickpeas, toasted breadcrumbs, crispy fried onions sprinkled on top. If you’re serving something with sharp acidity (tomato-based or vinegar-based sides), the richness of the mac and cheese balances it perfectly.
For kids’ meals, it’s hard to beat mac and cheese with a side of fruit and some crunchy vegetables with a dip. It’s one of those foods that makes even picky eaters happy, which means you’re actually getting dinner on the table without cooking three different meals.
Final Thoughts

The Instant Pot version of mac and cheese represents something important: good food doesn’t have to be complicated or time-consuming. This is comfort food that actually tastes like you care, made in less time than it takes to order takeout and have it delivered. It’s the kind of recipe that lives in your regular rotation because it solves a real problem—the 6 PM dinner emergency—while actually tasting good.
The technique is genuinely forgiving. Even if you mess something up slightly, you still end up with creamy, cheesy, delicious pasta. The worst-case scenario is still a satisfying dinner. Once you’ve made this once, you’ll have the muscle memory to do it without thinking, which means you’ll do it over and over because it’s so easy.
The real magic is that this is honest food. No preservatives, no weird additives, no processing. Just pasta, butter, milk, cheese, and salt, combined in a way that creates something genuinely luxurious-tasting. For your family, your kids, yourself at the end of a long day—this is what comfort food is supposed to be.