There’s something deeply satisfying about reaching into your oven and pulling out a homemade pumpkin pie that you’ve built entirely from scratch — not reaching for a can, not using a premade crust, but actually making it happen with your own hands. The smell alone is worth the effort. Real pumpkin puree tastes nothing like the canned version, somehow both earthier and brighter at the same time, and when you roast a whole pumpkin yourself, you’re capturing flavors that no industrial process can match. The good news? It’s not as intimidating as you might think.
A lot of people assume that homemade pumpkin pie requires special equipment, advanced technique, or hours of hands-on work. It doesn’t. What it does require is patience — not active time, but actual clock time while the pumpkin roasts and the pie bakes. The actual work you’ll do with your hands? Maybe thirty minutes total of mixing, rolling, and assembling. The rest is the oven doing the heavy lifting while you do something else.
This is the kind of recipe that teaches you something about baking. You’ll learn how to roast and puree a squash, how to make a butter-based crust, how to build a custard filling that sets perfectly, and how to troubleshoot the one thing that trips people up most with pumpkin pie — cracks in the surface. By the end, you’ll have a pie that tastes like autumn in the best possible way, and you’ll know exactly how to make it again.
The Real Story Behind Homemade Pumpkin Pie
Pumpkin pie gets dismissed as a purely American invention, but the concept of baking pumpkin into a custard dessert actually has older roots. Early European settlers brought the tradition of spiced custard tarts to the colonies, and when they discovered pumpkins — a vegetable that thrived in this new climate and kept beautifully through winter — the two traditions merged naturally. The filling itself is remarkably simple: pumpkin puree, eggs, cream, sugar, and spices.
What’s changed over time is how we get the pumpkin puree. Canned pumpkin revolutionized holiday baking because it made the process accessible and consistent. But canned puree is cooked at high temperature and often has stabilizers mixed in. It’s engineered for convenience, not for maximum flavor. When you roast a whole pumpkin at home, you’re tasting what the filling actually should taste like — sweeter, with a more delicate texture and a pumpkin flavor that feels sophisticated rather than one-note.
The pie itself is a custard baked inside a pastry shell, which means it’s more forgiving than people realize. A custard filling will set as long as the eggs cook through — the pie doesn’t need to be perfect to be delicious. The trickiest part isn’t the baking; it’s managing temperature so the crust browns without burning and the filling sets gently without cracking. But once you understand why these things happen, they become easy to prevent.
Why Making Pumpkin Pie From Scratch Is Easier Than You Think
Start by reframing what “from scratch” actually means. You’re not growing the pumpkins or churning butter. You’re taking whole ingredients, applying heat, and combining them into something greater than the sum of the parts. The real barrier isn’t skill — it’s just understanding the few specific things that matter.
The hardest part of the process is roasting the pumpkin, and “hard” here means it requires time, not effort. You cut the pumpkin in half, scoop out the seeds, roast it face-down until it’s soft enough to push a fork through, then scrape the flesh into a food processor. That’s it. You’re not doing anything more complicated than you would with a sweet potato, and in fact it’s easier because the pumpkin cooks faster and the flesh separates from the skin more cleanly.
Making pie crust from scratch has a reputation for being fussy, and sure, it can be if you’re obsessive about texture. But a rustic crust that you don’t roll to exact thickness, that has slightly uneven edges, that might crack a little bit — that crust tastes fantastic and proves that perfection isn’t the goal. You’re just trying to create a butter-based pastry that’s flaky. That requires cold butter, minimal mixing, and ice water. Three basic things.
The custard filling is literally the easiest component. You puree or blend the pumpkin with spices, then add eggs and cream, then pour it in. The oven does the rest. No candy thermometer, no water bath (though you can use one for insurance), no temperamental emulsions. Just ingredients and heat.
Roasting and Preparing Fresh Pumpkin for Maximum Flavor
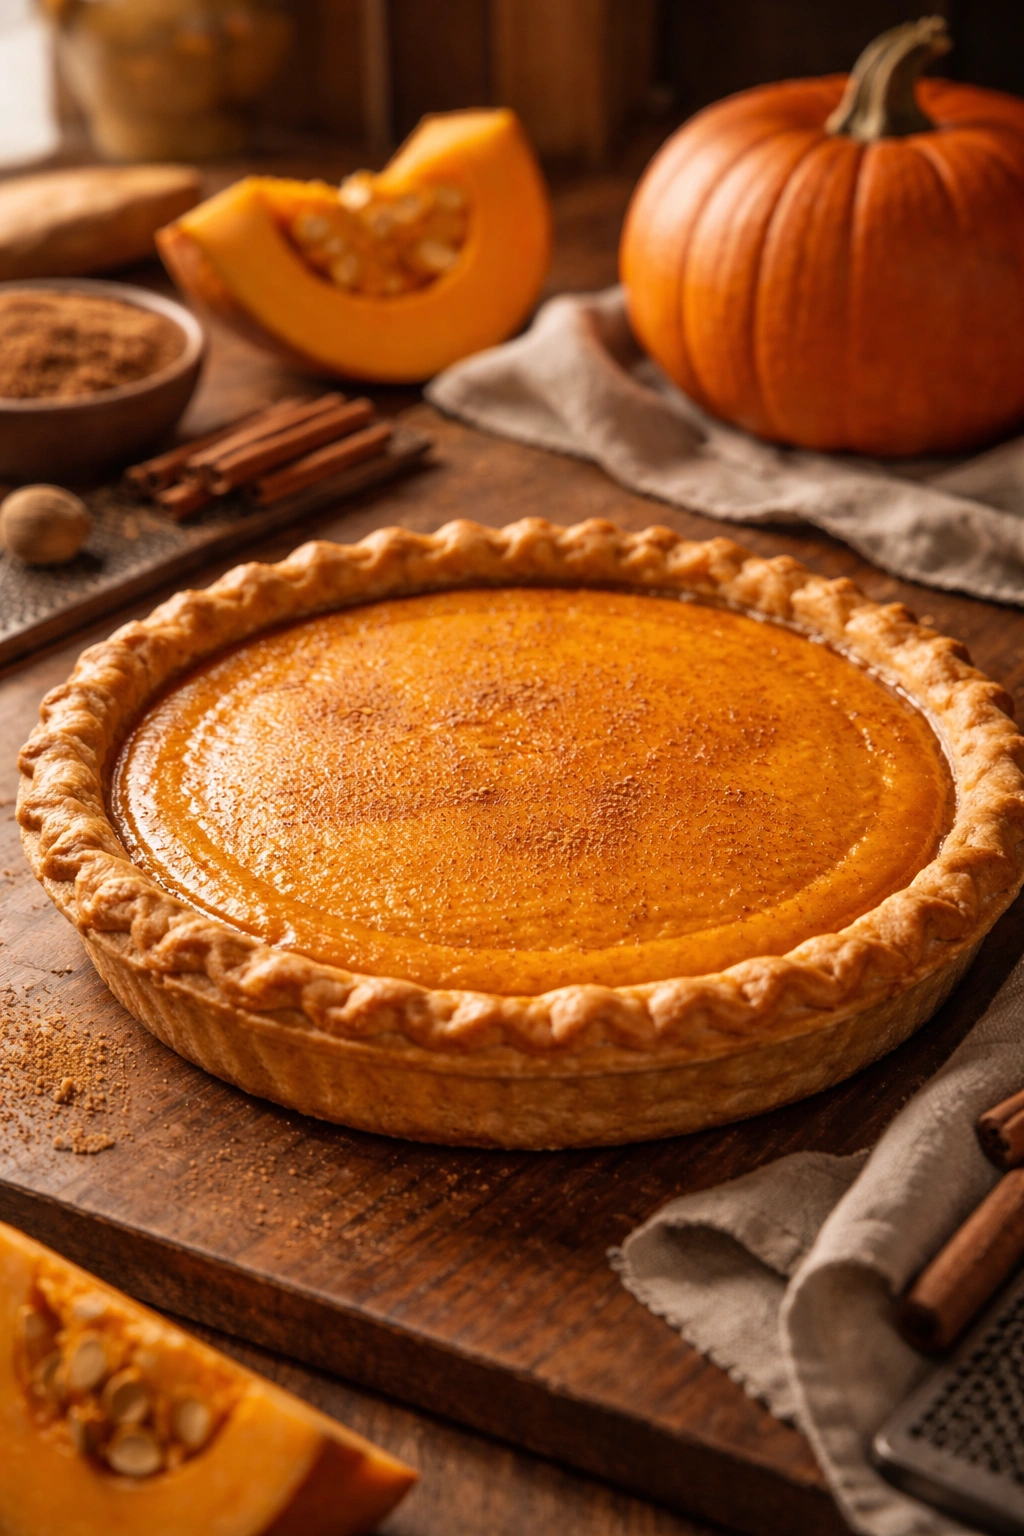
The pumpkin you want is called a sugar pumpkin or pie pumpkin, not a carving jack-o’-lantern pumpkin. The difference matters. Carving pumpkins are watery and stringy, bred for size and hollow cavities. Sugar pumpkins are smaller, sweeter, and have thicker, denser flesh with less moisture. They’re usually around 2-4 pounds. You’ll need about 2 pounds of whole pumpkin to yield roughly 1.5 cups of puree, which is what a standard 9-inch pie requires.
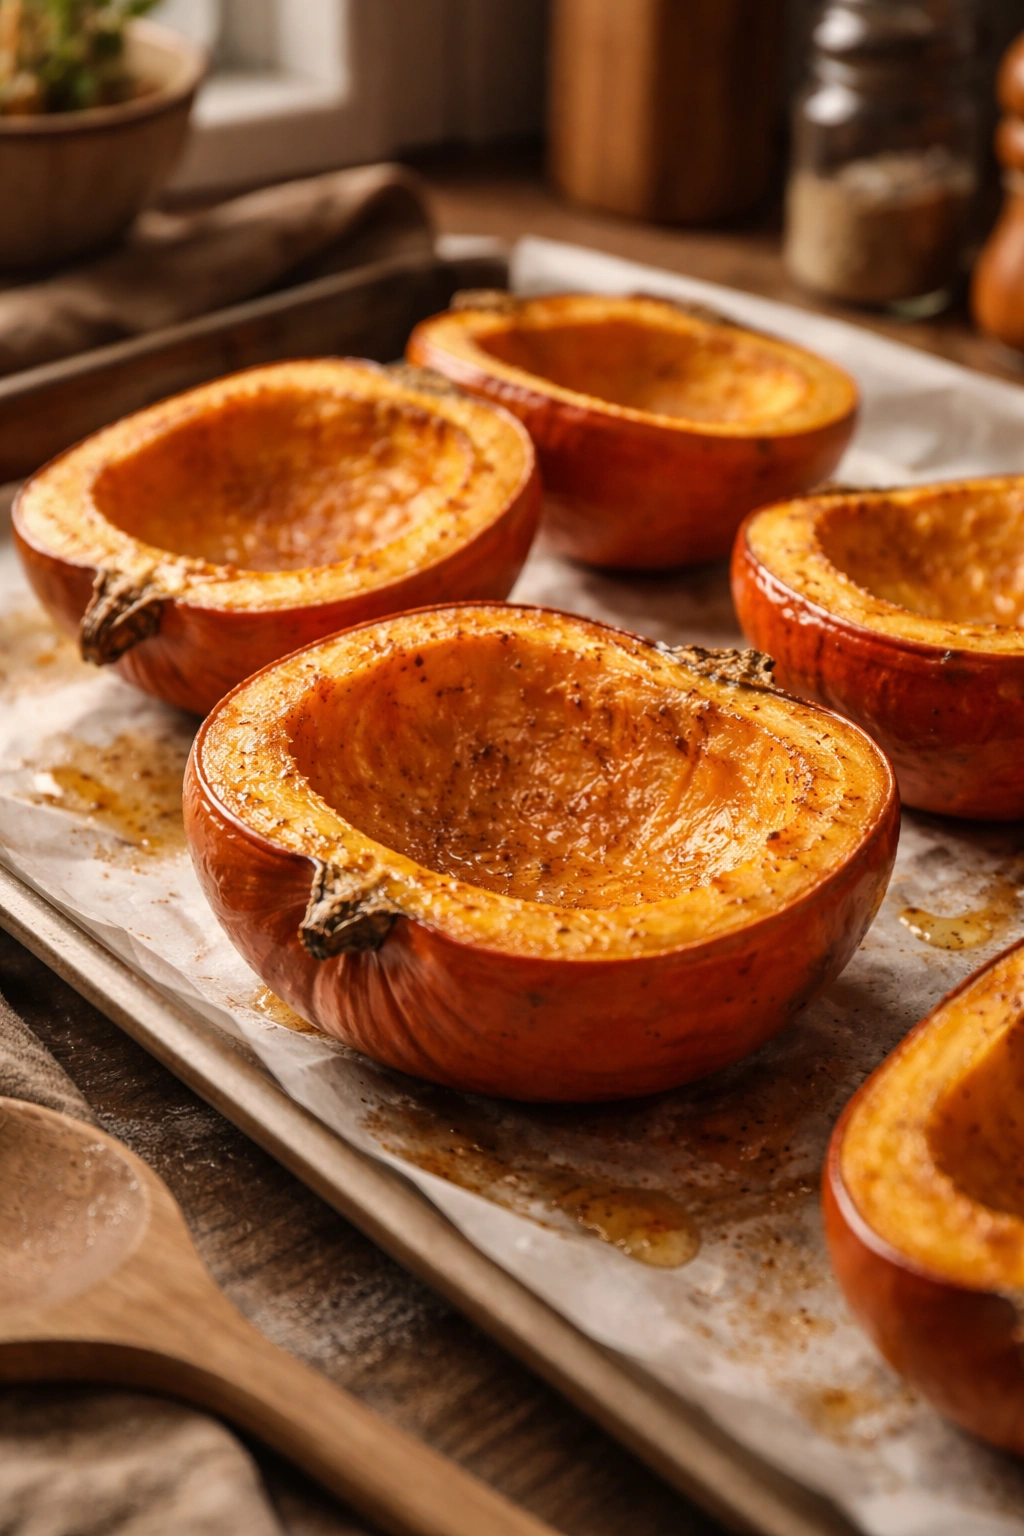
The roasting process is your chance to concentrate flavor. Heat brings out the natural sweetness and deepens the pumpkin taste. Cut the pumpkin in half (a sharp chef’s knife and some patience will get through the skin — don’t force it and risk your hand). Scoop out all the seeds and stringy bits with a sturdy spoon or ice cream scoop. If you want, roast those seeds separately for a snack, but for the pie itself, they just need to be removed from the flesh.
Place the pumpkin halves face-down on a baking sheet lined with parchment or foil. Rub the skin lightly with neutral oil if you want to help it brown, though it’s not strictly necessary. Roast at 375°F (190°C) for 45 to 60 minutes, depending on the size of your pumpkins. You’ll know it’s done when the flesh is completely soft — a fork should pierce it easily and the skin will have darkened slightly. Let it cool until you can handle it comfortably, then use a sturdy spoon to scrape the soft flesh away from the skin.
The puree at this point is often quite wet. You have two choices: puree it as-is and then strain it through a fine-mesh strainer lined with cheesecloth or a coffee filter (this takes 30 minutes to an hour and removes significant liquid), or spread the warm pumpkin flesh on a parchment-lined baking sheet and put it back in a 250°F (120°C) oven for 15-20 minutes to evaporate some moisture, then puree it. The second method is faster and gives you thicker puree with more concentrated flavor. Either way, you’re aiming for a smooth puree with no lumps or stringy bits. A food processor does this beautifully.
The Spice Blend That Makes All the Difference
This is where homemade becomes noticeably better than the canned-pie-filling version. Store-bought pie filling relies on a specific blend of warming spices in exact proportions, and it’s fine but somewhat flat. When you make your own, you can adjust the spices to your preference and use fresher spices, which matters enormously.
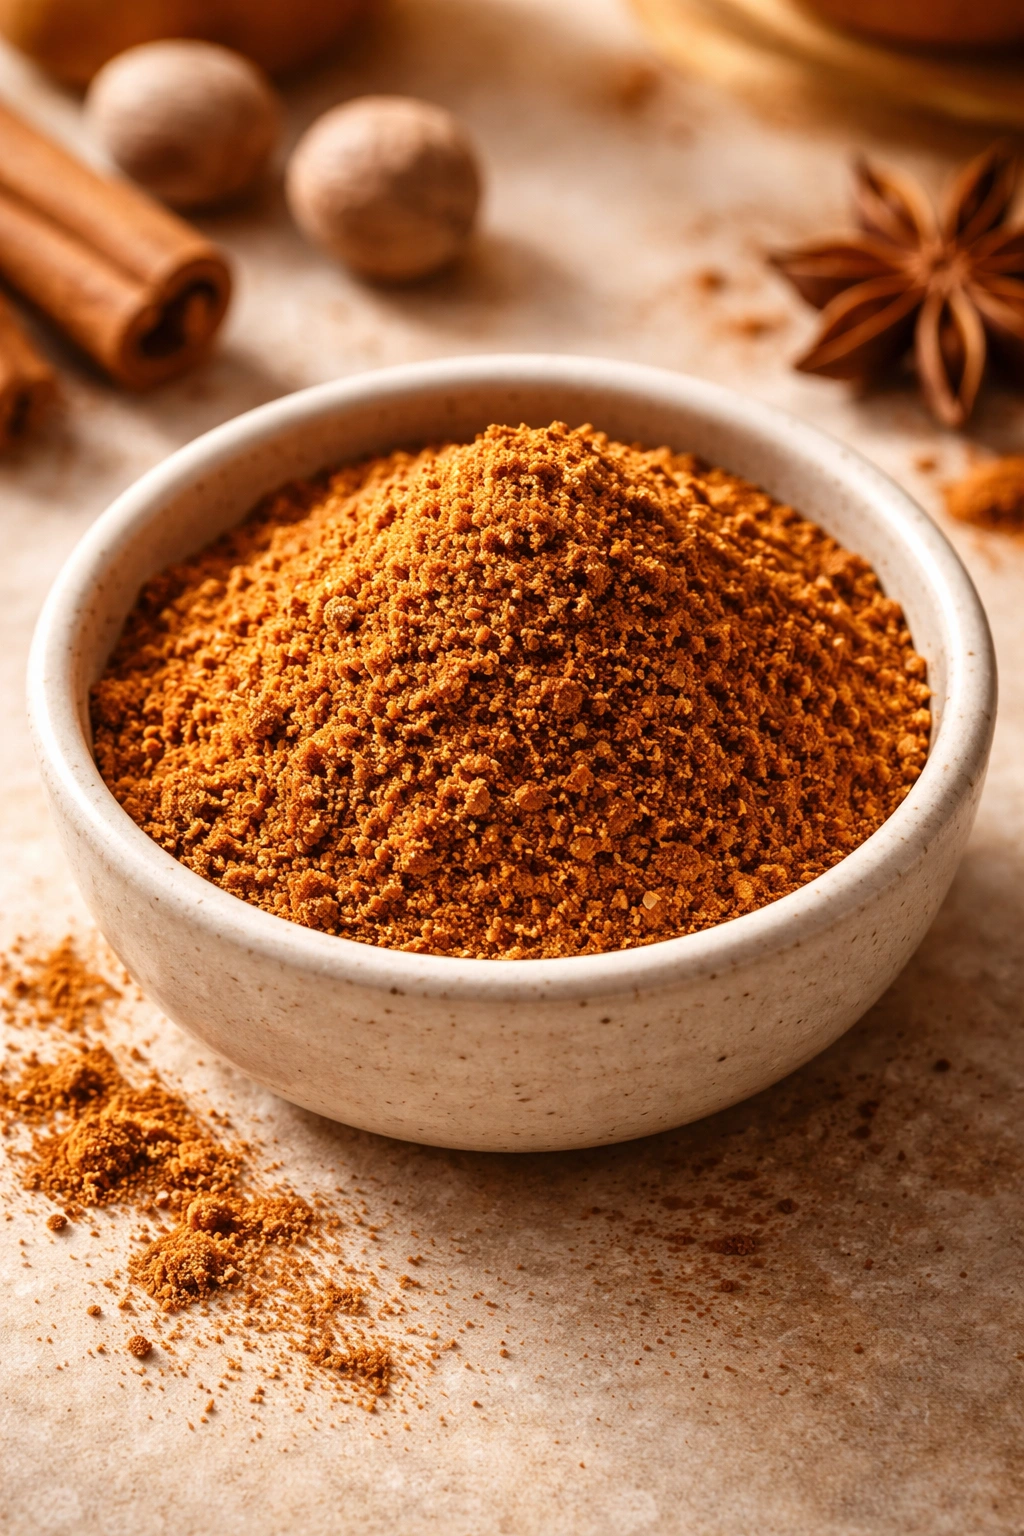
The classic pumpkin pie spice formula is cinnamon, nutmeg, ginger, and cloves. You’ll also want a tiny amount of salt to amplify the other flavors. Some recipes add cardamom or allspice, which aren’t traditional but add interesting depth. The ratio that works beautifully is 2 teaspoons ground cinnamon, 1 teaspoon ground ginger, 1/2 teaspoon ground nutmeg, 1/4 teaspoon ground cloves, and 1/4 teaspoon fine sea salt per 1.5 cups of pumpkin puree.
The reason homemade tastes better is that whole spices, ground fresh, have aromatic oils that are more volatile and more flavorful than spices ground months ago and sitting in a jar. If you have access to whole nutmeg and a microplane grater, grate it fresh into your filling — the difference is remarkable. The same applies to cinnamon and ginger if you can find them whole, though pre-ground versions of those are acceptable if that’s what you have.
Taste the filling before you pour it into the crust. Add a spoonful of the pumpkin mixture to a small bowl and taste it directly. Does it need more cinnamon? More warmth from the ginger? More nuttiness? Adjust before you commit to the pie. This is the moment to fix it, not the moment to regret it after baking.
Building the Perfect Pie Crust from Basic Ingredients
A good pie crust is just flour, butter, salt, and ice water. Those four ingredients, treated gently, create a flaky pastry. The science is straightforward: butter is solid fat suspended in flour. When you bake it, the water in the butter turns to steam, creating little gaps. Those gaps are flakiness.
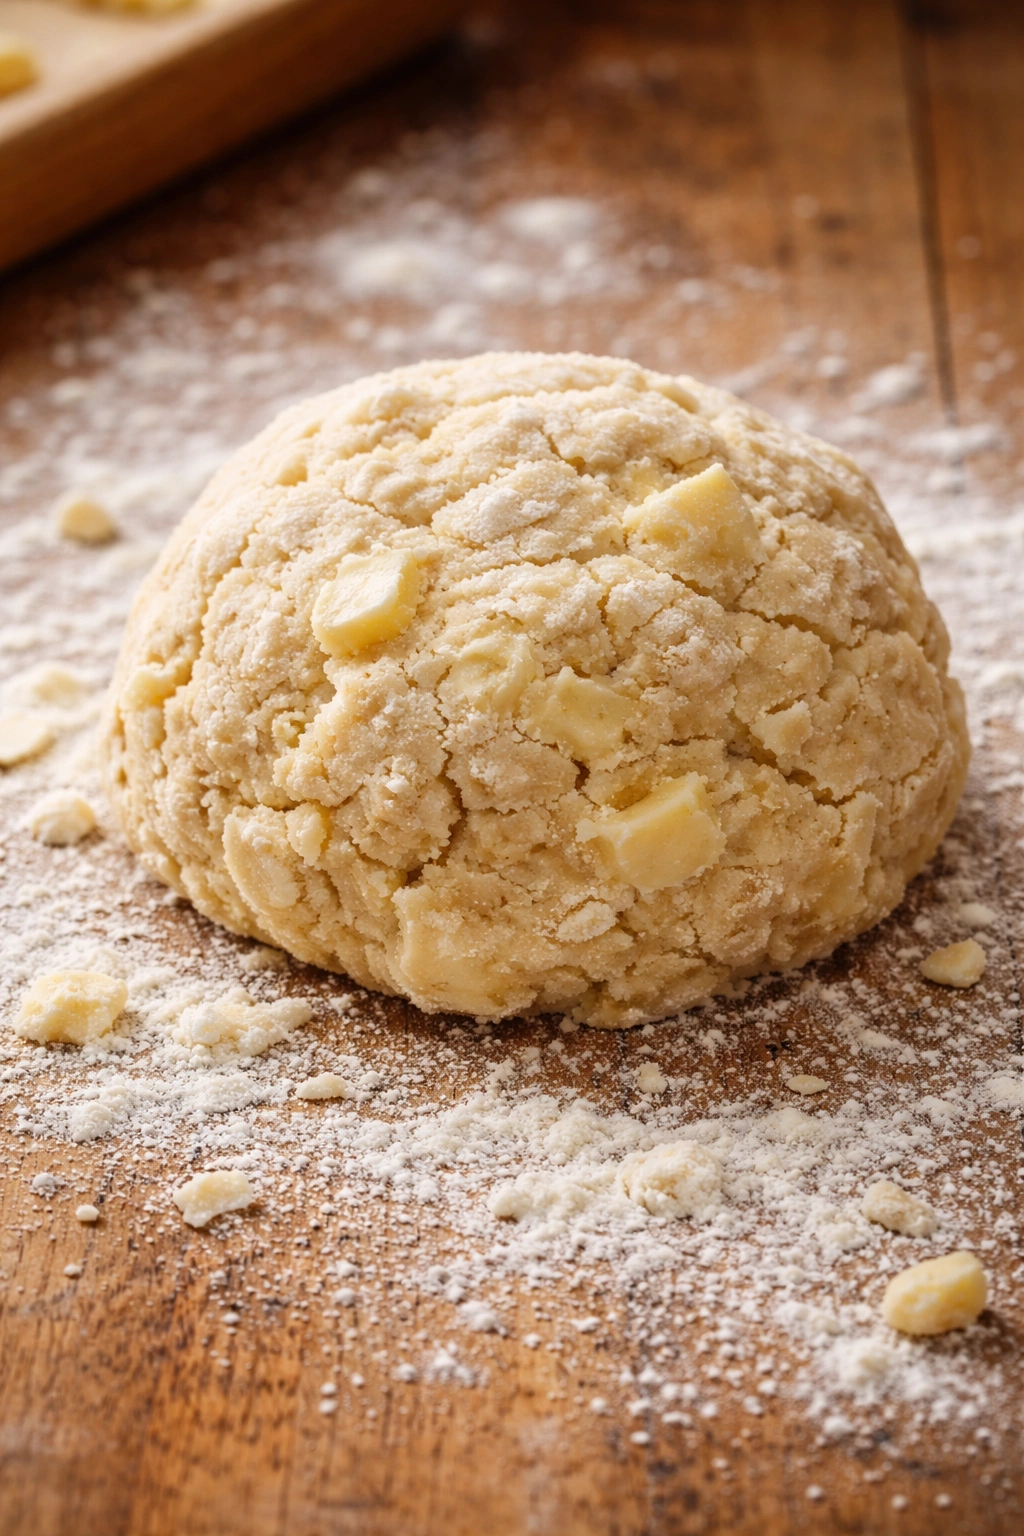
For a 9-inch pie crust, you’ll need 1.25 cups all-purpose flour, 1/2 cup (1 stick) cold unsalted butter cut into small cubes, 1/2 teaspoon fine sea salt, and 3-4 tablespoons ice water. Put the flour and salt in a bowl. Add the cold butter cubes and use a pastry cutter, two knives, or the tips of your fingers to work the butter into the flour until the mixture looks like coarse breadcrumbs — some pea-sized butter pieces should still be visible. This unevenness is good; it’s what creates flakiness.
Add the ice water a tablespoon at a time, mixing gently with a fork until the dough just barely comes together. You want it to hold together when you squeeze it, but it should still look somewhat shaggy and crumbly, not a smooth, unified ball. Too much water and the crust will be tough. Too little and it’ll be fragile. This is easier to feel than to describe, so if your first attempt isn’t perfect, you’ll do better the next time.
Form the dough into a disk, wrap it in plastic wrap, and refrigerate for at least 30 minutes. This resting time allows the gluten to relax and the butter to firm up again. You can prepare the dough the day before if that helps your timeline.
When you’re ready to roll it out, place the dough between two pieces of parchment paper and roll it gently to a 12-inch round — slightly larger than your 9-inch pie pan. Peel off the top parchment, flip it onto your pie pan (the dough is forgiving — if it tears, just press it back together), and peel off the second parchment. Press the dough into the pan, let the excess hang over the edges, then trim it to about 1 inch of overhang and fold that under to create a thick rim. Crimp the edges with your fingers or the tines of a fork, or leave them rustic and natural.
Chill the crust in the pie pan for at least 15 minutes while you prepare the filling. This second chill prevents the crust from shrinking dramatically during baking.
The Custard Base That Sets Creamy and Rich
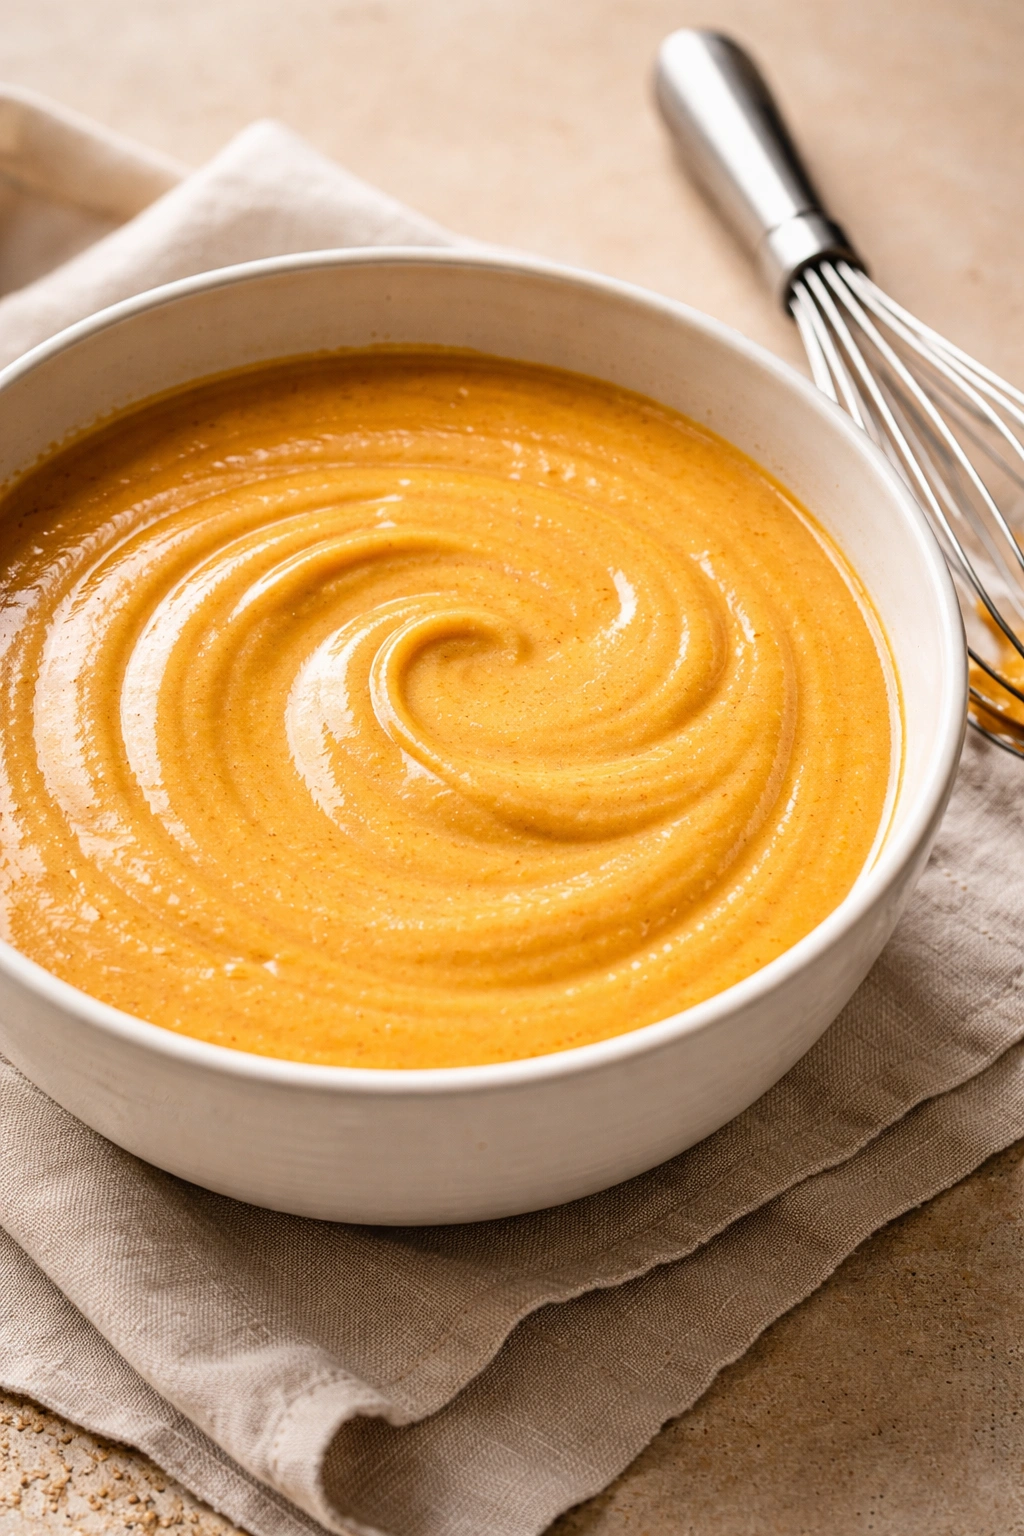
The filling itself is simplicity itself, but there’s technique in how you build it. Start with 1.5 cups fresh pumpkin puree. If you’re using canned, choose 100% pure pumpkin puree (not pumpkin pie filling, which already has sugar and spices added), and note that canned puree is slightly more concentrated than fresh, so you’ll use just 1 1/2 cups if the can is 15 ounces, or slightly less if you’re pouring from a 29-ounce can.
To the pumpkin add 3/4 cup granulated sugar, 1/2 teaspoon fine sea salt, 2 teaspoons ground cinnamon, 1 teaspoon ground ginger, 1/2 teaspoon ground nutmeg, and 1/4 teaspoon ground cloves. Whisk all of this together thoroughly — make sure there are no lumps of pumpkin and the spices are evenly distributed. This is where you taste and adjust if needed.
In a separate bowl, whisk together 2 large eggs and 1/2 cup heavy cream. You’re not trying to incorporate air; you’re just combining them. Add this mixture to the pumpkin and whisk gently until the filling is smooth and uniform. Some recipes use evaporated milk instead of cream, and that works too — it creates a slightly less rich filling but one that sets with a more custard-like texture rather than a dense one. The choice is yours. Some people do half cream and half evaporated milk for a middle ground.
At this point the filling is ready to go into the crust. Some bakers whisk in an additional 1/4 teaspoon vanilla extract or a tiny pinch of black pepper, both of which add interest without being identifiable. This is optional but worth considering.
How to Avoid Cracks and Get a Smooth Top
Cracks in the surface of a pumpkin pie happen for one reason: the filling overbakes. A custard is done when the proteins in the eggs have set to the point where the center is just barely firm, with maybe a tiny jiggle in the very center. If you bake it past that point, the filling continues to set and shrink, and the edges pull away from the center, creating cracks.
The key is understanding that the pie will continue to cook even after you remove it from the oven. Carryover cooking is real. You want to pull the pie out when the outer 2 inches of filling are set but the center still has a slight wobble. It will firm up completely as it cools.
Some bakers use a water bath (placing the pie pan inside a larger pan filled with hot water partway up the sides). This creates a gentler, more even heat and makes overbaking less likely. The water insulates the sides and bottom of the pie, so the center cooks more gradually. It’s not essential, but it’s a good insurance policy, especially your first time.
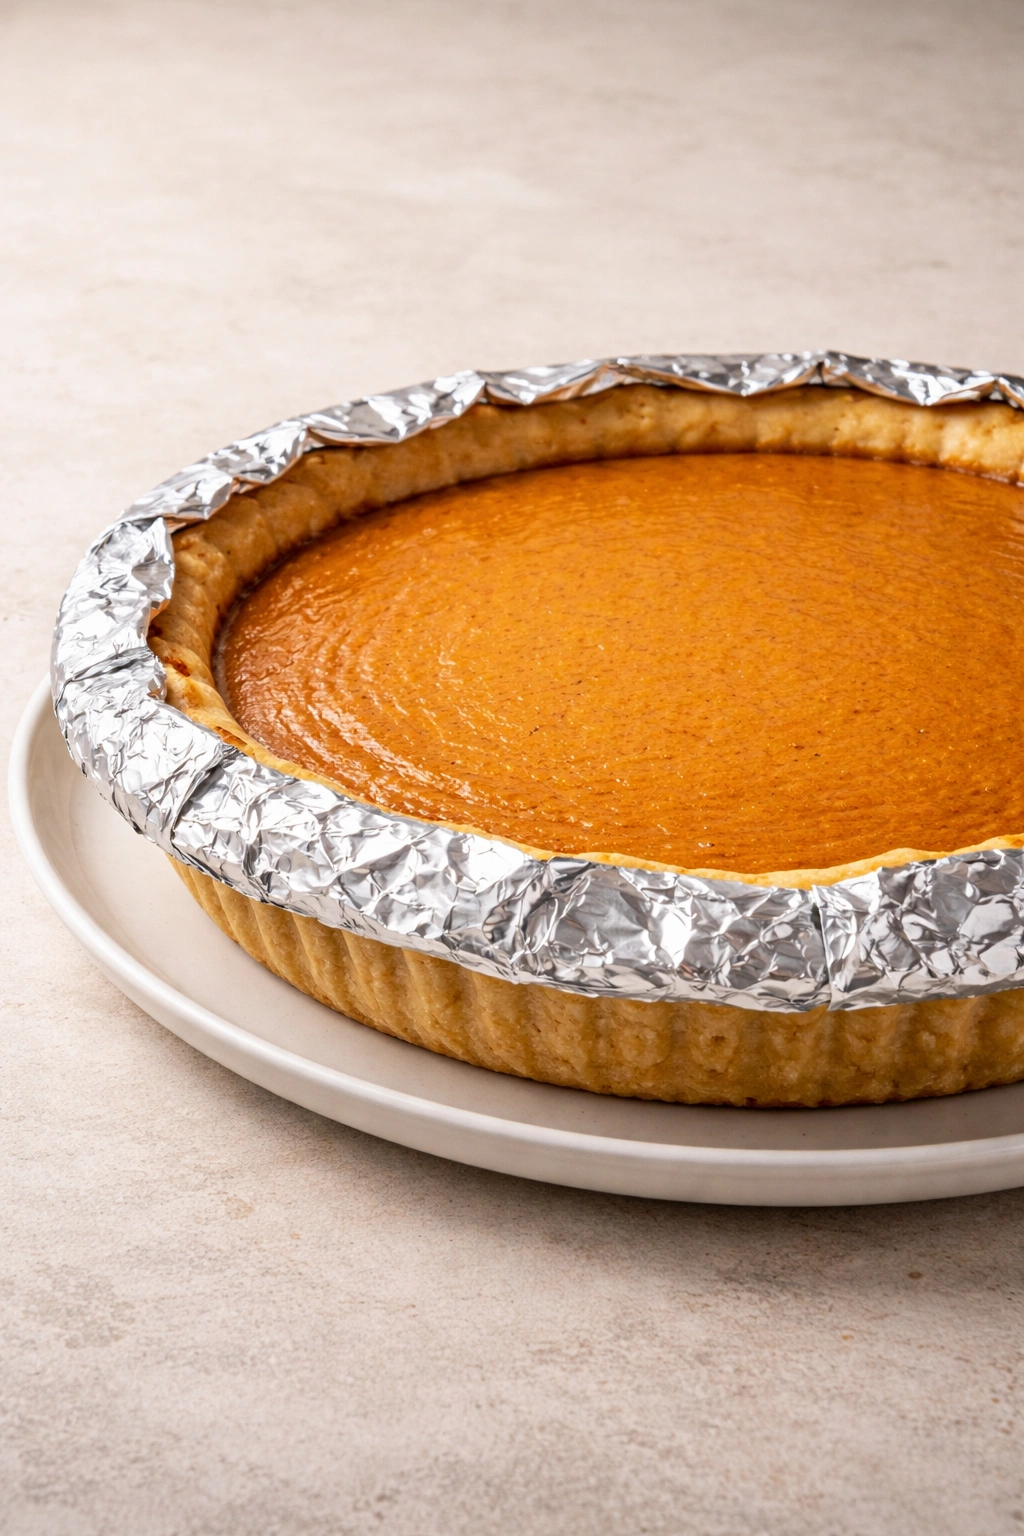
If you want to skip the water bath, place the pie on the lowest oven rack so the bottom bakes before the top, and cover the edges loosely with foil for the last 15 minutes of baking to prevent them from browning too much.
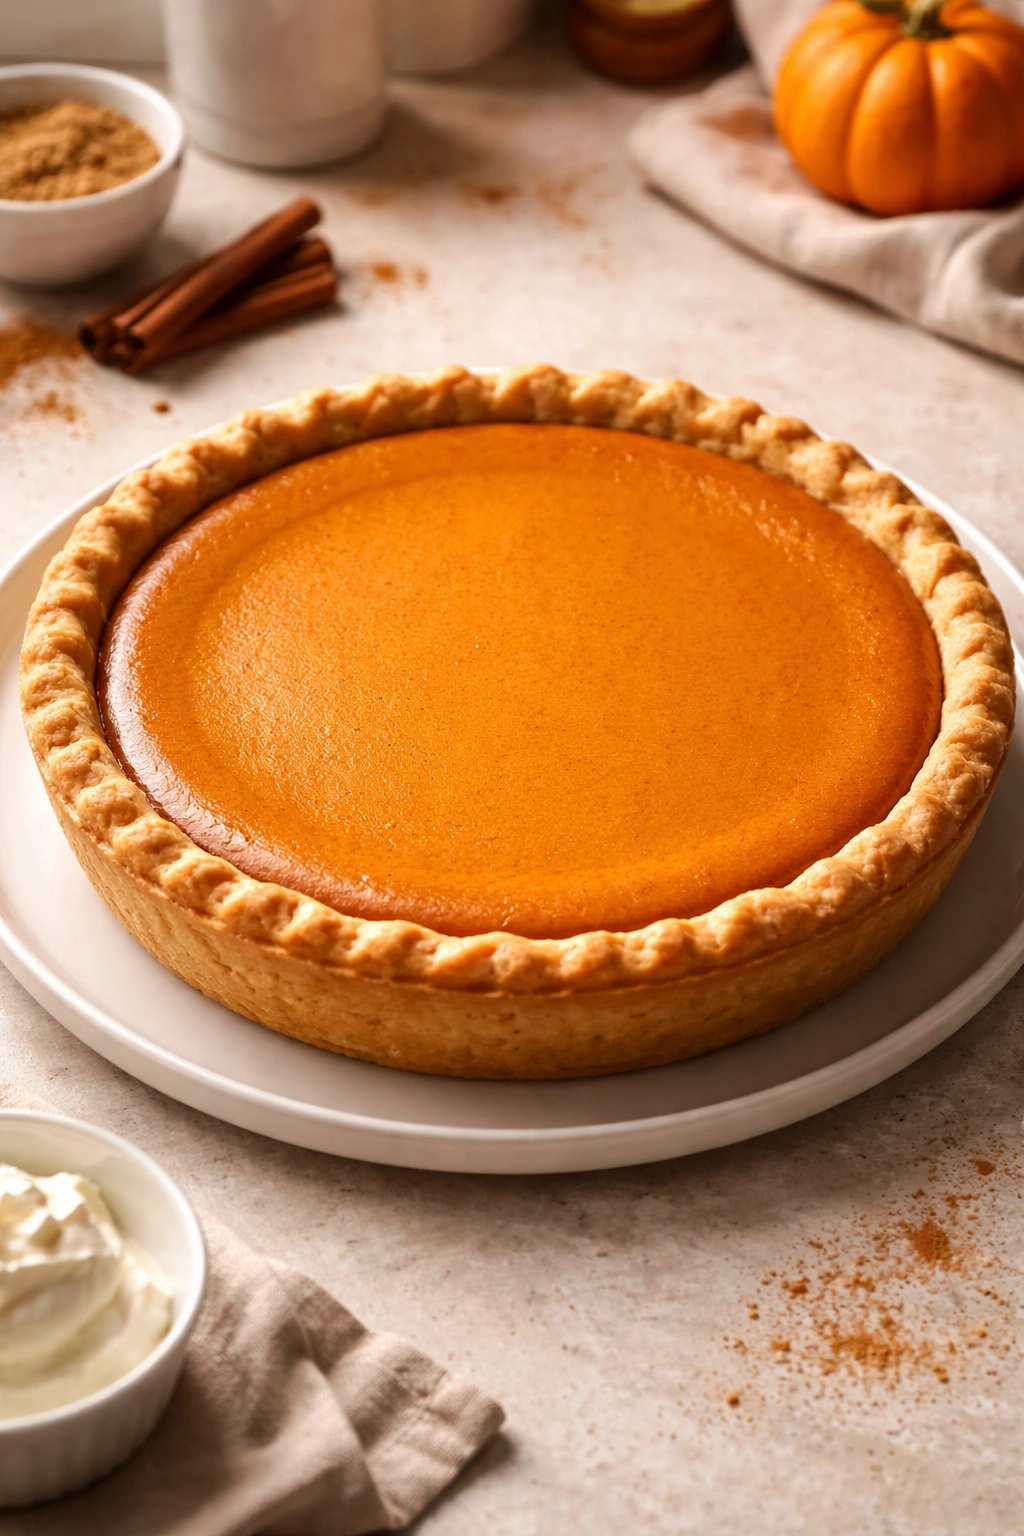
The filling is typically done when a knife inserted 1 inch from the edge comes out clean, but the very center still jiggles slightly when you gently shake the oven rack. That jiggle is what you want. The pie will set completely as it cools.
Getting the Bake Time and Temperature Just Right

Pumpkin pie bakes at 425°F (220°C) for 15 minutes, then at 350°F (175°C) for 35-45 minutes more. The initial high temperature helps the crust brown quickly so it doesn’t taste raw or pale. Then you drop the temperature to prevent the filling from overbaking while the crust continues to color gently.
If you’re using a water bath, place it in the oven before you preheat, so it’s ready to go. Pour hot (not boiling) water into the larger pan until it reaches halfway up the sides of the pie pan.
Place the pie on the lowest rack of your oven. Bake at 425°F for 15 minutes until the crust is partially set and starting to brown. Reduce the oven temperature to 350°F and continue baking for 35-45 minutes. The difference in baking time usually comes down to how much filling you’ve used and how thick it is, and whether your oven runs hot or cool.
As the pie bakes, you want to see the filling puff up slightly around the edges, then begin to set inward. About 20 minutes into the 350°F bake, the edges will look done while the center still jiggles. This is correct. Keep baking.
Check for doneness by gently shaking the oven rack (or carefully moving the pie slightly). The outer 2-3 inches should be firm, and the very center should have maybe a 2-inch diameter circle that wobbles slightly when moved. That wobble will disappear as the pie cools.
If after 40 minutes the crust is already quite dark and the filling isn’t done yet, tent the whole pie loosely with foil to slow the browning while the interior finishes setting.
Testing Doneness Without Ruining Your Pie
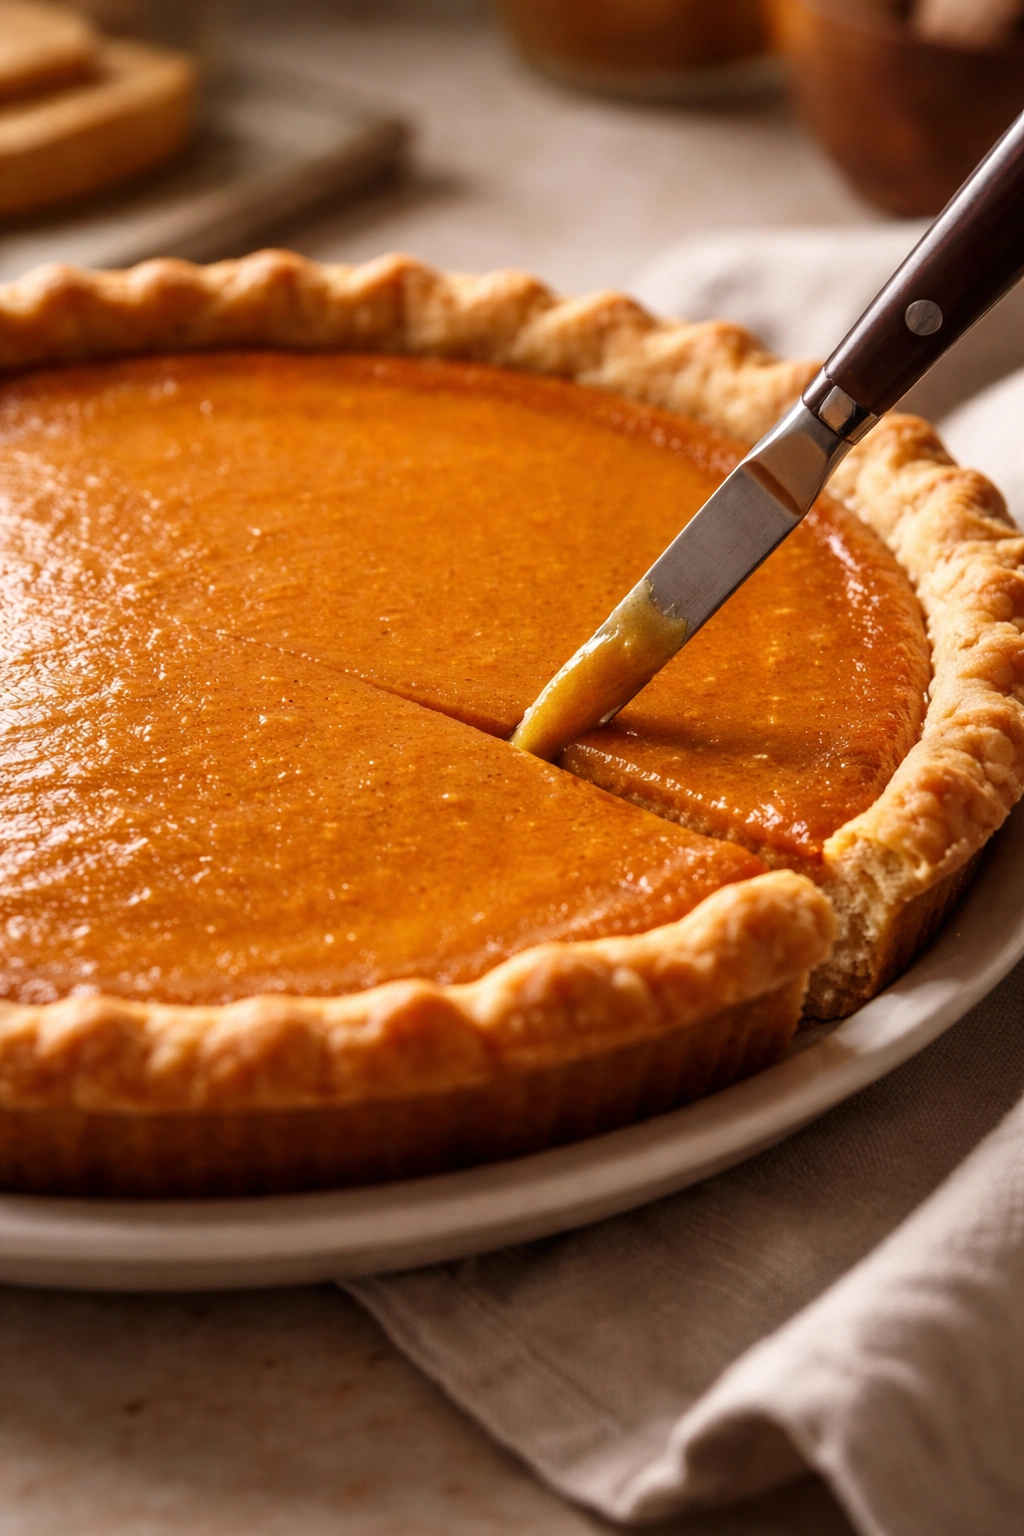
The knife test is the most reliable. Insert a knife (a thin paring knife is ideal) into the filling about 1 inch away from the edge. It should come out clean, with no liquid filling clinging to it. Then check the very center — about 1/2 inch from dead center, insert the knife again. This time, you want a little bit of custard still clinging to the knife. Not liquid custard, but not completely set custard either. That’s the sweet spot.
A meat thermometer works too. The center should be 165°F (74°C) to 170°F (77°C). Some people prefer to aim for 165°F because the carryover cooking as it cools will bring it higher. You don’t want to go much above 170°F or the custard becomes rubbery and grainy instead of creamy.
Don’t get anxious and pull the pie out too early. It’s okay to bake longer — the pie stops cooking at a certain point, so you don’t have to be perfectly precise. But underbaked filling tastes unpleasant and has a concerning texture. Slightly overbaked is still good.
Common Mistakes and How to Fix Them
A crust that’s soggy on the bottom: This happens when the bottom doesn’t bake before the filling goes in. Solve it by placing the pie on the lowest oven rack so the bottom heat is most intense. You can also place a preheated baking sheet on the lowest rack, then set the pie pan on top of that to shield the bottom from too much direct heat. Another option is to brush the raw crust with a beaten egg white before adding the filling — this creates a moisture barrier.
A crust that rises up and puffs in the center: The dough got too warm during handling or wasn’t chilled properly. This is more an aesthetic issue than a problem. It still tastes great. Prevent it by keeping everything cold and giving the crust plenty of chill time before baking. If it does puff, just accept it gracefully — rustic is charming.
Cracks radiating from the center: The filling overbaked and shrank. Next time, pull the pie out slightly earlier. The filling will set as it cools. Also ensure your oven temperature is accurate — use an oven thermometer to check.
A crust that burns before the filling is done: Your oven runs hot or you positioned the pie too close to the heating element. Cover the crust edges with foil partway through baking. Use the lowest rack next time. Try a 25-minute bake at 425°F followed by 45 minutes at 325°F for a slower overall cook.
A filling that stays jiggly in the center even after 50 minutes: Your oven might run cool. Check the temperature with an oven thermometer. If the pie isn’t setting, increase the oven temperature by 10-15°F and continue baking. Also ensure you’re not opening the oven door too frequently — every time you open it, heat escapes and baking slows.
A filling that tastes flat or one-dimensional: Your spices are old or you didn’t add enough. If this happens next time, whisk a little extra cinnamon and ginger directly into the cooled pie (mixed with a tiny bit of cream) and serve it on individual slices. Fresh spices make a huge difference — replace them every year if you bake seasonally.
Variations: Bourbon, Maple, and Other Delicious Twists
Once you’ve made the classic version, you have a foundation to play with. The beauty of building the filling from scratch is that you can adjust everything.
Bourbon or whiskey version: Add 2 tablespoons bourbon or whiskey to the egg and cream mixture before adding it to the pumpkin. The alcohol cooks off, leaving a subtle depth and warmth. Some people add an extra 1/4 teaspoon of nutmeg and a tiny pinch of cayenne to complement the whiskey.
Maple pumpkin pie: Replace 1/4 cup of the granulated sugar with pure maple syrup. Add an extra 1/4 teaspoon of ground cinnamon. The maple flavor is subtle but noticeable and works beautifully with the warm spices. Make sure you’re using real maple syrup, not pancake syrup — the flavor difference is enormous.
Brown sugar version: Replace some or all of the granulated sugar with packed brown sugar. Use 3/4 cup total sugar (a mix of brown and white, or all brown if you want deeper caramel notes). Brown sugar adds molasses depth and makes the filling slightly darker and more complex.
Cardamom and black pepper version: Add 1/4 teaspoon ground cardamom to the spice mix and a pinch of freshly ground black pepper. This is less traditional but more interesting — cardamom brings floral warmth and the black pepper adds a subtle heat that makes the spices stand out.
Ginger-forward version: Increase the ground ginger to 2 teaspoons and add 1/2 teaspoon fresh ginger zest (from ginger root) if you have it. You can even make candied ginger pieces and sprinkle them on top after baking. This version appeals to people who like warming spices more than traditional pumpkin pie fans expect.
Cream cheese version: Replace 1/4 cup of the heavy cream with 4 ounces of softened cream cheese mixed smooth with the eggs before combining with the pumpkin. This creates a denser, slightly tangy filling that’s richer. Some people love this; others find it masks the pumpkin flavor. It’s worth trying if you’re a cream cheese fan.
All of these variations follow the exact same baking instructions — same temperatures, same times, same doneness tests.
Make-Ahead Prep and Storage Guidelines
Making the crust ahead: You can prepare the pie dough up to 3 days in advance. Wrap the dough disk tightly in plastic wrap and refrigerate it. You can also roll it out, fit it into the pie pan, wrap the whole thing in plastic, and refrigerate for up to 2 days. This is actually helpful — the crust will be extra cold and flaky when it bakes.
Making the filling ahead: You can mix the spices and sugar into the pumpkin puree up to 2 days ahead. Keep it covered in the refrigerator. Add the eggs and cream no more than 4 hours before baking — the raw eggs are fine sitting for a few hours, but much longer and you risk food safety issues.
Freezing unbaked pie: You can assemble the entire pie, cover it tightly with plastic wrap and foil, and freeze it for up to 1 month. Bake it directly from frozen, adding about 15 minutes to the 350°F baking time. Don’t thaw it first.
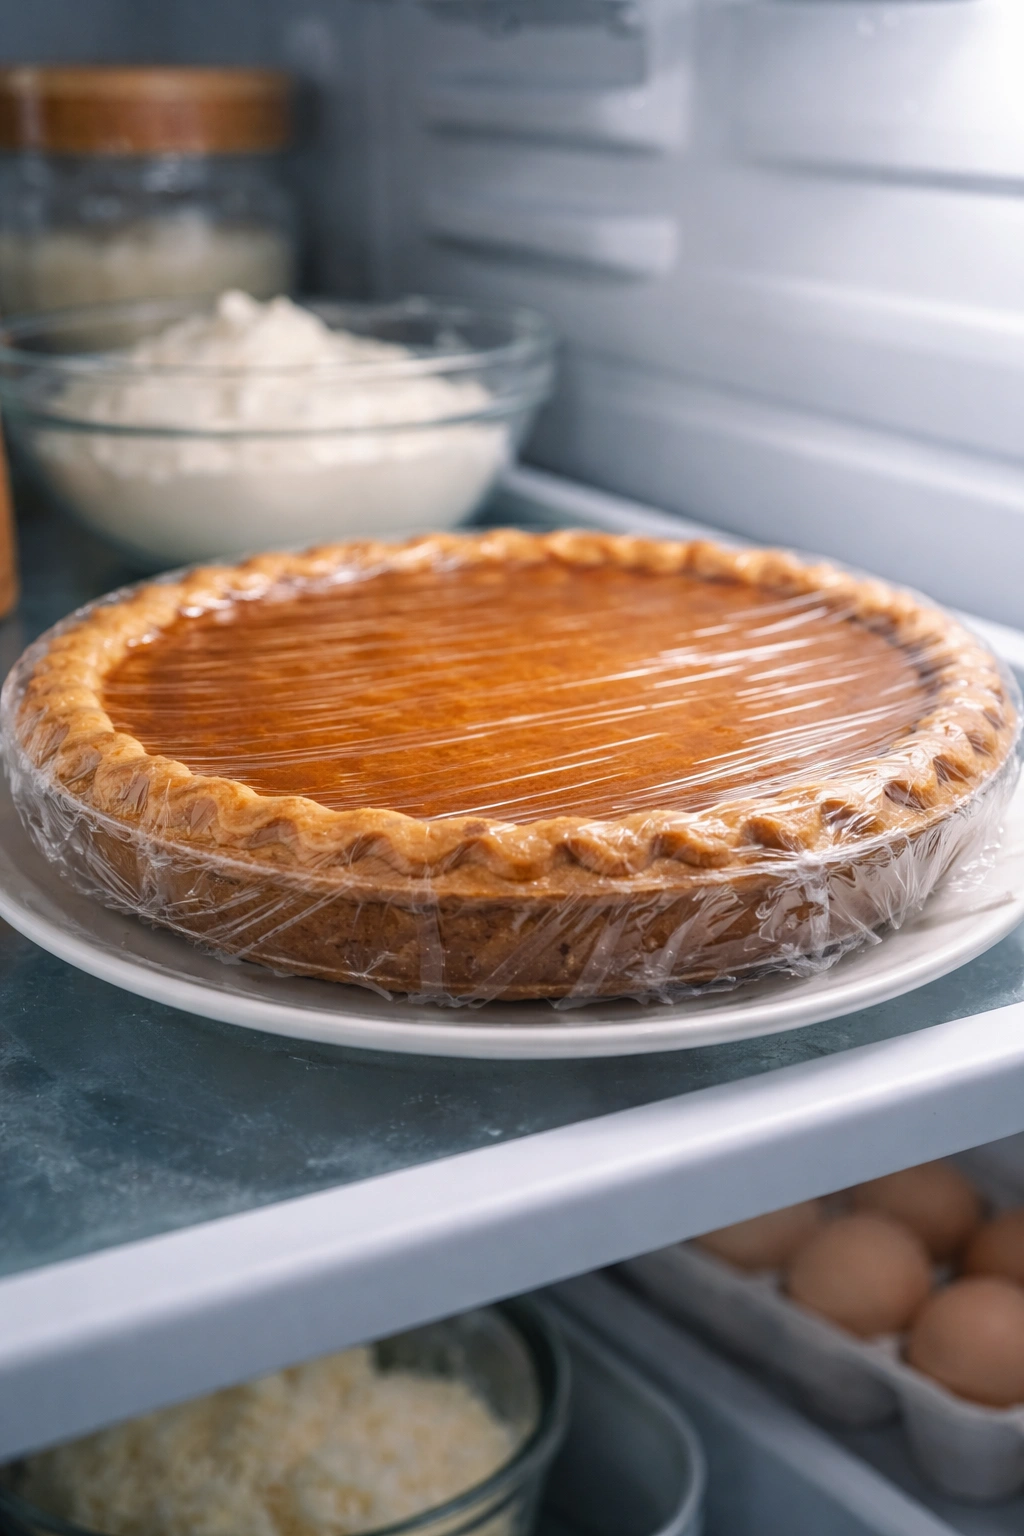
Storing baked pie: Keep the baked, cooled pie covered in the refrigerator for up to 4 days. The flavor actually improves slightly on the second and third days as the filling sets more firmly and the flavors meld. Do not leave it sitting at room temperature for more than 2 hours.
Freezing baked pie: Wrap the cooled pie tightly in plastic wrap, then foil, and freeze for up to 2 months. Thaw it in the refrigerator for several hours, then bring it to room temperature or gently reheat it before serving. To reheat, cover it loosely with foil and warm it at 300°F for 10-15 minutes.
Refrigerating components separately: If you want maximum flexibility, you can refrigerate the crust separately (wrapped in plastic), the filling separately (in a sealed container), and assemble them the morning of the day you want to bake. This is especially helpful during the holidays when oven space is precious.
Serving and Pairing Ideas
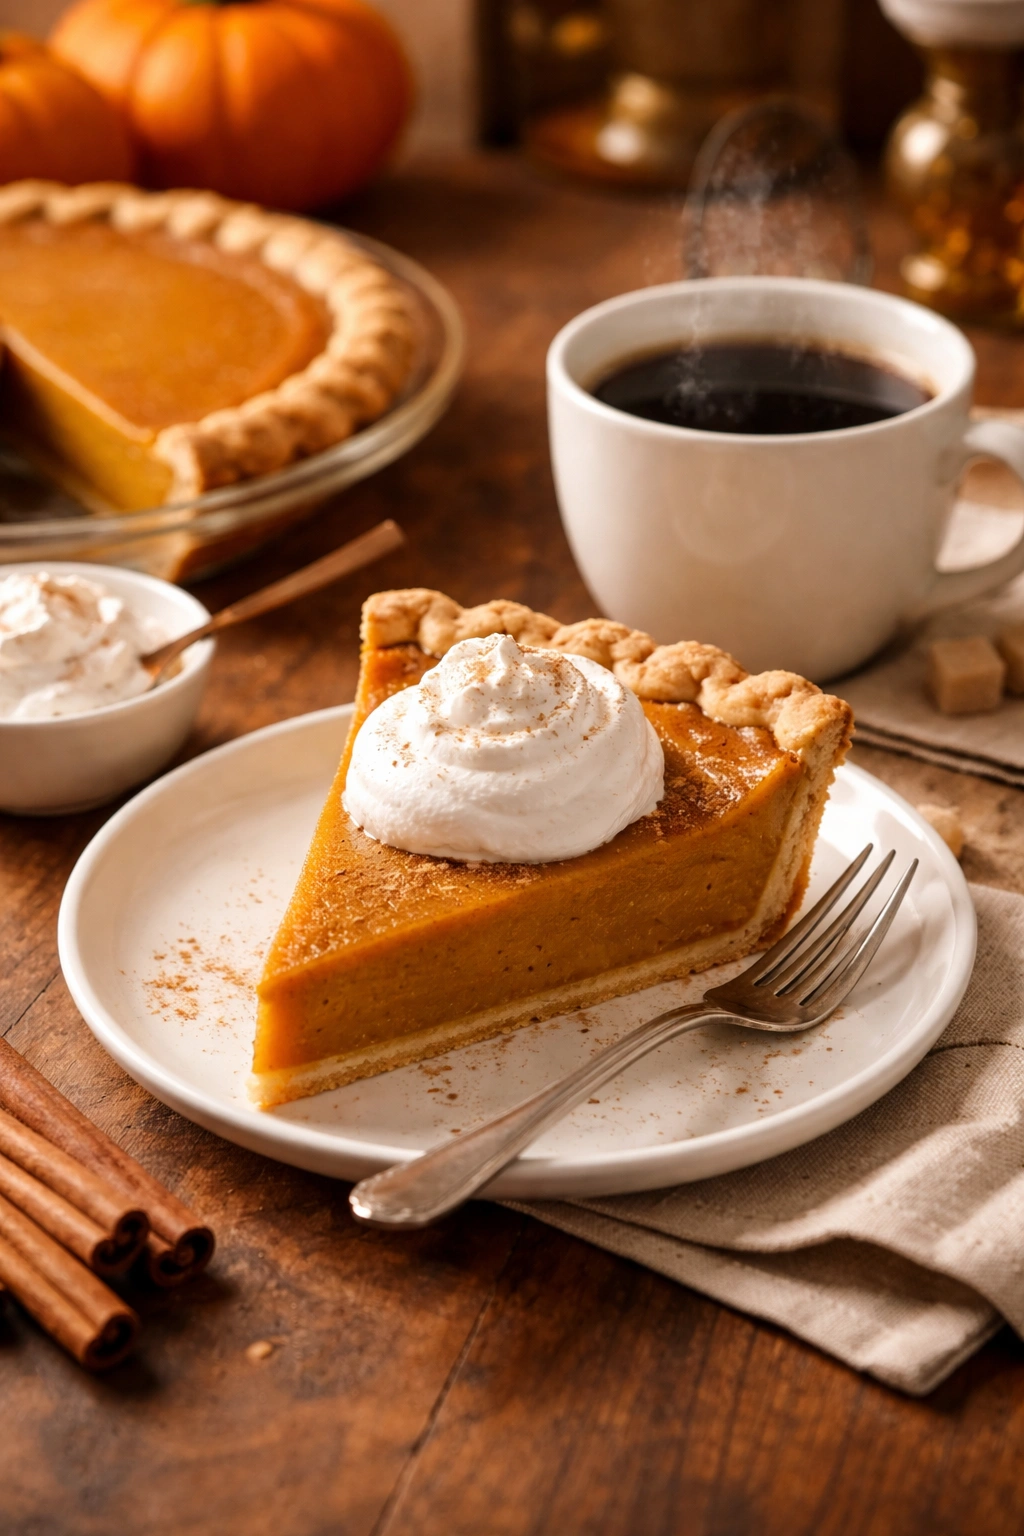
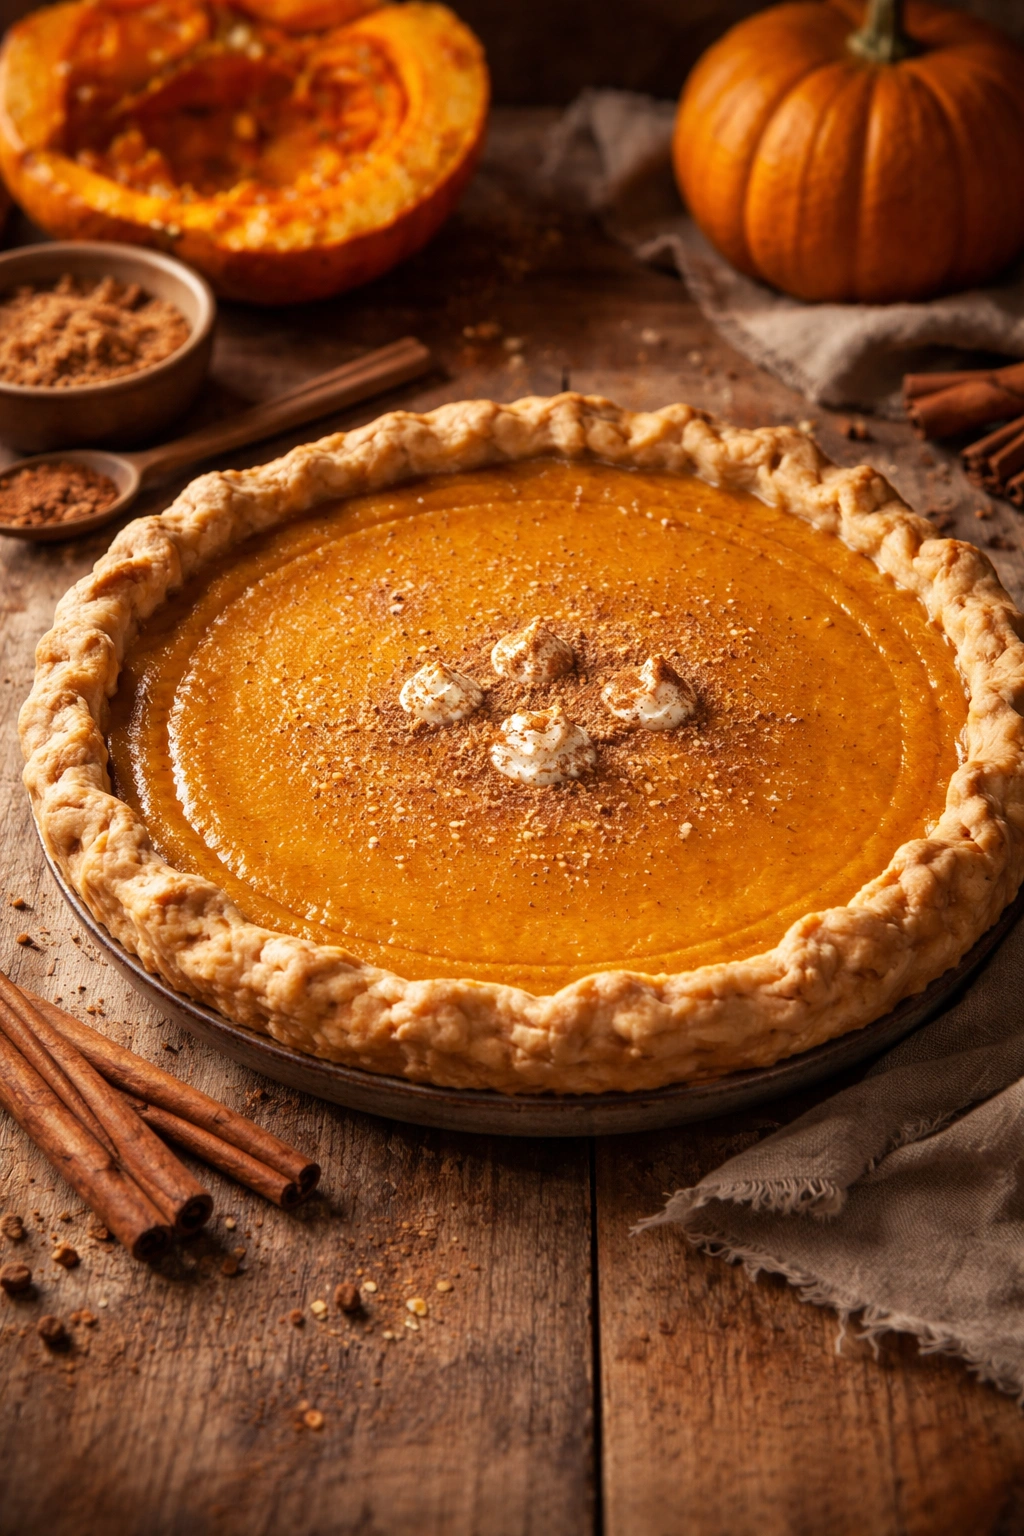
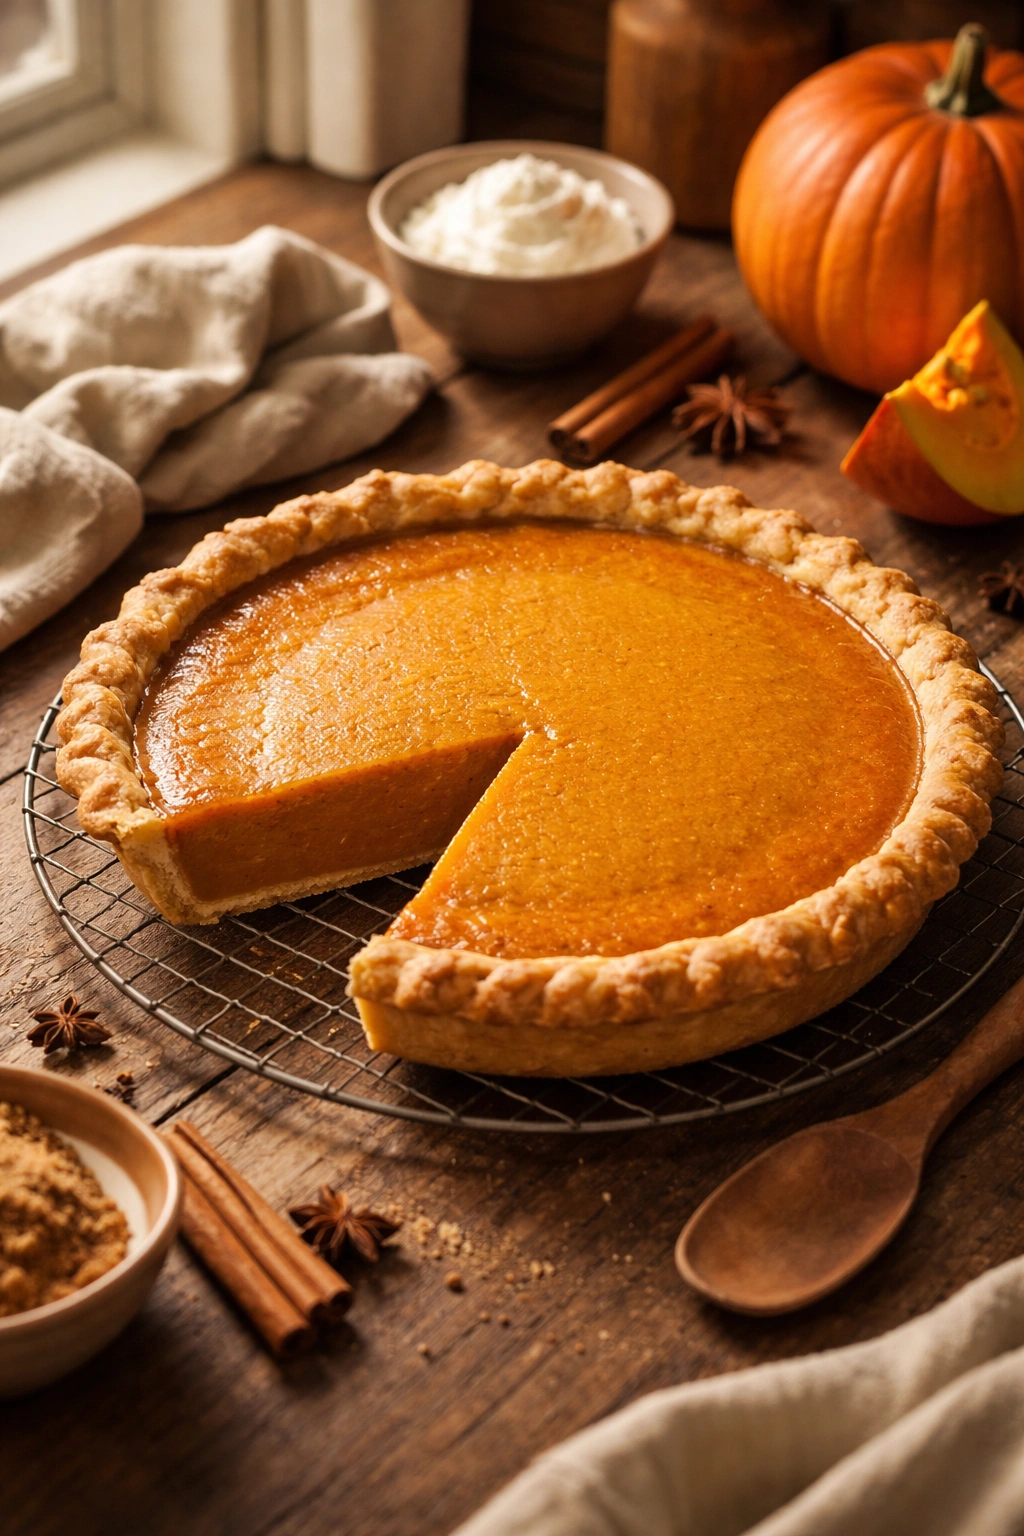
Pumpkin pie is traditionally served slightly warm or at room temperature with whipped cream. Make whipped cream by whipping 1 cup heavy cream with 2 tablespoons sugar and 1/2 teaspoon vanilla extract until soft peaks form. Don’t overbeat or it becomes grainy — stop as soon as it reaches cloud-like texture.
Some people add a tiny pinch of cinnamon to the whipped cream, which ties it visually and flavor-wise to the pie. Others add a tablespoon of bourbon or rum to the cream for depth. These are subtle additions but they elevate the whole dessert.
The pie pairs beautifully with coffee — hot, strong coffee is the classic pairing. A cup of dark-roasted espresso or a small mug of strong filter coffee with the pie is unbeatable. Herbal teas also work: ginger tea, cinnamon-spiced tea, even plain chamomile.
For wine pairings, try a tawny port, a sweet dessert wine like Moscato, or even a dry hard cider. The port is especially good because the warm spice notes align with the pie’s flavor. A glass of bourbon neat is also excellent.
For an elegant plating, slice the pie at the table and place each slice on a plate with a generous dollop of whipped cream on the side or right on top. A sprinkle of cinnamon or a few candied ginger pieces on the cream adds visual interest. If you have good brandy or liqueur, a tiny pour over the whipped cream adds luxury.
This pie works equally well as a casual dessert after a simple weeknight dinner or as the centerpiece of an elegant dinner party. It serves 8-10 people easily, and because it keeps so well, you can make it days ahead without stress.
Final Thoughts
Homemade pumpkin pie from scratch is one of those dishes that feels more impressive to make than it actually is. You’re roasting a vegetable, making a crust, whisking together a few ingredients, and baking. There’s no precision plating, no temperamental technique, no moment where everything can fall apart. What you get is a pie that tastes noticeably better than any shortcut version, and the knowledge that you’ve made it entirely from your own hands and your own ingredients.
The first time you make it, allow yourself extra time and don’t stress about minor imperfections. A crust that’s not perfectly even, a surface that has one small crack, a filling that’s slightly less thick than you imagined — these things don’t matter. They taste wonderful, and that’s the whole point.
The second time you make it (and you will make it again), you’ll notice the parts that went smoothly and remember the small things you’d do differently. That’s when it becomes truly easy. You’ll stop looking at recipes and start making it from memory, adjusting the spices to your taste and the amount of pie you want to make. You’ll probably develop a specific technique — maybe you always use a water bath, or you always cover the crust edges with foil for exactly the last 15 minutes — that makes it consistently perfect.
Yield: Serves 8 to 10 | Makes one 9-inch pie
Prep Time: 30 minutes (plus crust chilling)
Cook Time: 1 hour 45 minutes (45 minutes for pumpkin roasting, 15 minutes high heat bake, 35-45 minutes standard bake)
Total Time: 2 hours 15 minutes of active time + 2 hours chill time for crust + cooling time
Difficulty: Intermediate — you’re making three components (crust, puree, filling) but each is straightforward; the challenge is managing timing and understanding baking cues rather than executing complex technique.
For the Pie Crust:
- 1.25 cups all-purpose flour
- 1/2 cup (1 stick) unsalted butter, cold and cut into small cubes
- 1/2 teaspoon fine sea salt
- 3-4 tablespoons ice water
For the Pumpkin Filling:
- 1.5 cups fresh pumpkin puree (from roasted pumpkin) or pure pumpkin puree from a can (not pumpkin pie filling)
- 3/4 cup granulated sugar
- 1/2 teaspoon fine sea salt
- 2 teaspoons ground cinnamon
- 1 teaspoon ground ginger
- 1/2 teaspoon ground nutmeg
- 1/4 teaspoon ground cloves
- 2 large eggs
- 1/2 cup heavy cream (or 1/4 cup heavy cream plus 1/4 cup evaporated milk)
Optional: For Fresh Pumpkin Puree
- 2 pounds sugar pumpkin (pie pumpkin), washed and dried
- Neutral oil for roasting (optional but helpful)
Make the Crust:
- In a medium bowl, whisk together the flour and salt until combined. Add the cold butter cubes and use a pastry cutter, two knives, or the tips of your fingers to work the butter into the flour until the mixture resembles coarse breadcrumbs with some pea-sized pieces of butter still visible.
- Add the ice water a tablespoon at a time, mixing gently with a fork after each addition until the dough just barely holds together when squeezed but still looks somewhat shaggy and crumbly. Do not overmix.
- Form the dough into a disk, wrap it in plastic wrap, and refrigerate for at least 30 minutes (or up to 2 days ahead).
- When ready to use, place the dough between two pieces of parchment paper and roll it gently to a 12-inch round. Peel off the top parchment, flip the dough into a 9-inch pie pan, and peel off the second parchment. Press the dough into the pan, trim the overhang to 1 inch, fold that under to create a thick rim, and crimp the edges with your fingers or a fork.
- Chill the crust in the pie pan for at least 15 minutes while you prepare the filling.
Make the Pumpkin Puree (if using fresh pumpkin): 6. Preheat the oven to 375°F (190°C). Wash and dry a sugar pumpkin (2 pounds). Using a sharp knife, carefully cut it in half lengthwise. Scoop out all seeds and stringy bits with a sturdy spoon or ice cream scoop. 7. Place the pumpkin halves face-down on a parchment-lined baking sheet. Lightly rub the skin with neutral oil if desired (this helps browning but is optional). Roast for 45 to 60 minutes until the flesh is completely soft and a fork pierces it easily. 8. Remove from the oven and allow to cool until you can handle it. Using a sturdy spoon, scrape the soft flesh away from the skin. Place the flesh on a parchment-lined baking sheet and roast at 250°F (120°C) for 15-20 minutes to evaporate excess moisture. 9. Transfer the warm pumpkin flesh to a food processor and blend until completely smooth with no lumps or stringy bits. You should have approximately 1.5 cups of puree. Use immediately or refrigerate in a sealed container for up to 3 days.
Make the Filling and Bake: 10. In a medium bowl, whisk together the 1.5 cups pumpkin puree, 3/4 cup granulated sugar, 1/2 teaspoon fine sea salt, 2 teaspoons ground cinnamon, 1 teaspoon ground ginger, 1/2 teaspoon ground nutmeg, and 1/4 teaspoon ground cloves until well combined and smooth. Taste a small spoonful and adjust spices if desired. 11. In a separate bowl, whisk together 2 large eggs and 1/2 cup heavy cream until combined (do not incorporate air — you’re simply mixing them). Add this mixture to the pumpkin and whisk gently until the filling is smooth and uniform. 12. Pour the filling into the chilled pie crust and smooth the top with a spatula. 13. Preheat the oven to 425°F (220°C). If using a water bath, place a larger pan on the lowest oven rack and pour hot (not boiling) water into it until it reaches halfway up the sides of the pie pan when you place it there. 14. Place the pie on the lowest oven rack. Bake at 425°F for 15 minutes until the crust is partially set and beginning to brown. 15. Reduce the oven temperature to 350°F (175°C) and continue baking for 35-45 minutes. The outer 2-3 inches of filling should be set and firm, while the very center (about a 2-inch diameter) should still have a slight wobble when you gently shake the oven rack. Do not overbake — the pie will continue to set as it cools, and an overbaked filling will crack. 16. If the crust edges are browning too quickly, tent them loosely with foil for the last 15 minutes of baking. 17. To test for doneness, insert a thin paring knife 1 inch from the edge — it should come out clean. Check the very center — a knife inserted there should have a little custard still clinging to it, not liquid custard but not completely set either. Alternatively, use a meat thermometer: the center should read 165°F to 170°F (74-77°C). 18. Remove the pie from the oven and allow it to cool at room temperature for at least 2 hours. The filling will continue to set during cooling. Serve at room temperature or gently reheated.
For Serving:
- Freshly whipped cream (1 cup heavy cream whipped with 2 tablespoons sugar and 1/2 teaspoon vanilla extract)
- Optional: a pinch of ground cinnamon or candied ginger pieces to garnish the whipped cream
- Hot coffee or spiced tea for serving alongside