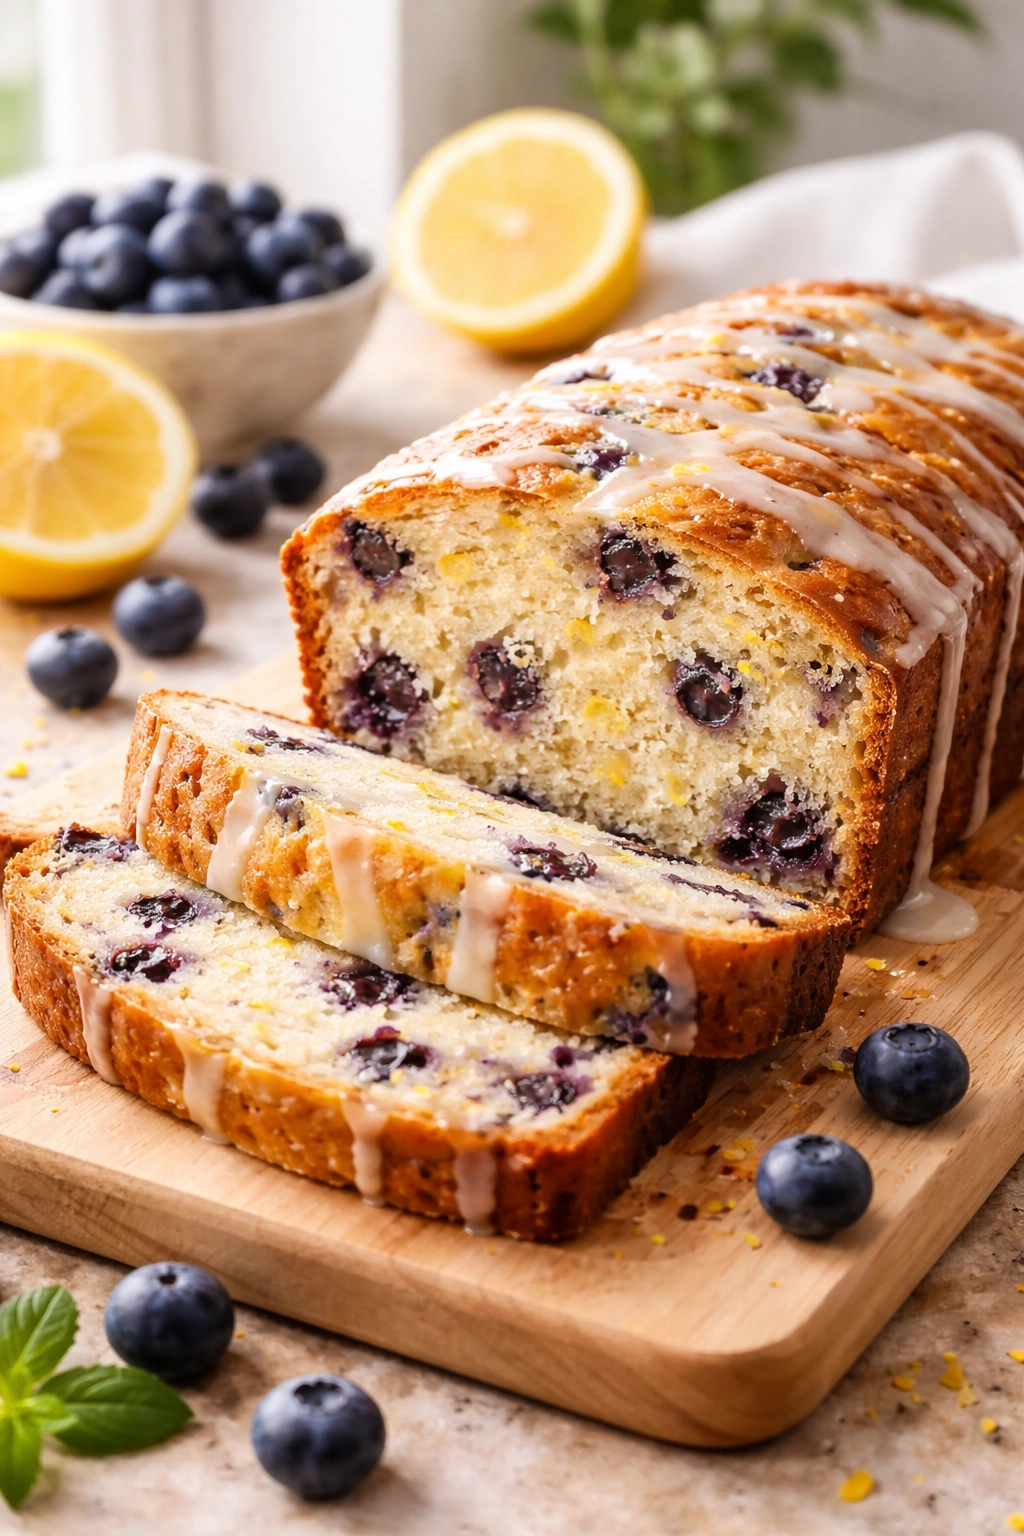
There’s something about a perfectly moist loaf cake that just disappears from the cooling rack. The kind where each slice is dense enough to stand on its own, yet tender enough that it practically melts the moment it hits your tongue. Add the bright, punchy flavor of lemon and the subtle tartness of blueberries, and you’ve got the kind of dessert that people actually ask for the recipe for—the one you find yourself making again and again because it’s foolproof, deeply flavorful, and doesn’t require any fancy equipment or techniques.
This isn’t one of those lemon cakes that tastes like you baked a chemical lemon drop. And it’s not a dry, crumbly blueberry cake that leaves your mouth feeling chalky. What makes this particular recipe stand out is the technique behind it: a deliberate combination of buttermilk for tanginess and moisture, oil instead of butter for tenderness, and a double dose of lemon (zest and juice) for genuine flavor that doesn’t fade after the first bite. The blueberries are treated with a specific trick that keeps them from sinking to the bottom and distributing unevenly, and the batter itself is mixed just enough to achieve that incredibly tender crumb without overdeveloping gluten.
After making this loaf dozens of times, I’ve refined every single element—from the exact ratio of wet to dry ingredients to the oven temperature that gives you those gorgeous golden edges while keeping the center impossibly moist. This is the version that actually stays moist for three days (it somehow improves overnight), the one your coffee-loving friends will demolish, and the one you’ll confidently make for potlucks, brunch gatherings, or just because it’s Tuesday and you deserve it.
Why This Lemon Blueberry Loaf Is Different
Most lemon loaf recipes rely heavily on butter, which often leaves you with a cake that tastes rich but dries out by day two. They also tend to skimp on the actual lemon flavor, relying instead on extract or a thin glaze to create the impression of lemoniness. The blueberry component is usually an afterthought—frozen berries that sink straight to the bottom, or fresh ones that bleed purple into the batter and leave white pockets where they’ve been displaced.
This recipe fixes all three problems. The combination of buttermilk and oil creates a genuinely tender crumb that stays moist throughout its entire life (yes, this loaf keeps beautifully). The double lemon hits you on multiple levels: lemon zest gives you bright, aromatic, fresh notes, while fresh lemon juice adds a subtle tang that deepens the overall flavor without screaming “artificial.” The blueberries are tossed in cornstarch before they go in, which prevents them from sinking and also seems to preserve their flavor better than standard methods.
The result is a loaf that’s special enough to serve at a dinner party, but simple enough that you’ll actually make it on a random Tuesday afternoon. It’s the kind of recipe that works whether you’re feeding yourself, your family, or a crowd—it scales beautifully, stays fresh longer than you’d expect, and somehow tastes even better the next day when the flavors have had time to fully develop.
What Makes Moisture the Key to This Recipe
Moisture in baked goods comes from three places: the wet ingredients (eggs, milk, juice), the fat content (butter or oil), and how those ingredients are combined. Most bakers focus only on the first two and miss the technique entirely. This recipe deliberately uses oil instead of butter for the fat, which is the secret that everyone overlooks.
Here’s why this matters: butter contains about 15-20% water and 80-85% fat, while oil is 100% fat. When you use oil, you’re maximizing fat content without adding extra water, and fat is what coats the flour particles and keeps a cake tender and moist. Butter is wonderful for flavor and browning, but oil creates superior crumb texture in loaf cakes specifically.
The buttermilk is equally crucial. Its acidity tenderizes the batter (the acid breaks down gluten strands before they can fully develop), and its lower fat content compared to whole milk means the cake isn’t overly rich. The combination of buttermilk plus oil creates a cake that’s tender, flavorful, and naturally moist without relying on oversweetening or chemical additives.
Getting Your Blueberries Right
Blueberry distribution is more important than most recipes acknowledge. Fresh blueberries are fantastic for flavor, but they’re wet enough that they tend to sink straight through the batter if you just stir them in. Frozen blueberries are convenient and distribute better, but they can bleed into the batter if they thaw during mixing. The solution is simple: toss your berries (fresh or frozen—frozen actually works perfectly here) in cornstarch before adding them to the batter.
The cornstarch does two things. First, it creates a fine coat that helps the berries stay suspended in the batter and not sink as quickly. Second, it helps preserve their structure so they don’t bleed flavor and color all over your cake. You only need about a tablespoon of cornstarch for 1.5 cups of blueberries, and it doesn’t affect the final texture at all.
Don’t thaw frozen blueberries before using them—that’s where the bleeding happens. Go straight from the freezer to tossing them in cornstarch to folding them into the batter. The coldness of the frozen berries actually helps with texture, as they warm gradually during baking rather than releasing all their moisture at once.
The Lemon-Blueberry Flavor Balance
Getting the lemon flavor right is where most recipes fail. You need enough lemon to taste bright and distinctive, but not so much that the cake tastes sour or one-dimensional. The key is using both lemon zest and lemon juice, as they contribute different flavor notes.
Lemon zest (the colored outer layer of the peel, without any of the white pith) has the most aromatic, complex lemon flavor. It’s where the essential oils live, and it adds brightness and sophistication. Lemon juice contributes tartness and acidity, which the buttermilk in the recipe will interact with in interesting ways. Together, they create a lemon flavor that feels fresh and natural, not artificial or overwhelming.
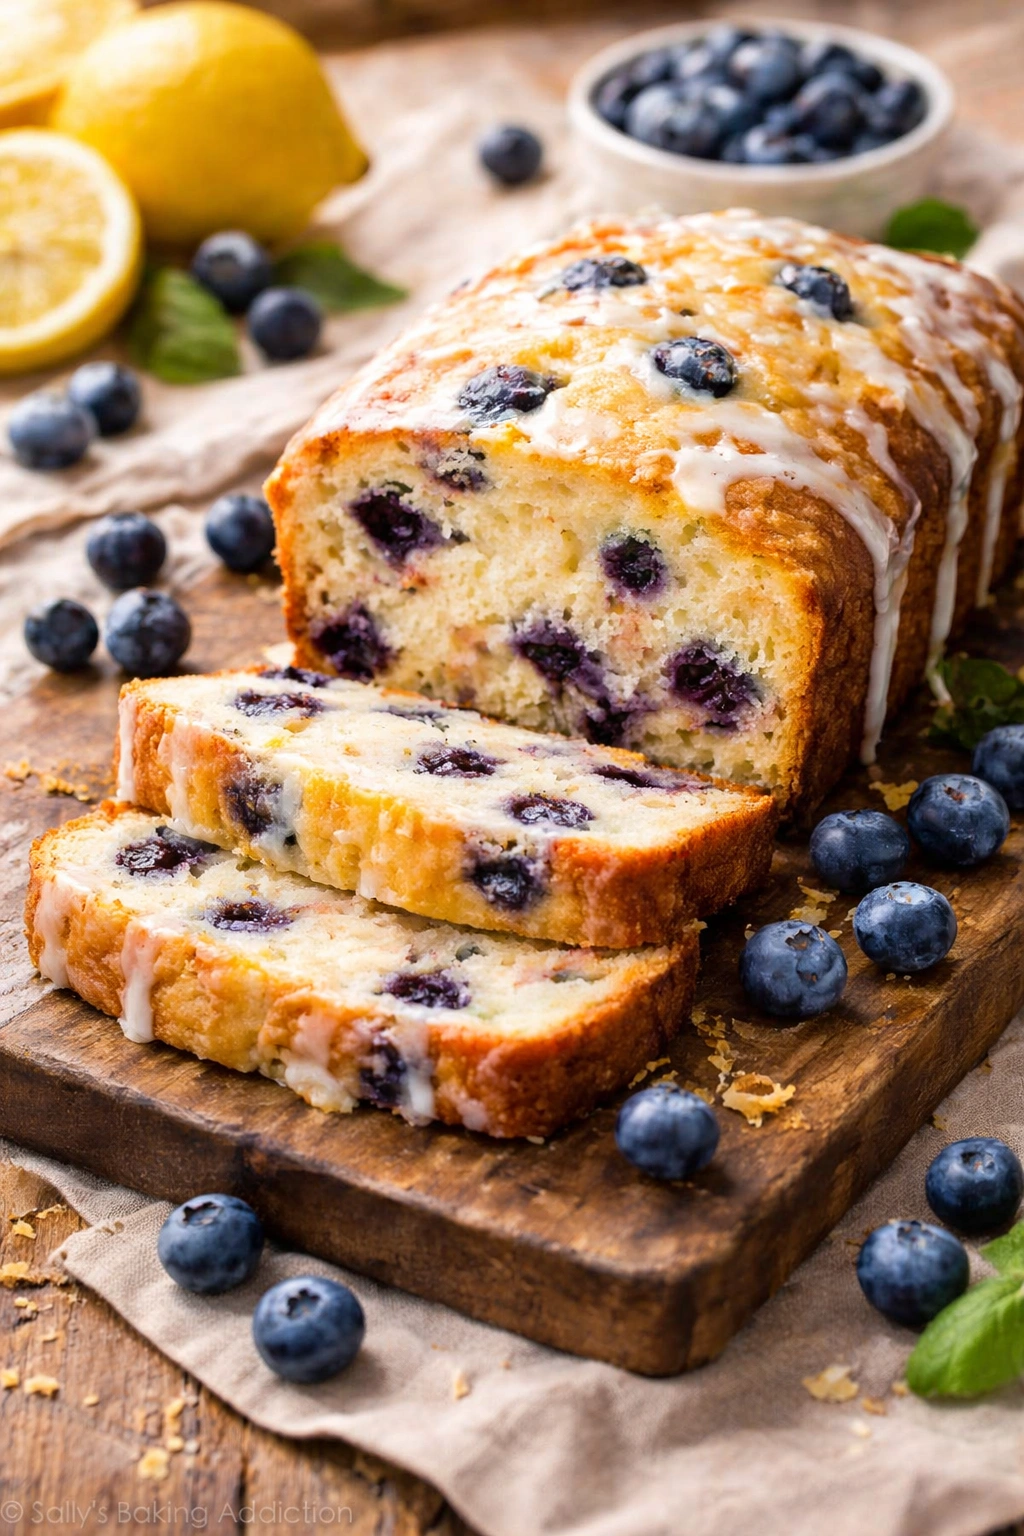
The blueberries are the perfect partner for lemon because their tartness complements the citrus notes without competing. They add a subtle earthiness and depth that prevents the cake from tasting one-note. The combination gives you complexity: you taste lemon first (from the zest), then blueberry (from the fruit), then a pleasant tartness (from the juice and buttermilk interacting) that keeps everything balanced.
Choosing Your Ingredients Wisely
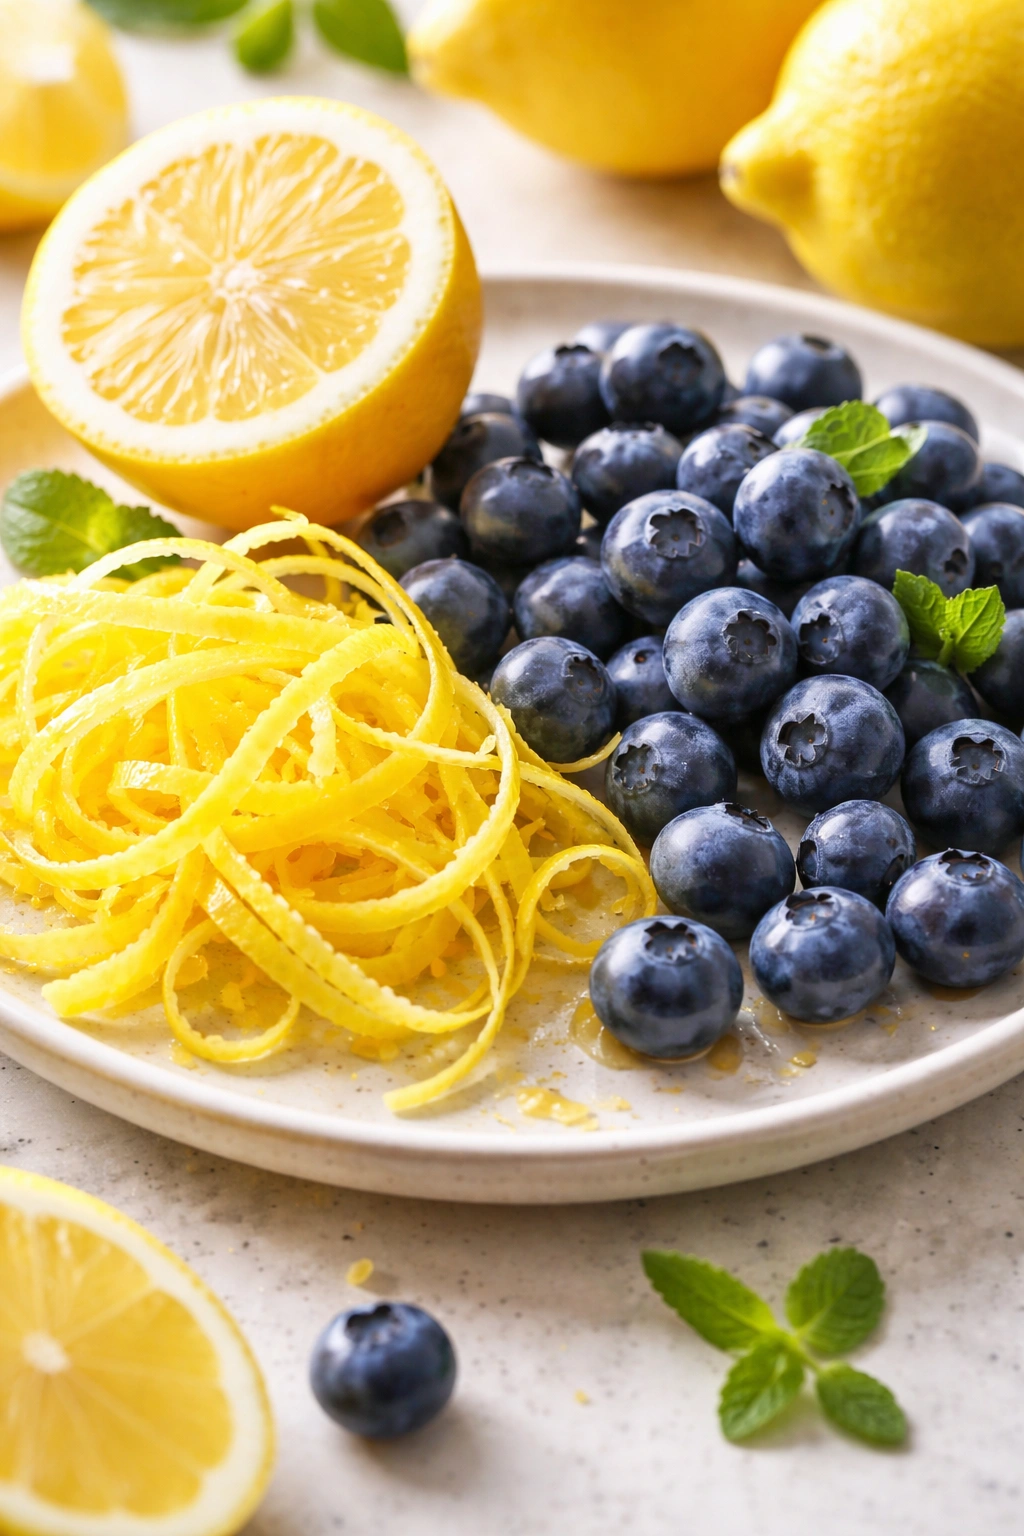
Your success with this loaf starts with ingredient quality and freshness. The lemon you choose really matters—look for thin-skinned lemons that feel heavy for their size, which indicates more juice content. Avoid any with soft spots or discoloration. You’ll want 2-3 medium lemons to get both the juice and zest you need.
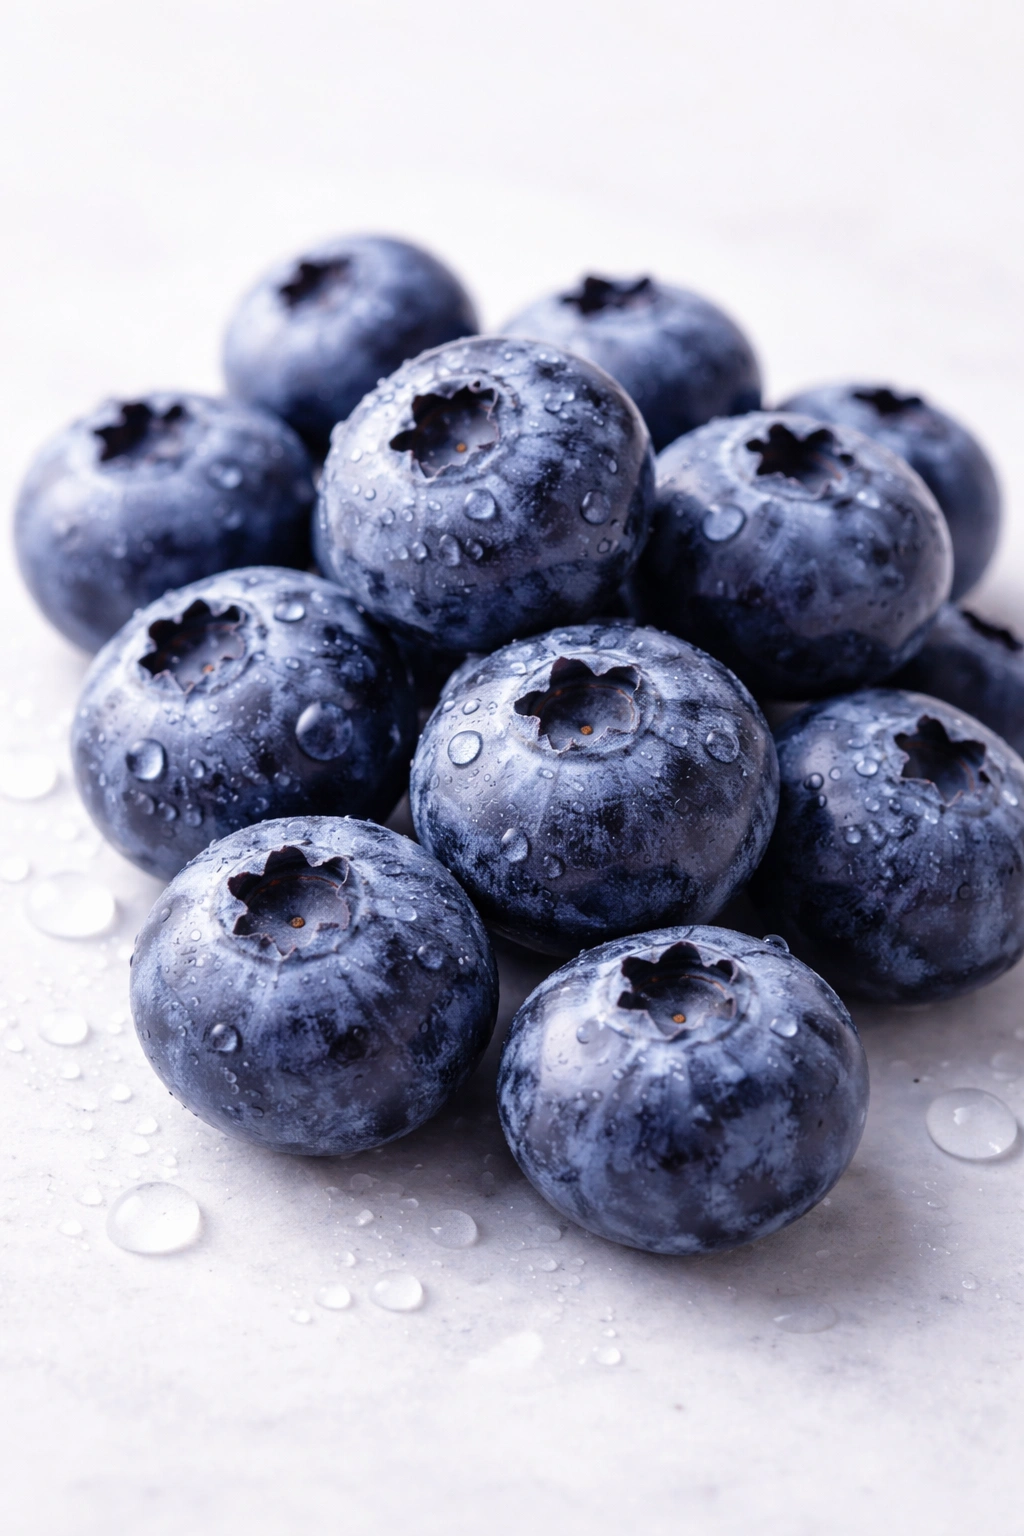
Blueberries are the other star ingredient. If you’re buying fresh, choose plump berries that are deep blue all over—avoid any with a reddish tinge, which means they’re not fully ripe. A medium-sized blueberry gives you the best flavor-to-texture ratio. If you’re using frozen, buy unsweetened berries with no added sugar or preservatives. The advantage of frozen is that they’re picked at peak ripeness and frozen immediately, so they often have better flavor than fresh berries that have sat in storage for days.
Buttermilk is non-negotiable here—don’t substitute regular milk. If you don’t have buttermilk on hand, make a substitute by adding 1 tablespoon of white vinegar or fresh lemon juice to 1 cup of regular milk, letting it sit for 5 minutes until it curdles. This gives you the acid and slight tang you need. The eggs should be at room temperature for better emulsification, so pull them out about 15 minutes before baking.
Yield: Makes one 9×5-inch loaf (serves 8-10)
Prep Time: 20 minutes (hands-on active time)
Cook Time: 50 minutes (baking time)
Total Time: 70 minutes active + 1 hour cooling
Difficulty: Beginner — This is a straightforward loaf cake with no special equipment or techniques required. If you can measure ingredients and use a whisk, you can make this successfully.
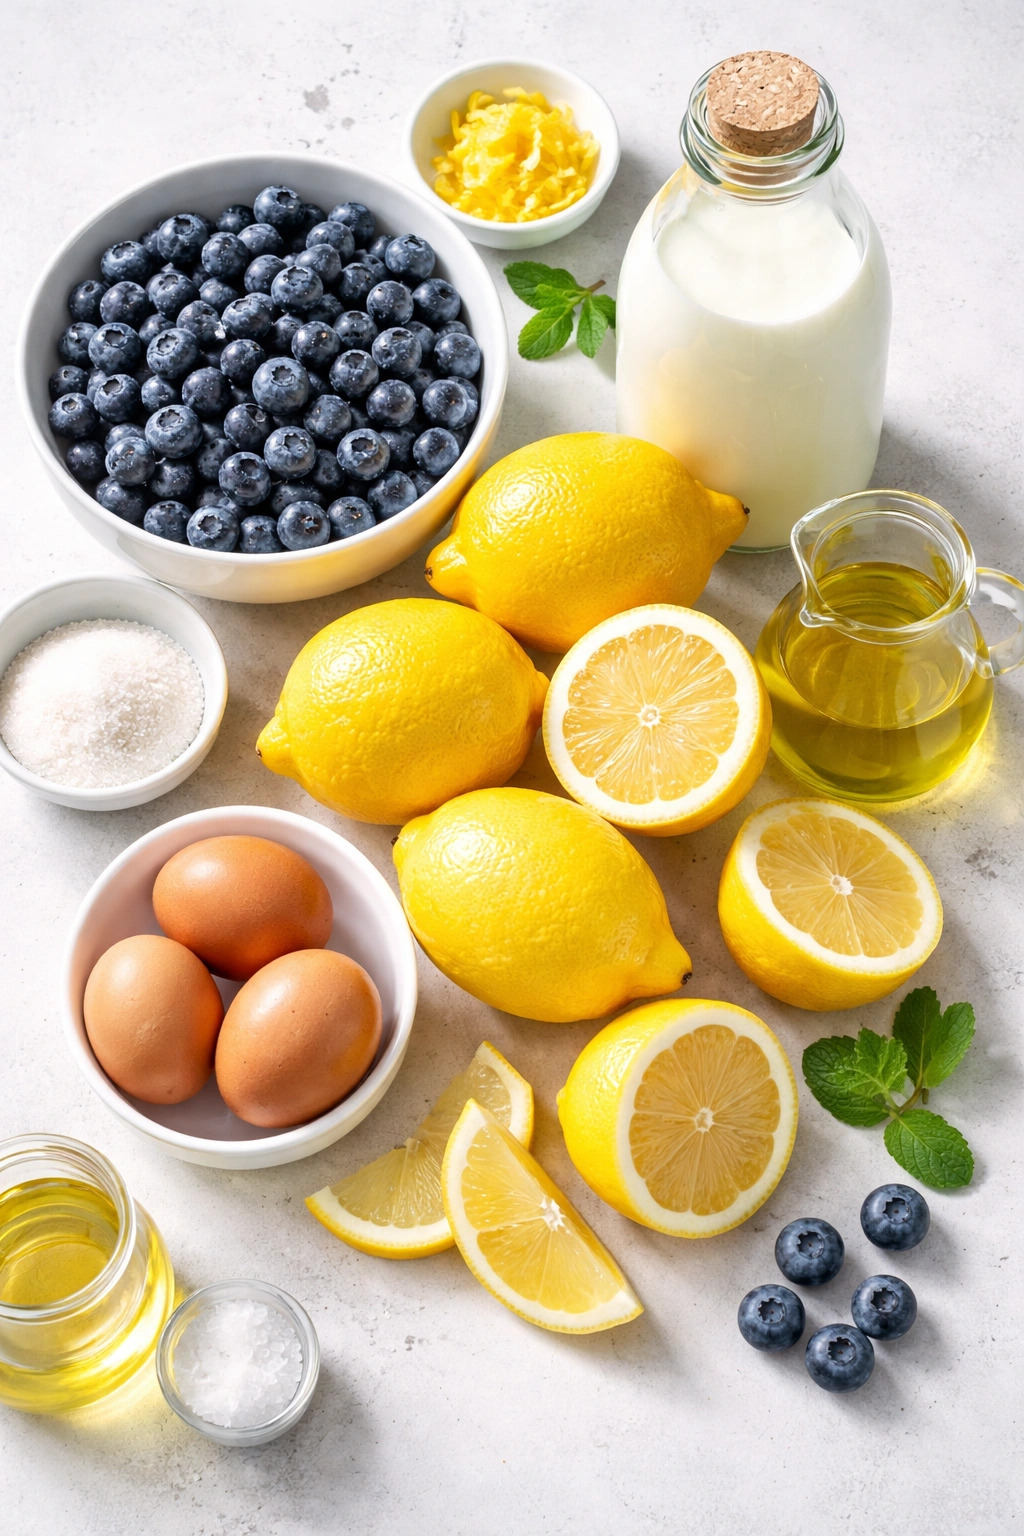
Ingredients You’ll Need
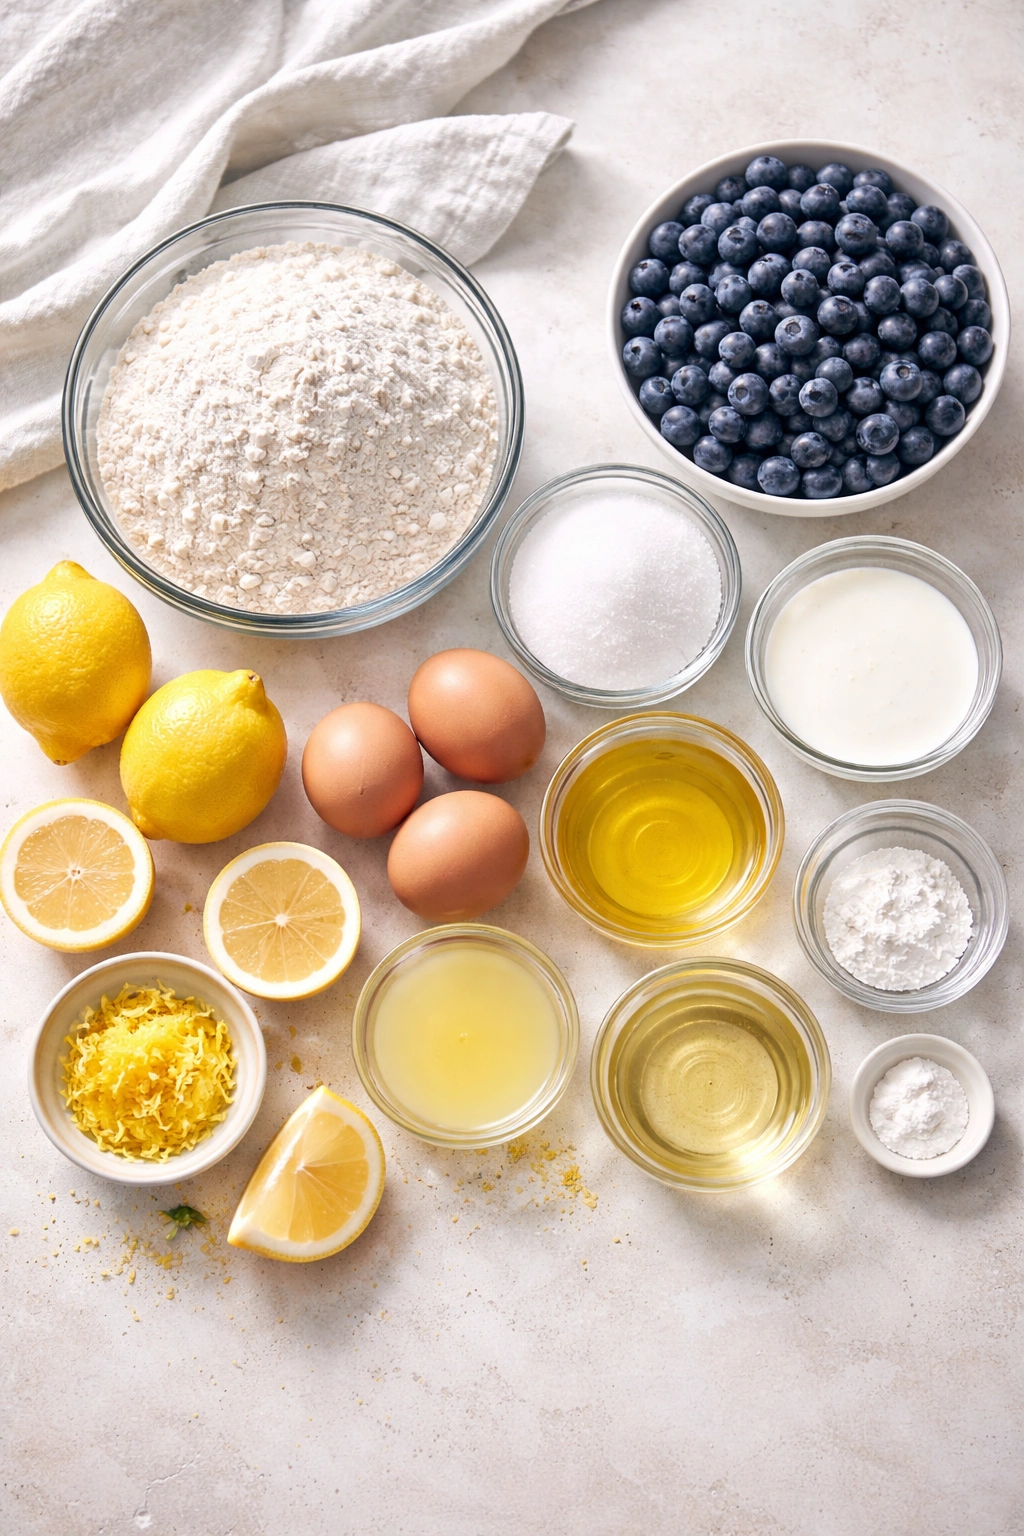
For the Loaf:
- 2 cups all-purpose flour
- 1½ teaspoons baking powder
- ½ teaspoon baking soda
- ½ teaspoon fine sea salt
- 1 cup (200 grams) granulated sugar
- 3 large eggs, at room temperature
- ¾ cup neutral oil (vegetable, canola, or light olive oil)
- ¾ cup buttermilk, at room temperature
- 2 tablespoons fresh lemon juice (about 1 lemon)
- 2 teaspoons freshly grated lemon zest (about 1 lemon)
- 1½ cups fresh or frozen blueberries (do not thaw if frozen)
- 1 tablespoon cornstarch
For the Glaze (Optional but Recommended):
- 1 cup powdered sugar, sifted
- 2-3 tablespoons fresh lemon juice
- 1 tablespoon whole milk or heavy cream
- Pinch of fine sea salt
- ½ teaspoon pure vanilla extract
- Lemon zest for garnish (optional)
Prepare the Pan and Preheat Your Oven
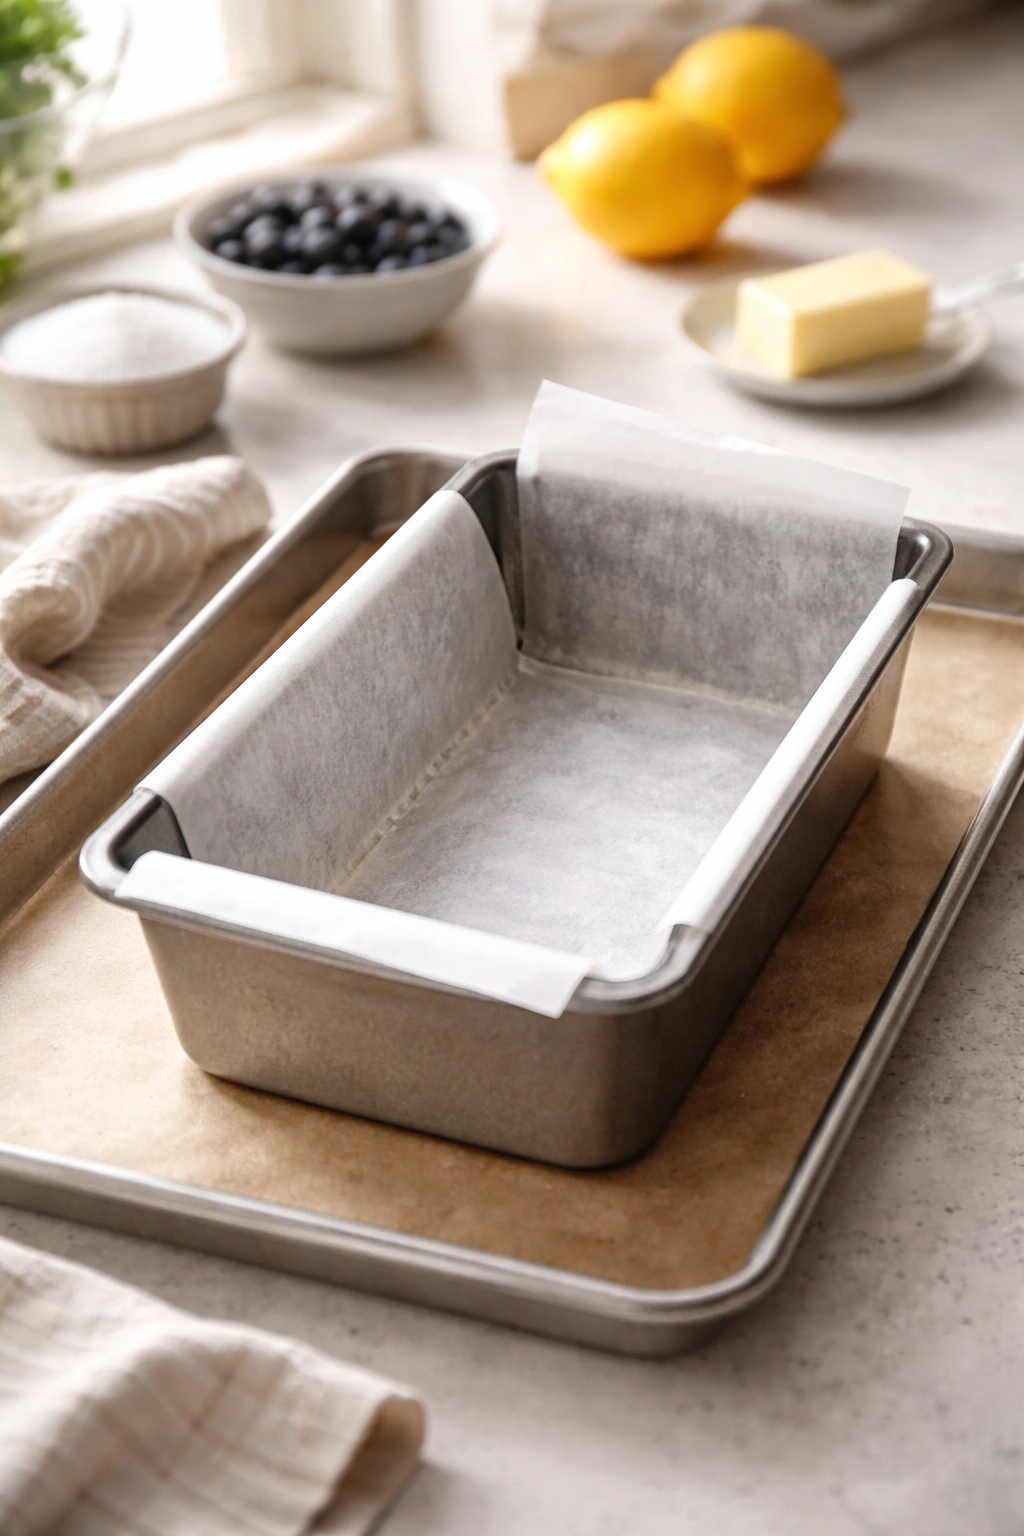
Proper preparation prevents sticking and ensures even baking. Position your oven rack in the center of the oven (this allows air to circulate evenly above and below the loaf) and preheat the oven to 350°F (175°C). This temperature is lower than you might expect for a loaf cake, but it’s deliberate—the gentle heat allows the cake to bake through to the center without over-browning the outside edges.
While the oven preheats, prepare a 9×5-inch loaf pan. Grease the entire interior generously with softened butter or non-stick cooking spray—pay special attention to the corners and edges where batter tends to stick. Line the bottom and two long sides with a strip of parchment paper, leaving a 1-inch overhang on each long side. This makes it incredibly easy to lift the finished loaf out of the pan without crumbling or breaking it. The overhanging parchment acts like handles.
Set your prepared pan aside on a baking sheet. The baking sheet serves two purposes: it catches any potential drips or overflow, and it helps conduct heat more evenly to the bottom of the loaf pan, promoting even cooking.
Mix the Dry Ingredients Together
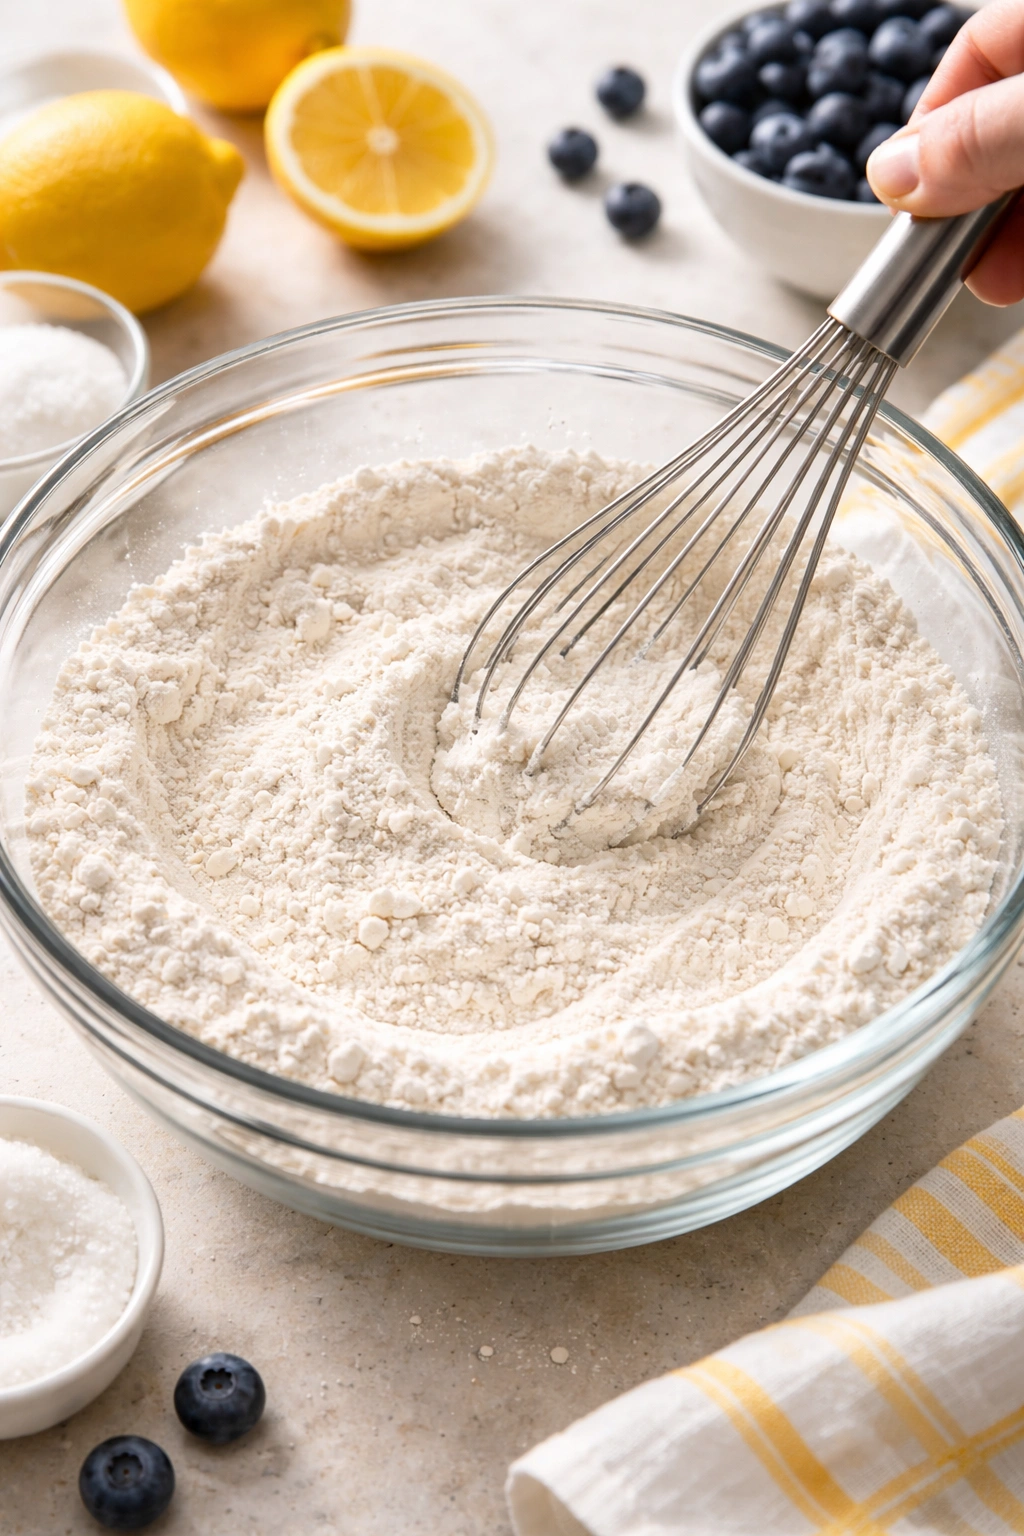
In a large mixing bowl, whisk together the flour, baking powder, baking soda, and salt. Whisking these dry ingredients together before you add the wet ingredients accomplishes two things: it distributes the leavening agents evenly (so you don’t end up with pockets of weak or overly-strong rising), and it aerates the flour slightly, which contributes to a lighter crumb.
Whisk in smooth, efficient motions, running the whisk through the mixture about 15-20 times. You’re not trying to incorporate air dramatically like you would with cream-based batters—you’re just making sure everything is evenly distributed. Set this mixture aside.
Combine the Wet Ingredients
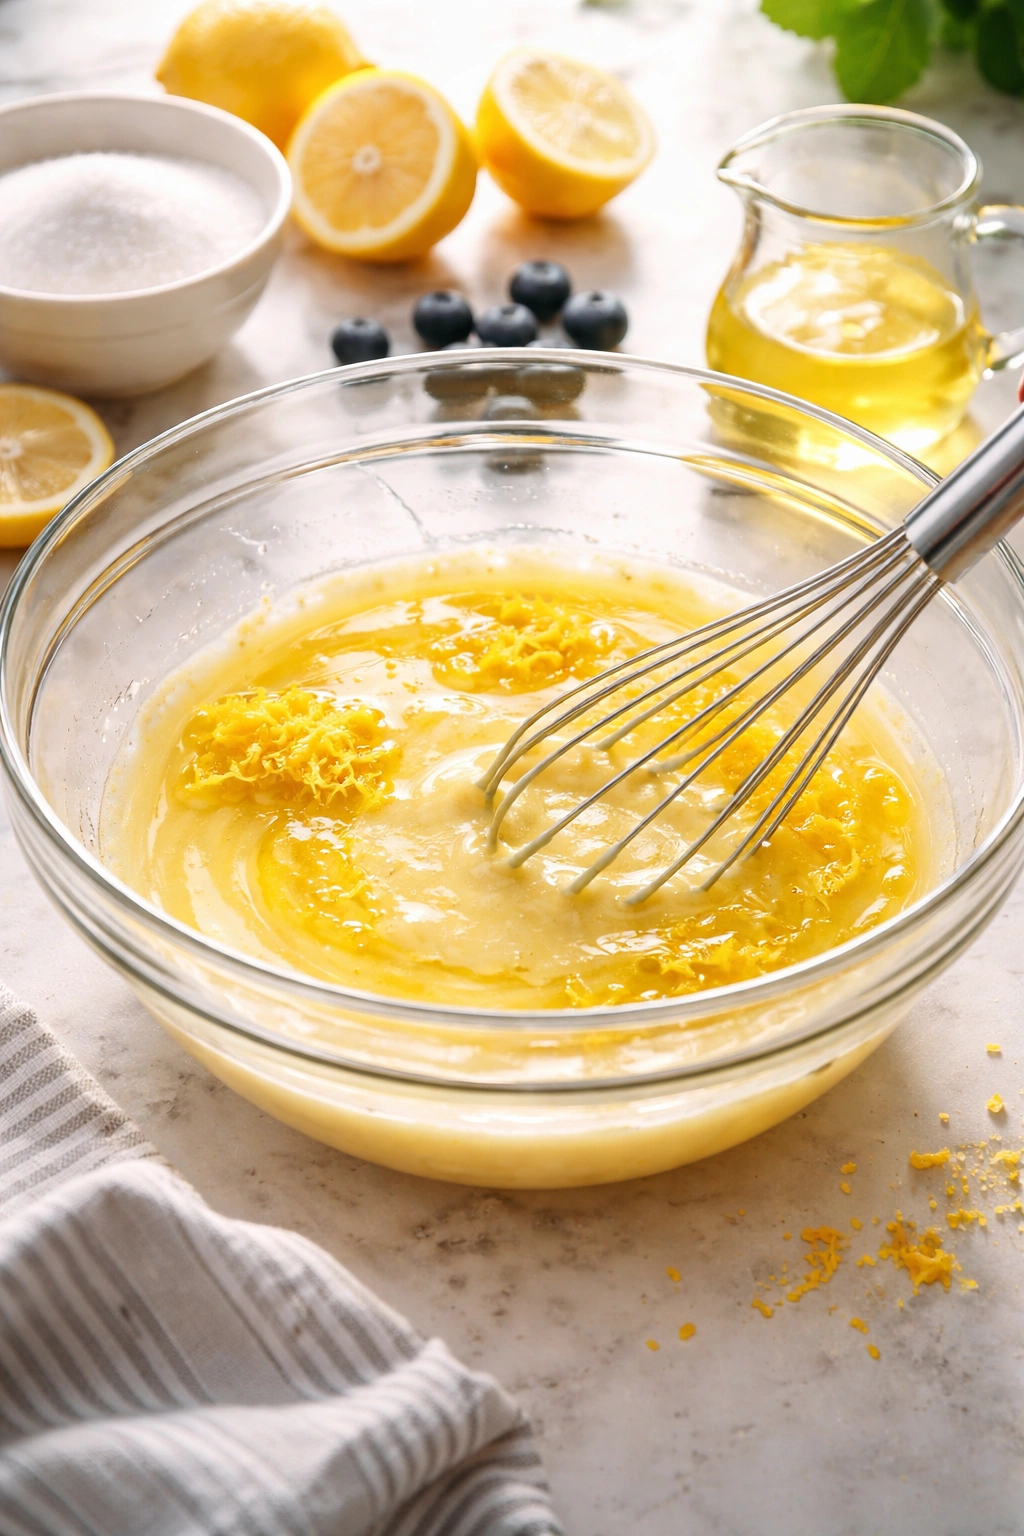
In another large bowl, whisk together the sugar and eggs. Start by cracking the eggs directly into the bowl with the sugar, then whisk vigorously for about 1-2 minutes. You’re not trying to make a foam like you would for a sponge cake, but you do want the mixture to become slightly pale and noticeably thicker—this indicates the sugar is dissolving and the eggs are partially emulsified.
Add the oil, lemon juice, and lemon zest to the egg mixture. Whisk to combine thoroughly. The oil will initially separate from the egg mixture (they’re not naturally compatible), but continued whisking will create an emulsion where the oil droplets become suspended in the egg liquid. You’ll see the mixture become creamy and slightly lighter in color. This takes about 1 minute of whisking.
Combine Wet and Dry Ingredients Gently
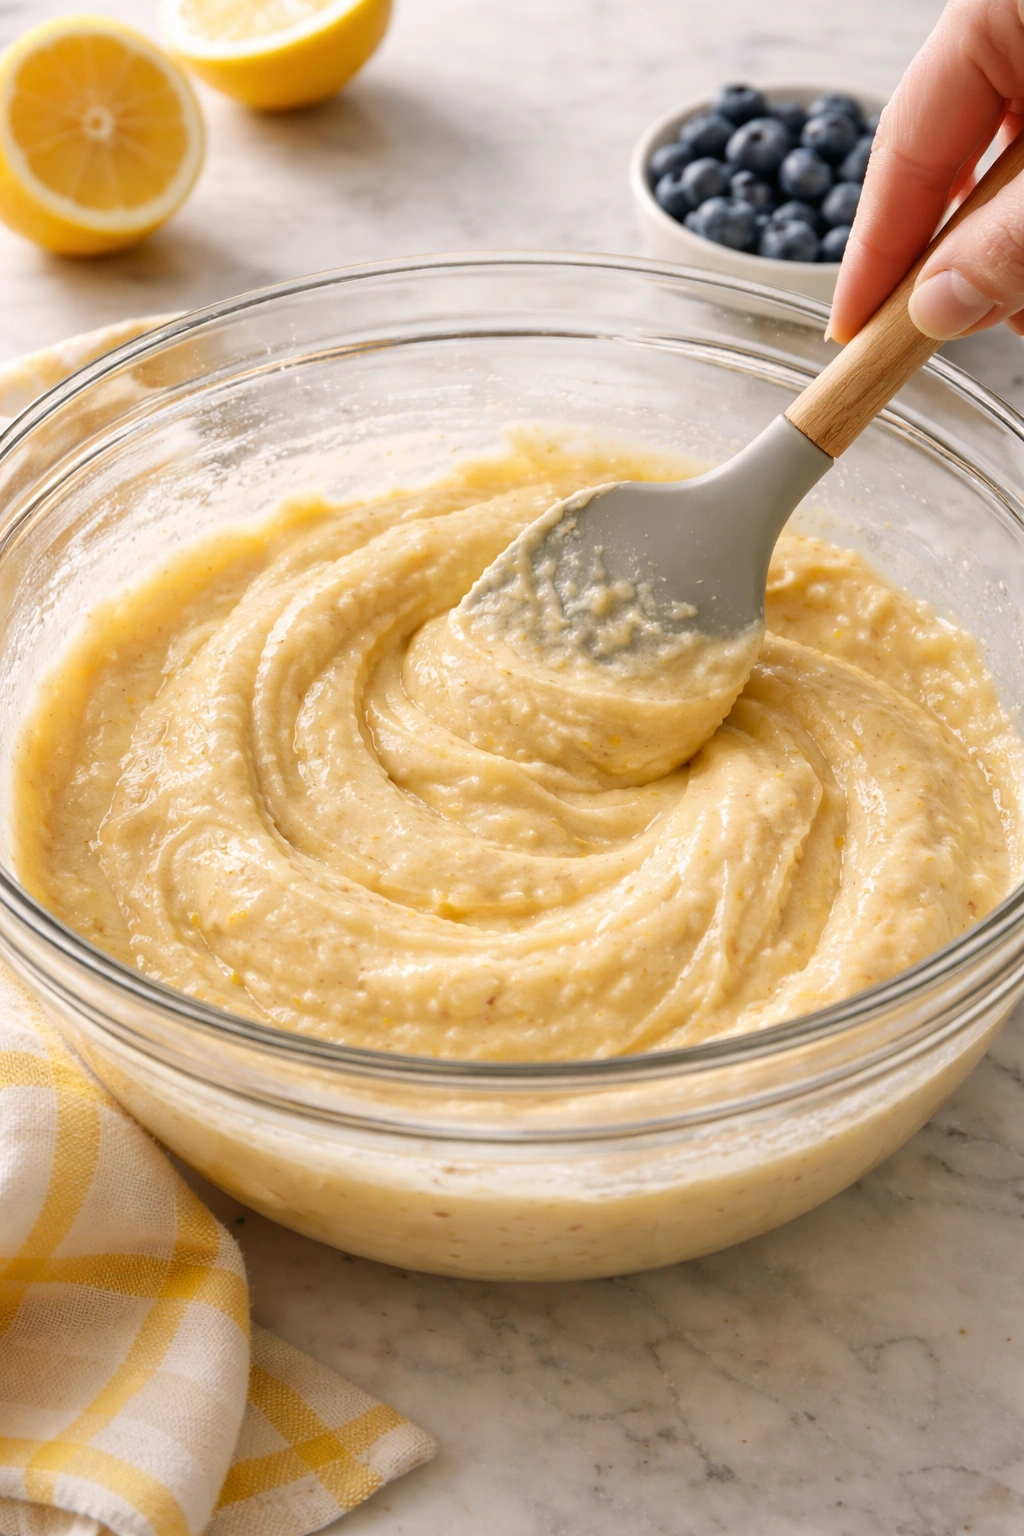
Pour the dry ingredients into the bowl with the wet ingredients. Using a spatula or wooden spoon, fold the mixture together gently, starting at the center of the bowl and sweeping down to the bottom, then up the side and across the top. Rotate the bowl slightly and repeat this motion, folding continuously until you don’t see any dry flour streaks.
Critical point: Stop as soon as you stop seeing dry flour. Overmixing develops gluten, which makes the cake tough and dense. You want the batter to be just combined—it’s okay if there are a few tiny lumps. Those lumps will disappear during baking. Mix for about 30-40 strokes with your spatula, no more.
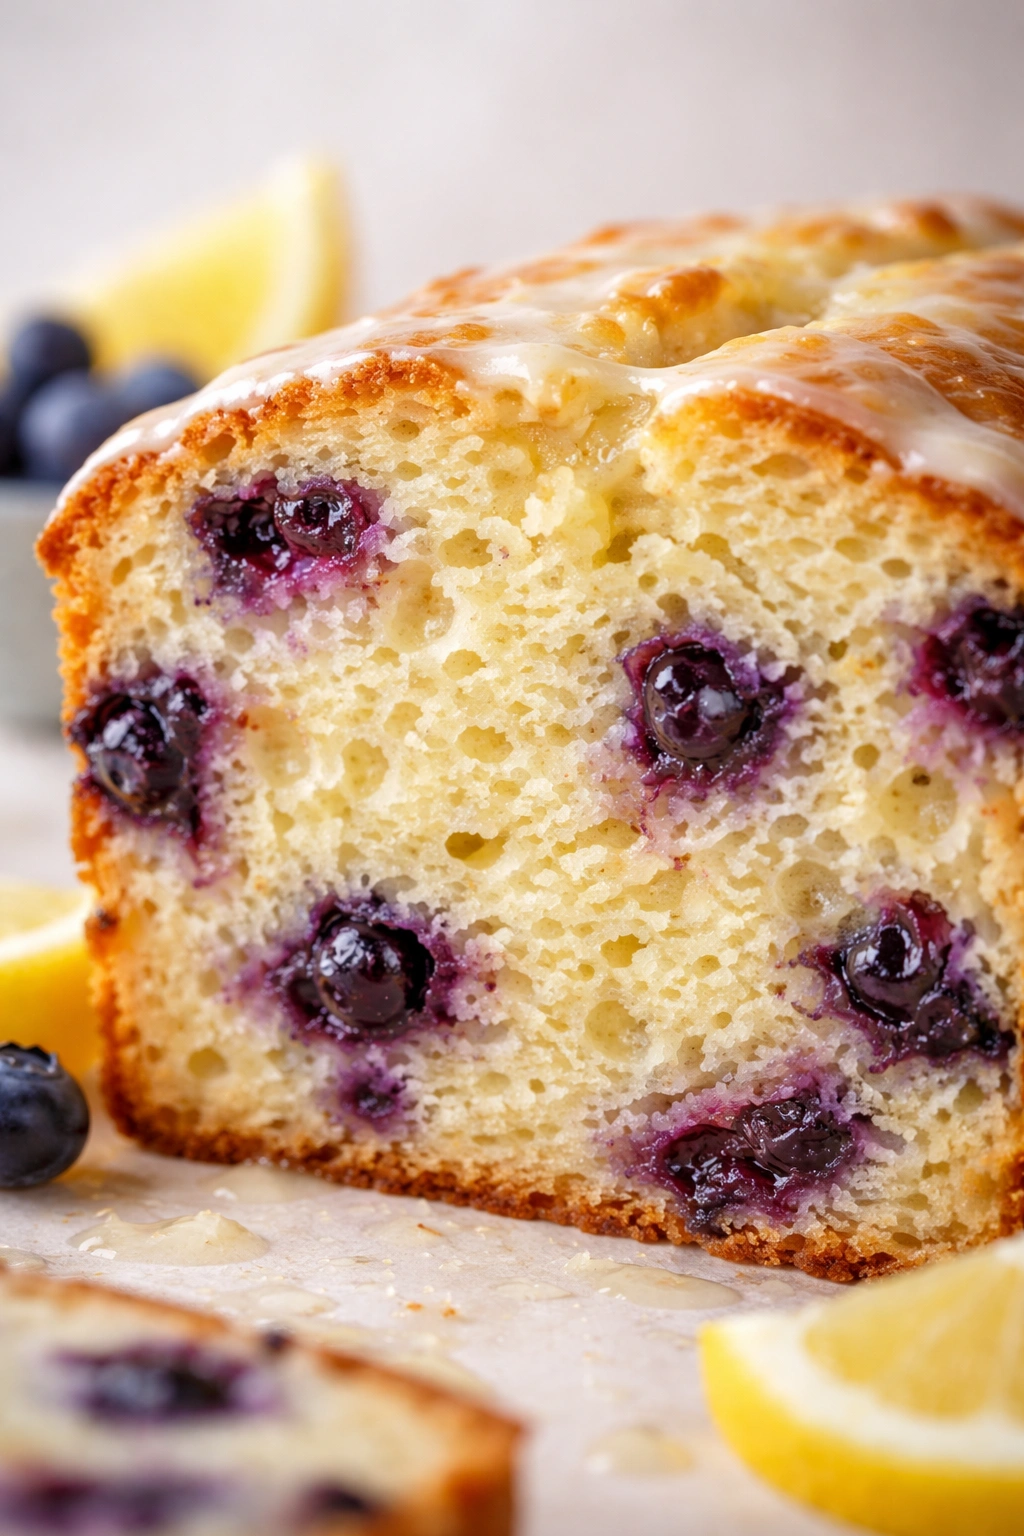
The batter should be smooth, creamy, and pale yellow-gold from the lemon zest and oil.
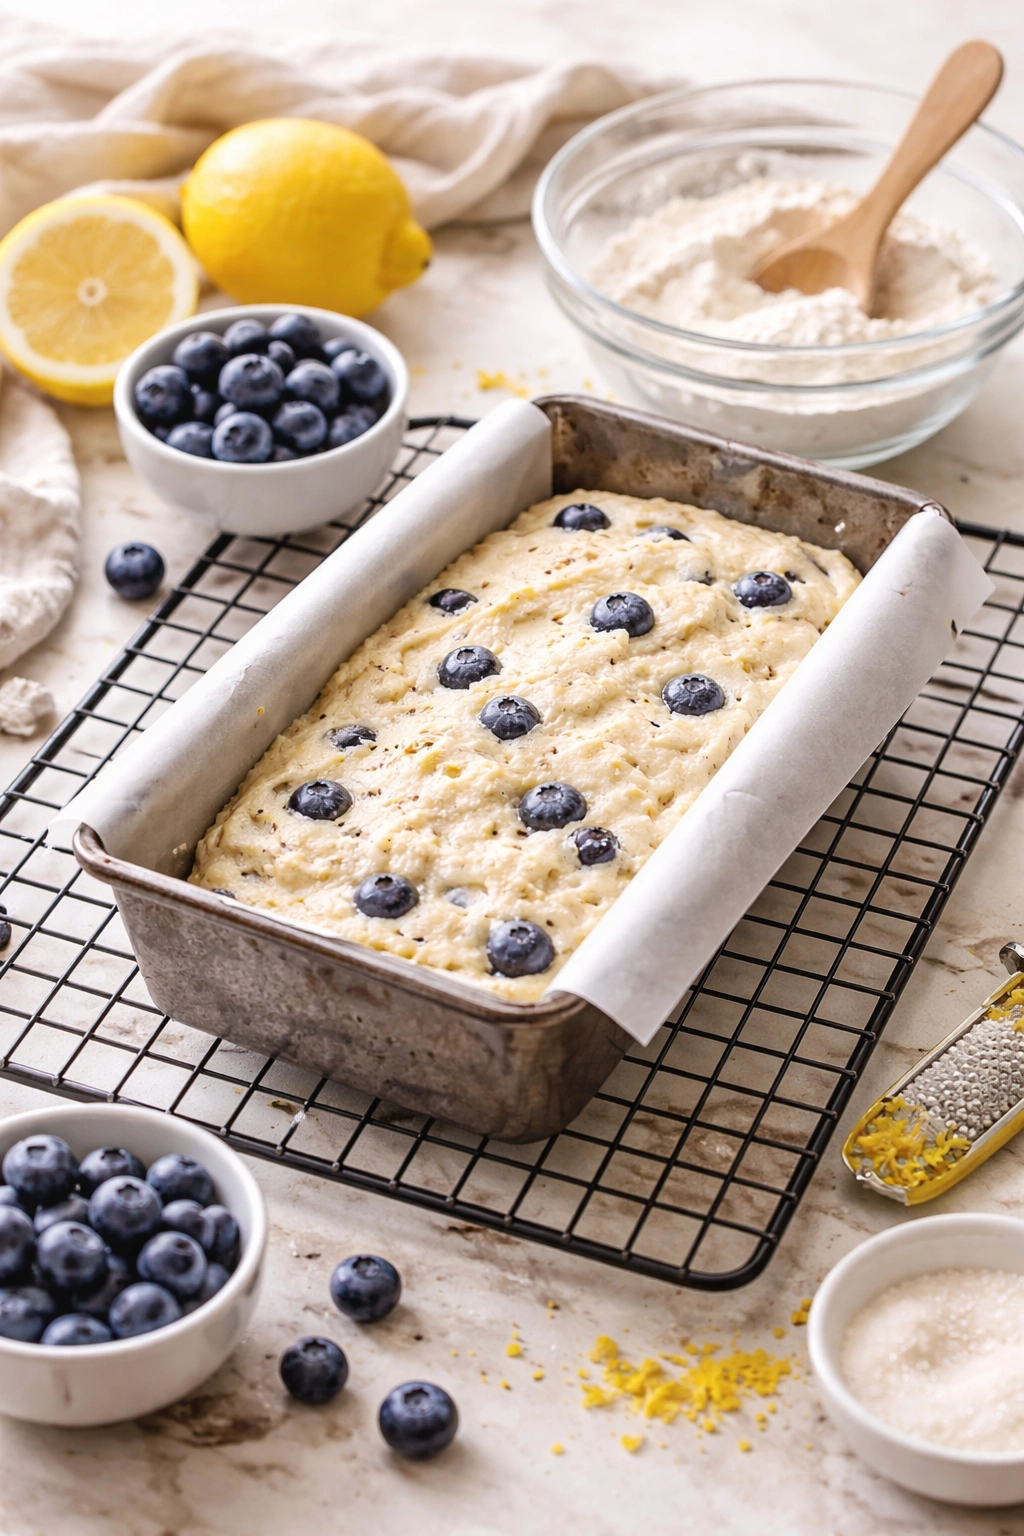
Fold in the Blueberries
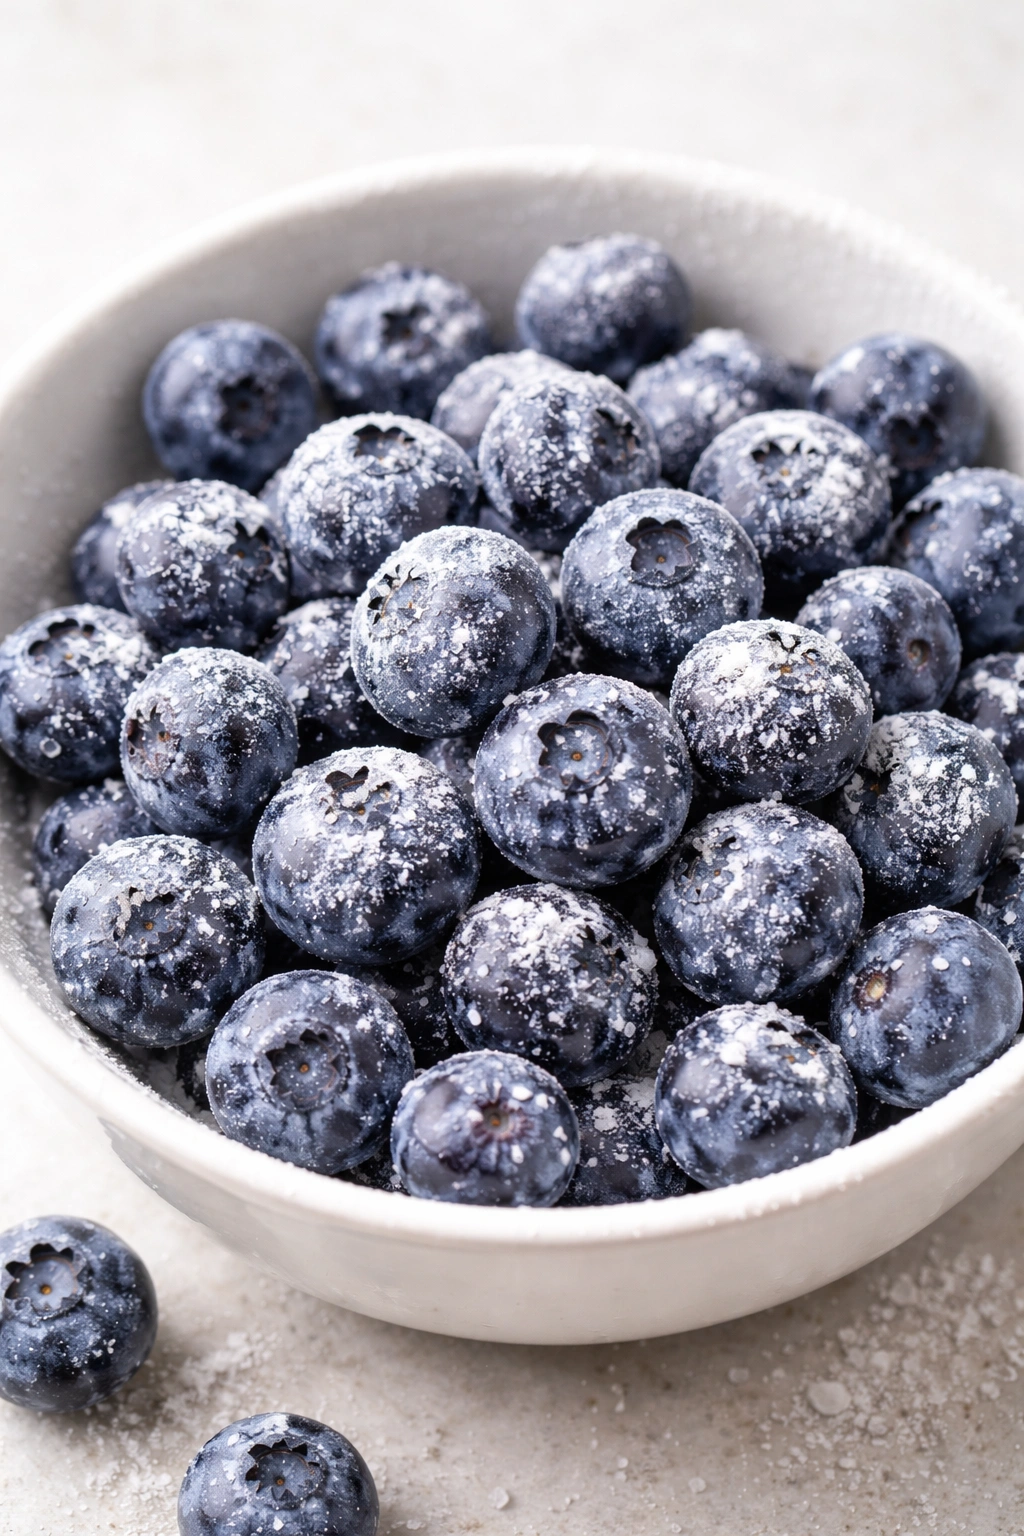
While you’re folding the dry ingredients, set aside your blueberries. In a small bowl, toss them gently with the cornstarch, using a spatula or wooden spoon to coat each berry lightly (you only need about 1 tablespoon of cornstarch total, so a very light coating). The cornstarch helps keep the berries suspended and prevents them from sinking.
Once the main batter is just combined, gently fold in the blueberries using just 10-15 additional folds. Be very gentle—you don’t want to crush the berries or overmix the batter. Some berries will inevitably tint the batter a pale blue-purple, and that’s perfect. It means they’re distributing their flavor throughout.
Pour into the Pan and Bake
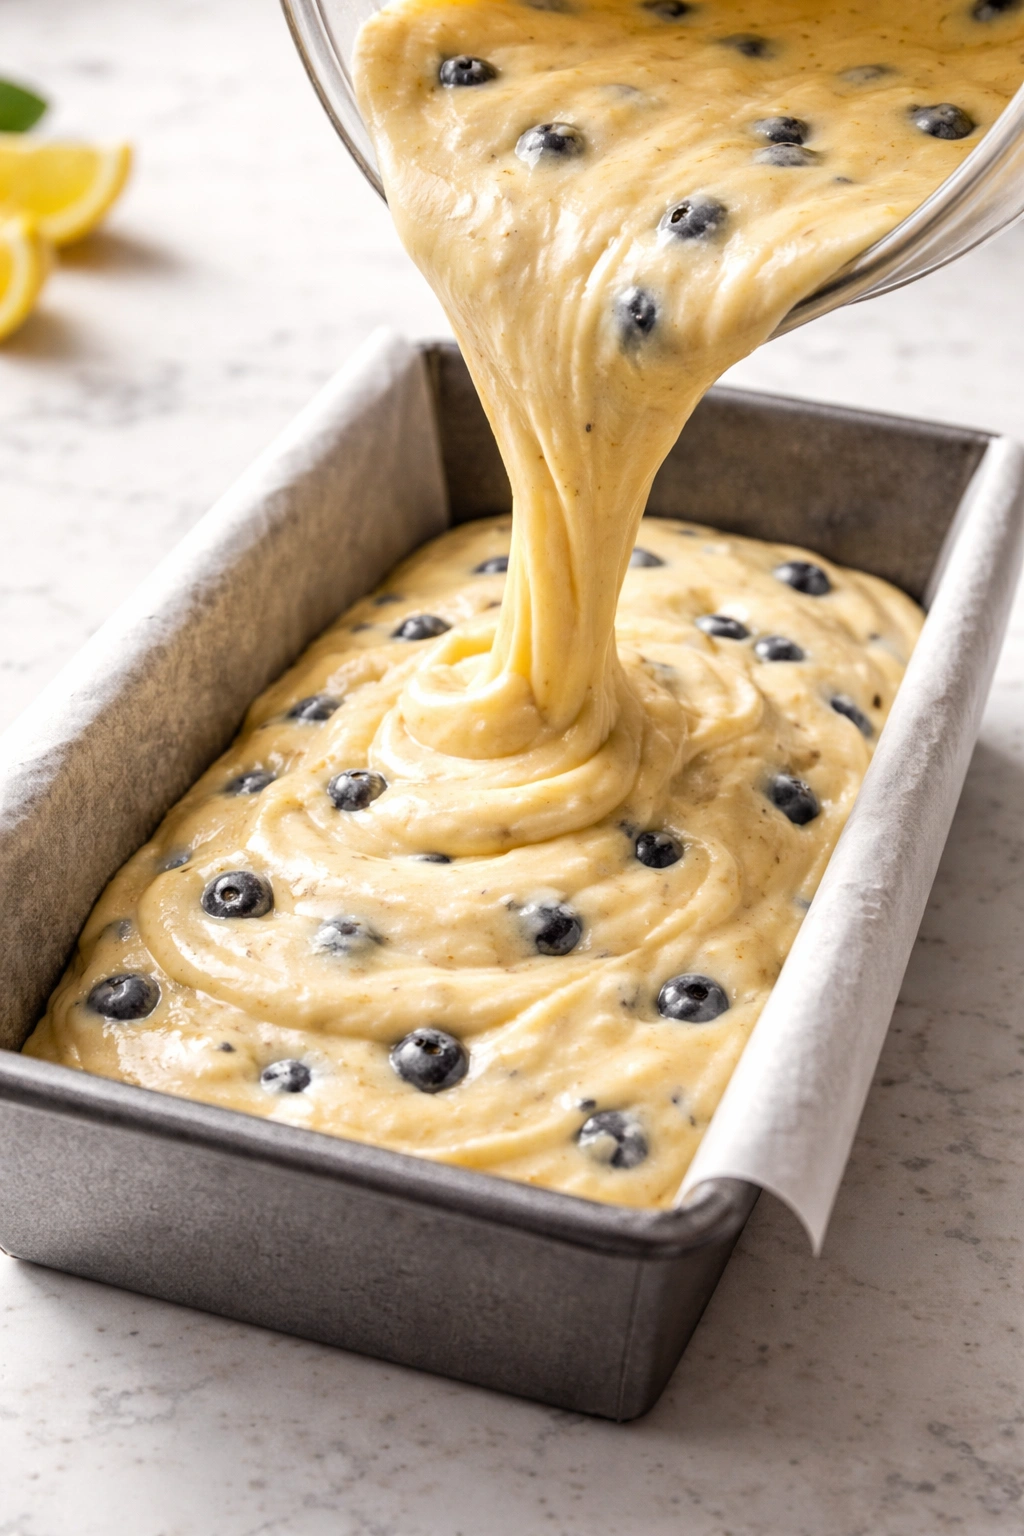
Pour the batter into your prepared loaf pan, smoothing the top gently with an offset spatula or the back of a spoon. The batter should fill the pan about three-quarters full. If you have extra batter (which occasionally happens depending on how full your cups are), you can divide it between two small teacups and bake alongside the loaf—mini loaves cook in about 30-35 minutes.
Place the loaf pan on the preheated baking sheet and slide into the oven.
Bake for 50 to 55 minutes, rotating the pan halfway through (at the 25-minute mark). Halfway through baking, pull the pan out briefly, rotate it 180 degrees so the side that was toward the back of the oven is now toward the front, and return it. This ensures even browning.
The loaf is done when the top is a medium golden brown and a toothpick or sharp knife inserted into the very center of the loaf comes out clean or with just a tiny bit of moist crumb clinging to it. You might also see some cracks forming on the top surface, which is completely normal and actually desirable—those cracks indicate the cake is baked through.
Cool and Remove from the Pan
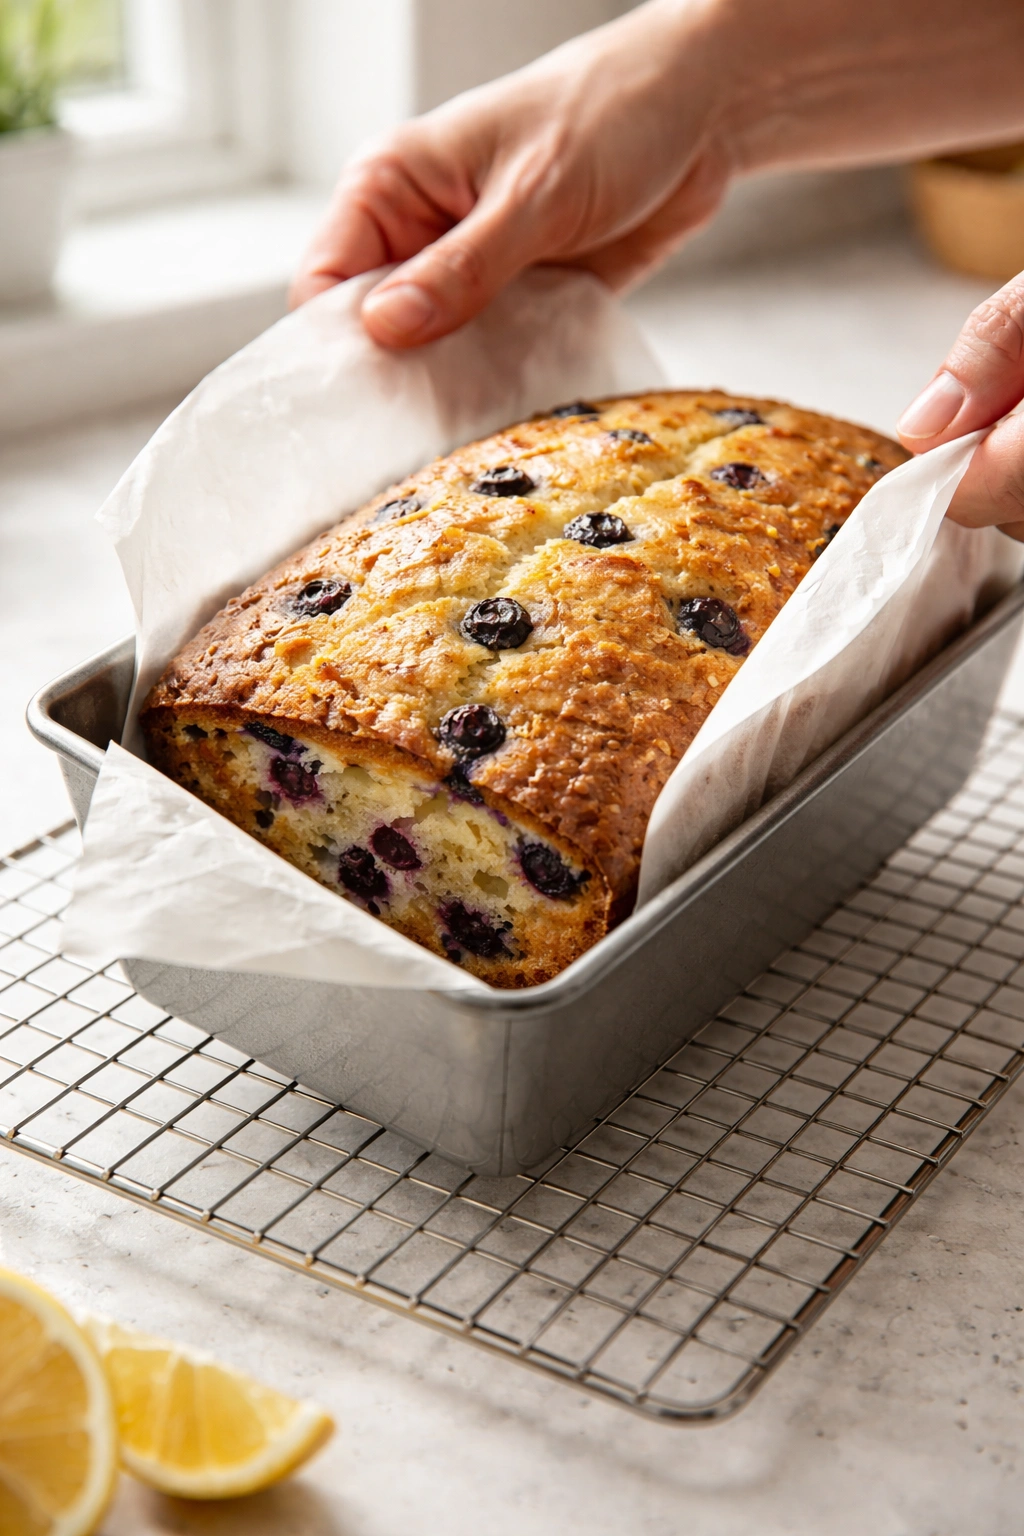
Remove the loaf from the oven and set the pan on a wire cooling rack. This is important: don’t skip the cooling step. Allow the loaf to cool in the pan for 15 minutes. During this time, the structure sets enough to be handled without falling apart, but the loaf is still warm enough that the parchment paper pulls away cleanly.
After 15 minutes, use the parchment paper overhangs to gently lift the loaf straight up and out of the pan. Set it on a wire cooling rack to cool completely—at least 1 hour before glazing or slicing. The loaf continues to set and firm up as it cools, and cutting it while it’s still warm causes the crumb to tear and crumble.
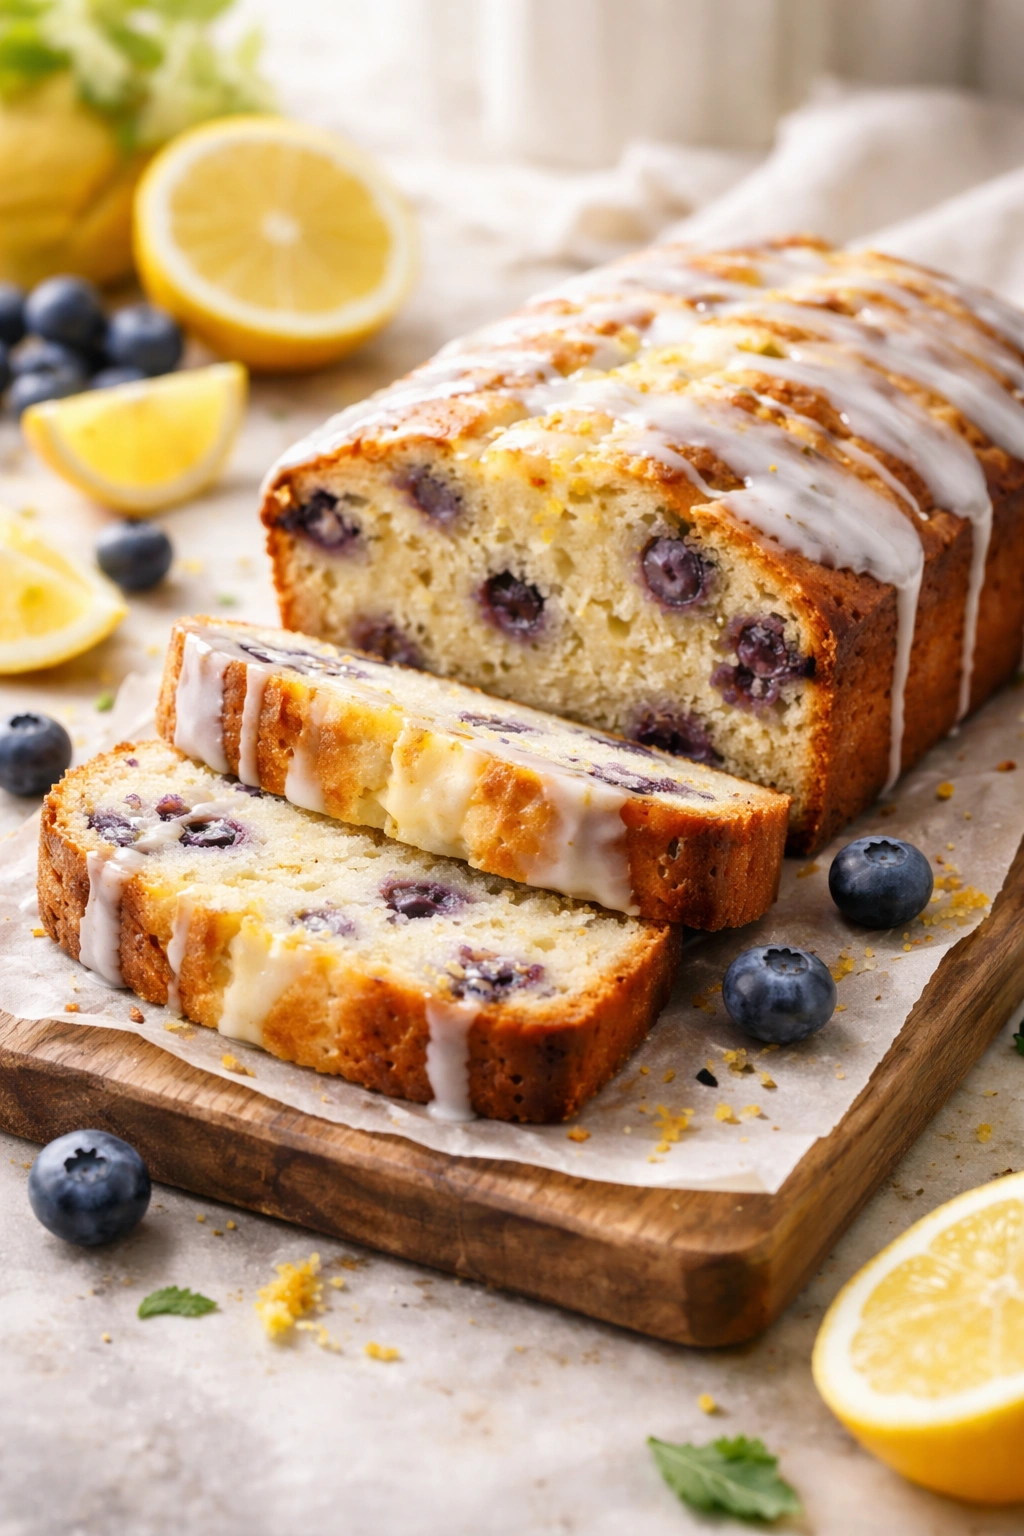
Make the Lemon Glaze (Optional but Worth It)

While the loaf cools, make the glaze if desired. In a small bowl, whisk together the sifted powdered sugar, 2 tablespoons of lemon juice, milk, salt, and vanilla extract. Whisk until smooth and pourable—it should be thick enough to coat the back of a spoon but fluid enough to drip slowly. If it’s too thick, add another splash of lemon juice, ½ teaspoon at a time. If it’s too thin, add a bit more powdered sugar.
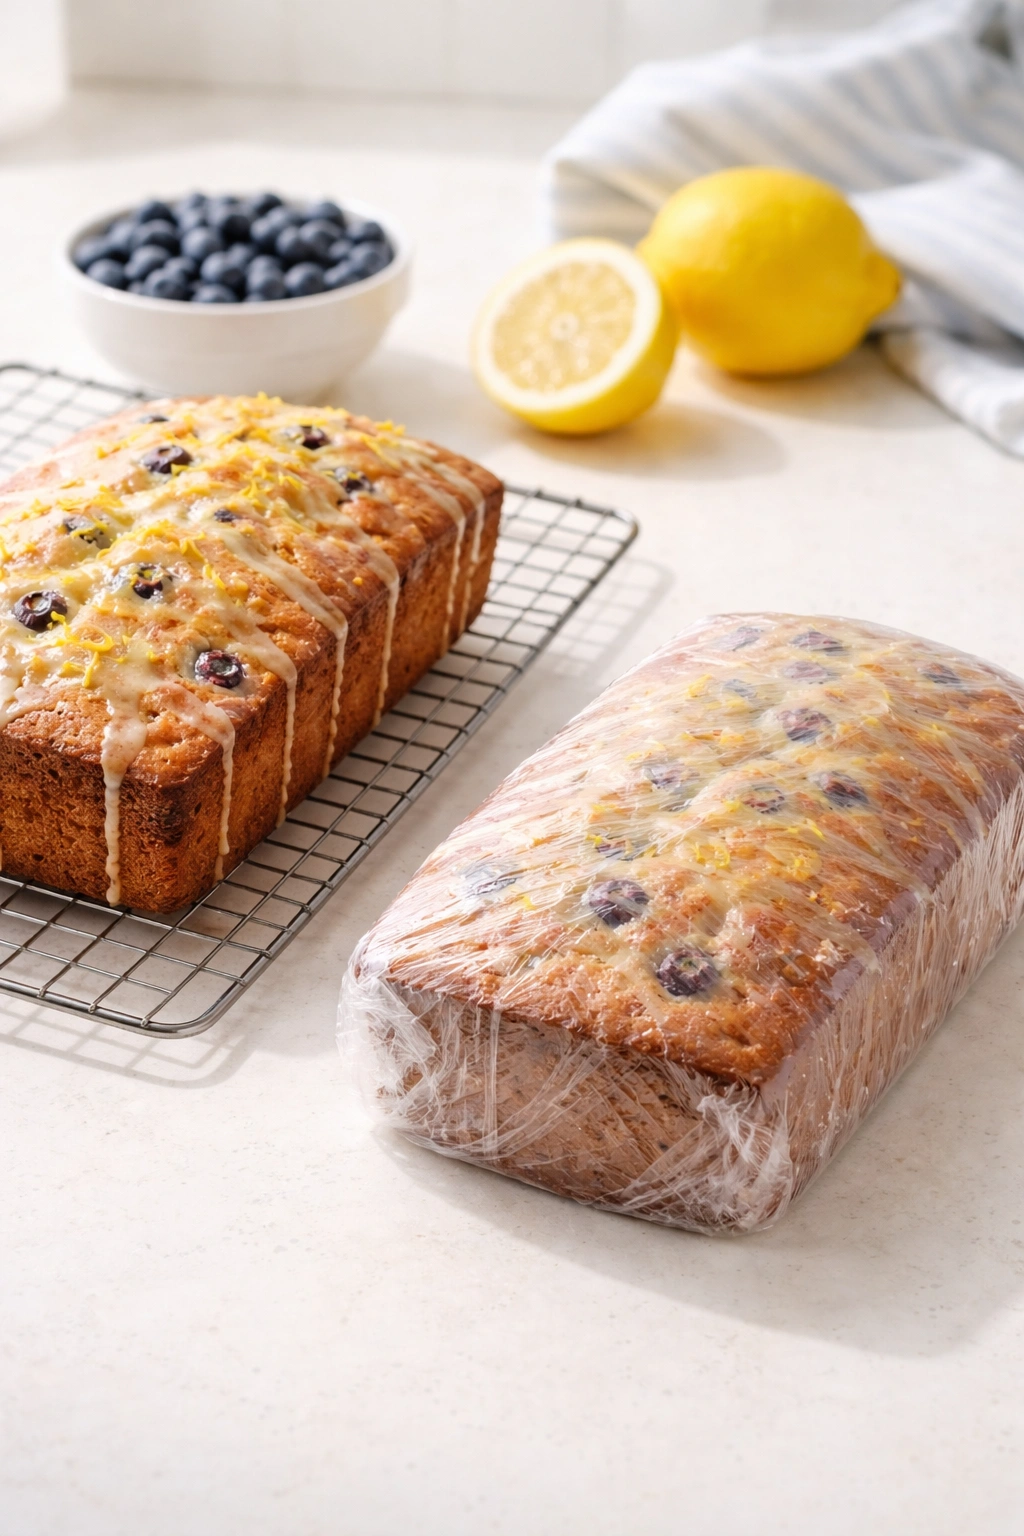
The glaze is best applied when the loaf is completely cooled but still the day you bake it. Pour the glaze over the top of the cooled loaf, allowing it to drip down the sides naturally. You can spread it gently with an offset spatula for a more even coating, or let it find its own way for a more rustic look. Top with a light sprinkle of additional lemon zest if desired.
Allow the glaze to set for at least 15 minutes (it can be a bit sticky if cut too soon) before slicing and serving.
How to Tell When It’s Perfectly Baked
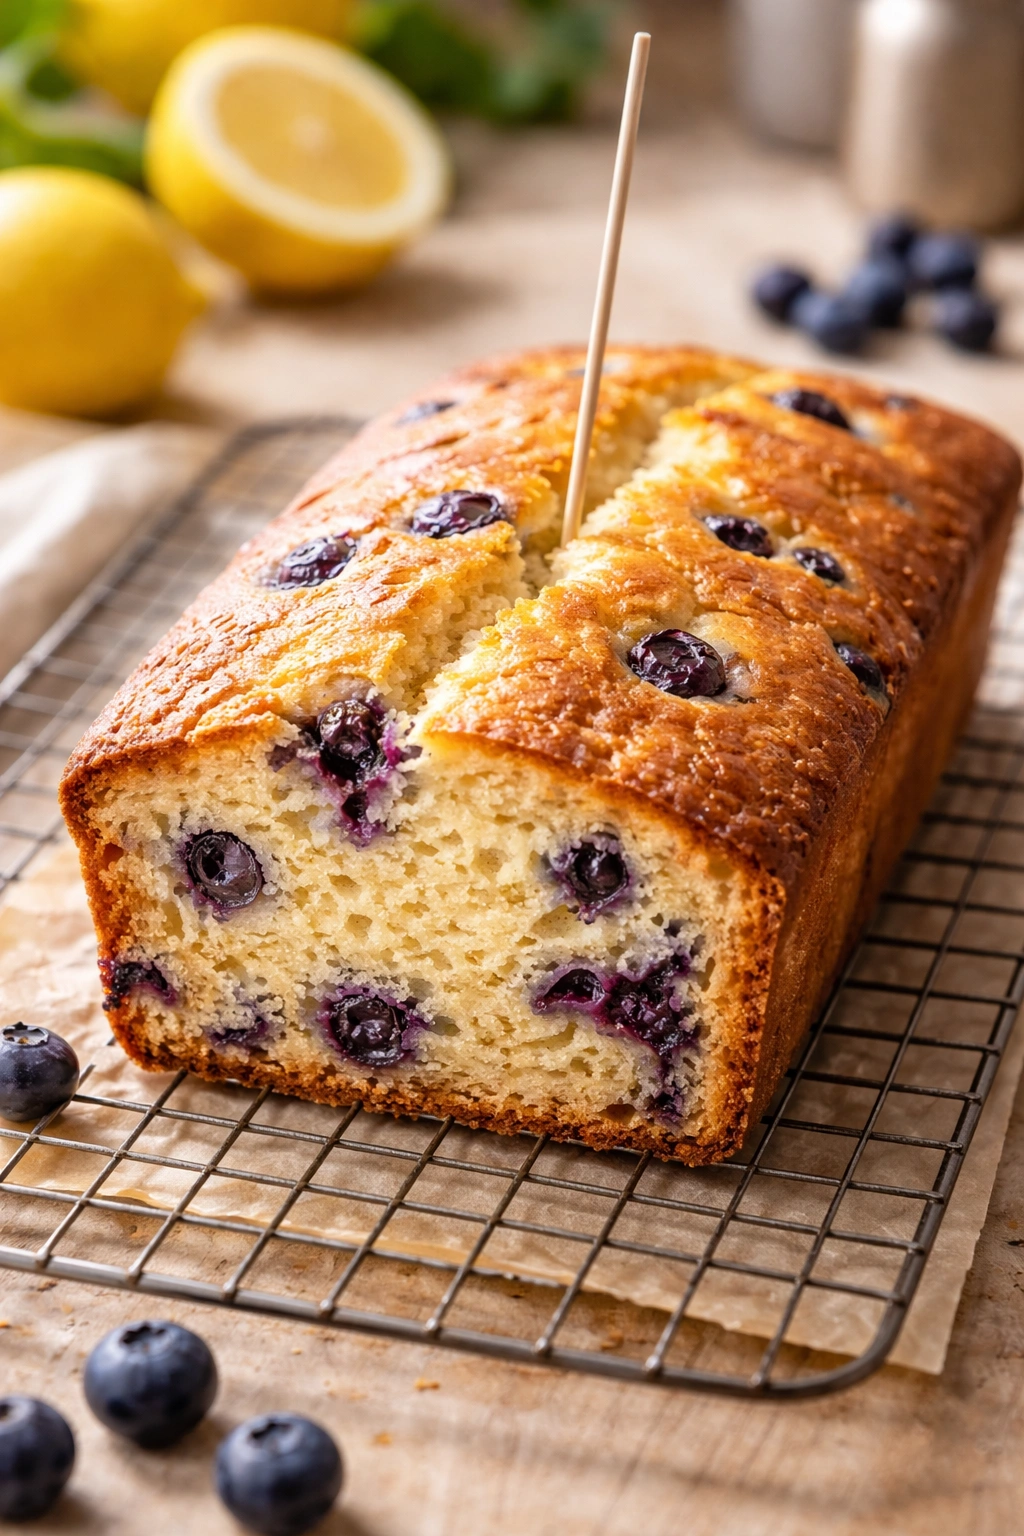
The most reliable test for doneness is the toothpick test: insert a toothpick or thin knife into the very center of the loaf (not into a blueberry, which can mislead you). When it’s done, the toothpick comes out clean or with just a tiny bit of moist crumb—not wet batter, but a few crumbs clinging to the pick are perfect. The cake continues to set slightly as it cools, so you want it barely set when you pull it from the oven.
The second test is visual. The top should be a medium golden brown, not pale and underbaked, and not dark brown and overbaked. The edges should be slightly darker than the center, which is completely normal. If you see the top browning too quickly before the center is baked through, tent the loaf loosely with aluminum foil for the last 10-15 minutes to prevent over-browning while the interior continues to cook.
A third indicator is the “crack test.” As the loaf bakes and the structure sets, it usually develops a few small cracks on the top surface, typically running down the center. This is completely normal and actually a sign that your loaf has a tender crumb—the cake is expanding and then setting, and those cracks are where that expansion occurred.
Cooling and Storing Your Loaf
The cooling process is crucial for texture and flavor development. The loaf continues cooking slightly from residual heat as it cools, and the flavors continue to develop and meld as the cake settles. Resist the urge to slice into it while it’s still warm—patience here results in cleaner slices and better texture.
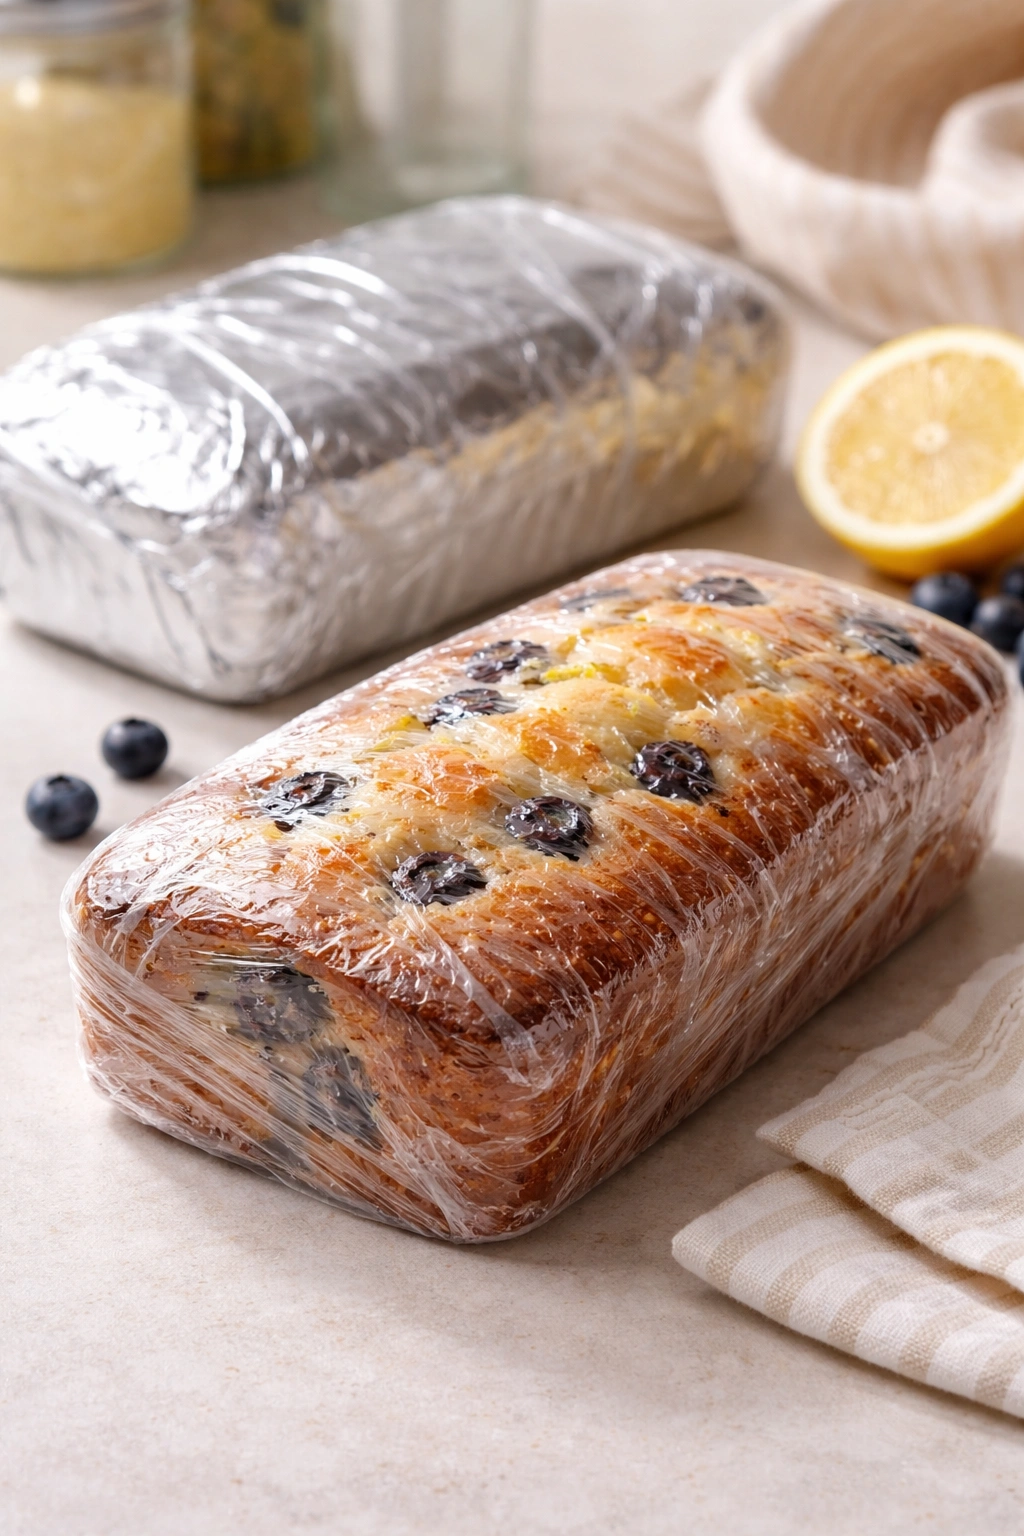
Once fully cooled, wrap the loaf tightly in plastic wrap or aluminum foil, or store it in an airtight container at room temperature. The loaf keeps beautifully for 3-4 days this way, and honestly, it tastes better the next day. The flavors deepen, and the cake becomes even more moist as the moisture redistributes throughout the crumb.
For longer storage, the loaf freezes exceptionally well. Wrap it securely in plastic wrap (use two layers to protect against freezer burn), then wrap the whole thing in aluminum foil. Label it with the date. Frozen loaves keep for up to 3 months. Thaw at room temperature while still wrapped, which takes about 2-3 hours, or unwrap and thaw in a low oven (250°F / 120°C) for about 20 minutes. The loaf actually tastes as fresh after thawing as it did the day it was baked.
Individual slices can be wrapped in plastic wrap and frozen separately if you want to pull them out one at a time. Thaw a slice at room temperature for about 30 minutes, or wrap it in a damp paper towel and microwave for 10-15 seconds for a just-warm slice (be careful not to overheat, which can make it rubbery).
Flavor Variations You Can Easily Make
Once you understand this recipe’s structure, you can adapt it in countless ways without losing its essential character. The buttermilk-oil base works beautifully with almost any flavor combination you can imagine.
Strawberry-Lemon Loaf: Replace the blueberries with fresh strawberries, diced into roughly the same size as a blueberry. The flavor will be slightly more delicate than blueberry-lemon, but absolutely lovely. Follow all the same steps, and reduce the baking time by 3-5 minutes since strawberries release more moisture during baking.
Raspberry-Lemon Loaf: Use fresh raspberries instead of blueberries. Raspberries are more fragile, so handle them gently and reduce the baking time slightly (47-50 minutes). They create a slightly softer texture in the final loaf, which some people prefer. The tartness of raspberries pairs beautifully with the lemon.
Lavender-Lemon Loaf: Omit the blueberries and add 1 tablespoon of dried culinary lavender buds to your dry ingredients. Toast the lavender buds in a dry pan for 30 seconds first to wake up their flavor, then crush them roughly and mix into the flour. The floral notes are subtle but unmistakable and pair beautifully with lemon. Add the blueberries back in if you want (the three flavors together are sophisticated and interesting), or leave them out for pure lavender-lemon.
Poppy Seed Lemon Loaf: Omit the blueberries and fold in 3 tablespoons of poppy seeds right before the blueberries would go in. This creates a more delicate crumb and a slightly nutty flavor that’s classic in lemon cakes. Add the zest of an additional lemon to keep the brightness.
Almond-Lemon-Blueberry Loaf: Replace ½ cup of the all-purpose flour with almond flour (not almond meal—almond flour is finer). Keep everything else the same and add ½ teaspoon of pure almond extract along with the vanilla. The almond creates a slightly richer, more complex flavor and a tender crumb. The baking time stays the same, but check at 48 minutes since the almond flour can brown a bit faster.
Glazed Variations: If using a glaze, swap the lemon juice for fresh orange juice and add a splash of Grand Marnier or Cointreau (optional but elegant). Or make a blueberry glaze by muddling fresh blueberries, straining them through cheesecloth, mixing that juice with powdered sugar, and using that instead of lemon juice for the glaze.
Make-Ahead and Freezing Guide
This loaf is perfect for make-ahead baking because it actually improves with time. You can bake it up to 4 days in advance, wrap it tightly, and store it at room temperature. Many people deliberately bake this loaf a day or two before serving to let the flavors develop more fully.
You can also prepare the batter in advance and bake the loaf right before you need it. Prepare the batter exactly as described above, then transfer it to your prepared loaf pan. Cover the pan tightly with plastic wrap and refrigerate for up to 8 hours. When you’re ready to bake, allow the batter to sit at room temperature for 15-20 minutes to take the chill off (this ensures more even baking), then bake as directed. You might need to add 5-8 minutes to the baking time since the batter is starting cooler.
Frozen blueberries are actually advantageous if you’re preparing batter in advance. They won’t start bleeding into the batter the way thawed berries would, and they’ll release their moisture more gradually during baking. Fresh blueberries will bleed more noticeably if the batter sits overnight, so if you’re using fresh berries and want to make batter ahead, it’s better to store everything separately and fold in the berries right before baking.
The fully baked loaf (with or without glaze) freezes beautifully for up to 3 months. Wrap it securely in plastic wrap and aluminum foil before freezing. Thaw at room temperature while still wrapped (2-3 hours), or place it unwrapped on a wire rack at room temperature (the moisture won’t be as evenly redistributed but it works fine, and thawing takes 30-45 minutes).
Serving Suggestions and Pairings
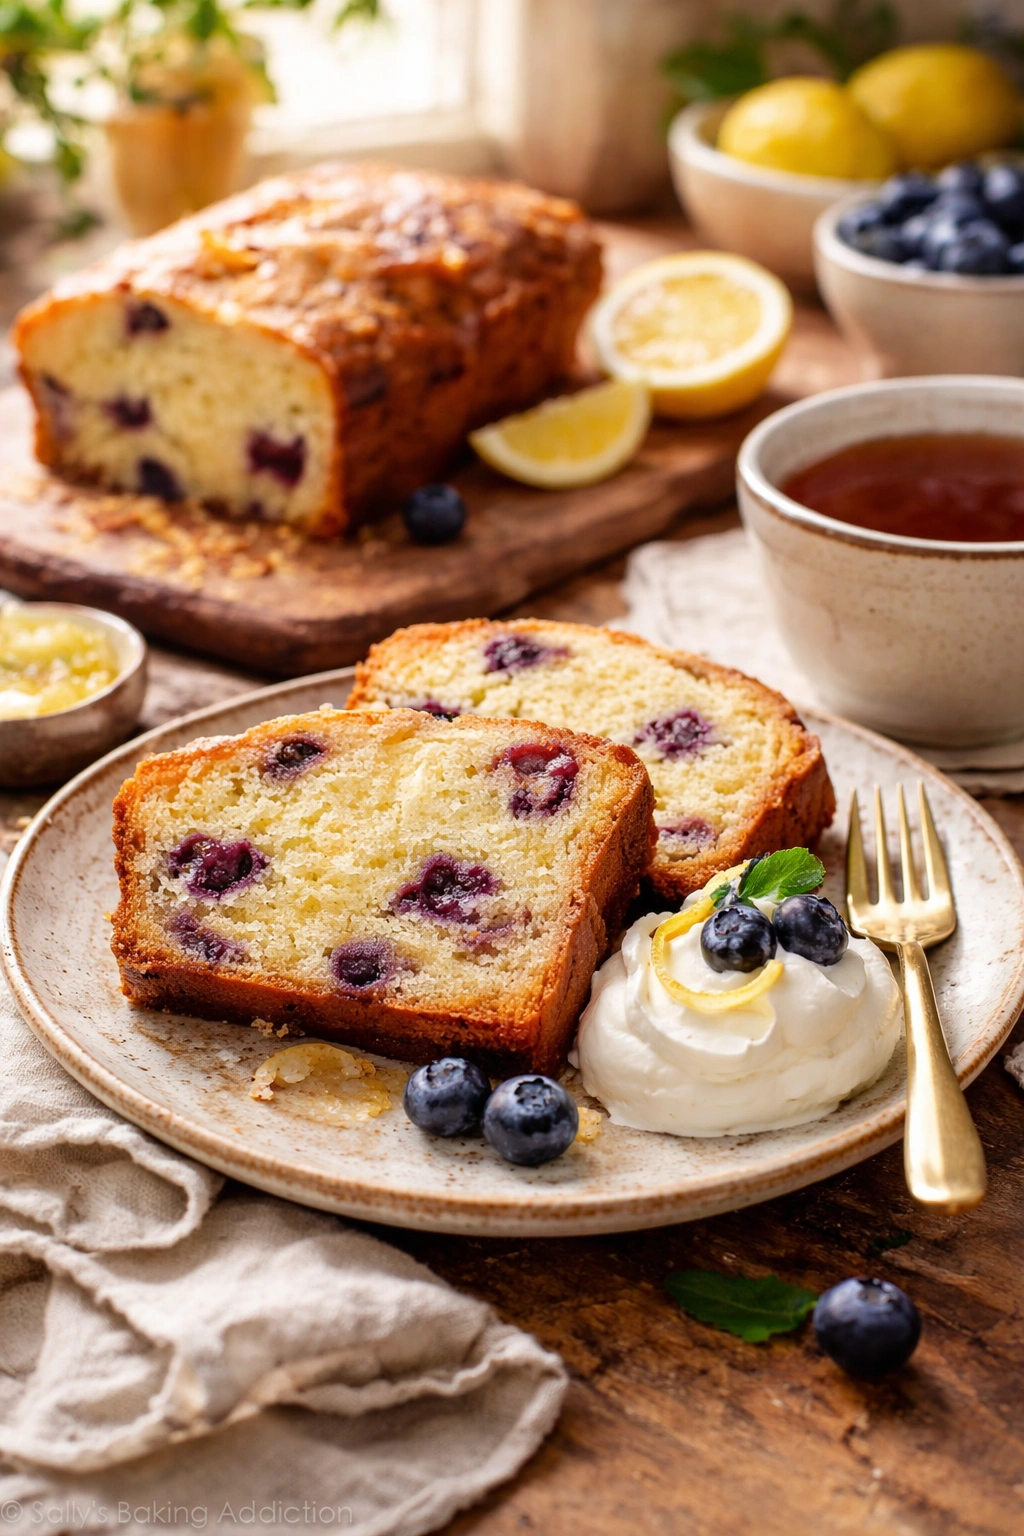
This loaf is wonderfully versatile. Serve it plain with a cup of coffee or tea for a simple breakfast or snack. Serve it with a dollop of whipped cream or crème fraîche for a more indulgent dessert. A light dusting of powdered sugar adds elegance without overwhelming the delicate lemon flavor.
For brunch, serve thin slices alongside scrambled eggs, fresh fruit, and aged cheddar cheese. The brightness of the lemon and blueberry cuts through the richness of eggs beautifully. You could also serve it toasted with butter and honey, or with a generous spread of lemon curd.
As a dessert, pair the loaf with vanilla ice cream or Greek yogurt for a lighter option. The tartness of yogurt plays beautifully with the lemon-blueberry flavors. It’s also exceptional served alongside a simple green salad with a lemon vinaigrette for an unconventional but compelling light dessert course.
For afternoon tea, arrange thin slices on a tiered stand alongside clotted cream, lemon curd, and small pots of tea. This feels restaurant-quality and special, but requires zero extra effort beyond what you’ve already done.
The loaf pairs beautifully with light white wines—Sauvignon Blanc, Pinot Grigio, or Albariño all work wonderfully. It also complements sparkling wine or champagne for elegant entertaining. For non-alcoholic pairings, serve it with herbal tea (chamomile or lemon balm are obvious choices), fresh lemonade, or even cold brew coffee.
Troubleshooting Common Issues
My loaf is too dense. This usually means the batter was overmixed. The more you mix, the more gluten develops, and the tougher and denser the cake becomes. Remember: fold gently until the dry ingredients just disappear. A few tiny lumps are fine. You can also check that you’re measuring your flour correctly—spoon flour into your measuring cup and level it off; don’t pack it down or scoop directly from the bag, both of which add extra flour and make the cake heavier.
The blueberries all sank to the bottom. You likely skipped coating them with cornstarch, or you folded them in too gently and they settled during baking. This doesn’t ruin the loaf, but distribution is uneven. Next time, definitely use the cornstarch trick and fold the berries in with purpose—you want them distributed throughout, not just gently stirred in.
The top is dry but the center is still wet. Your oven might run hot, causing the outside to cook too fast. Try lowering the oven temperature to 340°F (170°C) and adding 5-10 minutes to the bake time. You could also tent the top with foil partway through baking. Alternatively, your loaf pan might be very dark or metallic, which conducts heat too aggressively. Try using a lighter-colored pan or wrapping your current pan in foil to moderate the heat conduction.
The cake tastes dry. Measure your oil and buttermilk carefully—these are what keeps the cake moist. Too little of either one makes the loaf dry. Also make sure you’re not baking longer than necessary; overbaking even by 5 minutes makes the loaf noticeably drier. The toothpick test should show moist crumbs, not a completely clean pick.
I can’t taste the lemon. Use fresh lemon juice and zest, not bottled juice or extract (these lack flavor). The amount given in the recipe is correct for a subtle but distinct lemon flavor. If you want it more pronounced, add an additional teaspoon of zest (the flavor is more concentrated there than in the juice). You could also reduce the sugar by 2 tablespoons, which allows the lemon flavor to come forward more noticeably.
The glaze cracked or became grainy. Powdered sugar sometimes crystalizes if you over-whisk the glaze or add the liquid too quickly. Make sure you’re sifting the powdered sugar before you use it (this removes lumps), whisking gently rather than aggressively, and adding the liquid slowly. If it happens, strain the glaze through a fine-mesh sieve to remove the crystals.
Final Thoughts
This lemon blueberry loaf represents everything a quick bread should be: it’s sophisticated without being fussy, deeply flavorful without being aggressive, and genuinely moist without tasting heavy or dense. The combination of buttermilk and oil creates a texture that’s almost impossible to achieve with traditional butter-based methods, and the double lemon approach gives you brightness on multiple levels.
The real magic of this recipe is that it gets better with time. Most baked goods are best the day they’re made, but this loaf actually tastes more developed and flavorful the next day, when the flavors have had time to fully integrate and the moisture has evened out throughout the crumb. That’s why you’ll find yourself making it again and again—it’s reliable, it’s delicious, it keeps well, and it genuinely improves over a few days.
Once you’ve made it a couple of times and understand how the components work together, you’ll feel confident adapting it with different berries, different flavor extracts, or different glazes. The foundation is solid enough to support creative exploration while simple enough that nothing can really go wrong. That’s the hallmark of a truly great recipe—one that works perfectly as written but invites you to make it your own.