There’s nothing worse than standing at the stove with a spatula in hand, watching pancakes that looked promising bubble away into dense, rubbery disappointment. You followed a recipe, measured carefully, and still ended up with something that landed on the plate with all the appeal of a hockey puck. The frustration is real — especially when you know homemade pancakes should be pillowy, golden, and so tender they practically melt on your tongue.
The difference between dense, flat pancakes and genuinely fluffy ones rarely comes down to luck. It comes down to understanding exactly what happens in the batter before it ever hits the griddle, how to treat the ingredients with just the right amount of care, and what specific signs tell you when your batter is actually ready to cook. This recipe works because it respects the science of what makes pancakes rise and sets you up with unmistakable visual and tactile cues so you know precisely when something is right.
I’ve spent enough mornings testing pancake techniques to recognize the exact moment when a batter is perfectly aerated, the griddle is hot enough to create that gorgeous caramelized exterior without burning the inside, and the timing is spot-on to flip while the pancakes are still slightly wet on top. There’s a rhythm to it — a feel that becomes second nature once you’ve done it a few times. After you nail this technique, you’ll never go back to flat or rubbery again.
Why Most Homemade Pancakes Turn Out Dense or Flat
The most common reason pancakes disappoint has nothing to do with the recipe itself — it has to do with how the batter gets mixed. Most home cooks mix the batter until it looks smooth and homogeneous, which seems logical, but this is actually the exact opposite of what you want. When you overmix pancake batter, you activate gluten development in the flour, and gluten is a toughening agent that makes pancakes dense and chewy rather than tender and light.
The second major culprit is the griddle temperature. Too low and the pancakes spread out and never caramelize properly on the bottom — they stay pale and rubbery. Too high and the outside burns before the inside finishes cooking. A lot of people guess at the temperature instead of actually testing it, which leads to wildly inconsistent results even when they use the same recipe twice.
A third reason — one that catches even confident cooks — is waiting too long between mixing the batter and cooking it. Once you combine the wet and dry ingredients, a chemical reaction begins immediately. The baking powder or baking soda starts releasing gas bubbles, and those bubbles are what create the fluff. If you let the batter sit for 10 or 15 minutes before cooking, those bubbles dissipate and you’re left with flat pancakes that taste fine but lack the height and texture that makes them special.
Finally, many recipes skimp on one crucial ingredient: egg yolks. The yolk is what carries fat and emulsifiers that make pancakes tender and rich. Recipes that use whole eggs or skip a yolk often produce pancakes that are technically edible but lack the luxurious, custardy quality that separates truly fluffy pancakes from mediocre ones.
The Science Behind Perfectly Fluffy Pancakes

Fluffy pancakes are essentially a suspension of air bubbles trapped in a delicate network of flour, fat, and protein. The air comes from two sources: the leavening agents (baking powder) that release gas when they contact liquid, and the egg whites that get whipped and folded in to create an aerated foam.
The structure that holds those bubbles comes from gluten, but here’s the counterintuitive part — you need just enough gluten structure to hold the bubbles, not so much that it makes the pancakes tough. This is why mixing matters so much. When you overmix, gluten develops excessively and it tightens up, squeezing out air and creating a dense crumb. When you barely mix — lumpy batter is fine — you develop just enough gluten to give the pancakes structure without making them rubbery.
The fat and egg yolks serve multiple roles. Fat makes the pancakes tender by coating the flour particles and interfering with gluten development. Egg yolks add richness, help emulsify the batter so it stays smooth and pourable, and contribute to browning through the Maillard reaction that creates that golden color and toasted flavor. The egg whites, whipped separately and folded in gently, create additional air and make the final pancakes ethereal and light.
Leavening is another key mechanism. Baking powder reacts immediately when it contacts liquid, releasing carbon dioxide gas. Some of that gas escapes before cooking (which is why you cook pancakes quickly after mixing), but enough remains to inflate the batter as it heats up. The heat then sets the structure, trapping those bubbles in place.
Why This Recipe Uses Separated Eggs
Most basic pancake recipes use whole eggs mixed directly into the batter, and that works fine for acceptable pancakes. But separating the eggs — using the yolks in the batter and whipping the whites separately before folding them in — creates measurably fluffier pancakes with a superior texture.
Here’s why: when you whip egg whites, you’re incorporating air into them through mechanical action. The whipping denatures the proteins in the whites, which then network around the air bubbles you’ve created, stabilizing them. When you fold those whipped whites into the batter gently, you’re essentially adding a foam directly to the batter. That foam contains far more air than you could create any other way.
The yolks, meanwhile, stay with the wet ingredients. They contribute fat, emulsifiers, and flavor without interfering with the egg whites’ ability to create and hold that aerated foam. It’s the difference between making pancakes that are simply fluffy and making pancakes that are remarkably, noticeably fluffy — the kind that tower on the plate and feel almost cloud-like to eat.
You only need to whip the egg whites to soft peaks, not stiff peaks. Soft peaks fold in more easily without deflating, and you get all the benefit of the aerated structure without any of the risk of overbeating. This is a real technique used in restaurant kitchens because it delivers consistent, restaurant-quality results.
Choosing Ingredients That Actually Matter
Not all flour is the same, and for pancakes, it matters. All-purpose flour works perfectly — you don’t need specialty flours. All-purpose contains about 10-12% protein, which gives you enough gluten development for structure without being as high-protein as bread flour. If you’re in a country where flour strength varies, aim for a standard, all-purpose grade rather than cake flour (too low in protein, pancakes won’t hold together) or bread flour (too high in protein, pancakes get tough).
Baking powder is non-negotiable and it must be fresh. Baking powder loses potency over time, and old baking powder means fewer gas bubbles and flatter pancakes. If your baking powder has been open for more than a year, replace it. You can test old baking powder by mixing a teaspoon with hot water — if it fizzes vigorously, it’s still active. If it barely bubbles, it’s expired.
Eggs should be as fresh as possible. Fresh eggs have firmer whites that whip to stable peaks more easily than older eggs. Room-temperature eggs also beat better than cold ones, so take them out of the fridge 30 minutes before you start.
Milk should be whole milk for best results. The fat in whole milk makes pancakes tender and rich. Skim milk works in a pinch, but you’ll notice pancakes made with it are slightly drier. Buttermilk is fantastic if you have it — it adds tang and reacts with baking soda to create even more lift, though you’ll need to adjust the leavening.
Butter should be real butter, softened to room temperature or melted depending on what the recipe calls for. Vegetable oil works functionally but won’t contribute any of the flavor that butter brings. Melted butter drizzled into the batter incorporates more evenly than cold butter, which can create lumps.
Salt shouldn’t be skipped — it enhances the vanilla flavor and brings out the sweetness. Without salt, pancakes taste a bit flat and one-dimensional.
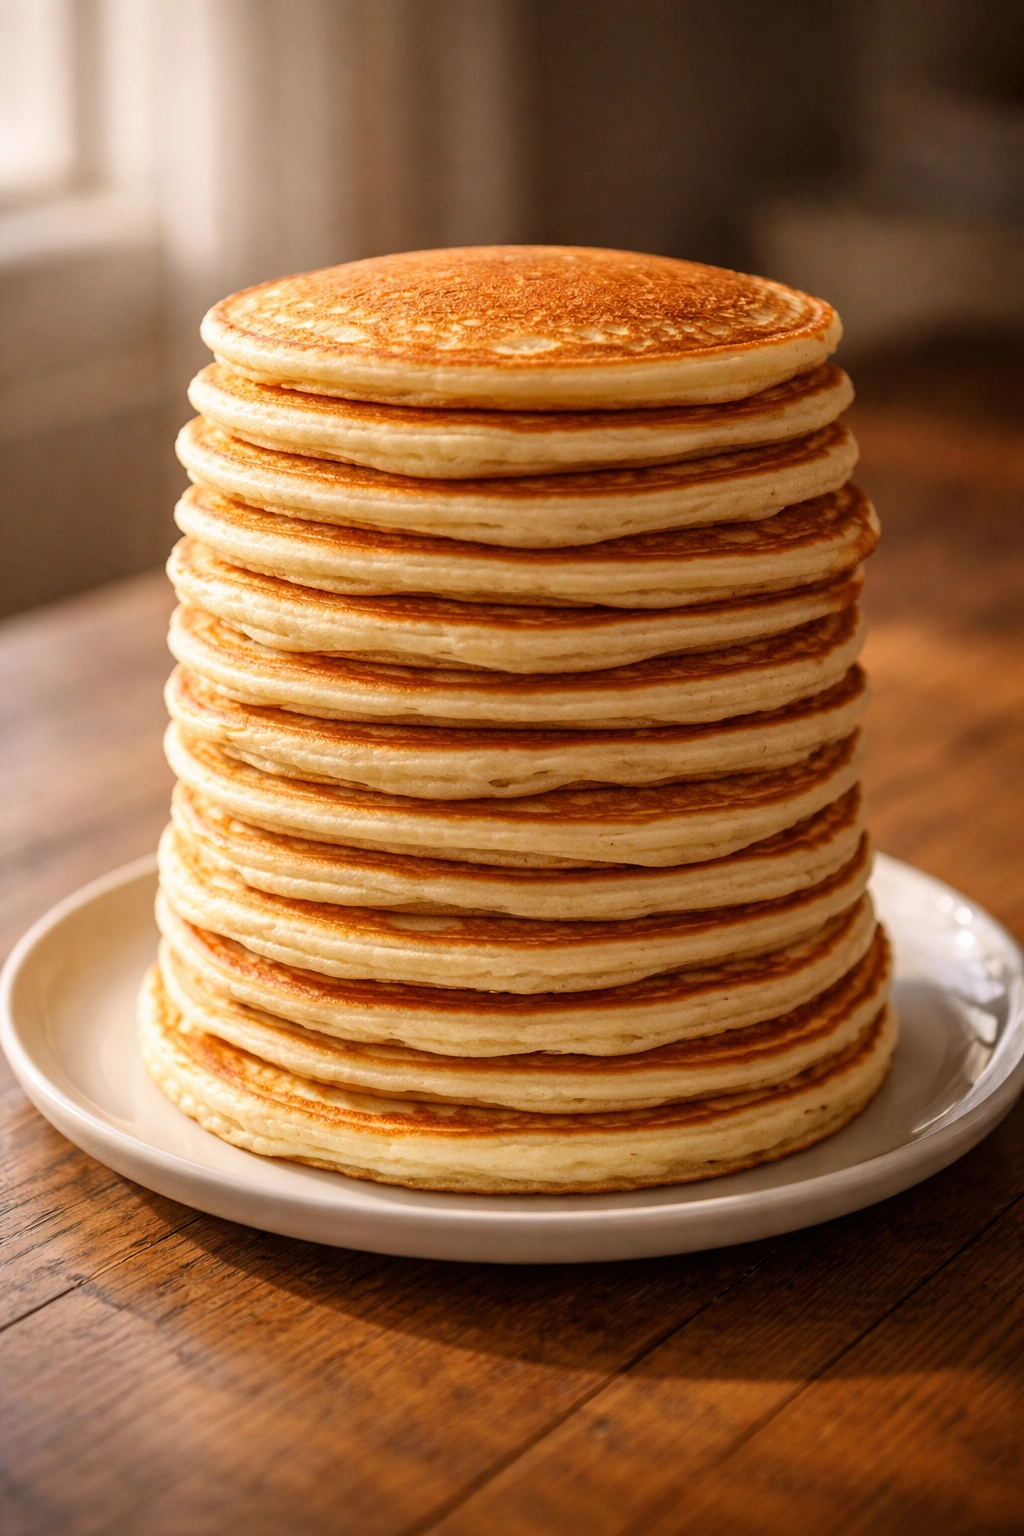
Yield: Serves 4 to 6 | Makes about 16 to 18 pancakes
Prep Time: 15 minutes
Cook Time: 15 to 20 minutes

Total Time: 30 to 35 minutes

Difficulty: Beginner — The technique is very forgiving, and all the steps are straightforward. The only thing you’re doing differently from a standard pancake recipe is separating the eggs and whipping the whites, which takes an extra minute but makes a huge difference in the final texture.

For the Batter:
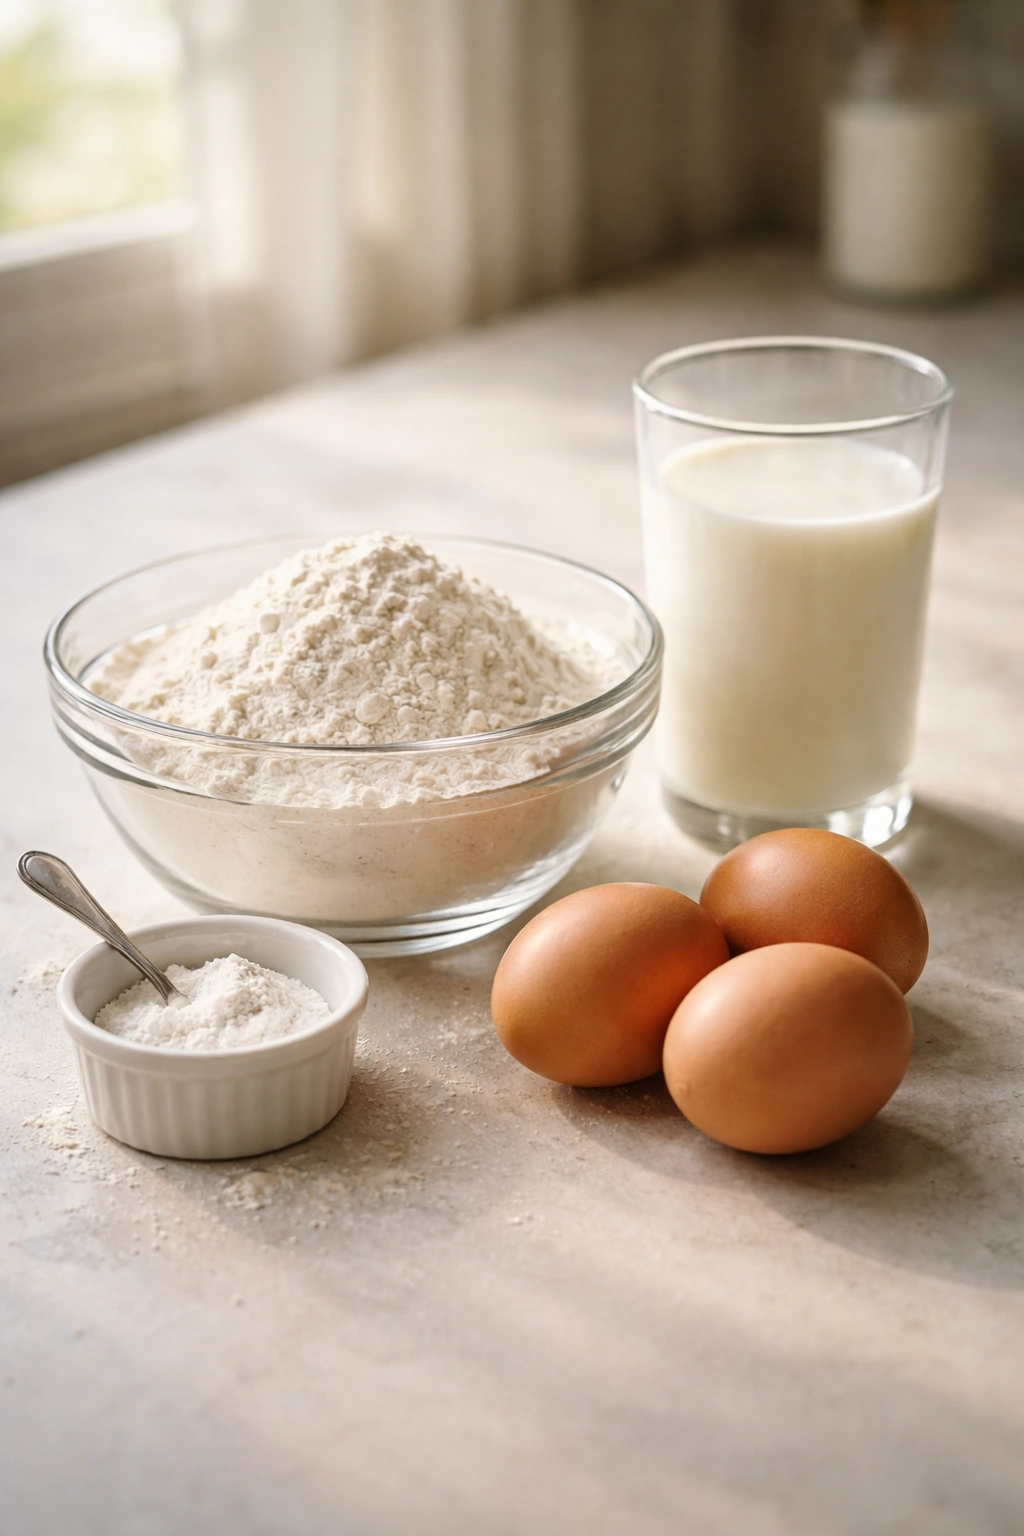
- 2 cups all-purpose flour
- 2 tablespoons granulated sugar
- 1½ teaspoons baking powder
- ½ teaspoon fine sea salt
- 1¾ cups whole milk, room temperature
- 4 large eggs (separated: yolks in one bowl, whites in another)
- 3 tablespoons unsalted butter, melted and cooled slightly
- 1 teaspoon pure vanilla extract
For Cooking:
- 1 tablespoon unsalted butter (for the griddle)
- Neutral oil if needed (vegetable, canola, or light olive oil)
For Serving (Optional):
- Pure maple syrup (warm, if you prefer)
- Fresh berries (blueberries, raspberries, strawberries)
- Whipped cream
- Powdered sugar
- Greek yogurt
- Sliced fresh fruit
- Cinnamon or nutmeg dusted on top
- A drizzle of melted chocolate
- Toasted nuts (pecans, walnuts, almonds)
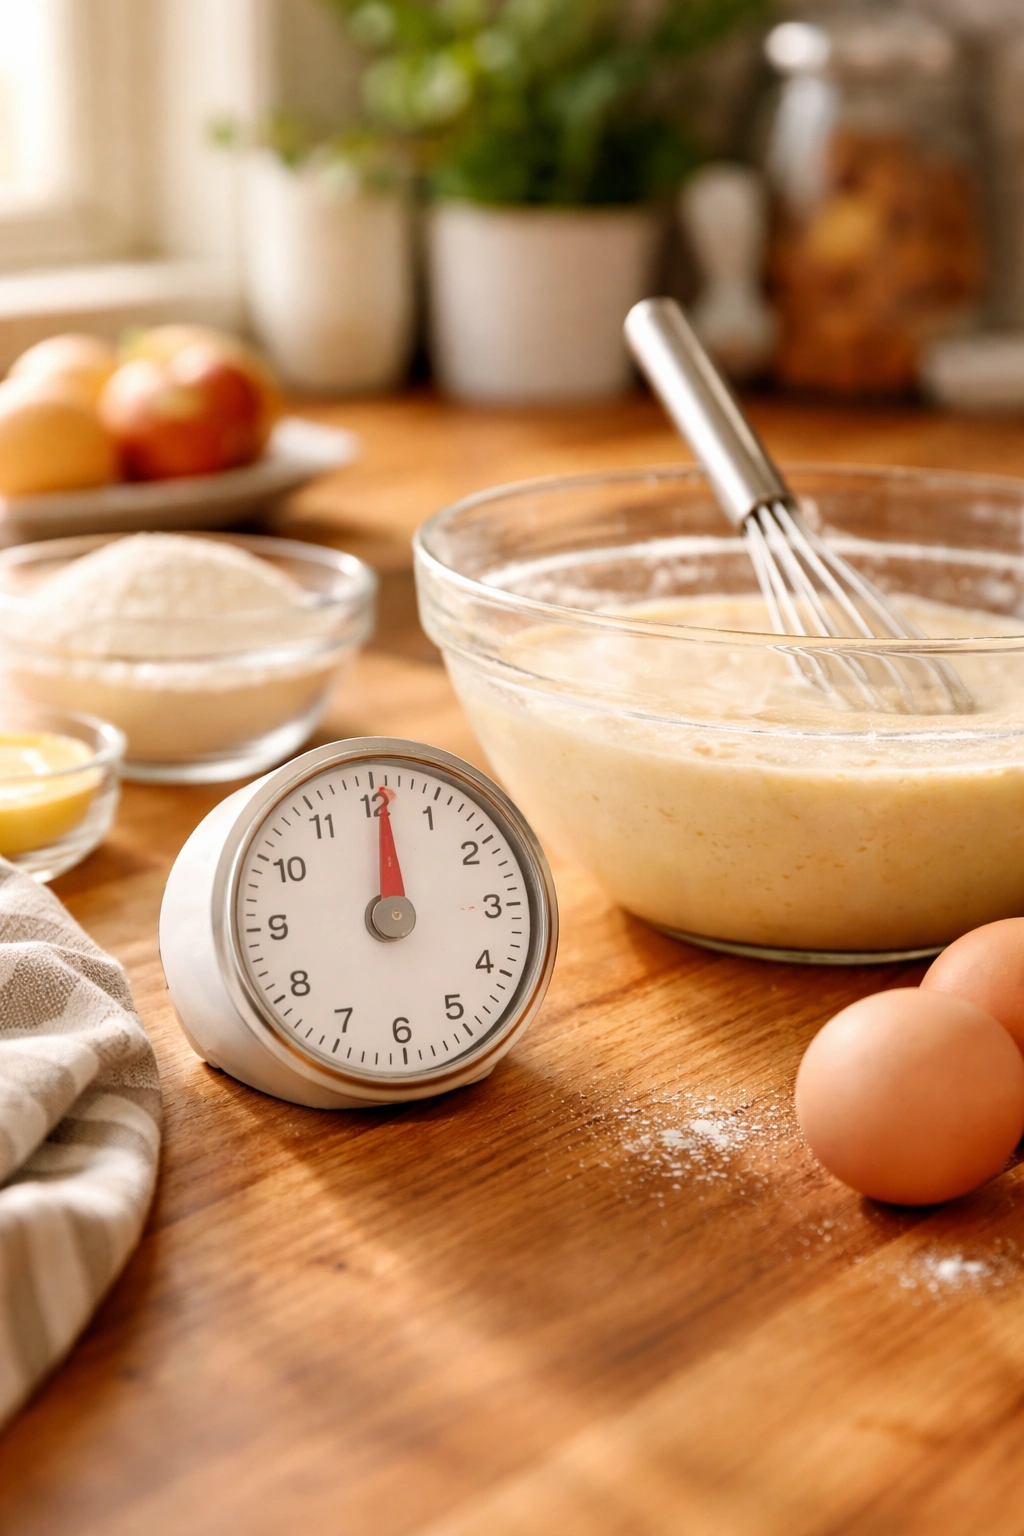
Prepare Your Workspace and Preheat the Griddle

Start by getting your workspace organized and setting your griddle to heat while you work on the batter. This two-step timing is crucial because you want the griddle hot and ready the moment your batter is mixed, not sitting there waiting for the surface to heat up.
Set a large mixing bowl, a medium mixing bowl, and a small mixing bowl on the counter. You’ll need these three bowls because you’re separating the eggs and keeping the batter components organized. Have your whisk handy, a measuring cup, and a measuring spoon set nearby.
Place a griddle or large nonstick skillet over medium heat. Let it preheat for about 3 to 4 minutes while you mix the batter. You’ll know it’s ready when a drop of water flicked onto the surface sizzles and dances across it — not immediately evaporates (which means it’s too hot) and not just sitting there (which means it’s not hot enough). The griddle should be hot enough that it creates a nice, caramelized bottom on the pancake within 45 seconds to a minute of cooking, but not so hot that the bottom burns before the interior finishes setting.
Mix the Dry Ingredients

In your largest mixing bowl, whisk together the flour, sugar, baking powder, and salt. Use your whisk to actually mix these, not just stir them — whisking aerates the flour slightly and distributes the baking powder and salt evenly, so you don’t end up with pockets of baking powder that create weird texture variations. Whisk for about 30 seconds until the dry ingredients are completely combined and you see no visible streaks of anything different from the flour.
Don’t worry if the mixture feels slightly powdery or has a subtle sheen — that’s normal and means the ingredients are fully incorporated. Set this bowl aside and don’t stir it anymore. The moment you combine the dry ingredients with the wet ingredients, the baking powder starts releasing gas, so you want that to happen right before you cook.
Combine the Wet Ingredients and Separate the Eggs Properly

In your medium mixing bowl, combine the egg yolks, milk, melted butter, and vanilla extract. Whisk these together until they’re fully combined and the yolks are broken up and evenly distributed. You want a smooth, homogeneous liquid — this is the one step where you’re actually supposed to mix thoroughly.
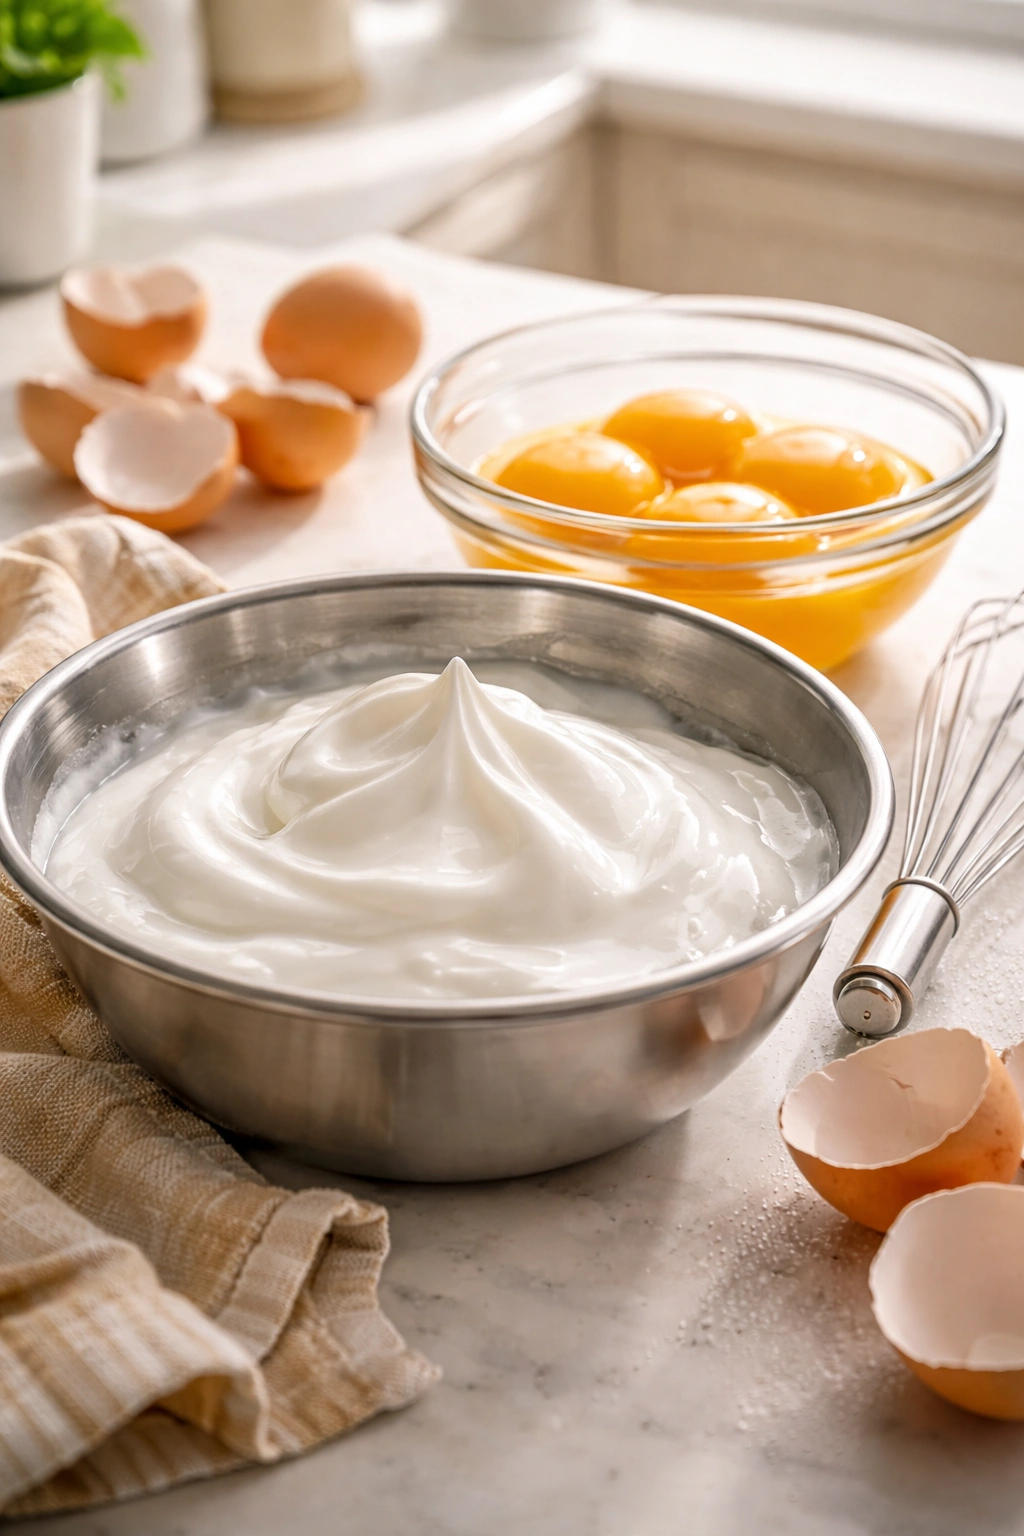
In your third bowl (the small one), add the egg whites. Use a hand mixer, a stand mixer with the whisk attachment, or a simple whisk and some elbow grease. You’re going to beat the egg whites until they form soft peaks — that means when you lift the whisk, the egg whites stand up in peaks that gently curl over at the tips rather than standing straight up like stiff peaks. Soft peaks take about 2 to 3 minutes with an electric mixer or about 4 to 5 minutes if you’re whisking by hand. You’ll know you’re there when the whites look foamy and white, have clearly increased in volume, and form peaks that aren’t rigid.
Here’s a crucial note: Do not overbeat the egg whites. If you beat them past soft peaks to stiff peaks, they become harder to fold into the batter and you risk breaking some of those precious air bubbles. Soft peaks are your target.
Combine Wet and Dry Ingredients With Minimal Mixing
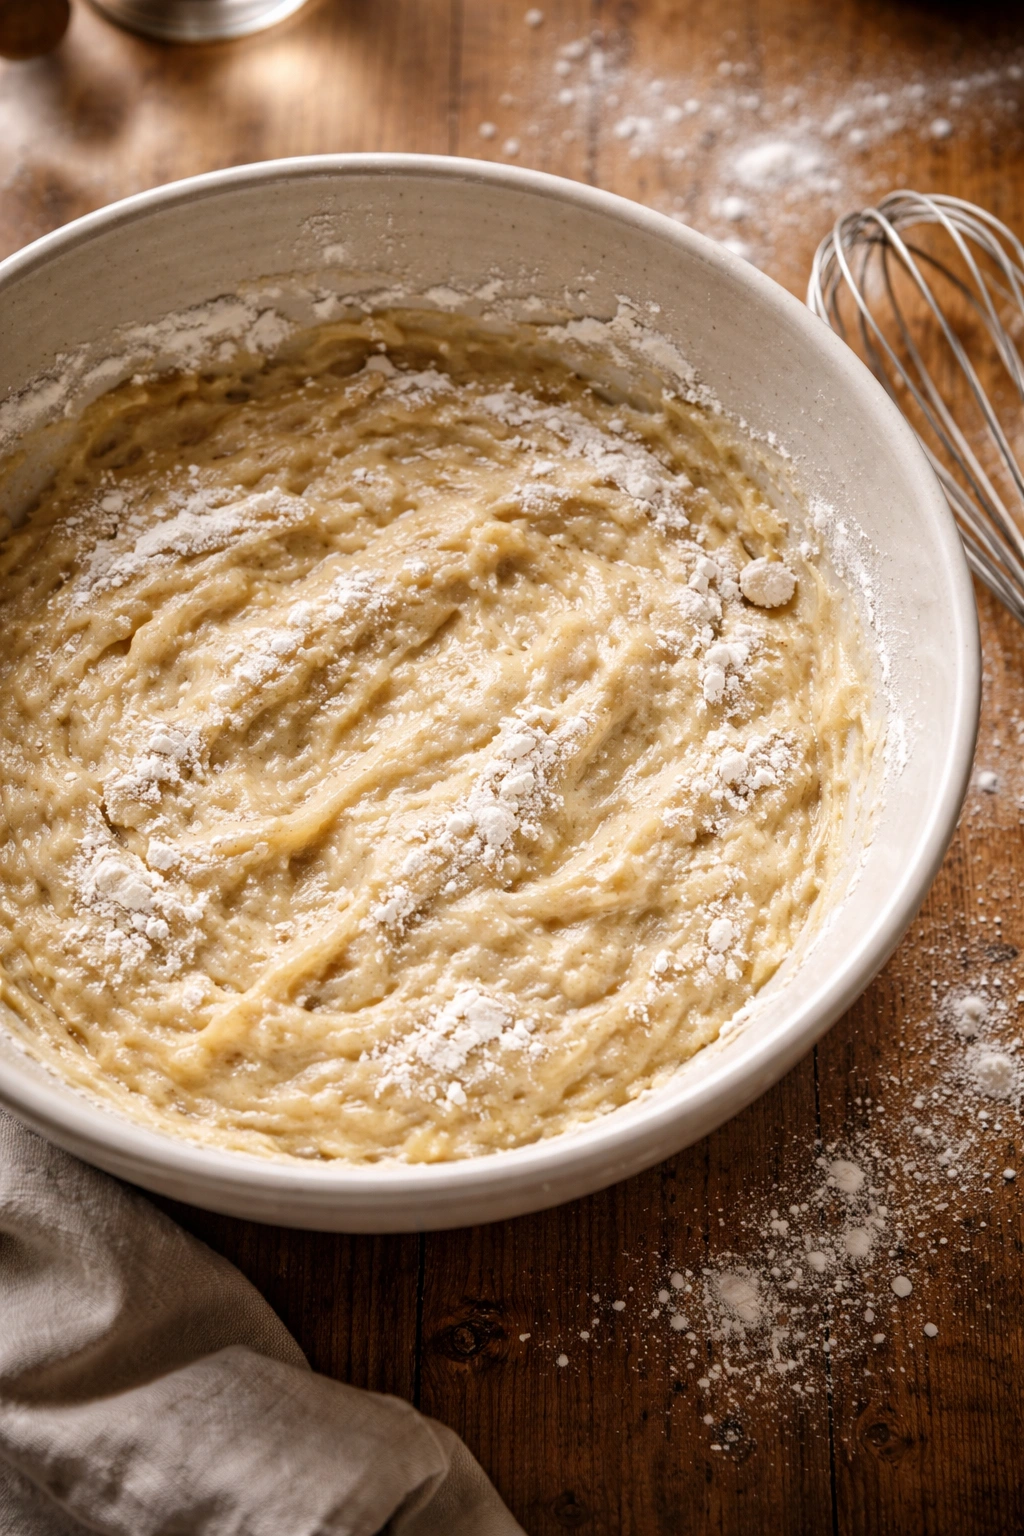
Pour the wet ingredients (egg yolks, milk, butter, vanilla) into the bowl of dry ingredients. Using your whisk, stir these together with just 8 to 10 strokes — you’re going for “barely combined” not “smooth.” The batter should look lumpy. It should have visible streaks of dry flour still visible. This is not a mistake. This is exactly what you want.
Why? Because as you continue to mix, you’ll further develop gluten and make the pancakes tough. By stopping while there are still lumps, you preserve tenderness. Those lumps will dissolve when the pancakes cook from the heat and moisture — they don’t need to be incorporated into the batter itself.
Fold in the Egg Whites With a Gentle Hand
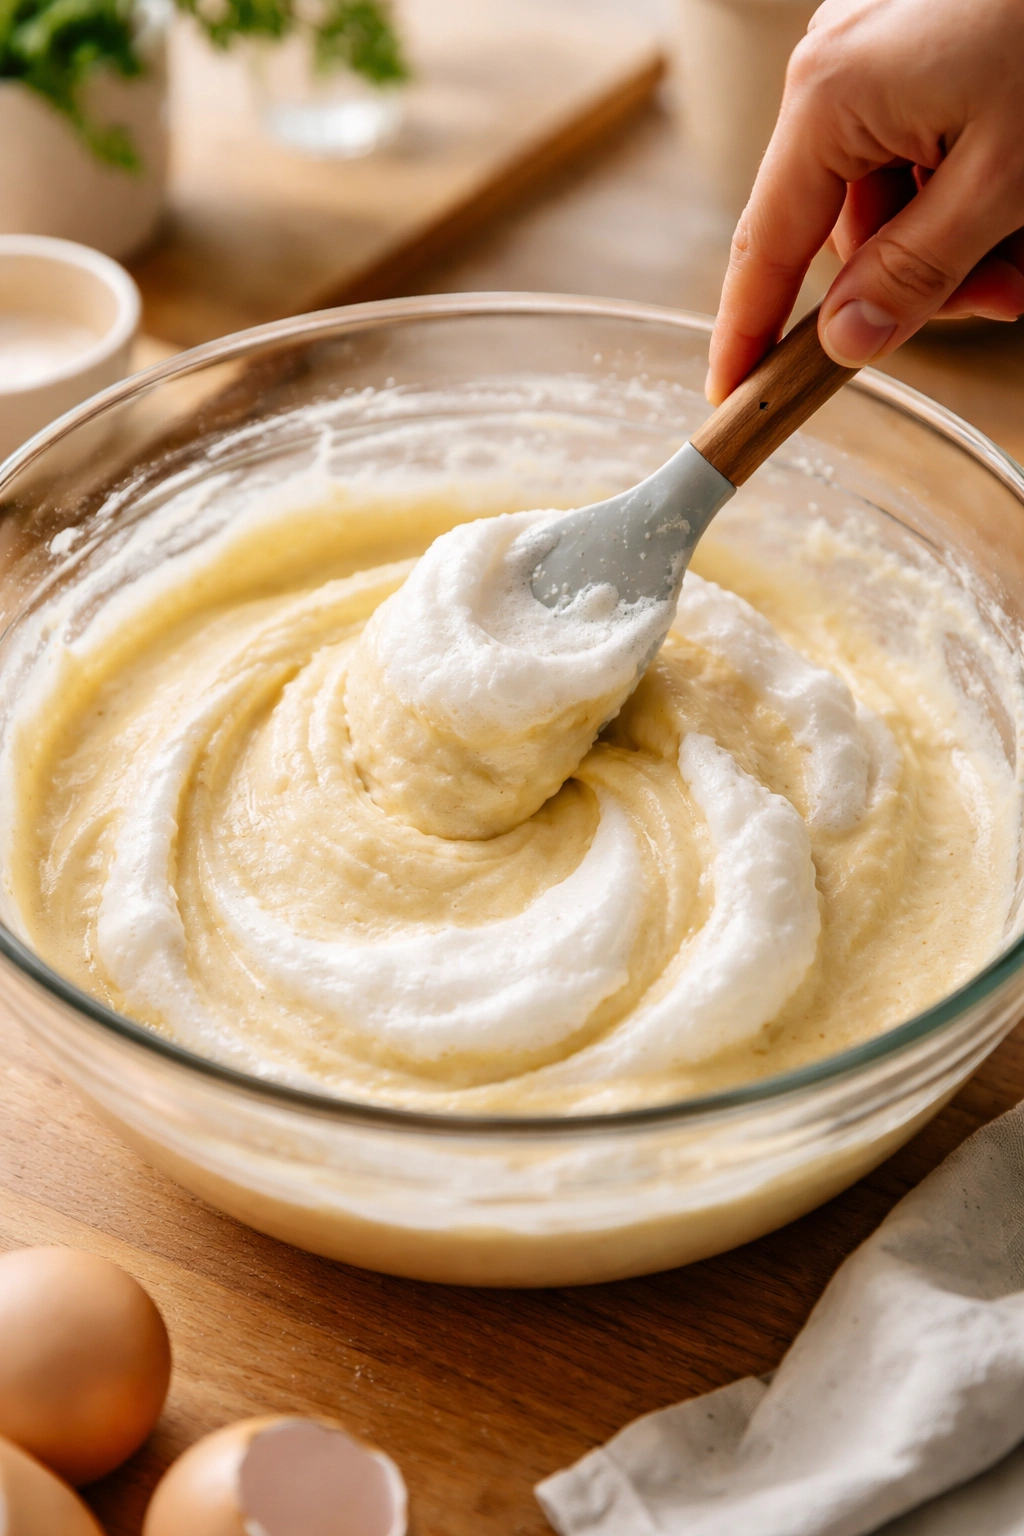
Now take your whipped egg whites and add them to the batter in two additions. First, add about one-third of the whites and fold them in gently using a spatula or large spoon. Use a folding motion: slice the spatula down through the middle of the batter, across the bottom, and up and over the top, rotating the bowl as you go. This technique incorporates the whites without deflating them.
Once the first addition is mostly incorporated (a few white streaks are fine), add the remaining whites and fold them in the same way until there are just a few white streaks remaining visible. You want to fold just enough that everything is mostly combined, but you should still see some white streaks in the batter. This “undermixing” preserves the air bubbles in the egg whites.
The batter should now look thick, lumpy, and studded with white foam. It should fall off your spatula in soft clumps rather than running like a thin batter. This texture is correct.
Test the Griddle Heat and Butter the Surface
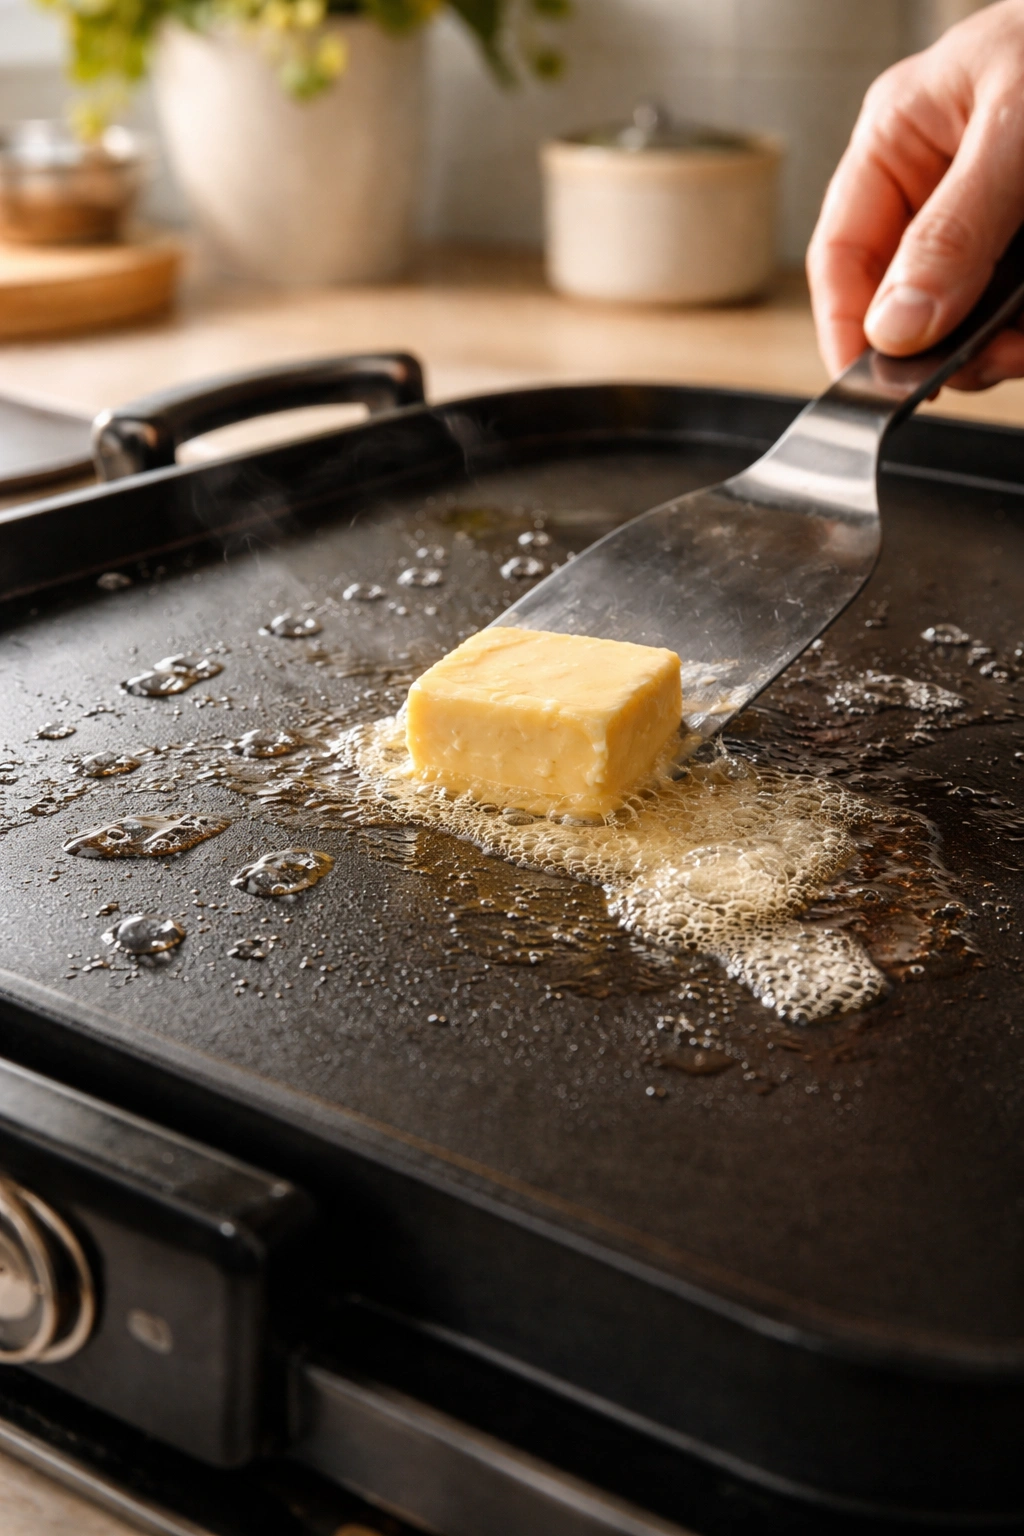
Before you cook your first pancake, test the griddle heat one more time. Flick a drop of water onto it — if it dances and sizzles for a few seconds before evaporating, the heat is perfect. If it evaporates immediately, the griddle is too hot; turn it down slightly and wait 30 seconds. If it just sits there without sizzling, the griddle is not hot enough; increase the heat slightly and wait a minute.
Rub a small piece of butter across the entire griddle surface. The butter should melt and foam slightly, coating the surface evenly. If the butter smokes, the griddle is too hot.
Cook the First Batch of Pancakes
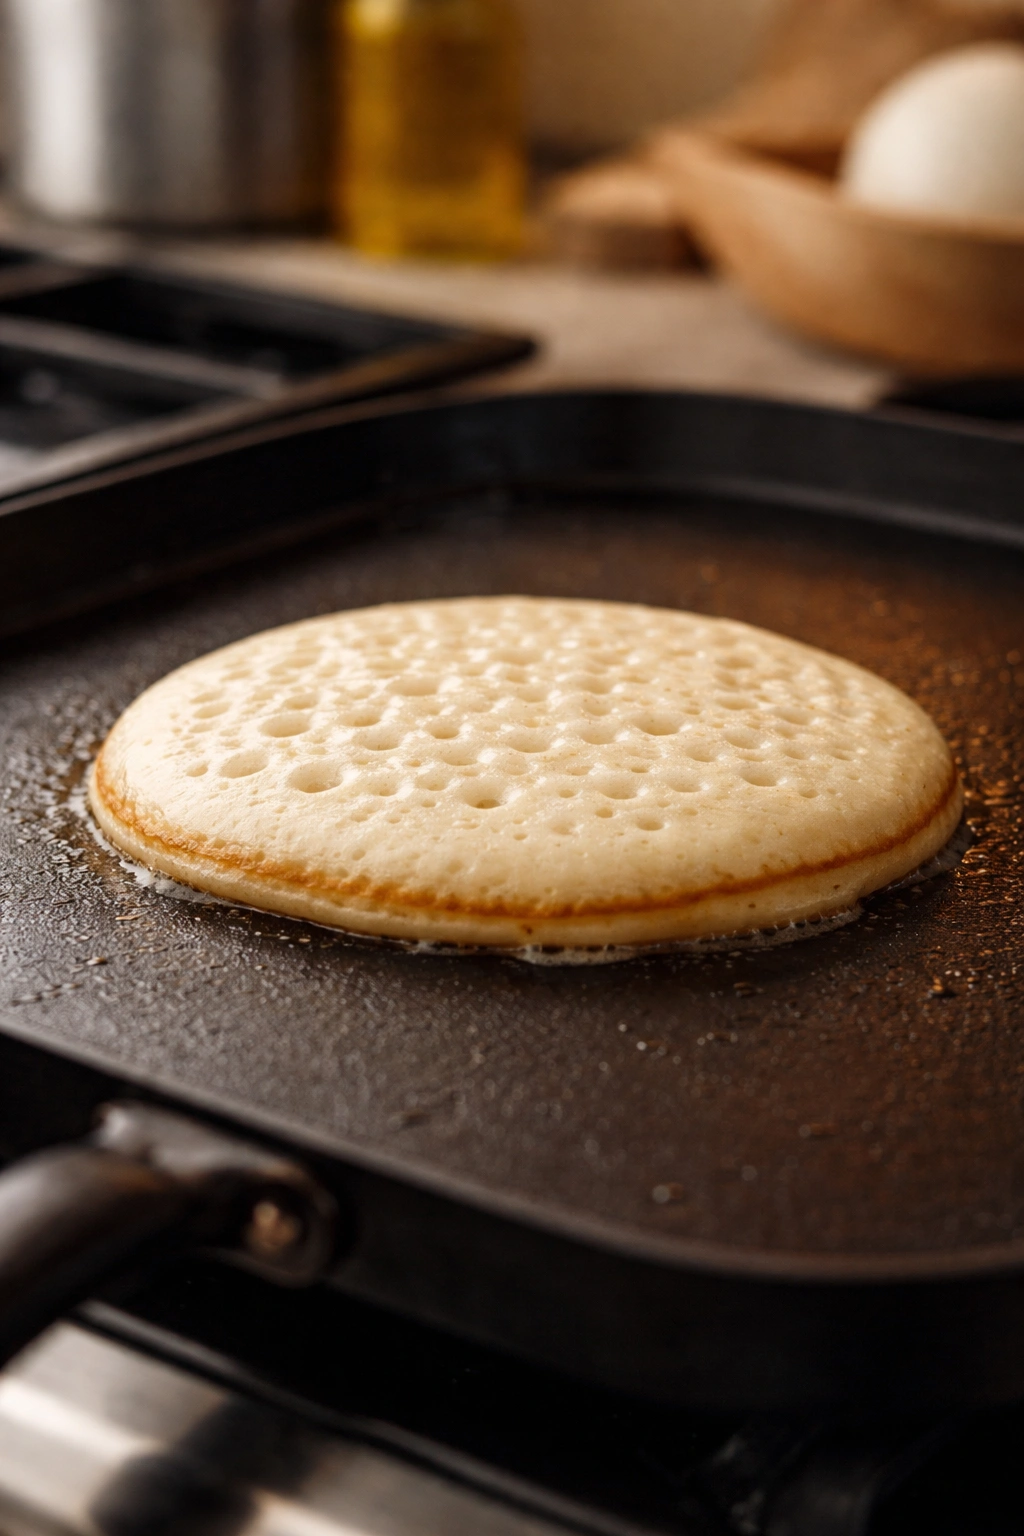
Using a ¼-cup measure or an ice cream scoop, pour one scoop of batter onto the griddle, spacing them about 2 inches apart. You should hear a gentle sizzle when the batter hits the hot griddle. Don’t press or flatten the pancakes — let them cook untouched.
Within about 30 to 45 seconds, you’ll see small bubbles forming on the top surface of the pancake. These bubbles are air escaping from the batter as it cooks and sets. Watch for about 15 to 20 more seconds until the bubbles pop and leave tiny holes, and the surface looks mostly dry — still slightly wet in the very center is fine, but the bulk of the surface should be dry. This is your signal that the bottom is set enough to flip without the pancake falling apart.
Slide your spatula underneath quickly and flip the pancake in one confident motion. Don’t flip slowly or hesitantly — flip decisively so you don’t fold the pancake or lose the height. The second side cooks faster than the first, usually about 30 to 40 seconds, until the bottom is golden brown and slightly crispy.
Transfer the cooked pancake to a warm plate. If you want to keep pancakes warm while you finish the batch, place them in a 200°F oven on a baking sheet.
Continue Cooking Remaining Pancakes
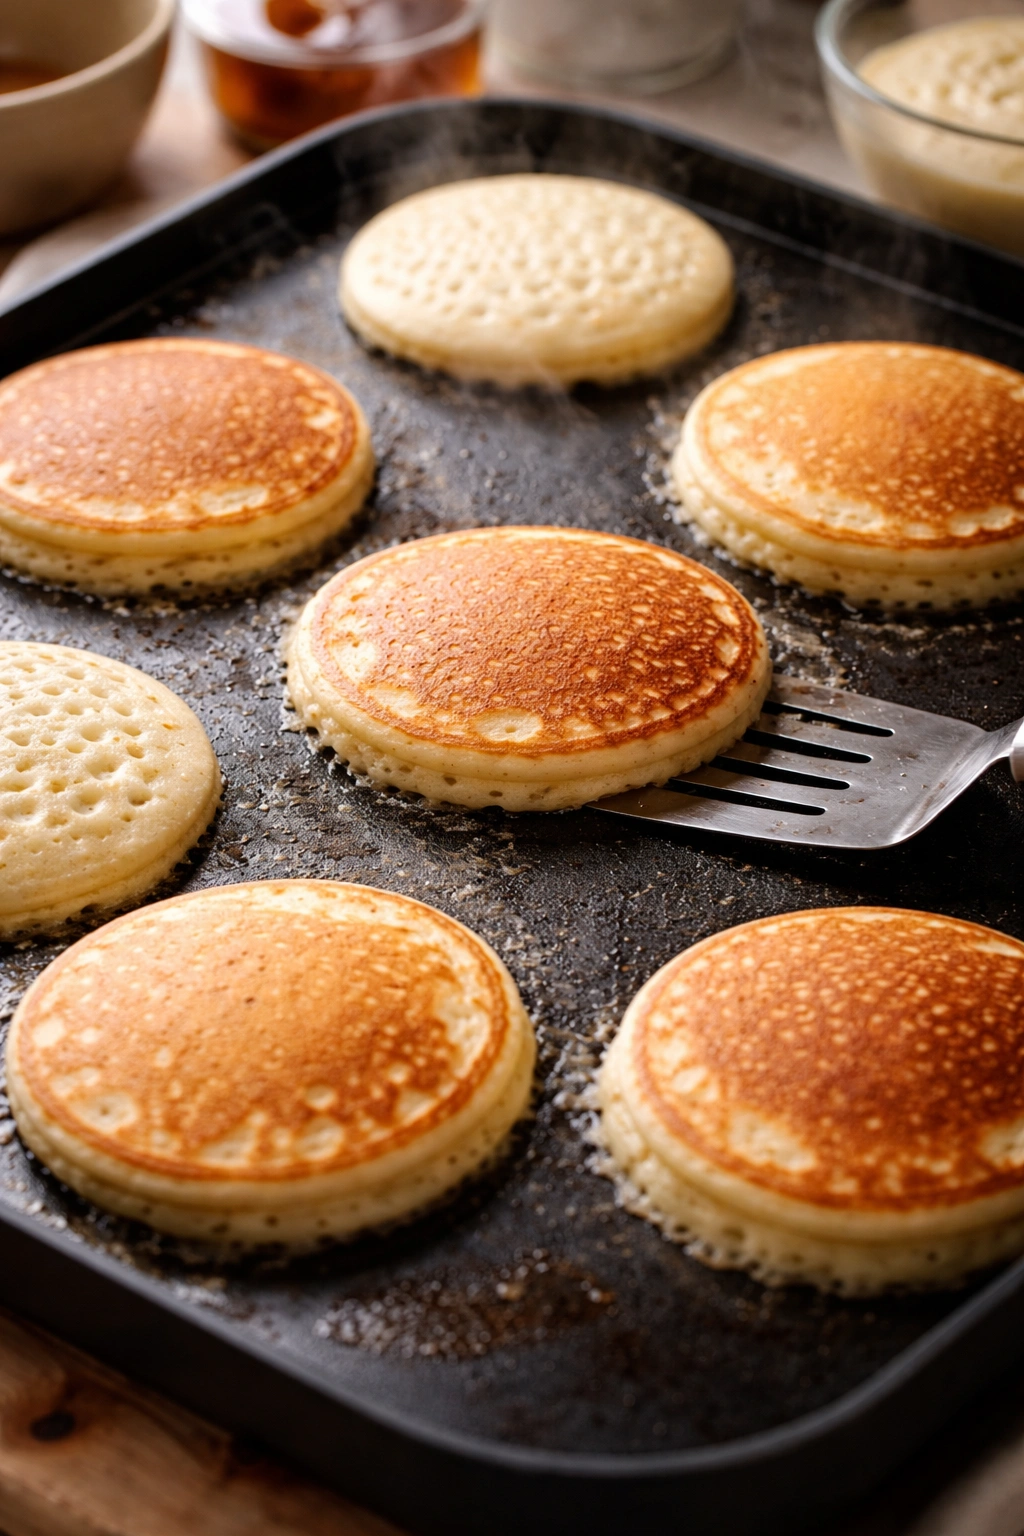
Repeat this process with the remaining batter. The griddle may not need more butter between each batch, but if pancakes start sticking or the griddle looks dry, rub a tiny bit more butter across the hot surface. You may also need to adjust the heat slightly as you go — sometimes the griddle gets slightly hotter or cooler depending on how many pancakes you’re cooking in succession.
The batter will thicken slightly as it sits (due to the flour absorbing moisture), which is normal. If it gets too thick and stiff, whisk in 1 to 2 tablespoons of milk to loosen it slightly. You want the batter pourable but still thick enough to hold its shape on the griddle.
Important timing note: Try to cook the pancakes within 3 to 5 minutes of mixing the batter. The longer you wait, the more gas the baking powder releases into the air rather than into the pancakes, resulting in flatter pancakes.
How to Know When Pancakes Are Actually Done
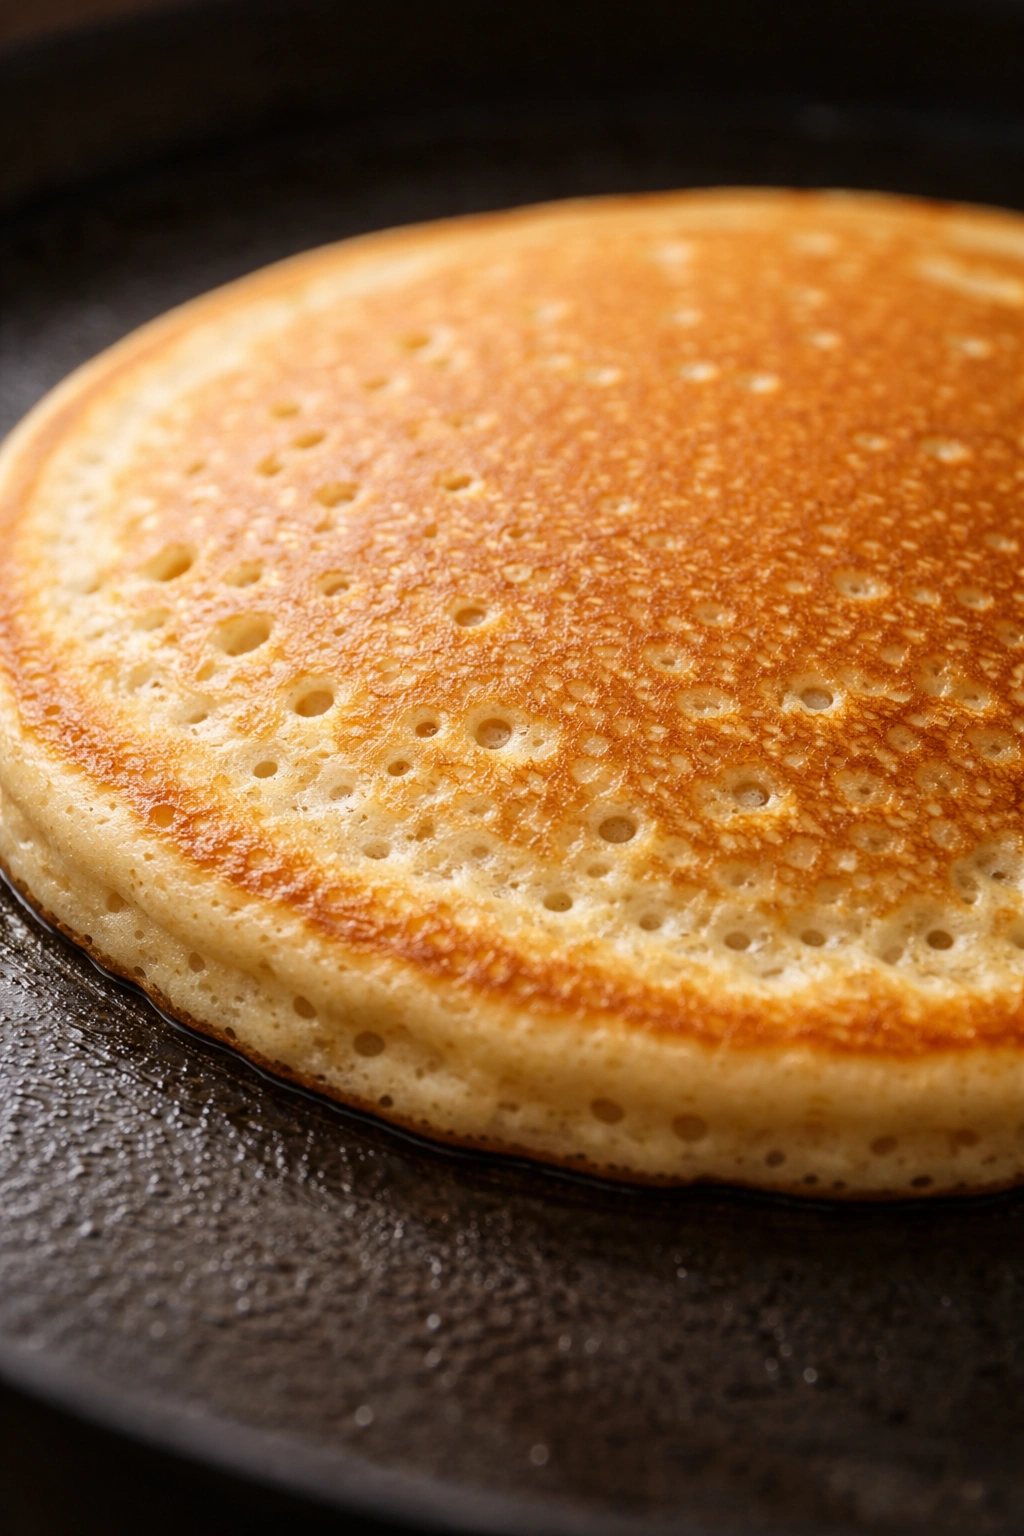
One of the most common mistakes is flipping pancakes too early or too late. The visual cue is crucial here: you’re looking for bubbles that have popped and left tiny holes in the surface, plus a surface that looks mostly set and dry. If you flip before you see these signs, the bottom isn’t cooked enough and the pancake falls apart or stays pale. If you wait too long, the bottom over-browns or even burns.
Another indicator is the smell — once you start smelling that toasted, caramelized pancake aroma, you’re very close to flipping. Trust your nose as much as your eyes.
Tips for Pancake Success Every Single Time

The most common mistake people make after discovering this recipe is skipping the egg white separation step because it seems fussy. Don’t. This step is what separates these pancakes from ordinary ones, and it takes literally one extra minute. The difference in fluffiness is remarkable and absolutely worth the tiny bit of extra effort.
Keep your ingredients at room temperature. Room-temperature milk combines more smoothly with the other wet ingredients, and room-temperature eggs whip to stable peaks much faster than cold ones. If you forget to pull eggs out ahead of time, place them in warm water for 5 minutes.
Don’t overmix the batter. Lumpy batter is correct. The lumps dissolve during cooking. Smooth batter means overworked gluten, which means dense pancakes. Mix just until combined, walk away, and resist the urge to stir.
Use real baking powder, not baking soda alone. If you only have baking soda, you need an acid (like buttermilk or lemon juice) to activate it. Regular baking powder contains both the base and the acid and works on its own.
Test your griddle heat before cooking. Too many people guess and end up with pancakes that are burnt outside and raw inside, or pale and rubbery. The water drop test takes 5 seconds and ensures perfect results.
Don’t let the batter sit for more than 5 minutes before cooking. Those gas bubbles from the baking powder start escaping into the air the moment they’re created. The longer you wait, the fewer bubbles remain to make the pancakes fluffy.
Flip only once. Flip the pancake once — that’s it. Flipping multiple times disrupts the structure and can make pancakes dense or break apart. Once, decisive flip is all you need.
Variations and Flavor Adaptations

Once you’ve nailed the basic recipe, this batter is endlessly adaptable. The key is understanding what components you can change and what you need to keep the same for that fluffy texture to remain.
Berry and Fruit Variations
Fresh or frozen berries can be folded into the batter or scattered on top of each pancake just after you pour it onto the griddle. If using frozen berries, don’t thaw them first — add them directly to the batter so they don’t bleed juice all through the batter. Blueberries, raspberries, and blackberries all work beautifully. You can also scatter peaches, strawberries, or diced mango on top of each pancake while it cooks on the first side.
For chocolate chip pancakes, add ¾ cup of semi-sweet or dark chocolate chips directly to the batter just before folding in the egg whites. The chocolate melts into pockets throughout the pancakes.
Spiced Pancakes
Add ½ teaspoon of ground cinnamon, ¼ teaspoon of ground nutmeg, and a tiny pinch of ground cloves to the dry ingredients. This creates warm, aromatic pancakes that are especially delicious topped with cinnamon-spiced whipped cream. For pumpkin spice pancakes, add 1 teaspoon of pumpkin pie spice blend to the dry ingredients and substitute ½ cup of the milk with pure pumpkin puree.
Gluten-Free Variation
Use a high-quality gluten-free all-purpose flour blend in place of the regular flour. Look for a blend that includes xanthan gum, which helps mimic the structure that gluten normally provides. You may need to add an extra ¼ cup of milk to the wet ingredients because gluten-free flours absorb moisture differently. The rest of the recipe stays the same, and the results are remarkably similar to wheat-based pancakes.
Dairy-Free and Vegan Option
Replace the milk with unsweetened plant-based milk (oat or almond milk works best). Substitute the butter with coconut oil or neutral vegetable oil in the same quantity. For the eggs, this is where it gets tricky — you lose the structure, emulsification, and leavening that eggs provide. Use 2 tablespoons of aquafaba (the liquid from canned chickpeas) whipped to soft peaks in place of the 4 whole eggs, plus ¼ cup of applesauce or mashed banana to replace the yolk emulsification. The results are a bit less fluffy but still quite good.
Extra-Rich Pancakes
Use half-and-half or light cream instead of milk. Add an extra egg yolk to the wet ingredients. Use melted butter in the batter plus a bit more butter to cook with. These pancakes are indulgent and decadent, closer to a custard-like texture. Perfect for special occasions.
Storage, Make-Ahead, and Reheating

Pancakes taste best eaten fresh and warm, but they store reasonably well if you plan ahead. Room temperature: Cooked pancakes can sit at room temperature for up to 2 hours loosely covered with a clean kitchen towel. After that, they start to dry out noticeably.
Refrigerator: Place cooked pancakes in an airtight container and refrigerate for up to 3 days. To reheat, place them on a microwave-safe plate, cover loosely with a damp paper towel, and microwave on 50% power for 30 to 60 seconds. The damp towel prevents them from drying out.
Freezer: Pancakes freeze beautifully for up to 3 months. Place them in a single layer on a baking sheet and freeze for 2 hours until solid, then transfer to a freezer bag or container. To reheat, place a frozen pancake directly in a toaster and set it to medium heat, or place it on a microwave-safe plate, cover loosely with a damp paper towel, and microwave on 50% power for 45 to 90 seconds depending on the thickness.
Batter make-ahead: Raw pancake batter does not store well beyond about 30 minutes because the baking powder loses potency. However, you can mix the dry ingredients together the evening before and store them in an airtight container. In the morning, whisk together the wet ingredients, combine with the dry ingredients, fold in separately whipped egg whites, and cook immediately.
Serving Suggestions and Flavor Pairings

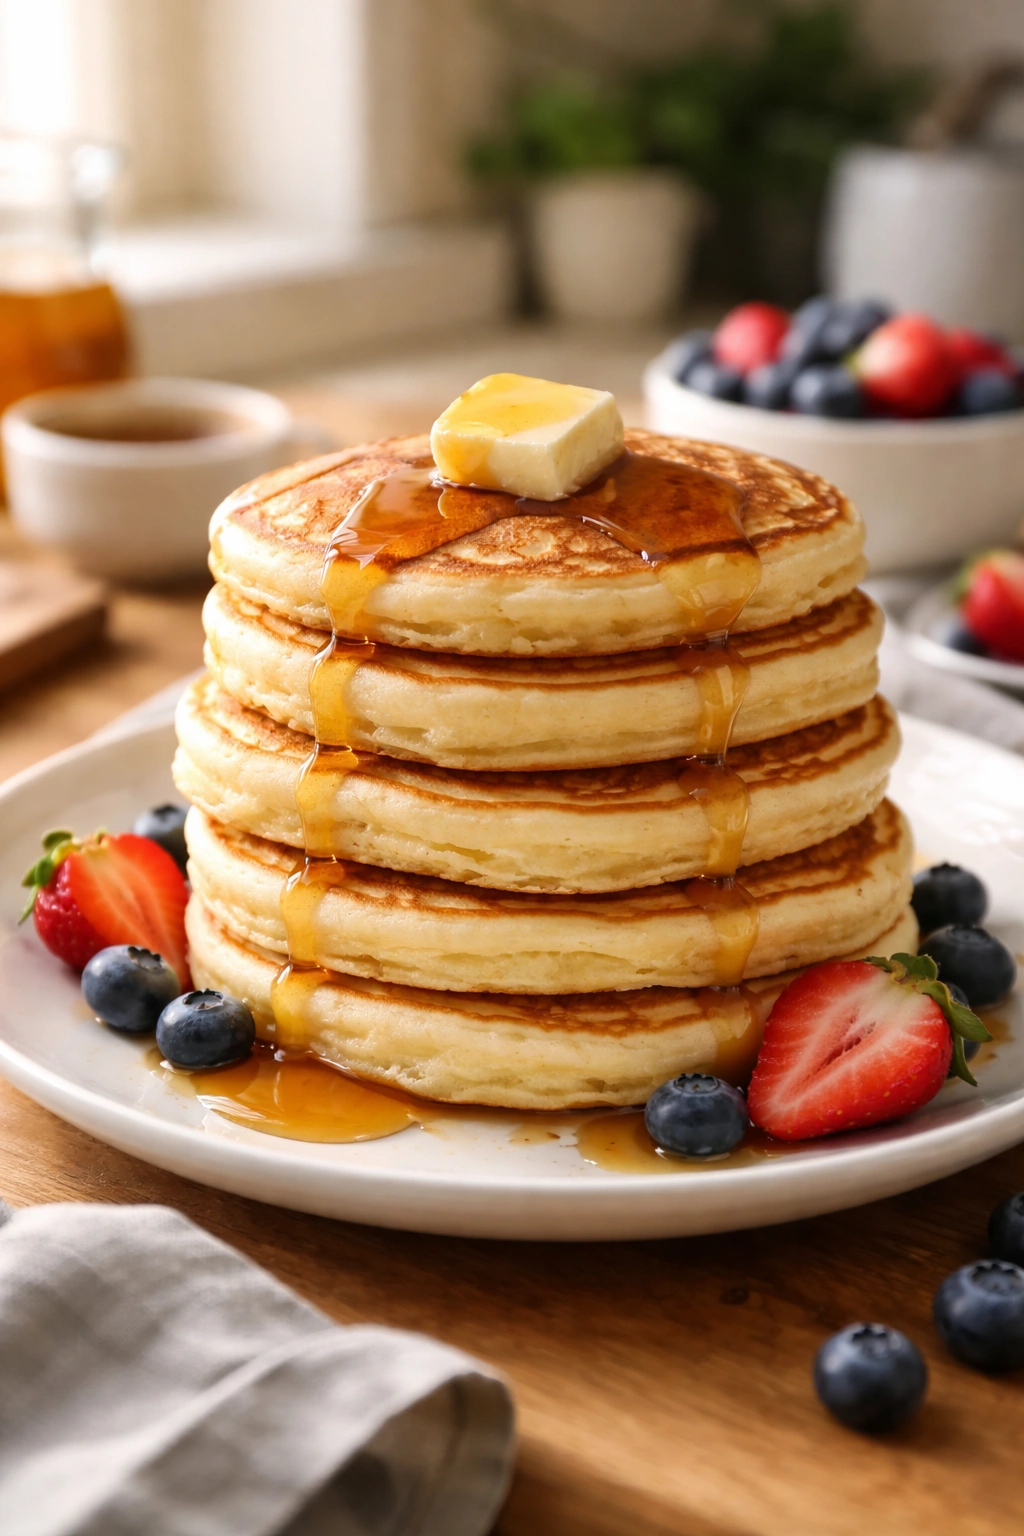
The beauty of pancakes is that they adapt to whatever you want to top them with. Warm pure maple syrup is the classic choice — drizzle it generously over a stack and watch it soak in slightly. If you want to make it special, warm the syrup gently in a small saucepan so it’s warm (not hot — just barely steaming) when it hits the pancakes.
Fresh berries are an obvious pairing that adds brightness and tartness to balance the richness of the pancakes. A handful of blueberries or raspberries scattered on top, or sliced strawberries alongside a stack, feels almost elegant without any extra effort.
Whipped cream turns pancakes into something special. A dollop of cold whipped cream melts slightly into the warm pancake surface and adds a luxurious texture contrast. Add a pinch of vanilla or a tiny splash of bourbon to the whipped cream if you want to elevate it further.
Greek yogurt provides tangy richness and protein without the heaviness of whipped cream. A spoonful alongside or between the pancakes in a stack adds sophistication and makes the meal more balanced.
Cinnamon butter is as simple as mixing softened butter with ground cinnamon and a tiny pinch of salt. Spread it between the layers of a warm pancake stack and watch it melt.
Savory toppings are underrated. Cooked bacon, crumbled sausage, sautéed mushrooms, or fried eggs pair surprisingly well with sweet pancakes. A fried egg on top of a pancake with a drizzle of hot sauce is genuinely delicious.
Nut butters like almond butter or peanut butter can be swirled into the top of a stack while the pancakes are still warm, or served on the side for dipping.
Troubleshooting Specific Problems

If your pancakes came out flat and dense, the most likely culprit is either overmixing the batter or old baking powder that lost potency. Check that your baking powder was opened less than a year ago, and for your next batch, mix the batter just until barely combined. You might also be letting the batter sit too long before cooking — cook within 3 to 5 minutes of mixing.
If the bottom burns before the middle cooks, your griddle is too hot. Turn the heat down and wait a minute for the griddle to cool slightly before your next batch. You should be hearing a gentle sizzle when the batter hits the griddle, not an aggressive sizzle.
If the pancakes pale and don’t develop a golden color, the griddle is too cool. Turn the heat up and wait until you see the water drop test creating an active sizzle before cooking the next batch.
If the pancakes are tough or rubbery, you overmixed the batter. The next batch, stop stirring as soon as you see the dry ingredients disappear — lumpy is correct.
If the pancakes are dry, you may be cooking them too long on the second side. Flip when you see popped bubbles on the top, then cook for just 30 to 40 seconds more. You’re not looking for deep golden brown on the second side — light golden is enough.
Final Thoughts
The distance between mediocre pancakes and genuinely great ones is smaller than most people realize. It comes down to separating the eggs and whipping the whites, being brave enough to leave lumps in your batter, and trusting the visual cues that tell you when to flip. Once you’ve made this recipe once, the technique becomes automatic, and you’ll have a weekday breakfast that feels almost restaurant-quality.
The wonderful thing about nailing this recipe is that it’s completely reproducible. It’s not dependent on guessing or intuition — it’s a process you can repeat with confidence, knowing that you’ll get the same fluffy, tender result every single time. That consistency, that reliability, is what transforms pancake morning from a gamble into something you can feel genuinely proud of.