There’s something deeply satisfying about ladling a steaming bowl of broccoli cheddar soup—that moment when warm, velvety creaminess meets the earthy sweetness of fresh broccoli and sharp, melted cheese. It’s the kind of soup that tastes like it took hours to simmer on the stove, yet this version comes together in just 30 minutes from start to finish.
The magic of this quick broccoli cheddar soup lies in smart technique rather than long cooking times. A proper roux made with butter and flour creates the creamy base without relying on heavy cream, the broccoli cooks tender while staying bright and flavorful, and the cheese melts seamlessly into a smooth, luscious soup. It’s the recipe that gets requested over and over—the one that’ll have people asking if you somehow snuck out to a fancy restaurant instead of pulling together dinner at home.
Why Broccoli Cheddar Soup Works as Quick Weeknight Comfort Food

This soup checks every box for a satisfying dinner: it’s warm, cheesy, loaded with vegetables, and genuinely nourishing without being pretentious. Unlike soups that require roasting, toasting spices separately, or complicated preparations, broccoli cheddar soup simply asks you to sauté, simmer, and stir. One pot. Minimal cleanup. Maximum coziness.
The beauty of broccoli cheddar soup is that it works whether you’re meal-prepping for the week, feeding hungry kids after school, or crafting a cozy dinner for two. It reheats beautifully, freezes reasonably well (with a small caveat about texture), and pairs with almost everything—bread bowls, crusty slices of sourdough, simple salads, sandwiches, or nothing at all if you’re just craving a perfect bowl of soup.
The Key to Creamy Texture Without Excess Cream

Most people assume broccoli cheddar soup requires heavy cream to achieve that signature velvet texture, but here’s what actually makes the difference: proper technique with butter, flour, and the right cheese. A roux—the traditional paste of equal parts fat and flour cooked together—forms the thickening base. This isn’t fussy or complicated; it’s the culinary equivalent of mixing butter and flour into a smooth paste, and it creates body and richness without relying on buckets of cream.
The broth simmering through the vegetables also contributes natural body as the broccoli softens slightly and releases its starches into the liquid. When you blend a portion of the soup (or leave it chunky if you prefer), those softened vegetables further contribute to creaminess. Finally, the cheese—specifically freshly grated cheddar added off the heat—melts into the warm broth and creates a sauce that coats every spoonful without any separation or grittiness.
Half-and-half strikes the perfect balance: enough richness to taste luxurious, but not so much that the soup becomes heavy or one-dimensional. You could swap it for whole milk if you want something lighter, or heavy cream if you’re after maximum richness, but half-and-half delivers the Goldilocks version—just right.
Understanding the Role of Fresh Broccoli

Fresh broccoli is the soul of this soup, and the quality and cut make a real difference. You want to use a large, firm broccoli head with florets that are dark green and compact (yellowing or wilting indicates age). The cut matters equally—chop your florets into bite-sized pieces smaller than you might think you need. These small pieces cook faster, distribute evenly throughout the soup, and blend into the base more effectively if you decide to purée part of it.
Many cooks assume they should blanch the broccoli first to preserve its bright color, but that’s actually unnecessary here. The broccoli cooks directly in the simmering broth for just 10 to 15 minutes, which is enough time for it to become tender without turning gray or mushy. The key is bringing the soup to a gentle simmer (never a rolling boil) and checking the broccoli for tenderness—it should bend easily with a fork but still hold its shape.
If you’re using frozen broccoli, it’s absolutely acceptable and actually convenient. Thaw it first and drain it well so you don’t add extra water to the soup. Frozen broccoli will cook faster than fresh, so add it toward the end of the cooking time and watch carefully—it’ll soften quickly.
Choosing the Right Cheese and Shredding Technique
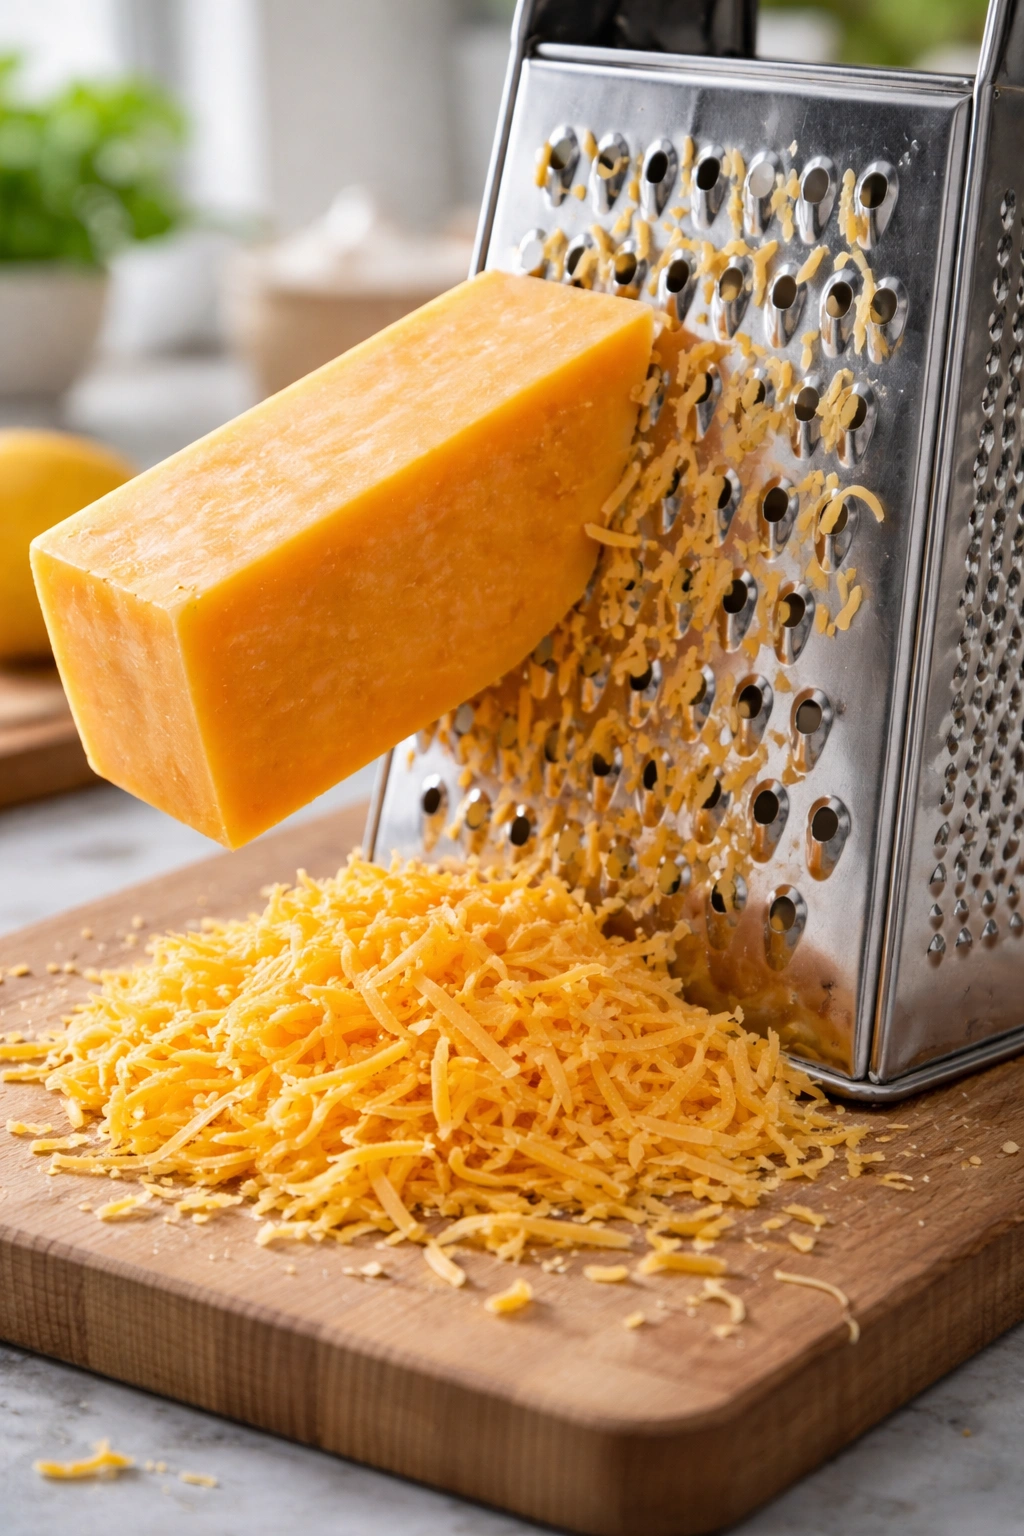
Here’s where many home cooks stumble: pre-shredded cheese from a bag is coated with anti-caking agents that prevent it from melting smoothly. When those additives hit warm broth, they separate and clump instead of creating a silky sauce. The difference between a batch made with grated block cheese and one made with pre-shredded is genuinely noticeable—smooth and luxurious versus gritty and separated.
Buy a block of sharp or extra-sharp cheddar (sharp means more flavor punch, which you definitely want here) and grate it yourself using the largest holes on a box grater or a food processor fitted with the shredding disk. This takes about two minutes and completely transforms the final soup.
The magic of adding cheese happens off heat. Once you remove the pot from the stove, you stir in the cheese a handful at a time, waiting until each addition fully melts and incorporates before adding more. This low-temperature method ensures every bit melts smoothly and becomes part of the sauce rather than separating into greasy streaks. This is non-negotiable for a silky final product.
The Two-Ingredient Base: Butter and Onion
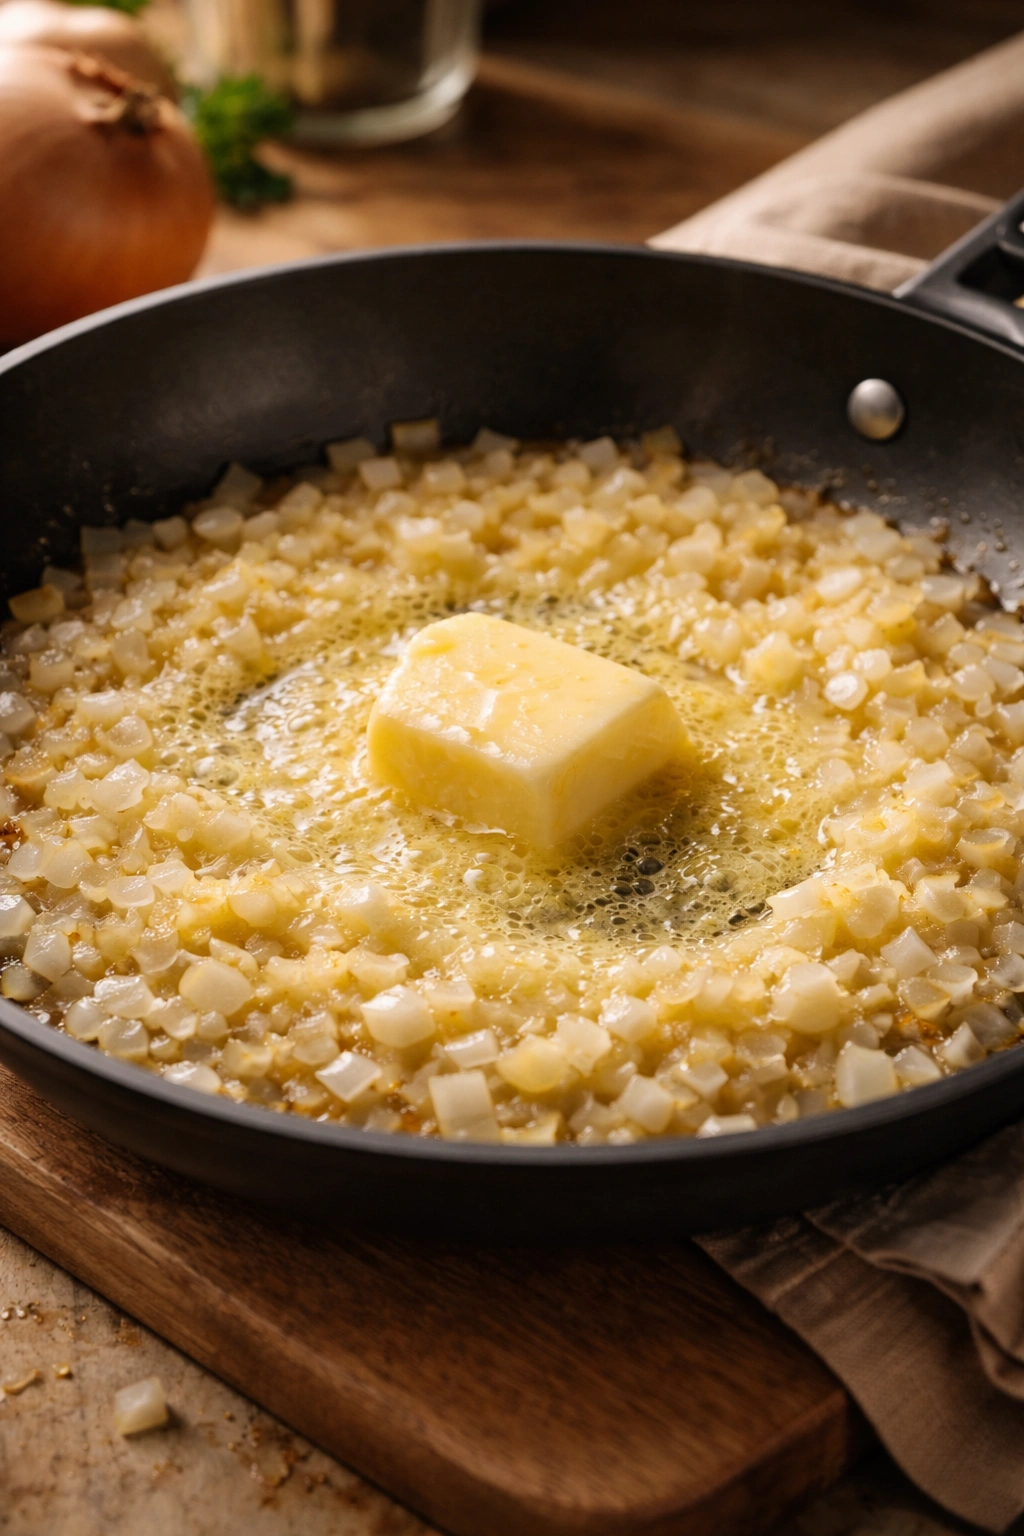
Before you do anything else, you need to build flavor, and that starts with butter and onion. Unsalted butter lets you control the final salt level, and a medium onion chopped fine creates the aromatic foundation. Sauté the onion over medium heat for about 3 to 5 minutes until it’s soft and just starting to turn translucent at the edges.
This brief cooking time does two things: it mellows the onion’s sharp bite and coaxes out its natural sugars, which add sweetness and depth to the final soup. You’re not trying to caramelize the onion (that takes much longer), just soften it enough that it disappears into the soup rather than lingering as a crunchy surprise.
Garlic joins the onion next—usually three or four cloves, minced fine. Give it just 30 seconds to a minute of cooking, until fragrant. This is all the time it needs; any longer and garlic can turn bitter.
Building the Roux That Creates Creaminess
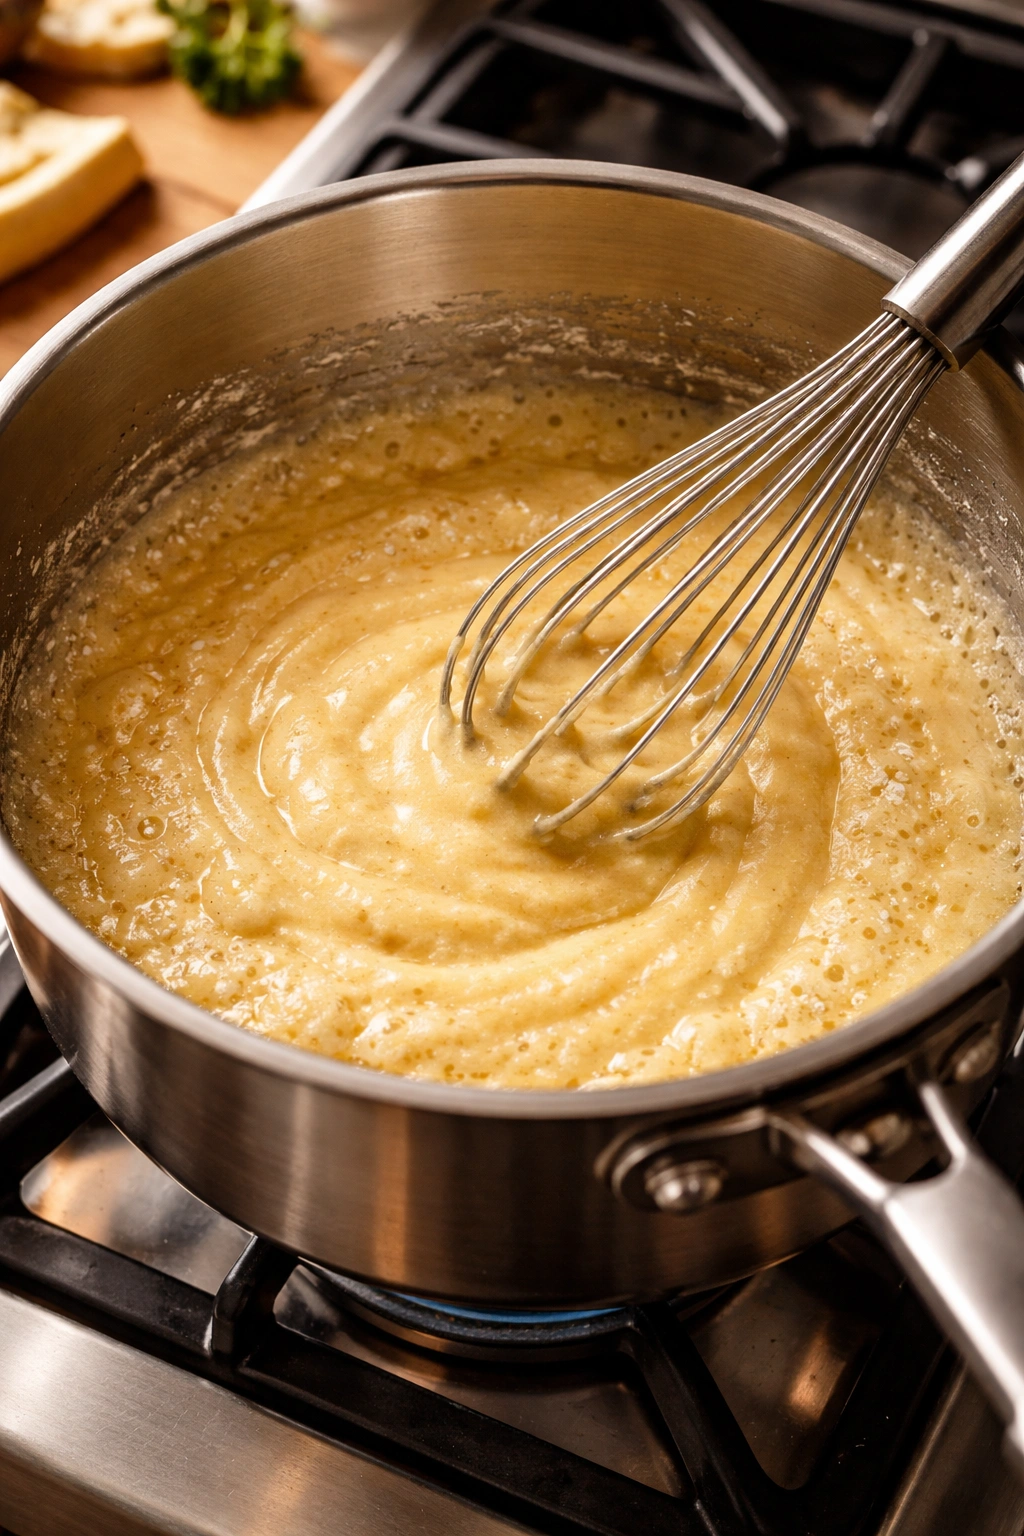
Once your aromatics are soft and fragrant, you make a roux. Add the remaining butter to the pot and let it melt, then sprinkle in the flour and whisk constantly for about 1 to 2 minutes. You’re looking for a smooth paste with a slightly foamy, bubbling surface—this shows the flour is cooking and losing its raw taste.
Never rush the roux or skip this step. A raw flour taste lingers in the finished soup if you don’t cook it long enough. You’ll also see the mixture begin to deepen in color from pale to light golden—that’s the starch in the flour toasting slightly, which adds subtle depth of flavor.
The roux thickens soup through a simple chemistry: starch molecules in the flour absorb liquid and swell, which turns thin broth into something with body and texture. This is the same technique used in restaurant kitchens worldwide, and it genuinely works.
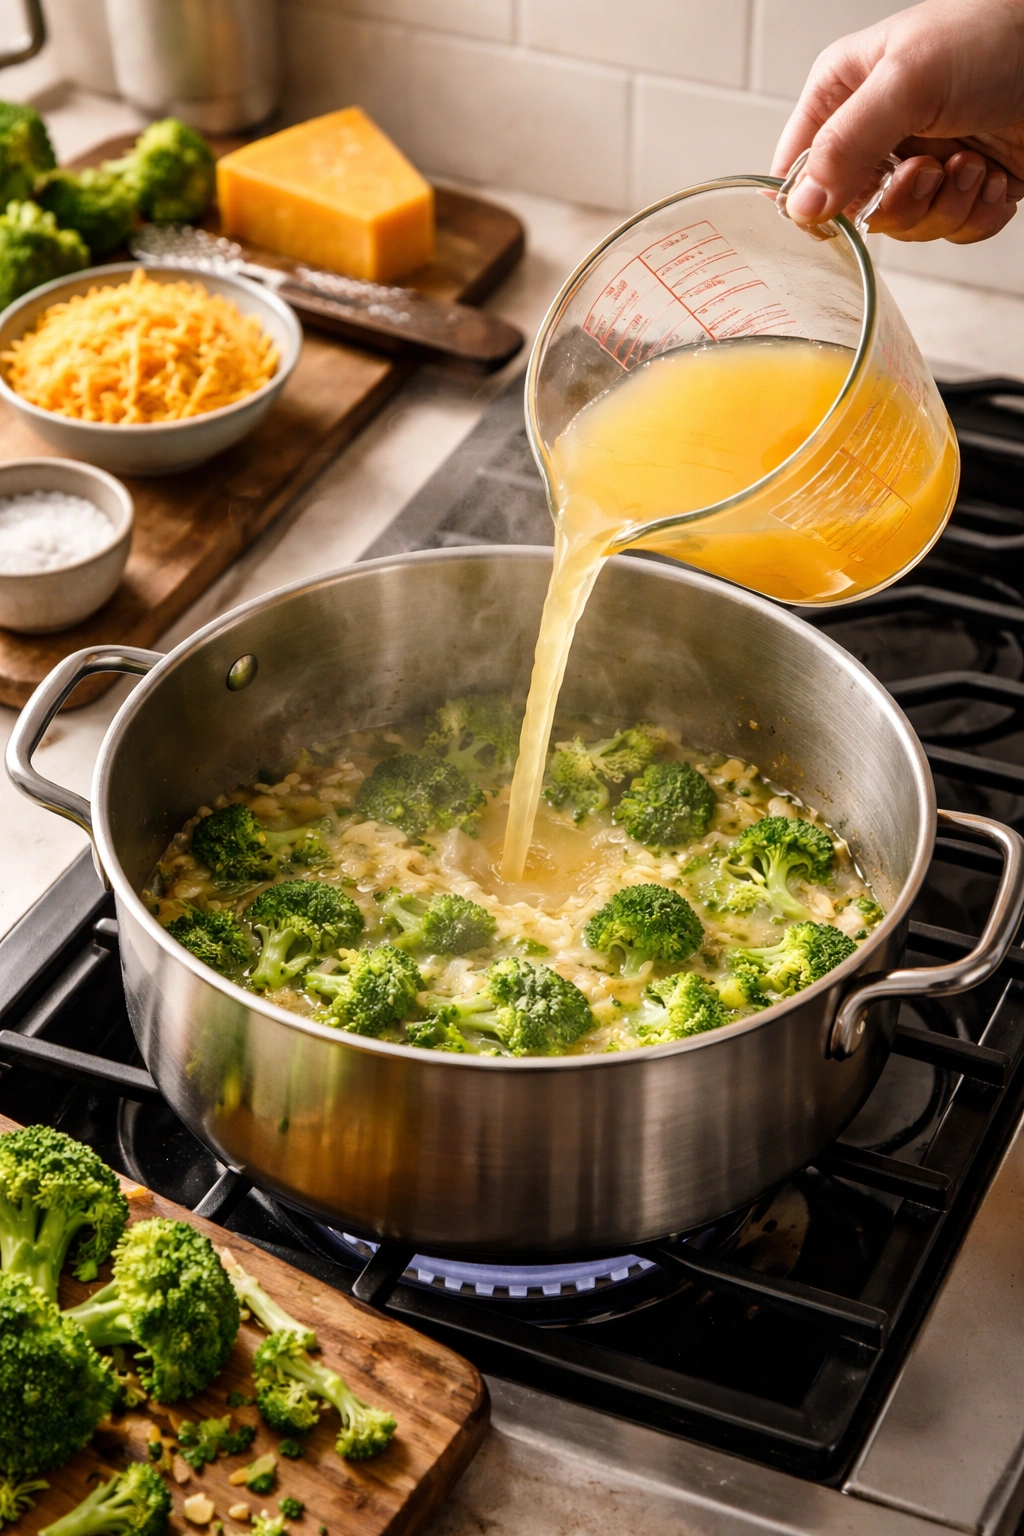
Whisking in Broth Without Creating Lumps
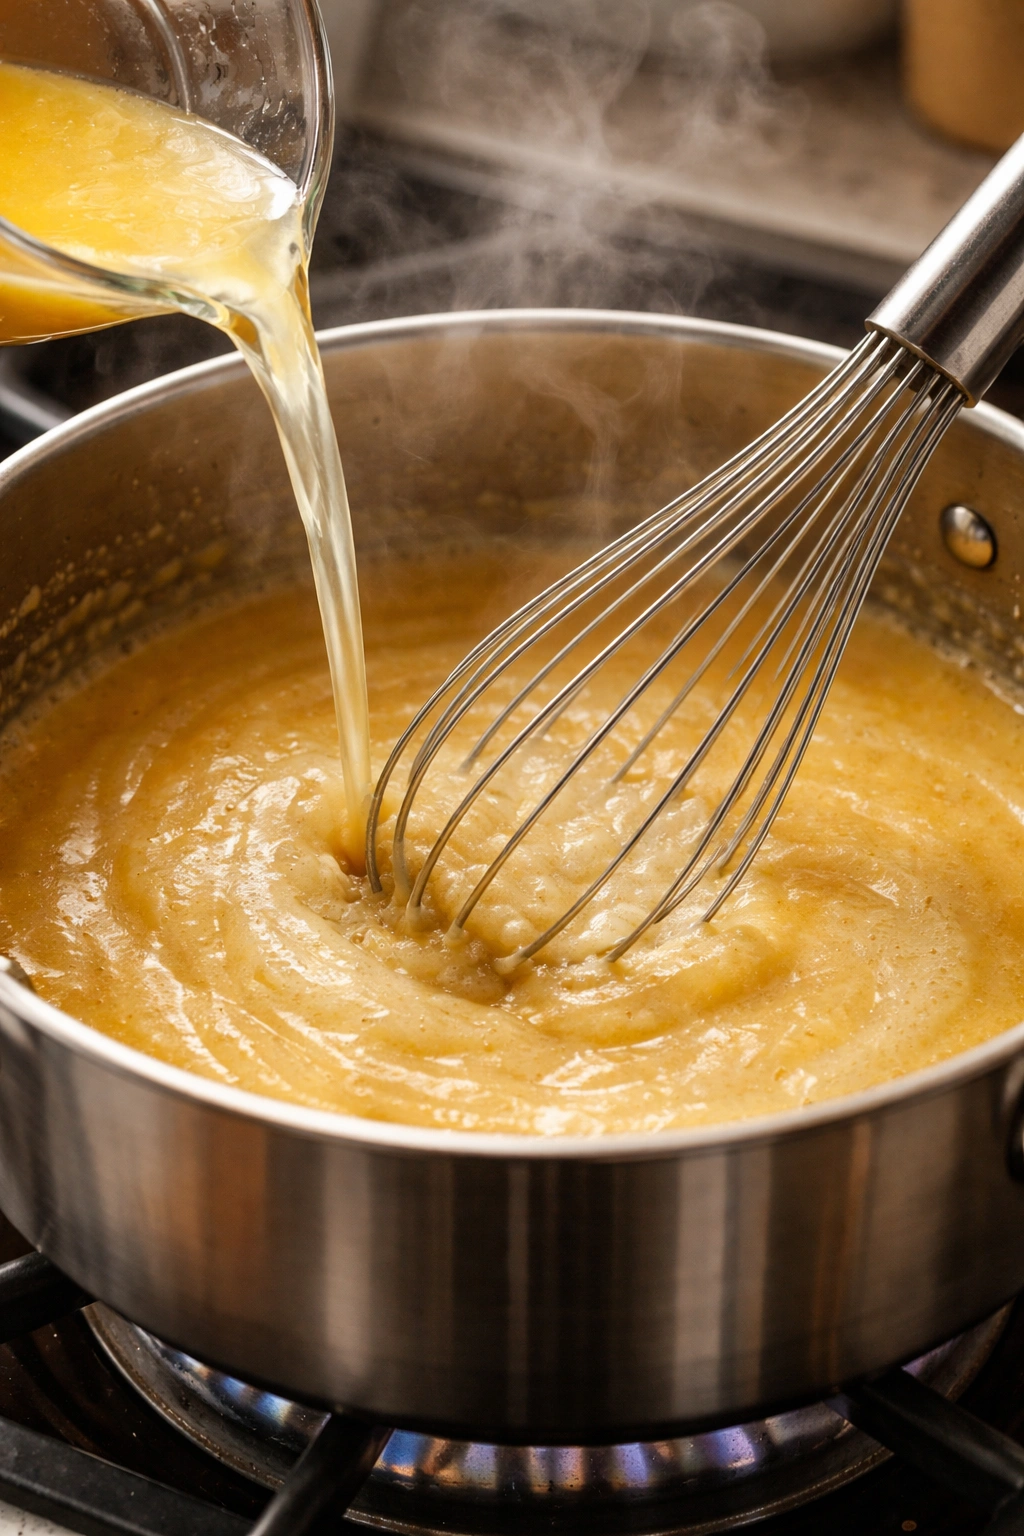
After your roux is golden and cooked, it’s time to add liquid—and this step requires attention. Slowly pour in the warm vegetable or chicken broth while whisking constantly. The warm broth is important because it whisks into the hot roux more smoothly; cold broth can sometimes shock the flour and create little lumps that are irritating to break up later.
Add the broth gradually—not all at once. Start with about a cup, whisking continuously until the mixture is smooth and no flour lumps remain on the bottom of the pot. Once that’s incorporated, add the remaining broth slowly while continuing to whisk. This patient approach takes maybe two minutes and ensures a silky, lump-free soup.
After the broth is fully incorporated, add the half-and-half and whisk again. Let the mixture simmer gently for about 5 minutes to thicken slightly before adding vegetables. You want it to reach the consistency of a light gravy—if it feels too thin, you’re doing fine; it’ll thicken more as the vegetables release starch and the liquid reduces.
Seasoning Before the Vegetables Go In
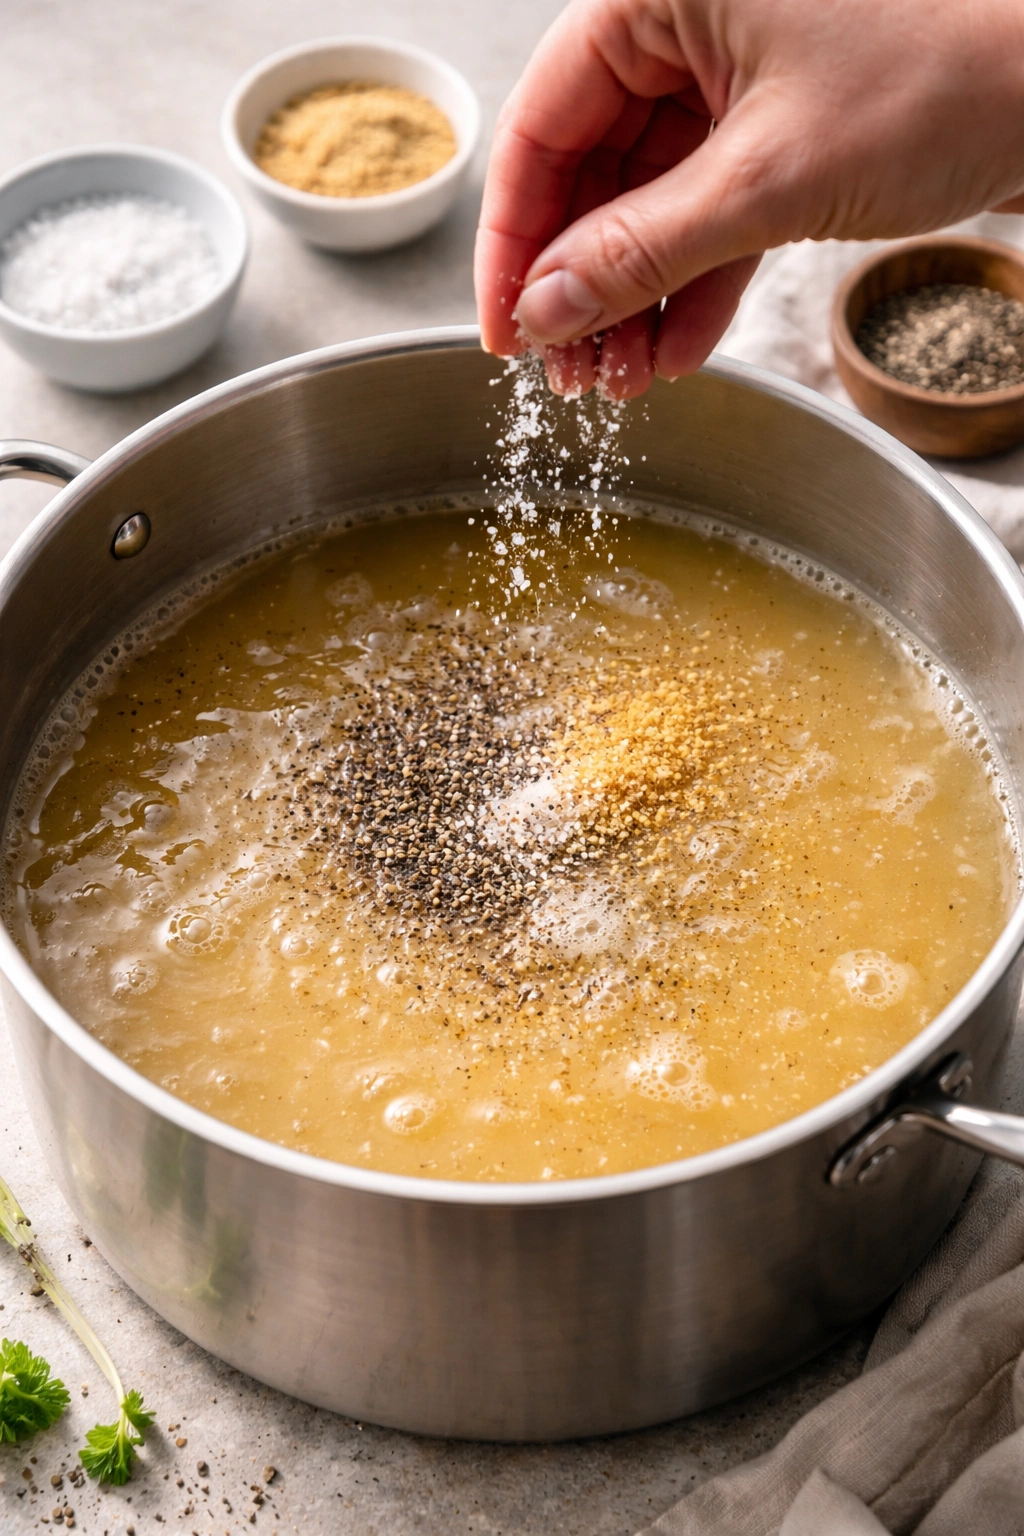
Season the broth base with salt, black pepper, and dry mustard powder before adding the vegetables. This is the moment when seasoning actually distributes evenly through the liquid rather than sitting on top of vegetables. Dry mustard might sound odd, but it’s a secret weapon—it adds a subtle peppery depth that makes the cheddar flavor taste more complex and restaurant-quality.
Start with about half a teaspoon of salt and a quarter teaspoon each of black pepper and dry mustard, then taste and adjust after everything is cooked. Different broths have different salt levels, and you want to account for that salt you’ll add with the cheese as well.
Some cooks add a tiny pinch of nutmeg here—just an eighth of a teaspoon if you want to try it. Nutmeg shouldn’t be detectable; it just adds a subtle warmth that complements the broccoli and cheese beautifully. This is entirely optional, but worth experimenting with once you’ve made the basic recipe a few times.
Adding Vegetables and Managing Cook Time
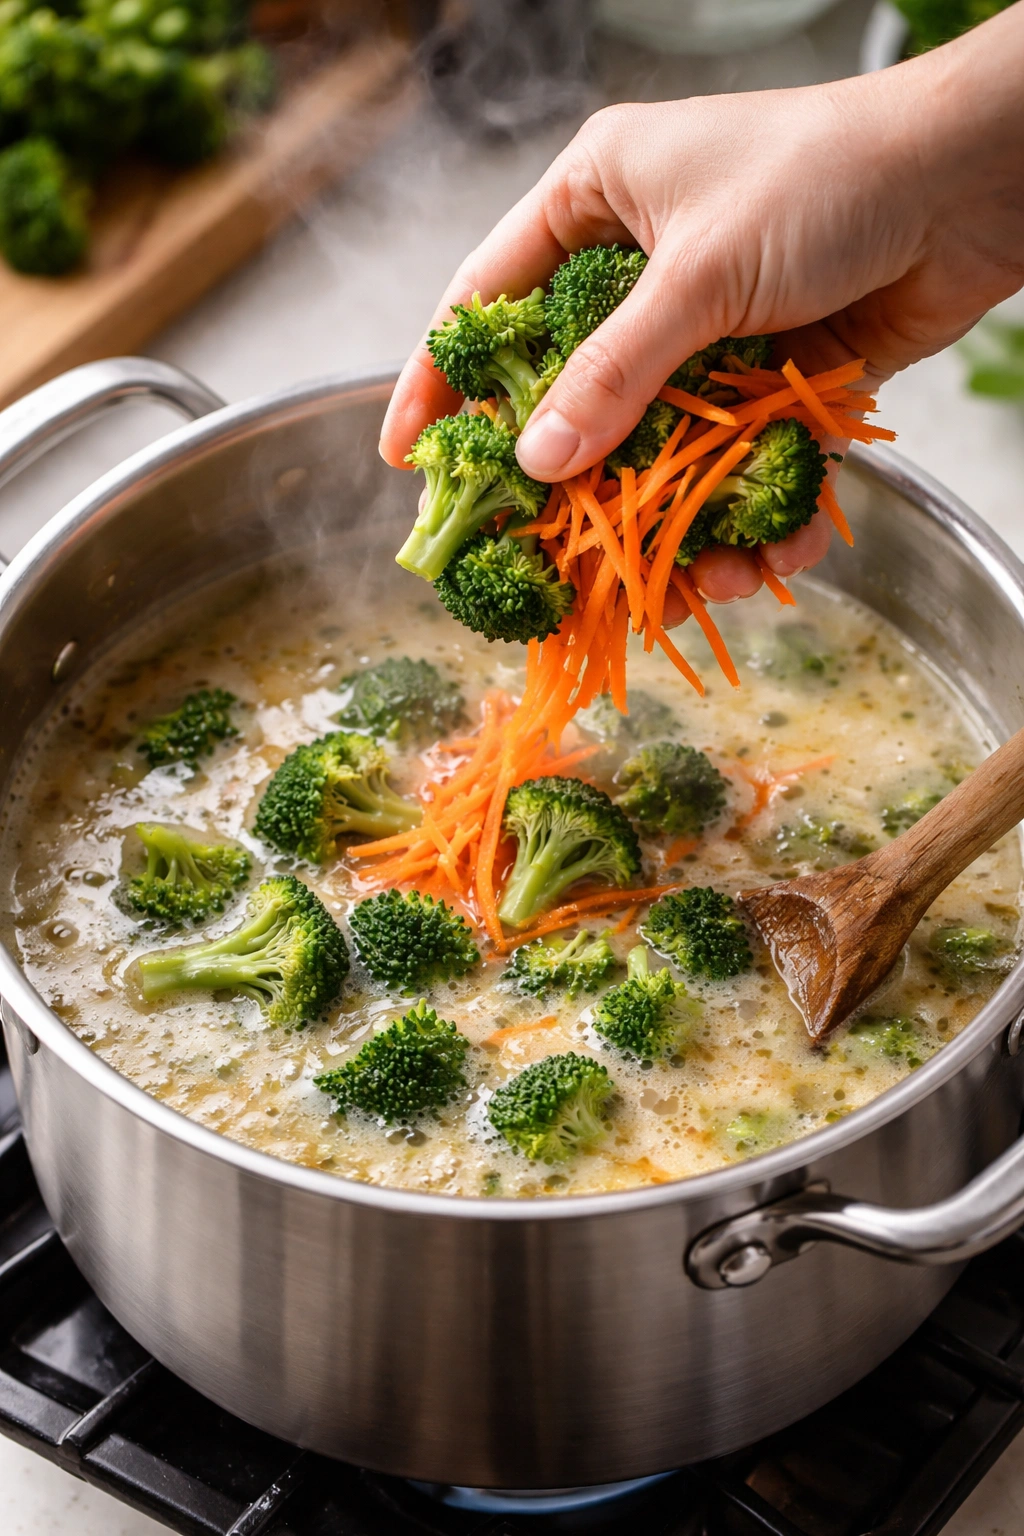
Now comes the straightforward part: add your chopped broccoli florets and shredded or diced carrots to the simmering broth. Stir everything together and adjust the heat to a gentle simmer—you want little bubbles breaking the surface, not a rolling boil.
Carrots add subtle sweetness, color, and that classic broccoli cheddar soup look. You can chop them into small dice or buy pre-shredded carrots from the produce section (one of the few pre-shredded items that makes sense). Shredded carrots actually cook faster and blend more smoothly into the soup if you decide to purée part of it.
Let the soup simmer for 10 to 15 minutes, until the broccoli is fork-tender and the carrots are soft. The exact time depends on how small you chopped everything and how hot your simmer is. Check around the 10-minute mark by piercing a broccoli floret with a fork—it should bend easily but still hold its shape. The broccoli should stay bright green, not dull or grayish, which would indicate overcooking.
Achieving Perfect Cheese Incorporation

Once the vegetables are tender, remove the pot from the heat completely. This is crucial: off-heat melting prevents the cheese from separating and turning grainy. Warm soup can continue to melt cheese just fine; you don’t need active heat.
Add the shredded cheese in four or five handfuls, stirring well after each addition and waiting until the cheese is fully melted before adding the next handful. Stir constantly and purposefully—not frantically, but steadily. You’re watching the cheese transform from shreds into a smooth, creamy sauce that coats the vegetables and broth.
The final result should look silky and unified, with no visible grease separating from the cheese or broth. If your cheese did separate despite your best efforts, whisk in a splash of milk or broth to help re-emulsify it, though this rarely happens if you follow the off-heat method and add cheese gradually.
Yield, Timing, and Difficulty Level

Yield: Serves 4 to 6 people | Makes approximately 6 to 7 cups
Prep Time: 15 minutes (chopping vegetables, measuring ingredients)
Cook Time: 20 minutes (sautéing aromatics, making roux, simmering vegetables, melting cheese)
Total Time: 35 minutes active
Difficulty: Beginner to Intermediate — This soup requires basic knife skills and attention while whisking, but no special equipment beyond a large pot and standard kitchen tools. The technique is straightforward and forgiving.
Complete Ingredient List
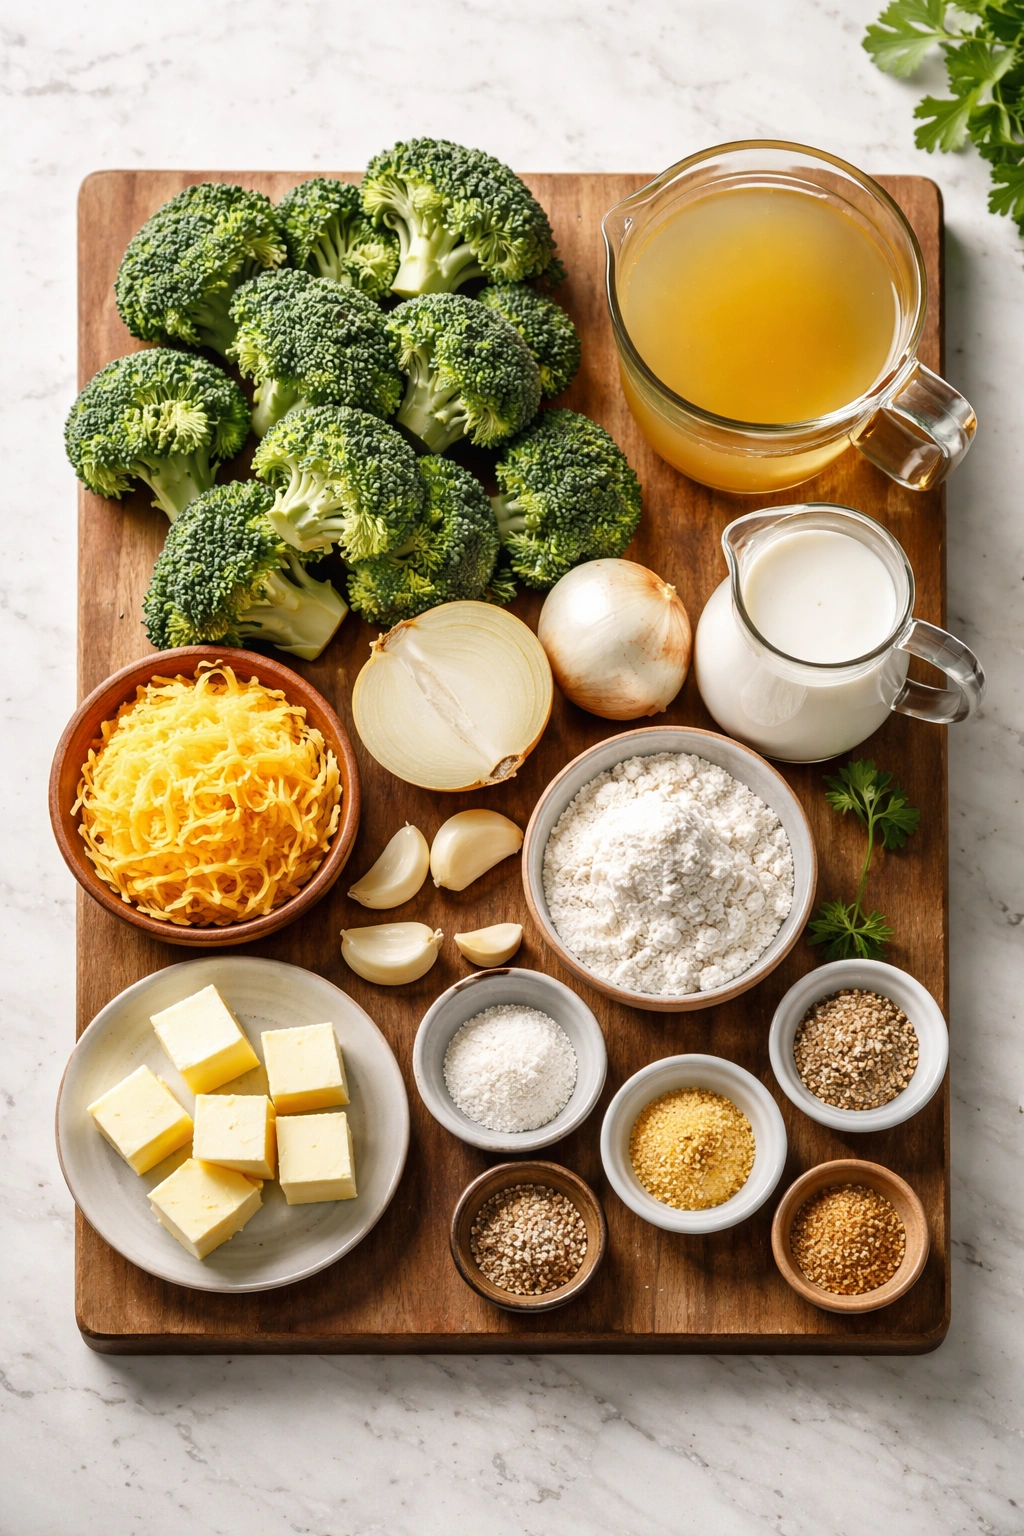
For the Soup Base:
- 3 tablespoons unsalted butter, divided
- 1 medium yellow onion, finely chopped
- 3 to 4 garlic cloves, minced
- 3 tablespoons all-purpose flour
- 4 cups vegetable broth or low-sodium chicken broth, preferably warmed
- 1½ cups half-and-half (or whole milk for lighter soup, or heavy cream for richer version)
- 1 teaspoon kosher salt, plus more to taste
- ½ teaspoon freshly ground black pepper, plus more to taste
- ¼ teaspoon dry mustard powder (or ½ teaspoon Dijon mustard)
- Pinch of nutmeg (optional but recommended)
For the Vegetables:
- 1 large broccoli head (about 1¼ pounds), florets chopped into bite-sized pieces
- 1 large carrot (about 8 ounces), peeled and shredded, julienned, or finely diced
- (Or 1 cup pre-shredded carrots from the produce section)
For the Cheese:
- 2 cups freshly shredded sharp cheddar cheese (about 8 ounces from a block)
For Serving (Optional):
- Extra shredded cheddar cheese for garnish
- Cracked black pepper
- Crusty bread or breadcrumbs for topping
Step-by-Step Cooking Instructions
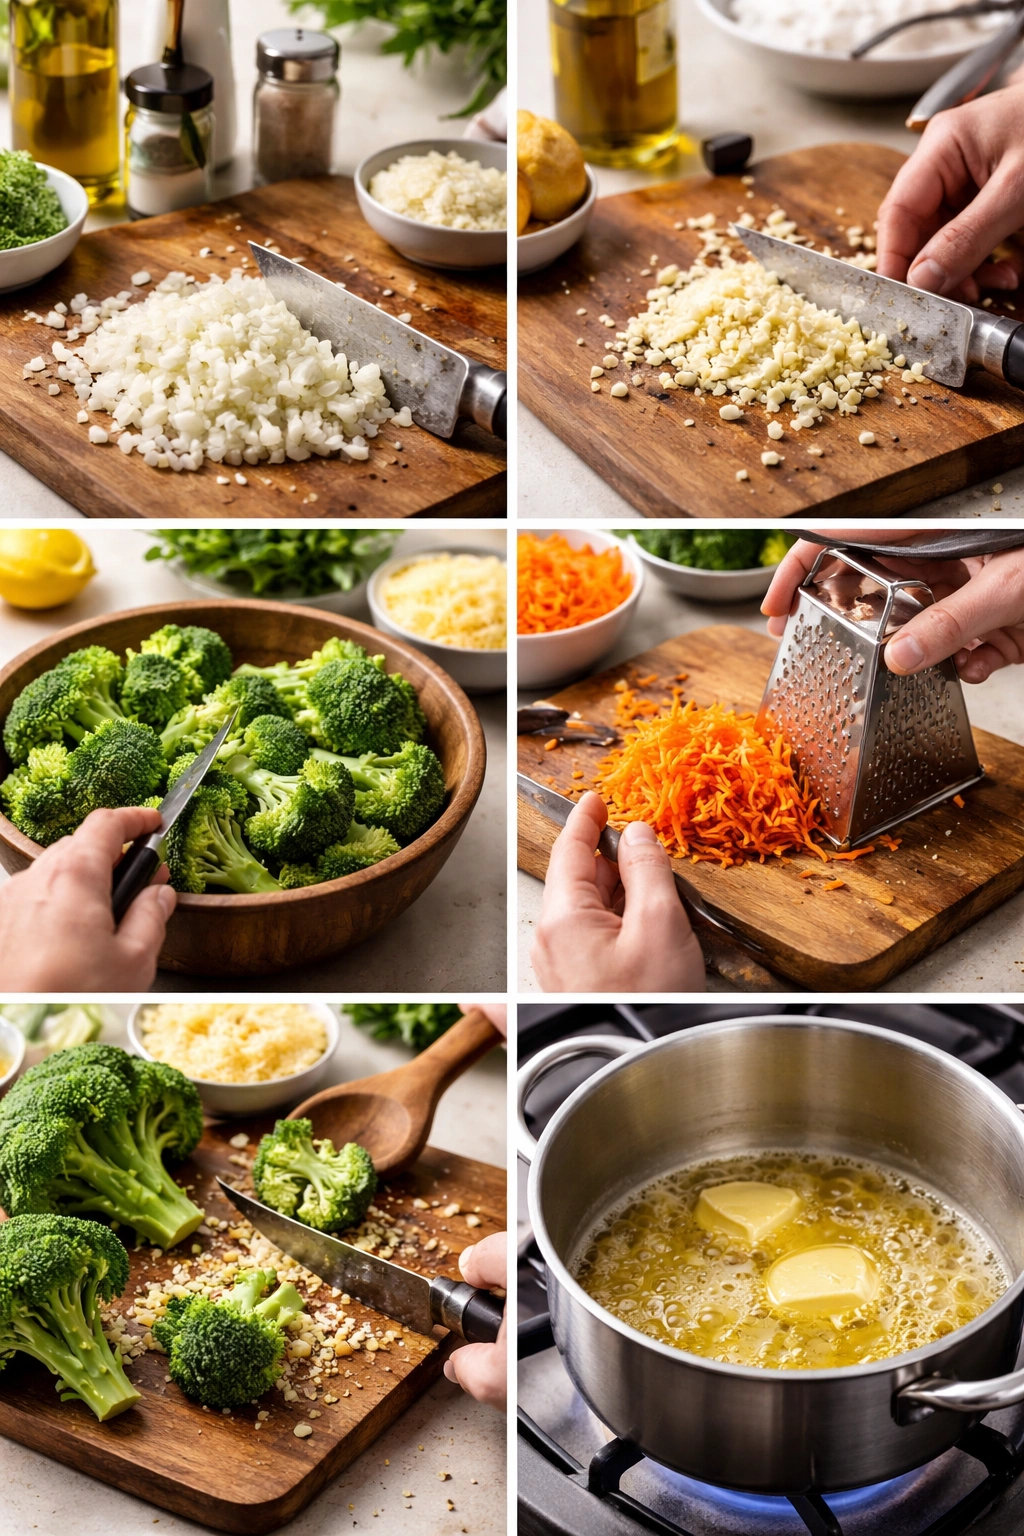
Prepare Your Ingredients:
-
Chop the onion into fine pieces (about quarter-inch dice) so it cooks evenly and disappears into the soup. Mince the garlic cloves finely as well.
-
Slice the broccoli florets off the main stem and cut them into bite-sized pieces—smaller than you think you’ll need, because small florets cook evenly and distribute throughout the soup. If you’re using frozen broccoli, thaw it completely and drain well.
-
Peel the carrot and shred it on a box grater (or buy pre-shredded carrots). Having everything prepped before you start cooking makes the process smooth and allows you to focus on technique.
Build the Flavor Base:
-
Place a large pot or Dutch oven over medium heat and add 2 tablespoons of the butter. Once melted and foamy, add the chopped onion and a pinch of salt.
-
Sauté the onion for 3 to 5 minutes, stirring occasionally, until softened and just beginning to turn translucent at the edges. Don’t rush this or let it brown—you’re looking for tender and fragrant.
-
Add the minced garlic and cook for 30 seconds to 1 minute, stirring constantly, until you smell the garlic’s aroma. This is the signal it’s cooked enough; any longer and garlic can turn bitter.
Make the Roux:
-
Add the remaining 1 tablespoon of butter to the pot and let it melt completely. This second addition of butter (combined with the remaining butter already in the pot) creates the roux without burning.
Advertisements -
Sprinkle the flour evenly over the butter and onion mixture. Using a whisk, stir constantly for 1 to 2 minutes, breaking up any lumps, until the mixture is smooth and foamy and has turned light golden in color. You’re cooking out the raw flour taste.
Whisk in the Broth Base:
-
Slowly pour the warm broth into the pot while whisking constantly. Start with about 1 cup, whisking continuously until the mixture is smooth and no flour lumps cling to the bottom of the pot.
-
Continue adding the remaining broth slowly while whisking, ensuring each addition is fully incorporated before adding more. This patient approach prevents lumps and creates a silky base.
-
Once all the broth is added and the mixture is smooth, add the half-and-half while whisking gently. The soup should look like a light gravy at this point—creamy but still pourable.
Season the Base:
- Add the salt, black pepper, dry mustard powder, and the pinch of nutmeg (if using). Whisk to combine so the seasonings distribute evenly throughout the liquid. Bring the mixture to a gentle simmer over medium heat and let it simmer for about 5 minutes, stirring occasionally, until it thickens slightly.
Cook the Vegetables:
-
Add the chopped broccoli florets and shredded carrots to the simmering broth. Stir well to distribute them evenly throughout the pot.
-
Reduce the heat to medium-low so the soup maintains a gentle simmer—you want small bubbles breaking the surface, not a rolling boil. Never boil the soup once you’ve added the dairy; boiling can cause separation.
-
Simmer for 10 to 15 minutes, until the broccoli is fork-tender and bright green, and the carrots are soft. Check at the 10-minute mark by piercing a broccoli floret with a fork; it should bend easily but still hold its shape. The broccoli should remain bright green, not dull or grayish.
Advertisements
Melt in the Cheese:
-
Remove the pot from heat completely. This is non-negotiable for smooth, creamy cheese incorporation. Add the shredded cheddar cheese in four or five handfuls, stirring well and waiting until each handful is fully melted and incorporated before adding the next.
-
Stir constantly and steadily—watch the cheese transform from shreds into a smooth, silky sauce. The final result should look unified and creamy, with no visible separation or grease. If you notice any separation, whisk in a splash of half-and-half or broth to help re-emulsify.
Taste and Finish:
-
Taste the soup and adjust the salt and pepper to your preference. Remember that you’ve added cheese, which adds its own saltiness, so start conservatively.
-
Ladle into bowls, garnish with a sprinkle of extra shredded cheddar, a crack of black pepper, or crusty bread crumbles if you like, and serve immediately while steaming hot.
Real Tips to Prevent Disaster
Warm your broth before adding it. Cold broth whisked into a hot roux can create stubborn lumps that are tedious to break up. Pour your broth into a microwave-safe measuring cup and microwave for 60 to 90 seconds until hot (not boiling), then whisk it in. This single step saves you from frustration.
Shred your own cheese, period. Pre-shredded cheese with anti-caking agents genuinely won’t melt smoothly—you’ll end up with a grainy, separated soup despite your best efforts. Grating a block of cheese takes two minutes and makes the difference between mediocre and silky. This is the one place where the extra effort truly matters.
Never skip the off-heat cheese melting step. Adding cheese to actively simmering soup causes the proteins in the cheese to seize and separate. Removing the pot from heat and adding cheese while the residual warmth is still present melts it perfectly and prevents grittiness.
Chop broccoli smaller than seems necessary. Small florets cook evenly, stay tender without turning mushy, and distribute throughout the soup beautifully. Large chunks cook unevenly and can feel tough or mealy in the finished product.
Watch the broccoli at the 10-minute mark, not the clock. Doneness depends on how finely you chopped the broccoli, how hot your simmer is, and your stove’s personality. Check early and taste, rather than timing it exactly.
Add vegetables last, sauté aromatics first. This sequencing ensures your broccoli stays bright and tender while your onion and garlic have time to develop flavor. Reverse the order and you’ll have overcooked broccoli or undercooked aromatics.
Texture Variations: Chunky, Smooth, or Blended

This soup is perfectly delicious left completely chunky, with broccoli florets visible in every spoonful. But if you prefer a creamier, more refined texture, you have options.
For a partially blended soup (silky but still textured), use an immersion blender directly in the pot to blend about one-third to one-half of the soup, leaving some broccoli pieces intact. Pulse rather than running continuously to maintain some texture. This creates a more velvety mouthfeel while keeping the rustic appeal of visible vegetables.
For a completely smooth soup, carefully transfer the soup (in batches if your blender isn’t huge) to a standard blender and purée until completely smooth. Vent the lid by cracking it open and covering loosely with a kitchen towel so steam can escape and hot soup doesn’t explode. This method creates a restaurant-quality silky soup, though some people find it less interesting texturally than leaving a few broccoli pieces.
Never blend the soup when it’s piping hot—let it cool for 3 to 5 minutes first, and always be careful when blending hot liquids. Starting on low speed and pulsing first before running continuously is the safest approach.
Ingredient Substitutions and Adjustments
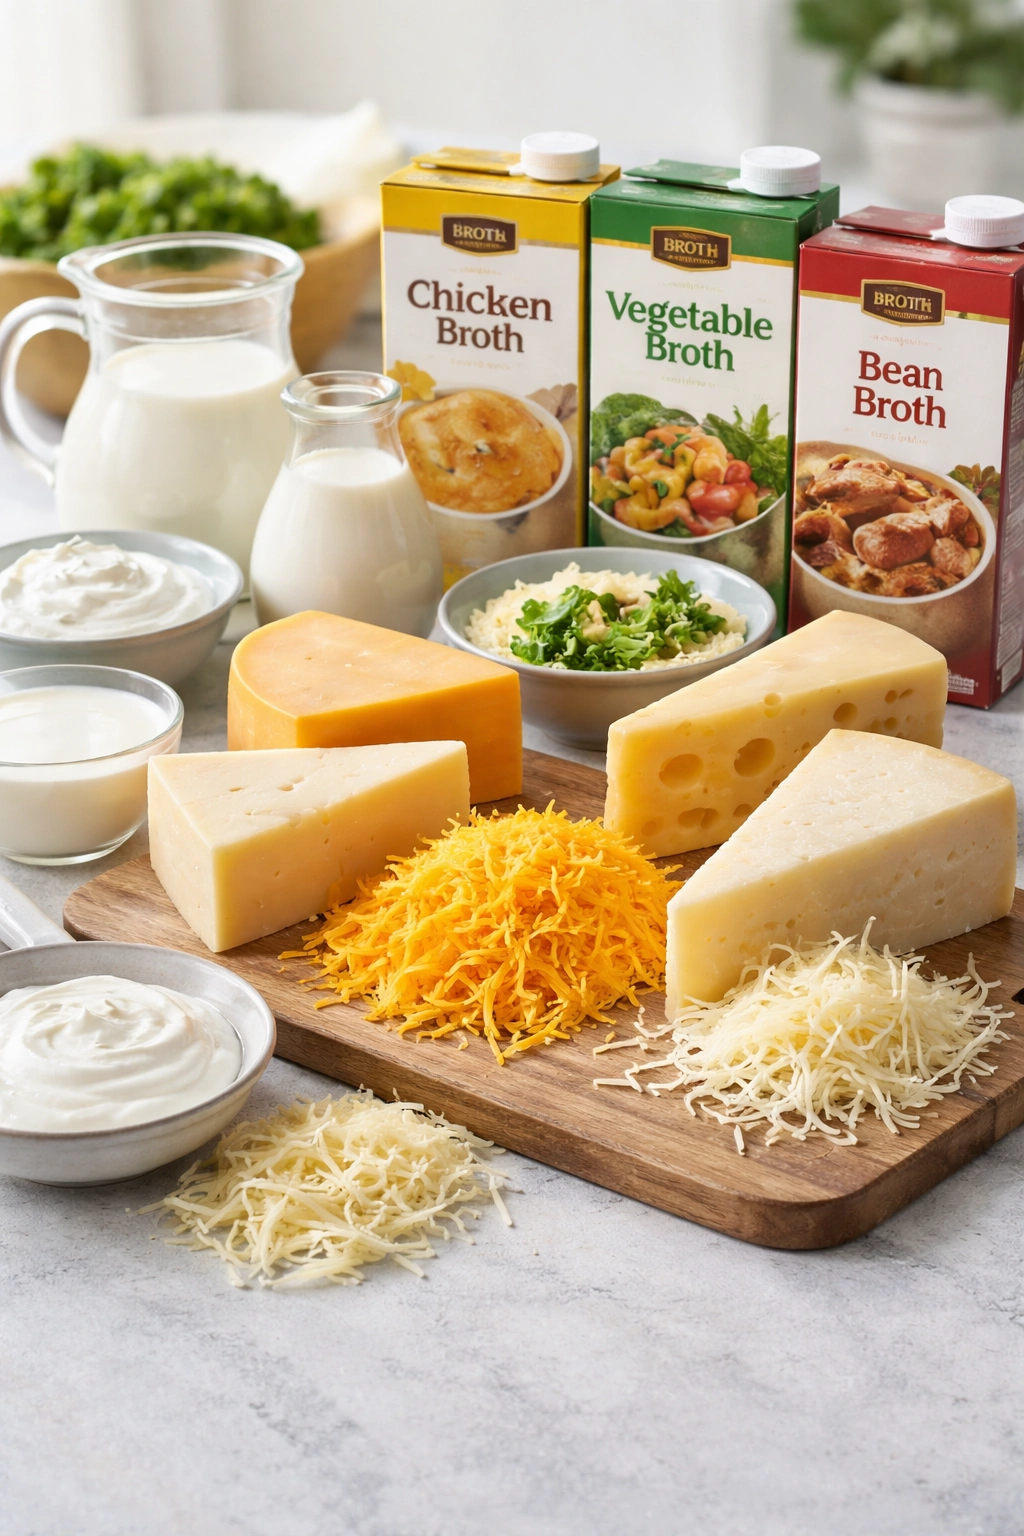
Broth alternatives: Vegetable broth creates a fully vegetarian soup; chicken broth adds subtle depth; bone broth adds incredible richness (use less because it’s more intensely flavored). Avoid beef broth, which would be odd with the sweetness of broccoli and the richness of cheese. In a pinch, you can use water plus a vegetable or chicken bouillon cube, but the soup won’t be quite as flavorful.
Dairy options: Half-and-half is the sweet spot, but whole milk creates a lighter soup (still creamy but less rich), while heavy cream creates an ultra-luxurious version. For a dairy-free version, use unsweetened plant-based milk (oat milk works best because it’s creamy) and replace the butter with vegan butter, but the final texture won’t be quite as smooth.
Cheese varieties: Sharp cheddar is traditional, but white cheddar (milder and slightly nuttier), Gruyère (more complex and funky), or Swiss (creamy and slightly sweet) all work beautifully. You could also do a blend—part sharp cheddar, part white cheddar for a more interesting flavor profile. Avoid pre-sliced or processed cheese singles, which don’t melt smoothly.
Broccoli alternatives: Cauliflower works as a straight swap; it’s milder and slightly sweeter than broccoli but creates an equally delicious soup. You could also use a mix—half broccoli, half cauliflower for something a bit different. Frozen broccoli or cauliflower works fine; just thaw and drain it first.
Carrot variations: Shredded carrots are traditional, but you can chop them into small dice instead, or omit them if you dislike carrots. The soup is delicious either way, though carrots add color and a subtle sweetness worth keeping if possible. Diced celery (a smaller amount, maybe half a stalk) adds another dimension if you’re in the mood to expand beyond the basic recipe.
Storage and Make-Ahead Instructions
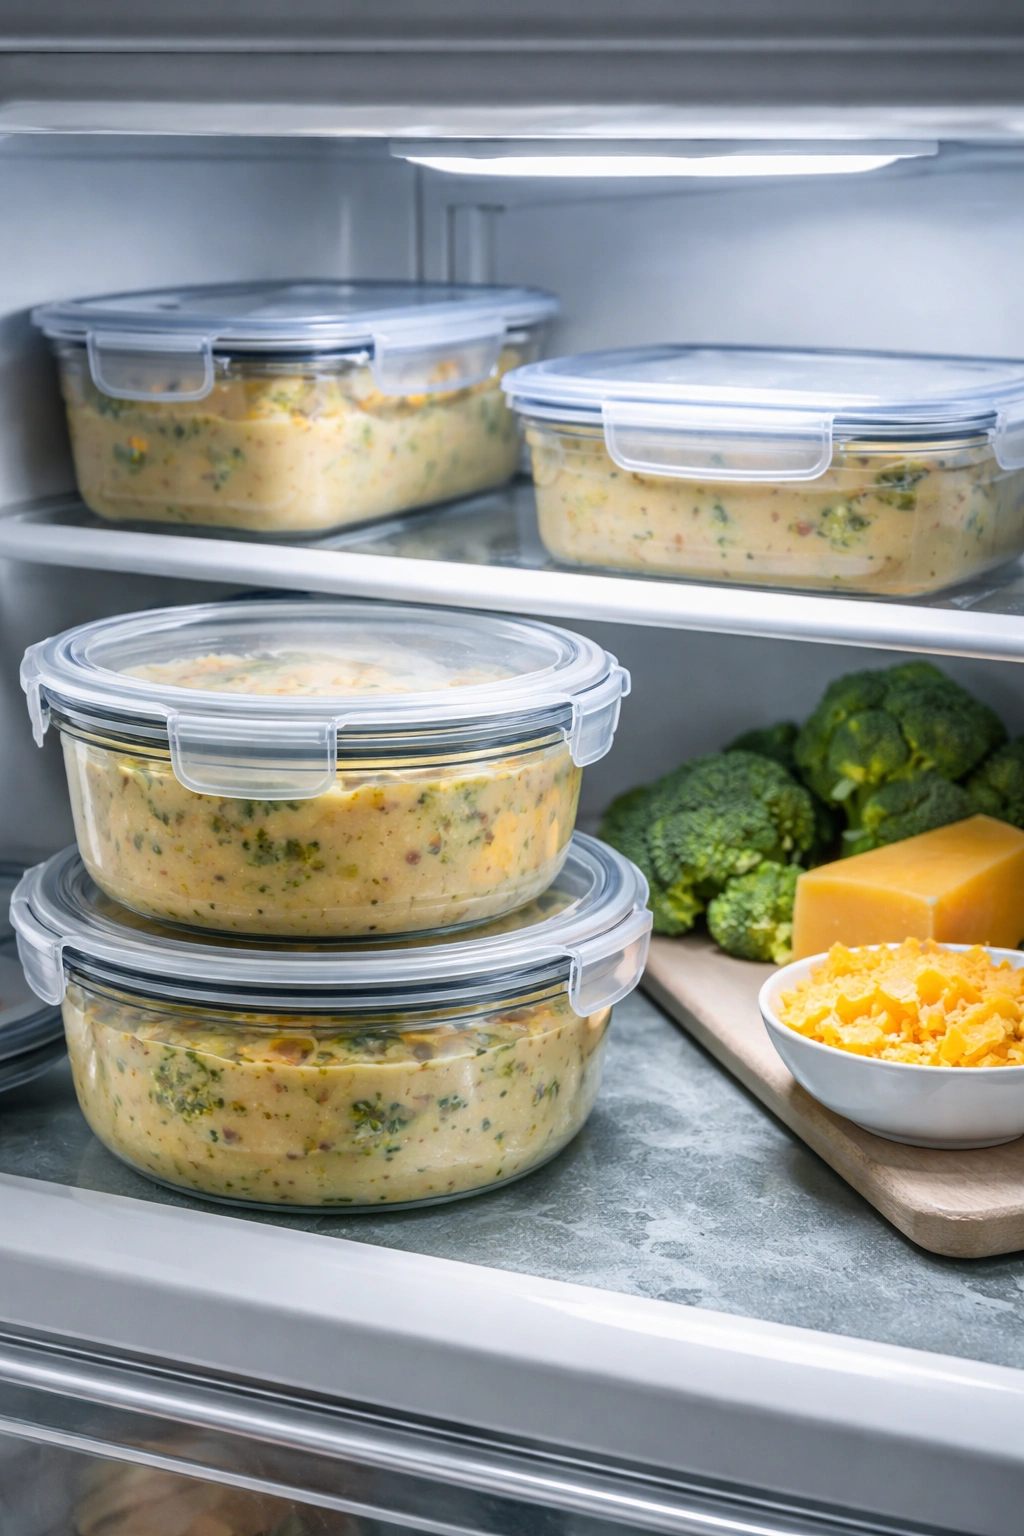
This soup keeps beautifully in the refrigerator. Store leftovers in an airtight container for up to 4 days. The soup may thicken slightly as it cools and sits; this is completely normal and actually happens because the roux continues to absorb liquid over time.
To reheat, pour the soup into a pot and warm it gently over medium-low heat, stirring occasionally, until heated through. Never reheat to a rolling boil, which can cause the cheese to separate and the soup to develop a gritty texture. Add a splash of broth or half-and-half if the soup seems too thick after refrigeration; this loosens it back to the right consistency.
Can you freeze this soup? Technically yes, but with caveats. The dairy-based soup can freeze for up to 3 months, but the texture often becomes slightly thin and grainy once thawed and reheated. If you do freeze it, thaw overnight in the refrigerator and reheat gently over low heat, whisking in a bit of additional half-and-half or broth to restore the creamy texture. Some cooks prefer to freeze the soup before adding the cheese and dairy, then add those components fresh when reheating, but this requires more planning.
For make-ahead purposes that work better: make the soup completely, cool it, and refrigerate it up to 4 days. This is more straightforward than freezing and gives you the best texture. Alternatively, prepare all the ingredients (chop vegetables, measure dry ingredients, etc.) the night before, then make the soup fresh the following day—it only takes 30 minutes, so this is often easier than reheating.
Serving Suggestions and Pairings

The bread bowl experience: The classic Panera presentation, a hollowed-out round of artisan bread bread or sourdough, turns the soup into an event. Fill the bread bowl with hot soup and let it warm the bread from the inside while you eat. Toward the end, tear off and eat pieces of the bread-bowl itself, which will have absorbed some of the soup—this is the best part.
Crusty bread for dipping: A thick slice of toasted sourdough, a hunk of focaccia, or even simple crusty baguette becomes the perfect vehicle for soup. Brush with olive oil and toast in the oven for a few minutes if you want extra texture.
Crispy croutons on top: Make homemade croutons by cutting day-old bread into cubes, tossing with olive oil, garlic powder, and salt, then roasting at 375°F (190°C) for 10 to 12 minutes until golden. These add satisfying texture and contrast to the creamy soup.
Side salad: A simple green salad with a bright vinaigrette (lemon vinaigrette, Dijon vinaigrette, or even a tangy apple cider vinaigrette) balances the richness of the soup beautifully. Peppery greens like arugula or watercress work especially well.
Grilled cheese sandwich: A classic pairing—crispy, buttery bread with melted cheese alongside creamy broccoli cheddar soup is peak comfort food. The textures and flavors complement each other perfectly.
Protein additions: While the soup is vegetarian as written, it’s excellent with additions. Stir in cooked shredded chicken, crumbled crispy bacon, or diced ham for heartier, more protein-rich meal.
Common Mistakes and How to Avoid Them

Lumpy soup from not whisking the broth in properly. Prevent this by whisking continuously as you pour, adding broth slowly in stages rather than all at once, and starting with warm broth rather than cold. If you do end up with a few lumps, push the soup through a fine-mesh strainer or use an immersion blender for 10 seconds to break them up.
Gritty, separated cheese texture. This comes from adding cheese to actively boiling soup or from using pre-shredded cheese with anti-caking agents. Solution: remove the pot from heat before adding cheese, use freshly grated cheese from a block, and add cheese gradually in small handfuls, waiting for each to melt completely.
Broccoli that’s gray and mushy instead of bright green and tender. Overcooking causes this, usually from a rolling boil or leaving the broccoli in too long. Cook at a gentle simmer and start checking at the 10-minute mark. Broccoli should bend easily with a fork but hold its shape.
Soup that’s too thin or too thick. Too thin usually means you used less cheese than called for or blended too much of the soup. Too thick can happen if the roux was made too heavily or the soup has sat in the fridge and thickened. Thin it by whisking in more broth or half-and-half; thicken it by making a small paste of cornstarch and water, whisking it in, and simmering for a minute.
Flat, boring flavor. This usually means under-seasoning. Remember to season the broth base (before adding vegetables) so flavors develop evenly. Taste at the end and adjust salt and pepper generously—cheddar soup needs good seasoning to shine.
Pre-shredded cheese that won’t melt smoothly. The anti-caking agents in pre-shredded cheese are the culprit. Solution: always buy a block and grate it yourself. It’s genuinely worth the two minutes.
Flavor Variations Worth Trying

Roasted red pepper broccoli cheddar: Add a roasted red pepper (jarred is fine) diced small or blended in for a slightly sweeter, more complex soup.
Bacon and cheddar version: Cook 4 slices of bacon until crispy, crumble it, and stir it in with the cheese at the end. Save some crumbles for garnish. The smoky, salty bacon complements the broccoli and cheese beautifully.
Broccoli cheddar with fresh herbs: Stir in a tablespoon of fresh thyme leaves or a tablespoon of minced fresh dill just before serving. Fresh herbs add brightness and sophistication.
Spicy version: Add a pinch of cayenne pepper or red pepper flakes when you season the broth base for a subtle heat that doesn’t overwhelm the cheese.
Potato-broccoli cheddar: Add one small diced russet potato when you add the broccoli. It cooks in the same time and adds heartiness and starch that makes the soup even creamier.
Cauliflower hybrid: Replace half the broccoli with cauliflower florets. Cauliflower creates a slightly sweeter, more delicate flavor while staying just as creamy.
The Real Reason This Soup Is So Satisfying

Beyond the flavors and the short cooking time, broccoli cheddar soup works because it’s fundamentally honest food. It’s not trying to be anything it’s not—it’s broccoli, cheese, and cream, respected and prepared well. The vegetables maintain their integrity instead of being cooked into mush. The cheese melts into a smooth sauce rather than becoming gritty or separated. The creaminess comes from thoughtful technique rather than excess heavy cream.
It’s the kind of soup that makes you feel cared for whether you made it for yourself or someone else made it for you. It’s warm and nourishing and genuinely satisfying in the way that comfort food should be—not heavy despite being creamy, not boring despite being simple, not rushed despite being quick.
Final Thoughts

What makes a truly great broccoli cheddar soup isn’t complexity or unusual ingredients—it’s respecting the few ingredients you have and technique that brings out their best. Fresh broccoli, real cheese grated from a block, proper emulsification, and seasoning that makes you want another spoonful.
The 30-minute timeline isn’t a trick or a compromise on quality; it’s simply recognizing that simple food cooked correctly doesn’t need hours. Roasting vegetables, reducing sauce by half, simmering for hours—these techniques have their place, but they’re not necessary here. What you need is butter that’s foamy, a roux that’s golden, broccoli that’s bright, and cheese that melts smoothly.
Make this soup on a gray afternoon when you want something warm. Make it when you’re in a hurry but refuse to sacrifice dinner quality. Make it for someone who needs comforting. Make it because the craving hits and you don’t want to wait. It’ll come together faster than the time it takes to reheat takeout, and you’ll end up with something infinitely better—a bowl of soup that tastes like you know exactly what you’re doing, even if you throw it together on a random Tuesday.