Breakfast tacos might be the most forgiving meal to prep for the entire week. They’re portable, reheatable without falling apart, endlessly customizable, and genuinely delicious whether you eat them Monday morning or Friday afternoon. Unlike some make-ahead breakfasts that turn soggy or disappointing by mid-week, properly prepped breakfast tacos actually taste better after the flavors have had time to settle and meld together.
The key to successful breakfast taco meal prep lies in understanding which components hold up well and which ones to save for assembly day. Proteins, beans, and roasted vegetables can be prepared in advance and stored for days. What you want to handle fresh—or at least on the day you plan to eat—is the tortillas and any really tender toppings like fresh herbs, creamy sauces, or delicate cheeses. The strategy is simple: do the heavy lifting mid-week, then spend just 90 seconds per taco assembling and heating them when you’re ready to eat.
These four recipes represent different flavor profiles and approaches, so you can either pick your absolute favorite or rotate through them across the week. Each one includes exact storage timelines, reheating methods, and advance-prep instructions designed specifically for busy people who want a genuinely good breakfast without morning scrambling. Let’s walk through each one.
1. Crispy Hash Brown and Chorizo Breakfast Tacos

This recipe delivers everything people love about a traditional diner breakfast taco: crispy fried potatoes, rich seasoned pork, melted cheese, and a runny egg yolk that ties everything together. The magic happens because the hash browns cook until genuinely crispy and golden—not just softly cooked—which gives you texture that survives the reheating process beautifully. Chorizo adds both flavor and fat, so the tacos don’t dry out even after days in the fridge.
Yield: Makes 8 tacos (serves 2 to 4 for the week) Prep Time: 25 minutes Cook Time: 35 minutes Total Time: 60 minutes active + 3 days refrigerated storage Difficulty: Intermediate — The hash browns require careful pan management to achieve the right crispness, but once you nail that technique, everything else is straightforward.
For the Hash Browns:
- 1½ pounds russet potatoes, left unpeeled
- 3 tablespoons vegetable oil, divided
- ¾ teaspoon fine sea salt
- ¼ teaspoon freshly ground black pepper
- ¼ teaspoon smoked paprika
For the Chorizo:
- 8 ounces fresh Mexican chorizo, casing removed
- ¼ cup diced yellow onion
- 1 jalapeño, minced (seeds removed for less heat, left in for more)
- 2 cloves garlic, minced
For Assembly:
- 8 small flour or corn tortillas
- 8 large eggs (for fresh assembly, not prepped)
- 1 cup shredded sharp cheddar cheese
- ½ cup fresh cilantro, roughly chopped
- ¼ cup diced white onion
- 1 lime, cut into wedges
- Hot sauce of choice
Prepare the Hash Browns:
-
Shred the unpeeled potatoes on the large holes of a box grater directly into a clean kitchen towel. Gather the towel tightly and wring out as much liquid as possible—this step is crucial for achieving crispness instead of sogginess. Let the wrung potatoes sit in a dry bowl for 5 minutes, then wring them once more to release any additional moisture.
Advertisements -
Heat 1½ tablespoons of the vegetable oil in a large cast-iron skillet over medium-high heat until it shimmers visibly across the entire pan surface.
-
Add half of the shredded potatoes to the hot oil, spreading them into a thin, even layer. Do not stir for at least 3 to 4 minutes. Let them sit undisturbed so the bottom develops a golden, crispy crust. You’ll hear them sizzle continuously—that’s the signal they’re browning correctly.
-
After 4 minutes, use a metal spatula to flip sections of the hash brown cake, breaking it into rough pieces. Continue cooking for another 3 to 4 minutes, stirring occasionally, until most of the potato pieces are golden brown and crispy on the edges. Transfer to a paper-towel-lined plate and season immediately with half of the salt, pepper, and paprika.
-
Repeat the process with the remaining 1½ tablespoons oil and the second batch of potatoes. Set both batches aside to cool completely.
Cook the Chorizo:
-
Return the same skillet to medium heat and add the chorizo, breaking it apart with a wooden spoon as it cooks. The chorizo will release its own fat, so you don’t need to add oil. Cook for 5 to 7 minutes, stirring occasionally, until the chorizo is fully cooked through and has lost all its raw pink color.
-
Add the diced onion, jalapeño, and garlic. Stir well and cook for 2 minutes more, just until the aromatics soften and become fragrant.
-
Return the cooked hash browns to the skillet with the chorizo and mix gently to combine, being careful not to break the crispy pieces into dust. Cook for 1 minute more to meld the flavors. Taste and adjust seasoning with additional salt and pepper if needed. Allow the mixture to cool to room temperature before storing.
Storage and Assembly:
Store the hash brown and chorizo mixture in an airtight container in the refrigerator for up to 4 days. Do not cook the eggs in advance—they’re best made fresh the morning you eat the tacos, which takes only 5 minutes anyway.
To serve, warm the hash brown mixture in a skillet over medium heat for 2 to 3 minutes until heated through. Warm the tortillas directly over a gas flame or in a dry skillet for 15 seconds per side until they’re pliable but still hold together. Fry or scramble your egg to your preferred doneness, then build each taco with a generous handful of the hash brown mixture, a small amount of cheese, the warm egg, cilantro, onion, and a squeeze of lime.
Why This Recipe Holds Up:
Hash browns actually improve over time as they continue to crisp up slightly in the fridge. The chorizo’s fat content keeps everything moist and prevents the potatoes from ever feeling dry. The layers of flavor compound over a few days, so Wednesday’s taco tastes even better than Monday’s.
Pro tip: If you want to get even more ahead, you can shred and wring out the potatoes the night before, then cook everything on Sunday. The components stay fresh for the full week when stored properly.
Variations Worth Trying:
- For a breakfast burrito instead: Use large flour tortillas and add black beans, cooked rice, and a drizzle of crema or sour cream, then wrap tightly in foil for excellent portability
- Dairy-free version: Skip the cheese entirely and add 1 teaspoon of cumin to the chorizo for extra depth
- Low-carb version: Serve the hash brown and chorizo mixture in lettuce cups or over a bed of sautéed spinach instead of tortillas
- Chipotle chorizo twist: Mix 1 tablespoon of chipotle powder into the chorizo before cooking for smoky heat
2. Scrambled Egg and Black Bean Breakfast Tacos
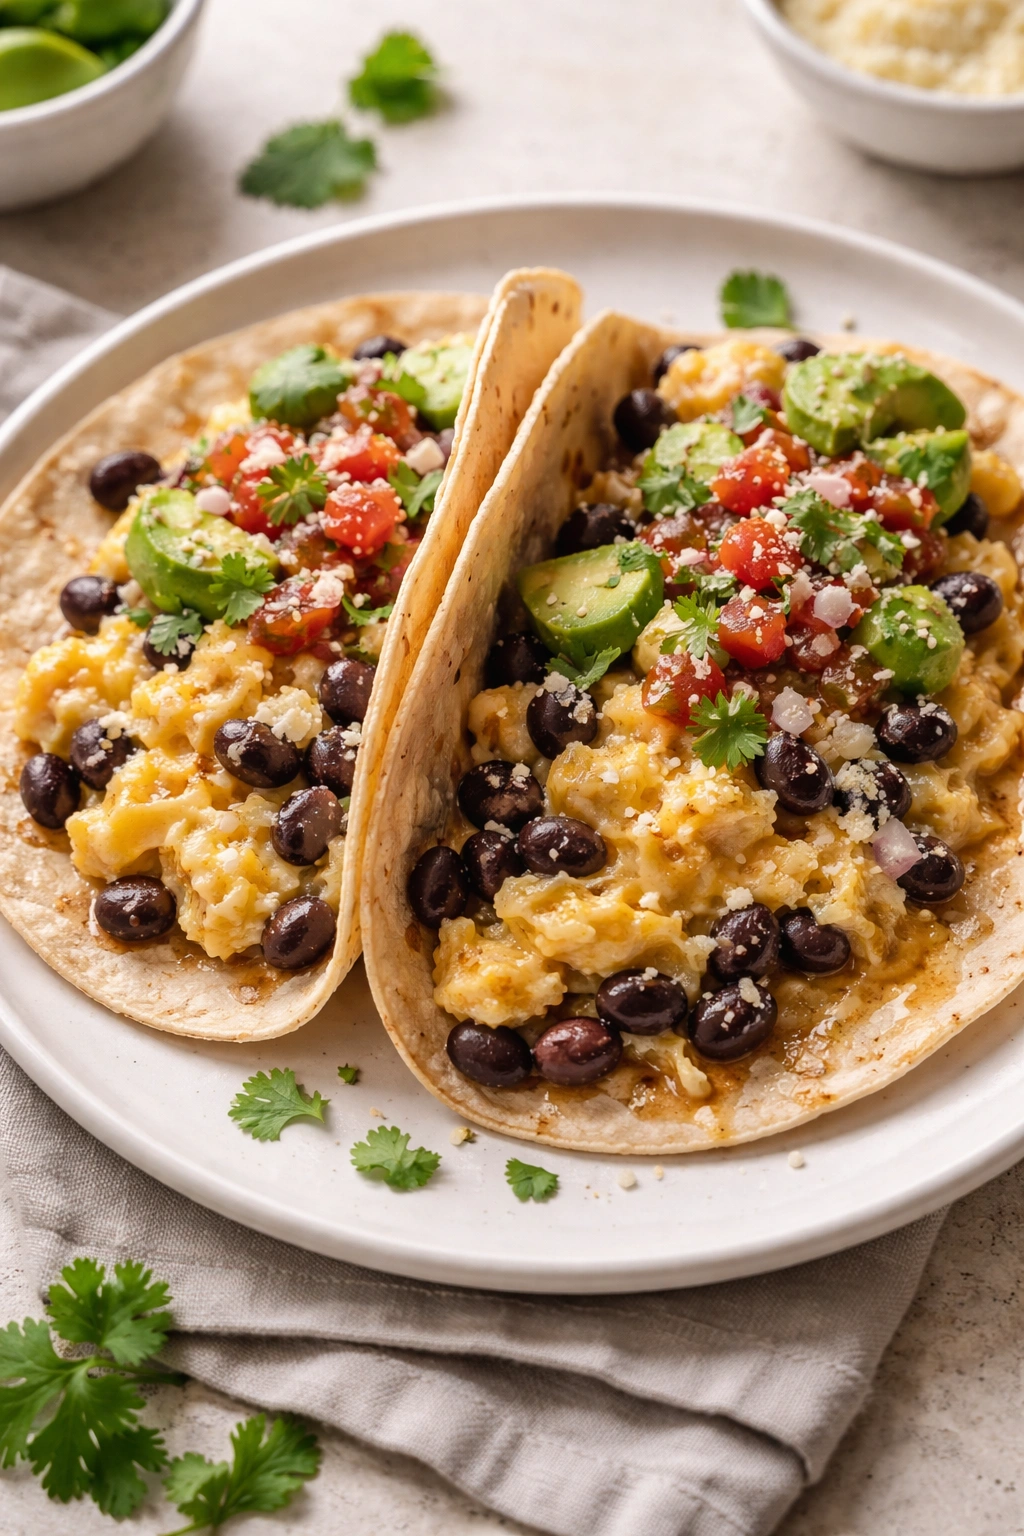
This is the recipe for people who want something filling, protein-packed, and genuinely good for you without sacrificing any flavor. Scrambled eggs cooked low and slow stay tender and creamy even after reheating, especially when they’re cooked with a bit of butter and finished with cheese and green onions. The black beans provide both substance and nutritional density, turning what could be a light breakfast into something that will sustain you through a busy morning.
Yield: Makes 8 tacos (serves 2 to 4 for the week) Prep Time: 15 minutes Cook Time: 25 minutes Total Time: 40 minutes active + 4 days refrigerated storage Difficulty: Beginner — Scrambled eggs are forgiving and hard to actually ruin; there’s plenty of room for variation in how cooked you want them.
For the Black Beans:
- 2 tablespoons olive oil
- ½ cup diced yellow onion
- 3 cloves garlic, minced
- 2 cups cooked black beans (or one 15-ounce can, drained and rinsed)
- 1 teaspoon ground cumin
- ½ teaspoon smoked paprika
- ¼ teaspoon cayenne pepper
- ½ teaspoon fine sea salt
- ¼ teaspoon freshly ground black pepper
- 2 tablespoons fresh lime juice
- 2 tablespoons chopped fresh cilantro
For the Scrambled Eggs:
- 8 large eggs
- 3 tablespoons unsalted butter
- ¼ teaspoon fine sea salt
- ⅛ teaspoon freshly ground black pepper
- ½ cup shredded Oaxaca or mozzarella cheese
- 3 green onions, sliced thin
For Assembly:
- 8 small flour or corn tortillas
- ½ cup cotija cheese or feta, crumbled
- ¼ cup fresh cilantro, roughly chopped
- Lime wedges
- Your preferred hot sauce or salsa
Make the Black Beans:
-
Heat the olive oil in a medium saucepan over medium heat. Add the diced onion and cook for 3 to 4 minutes, stirring occasionally, until the onion becomes translucent and softens slightly.
-
Add the garlic and cook for 30 seconds more, just until fragrant—don’t let the garlic brown or it will taste bitter.
-
Stir in the black beans, cumin, paprika, cayenne, salt, and black pepper. Cook for 5 minutes, stirring occasionally, so the spices fully bloom and the beans warm through completely.
-
Remove from heat and stir in the lime juice and cilantro. Taste and adjust the seasoning—you want the beans to taste fully seasoned and lively, not bland. Set aside to cool.
Prepare the Scrambled Eggs:
-
Crack the 8 eggs into a medium bowl and whisk vigorously for 15 to 20 seconds until the yolks and whites are fully combined and the mixture is uniform. Season with the salt and black pepper. This is the moment to add any optional ingredients—minced herbs, grated cheese, diced peppers—if you’d like. Whisking thoroughly at this stage means the eggs will cook evenly.
-
Melt the butter in a large nonstick skillet over medium-low heat. Once melted and foaming, add the whisked eggs. This is crucial: resist the urge to stir constantly. Let the eggs sit undisturbed for 20 to 30 seconds, then gently push a rubber spatula through the mixture, pulling the cooked eggs toward the center of the pan while letting the uncooked egg flow to the edges.
-
Repeat this gentle pushing and pulling motion every 20 to 30 seconds for 4 to 5 minutes total, until the eggs are soft and creamy but no longer visibly wet. Some cooks prefer their scrambled eggs slightly firmer—if that’s you, cook for an additional minute. The residual heat will continue cooking the eggs for another 30 seconds after you remove them from heat, so pull them off the stove when they’re still just slightly underdone.
-
Remove from heat immediately and stir in the shredded Oaxaca cheese and sliced green onions. The residual heat will melt the cheese beautifully without requiring additional cooking. Taste and adjust seasoning if needed.
Advertisements
Storage and Assembly:
Store the black beans and scrambled eggs in separate airtight containers in the refrigerator for up to 4 days. Keeping them separate means you can reheat them at different paces if needed—the beans heat faster than the eggs.
To serve, warm the black beans gently in a small skillet over medium-low heat, stirring occasionally, for 2 to 3 minutes. Warm the scrambled eggs in a separate skillet over low heat, stirring gently, for 2 to 3 minutes until warmed through. (Low heat is important here because high heat will toughen the eggs.) Warm the tortillas. Build each taco with a spoonful of black beans, a generous portion of scrambled eggs, crumbled cotija cheese, fresh cilantro, and a squeeze of lime.
Why This Recipe Works for Meal Prep:
Scrambled eggs actually stay remarkably creamy when reheated gently, especially if they weren’t overcooked in the first place. The black beans lose any moisture and gain structure as they sit, making them easier to portion neatly into the tacos. Together, they create a taco that feels substantial and satisfying.
Pro tip: If you find your reheated eggs are drying out, add a small pat of butter when you reheat them. The fat brings back the creaminess instantly.
Variations Worth Trying:
- Southwestern addition: Stir ½ cup of diced roasted poblano peppers into the black beans for smoky depth
- Breakfast hash version: Dice and roast ½ pound of potatoes with ½ teaspoon smoked paprika and ¼ teaspoon cayenne, then fold into the scrambled eggs
- Chorizo upgrade: Crumble 4 ounces of cooked chorizo into the bean mixture for meaty richness
- Creamy cheese version: Use cream cheese instead of regular cheese—tear it into small pieces and fold into the hot eggs for an ultra-creamy texture
3. Breakfast Steak and Caramelized Onion Tacos
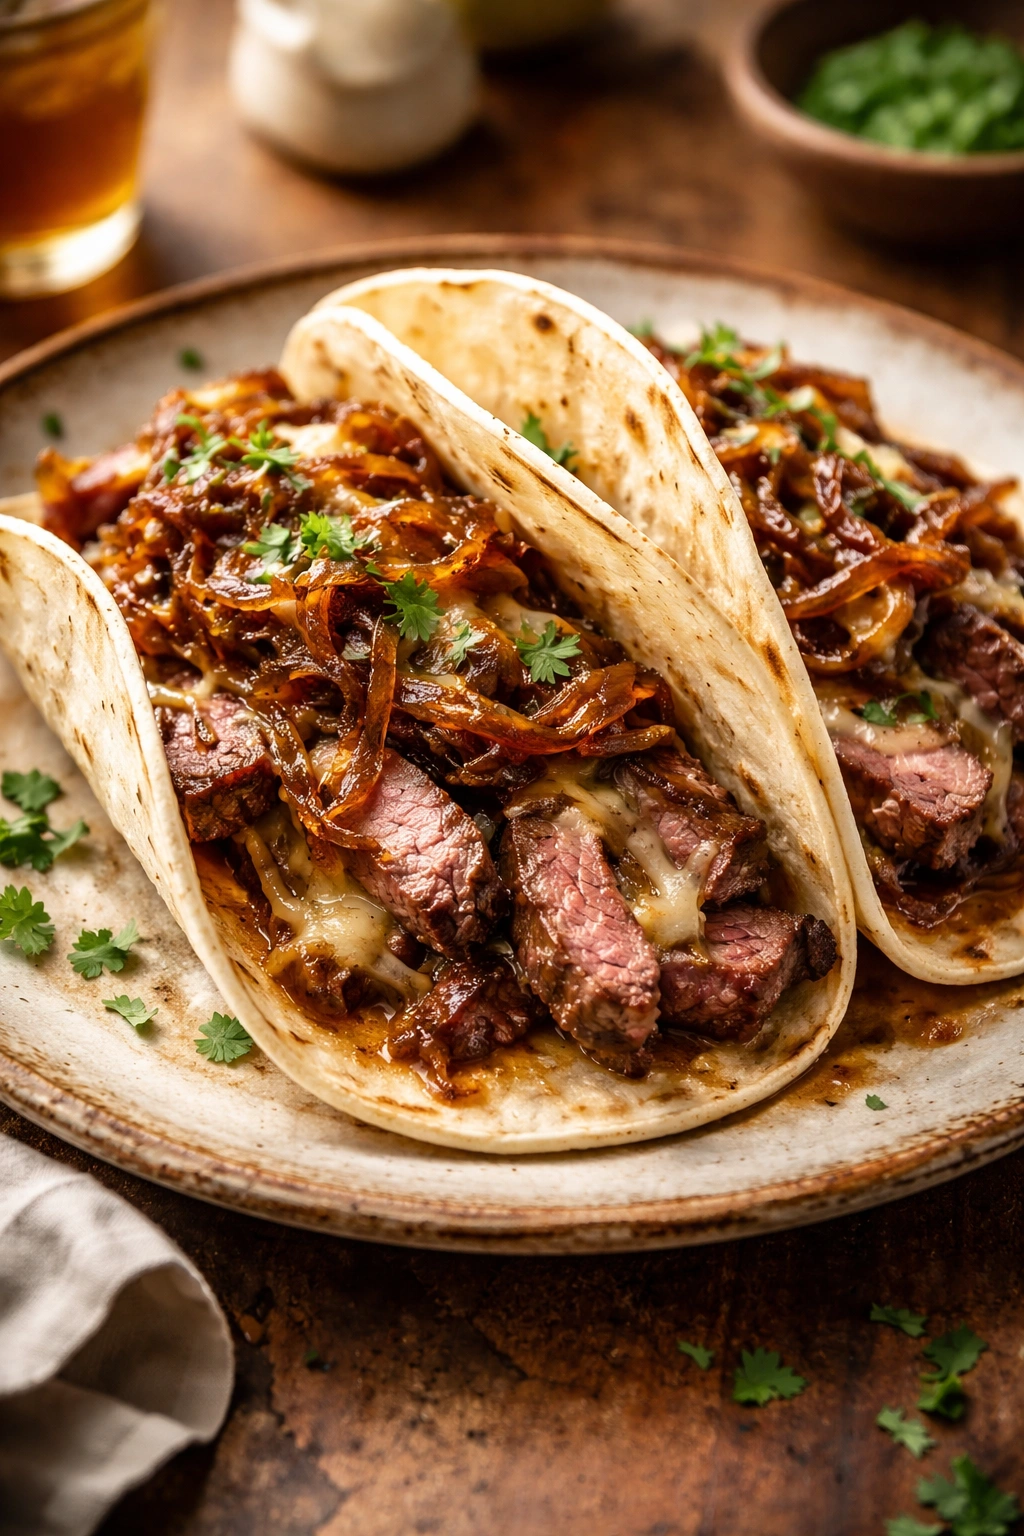
For anyone who thinks breakfast tacos should deliver real, substantial protein, this recipe will feel like a revelation. Thin-sliced steak cooks quickly, stores beautifully, and pairs perfectly with sweet, deeply caramelized onions that have been cooked low and slow until they turn jammy and golden. This is the breakfast taco that feels indulgent enough for a weekend brunch, yet practical enough for weekday meal prep.
Yield: Makes 8 tacos (serves 2 to 4 for the week) Prep Time: 20 minutes Cook Time: 50 minutes Total Time: 70 minutes active + 4 days refrigerated storage Difficulty: Intermediate — Caramelizing onions requires patience and attention, but the technique is straightforward once you understand the low-and-slow principle.
For the Caramelized Onions:
- 3 tablespoons unsalted butter
- 2 tablespoons olive oil
- 3 large yellow onions (about 2 pounds), peeled and sliced thin
- ¾ teaspoon fine sea salt, divided
- ¼ teaspoon freshly ground black pepper
- 1 tablespoon balsamic vinegar
- 1 tablespoon soy sauce
- 1 teaspoon Worcestershire sauce
- 1 teaspoon fresh thyme leaves (or ½ teaspoon dried)
For the Breakfast Steak:
- 1 pound sirloin or ribeye steak, cut thin (ask the butcher to slice it ¼ inch thick)
- 1½ teaspoons fine sea salt
- ½ teaspoon freshly ground black pepper
- 1 teaspoon smoked paprika
- 1 teaspoon garlic powder
- 2 tablespoons olive oil
For Assembly:
- 8 small flour tortillas (corn won’t hold up as well with the juices from the steak)
- 1 cup crumbled queso fresco
- ⅓ cup fresh cilantro, roughly chopped
- 1 lime, cut into wedges
- Your preferred salsa roja or verde
Caramelize the Onions:
-
Heat the butter and olive oil together in a large skillet (10 inches or bigger) over medium heat. Once foaming, add the sliced onions and sprinkle with ½ teaspoon of the salt. Stir well to coat the onions evenly with the fat.
-
Cook the onions uncovered, stirring every 2 to 3 minutes, for 10 minutes. The onions will release their moisture and soften significantly during this phase. You should see them beginning to turn translucent and shrink as the water cooks off.
-
After 10 minutes, reduce the heat to medium-low and continue cooking, stirring less frequently (every 4 to 5 minutes is fine now), for another 30 to 40 minutes. This is where patience pays off. The onions will gradually turn a deeper golden color, become softer and more jammy, and develop intensely sweet, caramelized flavors. You’re not rushing this—you’re letting the natural sugars in the onions slowly concentrate and turn golden brown.
-
When the onions are deeply golden brown (they should look almost like peanut butter in color), add the remaining ¼ teaspoon of salt, the black pepper, balsamic vinegar, soy sauce, Worcestershire sauce, and thyme. Stir everything together and cook for 1 minute more. Taste and adjust seasoning—you want the sweetness of the onions balanced by a touch of savory depth.
-
Transfer the caramelized onions to a bowl and set aside to cool completely. Don’t skip cooling them—this prevents condensation from forming when you store them, which can make them watery.
Prepare the Steak:
-
Pat the steak slices completely dry with paper towels. Any moisture on the surface will steam the meat instead of searing it, and you want a golden, flavorful crust. Mix the salt, black pepper, paprika, and garlic powder together on a small plate, then season all the steak slices evenly on both sides.
Advertisements -
Heat the olive oil in a large skillet over medium-high heat until it shimmers. The pan should be noticeably hot—flick a drop of water in and it should sizzle immediately. Working in batches if needed (don’t crowd the pan), sear the steak slices for 1 to 2 minutes per side, just until a golden-brown crust develops. The center should still be pink or medium-rare. Don’t overcook—remember, the steak will continue cooking as it rests and again when you reheat it.
-
Transfer the seared steak to a plate and allow it to rest for 5 minutes. This allows the muscle fibers to relax and retain more juice, which matters especially when reheating.
Storage and Assembly:
Store the caramelized onions and cooked steak in separate airtight containers in the refrigerator for up to 4 days. The steak will be easier to portion if you let it cool completely before storing.
To serve, gently warm the steak in a skillet over medium heat for 1 to 2 minutes per side—low heat, minimal cooking. The goal is warming, not cooking further. Warm the caramelized onions in the same pan while the steak is heating. Warm the tortillas. Build each taco with a portion of the steak, a generous scoop of caramelized onions, crumbled queso fresco, cilantro, and a squeeze of lime juice.
Why This Recipe Succeeds:
Thin-sliced steak cooked properly stays tender and sliceable even after days of refrigeration and reheating. Caramelized onions actually taste better on day three or four as the flavors deepen. Together, they create a breakfast taco that feels restaurant-quality but requires no fancy technique.
Pro tip: Save any steak drippings—they’re liquid gold for dipping tortillas or drizzling over the finished tacos.
Variations Worth Trying:
- Blue cheese version: Crumble blue cheese over the hot steak just before assembling for tangy richness
- Mushroom upgrade: Sauté 8 ounces of sliced mushrooms with the onions during the last 10 minutes of caramelization
- Horseradish twist: Mix 2 tablespoons of prepared horseradish with ¼ cup of sour cream and dollop into each taco for heat and brightness
- Herb-finished steak: Before searing, coat the steak slices in a mixture of minced fresh rosemary, thyme, and garlic for herbaceous depth
4. Veggie-Loaded Breakfast Tacos with Peppers and Mushrooms

This recipe proves that breakfast tacos don’t need meat to be satisfying. A combination of roasted vegetables, creamy scrambled eggs, and melted cheese creates something just as hearty and far more interesting than a standard vegetarian breakfast. The vegetables caramelize slightly as they roast, developing concentrated flavors and crispy edges. This is also your most forgiving recipe for meal prep since roasted vegetables actually improve over a few days as the flavors continue to develop.
Yield: Makes 8 tacos (serves 2 to 4 for the week) Prep Time: 20 minutes Cook Time: 40 minutes Total Time: 60 minutes active + 4 days refrigerated storage Difficulty: Beginner — Roasting vegetables is straightforward, and scrambled eggs are hard to mess up.
For the Roasted Vegetables:
- 1 large red bell pepper, cut into ½-inch strips
- 1 large yellow bell pepper, cut into ½-inch strips
- 8 ounces cremini mushrooms, cleaned and sliced
- 1 medium zucchini, cut into half-moons
- ½ red onion, cut into thin wedges
- 3 cloves garlic, minced
- 3 tablespoons olive oil
- ¾ teaspoon fine sea salt
- ¼ teaspoon freshly ground black pepper
- 1 teaspoon ground cumin
- ½ teaspoon smoked paprika
- ¼ teaspoon red pepper flakes
- 2 tablespoons fresh lime juice
- ¼ cup fresh cilantro, chopped
For the Scrambled Eggs:
- 8 large eggs
- 3 tablespoons unsalted butter
- ¼ teaspoon fine sea salt
- ⅛ teaspoon freshly ground black pepper
- ½ cup shredded Oaxaca or mozzarella cheese
- 2 green onions, sliced thin
For Assembly:
- 8 small flour or corn tortillas
- ½ cup crumbled cotija cheese or feta
- ¼ cup sour cream or Mexican crema
- ⅓ cup fresh cilantro
- Lime wedges
- Your preferred salsa
Roast the Vegetables:
-
Preheat the oven to 425°F (220°C) and position the racks so one is in the upper third and one is in the lower third.
-
On a large baking sheet (or two if you don’t have one large enough to fit everything in a single layer without crowding), combine the bell peppers, mushrooms, zucchini, and red onion. Drizzle with the olive oil and sprinkle with the salt, black pepper, cumin, paprika, and red pepper flakes. Toss everything together until the vegetables are evenly coated in the oil and spices.
-
Spread the vegetables into a single even layer—don’t pile them on top of each other, or they’ll steam instead of roast. Roast for 25 to 30 minutes, stirring halfway through, until the peppers are tender, the mushrooms have released their moisture and begun to brown at the edges, and the zucchini is beginning to caramelize. The vegetables should smell deeply fragrant and savory.
-
Remove the vegetables from the oven and stir in the minced garlic. Return to the oven for 1 minute more just to warm the garlic through (don’t let it burn). Remove and immediately drizzle with the lime juice and stir in the cilantro. Taste and adjust seasoning—the vegetables should be well-seasoned and vibrant. Set aside to cool.
Prepare the Scrambled Eggs:
-
Crack the 8 eggs into a medium bowl and whisk vigorously for 15 to 20 seconds until fully combined. Season with the salt and pepper.
-
Melt the butter in a large nonstick skillet over medium-low heat. Once melted and foaming, add the whisked eggs. Let them sit undisturbed for 20 to 30 seconds, then gently push a rubber spatula through the mixture, pulling the cooked eggs toward the center while letting the uncooked egg flow to the edges.
-
Repeat this gentle motion every 20 to 30 seconds for 4 to 5 minutes, until the eggs are soft, creamy, and no longer visibly wet. Remove from heat just before they look completely done—the residual heat will continue cooking them as they sit.
-
Stir in the shredded Oaxaca cheese and sliced green onions. Taste and adjust seasoning if needed.
Storage and Assembly:
Store the roasted vegetables and scrambled eggs in separate airtight containers in the refrigerator for up to 4 days. The vegetables actually become more flavorful as they sit and the seasonings continue to meld.
To serve, gently warm the eggs in a skillet over low heat for 2 to 3 minutes, stirring occasionally. Warm the vegetables in a separate skillet over medium heat for 2 to 3 minutes. Warm the tortillas. Build each taco with a portion of the roasted vegetables, a generous scoop of scrambled eggs, crumbled cotija cheese, a dollop of sour cream, fresh cilantro, and a squeeze of lime.
Why This Recipe Works:
Roasted vegetables are naturally sturdy and improve over a few days as flavors continue to develop. Scrambled eggs provide creamy richness that makes the vegetables feel like a complete meal. This recipe serves equally well as a regular breakfast taco, a vegetarian lunch, or even a light dinner.
Pro tip: The vegetables work beautifully tossed into rice or grain bowls, mixed into breakfast burritos, or served alongside roasted proteins during the week, so you can get multiple meals out of one batch if your plans change.
Variations Worth Trying:
- Black bean addition: Stir 1 cup of cooked black beans into the roasted vegetables right before storing for added protein and substance
- Feta and spinach version: Add 2 cups of fresh spinach to the egg pan in step 5, let it wilt, then stir in ½ cup of crumbled feta cheese
- Sweet potato upgrade: Replace the zucchini with 1 medium sweet potato cut into half-moons—it adds sweetness that balances the savory eggs beautifully
- Breakfast breakfast version: Add 4 ounces of crumbled chorizo or cooked bacon to the roasted vegetables for a meat component without adding significant prep time
Final Thoughts
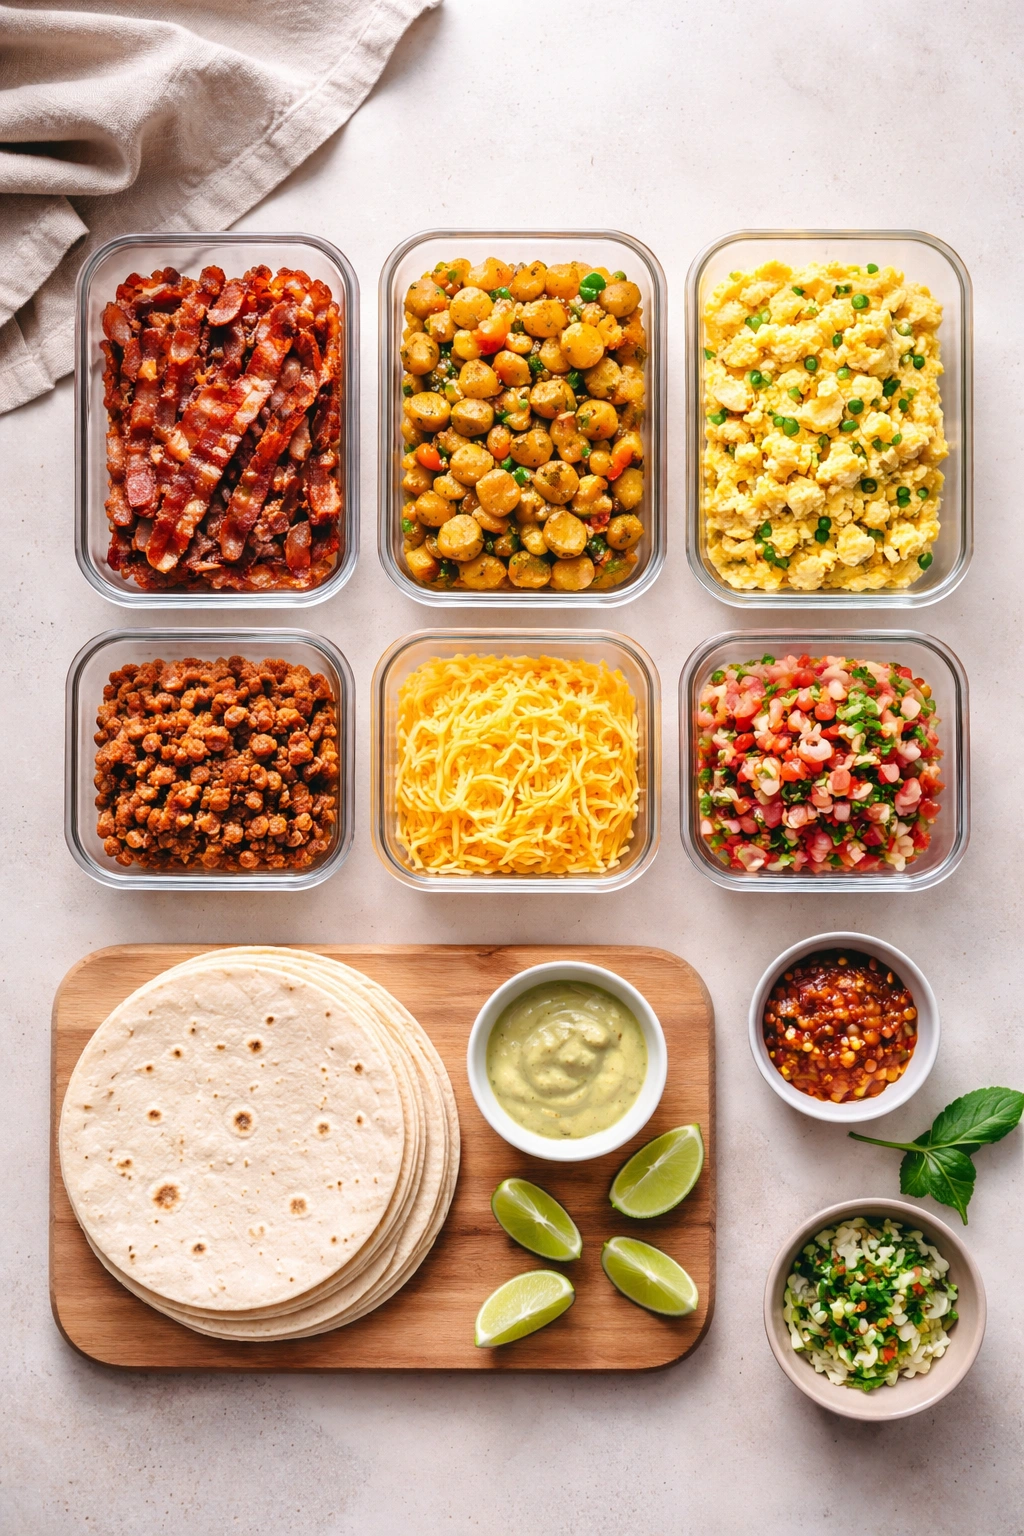
Breakfast taco meal prep transforms your mornings from chaotic to calm. You’re not just saving time—you’re building a week of genuinely satisfying breakfasts that taste cared for and intentional. Each of these four recipes holds up beautifully for four days in the refrigerator, meaning a single Sunday session sets you up completely for the week.
The real secret to success is understanding that different components reheat at different rates. Store your vegetables and proteins separately from your eggs when possible, warm them gently rather than aggressively, and save the fresh elements—avocado, fresh herbs, crunchy onions, lime juice—for the final assembly. That last-minute brightness is what transforms a reheated meal into something that actually tastes homemade rather than cafeteria-style.
Start with whichever recipe speaks to you most, nail the technique once, then rotate through the others or stick with your favorite. Once you’ve made breakfast tacos even one time, you’ll understand why so many people consider them the perfect meal to prep: they’re efficient to make, they’re portable, they freeze beautifully if you want to extend your prep even further, and they’re flexible enough to adapt to whatever you have on hand. Your future self on a rushed Thursday morning will thank you profusely for taking 90 minutes on Sunday to make them.