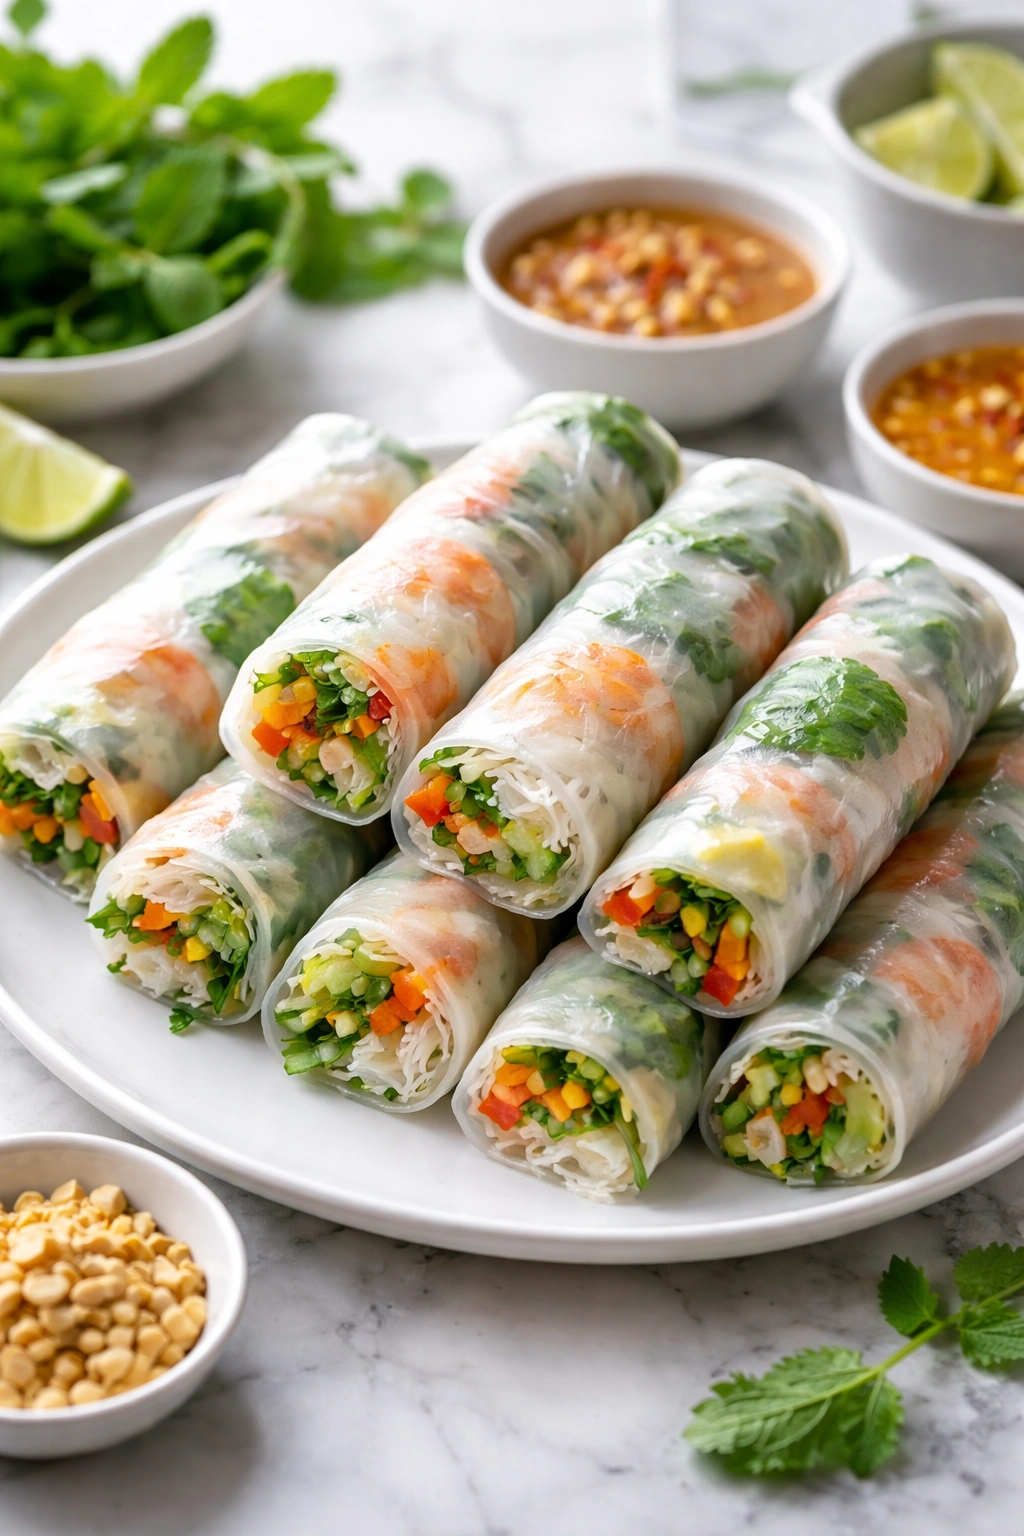
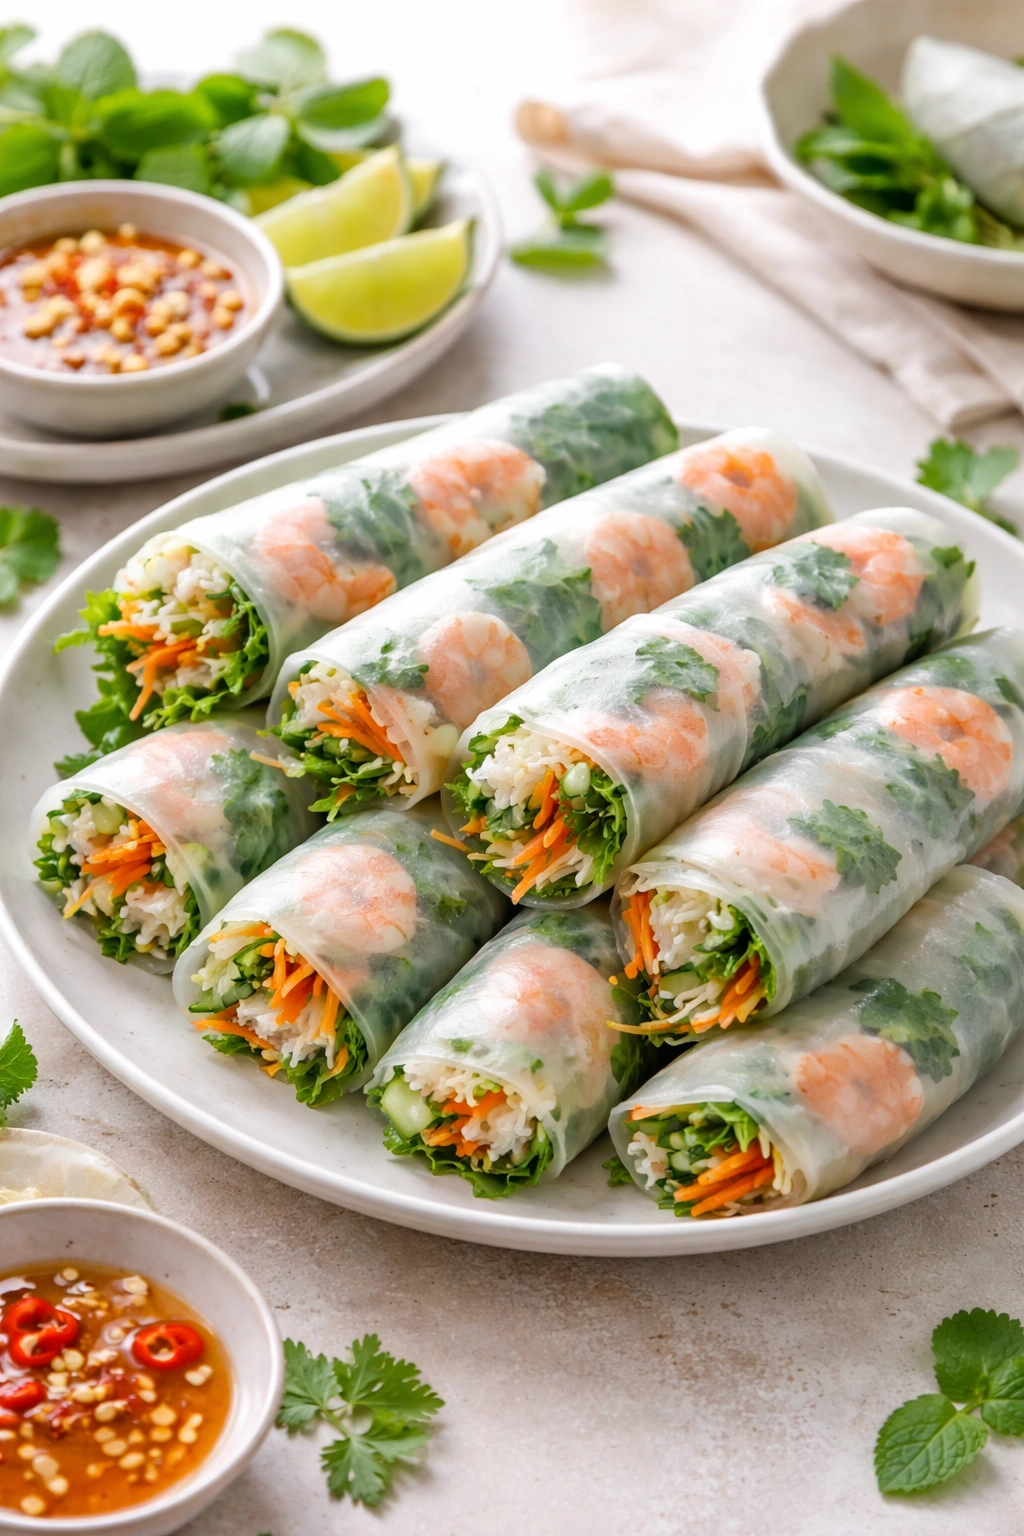
Fresh rice paper spring rolls are one of those dishes that seem intimidating until you’ve made them once. After that, they become second nature — and honestly, one of the most rewarding kitchen skills you can develop. There’s something genuinely satisfying about rolling a perfect spring roll at home, watching the translucent wrapper catch the light, knowing exactly what goes inside because you chose every ingredient yourself.
The thing is, there’s a massive difference between store-bought spring rolls and the ones you make in your kitchen. Homemade versions have a tender, delicate texture that holds up beautifully — not the rubbery, overstuffed mistakes you find in most restaurants or grocery stores. The fillings are fresh, crisp, and proportioned exactly how you like them. You control the heat level, the herb balance, the protein choice. And the rolling process? It’s actually enjoyable once you understand the mechanics.
This guide will take you through everything — from understanding rice paper and setting up your workspace to mastering the rolling technique and creating your own flavor variations. You’ll learn the common pitfalls and exactly how to avoid them. By the end, you’ll have the confidence and knowledge to make these beautiful rolls whenever you want, and to customize them endlessly based on what you have on hand.
What Makes Homemade Spring Rolls Worth the Effort
Store-bought spring rolls often taste like they were manufactured in a factory two weeks ago. The wrappers are thick and chewy instead of silky. The fillings are either mushy or taste like they’ve been sitting in a cooler for hours. The sauces come in little plastic containers that taste vaguely like sweet soy soup.
Homemade spring rolls are the opposite experience entirely. When you roll them yourself, you get to work with rice paper at the exact moment it’s softened to perfection — still tender but with enough structure to hold together. The vegetables stay crisp because you’re using them at peak freshness. The herbs are bright and aromatic. Everything tastes alive.
The other truth is that rolling spring rolls is genuinely fun once you understand the technique. There’s a rhythm to it, a meditative quality. Your hands learn the motion. You get faster with each roll. What takes 15 minutes for your first batch becomes 8 minutes by your fifth.
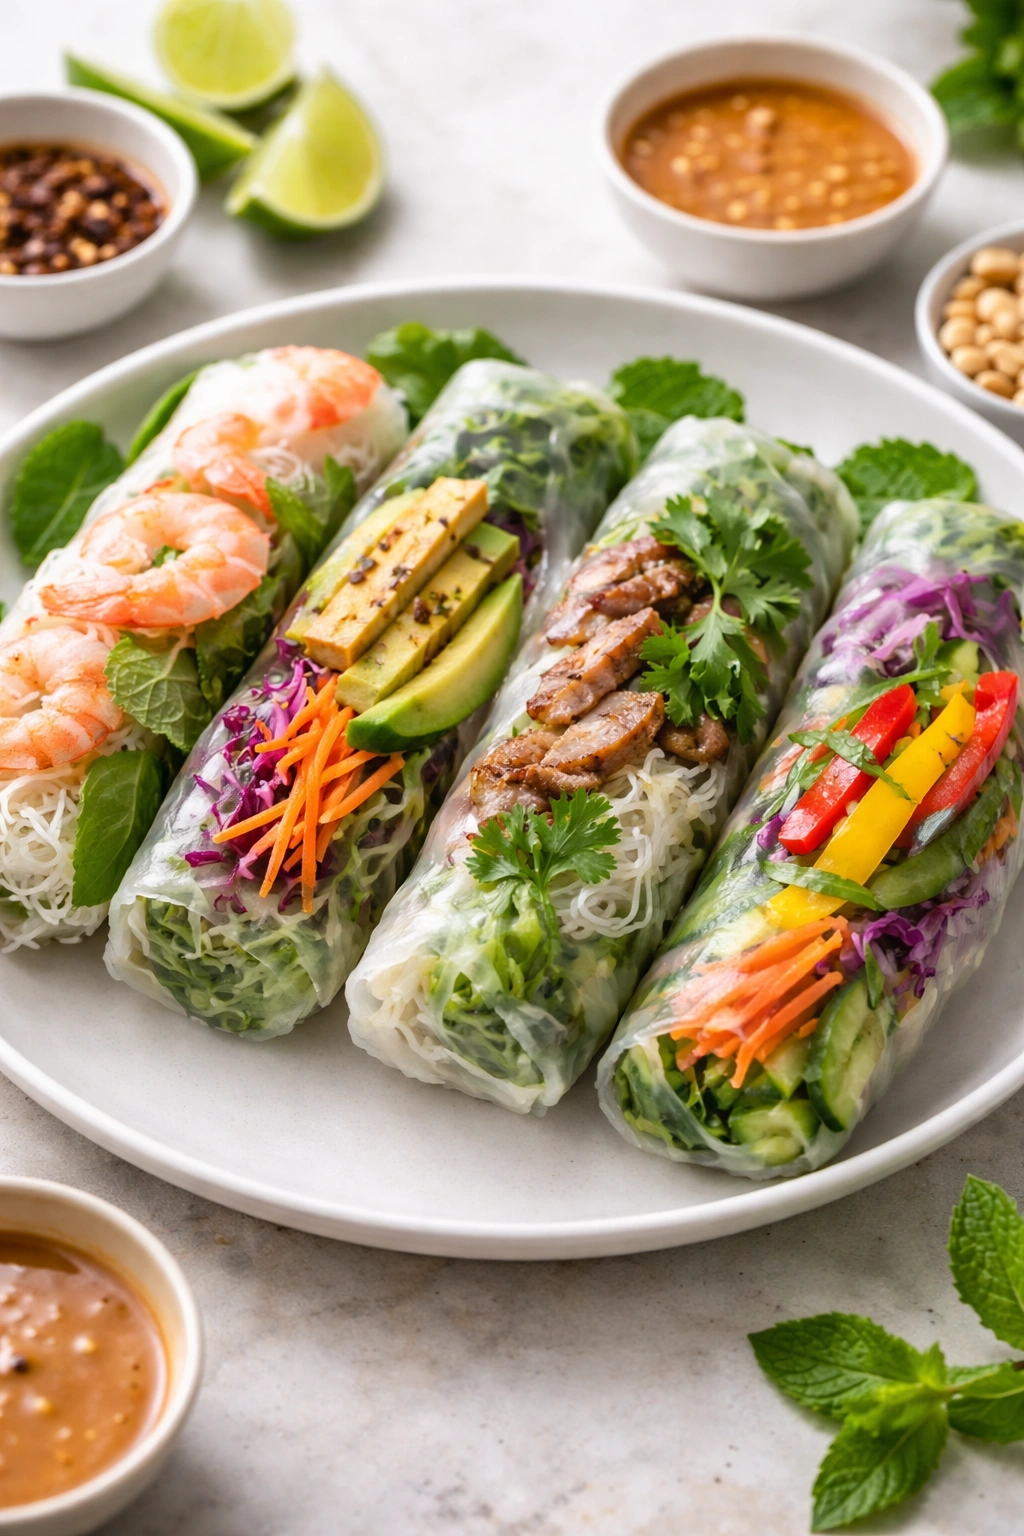
More importantly, homemade spring rolls are deeply customizable. Vegetarian, vegan, shrimp-filled, pork-based — it doesn’t matter. You can make spring rolls that suit your diet, your flavor preferences, your ingredient availability. Make them spicy if you like heat, herbaceous if you love basil and cilantro, protein-heavy if that’s your preference. Once you know how to roll them, the filling possibilities are genuinely endless.
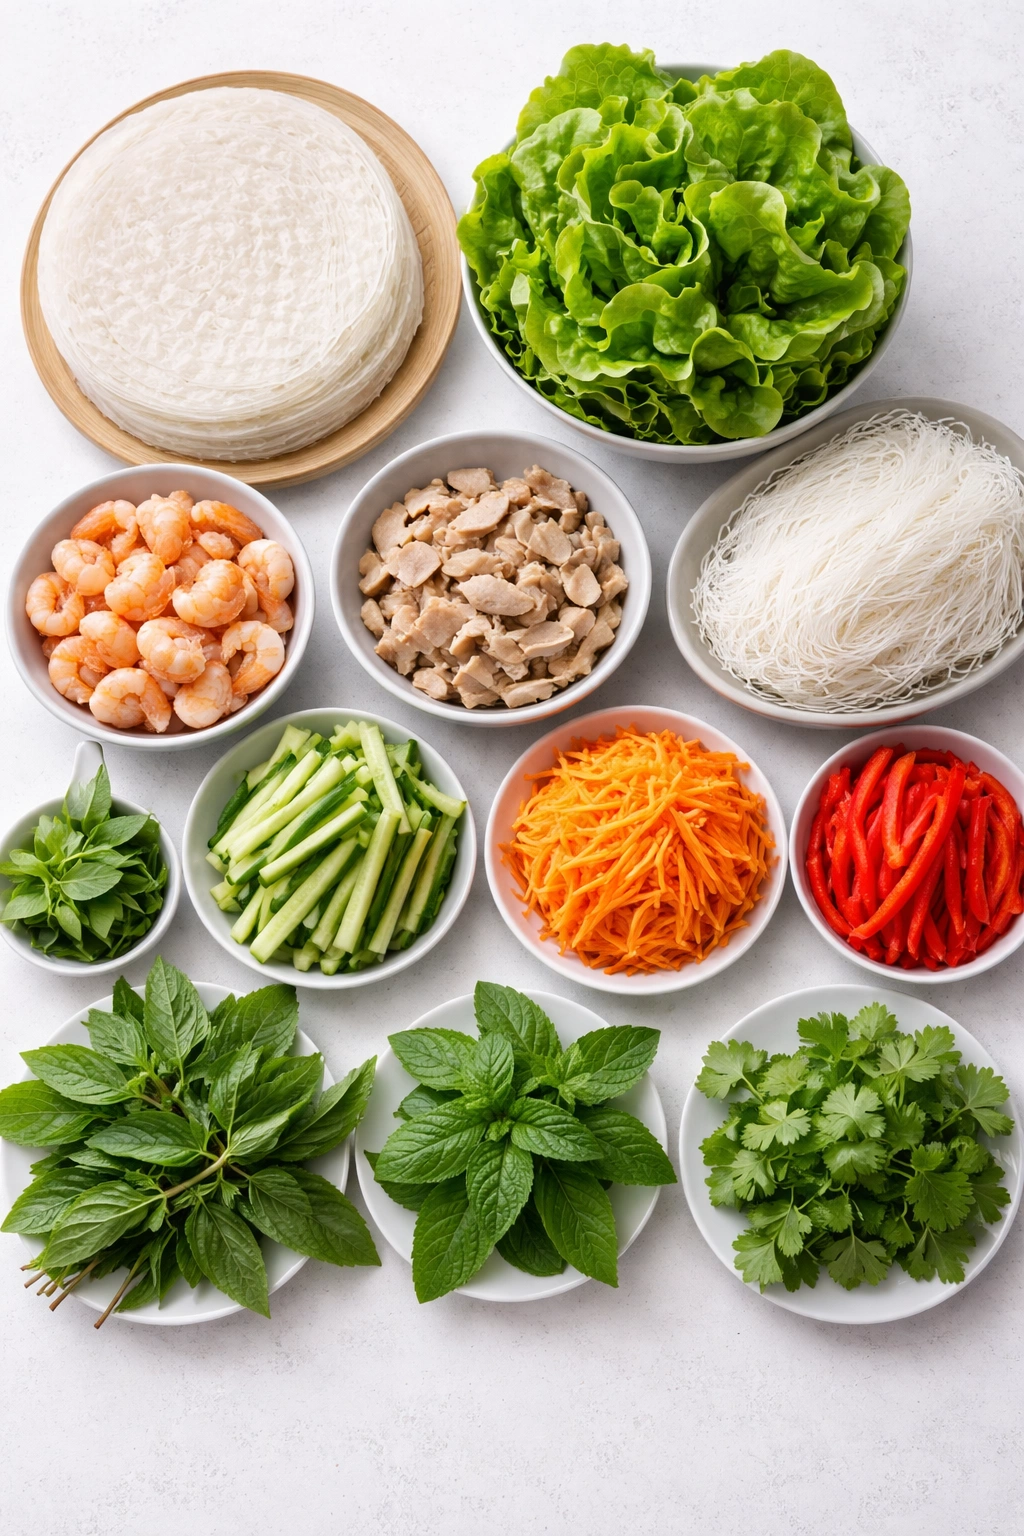
The Essential Ingredients You’ll Need
Rice paper spring rolls require very few ingredients, but the ones you choose matter enormously. You’re working with minimal flavoring — mostly herbs, vegetables, and a light dipping sauce — so ingredient quality makes a huge difference.
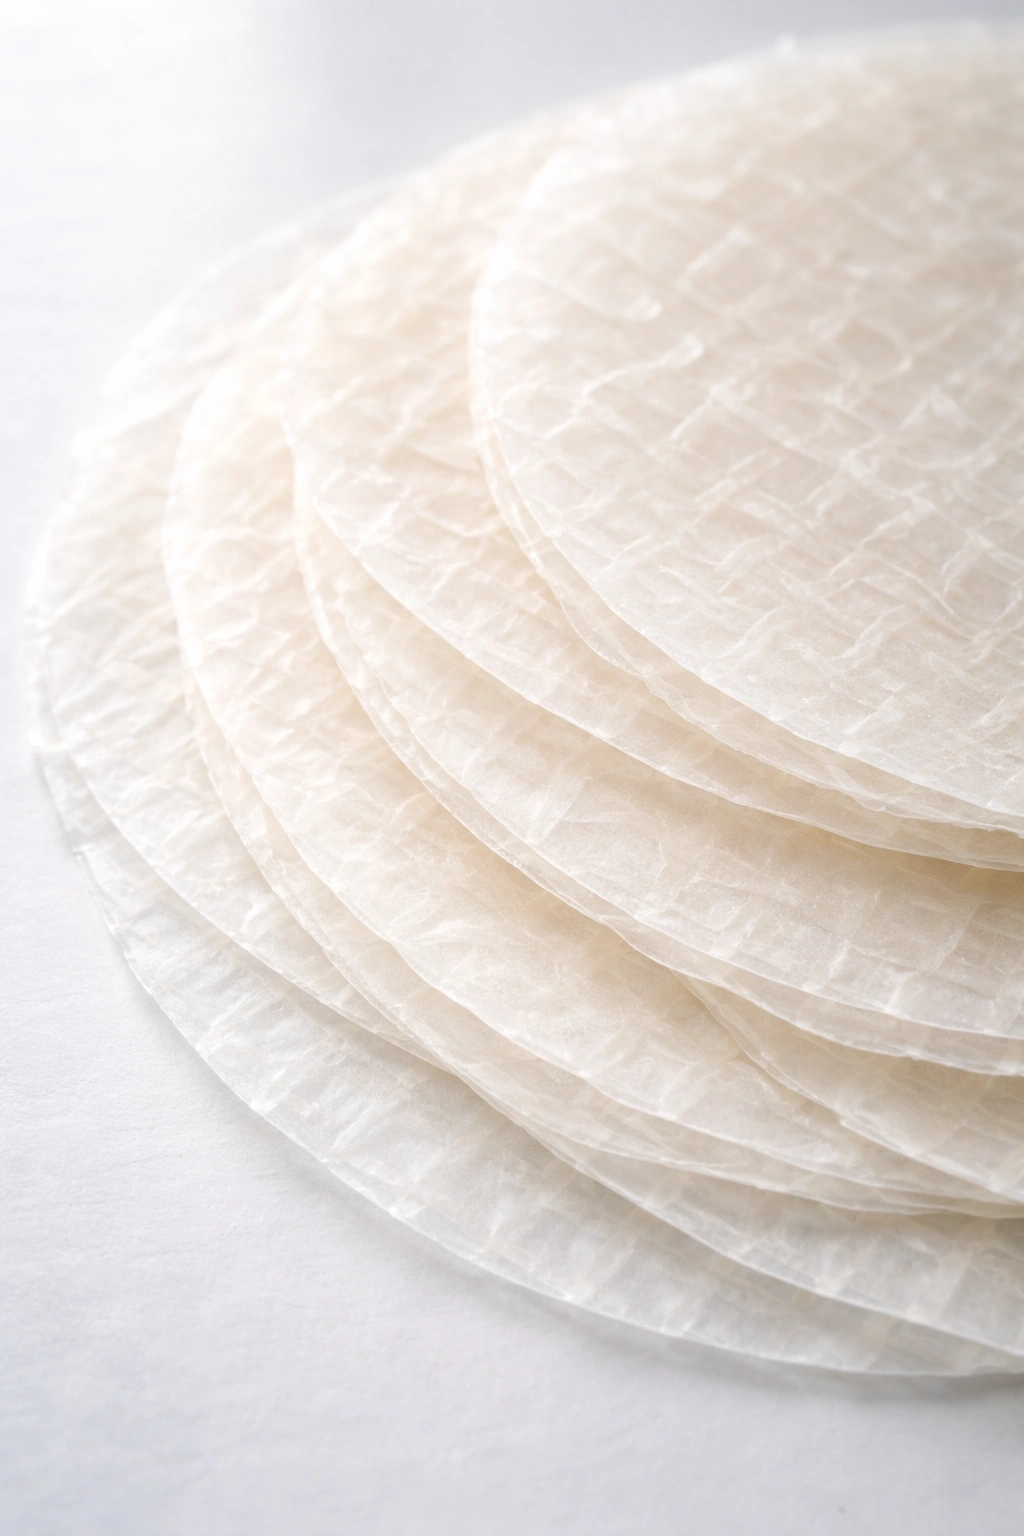
Rice paper is the foundation, and not all rice paper is created equal. Look for papers that are thin, flexible, and free from cracks or brittleness. Vietnamese brands tend to be more reliable than generic versions. The paper should feel slightly translucent and papery when dry; when moistened, it should soften quickly without becoming gummy or tearing apart.
Fresh herbs are non-negotiable. Thai basil has a subtle anise note that Vietnamese spring rolls traditionally feature, but regular basil works beautifully too. Mint should be fresh and fragrant — not the dried stuff. Cilantro adds brightness. These herbs aren’t garnish; they’re core flavoring.
Rice vermicelli — those thin, delicate rice noodles — provides subtle texture and slight chewiness. They cook in minutes and cool quickly. Some people skip them entirely, but they add a pleasant element that distinguishes Vietnamese spring rolls.
Vegetables should be at peak crispness. Lettuce leaves, typically iceberg or butter lettuce, form the base layer and protect the delicate rice paper from direct contact with moister fillings. Cucumber, shredded carrots, and bell peppers add crunch and color. Each ingredient has a specific purpose.
Protein is optional but traditional. Cooked shrimp, sliced pork, or leftover chicken all work. You can also skip it entirely and make them vegetarian, relying on tofu or simply the vegetables and herbs for substance.
Dipping sauce is what ties everything together. Fish sauce-based Vietnamese dipping sauces are traditional, though peanut sauce works beautifully too. The sauce should be flavorful enough to elevate the delicate roll but not so strong that it overpowers the fresh herbs.
Ingredient Spotlight: Rice Paper and Its Properties
Rice paper is the most mysterious ingredient to most home cooks, which is why so many people get it wrong. Understanding how it behaves is the key to rolling successfully.
Rice paper is made from rice flour and water, pressed thin and dried. When it’s dry, it’s brittle — almost translucent, with a papery texture. This brittleness means you absolutely cannot pick up a dry sheet and try to roll with it. It will crack. It will tear. It will shatter into pieces.
But rice paper has a magical property: it softens almost instantly when it touches warm water. A quarter-inch dip in warm water for just 2 to 3 seconds is enough to transform a brittle sheet into a pliable, stretchy wrapper. One extra second in the water and it goes past the optimal point, becoming so soft that it tears easily. This is where the precision comes in.
The ideal rice paper texture during rolling is barely set but still flexible — almost like a moistened leather cloth. It should feel slightly tacky and supple. It should stretch without tearing but be firm enough to hold together. This happens in that narrow window, right around 3 seconds in warm water.
Different brands have different optimal soaking times. Thinner papers might need only 2 seconds. Thicker varieties might need 4 or 5. The only way to know is to test the first sheet before committing to rolling. Warm water matters too — cold water takes much longer, hot water can soften the paper too fast and make it gummy. Aim for water that’s warm to the touch but not actively steaming.
Once you understand this single principle — that rice paper needs just barely enough water to transform from brittle to flexible — you’re already halfway to rolling success.
Preparing Your Workspace and Gathering Equipment
Your rolling environment matters more than you’d think. You’re working with delicate materials, and a chaotic or crowded workspace makes everything harder.
Clear a large, clean work surface. You need space to lay out your rice paper, arrange your fillings, and actually roll without bumping things. A clean kitchen counter or dining table works perfectly. Paper towels or a clean, damp kitchen towel near your workspace are essential — they keep your hands moist and prevent the rice paper from sticking excessively.
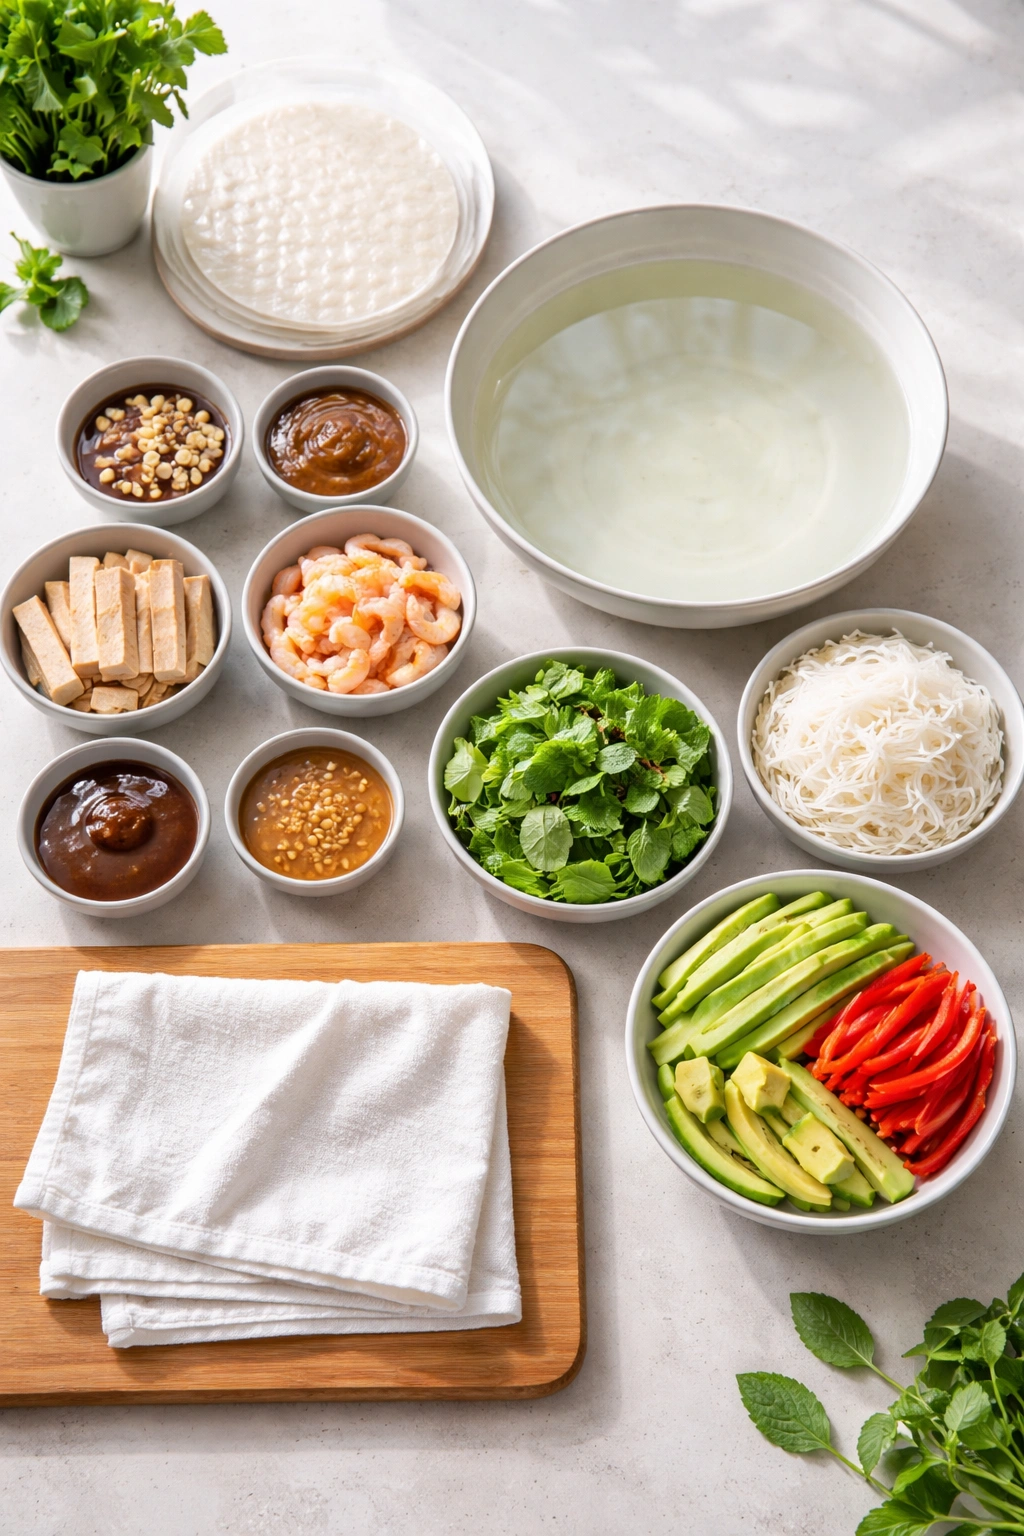
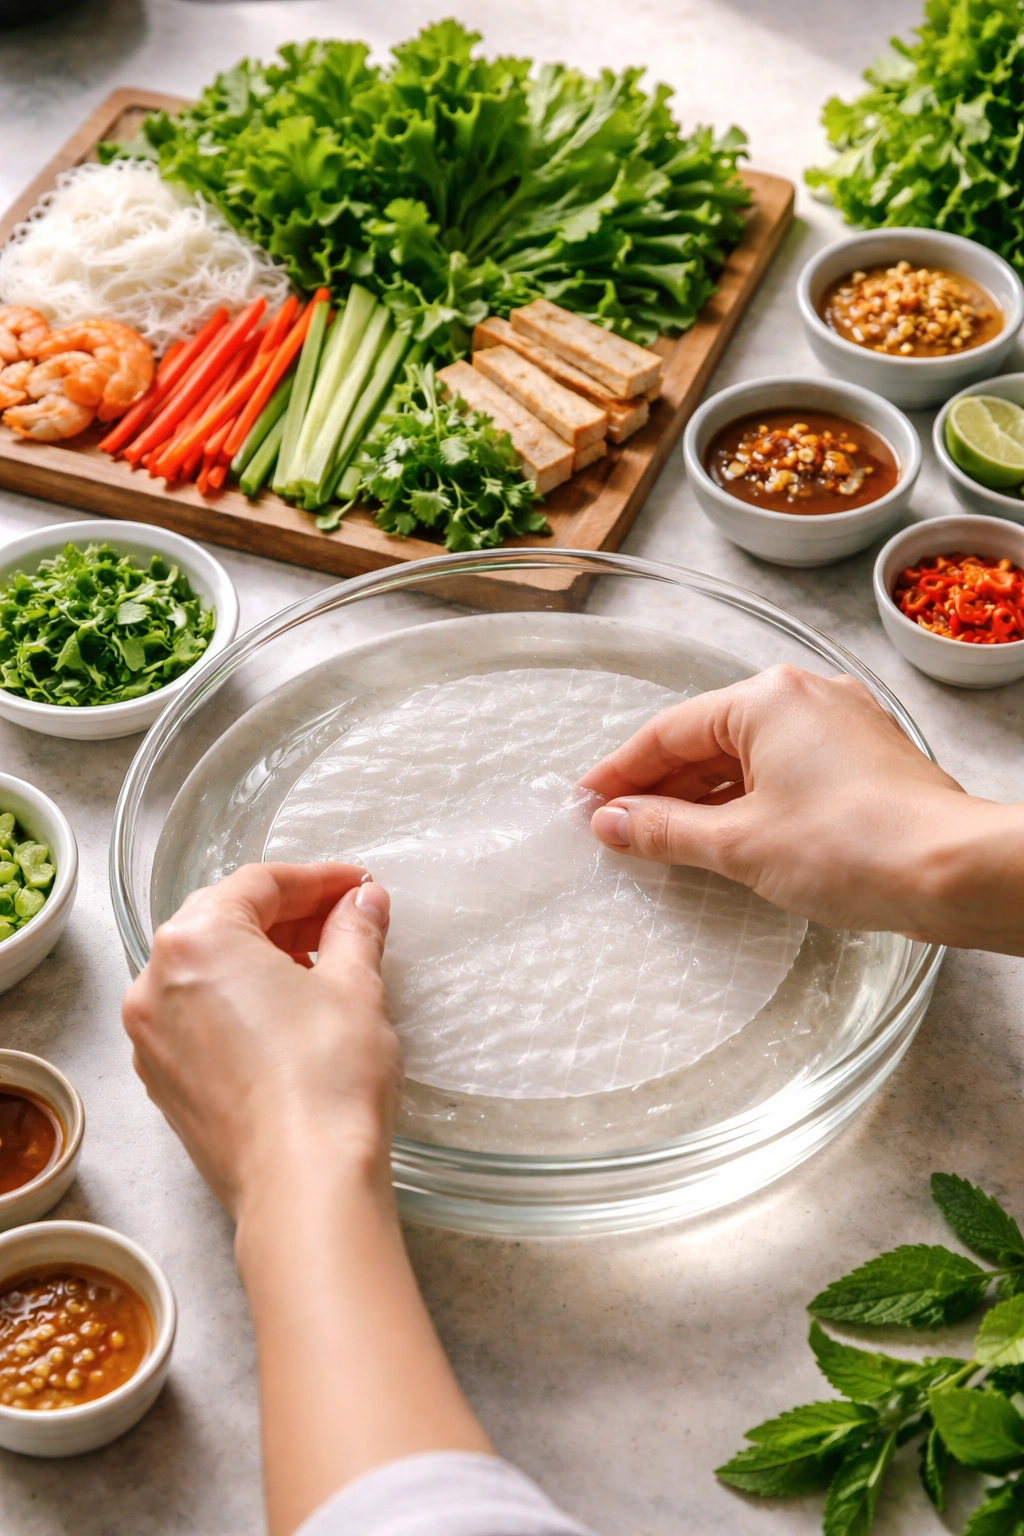
Fill a shallow bowl (roughly 9 to 10 inches across) with warm water. This is your soaking station. You’ll dip each sheet of rice paper here for just a few seconds before laying it on your work surface. A round, flat-bottomed bowl works better than a deep or narrow one because it gives you room to submerge the whole paper at once without folding it.
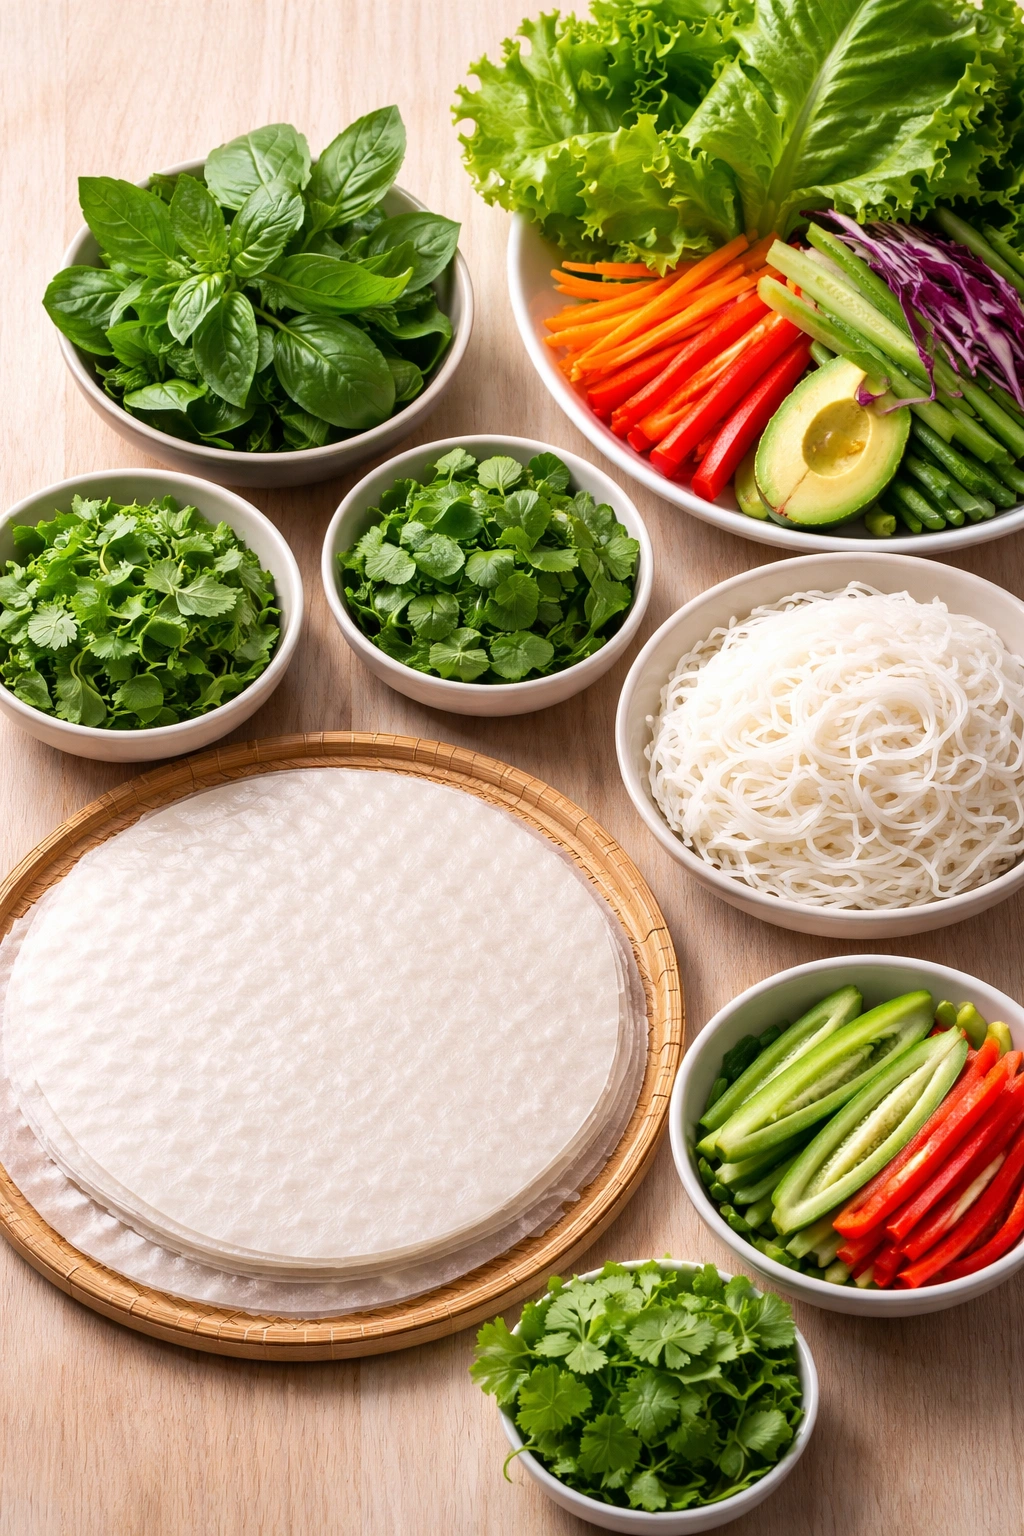
Gather your filling ingredients in small bowls or on a cutting board, arranged in the order you’ll use them: lettuce, then the cooked noodles, then herbs, then vegetables, then protein. This assembly-line setup prevents you from fumbling or making extra motions while you’re rolling. Every motion should be smooth and deliberate.
A small plate or damp towel on which to rest your finished rolls keeps them from drying out as you work. If rolls sit uncovered for more than a few minutes, they begin to toughen. A simple plate with a damp paper towel placed over them prevents this.
That’s genuinely all the equipment you need. No special rolling mats, no fancy tools. Your hands do the work, and that’s actually the best part — it forces you to develop feel and intuition rather than relying on gadgets.
Preparing and Arranging Filling Ingredients

Mise en place — having everything prepped and ready — is the difference between rolling that feels smooth and rolling that feels stressful.
Rice vermicelli: Cook according to package directions, typically 4 to 5 minutes of boiling or soaking in hot water. The noodles should be soft but not mushy, with a slight tender bite. Drain them thoroughly and spread on a plate to cool completely. Cold noodles roll better and taste better. Some people toss them with a tiny drizzle of sesame oil, which adds flavor and prevents sticking.
Vegetables: Shred carrots and cucumbers into matchstick-sized pieces. This size cooks quickly and fits neatly inside a spring roll. Slice bell peppers the same way. These vegetables should be cold and crisp when you roll. If they’ve warmed up on your counter, pop them in the fridge for 10 minutes.
Herbs: Strip basil, mint, and cilantro leaves from their stems and arrange them on a small plate. Don’t chop them — whole leaves roll better and taste fresher. They’ll soften just enough during rolling and eating to be pleasant to bite through.
Lettuce leaves: Use butter lettuce, iceberg, or similar tender varieties. Separate the leaves gently and arrange them on a plate. Each spring roll gets one or two leaves as its base layer. These protect the rice paper from becoming soggy when you eat the roll.
Protein and cooked noodles: Arrange these in their own bowls, ready to portion. You’ll use about 2 tablespoons of noodles and 3 to 4 cooked shrimp (or equivalent protein) per roll.
Everything should be cold or room temperature when you start rolling. Cold ingredients roll better and taste fresher. If anything feels warm or has been sitting out, take 10 minutes to chill it before you begin.
Serving and Timing Information
Yield: Makes 12 to 14 spring rolls | Serves 4 as an appetizer or 2 to 3 as a light main course
Prep Time: 30 minutes | Hands-on prep of ingredients, cooking noodles, and arranging fillings
Cook Time: 20 to 25 minutes | Rolling and assembly time; no actual cooking required once assembly begins
Total Time: 50 to 55 minutes | 30 minutes prep + 20 to 25 minutes rolling
Difficulty: Beginner to Intermediate — The technique is straightforward once you understand how to soften rice paper correctly, and the rolling motion becomes intuitive with the first few rolls. There’s no cooking skill required, only basic knife work and a light touch.
Best Served: Immediately after rolling, while the wrappers are still tender and the fillings are at their peak freshness. Spring rolls can be made up to 4 hours ahead and refrigerated, but they taste best within the first 2 hours of rolling.
Complete Ingredient List
For the Spring Rolls:
- 1 package (8.8 ounces) rice paper wrappers, ideally Vietnamese brand
- 2 ounces dried rice vermicelli noodles
- 8 to 10 butter lettuce or iceberg lettuce leaves, gently separated
- 1 large cucumber, cut into thin matchstick pieces (about 1.5 cups)
- 2 medium carrots, peeled and shredded into thin matchsticks (about 1 cup)
- 1 red bell pepper, cored and sliced into thin matchsticks (about ¾ cup)
- Fresh Thai basil or regular basil leaves (about 1 cup loosely packed)
- Fresh mint leaves (about ¾ cup loosely packed)
- Fresh cilantro leaves (about ¾ cup loosely packed)
- 1.5 pounds large shrimp, peeled, deveined, and cooked; or 12 to 14 ounces sliced cooked pork or chicken
- Warm water for soaking rice paper
For Vietnamese Dipping Sauce (Nước Chấm):
- ¼ cup fish sauce
- 3 tablespoons fresh lime juice
- 2 tablespoons water
- 2 tablespoons granulated sugar
- 1 teaspoon minced garlic (about 1 small clove)
- 1 small Thai chili, thinly sliced (optional; omit for mild sauce)
- 1 tablespoon finely shredded carrot (for visual appeal)
Alternative: Peanut Dipping Sauce (Hoisin-Peanut):
- ½ cup creamy peanut butter
- 3 tablespoons hoisin sauce
- 2 tablespoons water or coconut milk
- 1 tablespoon lime juice
- 1 teaspoon minced garlic
- ½ teaspoon sriracha or chili paste (optional, to taste)
Step-by-Step Rolling Instructions
Prepare Your Workspace:
-
Fill a shallow, round bowl with warm water — approximately 80 to 90°F (27 to 32°C), or warm to the touch but not hot enough that you’d pull your hand away quickly. This is your rice paper soaking station.
-
Arrange all filling ingredients in small bowls or on a large cutting board in the order you’ll use them: lettuce, rice noodles, herbs (basil, mint, cilantro grouped together), vegetables (cucumber, carrots, bell pepper), and protein. Have a damp kitchen towel or damp paper towels nearby to keep your hands moist throughout rolling.
-
Set a large plate or cutting board nearby where you’ll place finished rolls. Cover it with a damp paper towel or clean kitchen towel to keep the finished rolls from drying out as you work.
Make the Dipping Sauce:
-
For Vietnamese dipping sauce: Combine the fish sauce, lime juice, water, and sugar in a small bowl. Stir until the sugar dissolves completely. Add the minced garlic and sliced chili (if using), then stir in the shredded carrot. Set aside to allow flavors to meld for at least 10 minutes. The sauce tastes better if it sits for 30 minutes or more.
-
For peanut dipping sauce: Combine the peanut butter, hoisin sauce, water or coconut milk, and lime juice in a small bowl. Whisk until smooth and pourable — the consistency should be thin enough to drizzle but thick enough to coat a spring roll. Add minced garlic and sriracha to taste. Stir until well combined and set aside.
Roll the Spring Rolls:
-
Fill your bowl of warm water one more time, ensuring it’s at the right temperature. Test with your fingertip — it should feel pleasantly warm, not hot.
-
Dip one sheet of rice paper into the warm water for exactly 2 to 3 seconds, ensuring the entire sheet is submerged. Lift it out gently and lay it flat on your work surface. The paper will feel slightly translucent and pliable now — this is the ideal texture. Do not oversoak; the paper will become too soft and tear when you try to roll.
-
Lay one or two lettuce leaves on the lower third of the rice paper, leaving about an inch of space from the bottom edge. The lettuce acts as a barrier between the wet fillings and the delicate rice paper wrapper.
-
Arrange about 2 tablespoons of cooked rice noodles in a small pile on top of the lettuce, spreading them across the width of the paper but keeping them concentrated in the lower-third area where you’ll start rolling. The pile should be roughly the thickness of your finger.
-
Layer a small handful of fresh basil leaves (about 4 to 5 leaves) on top of the noodles, then a similar amount of mint and cilantro, creating a colorful herb bed. These herbs are the heart of the roll — don’t skimp, but don’t overstuff either.
-
Arrange about 3 to 4 shrimp (or equivalent protein) on top of the herbs, breaking larger ones in half to fit the width of the wrapper without creating bulk. If using sliced pork or chicken, use about 2 ounces per roll (roughly 3 to 4 thin slices).
-
Top the protein with a small handful of shredded cucumber (about 2 to 3 tablespoons), then a small handful of shredded carrot (about 1 tablespoon), then a few matchsticks of red bell pepper. These vegetables add crunch and color without making the roll too thick.
-
Now fold and roll: Fold the bottom edge of the rice paper up and over the filling, tucking it underneath the pile to create a tight seal. Press gently as you fold — you want the wrapper snug against the fillings but not so tight that you tear the paper.
-
Fold the left and right edges of the rice paper inward toward the center, creating a rectangular shape. These side folds should cover the exposed ends of the fillings without crushing them. Press gently.
-
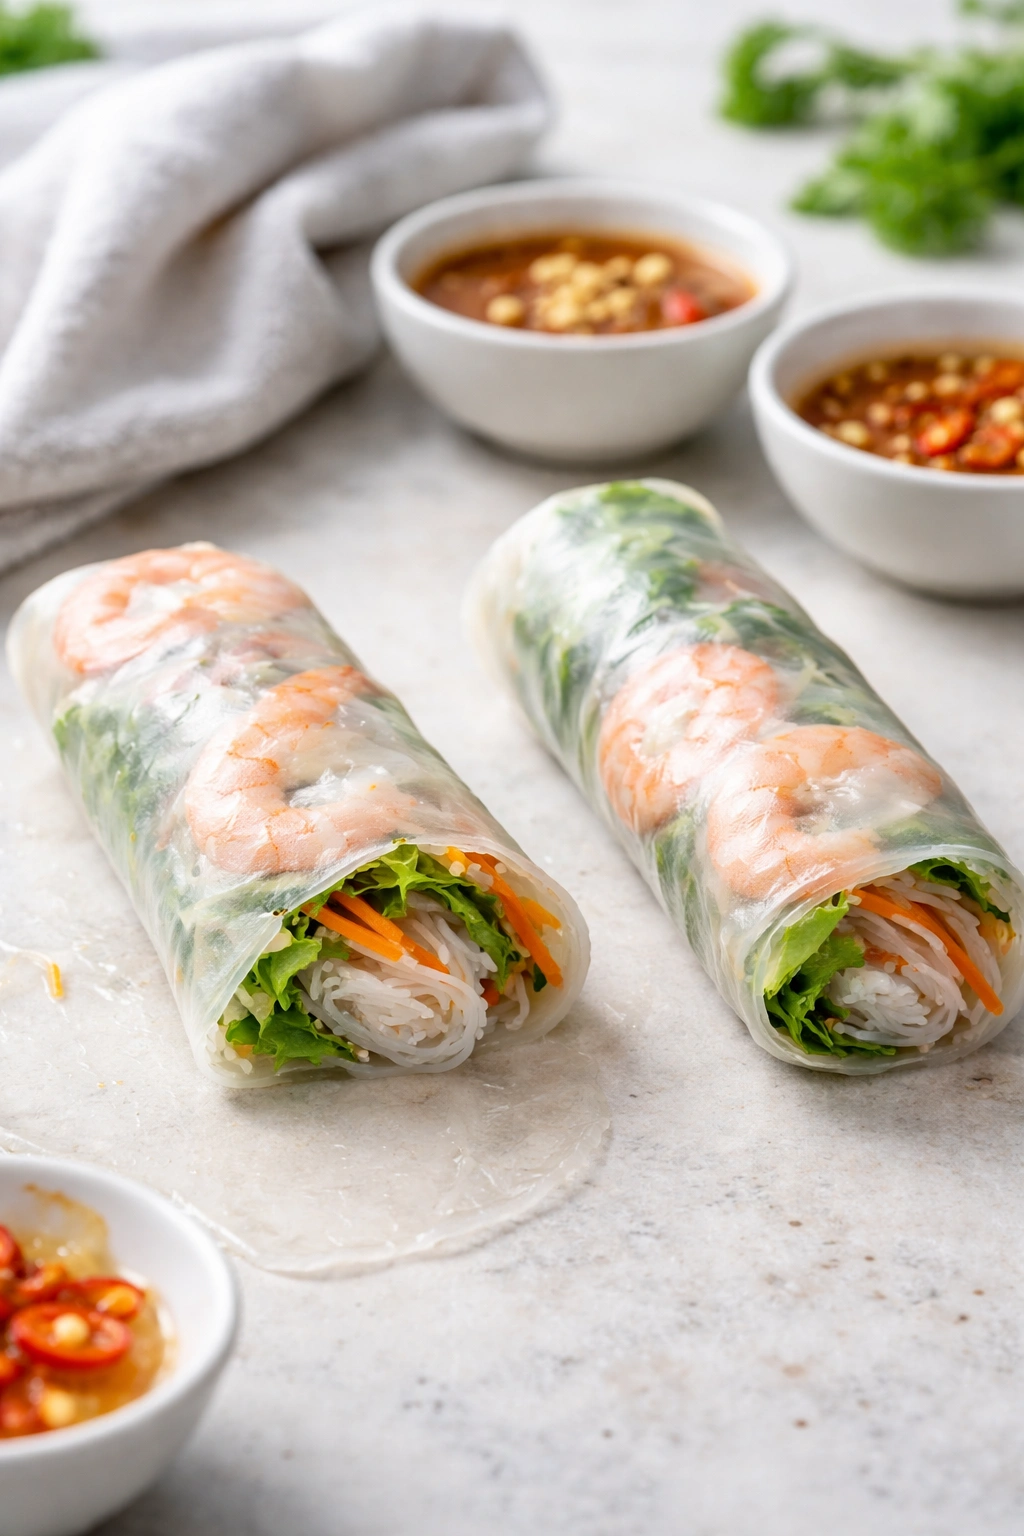
Roll the bundle away from you, using your fingers to keep tension on the wrapper and the fillings firmly packed as you roll. The roll should feel snug but not overstuffed. Continue rolling until the entire wrapper is wrapped around the filling, and the seam is on the bottom. The finished roll should be about 3 inches long, roughly the thickness of your thumb, and have a clean seam.
Advertisements -
Place the finished roll seam-side down on your damp-towel-lined plate. The damp towel prevents the rolls from drying out. If you’re making many rolls, they can overlap slightly on the plate.
-
Repeat this process with the remaining rice paper and fillings. Each roll should take about 60 to 90 seconds once you’ve got the motion down. Pro tip: If the rice paper begins to feel too stiff or hard to work with, you’ve let it sit on the counter too long. Dip a fresh sheet.
-
Once all rolls are complete, allow them to rest for 5 to 10 minutes before serving. This brief rest firms up the wrapper slightly without drying it out, making the rolls easier to handle and more pleasant to eat.
The Assembly Technique: Rolling Your First Spring Roll

Your first spring roll will feel awkward. That’s normal. By your third or fourth, your hands will understand the motion and the whole process becomes fluid.
The key insight is that rice paper is much more forgiving than you think. It won’t tear from normal handling or moderate pressure. It tears only from excessive force, too much water, or trying to overstretch it. A little wrinkle in the wrapper doesn’t ruin anything — it’s almost invisible once you eat the roll.
The bottom fold is the most important. This is where you create the seal that keeps everything together. Press firmly but not aggressively as you fold the bottom up and over the filling. You want the paper to grip the fillings without tearing. This fold determines whether your roll stays together when you pick it up to eat.
The side folds come next, and they should be gentle. You’re not trying to create a tight military envelope — you’re just folding the edges inward enough to contain the fillings. Leave some gentle folds and creases; they’re part of the appeal.
The forward roll is where rhythm helps. A slow, deliberate roll with gentle tension is better than a quick, aggressive one. Keep your fingers on top of the filling pile as you roll, using light pressure to keep everything compact. This prevents the fillings from shifting or sliding inside the wrapper.
The seam should end up on the bottom when the roll is finished. If your seam is on the side or top, it means you over-rotated or didn’t start the bottom fold far enough down. Neither is a disaster — the roll will still taste fine. But getting the seam on the bottom becomes second nature with practice.
Common Rolling Mistakes and How to Fix Them
The rice paper is cracking or shattering: Your paper didn’t soak long enough, or your water was too cool. Add 1 to 2 seconds to your soaking time and ensure your water stays warm. If you’ve already started with brittle paper, you can try gently pressing it between your damp fingers for a few seconds to soften it, but it’s usually better to start fresh.
The rice paper is falling apart or tearing as I roll: You’ve soaked too long or your water is too hot. Cut your soaking time to 2 seconds maximum and let the water cool slightly. Also, ensure your hands are only slightly damp, not dripping wet — excess water makes the paper too soft. If you get a tear mid-roll, you can often patch it by pressing a tiny piece of softened rice paper over the hole, or just continue rolling carefully.
The roll is too thick or too bulky: You’re overfilling. Remember that you only need about 2 tablespoons of noodles, 4 to 5 basil leaves, a small handful of each vegetable, and 3 to 4 shrimp per roll. Less is more here. Overstuffed rolls are hard to roll, prone to bursting, and actually less pleasant to eat because the flavors get muddled.
The filling is leaking out of the sides: Your side folds aren’t covering the exposed ends properly. Make sure the lettuce and noodles are positioned far enough down on the rice paper that when you fold the sides inward, they cover the exposed food completely. If the sides still leak, your filling is too much — try again with less.
My rolls are falling apart when I pick them up: The bottom seal wasn’t tight enough. Press much more firmly when you make that first bottom fold, really pressing the wrapper underneath the filling. Alternatively, you might be picking up the rolls too soon after rolling — give them 10 minutes to set a bit before handling.
The rice paper is sticking to my hands or the work surface: Your hands or surface are too wet. Rinse your hands and pat them nearly dry, leaving them just slightly damp — not dripping. If your work surface is soaked, wipe it with a dry paper towel. A little moisture is necessary; too much is counterproductive.
I can’t remember the order of fillings: Pre-arrange everything on a cutting board in the exact order you’ll use it. Muscle memory will take over after 5 or 6 rolls, but visual arrangement helps enormously while you’re learning.
Flavor Variations and Creative Filling Combinations
Once you master the basic rolling technique, you can customize the fillings endlessly. The structure remains the same — lettuce base, noodles, herbs, vegetables, protein, wrapper — but the specific ingredients change dramatically.
Vietnamese Classic (Traditional): The recipe outlined above — shrimp, rice noodles, fresh herbs, and vegetables. This is the gold standard for a reason. It’s fresh, light, and perfectly balanced.
Vegetarian Spring Rolls: Skip the shrimp and add extra vegetables — sliced avocado, thinly sliced mushrooms sautéed with garlic until tender and cooled, or baked tofu pressed in a light soy-sesame marinade. The herbs and vegetables provide plenty of substance and flavor without any animal protein.
Pork and Herb: Use thinly sliced grilled pork tenderloin or char siu pork instead of shrimp. Add extra cilantro and a few slices of jalapeño for heat. Serve with a hoisin-peanut dipping sauce for a richer flavor profile.
Summer Vegetable Garden: Use whatever vegetables are at peak season — crisp snap peas sliced lengthwise, thinly sliced yellow squash, shredded zucchini, and microgreens. This version celebrates the vegetables rather than the protein, and it’s spectacular in warm months.
Spicy Thai Version: Add thin slices of fresh Thai chili to each roll, increase the cilantro and Thai basil, and serve with a dipping sauce that includes sriracha or extra chili. You might also add thin slices of cooked chicken breast and a splash of sesame oil tossed into the noodles.
Avocado and Shrimp: Add 2 to 3 thin slices of ripe avocado per roll along with the shrimp. Include lime juice in your dipping sauce. The creaminess of the avocado against the delicate rice paper is absolutely luxurious.
Leftover Roasted Vegetable Version: Use whatever roasted vegetables you have on hand — roasted bell peppers, roasted asparagus cut into pieces, roasted carrots. Include fresh herbs generously. This is a great way to transform dinner leftovers into lunch spring rolls.
Crispy Tofu and Ginger: Use baked or pan-fried tofu pressed in a ginger-soy marinade, cooled and cut into thin slices. Add a tiny piece of fresh ginger, extra cilantro, and serve with a sesame-based dipping sauce. The ginger and tofu combination is earthy and deeply satisfying.
Cold Noodle Style: Use chilled ramen or udon noodles instead of rice vermicelli, topped with shredded cucumber, julienned carrot, and thin strips of cooked chicken or tofu. Serve with a cold sesame-based dipping sauce. These are hearty enough for a light lunch.
The secret is maintaining the structural balance — you need lettuce at the bottom for protection, some form of starch (noodles, or skip it entirely), vegetables for crunch, herbs for brightness, and protein or a hearty vegetable for substance. The specific ingredients can vary infinitely.
Storage, Refrigeration, and Make-Ahead Tips
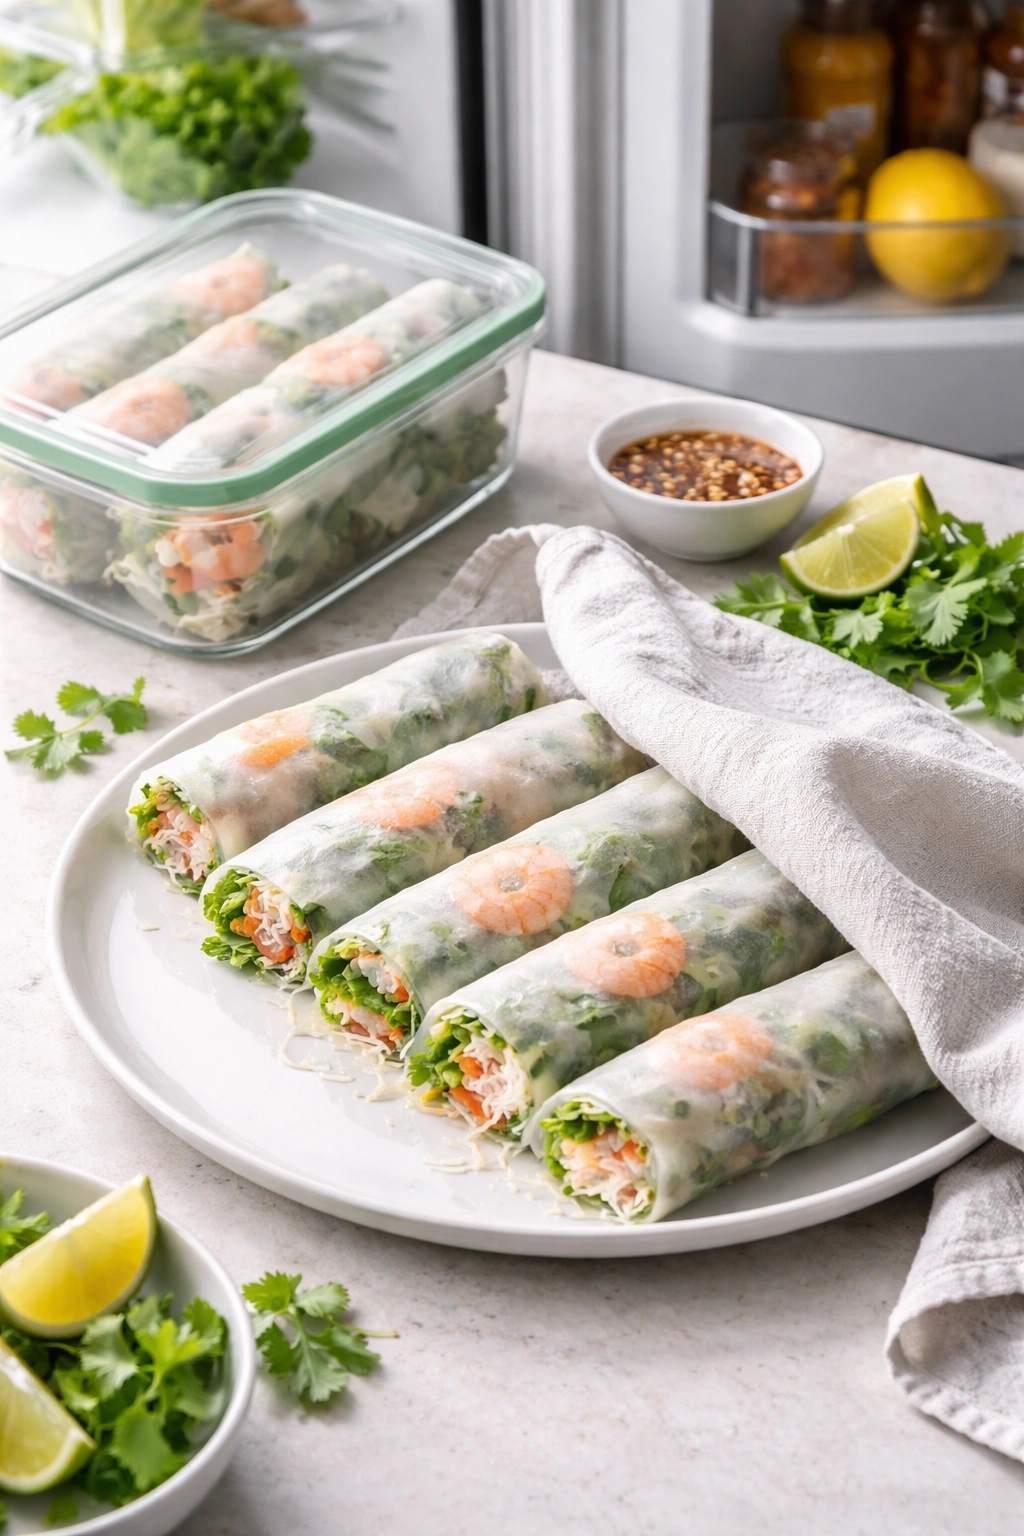
Making Them Ahead: Spring rolls are best eaten immediately, but you can make them up to 4 hours ahead if necessary. Arrange them in a single layer on a plate, cover them with plastic wrap or a damp paper towel, and refrigerate. The rice paper will soften further as they sit, becoming slightly more tender. They won’t dry out if they’re properly covered. Remove them from the fridge 10 to 15 minutes before serving to allow them to come to room temperature — cold spring rolls are pleasant but taste slightly muted compared to room-temperature ones.
Do Not Freeze Raw Spring Rolls: Once assembled, spring rolls don’t freeze well. The rice paper becomes gummy and the vegetables release water as they thaw, making the rolls soggy. If you want to prepare spring rolls in advance, freeze the individual components instead and roll them fresh when you’re ready to serve.
Prep Components in Advance: Everything except assembly can be done up to a day ahead. Cook the noodles, cut the vegetables, arrange them in bowls, and refrigerate. Prepare your dipping sauce, which actually tastes better after a few hours. This way, assembly on the day you serve them takes only 20 to 25 minutes.
Storing Prepared Vegetables: Cut vegetables stay crisp for up to 24 hours if stored in airtight containers in the refrigerator. Herbs are best used within a few hours of being separated from their stems — they begin to wilt and brown if stored too long. If you must store herbs, wrap them loosely in a damp paper towel, place them in a bag, and refrigerate. They’ll keep for a few hours this way.
Dipping Sauce Storage: Vietnamese dipping sauce keeps in the refrigerator for up to 5 days. The flavors actually improve and meld together as it sits. Peanut-based dipping sauce also keeps for several days if refrigerated, though it may thicken slightly as it cools — stir in a bit of water to thin it back out.
Leftover Spring Rolls (If Any): These are best eaten immediately but can be refrigerated for up to 24 hours. As they sit, the rice paper continues to soften and becomes more delicate. They won’t last much longer than 24 hours before the vegetables begin to release moisture and the whole thing becomes soggy. Eat them cold from the fridge or let them come to room temperature before eating.
The Best Dipping Sauces
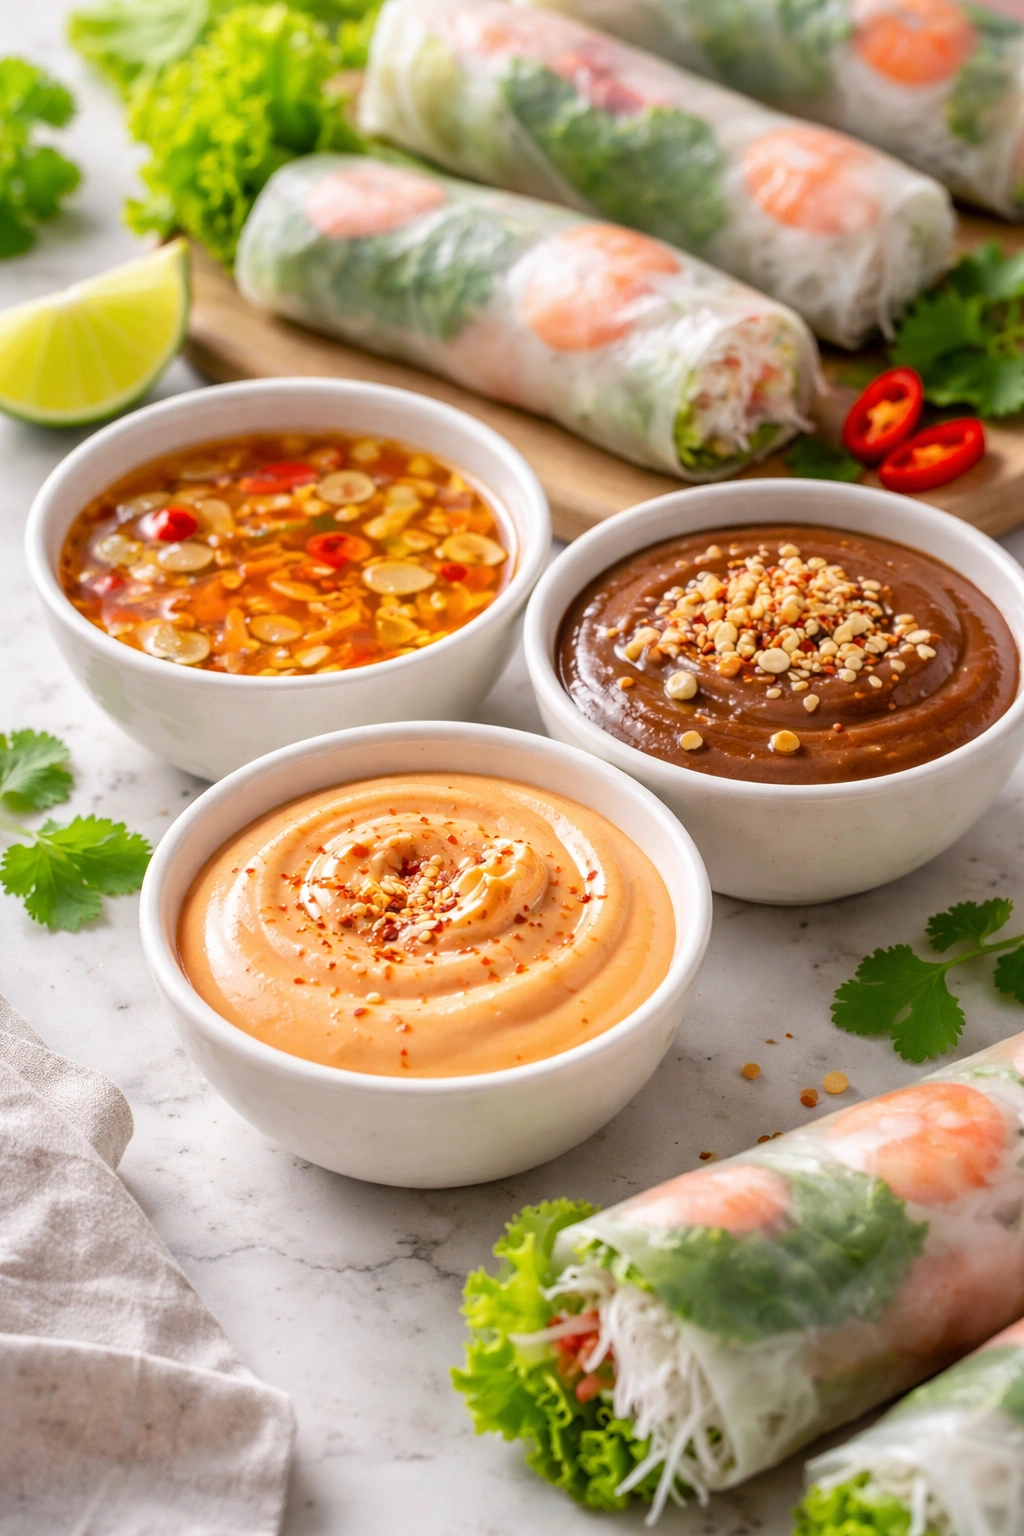
Spring rolls exist in relationship with their dipping sauce. A mediocre sauce makes a great roll just okay. An exceptional sauce makes even a slightly imperfect roll delicious.
Vietnamese Fish Sauce Dipping Sauce (Nước Chấm): This is the traditional partner to fresh spring rolls. It’s salty, sour, slightly sweet, and garlicky — a perfect complement to the delicate, herb-forward filling. The sauce should taste balanced, not overly fishy or salty. If your version tastes too strong, add a tiny bit more water. If it tastes bland, add more lime juice or fish sauce. This sauce works with essentially every spring roll variation.
Peanut Hoisin Sauce: This is richer and slightly sweet, with a savory peanut depth. It works particularly well with spring rolls that contain cooked pork or chicken, or with vegetarian rolls where you want a heartier sauce. The sauce should be thin enough to drizzle but thick enough to coat; if it’s too thick, thin it with a bit of water. If it’s too thin, add a tablespoon more peanut butter.
Spicy Sriracha Mayo: Blend sriracha, mayo, lime juice, and a tiny bit of garlic for a creamy, spicy dipping sauce. This is not traditional but absolutely delicious, especially with shrimp-filled rolls. Adjust the sriracha to your heat tolerance.
Tamarind-Lime Sauce: Tamarind paste adds a deep sour note that’s different from lime alone. Mix tamarind paste with fish sauce, sugar, water, and garlic for a complex sauce that tastes sophisticated and balanced. This version requires tamarind paste, which might not be in your pantry — fish sauce-based sauce works just as well.
Simple Lime and Salt: If you’re in a hurry or want to let the fresh herbs truly shine, a simple dipping sauce of fresh lime juice, a pinch of sea salt, and finely minced garlic is all you need. This sauce puts the focus entirely on the spring roll itself.
Cilantro-Lime Sauce: Blend fresh cilantro, lime juice, water, fish sauce or soy sauce, garlic, and a touch of sugar for a herbaceous sauce that echoes the herbs in the spring roll itself. This sauce is particularly good when you want a brighter, more intense herb flavor.
The ratio for most dipping sauces is roughly: 3 parts savory liquid (fish sauce or soy sauce), 2 parts sour (lime juice), 1 part sweet (sugar), plus garlic and optional heat. Adjust to your taste, knowing that the sauce should taste bold and concentrated — not diluted or bland.
Serving and Pairing Ideas
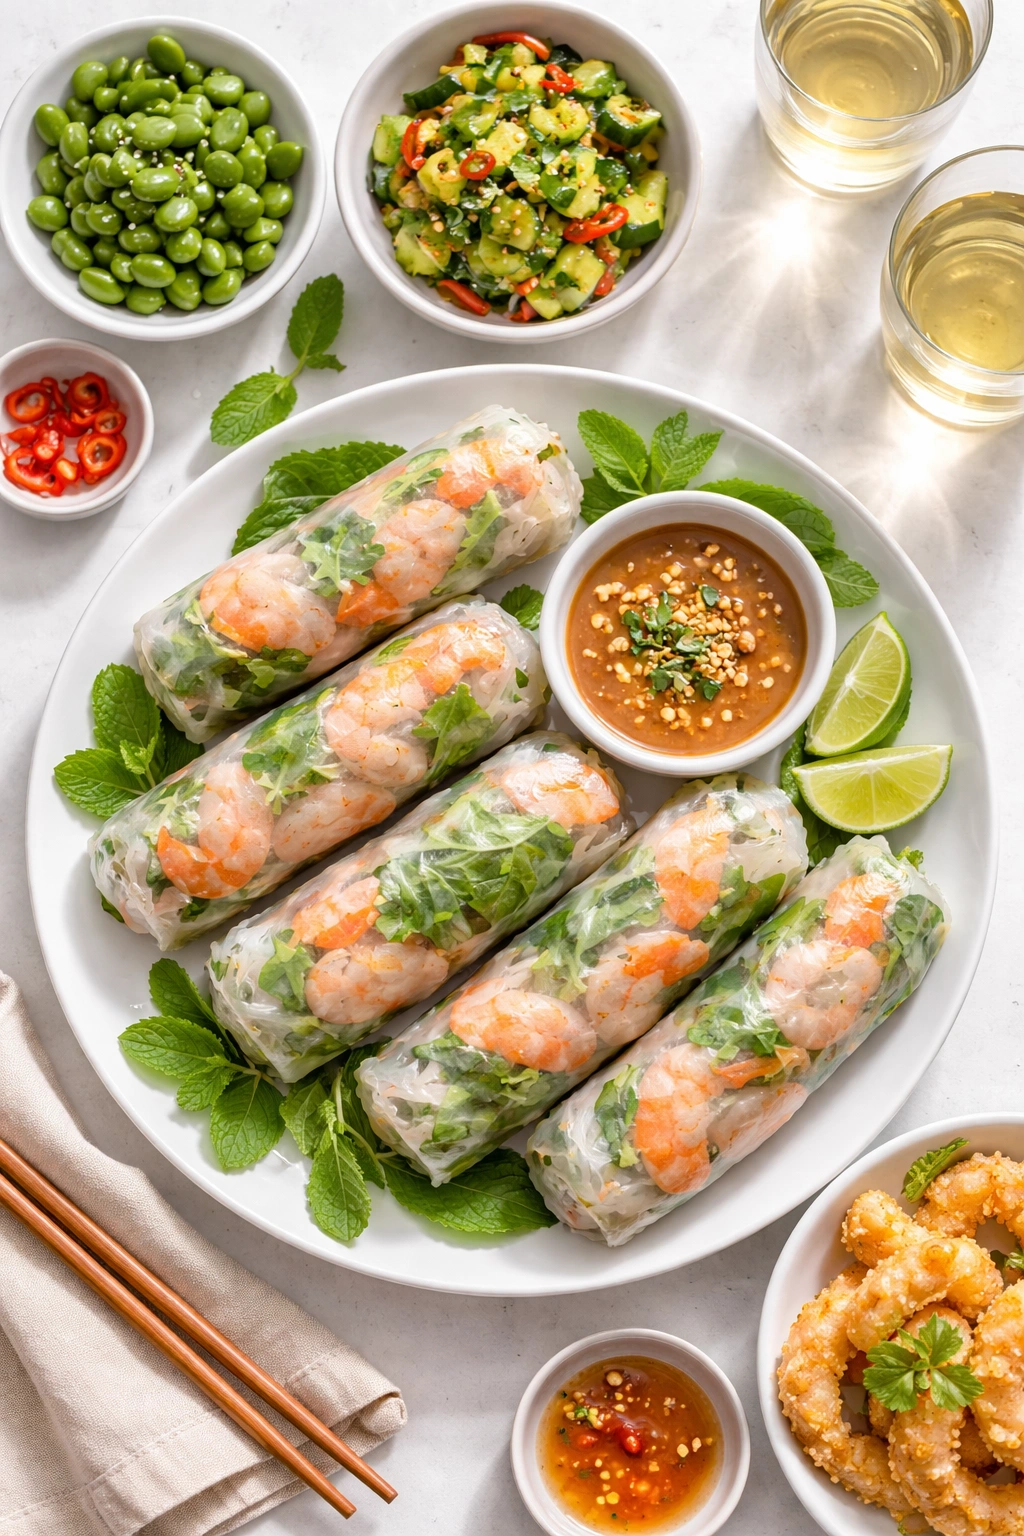
As An Appetizer: Arrange finished spring rolls on a platter with your dipping sauce in a small bowl in the center or on the side. Spring rolls are elegant enough for a dinner party, casual enough for a weeknight meal with friends. They’re naturally gluten-free (assuming your dipping sauce doesn’t contain soy) and vegetarian options are simple.
As A Light Lunch: A plate of 3 to 4 spring rolls with fresh fruit on the side and iced tea makes a perfectly balanced lunch. The rolls are substantial enough to be satisfying but light enough that you won’t feel sluggish afterward. Add a small salad on the side if you want extra vegetables.
With Asian-Inspired Meals: Spring rolls pair beautifully with Vietnamese pho, Thai curry, or even simple stir-fried rice. They’re a natural complement to Asian meals but also work with non-Asian foods — they’re fresh and vegetable-forward enough to pair with grilled fish or roasted chicken.
Summer Entertaining: Spring rolls are ideal for warm-weather entertaining because they’re made ahead, eaten at room temperature, and require no cooking on the day of your party. Make them up to 4 hours ahead, arrange them on a platter, and guests can enjoy them throughout the meal.
With Cold Beverages: Spring rolls pair beautifully with crisp white wine, light lager beer, iced tea, or coconut water. Avoid heavy red wines or dark beers — the delicate flavors of the rolls get overpowered.
With Fresh Fruit: Serve alongside sliced mango, pineapple, or papaya for a tropical meal. The fruit’s sweetness and acidity complement the herbaceous, savory spring rolls perfectly.
As Finger Food: Spring rolls are absolutely perfect for casual gatherings where people want to eat while standing and mingling. They’re self-contained, not messy, and substantial enough to feel satisfying as party food.
Thai-Inspired Meal Pairing: Serve spring rolls as the first course, followed by a fragrant Thai curry with jasmine rice, and finish with mango sticky rice. The meal has natural flow and progression of flavors.
Final Thoughts
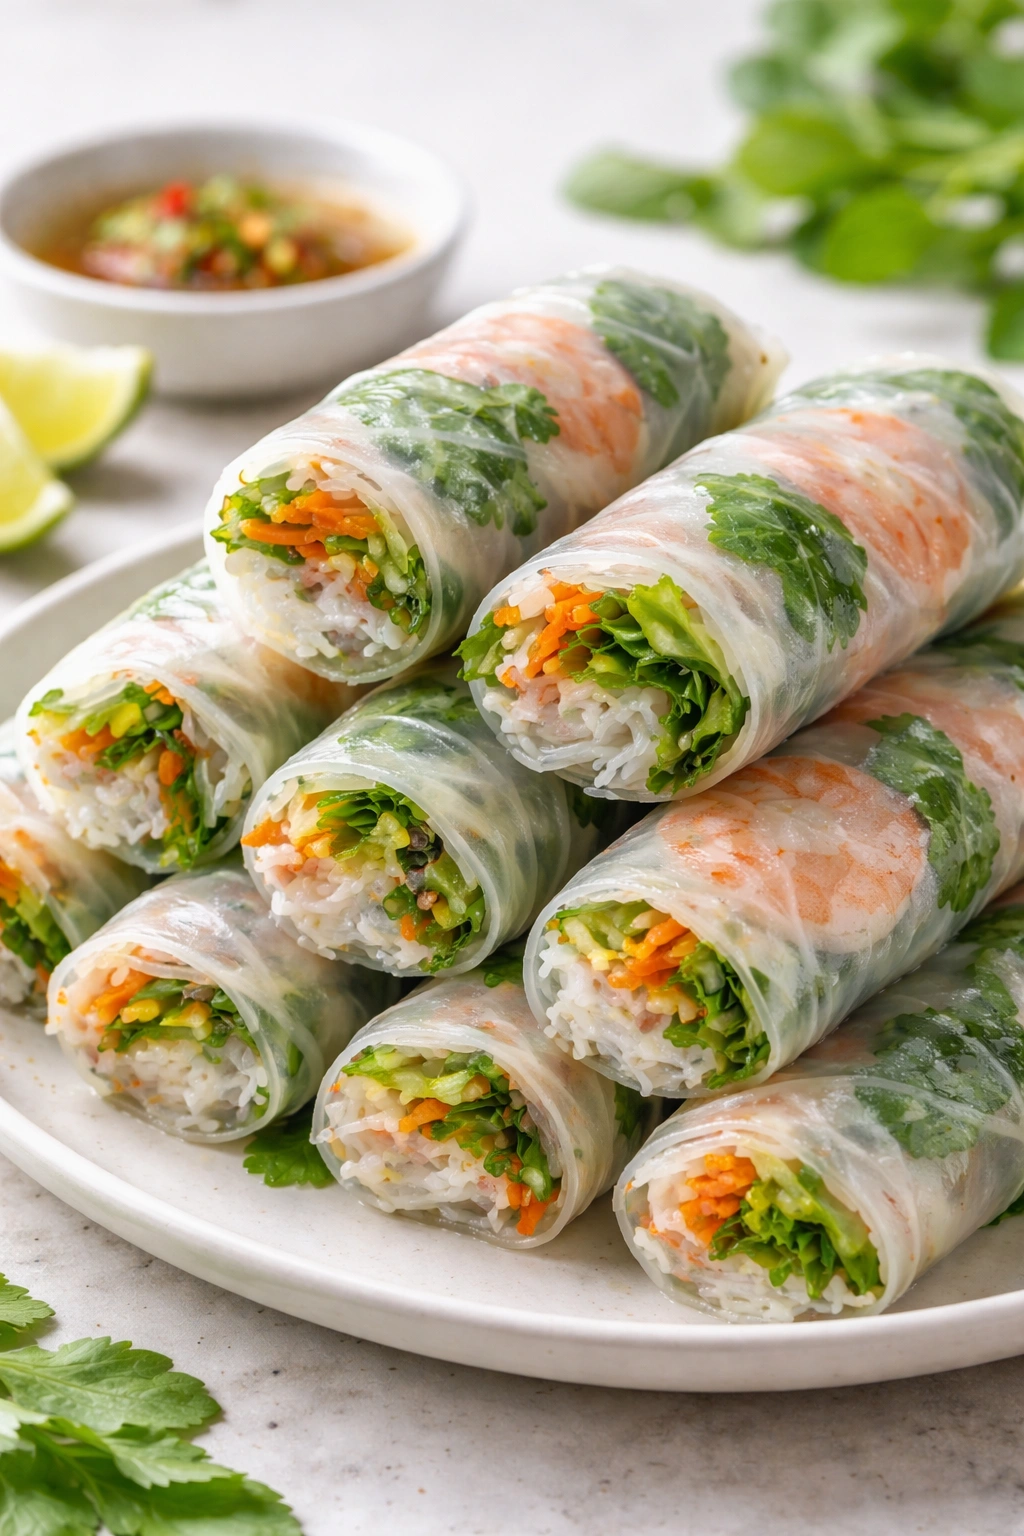
The beauty of fresh spring rolls is that they’re simultaneously elegant and approachable. They look impressive — those translucent, delicate wrappers with visible herbs and vegetables showing through are genuinely beautiful on a plate. But they’re not difficult to make once you understand the two fundamental principles: rice paper needs just the right amount of moisture to become workable, and the rolling motion is about gentle, deliberate pressure rather than aggressive force.
The technique becomes intuitive after a handful of rolls. Your hands learn the motion. You develop feel for when the rice paper is perfectly softened. You understand instinctively how much filling is the right amount. What seems mysterious now will feel natural in a month if you make them semi-regularly.
More importantly, once you can make spring rolls, you have endless flexibility. You’re no longer limited to restaurant versions or store-bought rolls. You can adapt fillings to your preferences, use what’s in your fridge, make them vegetarian or protein-heavy, spicy or mild. They become a skill you reach for constantly — a quick lunch, an elegant appetizer, a light dinner.
Start with the basic recipe outlined here. Get comfortable with the rolling motion. Taste how the traditional version should taste. Then experiment. Customize. Find your own signature filling. The structure is straightforward enough that you can focus on flavor and texture rather than struggling with technique.
Your first batch might have some imperfect rolls — ones that are slightly thicker than ideal, or with slightly visible seams. Honestly, who cares? They’ll taste delicious. The second batch will be better. The third better still. By your tenth batch, you’ll be rolling them with complete confidence and probably already experimenting with variations.
That’s the real joy of learning to make fresh spring rolls: they taste amazing, they look elegant, and once you understand the technique, they’re genuinely fun to make.