Game day is coming, and you need dips. Not just any dips — dips that stay perfectly warm and creamy from kickoff through the final whistle, without drying out, burning, or turning into a congealed mess halfway through the fourth quarter. That’s where a crock pot becomes your secret weapon.
A slow cooker transforms party dips from a logistical nightmare into a set-it-and-forget-it centerpiece of your spread. You can prepare the ingredients in advance, flip on low, and let the gentle heat do exactly what you need: keep everything at that ideal dipping temperature while you focus on the game, your guests, and actually enjoying yourself instead of babysitting a cheese dip in a warming tray. The results are consistently better, too — no scorched edges, no cooling corners, just creamy, cohesive dips that taste as good in the third quarter as they did when everyone first arrived.
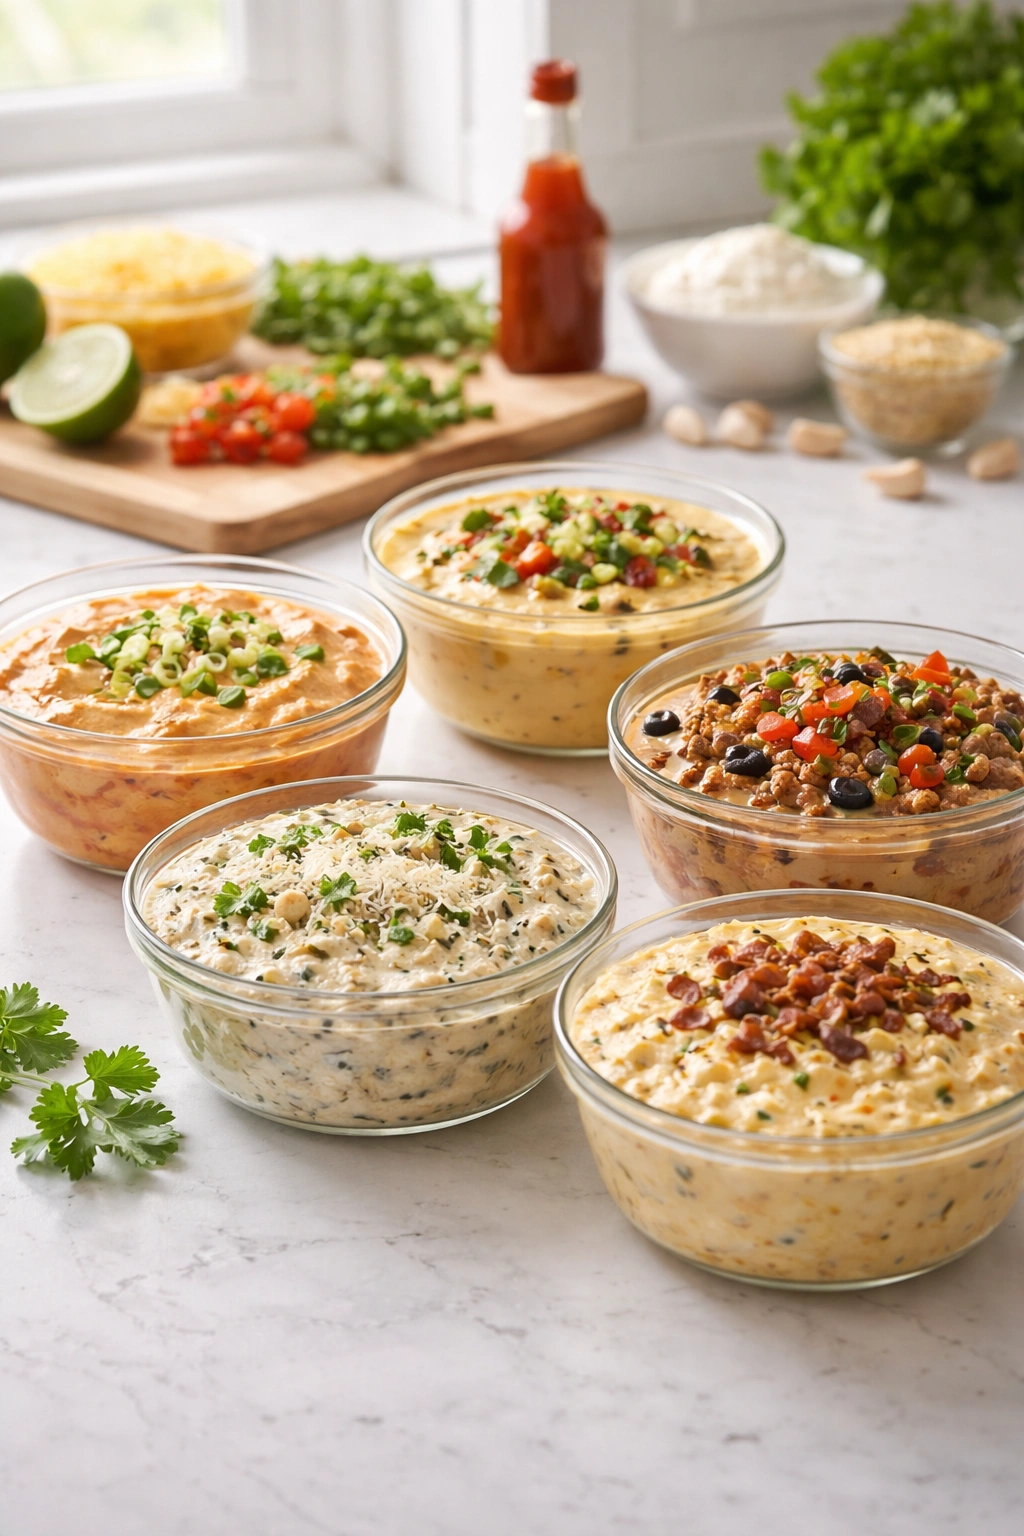
The five dips that follow have all been designed specifically for the crock pot environment. They’re deeply flavorful, visually impressive, and sturdy enough to survive being transported, held at temperature for hours, and scooped aggressively by hungry fans. Some are traditional crowd-pleasers with a twist; others bring unexpected flavor combinations that will have your guests asking for the recipe. Each one is calculated to feed 8-12 people comfortably and can be doubled if you’re hosting a larger crowd.
Why Crock Pots Are the Secret Weapon for Party Dips
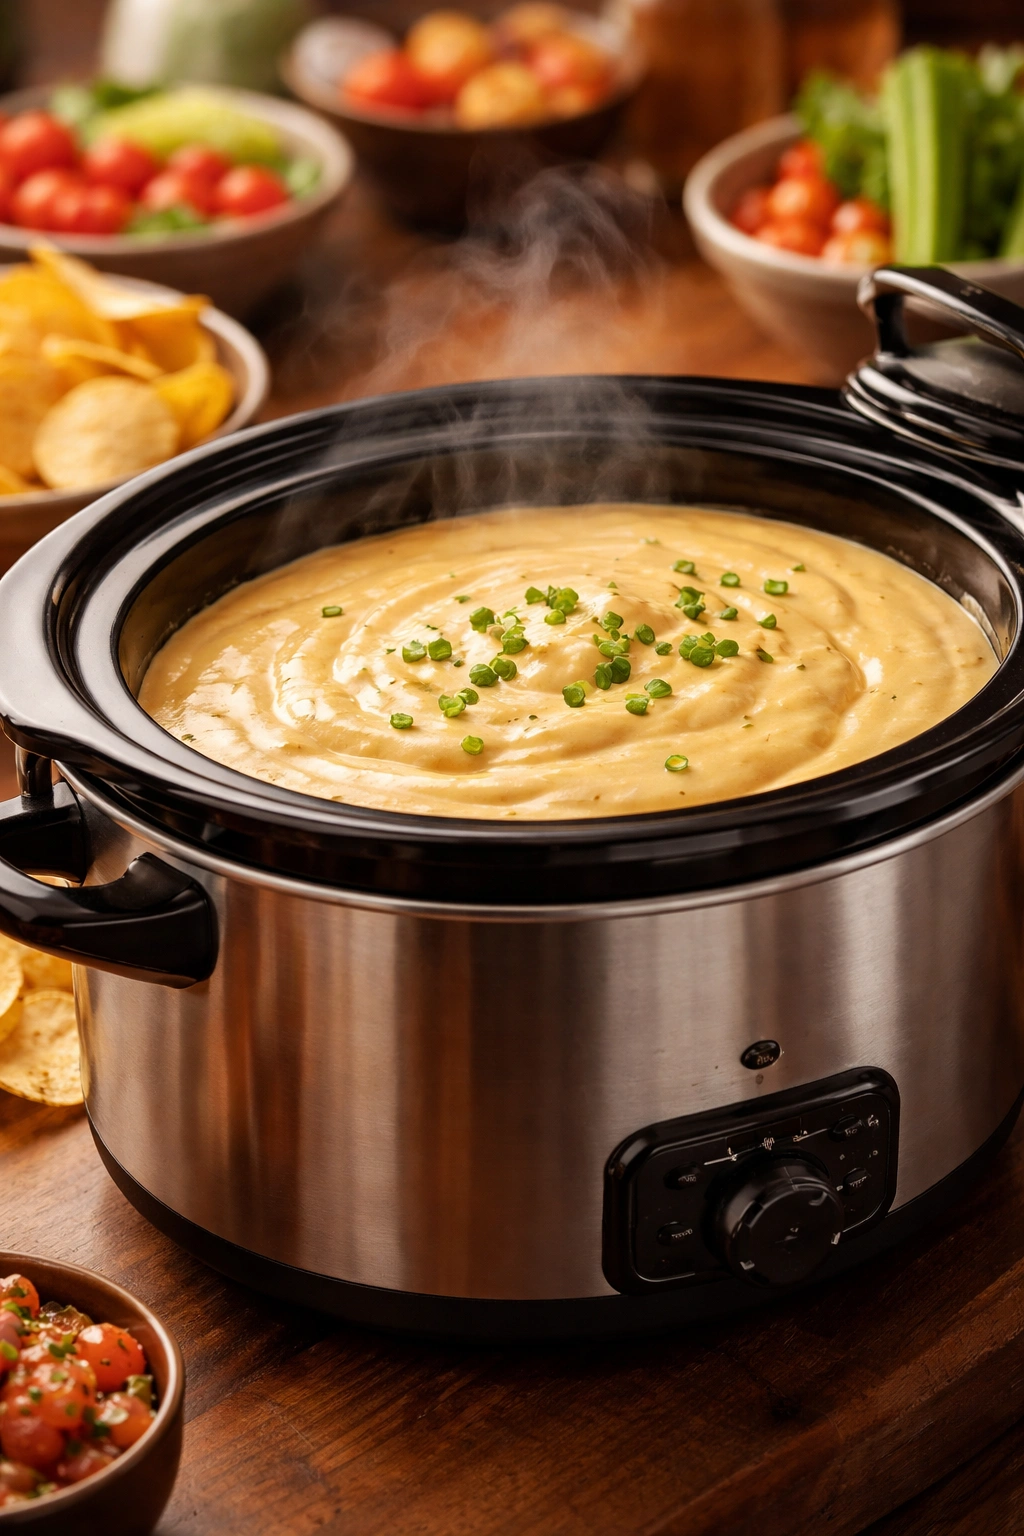
A crock pot does something regular serving dishes simply can’t: it maintains a precise, steady heat that’s powerful enough to keep dips warm but gentle enough to prevent them from breaking, separating, or developing that burnt-at-the-edges character that ruins even the best flavors. The environment inside a slow cooker is humid, which means dairy-based dips stay silky and emulsified instead of drying out on the surface.
This matters more than it sounds. When you’re serving food to a crowd over a 3-4 hour period, temperature stability is everything. A cheese dip that’s piping hot at 6 p.m. and cold by 8 p.m. gets increasingly unappealing to scoop; one that stays consistently warm encourages people to keep dipping. That steady warmth also helps flavors meld together, so a dip actually tastes better after sitting for an hour than it did when you first turned on the crock pot.
There’s also the practical reality: your oven space is already occupied by other foods, your stovetop is limited, and you don’t want to spend half the game mentally monitoring a pot on low heat. A crock pot plugged into a corner outlet requires zero active attention — just a stir or two if the recipe calls for it.
How to Set Up Your Crock Pot Dip Station
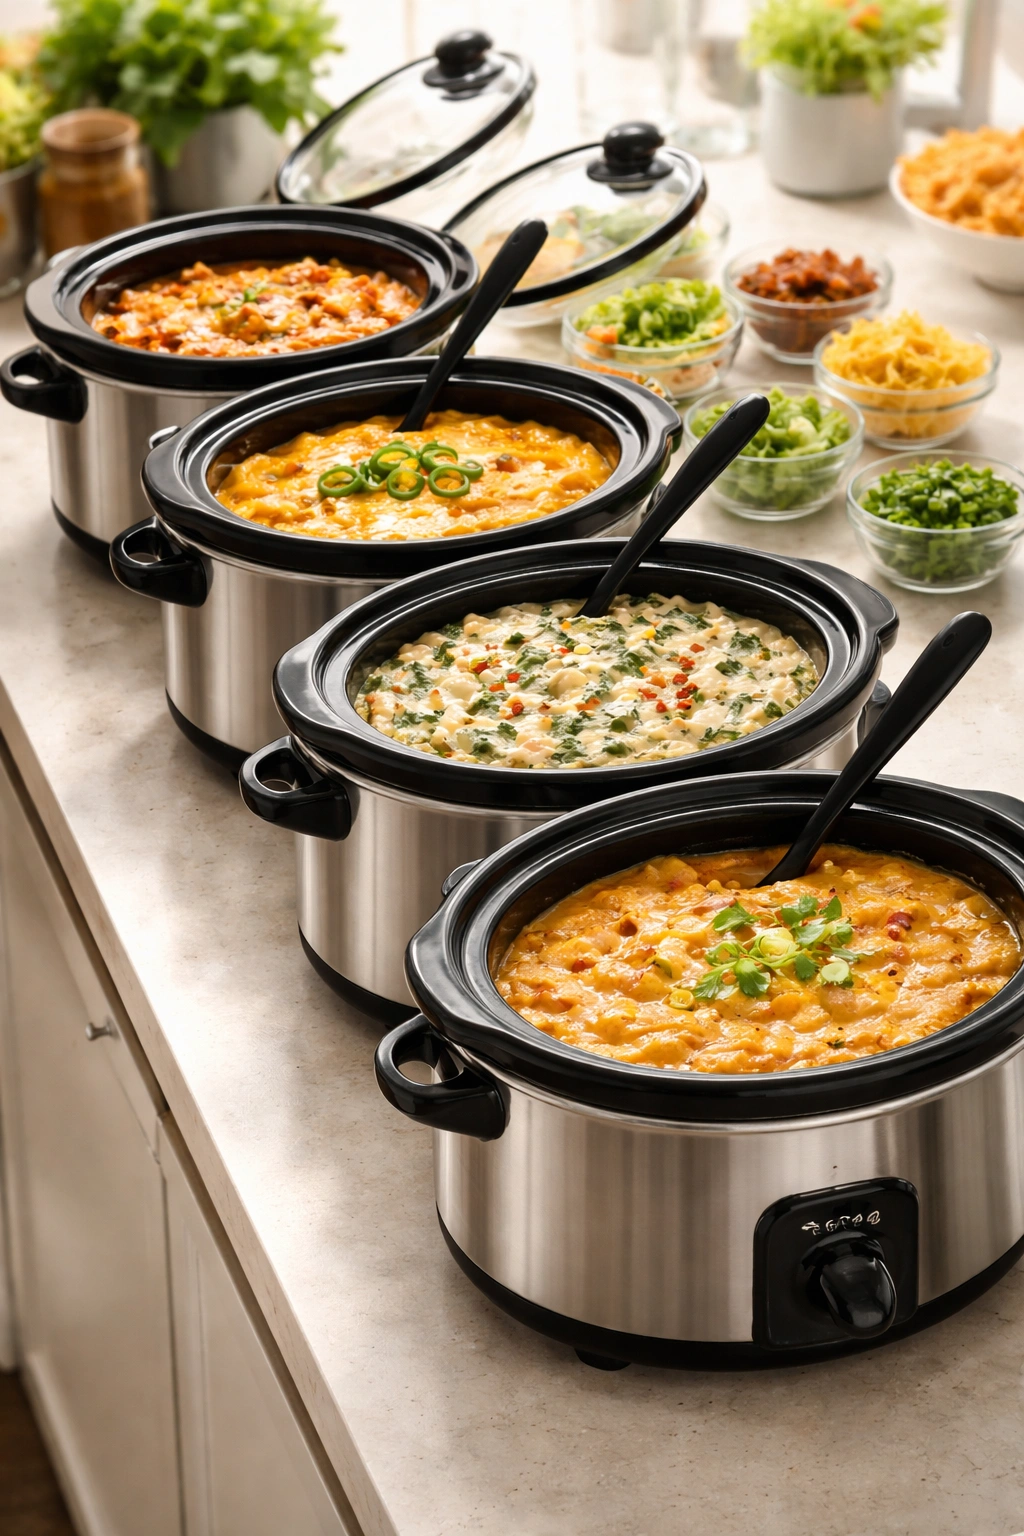
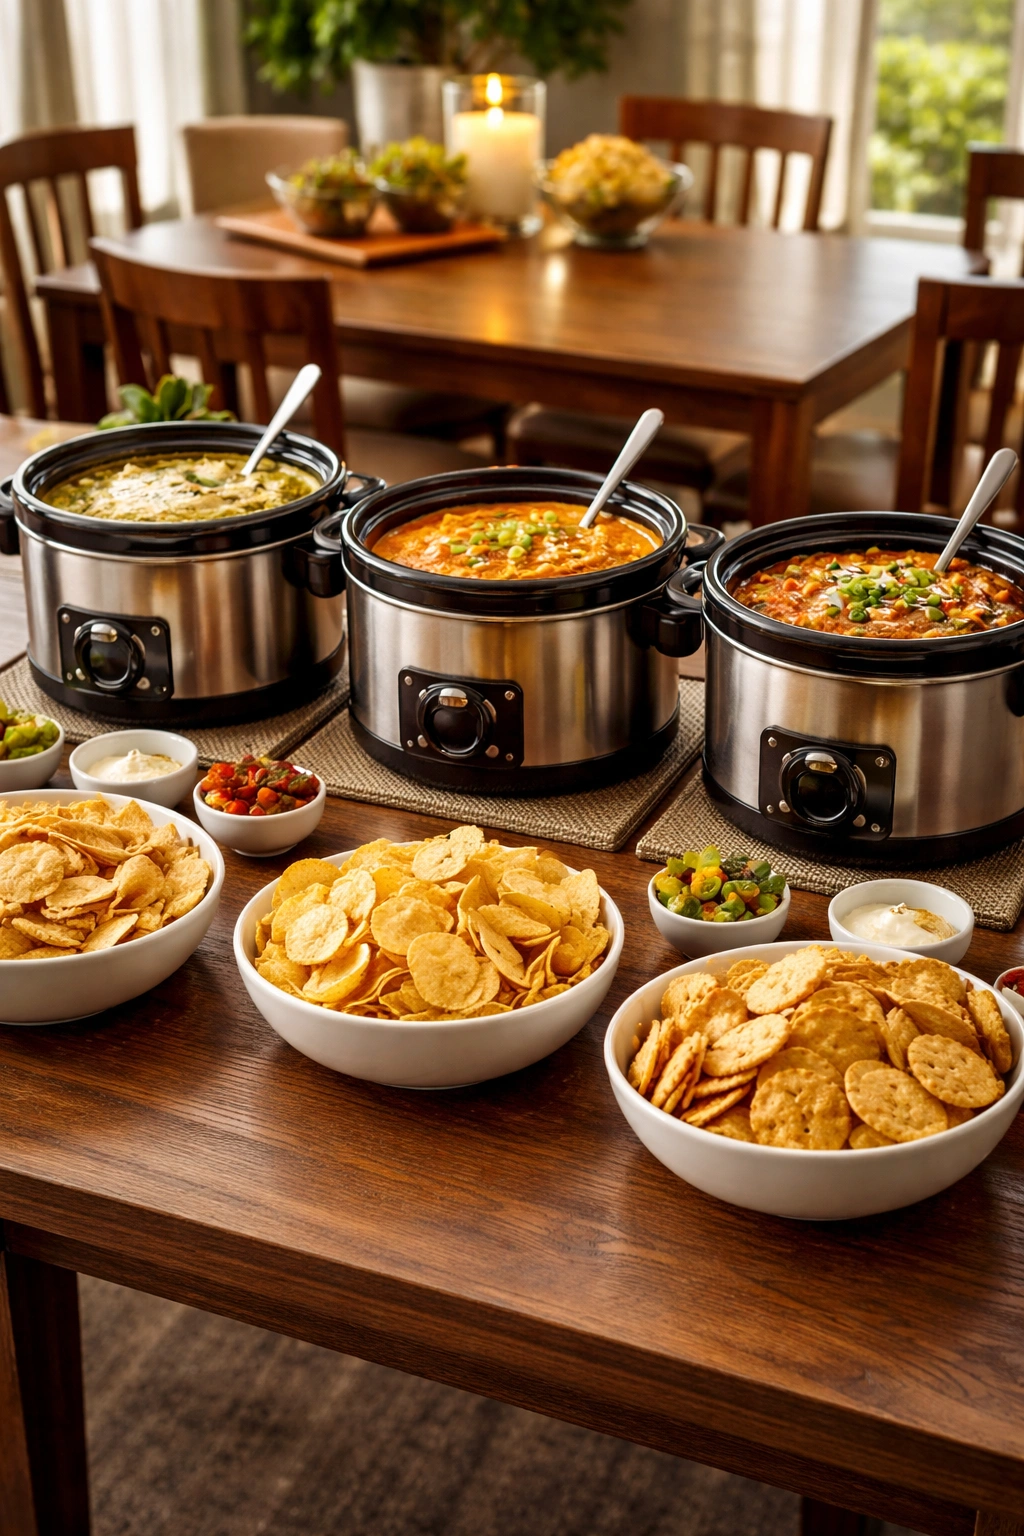
Start by choosing the right size slow cooker for the number of guests and amount of dip. A standard 6-quart crock pot is ideal for most of these recipes; it’s large enough that the dip doesn’t boil aggressively but small enough that it heats evenly. If you’re making multiple dips, set up separate crock pots on a buffet table or counter — this looks impressive, gives guests variety, and prevents flavors from mingling if someone dips a chip in one dip, then another.
Always turn the crock pot on to “Low” about 15-20 minutes before guests arrive, depending on the recipe and whether your ingredients came from the fridge or were assembled at room temperature. “Low” is non-negotiable here; “High” will cause dairy to break and proteins to become grainy and separated. You want gentle heat that maintains a soft, stirrable consistency without ever approaching a boil.
Place a small ladle or serving spoon in the dip, not chips or crackers. This prevents cross-contamination, keeps your dip cleaner longer, and looks more intentional. Set out napkins directly in front of the crock pot, and refresh your chip baskets every 20-30 minutes — stale, soft chips are worse than empty baskets.
1. Loaded Beef and Cheddar Beer Dip
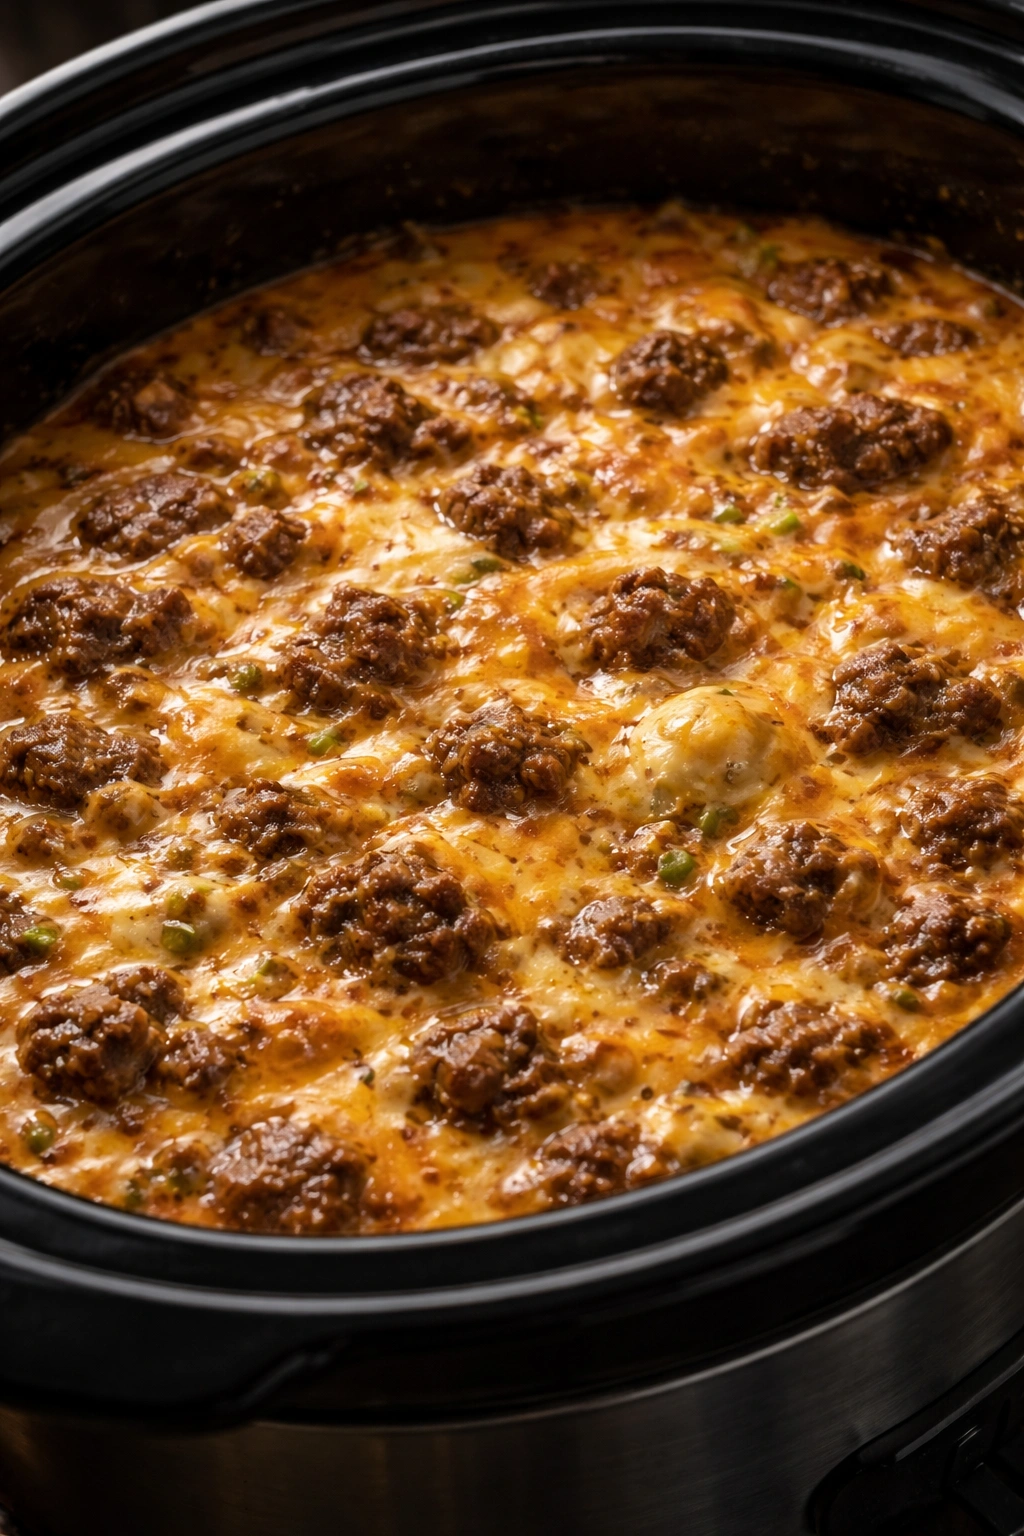
This is the dip that converts people who claim they don’t like “complicated” appetizers. It’s savory, substantial, feels indulgent, and somehow tastes better warm than it does at room temperature. The beer deglazes the beef, adding a subtle depth that keeps people asking what the secret ingredient is (it’s just good technique).
This dip uses ground beef as its foundation, which means it’s hearty enough to serve on toasted bread rounds or in crispy wonton cups if you want to dress it up beyond chips. The flavor builds over time as it sits in the crock pot, so it’s actually better after 30-45 minutes than it is right when you finish cooking it.
Yield: Serves 10-12 | Makes approximately 5 cups
Prep Time: 20 minutes Cook Time: 2 hours on low (or 1 hour to reach serving temperature; keep warm for up to 4 hours on low) Total Time: 2 hours 20 minutes, plus up to 2 additional hours on warm Difficulty: Intermediate — You need to brown the beef properly beforehand, but the crock pot handles the rest.
For the Dip:
- 1.5 pounds ground beef (80/20 blend)
- 1 tablespoon olive oil
- 4 cloves garlic, minced
- 1 small yellow onion, diced finely
- 1 cup beef broth
- ¾ cup lager or pale ale beer (a beer you’d actually drink — avoid dark stouts here)
- 4 cups sharp cheddar cheese, shredded from a block (not pre-shredded)
- 8 ounces cream cheese, cubed and softened
- 2 tablespoons whole grain mustard (this adds complexity without making it taste like mustard)
- 1 tablespoon Worcestershire sauce
- 1 teaspoon smoked paprika
- ½ teaspoon cayenne pepper
- 1 teaspoon kosher salt
- ½ teaspoon black pepper
- 3 strips bacon, cooked until crispy, crumbled
- 3 tablespoons fresh chives, chopped
- Optional: 1 cup sour cream, stirred in at the end for creamier texture
Prepare the Beef:
- Heat the olive oil in a large skillet over medium-high heat. When the oil shimmers, add the ground beef and break it up with a wooden spoon as it cooks, pressing it against the sides of the pan to develop browning rather than letting it just steam. This takes 5-7 minutes, and you want the meat noticeably browned and broken into small pieces, not gray.
- Add the diced onion and minced garlic to the cooked beef. Stir frequently for 2 minutes until the onion begins to soften and the garlic becomes fragrant.
- Pour in the beer, scraping the bottom of the pan with your wooden spoon to release any browned bits stuck to the surface (this is where flavor lives). Let the beer reduce by half, which takes about 2 minutes of medium-high heat — you’ll see the liquid noticeably decrease and the alcohol smell will fade.
- Stir in the beef broth, Worcestershire, mustard, paprika, cayenne, salt, and pepper. Simmer for 2 minutes, then transfer the entire beef mixture to your crock pot.
Combine in the Crock Pot: 5. Add the cheddar cheese and cream cheese to the beef mixture in the crock pot. Stir well, breaking up the cream cheese so it disperses evenly. 6. Set the crock pot to low and cover. Let it warm for 45 minutes to 1 hour, stirring occasionally (every 15 minutes or so), until the cheese is completely melted and the dip is silky and warm. 7. If you’re using sour cream for extra creaminess, fold it in after the cheese has fully melted. Taste and adjust salt and spice as needed — remember that flavors can taste muted when food is very hot, so be conservative with additional salt. 8. Keep the crock pot on low throughout serving. Stir every 30-45 minutes to ensure even heating and prevent the bottom from concentrating flavors too much.
Finish and Serve: 9. Just before serving (or up to 30 minutes before), top with the crumbled bacon and fresh chives. Some will melt into the dip; some will sit on top and add texture.
Pro Tips: Don’t use pre-shredded cheese in this dip — the anti-caking agents prevent it from melting smoothly and you’ll end up with a grainy texture instead of silky cheddar. Shred your own from a block, or ask the deli counter to shred it fresh. The quality difference is remarkable.
If the dip seems too thick after it’s been in the crock pot for a while, thin it with a splash of beef broth or even heavy cream, stirred in a little at a time. It’s easier to loosen than to thicken.
The beer choice actually matters here. A crisp pale ale or lager works beautifully; a heavy stout or IPA will overpower the subtle beef flavors. Stick with something mild and pleasant to drink.
Make-Ahead: Brown the beef, sauté the onion and garlic, and prepare the beer reduction up to 1 day ahead. Store in the fridge. On game day, transfer to the crock pot with the remaining ingredients about 1.5 hours before serving.
Storage: Refrigerate leftover dip in an airtight container for up to 3 days. Reheat gently in a crock pot on low or in a small saucepan over low heat, stirring frequently, until warm throughout. It will thicken as it cools, so add a splash of broth or cream when reheating.
Serving Suggestions: Serve with sturdy, unflavored tortilla chips, toasted bread rounds, crispy wonton cups, or alongside sliced bell peppers and celery for texture contrast. This dip is also excellent spooned onto thin pretzel slices or used as a topping for baked potatoes or nachos.
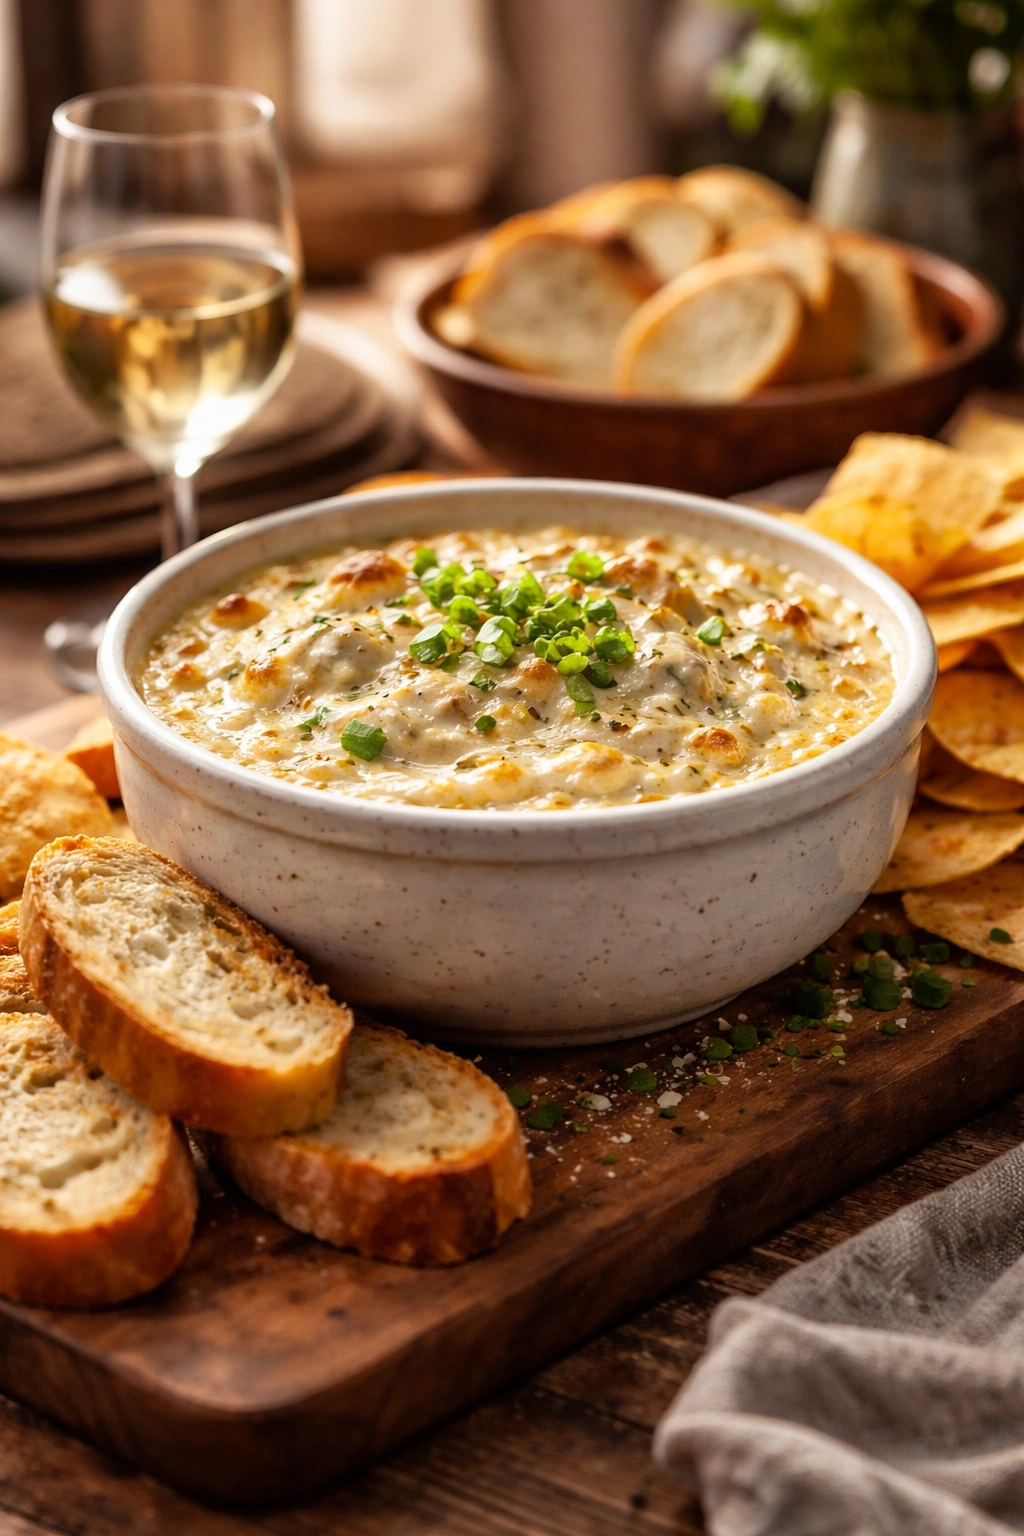
2. Spinach Artichoke and Jalapeño Popper Dip
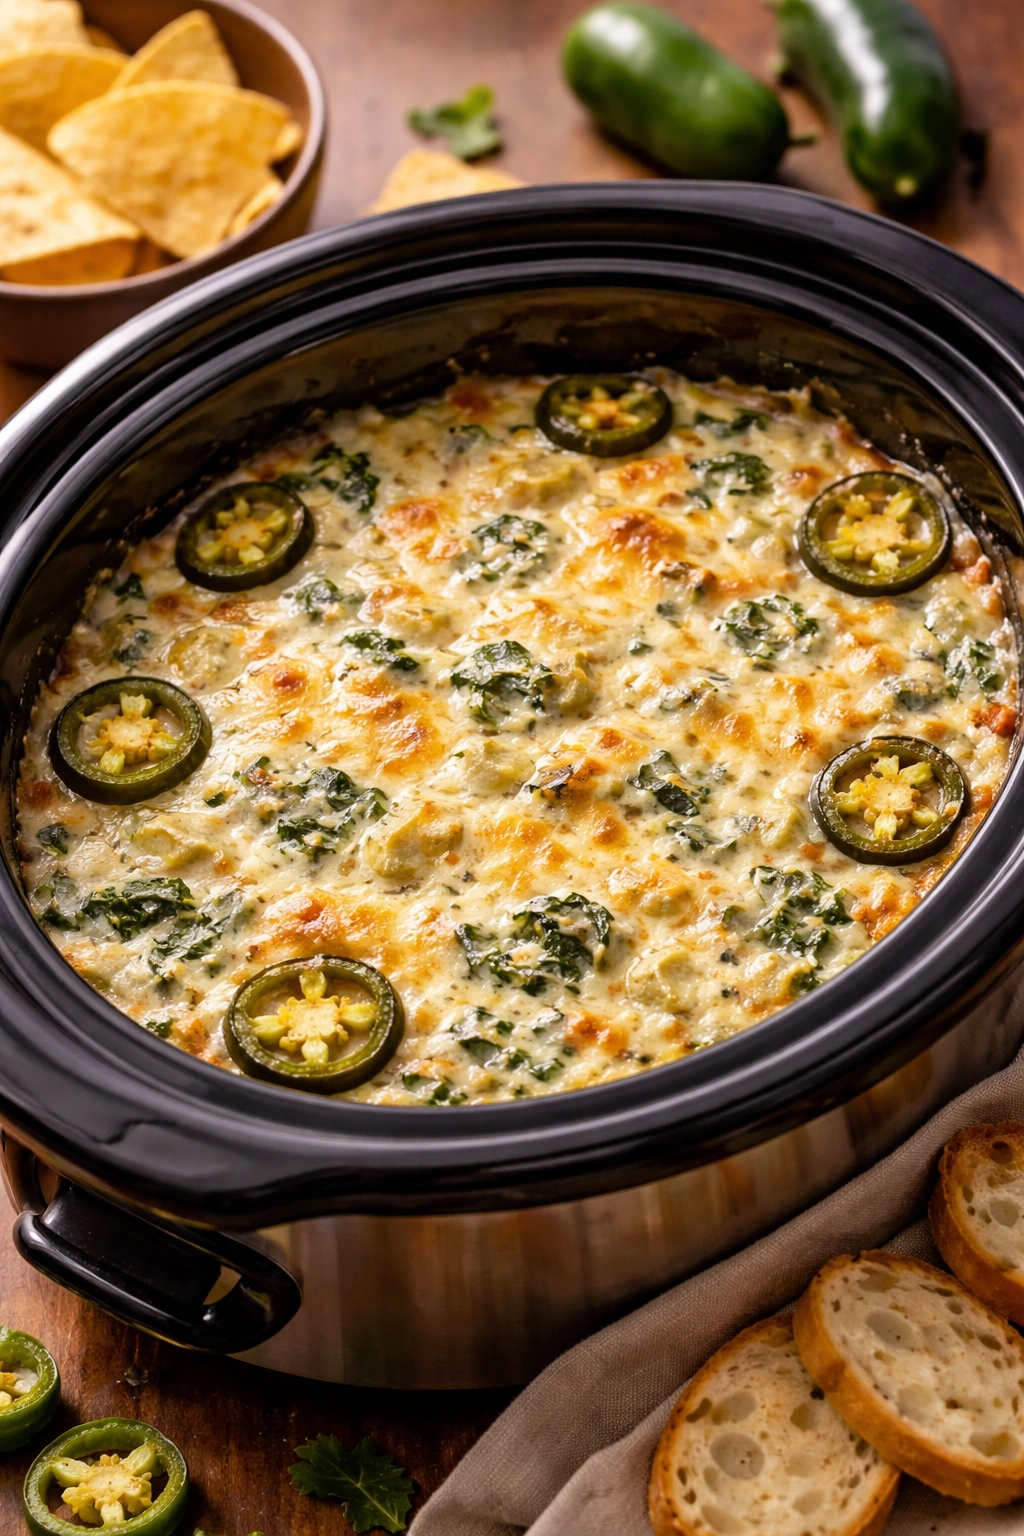
This dip walks the perfect line between comfort-food familiar and distinctly flavorful. It’s the spinach artichoke dip everyone knows and loves, but with the cream cheese-wrapped jalapeño element that’s become wildly popular over the last decade. The result tastes like multiple dishes had a productive conversation.
The jalapeños add both heat and a fresh, vegetal brightness that keeps the dip from feeling heavy, even though it’s based entirely in cream cheese and cheese. Roasting the jalapeños first mellows their raw edge and lets their flavor integrate rather than dominate.
Yield: Serves 8-10 | Makes approximately 4 cups
Prep Time: 25 minutes Cook Time: 2.5 hours total (45 minutes roasting + 1.5 to 2 hours in crock pot) Total Time: 2 hours 50 minutes active + up to 3 additional hours on warm Difficulty: Intermediate — The roasting and prep take attention, but the crock pot phase is passive.
For the Dip:
- 6 fresh jalapeños (roughly 3-4 inches long), halved lengthwise and seeded
- 2 tablespoons olive oil, divided
- 16 ounces cream cheese, softened
- ½ cup sour cream
- ½ cup mayonnaise (use real mayo, not salad dressing)
- 1.5 cups sharp cheddar cheese, shredded
- ¾ cup parmesan cheese, freshly grated
- 1 (10-ounce) package frozen spinach, thawed and squeezed completely dry (this is crucial — wet spinach makes a watery dip)
- 1 (14-ounce) can artichoke hearts, drained and chopped into bite-sized pieces
- 4 cloves garlic, minced
- ½ teaspoon red pepper flakes
- 1 teaspoon kosher salt
- ½ teaspoon black pepper
- ¼ teaspoon cayenne
- 2 tablespoons lime juice (fresh is essential here)
- ¼ cup crispy bacon pieces (about 3-4 slices cooked), optional but strongly recommended
- 3 tablespoons fresh cilantro, chopped, plus more for garnish
Prepare the Jalapeños:
- Preheat your oven to 400°F (205°C). Line a baking sheet with parchment or foil.
- Brush the jalapeño halves with 1 tablespoon of olive oil on both sides, then place them cut-side down on the prepared baking sheet. Roast for 15-18 minutes until the skin is charred in patches and the flesh is completely soft when pierced with a fork. They should look slightly blackened in spots — that’s exactly what you want.
- Remove from the oven and let cool for 5 minutes, then chop into roughly ½-inch pieces. Set aside.
Combine the Dip: 4. In a large bowl, combine the softened cream cheese, sour cream, and mayonnaise. Mix until completely smooth — no lumps of cream cheese visible. This base is important and worth whisking well. 5. Fold in the cheddar and parmesan cheeses until evenly distributed. 6. Add the thawed, squeezed-dry spinach and chopped artichoke hearts to the cheese mixture, folding gently until both are evenly incorporated. 7. Stir in the minced garlic, red pepper flakes, salt, pepper, and cayenne. The dip should taste seasoned but not spicy — the heat should be there as background flavor, not a punch. 8. Fold in the roasted jalapeños, the lime juice, bacon pieces, and cilantro. Fold gently so the jalapeños don’t break apart into tiny pieces.
Transfer to Crock Pot: 9. Transfer the entire dip mixture to your crock pot and stir well to ensure everything is evenly distributed. If the dip seems very thick, add a splash of milk (2-3 tablespoons) to loosen it slightly. 10. Set the crock pot to low and cover. Let it warm for 1.5 to 2 hours before serving, stirring every 20-30 minutes to ensure even heating and to bring the warmer ingredients from the edges into the center. 11. Once it reaches serving temperature, it can stay on low for up to 3 hours. Stir occasionally to maintain consistency.
Pro Tips: The most common mistake with spinach dips is not squeezing the thawed spinach dry enough. Frozen spinach releases tremendous moisture, and any of that water that makes it into your dip will result in a watery, broken-looking appetizer. Thaw it, press it firmly in a strainer or with a clean kitchen towel, and if you’re unsure whether it’s dry enough, repeat the squeezing process.
The lime juice is not optional — it cuts through the richness of the cream cheese and mayo, brightening the entire dip and preventing it from tasting heavy. Lemon juice works in a pinch, but lime is distinctly better here.
If your dip breaks or looks separated after sitting in the crock pot for a while, don’t panic. Turn the crock pot off, transfer the dip to a blender in two batches, blend until smooth, return to the crock pot, and add a splash of milk to get the consistency back to creamy. It’ll look perfect again.
Make-Ahead: Chop the artichokes and roast the jalapeños up to 2 days ahead. Mix the dry ingredients and the cheese base up to 1 day ahead. Combine everything about 1 hour before you plan to heat the crock pot.
Storage: Refrigerate leftovers in an airtight container for up to 4 days. Reheat in a crock pot on low or in the microwave in 30-second increments, stirring between each, until warm throughout.
Serving Suggestions: Serve with tortilla chips, blue corn chips, crispy pita chips, or alongside crudités (celery, bell peppers, cherry tomatoes) for fresh contrast. It’s also excellent on toasted bread rounds, in phyllo cups, or swirled onto a veggie platter as a dip station.
Variation: Add ½ cup crispy fried onions right before serving for added texture and a savory depth. Or stir in ½ cup sun-dried tomatoes (packed in oil, drained) for a Mediterranean twist.
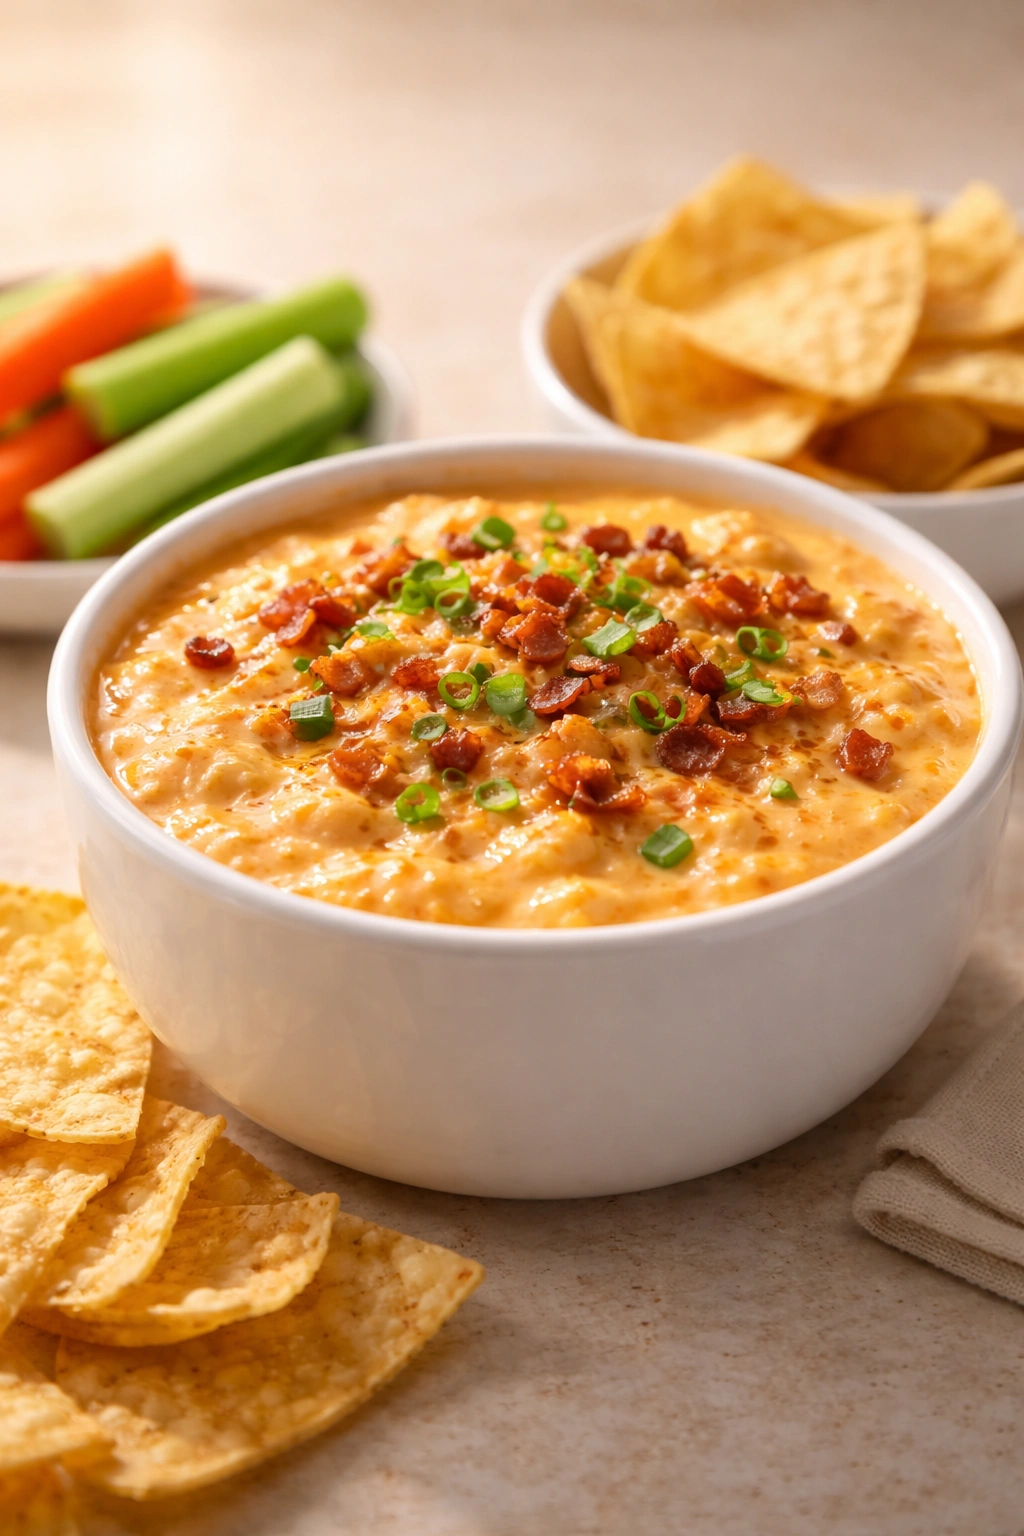
3. Smoked Brisket Chili Cheese Dip with Crispy Onions
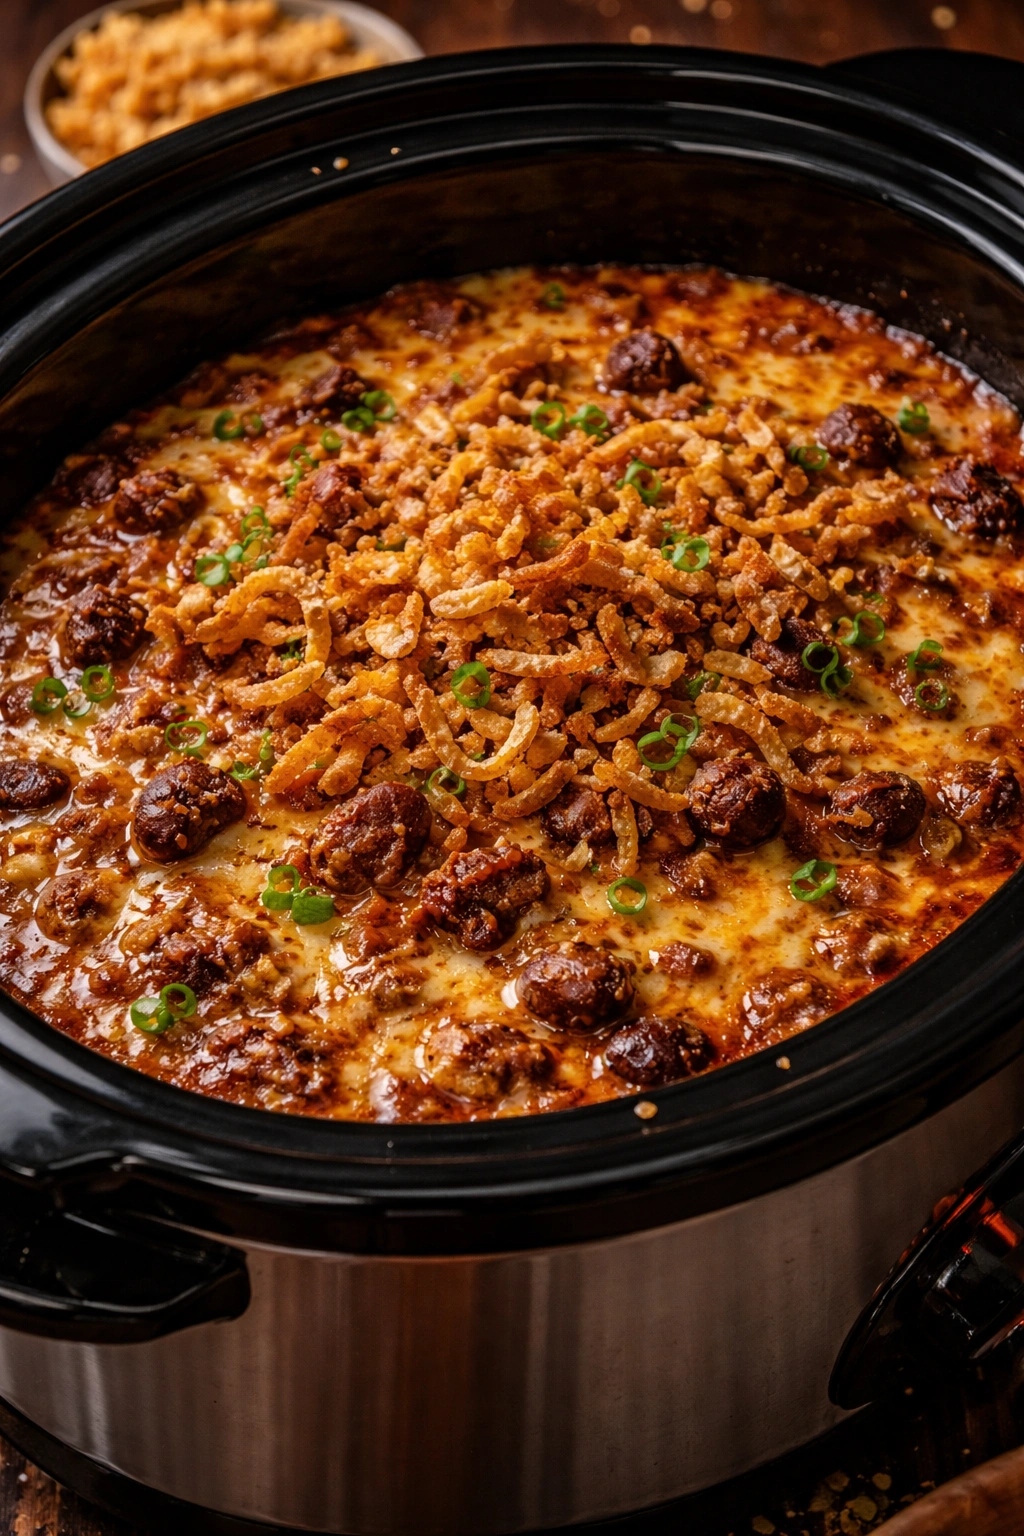
This is a dip for people who think game day food should be hearty, meaty, and unapologetic. It’s built on a simplified chili base that’s chunky enough to feel substantial but smooth enough to scoop without the dip shattering into component parts.
The secret here is using smoked brisket — either leftover from a cook you did yourself or high-quality smoked brisket from a good BBQ place. It adds a depth that ground beef can’t quite match. The chili spicing is intentional and forward without being painfully hot, and the cheese layer on top makes it feel indulgent without overwhelming the meat-and-spice foundation.
Yield: Serves 10-12 | Makes approximately 5.5 cups
Prep Time: 20 minutes (significantly less if you’re using prepared smoked brisket) Cook Time: 2.5 to 3 hours on low Total Time: 2 hours 50 minutes to 3 hours 20 minutes, plus up to 3 additional hours on warm Difficulty: Intermediate — Mostly a matter of layering and letting the crock pot work, but you need good smoked brisket.
For the Dip:
- 2 tablespoons olive oil
- 1 large yellow onion, diced
- 4 cloves garlic, minced
- 1 pound smoked brisket, chopped into ¼-inch pieces (roughly the size of peas, not shreds)
- 2 tablespoons chili powder (use a good chili powder, not a chili seasoning blend)
- 1 tablespoon cumin
- 2 teaspoons smoked paprika
- 1 teaspoon cayenne pepper (or ½ teaspoon if you prefer less heat)
- 1 teaspoon kosher salt, plus more to taste
- ½ teaspoon black pepper
- 1 (15-ounce) can black beans, drained and rinsed
- 1 (15-ounce) can kidney beans, drained and rinsed
- 1 cup beef broth
- ½ cup whole milk or heavy cream
- 1 tablespoon tomato paste
- 2 tablespoons butter
- 3 tablespoons all-purpose flour
- 3 cups sharp cheddar cheese, shredded
- 1 cup pepper jack cheese, shredded
- 1 cup crispy fried onions, divided (Fried onions, not fresh)
- ¼ cup fresh cilantro, chopped
- ¼ cup sliced jalapeños (fresh or pickled)
- Lime wedges for serving
Make the Spice Base and Start the Dip:
- Heat the olive oil in a large skillet over medium heat. Add the diced onion and cook for 4-5 minutes, stirring occasionally, until it’s softened and becoming translucent at the edges.
- Add the minced garlic and cook for 1 minute until fragrant, then stir in the chili powder, cumin, smoked paprika, cayenne, salt, and pepper. Cook for 1-2 minutes, stirring constantly, until the spices are toasted and release their fragrance — this bloom is what makes the spicing taste rich rather than flat.
- Add the chopped smoked brisket to the spiced onion mixture and stir to coat. Let it cook for 2 minutes, then transfer everything to your crock pot.
Build the Chili Base: 4. Add the drained black beans, kidney beans, beef broth, and tomato paste to the crock pot. Stir well, breaking up any lumps of tomato paste. The mixture should be somewhat thick but still liquid enough that you can see the beans. 5. Set the crock pot to low and cover. Let it cook for 1 hour, stirring occasionally. This allows the beans to heat through completely and the flavors to begin melding.
Make the Cheese Layer: 6. While the chili is cooking, make a simple cheese base: In a small saucepan, melt the butter over medium-low heat. Whisk in the flour to create a paste, cooking for 1-2 minutes while stirring constantly. This is a roux and it should smell pleasantly buttery and toasted, not burnt. 7. Gradually add the milk or cream, whisking constantly to prevent lumps from forming. Keep whisking until the mixture is smooth and slightly thickened, about 2-3 minutes. Remove from heat. 8. Add the cheddar and pepper jack cheeses to the cream sauce, stirring until they’re completely melted and incorporated. The mixture should be silky and pourable, not grainy. If it seems too thick, add a splash more milk.
Combine Everything: 9. After the chili base has cooked for 1 hour, pour the cheese mixture into the crock pot and stir very thoroughly, making sure the cheese sauce reaches all the way to the bottom and is evenly distributed throughout the chili. 10. Cover and continue cooking on low for another 1 to 1.5 hours, stirring every 15-20 minutes, until the entire dip is heated through and looks cohesive and creamy. 11. Just before serving, fold in ½ cup of the crispy fried onions (reserving the rest for garnish), the cilantro, and the sliced jalapeños. Taste and adjust salt and spice — remember that very hot food tastes less seasoned than it actually is, so taste carefully before adding more salt. 12. Serve with the remaining crispy onions sprinkled on top as garnish and lime wedges on the side.
Pro Tips: The quality of the smoked brisket is absolutely non-negotiable. Flavorless, dried-out brisket will make a dull dip no matter what else you do. If you can, visit a good BBQ restaurant and buy a pound of their smoked brisket; the difference versus grocery store deli meat is transformative.
The roux-based cheese layer prevents the cheese from breaking and becoming grainy during extended crock pot time. Don’t skip this step or try to just throw cheese directly into the hot chili. The roux is the reason this dip stays silky for hours.
Chop the brisket into pieces roughly the size of peas or lentils — small enough that you can scoop comfortably on a chip, but large enough that you still get bites of distinctive meat rather than a shredded texture.
Make-Ahead: Prepare the entire chili base (through step 4) up to 1 day ahead and refrigerate in an airtight container. On game day, transfer to the crock pot and proceed with cooking. Make the cheese sauce up to 2 hours ahead and store in the fridge in a covered container, then reheat gently and stir into the chili once it’s been cooking for 1 hour.
Storage: Refrigerate leftovers in an airtight container for up to 4 days. Reheat gently in the crock pot on low, stirring frequently, until warm. Add a splash of beef broth or milk if the dip has thickened too much as it cooled.
Serving Suggestions: Serve with sturdy tortilla chips (the thicker, the better — they won’t break under the weight of this dip), crispy scoops, or alongside cornbread, jalapeño cornbread muffins, or crispy flour tortilla chips. Also excellent on nachos with fresh cilantro, lime crema, and pickled onions.
Variation: Swap the kidney beans for pinto beans, or use a mix of three beans. Add ½ cup roasted corn (thawed if frozen) for sweetness and texture. Substitute the pepper jack with Oaxaca or smoked gouda for different flavor profiles.
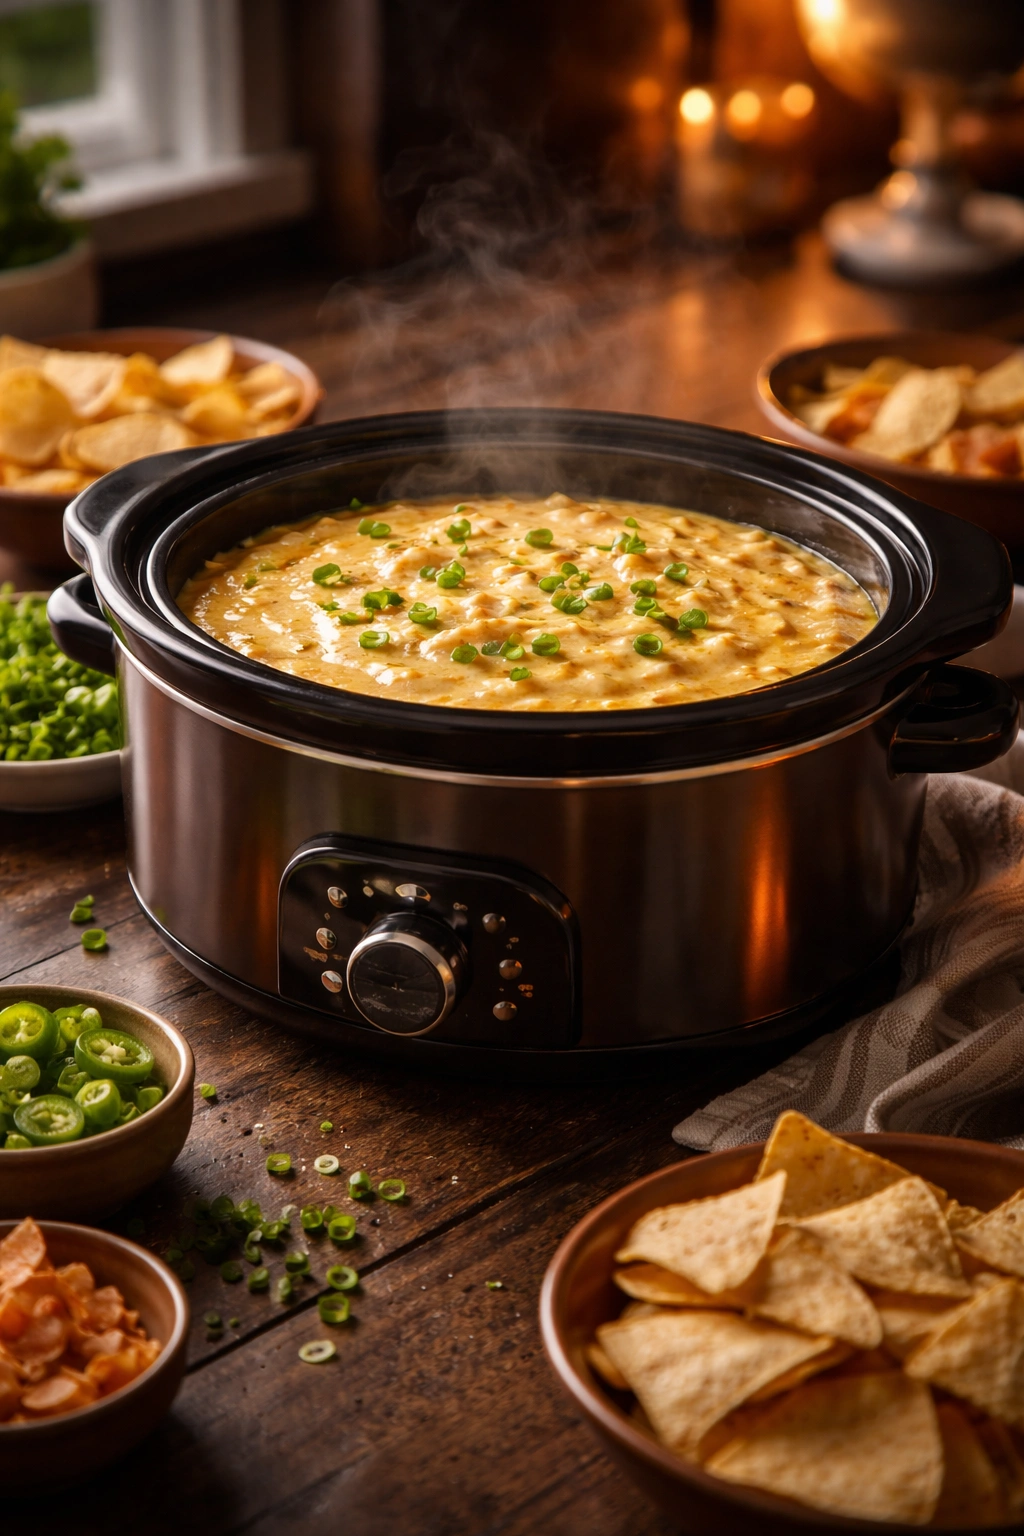
4. Buffalo Chicken Dip with Blue Cheese and Crispy Wonton Chips
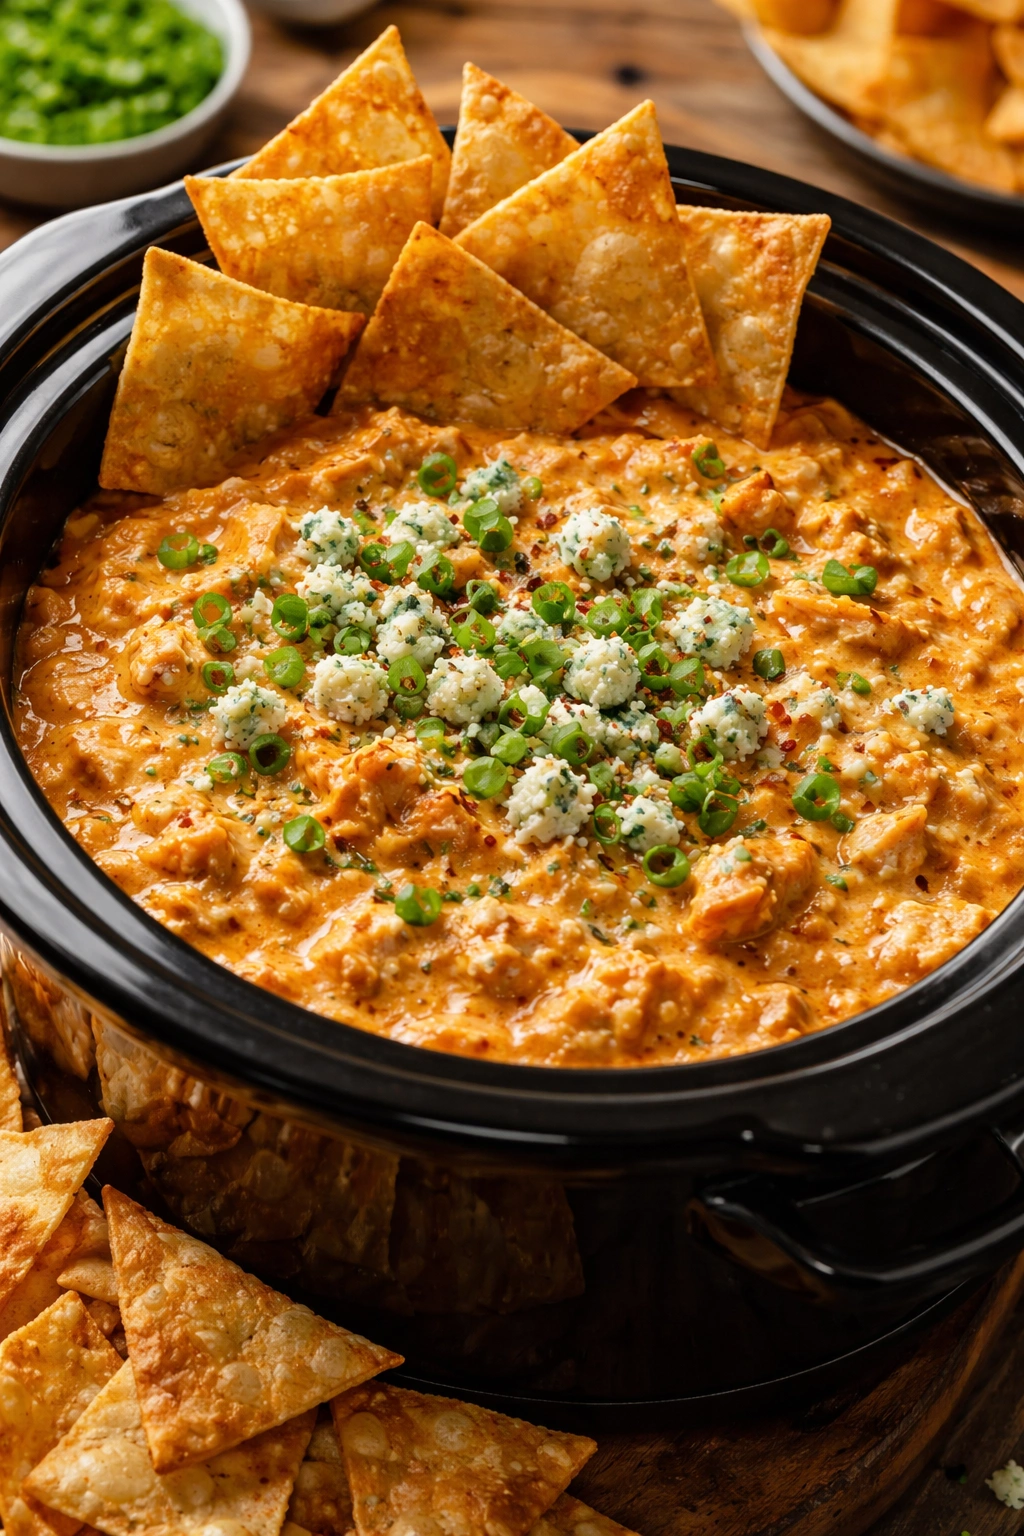
This is the dip that converts the skeptics. It tastes like the best parts of buffalo chicken wings — the hot sauce heat, the creamy cool element, the savory satisfaction — without requiring everyone to get sauce all over their hands and faces while standing up at a game.
The secret is starting with real shredded chicken (not canned) and building the heat carefully so it’s present and noticeable without being genuinely painful. The blue cheese is there for richness and tang, and a touch of ranch powder adds a subtle background note that makes the whole dip feel familiar and comforting despite the spicing.
Yield: Serves 8-10 | Makes approximately 4.5 cups
Prep Time: 20 minutes (or 5 minutes if using a rotisserie chicken) Cook Time: 2 to 2.5 hours on low Total Time: 2 hours 20 minutes to 2 hours 50 minutes, plus up to 3 additional hours on warm Difficulty: Intermediate — Mostly mixing and warming, but you need good-quality cooked chicken.
For the Dip:
- 3 cups cooked, shredded chicken (from about 1 rotisserie chicken, skin and bones removed)
- 1 cup buffalo sauce (Frank’s RedHot is the standard, and there’s nothing wrong with it, but you can also use a high-quality hot sauce if you prefer a different flavor profile)
- ½ cup hot sauce (if you prefer more heat) or keep it at 1 cup total sauce for milder dip
- 8 ounces cream cheese, softened and cubed
- 6 ounces blue cheese, crumbled (Gorgonzola, Roquefort, or domestic blue all work)
- ½ cup ranch dressing (not ranch seasoning powder, but actual ready-made dressing from the refrigerated section)
- ½ cup sharp cheddar cheese, shredded
- ¼ cup parmesan cheese, freshly grated
- 2 tablespoons butter
- 3 cloves garlic, minced
- ¼ teaspoon cayenne pepper
- ¼ teaspoon smoked paprika
- 1 teaspoon Worcestershire sauce
- Kosher salt and black pepper to taste
- 3 tablespoons fresh blue cheese crumbles for garnish (a little crumbles stirred in is good; extra on top is better)
- 3 tablespoons fresh chives, chopped
- 2 tablespoons fresh cilantro, optional
Build the Dip:
- Combine the shredded chicken and buffalo sauce in a large bowl, stirring until the chicken is evenly coated. Set aside.
- In a separate medium bowl, combine the softened cream cheese, crumbled blue cheese, and ranch dressing. Mix until mostly smooth — there will be small chunks of blue cheese throughout, and that’s correct. Don’t over-mix or the blue cheese will disappear entirely.
- Add the cheddar and parmesan cheese to the cream cheese mixture and fold until everything is evenly distributed.
- Gently fold the buffalo chicken into the cheese mixture, being careful not to break up the chicken shreds too much. You want distinct bites of chicken throughout the dip, not a shredded paste.
Transfer to Crock Pot: 5. Melt the butter in your crock pot on the “Low” setting (just turn it on for a minute or two until the bottom is warm and any butter is melted). Add the minced garlic and let it warm for about 30 seconds until fragrant. 6. Transfer the entire chicken and cheese mixture to the crock pot with the warm garlic and butter. Stir well, scraping the bottom to ensure nothing sticks, and fold in the cayenne, smoked paprika, and Worcestershire sauce. 7. Cover and let the dip warm on low for 1.5 to 2 hours, stirring every 20-30 minutes. The dip should look cohesive and creamy, with no obvious separated pools of liquid, and it should feel hot to the touch. 8. Taste and adjust seasoning — add more hot sauce if you want more heat, salt if it needs savory depth, or a squeeze of lime juice if it needs brightness. Remember that very hot food tastes less flavorful, so be conservative with adjustments when the dip is piping hot. 9. Just before serving, scatter the fresh blue cheese crumbles and fresh chives on top. If you’re using cilantro, add that too.
Pro Tips: Use good chicken. A rotisserie chicken from your grocery store is better than boiling or poaching chicken yourself — it’s already flavorful and moist. If you’re using leftover cooked chicken from another meal, make sure it’s not dry or overly processed. The final dip will only be as good as the chicken that’s in it.
Blue cheese can be aggressive, and not everyone loves it. If you’re serving this to a crowd where you’re unsure of blue cheese enthusiasm, reduce it to 4 ounces and add an extra ½ cup of sharp cheddar instead. You’ll still get the tang and richness without the funky intensity.
The ranch dressing acts as an emulsifier, helping keep the cream cheese and cheese smooth and preventing the dip from becoming grainy. Don’t skip it or replace it with ranch powder mixed with milk — the actual dressing has stabilizers that matter.
Make-Ahead: Shred the chicken, make the cheese base, and coat the chicken in buffalo sauce up to 1 day ahead. Store in separate airtight containers in the fridge. On game day, combine everything and transfer to the crock pot about 1.5 hours before you want to serve.
Storage: Refrigerate leftovers in an airtight container for up to 3 days. Reheat gently in the microwave in 30-second increments, stirring between each, or in a crock pot on low, stirring frequently until warm. The dip will thicken as it cools, so add a splash of whole milk or additional ranch dressing when reheating to restore the creamy texture.
Serving Suggestions: Serve with celery sticks (which is traditional), blue corn tortilla chips, crispy wonton chips, or sturdy pita chips. Also excellent on toasted bread rounds or with sliced bell peppers for a lighter option. A small bowl of additional blue cheese crumbles and a drizzle of hot sauce on top right before serving makes it look restaurant-quality.
Variation: Add ½ cup roasted corn or ¼ cup crispy bacon for texture. Swap the blue cheese for a milder gorgonzola or even a good sharp cheddar if blue cheese isn’t your crowd’s thing. Add 1 tablespoon fresh lime juice and a pinch of cumin for a buffalo chicken with a subtle lime-cumin twist.
5. Smoked Gouda, Caramelized Onion, and Pulled Pork Dip
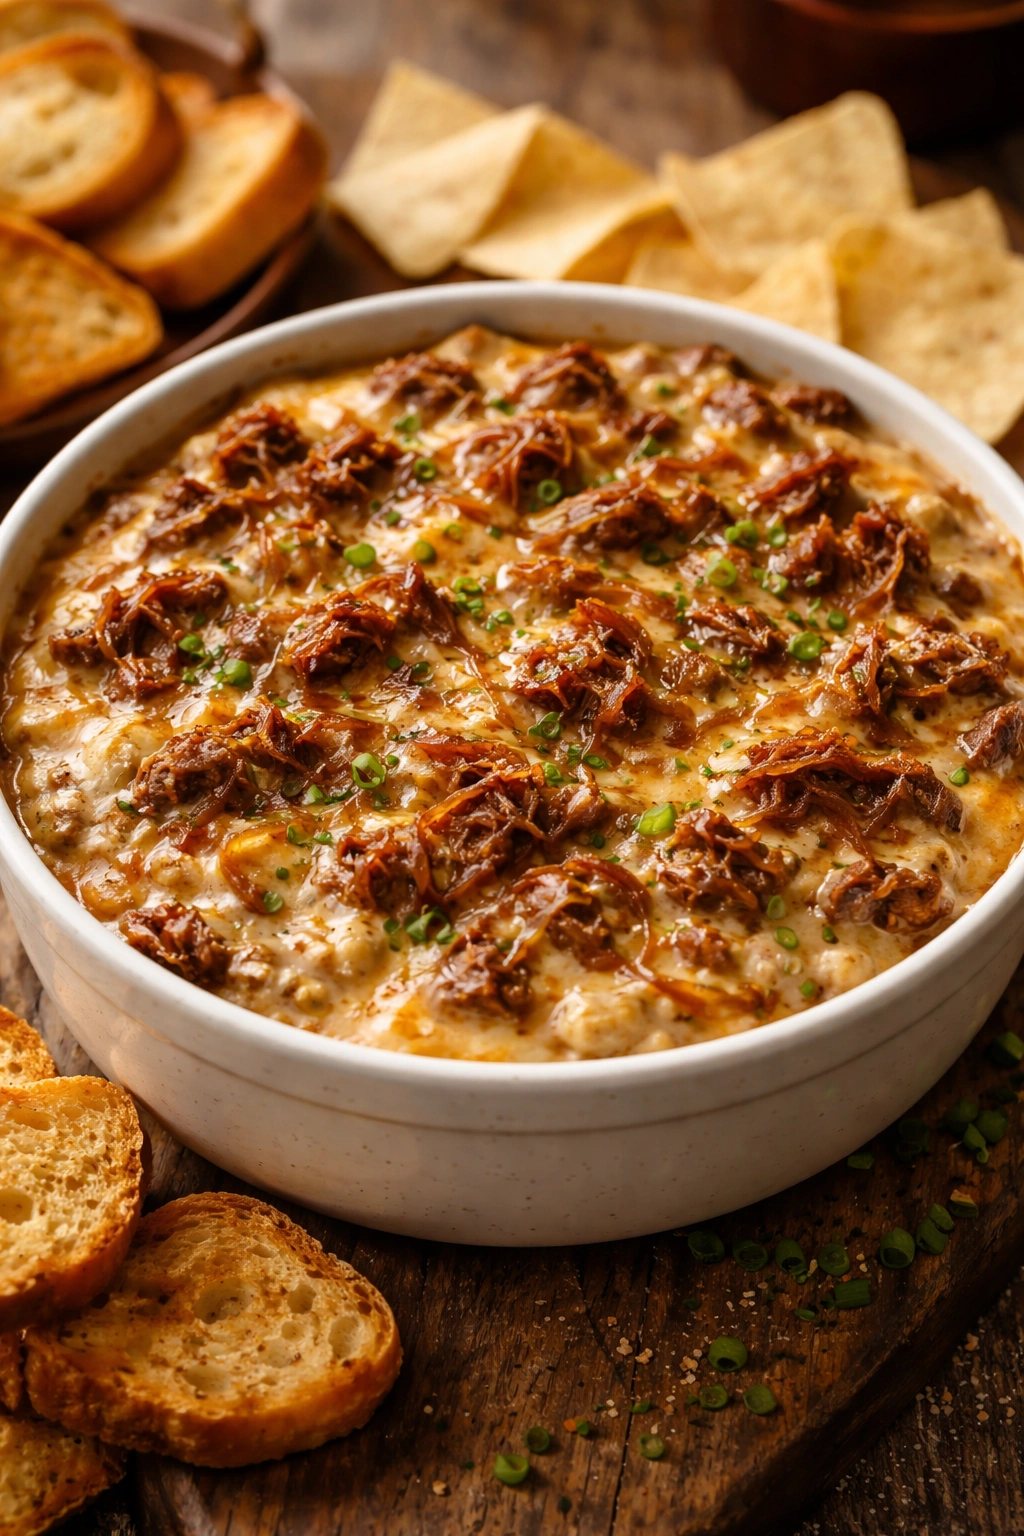
This is the dip for people who think their game day food should feel sophisticated and approachable at the same time. Smoked gouda brings a deep, complex flavor that feels more upscale than sharp cheddar, while caramelized onions add sweetness and richness. The pulled pork ties it all together — meaty, tender, and deeply flavorful without being spicy or aggressive.
This dip is built on a cream cheese base like most of the others, but the supporting cast of ingredients gives it a completely different character. It’s the kind of dip that would be equally at home at a cocktail party or a casual game day gathering.
Yield: Serves 10-12 | Makes approximately 5 cups
Prep Time: 45 minutes (mostly caramelizing the onions; significantly less if you’re using prepared pulled pork) Cook Time: 3 to 3.5 hours total (onions first, then crock pot) Total Time: 3 hours 45 minutes to 4 hours 15 minutes, plus up to 3 additional hours on warm Difficulty: Intermediate — Caramelizing onions takes patience and attention, but it’s straightforward. The crock pot phase is passive.
For the Dip:
- 3 large yellow onions (about 2 pounds), sliced thinly (use a mandoline if you have one)
- 3 tablespoons butter
- 1 teaspoon kosher salt, divided
- ½ teaspoon balsamic vinegar
- 12 ounces cream cheese, softened and cubed
- ½ cup sour cream
- ½ cup whole milk
- 1.5 cups smoked gouda cheese, shredded
- ¾ cup gruyere or mild cheddar, shredded (to balance the intensity of the smoked gouda)
- 2 cups pulled pork, shredded (from a slow cooker, a BBQ restaurant, or high-quality deli)
- 2 cloves garlic, minced
- 1 tablespoon whole grain mustard
- 1 teaspoon smoked paprika
- ½ teaspoon freshly cracked black pepper
- ¼ teaspoon cayenne
- 2 tablespoons apple cider vinegar
- 2 tablespoons fresh thyme, chopped (or 1 tablespoon dried thyme)
- ¼ cup crispy bacon, crumbled (about 2-3 slices)
- 2 tablespoons fresh chives, chopped
- 1 teaspoon fleur de sel or flaky sea salt for garnish
- Cracked black pepper for garnish
Caramelize the Onions (Do This First):
- Melt the butter in a large, heavy-bottomed skillet over medium heat. Add the sliced onions and ½ teaspoon kosher salt, stirring to coat all the onion slices with butter.
- Cook the onions for about 5 minutes, stirring frequently, until they release their liquid and begin to soften. They’ll look wet and take up more volume than they will at the end.
- Reduce the heat to medium-low and continue cooking, stirring every 3-4 minutes, for 25-35 minutes total. What you’re looking for is gradual browning: the onions will begin to stick slightly to the bottom of the pan, then release as you stir, then stick again. Each time they stick slightly and you scrape them up, you’re building flavor through the browning process (Maillard reaction, if you want the technical term).
- After about 20 minutes, the onions should be noticeably darker and smaller in volume, condensed down to about a quarter of their starting size. They should smell deeply sweet and caramel-like, not burnt. If they’re turning too dark too quickly, reduce the heat to low and continue more slowly. Burnt onions taste bitter and will ruin the dip.
- When the onions are mahogany brown and smell undeniably sweet and caramelized (this should take 25-35 minutes total), add the balsamic vinegar and stir well. This deglazes the pan and adds a subtle complexity. Cook for another 1 minute, then remove from heat and let cool slightly.
Build the Dip: 6. In a large bowl, combine the softened cream cheese, sour cream, and milk. Whisk until smooth and creamy with no lumps of cream cheese visible. 7. Fold in the shredded smoked gouda and gruyere until evenly distributed. 8. Add the cooled caramelized onions, pulled pork, minced garlic, whole grain mustard, smoked paprika, black pepper, cayenne, apple cider vinegar, and fresh thyme. Fold very gently until everything is evenly mixed, being careful not to shred the pork into too-small pieces. 9. Taste and adjust seasoning — the dip should taste savory and complex, with sweetness from the onions providing balance to the smoke from the gouda. Add more salt if it tastes flat; add a splash more apple cider vinegar if you want more tang.
Transfer to Crock Pot: 10. Transfer the entire dip to your crock pot and stir well, making sure nothing has settled or separated. The mixture should look cohesive and creamy. 11. Set the crock pot to low and cover. Let it warm for 1.5 to 2 hours, stirring every 20-30 minutes, until it reaches serving temperature and is heated through completely. 12. Once warmed, the dip can stay on low for up to 3 hours. Give it an occasional stir to maintain consistency. 13. Just before serving, top with the crumbled bacon, fresh chives, a pinch of fleur de sel, and a crack of fresh black pepper.
Pro Tips: Don’t rush the caramelization of the onions. The difference between onions that have caramelized for 20 minutes and ones that have gone the full 30-35 minutes is dramatic — the latter are deeper, more complex, and almost candy-sweet. If you’re in a time crunch, caramelize them a full day ahead and store in the fridge. You can make the onions whenever you have time.
Smoked gouda is more aggressive in flavor than many cheeses, so balancing it with a milder gouda or cheddar prevents the dip from tasting overwhelmingly smoky. If you absolutely love smoked gouda and want more of it, increase it to 2 cups and reduce the gruyere accordingly — but taste as you go.
The pulled pork should be tender and flavorful, not dry or over-processed. Quality matters here. If you’re using leftover pulled pork from a cook you did yourself, shred it finely so it distributes evenly throughout the dip. If you’re buying it from a BBQ place, ask for it unsauced and let the dip provide all the flavor.
Make-Ahead: Caramelize the onions up to 2 days ahead and store in the fridge in an airtight container. Make the cream cheese base and shred the pork up to 1 day ahead. On game day, combine everything and transfer to the crock pot about 1.5 hours before serving.
Storage: Refrigerate leftovers in an airtight container for up to 4 days. Reheat gently in the crock pot on low, stirring frequently, until warm. Add a splash of whole milk or heavy cream if the dip has thickened too much as it cooled.
Serving Suggestions: Serve with crispy scoops, toasted bread rounds, or simple sturdy tortilla chips that won’t compete with the sophisticated flavors. Also excellent with sliced apple (the slight sweetness complements the caramelized onions), on crostini, or with crispy cracker chips. A small bowl of fleur de sel on the side lets guests add a final finishing touch if they like.
Variation: Add ½ cup roasted apple (small diced Granny Smith or Honeycrisp apple, tossed with a touch of butter and roasted at 400°F for 15 minutes until softened) for additional sweetness and texture. Swap the pulled pork for shredded smoked brisket or braised beef if you prefer. Add ¼ cup crispy fried onions just before serving for extra crunch.
Make-Ahead Prep Strategies for Multiple Dips
If you’re serving more than one dip, preparing ahead is how you stay sane on game day. The strategy is to do as much as you can the day before, then spend just 20-30 minutes on the morning of putting everything together and getting it into crock pots.
The Day Before: Brown ground beef for the beer dip and let it cool; store in the fridge. Roast jalapeños and chop artichokes for the spinach artichoke dip; store in separate containers. Chop the onion and chicken and make cream cheese bases; store in the fridge. Caramelize onions for the pulled pork dip; store in the fridge. The only things you really can’t do ahead are assembling everything into the dip mixture — dairy-based dips can weep or separate if left in the fridge too long before cooking.
The Morning Of: Combine all the ingredients for each dip in separate large bowls. Do this assembly line-style: line up five bowls, go through each ingredient one at a time, adding it to each dip that needs it. This method reduces the chance of forgetting an ingredient and is faster than making one dip completely, then moving on to the next.
Transfer each completed dip to its own crock pot. Cover and turn them all on low starting about 1.5 hours before guests arrive. Stir each one after 45 minutes, then every 30 minutes or so until serving.
If you have limited counter space and need to serve all five dips simultaneously, set up crock pots in a staggered arrangement. The heat from one appliance won’t disrupt the others if they’re a few feet apart. Use extension cords if needed to position them conveniently for your guests.
Keeping Your Dips at the Perfect Temperature
The greatest challenge with serving dips for an extended period is temperature management. Too hot and dairy-based dips can break and separate; too cool and they congeal into unappetizing globs. The crock pot’s low setting is engineered to solve this problem — it generates just enough heat to maintain serving temperature without damaging the dip’s texture.
Never turn a crock pot to high once the dip is assembled and warm. Even 30 minutes on high can cause cream cheese to break and look curdled. Stick to low throughout the entire serving period.
If a dip begins to look too thick or seems to be concentrating in flavor (a sign that liquid is evaporating), add a splash of milk, broth, or even water, depending on the dip. Stir it in completely, and the dip will loosen right back to the proper consistency.
If a dip looks separated or broken (pools of clear liquid on top, grainy texture throughout), it’s usually fixable. Transfer it to a blender in two batches, blend until smooth, and return to the crock pot with a splash of milk, stirring well. Most dips will come back together beautifully.
Rotate your dips’ positions on the buffet table every hour or so. If one crock pot has been running for 3 hours straight on the corner of the table, the dip closest to the heating element might be drier than the one that’s just been set up. Rotating distributes that risk evenly.
Serving Your Dips Attractively
The visual presentation of your dip station sets the tone for how people interact with your food. A haphazard arrangement of crock pots and scattered chips suggests careless hosting; an intentional, organized setup suggests you’ve thought about your guests’ experience.
Set each crock pot on a trivet or heat-proof mat to protect your table surface and signal that this is a buffet station. Place a small ladle or spoon in each dip, not a chip. This prevents your dips from becoming soggy chip storage containers and signals that there’s a right way to scoop.
Arrange chips and crackers in attractive bowls or on a platter directly in front of each crock pot, not scattered randomly. Use a mix of chip types — some sturdy for heavy dips, some delicate for lighter dips, some vegetable-based for variety. Refill chip bowls every 30 minutes; stale chips are the enemy of any dip experience.
Use small plates or napkins immediately in front of the dip station so people can easily grab one while they’re dipping. Make them visible and accessible — if people have to hunt for napkins, they won’t use them and you’ll end up with messy guests.
Label each dip with a small card or sign indicating what it is. People are more likely to try something if they know what they’re eating. Include any allergen information if you have guests with dietary restrictions (e.g., “Contains dairy,” “Contains nuts,” “Spicy”).
If you want your setup to look particularly polished, place fresh herbs on top of each dip right before serving — cilantro on the buffalo chicken dip, chives on the spinach artichoke dip, thyme on the pulled pork dip. This adds color, signals freshness, and gives the spread a finished, intentional appearance.
Serving Beyond Game Day
While these dips are perfectly calibrated for a 3-4 hour game day gathering, they’re also excellent for other entertaining situations. Serve them at a casual weeknight dinner party with wine and bread. Bring them to potlucks in a crock pot (provided the venue has electricity). Use them as an opening course for a larger meal, followed by more substantial dishes.
Most of these dips can also be used outside the dip context. Spread the spinach artichoke dip on a sandwich or toast it with grilled cheese. Toss the buffalo chicken dip with pasta for a one-pot dinner. Use the pulled pork dip as a topping for nachos or baked potatoes. Serve the smoked gouda and pulled pork dip alongside sliced beef or on crackers as a cheese course.
They also freeze beautifully — transfer any leftover dip to a freezer container and freeze for up to 2 months. Thaw in the fridge overnight and reheat gently in the crock pot on low, stirring frequently and adding a splash of milk if needed to restore the creamy texture.
Final Thoughts
A crock pot transforms dip service from a stressful logistical challenge into something genuinely easy and enjoyable. You prepare ahead, turn on the pot, and forget about temperature management while you actually watch the game and enjoy your guests.
These five dips are designed to be make-ahead friendly, sturdy enough to survive extended service, and flavorful enough that people will be asking for recipes well into the week after the game. Each one brings something distinctly different to your spread — meaty and robust, creamy and vegetable-forward, spicy and familiar — so you have options for different tastes and dietary preferences.
The real magic happens when you invest in good ingredient quality: real shredded cheese instead of pre-shredded, good smoked meat instead of processed deli options, fresh herbs instead of dusty dried ones from the back of the cupboard. These small upgrades transform a dip from “something to eat while watching football” into “why is this so good?” territory.
Start with one dip that appeals to you most, master the technique, and build from there. Next time you’re hosting, add a second dip. Before long, you’ll have a signature spread that guests know to expect and genuinely look forward to. That’s the mark of good entertaining — when the food sets such a good tone that people remember the party more for the dips than for the score of the game.