There’s something almost magical about cooking a perfect steak at home—the sizzle of meat hitting a smoking-hot pan, the nutty aroma of butter and garlic, that first bite of a beautifully browned crust giving way to a tender, juicy interior. If you’ve ever felt intimidated by the prospect of cooking steak yourself, wondering if you’d somehow ruin an expensive cut or end up with something chewy and overcooked, let me reassure you: pan-searing a steak is one of the easiest, most dramatic cooking techniques you can master. The method is straightforward, the ingredients are minimal, and with a handful of core principles, you’ll produce steakhouse-quality results in your own kitchen—faster than you could drive to a restaurant and back.
What makes steak cooking seem so complicated isn’t actually the cooking part. It’s the number of conflicting opinions and old wives’ tales floating around: Does salt draw out moisture or lock in flavor? Should you sear in butter or oil? How do you know when it’s done without cutting into it and ruining the presentation? These questions have spawned endless debate, but they’ve also been answered definitively by culinary science and expert cooks who’ve refined this technique over thousands of repetitions. The truth is simpler and more reassuring than you might think.
This guide strips away the mythology and gives you exactly what you need to cook steak like someone who’s done it hundreds of times—but approached with the confidence and clarity that comes from understanding why each step matters. You’ll learn which cuts forgive beginner mistakes, how to build a proper crust without a special technique, when to salt (and when not to), what temperature to aim for, and how to rest your steak so every bite is as juicy as it can possibly be. Whether you’re cooking a budget-friendly sirloin or splurging on a premium ribeye, these techniques apply universally.
Understanding the Best Steak Cuts for Home Cooks
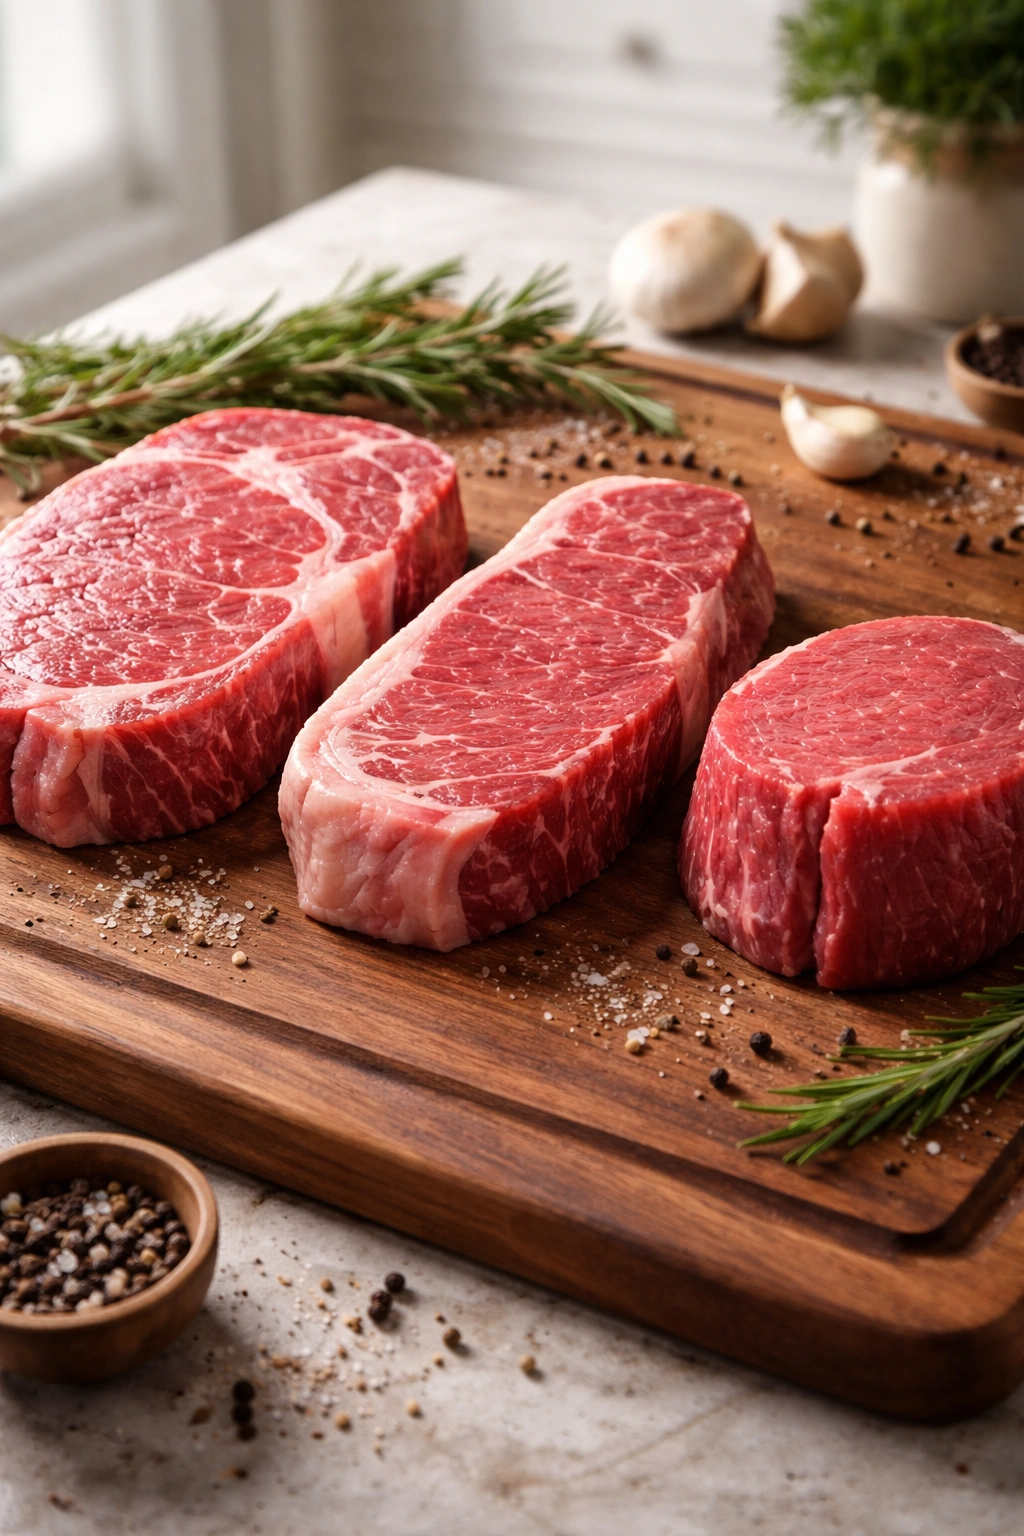
Not all steak cuts are created equal, and some are far more forgiving for home cooks than others. The most beginner-friendly steaks are those with sufficient marbling—those visible streaks and pockets of fat throughout the meat—because that fat renders as the steak cooks, keeping the meat tender and juicy even if your timing isn’t perfect. Thinner steaks also cook faster and more evenly, giving you less opportunity to overshoot your target temperature.
Ribeye is arguably the easiest steak to cook successfully. Cut from the rib section, it’s generously marbled with fat that melts into the meat as it sears, creating incredible flavor and natural juiciness. Even if you accidentally cook it slightly past your intended doneness, a ribeye stays tender and delicious because of that fat content. The fat also means fewer variables working against you—you can be slightly less precise with timing and still end up with a fantastic steak.
New York Strip steaks offer that perfect balance between tenderness and bold, beefy flavor that makes them a steakhouse favorite. They have enough fat to stay juicy without being overly fatty, and they develop a beautiful crust due to their protein structure. The New York strip is slightly more forgiving than a filet mignon but requires a bit more attention than a ribeye. Most beginners find this cut rewarding because it teaches proper technique while still being hard to completely ruin.
Sirloin deserves a place in your rotation for one simple reason: it’s affordable and genuinely delicious when cooked correctly. Yes, it’s leaner than ribeye, but that doesn’t mean it’s tough or flavorless—it just means you need to pay closer attention to doneness because overcooking it more noticeably than other cuts. Sirloin won’t have quite the buttery richness of ribeye, but it delivers genuine beef flavor at a fraction of the price, making it perfect for practicing your technique.
Filet Mignon is the leanest commonly available steak, and it’s prized for its incredible tenderness. Because it has minimal fat, it’s almost impossible to overcook it into toughness—the meat stays naturally tender regardless of whether you nail the temperature or miss it by a few degrees. However, its lack of fat also means it has more subtle beef flavor compared to fattier cuts. Filet mignon pairs beautifully with rich sauces or a generous basting of butter and garlic, which compensate for the leaner meat.
Flat Iron steaks are a hidden gem for beginners because they’re thin (meaning they cook quickly), remarkably tender thanks to their cut location, and incredibly affordable. They cook so fast that you get immediate feedback on whether your heat level is right, and they’re flavorful enough to shine with nothing more than salt and pepper. If you’re nervous about cooking an expensive cut, flat iron lets you build confidence inexpensively.
What Makes a Steak Worth Cooking
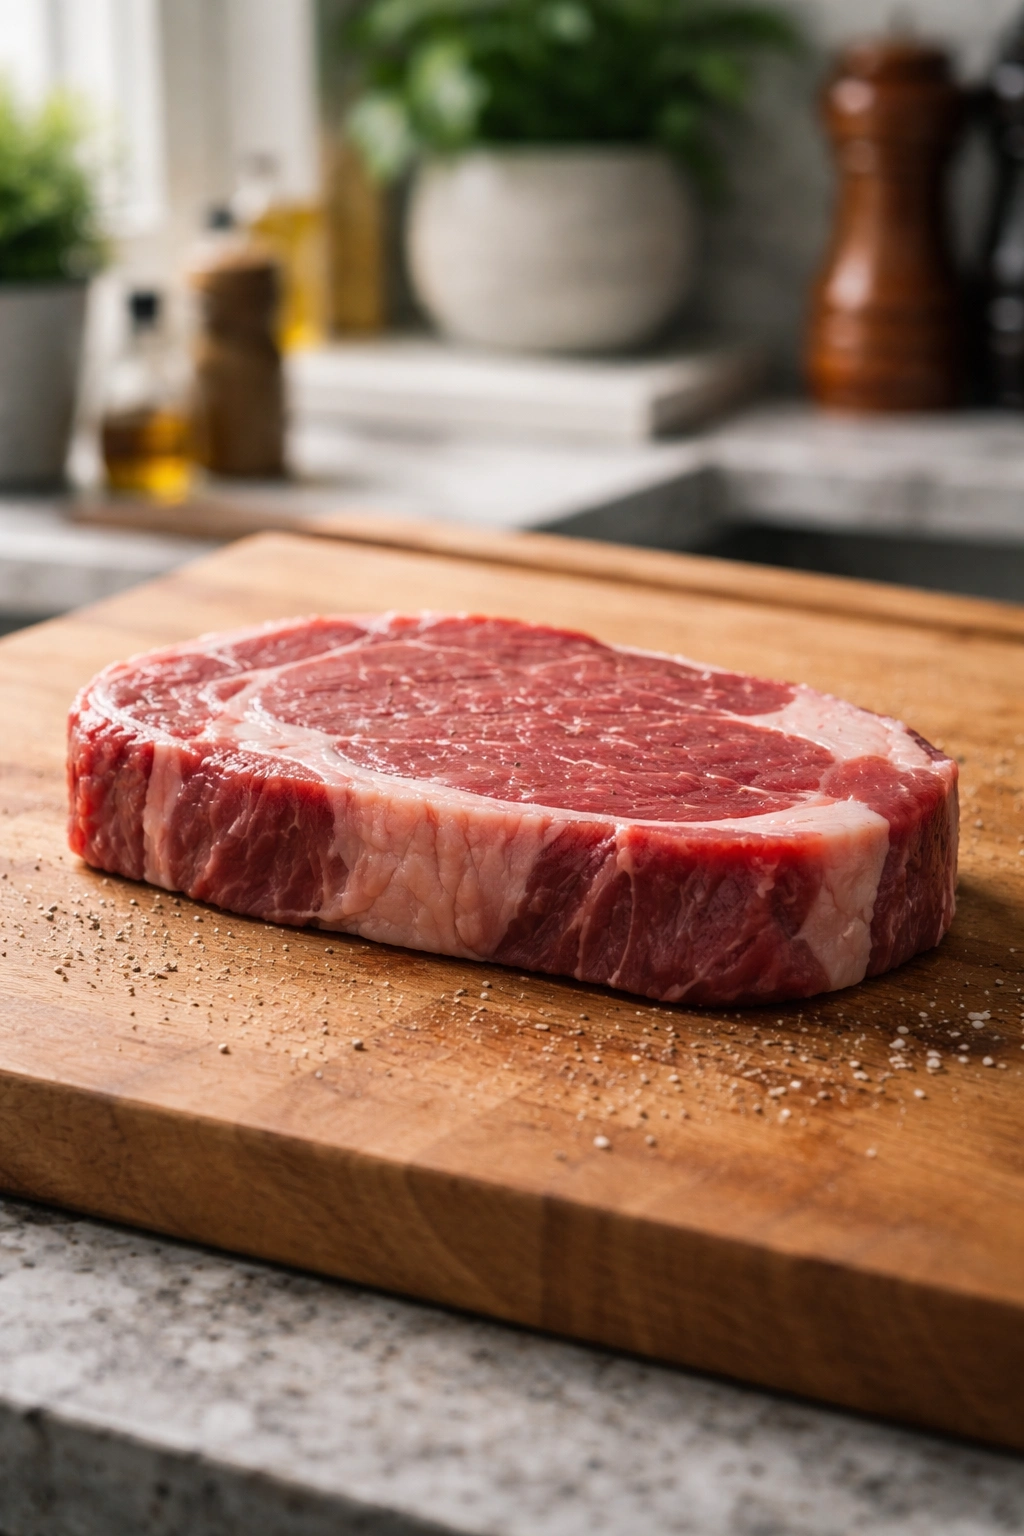
The thickness of your steak matters more than you might realize. Aim for steaks that are at least 1 to 1.5 inches thick, preferably 1.25 inches (about 2.5 centimeters). Thinner steaks overcook too easily because they don’t have enough thermal mass to stay cool in the center while the exterior develops a crust. Thicker steaks give you a larger window of time where the interior is rare or medium-rare while the outside browns perfectly. A general rule: it’s easier to cook one thick steak and portion it afterward than to nail multiple thin steaks simultaneously.
Look for steaks with visible marbling—those white lines and flecks of fat running through the meat. More marbling means more flavor and more insurance against drying out. If you’re buying at a butcher counter, ask them to point out which cuts have good marbling. And don’t worry about the fat on the exterior—that exterior fat renders down and helps the steak cook properly and develop flavor, and it’s easy to trim away before or after cooking if you prefer.
Cuts to Approach with Extra Caution
Lean cuts like tenderloin or premium filet require slightly more precision because there’s less forgiving fat to keep them juicy. They’re still absolutely cookable at home, but they benefit from higher-end ingredients (expensive grass-fed beef has more flavor) and leaving them cooked more toward rare-to-medium-rare rather than well-done. Very thick steaks (over 2 inches) are tricky on the stovetop alone because your exterior will overcook before your interior reaches medium-rare. These steaks benefit from a reverse-sear method: a low-temperature oven first, then a quick sear.
Preparing Your Steak: The Foundation of Success
Everything that happens before the steak touches the pan determines a huge portion of your success. The two most critical prep steps are bringing the steak to room temperature and drying it completely. These aren’t optional flourishes—they’re the bedrock of proper steak cooking.
Bringing Steak to Room Temperature
Take your steak out of the refrigerator 30 minutes to 1 hour before cooking—ideally closer to a full hour. This seems like a small step, but it makes an enormous difference in how evenly your steak cooks. A cold steak fresh from the refrigerator has a very different internal temperature from room temperature, which means the exterior has to cook much longer to reach your target doneness, leading to a thick gray band of overcooked meat beneath that beautiful crust.
When the steak is already warm to the touch, the heat from the pan travels through it more evenly and quickly. You get a beautiful brown crust on the outside while the interior reaches your desired doneness without that overcooked band. It’s genuinely one of the most impactful steps you can take, and it costs you nothing except a little advance planning.
Patting Completely Dry
Before anything else happens, use paper towels to thoroughly pat both sides and the edges of the steak completely dry. Any moisture on the surface will evaporate before the meat can brown, and that steam rising off your steak is wasted heat that could be browning the crust instead. A dry steak surface also reduces dangerous splattering when the steak hits the hot pan, and it prevents the steak from steaming rather than searing.
Don’t be shy about this step. Really press with the paper towel and replace it if it becomes damp. Get the sides and edges too, not just the flat surfaces. This single action eliminates more steak-cooking mistakes than almost any other step.
The Science and Art of Seasoning
The question of when to season steak has sparked genuine debate among cooks for years. The answer, supported by extensive testing, is refreshingly clear: salt your steak either immediately before cooking (within 5 minutes) or at least 40 minutes before cooking. Anything in between is the worst possible timing.
Understanding How Salt Works
Here’s what happens physiologically: When salt first touches the meat’s surface, it sits there undissolved, and you get a beautiful crust because there’s no excess moisture. After about 3 to 4 minutes, the salt begins to draw out liquid through osmosis. This liquid pools on the surface, and if you sear the steak at this point, you’re spending precious heat evaporating that water rather than browning the meat. Your crust will be pale and weak, and the meat will lose flavor.
Starting around 10 to 15 minutes after salting, something remarkable happens: the salt-and-moisture brine begins working back into the meat, breaking down muscle structure and making it more absorptive. By 40 minutes, most of the liquid has been reabsorbed. The meat at this point is more deeply seasoned throughout, not just on the surface, and you’ve actually tenderized it slightly in the process. If you can wait even longer—ideally overnight in the refrigerator on an uncovered rack—the salt penetrates even deeper, giving you steak that’s seasoned all the way through.
The Best Approach for Your Timeline
If you’re cooking right now and forgot to salt ahead: salt immediately before the steak hits the pan. You’ll get excellent browning and good flavor. If you have 40 minutes or more: salt the steak and let it rest at room temperature on a plate or rack. This is the superior method if you have the time, delivering more tender, more flavorful steak. For overnight salting (the absolute best): place the salted steak uncovered on a rack over a baking sheet in the refrigerator for up to 24 hours, then remove it to come to room temperature before cooking.
Don’t worry about the steak looking dried out after overnight salting—that’s completely normal and only superficial. The surface moisture loss is negligible compared to the moisture that leaves during cooking anyway, and the seasoning payoff is worth it.
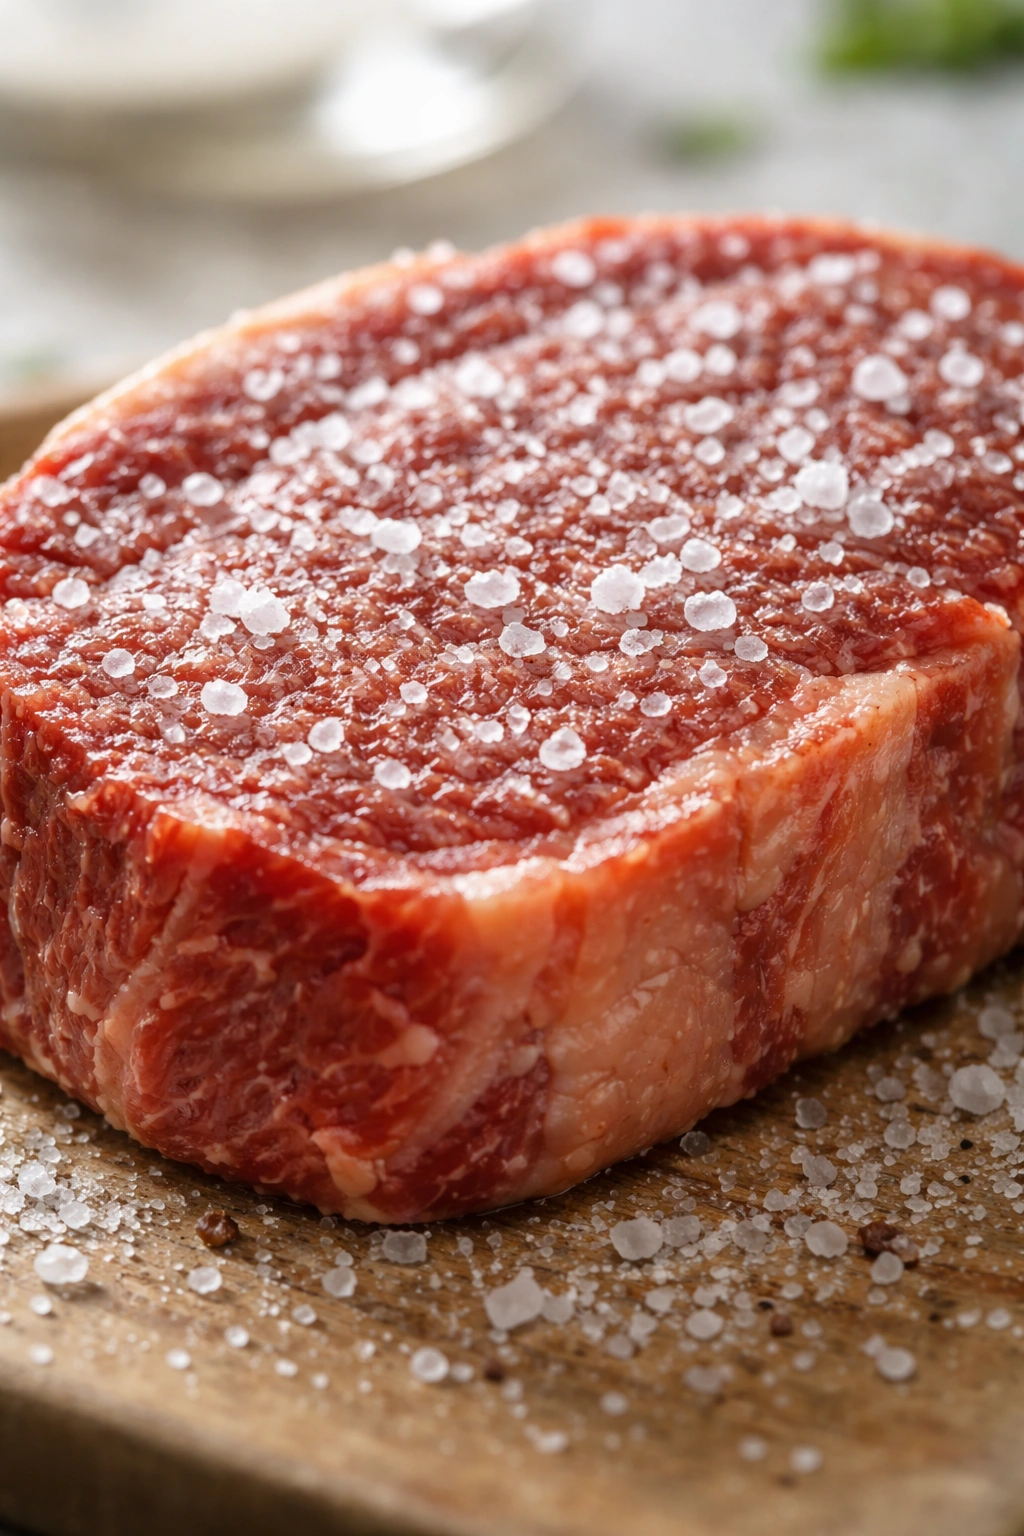
Seasoning Execution
Use kosher salt or coarse sea salt, not fine table salt, because you can see and control how much you’re using. Sprinkle generously on both sides—more generously than you probably think you should. Season the sides and edges too if you can. The flavor of salt “cooks into” the steak as it sears, so what seems like a lot on the surface won’t be overly salty in the finished steak.
For black pepper, use freshly ground pepper that’s a bit coarse, not fine powder. Fine pepper tends to burn during the high-heat searing, turning bitter. You can coarse-grind your pepper in a bag with a rolling pin if your grinder makes it too fine. Apply pepper generously at the same time as salt—yes, people claim pepper becomes bitter if added before cooking, but quality freshly ground pepper doesn’t, and the flavor integrates beautifully.
Choosing and Prepping Your Cooking Pan

Your pan choice is more consequential than most beginners realize. A heavy-bottomed pan that conducts and retains heat evenly is non-negotiable for good steak searing. Cast iron and stainless steel are both excellent choices. Cast iron is legendary for heat retention and even distribution—it’s practically impossible to find a cast-iron pan that doesn’t work beautifully for steak. Stainless steel is equally capable, slightly easier to manage, and gives you nearly identical results.
Avoid non-stick pans or thin aluminum pans. Non-stick coatings can’t handle the extreme heat you need for a proper sear, and thin pans create uneven heating that produces inconsistent browning. You need thermal mass—a pan that’s heavy enough to absorb the heat from your burner and then hold that temperature steady when you place a cold steak inside.
Preheating Your Pan Properly
Preheat your empty pan over medium-high heat for at least 5 minutes before you even add oil. This is not optional. You want the pan genuinely hot before anything touches it. You can test readiness by holding your hand a few inches above the pan’s surface—you should feel intense, obvious heat radiating upward. When you add oil to a properly preheated pan, it should shimmer and move fluidly around the surface almost immediately.
The best way to know you’re truly ready is when you add a tiny drop of water to the dry pan and it beads up and skitters across the surface rather than pooling and sizzling. That’s your signal that the pan is hot enough to properly sear steak.
The Oil Question
Use a neutral oil with a high smoke point: vegetable oil, canola oil, avocado oil, or grapeseed oil. Oil the steak lightly (not the pan), rubbing it in to coat both sides evenly. This approach ensures even coverage and eliminates the worry of oil burning or being cold when the steak enters the pan. Since your pan is preheated to smoking hot, the oil will reach the proper temperature instantly when it contacts the hot surface.
Avoid olive oil entirely. Even “light” olive oil has a lower smoke point than you need, and it will smoke excessively and potentially burn at the temperatures required for a proper steak sear. Butter alone also has a lower smoke point than oil, which is why most chefs use oil for the initial searing phase and add butter only at the end.
The Pan-Searing Technique: Building Your Crust
This is where steak cooking stops being intimidating and becomes thrilling. The actual searing process is shockingly simple, and the results are dramatic.
Searing the First Side
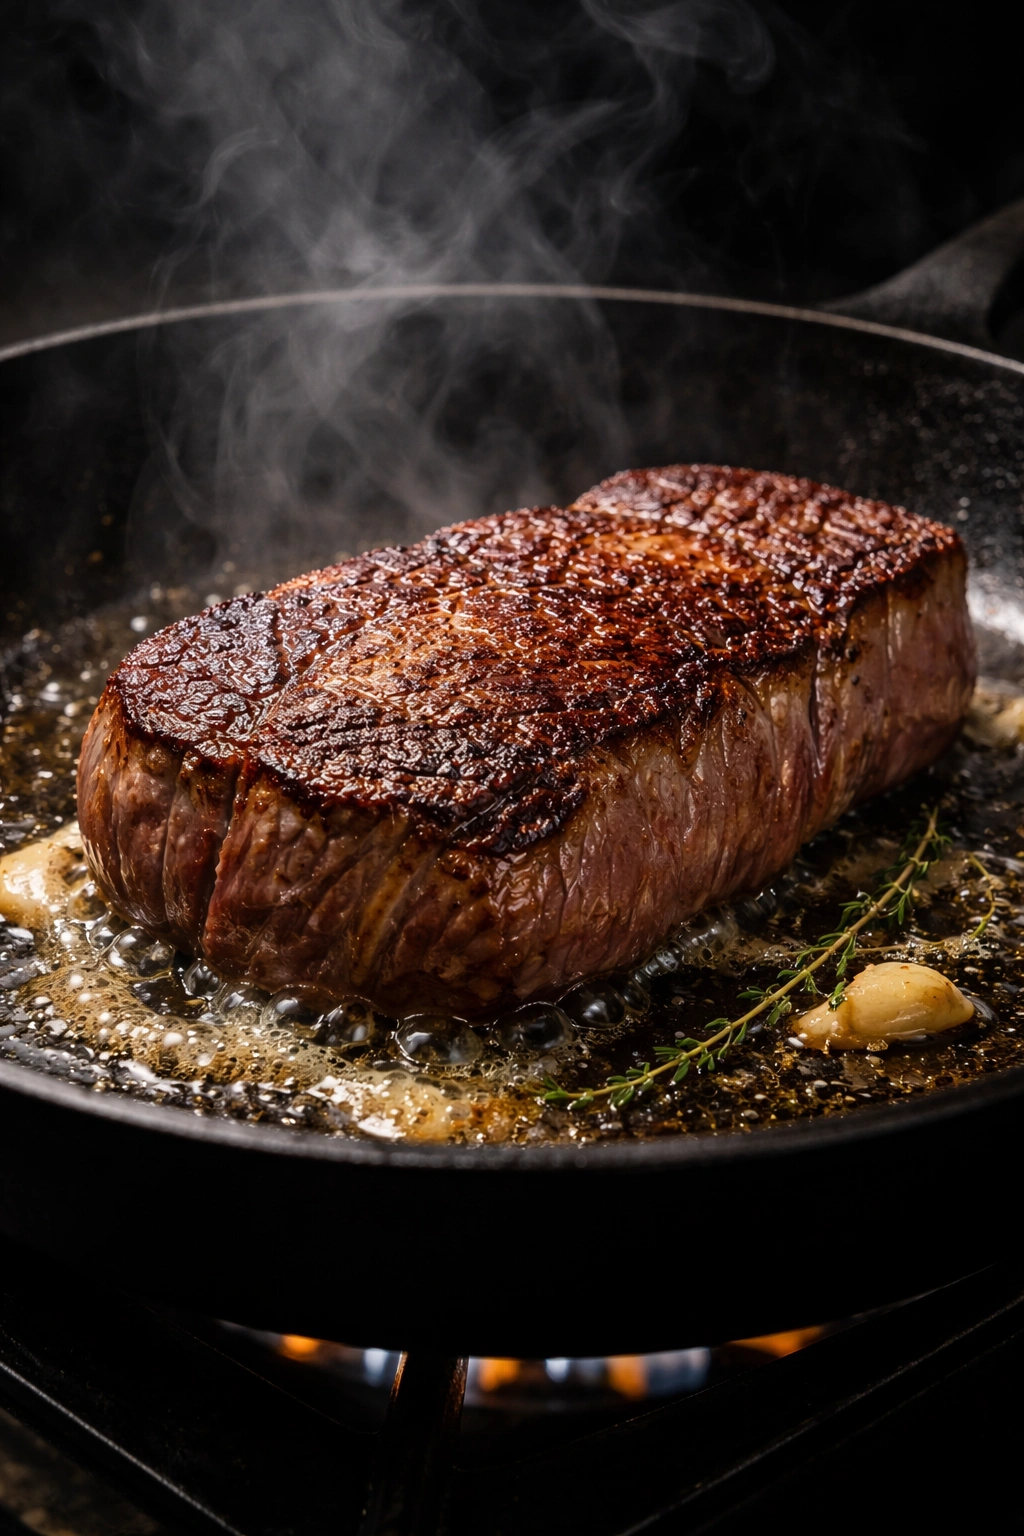
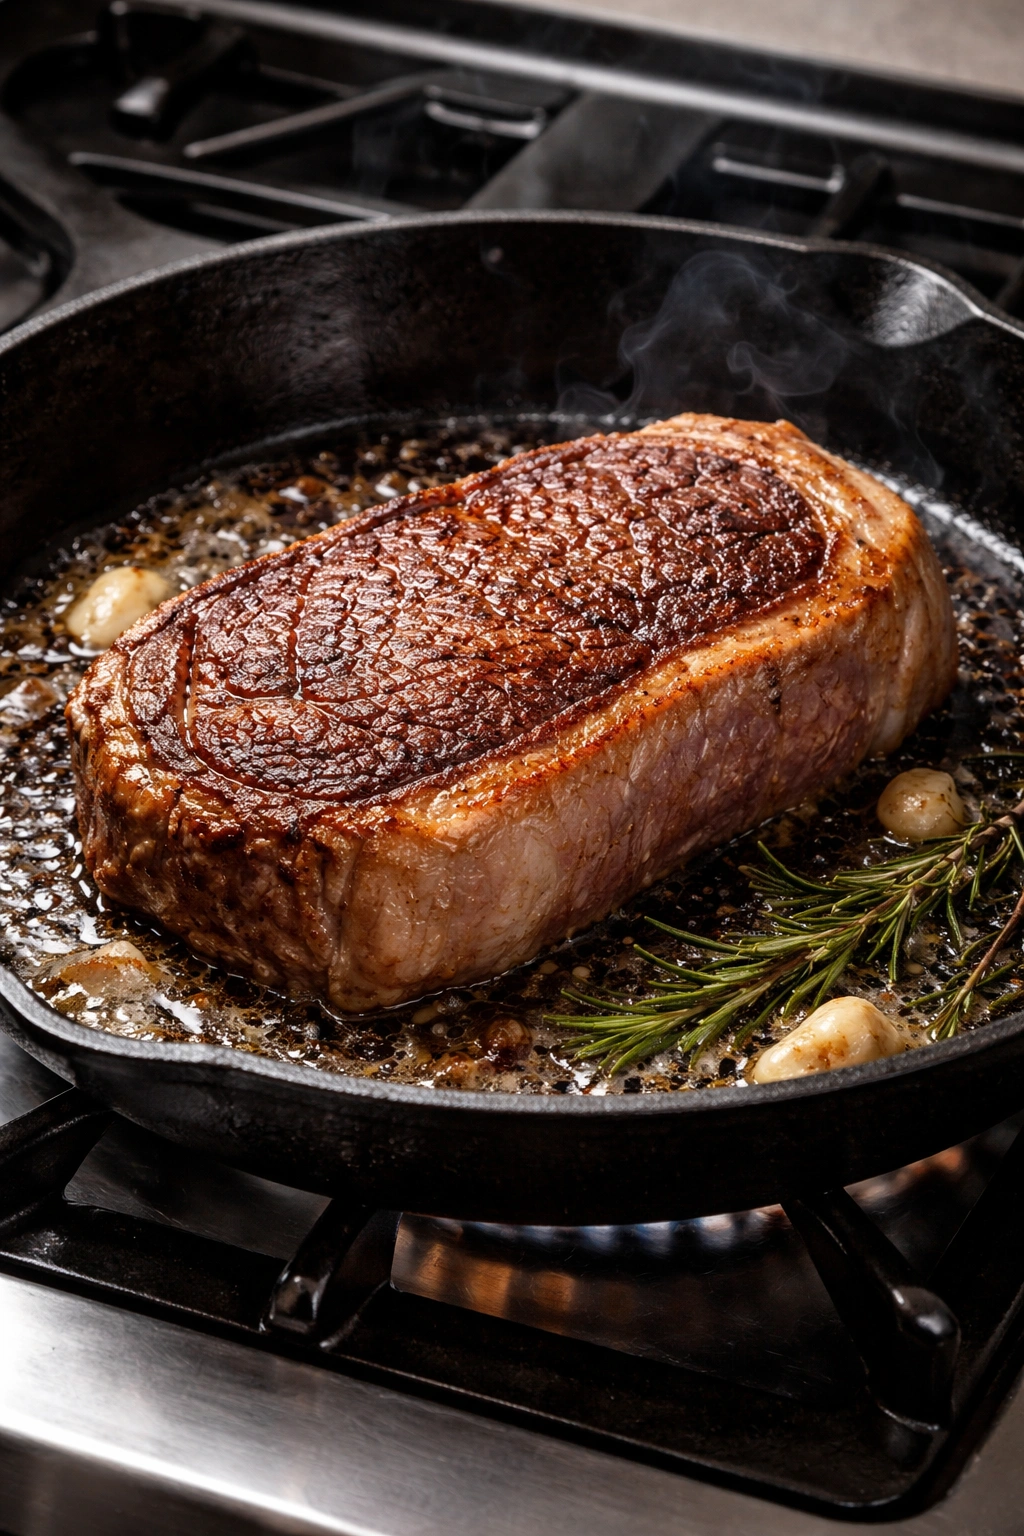
Once your pan is smoking hot and your steak is at room temperature, completely dry, oiled, and seasoned, carefully place the steak in the pan, setting it away from you so any oil spattering moves away rather than toward you. The steak should sizzle immediately and loudly. This is the sound of a proper sear beginning.
Now walk away from it. Seriously. One of the biggest mistakes beginners make is fiddling with the steak. Let it sit undisturbed for 2 to 3 minutes (adjust based on thickness and your burner’s intensity). Resist every impulse to peek, poke, or flip. The steak will let you know when it’s ready to flip—you’ll be able to lift it easily with tongs, and the underside will be dark brown and caramelized, not pale and stuck.
The reason you don’t move it is that moving it interrupts the browning process. Browning happens through the Maillard reaction, a chemical transformation that creates new flavor compounds and color. That reaction requires sustained, direct heat contact. Every time you move the steak, you break that contact and interrupt the process, resulting in pale, less flavorful browning.
Flipping and Building Multiple Layers of Crust
After 2 to 3 minutes, flip the steak once using tongs (never pierce it with a fork—that’s a myth about juices escaping, but it’s still unnecessary). Immediately sear the second side for another 2 to 3 minutes, aiming for the same dark brown color as the first side.
Some cooks advocate frequent flipping, claiming it leads to more even cooking. This is true, but it’s not necessary for home cooks cooking steaks that are properly brought to room temperature. One flip is perfectly fine. The key is that you sear until you see dark, even browning—not pale tan, but rich brown with hints of char.
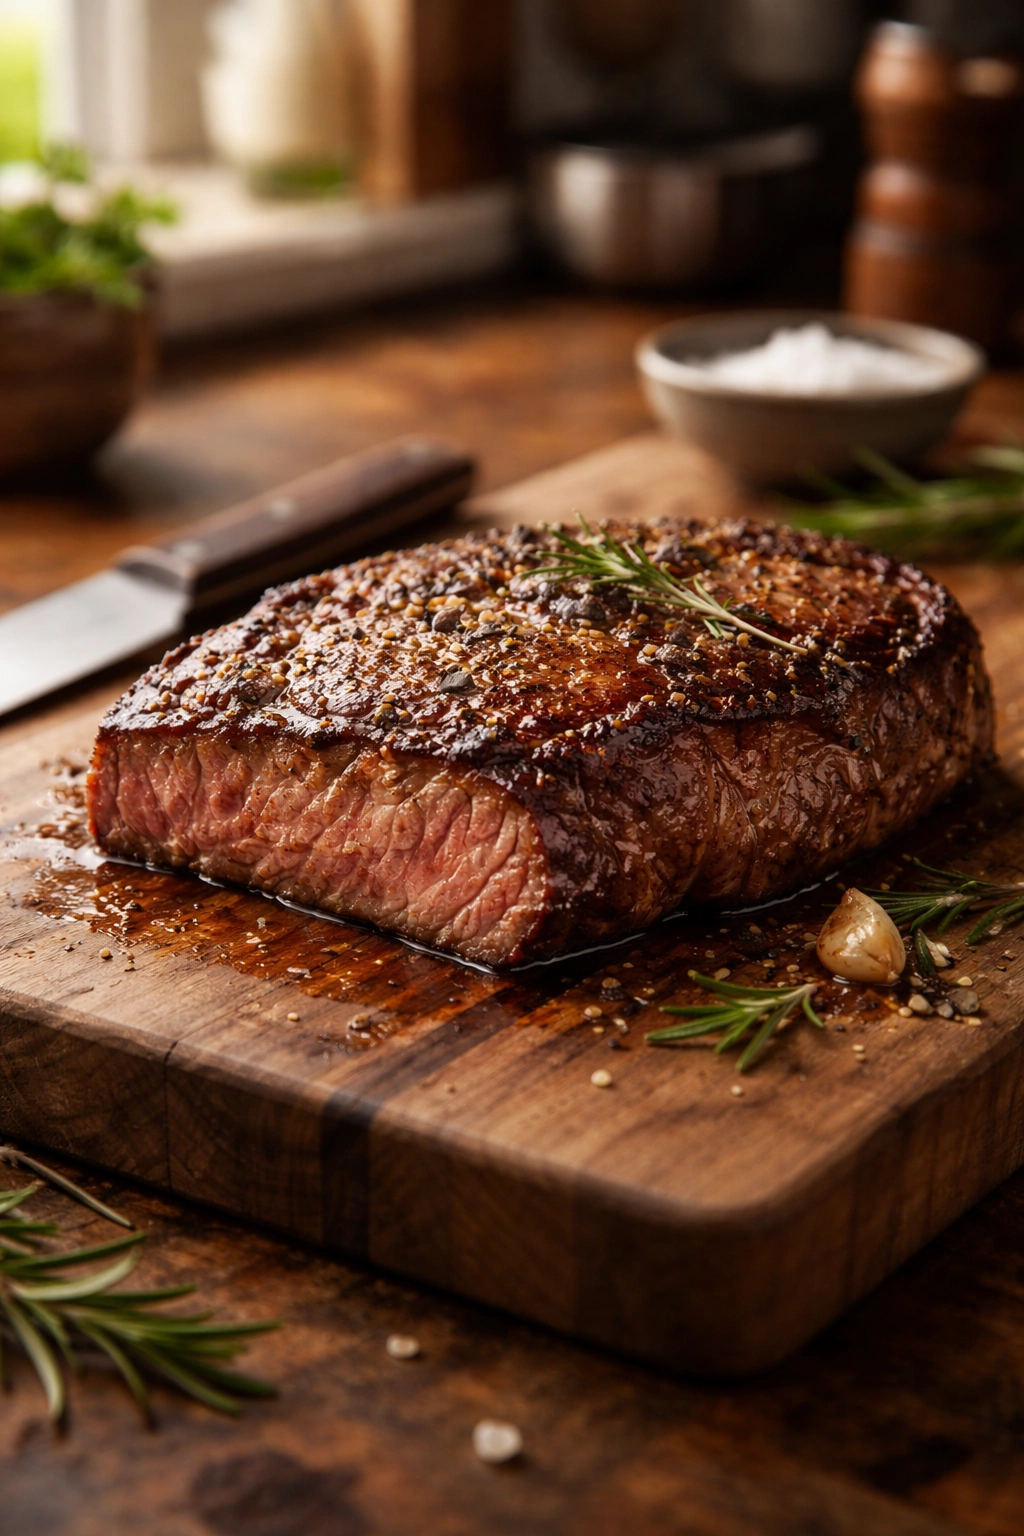
After both sides have a good crust, use tongs to stand the steak on its edge and sear the fatty edge for about 1 minute. This edge often gets neglected, but it’s frequently the fattiest, most flavorful part of the steak. Standing it on edge and holding it with tongs while the fat side makes contact with the hot pan renders that fat and develops incredible flavor.
Basting with Garlic-Thyme Butter for Restaurant Quality
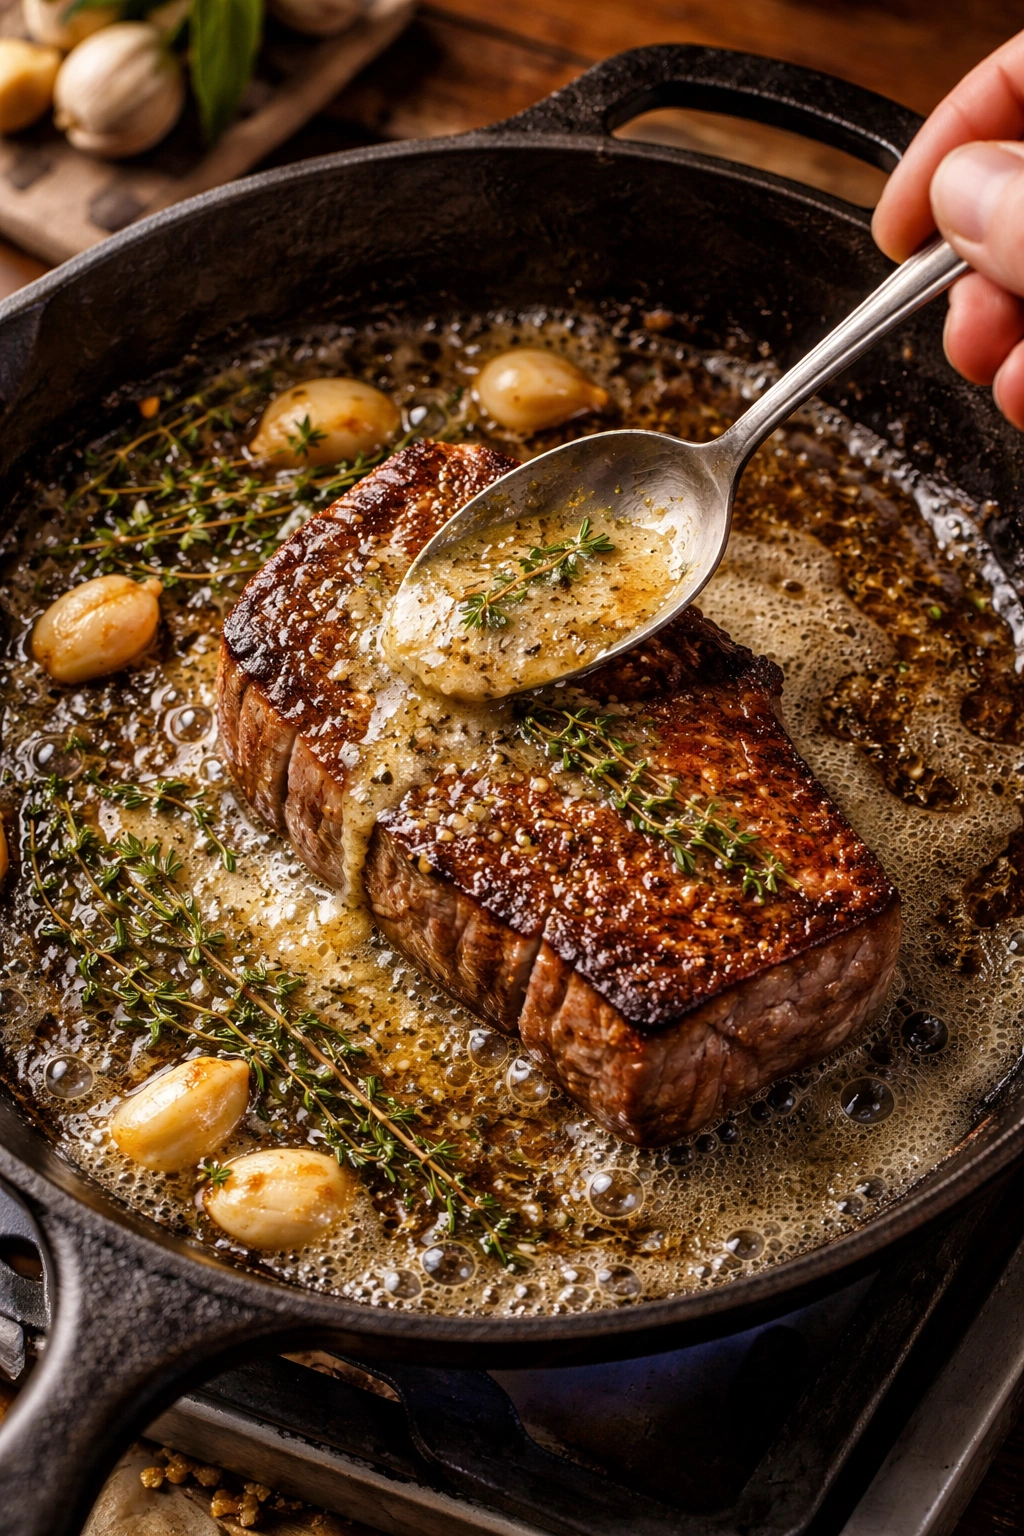
This is where a good steak becomes a steakhouse-quality steak. During the final 1 to 2 minutes of cooking, add a tablespoon or two of unsalted butter to the pan, along with 4 to 6 lightly crushed garlic cloves and a few fresh thyme or rosemary sprigs. The butter will melt and foam, and the garlic and herbs will release their aromatic oils into the butter.
Tilt the pan slightly and continuously spoon this golden, fragrant butter over the steak—across the top, down the sides, into any nooks and crevices. This isn’t just for flavor (though the flavor is extraordinary). The basting action keeps the exterior warm while the interior finishes cooking, and it helps render the surface fat, creating an even more luscious crust. The butter also coats the meat, adding a creamy richness that’s characteristic of steakhouse steak.
This basting phase lasts just 1 to 2 minutes. You’re not actually cooking the steak any longer at this point—you’re finishing it. Make sure you have a good digital thermometer inserted horizontally into the thickest part of the steak so you know precisely when to stop.
Hitting Your Target Temperature: The Only Way to Know for Sure
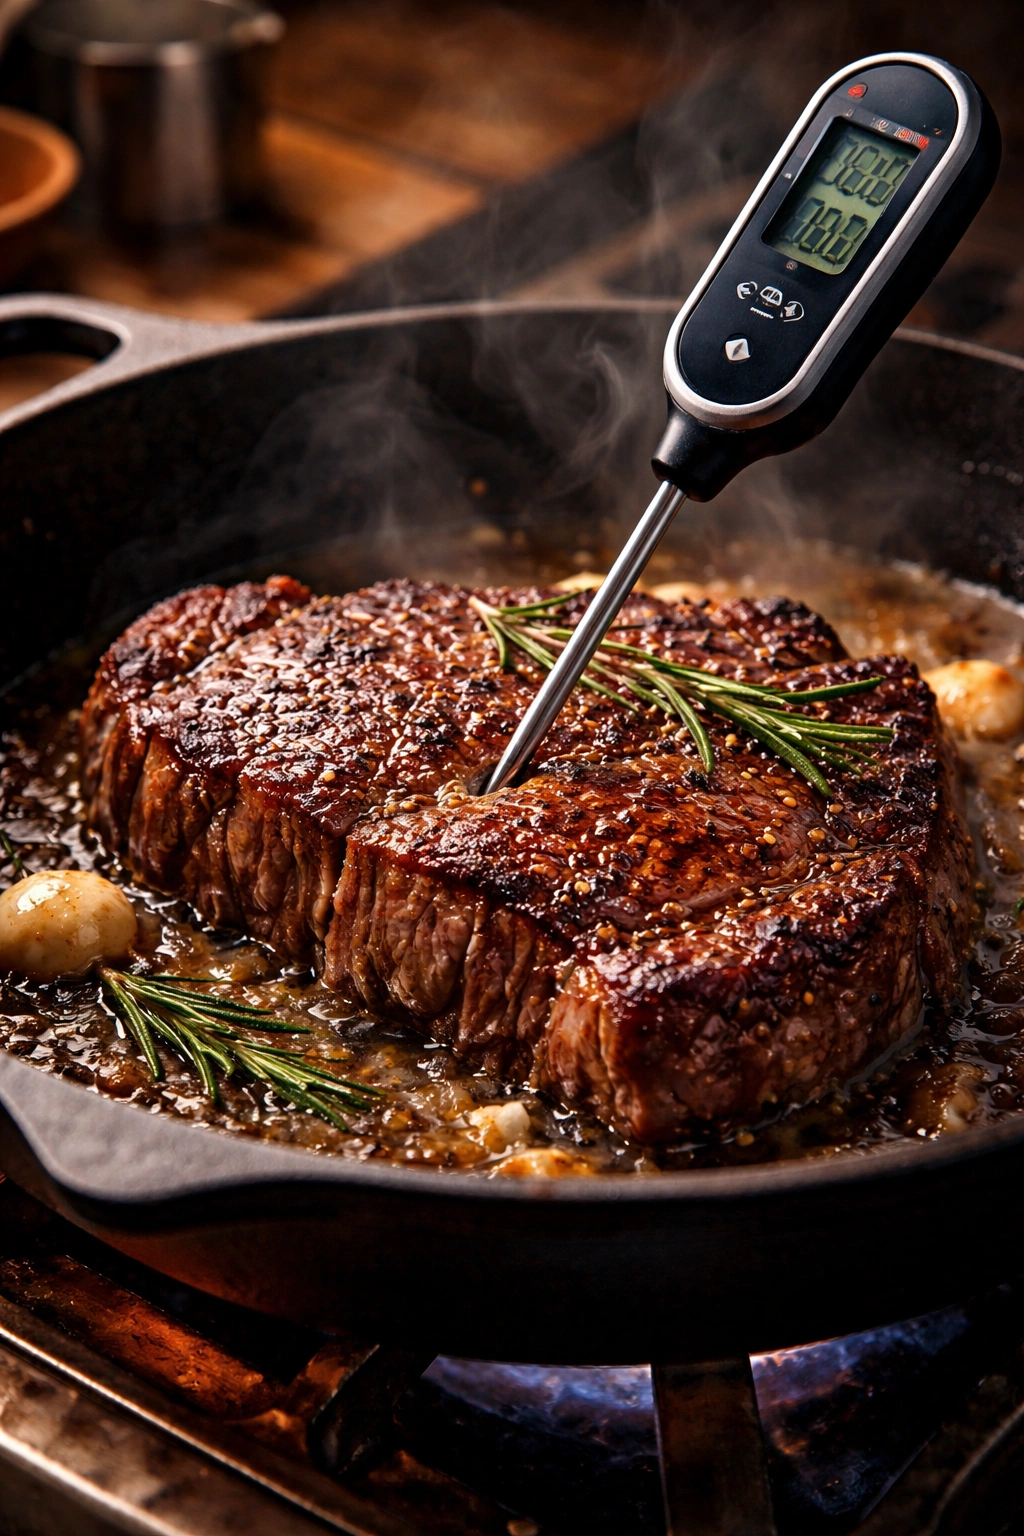
Stop using the poke test, the hand-touch method, or any other guesswork technique. These methods are notoriously inaccurate, and there’s no reason to guess when a $12 instant-read digital thermometer gives you perfect accuracy. Buy one immediately if you don’t have one.
Understanding Carryover Cooking
Here’s the critical detail that saves countless steaks: the steak’s internal temperature continues to rise by 5 to 10 degrees (sometimes more) after you remove it from the pan, a phenomenon called carryover cooking. This happens because the exterior is much hotter than the center, and heat gradually migrates inward even after the external heat source is removed.
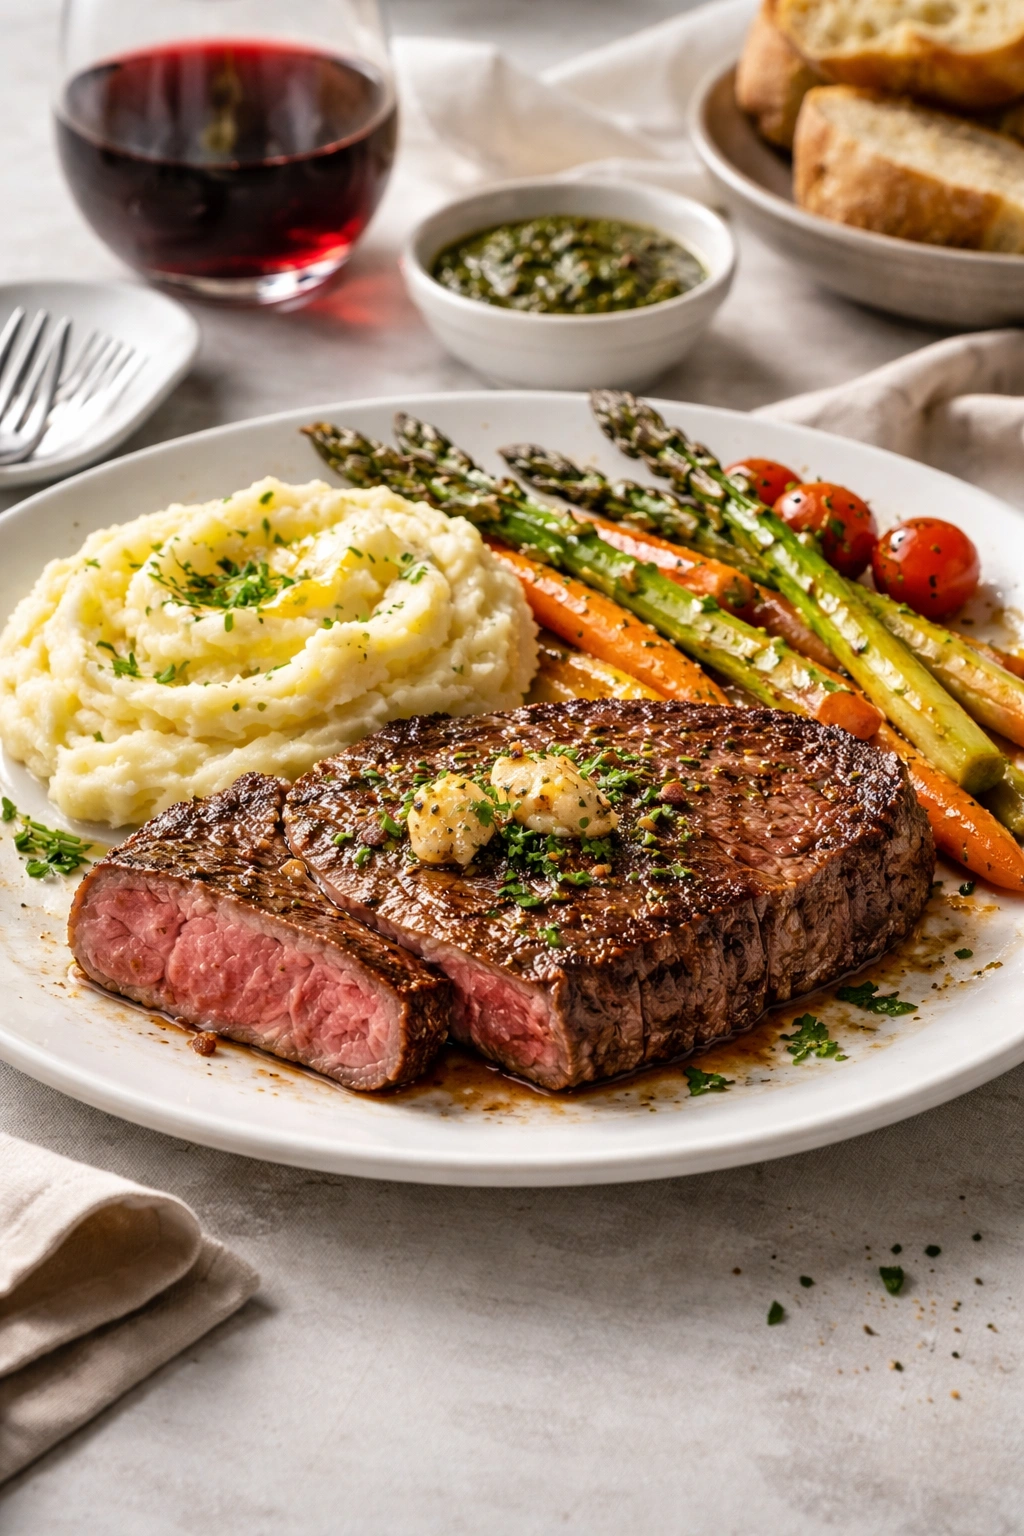
Because of carryover cooking, you must remove the steak from the pan 5 to 10 degrees before your target temperature. For medium-rare (the most popular doneness), remove the steak when it reaches 125°F internally, and it will rise to approximately 130°F as it rests. For medium, remove at 135°F for a final temperature of 140°F.
Target Temperature Chart
- Rare: Remove at 120–125°F, final temp 125–130°F (cool red center, soft throughout)
- Medium-Rare: Remove at 125–130°F, final temp 130–135°F (warm red center, soft with slight firmness)
- Medium: Remove at 135–140°F, final temp 140–145°F (warm pink center, firmer texture)
- Medium-Well: Remove at 145–150°F, final temp 150–155°F (slightly pink center, noticeably firm)
- Well-Done: Remove at 155°F+, final temp 160°F+ (no pink, firm throughout)
How to Use Your Thermometer Correctly
Insert the thermometer horizontally into the side of the steak, penetrating toward the thickest part of the center without touching fat or bone. Wait a few seconds for the reading to stabilize. If you’re cooking a thin steak and the thermometer seems to go all the way through, that’s fine—you’re measuring the center regardless.
The Essential Resting Phase
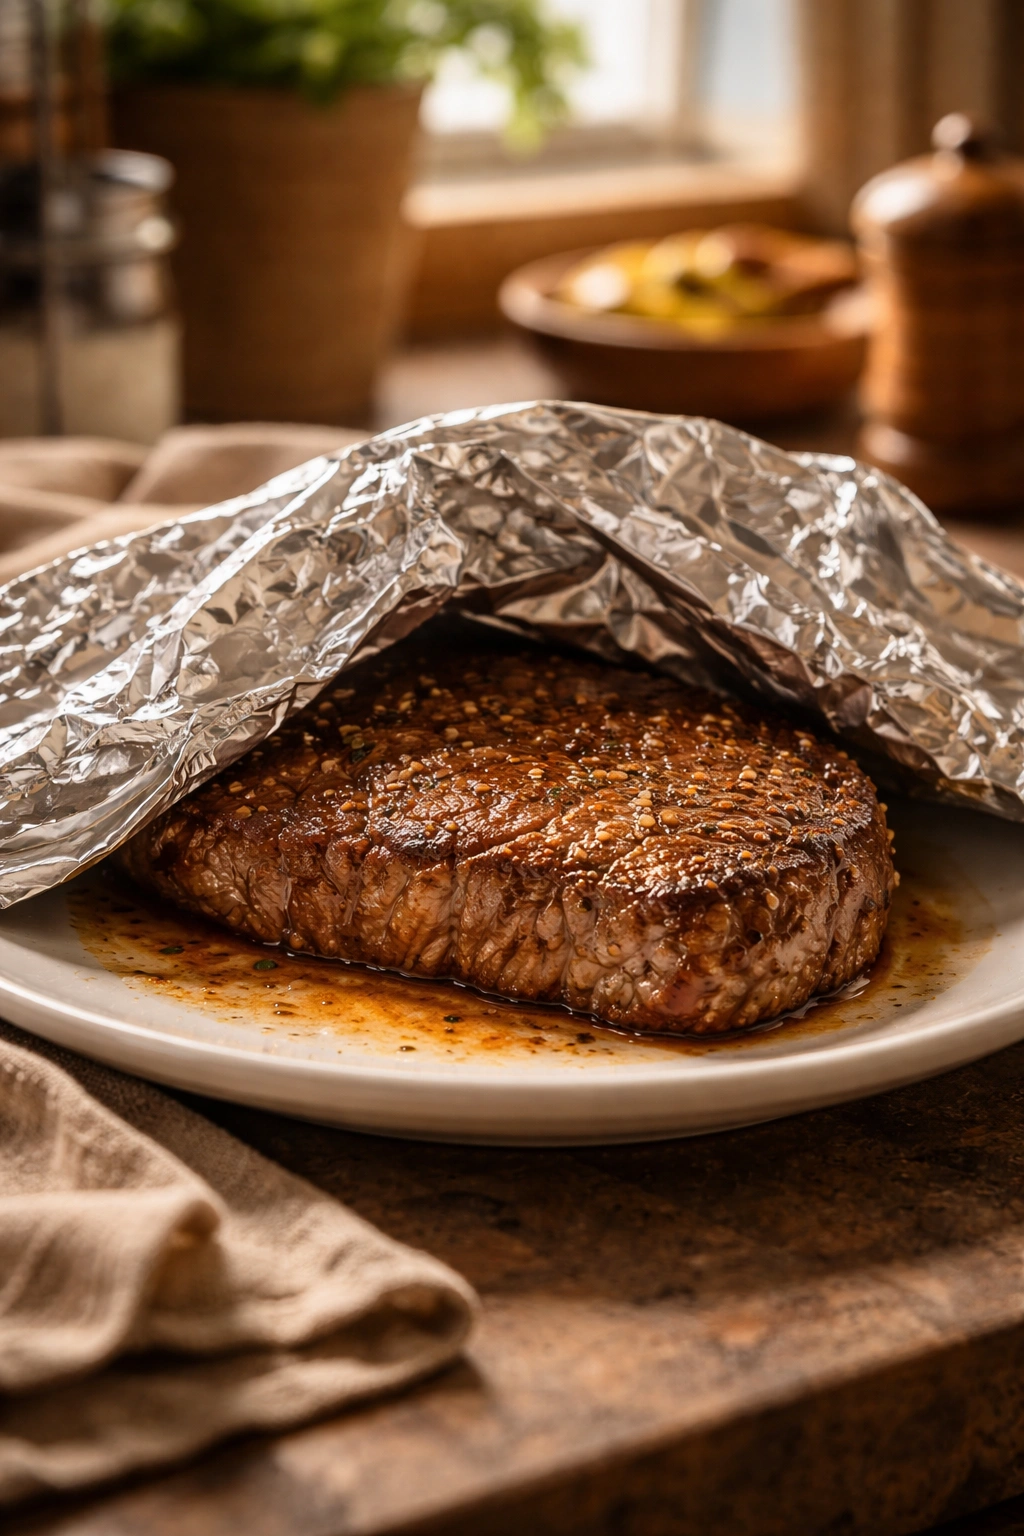
Transfer the steak to a warm plate or cutting board and cover it loosely with aluminum foil. Let it rest for at least 5 to 10 minutes before cutting or serving. This resting phase is absolutely non-negotiable if you want a juicy steak.
Why Resting Matters
When steak cooks, the heat causes muscle fibers to contract, squeezing out juices. Those juices pool on the surface and want to pour out as soon as you cut into the meat. Resting allows the muscle fibers to gradually relax, and the juices get reabsorbed back into the meat. You’re essentially letting the steak recover from the trauma of cooking.
If you skip the rest and cut immediately, all those flavorful juices run right out onto your plate instead of staying inside the meat where they belong. The difference between a rested and unrested steak is genuinely noticeable—the unrested steak looks weeping and the meat is drier with each bite.
The general rule: rest your steak for as long as you cooked it. If cooking took 5 minutes, rest for 5 minutes. If it took 8 minutes, rest for 8 minutes. A minimum of 5 minutes is always appropriate for stovetop-seared steak. Up to 15 minutes is fine—the steak won’t get cold under foil.
Slicing and Serving Your Steak
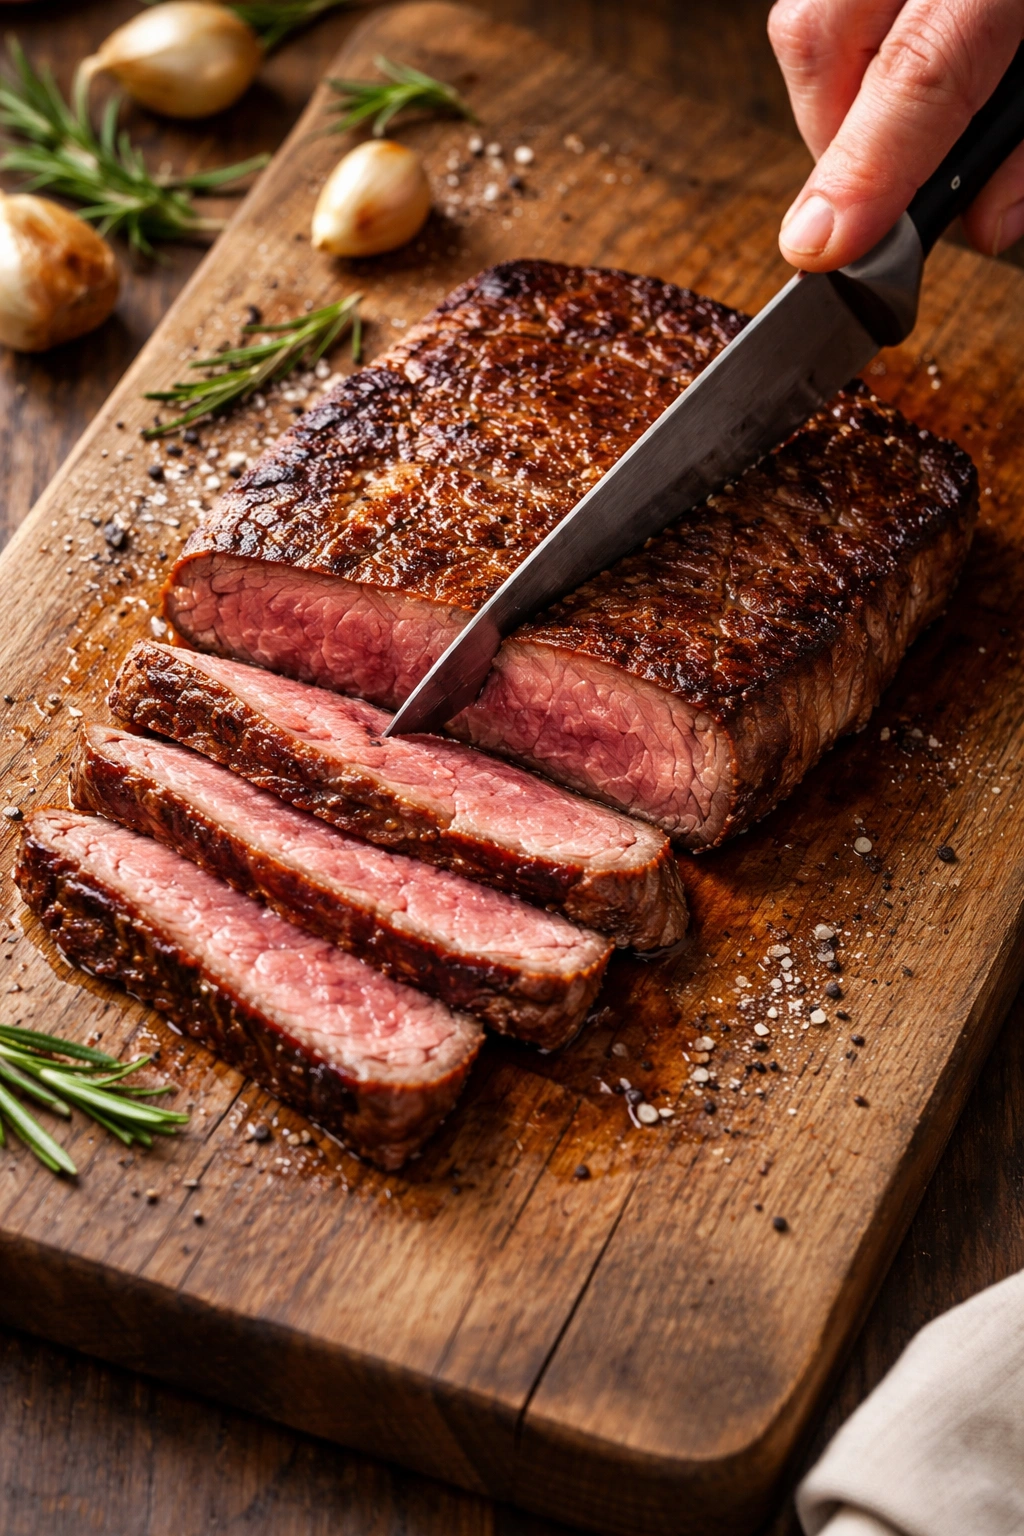
Always slice steak against the grain. The grain is the direction the muscle fibers run. Slicing against the grain severs those fibers, making each bite more tender. Slicing with the grain leaves long fibers intact, which feels stringy and chewy even if the steak is perfectly cooked.
Look at the steak and identify which direction the lines (muscle fibers) run. If you’re unsure, cut one thin slice and look at which direction feels tender and which feels tough, then adjust your angle accordingly. Slice at a slight angle for a steakhouse-style presentation.
If you’re serving the steak whole (which is a perfectly valid presentation), plate it immediately and drizzle any remaining butter-garlic mixture from the pan over the top. This adds final richness and luxe factor.
Common Mistakes and How to Avoid Them
Understanding what goes wrong helps you protect yourself against it. The most common steak-cooking failures are entirely preventable if you know what to watch for.
Cooking Steak Straight from the Refrigerator
A cold steak fresh from the fridge requires extra cooking time for the center to warm up. This means your exterior overcooks while waiting for the center to reach temperature. The result is a thick gray band of overcooked meat beneath the brown crust and a steak that’s tough and dry. Always bring steak to room temperature—nonnegotiable.
Using Thin Steaks or Crowded Pans
Thin steaks (under 1 inch) overcook before their exterior browns properly. You end up with a pale, weak sear and a steak that’s cooked beyond where you want it. Use steaks at least 1.25 inches thick. Additionally, never cook more than two steaks in a pan at once. A crowded pan reduces temperature too much, causing the meat to steam rather than sear, resulting in pale, flavorless surfaces.
Failing to Pat Dry or Skipping the Preheat
These shortcuts always backfire. A wet steak won’t brown properly—it’ll steam instead. An insufficiently preheated pan means the steak’s exterior overcooks before the interior reaches temperature. Both are easy to prevent with a little advance planning.
Cutting Into the Steak Prematurely
If you cut immediately after cooking, all the juices run out and the steak becomes dry. Wait. The 5-10 minute rest is when the steak finishes cooking and reabsorbs its juices. Cutting too soon wastes these precious flavors.
Serving Suggestions and Pairings
A perfectly cooked steak deserves thoughtful accompaniments that complement rather than overshadow the meat.
Classic steakhouse sides include creamy mashed potatoes, roasted asparagus or Brussels sprouts, and simple grilled vegetables. These sides are classic because they work—their richness and simplicity don’t compete with the steak. A simple green salad with vinaigrette or a wedge salad with blue cheese dressing provides brightness and acidity that cuts through the richness of beef and butter.
Sauce options abound. A simple garlic butter (softened butter mixed with minced garlic and fresh parsley) melting over warm steak is elegant and requires no extra cooking. Chimichurri sauce (fresh herbs, garlic, vinegar, and oil) adds brightness. Peppercorn sauce or creamy mushroom sauce add umami depth if you want to layer flavors.
For beverages, pair your steak with red wine (Cabernet Sauvignon, Malbec, or Merlot are excellent), a full-bodied beer, or simply cold water to cleanse the palate between bites.
Storage, Leftovers, and Meal Prep
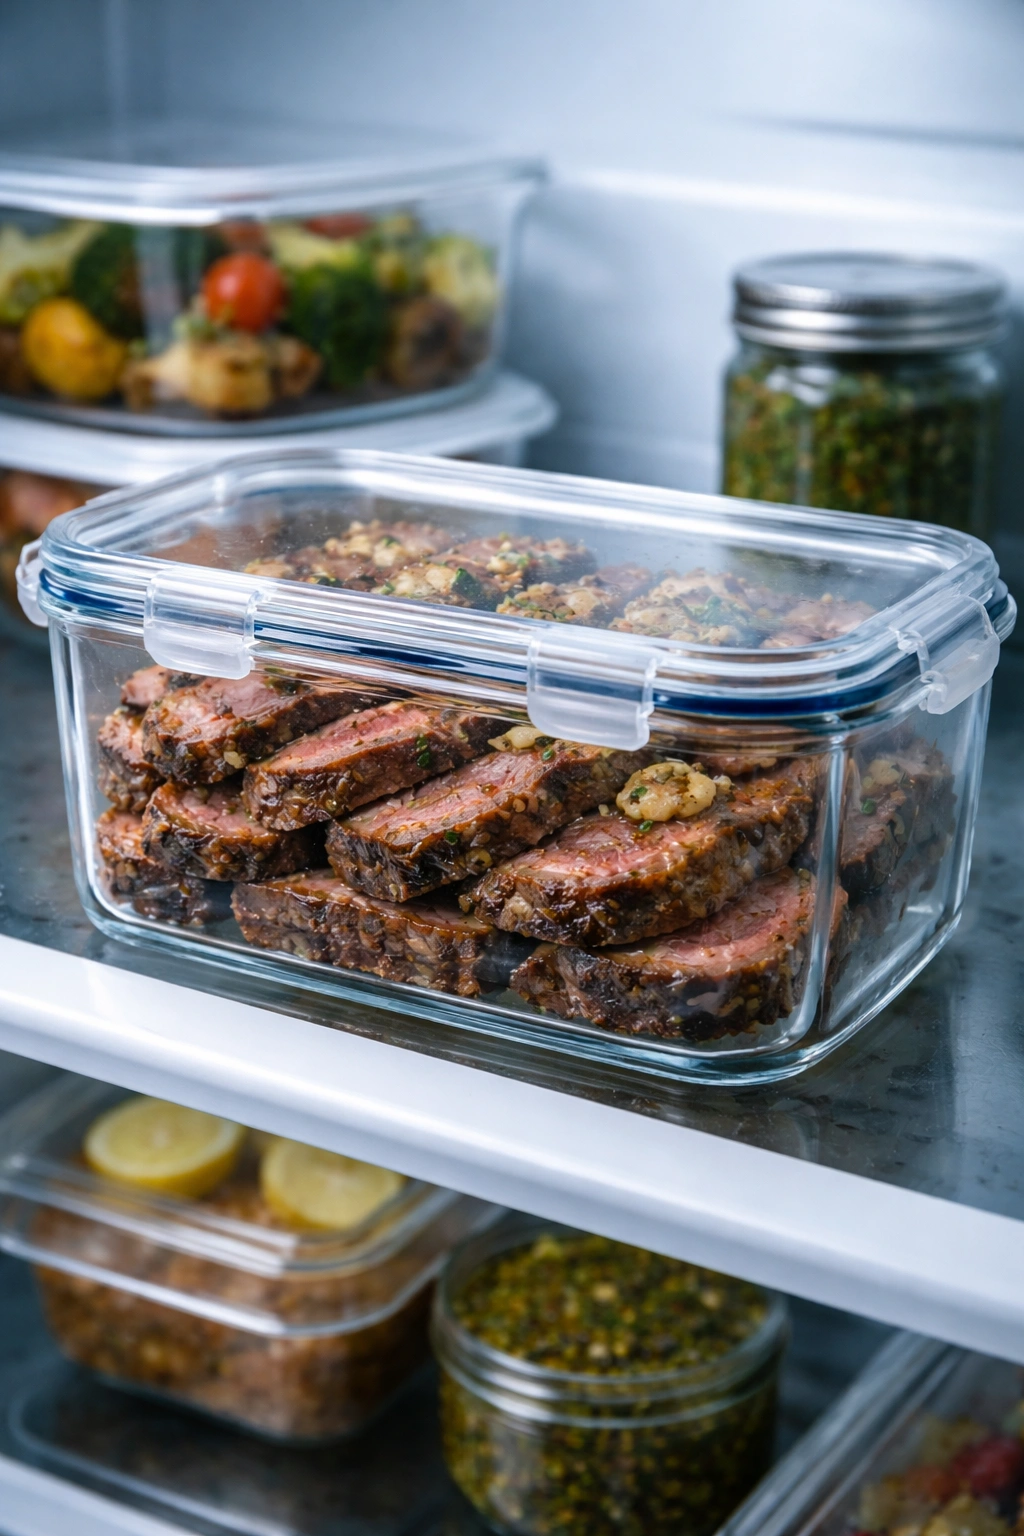
A leftover steak is a problem most home cooks wish they had more often. Cooked steak keeps in the refrigerator for 3 to 4 days in an airtight container. It can also be frozen for up to 2 to 3 months if vacuum-sealed or carefully wrapped to prevent freezer burn.
Cold or reheated steak is perfect for salads—slice it thin and toss with greens, blue cheese, and vinaigrette for an elegant steak cobb salad. Dice it for steak tacos or a Philly cheesesteak sandwich. Steak fajitas are another easy meal-prep option: slice your leftover steak, warm it quickly in a skillet with peppers and onions, and serve in tortillas.
To reheat steak without drying it out, slice it thin and warm it gently in a low oven (300°F for just 5 to 10 minutes) or briefly in a hot skillet with a bit of butter. The goal is warming only, not additional cooking.
The Reverse Sear Method for Extra-Thick Steaks
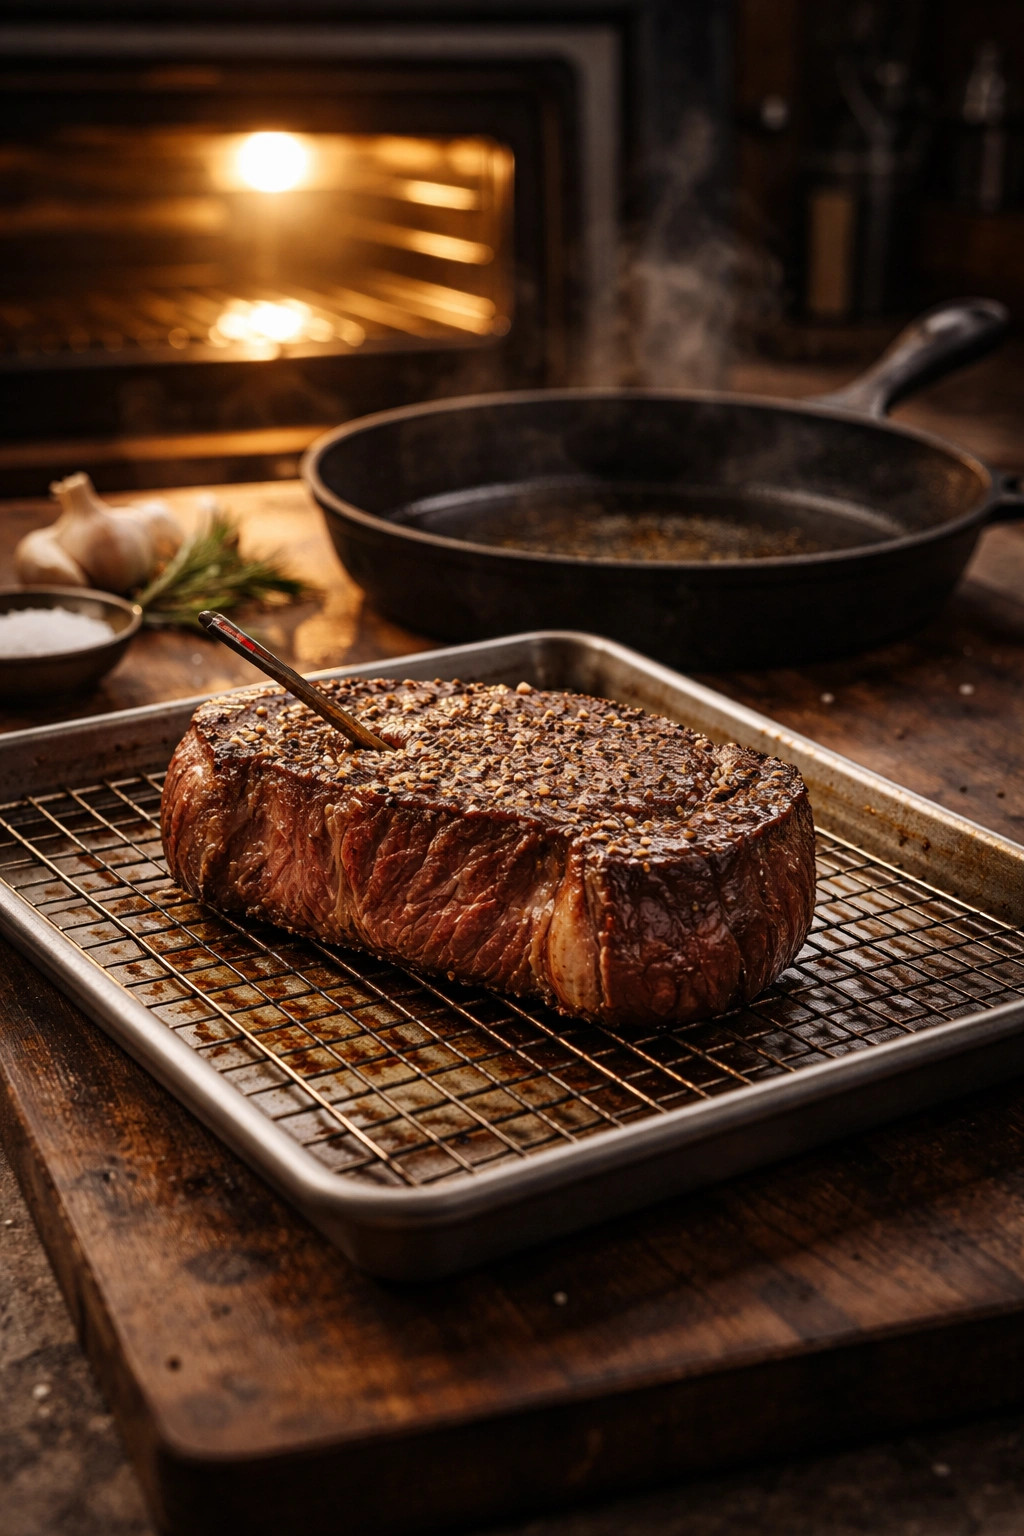
For steaks thicker than 1.5 inches or if you want absolutely guaranteed edge-to-edge even cooking, the reverse sear method offers exceptional results. Cook the steak in a low oven (175–200°F) for 20 to 40 minutes, checking temperature frequently, until the center reaches 110–120°F. Then sear it hard in a smoking-hot pan for 30 to 45 seconds per side. This method delivers a perfectly cooked interior and a crust just as dark as traditional searing, with virtually no risk of overcooking the center.
Final Thoughts
Cooking steak at home is genuinely simple once you understand the principles. Bring it to room temperature, dry it thoroughly, sear it hard in a hot pan, baste it with butter and aromatics, check the temperature with a thermometer, and rest it. Follow these steps and you’ll produce steak that rivals your favorite restaurant, in less time than a reservation would take, for a fraction of the cost.
The confidence that comes from cooking a perfect steak is remarkable. You’ll stop feeling intimidated and start seeing steak cooking as the straightforward, manageable technique that it actually is. And once you’ve mastered stovetop steak, you’ll find yourself making it regularly—because it’s fast, delicious, and surprisingly foolproof when you understand what you’re doing. Every steak teaches you something, and after a few successful attempts, you’ll be cooking steak better than most people eating out.