Meal prepping chicken is one of the easiest ways to set yourself up for a healthier week without spending hours in the kitchen. Whether you’re managing a busy schedule, trying to stick to fitness goals, or simply tired of deciding what’s for dinner, having protein-packed chicken ready to go transforms everything. The beauty of batch-cooking chicken is that it’s incredibly forgiving—once you’ve got it prepared, you can use it in salads, grain bowls, tacos, wraps, pasta dishes, or eat it straight with a side of roasted vegetables.
The challenge most people face isn’t knowing why to meal prep chicken—it’s figuring out which method works best for their lifestyle. You might not have a grill in winter, or maybe your oven space is limited, or you want meals that are done in 15 minutes instead of 30. That’s why having five solid techniques in your back pocket means you can adapt to whatever your week looks like. Each method produces slightly different textures and flavors, so rotating between them keeps your meal prep from becoming monotonous.
This guide walks you through five battle-tested ways to meal prep chicken, from hands-off slow cooker methods to quick stovetop techniques. You’ll discover which approach suits your schedule, how to avoid the dry-chicken disaster that derails so many meal prepping efforts, and exactly how to store everything for maximum freshness throughout the week.
1. Oven-Baked Chicken Breasts
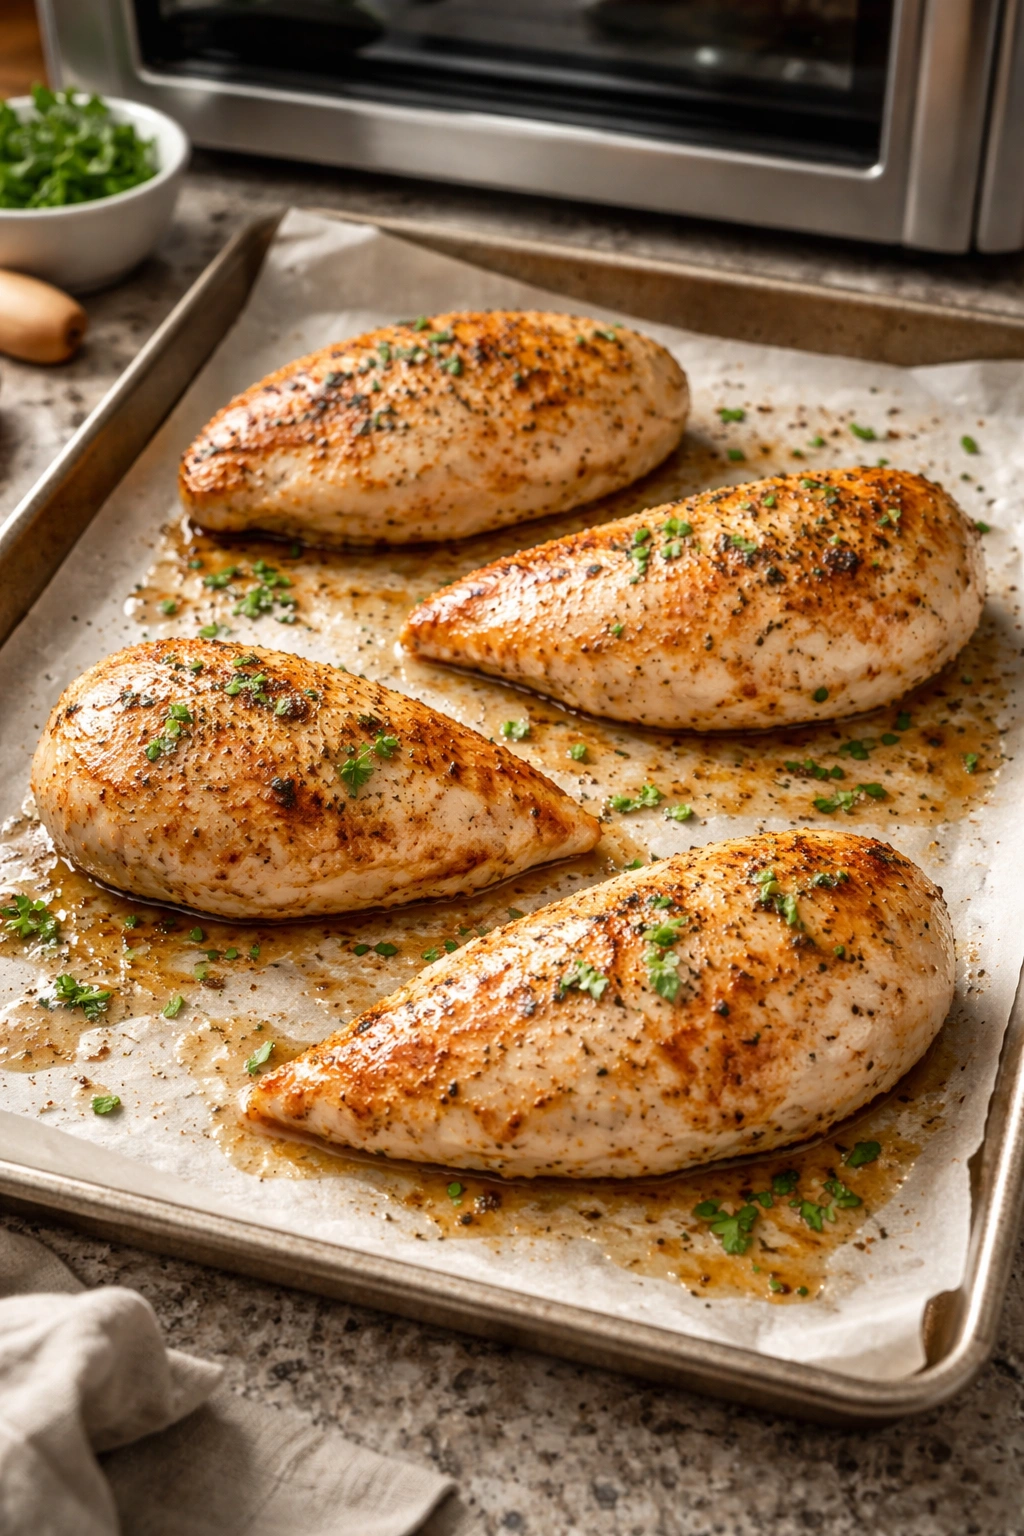
Oven-baked chicken is the workhorse of meal prep—it’s reliable, requires minimal hands-on time, and produces consistently juicy results when you follow a few key steps. Preheating your oven to 400°F and using boneless, skinless chicken breasts creates a straightforward cooking environment where the chicken cooks evenly without the unpredictable heat spots that sometimes plague stovetop methods.
The secret to keeping baked chicken moist isn’t complicated: season it generously, don’t overcrowd your baking sheet, and use a meat thermometer to nail the 165°F internal temperature without going higher. The moment chicken hits 175°F or beyond, it starts to dry out, so precision here makes all the difference.
How to Prepare Your Chicken for the Oven
Start by patting your chicken breasts completely dry with paper towels—this moisture is your enemy when you’re trying to achieve a lightly golden surface. Trim away any excess skin or connective tissue, then arrange them on a parchment-lined baking sheet with at least an inch of space between each piece. This spacing matters because it allows hot air to circulate evenly around the chicken rather than steaming it.
Drizzle with a light coating of olive oil (about 1 tablespoon for 4 breasts) and season generously with salt and pepper. This is where you get creative—garlic powder, paprika, Italian seasoning, lemon zest, or a simple herb blend all work beautifully. The oil isn’t just for flavor; it helps the chicken brown and prevents it from drying out during cooking.
Baking Times and Temperatures
Bake at 400°F for 20 to 25 minutes, depending on the thickness of your breasts. If you’ve cut them in half lengthwise (which makes them cook faster and more evenly), they’ll be ready closer to 15 to 18 minutes. Insert your meat thermometer into the thickest part of the largest breast—aim for 165°F and pull it out immediately.
Once the chicken comes out of the oven, let it rest for 5 to 10 minutes. This resting period is non-negotiable if you want juicy chicken—the residual heat continues cooking the exterior slightly while the juices redistribute throughout the meat. Skip this step and you’ll watch all those hard-earned juices run out onto your cutting board.
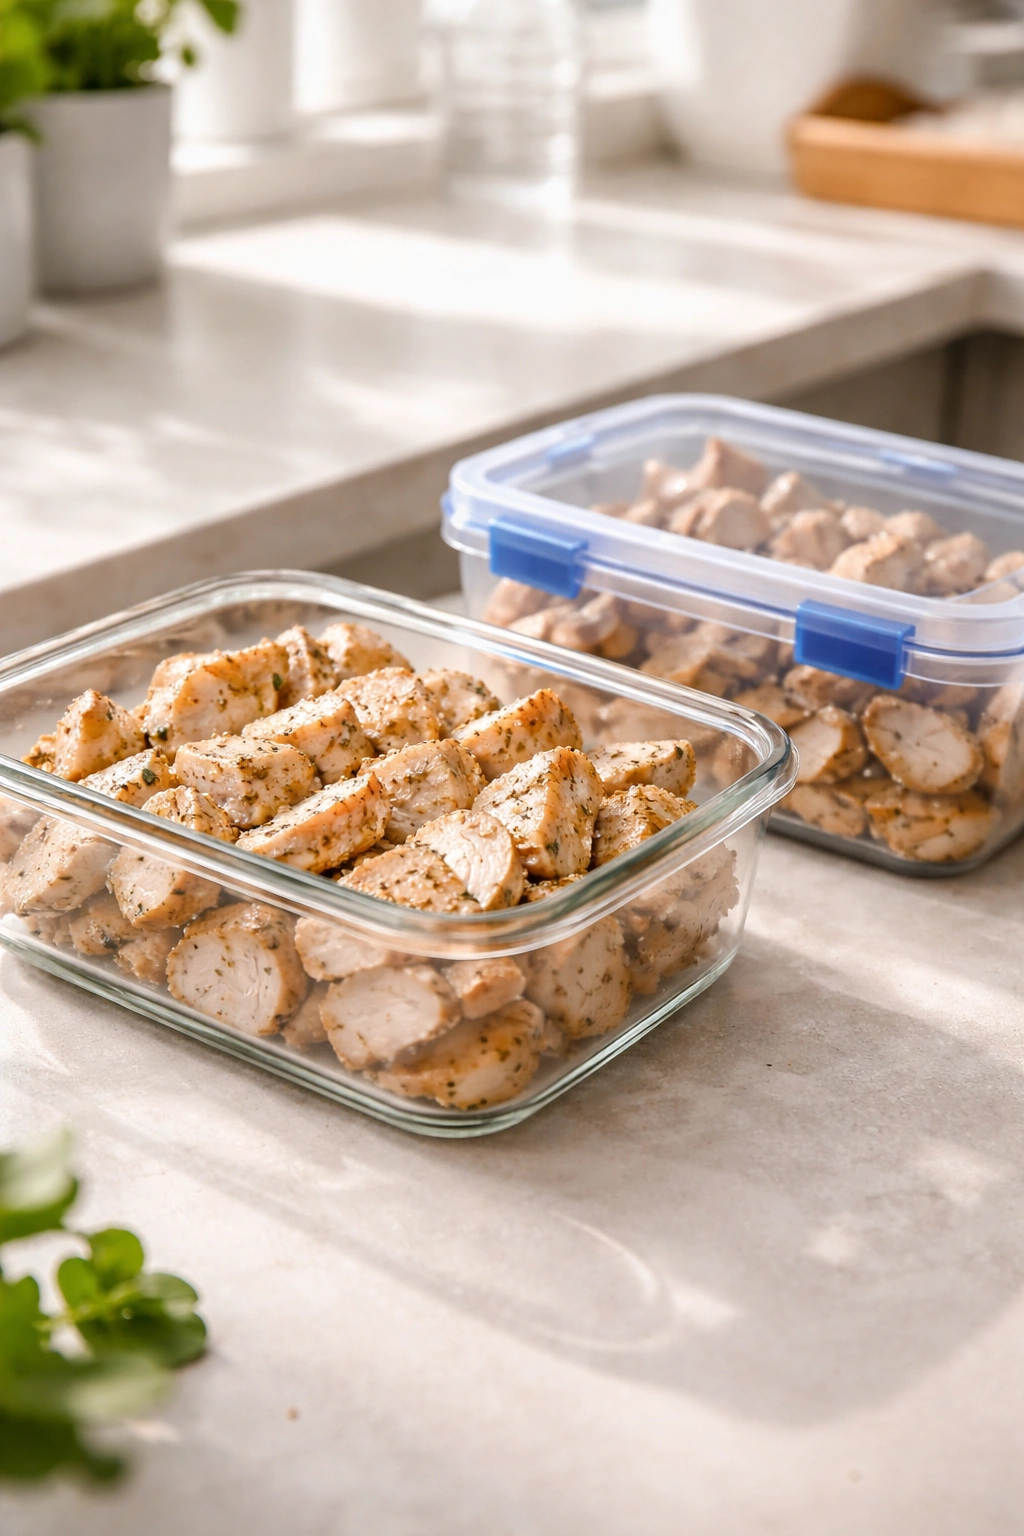
Slicing and Storage Strategies
After resting, you can slice, dice, or shred the chicken depending on how you plan to use it throughout the week. Diced works great for salads and grain bowls, sliced is perfect for sandwiches and wraps, and shredded is ideal for tacos and creamy dishes. Store everything in airtight glass containers (glass reheats more evenly than plastic) and refrigerate for up to 4 days.
Pro tip: Don’t dice the chicken before storing—keep it in larger pieces and cut it only as needed. Smaller pieces lose moisture faster during storage and when reheated, so whole pieces maintain their texture and juiciness much better over several days.
2. Instant Pot Shredded Chicken
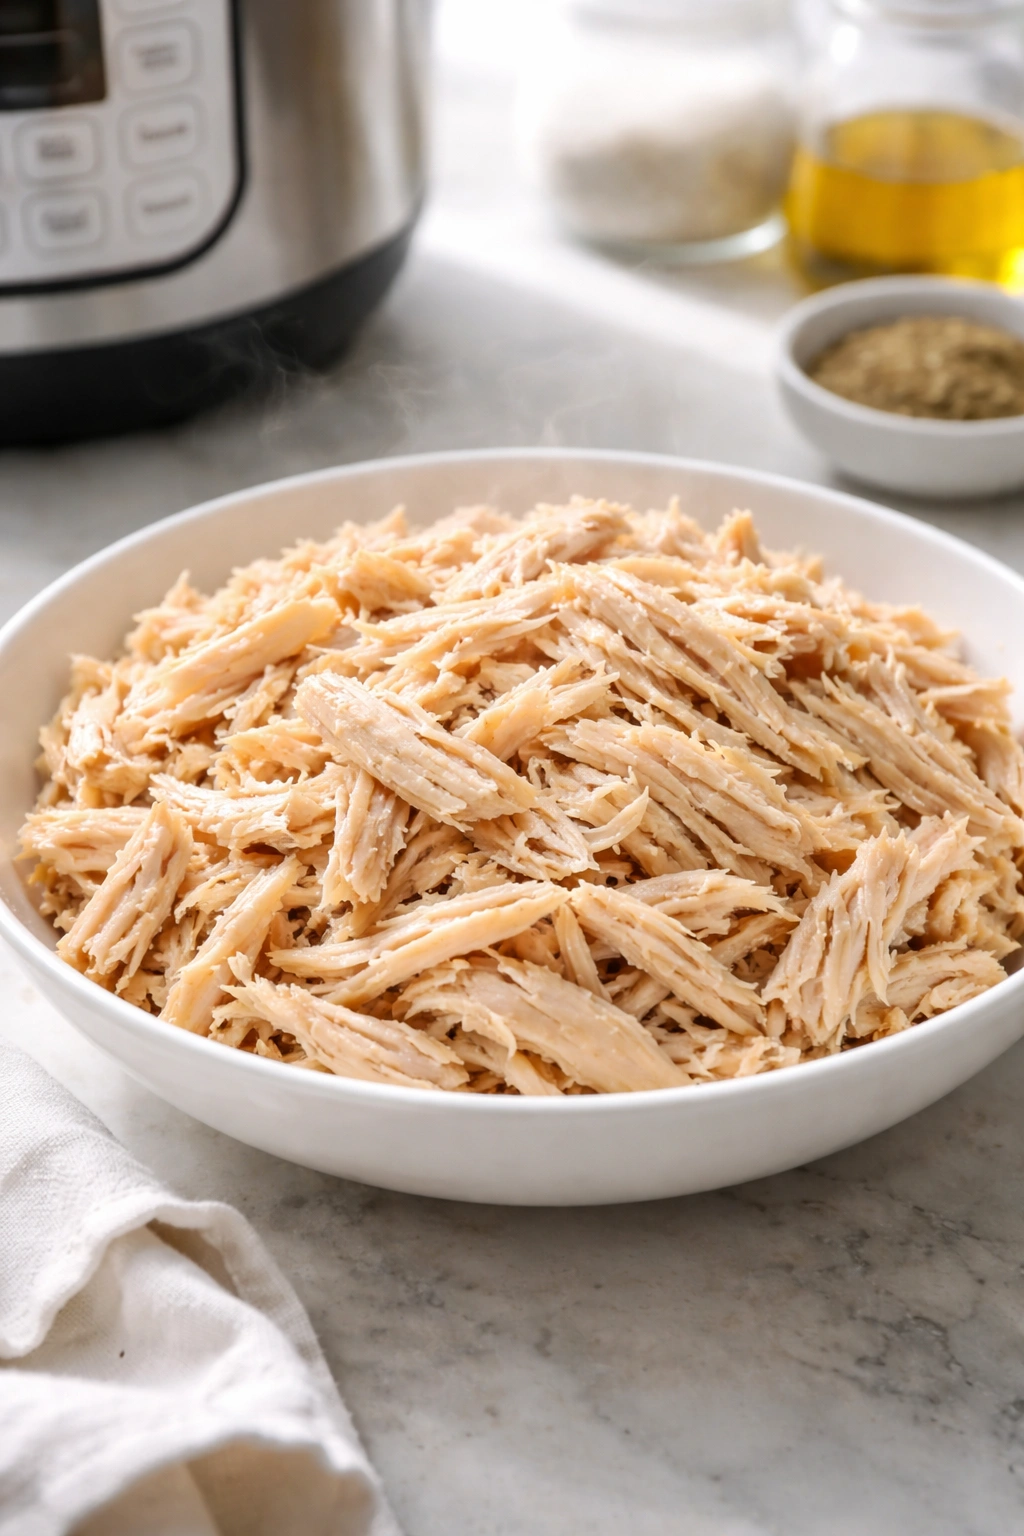
The Instant Pot method is a game-changer for anyone who values speed and wants completely hands-off cooking. This approach produces incredibly tender, juicy shredded chicken that’s perfect for tacos, enchiladas, salads, or anything else that calls for shredded chicken. The pressure-cooking method actually helps keep the chicken moist because the sealed environment prevents water from escaping.
Boneless, skinless chicken breasts are ideal here, though thighs work beautifully too if you prefer them. Most Instant Pots can comfortably fit 2 to 4 large breasts at once, so adjust your batch size based on your pot’s capacity.
Setting Up Your Instant Pot
Pour 1 cup of low-sodium chicken broth into the bottom of your Instant Pot—this liquid is essential because it creates the steam needed for pressure cooking and keeps the chicken incredibly moist. Arrange your chicken breasts on the trivet (the metal rack that comes with your pot) so they sit above the liquid rather than sitting directly in it.
Season the chicken with whatever flavors you’re in the mood for. A simple approach uses garlic powder, onion powder, paprika, and Italian seasoning sprinkled over the breasts. If you want more adventurous flavors, try cumin and chili powder for a southwestern vibe, or experiment with lemon zest and thyme for something brighter.
Cooking and Natural Release
Seal your Instant Pot and set it to high pressure for 10 minutes. Once the timer sounds, resist the urge to immediately release the pressure—instead, let it naturally release for another 10 minutes. This natural release is crucial because it allows the chicken to gently finish cooking without the shock of sudden pressure loss, which can make the meat tough.
After the 10-minute natural release, manually release any remaining pressure and carefully open the lid. The chicken should be fall-apart tender at this point, practically shredding itself.
Shredding and Flavor Absorption
Use two forks to shred the chicken right in the pot—this lets it absorb all the broth-based flavor, which keeps it incredibly moist when reheated. Alternatively, a hand mixer on low speed shreds the chicken in seconds and is genuinely fun to watch. If you prefer, you can remove the chicken to a bowl first, then shred it more carefully.
Store your shredded chicken in airtight containers (the broth adds extra moisture and flavor) for up to 4 days in the refrigerator. You can also freeze it for up to 3 months—just make sure to include some of the broth to prevent freezer burn.
3. Slow Cooker Chicken
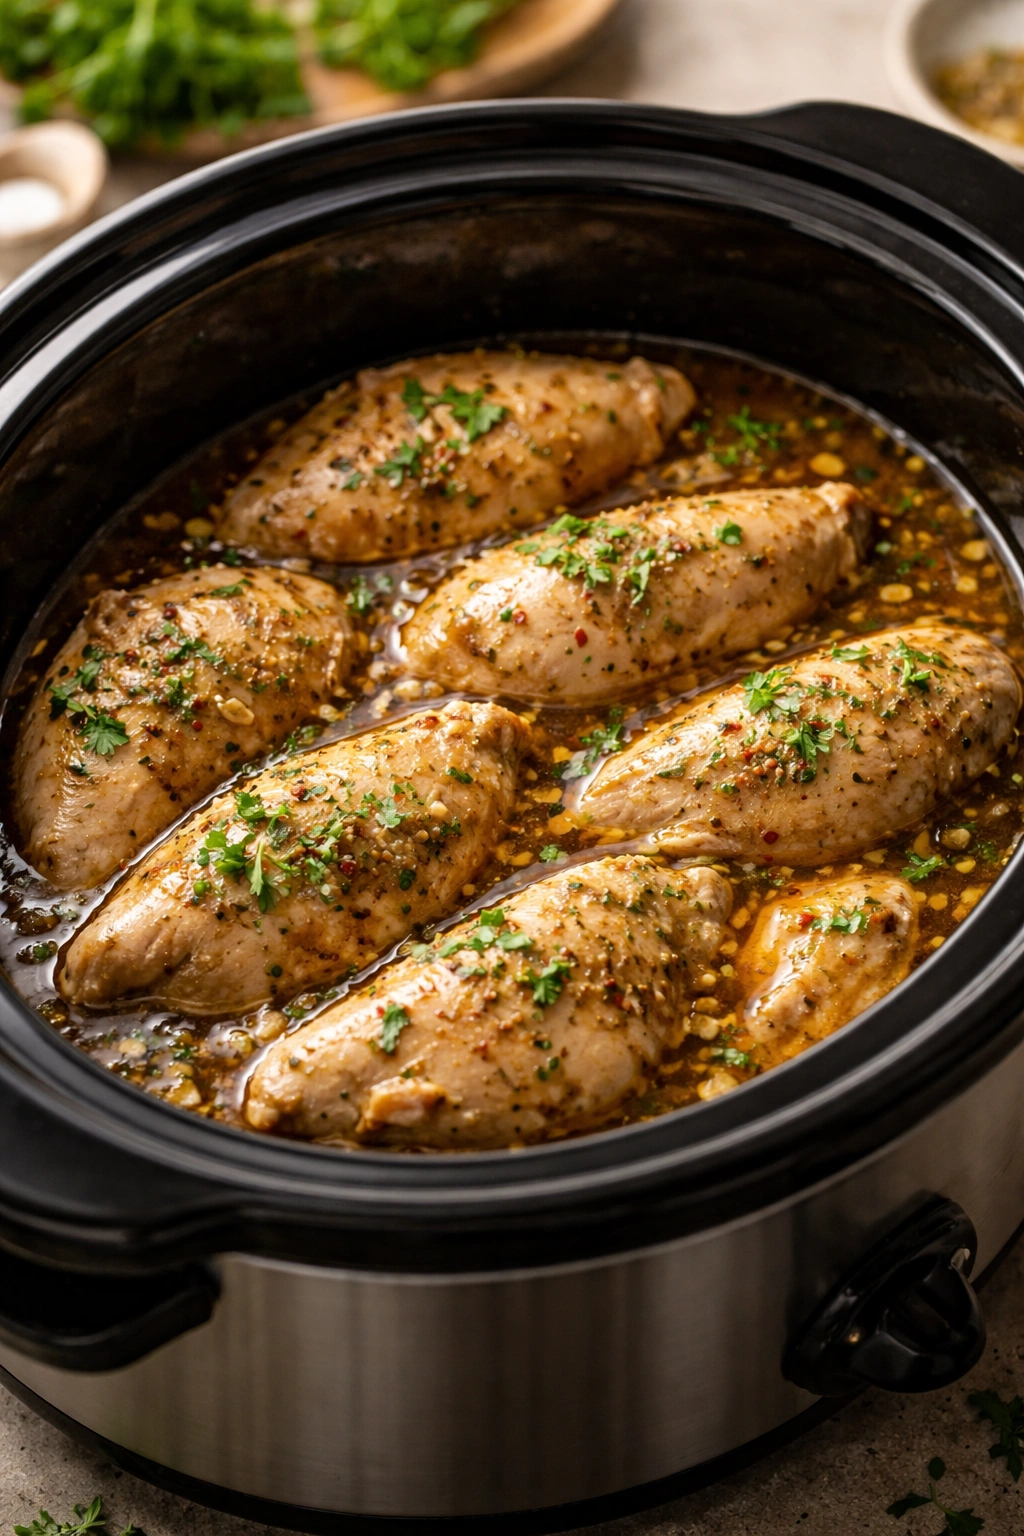
Slow cooker chicken is the ultimate set-it-and-forget-it approach, perfect for busy weeks when you need to prep dinner while handling everything else. This method works wonderfully because the low, moist heat environment keeps chicken incredibly tender and forgiving—even if you accidentally cook it slightly longer than intended, it stays juicy rather than drying out.
The slow cooker is also fantastic for infusing chicken with complex flavors that would take much longer using other methods. Marinades, broths, and spices have hours to develop and penetrate the meat, resulting in deeply flavored chicken that tastes anything but boring.
Preparation and Liquid Ratios
Place boneless, skinless chicken breasts in the bottom of your slow cooker and add approximately 1 cup of liquid. This can be chicken broth, salsa, coconut milk, or even a combination of seasonings mixed with water. The liquid is essential because it keeps the chicken moist and creates the cooking environment that makes slow cookers so effective.
For basic preparations, add salt, pepper, and any aromatics you like—garlic cloves, sliced onions, bay leaves, or fresh herbs all work beautifully. If you’re making a specific dish like salsa chicken or barbecue chicken, this is where you’d add your sauce ingredients.
Cooking Times and Texture Preferences
Cook on low for 6 to 8 hours, or on high for 3 to 4 hours. The exact time depends on how many breasts you’re cooking and the specific model of your slow cooker, but use a meat thermometer to ensure the internal temperature reaches 165°F. Most chicken will be perfectly cooked after 6 hours on low, at which point the meat pulls apart with a fork.
One important note: slow cooker chicken tends to be moister and more tender than oven-baked chicken, which some people love and others find slightly less textured. If you prefer firmer chicken, cook it on high for the shorter time rather than low for the longer duration.
Shredding and Using Your Chicken
Once cooked, you can shred the chicken directly in the slow cooker, or transfer it to a cutting board and shred it there. If you shredded it in the slow cooker, strain some of the cooking liquid into storage containers with the chicken—this liquid adds flavor and keeps everything moist during storage and reheating.
Store for up to 4 days in the refrigerator, or freeze for up to 3 months. This method is ideal if you want to make multiple batches of chicken with different seasonings—you could make salsa chicken in one slow cooker, barbecue chicken in another, and herbed chicken in a third, rotating through them throughout the week.
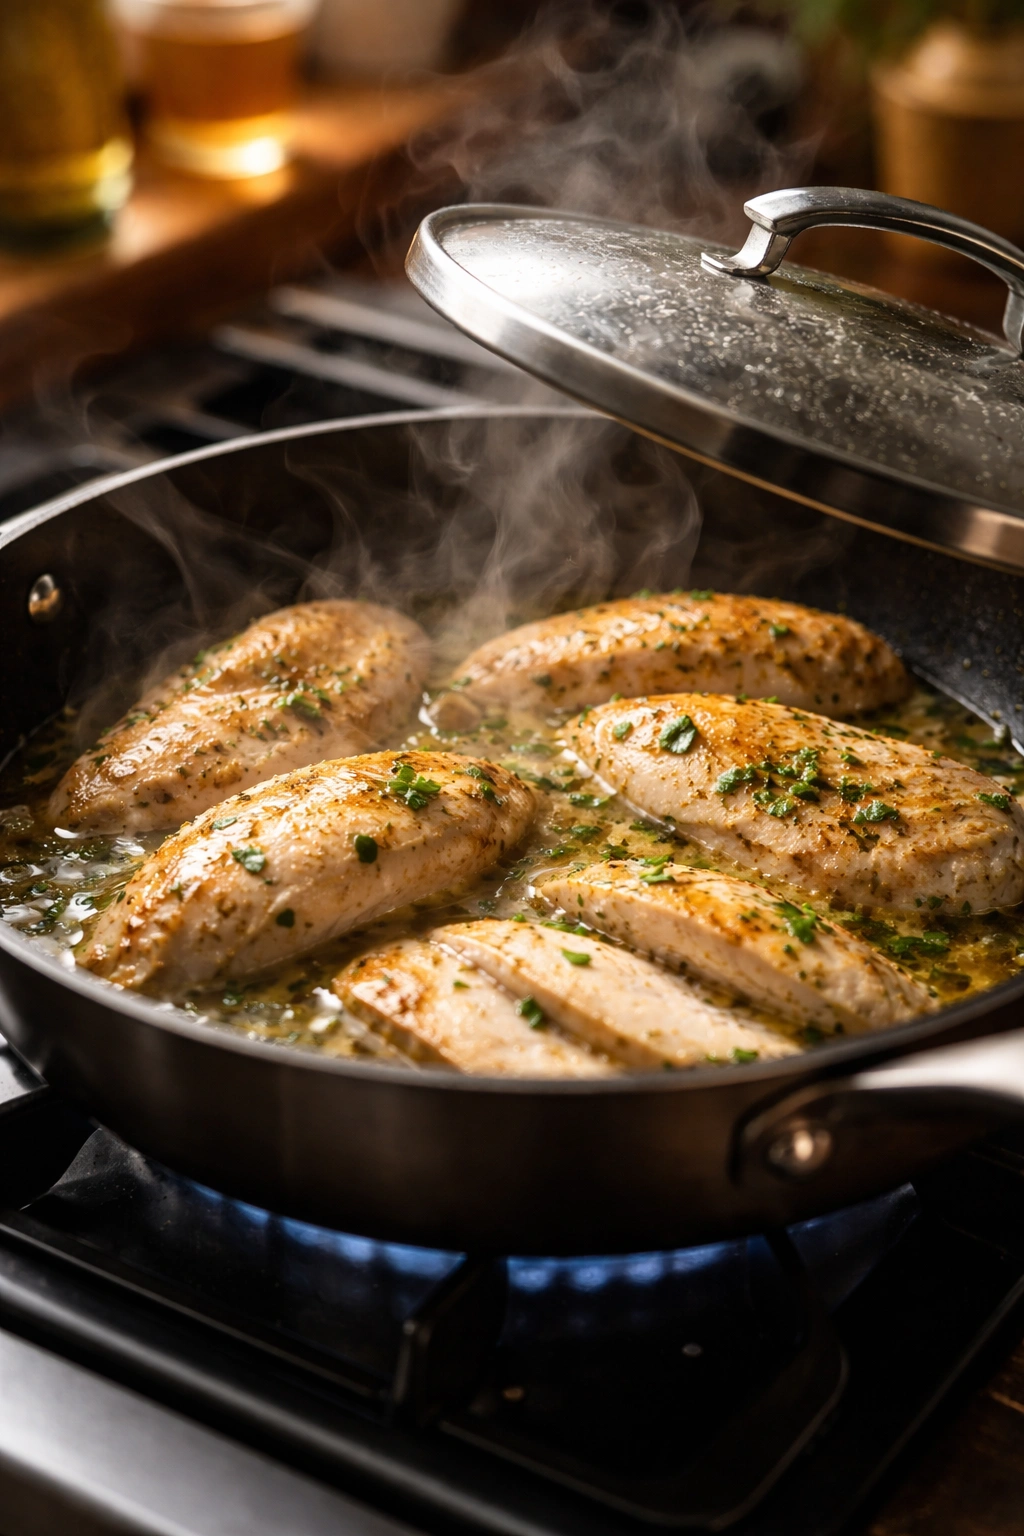
4. Stovetop Seared Chicken
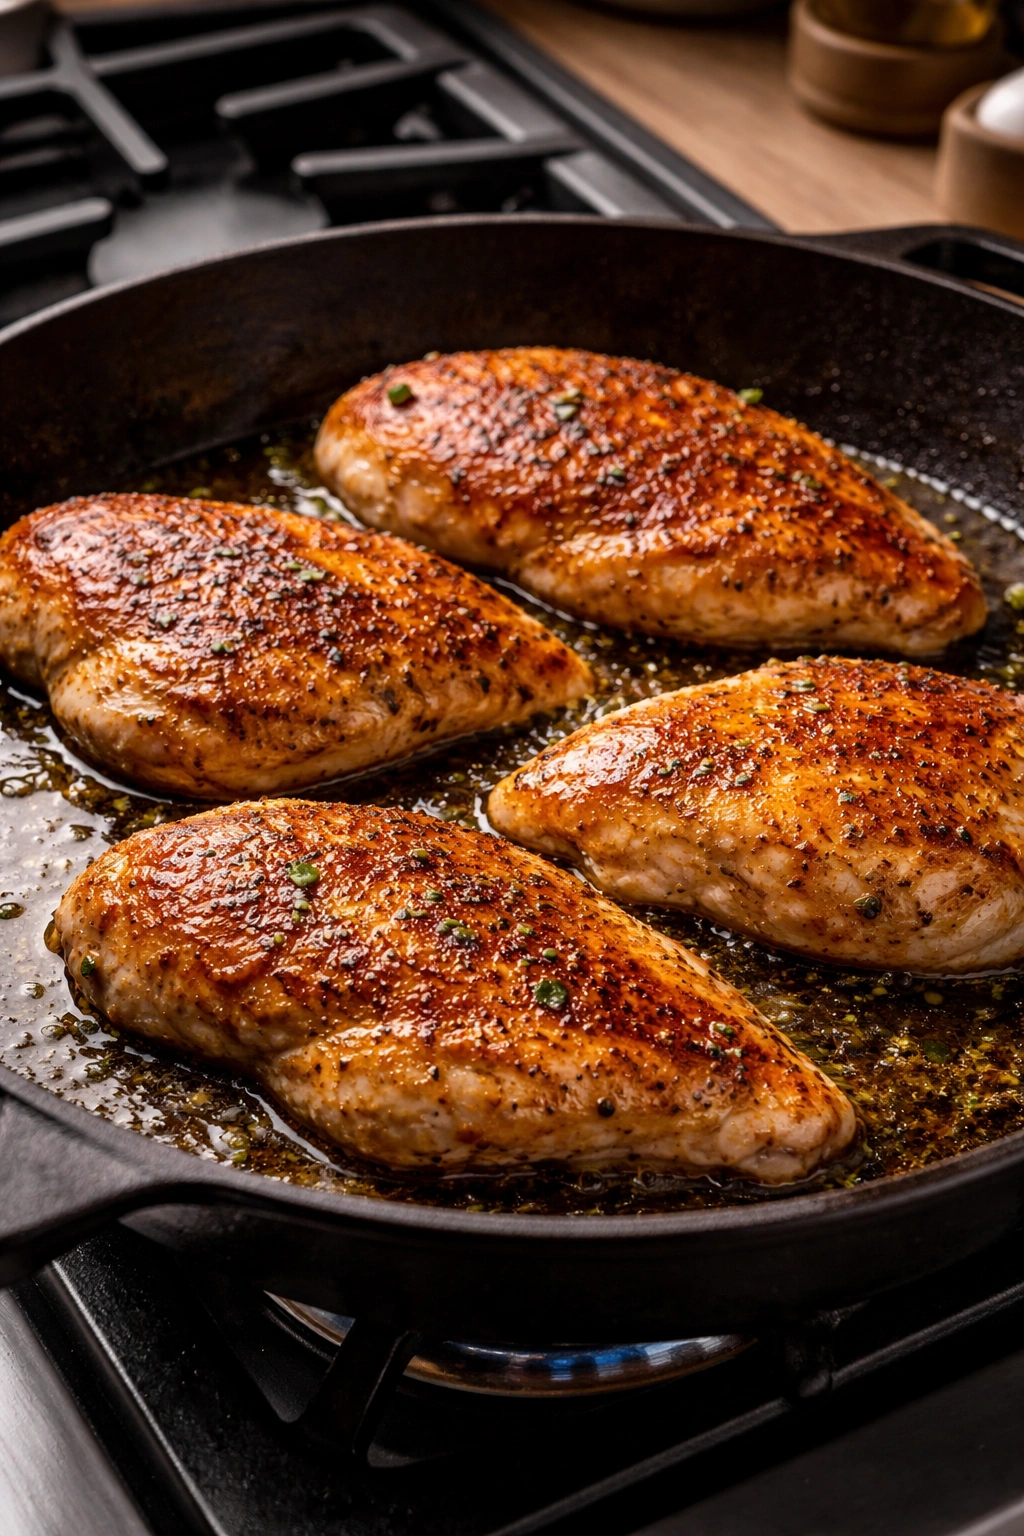
Stovetop searing produces chicken with the best golden-brown exterior and is the fastest active-cooking method on this list. If you want complex, caramelized flavors and don’t mind actively monitoring the cooking process, this is your method. Seared chicken is perfect for eating as a standalone protein with sides, slicing into grain bowls, or adding to salads where you want some textural contrast.
This method does require a bit of attention—you’ll be standing at the stove for about 15 minutes total—but the flavor payoff is worth it. The Maillard reaction (that golden-brown sear) creates depth that you simply can’t get from other cooking methods.
Seasoning and Pan Setup
Season your boneless, skinless chicken breasts generously with salt and pepper at least 10 minutes before cooking (this helps the seasoning adhere and seasons the chicken from the inside out). Add any other seasonings you’d like—smoked paprika, garlic powder, thyme, or a dry spice rub all work beautifully.
Heat a large stainless steel or cast iron skillet over medium-high heat until it’s quite hot. Add about 1 tablespoon of olive oil and swirl to coat the entire surface. The oil should shimmer and move easily around the pan—if it’s smoking, your heat is too high and will burn the exterior before cooking the interior.
The Searing Process
Place the seasoned chicken in the hot pan and resist the urge to move it around. Let it sear undisturbed for 5 to 7 minutes, which is enough time for a golden crust to develop. You’ll see the edges start to turn opaque as the chicken cooks from the outside in.
Flip the chicken using tongs and cook the other side for another 5 to 7 minutes, depending on thickness. Check the internal temperature with your meat thermometer—as soon as it hits 165°F, remove the chicken from heat. The residual heat will continue to cook it slightly even after it leaves the pan.
Resting and Storage
Transfer the seared chicken to a cutting board and let it rest for 5 minutes before slicing. This rest period is what keeps the interior juicy after searing. Once cooled to room temperature, store in airtight containers for up to 4 days.
Because seared chicken has less liquid than other methods, it’s slightly more prone to drying out during reheating. Reheat gently in a covered pan on the stovetop with a splash of broth, rather than using the microwave, for best results.
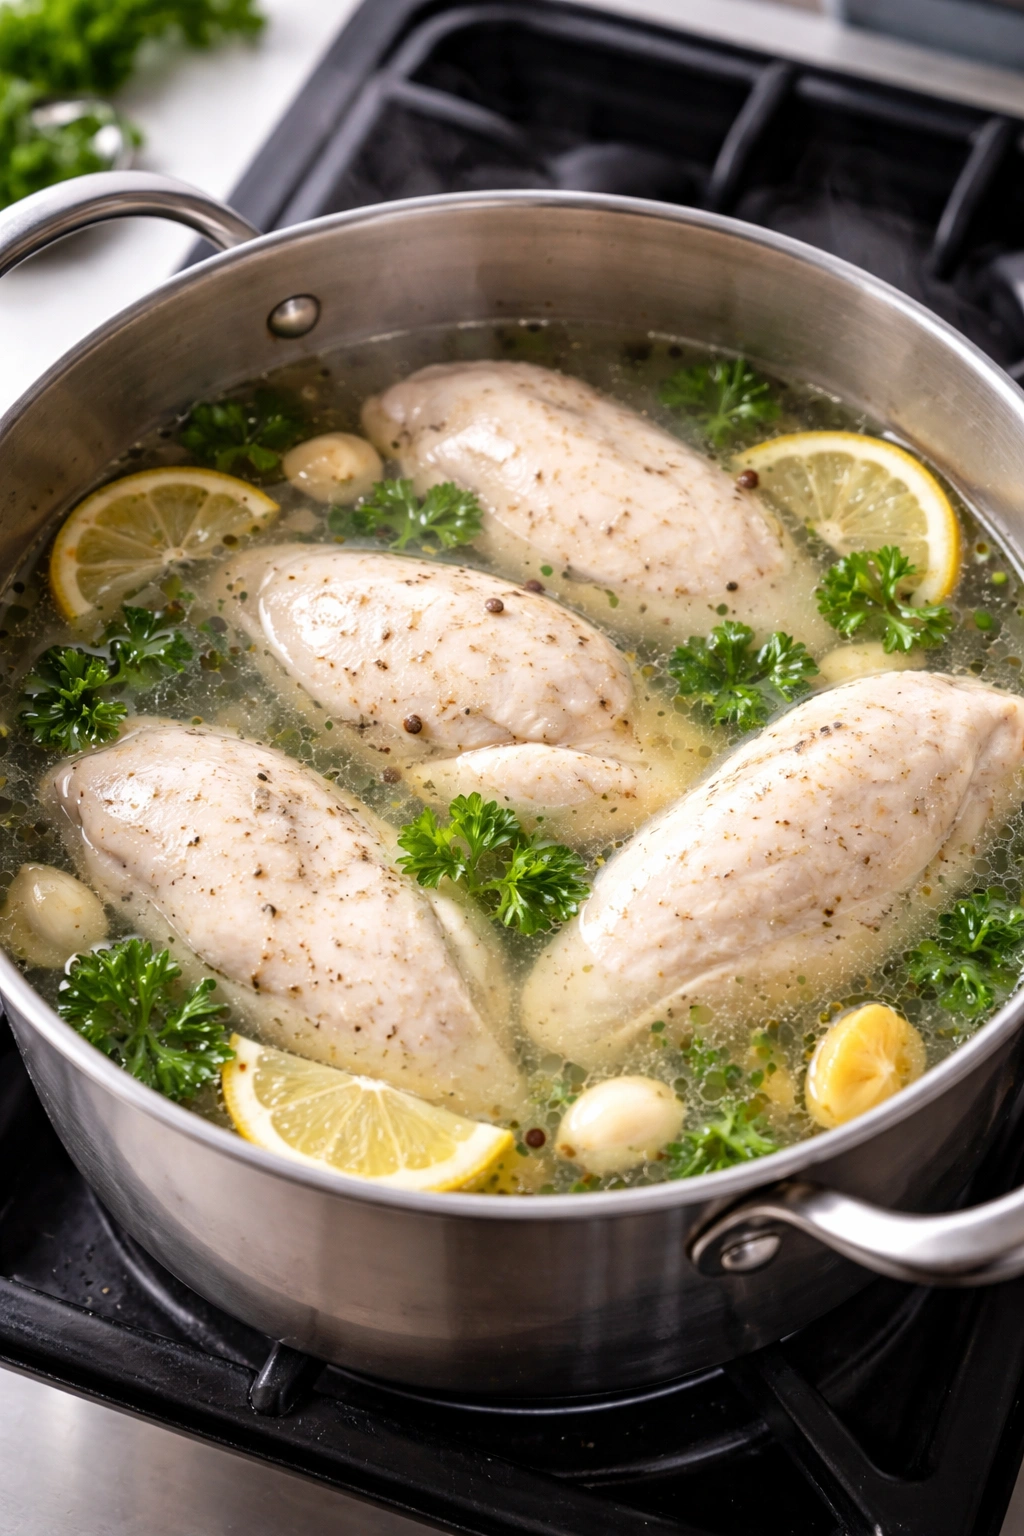
5. Poached Chicken
Poached chicken is the gentlest cooking method available, producing incredibly moist, delicate meat that’s perfect for salads, wraps, and anywhere you want chicken to absorb other flavors without overwhelming them. This technique requires patience rather than high heat, making it nearly impossible to overcook.
Poaching produces chicken that stays juicy longer during storage and reheating because it’s cooked in liquid rather than exposed to dry heat. The subtle, neutral flavor is also a blank canvas—you can pair poached chicken with virtually any sauce, dressing, or ingredient combination.
The Poaching Liquid and Setup
Fill a large pot with enough water or low-sodium chicken broth to cover your chicken breasts by about an inch. Add aromatic ingredients like bay leaves, peppercorns, crushed garlic cloves, and fresh herbs (thyme, rosemary, or parsley all work well). These aromatics infuse the chicken subtly—you’re not looking for intense flavors here, just subtle undertones.
Bring the liquid to a gentle simmer—this is critical. You want small bubbles rising slowly to the surface, not a rolling boil. Boiling toughens chicken by cooking the exterior too quickly before the interior has time to cook gently, resulting in rubbery meat.
Gentle Cooking and Timing
Once the liquid reaches a simmer, add your chicken breasts and maintain that gentle simmer for 15 to 20 minutes, depending on thickness. Use a meat thermometer to check that the internal temperature has reached 165°F. The chicken will look pale white, not browned, and the meat will be extremely tender.
Remove the chicken with a slotted spoon and transfer it to a cutting board. Let it rest for 5 minutes in the ambient air—this is your only resting period with poached chicken, so don’t skip it even though the chicken wasn’t cooked with dry heat.
Slicing and Storage
Slice or shred the chicken as desired once it’s cooled. You can store it plain or strain some of the poaching liquid into your storage containers—this adds moisture and subtle flavor. Store for up to 4 days in the refrigerator, or freeze for up to 3 months.
Poached chicken reheats beautifully because it’s already so moist. You can reheat it gently in a pan with a splash of broth, in the microwave covered with a damp paper towel, or even eat it cold straight from the container.
Choosing the Right Cut of Chicken
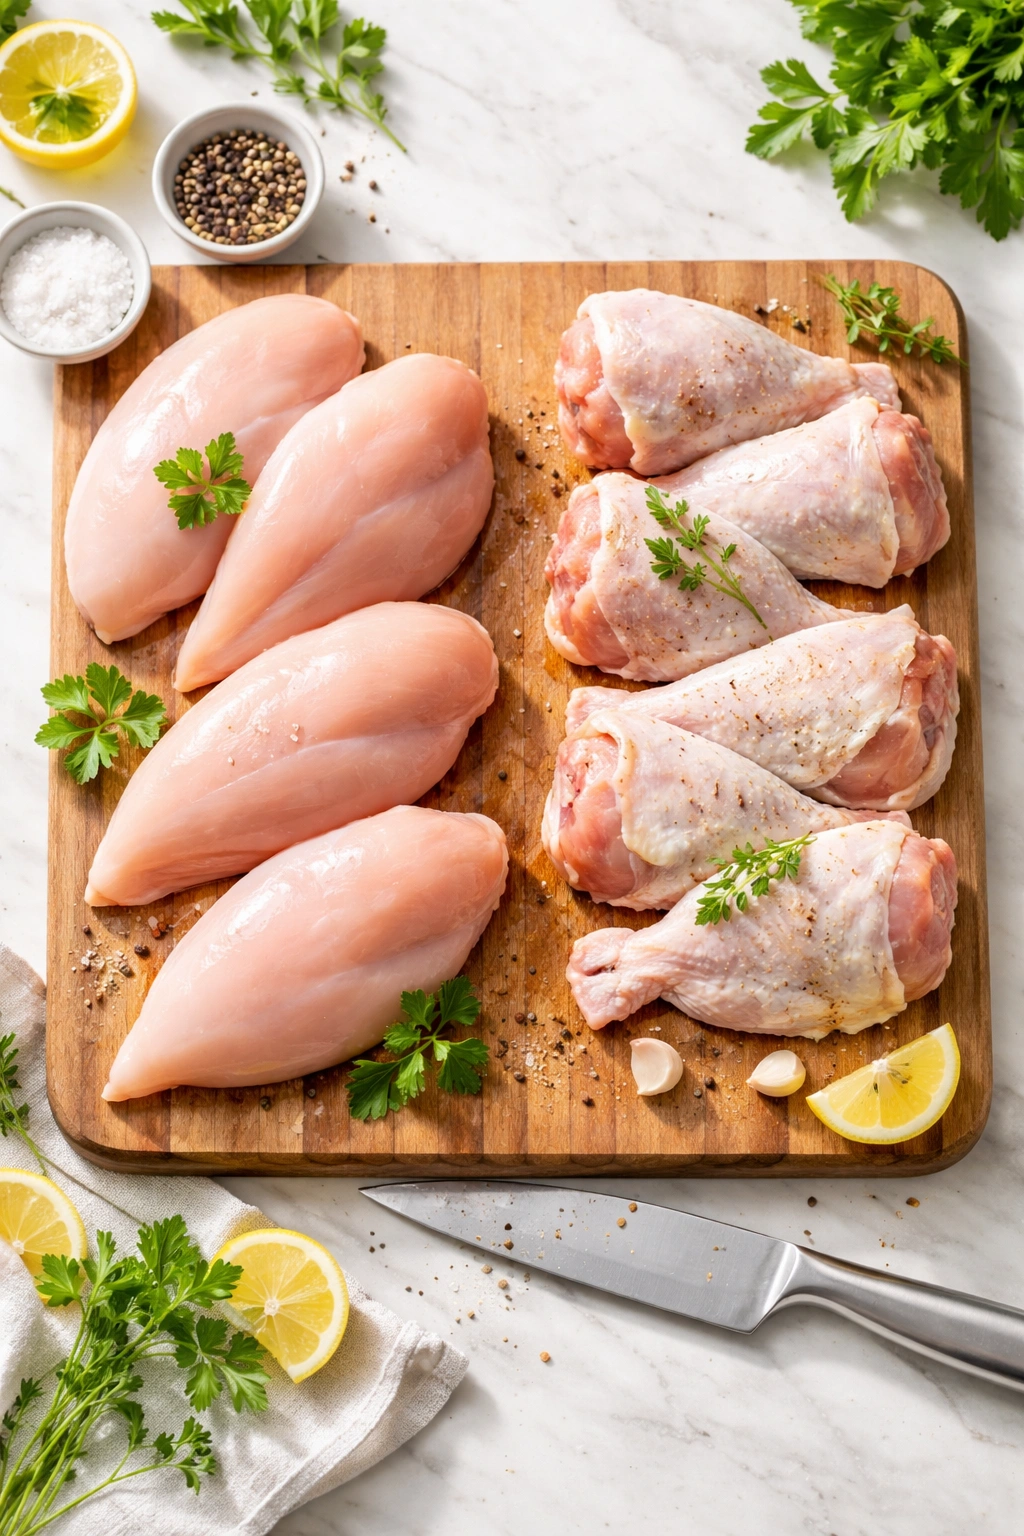
The type of chicken you select dramatically affects both flavor and cooking time, so understanding your options helps you pick the best fit for your meal prep goals. Boneless, skinless chicken breasts are the lean choice—they’re lower in fat, cook quickly, and have a mild flavor that works with any cuisine. They’re perfect if you’re watching calories or prefer a lighter meal.
Chicken thighs, whether boneless or skin-on, have more fat and connective tissue, which keeps them incredibly juicy even when slightly overcooked. Thighs have a richer, more complex flavor than breasts, making them ideal for curries, stews, and dishes where you want chicken to be a prominent flavor component rather than a neutral protein carrier.
For budget-conscious meal prepping, buying bone-in, skin-on chicken thighs costs significantly less per pound than boneless breasts. You’ll spend a few extra minutes removing the skin and bones, but the savings add up quickly. Whole chickens are the cheapest option per pound, and you can break them down yourself, freeze the bones for stock, and have multiple cuts ready for different recipes.
The thickness of chicken breasts matters more than people realize. If some pieces are noticeably thicker than others, either pound them gently to even them out or cut the thicker pieces in half lengthwise. This ensures everything cooks at the same rate—you won’t end up with some pieces overcooked while others aren’t done.
Storage and Food Safety Guidelines
Proper storage isn’t just about taste—it’s about preventing foodborne illness, so following guidelines isn’t optional. According to food safety standards, cooked chicken is safe to eat for 3 to 4 days when stored at 40°F or below in airtight containers. This timeline assumes your refrigerator maintains the proper temperature consistently.
Get your cooked chicken into the refrigerator within 2 hours of cooking (or 1 hour if your kitchen is very warm). The “danger zone” between 40°F and 140°F is where bacteria multiply rapidly, so minimizing the time your chicken spends in this zone is critical. If you’re cooking large batches, divide them into shallow containers so they cool to the proper temperature faster.
Frozen cooked chicken stays safe indefinitely, but quality deteriorates after about 3 months. Freezer burn—which occurs when moisture escapes from the chicken—doesn’t make it unsafe to eat, but it does affect texture and flavor. Prevent freezer burn by removing as much air as possible from freezer bags, or using vacuum-sealed containers designed for long-term storage.
Label everything with the date it was cooked—a simple piece of tape with a permanent marker prevents guessing. If you’re storing multiple batches or variations (like some with teriyaki seasoning and some plain), label those too, so you know exactly what you’re reheating.
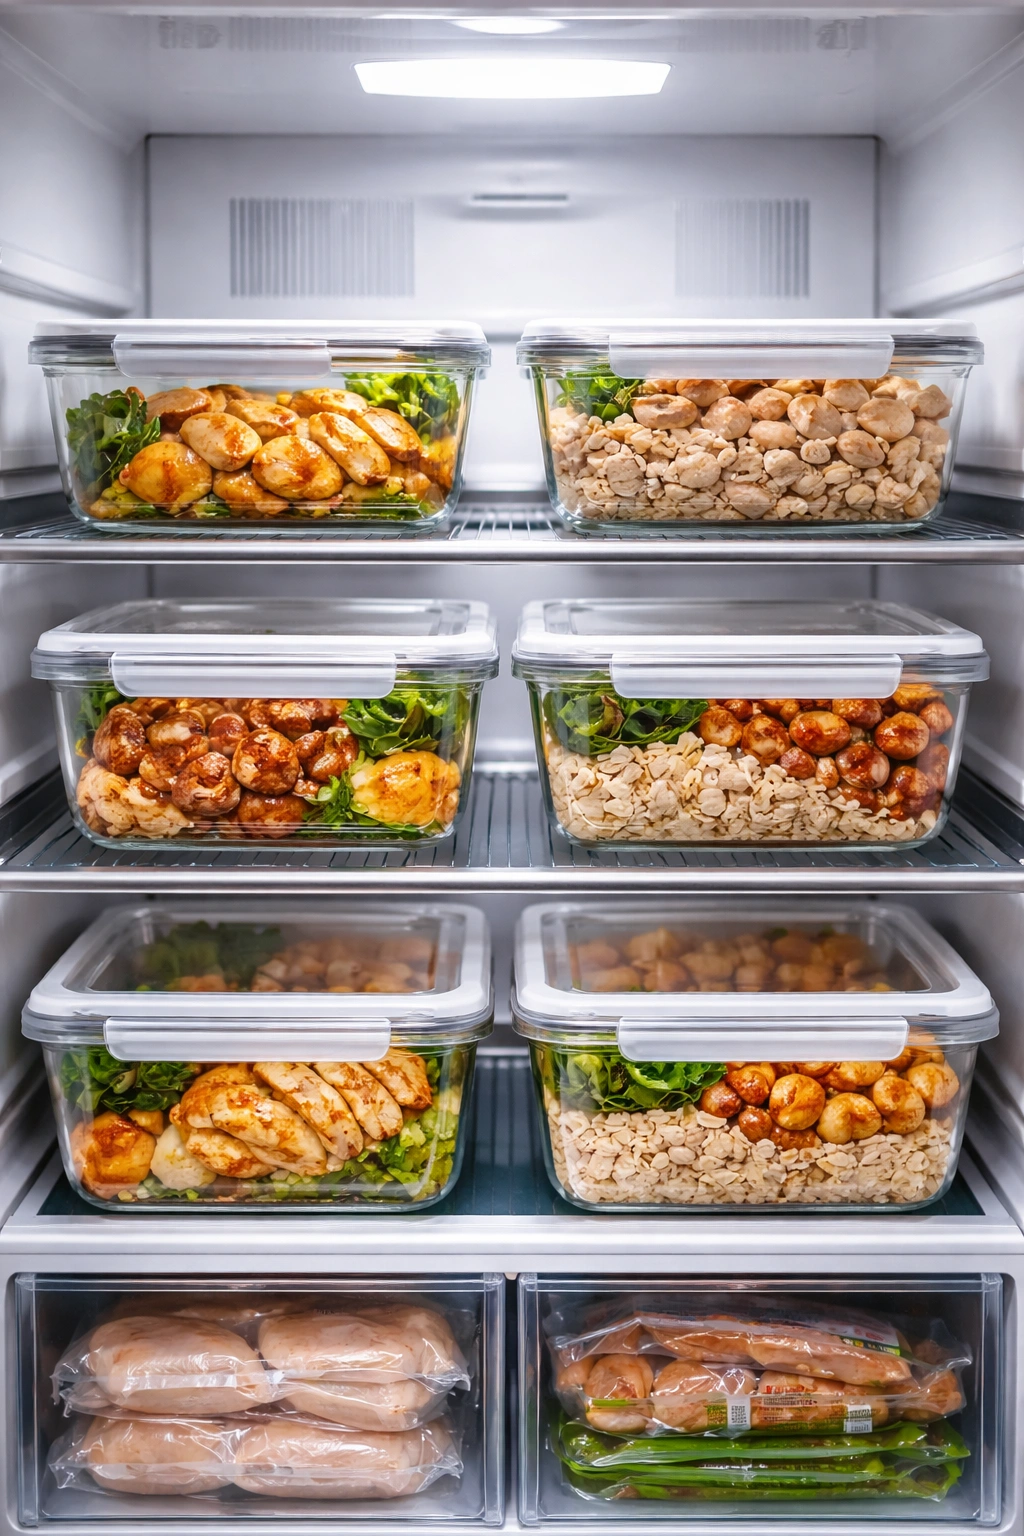
How to Store Meal Prep Chicken Properly
Glass containers are superior to plastic for storing cooked chicken because they don’t retain odors or stains, don’t leach chemicals when heated, and distribute heat more evenly during reheating. If you use plastic, opt for BPA-free containers and avoid reheating in the plastic—transfer the chicken to a glass dish or ceramic plate first.
Fill containers up to about three-quarters full, leaving headspace so that air can circulate slightly and any residual heat can escape. This prevents condensation from collecting on the lid and dripping back onto the chicken, which promotes bacterial growth. Once the containers reach room temperature (usually within an hour of cooking), move them to the refrigerator.
For freezer storage, flat freezer bags take up significantly less space than containers and allow you to remove air easily. Fill each bag with a single meal-sized portion of chicken (about 3 to 4 ounces per person), then use your hands to press out as much air as possible before sealing. Stack the flat bags on top of each other in the freezer to maximize space—they thaw much faster than thick blocks of frozen chicken anyway.
Portion your chicken before freezing if possible, so you can thaw only what you need rather than defrosting an entire batch. Thaw frozen chicken overnight in the refrigerator rather than at room temperature, which keeps it in the safe zone and prevents any bacterial growth.
Reheating Without Drying Out
Reheating is where many meal prep efforts fall apart—even perfectly cooked chicken becomes dry and rubbery if you use the wrong method. The microwave is the fastest option, but it’s also the harshest on texture, so if you have even five extra minutes, use a stovetop method instead.
For microwave reheating, place chicken in a microwave-safe container, cover it loosely (not sealed tightly), and add a splash of broth or water to create steam. Heat on 50% power rather than full power—this gentler approach cooks the chicken through without blasting it with intense heat. Two minutes for a regular portion is usually enough; add 30-second increments after that if needed.
Stovetop reheating is gentler and produces better results. Place the chicken in a covered pan over medium heat with just enough broth to prevent sticking. Let it warm through slowly—about 3 to 5 minutes for a meal-sized portion. The gentle, moist heat keeps the chicken juicy and even improves texture compared to reheating in the microwave.
Oven reheating works well for larger portions or if you’re reheating a full meal. Cover the container with foil and heat at 350°F for about 10 minutes, checking that the chicken is heated through (165°F internally) but not cooked further. This method works beautifully if you’re reheating an entire meal, as vegetables and grains reheat at roughly the same pace.
Never reheat chicken more than once—once it’s cooled, eat it within a few hours or refrigerate it immediately. Repeated heating cycles increase the risk of bacterial growth and negatively impact food safety.
Versatile Uses for Your Prepped Chicken

Once you’ve got a batch of meal prep chicken ready, the uses are genuinely endless. Dice it and toss it into grain bowls with rice, quinoa, or farro, then top with roasted vegetables, fresh greens, and your choice of sauce or dressing. Shredded chicken is perfect for tacos, burritos, quesadillas, enchiladas, and any handheld format where you want easy assembly.
Sliced chicken tops salads beautifully, adding protein and substance without making you feel like you’re eating plain leaves. It works in mason jar salads for grab-and-go lunches—layer the dressing on the bottom, then vegetables, grains, greens, and chicken on top, so everything stays separate until you shake it together right before eating.
Chicken works in pasta dishes, curries, stir-fries, soups, and casseroles. Shredded chicken mixed with mayo, chopped vegetables, and seasonings makes quick chicken salad for sandwiches or lettuce wraps. Dice it small and add it to egg fried rice, or mix it into a creamy risotto. The versatility is genuinely one of the best parts of meal prepping chicken—the same batch can become completely different meals throughout the week.
Make chicken salad variations with different flavor profiles: an Asian-inspired version with sesame oil and ginger, a Mediterranean version with sun-dried tomatoes and olives, or a classic version with dill and tarragon. These variations mean you never get bored eating the same chicken twice.
Common Mistakes to Avoid
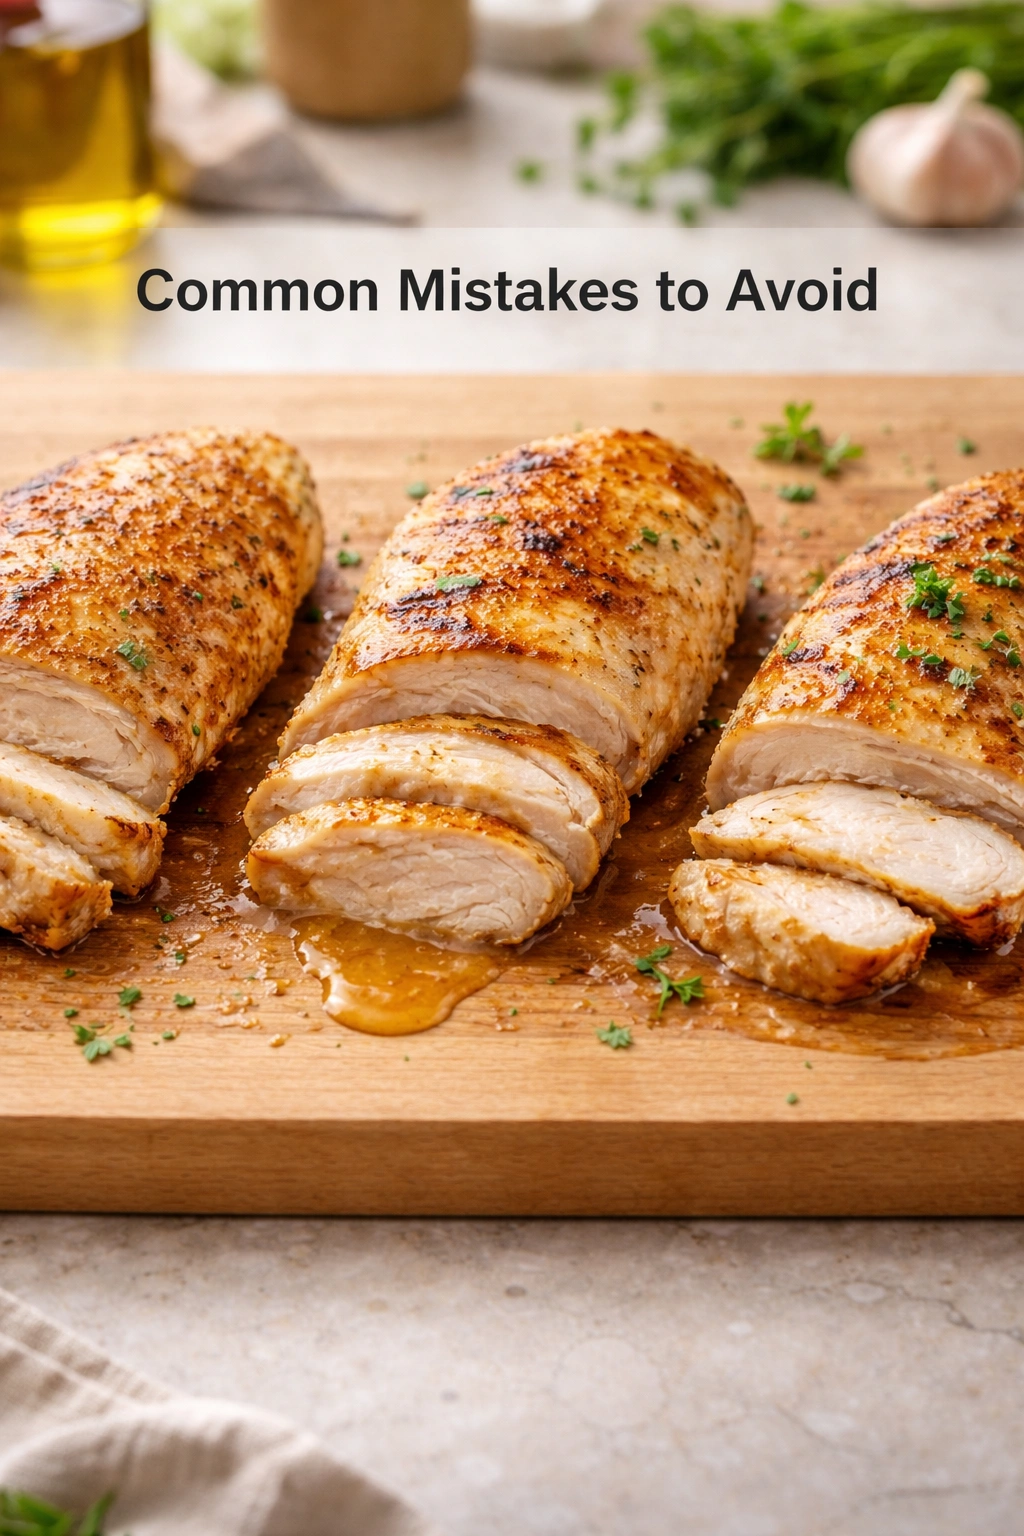
Overcooking is the most common mistake, and it’s almost always intentional—people cook chicken past 165°F “to be safe,” not realizing that 165°F is the temperature where all harmful bacteria are eliminated. Anything beyond that just makes your chicken dry. Use a meat thermometer, check at 165°F, and pull it immediately.
Skipping the resting period is another major mistake. Those 5 to 10 minutes after cooking aren’t wasted time—they’re essential for allowing juices to redistribute and firm up slightly, so everything stays juicy when you cut or shred the chicken. If you skip this step, you’ll literally watch all those juices run out onto your cutting board and into the trash.
Cutting chicken into small pieces before storage is a mistake that seems convenient at the time but backfires during reheating. Smaller pieces have more surface area exposed to air, so they dry out faster during storage and reheating. Keep chicken in larger pieces and cut only as needed throughout the week.
Storing chicken without proper containers or labels leads to waste and food safety issues. Cooked chicken in an unmarked container could be anything—how do you know if it’s been there 2 days or 2 weeks? Label everything with the date and contents, and use proper airtight containers, not just plastic wrap or aluminum foil.
Neglecting to cool chicken before refrigerating is a mistake many home cooks make. Hot chicken warms up your entire refrigerator, potentially raising the temperature above safe levels and affecting other foods. Let cooked chicken cool to room temperature on the counter (about 1 to 2 hours) before transferring it to the fridge.
Pro Tips for Better Results
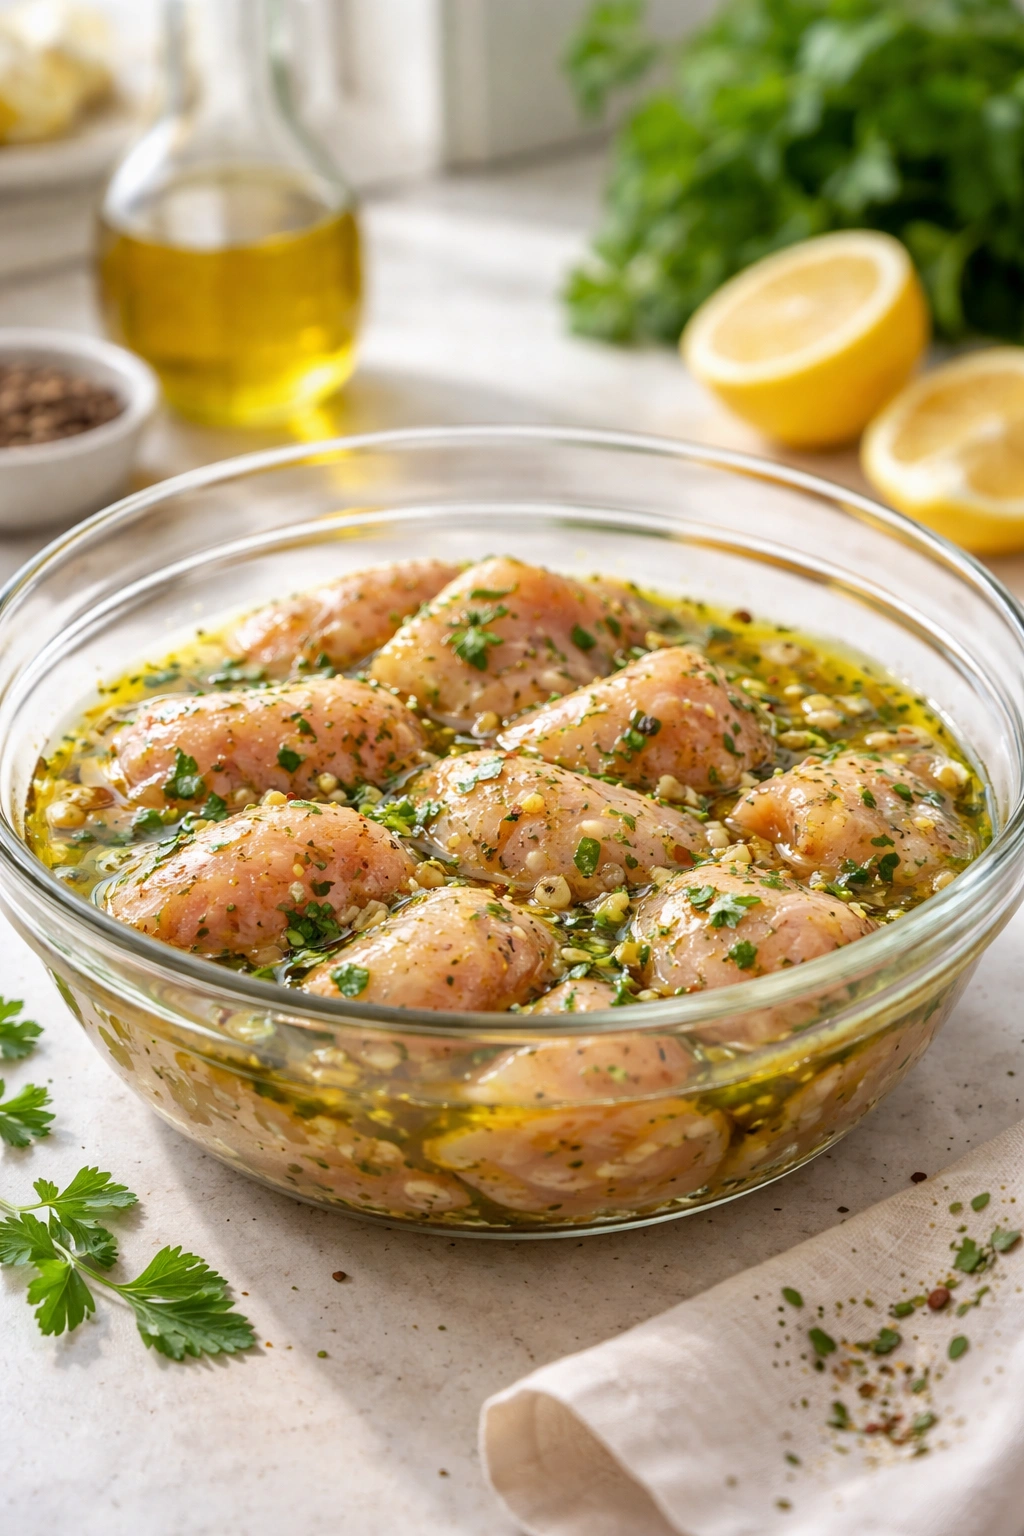
Marinate chicken before cooking whenever possible—even 30 minutes in a simple mixture of olive oil, lemon juice, and seasonings dramatically improves flavor and tenderness. The acid in the marinade breaks down proteins slightly, making the meat more tender, while the seasonings penetrate throughout. Plan to marinate the night before if you want maximum flavor development.
Cut chicken breasts in half lengthwise to create thinner cutlets that cook faster and more evenly. This also increases surface area for browning, which adds flavor. Thinner cutlets are done in 12 to 15 minutes rather than 20 to 25 minutes, which is helpful when you’re cooking multiple batches or short on time.
Pat chicken completely dry before cooking using any method except poaching. Moisture on the surface prevents browning and creates steam that can make the exterior rubbery. Paper towels work fine, or use a clean kitchen towel and really press out any excess moisture.
Season aggressively—most home cooks undersalt their chicken, which makes it taste bland even when it’s technically perfectly cooked. Season before cooking, not after, so the salt has time to penetrate the meat. You can always add more salt later, but you can’t remove it, so start with confidence and taste as you go.
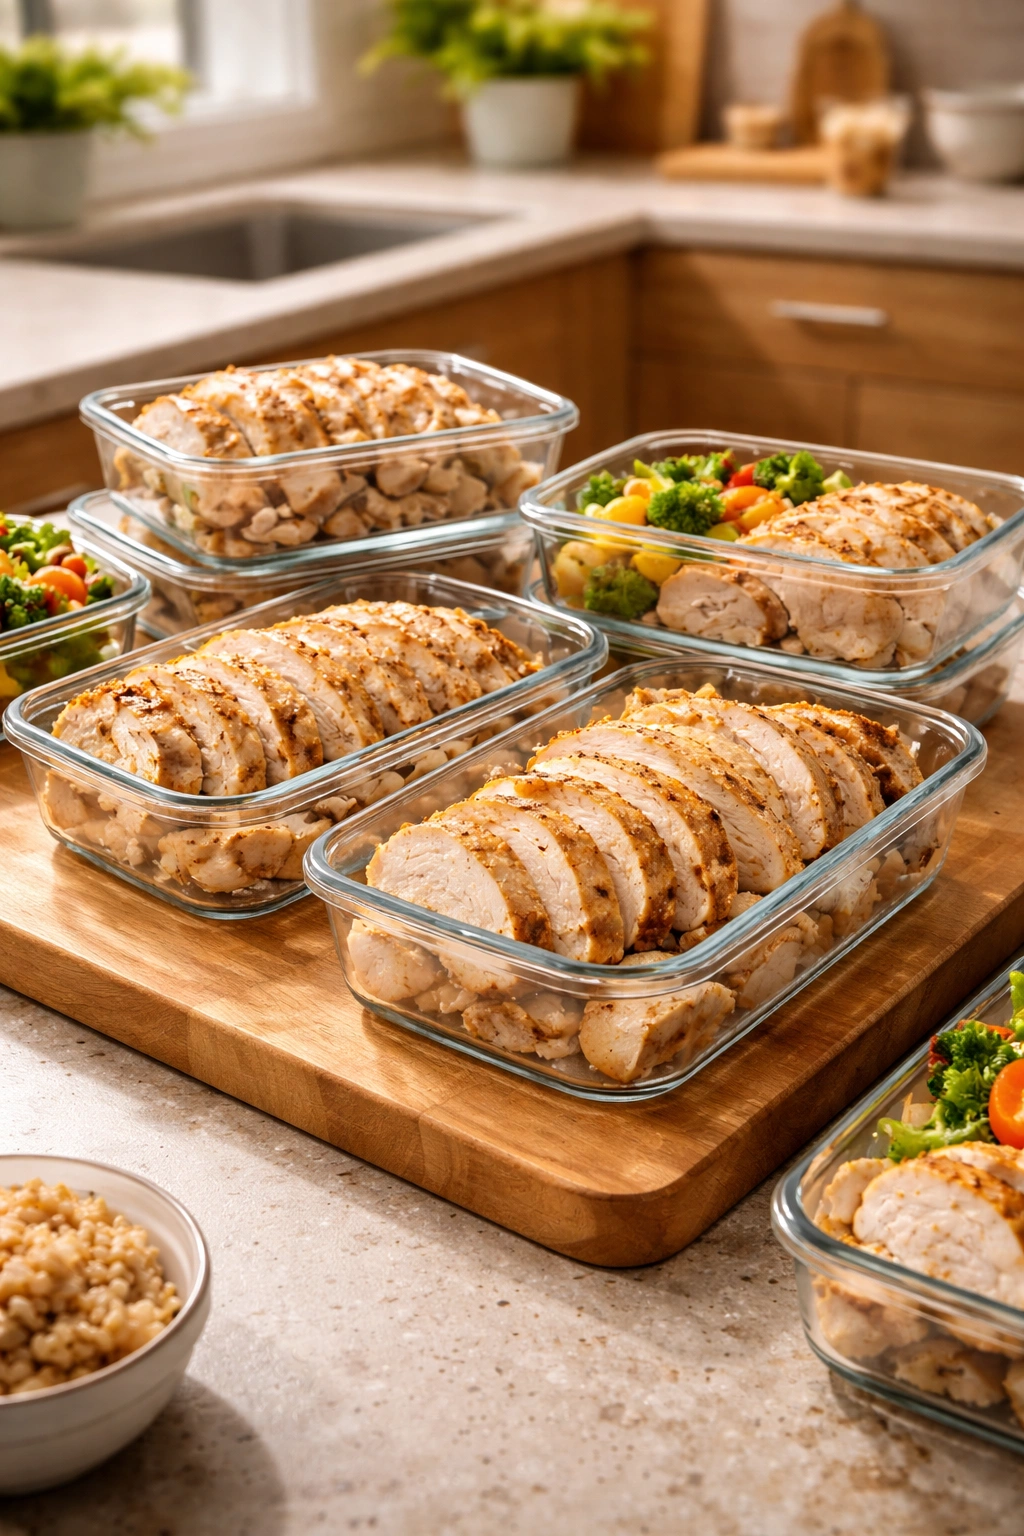
Make double or triple batches when you’re already cooking a meal-sized portion. The effort difference between cooking 2 chicken breasts and 6 is minimal—you’re just using a larger pan and cooking for slightly longer. One meal prep session that takes 45 minutes can set you up with chicken for an entire week, eliminating that decision fatigue every night.
Invest in an instant-read meat thermometer—it’s the single best tool for cooking chicken perfectly every time. You’ll spend about $15 to $30 and never again worry about whether your chicken is done or overdone. This tool pays for itself in the first few weeks by preventing chicken waste from overcooking.
Final Thoughts
Meal prepping chicken isn’t complicated—it’s just about picking a method that fits your schedule and sticking with it long enough to develop the rhythm. Whether you’re oven-baking while managing other tasks, using your Instant Pot for speed, or slowly poaching for ultimate tenderness, the key is consistency and proper storage. Once you nail the basics of your chosen method, you can build an entire week of healthy meals around properly prepped chicken.
The real advantage of having chicken ready to go isn’t just about saving time—it’s about making the healthy choice the easy choice. When you’re tired at the end of the day, hungry, and exhausted from decision-making, a container of perfectly cooked chicken means the difference between a healthy meal and reaching for takeout or processed foods. You’ve already invested the effort and planning, so eating well becomes automatic rather than something you have to negotiate with yourself about.
Start with whichever method appeals to you most, cook your first batch this week, and see how having protein ready changes your relationship with meal planning. You’ll likely find that one method becomes your go-to, though experimenting with different techniques keeps things interesting and builds flexibility into your routine. Chicken is forgiving, versatile, and genuinely hard to mess up once you understand the basic principles. Your future self will absolutely thank you for taking this step.