Forget everything you think you know about dry, disappointing baked chicken breasts. The problem isn’t chicken itself—it’s that most recipes approach it all wrong, either cooking it too slowly at low temperatures, skipping a crucial brining step, or just not seasoning it well enough to actually taste good. This recipe fixes all of that. With a straightforward method that takes less than 25 minutes from start to finish, you’ll get chicken that’s so tender and juicy you won’t believe it came straight from your oven without any complex techniques, fancy equipment, or hours of marinating. The secret? A combination of high-heat baking, a foolproof spice blend with a touch of brown sugar for caramelization, and knowing exactly when to pull the pan out so the chicken stays moist instead of turning into rubber.
The best part is that this works every single time. Whether you’re cooking for a weeknight family dinner, prepping protein for the entire week ahead, or impressing guests with a simple, elegant main course, this baked chicken delivers results that feel far more sophisticated than the minimal effort required. Once you master this method, you’ll find yourself making it constantly—not just because it’s reliable, but because it’s genuinely delicious and pairs with absolutely everything.
Why This Recipe Method Works So Well
There’s a reason this approach appears in countless professional kitchens and on food blogs everywhere. The technique respects the basic biology of chicken while working around its notorious pitfalls. When you bake chicken breasts at a lower temperature like 350°F, they take 30-40 minutes to cook through, giving plenty of time for the outside to dry out while the inside finishes cooking. By baking at high heat—425 to 450°F—the exterior develops a golden, caramelized crust in a matter of minutes, which acts like a seal that traps moisture inside. The entire process finishes in 15-20 minutes, meaning the interior stays tender and juicy before it has any chance to dry out.
The second reason this works involves the spice blend itself. Most basic seasonings alone won’t properly flavor chicken in such a short cooking time. But brown sugar is the game-changer. As it caramelizes on the surface, it doesn’t just add sweetness—it creates a slightly sticky paste that helps other spices adhere to the chicken and creates an irresistible crust. The paprika adds both color and a subtle smoky depth, while garlic and onion powder provide savory backbone without any of the moisture that fresh garlic or onions would introduce.
Equally important is what doesn’t go in this recipe. There’s no complicated marinade to prep ahead, no brining that takes six hours, and no searing in a hot skillet first. Just pound, season, and bake. This simplicity is intentional—every step has been tested and refined to cut out anything that doesn’t genuinely improve the final result.
The Science Behind Juicy Oven-Baked Chicken
Understanding what actually happens inside the chicken as it bakes helps explain why this method works and why cutting corners will fail. Chicken breast is lean muscle, which means it has relatively little fat and lots of protein fibers that contract as they heat. Once those proteins reach about 165°F internally, they’ve fully coagulated and the meat is safely cooked. But if you keep cooking past that point—even by just a few degrees—the proteins squeeze out their moisture, and you end up with dry, chalky chicken.
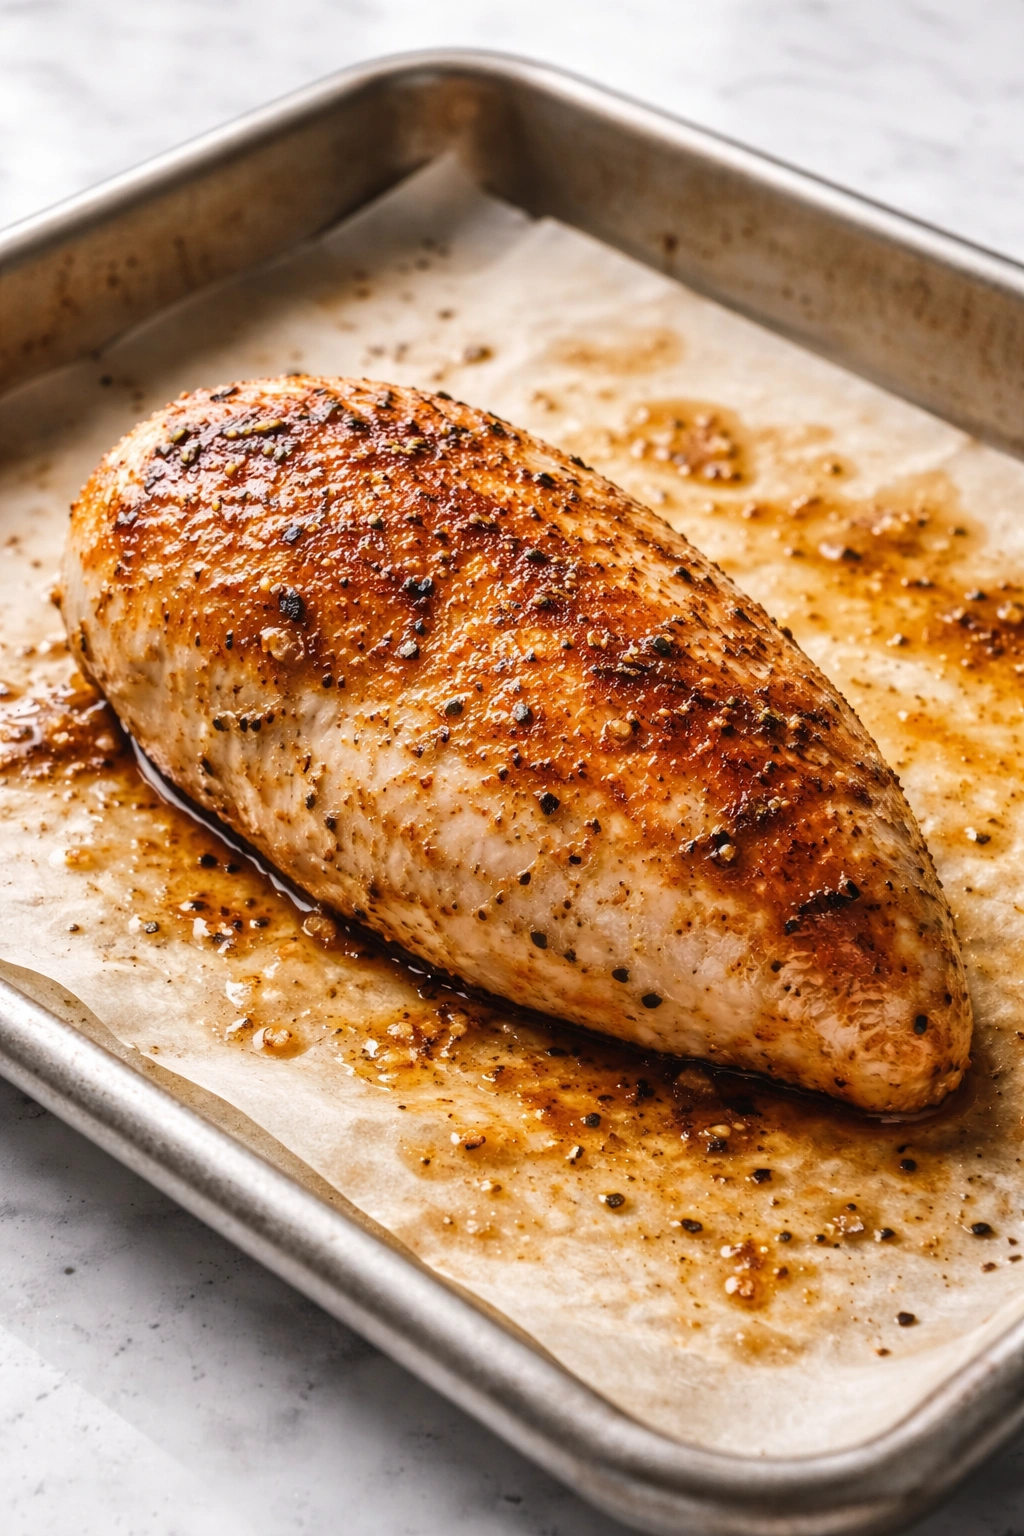
The race is on, then: you need heat high enough to cook the chicken through quickly, but you also need to stop cooking the moment it reaches 165°F, not a degree beyond. High-temperature baking accomplishes both. At 425-450°F, the outside heats very quickly, which means the temperature gradient from outside to inside is steep. The chicken cooks from the outside in, and by the time the very center reaches the safe temperature, the exterior hasn’t been exposed to intense heat for long enough to dry out.
The brown sugar in the seasoning plays another physiological role. As the chicken bakes, the sugar caramelizes and the moisture in the chicken’s surface creates a slightly humid microclimate under that seasoning crust. This keeps the outside from overcooking while the interior finishes. It’s a delicate balance, which is why a meat thermometer becomes your most valuable tool—it’s the only way to know exactly when you’ve hit that sweet spot.
Choosing the Right Chicken for Best Results
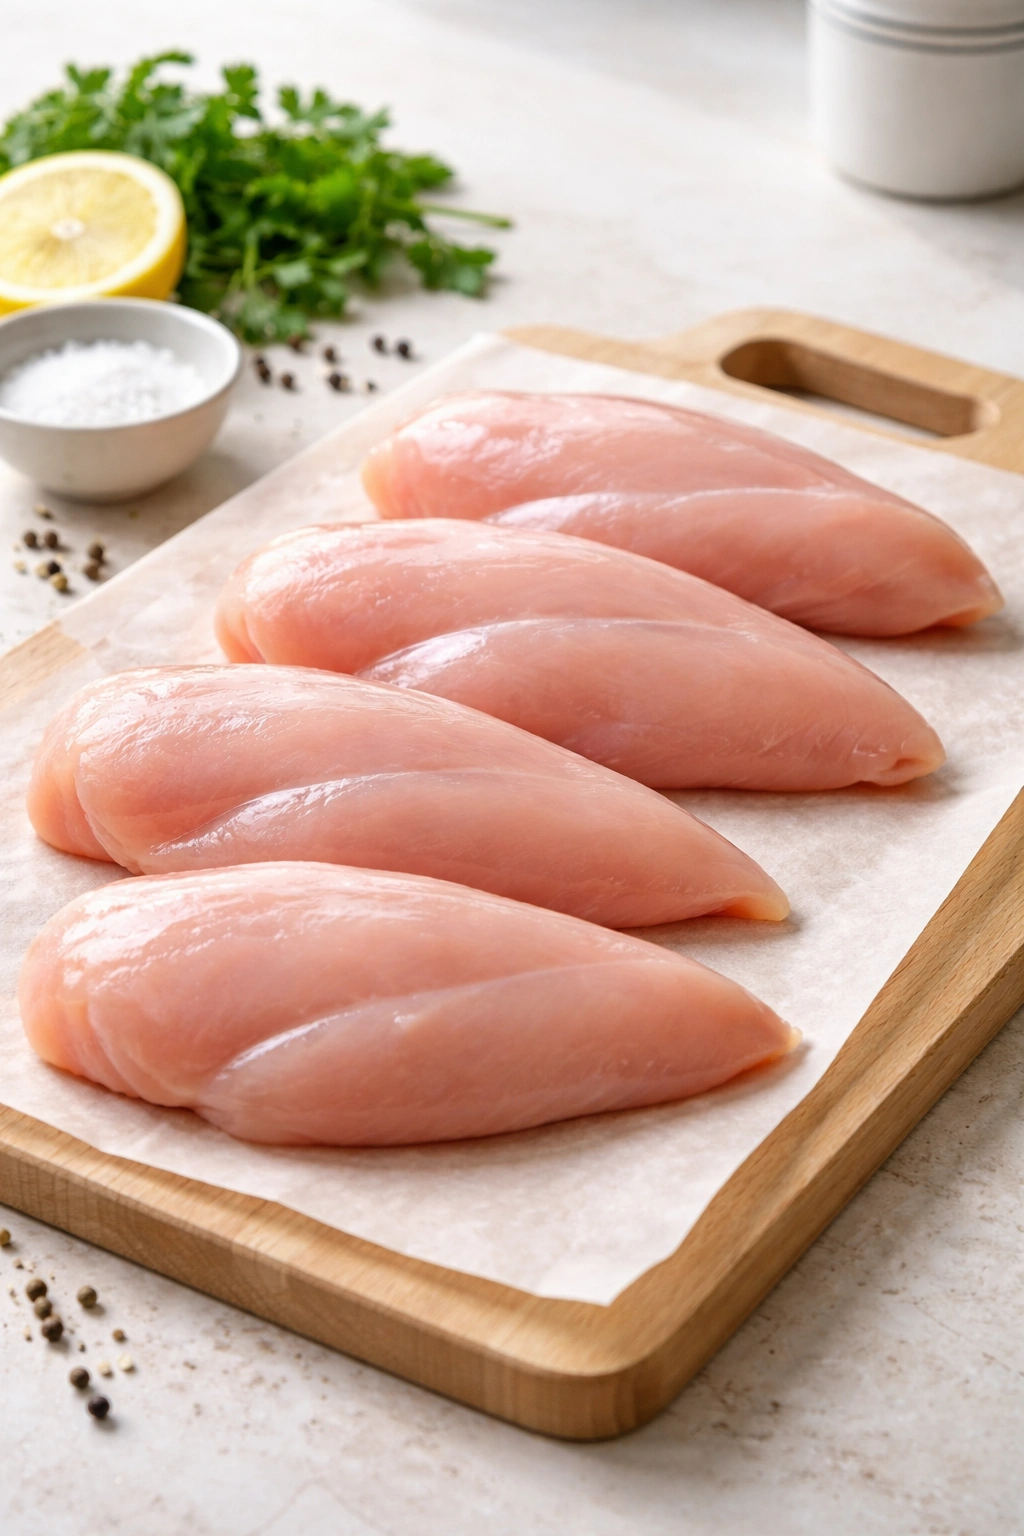
Not all chicken breasts are created equal, and your success starts at the grocery store. Look for boneless, skinless chicken breasts that are as uniform in thickness as possible. Ideally, they should be about 1 to 1.5 inches thick at their thickest point. If you find breasts that are thicker on one end and taper to almost nothing on the other—which is common—you’ll need to even them out by pounding, which we’ll cover in the preparation section.
Fresh versus frozen makes a real difference here. Fresh chicken breasts, never frozen, will cook slightly faster and more evenly than previously frozen ones that have been thawed. If you’re using frozen chicken, make sure to thaw it completely in the refrigerator before cooking—never try to bake them from solid frozen, as the outsides will overcook before the centers are done. That said, if you’re in a genuine time crunch, thawing them in cold water (submerged in a sealed bag) takes only 30 minutes and works well.
Watch for chicken that’s been pre-brined or pre-salted. Many producers now add a saltwater solution to chicken breasts, which technically helps with juiciness but can sometimes make them salty. Check the label—if it says “enhanced” or “pre-brined,” you’re already working with added sodium, so you might reduce the salt in the seasoning blend slightly to compensate.
Size matters more than you’d think. Try to choose breasts that are roughly the same size so they cook evenly. If you have one that’s noticeably larger or smaller than the others, set it aside and cook it separately, or cut the larger one in half to match the thickness of the smaller ones. Most chicken breasts you’ll find range from 6 to 8 ounces, which is the sweet spot for 15-20 minute cooking times at high heat.
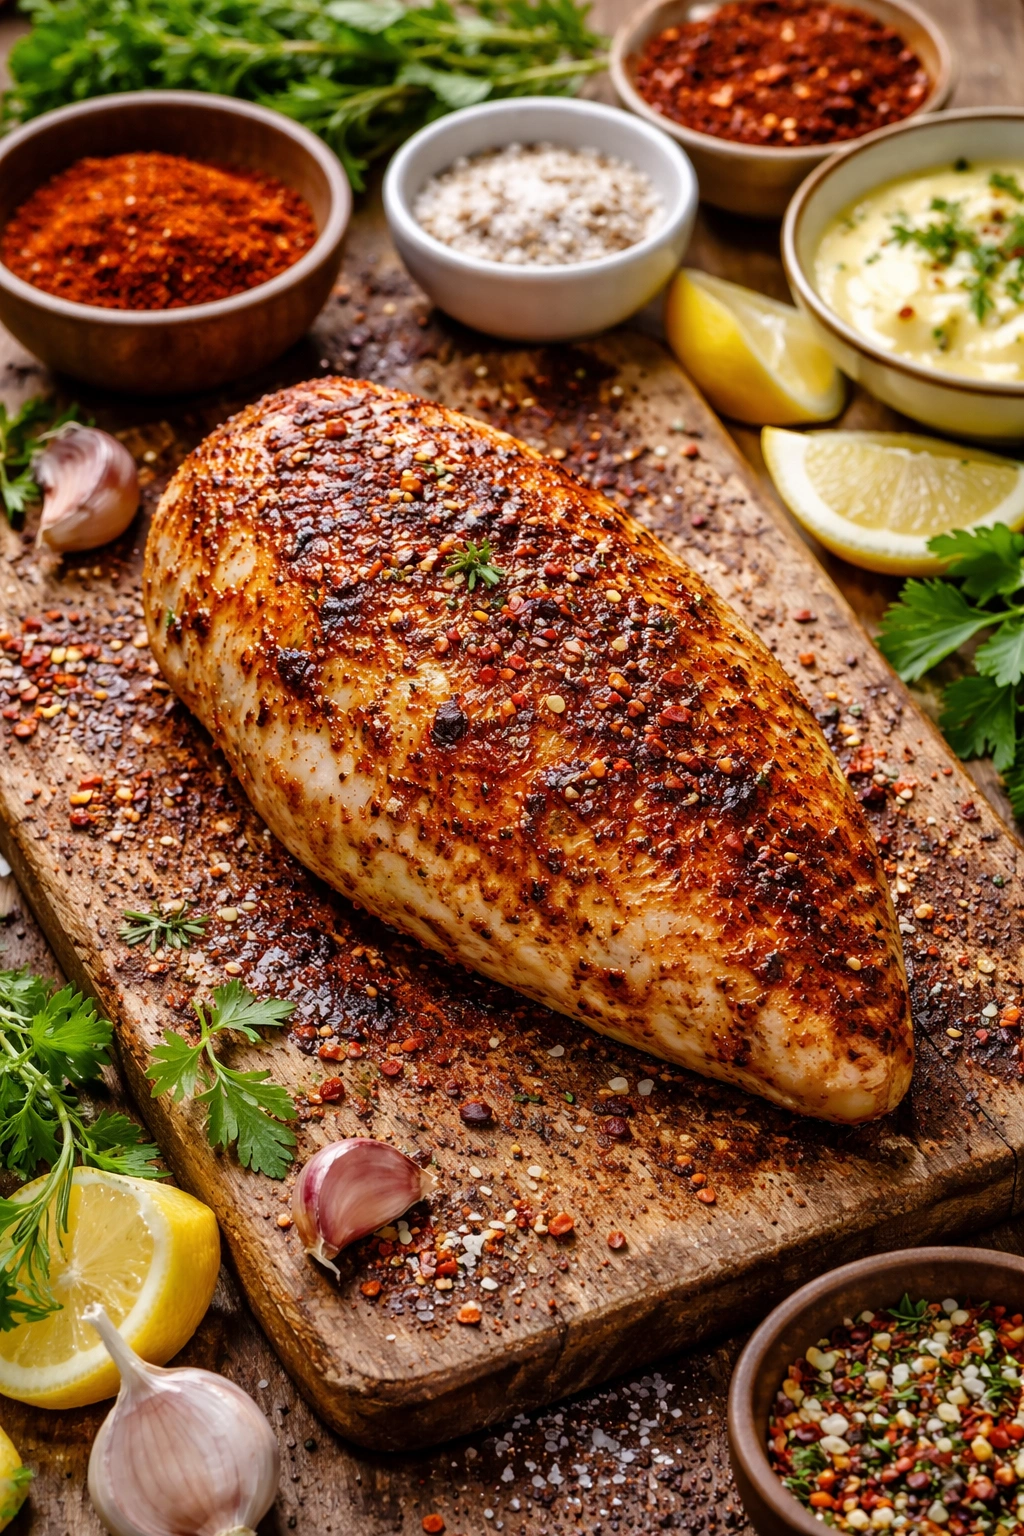
Creating the Magic Seasoning Blend
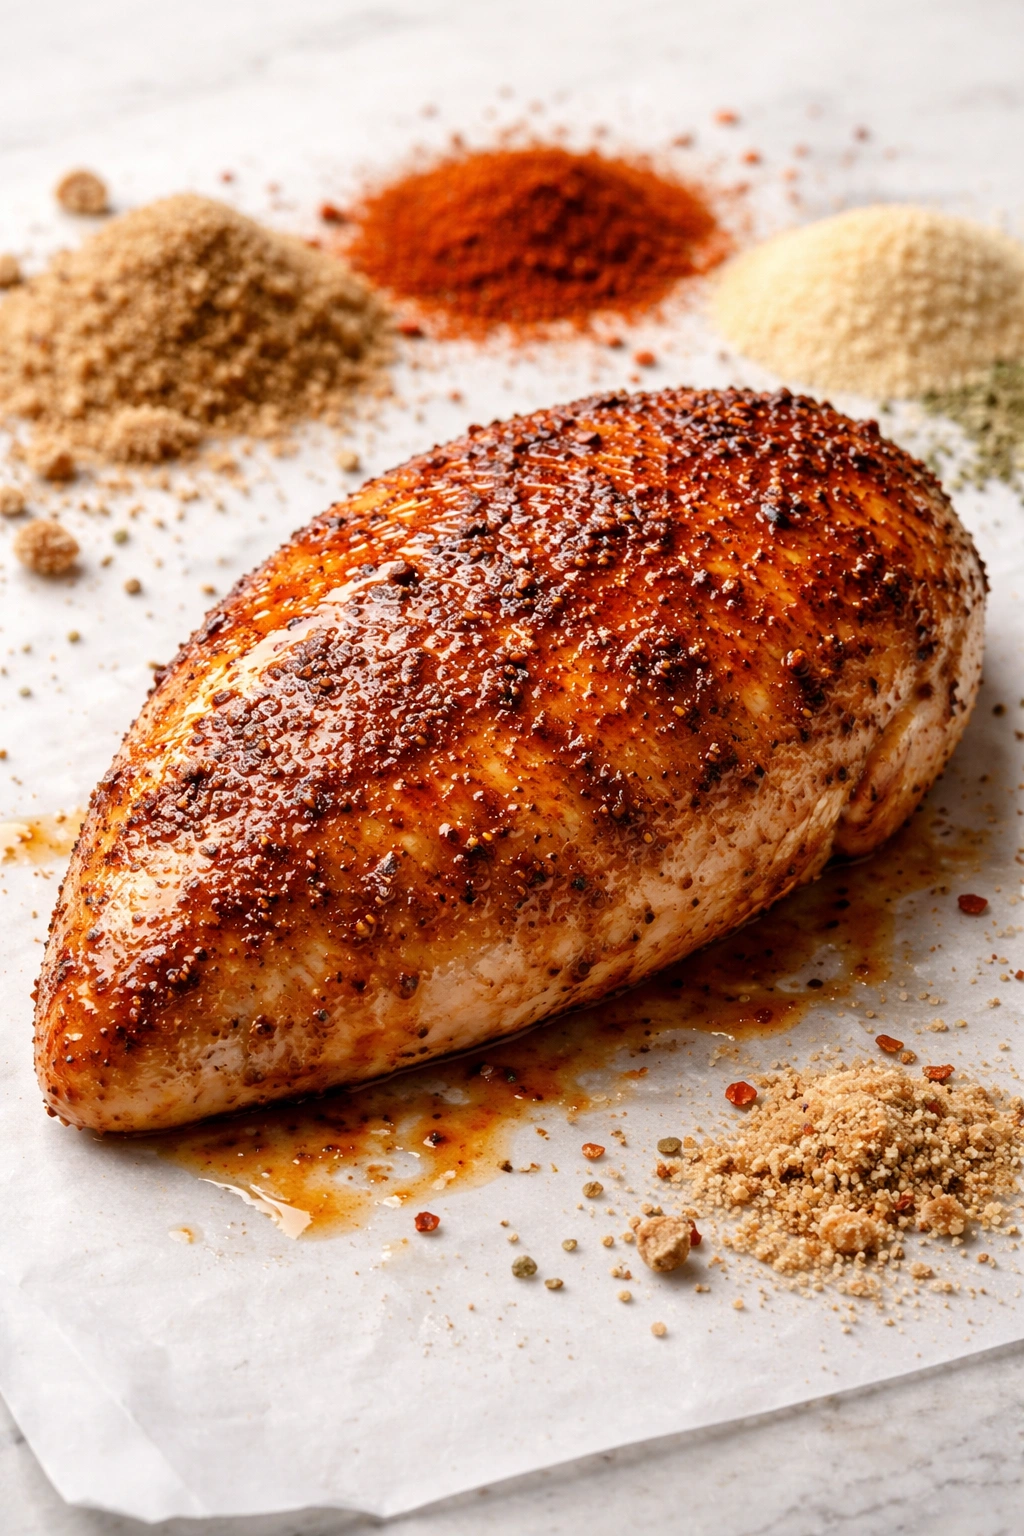
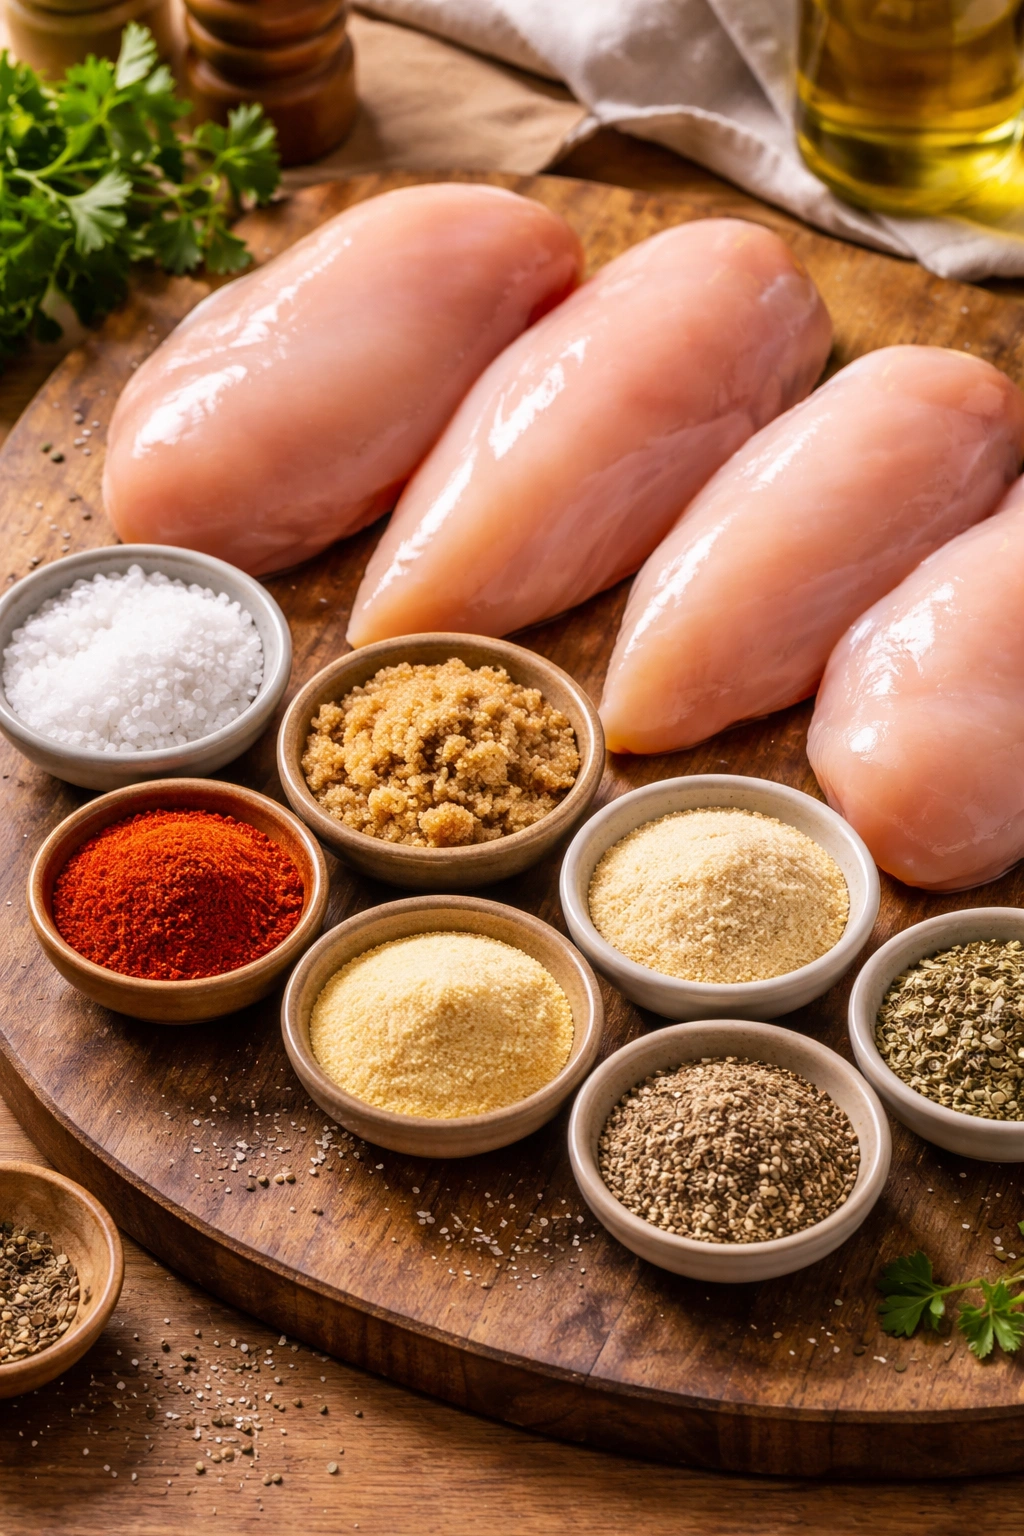
This seasoning blend is simple enough to fit on a small index card, but it’s surprisingly complex in flavor. The combination works because each ingredient plays a distinct role, and they build on each other rather than competing.
Brown sugar is the star. Use soft, fresh brown sugar—not the hard brick that’s been in your cabinet for two years. The moisture in fresh brown sugar helps it dissolve evenly and coat the chicken thoroughly. If your brown sugar is clumpy, break it apart with your fingers or pulse it briefly in a food processor before mixing. About 1 tablespoon of brown sugar per four chicken breasts gives you enough to create a visible crust without making the chicken taste sweet.
Paprika adds color and depth. You have options here: sweet paprika gives a mild, slightly fruity taste; smoked paprika adds a distinctly smoky, barbecue-like flavor; and hot paprika brings actual heat. Most people reach for sweet or smoked. Start with 1 teaspoon per four breasts. If your paprika has been sitting in the back of the cabinet for more than a year, replace it—paprika’s flavor fades faster than most spices, and old paprika will disappoint you.
Garlic powder and onion powder provide savory richness. Fresh garlic or onions would add too much moisture and cook unevenly on the chicken’s surface, so the powdered forms work better here. Use just 1 teaspoon each to avoid overpowering the dish. These are common, inexpensive ingredients, so there’s no reason not to have fresh ones on hand.
Salt and black pepper are non-negotiable. Salt does more than just taste salty—it enhances the perception of all other flavors. Use fine sea salt or kosher salt (which actually measures differently, so check your recipe carefully). Freshly ground black pepper tastes markedly better than pre-ground, though either works. Add about 1.5 teaspoons total salt and ½ teaspoon black pepper per four breasts.
Optional additions that elevate the blend include dried oregano or thyme for an herbier profile, a tiny pinch of cayenne for subtle heat, or a quarter teaspoon of smoked paprika mixed with sweet paprika for complexity. The beauty of this seasoning approach is that you can adapt it to your preferences or what you have on hand.
How to Pound Chicken to Even Thickness
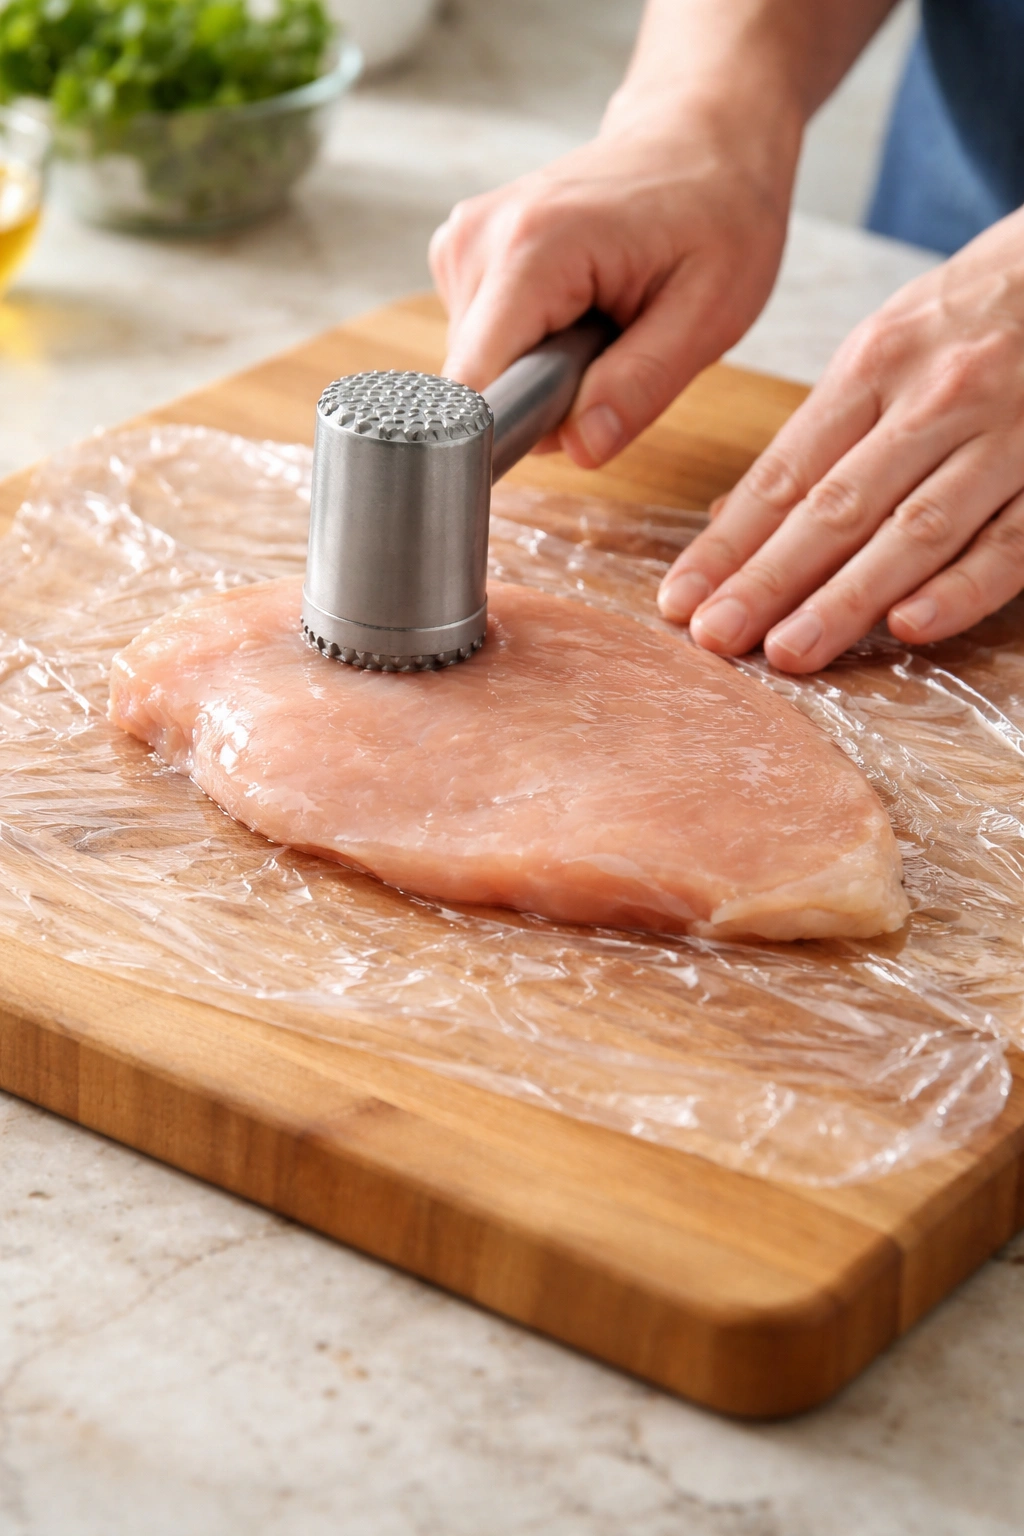
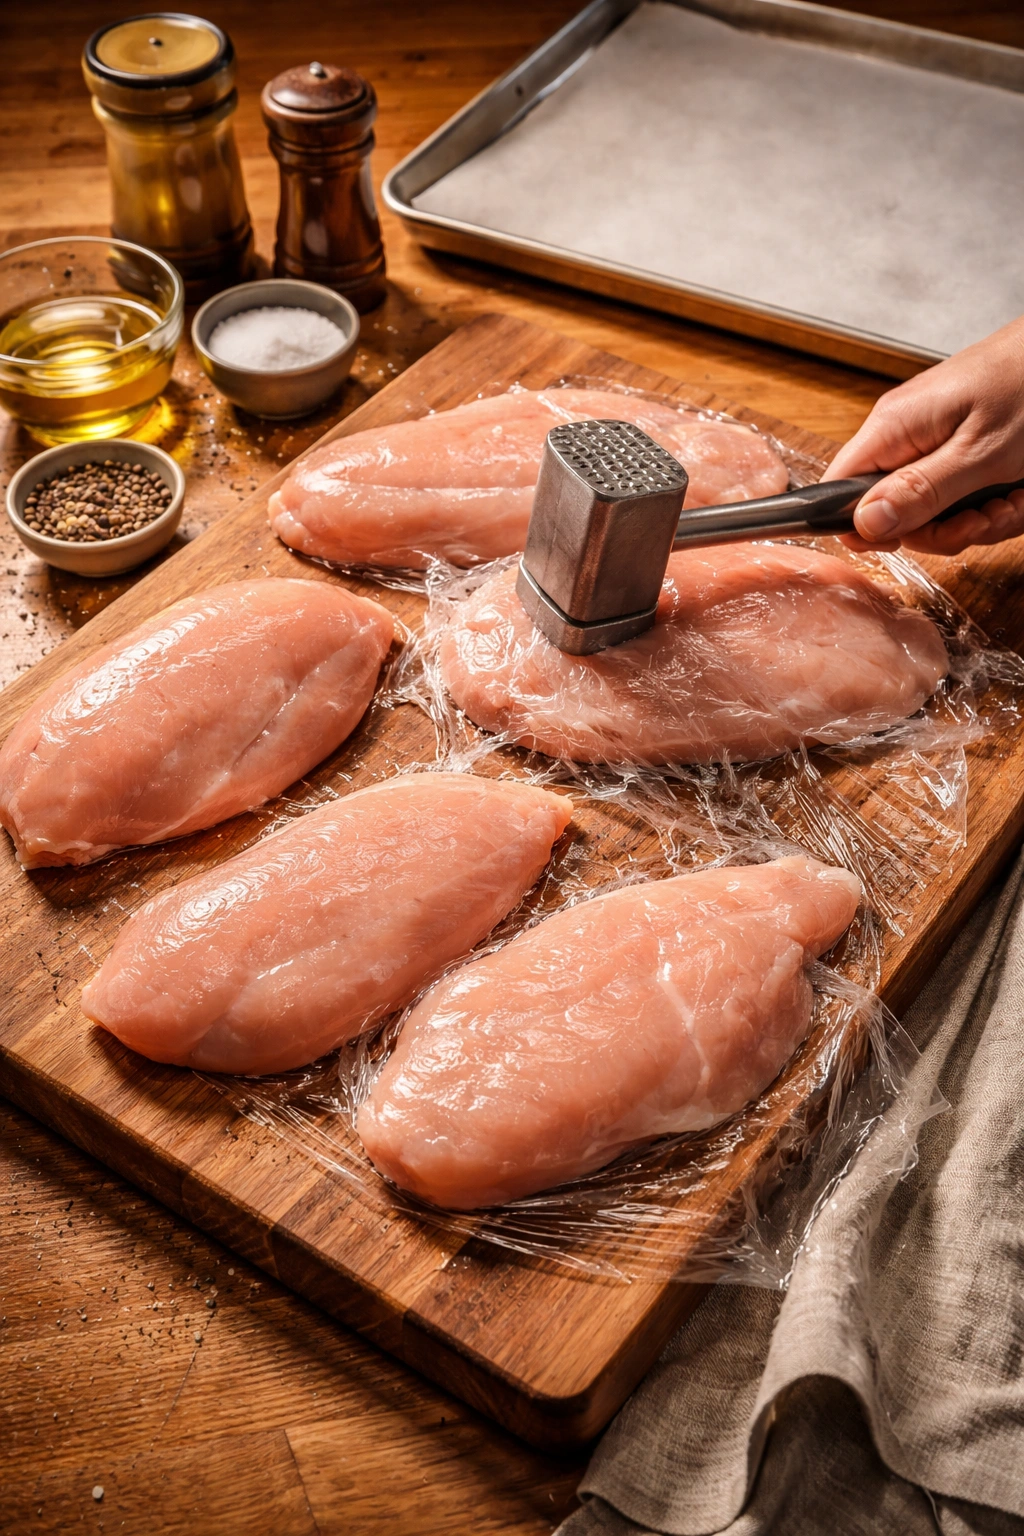
This step feels optional but absolutely isn’t. Pounding the chicken to uniform thickness is what separates beautifully cooked chicken from a disaster where the thin end is rubbery and the thick end is still partially raw.
Place your chicken breasts on a clean cutting board, one at a time. Cover it with a layer of plastic wrap—this is important because it prevents splashing and also helps contain the moisture. Using a meat mallet (the flat side, not the spiked side), gently but firmly pound the thicker sections until the entire breast is roughly the same thickness. You’re not trying to pulverize it; you’re just evening it out. Aim for about 1 to 1.5 inches thick all over.
If you don’t have a meat mallet, a rolling pin, a small heavy skillet, or even the bottom of a sturdy measuring cup works. Some people use their fist, which is surprisingly effective and oddly therapeutic. The point is gentle, even pressure, not violence.
For larger chicken breasts—those that are noticeably thicker than 1.5 inches even after pounding—consider cutting them in half horizontally. This is called butterflying or creating a thin cutlet, and it ensures even faster, more reliable cooking. Two thinner pieces will cook more evenly than one thick piece that you’ve pounded flat.
Temperature and Timing for Perfect Doneness
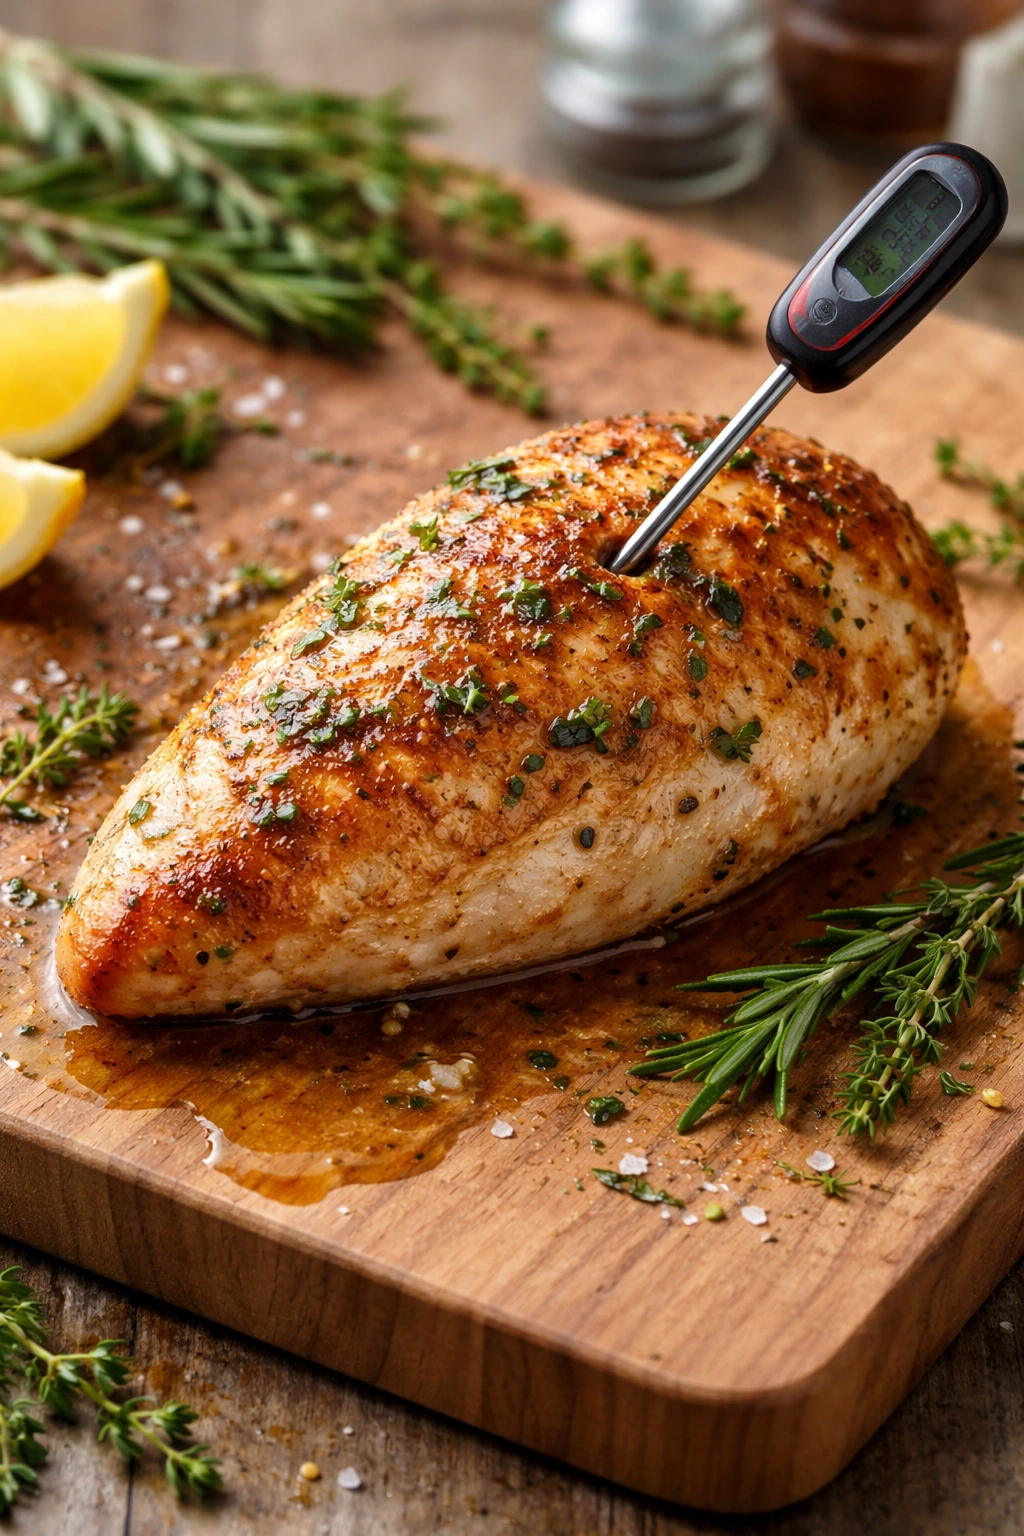
This is where precision matters. Oven temperature variations exist—some ovens run hot, some run cold—and chicken breast thickness varies too. That’s why a meat thermometer is your best friend, not a suggestion.
Preheat your oven to 425°F (220°C). Some recipes go as high as 450°F, which will shorten cooking time to 15-18 minutes. The trade-off is that higher heat increases the risk of the chicken overcooking before you notice. If you prefer a more forgiving range, 425°F gives you a bit more buffer time while still achieving that golden caramelization. For a convection oven, reduce the temperature to 400°F.
Line your baking dish (a 9×13-inch is standard) with parchment paper or foil for easy cleanup. Arrange the chicken in a single layer, making sure pieces aren’t touching or overlapping. They need space around them so air can circulate, otherwise the bottom will steam instead of baking. If your chicken pieces are crowded, use two baking dishes or a larger sheet pan.
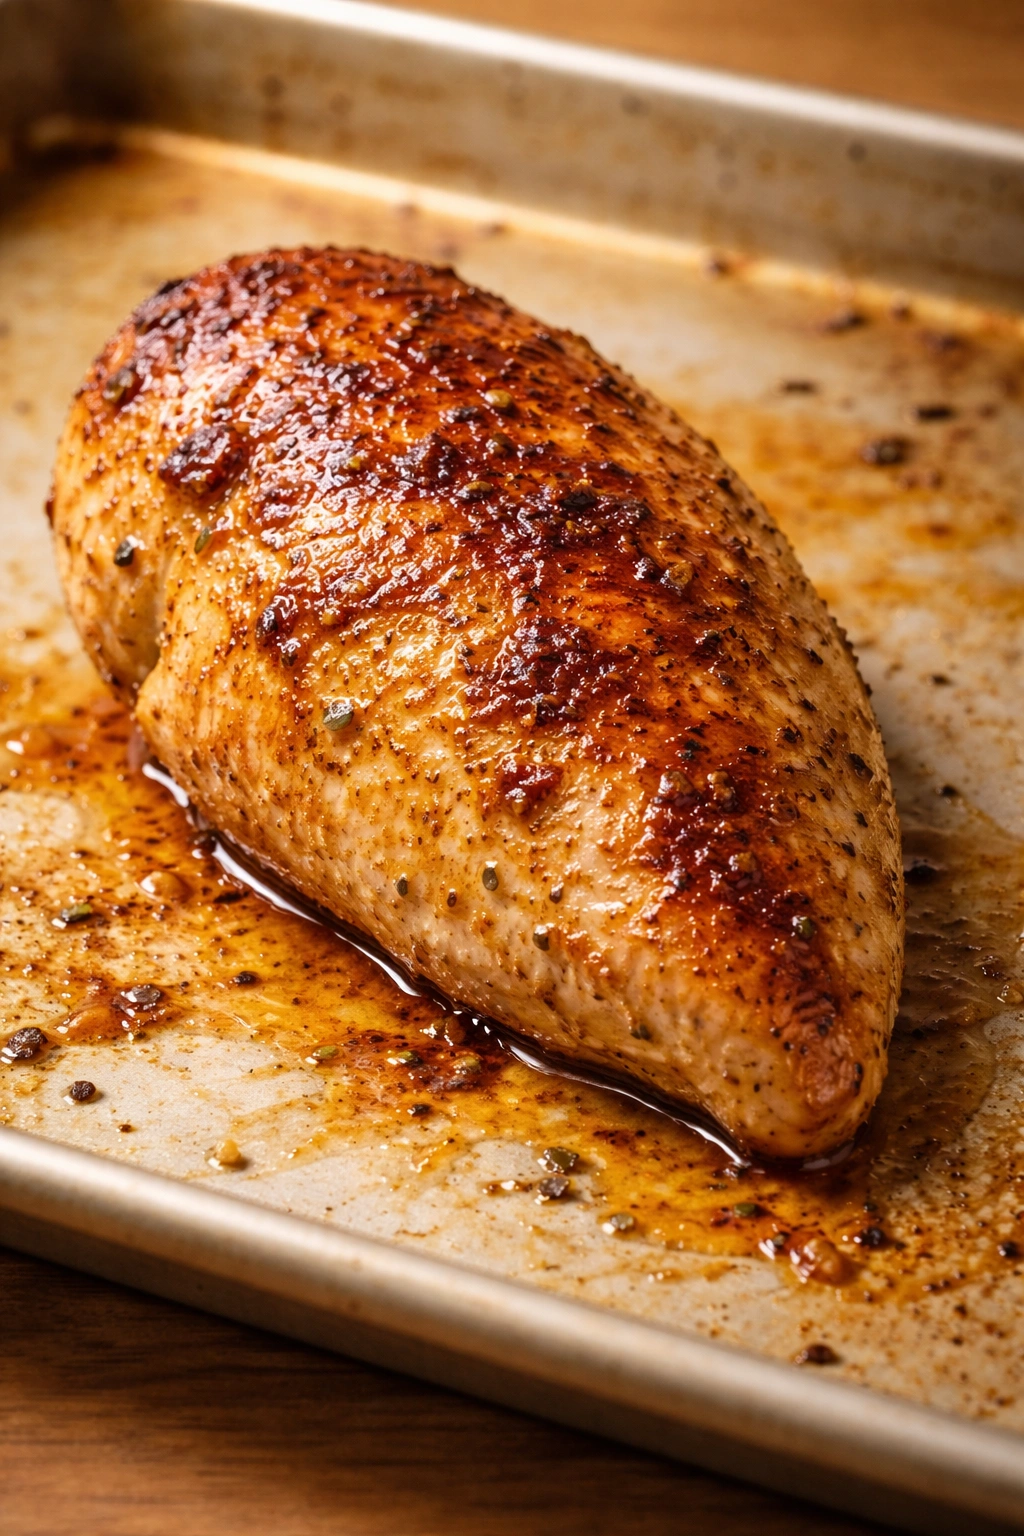
Cooking time typically ranges from 15-22 minutes depending on chicken thickness and your oven’s actual temperature. For ¾-inch-thick breasts, aim for 15-18 minutes. For 1-inch-thick breasts, plan on 18-22 minutes. The best approach: start checking internal temperature at 15 minutes using an instant-read meat thermometer inserted into the thickest part of the largest breast, away from bone or fat. The target is exactly 165°F (74°C).
Here’s the critical part: don’t rely on color alone, and don’t estimate. The chicken might look beautiful and golden but still be slightly undercooked in the center. Conversely, it might not look as browned as you’d like but could already be done. A meat thermometer removes all guesswork. Most supermarkets sell them for $10-20, and they’re worth every penny for the reliability alone.
Yield: Serves 4 | Makes 4 boneless, skinless chicken breasts
Prep Time: 10 minutes
Cook Time: 18 minutes
Total Time: 28 minutes
Difficulty: Beginner — The steps are straightforward, there’s minimal prep work, and no special skills or equipment required beyond a meat thermometer, which is essential but inexpensive.
The Complete Ingredient List
For the Chicken:
- 4 boneless, skinless chicken breasts (about 1½ to 2 pounds total)
- 1 tablespoon olive oil or melted butter
For the Seasoning Blend:
- 1½ teaspoons fine sea salt or kosher salt
- 1 tablespoon packed brown sugar (soft, not hardened)
- 1 teaspoon paprika (sweet or smoked, your choice)
- 1 teaspoon garlic powder (not garlic salt)
- ½ teaspoon onion powder
- ½ teaspoon freshly ground black pepper
- ¼ teaspoon dried oregano or dried thyme (optional but recommended)
Step-by-Step Instructions for Perfectly Baked Chicken
Prepare Your Equipment and Preheat:
-
Preheat your oven to 425°F (220°C), positioning the rack in the center. If using a convection oven, set it to 400°F and follow the same cooking time.
-
Line a 9×13-inch baking dish (or a large rimmed sheet pan) with parchment paper or aluminum foil for easy cleanup. Lightly spray or rub with a small amount of oil so the seasoning won’t stick to the pan.
Prepare the Chicken:
-
Pat the chicken breasts dry with paper towels. Moisture on the surface will steam rather than crisp, so this step genuinely matters—don’t skip it.
-
Place one chicken breast on a cutting board and cover it completely with plastic wrap. Using a meat mallet, rolling pin, or the bottom of a skillet, gently pound the thicker sections until the entire breast is roughly the same thickness—aim for about 1 to 1.5 inches thick.
Advertisements -
Repeat with the remaining chicken breasts. If any breast is significantly larger than the others, cut it in half horizontally after pounding to ensure even cooking.
Mix the Seasoning Blend:
- In a small bowl, combine the salt, brown sugar, paprika, garlic powder, onion powder, black pepper, and optional dried herb. Stir with a small spoon until the mixture is evenly combined, breaking apart any clumps of brown sugar with the back of the spoon. The mixture should look fairly uniform, not lumpy.
Season and Arrange:
-
Place the prepared chicken breasts in a single layer in your prepared baking dish, making sure they don’t touch or overlap. They need air circulation around all sides to bake evenly.
-
Drizzle the olive oil over the chicken, about ¼ teaspoon per breast, and use your fingers to rub it across the surface of each piece, coating both the top and bottom. The oil helps the seasoning stick and promotes browning.
-
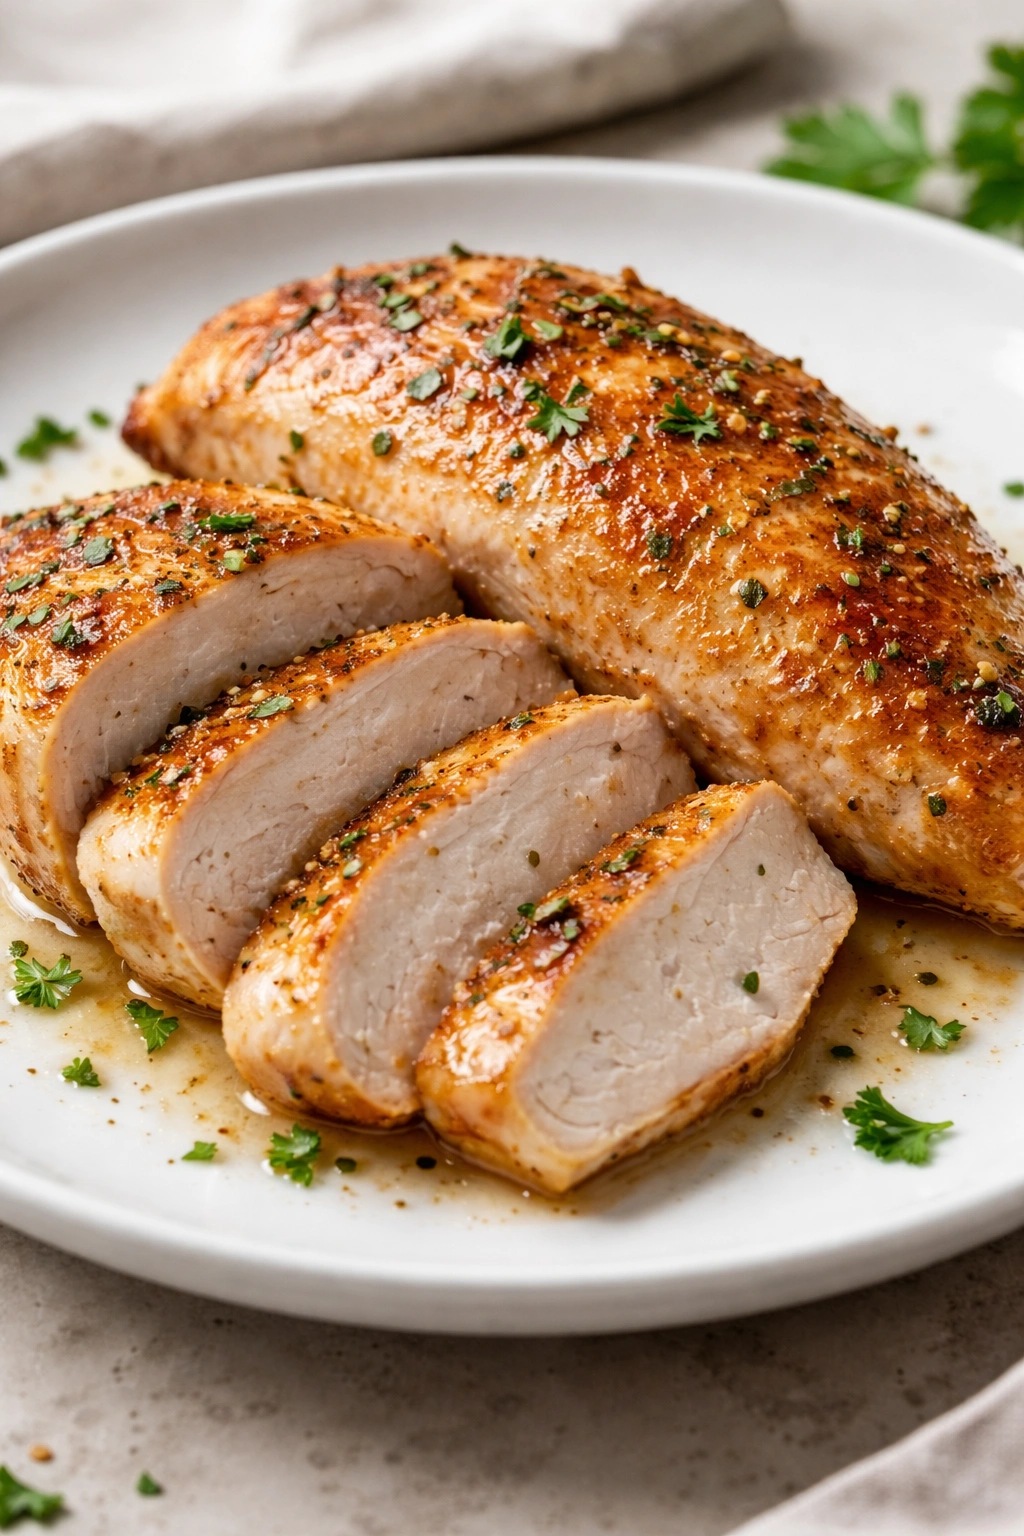
Sprinkle the seasoning mixture evenly over the chicken breasts, dividing it as equally as possible among the four pieces. Use your fingers to gently rub the seasoning into the surface, making sure it adheres to both sides and all edges. The seasoning should look like a visible coating on the chicken, not just scattered on top.
Bake:
-
Place the baking dish in the preheated oven on the center rack. Set a timer for 15 minutes as a reminder to start checking for doneness.
-
At the 15-minute mark, insert an instant-read meat thermometer into the thickest part of the largest chicken breast, making sure the probe doesn’t touch the bottom of the pan. Look for a reading of exactly 165°F (74°C). If it reads below 165°F, return to the oven and check again every 2-3 minutes. Once you see 165°F, immediately remove the pan from the oven.
-
This timing is crucial. Cooking even 3-5 degrees beyond 165°F will dry out the chicken. Your goal is to stop cooking the moment it’s safe, not to cook it any further.
Advertisements
Rest Before Serving:
-
Remove the baking dish from the oven and carefully transfer the chicken breasts to a clean serving plate or individual plates using tongs or a spatula. Do not cut into the chicken yet.
-
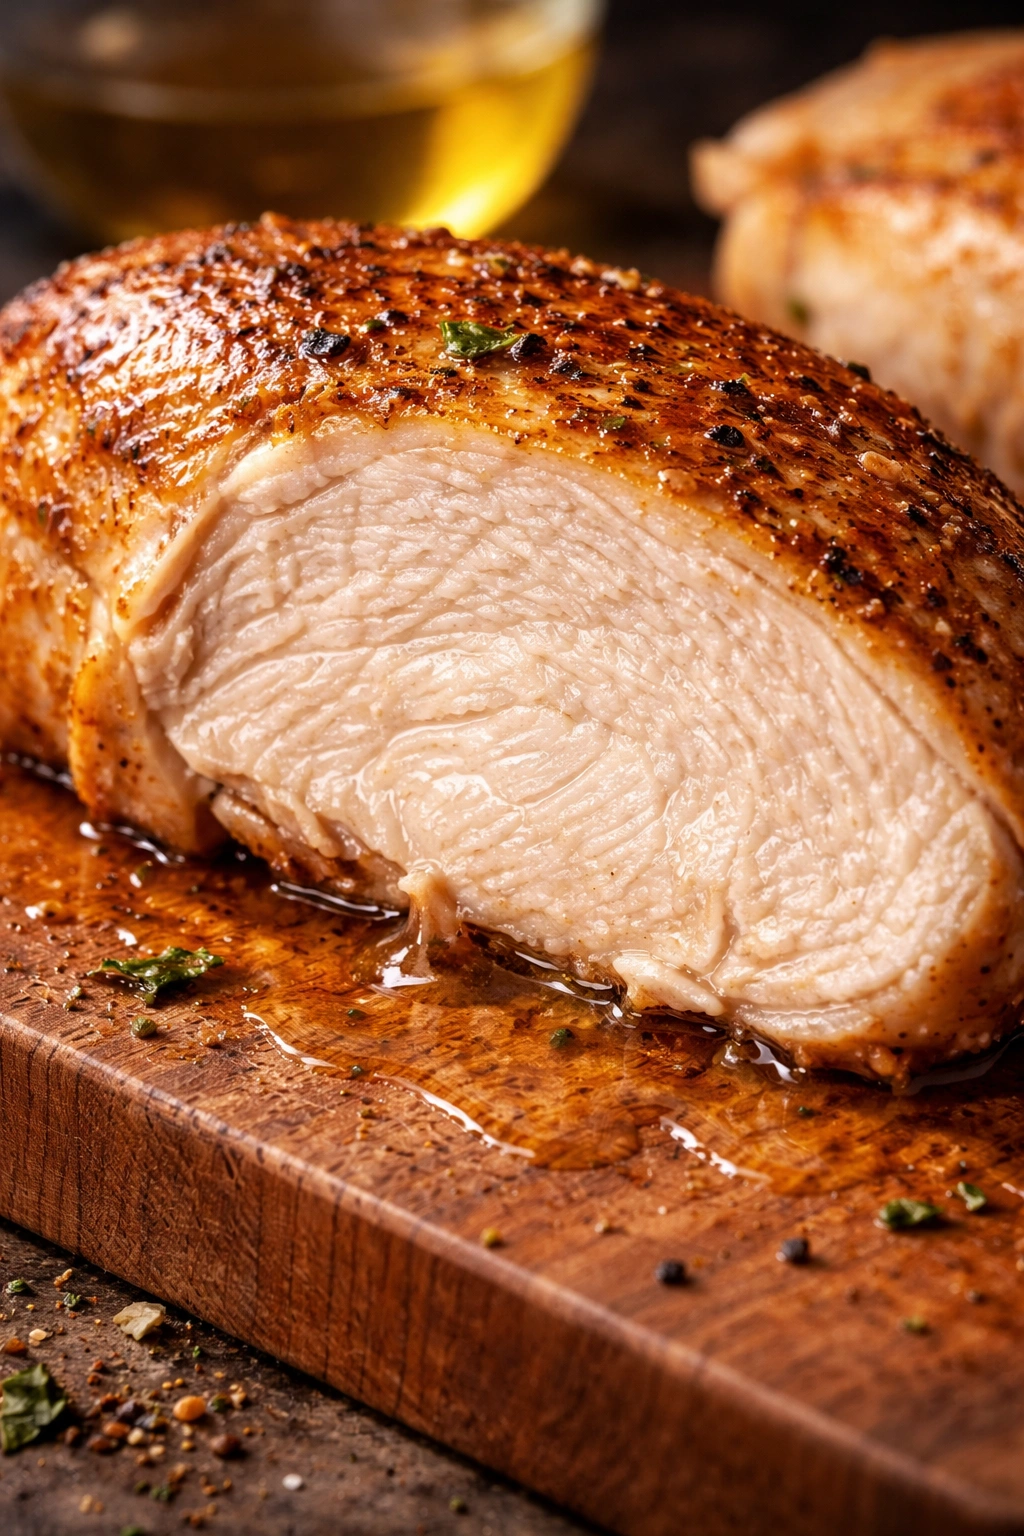
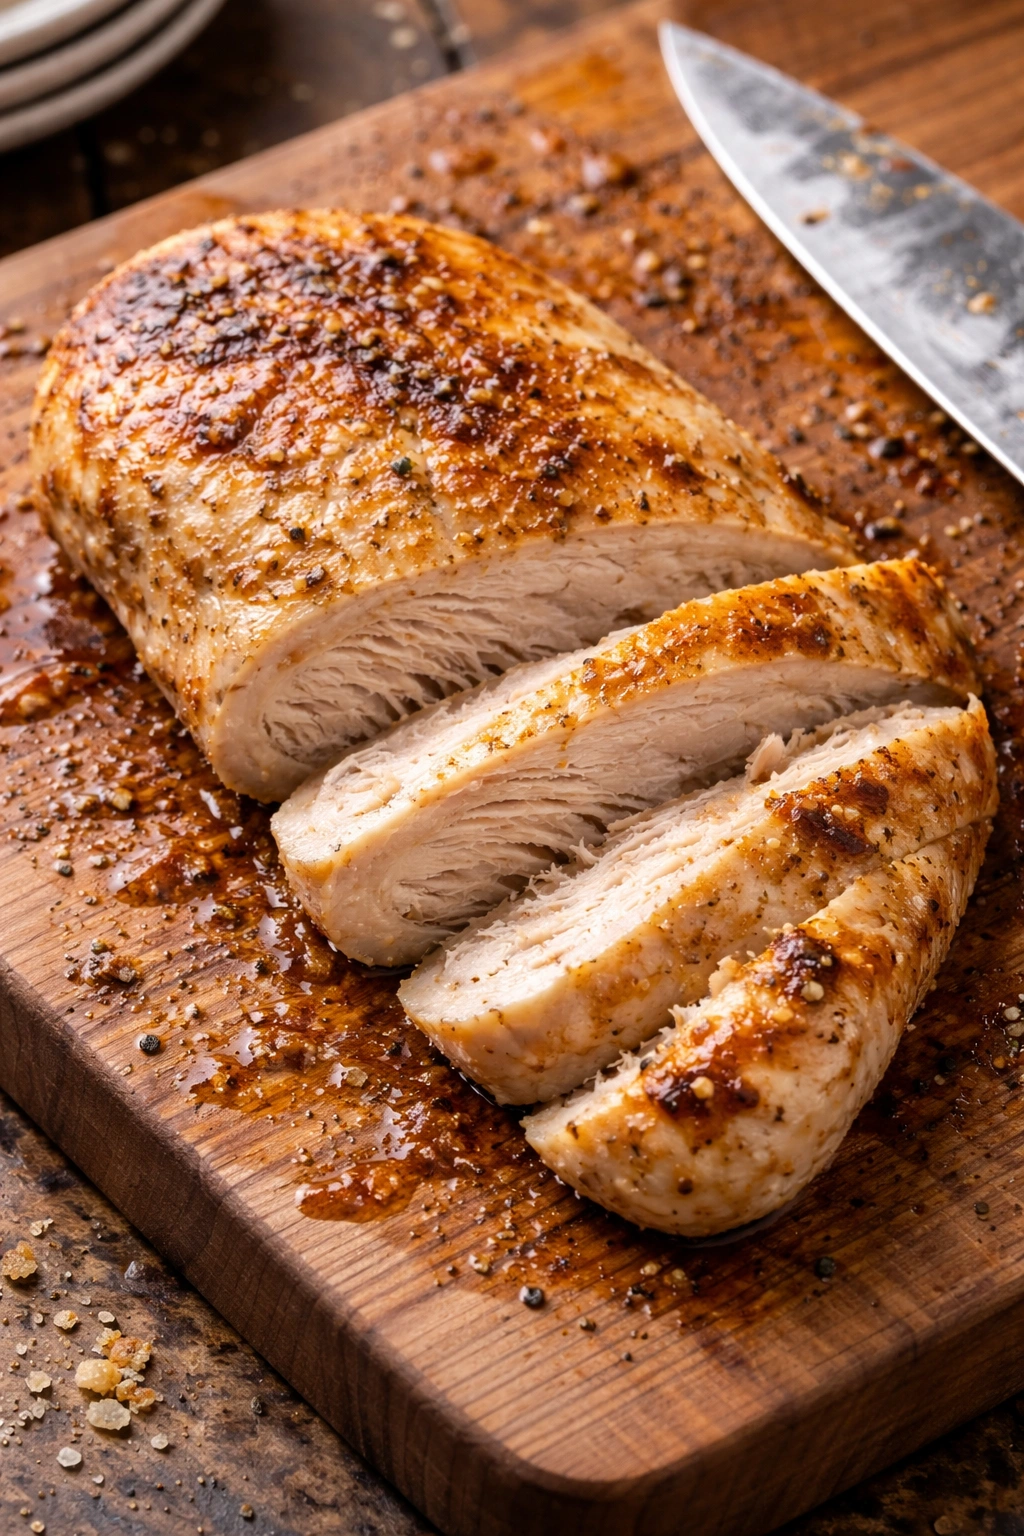
Loosely tent the chicken with aluminum foil and let it rest for 5 to 10 minutes at room temperature. During this resting period, the chicken continues to cook very slightly from residual heat, and—more importantly—the muscle fibers relax and reabsorb the juices instead of them running out onto the plate when you slice.
-
After resting, slice and serve immediately, or serve whole. If desired, drizzle with any pan juices that have pooled in the dish. Taste before adding any salt—the seasoning blend is quite complete, and you likely won’t need more.
Pro Tips for Guaranteed Success Every Time
Let the thermometer be your guide, not the timer. Every oven is slightly different, chicken varies in thickness, and altitude affects cooking times. The only reliable way to know when chicken is done is to measure its internal temperature. A $15 instant-read thermometer is the single best investment for consistent results.
Don’t skip the resting period. This feels like wasted time, but it genuinely makes the difference between juicy chicken and chicken that’s technically safe but feels dry. Those five to ten minutes allow the muscle fibers to relax and the juices to redistribute. When you slice into it, those juices stay inside the meat rather than bleeding out onto the plate.
If you prefer more of a golden crust, turn your oven’s broiler to high for the final 3-5 minutes of baking. Watch closely—the broiler can brown the chicken beautifully or burn it in seconds. Remove it as soon as the surface turns golden brown.
Pan juices are liquid gold. As the chicken bakes, it releases savory juices into the bottom of the pan. Don’t waste these. Either drizzle them directly over your finished chicken, or whisk them with a tablespoon of butter and fresh herbs for a quick sauce. These juices are pure chicken flavor and make a tremendous difference in the final dish.
Pound the chicken before cooking, not after. Some recipes suggest pounding after cooking, thinking it will tenderize the finished chicken. This actually squeezes out all the juices you just spent time cooking in. Always pound before seasoning and baking.
Invest in quality paprika. Paprika loses its flavor as it ages, and stale paprika will disappoint you. If your paprika has been in the cabinet for more than a year, buy fresh. The difference is noticeable.
Common Mistakes That Result in Dry Chicken
Cooking at too low a temperature. If you bake chicken at 350°F, it takes 35-40 minutes to cook through, giving the outside plenty of time to dry out while waiting for the inside to finish. High heat and short time is the answer.
Not pounding the chicken to even thickness. The thin end will finish cooking while the thick end is still raw, forcing you to choose between rubbery thin sections or undercooked thick sections. Pound it first.
Overcooking past 165°F. The single biggest mistake. Just because 165°F is safe doesn’t mean it’s the endpoint for perfect texture. Cook to exactly 165°F, not 170°F or 175°F. Those extra degrees matter tremendously.
Skipping the rest period. Cutting into hot chicken immediately releases all the juices onto your plate instead of keeping them in the meat. A five-minute rest fixes this.
Using old or stale spices. Paprika and garlic powder lose potency over time. If your seasonings are more than a year old, your chicken will taste bland no matter how perfectly you cook it.
Crowding the pan. If pieces are touching or overlapping, the sides that touch won’t brown, and the chicken will steam instead of bake. Space them out so air can circulate completely.
Wet chicken. Moisture on the surface steams off rather than allowing the seasoning to brown and crisp. Always pat the chicken dry before seasoning.
Variations and Flavor Adaptations
The beauty of this base recipe is how adaptable it is. You can keep the core method—high heat, quick baking, resting—and swap out the seasoning entirely.
For an Italian profile, replace the paprika and oregano with 2 teaspoons of Italian seasoning (or use 1 teaspoon each of dried basil, oregano, and thyme). Add ¼ teaspoon of crushed red pepper flakes if you like heat. The brown sugar and salt remain the same and balance the herbs beautifully.
For a Cajun or Creole version, keep the brown sugar and paprika, but add ½ teaspoon of cayenne pepper, ½ teaspoon of smoked paprika, and ¼ teaspoon of dried thyme. Increase the garlic powder slightly to ¾ teaspoon. This creates a spicier, more complex profile.
For a simple lemon-herb version, reduce the brown sugar to 1 teaspoon, skip the paprika, and add 1 teaspoon of dried thyme or oregano, ½ teaspoon of dried dill, and the zest of one lemon mixed into the seasoning blend. The citrus brightens everything without adding liquid.
For a Mediterranean approach, add 1 teaspoon of dried oregano, ½ teaspoon of garlic powder (increase to ¾ teaspoon), and ¼ teaspoon of dried thyme. Include a pinch of crushed fennel seeds if you have them. Drizzle finished chicken with a bit of good olive oil and fresh lemon juice before serving.
For something smokier and more intense, use smoked paprika (2 teaspoons total instead of 1), add ¼ teaspoon of liquid smoke if you want to be bold, and reduce the brown sugar to 1 teaspoon. This works wonderfully when paired with barbecue sauce or served with smoky side dishes.
For an Asian-inspired variation, skip the Italian seasonings entirely. Mix 1 tablespoon of brown sugar with 1 teaspoon of garlic powder, ½ teaspoon of fresh ginger powder, ½ teaspoon of onion powder, and ¼ teaspoon of white pepper. Brush the cooked chicken with a mixture of soy sauce and melted butter before serving, or drizzle with a quick sesame-ginger glaze.
You can even apply this method to chicken thighs instead of breasts, though they’ll need 5-10 extra minutes of cooking time due to their higher fat content. The seasoning ratio stays the same, and thighs are actually more forgiving because their higher fat content means you have to work harder to dry them out.
How to Store, Make Ahead, and Reheat
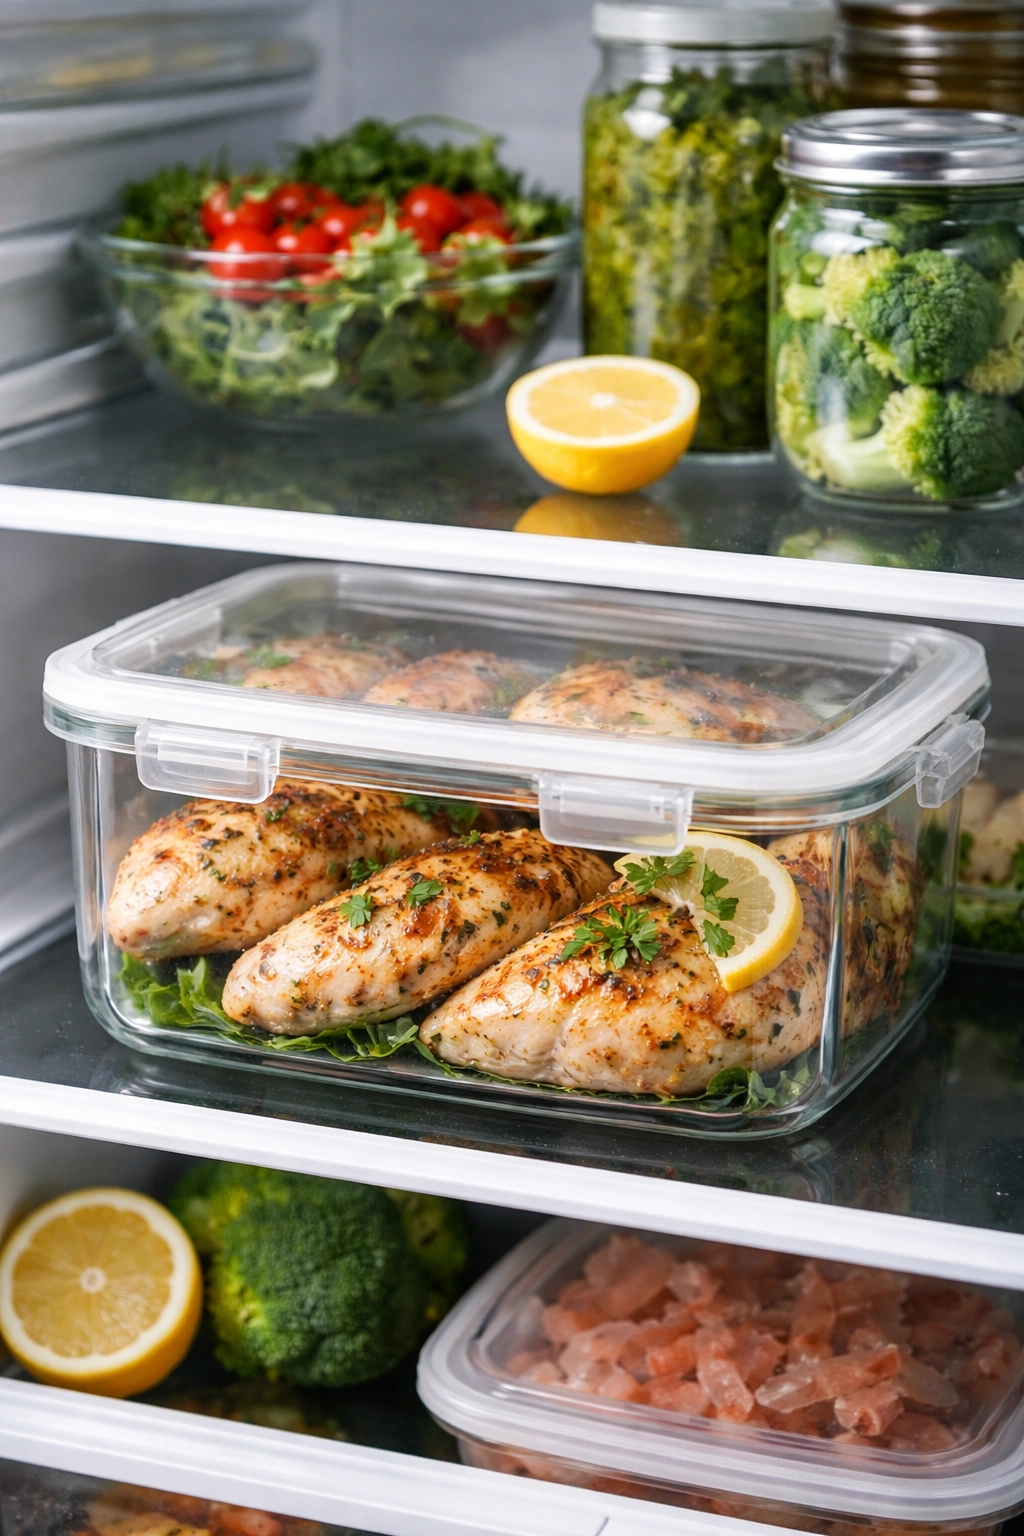
Storage for leftovers. Cooked chicken breasts keep in an airtight container in the refrigerator for up to 4 days. For longer storage, transfer them to a freezer-safe bag or container and freeze for up to 3 months. Pro tip: Before freezing, let the chicken cool completely, then divide into individual portions. This way you can thaw and reheat just what you need without defrosting an entire batch.
Make-ahead strategy. You can prepare the chicken through the seasoning step (Step 9) up to 8 hours before baking. Cover the dish with plastic wrap and refrigerate. When you’re ready to cook, let the dish sit at room temperature for about 10 minutes while the oven preheats, then bake as directed. Cold chicken will take slightly longer—add 2-3 minutes to the cooking time.
Alternatively, fully cook the chicken ahead and store it. This is perfect for meal prep. Bake the chicken, let it cool, and refrigerate it in an airtight container. It stays fresh for 4 days and is ready to use in salads, wraps, pasta dishes, or grain bowls.
Reheating without drying it out. This is crucial because reheating is where leftover chicken usually becomes dry and disappointing. You have several good options:
-
Oven method (best for texture): Preheat to 325°F. Place the chicken in a covered baking dish with a tablespoon of water or broth. Cover with foil and heat for 8-10 minutes until warmed through. The low temperature and covered environment prevent further drying.
Advertisements -
Microwave method (fastest): Place chicken on a microwave-safe plate, drizzle with a teaspoon of water or broth, cover loosely with a damp paper towel, and microwave in 30-second intervals until warm. This takes just 1-2 minutes for a single breast.
-
Skillet method (adds flavor): Heat a skillet over medium heat with a small knob of butter. Place the chicken in the pan and cook for 2-3 minutes per side until heated through. The butter adds richness and prevents sticking.
Never use high heat to reheat chicken, and don’t let it sit on the counter at room temperature for more than 2 hours after cooking.
Perfect Serving Pairings and Plating Ideas
Baked chicken breasts are versatile enough to pair with virtually any side dish, but some combinations are particularly harmonious.
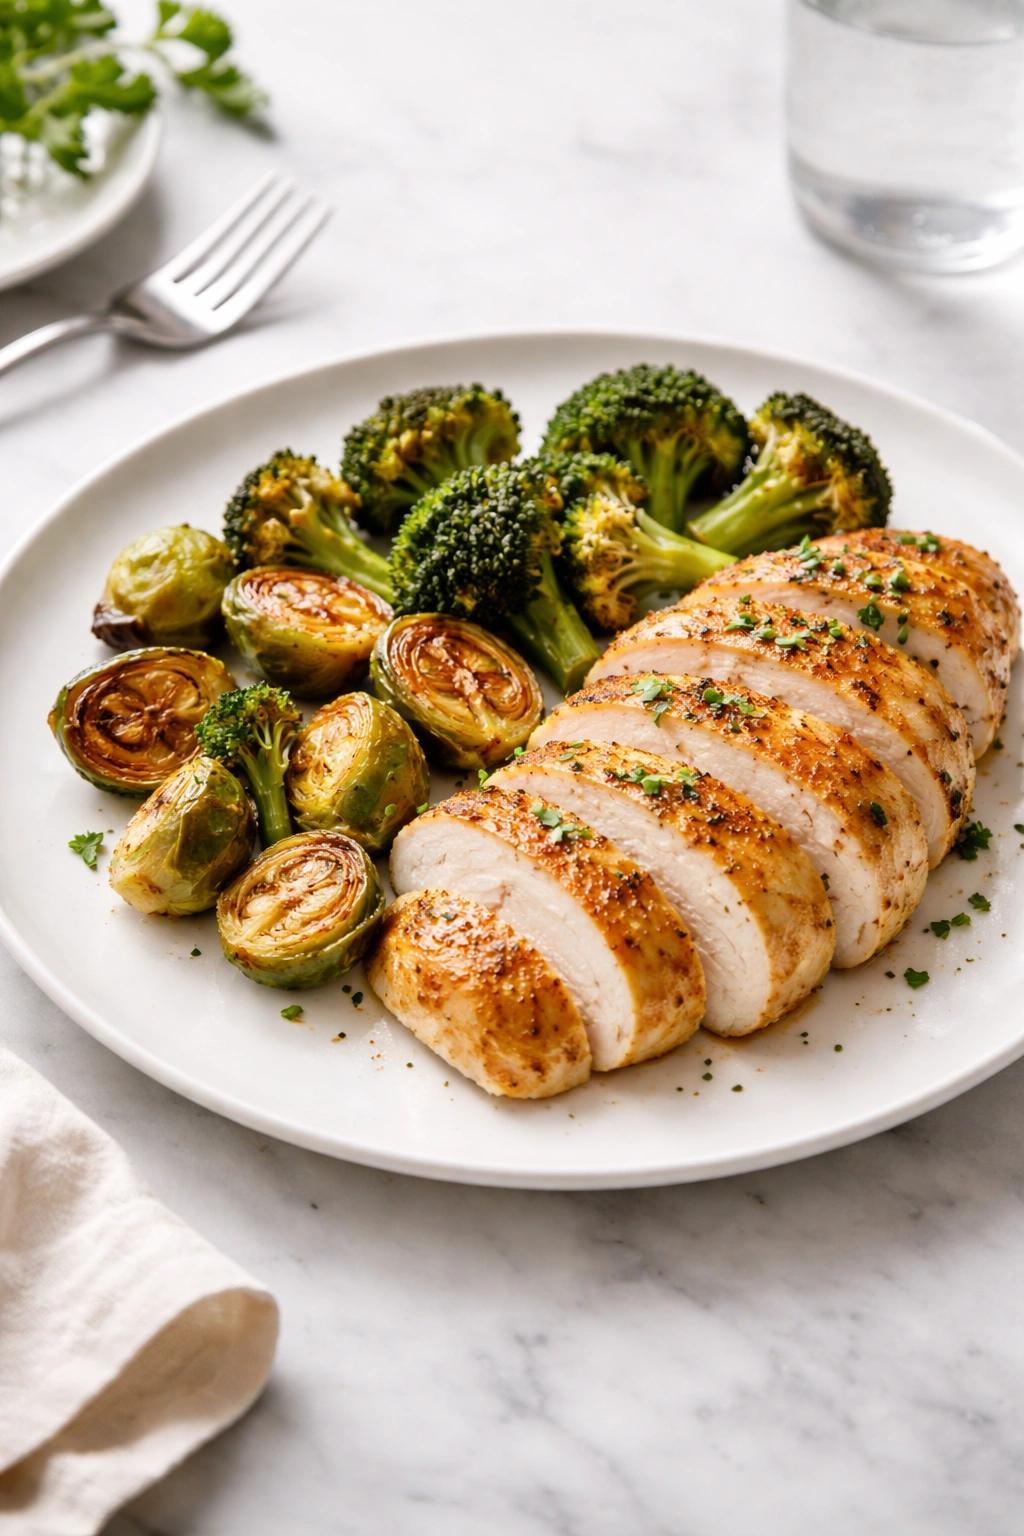
For a simple, elegant dinner: Serve alongside roasted vegetables that cooked in your oven at the same time. Toss broccoli florets, Brussels sprout halves, or asparagus spears with olive oil and salt, spread them on a separate baking sheet, and roast at 425°F for the same 18-20 minutes as the chicken. The timing works perfectly.
For comfort food: Pair with creamy mashed potatoes or buttered egg noodles. The rich sides complement the juicy, savory chicken without competing for attention.
For something lighter: Serve over a bed of mixed greens or grain. Slice the chicken and arrange it over a fresh salad dressed with lemon vinaigrette, or serve alongside quinoa or farro that you’ve tossed with herbs and vegetables.
For meal prep bowls: Chop or slice the cooled chicken and layer it with roasted vegetables, rice or grains, and a favorite sauce like tahini dressing, pesto, or a simple lemon-herb vinaigrette.
Sauce pairings that elevate the dish:
- A drizzle of chimichurri sauce (fresh herbs, garlic, vinegar, and oil)
- Pan juices whisked with Dijon mustard and fresh thyme
- A quick beurre blanc made from the pan drippings, white wine, and butter
- Simple salsa or pico de gallo for a fresh, bright profile
- Creamy garlic butter for richness
Plating for presentation. Even simple food looks more intentional when plated thoughtfully. Slice the chicken on a bias (at an angle) so the pieces look elegant, fan them slightly on the plate, and arrange vegetables in a way that shows you cared. Even at home, this transforms “dinner” into “a meal.”
Final Thoughts
This baked chicken recipe succeeds because it respects the ingredient while respecting your time. You’re not trying to outsmart the chicken with complex techniques or tricky timing—you’re simply giving it the conditions it needs to cook perfectly: high, dry heat; quick cooking time; and immediate stopping at the moment it’s done. Everything else—the seasoning, the resting, the pan juices—exists to support those three core principles.
Once you’ve made this a few times and your hands know how to pound the chicken, your eye recognizes that beautiful golden crust, and your meat thermometer confirms the exact moment of doneness, the entire process becomes almost automatic. You’ll find yourself making it for weeknight dinners without thinking, for meal prep Sundays when you want protein ready for the week, and even for company when you want something that tastes impressive but requires minimal effort. That’s when you know you’ve found your recipe—not the one that’s most complicated or most trendy, but the one you actually make.