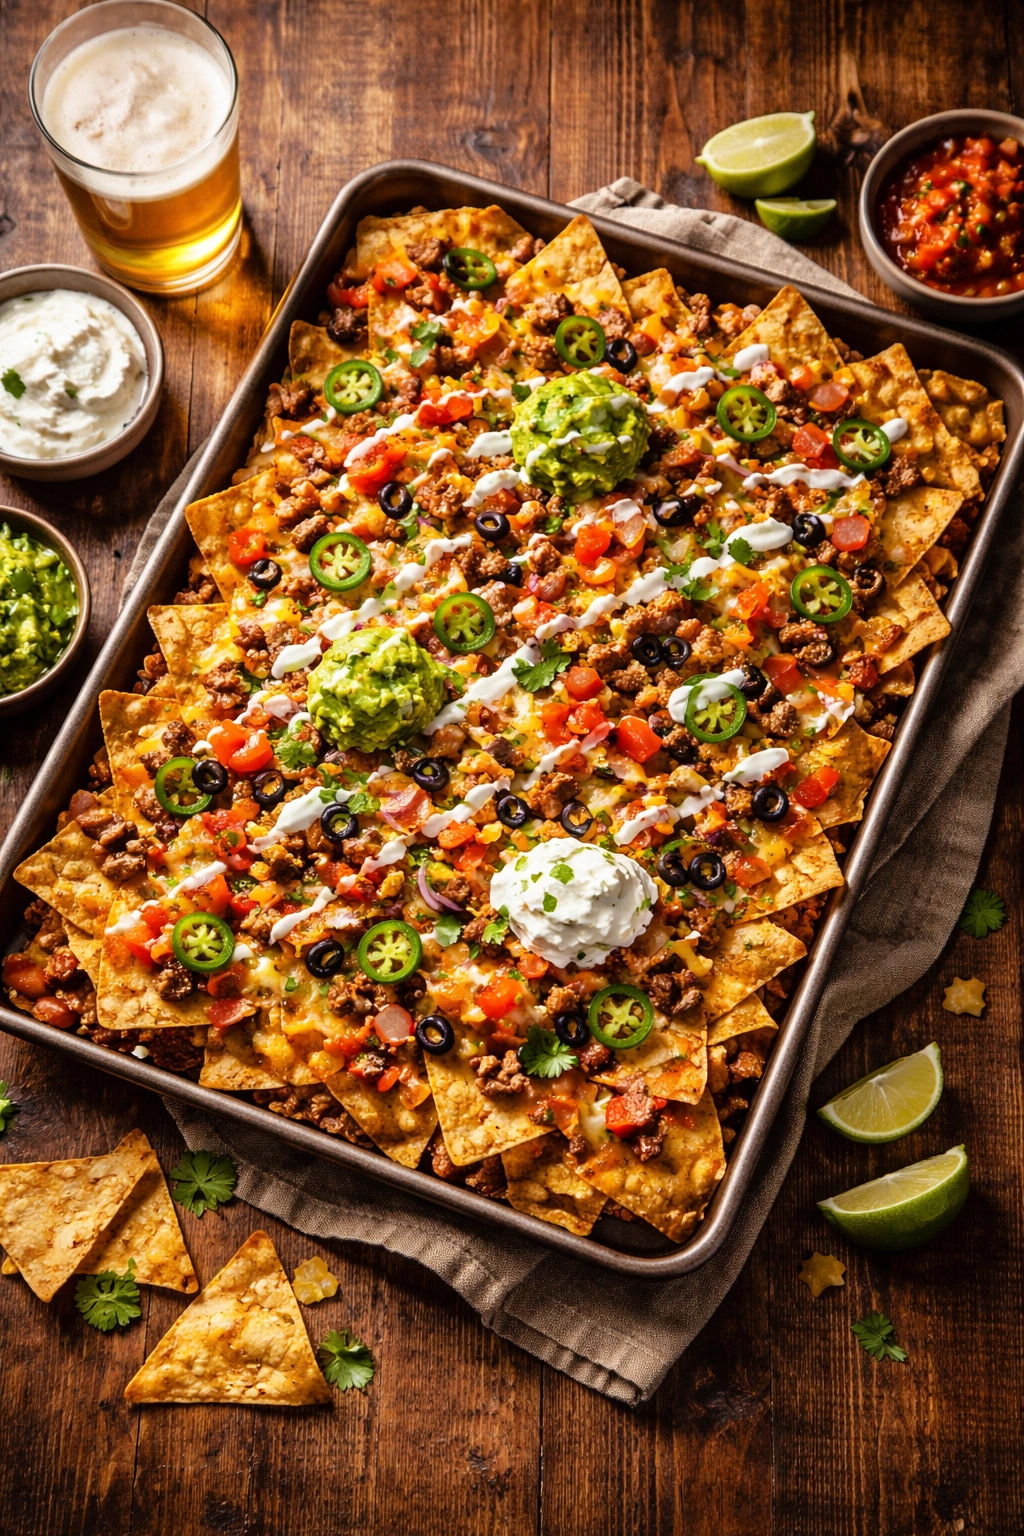
There’s something about game day that demands serious food, and nachos hit that sweet spot between elegant enough to impress and easy enough to pull together while the game is on. But here’s the thing — traditional nachos made in a pile on a plate get soggy in about five minutes. The bottom layer becomes a soggy mess while the top stays crispy, and nobody’s happy. Sheet pan nachos solve this completely. By spreading everything in an even layer across a large sheet pan, every single chip gets the perfect ratio of toppings, the cheese melts uniformly, and everything stays crispy enough to eat comfortably from start to finish. You’re not standing over a pile trying to navigate around cheese strings and settling for bare chips at the bottom. This method feels fancy enough to impress your crowd but is genuinely so simple that you can prep it in 15 minutes and have it bubbling out of the oven before anyone even notices you’ve disappeared from the living room.
Game day appetizers are an entire category of food that gets overlooked. People assume they need to be complicated or require last-minute assembly, but the best ones are actually those that come together in advance, look substantial when you bring them out, and feed a crowd without much fuss. Sheet pan nachos check every box. The pan itself becomes the serving vessel — there’s no transferring, no mess, and everyone grabs what they want directly from the pan using their own chips. It’s interactive, it’s efficient, and frankly, it’s the kind of food that actually disappears. You’ll find yourself pulling this recipe out for tailgates, poker nights, Super Bowl parties, playoff games, or really any gathering where appetizers need to be impressive but your hands need to stay free to watch the action.
What makes a truly excellent sheet pan nacho situation is understanding the balance between quality ingredients and smart assembly. Cheap tortilla chips will shatter under the weight of toppings and cheese. The protein matters — ground beef seasoned properly tastes infinitely better than just throwing raw meat on chips. The cheese needs to be real cheese, not the pre-shredded stuff (the anti-caking agents keep it from melting smoothly). And the toppings need to be distributed in a way that every chip actually encounters them, not just the lucky ones at the center. This recipe walks you through all those decisions and gives you the exact setup to pull off the best version of this dish.
What Makes Sheet Pan Nachos the Best Game Day Appetizer
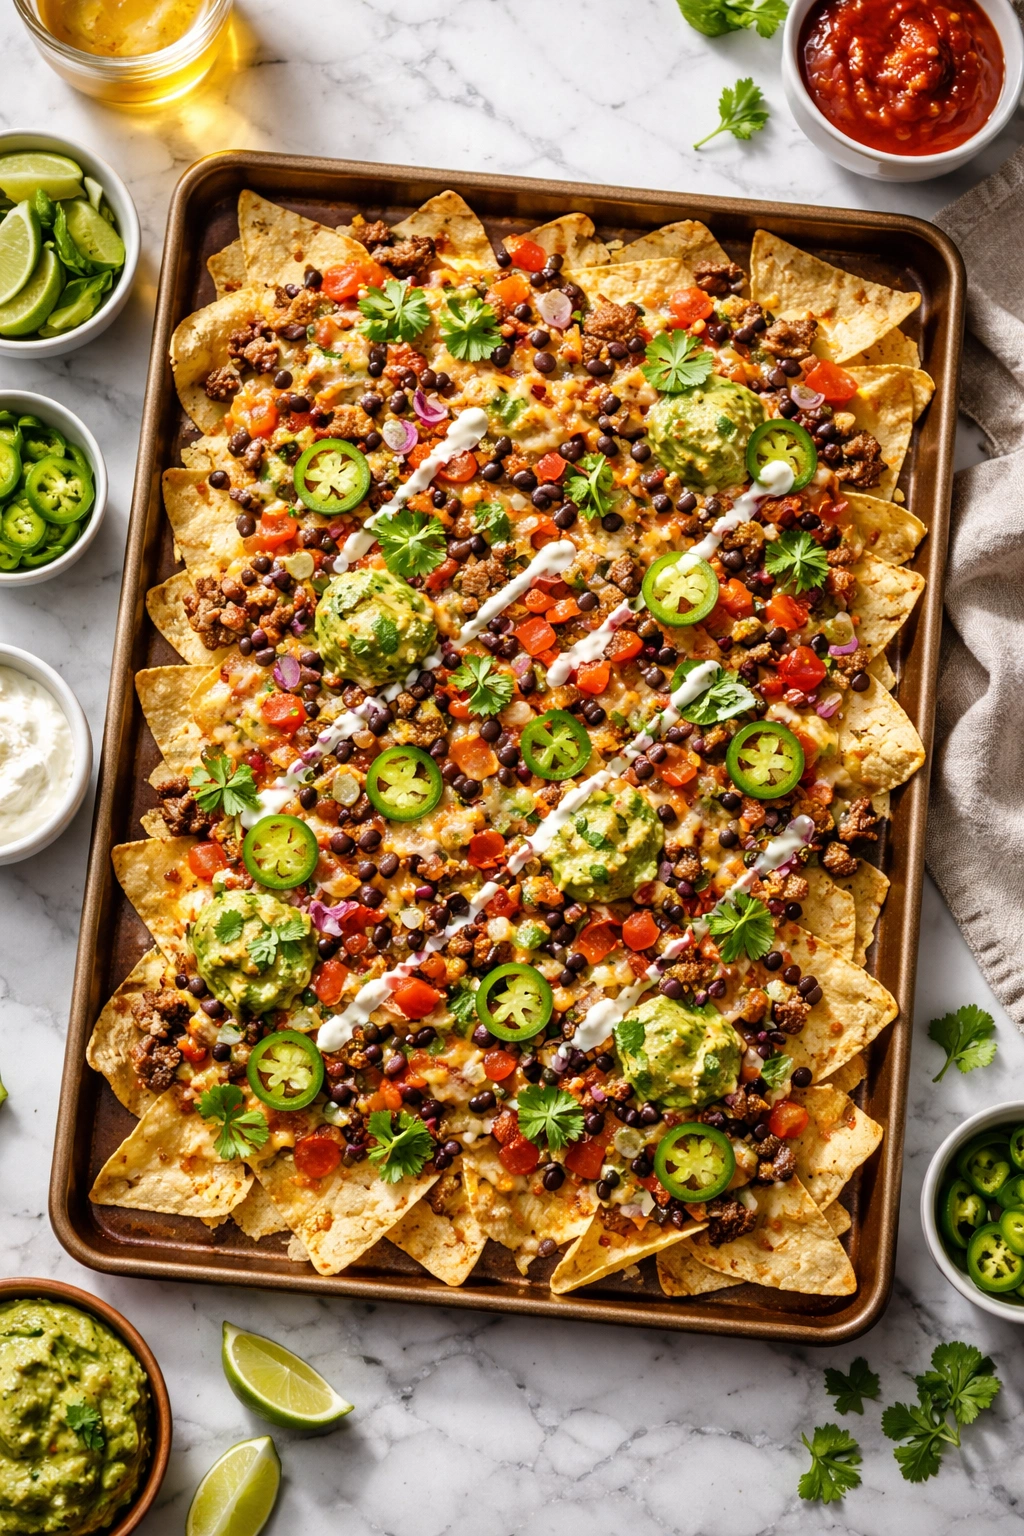
Traditional nachos have a structural problem — they’re built in a pile, which means uneven heat distribution, soggy bottoms, and that awkward moment where you have a chip with nothing on it or one that’s loaded so heavily it falls apart. Sheet pan nachos eliminate all of this by laying everything flat across a large surface area. Everything bakes at the same temperature, cheese melts evenly across every chip, and the heat circulates underneath as well as on top, keeping the chips themselves crispy even under their toppings. You’re not fighting against gravity or dealing with layers of cold chips hidden under warm melted cheese.
The format also changes how people eat them. Instead of reaching into a communal pile where half the toppings stay stuck to the bottom of the serving dish, people grab individual chips or small groups of chips. Each person can actually get a balanced bite. It feels less chaotic and more like a real appetizer, even though the preparation is just as easy.
From a logistics standpoint, this is also the most crowd-friendly way to serve nachos. A sheet pan fits in a standard oven and can feed 8-12 people depending on what else you’re serving. You’re not fumbling with multiple plates or trying to keep things warm in separate dishes. Everything comes out once, hot and ready, and people help themselves. If you’re watching a game, you can prep this while the first quarter is finishing, get it in the oven before halftime, and have it ready for when everyone gets hungry. That’s the kind of timing that feels like you’ve got everything handled.
Why These Specific Ingredient Choices Matter
Not all chips are created equal, and this matters more than you’d think when you’re building nachos. The best tortilla chips for this application are sturdy enough to support toppings without shattering, but not so thick that they’re hard to bite through. Look for chips that are baked or fried to a medium thickness — chip brand matters here more than most people realize. Test a few brands and find one that stands up to the weight of cheese and toppings without becoming a crumbly mess on your plate.
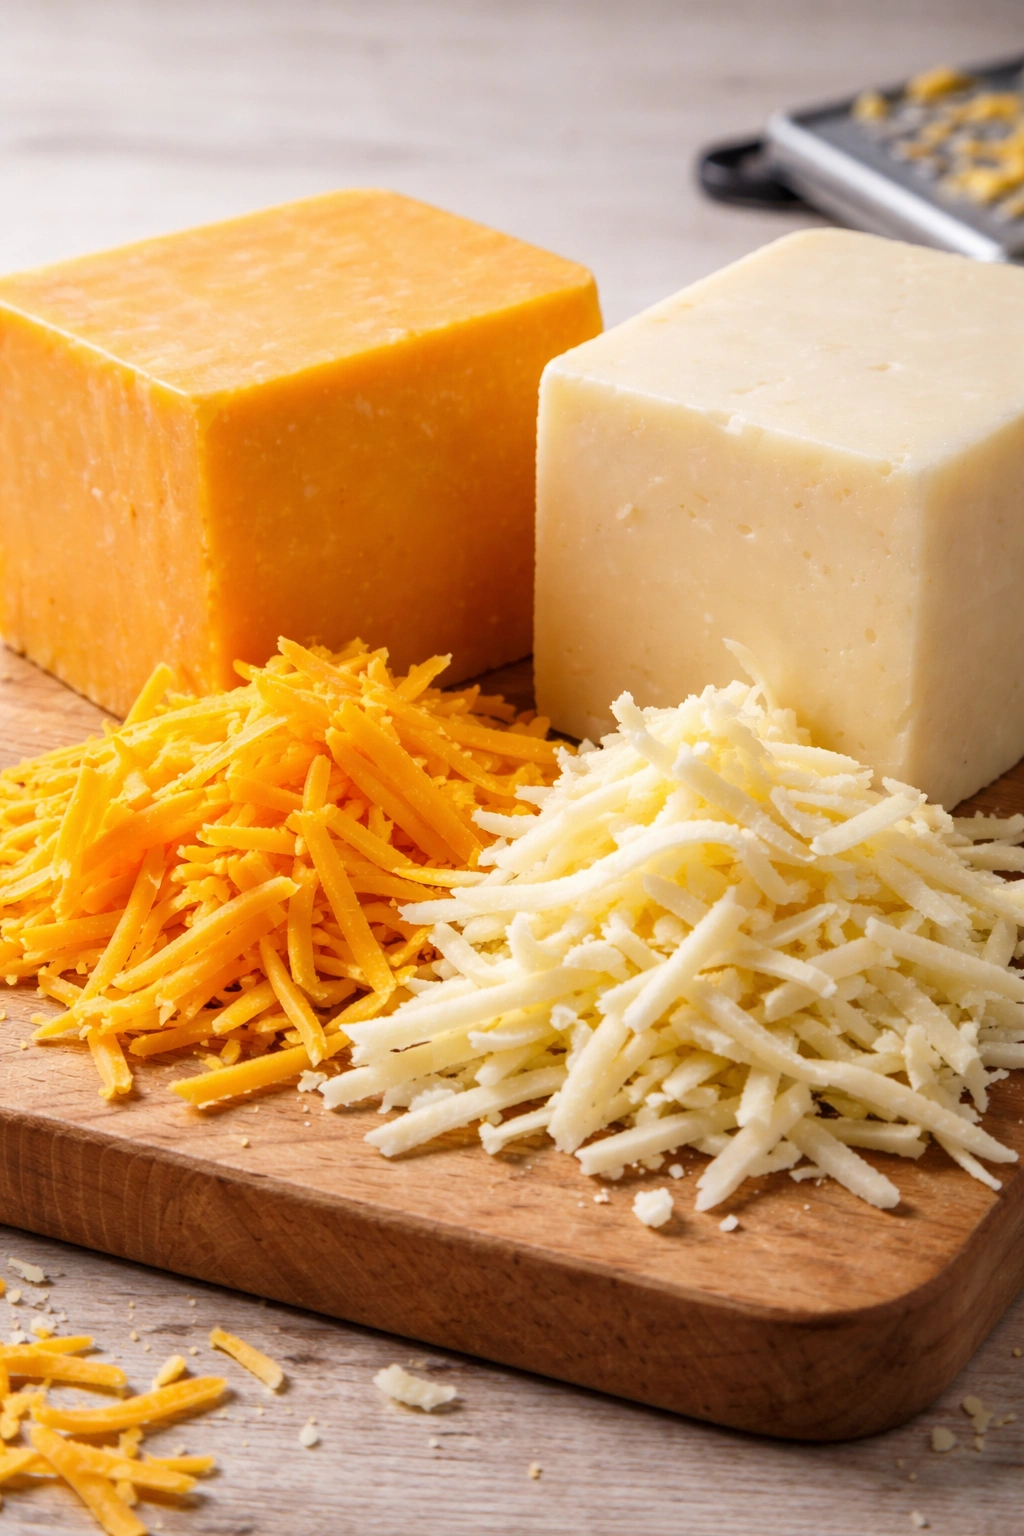
For cheese, forget pre-shredded. The anti-caking compounds in pre-shredded cheese actually interfere with melting, and you’ll end up with a separated, grainy texture instead of that smooth, creamy melt. Buy a block of sharp cheddar and a block of Monterey Jack, and shred them yourself right before assembly. Sharp cheddar brings flavor and color; Monterey Jack brings creaminess and stretch. Together they create that ideal nacho cheese situation.
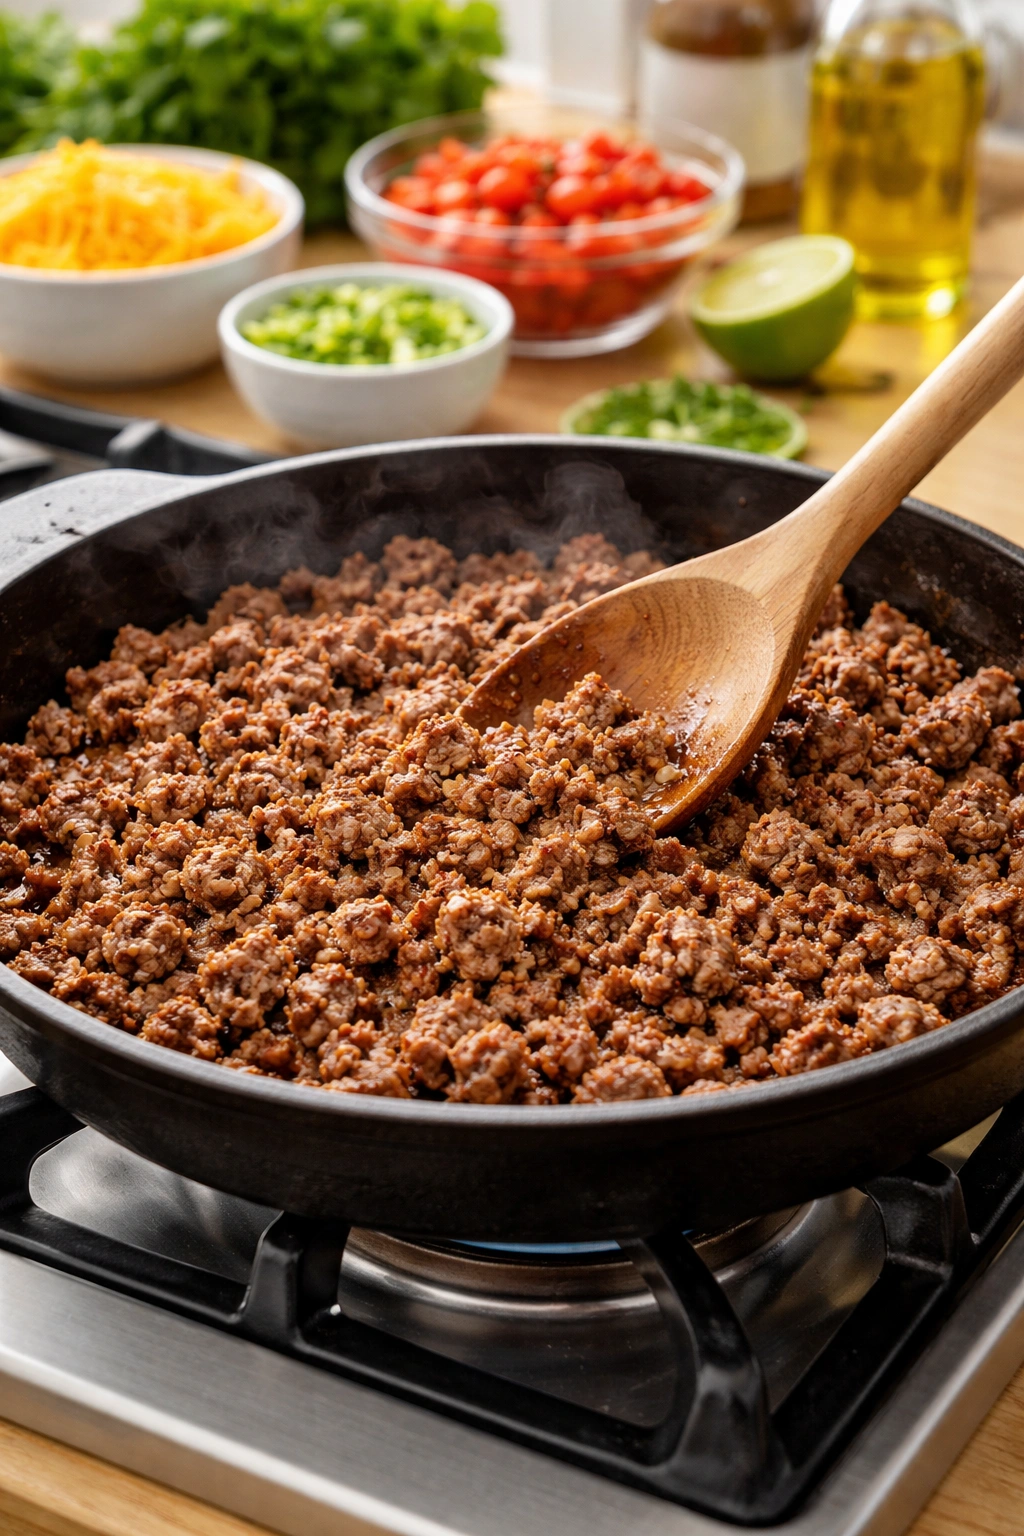
The seasoned ground beef should taste like actual seasoned beef, not like the spice packet overpowered the meat. The seasoning is a complement, not a mask. Toast your beef in a skillet until it’s broken into fine pieces with good browning on the edges, then add just enough seasoning to make it savory and slightly spiced, not to make it taste like pure cumin and chili powder. Taste it as you go — you want people to taste beef first, seasoning second.
The toppings beyond cheese and beef are where you express preference, but the non-negotiables are something for brightness (jalapeños or a lime crema), something for texture (fresh cilantro or green onions), and something for additional flavor (sour cream, guacamole, or a simple pico de gallo). These balance the richness of the cheese and beef and keep the whole dish from feeling one-note. The jalapeños should be fresh, not canned, and sliced thin enough that they cook through in the oven but still have structure.
Yield: Serves 8 to 12 as an appetizer | Makes one 18×13-inch sheet pan of nachos
Prep Time: 20 minutes
Cook Time: 12 minutes
Total Time: 32 minutes
Difficulty: Beginner — assembly is straightforward, minimal active cooking required, and the recipe is forgiving if you’re not precise with toppings.
Complete Ingredients for Sheet Pan Nachos
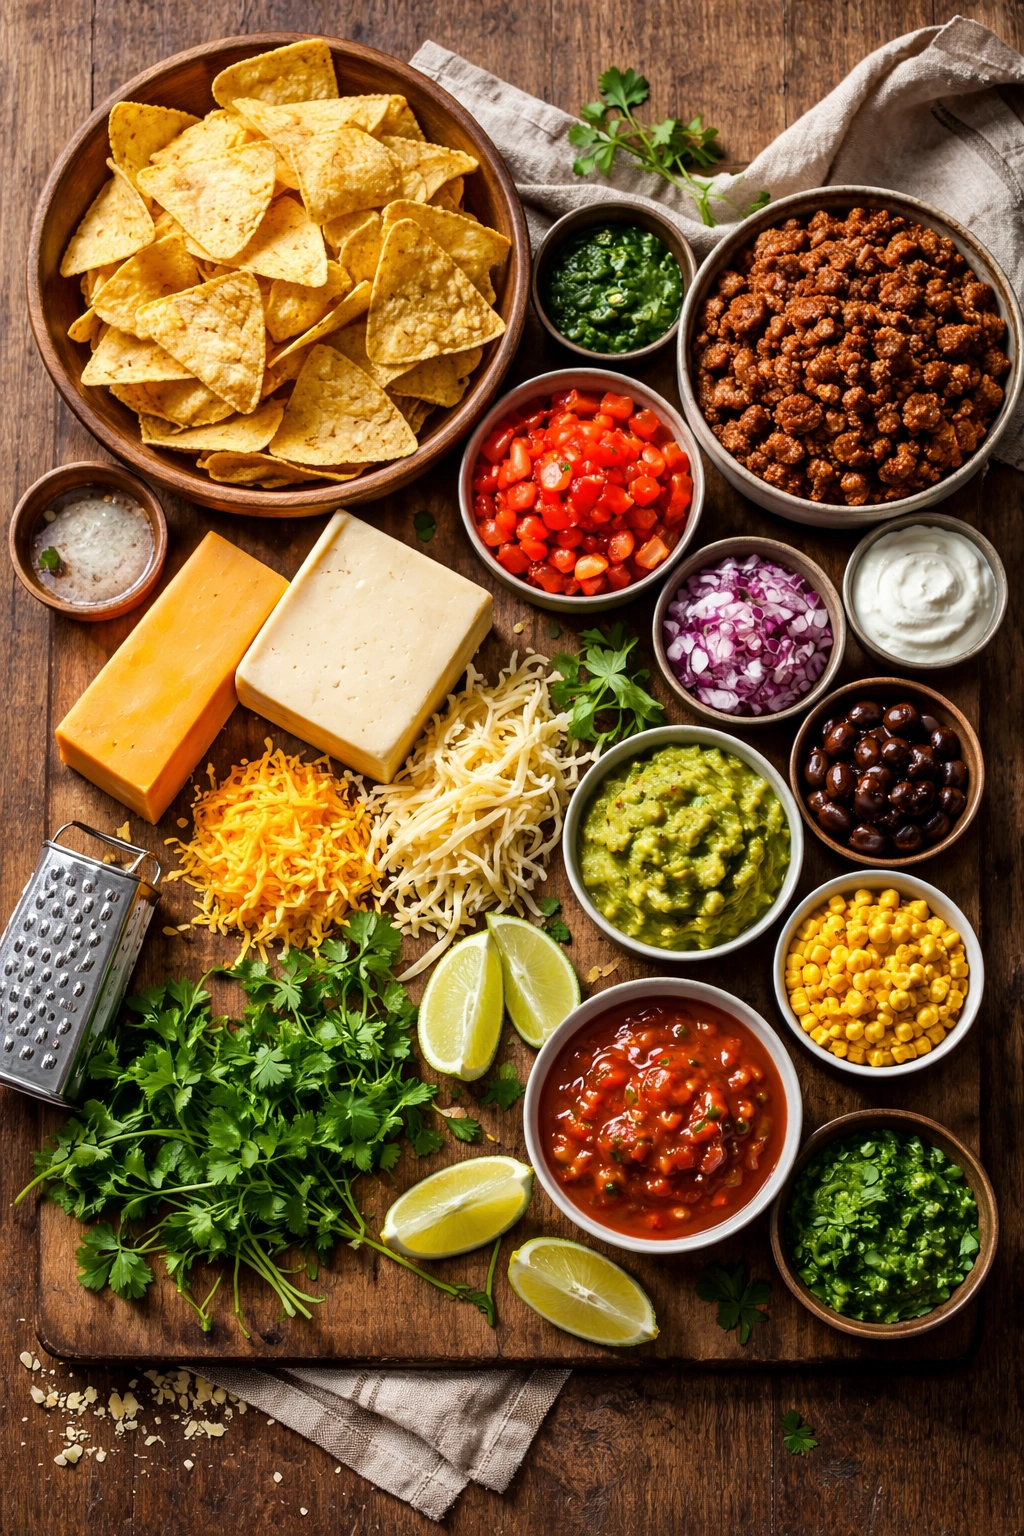
For the Base:
- 1 pound (about 10 cups) sturdy tortilla chips (look for brands like Frontera, Tostitos, or Mission — avoid ultra-thin or delicate varieties)
- 8 ounces sharp cheddar cheese, shredded from a block (not pre-shredded)
- 6 ounces Monterey Jack cheese, shredded from a block
- 1 pound ground beef (80/20 blend works best)
- 2 teaspoons kosher salt, divided
- 1 teaspoon ground cumin
- ½ teaspoon smoked paprika
- ¼ teaspoon garlic powder
- ¼ teaspoon cayenne pepper (optional, for gentle heat)
- Pinch of black pepper
For Topping:
- ½ cup fresh jalapeños, thinly sliced (seeds removed for less heat, or keep them for spice)
- ½ cup sour cream
- ¼ cup fresh cilantro, roughly chopped
- ¼ cup diced red onion
- Juice of 1 lime
- ¼ teaspoon kosher salt (for topping mix)
- ¼ cup diced tomato (or fresh pico de gallo)
- ¼ cup sliced green onions (white and light green parts)
- Optional: ¼ cup guacamole or diced avocado (add just before serving to prevent browning)
- Optional: ¼ cup pickled jalapeños (in addition to fresh) for extra tang
- Optional: ¼ cup cotija cheese, crumbled (adds a salty, authentic touch)
Step-by-Step Instructions for Perfect Sheet Pan Nachos
Prep and Cook the Beef:
-
Remove the ground beef from the refrigerator 15 minutes before cooking so it starts closer to room temperature — this helps it brown better instead of steaming. Heat a large skillet over medium-high heat for 1 minute.
-
Add the ground beef to the hot skillet and break it into small, fine pieces using a wooden spoon or spatula, stirring constantly. Don’t let it clump — you want pieces about the size of peas or lentils. Cook for 5 to 7 minutes, stirring frequently, until the beef is completely browned with good caramelization on the edges and no pink remains.
Advertisements -
Once the beef is fully browned, drain away any accumulated grease by tilting the pan and using a spoon to press the meat against the side while pouring the grease into a heat-safe container. You want the beef to be noticeably drier than when it finished cooking.
-
Reduce the heat to low. Add 1 teaspoon of the salt, cumin, smoked paprika, garlic powder, cayenne (if using), and black pepper. Stir constantly for 1 minute until the spices toast lightly in the residual heat and smell fragrant. Taste the beef and adjust salt if needed — it should taste savory and slightly spiced, with beef flavor as the dominant note. Set aside and keep warm.
Assemble and Bake:
-
Position an oven rack in the upper third of your oven and preheat to 400°F (200°C). Line a large sheet pan (18×13 inches) with heavy-duty aluminum foil for easy cleanup, or leave it bare if you prefer.
-
Spread the tortilla chips in an even, slightly overlapping layer across the entire sheet pan. You want chips in one layer, not heaped, and they should cover the pan with minimal gaps — aim for about 70-80% coverage. It’s okay if some areas are slightly more densely packed than others.
-
Sprinkle the seasoned ground beef evenly over the chips, breaking up any clumps and distributing it so every area of the pan has some beef. You’re aiming for roughly even distribution, not perfect — any bare spots will be addressed with cheese.
-
In a small bowl, toss together the shredded cheddar and Monterey Jack cheese. Sprinkle this cheese mixture evenly over the entire pan, making sure all the chips, especially the edges, have some cheese. The cheese should cover most of the chips but you should still be able to see some chip below it — you’re not making a solid cheese blanket.
-
Scatter the fresh jalapeño slices evenly across the cheese. Don’t cluster them in one area; distribute them so you see a few slices across each section of the pan. These will cook through in the oven and soften slightly while staying fresh-tasting.
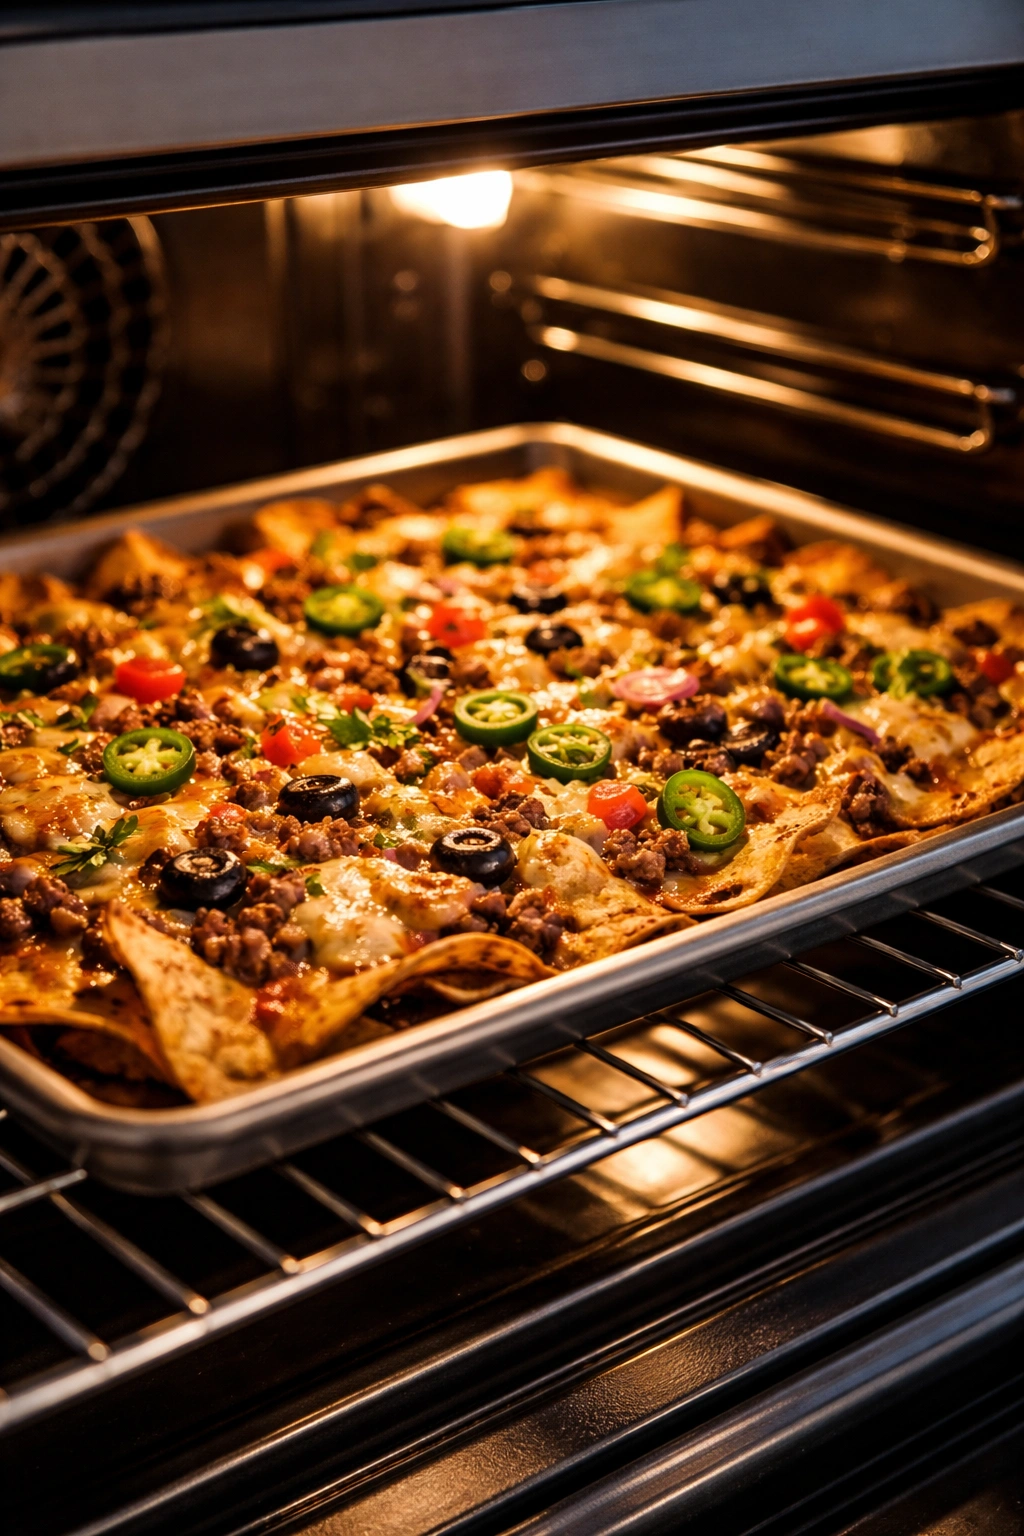
-
Bake on the upper rack for 12 to 14 minutes. The cheese should be completely melted and just starting to bubble at the edges, and the chips should still be crispy (not soggy). The timing depends slightly on your oven — start checking at 11 minutes. Do not overbake; once the cheese is melted through, pull the pan out immediately. Leaving it longer will cause the chips to become soft and lose their structure.
Final Touches:
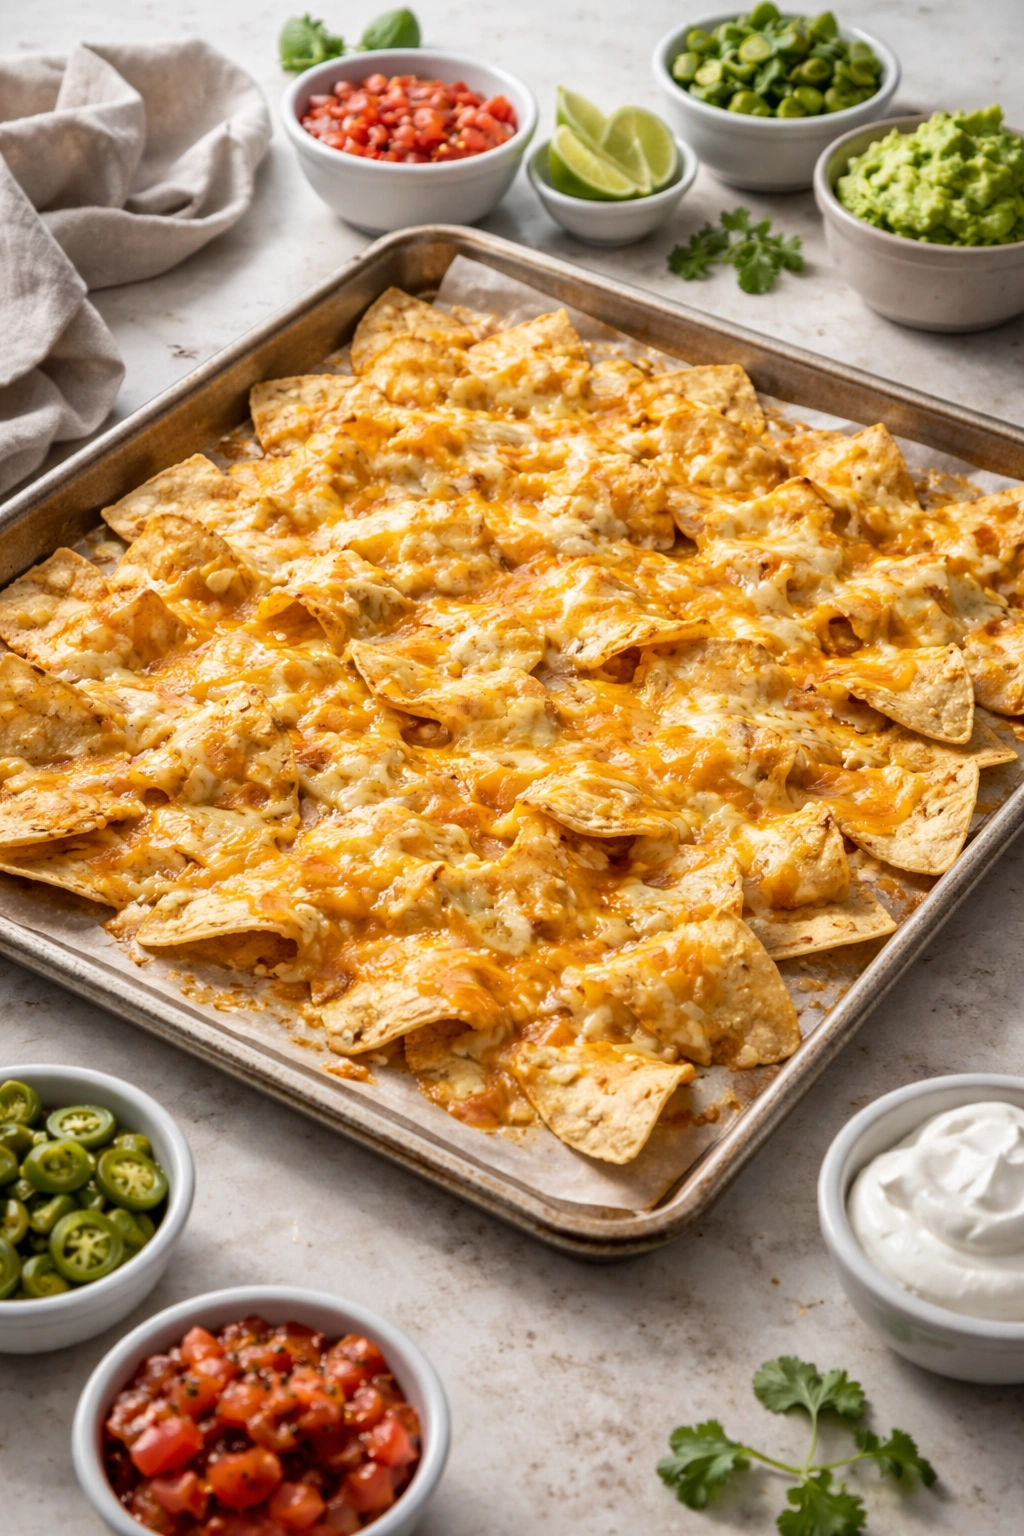
-
Remove the pan from the oven and let it rest for 1 minute. While it’s still hot, drizzle the sour cream in small dollops across the surface — about 8-10 small spoonfuls scattered across the pan. The heat will soften it slightly and make it easier to spread when eating.
-
Scatter the fresh cilantro, diced red onion, and diced tomato across the top. Add the sliced green onions last (they stay fresher-tasting if added just before serving). If using guacamole or avocado, add it right before bringing the pan to the table.
-
Squeeze the lime juice over the entire surface — this brightens all the flavors and adds acid that cuts through the richness of the cheese and beef. The lime is not optional; it transforms the whole dish.
-
Taste one chip to assess seasoning. If it needs more salt, sprinkle a tiny pinch over the top. Bring the pan directly to the table while still warm and let people help themselves with small plates or napkins.
Pro Tips for Nacho Perfection
The most important thing to understand about sheet pan nachos is that timing is everything. You want everything to come together in the oven at the same moment — the cheese should melt through completely, the beef should stay warm, and the chips should stay crispy. This narrow window is why that 12-to-14-minute bake time is so critical. Every oven is slightly different, so check at the 11-minute mark and pull the pan out the second the cheese is fully melted and bubbling slightly at the edges. A few seconds too long and the chips start absorbing moisture from the cheese and toppings and lose their structure.
The temperature matters too. Four hundred degrees is the sweet spot. Lower and your cheese will melt slowly, making your chips soggy by the time the cheese is done. Higher and the cheese will bubble and potentially brown before penetrating all the way through, leaving cold melted cheese at the bottom of some piles. Four hundred degrees gives you that perfect melt in a short, crisp window.
One thing that changes the texture dramatically is how much you overlap the chips. If you pack them too densely, you’ll trap steam and end up with a softer chip. If you space them too far apart, bare chip areas won’t get cheese coverage and will stay plain and dry. That slight overlap with visible gaps in between is the target — it looks beautiful, it gets cooked evenly, and it serves both the texture and the flavor.
The beef texture also matters more than people realize. When you’re browning it, resist the urge to stir constantly in circles. Instead, let it sit for 30-45 seconds at a time, letting the bottom contact develop a brown crust, then stir and break it up again. This gives you better browning and more texture than if you’re stirring continuously. The goal is small pieces with good color, not a uniform gray paste.
For the cheese, shred it yourself and use it immediately. Pre-shredded cheese has anti-caking agents that don’t melt as smoothly, and shredded cheese that’s been sitting in your fridge will start to dry out and won’t melt as uniformly. If you’re shredding in advance (more than 20 minutes before cooking), toss the shredded cheese with just a tiny pinch of cornstarch to keep the pieces from sticking together, but never with the anti-caking agents in store-bought pre-shredded cheese.
One subtle trick: slightly warm your sour cream before the game starts by leaving it out on the counter for 30 minutes. Cold sour cream stays in small blobs on top of hot nachos; room-temperature sour cream spreads more easily and blends better with everything. You don’t want it warm, just not straight from the fridge.
Common Nacho Mistakes and How to Avoid Them
The biggest mistake is packing the chips too densely. People see an 18×13-inch pan and think they need to completely fill it with chips in multiple layers. That’s wrong. A single layer with slight overlaps is exactly right. Multiple layers mean the chips underneath never get directly exposed to heat, never get crispy, and end up soggy and steamed instead. One thin, even layer is what makes this method work.
Another common error is adding the sour cream and other cool toppings before baking instead of after. If you put cold sour cream on the chips before they go in the oven, it melts and mixes with everything, creating a texture that’s not quite right. The sour cream, cilantro, lime, and fresh toppings are there to provide contrast — cold, fresh, and bright against the hot, rich baked components. Add them after baking and you get that textural and temperature contrast that makes the whole thing work.
People also often forget that the seasoning in the beef is the only seasoning in the entire dish besides the lime and salt on top. If you’re not tasting the beef as you season it, you might end up with something that’s way too spiced. Use a light hand with the spices and taste as you go. Remember that the beef is one element among many — it should enhance, not dominate.
Many home cooks also don’t think about the cheese mixture carefully enough. If you use only cheddar, the result is sharp and can be grainy. If you use only Monterey Jack, it melts beautifully but lacks flavor. The 50/50 blend gives you the best of both — sharp flavor from the cheddar, smooth melt from the Monterey Jack, and a color that’s deep golden orange instead of pale yellow.
Another frequent mistake is using jalapeños that are sliced too thick. Thick slices don’t cook through in the time the nachos are in the oven and end up tasting raw. Thin slices (about ⅛-inch thick) soften and cook through while staying fresh-tasting and not wilting into mush. Remove some or all of the seeds if you want less heat, or keep them if you want more.
Finally, people sometimes bake the nachos without an upper-rack position and end up with toppings that brown too much or cheese that bubbles up and catches fire. The upper third of the oven gives the top the direct heat it needs without the danger of burning. It also keeps the bake time short, which is essential for crispness.
Creative Variations to Try
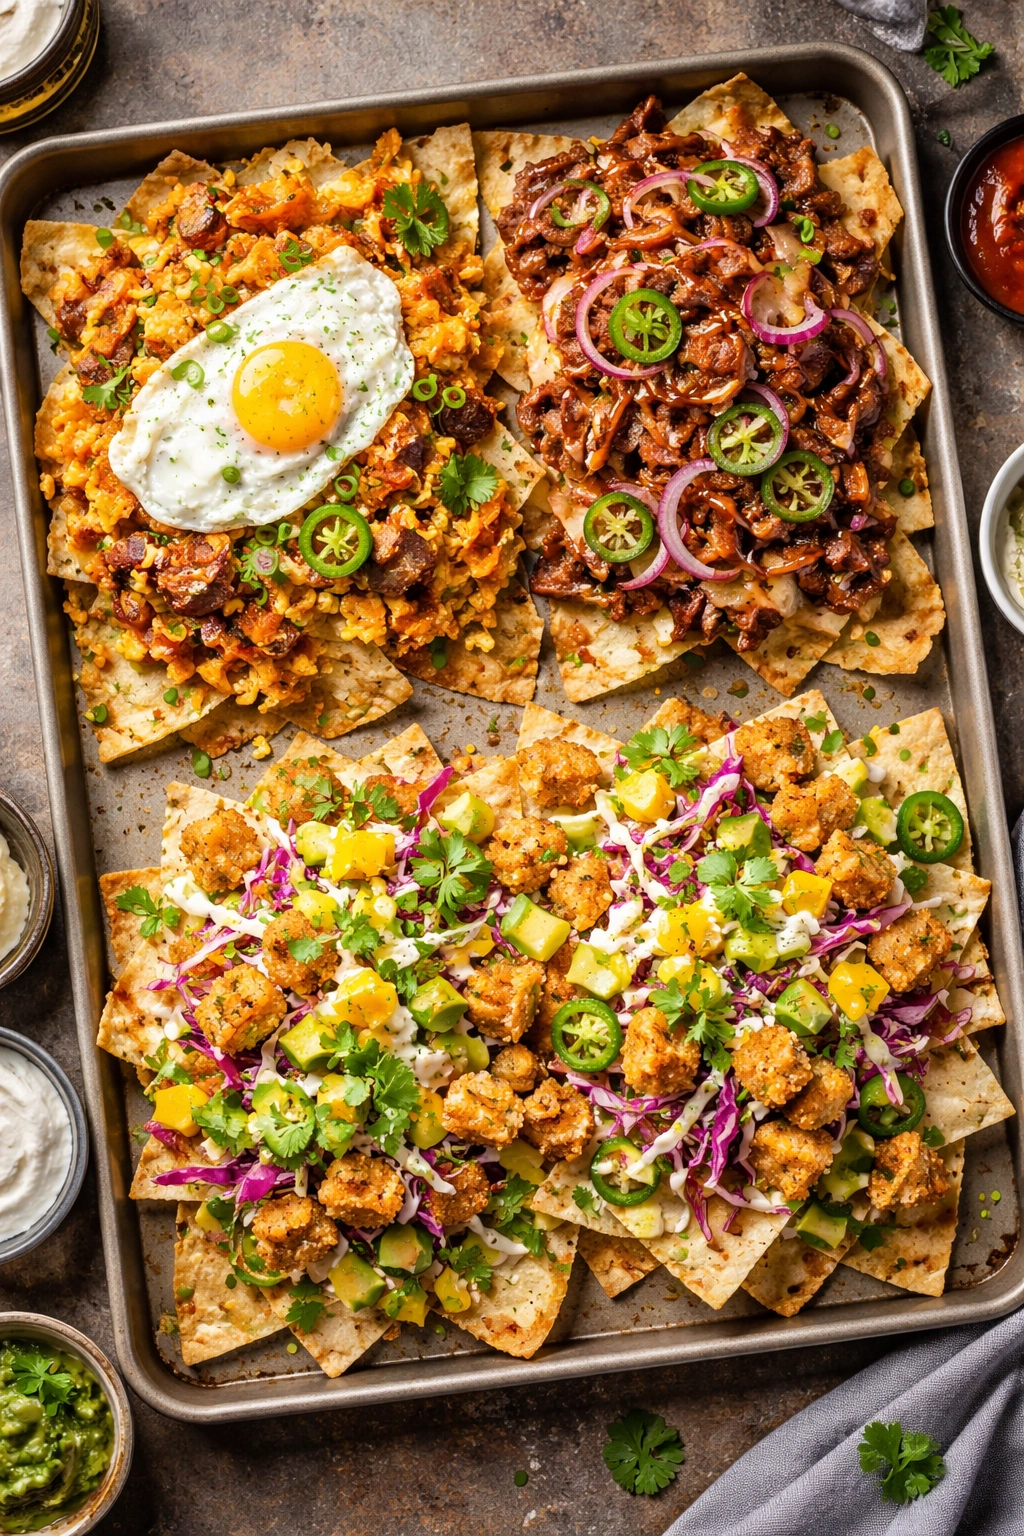
The Breakfast Nachos Version: Skip the ground beef entirely and use crispy bacon or sausage crumbles. Add a fried egg on top of each chip right before serving, or scramble some eggs and layer them under the cheese before baking. Add diced hash browns under the cheese for extra texture, and use sharp cheddar exclusively. Drizzle with maple syrup instead of lime juice and top with fresh thyme and crispy onions. This turns into a legitimate breakfast appetizer.
Pulled Pork Nachos: Replace the seasoned ground beef with shredded pulled pork (about 1½ cups), mixed with a few tablespoons of barbecue sauce. Use sharp cheddar and smoked gouda cheese instead of Monterey Jack. Top with crispy fried onions, diced red onion, jalapeños, and drizzle with ranch dressing and extra barbecue sauce. Finish with fresh cilantro and lime juice. This feels like a Tex-Mex pulled pork sandwich in nacho form.
Fish Tacos Nachos: Use seasoned flaked white fish or crispy fish pieces instead of beef. Season the fish with cumin, chili powder, and lime zest. Use a 50/50 blend of cotija cheese and Oaxaca cheese. Top with shredded cabbage, diced mango, fresh cilantro, jalapeños, and drizzle with a lime crema (sour cream mixed with lime juice and garlic). Finish with crispy tortilla strips scattered on top.
Three-Cheese Vegetarian Version: Skip the beef and use 3 cups of diced roasted vegetables (zucchini, bell peppers, mushrooms, and onions tossed with olive oil, salt, and herbs, then roasted at 400°F for 20 minutes until caramelized). Use three cheeses: sharp cheddar, Monterey Jack, and crumbled cotija. Add black beans (about 1 cup, drained and warmed) under the cheese. Top with jalapeños, cilantro, red onion, tomato, and a full avocado sliced just before serving. Drizzle with lime crema and a squeeze of lime.
Korean-Inspired Nachos: Season the ground beef with gochujang (Korean chili paste), soy sauce, garlic, ginger, and sesame oil instead of cumin and paprika. Use sharp cheddar and gruyere cheese. Top with sliced green onions, crispy fried garlic, toasted sesame seeds, diced cucumber, and pickled red onion. Drizzle with a sauce made from sour cream mixed with a small amount of gochujang thinned with lime juice. The result is rich, spiced, and unexpectedly balanced.
Loaded Breakfast Version with Chorizo: Use Mexican chorizo (about ¾ pound) instead of ground beef — remove it from the casing and crumble it as you cook. Add 2 diced potatoes, par-cooked in the microwave (3 minutes) before adding to the chips. Use a 50/50 blend of Oaxaca cheese and sharp cheddar. Before baking, beat 2 eggs together and drizzle them lightly over the top, then bake as normal — the eggs will set in the heat. Top with cilantro, diced tomato, sliced jalapeños, and sour cream.
Make-Ahead and Storage Tips
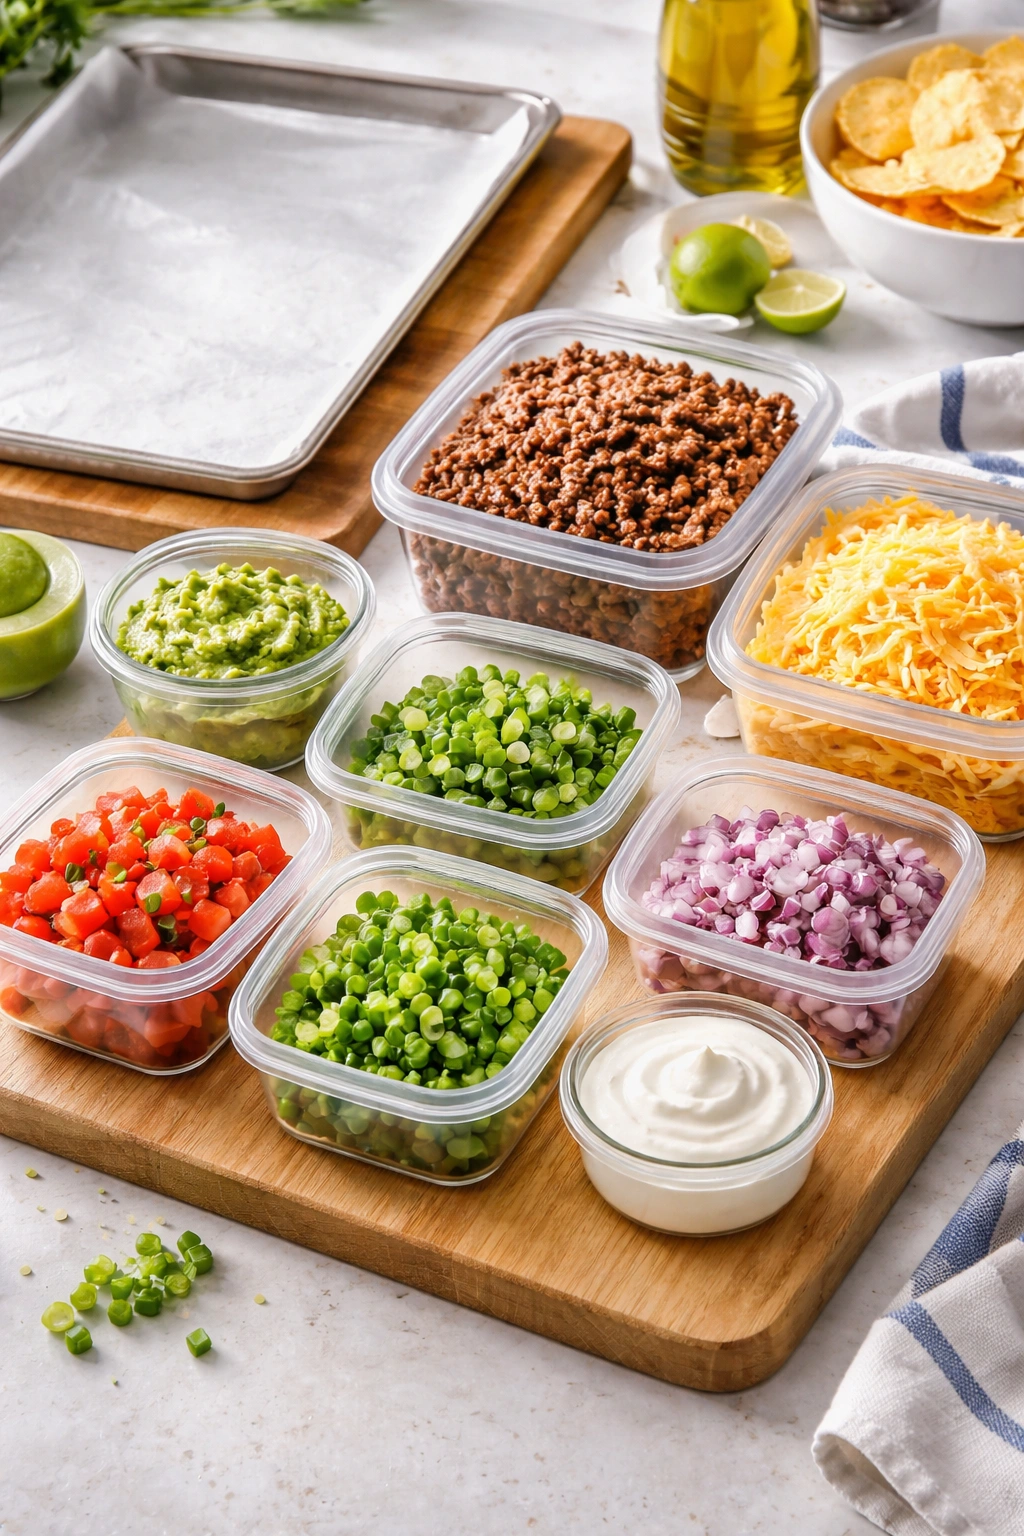
The good news about sheet pan nachos is that they’re best served immediately after baking and assembled to order, so “make-ahead” is less about storing finished nachos and more about strategic prep work that happens in advance. You can brown the seasoned beef up to 3 days ahead and store it in an airtight container in the refrigerator. Reheat it gently over low heat with a splash of water before assembly, stirring occasionally until it’s warm throughout.
You can shred your cheese up to 8 hours ahead if you toss it with a tiny pinch of cornstarch to keep the pieces from sticking together. Store it in an airtight container in the refrigerator and bring it out 15 minutes before you need it so it’s not cold when it hits the hot chips.
The jalapeños can be sliced up to 6 hours ahead and stored in a sealed container in the fridge. The red onion can be diced the morning of and will actually taste better — it’s had time to mellow slightly and won’t be as sharp. Fresh cilantro should be chopped just before serving to preserve its brightness.
For the fresh toppings (sour cream, cilantro, lime, tomato), assemble them on the side in small bowls and add them to the warm nachos immediately after baking. Cold toppings added to hot nachos create that essential textural and temperature contrast.
If you somehow have leftover nachos (which is rare), you can store them in an airtight container in the refrigerator for up to 2 days, but they will lose crispness. Reheat them on a sheet pan at 300°F for about 8-10 minutes until warmed through and slightly crisped. It won’t be exactly the same as fresh, but it’s still good.
Don’t attempt to freeze assembled nachos — the chips will become soggy and the texture will be lost. However, you can freeze the cooked seasoned beef for up to 3 months, frozen shredded cheese for up to 2 months, and any cooked vegetables in advance. Thaw the beef overnight in the refrigerator before reheating.
Pairing and Serving Ideas
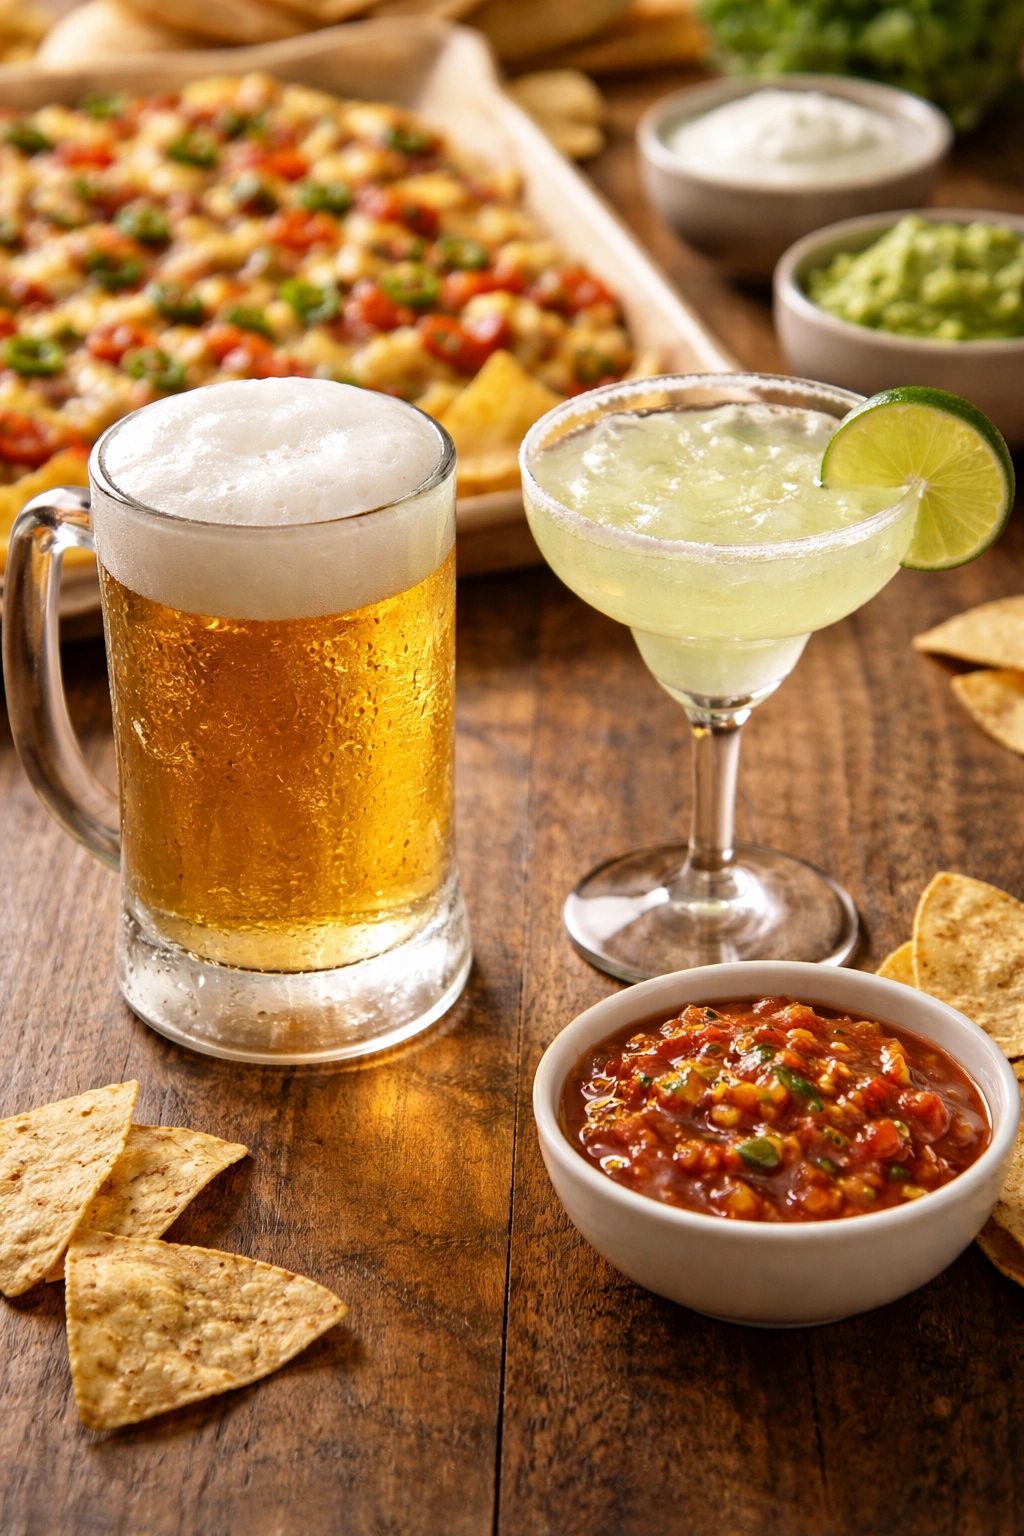
Sheet pan nachos work beautifully alongside a cold beer — the crispness and carbonation cut through the richness of the cheese and beef. They pair equally well with margaritas, especially lime or jalapeño variations. For non-alcoholic options, they’re fantastic with fresh lime agua fresca or even a simple lime and ginger sparkling drink.
If you’re serving nachos as the main appetizer at a game day gathering, plan on about 1 cup of chips per person, which means an 18×13-inch sheet pan feeds roughly 8-10 people as an appetizer before food, or about 6 people if nachos are part of a larger appetizer spread. If you’re serving it as the meal and not the appetizer, double that.
Complement nachos with other light, handheld foods if you’re planning a full spread. Fresh salsa (pico de gallo, mango salsa, or a traditional tomato-based version), guacamole, and fresh lime juice are assumed, but you can also add ceviche, shrimp ceviche tostadas, or a taco stand where people assemble their own. The combination of nachos, fresh salsas, and tacos creates a complete spread that feeds a crowd without being overwhelming.
For a more refined entertaining situation, serve nachos with a small green salad on the side tossed with lime vinaigrette — the fresh greens and acid balance the richness beautifully. Add some marinated olives, roasted cashews, and thinly sliced radishes on the side for additional crunch and freshness.
Nachos also work wonderfully at a casual dinner party as a main course alongside soup, salad, or rice. The richness makes it a satisfying single dish, and everyone can customize their own plate by choosing the ratio of nachos to toppings they want.
Final Thoughts
Sheet pan nachos are one of those dishes that feels impressive to the people eating them but requires almost no special skills from the person making them. The magic is in understanding why each component matters — why single-layer chips stay crispy, why that particular cheese blend melts perfectly, why the toppings go on after baking instead of before. Once you understand the method, you can adapt it endlessly. Pulled pork instead of beef, different cheese blends, seasonal vegetables, whatever you want — the structure stays the same and the result stays excellent.
The best part is that you can have perfectly hot, properly melted, universally crispy nachos on the table in less than 35 minutes from start to finish. You’re not hovering over the stove. You’re not assembling nachos in real time while everyone’s watching the game. You prep, you bake, and you bring out something that looks like you put in way more effort than you actually did. That’s the whole game day appetizer goal — impressive, delicious, and simple enough to pull off without stress. Make this once and you’ll find yourself reaching for the recipe every time people are gathering to watch something.