Imagine the creamy richness of Thai mango sticky rice meeting the modern convenience and health benefits of chia pudding. The result is a dessert that somehow feels indulgent and nourishing at the same time — vibrant tropical mango layered with silky chia pudding, dotted with tender sticky rice, all bound together by a fragrant coconut sauce that makes every spoonful taste like a vacation. This isn’t a traditional recipe you’ll find in Thailand; it’s a creative fusion that takes the best parts of a beloved classic and reimagines it for contemporary kitchens. Best of all, most of the work happens overnight while you sleep, making breakfast feel like dessert.
What makes this dish special is how the different textures play against each other. The creamy chia pudding base provides structure without any dairy if you want it that way, the sticky rice offers soft, slightly chewy pockets of starch, fresh mango gives brightness and natural sweetness, and the coconut sauce ties everything together with richness and warmth. You don’t need any special equipment beyond what’s already in most kitchens, the ingredient list is short and accessible, and the flavor actually improves slightly as it sits — making this the kind of breakfast or dessert you can prep ahead and serve with confidence to guests or enjoy guilt-free throughout your week.
Why This Hybrid Dessert Works
This dish succeeds because it respects the core appeal of both its parent recipes while making practical improvements. Traditional mango sticky rice requires active time on the stove, careful temperature management, and ideally should be served warm for the best texture — which limits when and how you can enjoy it. Chia pudding, on the other hand, is infinitely make-ahead friendly but can feel one-note if flavored simply. By combining them, you get the make-ahead convenience of chia pudding with the complex, deeply satisfying flavor profile of mango sticky rice.
The chia pudding base does something clever here: it adds protein and healthy omega-3 fats while creating a creamy matrix that holds everything together without requiring heavy cream or even coconut milk in the pudding layer itself. You can absolutely make this vegan, dairy-free, and refined-sugar-free if that aligns with your preferences, or you can lean into richness with full-fat coconut milk. The sticky rice becomes a textural element rather than the main component, which means a smaller amount goes further.
The cold temperature works in your favor too. Unlike warm mango sticky rice, which demands immediate eating, this chilled version actually tastes better the next day as flavors meld and the chia seeds fully hydrate. It’s the kind of dish that makes your morning routine feel intentional and special without requiring you to cook anything on the actual day you eat it.
The Story Behind Mango Sticky Rice and Chia Pudding
Mango sticky rice is a beloved Thai dessert with origins in Southeast Asia, where sticky rice (called glutinous rice or sweet rice) has been a staple for centuries. The classic version emerged as a way to use sticky rice’s natural sweetness and soft texture in something festive, pairing it with ripe mangoes and a sweetened coconut sauce. The dish became associated with warm months when mangoes reach their peak sweetness and tender, pale-fleshed varieties are available. It spread beyond Thailand throughout Southeast Asia and eventually found its way into Thai restaurants across North America, becoming one of the first desserts people associate with Thai cuisine.
Chia pudding is a much more recent creation, gaining popularity in the twenty-first century as part of the larger movement toward plant-based breakfasts and whole-food ingredients. Chia seeds, cultivated and used for centuries by Aztec cultures, were rediscovered by modern wellness culture as a nutrient-dense superfood. The pudding itself is brilliantly simple: chia seeds absorb liquid and develop a pudding-like texture through an overnight soak, requiring absolutely no cooking. It became a breakfast staple because it’s infinitely customizable, keeps for days, and offers protein, fiber, and healthy fats without any added processing.
The fusion of these two makes sense when you think about it. Both dishes are about simplicity elevated through quality ingredients. Both reward make-ahead preparation. Both are naturally sweet without feeling heavy. This particular combination might be new to you, but it builds on the long tradition of desserts that cross cultural boundaries and meet modern life halfway — respecting tradition while adapting to how we actually want to eat.
Key Ingredients You’ll Need

This recipe uses a carefully selected list of ingredients that you likely already have or can find at any grocery store. There are no specialty items that require a trip to a specific market, though a few of them are worth quality-checking.
For the Chia Pudding Base:
- 1 cup full-fat coconut milk (or whole milk, or oat milk if you prefer dairy-free)
- ½ cup low-fat coconut milk or almond milk (to balance richness)
- ⅓ cup raw chia seeds
- 2 tablespoons pure maple syrup (or agave nectar, or honey if not vegan)
- 1 teaspoon pure vanilla extract
- Pinch of fine sea salt
For the Sweet Coconut Sauce:
- ¾ cup full-fat coconut milk
- ¼ cup palm sugar (or brown sugar, or white sugar)
- 1 tablespoon sweetened condensed milk (optional, adds richness; omit for vegan)
- ¼ teaspoon fine sea salt
- ¼ teaspoon vanilla extract
For Assembly and Serving:
- 1 cup uncooked sweet sticky rice (also labeled glutinous rice or sticky rice)
- 2 cups water
- 3 to 4 ripe but firm mangoes (about 1½ pounds total), preferably Ataulfo or Honey mangoes
- 2 tablespoons roasted unsalted peanuts, chopped (optional garnish)
- Fresh mint leaves for garnish (optional)
- Extra coconut milk for drizzling
Notes on ingredient choices: The chia seeds should be black or white chia seeds — they’re interchangeable in terms of taste and texture, though black chia seeds disappear visually into darker liquids while white seeds stay visible. Coconut milk varies wildly in quality; look for a brand with just two ingredients: coconut and water, with no gums or thickeners. The sticky rice is crucial — regular white rice won’t work here because it doesn’t have the same starch content that creates that signature stickiness. You can find it in the international aisle, at Asian markets, or online, usually labeled as “sticky rice,” “sweet rice,” or “glutinous rice” (the word glutinous refers to the texture, not wheat gluten, so it’s safe for celiac diets). For mangoes, choose ones that yield slightly to pressure near the stem end but aren’t soft throughout — you want ripe but not overripe.
Yield, Prep Time, Cook Time, Total Time, and Difficulty
Yield: Serves 4 as a generous dessert or breakfast bowl | Makes 4 pudding components
Prep Time: 20 minutes (chopping fruit, mixing pudding base, measuring ingredients)
Cook Time: 45 minutes (cooking sticky rice and simmering coconut sauce)
Total Time: 65 minutes active + overnight chilling (at least 8 hours, up to 24 hours)
Chill/Rest Time: Minimum 8 hours, preferably overnight; pudding is best after 12 hours when chia seeds are fully hydrated
Difficulty: Intermediate — No special equipment needed beyond a pot and basic kitchen tools. The chia pudding is entirely hands-off, the sticky rice requires attention but no technique, and assembly is just layering. The slightly intermediate rating reflects that you’re coordinating multiple components and need to plan a day ahead.
Best Served: Chilled, directly from the refrigerator; consumed within 3 days of assembly for best texture
How to Make the Chia Pudding Base
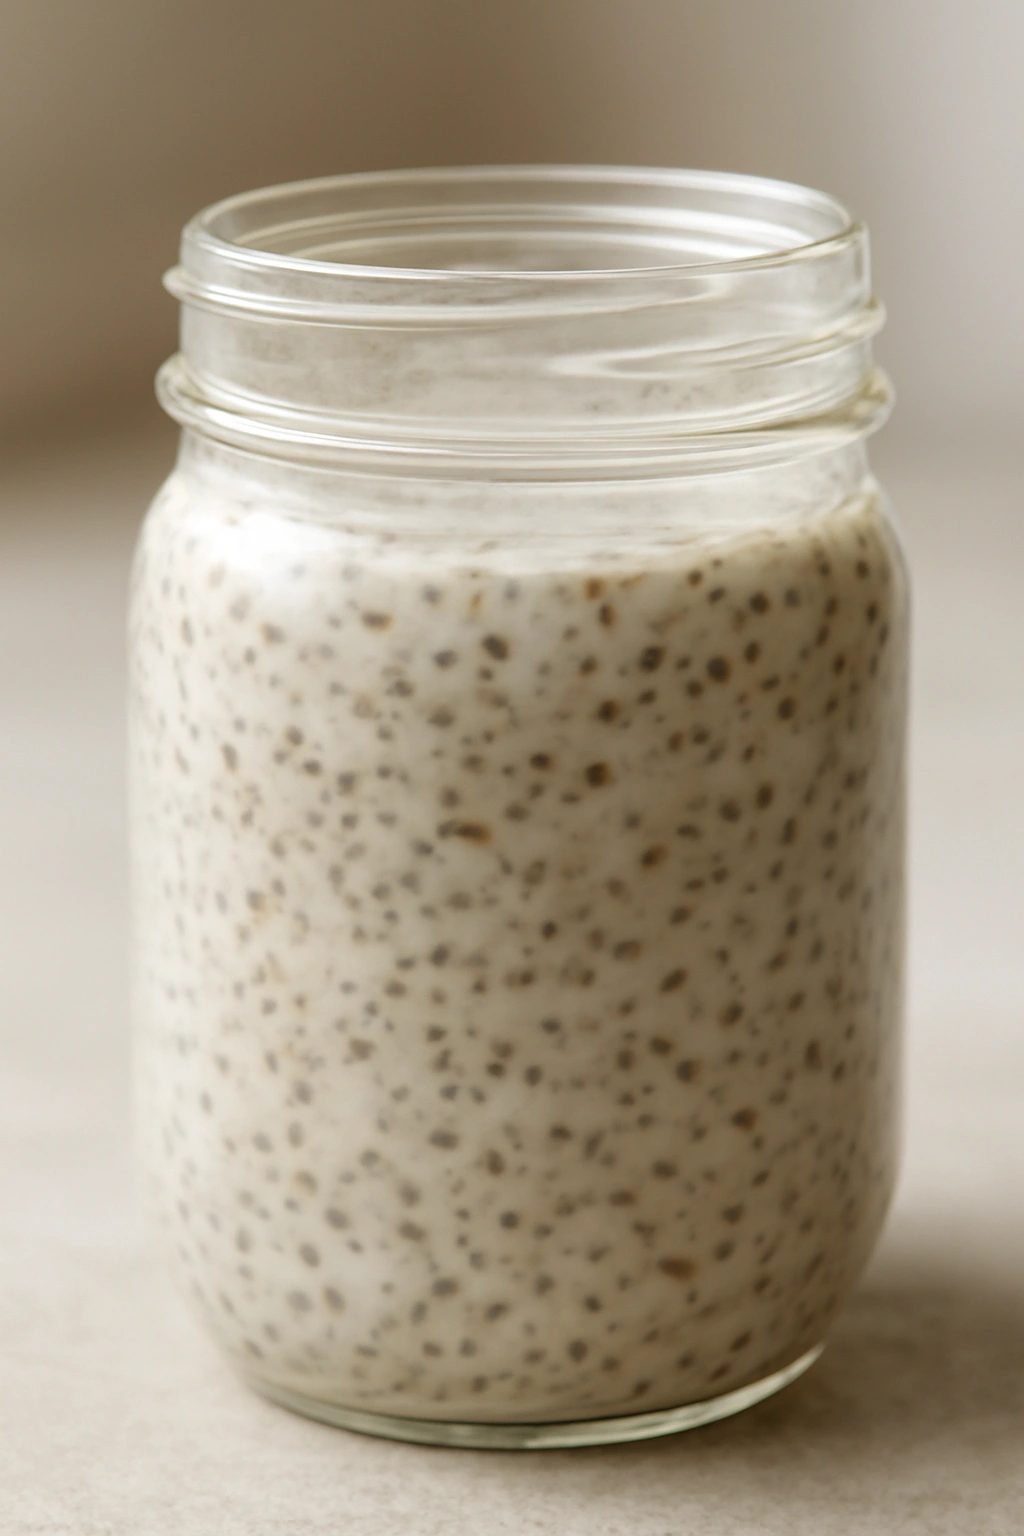
The chia pudding base is where the magic of make-ahead preparation happens. This is actually the first component you should prepare because it needs overnight hydration, and once it’s ready, you can build everything else around it. The combination of full-fat and lighter coconut milk is intentional — full-fat coconut milk alone becomes almost too heavy and separates oddly as it sits, while a blend gives you creaminess without greasiness.
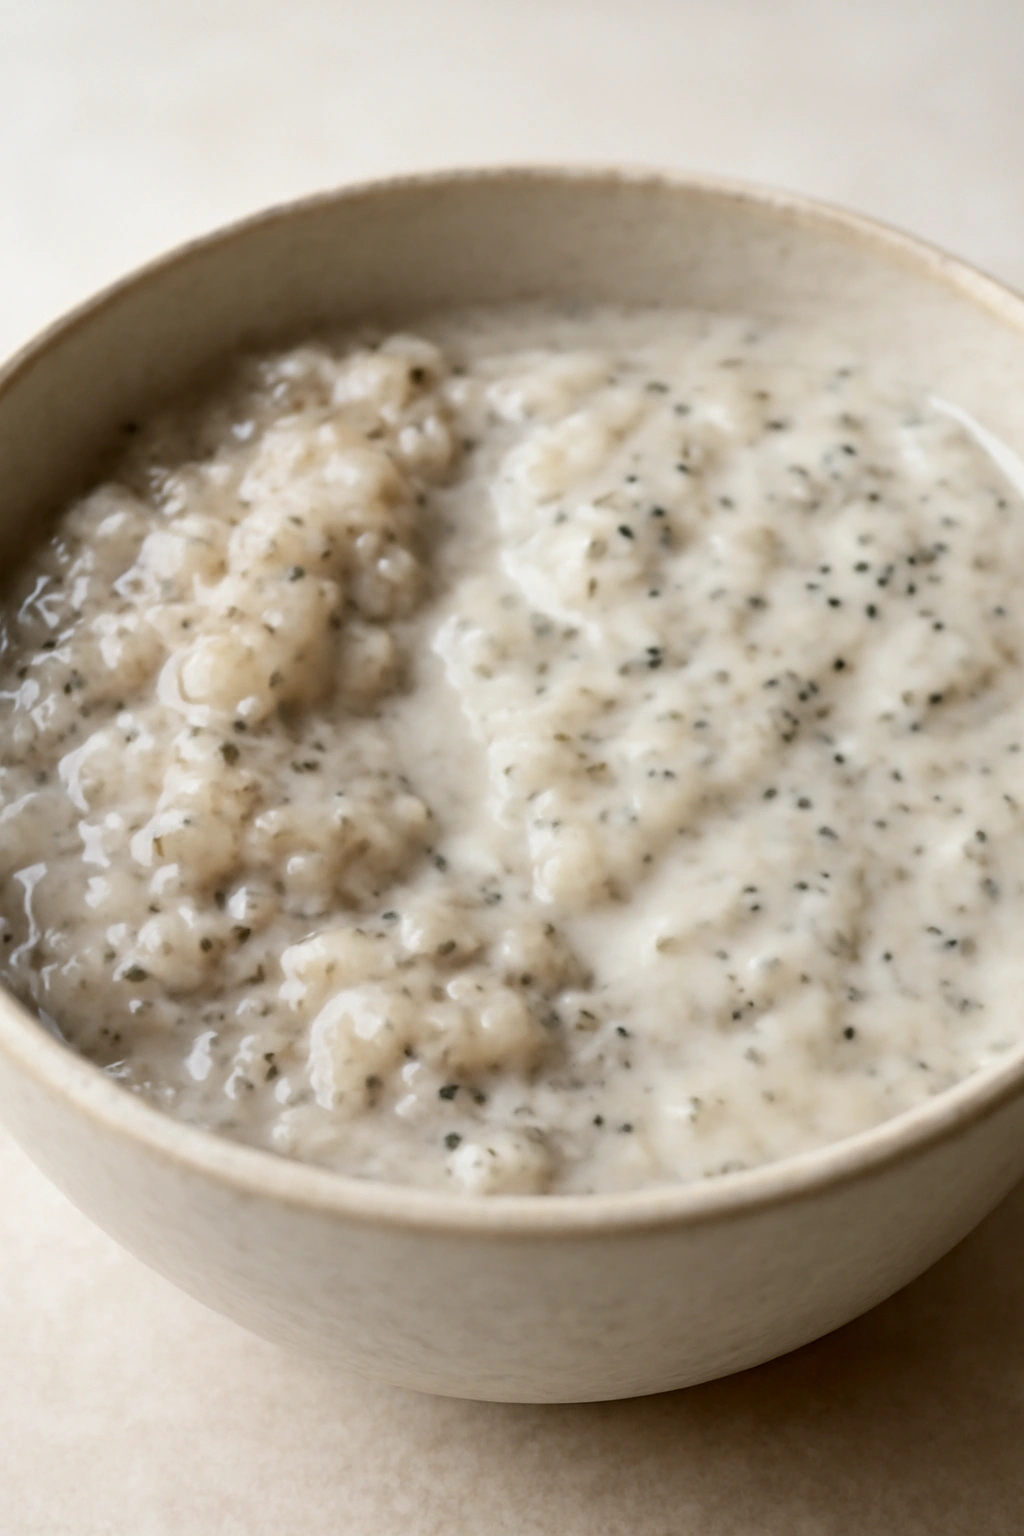
Combine the full-fat coconut milk, lighter coconut milk (or almond milk), chia seeds, maple syrup, vanilla extract, and sea salt in a mason jar or container. The salt might seem like an odd addition to a sweet pudding, but a tiny pinch enhances the coconut flavor and brightens the overall sweetness without adding a salty taste. Whisk the mixture vigorously for about 1 minute, breaking up any chia seed clumps that form immediately. You’ll notice the mixture starts to thicken almost immediately as the chia seeds begin absorbing liquid.
Cover the container and refrigerate for at least 8 hours, though overnight (12 hours) is ideal. About halfway through chilling, give it another quick stir with a fork — this prevents the chia seeds from settling into a dense layer at the bottom and ensures even hydration. When you open the container the next morning, you should have a thick, spoonable pudding with a texture somewhere between yogurt and tapioca. If it seems too thick, whisk in a tablespoon of milk and let it sit another 10 minutes.
The pudding is best prepared the night before you plan to serve it, giving you a full 12 to 24 hours of hydration. You can make it up to three days ahead, though the flavor stays fresher if you use it within two days.
Preparing the Sweet Coconut Sauce
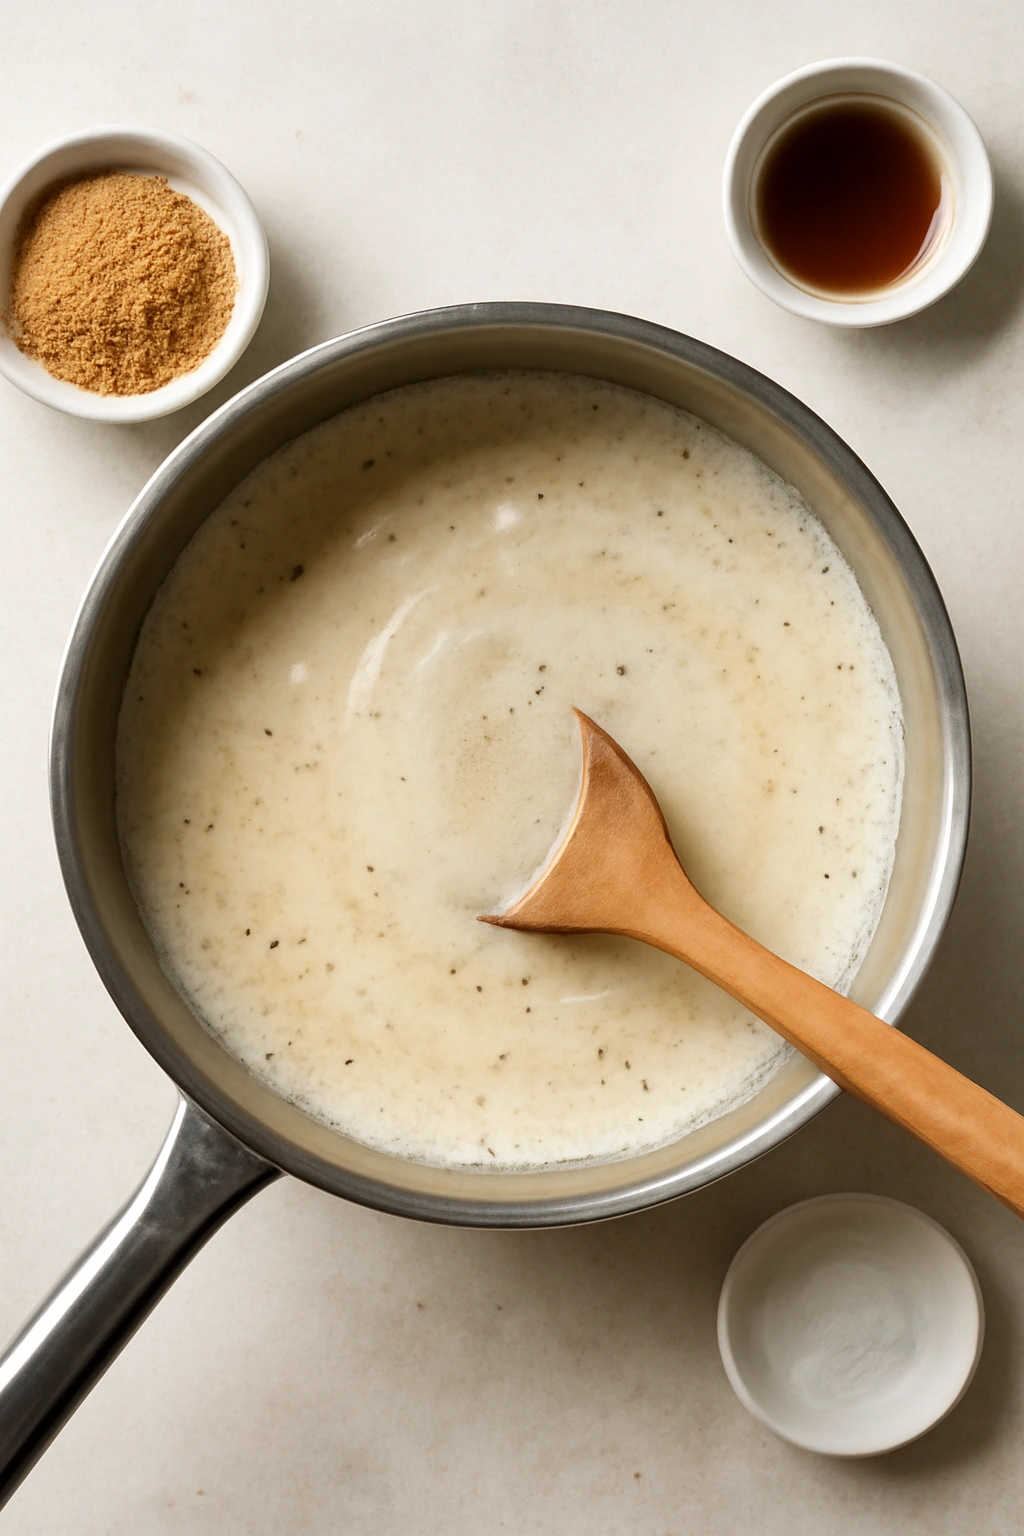
The coconut sauce is where the traditional mango sticky rice flavor lives, so this component shouldn’t be rushed. This sauce coats everything else and ties all the textures together into a cohesive dessert. Unlike the pudding base, the sauce is best made fresh the day you serve the dessert, or at most one day ahead.
Pour the full-fat coconut milk into a small saucepan and bring it to a gentle simmer over medium heat. Don’t boil it aggressively — you just want tiny bubbles breaking the surface. Add the palm sugar (or brown sugar), sweetened condensed milk if you’re using it, and the sea salt. Stir constantly until all the sugar dissolves completely, which should take about 3 to 4 minutes. The mixture will be silky and slightly darker than plain coconut milk.
Remove the saucepan from heat and stir in the vanilla extract. The sauce should smell floral and sweet, not sharp or burnt. Taste a tiny spoonful — it should taste noticeably sweet on its own, almost syrupy, because it will be diluted when you layer it with the less-sweet chia pudding and fruit. If you prefer less sweetness, reduce the sugar by a tablespoon, but remember that the sauce is meant to be concentrated.
Pour the sauce into a small bowl and let it cool to room temperature, about 15 minutes. You can make this sauce several hours ahead and keep it at room temperature, or refrigerate it and gently warm it in a microwave or small pot before serving if you prefer to serve it warm (a nice contrast to the cold pudding). The sauce should be pourable but not runny — if it thickens too much as it cools, whisk in another tablespoon of coconut milk to loosen it.
Cooking the Sticky Rice Component
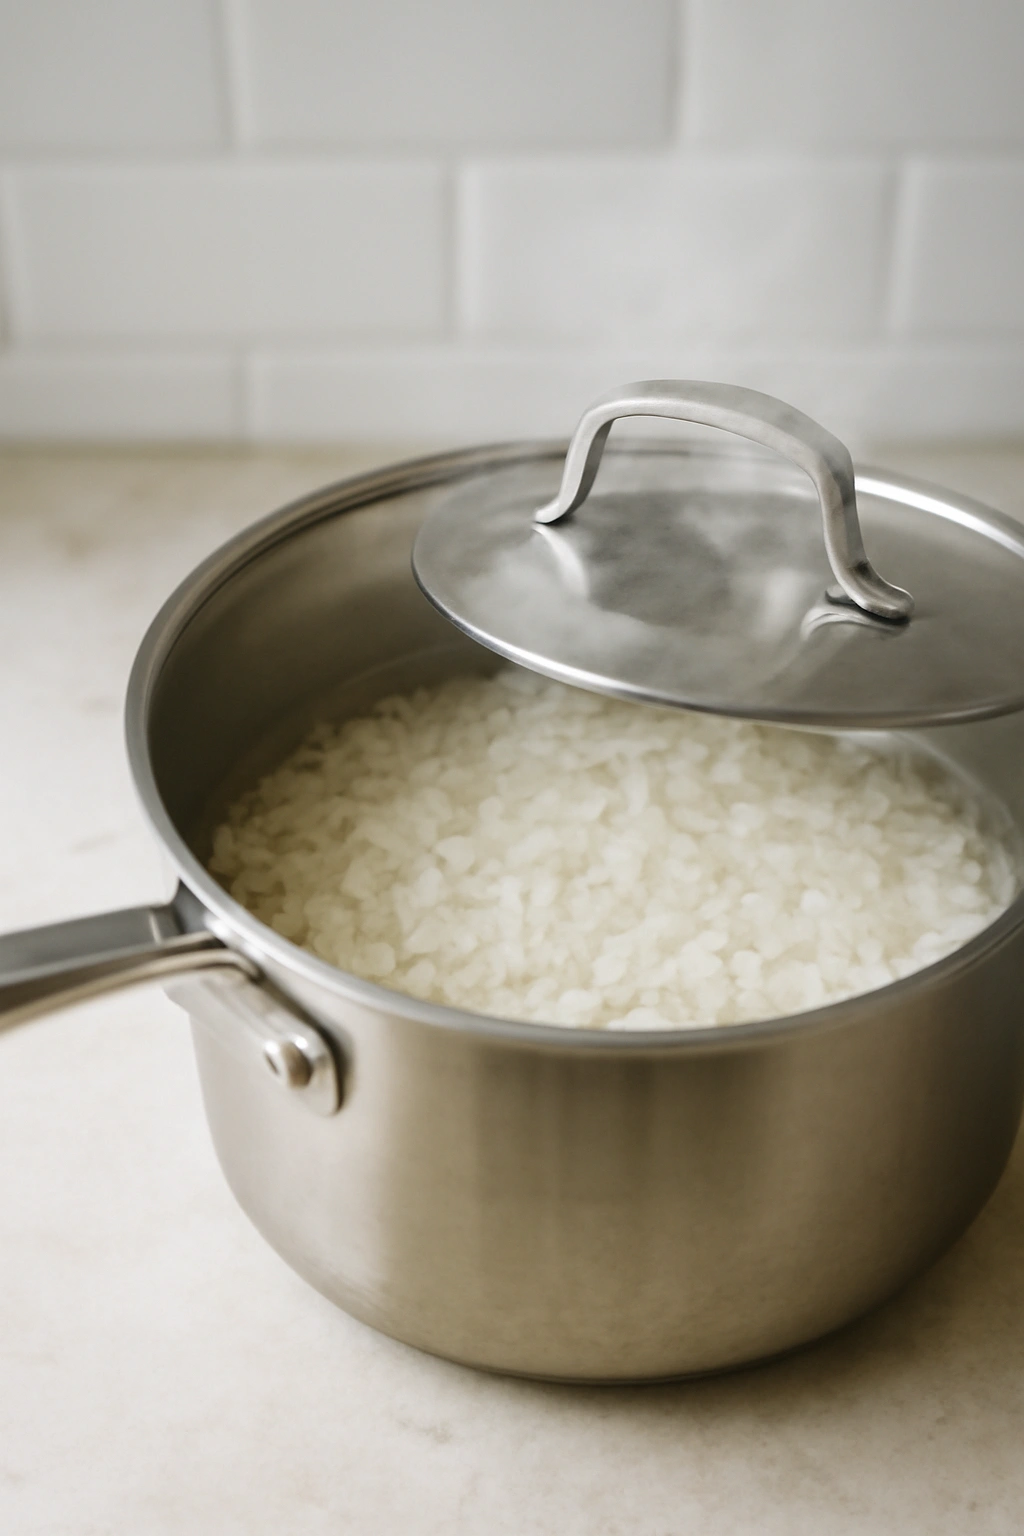
Sticky rice requires a different cooking method than regular rice because you’re trying to gelatinize the starches completely, creating that characteristic clingy, tender texture. Start by rinsing the sticky rice thoroughly under cold running water in a fine-mesh strainer, stirring gently with your fingers until the water runs mostly clear. This removes excess starch from the outside of the grains. Rinsing is important — it prevents the rice from becoming overly gluey.
Place the rinsed sticky rice in a medium saucepan and add 2 cups of fresh water. Don’t substitute the water amount — sticky rice needs a precise liquid-to-rice ratio. Bring the water to a boil over high heat, then immediately reduce the heat to low, cover the saucepan with a tight-fitting lid, and let it cook undisturbed for 20 to 25 minutes. You should not peek or stir during this time — each time you lift the lid, steam escapes and the cooking time extends.
After 20 minutes, carefully remove the lid and check a single grain of rice. It should be completely translucent and soft enough to mash easily between your fingers with no hard core in the center. If you see any white, opaque center, cover and cook for another 2 to 3 minutes. Once the rice is done, remove it from the heat and let it rest, covered, for 5 minutes. This allows the residual heat to finish the cooking and makes the grains slightly less sticky and easier to handle.
Transfer the cooked sticky rice to a bowl and drizzle it with a tablespoon of coconut milk while it’s still warm. This prevents the rice from drying out and adds flavor. Let it cool to room temperature before using, about 15 minutes. You can cook the sticky rice a few hours ahead and store it at room temperature, covered, or refrigerate it overnight and use it chilled directly from the fridge — both work perfectly in this dish.
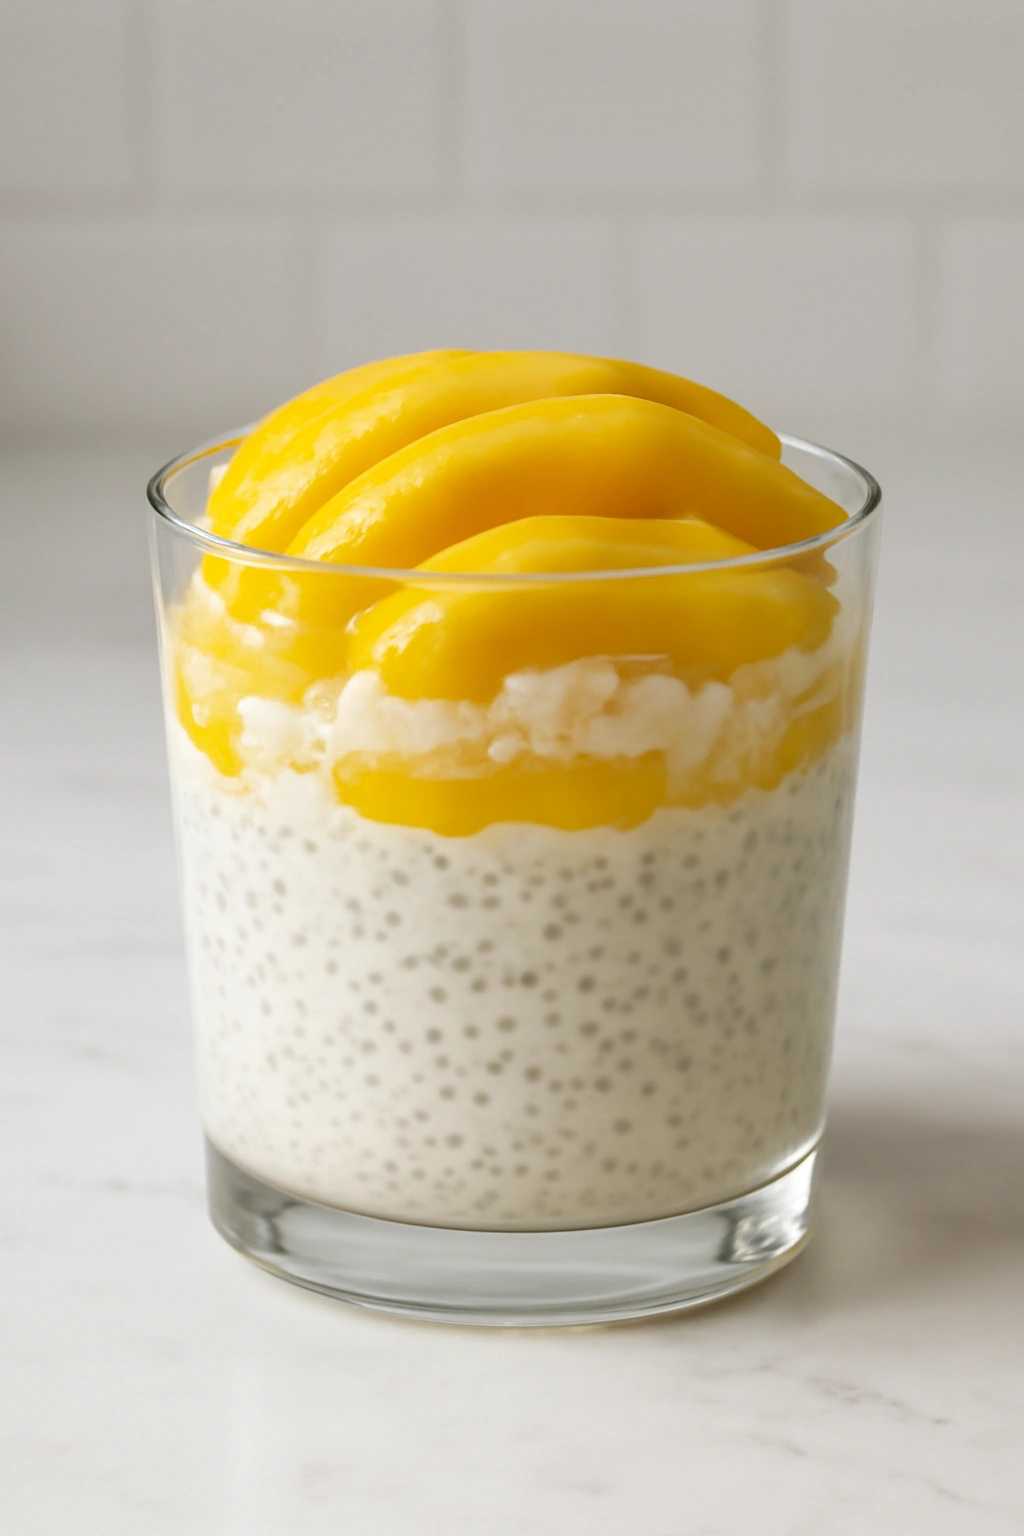
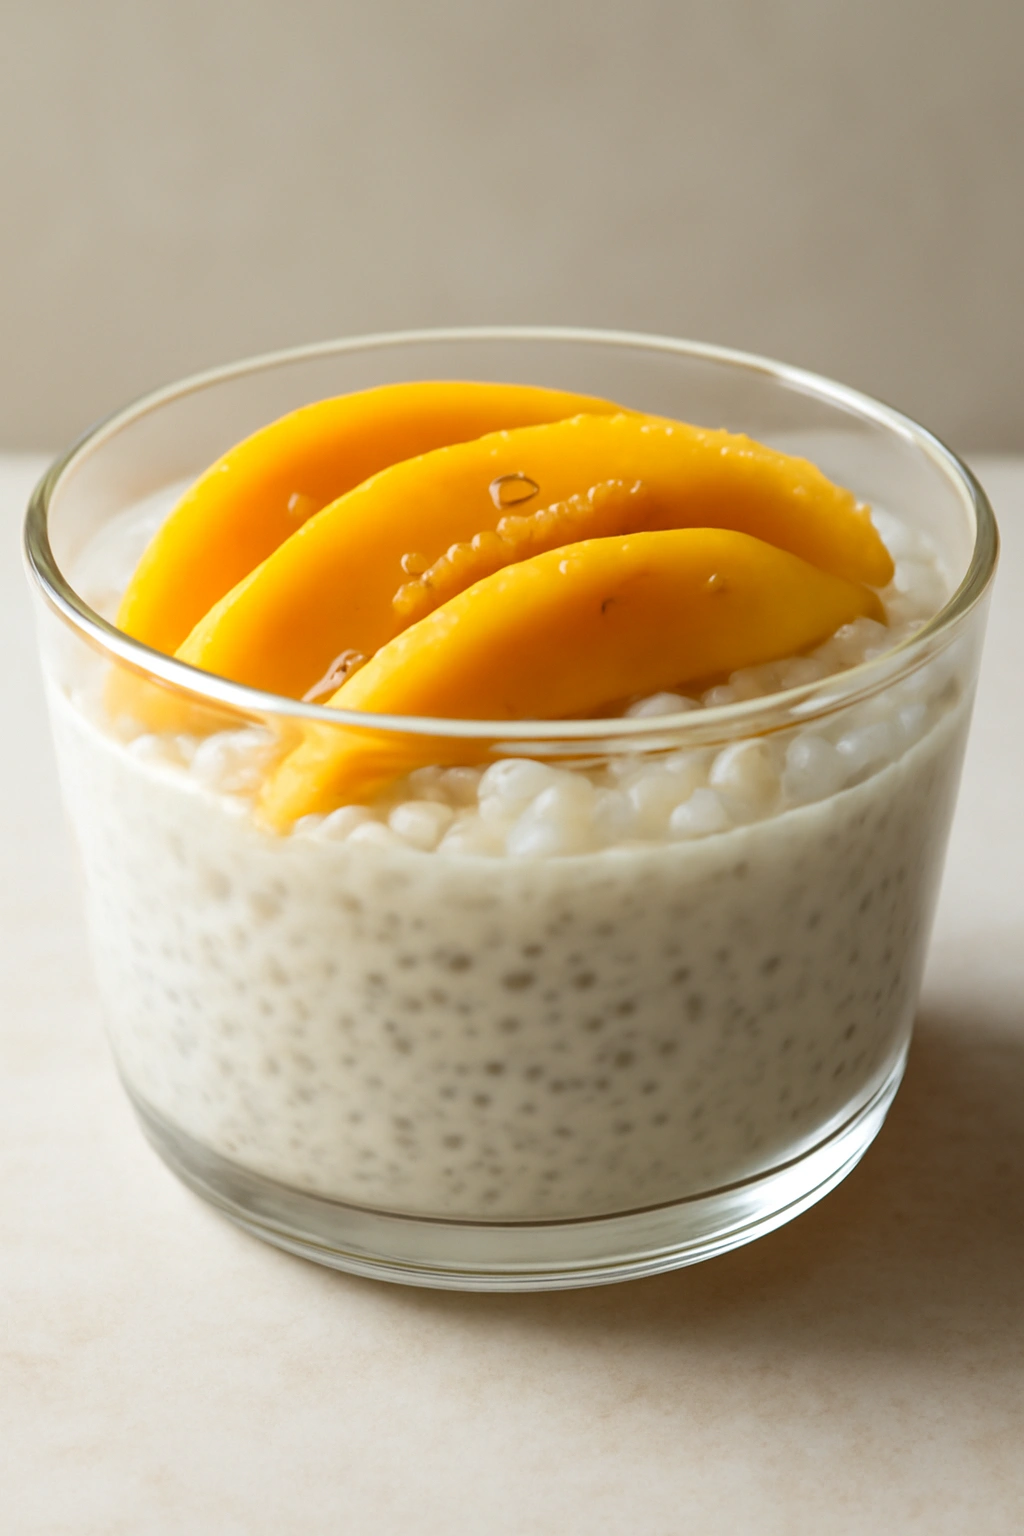
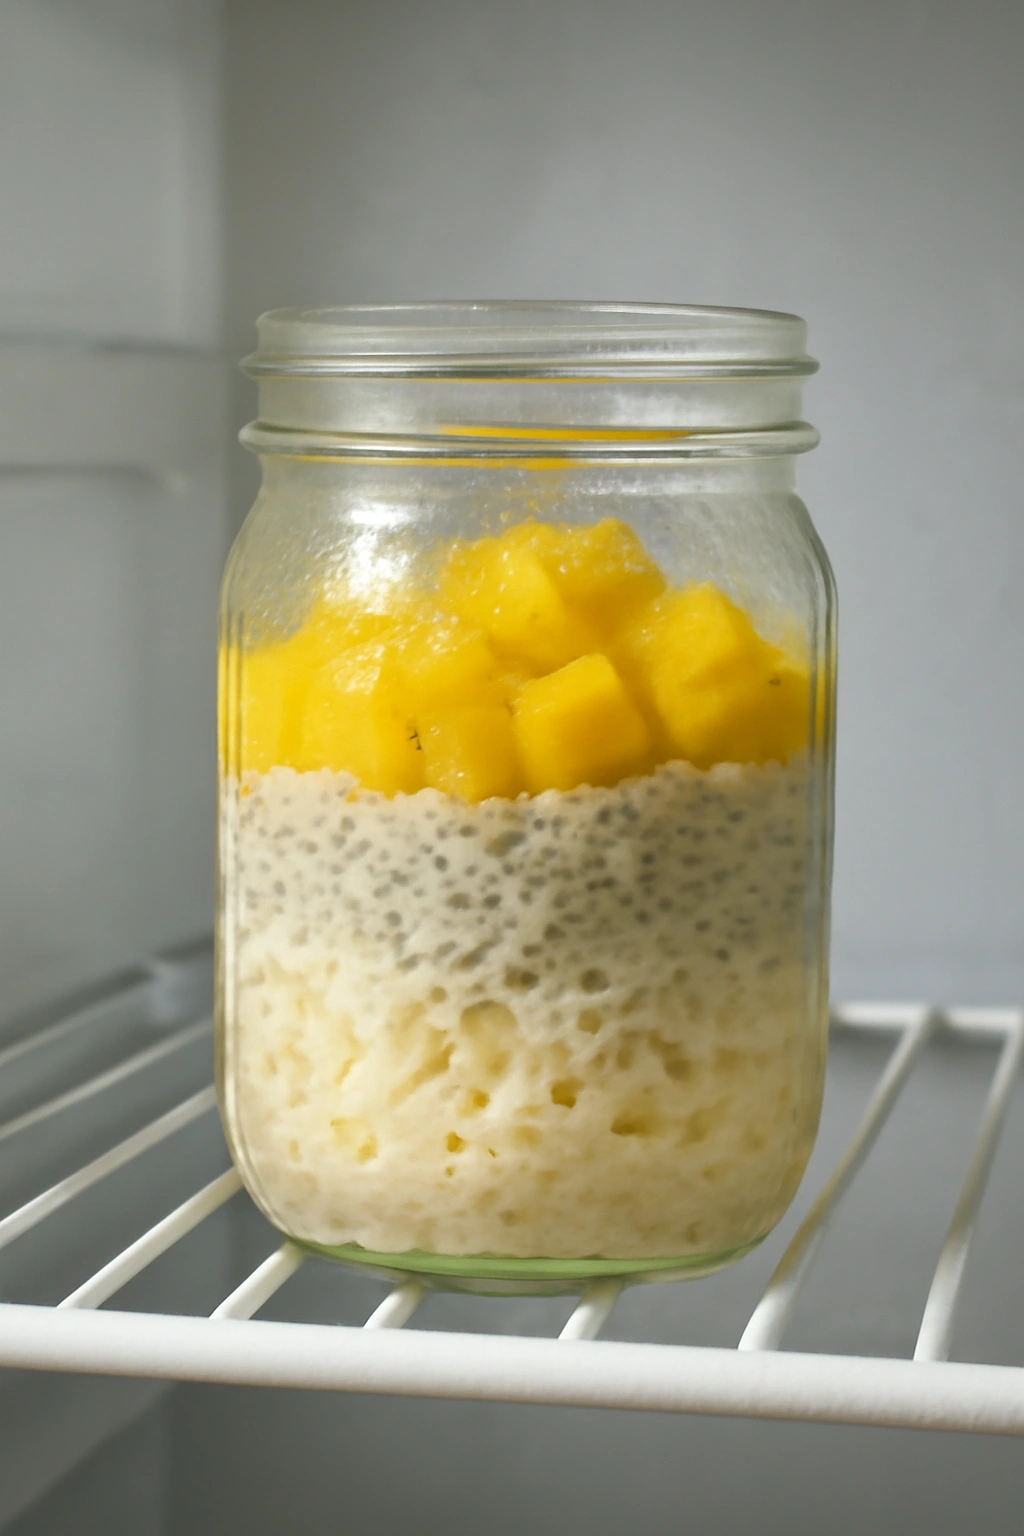
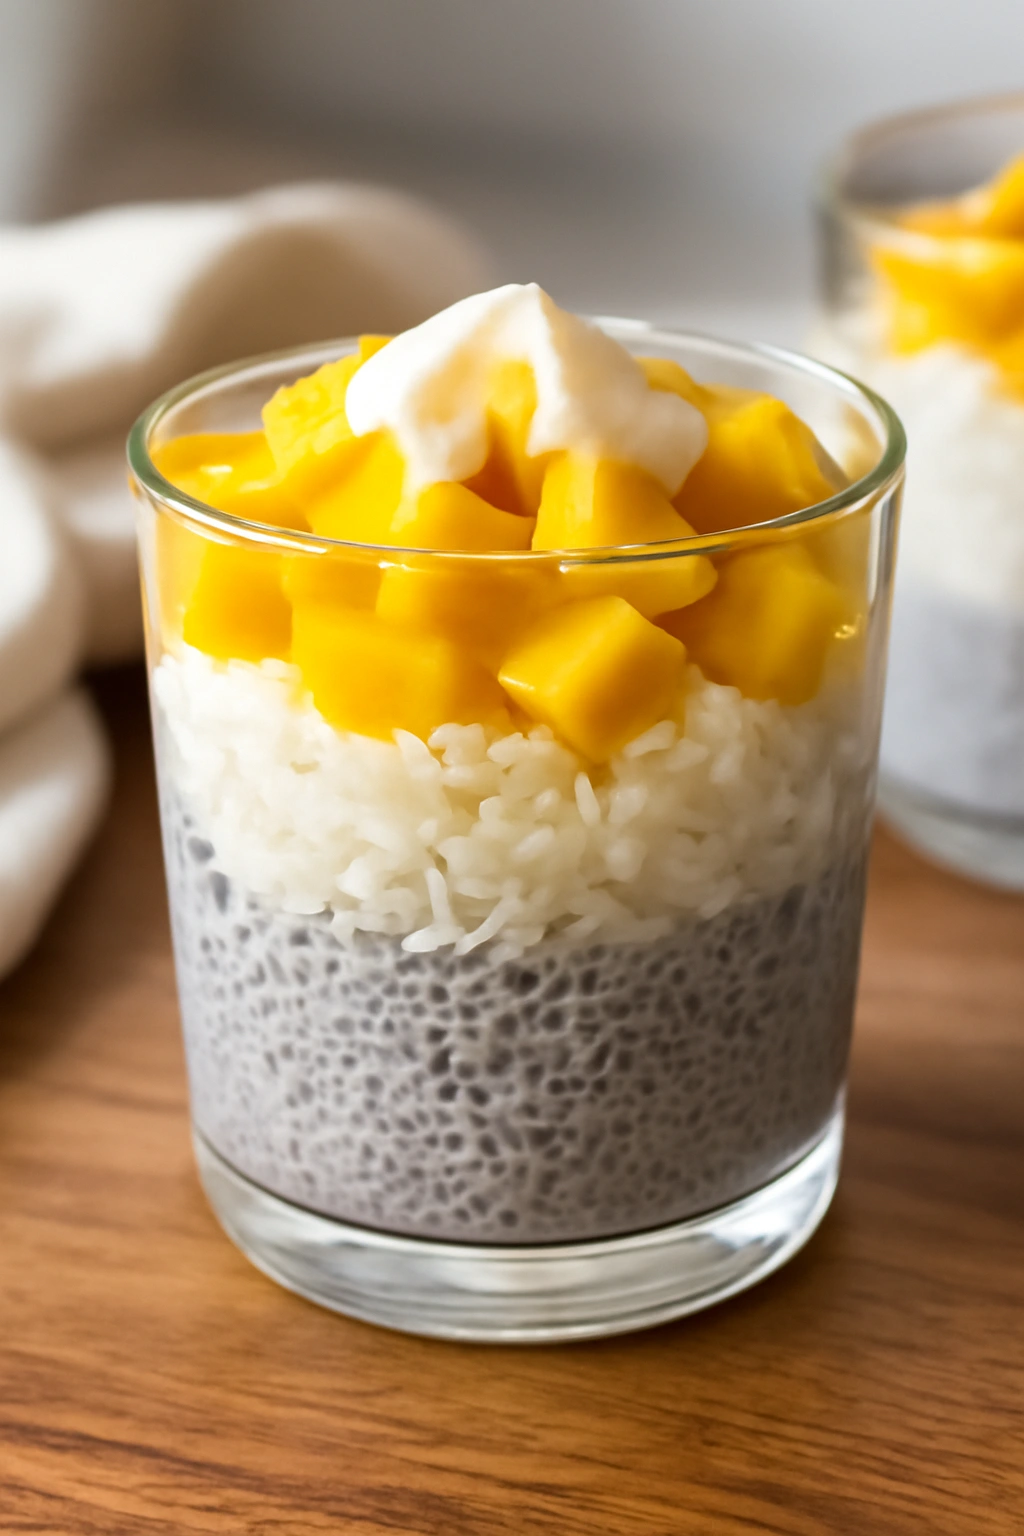
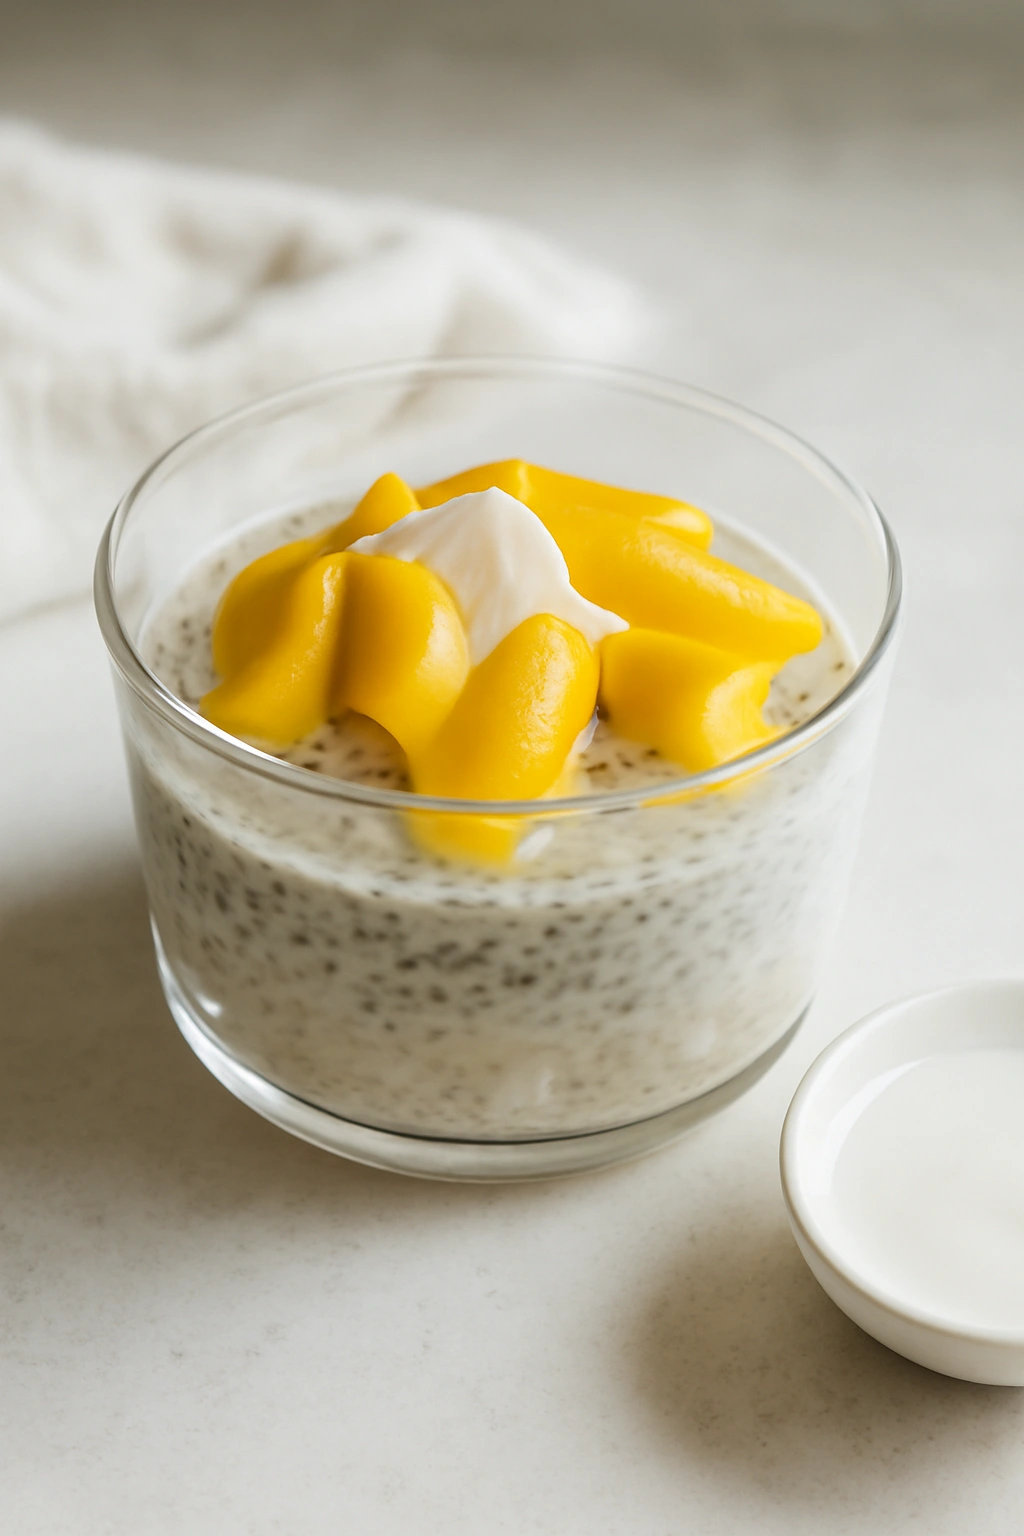
Assembling Your Mango Sticky Rice Chia Pudding
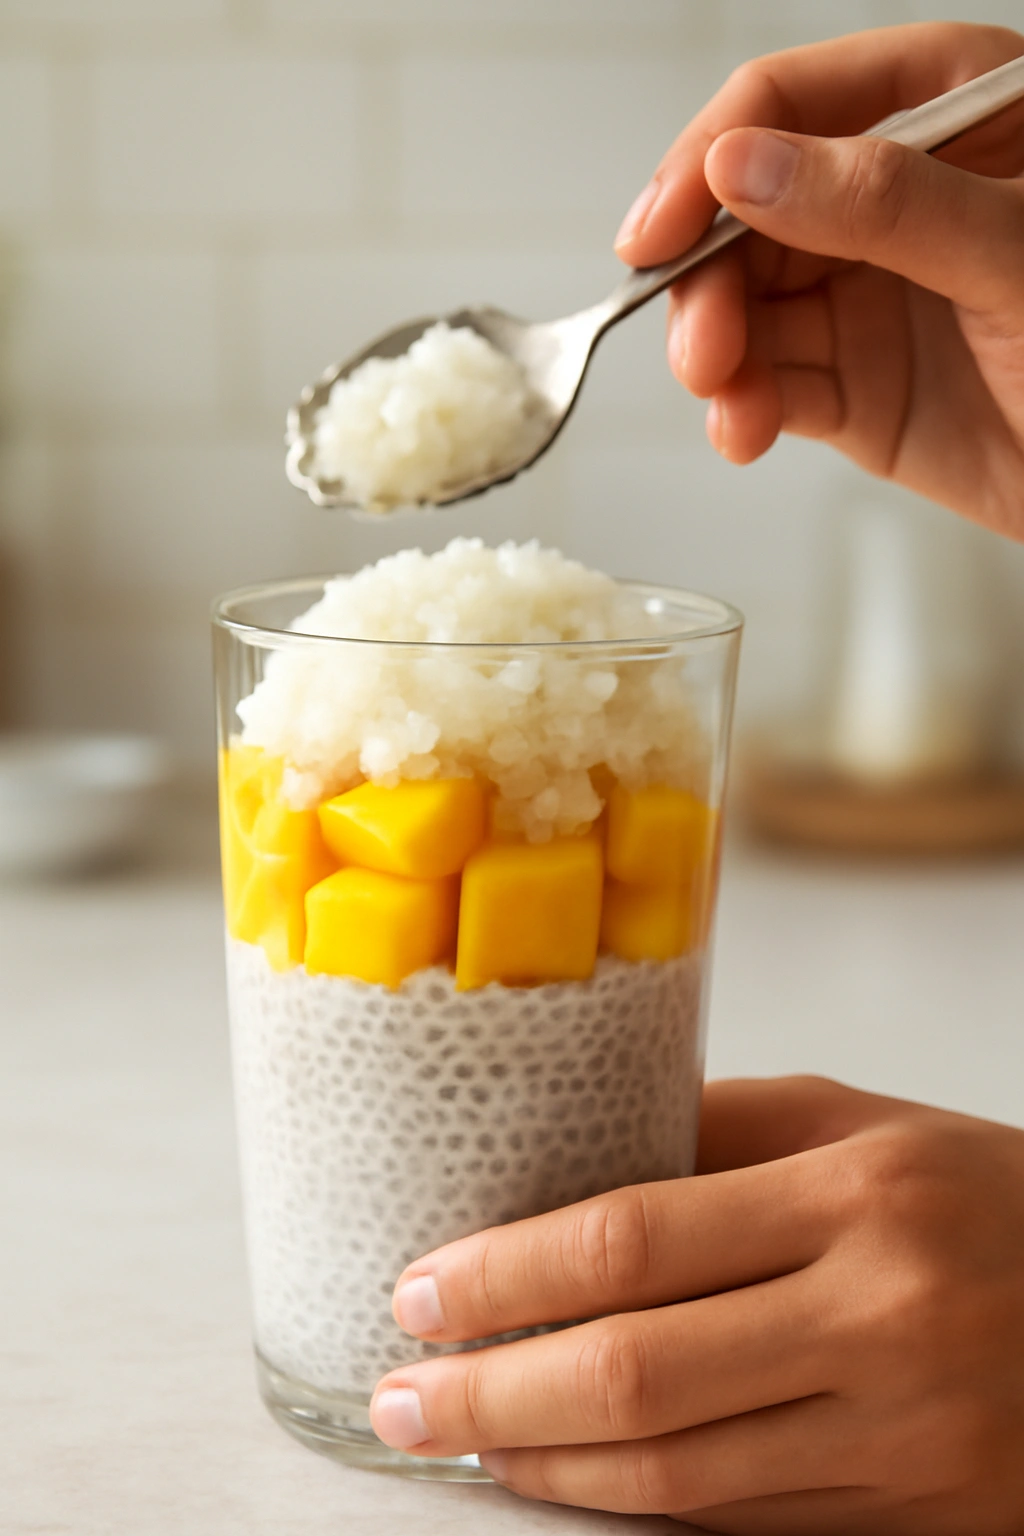
Now you have all three components ready, and assembly is where this hybrid dessert comes together. This is best done just before serving, though you can assemble it up to 1 hour ahead if you cover it and refrigerate it.
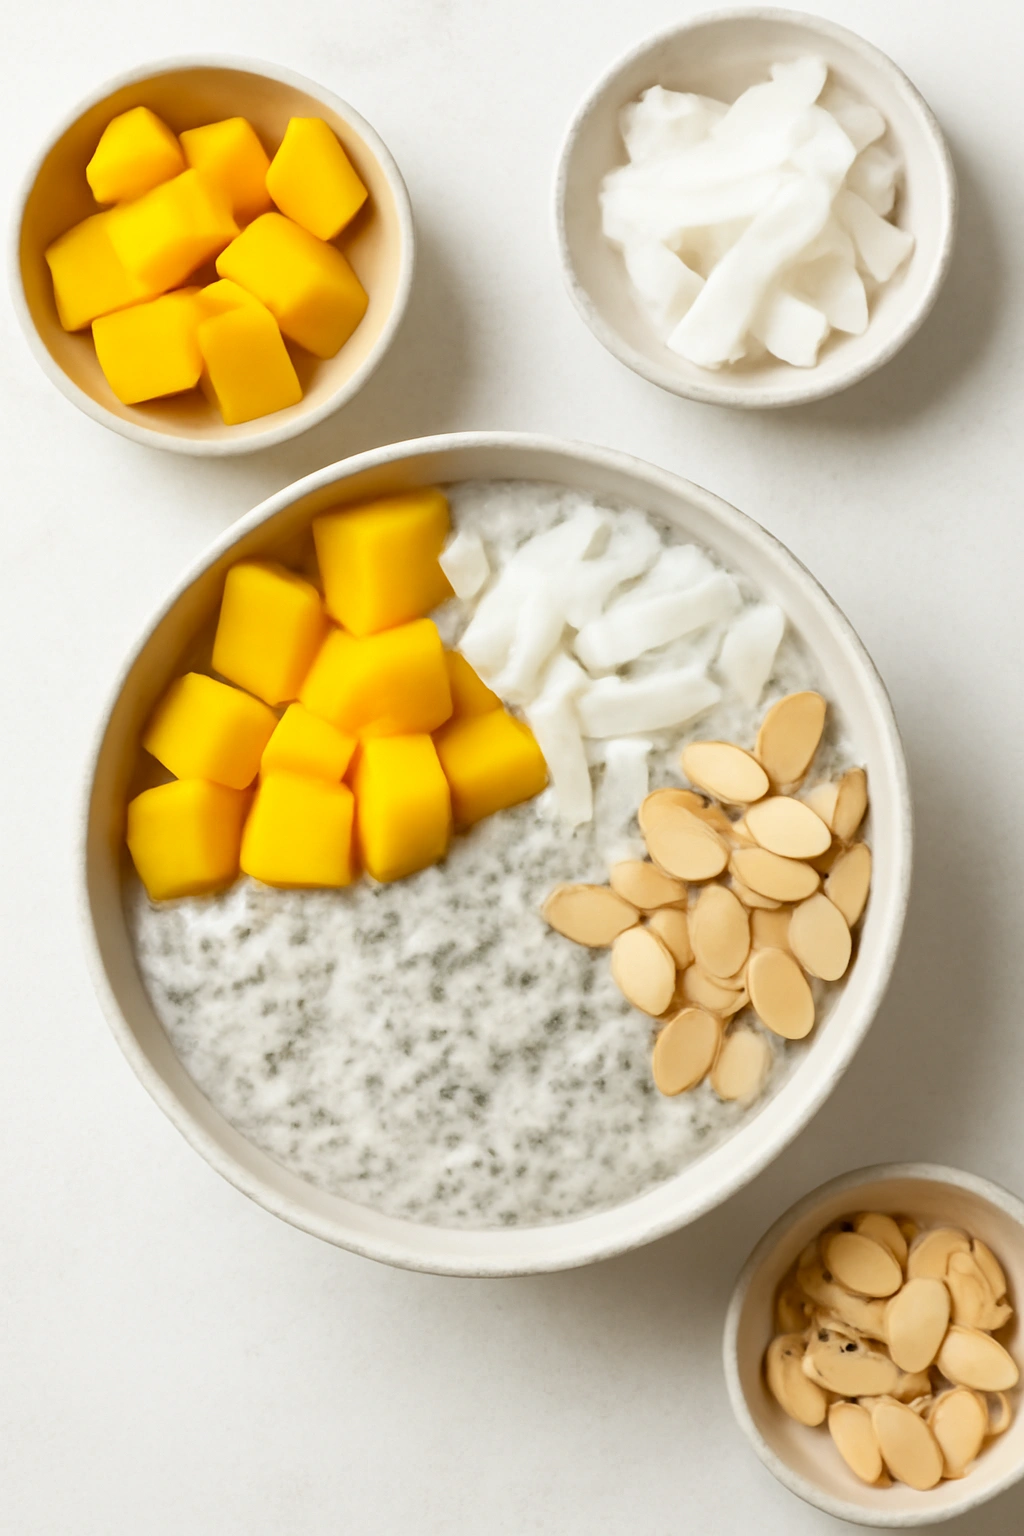
Start by preparing your mangoes. For each mango, slice off the top third on both long sides of the pit, giving you two large flat pieces per fruit. Score the flesh in a crosshatch pattern without cutting through the skin, then gently push the skin side inward to create a hedgehog effect, making it easy to cut off the individual cubes. If you prefer your mango sliced into planks rather than cubes, simply slice the flesh away from the pit into thin pieces. You should have enough mango to fill the bowls with a generous layer — about ¾ cup per serving.
Choose your serving vessels next. Small bowls, wide-mouthed glasses, or even larger coffee mugs work beautifully for this. The visual presentation benefits from some height and translucency if possible — transparent glasses show off the layers nicely. Spoon about ½ cup of chia pudding into the bottom of each serving bowl, creating an even layer.
Top the chia pudding with a generous layer of fresh mango cubes or slices, using about ¾ cup per serving. Scatter 2 to 3 tablespoons of the cooked sticky rice over the mango, distributing it evenly. Don’t skimp on the sticky rice — you want enough that every spoonful includes at least a few grains.
Pour about 3 to 4 tablespoons of the sweet coconut sauce over the top of each bowl, letting it soak into the layers slightly. If you’ve made the sauce warm, this creates a nice temperature contrast with the cold pudding and fruit. If you prefer everything chilled, use the sauce at room temperature.
Finish with a light garnish if desired: a sprinkle of chopped roasted peanuts adds textural contrast and a subtle nutty flavor that complements the tropical fruit, and a few fresh mint leaves brighten the whole thing. These garnishes are optional but recommended — they elevate the dish from simple to restaurant-worthy.
Common Mistakes to Avoid
Understanding what goes wrong helps you avoid frustration on your first attempt. The most frequent mistake is using regular chia seeds that are too old or stale — they won’t hydrate properly, leaving you with a thin, watery pudding instead of a thick, spoonable one. Check the date on your chia seed container; they should be less than a year old. Fresh chia seeds hydrate in an obvious, dramatic way; stale ones sit in liquid without absorbing much.
Another common issue is not using enough liquid in the chia pudding and ending up with something that’s more paste than pudding. This usually happens when people estimate the measurements instead of measuring precisely. The ratio here is critical: ⅓ cup chia seeds to 1.5 cups total liquid (one cup full-fat coconut milk plus ½ cup lighter milk). Measure both the chia seeds and liquids by volume, not by eye.
The sticky rice step trips up some people because they skip the rinsing or don’t use the correct water-to-rice ratio. Unrinsed sticky rice becomes a gluey, unappetizing mass because there’s too much starch on the surface. And using more water than specified will give you overcooked, mushy rice rather than tender, individually distinguishable grains.
For the mangoes, choosing fruit that’s too soft or too hard creates problems. Overripe mangoes become mushy as they sit and their flavor becomes fermented rather than fresh. Underripe mangoes are tough and flavorless, and they won’t soften in the cold pudding. Look for mangoes that yield gently to thumb pressure near the stem end but are still fairly firm through the middle — they’ll be perfect for serving within a few hours.
Many people also make the coconut sauce too thin or not sweet enough. It should taste quite sweet and rich on its own, tasting almost syrupy in a spoonful, because it gets diluted when layered with the less-sweet pudding and fruit. If it tastes subtle, add another tablespoon of palm sugar and let it dissolve fully.
Variations to Customize Your Pudding
The beauty of this hybrid dessert is that it adapts beautifully to different preferences and ingredient availability. If you can’t find Ataulfo or Honey mangoes, any ripe mango works, though Ataulfo mangoes have a particularly creamy, rich flavor that pairs beautifully with the coconut. Kent, Alphonso, or even standard supermarket varieties are fine — just make sure they’re ripe enough to taste sweet.
Dairy-Free or Plant-Based Version: Use full-fat coconut milk in the chia pudding base and omit the sweetened condensed milk from the coconut sauce, or substitute a coconut cream mixed with a touch of maple syrup. The pudding will be equally creamy, and many people prefer this version for the distinct coconut flavor.
Extra Protein Addition: Stir 2 to 3 tablespoons of vegan protein powder (vanilla or coconut flavored) into the chia pudding base when you first mix it. This keeps the pudding smooth since protein powder hasn’t been hydrated separately. You can also add 1 to 2 tablespoons of almond butter to the base for richness and protein — whisk it in very thoroughly so there are no lumps.
Lower-Sugar Version: Reduce the maple syrup in the pudding to 1 tablespoon and the palm sugar in the sauce to 2 tablespoons. The dessert will be less sweet but still pleasant, especially when paired with ripe mango. You can also replace some of the coconut milk with unsweetened almond milk to further reduce sugar and calories.
Texture Variations: If you prefer less of the sticky rice element, reduce it to just 1 tablespoon per serving and increase the fresh mango slightly. Conversely, if you’re a sticky rice devotee, use ½ cup per serving and reduce the chia pudding slightly. Some people like to add shredded fresh coconut on top as a garnish, or a sprinkle of sesame seeds for a nutty twist.
Seasonal Swaps: In winter months when fresh mangoes are less peak, substitute ripe pineapple for a tropical but slightly tangier version, or use thawed frozen mango chunks (often sweeter and more intense than fresh). You can even experiment with papaya, which has a similar texture and tropical flavor profile.
Make It a Treat: Layer this over vanilla ice cream instead of plain chia pudding for a more indulgent dessert, or use it as a topping for granola and yogurt the next morning. The components work in multiple contexts.
Tips for Perfect Results Every Time
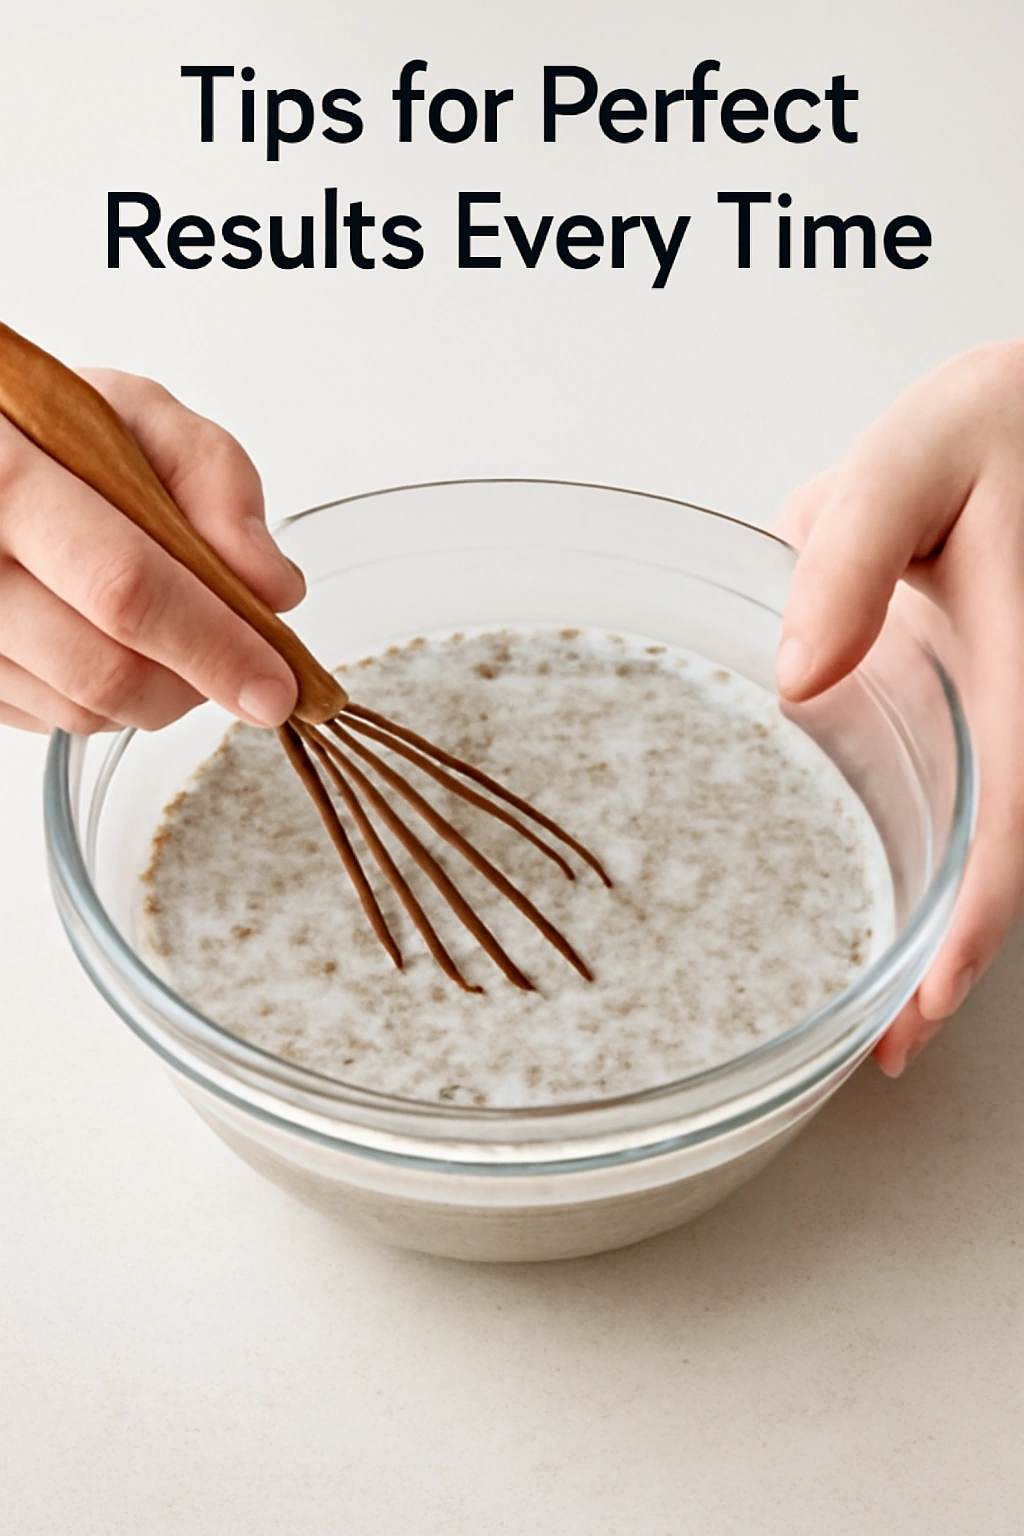
A few small techniques make a noticeable difference in how this pudding turns out. When you’re mixing the chia pudding base, that initial 1 minute of vigorous whisking is more important than it seems. Chia seeds can clump together almost instantly when they hit liquid, and breaking up those clumps right away ensures they hydrate evenly. If you skip this step or stir too gently, you’ll get one dense layer of hydrated seeds at the bottom and watery liquid at the top.
Use room-temperature liquid when you first make the chia pudding base. Cold liquid straight from the fridge will slow the initial hydration slightly and make it harder to whisk out clumps. You can chill everything once it’s mixed.
Don’t overthink mango ripeness. A mango that’s perfectly ripe one day might feel slightly soft the next, which is fine. Soft mangoes mean less structural integrity and a slightly softer mouthfeel in your bowl, but they’ll still taste delicious. Only avoid mangoes that smell fermented or have dark, oozing spots.
The sticky rice benefits from brief reheating just before serving. If you’ve made it ahead and it’s been refrigerated, place it in a microwave-safe bowl with a tablespoon of water, cover loosely, and microwave for 30 seconds to 1 minute. The warmth makes it more pliant and helps the coconut sauce soak in slightly, distributing flavor better.
Temperature contrast matters. The best eating experience comes from eating chilled pudding and fruit with warm (or at least room-temperature) coconut sauce. The sauce soaks into the warm sticky rice and creates a slightly different flavor and texture than if everything is uniformly cold. If you’re serving this straight from the refrigerator, consider warming the sauce very gently in the microwave before pouring it over — just 20 to 30 seconds in a microwave-safe container.
Stir the assembled bowls once or twice while you’re eating, folding the layers together as you go deeper. This distributes the flavors more evenly with each spoonful than eating from the top down in distinct layers.
Storage and Make-Ahead Instructions
This dessert is genuinely flexible for make-ahead preparation, though the optimal approach depends on which components you want to prepare when. The chia pudding base lasts up to 3 days in the refrigerator, storing in an airtight container. Make this first, at least 8 to 12 hours before you plan to serve the dessert. The flavor doesn’t change in storage, but the chia seeds gradually absorb more and more liquid, so the pudding becomes progressively thicker. After 3 days, it becomes almost paste-like, and while it’s still edible, the texture isn’t as pleasant.
The sticky rice keeps for up to 4 days refrigerated in an airtight container, and it can actually be stored at room temperature covered for up to 8 hours without spoiling. When you use refrigerated sticky rice, briefly warm it as described in the tips section above. Cooked sticky rice can also be frozen for up to one month in a freezer-safe container — thaw it overnight in the refrigerator and warm it gently before using.
The coconut sauce is best made the day you serve the dessert, when everything is freshest and the flavor most vibrant. If you need to make it ahead, refrigerate it for up to 2 days and gently warm it in a small pot or microwave before using. The sauce thickens slightly as it cools, so warming it to room temperature or gently heating it restores the right pouring consistency.
Final assembly can happen up to 1 hour before serving. Once everything is assembled in bowls, cover them with plastic wrap and refrigerate until you’re ready to eat. The mango will release some juice as it sits, which mixes with the other components and actually tastes good — the pudding gradually becomes slightly more liquidy, but this is fine. The texture is still pleasant, and the flavors are more integrated.
The assembled pudding is best eaten within a few hours of assembly, while the chia pudding is still at peak thickness and the fresh mango hasn’t begun to separate or brown. If you’re prepping for multiple servings, you can also assemble the components in individual containers or jars and keep them separate, then combine them into bowls just before serving — this keeps everything at its best texture.
Don’t freeze the assembled pudding. The chia seeds become hard when frozen, and mango separates unpleasantly. However, you can freeze the cooked sticky rice and the chia pudding base separately (though the latter becomes icy and less pleasant when frozen and thawed).
Best Ways to Serve and Eat This Dessert
This pudding is flexible enough to work in multiple contexts, even though it’s most at home as a breakfast or dessert. For breakfast, serve it chilled straight from the refrigerator, perhaps with a light drizzle of honey or a few crushed granola clusters on top for extra texture. It feels luxurious but actually provides real nutrition — the chia seeds offer protein and healthy fats, the coconut milk provides calories and satisfaction, and the mango adds vitamin C and fiber.
For afternoon snack or light dessert, serve it exactly as described in the assembly section — layered in a clear bowl or glass so the components are visible, with the warm or room-temperature coconut sauce drizzled on top. Eat it slowly with a spoon, layering flavors as you go down through the bowl.
As an evening dessert, you can serve this straight from the fridge, or bring the coconut sauce to a warm state for added decadence. It’s sweet enough to feel like a proper dessert without being heavy like cake or traditional ice cream — many people find it feels lighter and more satisfying after a meal than heavier options.
Presentation tips: If you’re serving this to guests, assemble it in individual clear bowls or wide-mouthed glasses rather than one large bowl. The layers look impressive, and guests can see exactly what they’re eating. Spoon the pudding around the sides of the glass rather than filling it completely straight down, creating visible layers. A single mint leaf or small lime wheel balanced on top adds a professional touch.
Eating experience matters: This is a spoon-eaten dessert, and the best approach is to take relatively small spoonfuls that include all the components — some chia pudding, some mango, some sticky rice, some coconut sauce. Let each spoonful sit on your tongue for a moment before swallowing; the flavor evolves as the temperature changes and the ingredients mix together.
You can also serve this deconstructed if you want — layer the pudding, mango, and sticky rice in a bowl without the coconut sauce, and drizzle the sauce on the table beside the bowl, letting people dip each spoonful into the sauce as they eat. This changes the flavor intensity based on personal preference.
Final Thoughts
This dessert genuinely rewards the minimal effort it requires. The most time-consuming part is planning a day ahead so the chia pudding has time to hydrate, and the actual hands-on work takes less than an hour when you spread it across the sticky rice cooking and sauce simmering. Once everything is assembled, you have a bowlful of soft textures, tropical flavor, and genuine satisfaction — something that tastes fancy enough to serve at a dinner party but simple enough to make for yourself on an ordinary Tuesday.
The beautiful part about combining mango sticky rice with chia pudding is that neither component goes to waste; every part serves a purpose. The chia pudding adds structure and nutrition. The sticky rice provides that distinctive chewy sweetness you crave. The fresh mango brings brightness and texture. The coconut sauce ties everything together. You end up with something greater than the sum of its parts.
Make this once, and you’ll find yourself making it repeatedly. Keep the chia pudding and cooked sticky rice on hand in your refrigerator, and you can assemble fresh bowls any morning, choosing which mangoes happened to be perfect that week. Serve it warm with vanilla ice cream. Serve it cold as a standalone dessert. Top it with granola for crunch. The recipe is flexible because the foundation is solid. Once you understand how these components work together, you can adapt it endlessly while keeping the core appeal intact.