The air fryer has transformed weeknight cooking for countless home cooks who want restaurant-quality results without the fuss, grease, or elaborate cleanup. If you’ve just unwrapped your first air fryer or you’re still gathering courage to move past frozen french fries, this guide is written specifically for you. The beauty of air frying lies in its forgiving nature — it’s genuinely hard to ruin a meal when you follow basic timing and temperature guidelines. The superconvection effect (that high-speed fan blasting hot air directly onto your food) does most of the heavy lifting, delivering golden-brown, crispy exteriors in about half the time a conventional oven requires, with none of the oil splatter of traditional frying methods.
The meals below represent the sweet spot for beginners: they require minimal ingredients, use straightforward cooking techniques, and deliver results that taste far more impressive than the effort invested. Each recipe introduces you to different air fryer capabilities — from cooking raw proteins to roasting vegetables to even attempting dessert — so you’ll build genuine confidence as you work through them. These aren’t complicated restaurant dishes or recipes with twenty-ingredient lists. They’re honest, delicious meals that prove the air fryer isn’t just a gadget that takes up counter space; it’s a genuine upgrade to your cooking routine.
1. Air-Fryer Chicken Breasts
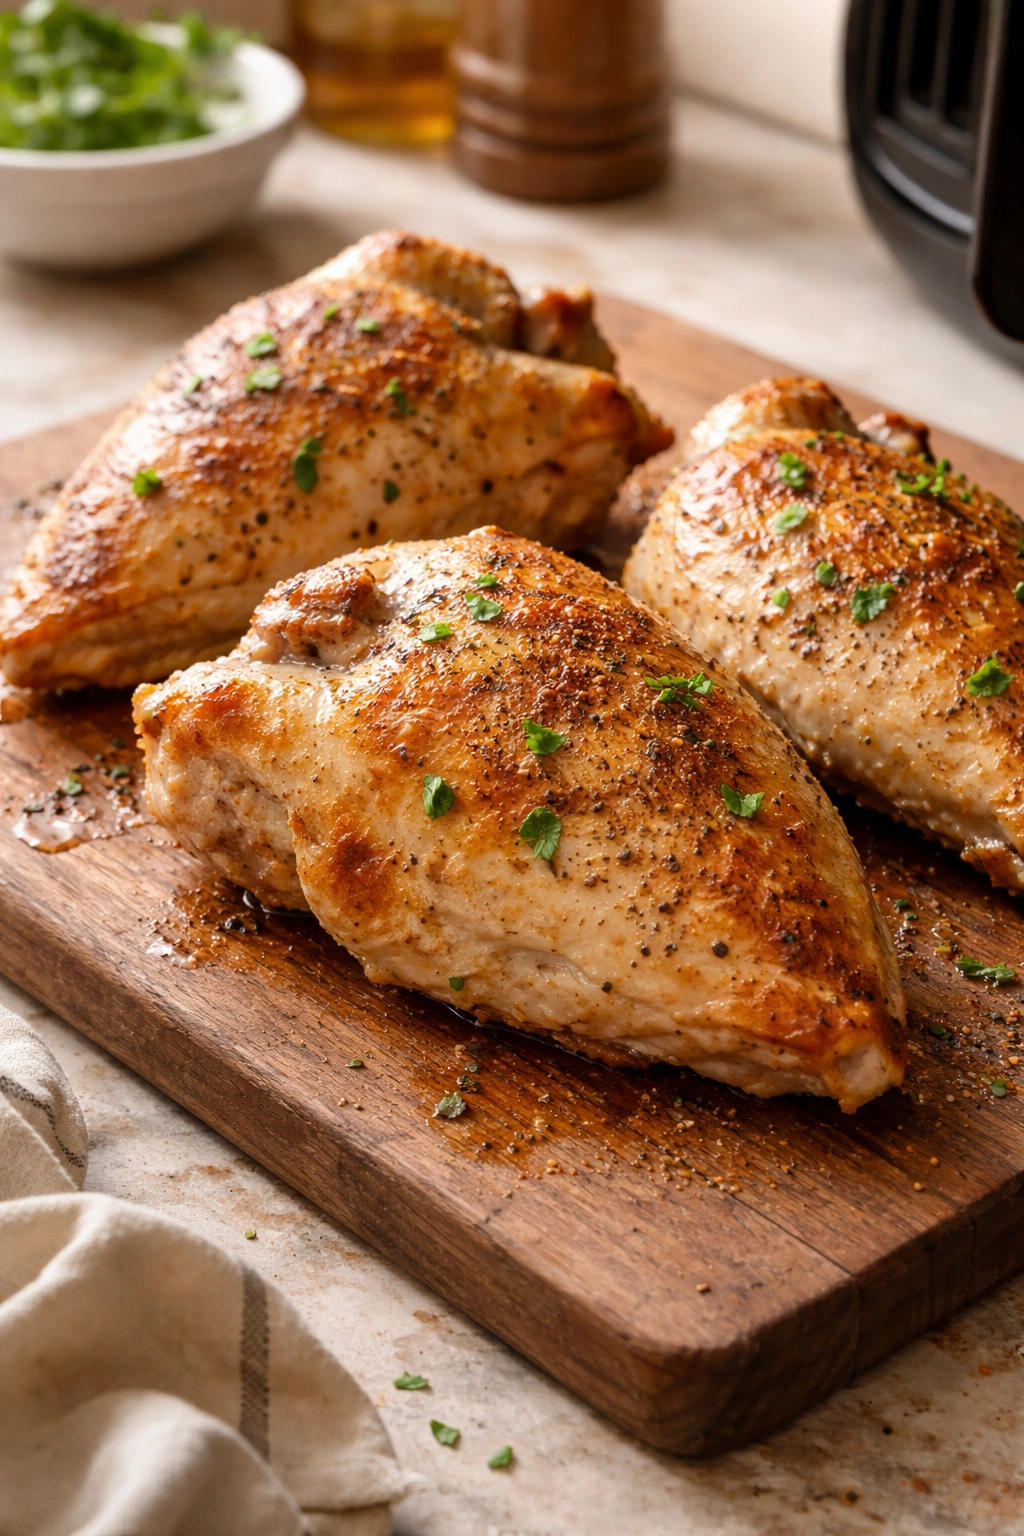
Cooking chicken breast in an air fryer eliminates the fear that haunted many home cooks: dry, rubbery meat. The key is bone-in breasts treated with a dry brine (salt and seasoning applied ahead of time), which draws surface moisture out while keeping the interior protected and juicy. Unlike stovetop cooking where you’re constantly monitoring temperature and flipping, the air fryer handles the heavy lifting automatically with its circulating heat system. Most beginner cooks worry about undercooking or overcooking chicken, but an air fryer’s consistent, high-speed heat circulation makes this nearly impossible if you follow timing guidelines.
Why It’s the Perfect Beginner Protein
Chicken breasts are forgiving and versatile — once you master this fundamental technique, you can build dozens of meals around it. The air fryer cooks them in roughly 15 minutes at 380°F, which is substantially faster than oven-roasting. Because the meat stays so tender, this single recipe opens doors to chicken salads, grain bowls, tacos, pasta dishes, and sandwich fillings throughout your week. Many beginners are surprised by how juicy the result turns out compared to their stovetop experiences.
How to Master the Technique
Start with a simple salt-and-pepper seasoning, or try a homemade blend of paprika, garlic powder, and a touch of brown sugar (the sugar helps browning). Pat your chicken breasts dry with paper towels — moisture is your enemy for crispy skin. Season generously, place them skin-side up in the air fryer basket without crowding, and cook at 380°F for 15-18 minutes depending on thickness. Internal temperature should reach 165°F at the thickest part. Let the breasts rest for 5 minutes after cooking before slicing or serving; this redistributes the juices throughout the meat. The resting step transforms good chicken into genuinely tender, restaurant-quality chicken.
2. Crispy Air-Fryer Bacon
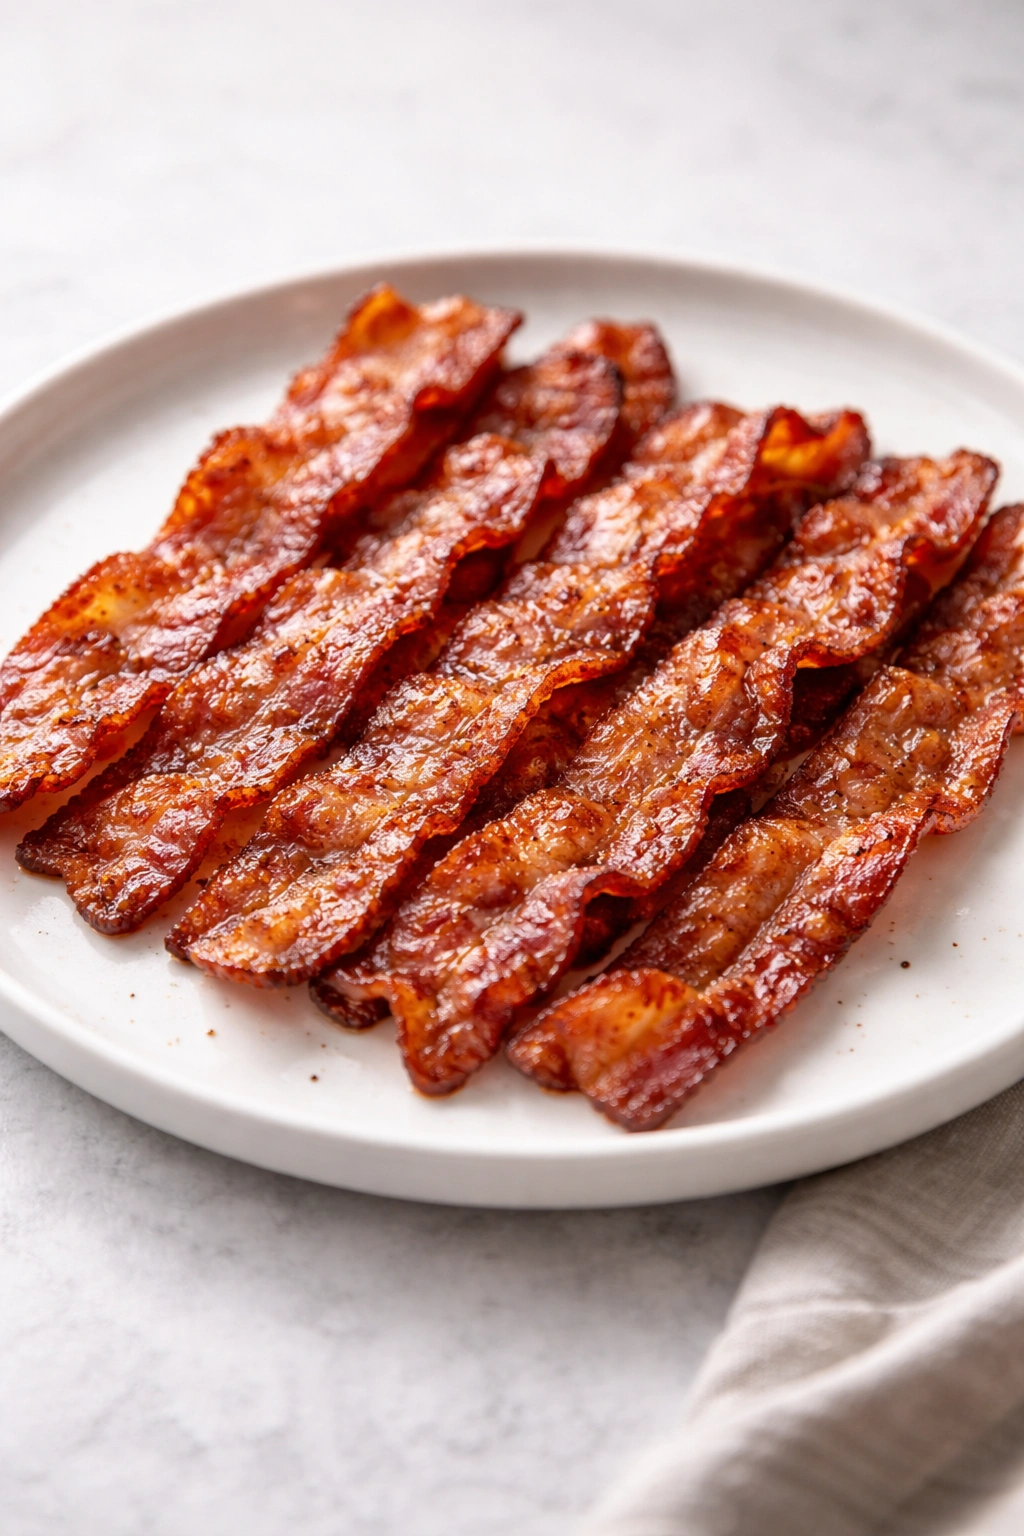
Bacon in an air fryer is nothing short of revolutionary for anyone who’s ever cooked it on the stovetop while nervously watching for splatters. There’s no grease popping onto your skin, no babysitting required, no paper-towel cleanup nightmare. The air fryer renders bacon to perfect crispness in about 10 minutes flat, and because the basket catches all the rendered fat, the bacon emerges uniformly cooked without any chewy or burnt spots. You can cook an entire pound at once (depending on basket size), making this the ideal solution for meal prep or feeding a crowd at breakfast.
Why Beginners Love This Recipe
Bacon seems simple until you try making it and discover the variables: heat level, timing, thickness of the strips. The air fryer removes nearly all guesswork. You layer the bacon strips in the basket (they can overlap slightly), set the temperature to 375°F, and set the timer for 10 minutes. That’s it. The circulating heat cooks both sides evenly, and you never have to flip or monitor anything. Some strips finish slightly crispier than others, but even the softer ones taste superior to stovetop bacon.
Pro Tips for Perfect Results
Line your air fryer basket with aluminum foil before adding bacon — this catches the rendered fat and makes cleanup effortless (just discard the foil after cooking). If you prefer extra-crispy bacon, cook for 12 minutes instead of 10. For softer bacon, reduce time to 8 minutes. Once cooked, transfer the bacon to a paper-towel-lined plate while still hot to absorb any excess grease. Leftover cooked bacon keeps in the refrigerator for five days and reheats perfectly in the air fryer in about 2 minutes at 350°F.
3. Air-Fryer Salmon Fillets
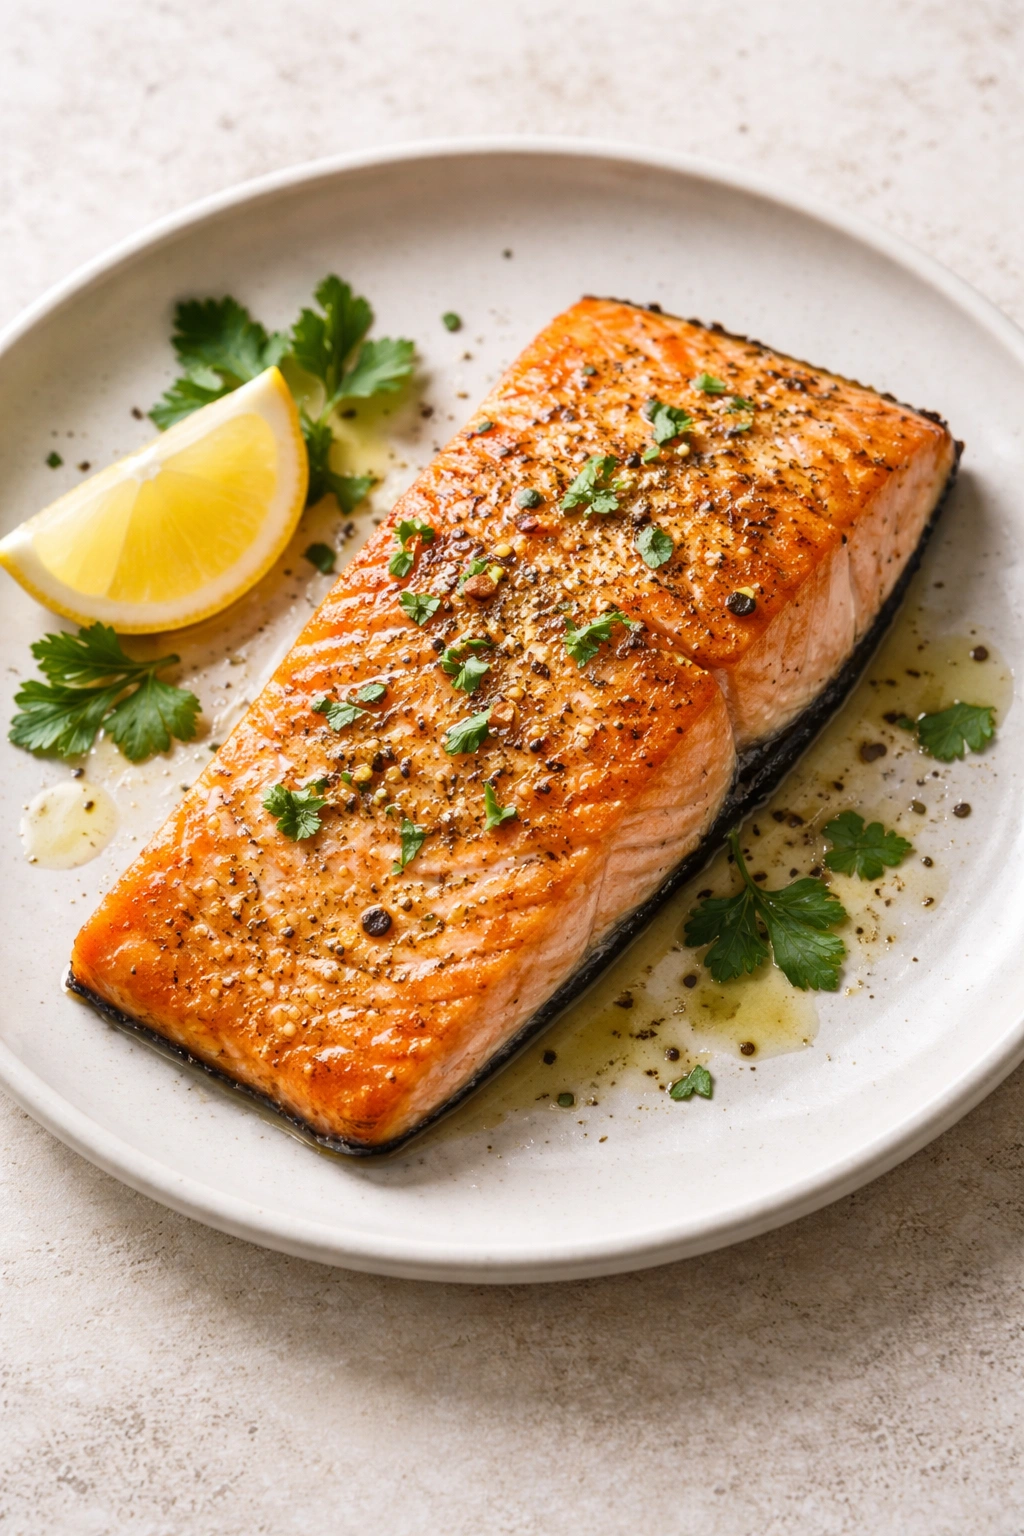
Salmon intimidates many beginner cooks because cooking fish seems like a skill requiring years of practice. In reality, the air fryer transforms salmon into the easiest protein you can cook — it’s actually harder to ruin than chicken. A salmon fillet needs nothing more than olive oil, salt, pepper, and perhaps a squeeze of lemon to become a restaurant-quality dinner in under 10 minutes. The closed cooking chamber traps the moisture, preventing the dry-out that happens in traditional ovens, and the circulating heat crisps the skin while keeping the flesh tender and flaky.
Why Salmon Is Ideal for Beginners
The main advantage is speed combined with nearly guaranteed success. You don’t need to monitor internal temperature obsessively because properly cooked salmon has a very forgiving window — slightly undercooked is still delicious, and salmon is difficult to truly overcook. A standard 5-ounce fillet cooks through in 8-10 minutes at 380°F. There’s no flipping required (skin-side down the entire time), no special equipment needed beyond what you already have. The biggest improvement comes from patting your salmon dry before cooking — moisture on the surface prevents proper crisping.
Simple Cooking Method
Place your salmon skin-side down on a small piece of parchment paper or aluminum foil (this prevents sticking). Brush lightly with olive oil, season the top side with salt and pepper, and place it in the air fryer basket. Cook at 380°F for 8-10 minutes until the flesh flakes easily with a fork and reaches 145°F at the thickest part. That’s genuinely all there is to it. Serve with lemon wedges, roasted asparagus, or your choice of grain. The simplicity of this approach shouldn’t fool you — the results rival what you’d get at a seafood restaurant.
4. Air-Fryer Pork Chops
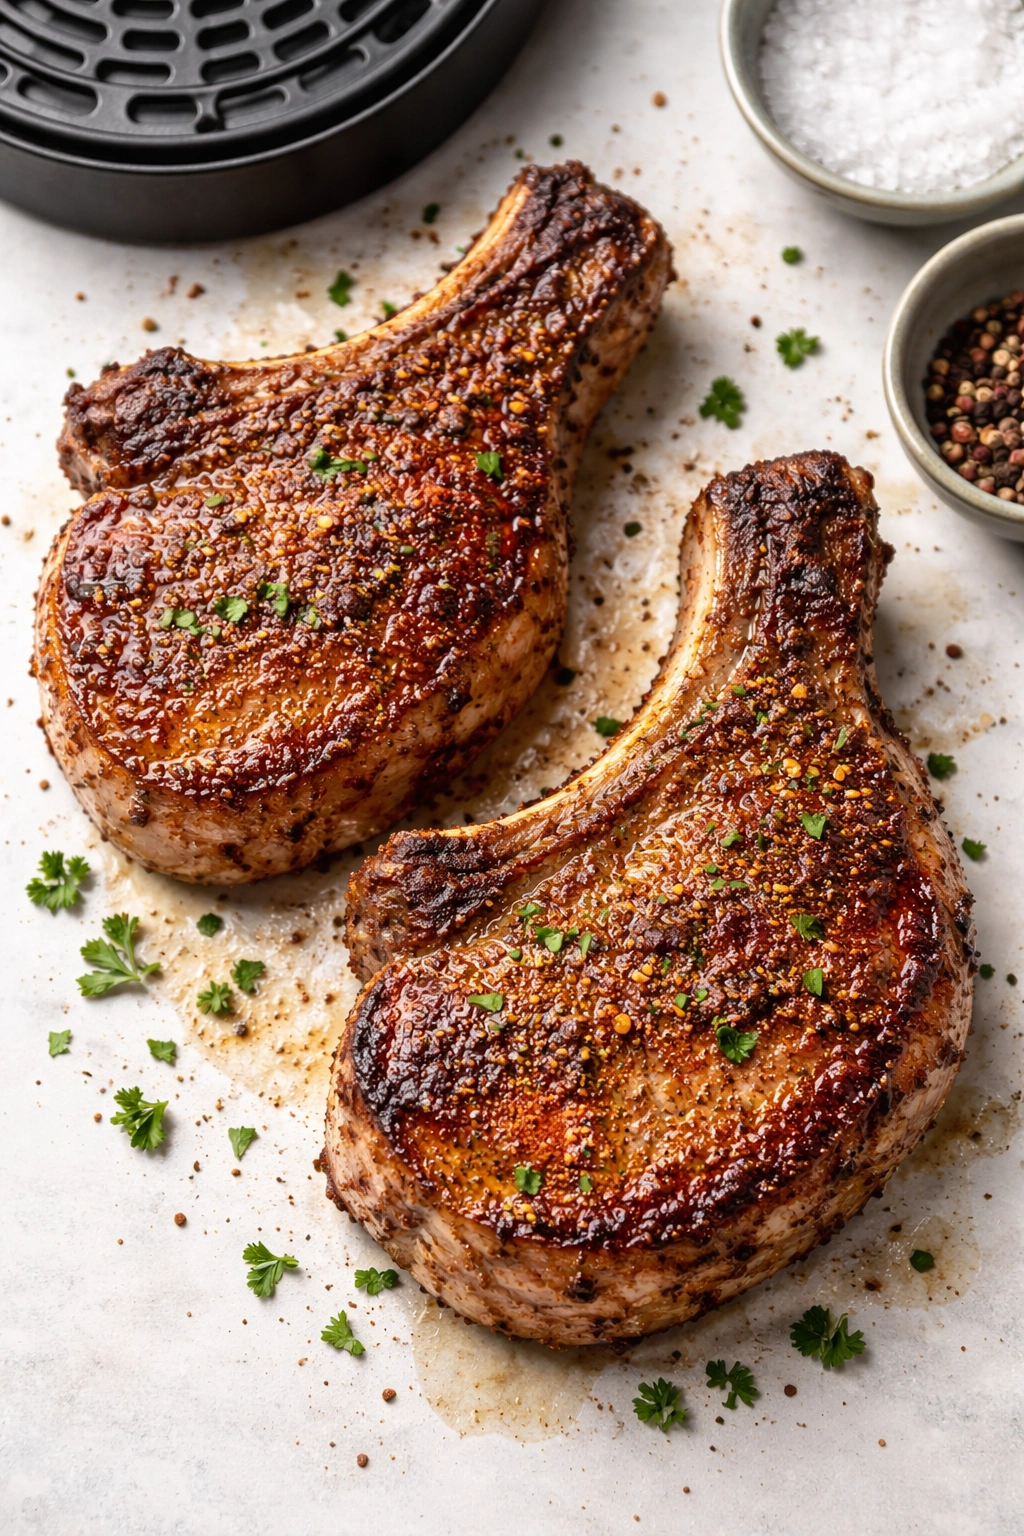
Pork chops have earned a reputation for being tough and dry, but that’s only true if cooked incorrectly. The air fryer solves this problem naturally because it cooks quickly without the intense, prolonged dry heat of a conventional oven. Bone-in pork chops benefit from a brown sugar and spice rub applied before cooking, which creates a caramelized crust while the interior stays moist and tender. A 1-inch thick chop cooks through in about 12 minutes, producing a dinner that feels far more special than the minimal effort required.
What Makes This Recipe Beginner-Friendly
Pork chops are smaller and more forgiving than chicken breasts — there’s less surface area and they cook uniformly throughout. You don’t need to worry about bone-in versus boneless because both work beautifully (bone-in is slightly more flavorful). The dry brine technique (applying salt and seasoning 20 minutes before cooking) is foolproof: it draws moisture to the surface, which then evaporates and creates browning, while the salt penetrates the meat and keeps it juicy. Many home cooks who’ve had tough pork chops in the past are genuinely shocked by how tender air-fried ones turn out.
Building Your Spice Rub
Mix together brown sugar, salt, paprika, cumin, and a pinch of black pepper (adjust quantities to taste). Apply this mixture generously to both sides of your pork chops about 20 minutes before cooking. This waiting period is crucial — it allows the salt to penetrate the meat. Cook at 375°F for 10-13 minutes depending on thickness, flipping the chops halfway through. Let them rest for 3-4 minutes after cooking before serving. Serve with roasted vegetables or a simple salad for a complete dinner in under 30 minutes total.
5. Air-Fryer Chicken Thighs
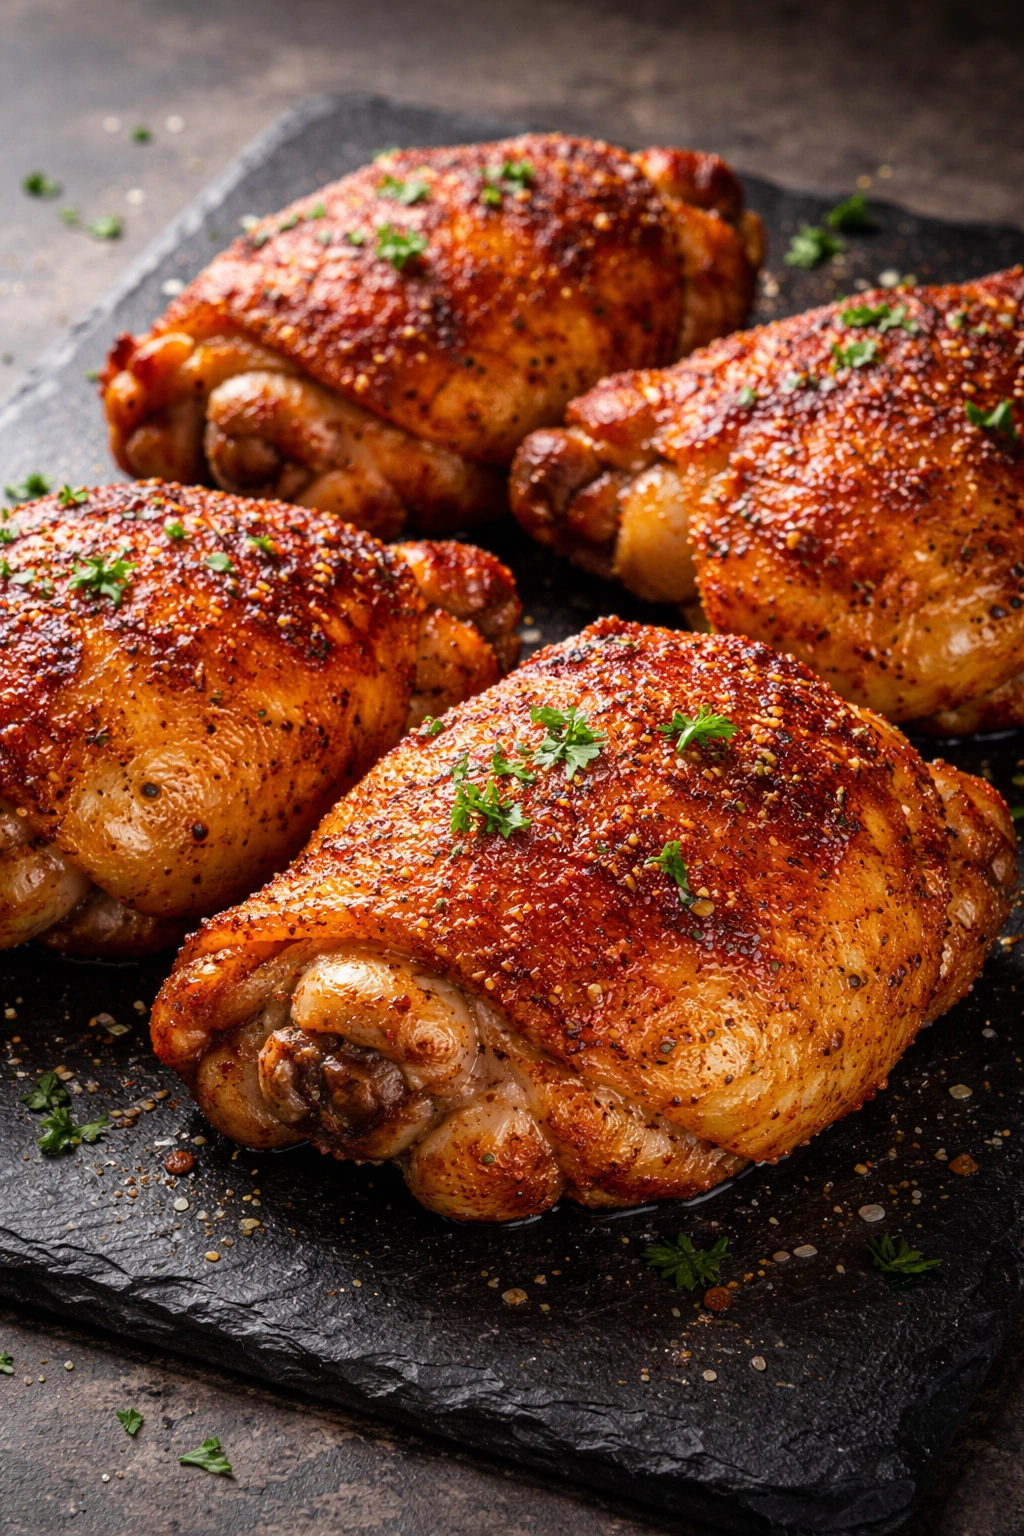
Chicken thighs are actually more forgiving for beginners than chicken breasts because they contain more fat, which means you have to work much harder to dry them out. The darker meat stays juicy even if you cook it slightly longer than optimal. Thighs also benefit from high-heat cooking that crisps the skin beautifully — something the air fryer excels at. A simple seasoning of paprika, garlic powder, and salt is all you need, though you can experiment with any dried spice blend in your pantry.
Why Thighs Are a Beginner’s Secret Weapon
The forgiving nature of thigh meat combined with quick air fryer cooking creates nearly foolproof results. Bone-in, skin-on chicken thighs cook in about 18-20 minutes at 400°F, and the skin becomes crackly and golden without any extra effort. There’s no flipping required if you start skin-side down. The meat stays so moist that even if your timing is off by a few minutes, the result is still delicious. Many experienced cooks actually prefer thighs to breasts for this exact reason.
Simple Preparation and Cooking
Pat your thighs dry with paper towels. Season generously with paprika, garlic powder, salt, and black pepper (or your preferred spice blend). Arrange them skin-side down in the air fryer basket in a single layer — don’t overcrowd. Cook at 400°F for 18-20 minutes without flipping. The skin should emerge deeply golden and crispy. Check that the internal temperature reaches 165°F at the thickest part (not touching bone). Let rest for 5 minutes. Serve immediately with roasted vegetables or over rice for a complete meal.
6. Air-Fryer Brussels Sprouts with Garlic and Balsamic
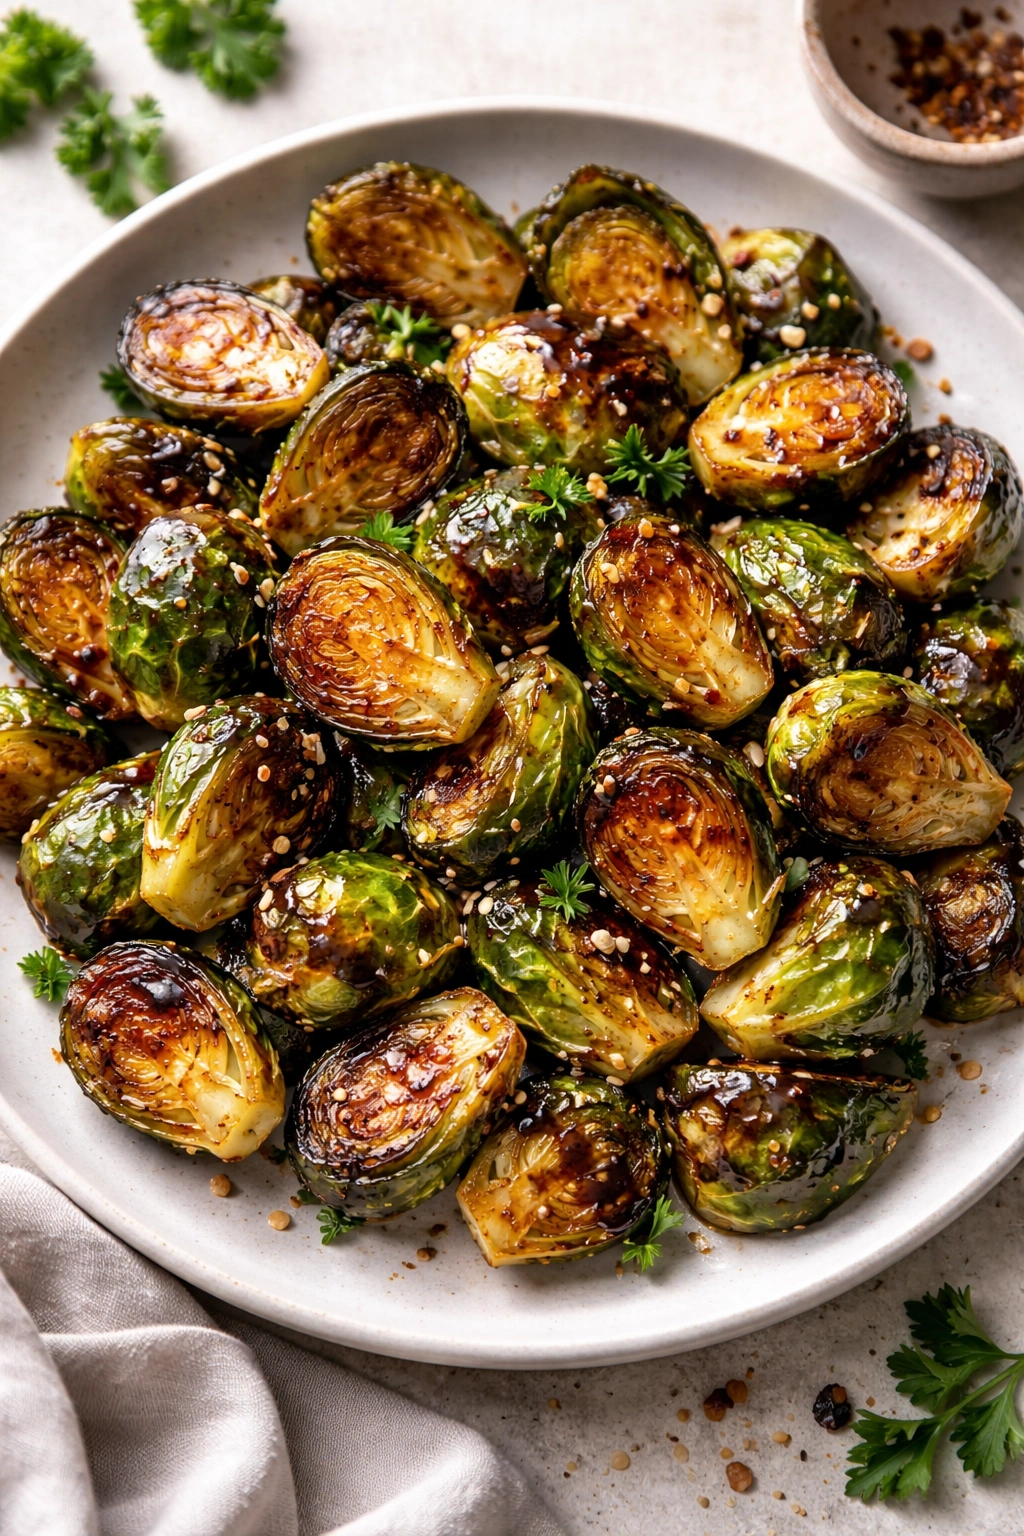
If you’ve never enjoyed brussels sprouts before, the air fryer might change your mind entirely. Many people grew up eating overcooked, mushy brussels sprouts that smelled unpleasant — but proper preparation creates something entirely different. Air-fried brussels sprouts develop crispy, caramelized edges while the insides stay tender, and the quick cooking prevents the sulfurous smell that long-cooking methods produce. A simple glaze of balsamic vinegar, soy sauce, and lime juice creates a glossy, flavorful coating that transforms these humble vegetables into something genuinely crave-worthy.
Why Vegetables Are Perfect for Learning Air Fryer Basics
Vegetables are extremely forgiving — a few minutes more or less of cooking time won’t ruin them. This makes vegetable recipes ideal for learning your specific air fryer’s quirks and hot spots. Plus, vegetables are inexpensive, so you can experiment freely without worrying about wasting money on mistakes. The air fryer’s high heat and circulating air create browning and crispness that’s nearly impossible to achieve in a conventional oven without extended cooking times.
Making the Glaze
Trim the stem ends from your brussels sprouts and cut larger ones in half lengthwise. Toss with olive oil and salt in a bowl until evenly coated. Arrange cut-side down in the air fryer basket in a single layer. Cook at 380°F for 12-15 minutes, shaking the basket halfway through for even cooking. While they cook, whisk together balsamic vinegar, soy sauce, and lime juice in equal parts. When the brussels sprouts emerge deeply browned and crispy, toss them with the glaze and serve immediately. This side dish impresses dinner guests while taking minimal effort.
7. Air-Fryer Sweet Potato Fries
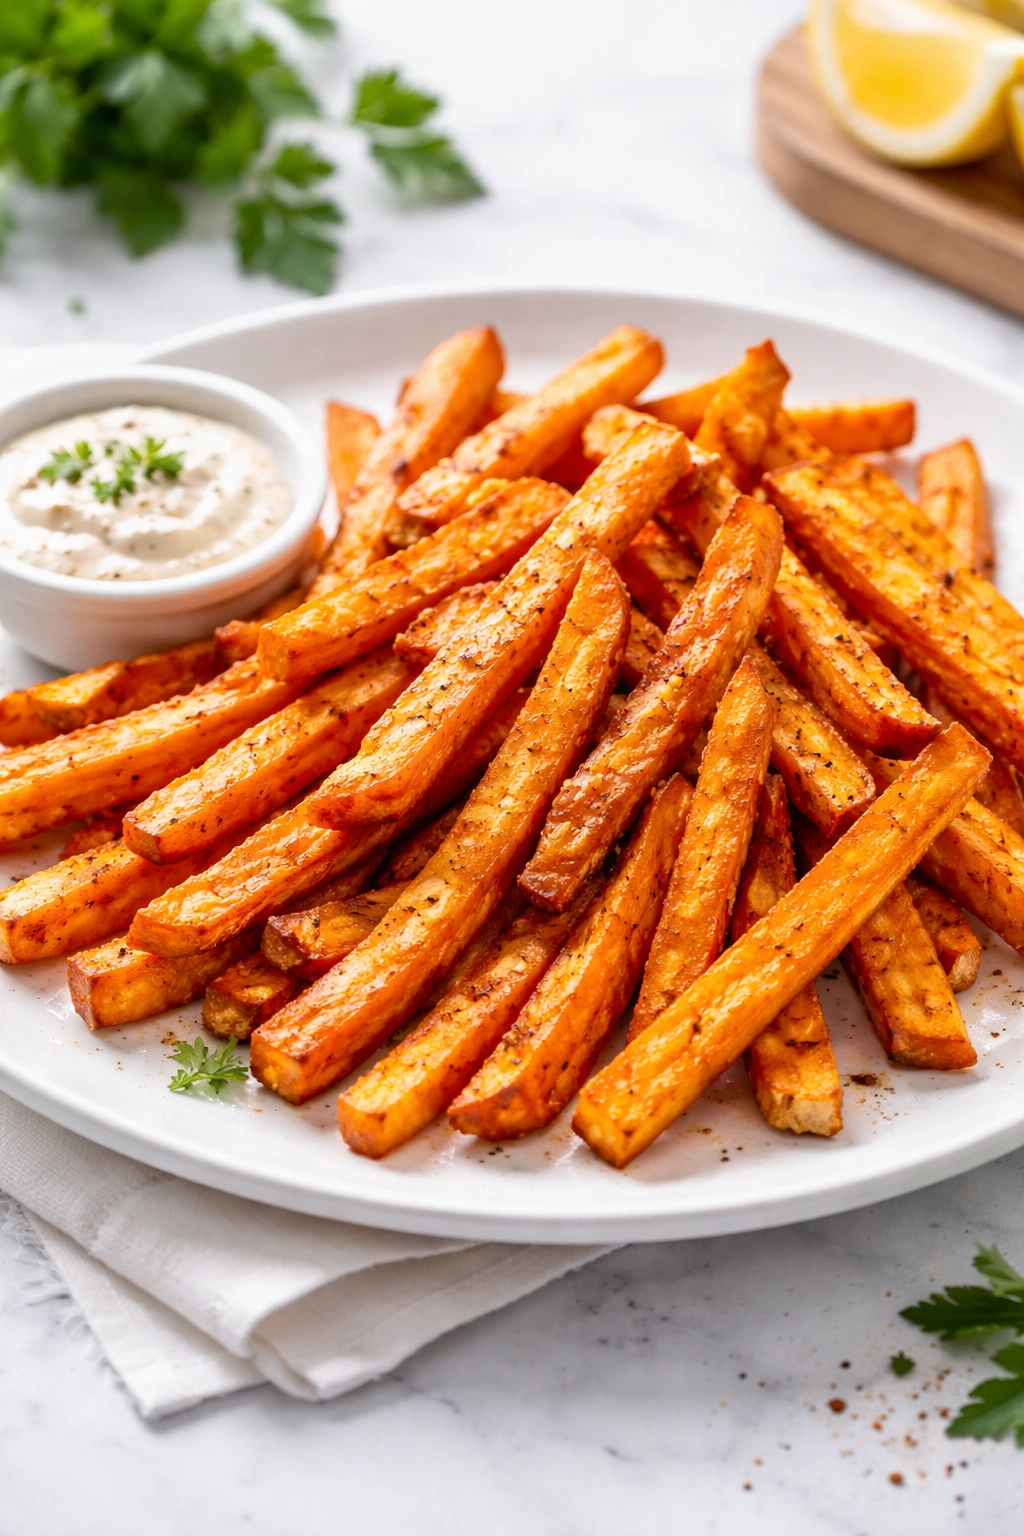
Sweet potato fries feel indulgent compared to regular fries, and the air fryer makes them crispier than the oven while using a fraction of the oil required for deep frying. Cut sweet potatoes into uniform-sized sticks (about ¼-inch thick for best results), toss lightly with oil and seasoning, and air fry at 380°F for 15-18 minutes, shaking the basket halfway through. The exterior becomes crispy and caramelized while the interior stays creamy and naturally sweet. Unlike regular fries, sweet potato fries benefit from minimal seasoning — salt and a touch of paprika is often enough.
What Makes This a Great Beginner Dish
Fries require zero special techniques or knowledge beyond cutting potatoes into consistent sizes and tossing them with oil. There’s no marinating, brining, or complex flavor building — just straightforward, honest cooking. You can’t really overcook fries (well-done is just a matter of preference), and even if you undercook them slightly, they’re still edible. This recipe builds confidence because it delivers impressive results through pure simplicity. Homemade fries also taste dramatically better than store-bought frozen versions, which is a revelation for many home cooks.
Achieving Maximum Crispiness
The key is cutting your sweet potatoes to uniform thickness so they cook evenly. Soak cut potatoes in cold water for 20-30 minutes before cooking — this removes some starch and helps them crisp better. Pat them very dry before tossing with just enough oil to coat lightly (too much oil prevents crispiness). Season with salt, paprika, and cayenne pepper if desired. Arrange in the basket in a single layer without crowding, and shake the basket about halfway through cooking. Serve immediately with your favorite dipping sauce.
8. Air-Fryer Mozzarella Sticks
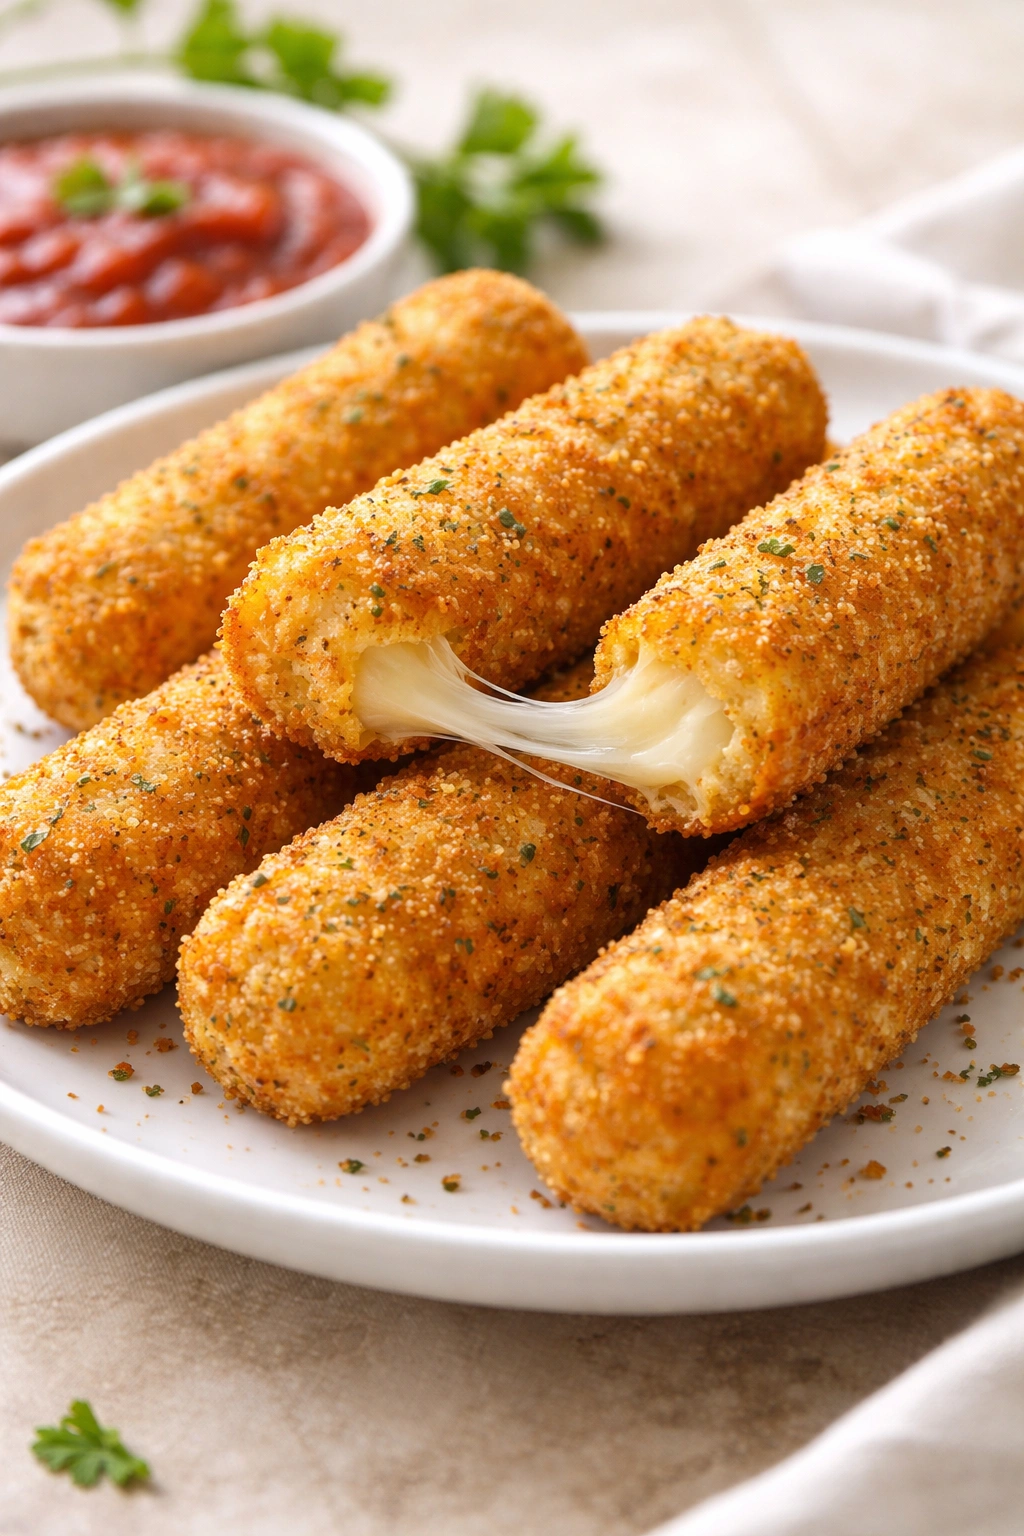
Mozzarella sticks seem like they require special equipment and expertise, but the air fryer makes them foolproof. You can buy store-bought string cheese and bread them yourself, creating a crispy exterior and gooey interior in just 5-7 minutes. This is comfort food at its finest, and watching the cheese pull from the breaded coating is genuinely satisfying. The air fryer method produces mozzarella sticks with less grease and more crispness than traditional frying, with zero mess or cleanup nightmare.
Why This Recipe Builds Confidence
There’s something psychologically satisfying about making something you previously thought required deep-frying equipment. Mozzarella sticks also have a very forgiving cooking window — even slightly overcooked ones taste fine. If the cheese leaks out slightly, it still tastes delicious (just a bit messy). This recipe teaches you about breading techniques and shows that foods traditionally fried can be successfully air-fried with equally good (or better) results.
Simple Assembly and Cooking
Start with cold string cheese straight from the refrigerator. Set up three shallow bowls: one with flour, one with beaten egg, and one with panko breadcrumbs. Coat each piece of cheese first in flour, then in egg, then in panko, pressing gently so the coating adheres. For extra-crispy results, double-bread by repeating the egg and panko step. Place on a plate and freeze for at least 30 minutes (or several hours). Cook from frozen at 375°F for 5-7 minutes until the exterior is golden brown. Serve immediately with marinara sauce for dipping.
9. Air-Fryer Chicken Tenders
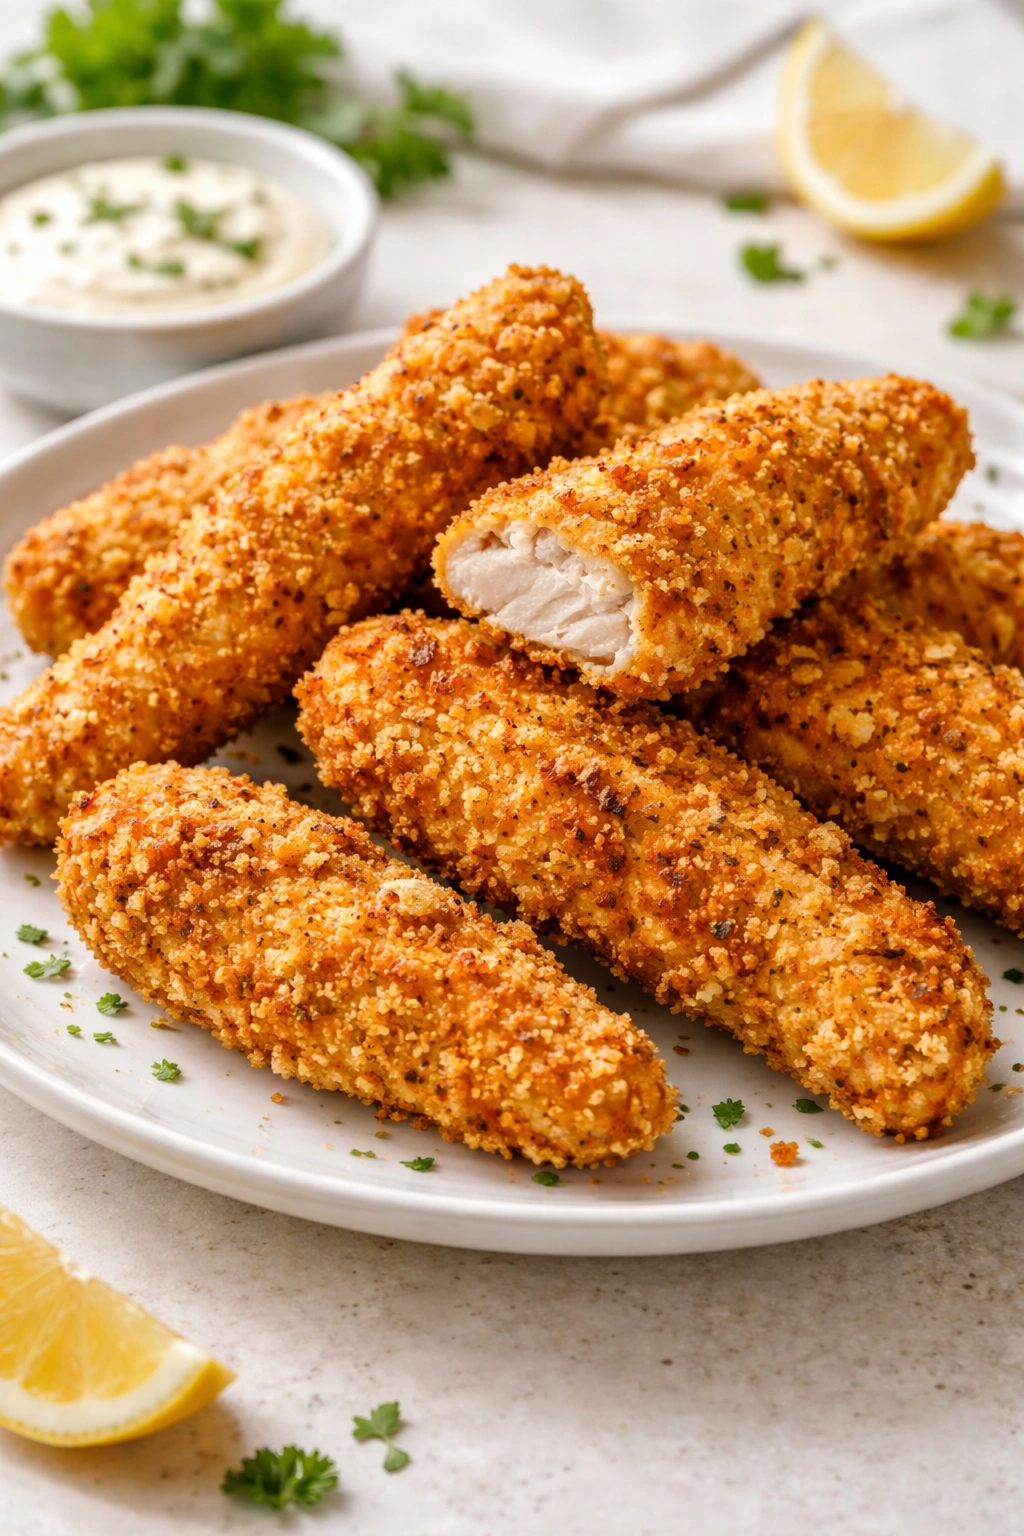
Chicken tenders (or chicken strips cut from chicken breasts) become incredibly crispy on the outside and tender on the inside when air-fried. Unlike pan-frying, there’s no splashing oil, and unlike oven-baking, they finish with actual crispness rather than merely baked chicken. A simple breading of egg and panko, with seasonings like paprika and garlic powder mixed in, creates a coating that rivals fried chicken. This recipe is ideal for beginner cooks because it’s virtually impossible to fail at, and kids almost universally enjoy the result.
Why Tenders Are Beginner Gold
Tenders cook through in about 10 minutes, so timing isn’t critical in the way it is with thicker proteins. The breading step is genuinely easy — you don’t need special technique or advanced skills. Once breaded, you simply arrange them in the basket and walk away. The air fryer circulates heat evenly around each tender, eliminating the need to flip or rotate. This is an ideal recipe for your first time air-frying raw protein.
Breading and Cooking Technique
Pat chicken breasts dry and cut them into strips roughly 1-inch wide. Set up two shallow bowls: one with beaten egg and one with panko mixed with paprika, garlic powder, salt, and pepper. Coat each strip in egg, then in the panko mixture, pressing gently. Place in the air fryer basket in a single layer without overlapping. Cook at 400°F for 10-12 minutes, flipping halfway through. The chicken should be golden brown and reach 165°F internally. Serve with your choice of dipping sauce (honey mustard, barbecue sauce, or ranch all work beautifully).
10. Air-Fryer Hard-Boiled Eggs
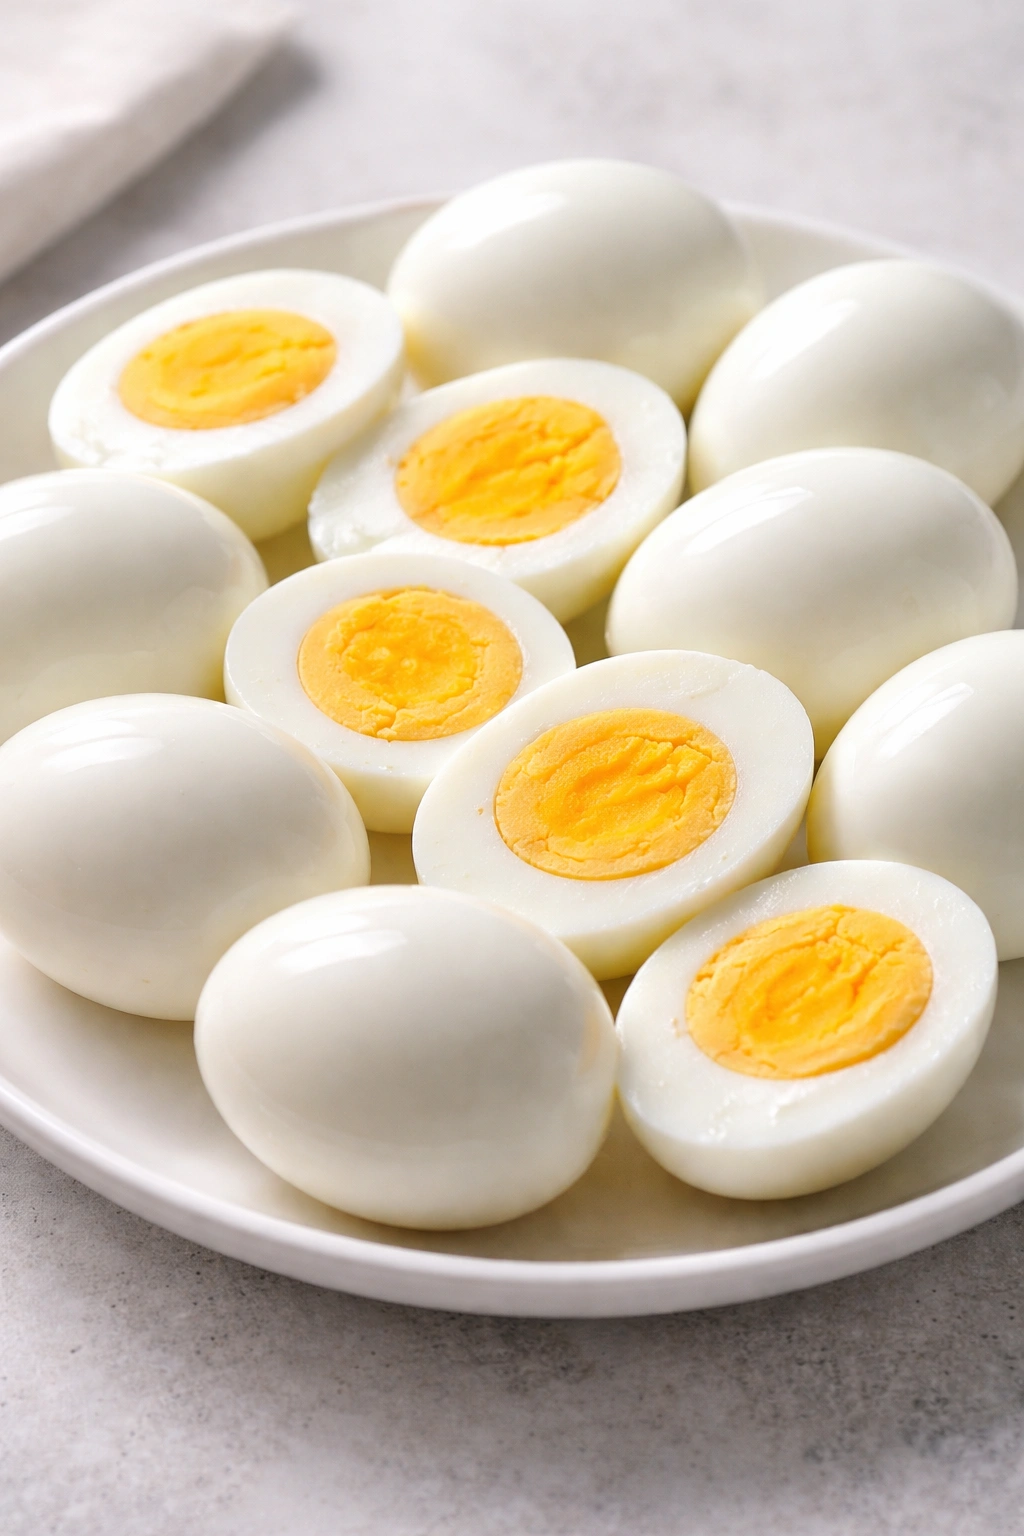
Hard-boiled eggs in the air fryer are almost absurdly easy, and yet most home cooks have never tried it. No waiting for water to boil, no setting a timer and worrying you’ll forget about them, no ice bath guessing game. Simply place room-temperature or cold eggs in the air fryer basket and cook at 270°F for 15 minutes. The eggs emerge perfectly cooked with just a touch of that gray-green ring you often get from boiling. This method is so reliable that many home cooks now exclusively use their air fryer for hard-boiled eggs.
Why This Seems Like Magic to Beginners
The concept seems almost too simple to work, yet it delivers consistent results every single time. There’s no skill involved, no knowledge required, just basic timing. Once you’ve made them once, you’ll never go back to boiling. The air fryer method produces eggs that are just as easy to peel as properly boiled eggs (actually easier, because steam does the work for you). Many cooks prepare a batch at the start of the week for quick breakfasts, snacks, or salad toppings.
Cooking and Peeling Instructions
Place eggs in the air fryer basket without oil or water — they cook dry. Set the temperature to 270°F and the timer for 15 minutes. When done, transfer eggs immediately to an ice bath (a bowl filled with cold water and ice). Let them sit for 5 minutes, which stops the cooking process and prevents that gray-green ring. Peel gently under cool running water, starting from the wider end where the air pocket is. The shell should slip off cleanly. Store peeled or unpeeled eggs in the refrigerator for up to one week. Use them for quick breakfasts, salads, or snacks throughout your week.
Final Takeaway
These ten meals represent your gateway into confident air fryer cooking. Each one teaches you something valuable about heat, timing, and technique, while delivering genuinely delicious results that make you feel like an accomplished home cook. The beautiful truth about air fryers is that they’re actually more forgiving than traditional cooking methods — the circulating heat does most of the work, and the stakes feel lower because you can’t burn things as easily as on a stovetop or in a conventional oven.
Start with whichever recipe appeals to you most. You might choose the hard-boiled eggs because they seem impossible to mess up, or the salmon because you’re craving something elegant. There’s no required order, no progression you must follow. What matters is that you start using your air fryer, building confidence with each meal, and discovering which recipes become your personal staples. Within a few weeks of regular use, you’ll stop consulting recipes because you’ll understand how your specific air fryer works, what temperatures work best for your preferred doneness levels, and how to troubleshoot inevitable minor variations.
The air fryer isn’t a miracle machine that makes bad food taste good — it’s a precision tool that makes good food easier and faster than ever before. Once you’ve experienced how quickly salmon cooks, how crispy vegetables become, or how juicy chicken stays, you’ll understand why so many home cooks have made this tool central to their cooking routine. Your biggest challenge won’t be making these meals successfully; it’ll be deciding what to cook next.