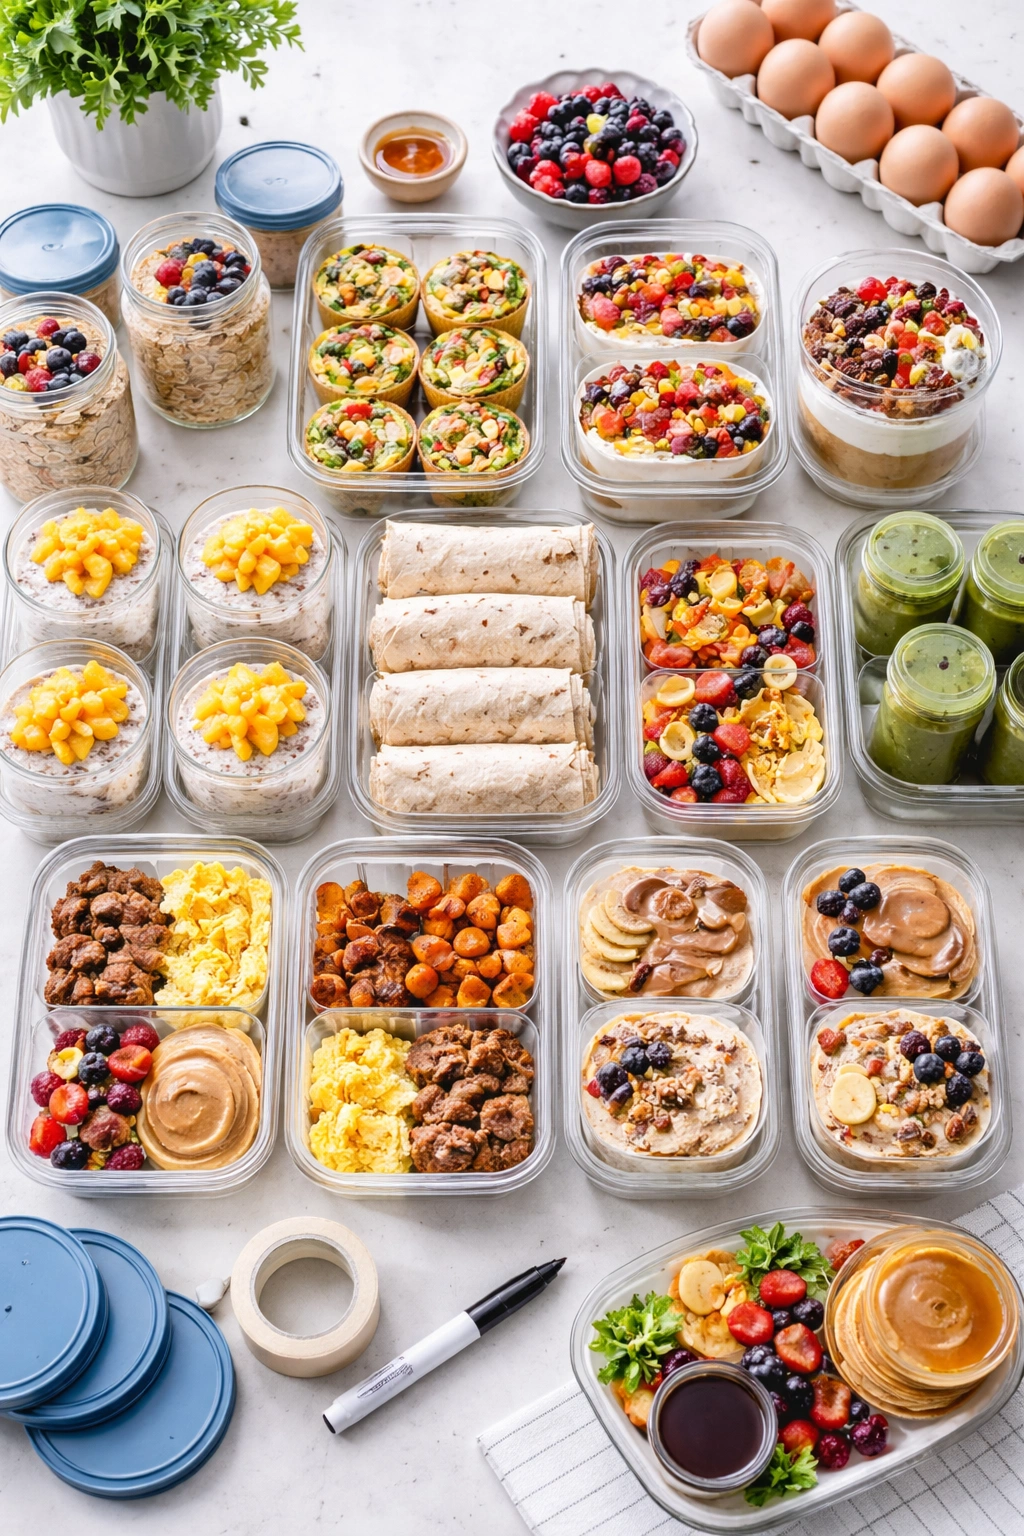
Sunday evenings are when most people face a choice: spend two hours prepping breakfast for the week, or stumble through five mornings of scrambled decisions and whatever’s fastest to grab. The thing is, breakfast meal prep doesn’t have to feel like a chore—it’s actually one of the highest-ROI meal prep strategies you can build into your routine. When your breakfast is already waiting in the fridge, you’re not just saving 15 minutes each morning. You’re also removing the opportunity for skipping breakfast entirely, making better choices than whatever drive-through option is nearby, and actually eating something that fuels your body instead of just filling a gap.
The best breakfast meal preps share two qualities: they’re genuinely delicious when reheated or eaten cold, and they hold up well over 4-5 days without turning soggy, separated, or sad. That’s a narrower window than it sounds, which is why some breakfast ideas work beautifully as meal prep while others fall apart by Wednesday. The ten options below have been tested by people who actually live busy lives—not food stylists with endless time on their hands. Each one can be made in a two-to-three-hour Sunday session and will give you grab-and-go mornings for the entire week ahead.
1. Make-Ahead Breakfast Burritos
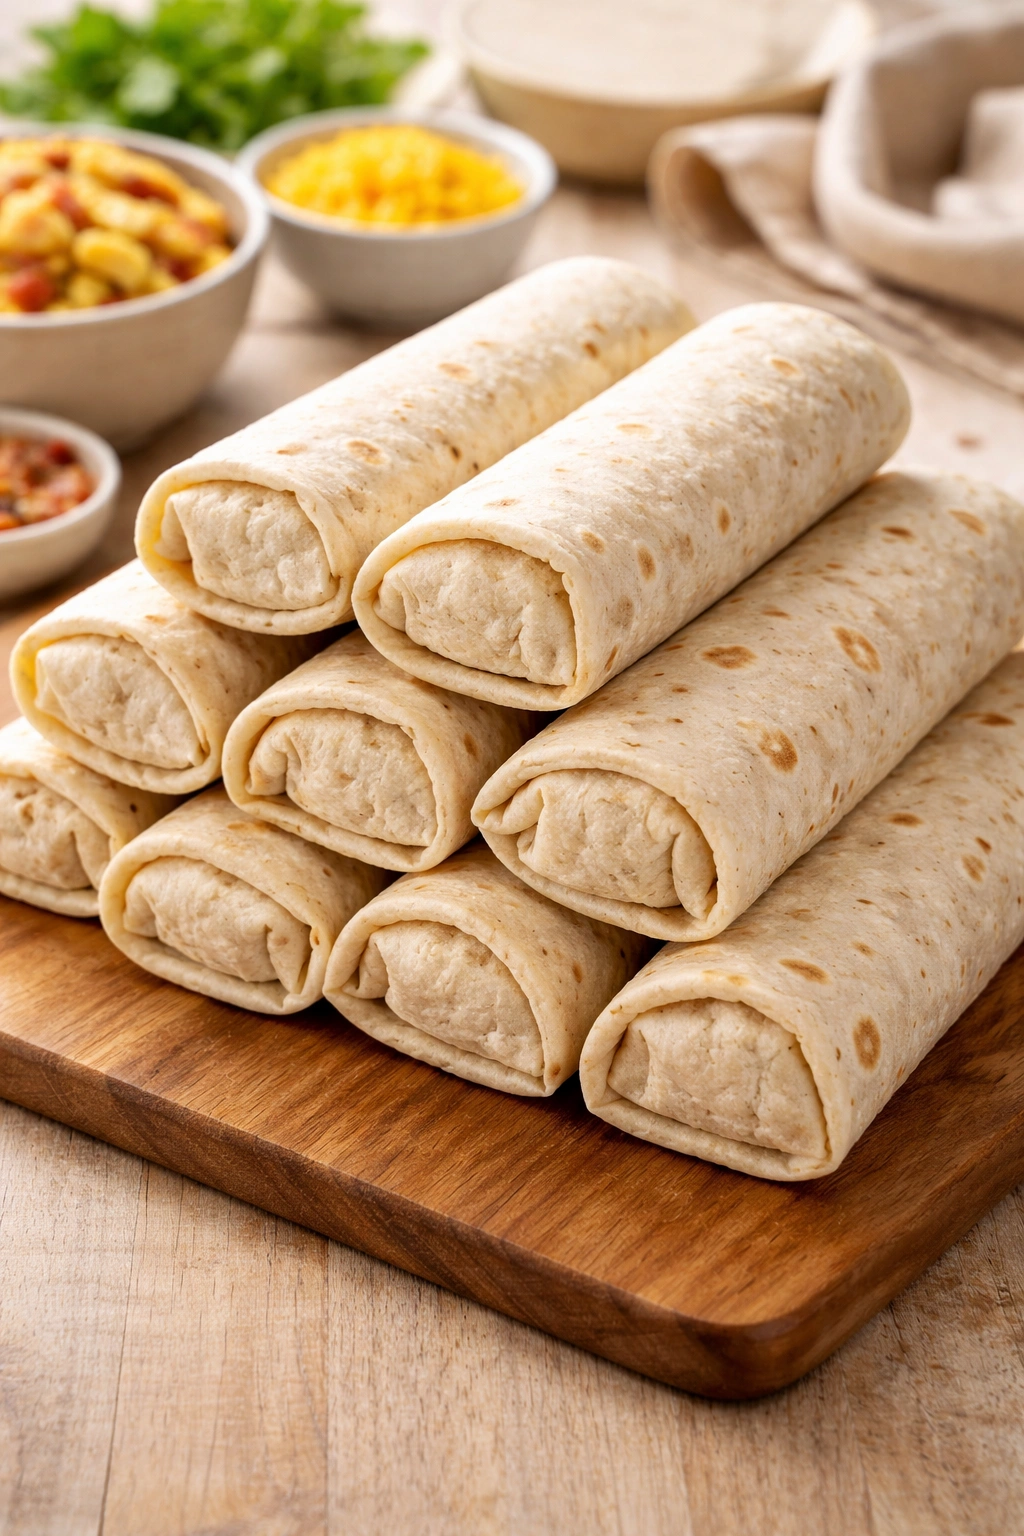
Breakfast burritos are the ultimate portable meal prep, and they freeze beautifully for up to three months. Wrap them on Sunday, grab them throughout the week, and you’ve got a complete, balanced breakfast that tastes as good thawed as it does fresh.
Why This Works for Meal Prep
Burritos are fundamentally a flour tortilla carrying a complete meal: protein, vegetables, starch, and fat. Because you’re wrapping everything inside, the components stay protected from drying out. Even better, they reheat quickly in the microwave (2-3 minutes from frozen) without losing texture or flavor. The whole structure means you can grab one hand and eat it walking, no plate required.
Start with large flour tortillas—the 10-inch ones are ideal because they’re sturdy enough to hold weight without tearing. Scramble 8-10 eggs with a pinch of salt and pepper, cooking them slightly less than you normally would (they’ll continue cooking during storage). While the eggs are still warm, stir in diced peppers, onions, shredded cheese, cooked diced sausage or bacon, and a handful of shredded potatoes if you like them heartier.
What to Include
- 1 large flour tortilla per burrito
- ¾ cup scrambled eggs
- ¼ cup diced cooked meat
- ⅓ cup mixed diced vegetables
- 2 tablespoons shredded cheese
- Optional: salsa, hot sauce, avocado
Lay out each tortilla, add filling slightly off-center, fold in the sides, then roll tightly from bottom to top. Wrap each burrito in foil or parchment paper, then slide them into a freezer bag. When you’re ready to eat, unwrap the paper, wrap the burrito in a paper towel, and microwave for 2-3 minutes. The paper towel absorbs steam and keeps the exterior from getting rubbery.
Pro tip: Skip wet ingredients like salsa or guacamole until you’re eating it—add them fresh on the day you eat it so the tortilla doesn’t become soggy during storage.
2. Egg Muffin Cups with Vegetables
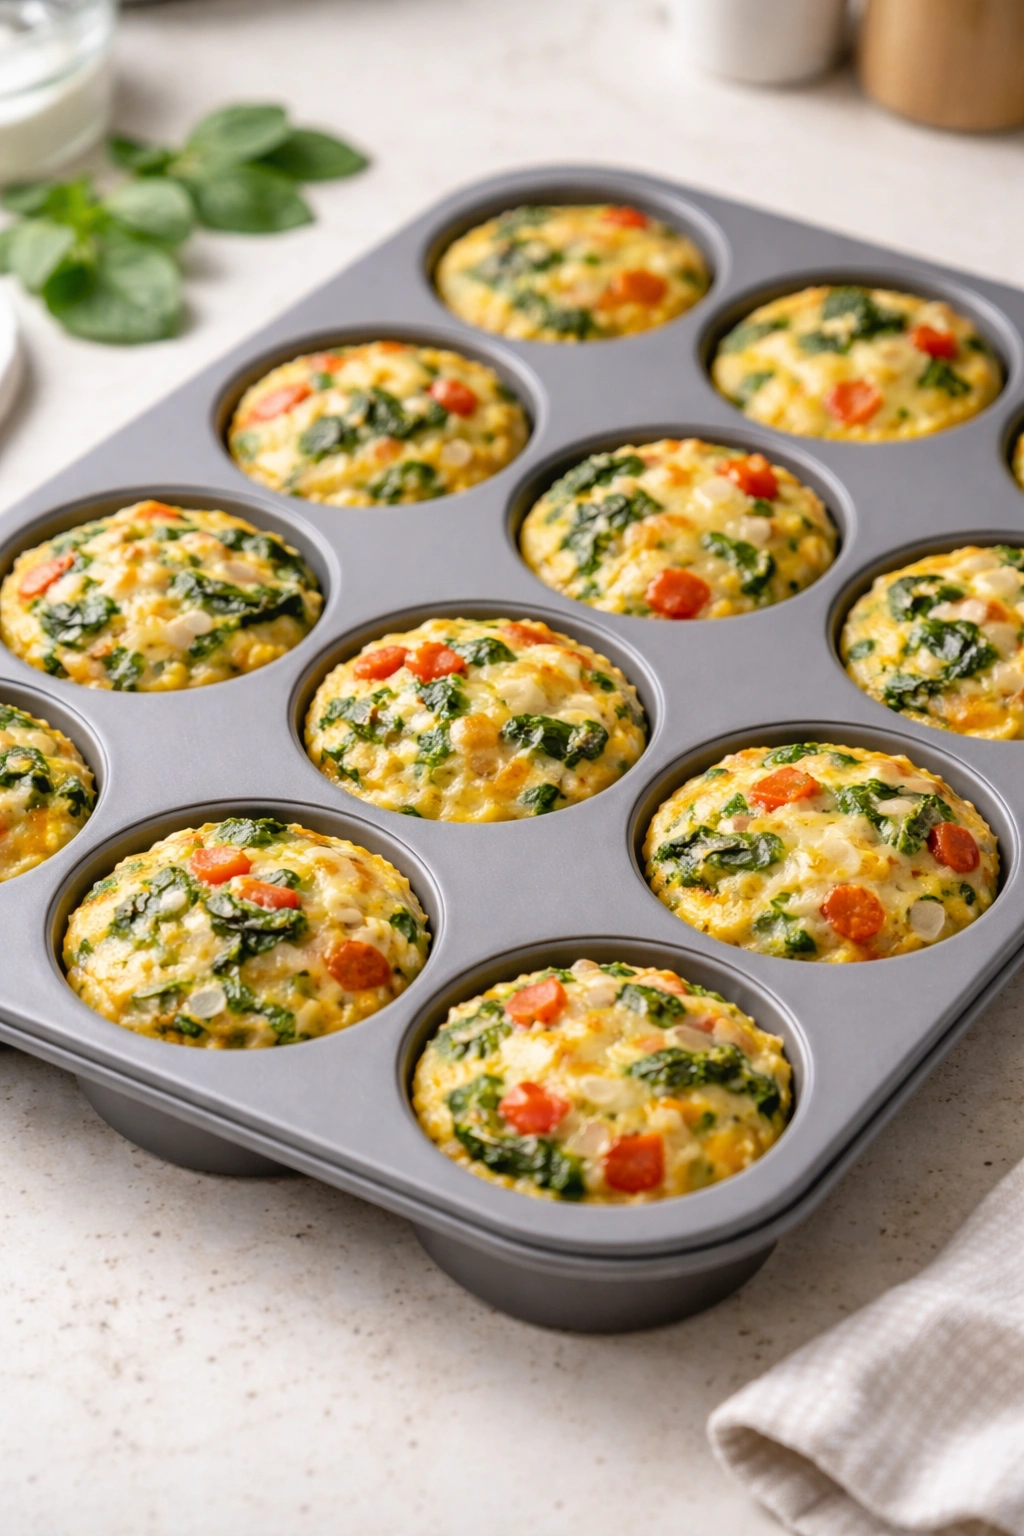
Egg muffin cups are bite-sized, portion-controlled, and endlessly customizable. Make three batches with completely different vegetable and meat combinations, and you won’t get bored eating them five days in a row.
Why These Are Game-Changers for Breakfast
Muffin cups give you precise portion control without measuring—one muffin is roughly one serving. They’re completely portable (grab a few, toss in a container), require zero reheating if you eat them cold, and they’re packed with protein and vegetables with almost zero carbs if that matters to your goals. The fact that they freeze well means you can make a double batch and eat half the week fresh, half the week frozen.
The basic formula is simple: whisk together 8-10 eggs with a splash of milk or cream, salt, and pepper. Divide your chosen vegetables, cheese, and cooked meat among a greased muffin tin, then pour the egg mixture until each cup is three-quarters full. Bake at 350°F for 18-20 minutes until the centers are just set and the tops are lightly golden.
Three Mix-In Combinations to Rotate
- Spinach, feta, and sun-dried tomato: 1 cup chopped fresh spinach, ¼ cup crumbled feta cheese, 3 tablespoons chopped sun-dried tomatoes (oil-packed, drained)
- Broccoli, cheddar, and bacon: 1 cup chopped broccoli florets, ½ cup shredded sharp cheddar, ½ cup crumbled cooked bacon
- Bell peppers, sausage, and Swiss: 1 cup diced red and yellow bell peppers, ½ cup cooked diced sausage, ½ cup shredded Swiss cheese
Pop them out of the tin once cooled, store in an airtight container, and they’ll keep for 4-5 days in the fridge or up to three months in the freezer. Eat them straight from the container cold, or warm one in the microwave for 30-45 seconds if you prefer them warm.
3. Overnight Oats with Flavor Variety
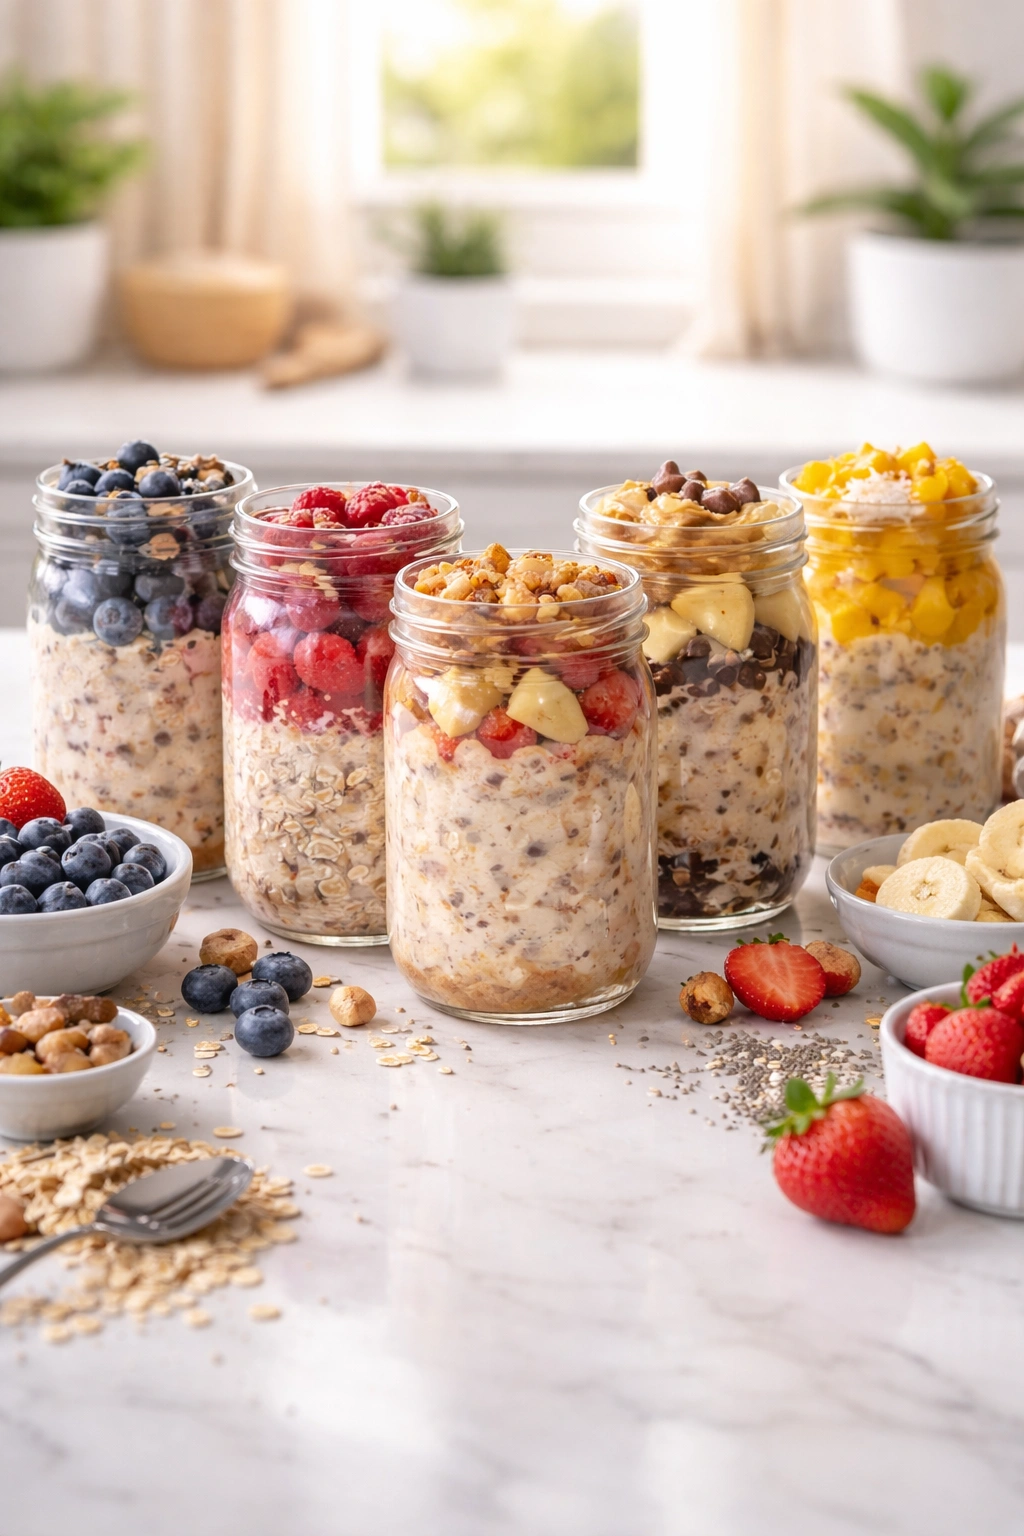
Overnight oats are liquid gold for meal prep: you literally mix them the night before, and breakfast is ready when you wake up. No cooking required, which means your Sunday prep is even faster.
Why Overnight Oats Are the Low-Effort Win
The magic happens through osmosis—the oats absorb the liquid overnight and become soft, creamy, and ready to eat straight from the jar. You’re not cooking anything, you’re not heating anything, and you’re not dirtying any dishes beyond a spoon and container. Each serving is contained in its own jar, which means zero portioning decisions in the morning.
The basic ratio is 1 cup liquid (milk, yogurt thinned with milk, or a combination) to ½ cup rolled oats. Add that to a mason jar, then add your mix-ins: a tablespoon of nut butter, a tablespoon of honey or maple syrup, a quarter cup of chopped fresh or frozen fruit, a pinch of cinnamon, and a tiny pinch of salt. Stir well, screw the lid on tight, and refrigerate overnight. The oats will thicken as they sit, so if you want them thinner on day five, just stir in a splash more milk before eating.
Four Flavor Formulas to Prep
- Chocolate peanut butter: 1 cup whole milk, ½ cup rolled oats, 2 tablespoons peanut butter, 1 tablespoon cocoa powder, 1 tablespoon honey, pinch of salt
- Berry vanilla: 1 cup milk, ½ cup rolled oats, ½ cup fresh or frozen berries, 1 tablespoon honey, ½ teaspoon vanilla extract, pinch of salt
- Apple cinnamon walnut: 1 cup milk, ½ cup rolled oats, ⅓ cup chopped apple, ¼ cup chopped walnuts, 1 tablespoon maple syrup, ½ teaspoon cinnamon
- Tropical mango: 1 cup coconut milk, ½ cup rolled oats, ½ cup diced fresh mango, 2 tablespoons shredded coconut, 1 tablespoon honey, squeeze of lime juice
Make five jars per flavor and line them up in the fridge. Grab one each morning and eat it straight from the jar if you’re rushing, or transfer to a bowl if you prefer eating from a spoon.
Pro tip: If your overnight oats seem too thick by day four or five, the oats have absorbed all available moisture. Stir in a splash of milk or coconut milk until you reach your preferred consistency—they won’t become thin again, but you’ll restore creaminess.
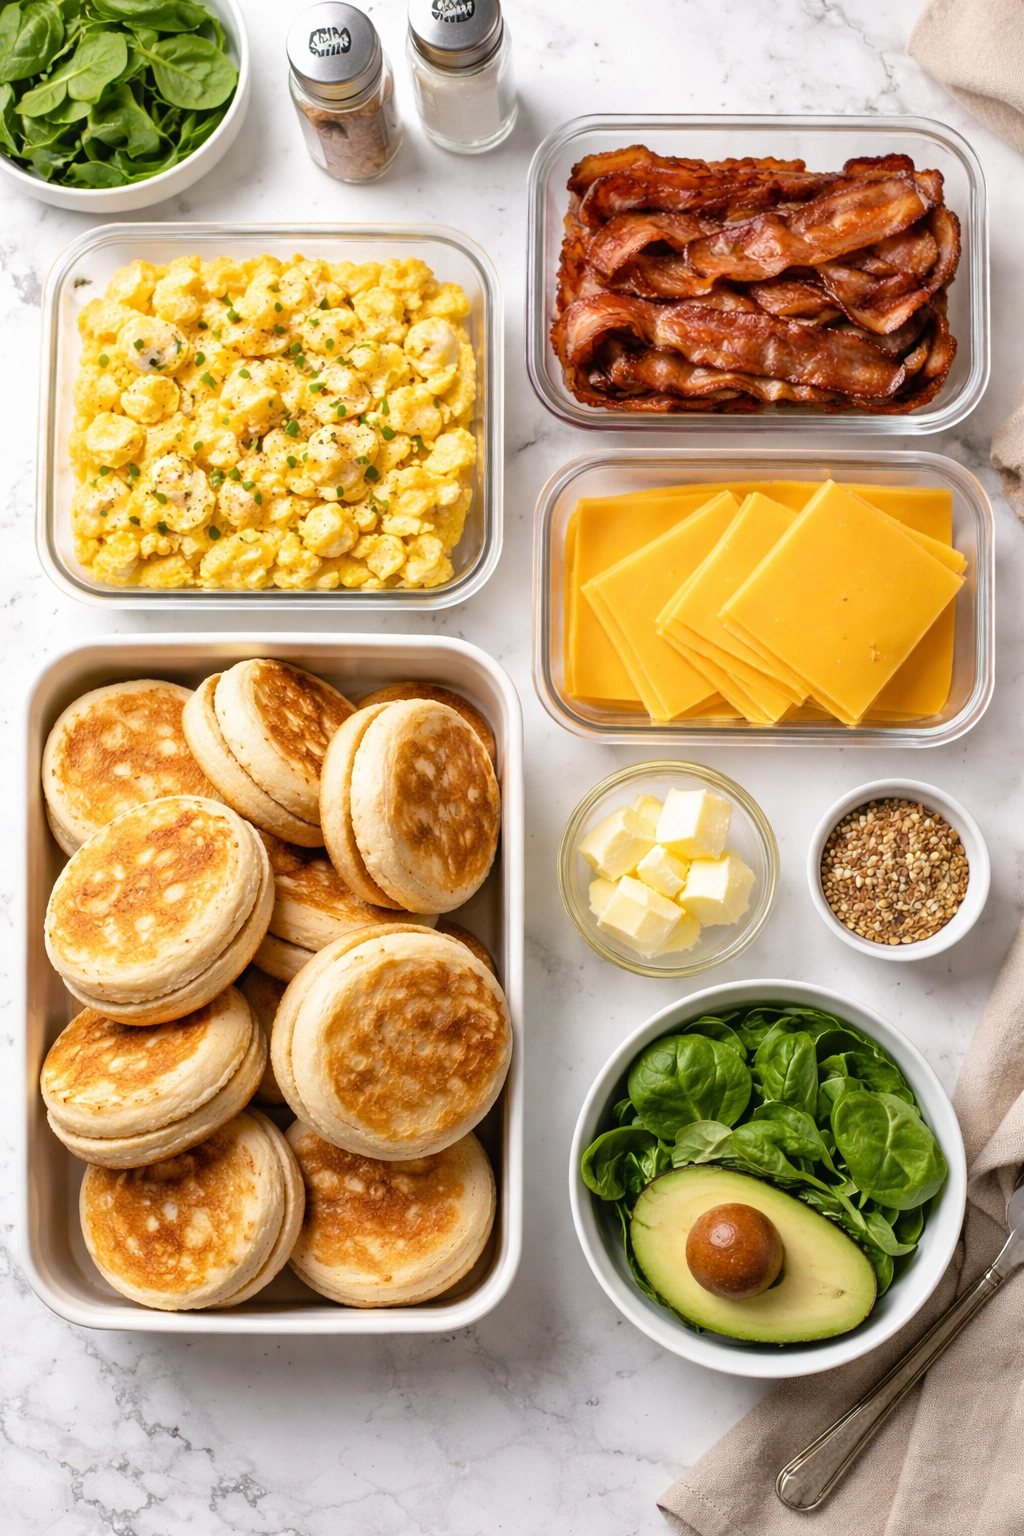
4. Breakfast Casserole (Make Once, Eat All Week)
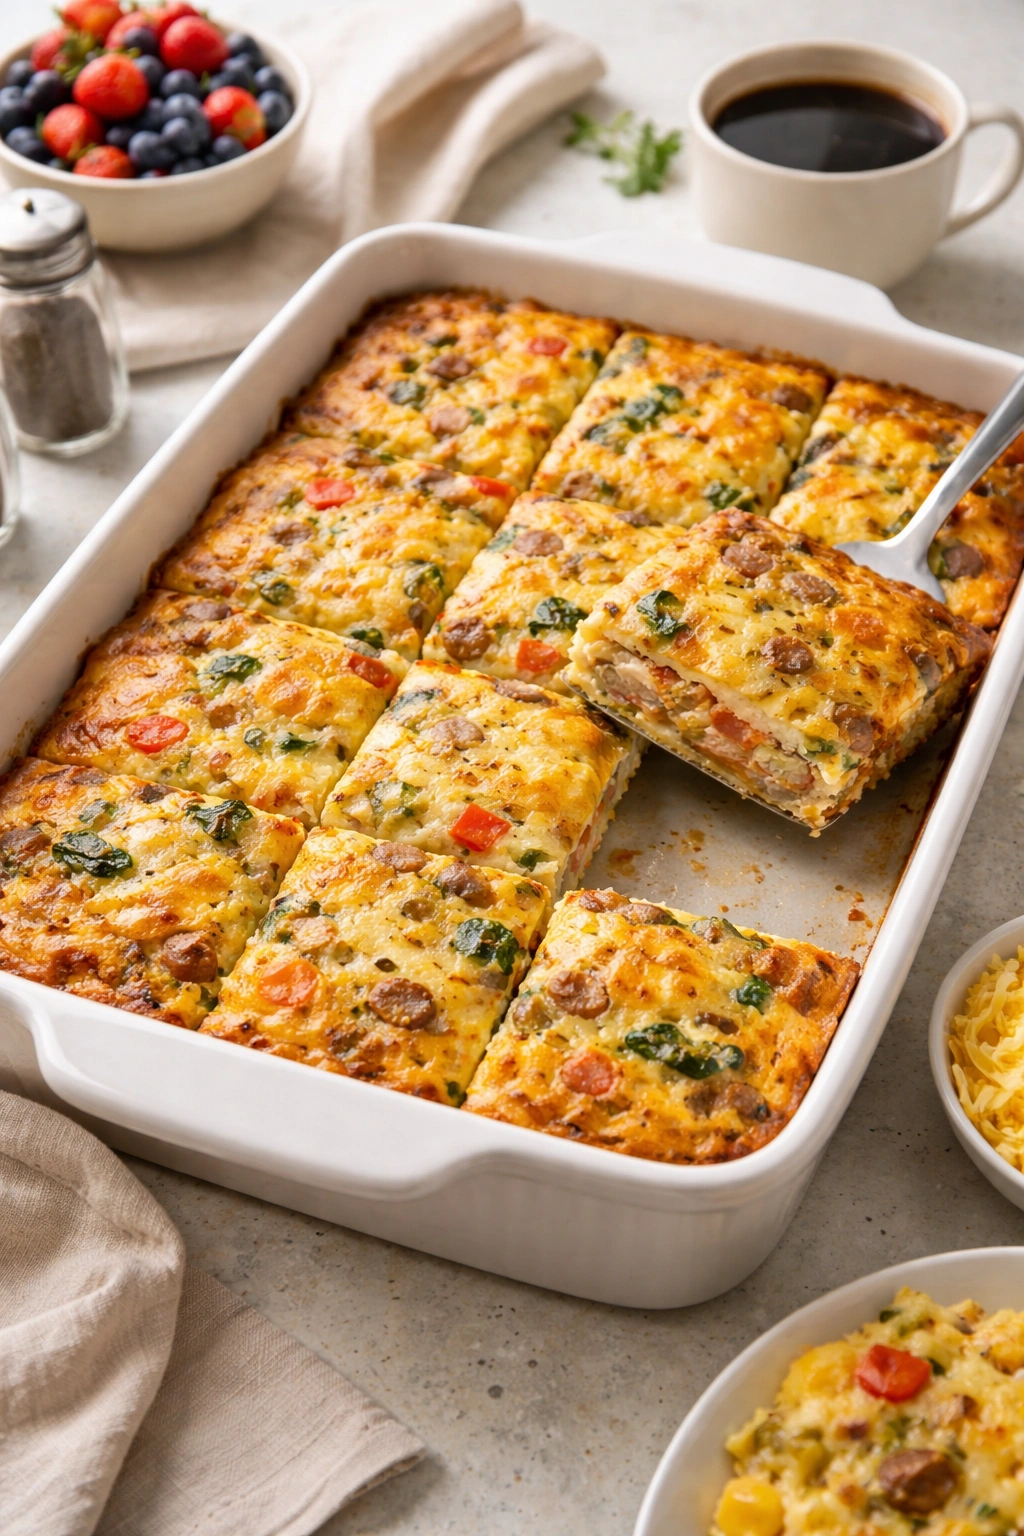
A savory breakfast casserole is your secret weapon for filling, satisfying mornings. One 9×13-inch pan serves 6-8 people across the week and holds up perfectly when portioned and reheated.
Why a Casserole Is the Ultimate Meal Prep
You’re essentially baking a sheet pan full of eggs, bread, vegetables, and meat—all together in one dish. Cut it into portions, store them separately, and you’ve got grab-and-go breakfast that tastes like you spent an hour cooking when you actually spent 15 minutes assembling and 45 minutes baking. The casserole stays moist throughout the week because everything is cohesive; it doesn’t dry out like standalone scrambled eggs would.
Cut 8-10 slices of day-old bread (sourdough or Italian bread works best) into cubes and spread them across a greased 9×13 baking pan. Scatter 2 cups of shredded cheese, 1 cup of diced cooked sausage or bacon, and 2 cups of mixed diced vegetables (peppers, onions, mushrooms, spinach) over the bread. Whisk together 10 eggs, 2 cups of milk, 1 teaspoon of salt, ½ teaspoon of pepper, and ½ teaspoon of mustard powder, then pour the mixture evenly over everything.
Let it sit for 10 minutes so the bread absorbs some liquid, then bake uncovered at 350°F for 45 minutes, until the top is golden and a knife inserted in the center comes out clean. Cool completely before cutting into 6-8 pieces. Store each piece in its own airtight container or wrapped in foil.
Casserole Combinations That Work Well
- Smoked sausage, peppers, onions, sharp cheddar, fresh thyme
- Bacon, broccoli, Swiss cheese, a pinch of garlic powder
- Diced ham, mushrooms, caramelized onions, gruyere cheese, fresh sage
Reheat a piece in the microwave for 60-90 seconds or warm in a 300°F oven for 10 minutes until heated through. Each portion keeps for 5 days in the fridge and freezes beautifully for up to three months.
5. Yogurt Parfait Jars
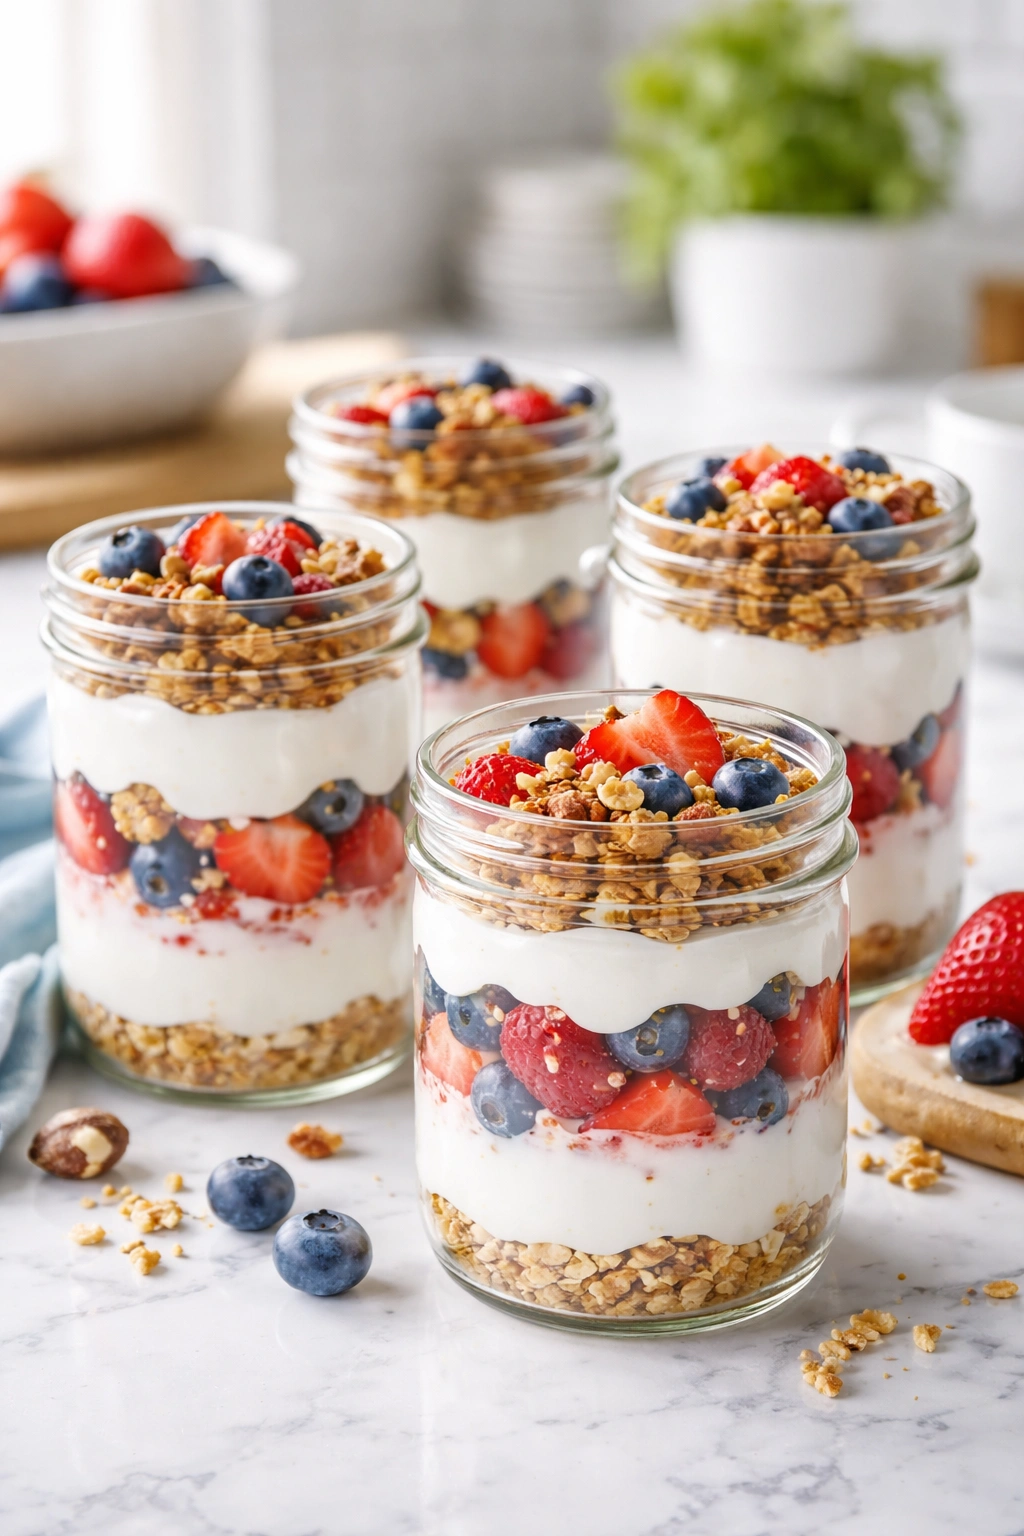
Yogurt parfaits feel fancy but they’re stupidly easy to assemble. Layer them in jars on Sunday, and you’ve got portable, customizable breakfast that you can literally drink if you’re running late.
Why Layered Parfaits Work as Meal Prep
The layers work together as insurance: the granola stays crunchier when it’s separated from yogurt by a layer of fruit on the bottom, and the fruit doesn’t get crushed by the weight of granola on top. You’re creating texture contrast that persists through the week, which keeps breakfast interesting and prevents the “mushy bowl of sadness” that happens when you mix everything together on day five.
Use wide-mouth mason jars or simple containers—glass or plastic both work fine. The formula is: yogurt (Greek yogurt, if you want extra protein), granola, fruit, and a handful of nuts or seeds. But the key is layering in the right order for storage longevity.
Start with ¼ cup of yogurt on the bottom. Add a thin layer of fruit (roughly ⅓ cup). Add ⅓ cup of granola. Top with another ¼ cup yogurt. If you want more volume, repeat the layers, ending with yogurt on top. The yogurt acts as a buffer keeping the granola from touching the container walls and getting stale.
Flavor Combinations to Prep
- Honey granola with peaches and almonds: Greek yogurt, peach slices, honey granola, sliced almonds
- Berry crunch with coconut: Greek yogurt, mixed berries, coconut granola, shredded coconut, chopped almonds
- Apple cinnamon walnut: Greek yogurt, diced apple tossed with lemon juice, cinnamon granola, chopped walnuts, drizzle of honey
- Tropical coconut: Greek yogurt, diced mango and pineapple, coconut granola, macadamia nuts, shredded coconut
Make five jars and keep them sealed until you’re ready to eat. They’ll stay fresh for 5 days, though the granola will gradually soften the longer they sit. If you prefer crunch, stir a little before eating and add an extra handful of granola on top to get that textural contrast back.
6. Breakfast Cookies and Energy Bars
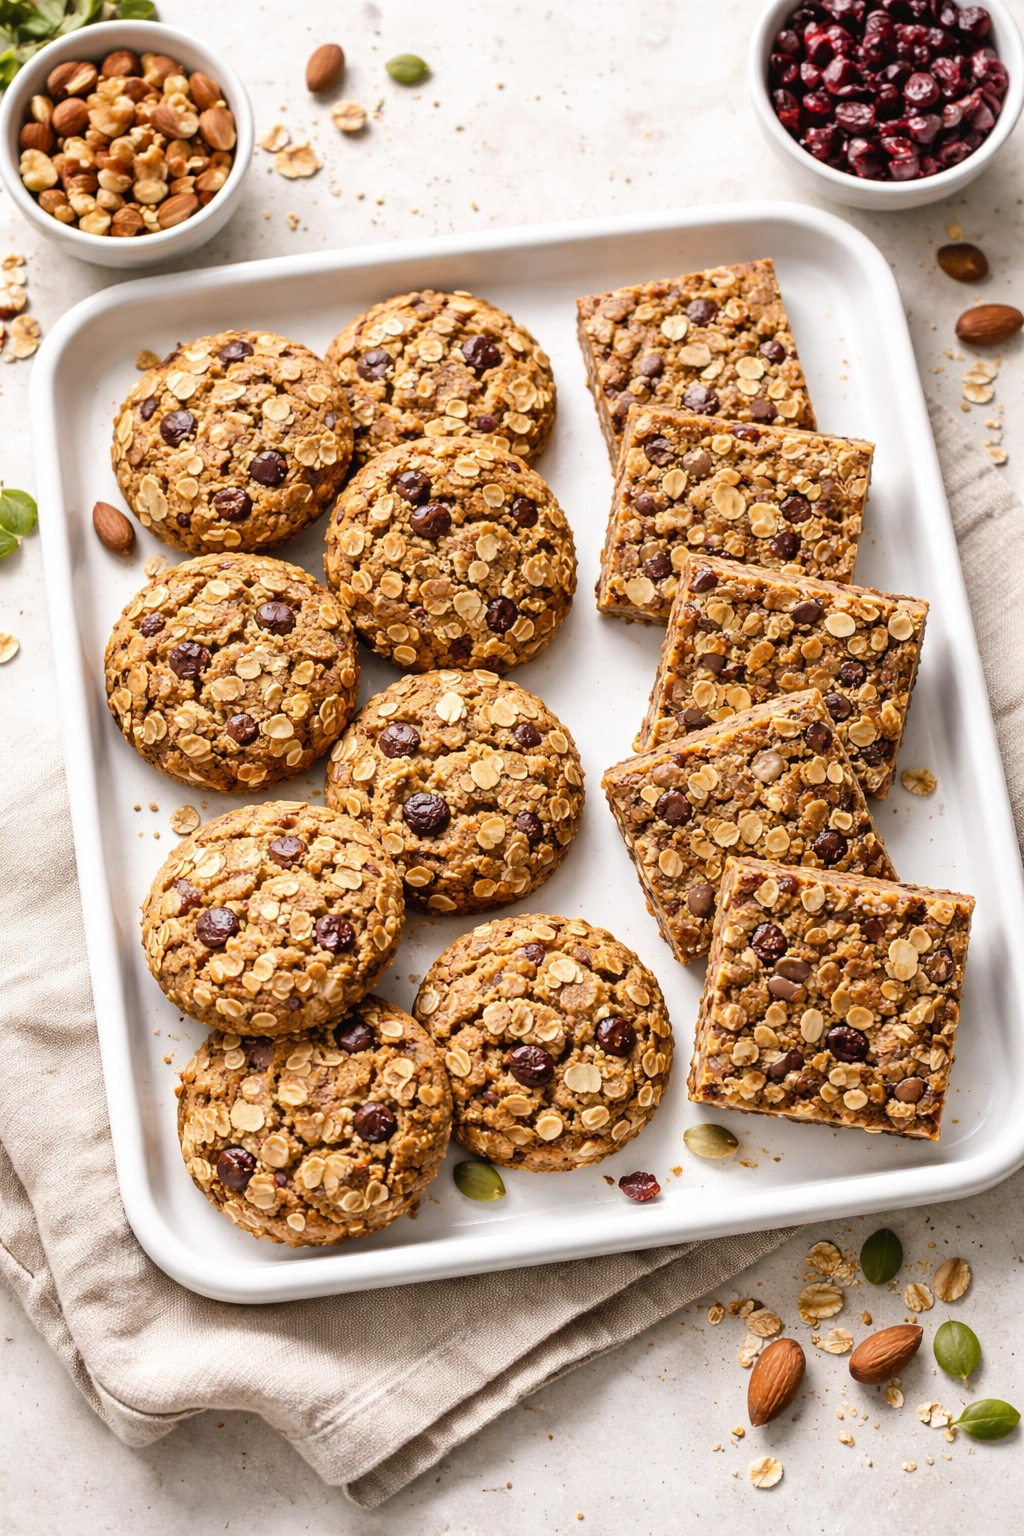
Breakfast cookies and bars are basically oatmeal, nut butter, and mix-ins pressed into a baked good. They’re finger-food breakfast for people constantly on the move, and they taste like a mild dessert without being actual dessert.
Why These Are Surprisingly Practical
Cookies and bars require zero reheating and zero utensils. You literally grab one from the fridge on your way out the door. They’re nutrient-dense—packed with oats, nuts, seeds, and dried fruit—so they actually fuel your body for a couple of hours. They’re also the easiest breakfast to sneak into a gym bag, a backpack, or your car for mornings when you’re driving directly to somewhere that isn’t home.
For breakfast cookies, cream together ½ cup of softened nut butter (almond or peanut), ¼ cup coconut oil, ½ cup honey, and 1 beaten egg. Fold in 2 cups of rolled oats, 1 teaspoon of vanilla, ½ teaspoon of cinnamon, and your mix-ins: ½ cup of dried fruit (raisins, cranberries, chopped dates), ½ cup of chopped nuts, and ¼ cup of chocolate chips or seeds. Drop spoonfuls onto a baking sheet and bake at 325°F for 12-14 minutes until barely golden.
For bars, spread the same batter into a parchment-lined 8×8 baking pan and bake at 325°F for 18-20 minutes. Let them cool completely before cutting into 12-16 bars. Both will keep for 5-6 days in an airtight container, or freeze for up to three months.
Mix-In Options for Variety
- Chocolate chip banana with walnuts
- Cranberry orange with pecans
- Apple cinnamon with pumpkin seeds
- Coconut date with macadamia nuts
Pro tip: Make a double batch and freeze half. You’ll have back-up breakfasts ready to grab on weeks when Sunday prep doesn’t happen.
7. Smoothie Bowls (Component Prep)
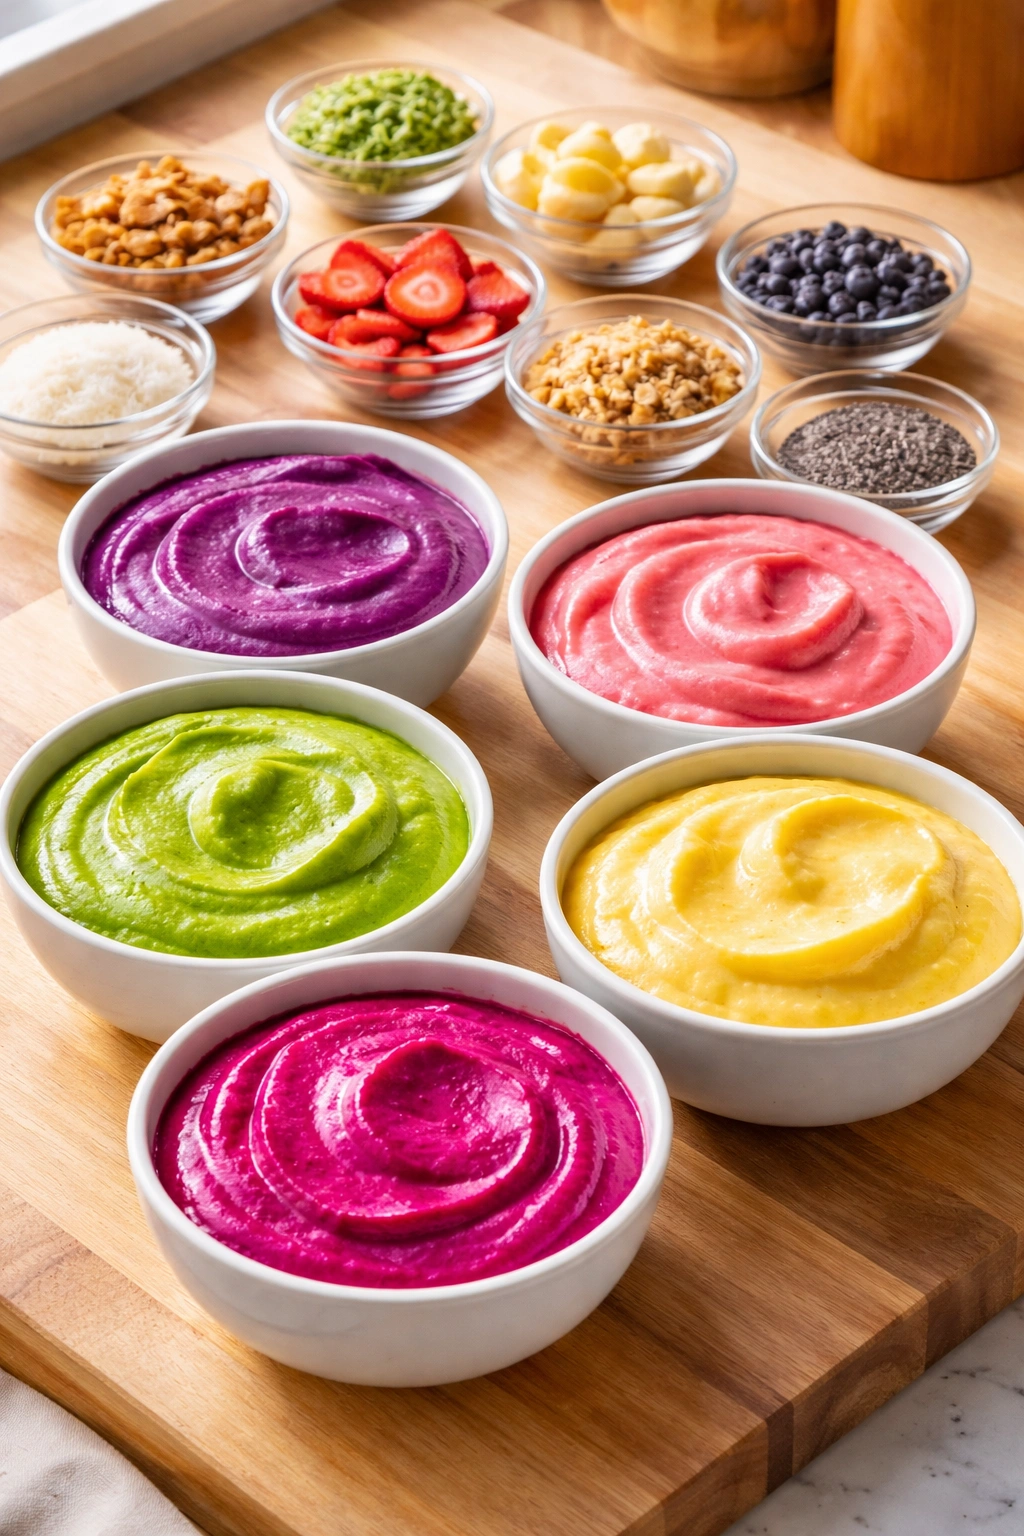
Instead of prepping full smoothie bowls (which get soggy), prep the components separately and assemble them fresh in the morning. It’s meal prep that doesn’t feel like meal prep.
Why Component Prep Works Better Than Full Assembly
A fully assembled smoothie bowl left in the fridge overnight is a melted, grainy, depressing situation by morning. But if you freeze your smoothie base in portioned containers and prep your toppings separately, you’re 90 seconds away from an actually good smoothie bowl every single day.
On Sunday, make your base: blend 2 frozen bananas, 1 cup of frozen berries or mango, 1 cup of yogurt or milk, and a tablespoon of nut butter until thick but pourable. Divide into five portions in small containers and freeze them overnight (or use an ice cube tray, then pop the frozen chunks into a bag once solid). Separately, prep your toppings: shredded coconut, granola, sliced fruit, chia seeds, almonds, honey drizzle—whatever you like. Keep each topping in its own small container.
Each morning, run the frozen smoothie base under warm water for 15 seconds to soften it slightly, pour it into a bowl, add a handful of toppings, and eat with a spoon. The base is thick enough to eat with a spoon, and you get the textural variety of fresh toppings without any sogginess.
Three Smoothie Base Formulas
- Strawberry banana: 2 frozen bananas, 1 cup frozen strawberries, 1 cup Greek yogurt, 2 tablespoons almond butter, splash of milk if needed
- Tropical mango: 2 frozen bananas, 1 cup frozen mango, 1 cup coconut milk, 1 tablespoon honey, squeeze of lime
- Blueberry acai: 2 frozen bananas, 1 cup frozen blueberries, ½ frozen acai packet, 1 cup milk, 1 tablespoon nut butter
Toppings to prep in advance: granola, shredded coconut, fresh berries, sliced kiwi, sliced banana (toss with lemon juice to prevent browning), chia seeds, hemp seeds, chopped almonds, drizzle of honey.
8. Pancakes and Waffles (Frozen for the Week)
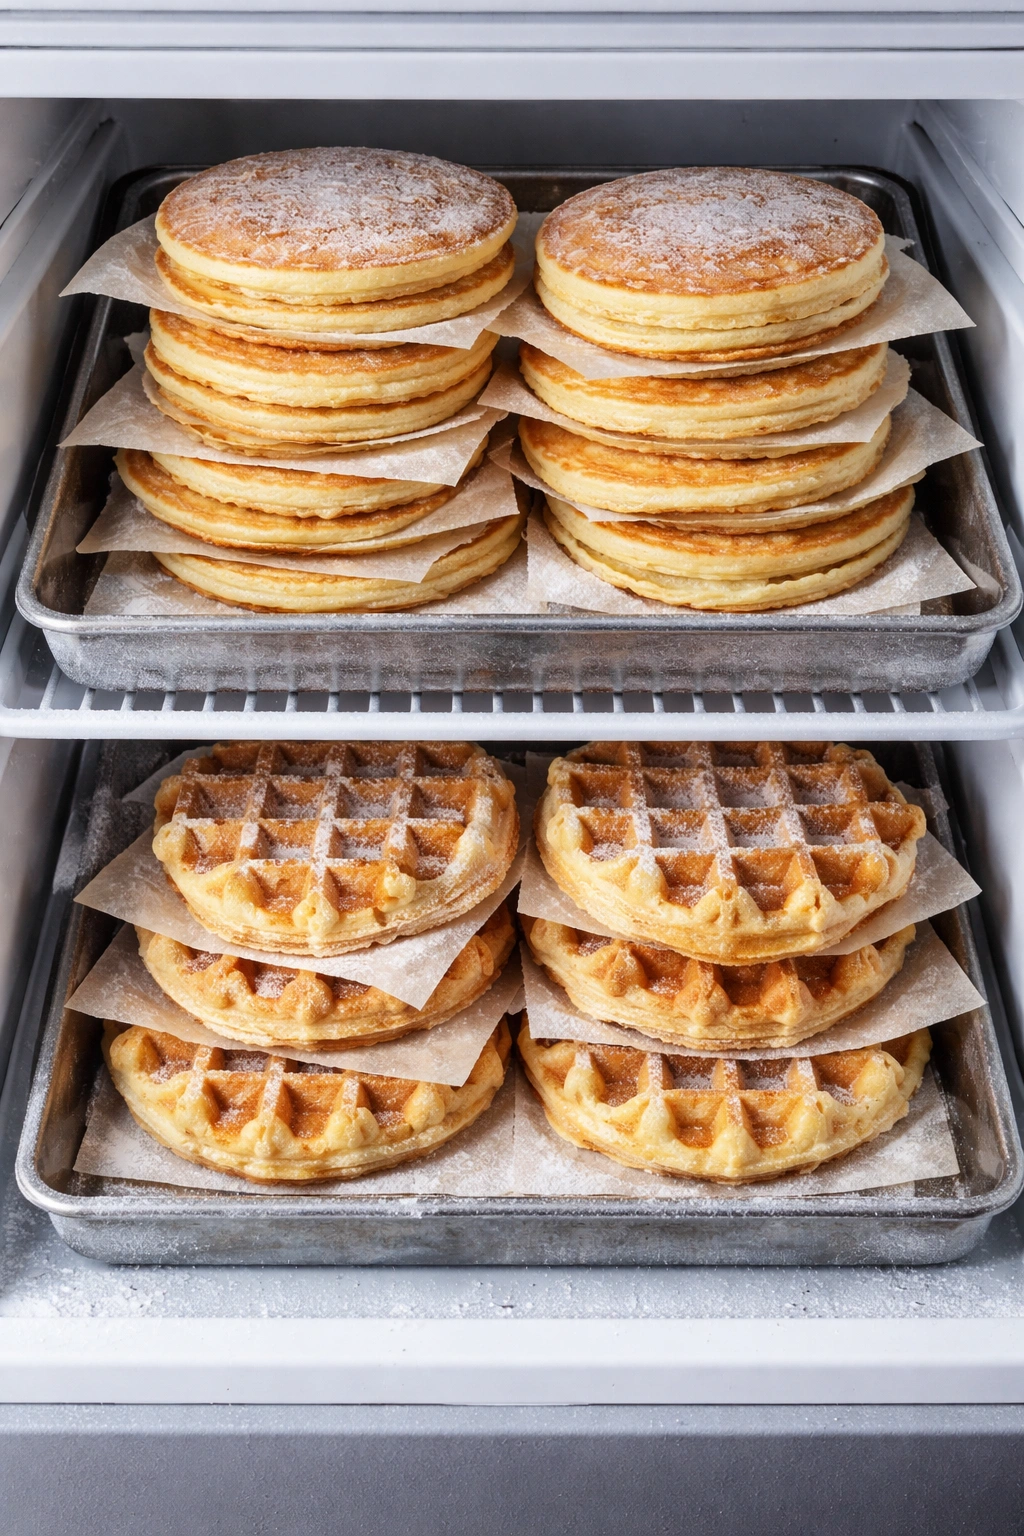
You can absolutely batch-cook pancakes and waffles on Sunday, then reheat them throughout the week. They freeze beautifully and taste as good reheated as they do fresh if you do it right.
Why Frozen Pancakes Are Secret Genius
A stack of pancakes made on Sunday tastes exactly like a stack of pancakes made Tuesday morning if you reheat them properly. You’re not eating day-old pancakes; you’re eating frozen pancakes that have been perfectly preserved. The whole point is that you’re skipping the cooking step on busy mornings, which means you’ve actually gained 10-15 minutes of sleep.
Make your favorite pancake batter (or use whole-wheat or protein pancake mix for a nutritional upgrade). Cook the pancakes as you normally would, let them cool completely on a wire rack, then layer them between parchment paper in a freezer bag. They’ll keep frozen for up to three months. When you want to eat them, skip the toaster and instead reheat in a 300°F oven for 5 minutes until warm through, or microwave one at a time for 60-90 seconds.
The same logic applies to waffles. Make a big batch, cool completely, freeze with parchment between them, and reheat in a toaster or oven. You lose a tiny bit of crispness compared to eating them immediately, but you gain an entire weekday of not cooking breakfast—the trade-off is absolutely worth it.
Pancake and Waffle Mix Ideas
- Banana walnut: Add mashed banana and chopped walnuts to your base batter
- Blueberry: Fold fresh or frozen blueberries into the batter just before cooking
- Whole wheat: Swap half your all-purpose flour for whole wheat flour and add 1 tablespoon of honey
- Protein pancakes: Use a vanilla protein pancake mix and cook according to package directions
Make 20-25 pancakes or 12-16 waffles depending on how hungry you are each morning. Store with parchment between layers so they don’t stick together. Top with fresh fruit, nut butter, Greek yogurt, or a drizzle of honey on the morning you eat them.
9. Build-Your-Own Breakfast Sandwiches
Assemble breakfast sandwiches in components, not fully constructed, so you can customize each one the morning you eat it. Your Sunday work is just cooking the components and portioning them out.
Why Building Them Fresh Tastes So Much Better
A breakfast sandwich made on Sunday and eaten on Wednesday has a soggy, sad bread situation no matter how careful you are. But if you cook the eggs, bacon, and sausage on Sunday, then assemble fresh on eating day, you get a properly crispy exterior and all the moisture stays contained inside where it belongs.
On Sunday, cook a big batch of scrambled eggs (shoot for slightly underdone so they don’t dry out during storage). Cook bacon or sausage patties until crispy. Cook some diced peppers and onions if you like them. Portion everything into containers: a container of eggs, a container of cooked meat, a container of vegetables. Keep cheese slices sealed in a bag.
Each morning, toast an English muffin, bagel, or sandwich round, then layer with one portion of eggs, your choice of meat, a slice of cheese, and the vegetables if you want them. Fresh toast means crispy bread; fresh assembly means everything tastes like you made it minutes ago.
Breakfast Sandwich Options to Rotate
- Classic bacon and egg: Bacon, scrambled eggs, American cheese, English muffin
- Sausage and pepper: Sausage patty, scrambled eggs, diced peppers and onions, sharp cheddar, English muffin
- Veggie breakfast: Scrambled eggs, sautéed mushrooms and spinach, Swiss cheese, whole wheat muffin
- Ham and Swiss: Diced ham, scrambled eggs, Swiss cheese, fresh tomato slice, bagel
All components keep for 5 days in the fridge. Just grab what you need each morning and assemble with a fresh bread component.
Pro tip: Toast the bread fresh each morning instead of pretoasting on Sunday—that 90 seconds of toasting time is worth the dramatically better texture and flavor.
10. Homemade Granola and Breakfast Grain Mix
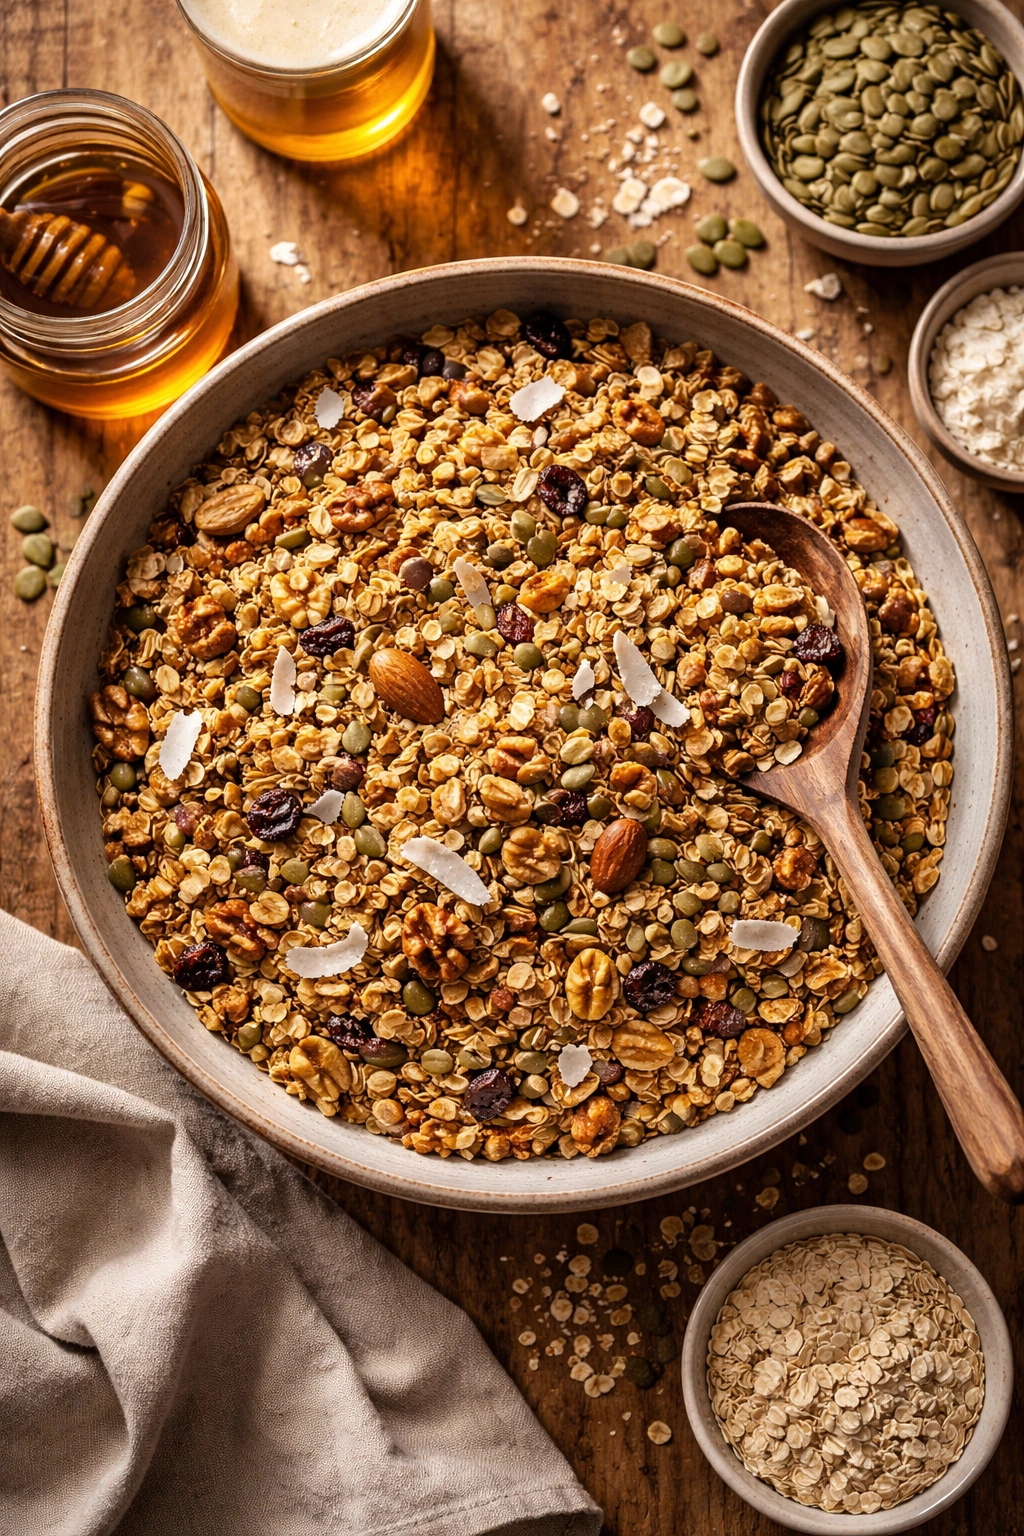
Make your own granola and grain mix on Sunday and you’ll have something crunchy, customizable, and infinitely cheaper than store-bought options waiting in containers all week.
Why Homemade Granola Is Actually Worth Making
Store-bought granola often costs $8-12 per pound and is frequently loaded with more sugar than actual breakfast cereal. Homemade granola costs about $2 per pound and you control every ingredient. You can also make it to your exact texture and flavor preferences—some people want big clumps, others want uniform nuggets. Some want it loaded with coconut, others prefer nuts. You can’t customize the stuff in a box.
Combine 3 cups of rolled oats, 1 cup of mixed nuts (almonds, pecans, walnuts—chopped), ½ cup of seeds (sunflower, pumpkin, sesame), ½ cup of unsweetened coconut flakes, and ½ teaspoon of fine salt in a large bowl. In a separate bowl, whisk together ⅓ cup of honey (or maple syrup), ¼ cup of coconut oil, 1 teaspoon of vanilla extract, and 1 teaspoon of cinnamon. Pour the wet mixture over the dry and stir until everything is coated.
Spread on two baking sheets and bake at 325°F for 25-30 minutes, stirring every 10 minutes, until golden and fragrant. The key is stirring frequently so it toasts evenly rather than browning too dark at the edges. Let it cool completely on the sheet (it will crisp up as it cools), then break it into chunks. Add dried fruit (raisins, cranberries, diced dates) after it’s cool so the fruit doesn’t overcook.
Granola and Grain Combinations
- Classic with dried cranberries: Oats, almonds, sunflower seeds, coconut, dried cranberries
- Chocolate almond: Oats, almonds, cocoa powder mixed into the honey mixture, dark chocolate chips added after cooling
- Apple pie: Oats, pecans, pumpkin seeds, cinnamon-heavy, dried apple pieces added after cooling
- Tropical coconut: Oats, macadamia nuts, extra coconut flakes, dried mango pieces, shredded coconut toasted separately
Store in an airtight container and it’ll stay crispy for 2-3 weeks. Eat it with yogurt, milk, or straight from the container as a snack throughout the week.
Practical Tips for Successful Breakfast Meal Prep
The difference between meal prep that you actually eat and meal prep that you find congealed in the fridge on Friday boils down to a few concrete decisions made on Sunday.
Invest in the right containers. Glass containers with snap-on lids are worth every penny—they don’t retain odors, they’re see-through so you remember what you prepped, and they’re actually pleasant to eat out of. Disposable containers are convenient but they get gross after 48 hours, and you’re way more likely to skip breakfast if eating it feels like a chore. Similarly, individual glass or plastic jars for overnight oats and parfaits mean you’re really just grabbing and going instead of assembling.
Cool everything completely before storing. Hot food releases steam, which condenses on container lids and makes everything soggy. Let casseroles, egg muffins, and burritos cool on the counter for at least 30 minutes before putting lids on. This extra patience step is the difference between crispy exterior and soggy sadness.
Label everything with the date. Use masking tape and a permanent marker, or print small date labels. You won’t remember on Wednesday whether those egg muffins are three days old or five. Most prepped breakfast lasts 4-5 days in the fridge, so marking the date keeps you from accidentally eating something past its prime.
Make enough variety that you won’t get bored. If you prep only overnight oats, you’ll love them Monday through Wednesday and be burnt out by Friday. The 10 options above are specifically so you can pick 2-3 you’re actually excited about and rotate throughout the week. Mixed variety is what makes meal prep sustainable.
Don’t skip the tasting step. After you’ve made a batch, eat one portion fresh (before refrigerating) so you know whether it tastes good and whether the recipe is actually worth eating five times. A rushed prep that tastes mediocre is worse than no prep at all—you’ll just buy coffee and a pastry instead on day three anyway.
Final Thoughts
Sunday meal prep doesn’t have to be complicated, expensive, or time-consuming. A single two-to-three-hour session with the right recipes yields 5-7 days of ready-to-go breakfasts that cost a fraction of what you’d spend at a café and taste infinitely better than whatever’s fastest at a drive-through. The breakfast options above are picked because they’re actually delicious, they reheat or no-heat beautifully, and they don’t require any special equipment beyond what most people already have in their kitchen.
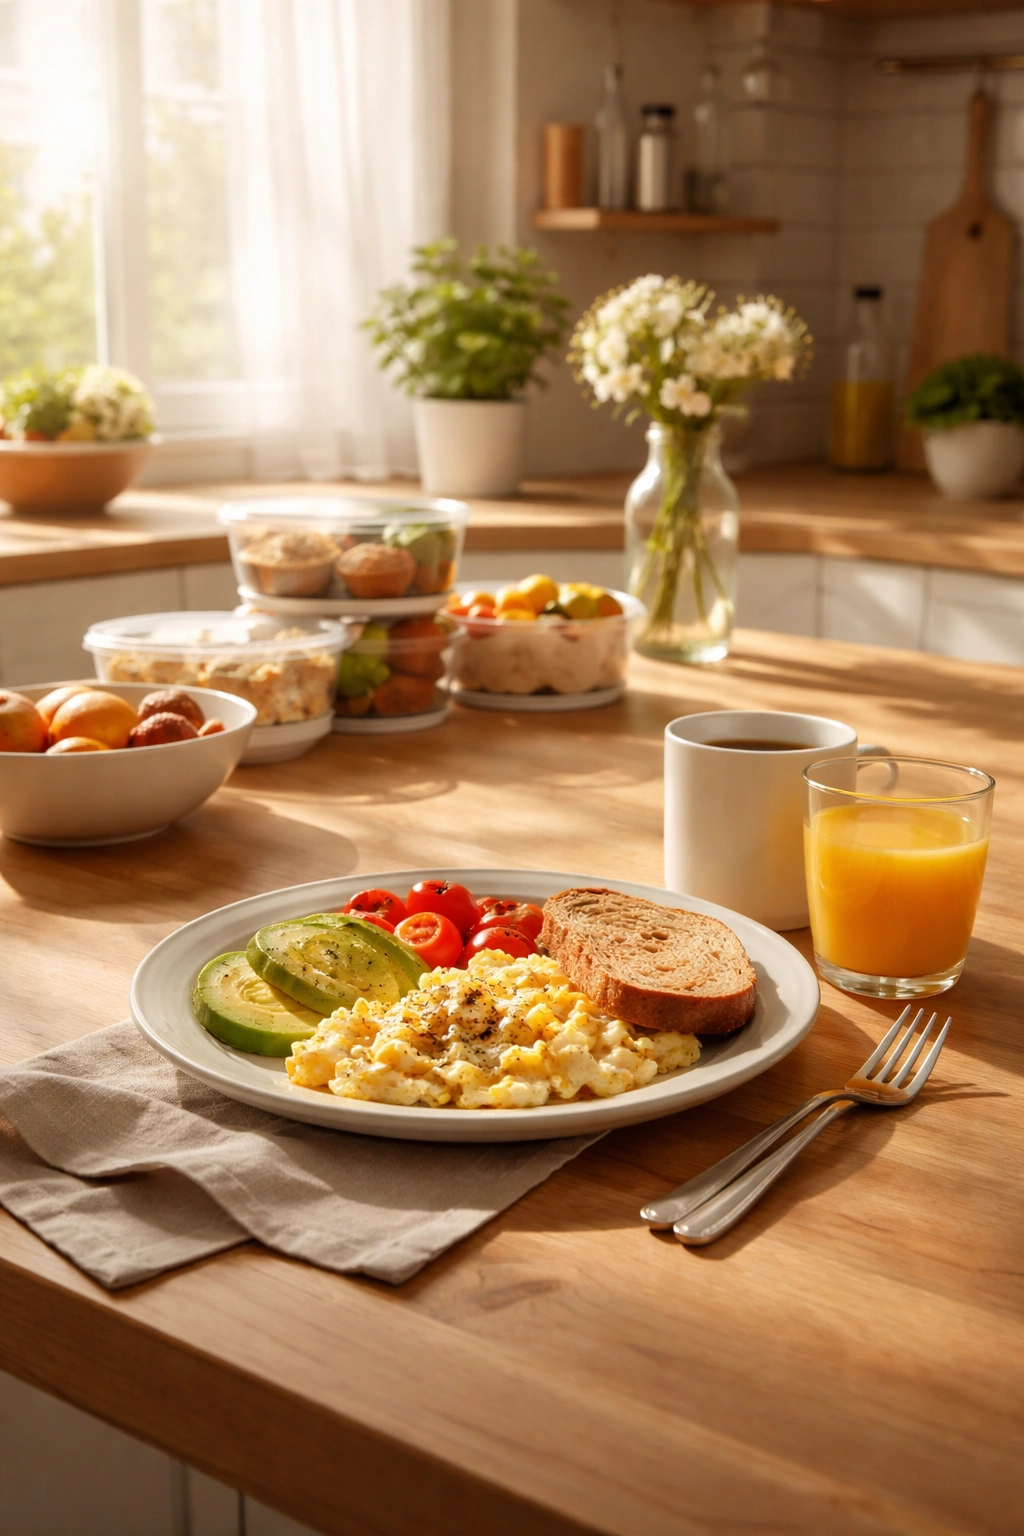
Pick two or three of these options that actually appeal to you (not what you think you should eat—what you actually want to eat), spend a couple hours on Sunday, and wake up on Monday through Friday already winning. The mornings when breakfast is already done are the mornings you’re not rushing, not stressed, and not skipping the meal that literally breaks your overnight fast. That small shift compounds into bigger energy, better focus, and a sense of control that extends way beyond just breakfast.
The best meal prep strategy is the one you’ll actually do. Start with one option this Sunday. Make it well. Eat it consistently. When you’re comfortable, add a second option. Build from there. Your future weekday self will be endlessly grateful.