When a dessert craving hits and you’re staring at an empty pantry, the last thing you want is a complicated recipe with a shopping list that rivals a small grocery store trip. The magic of three-ingredient desserts lies in their brutal simplicity—they prove that you don’t need a culinary degree, a kitchen full of specialty equipment, or an ingredient list longer than your arm to create something genuinely delicious and impressive enough to serve to guests. These minimal-ingredient creations rely on the quality and proper execution of just a few components, which means every single ingredient has to earn its place on the plate.
What makes these desserts so powerful is that they force you to respect the fundamentals: proper technique, precise measurements, and ingredient quality matter far more than complexity. A three-ingredient chocolate mousse becomes transcendent when you understand how to whip egg whites to stiff peaks and fold them gently. A three-ingredient caramel becomes silky and balanced when you know exactly when to stop cooking it and how to temper it with butter. These constraints aren’t limitations—they’re invitations to master the absolute essentials of dessert-making, the skills that make a good cook great.
Beyond the practical appeal, there’s something genuinely satisfying about opening your fridge or pantry and realizing you already have everything you need to make dessert. No waiting for delivery, no substitute ingredients that might change the outcome, no standing in a grocery store aisle trying to remember whether you already have vanilla extract at home. You simply make it, right now, with what’s actually in your kitchen. That immediacy and self-sufficiency has its own kind of magic—and it often produces some of the most memorable desserts you’ll make all year.
Why 3-Ingredient Desserts Are a Game-Changer
Three-ingredient desserts represent a fundamental shift in how you can approach sweet treats at home. Instead of viewing baking as an elaborate production that requires hours of planning and specialized supplies, they reframe dessert-making as something genuinely accessible, even on a Tuesday evening when you’re exhausted and your sweet tooth won’t quit. The beauty isn’t in being cheap or lazy—it’s in the clarity that comes from limitation.
When a recipe has only three ingredients, there’s nowhere for a mistake to hide. If your chocolate mousse isn’t silky, it’s not because you forgot a secret ingredient—it’s because you either didn’t whip the egg whites properly or you crushed them when folding. This feedback loop makes you a better baker because every failure becomes immediately diagnostic. You learn to read your ingredients, to understand how they interact, to develop the kind of intuitive skill that separates competent cooks from confident ones.
The psychological advantage shouldn’t be underestimated either. Opening a three-ingredient recipe feels achievable in a way that a fifteen-ingredient layer cake does not. You’re not intimidated before you start. You’re not second-guessing whether you bought the right type of chocolate or whether you need to bring eggs to room temperature for this particular project. You simply gather three things, follow clear instructions, and a surprisingly sophisticated dessert emerges in your kitchen. That sense of confidence and accomplishment is something you can absolutely build your baking skills on.
Chocolate Mug Brownies
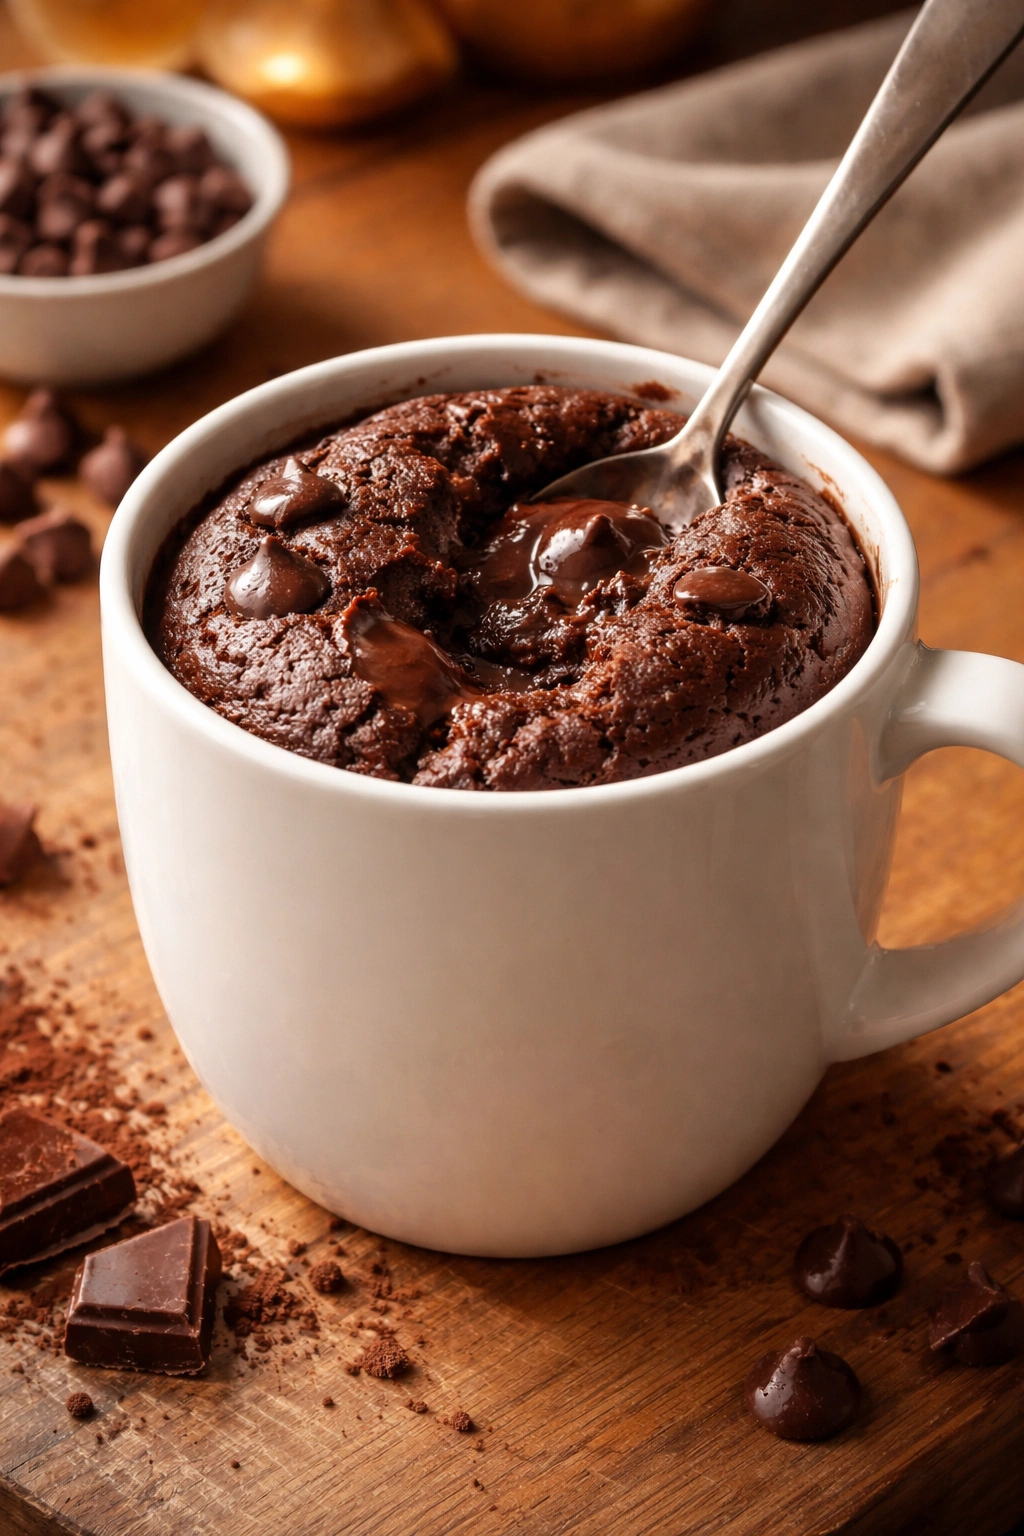
The chocolate mug brownie is the dessert equivalent of comfort in its purest form—warm, fudgy, and ready in less time than it takes to brew a cup of coffee. This isn’t the sort of brownie that makes you question why you didn’t just buy a box mix; this is the sort that tastes like someone who genuinely knows their way around a kitchen made it for you in their apartment at 10 p.m. The secret is using high-quality chocolate and just enough structure to keep it from being completely liquid, while still maintaining that essential molten center.
The genius of the mug brownie is in the math: you’re creating an environment where even a novice baker can nail the texture. The microwave delivers focused, even heat that prevents the brownie from cooking around the edges while staying raw in the middle—the traditional oven-baking problem. One large mug of brownie serves either one person very generously or two people comfortably, making it the perfect formula for when a craving hits at an unconventional hour and you don’t want to commit to a full 9-inch pan.
Yield: 1 large brownie or 2 small servings | Prep Time: 5 minutes | Cook Time: 2 minutes | Total Time: 7 minutes | Difficulty: Beginner — Mix ingredients in a mug and microwave. That’s genuinely the whole process.
For the Mug Brownie:
- 1/4 cup (50g) high-quality dark chocolate, roughly chopped
- 2 tablespoons unsalted butter
- 1/4 cup all-purpose flour
- Place the chopped chocolate and butter directly in a large microwave-safe mug—the kind you’d use for coffee or hot chocolate, approximately 12-14 ounces.
- Microwave on 50% power for 90 seconds, stirring halfway through, until the chocolate and butter are completely melted and smooth. The 50% power setting prevents the chocolate from seizing or developing hot spots.
- Add the flour directly to the mug and stir vigorously for about 30 seconds until no streaks of flour remain. The batter should be thick, smooth, and uniform.
- Microwave at full power for 1 to 1.5 minutes, until the brownie is set around the edges but still slightly soft when you gently press the center with your fingertip. Every microwave varies in power, so start with 1 minute and check—you can always add 15 more seconds if needed. Do not overcook—the residual heat will continue cooking the brownie after it leaves the microwave.
- Let the mug sit for 1 minute, then serve warm directly from the mug with a spoon, or let it cool for 2 minutes and invert onto a small plate if you prefer a more formal presentation.
The texture of a perfect mug brownie is essentially a warm chocolate cake with a fudgy center—not quite mousse-like, but rich enough that you can feel the quality of the chocolate in every bite. Serve it warm, ideally straight from the microwave, when the chocolate flavor is most vibrant and the texture is at its peak of indulgence.
Tips for Perfect Mug Brownies Every Time
The most common mistake is using chocolate chips instead of real chocolate—melted chips have a waxy texture that muddles the final brownie. Use chopped dark chocolate, bittersweet chocolate, or even milk chocolate depending on your preference, but make it real chocolate. The difference is immediate and noticeable.
The second consideration is not overmixing after you add the flour. You want just enough stirring to fully incorporate the flour, but you’re not making a traditional cake batter. More mixing develops gluten and can make the brownie slightly tough rather than properly fudgy. Stir until you see no white streaks, then stop.
Microwave power varies wildly between different machines, so treat the cooking time as a starting point rather than gospel. If your microwave is particularly powerful, 1 minute might be enough; if it’s older or less powerful, you might need the full 1.5 minutes. The key is watching for the brownie to pull away slightly from the sides of the mug while the center still jiggles ever so slightly.
Variations Worth Trying
For a salted caramel brownie, drizzle a teaspoon of dulce de leche or caramel sauce into the batter just before the final microwave step. For a peppermint version, add a tiny pinch of peppermint extract to the melted chocolate—literally a quarter teaspoon, because peppermint is powerful. For a brownie with extra depth, use espresso powder or instant coffee powder mixed into the melted chocolate, about an eighth of a teaspoon.
You can also swap the flour: almond flour creates a denser, more cake-like brownie; coconut flour (use a touch less, like 3 tablespoons, since it’s more absorbent) makes a subtly flavored variation. Both work beautifully and feel slightly more interesting than all-purpose flour.
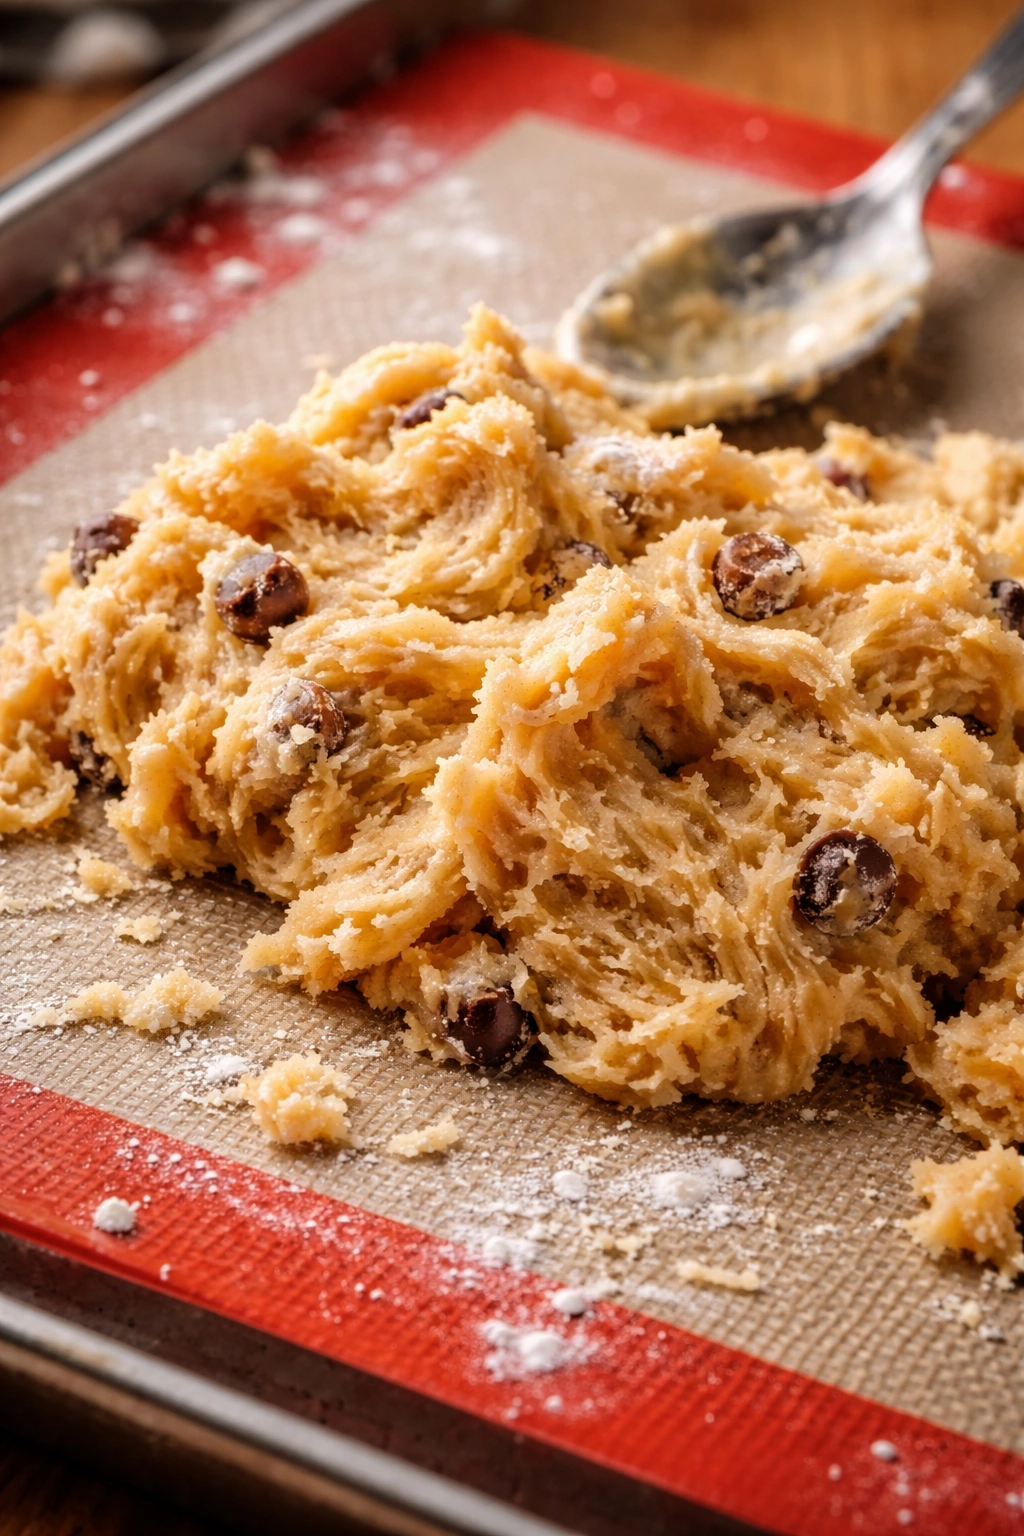
No-Bake Peanut Butter Cookies
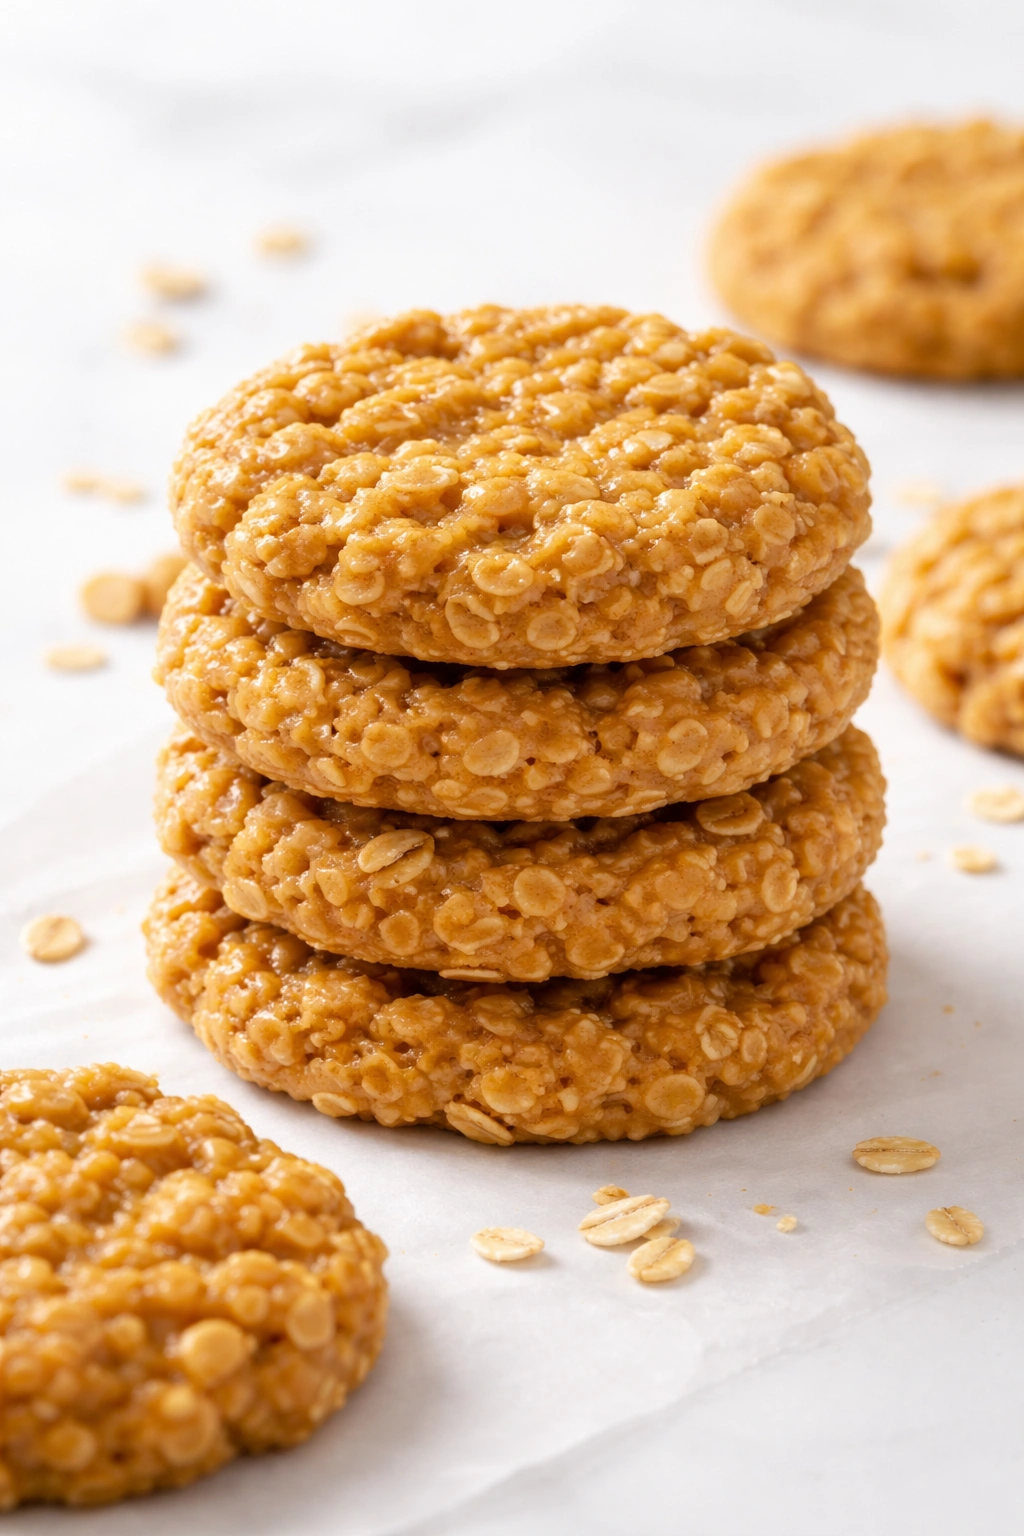
These are the cookies you make when you need something sweet in fifteen minutes, when your oven is already full, or when the idea of turning on an appliance feels like too much effort. Despite requiring zero actual baking, they taste like a proper peanut butter cookie—crispy on the outside, with that deep peanut butter flavor and a slight chewiness throughout. The secret is understanding how to use heat and cooling to set the texture you want without an oven’s dry, intense warmth.
The beauty of no-bake cookies is that they’re controlled entirely by you. You’re not dealing with oven temperatures that vary from one person’s kitchen to another’s, with hot spots or uneven heating. You melt, you mix, you set, you enjoy. They come together in stages, which means you can even leave them in the refrigerator overnight and finish them the next day if your timing doesn’t quite work out. No-bake peanut butter cookies are forgiving, fast, and honestly impressive considering the work required.
Yield: About 12 cookies | Prep Time: 10 minutes | Cook Time: 0 minutes | Total Time: 15 minutes active + 20 minutes chilling | Difficulty: Beginner — No oven skills required; mostly stirring and refrigeration.
For the No-Bake Peanut Butter Cookies:
- 1 cup natural peanut butter (or conventional peanut butter)
- 1 cup powdered sugar, sifted
- 1 cup semi-sweet or dark chocolate, roughly chopped
Prepare the Cookies:
- Measure the peanut butter directly into a medium mixing bowl. If your peanut butter is very stiff, you can microwave it for 15-20 seconds to soften it slightly, but it should remain thick and spreadable, not oily.
- Add the sifted powdered sugar to the peanut butter and stir with a sturdy wooden spoon or rubber spatula until the mixture is completely uniform, thick, and uniform in texture. This should take about 1 minute of stirring. The mixture will resemble a thick playdough consistency.
- Using a small cookie scoop or teaspoon, drop rounded portions of the peanut butter mixture onto a parchment-lined baking sheet, spacing them about 2 inches apart—you should have approximately 12 portions. The mixture won’t spread, so the exact spacing isn’t critical, but spacing helps with even setting.
- Refrigerate for 10 minutes until the peanut butter cookies are firm enough to hold their shape when touched.
Coat with Chocolate: 5. While the cookies chill, place the chopped chocolate in a microwave-safe bowl and microwave at 50% power in 30-second intervals, stirring between each one, until the chocolate is completely smooth and melted. About 1.5-2 minutes total, depending on your microwave. 6. Remove the peanut butter cookies from the refrigerator. Using a fork or chocolate fork (a special two-pronged utensil for dipping), pierce one cookie, dip it fully into the melted chocolate, and place it back on the parchment paper. The chocolate coating should be thin but complete, covering all visible peanut butter. 7. Repeat with each cookie. Don’t worry if the coating isn’t perfectly even—homemade charm is part of the appeal. 8. Return the chocolate-coated cookies to the refrigerator for 10 minutes until the chocolate is completely set and firm.
The finished cookie should have a crispy chocolate shell that shatters between your teeth, giving way to the dense, creamy peanut butter center. The combination of textures is the entire point—if you like softer cookies, you’re making the wrong recipe. These are meant to have some structural integrity.
Making Them Properly Every Time
Natural peanut butter (the kind with no added sugar or oils) creates a slightly less sweet cookie and a more pronounced peanut flavor. Conventional peanut butter (the kind in the jar with added oils and sugar) makes a creamier mixture that’s sometimes easier to work with. Either works, but they’ll taste distinctly different. Natural peanut butter tastes more genuinely like peanut; conventional tastes like the childhood memory of peanut butter cookies.
The powdered sugar must be sifted before measuring. Lumpy powdered sugar will create an uneven texture in your cookies, with some areas dense and some areas grainy. Sifting takes two minutes and makes a real difference in the final product.
When you dip the cookies in chocolate, work quickly but carefully. If the chocolate starts to thicken (which means it’s cooling and setting), microwave it for another 10-15 seconds to return it to a smooth, pourable consistency. Chocolate that’s too thick will coat unevenly; chocolate that’s too thin will drip off.
Variations to Customize Them
Add a quarter teaspoon of vanilla extract to the peanut butter mixture for subtle vanilla notes. Add a pinch of sea salt on top of the chocolate coating before it sets for a sweet-salty contrast. Use white chocolate instead of dark chocolate for a different flavor entirely. Add a teaspoon of honey to the peanut butter mixture for a slightly smoother, glossier texture. Mix crunchy peanut butter with smooth peanut butter for a hybrid texture.
Strawberry Shortcake (Simplified)

Strawberry shortcake is one of the archetypal desserts, the kind that shows up at celebrations and summer gatherings because it’s genuinely beloved. The traditional version involves baking a tender sponge cake, whipping cream, macerating strawberries, and assembling everything into layers. The three-ingredient version strips away everything except the essence: buttery, tender cake; whipped cream; and fresh, sweet strawberries. What remains is somehow even better because every element can be truly excellent without the distraction of excessive complexity.
The magic here is choosing the right three ingredients and understanding how to treat them. You need real butter in the cake for flavor and richness, fresh strawberries picked when they’re genuinely ripe, and cream with enough fat to whip into clouds. Shortcuts in any of these three areas will make themselves painfully obvious in the final dessert. But when you get them right, this is unforgettable—simple, stunning, and actually tastes like strawberry season in a bowl.
Yield: Serves 4 to 6 | Prep Time: 20 minutes | Cook Time: 25 minutes | Total Time: 45 minutes + cooling | Difficulty: Intermediate — Baking requires attention to detail; assembly requires gentle handling to avoid crushing the cake.
For the Shortcake Cake:
- 1 cup all-purpose flour
- 4 tablespoons unsalted butter, softened to room temperature
- 1 pound fresh strawberries, hulled and halved (about 3 cups)
For Assembly:
- 1 cup heavy cream, chilled
- 2 tablespoons powdered sugar
- 1 teaspoon vanilla extract (Note: These three items together count toward your 3-ingredient limit for this variation. Alternatively, omit the powdered sugar and vanilla from the cream if you prefer an ultra-minimal version with no sweetening in the whipped cream—the strawberries provide enough sweetness.)
Prepare and Bake the Cake:
- Preheat the oven to 375°F (190°C). Line a 6-inch or 8-inch round cake pan with parchment paper, letting the parchment overhang the edges so you can easily lift the finished cake out.
- In a medium bowl, whisk the flour and set it aside.
- In another bowl, using a hand mixer or wooden spoon, beat the softened butter for about 2 minutes until it’s noticeably pale and fluffy. This aerates the butter and creates a lighter crumb.
- Reduce the mixer to low speed and add the flour in three additions, mixing just until each addition disappears into the butter. The batter will be thick, more like a cookie dough than a traditional cake batter. Do not overmix—overworking the batter develops gluten and creates a tougher crumb.
- Transfer the batter to the prepared pan and press it gently and evenly into a thin, uniform layer. This is not a thick, fluffy cake—it’s intentionally thin, almost shortbread-like. Aim for about a quarter-inch thickness.
- Bake for 20 to 25 minutes, rotating the pan halfway through, until the cake is light golden brown at the edges and a toothpick inserted in the center comes out clean. The top should look dry but not dark.
- Remove from the oven and let cool in the pan for 5 minutes, then turn out onto a wire rack to cool completely—at least 20 minutes. Cooling is crucial; a warm cake is fragile and will fall apart when assembled.
Prepare the Strawberries: 8. While the cake cools, place the halved strawberries in a medium bowl and toss them gently with any accumulated juices. If you prefer sweeter strawberries, add a tablespoon of sugar and let them macerate (sit and release their juices) for 5 minutes. Do not over-sugar—the goal is to enhance the natural strawberry flavor, not mask it.
Whip the Cream and Assemble: 9. Pour the chilled heavy cream into a chilled bowl and beat on medium-high speed (if using a hand mixer) or use a whisk if you’re doing it by hand. The cream will go through stages: first it becomes foamy, then it thickens, and eventually soft peaks form (the cream holds gentle curves but collapses when you lift the whisk). If you’re using powdered sugar and vanilla, add them when soft peaks just begin to form, then whip for another 30 seconds until stiff peaks form (the cream holds firm points when you lift the whisk). 10. Once the cake is completely cooled, cut it into wedges or break it into rough pieces with your hands—this rustic approach is actually more charming than precise cutting. 11. To serve, place a piece of cake in a bowl, top it with a generous spoonful of whipped cream, and finish with a spoonful of strawberries and their accumulated juices. The juices soak into the cake and add moisture and flavor. Serve immediately.
The texture contrast here is everything: the slightly firm, buttery cake; the clouds of cold whipped cream; the soft, juicy strawberries. Each element should be noticeable and distinct, not melted together into homogeneity.
Keeping the Cake Tender and Fresh
The ratio of butter to flour is deliberately high, which creates a rich, tender crumb rather than a light, airy one. This is the texture you want—more similar to shortbread than to a fluffy sponge cake. The high butter content means the cake will stay moist and delicious even a few hours after baking, which is helpful if you’re making it ahead.
Don’t skip the cooling step. A warm cake is fragile and will fall apart when you try to cut or serve it. Cooled cake has time to set its structure and becomes much more handleable. If you’re in a major time crunch, you can speed this by placing the cake in the freezer for 10 minutes, but cooling at room temperature is preferable.
The strawberries release juice as they sit—this is a feature, not a bug. Those juices should soak into the cake and add moisture and fresh fruit flavor. If your strawberries seem dry or not particularly juicy, macerate them with a tablespoon of sugar for 5 minutes before using them.
Simple Variations to Try
Add a quarter teaspoon of vanilla extract to the butter before mixing in the flour for subtle vanilla notes throughout the cake. Use a mixture of strawberries and raspberries (about 2 cups strawberries and 1 cup raspberries) for a more complex fruit flavor. Make individual shortcakes by baking the batter in a muffin tin instead of a cake pan—smaller portions are sometimes more elegant. Layer the components (cake, cream, strawberries, repeat) in a wine glass or small jar for a more sophisticated presentation.
Vanilla Panna Cotta
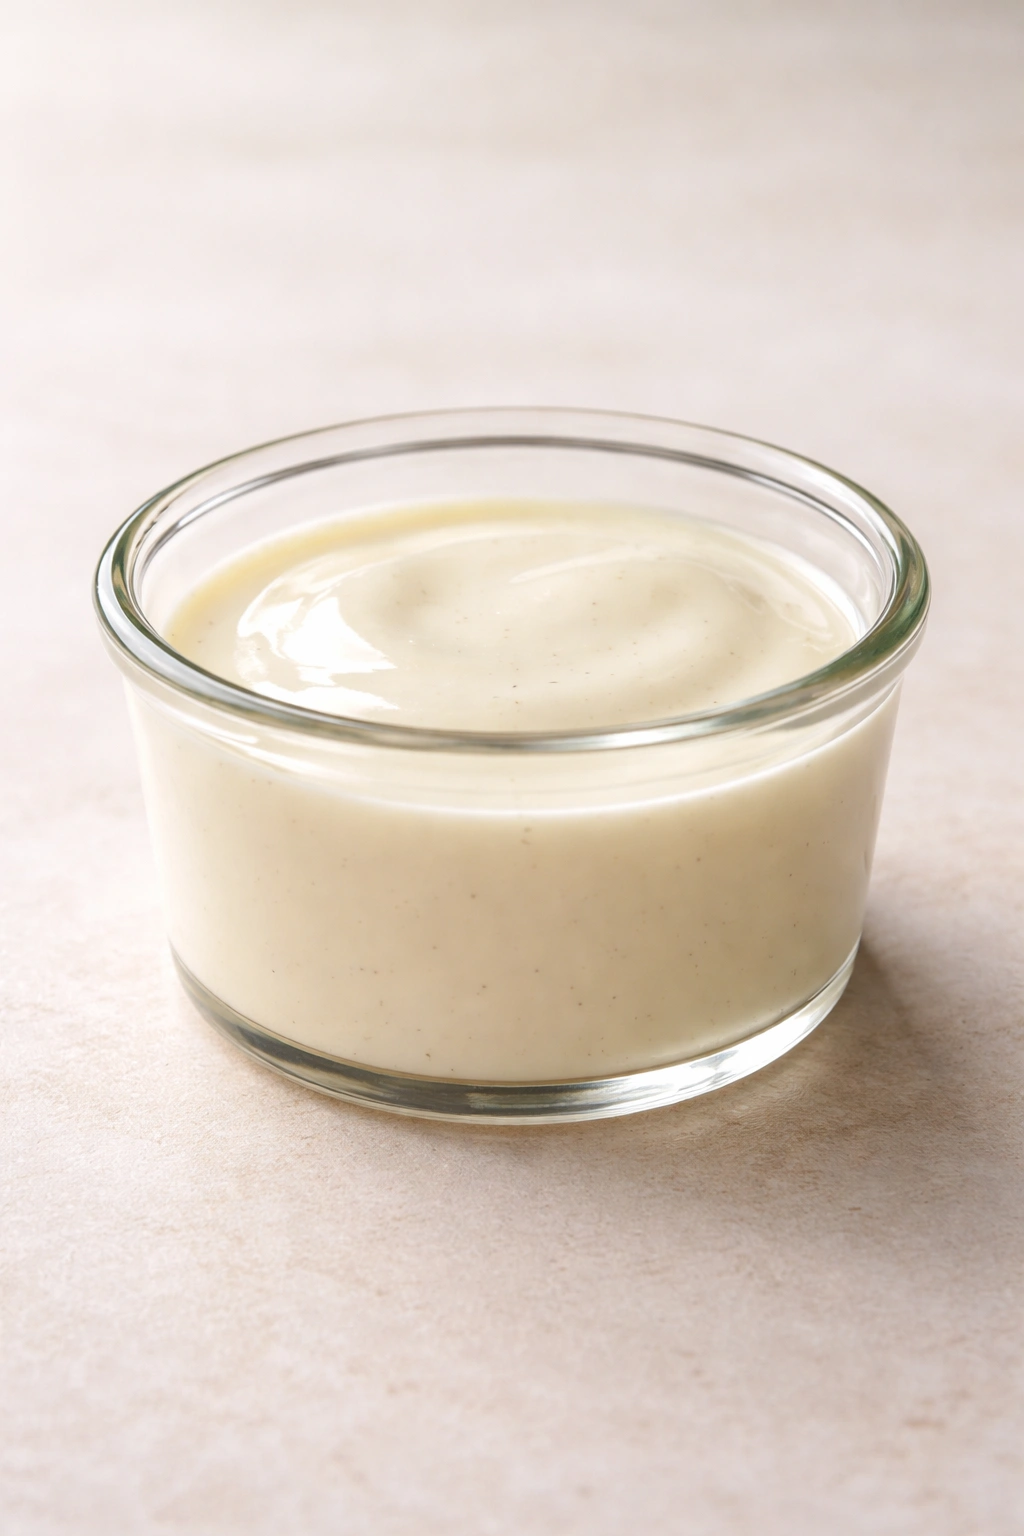
Panna cotta, meaning “cooked cream” in Italian, is one of those desserts that sounds fancy enough to impress anyone but is actually shockingly simple to execute. It’s silky, luxurious, and somehow feels like a special occasion dessert despite requiring almost no effort. The three-ingredient version strips away any complications—just cream, sugar, and gelatin, gently cooked and set. What emerges is possibly the most elegant dessert you can make with three ingredients.
The appeal of panna cotta is its texture: it should be barely set, the consistency of loosely scrambled eggs, not a firm jello-like dessert. It wobbles slightly when you move the plate, it’s fragile to the point that you eat it with a spoon and it’s almost melts on your tongue. This is an exercise in knowing when to stop—setting it just enough that it holds its shape but not one moment longer.
Yield: Serves 4 | Prep Time: 10 minutes | Cook Time: 0 minutes | Total Time: 15 minutes active + 4 hours chilling | Difficulty: Beginner — The only technique is bringing cream and sugar to a simmer and blooming gelatin properly.
For the Vanilla Panna Cotta:
- 1 cup heavy cream, divided (¾ cup for cooking, ¼ cup for softening gelatin)
- 2 tablespoons granulated sugar
- 1½ teaspoons gelatin powder (about ½ packet)
(Optional garnish: fresh berries, a drizzle of honey, or a sprig of fresh mint)
Prepare the Gelatin:
- Pour the ¼ cup heavy cream into a small dish. Sprinkle the gelatin powder evenly over the surface and let it sit for exactly 2 minutes without stirring. This is called “blooming” the gelatin and allows the powder to absorb moisture and hydrate, which ensures smooth, lump-free gelatin in the final dessert.
Cook the Base: 2. Pour the ¾ cup heavy cream into a small saucepan and add the sugar. Heat over medium-low heat, stirring occasionally, until the cream is steaming (tiny wisps of steam rising from the surface) and you see tiny bubbles forming around the edges—about 5 minutes. This is not a boil; you’re gently warming the cream to help dissolve the sugar and to help the gelatin incorporate smoothly. 3. Remove the saucepan from heat. Let the cream cool for exactly 1 minute—this prevents the gelatin from becoming overcooked or losing its setting power. 4. Add the bloomed gelatin and the cream it absorbed directly to the warm cream. Stir very gently and slowly for about 30 seconds until the gelatin completely dissolves and the mixture is uniform and smooth. Do not stir vigorously or whisk—vigorous stirring incorporates air and creates bubbles in your panna cotta.
Set the Panna Cotta: 5. Pour the mixture evenly into serving glasses or small ramekins—approximately ½ cup per serving if you’re using wine glasses, or less if you’re using small 4-ounce ramekins. Pour slowly and steadily to minimize bubble formation. 6. Cover loosely with plastic wrap and refrigerate for at least 4 hours, but preferably overnight. The panna cotta should set to a slightly jiggly consistency—if you touch it with a spoon, it should shimmy slightly but hold its shape.
Serve cold directly from the glass or ramekin. The temperature contrast of the cold panna cotta against body temperature makes it taste even more luxurious and special.
Getting the Texture Exactly Right
The most common panna cotta mistake is overcooking or overheating the cream, which causes the gelatin to break down and creates a spongy, broken texture instead of a silky one. You’re aiming for steaming cream, not a simmer, and definitely not a boil. If the cream ever actually bubbles, pull it off heat immediately.
The second consideration is not stirring too vigorously when adding the gelatin. You want to incorporate it smoothly, but aggressive stirring creates foam and bubbles that will ruin the silky appearance and texture. Stir gently, slowly, almost luxuriously—this is not the time to rush.
Finally, don’t skip the blooming step. Blooming ensures the gelatin dissolves smoothly into the warm cream. If you add dry gelatin directly to the cream without blooming, you’ll get lumps that never fully dissolve, creating a grainy texture.
Variations Beyond Plain Vanilla
Add ½ teaspoon of vanilla extract to the warm cream right after it comes off heat, before you add the gelatin. Use a flavored liquid instead of some of the cream: ¼ cup strong brewed espresso cooled slightly, or ¼ cup liqueur, or ¼ cup fruit juice. For strawberry panna cotta, use ¼ cup strawberry puree (blend fresh strawberries and strain through a fine sieve) as one of your liquid components. Layer different flavored panna cottas in the same glass—vanilla on the bottom, strawberry on top, for a striped effect. Serve with fresh berries, a drizzle of chocolate sauce, or a dollop of whipped cream on top.
Salted Caramel Popcorn

Salted caramel popcorn sits somewhere between candy, snack, and dessert—it’s the kind of thing that starts as “just a handful” and somehow disappears entirely. The three-ingredient version is pure caramel coating, butter for richness, and salt for balance. When it’s done right, the caramel shatters between your teeth, the butter makes it feel luxurious rather than just crunchy, and the salt keeps it from being overwhelmingly sweet. It’s surprisingly elegant for such a casual snack.
The magic of salted caramel popcorn is understanding dry caramel—that is, making caramel without adding water first. You heat sugar until it liquefies and darkens, which concentrates the flavor and creates a deeper, more complex taste than caramel made with water. It’s a slightly bolder technique than the safer “wet” caramel method, but for three-ingredient popcorn, it’s absolutely worth it.
Yield: About 6-8 cups finished popcorn | Prep Time: 10 minutes | Cook Time: 15 minutes | Total Time: 25 minutes + cooling | Difficulty: Beginner — The caramel technique is simple, though you need to pay attention to prevent burning.
For the Salted Caramel Popcorn:
- ¼ cup granulated sugar
- 4 tablespoons unsalted butter
- 6-8 cups freshly popped plain popcorn (from about ¼ cup unpopped kernels), cooled slightly and transferred to a large bowl
Make the Caramel:
- Pour the sugar into a medium saucepan and heat it over medium heat. Do not stir—instead, let the sugar melt undisturbed for about 2 minutes. Once the edges begin to melt and liquefy, use a wooden spoon to gently push the unmelted sugar from the center toward the edges, still without stirring. The sugar should gradually dissolve into a liquid, amber-colored caramel over about 4-5 minutes total.
- The caramel is ready when it reaches a deep amber color—similar in color to tea or honey held up to light. This stage is crucial: light caramel tastes buttery and mild; dark caramel tastes richer and slightly bitter in the best way. For salted caramel, you want the deeper color.
- The moment the caramel reaches the right color, remove the saucepan from heat and add the butter. Stir gently until the butter melts completely into the caramel and the mixture is smooth and uniform.
- Be extremely careful—the caramel and butter mixture is dangerously hot and will cause severe burns. Let it cool for exactly 30 seconds before proceeding.
Coat the Popcorn: 5. Slowly pour the warm caramel over the popcorn in its bowl, stirring constantly with a wooden spoon or heat-resistant spatula. The goal is to coat every piece as evenly as possible. Some pieces will get a heavier coating (these will be delicious and crispy); some will get a light coating (these will stay crunchier). This variation in coating is actually ideal—it creates different textures throughout. 6. Spread the coated popcorn onto parchment-lined baking sheets in a single layer and let it cool for at least 10 minutes. The caramel will harden as it cools. 7. Once completely cool, sprinkle the salted caramel popcorn with fleur de sel or finishing salt (or even a light sprinkle of kosher salt), breaking up any clumps that stuck together. The salt should be noticeable—you want to taste it in contrast with the sweet caramel. 8. Store in an airtight container; it will stay fresh and crispy for about 3 days.
The finished popcorn should have a delicate, crispy caramel shell that shatters when you bite it, releasing the buttery, salty-sweet flavors all at once. Each piece should be distinct and coated, not clumped together in one solid mass.
Mastering the Caramel
The dry caramel method (heating sugar without water) creates a deeper, more complex flavor than wet caramel, but it requires attention. Sugar melts unevenly, so you need to help it along by gently pushing unmelted sugar toward the edges. Resist the urge to stir constantly—frequent stirring can cause sugar crystals to form and turn grainy.
The color of the caramel is your timer. You can’t rely on a thermometer or a specific time—different stoves heat differently, different sugar crystals behave differently. Instead, watch the color carefully. The moment it reaches deep amber, it’s ready. If you take it darker, it becomes bitter in an unpleasant way (not the good kind of bitter, but harsh). If you take it too light, it tastes more like plain sugar than caramel.
After you add the butter and remove from heat, that thirty-second cooling period is important. It allows the mixture to stop bubbling and reduces the risk of severe burns when you start pouring. But don’t let it cool longer than thirty seconds, or the caramel will start to solidify before it coats the popcorn.
Flavor Variations
Make it spiced by adding a quarter teaspoon of cinnamon or cayenne pepper to the caramel right after you add the butter. Add a pinch of vanilla extract for subtle vanilla notes. For chocolate salted caramel popcorn, drizzle melted chocolate over the cooled caramel popcorn and sprinkle more salt on top. For a maple version, use melted butter, then toss the popcorn with a caramel made from maple syrup instead of granulated sugar.
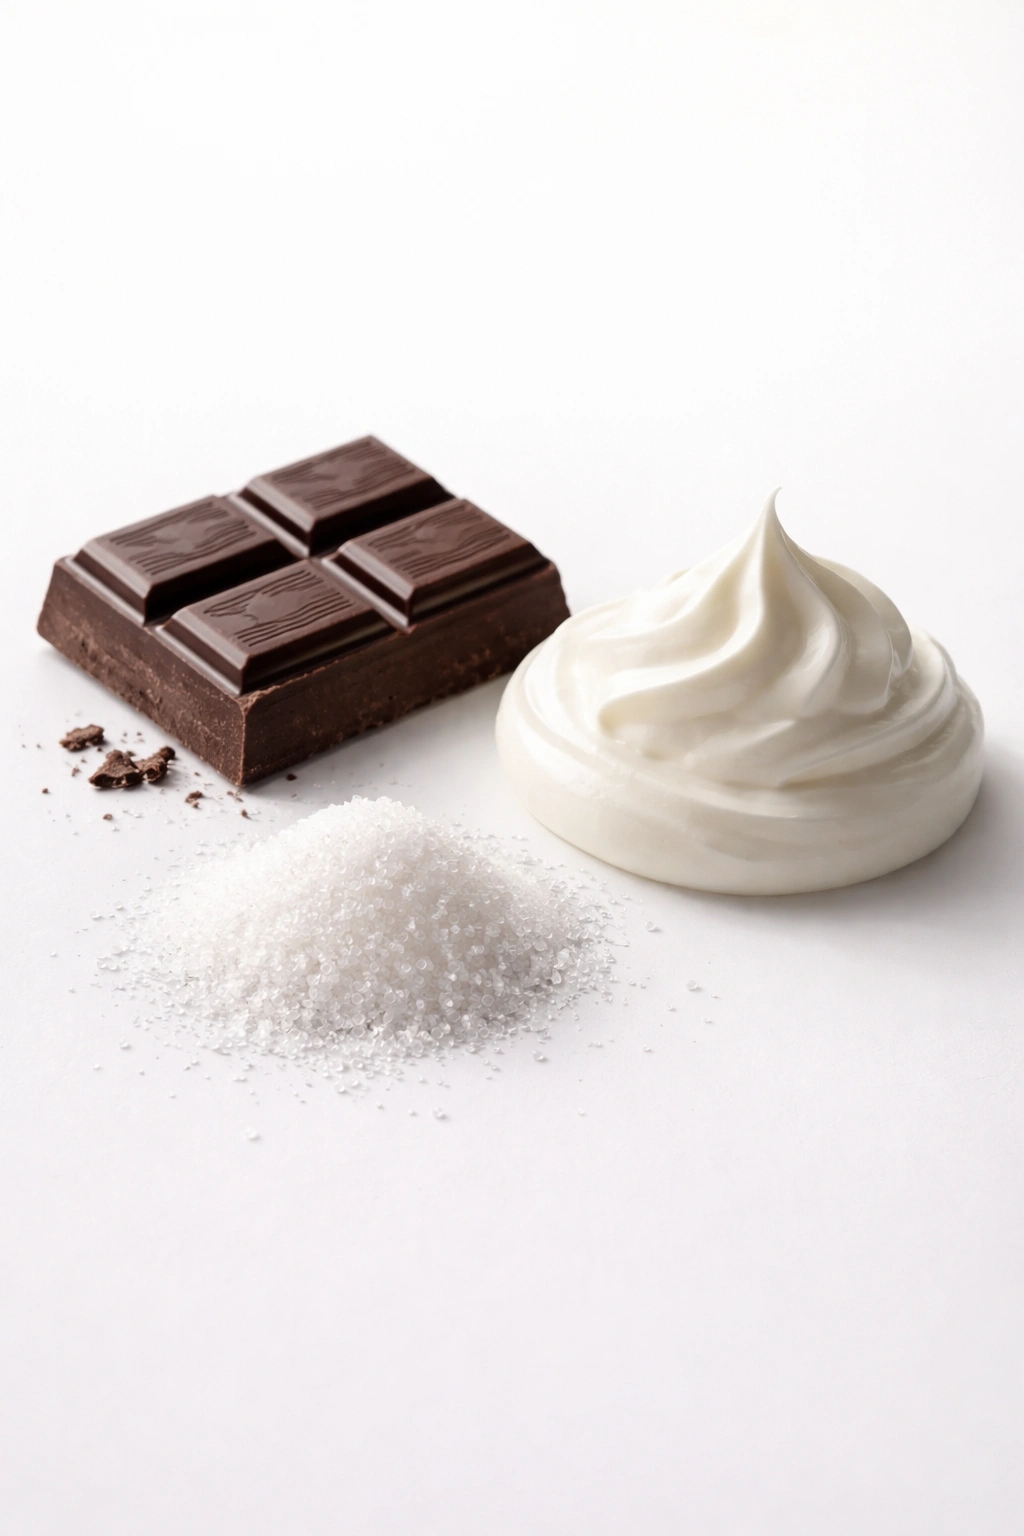
Chocolate Avocado Mousse
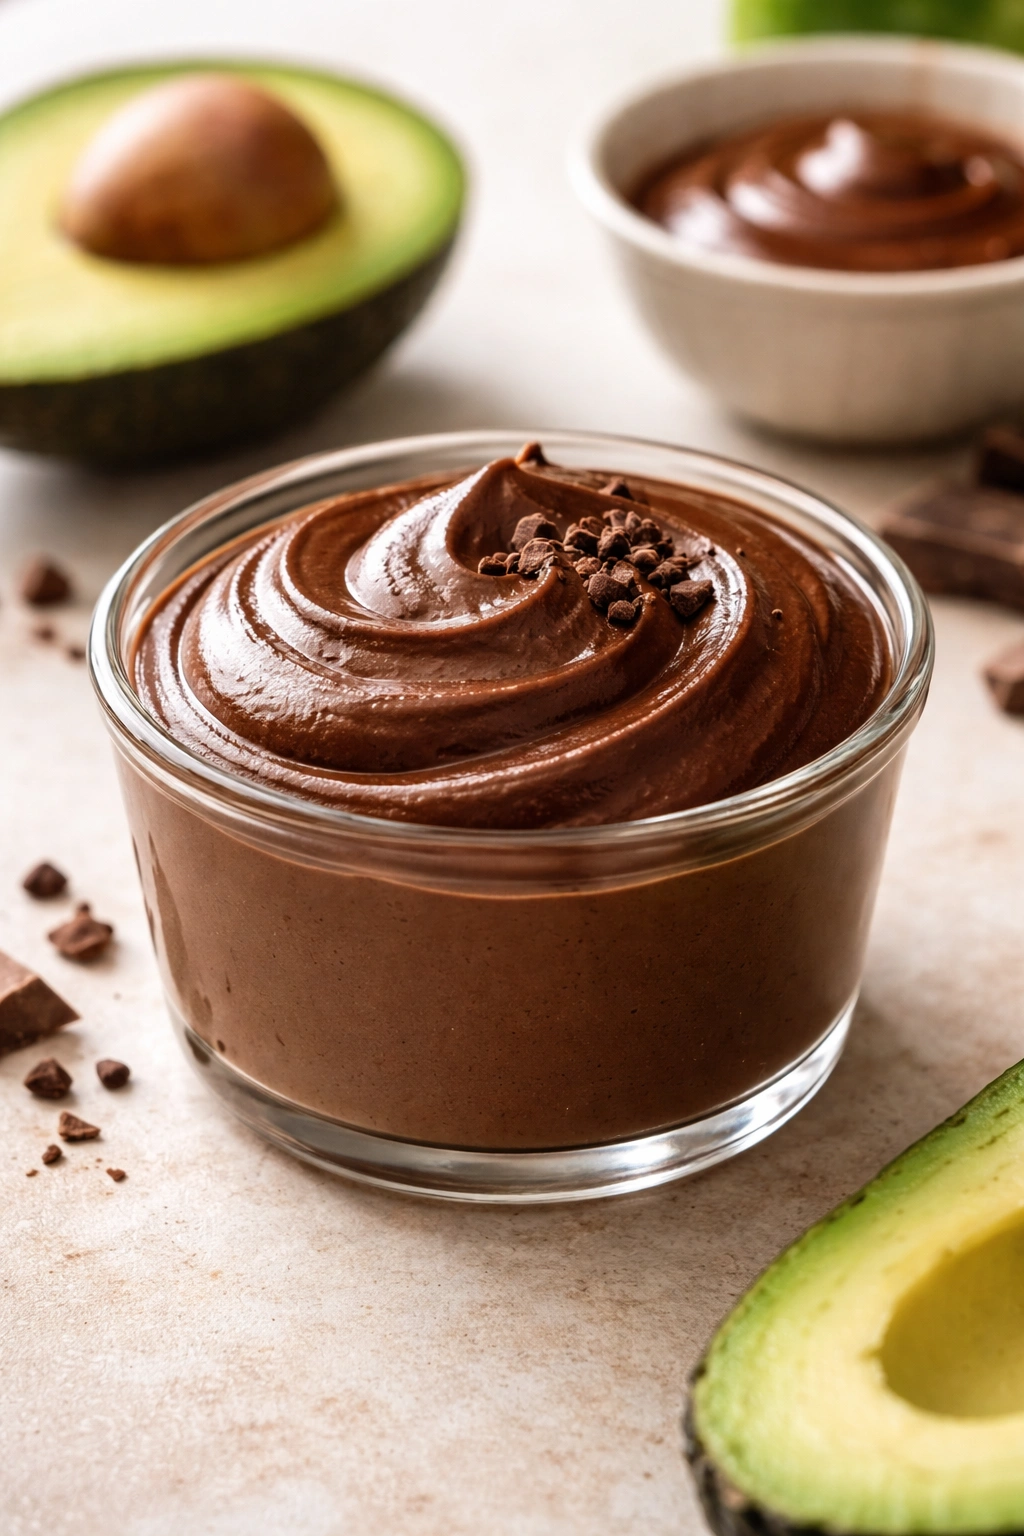
Chocolate avocado mousse sounds like it shouldn’t work—avocado in dessert strikes many people as conceptually odd until they taste it. The reality is that ripe avocado contributes incredible creaminess and richness to chocolate mousse without any trace of avocado flavor. It’s a secret weapon for making chocolate mousse that’s silky and luxurious without eggs (if you prefer), without cream (if you’re watching dairy), but still feels thoroughly decadent. This is elegant, surprisingly grown-up, and genuinely impressive despite its simplicity.
The texture of a proper chocolate avocado mousse is cloud-like and light, almost airy, despite having absolutely nothing whipped into it. The magic is in choosing perfectly ripe avocados and melting chocolate correctly so it incorporates smoothly.
Yield: Serves 4 | Prep Time: 10 minutes | Cook Time: 0 minutes | Total Time: 10 minutes | Difficulty: Beginner — Just blend and portion. No cooking, no technique required.
For the Chocolate Avocado Mousse:
- 4 ounces dark chocolate (at least 60% cacao), roughly chopped
- 2 ripe avocados, pitted and peeled
- 3 tablespoons unsweetened cocoa powder, sifted
Prepare the Mousse:
- Place the chopped chocolate in a microwave-safe bowl and microwave at 50% power in 30-second intervals, stirring between each one, until the chocolate is completely melted and smooth—about 1.5-2 minutes total. Let the melted chocolate cool for 2 minutes so it’s still warm but not so hot that it scrambles anything you blend it with.
- Halve each avocado lengthwise and remove the pit. Using a spoon, scoop the flesh directly into a food processor or blender. You should have about 1 cup of avocado flesh.
- Add the cooled melted chocolate and the sifted cocoa powder to the food processor.
- Blend on high speed for about 1 minute until the mixture is completely smooth, thick, and uniform. Scrape down the sides of the processor and pulse a few more times to ensure there are no streaks of cocoa powder.
- Divide the mousse evenly among four small glasses or bowls, filling each about three-quarters full. Serve immediately or cover and refrigerate for up to 4 hours.
The mousse should be thick, dense, and silky—more like dense pudding than airy mousse. If you want a lighter, airier texture, gently fold in one whipped egg white or a few tablespoons of whipped cream, but that pushes you beyond three ingredients.
Getting the Avocado Right
The ripeness of your avocados is crucial. An unripe avocado is grainy and bitter; an overripe avocado is mushy and brown inside. You want perfectly ripe avocados—the flesh should yield to gentle pressure but not feel mushy. A perfectly ripe avocado should look dark green on the outside and bright green inside with no brown streaks.
If your avocados aren’t quite ripe, you can accelerate the process by placing them in a paper bag with a banana for a day—the banana releases ethylene gas, which ripens other fruits. If you’ve cut into an avocado and it’s not quite ripe, you can still use it; the mousse will work, but it might be slightly less creamy.
Simple Additions and Variations
Add a quarter teaspoon of vanilla extract for subtle vanilla notes. Add a small pinch of sea salt to enhance the chocolate flavor. For a mocha mousse, add a teaspoon of instant espresso powder to the melted chocolate. For a spiced version, add a pinch of cinnamon or cayenne. Top with fresh raspberries, whipped cream, or crispy chocolate chips for texture contrast.
Lemon Icebox Cookies
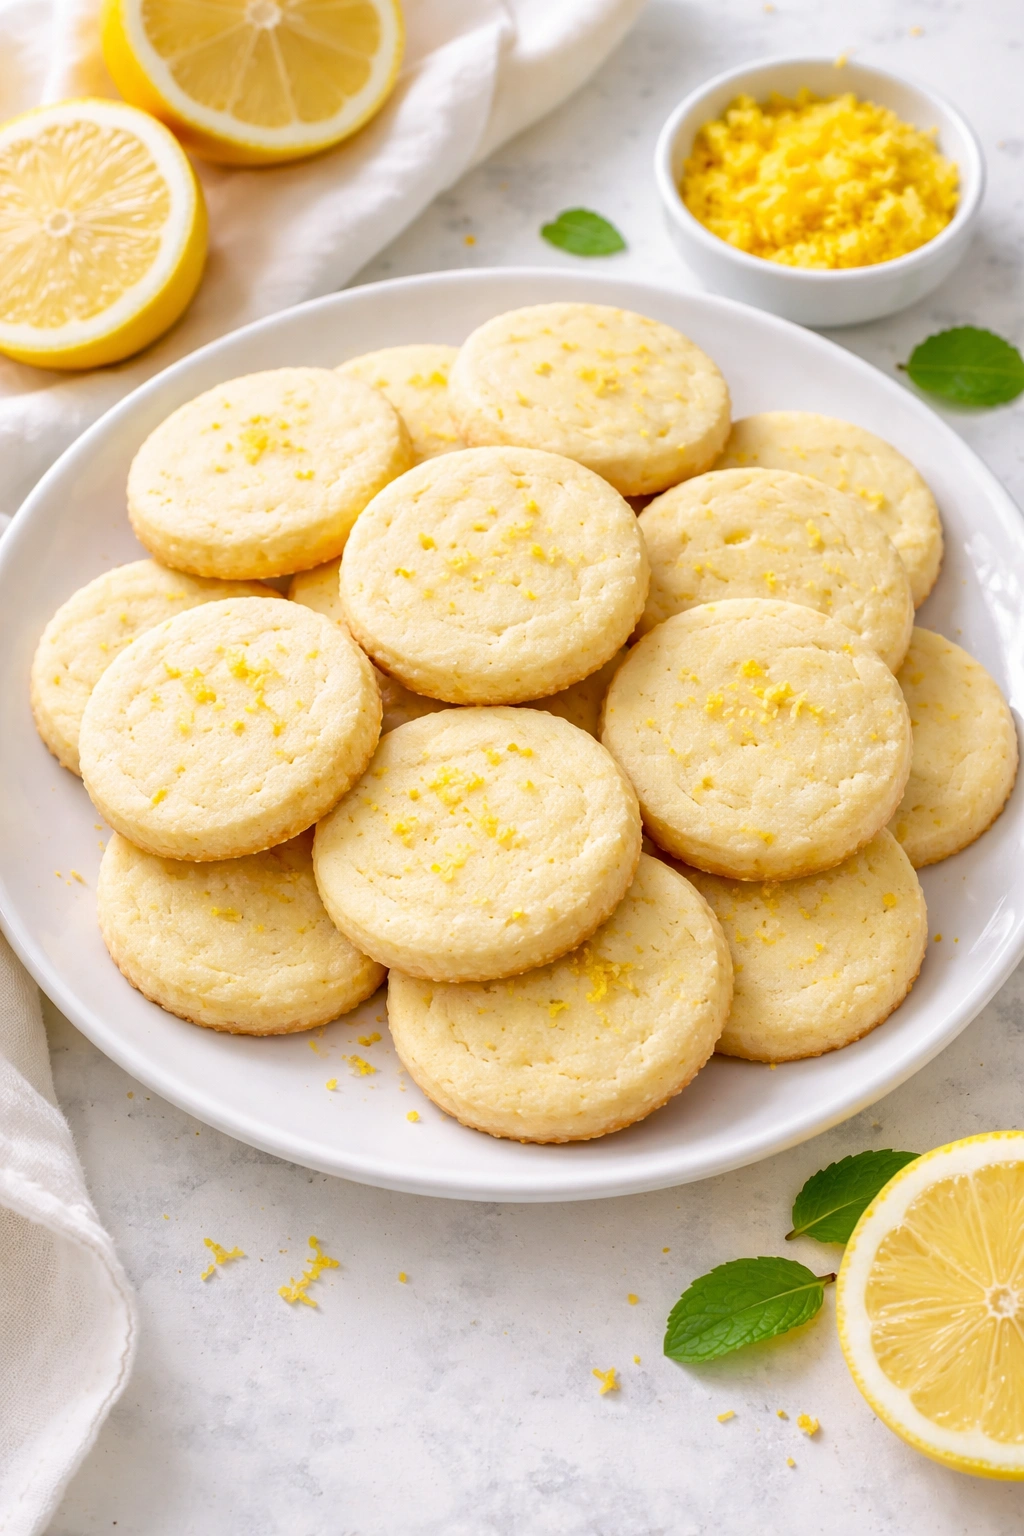
Lemon icebox cookies are a throwback to simpler times, when a box of lemon sandwich cookies with a cream filling was an absolutely appropriate dessert to keep on hand. The three-ingredient homemade version captures the same nostalgic charm but with bright, fresh lemon flavor and an actual butter cookie base instead of a mild, processed one. The name “icebox” refers to the fact that they’re chilled before baking—modern home bakers would call them refrigerator cookies.
These are delicate, buttery, crispy-tender cookies that taste like pure lemon. They’re perfect for serving with tea or coffee, impressive enough to package as gifts, and shockingly simple to execute. The dough comes together quickly and actually improves with a night in the refrigerator, which gives the flavors time to develop and intensify.
Yield: About 20-24 cookies | Prep Time: 15 minutes | Cook Time: 12 minutes | Total Time: 27 minutes + chilling time | Difficulty: Beginner — Standard cookie dough preparation; the only requirement is patience for chilling.
For the Lemon Icebox Cookies:
- 4 tablespoons unsalted butter, softened to room temperature
- ¼ cup granulated sugar
- ½ cup all-purpose flour, plus more for dusting
Make the Dough:
- In a small bowl, beat the softened butter and sugar together with a wooden spoon or hand mixer for about 2 minutes until the mixture is pale, creamy, and noticeably fluffy. This aerates the butter and creates a lighter cookie.
- Add the flour and the lemon zest, stirring until the mixture comes together into a stiff dough. The dough should hold together when squeezed but not be sticky.
- Form the dough into a rough log about 1.5 inches in diameter and 6 inches long, wrap it tightly in plastic wrap, and refrigerate for at least 2 hours or up to overnight. Chilling makes the dough easier to slice and bake, and the flavors develop and intensify as it sits.
Bake the Cookies: 4. Preheat the oven to 350°F (175°C) and line a baking sheet with parchment paper. 5. Remove the dough log from the refrigerator and let it sit at room temperature for 2-3 minutes to soften slightly—this makes it easier to slice without crumbling. Using a thin, sharp knife, slice the dough log into cookies about ¼-inch thick. The edges of the dough log may crack slightly during slicing; this is normal and actually adds to their rustic charm. 6. Arrange the sliced cookies on the prepared baking sheet, spacing them about 2 inches apart. They won’t spread much, but give them a little room. 7. Bake for 10 to 12 minutes, rotating the pan halfway through, until the edges are just barely golden and the centers are pale but set when you touch them gently—the cookies should still feel tender, not hard. 8. Let the cookies cool on the baking sheet for 5 minutes, then transfer them to a wire rack to cool completely.
The finished cookies should be crispy-tender with a delicate crumb and a bright lemon flavor that’s neither tart nor sweet, but balanced between them.
Technique Notes for Success
Lemon zest is essential here—it’s the entire source of lemon flavor in a three-ingredient cookie. Make sure you’re using fresh lemons, not bottled lemon extract or juice, which would make the dough wet. Zest the lemon before cutting it in half for juice (if you’re using the juice for something else), using a microplane or box grater to capture only the yellow outer zest, not the bitter white pith underneath.
Softened butter is crucial for this recipe. Softened means you can easily press your finger into it but it’s not oily or melting. If your butter is too cold, the dough will be stiff and hard to work with; if it’s too warm, the dough becomes greasy.
The chilling step is important. Chilled dough is much easier to slice cleanly, and it bakes more evenly. If you’re slicing the dough and it’s crumbling or breaking, it’s too cold—let it sit at room temperature for a few minutes and try again.
Variations to Explore
Swap the lemon zest for lime zest for bright, tropical lemon-like cookies. Add a tiny pinch of ground ginger for subtle spice. Make them into sandwich cookies by spreading a thin layer of lemon curd or cream cheese frosting between two cooled cookies. Dip half of each cooled cookie in melted white chocolate for a more decadent version.
Brown Butter Miso Shortbread
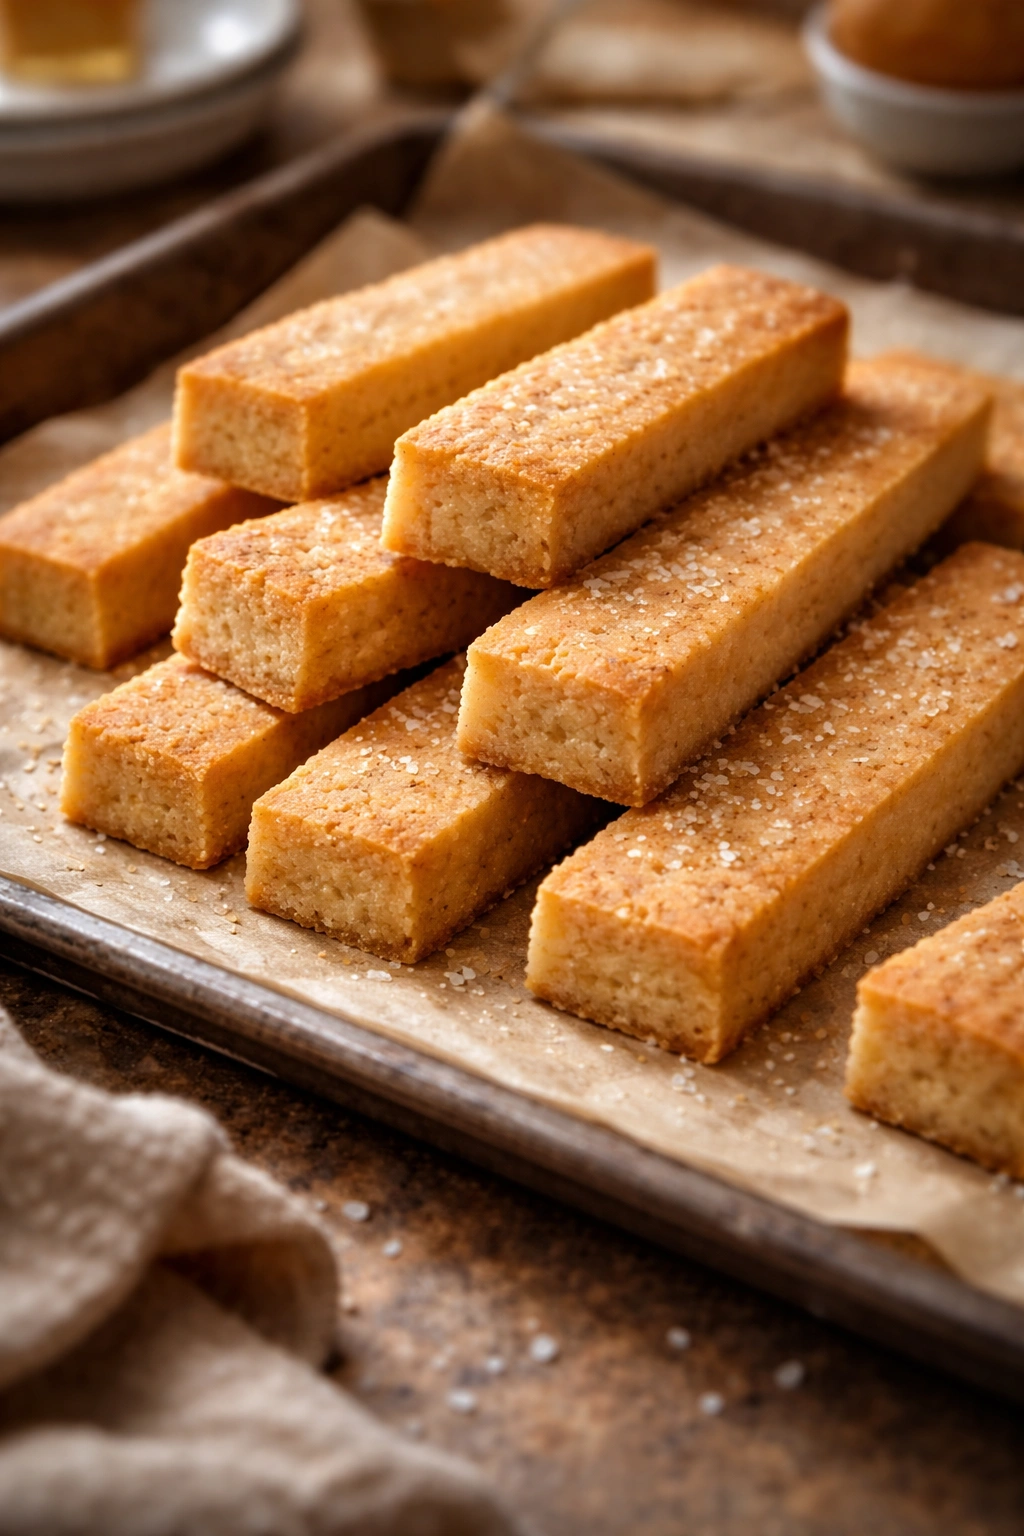
Brown butter miso shortbread represents the sweet spot where simplicity meets sophistication. Shortbread is already an elegant cookie—butter, sugar, and flour in perfect proportion—but brown butter and miso add depth and complexity that elevates it from simple to genuinely memorable. The brown butter adds a nutty, caramelized richness; the miso contributes savory, umami notes that deepen the butter flavor and balance the sweetness. These aren’t cookies that scream their ingredients—they’re cookies that make people say, “These are incredible, what’s in them?”
This is a cookie that actually requires some technique and attention, but not because it’s complicated—it’s because you need to understand what you’re doing at each step. Understanding brown butter and knowing how to toast miso separately will make you a more confident baker across all your future projects.
Yield: About 16 shortbread fingers | Prep Time: 10 minutes | Cook Time: 15 minutes | Total Time: 25 minutes | Difficulty: Intermediate — Brown butter requires attention to prevent burning; otherwise straightforward.
For the Brown Butter Miso Shortbread:
- 6 tablespoons unsalted butter
- 3 tablespoons granulated sugar
- ½ cup all-purpose flour, plus 1 teaspoon white miso paste
Brown the Butter:
- Cut the butter into tablespoon-sized pieces and place them in a small saucepan over medium heat. The butter will melt, then foam, then the milk solids will sink to the bottom and begin to brown.
- Stir occasionally and watch carefully—this takes about 5-7 minutes total. The butter progresses from melted → foaming → light brown → medium brown → dark brown. You want medium brown, when the butter has a distinctly nutty aroma and is the color of weak tea. If it becomes too dark, it tastes burnt and bitter rather than nutty. If you’ve never browned butter before, it’s worth setting a timer so you don’t overdo it.
- Once the butter reaches medium brown, remove it from heat and let it cool for about 5 minutes. Strain the brown butter through a fine sieve or a cheesecloth-lined strainer to remove the solids (these solids are flavorful but they make the dough grainy). You should have about 4 tablespoons of clear brown butter.
- While the brown butter cools, heat a small, dry skillet over medium heat and add the white miso. Toast it in the pan for about 1 minute, stirring constantly, until it becomes slightly darker and releases a toasted aroma. This removes any raw funk from the miso and brings out its umami depth. Transfer it to a small bowl.
Make the Dough: 5. In a medium bowl, combine the cooled brown butter (without the solids), the toasted miso, and the sugar. Stir vigorously with a wooden spoon until the mixture is uniform and creamy, about 1 minute. The miso will break down and distribute throughout the butter. 6. Add the flour and stir until the mixture comes together into a crumbly, wet dough that holds together when squeezed. 7. Transfer the dough to a parchment-lined small baking pan (about 6×8 inches) and press it firmly and evenly into the bottom of the pan to form a thin, compact layer. The layer should be about ¼-inch thick and feel quite dense.
Bake: 8. Preheat the oven to 350°F (175°C). Bake the shortbread for 12 to 15 minutes, until the edges are just barely golden and the center is pale but set when you touch it gently. The shortbread will continue to cook slightly after you remove it from the oven, so pull it out while it still looks slightly underbaked in the center. 9. Let the shortbread cool in the pan for 5 minutes, then cut it into 16 fingers or squares while it’s still warm—use a sharp knife dipped in hot water between cuts for cleaner edges. 10. Transfer the pieces to a wire rack to cool completely.
The finished shortbread should be crispy-tender, melting on your tongue, with a complex buttery-nutty-umami flavor that’s hard to pinpoint but absolutely addictive.
Getting the Brown Butter Right
Brown butter is butter that’s been heated until the milk solids separate and brown, concentrating the flavor into something deeply nutty and caramelized. It’s one of the most important techniques in baking because it appears in hundreds of recipes once you start recognizing where it adds value. For shortbread, brown butter is absolutely worth the extra step.
The key is watching the color carefully. The butter goes from light brown to too dark very quickly—within thirty seconds. Medium brown is the sweet spot. You want to smell distinctly toasted and nutty, not burnt or acrid. If you’re unsure, pull the pan off heat a few seconds earlier rather than later; residual heat will continue the browning process.
Straining out the solids is important. These milk solids are flavorful and delicious in some applications, but in shortbread they create graininess. You want pure, clear brown butter for smooth, tender shortbread.
Why Toast the Miso
White miso has a raw, slightly funky flavor when it’s untoasted. Toasting it for just one minute mellows that raw edge and brings out the deeper umami and nutty notes. You’re not trying to brown it or change its color dramatically—just warm it and let it release its aroma. This is a technique that transforms the entire character of the miso from “umami ingredient” to “subtle umami depth.”
If you skip this step, your shortbread will still be good, but it will taste more obviously like “miso cookies” rather than “what is that incredible complex flavor in this cookie?”
Tips for Making 3-Ingredient Desserts Perfect Every Time

Three-ingredient desserts require a different mindset than traditional recipes. When you only have three ingredients, there’s no ingredient to hide behind, no complex spice blend to distract from a problem, no elaborate technique to prove your skills. Instead, three-ingredient desserts are an exercise in fundamentals: understanding your ingredients, respecting technique, and knowing when something is ready. These principles transcend the simple recipes and will make you a better baker across the board.
Start by respecting ingredient quality. With only three components, subpar ingredients become immediately obvious. If you’re making chocolate mousse and you use mediocre chocolate, every spoonful will taste mediocre. If you’re making panna cotta and you use low-fat cream, the texture will be thin instead of luxurious. This isn’t snobbery—it’s simple physics. Excellent ingredients create excellent desserts; mediocre ingredients cannot be elevated through technique or complexity when there’s nowhere to hide.
Precision matters intensely in three-ingredient cooking. A quarter teaspoon of salt might seem inconsequential, but in a recipe with only three components, it’s the difference between flat and balanced. Use a kitchen scale if you have one—it removes guesswork and creates consistency from batch to batch. If you’re measuring by volume (cups and teaspoons), level your measurements carefully rather than scooping directly from a bag.
Read the entire recipe before you start cooking. Three-ingredient recipes move quickly, and you don’t want to discover halfway through that something needs to chill for four hours or that you need an ingredient you haven’t prepped. Having everything ready—mise en place, the baker’s term for “everything in its place”—prevents mistakes and makes the actual cooking feel smooth and confident.
Common Mistakes and How to Avoid Them
The most common mistake in three-ingredient desserts is assuming that simplicity means easy. Three-ingredient desserts are actually quite exacting because every ingredient and technique must be executed properly. A slightly overcooked caramel changes the entire dessert; a slightly underbaked cake changes its texture. When you have limited ingredients to work with, technique becomes everything.
Overworking dough is a classic mistake that appears in shortbread, cookie dough, and any baked good with flour. When you stir flour into fat and sugar, you’re developing gluten, which makes the finished product tough instead of tender. Stir until just combined and then stop. Resist the urge to make sure everything is perfectly mixed—a few streaks of flour are actually better than an overmixed dough.
Not understanding doneness is another common pitfall. Most three-ingredient baked goods benefit from being slightly underbaked—they look like they’re not quite done when you pull them from the oven, but carryover cooking (the residual heat that continues cooking the dessert after you remove it) completes the job. Learn to recognize the visual and tactile cues: a cookie should still feel soft when you touch it; a brownie should jiggle slightly in the center. Understanding these cues comes from experience and patience.
Temperature matters more than you might think. Room-temperature ingredients mix more smoothly and incorporate more completely. Chilled dough bakes differently than room-temperature dough. Cold cream whips better than room-temperature cream. These seemingly minor details actually change the outcome substantially.
Storage and Make-Ahead Strategies
The beauty of many three-ingredient desserts is that they can be made partially or entirely ahead, which removes stress from last-minute entertaining. Understanding how and how long to store each component lets you prepare confidently in advance without sacrificing freshness and quality.
Shortbread, cookies, and other crispy baked goods keep beautifully in an airtight container at room temperature for three to five days, longer in some cases. The key is sealing them completely so they don’t absorb moisture from the air and become soft. If they do soften, you can place them back in a 300°F oven for a few minutes to crisp them up. Refrigerating cookies is unnecessary unless they’re very rich and buttery; cold temperatures actually emphasize their butter flavor slightly.
Mousse and panna cotta can be made up to a day in advance and covered tightly in the refrigerator. These desserts actually benefit from advance preparation because the flavors develop and deepen. Whipped cream, however, is best made just before serving or no more than an hour ahead—it slowly separates and loses its cloud-like texture.
Caramel and chocolate coatings can be made ahead and stored in airtight containers at room temperature for several days, then gently warmed before using. Brown butter can be made several days ahead and stored in the refrigerator, then gently warmed before using. Having these components prepared lets you assemble final desserts quickly.
Uncooked dough for shortbread and cookies can be made and wrapped tightly in plastic wrap, then refrigerated for up to three days or frozen for several months. This is genuinely helpful for last-minute baking—make your dough on Sunday, slice and bake it on Friday for a dessert that tastes fresh and impressive despite minimal effort that evening.
Final Thoughts

Three-ingredient desserts live at the intersection of simplicity and sophistication, proving that you don’t need complexity to create something genuinely delicious and memorable. They’re forgiving in the sense that you can’t hide behind elaborate flavor profiles or intricate techniques, but they’re exacting in the sense that every ingredient and action matters. This actually makes them perfect for building your baking foundation and developing genuine skill.
The real magic of three-ingredient desserts is psychological as much as culinary. There’s something deeply satisfying about looking in your pantry, finding exactly what you need without a shopping trip, and creating something beautiful and delicious within the hour. That self-sufficiency, that sense of having what you need, that ability to deliver something special immediately rather than eventually—that’s actually the whole appeal. You’re not trying to impress people with your ingredient list or your technique. You’re just delivering real desserts, made with care, from the ingredients you already have on hand.