Dump cakes are the ultimate expression of lazy baker’s wisdom — throw everything into a pan in roughly the right order, let the oven do the work, and end up with a dessert that tastes like you spent hours perfecting it. There’s something almost magical about how a few layers of fruit, cake batter, and melted butter transform into something with caramelized edges, juicy fruit centers, and a tender crumb texture that no amount of precise measuring could improve. The concept emerged from American home cooking as a practical solution to the question “how do I make dessert without actually making dessert?” and it’s remained beloved ever since because it simply works.
What makes dump cakes so forgiving is their structural philosophy: the fruit releases moisture as it bakes, which combines with melted butter and dry cake mix to create a self-basting, self-saucing dessert. You’re not trying to achieve picture-perfect layers or a level crumb — you’re letting gravity, heat, and chemistry do the heavy lifting. Even if your cake mix isn’t distributed perfectly or your fruit isn’t cut uniformly, the final result will taste delicious and look rustic-charming on the plate. These recipes are proof that the best desserts aren’t always the most complicated ones.
1. Classic Peach Cobbler Dump Cake
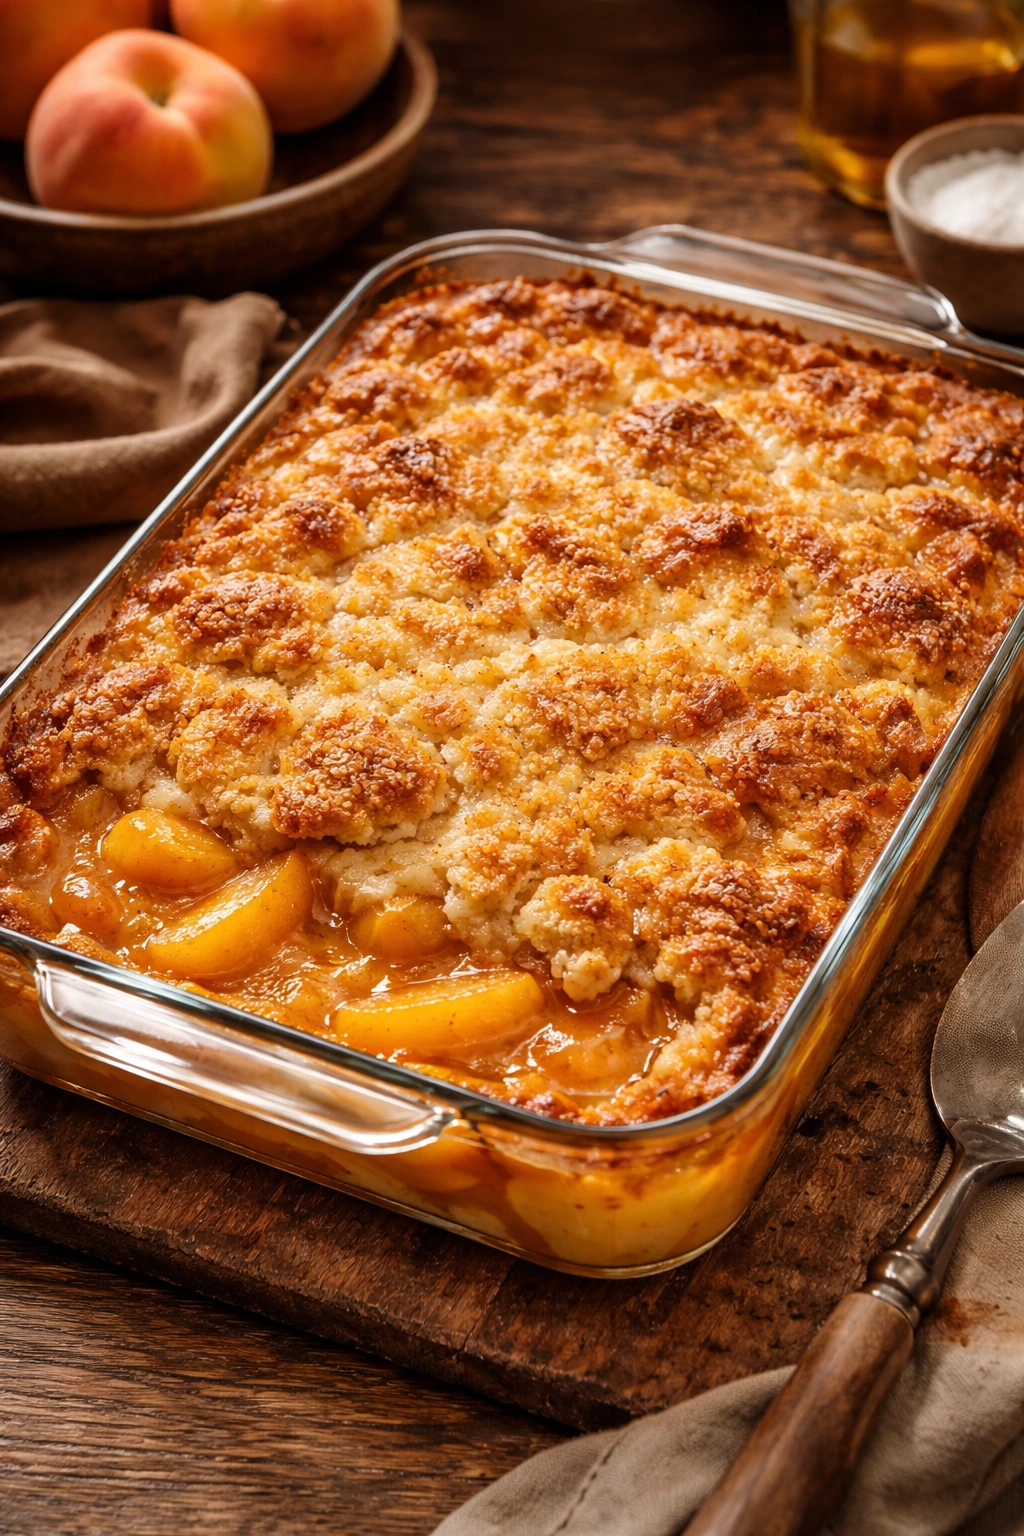
There’s a reason peach cobbler has stayed popular through generations — the combination of juicy, sweet peaches with butter and cake is practically unbeatable. This version starts with canned peaches (no peeling required), which means you’re genuinely minutes away from having warm dessert ready to eat. The butter-soaked cake topping gets crispy and golden while the peaches bubble underneath, creating those caramelized edges that make people reach for seconds.
For the Filling:
- Two 29-ounce cans sliced peaches in light syrup, undrained
- ¼ cup granulated sugar
- 1 teaspoon vanilla extract
- ½ teaspoon ground cinnamon
- ¼ teaspoon ground nutmeg
- Pinch of fine sea salt
For the Topping:
- 1½ cups all-purpose flour
- 1 cup granulated sugar
- 1½ teaspoons baking powder
- ½ teaspoon fine sea salt
- 6 tablespoons cold unsalted butter, cut into small cubes
- ¾ cup whole milk
Yield: Serves 8 to 10
Prep Time: 10 minutes
Cook Time: 50 minutes
Total Time: 1 hour
Difficulty: Beginner — mixing a simple topping and pouring fruit into a pan is straightforward, even for someone who’s never baked before.
Bake:
-
Preheat the oven to 350°F (175°C) and position the rack in the center.
-
Pour the peaches with their syrup into a 9×13-inch baking dish. Add the sugar, vanilla extract, cinnamon, nutmeg, and salt, stirring gently to combine. Spread the mixture into an even layer.
-
In a medium bowl, whisk together the flour, sugar, baking powder, and salt until combined. Add the cold butter cubes and use a fork or your fingertips to work the mixture until it resembles coarse breadcrumbs with some pea-sized butter pieces still visible throughout.
Advertisements -
Add the milk to the flour mixture and stir with a wooden spoon until just combined — the batter will be thick and slightly lumpy. Do not overmix. Dollop spoonfuls of batter over the peach filling, spreading it gently with the back of the spoon into an uneven, rustic layer. It’s perfectly fine if some fruit shows through.
-
Bake for 45 to 50 minutes, rotating the pan halfway through, until the topping is golden brown and a toothpick inserted into the thickest part of the cake comes out clean or with just a few moist crumbs clinging to it.
-
Let cool in the pan for 15 minutes before serving so the filling can set slightly and won’t run all over the plate.
Quick tips: The key to a tender cake topping is cold butter and not overmixing the batter — both keep gluten development minimal. Serve warm with vanilla ice cream or fresh whipped cream. For extra spice, bump the cinnamon up to ¾ teaspoon and add a pinch of ground cloves.
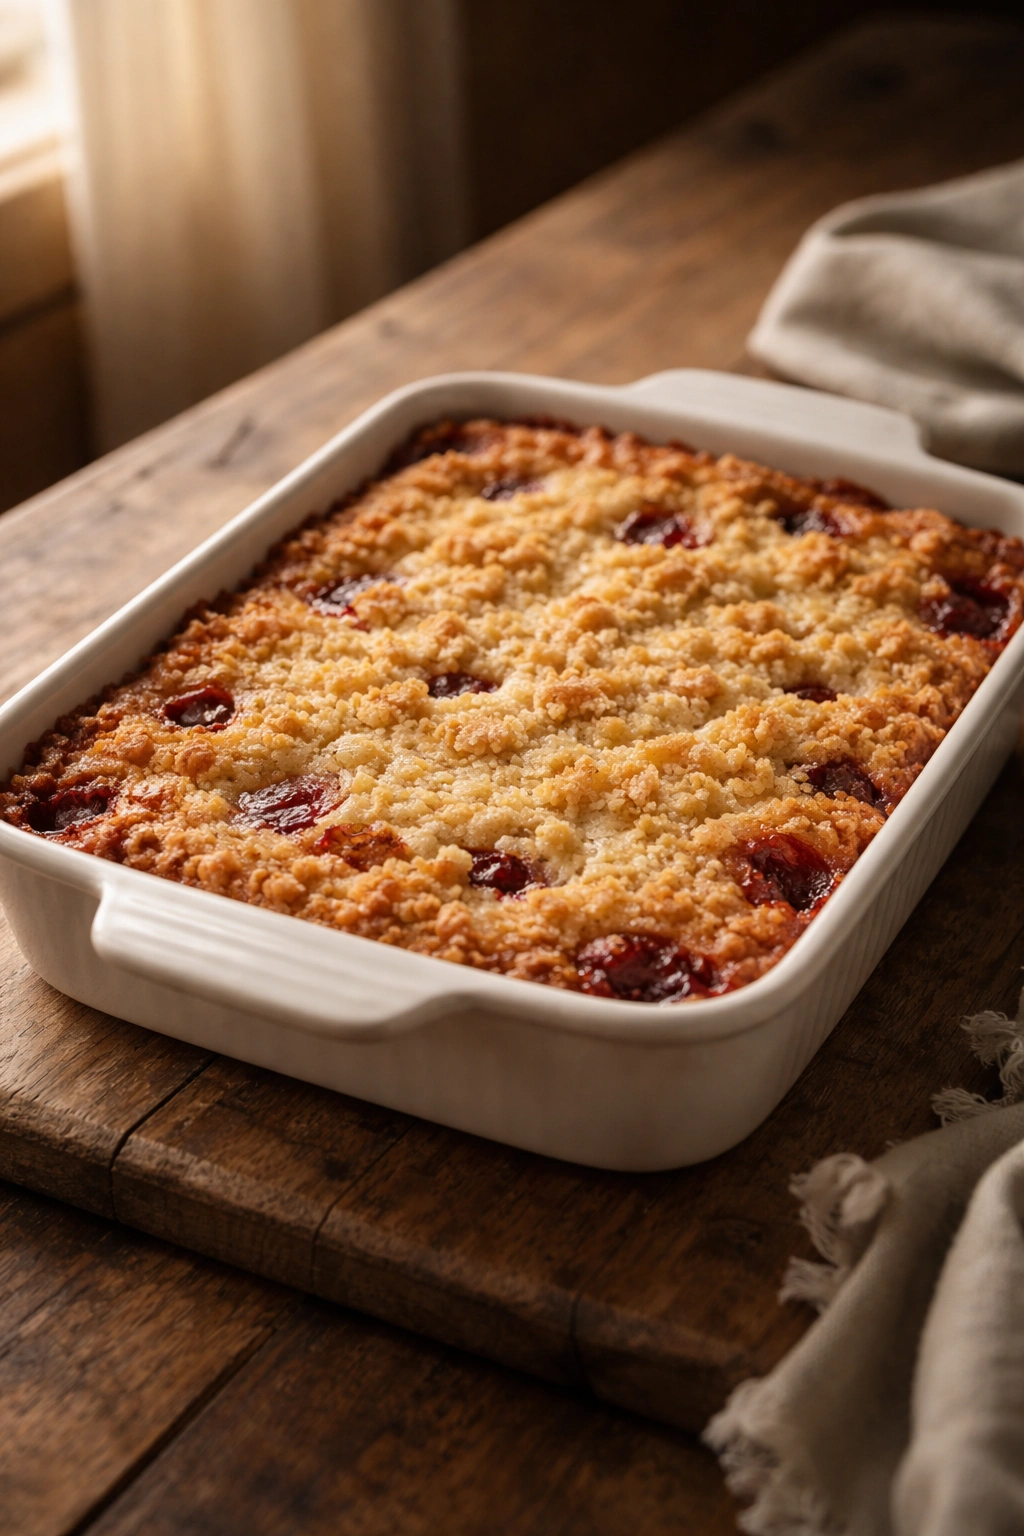
2. Chocolate Cherry Dump Cake
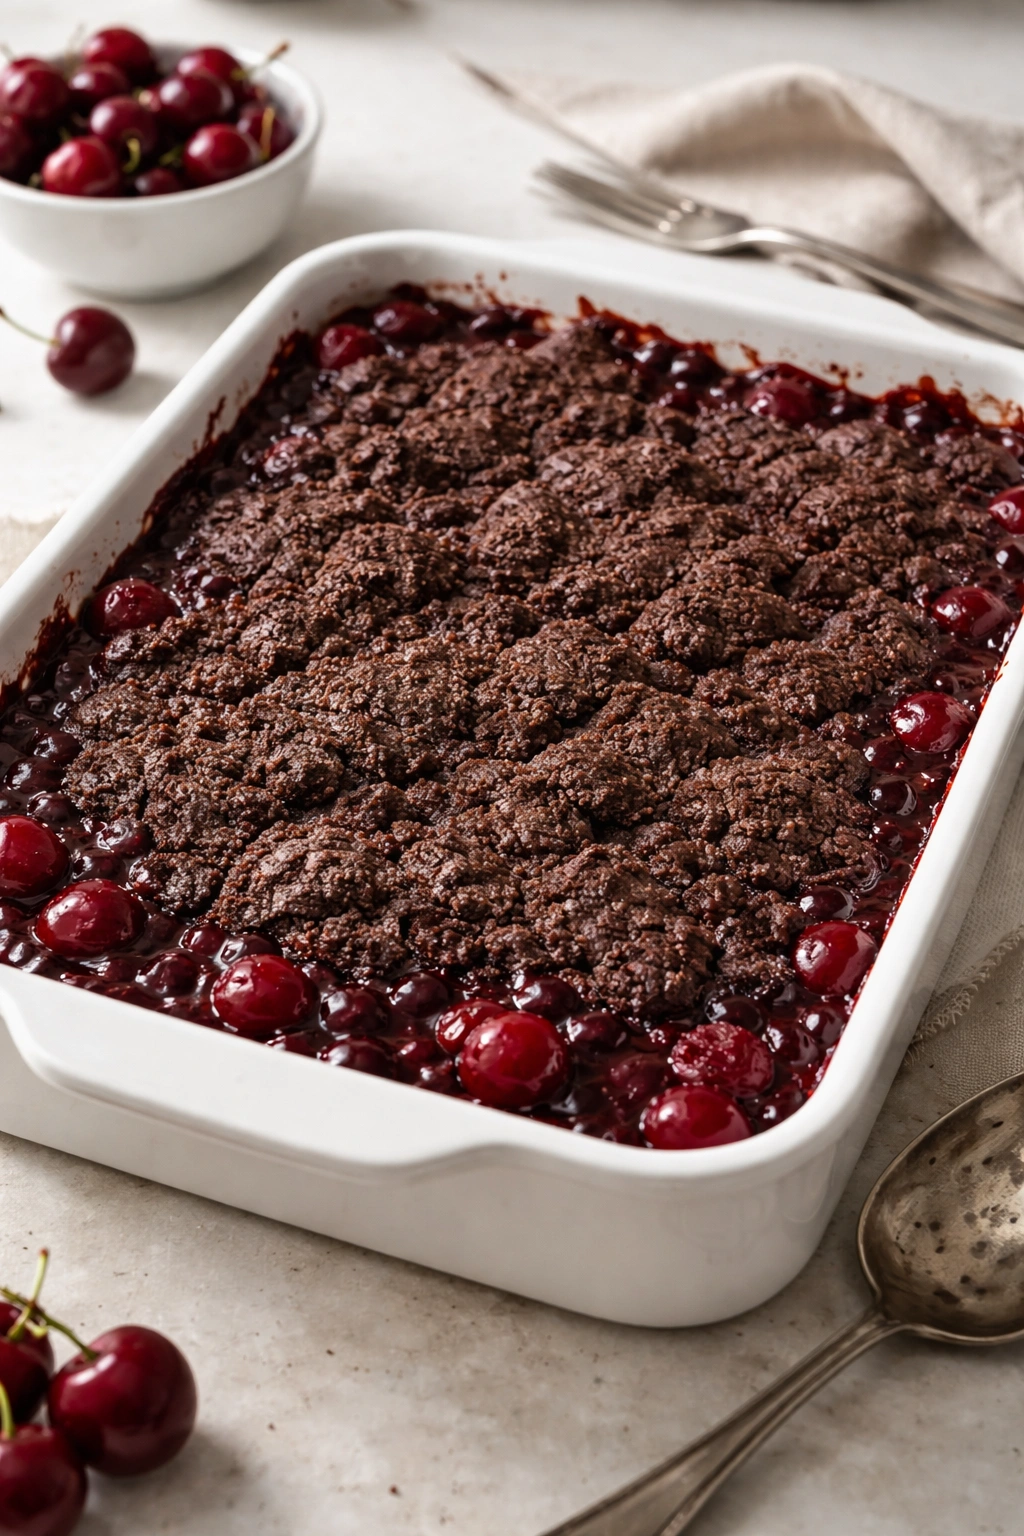
The combination of dark chocolate and tart cherries is sophisticated enough for a dinner party but requires basically zero skill to execute. Canned cherries in syrup work beautifully here, giving you intense cherry flavor without any pitting or chopping. The chocolate cake part rises and becomes tender while the cherry filling bubbles up around the edges, creating a sauce that’s part fruit, part chocolate melting.
For the Filling:
- Two 15-ounce cans pitted dark sweet cherries, undrained
- ¼ cup granulated sugar
- 1 tablespoon fresh lemon juice
- ¼ teaspoon fine sea salt
For the Topping:
- 1 cup all-purpose flour
- ¾ cup granulated sugar
- ¼ cup unsweetened cocoa powder
- 1½ teaspoons baking powder
- ¼ teaspoon fine sea salt
- 6 tablespoons cold unsalted butter, cut into cubes
- ½ cup whole milk
Yield: Serves 8
Prep Time: 10 minutes
Cook Time: 45 minutes
Total Time: 55 minutes
Difficulty: Beginner — cocoa powder whisks smoothly into flour, and there’s no chocolate melting required.
Bake:
-
Preheat the oven to 350°F (175°C) with the rack in the center position.
Advertisements -
Drain the cherry liquid into a measuring cup and set aside, reserving ¼ cup. Pour the drained cherries into a 9×13-inch baking dish along with the reserved syrup, sugar, lemon juice, and salt. Stir gently to combine. The lemon juice brightens the cherry flavor and prevents the dessert from tasting one-dimensional.
-
In a medium bowl, whisk together the flour, sugar, cocoa powder, baking powder, and salt until no cocoa lumps remain. Add the cold butter and use a fork to work it into the flour mixture until the texture resembles coarse sand with some pea-sized pieces of butter still visible.
-
Stir the milk into the flour mixture until just combined — the batter should be thick and slightly lumpy. Drop spoonfuls across the cherry filling in an uneven pattern, using the back of a spoon to gently spread it without pressing down. Aim to cover about 75 percent of the fruit surface.
-
Bake for 40 to 45 minutes, rotating halfway through, until the cake portion is set and springs back lightly when pressed, and the cherry mixture is bubbling at the edges.
-
Cool for 10 to 15 minutes in the pan before serving.
Variations and serving ideas: A dusting of powdered sugar right before serving adds elegance. The flavors deepen and improve if you make this a day ahead — cover it loosely with foil and reheat gently before serving. Serve with Greek yogurt for a sophisticated twist instead of ice cream.
3. Strawberry Shortcake Dump Cake
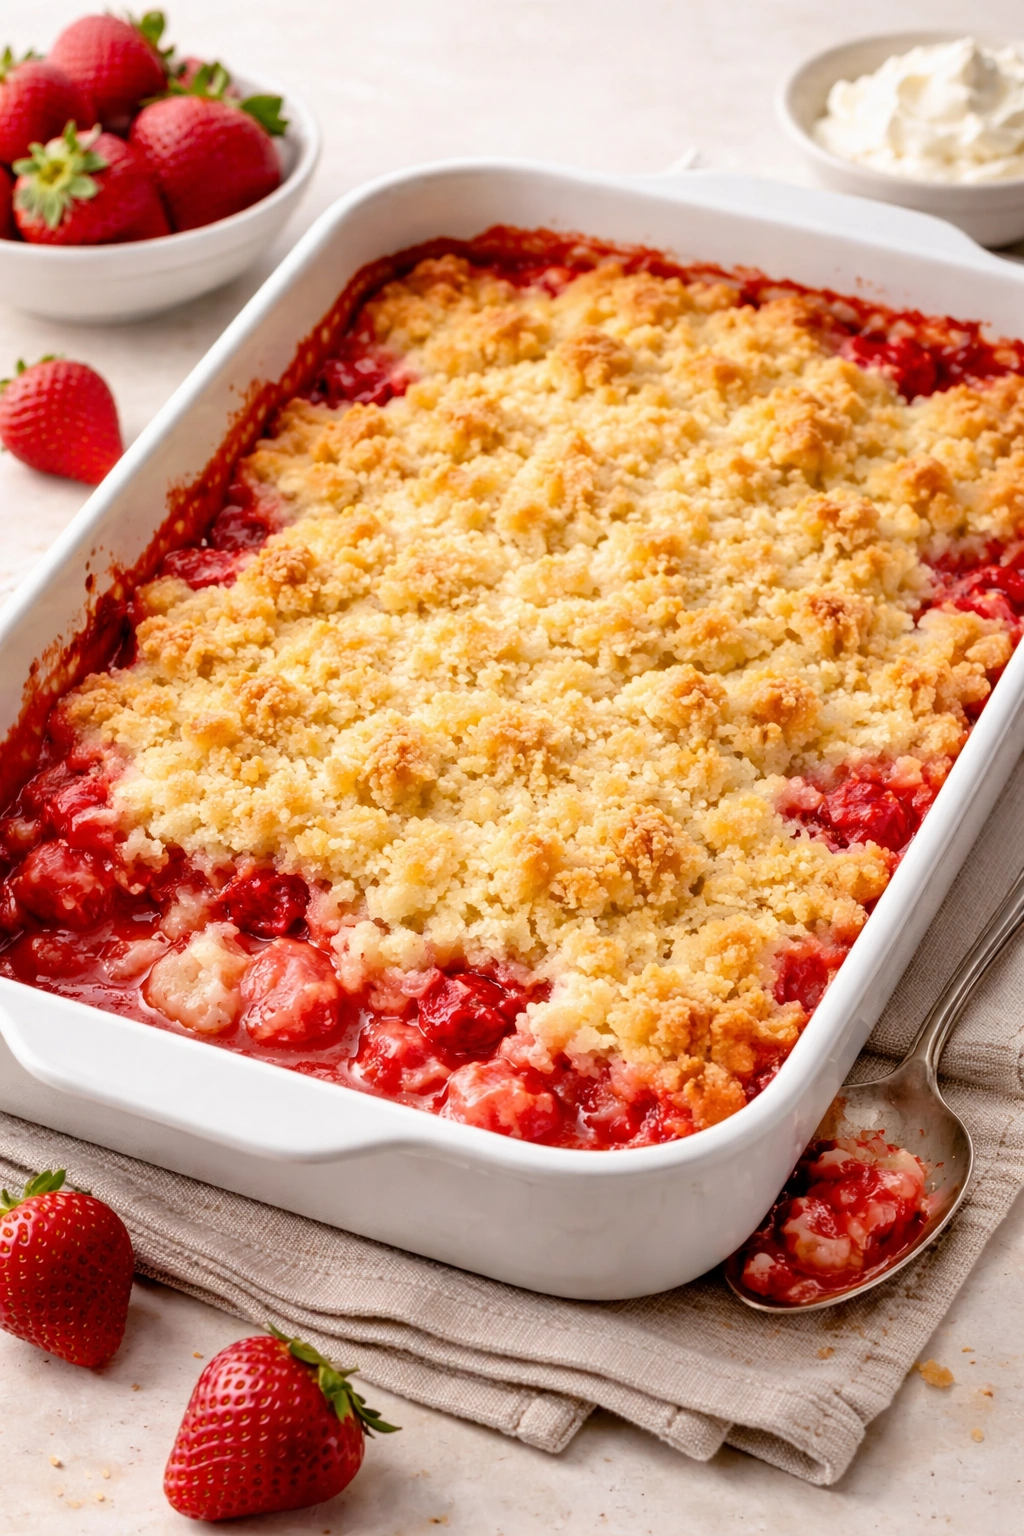
This captures the flavor and texture of traditional strawberry shortcake but in the easiest possible format. Fresh strawberries macerate while they bake, releasing their juice and mingling with butter to create a compote-like filling beneath a tender vanilla cake. The result tastes elegant but feels completely effortless to make.
For the Filling:
- 2 pounds fresh strawberries, hulled and halved
- ⅓ cup granulated sugar
- 2 tablespoons fresh lemon juice
- 1 teaspoon vanilla extract
- Pinch of fine sea salt
For the Topping:
- 1½ cups all-purpose flour
- 1 cup granulated sugar
- 1½ teaspoons baking powder
- ½ teaspoon fine sea salt
- 6 tablespoons cold unsalted butter, cut into small cubes
- ¾ cup whole milk
- 1 teaspoon vanilla extract
Yield: Serves 8 to 10
Prep Time: 15 minutes (mostly hulling strawberries)
Cook Time: 50 minutes
Total Time: 1 hour 5 minutes
Difficulty: Beginner — the only knife work is halving strawberries.
Bake:
-
Preheat the oven to 350°F (175°C) and position the rack in the center.
-
Spread the strawberries in a 9×13-inch baking dish. Sprinkle with the sugar, lemon juice, vanilla extract, and salt, then gently toss to distribute the seasonings evenly throughout.
-
In a medium bowl, whisk together the flour, sugar, baking powder, and salt. Add the cold butter cubes and use a fork to work them in until the mixture resembles coarse breadcrumbs.
-
Stir together the milk and vanilla extract in a small bowl, then add to the flour mixture. Stir until just combined — small lumps are perfectly fine. Drop spoonfuls of batter across the strawberry filling, using the back of the spoon to gently spread it into an uneven, rustic layer.
-
Bake for 45 to 50 minutes, rotating the pan halfway through, until the topping is golden brown and the strawberry filling is bubbling around the edges. The cake portion should feel set when you gently press it.
-
Let cool for 15 minutes before serving — this allows the filling to set enough that it won’t run completely off the plate.
Pro tip: Make this in the morning and let it sit at room temperature; the flavors meld together beautifully, and the texture becomes even more cohesive. Serve with whipped cream and fresh whole strawberries on top for a showstopping presentation that took you ten minutes to assemble.
4. Blueberry Lemon Dump Cake
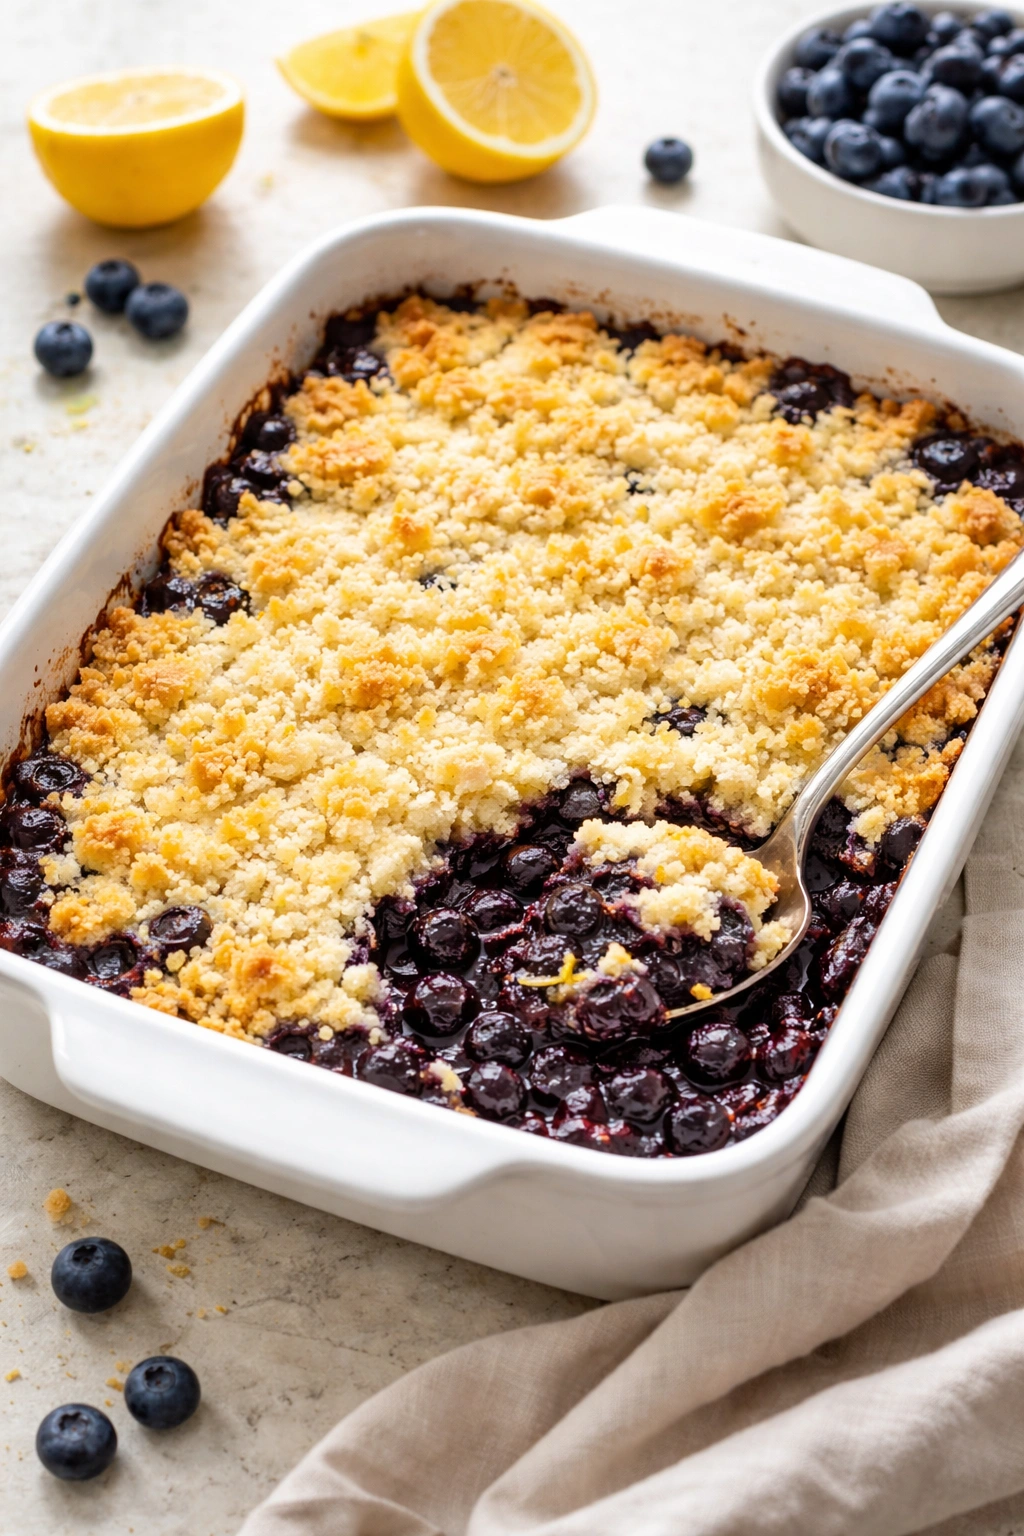
The tartness of lemon makes blueberry desserts feel lighter and less one-note, and combining them in a dump cake lets the flavors really shine. Fresh blueberries burst slightly during baking, releasing their juice to mingle with lemon zest and tender cake crumb. This is the kind of dessert that makes you feel virtuous eating it because you actually included fresh fruit.
For the Filling:
- 4 cups fresh blueberries (about 1½ pounds), rinsed and picked over
- ⅓ cup granulated sugar
- Zest of 2 lemons (about 1 tablespoon)
- 2 tablespoons fresh lemon juice
- 1 teaspoon vanilla extract
- Pinch of fine sea salt
For the Topping:
- 1½ cups all-purpose flour
- 1 cup granulated sugar
- 1½ teaspoons baking powder
- ½ teaspoon fine sea salt
- 6 tablespoons cold unsalted butter, cut into cubes
- ¾ cup whole milk
- ½ teaspoon vanilla extract
Yield: Serves 8
Prep Time: 10 minutes
Cook Time: 50 minutes
Total Time: 1 hour
Difficulty: Beginner — blueberries need no prep besides rinsing.
Bake:
-
Preheat the oven to 350°F (175°C) with the rack positioned in the center.
-
Spread the blueberries evenly in a 9×13-inch baking dish. Sprinkle with the sugar, lemon zest, lemon juice, vanilla extract, and salt. Gently toss to combine, being careful not to crush the berries too much — they’ll release plenty of juice as they bake.
-
In a medium bowl, whisk together the flour, sugar, baking powder, and salt until combined. Cut in the cold butter using a fork until the mixture resembles coarse breadcrumbs with some pea-sized butter pieces remaining.
-
Combine the milk and vanilla extract in a small bowl, then stir into the flour mixture until just incorporated. The batter will be thick and slightly lumpy. Drop spoonfuls across the blueberries, spreading them into a rustic, uneven layer.
-
Bake for 45 to 50 minutes, rotating the pan halfway through, until the topping is golden brown and a toothpick inserted into the thickest part comes out clean.
-
Cool in the pan for 15 minutes before serving.
Serving ideas: A sprinkle of coarse sugar on top of the warm cake adds textural interest and a subtle sweetness boost. This cake actually improves after sitting overnight — the flavors merge and the texture becomes more cohesive. Store covered at room temperature for up to 2 days or refrigerate for up to 4 days.
5. Apple Cinnamon Dump Cake with Streusel Topping
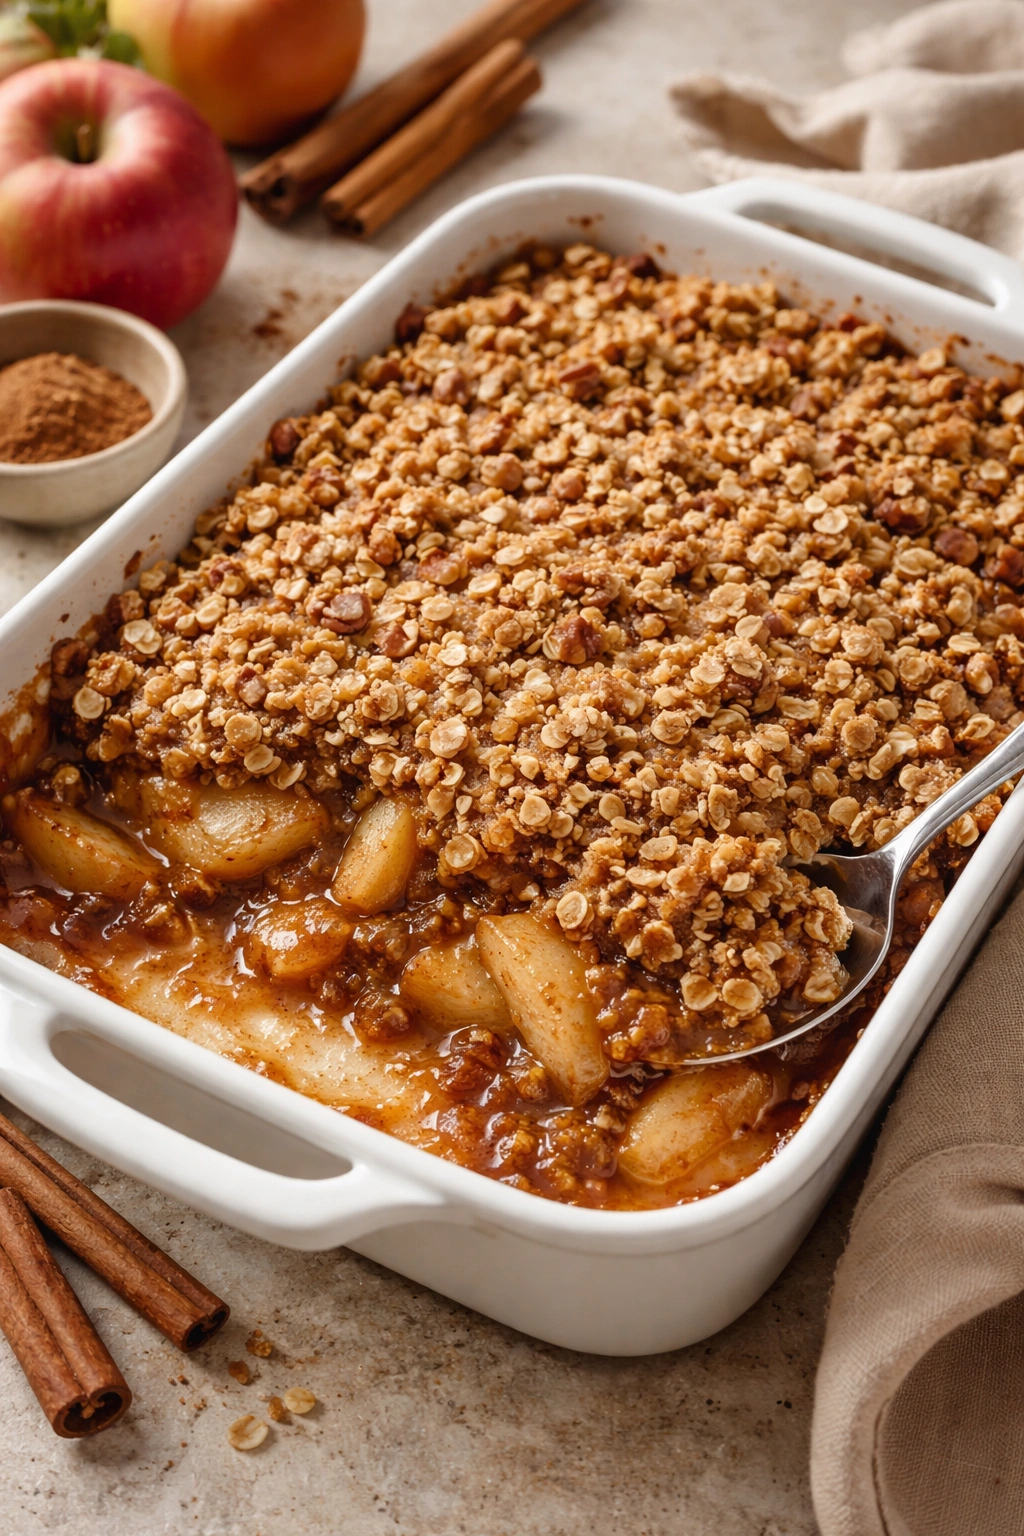
This version plays with the traditional dump cake format by using a crumbly streusel topping instead of batter, creating a texture somewhere between a coffee cake and a crisp. Cinnamon-spiced apples are layered with buttery oat streusel that gets crunchy and golden in the oven. The result is less like cake and more like a warm, comforting apple crumble, but technically still a dump cake.
For the Filling:
- Four 15-ounce cans sliced apples (or about 6 cups fresh apples, peeled, cored, and sliced)
- ¼ cup granulated sugar
- ¼ cup brown sugar, packed
- 2 tablespoons fresh lemon juice
- 1 teaspoon vanilla extract
- 1½ teaspoons ground cinnamon
- ¼ teaspoon ground nutmeg
- ¼ teaspoon fine sea salt
For the Streusel Topping:
- 1 cup old-fashioned rolled oats
- ¾ cup all-purpose flour
- ½ cup brown sugar, packed
- ½ cup cold unsalted butter, cut into small cubes
- ¼ teaspoon fine sea salt
- ¼ teaspoon ground cinnamon
Yield: Serves 8 to 10
Prep Time: 15 minutes
Cook Time: 50 minutes
Total Time: 1 hour 5 minutes
Difficulty: Beginner — streusel is literally just mixed with a fork; no special technique required.
Bake:
-
Preheat the oven to 350°F (175°C) and position the rack in the center.
-
Drain the canned apples in a colander, then spread them in a 9×13-inch baking dish. (If using fresh apples, arrange them in the dish.) Sprinkle with the granulated sugar, brown sugar, lemon juice, vanilla extract, cinnamon, nutmeg, and salt. Toss gently to coat everything evenly.
-
Make the streusel topping: In a medium bowl, combine the oats, flour, brown sugar, salt, and cinnamon. Add the cold butter cubes and use a fork to work them in until the mixture resembles coarse crumbs with some pea-sized pieces of butter still visible — don’t overmix or try to make it fully homogeneous.
-
Sprinkle the streusel mixture evenly across the apples, breaking up any large clumps with your fingers as you distribute it.
-
Bake for 45 to 50 minutes, rotating the pan halfway through, until the streusel is golden brown and the apple filling is bubbling around the edges.
Advertisements -
Cool in the pan for 15 to 20 minutes before serving so the filling can set.
Storage tip: This is one of the best dump cakes for make-ahead preparation — assemble it completely in the morning, cover it, and refrigerate until you’re ready to bake. Just add 5 to 10 minutes to the baking time since you’re starting with a cold pan. Leftovers taste wonderful at room temperature and are honestly better the next day once the flavors have had time to settle and meld together.
6. Tropical Pineapple Dump Cake
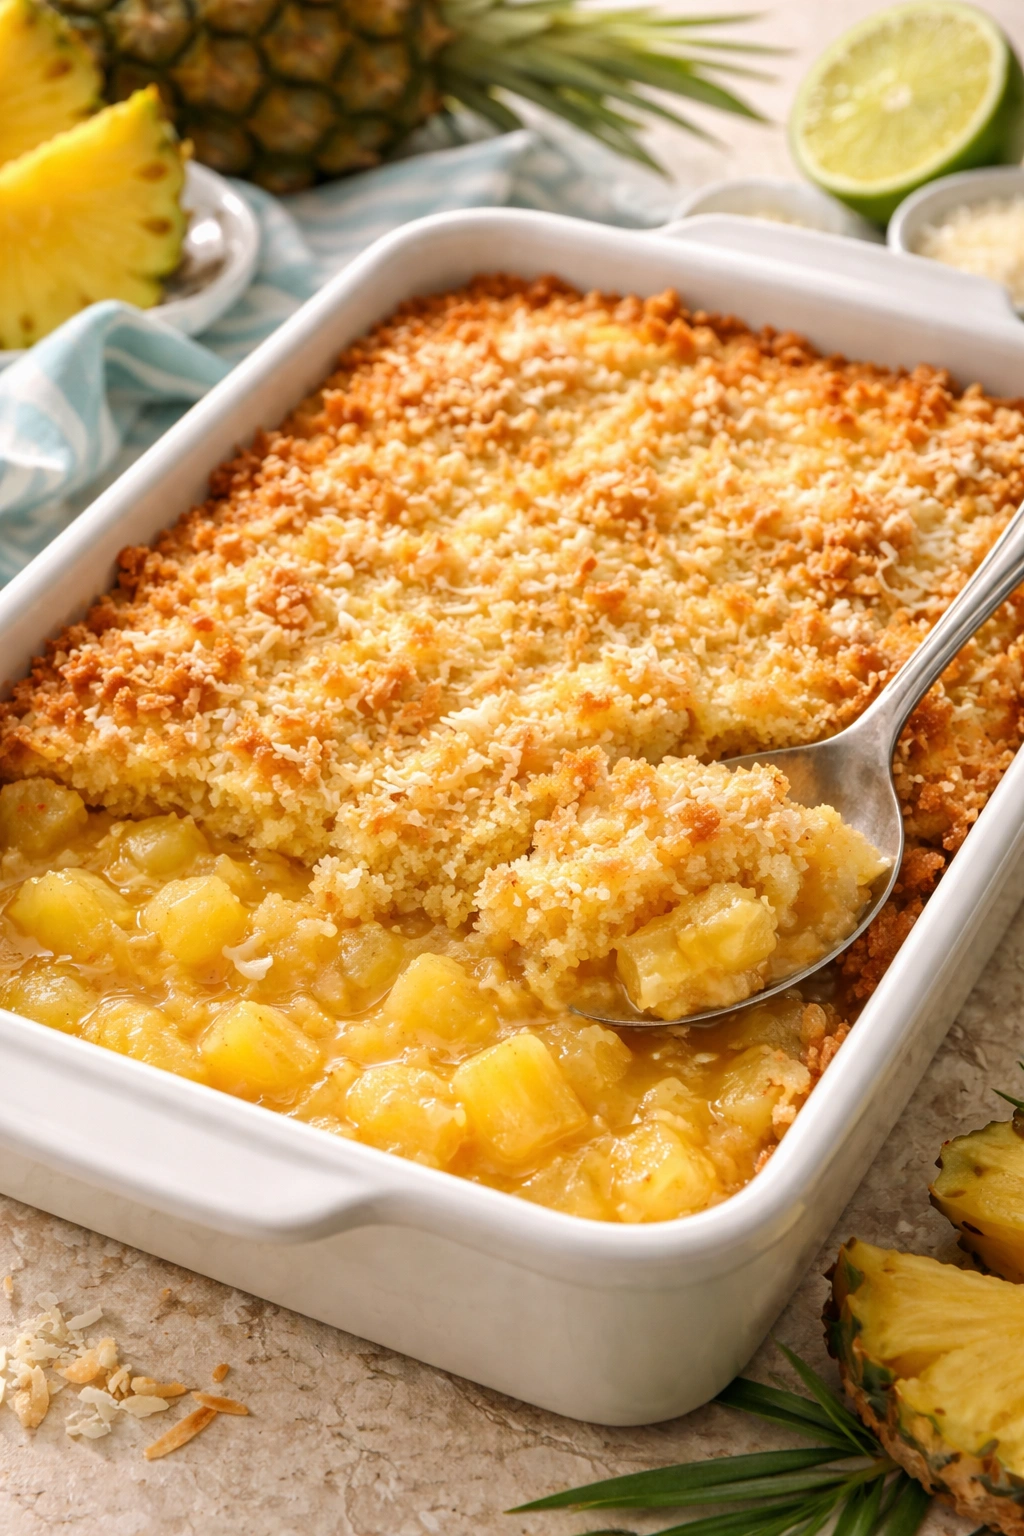
Pineapple in a dump cake creates brightness and a subtle tartness that prevents the dessert from feeling too heavy or one-dimensional. Using canned pineapple in juice (not syrup) keeps the sweetness balanced and lets the fruit flavor come through clearly. A touch of coconut extract in the batter echoes the tropical theme without making it taste artificial.
For the Filling:
- Two 20-ounce cans pineapple chunks in juice, undrained
- ⅓ cup granulated sugar
- 2 tablespoons fresh lime juice
- 1 teaspoon vanilla extract
- ⅛ teaspoon fine sea salt
For the Topping:
- 1½ cups all-purpose flour
- 1 cup granulated sugar
- 1½ teaspoons baking powder
- ½ teaspoon fine sea salt
- 6 tablespoons cold unsalted butter, cut into small cubes
- ¾ cup whole milk
- ½ teaspoon vanilla extract
- ¼ teaspoon coconut extract (optional but recommended)
Yield: Serves 8
Prep Time: 10 minutes
Cook Time: 50 minutes
Total Time: 1 hour
Difficulty: Beginner — all components require only basic mixing.
Bake:
-
Preheat the oven to 350°F (175°C) with the rack in the center position.
-
Pour the pineapple with its juice into a 9×13-inch baking dish. Add the sugar, lime juice, vanilla extract, and salt, stirring to combine. The lime juice adds brightness without making the dessert taste distinctly lime-flavored — it’s subtle but important.
-
In a medium bowl, whisk together the flour, sugar, baking powder, and salt. Add the cold butter cubes and use a fork to work them in until the mixture resembles coarse breadcrumbs with some small pieces of butter still visible.
Advertisements -
Combine the milk, vanilla extract, and coconut extract in a small bowl, then add to the flour mixture. Stir until just combined — the batter should be thick and lumpy. Drop spoonfuls across the pineapple filling and gently spread into an uneven layer.
-
Bake for 45 to 50 minutes, rotating the pan halfway through, until the topping is golden brown and springs back lightly when touched, and the pineapple filling is bubbling at the edges.
-
Let cool for 15 minutes before serving.
Variations: For a toasted coconut version, toast ½ cup unsweetened shredded coconut in a dry skillet over medium heat until fragrant (about 3 minutes), then sprinkle it on top of the batter before baking. The toasted coconut adds texture and deepens the tropical flavor.
7. Mixed Berry Dump Cake with Almond Topping
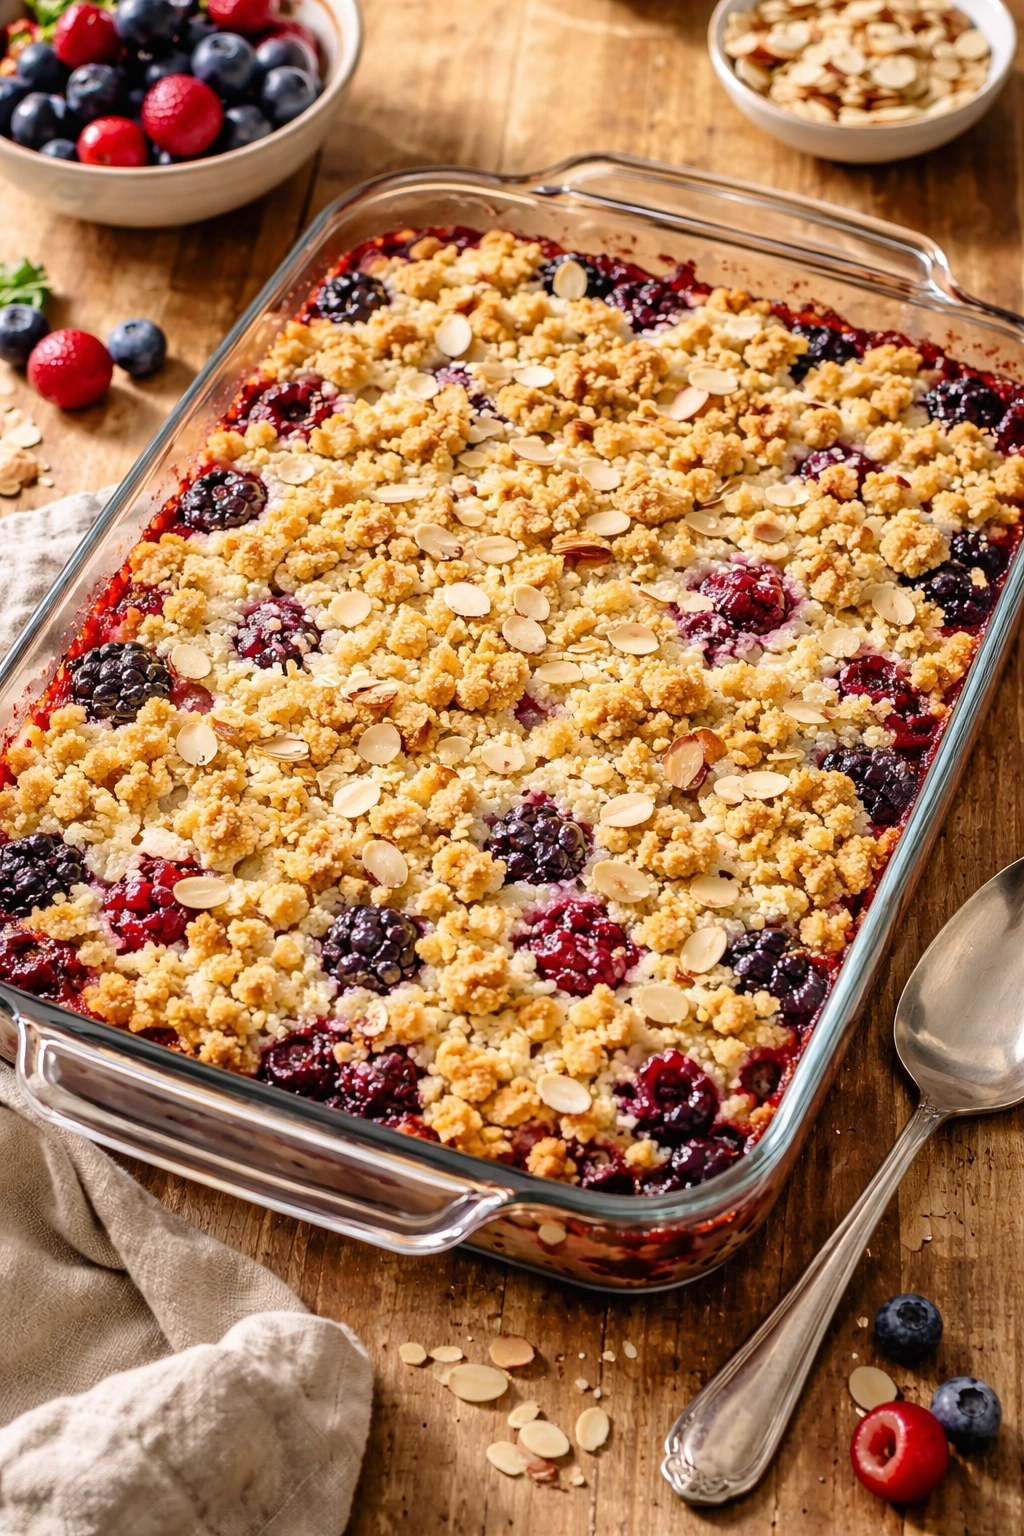
Combining multiple berries creates complexity and keeps the flavor from becoming monotonous — blackberries add earthiness, raspberries add tartness, and blueberries add subtle sweetness. A touch of almond extract in the topping enhances the berry flavors naturally without calling attention to itself. This is an impressive-looking dessert that honestly takes longer to wash the berries than to put the whole thing together.
For the Filling:
- 1½ cups fresh blueberries
- 1½ cups fresh raspberries
- 1½ cups fresh blackberries
- ⅓ cup granulated sugar
- 2 tablespoons fresh lemon juice
- 1 teaspoon vanilla extract
- Pinch of fine sea salt
For the Topping:
- 1½ cups all-purpose flour
- 1 cup granulated sugar
- 1½ teaspoons baking powder
- ½ teaspoon fine sea salt
- 6 tablespoons cold unsalted butter, cut into cubes
- ¾ cup whole milk
- ¼ teaspoon almond extract
Yield: Serves 8 to 10
Prep Time: 15 minutes (mostly rinsing berries)
Cook Time: 50 minutes
Total Time: 1 hour 5 minutes
Difficulty: Beginner — berries require no knife work.
Bake:
-
Preheat the oven to 350°F (175°C) and position the rack in the center.
Advertisements -
Rinse all the berries and spread them gently in a 9×13-inch baking dish. Sprinkle with the sugar, lemon juice, vanilla extract, and salt. Toss very gently with a soft touch — you want to combine the seasonings without crushing the berries.
-
In a medium bowl, whisk together the flour, sugar, baking powder, and salt. Add the cold butter cubes and use a fork to work them in until the mixture resembles coarse breadcrumbs.
-
Stir the milk and almond extract together in a small bowl, then add to the flour mixture. Stir until just combined. Drop spoonfuls of batter across the berries and gently spread into an uneven layer.
-
Bake for 45 to 50 minutes, rotating the pan halfway through, until the topping is golden brown and a toothpick inserted into the thickest part comes out clean. You should see berry juice bubbling around the edges.
-
Cool for 15 minutes before serving.
Make-ahead strategy: You can assemble this entirely up to 12 hours ahead — just cover it well and refrigerate. Add 5 to 10 minutes to the baking time to account for starting cold. The flavors actually improve when allowed to sit; the berries have time to macerate and blend together beautifully.
8. Brown Butter Pecan Dump Cake
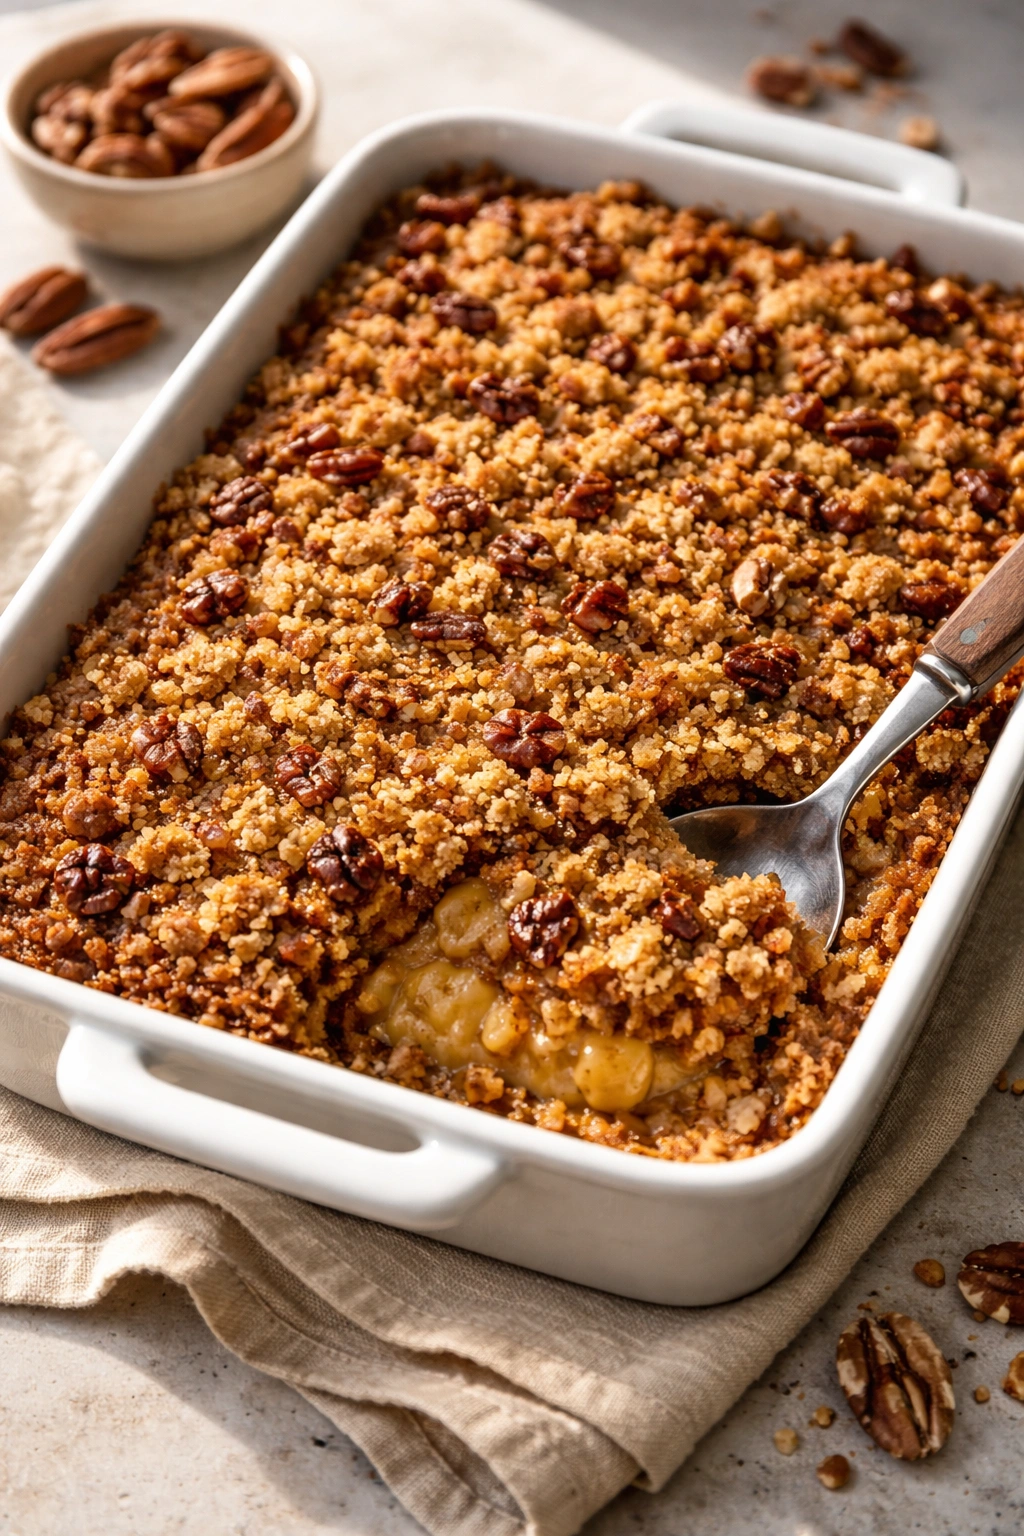
Brown butter deepens the flavor of any dessert, and in a dump cake format, it’s the secret ingredient that elevates the whole thing from ordinary to sophisticated without any extra work. The nuttiness comes through in both the batter and the streusel topping, creating a dessert that tastes like it took hours to plan. Pecans add crunch and richness without requiring any toasting or special prep.
For the Filling:
- 2 pounds fresh or frozen peaches (or two 29-ounce cans, undrained)
- ¼ cup granulated sugar
- 1 tablespoon fresh lemon juice
- ½ teaspoon vanilla extract
- Pinch of fine sea salt
For the Topping:
- 8 tablespoons unsalted butter
- 1½ cups all-purpose flour
- 1 cup granulated sugar
- 1½ teaspoons baking powder
- ½ teaspoon fine sea salt
- ¾ cup whole milk
- 1 teaspoon vanilla extract
- 1 cup chopped pecans (about 4 ounces), lightly toasted if possible
Yield: Serves 8 to 10
Prep Time: 15 minutes (includes browning butter)
Cook Time: 50 minutes
Total Time: 1 hour 5 minutes
Difficulty: Intermediate — browning butter requires attention, but the process is straightforward.
Prepare the Brown Butter:
- Cut the 8 tablespoons of butter into cubes and place them in a small saucepan over medium heat. Let the butter melt, swirling occasionally, until the milk solids turn golden brown and the butter smells deeply nutty — this takes about 5 to 8 minutes. Watch carefully toward the end; butter can go from perfectly browned to burnt in seconds. Pour the brown butter into a small bowl and let it cool to room temperature (about 10 minutes).
Bake:
-
Preheat the oven to 350°F (175°C) with the rack in the center.
-
If using fresh peaches, peel them (blanch in boiling water for 1 minute if necessary to make peeling easier), slice them, and spread them in a 9×13-inch baking dish. If using canned, pour them with their syrup into the dish. Sprinkle with the sugar, lemon juice, vanilla extract, and salt, tossing gently to combine.
-
In a medium bowl, whisk together the flour, sugar, baking powder, and salt. Combine the cooled brown butter and milk in a small bowl, then add to the flour mixture along with the vanilla extract. Stir until just combined — the batter will be thick and slightly lumpy. Fold in the chopped pecans gently.
-
Drop spoonfuls of batter across the peach filling and gently spread into an uneven, rustic layer.
-
Bake for 45 to 50 minutes, rotating the pan halfway through, until the topping is golden brown and the peach filling is bubbling around the edges.
-
Cool for 15 minutes before serving.
Storage note: This cake actually tastes better the next day — the brown butter flavor deepens and becomes more pronounced as it sits. Store covered at room temperature for up to 2 days or refrigerate for up to 4 days. Reheat gently before serving if you prefer it warm.
9. Caramel Apple Dump Cake
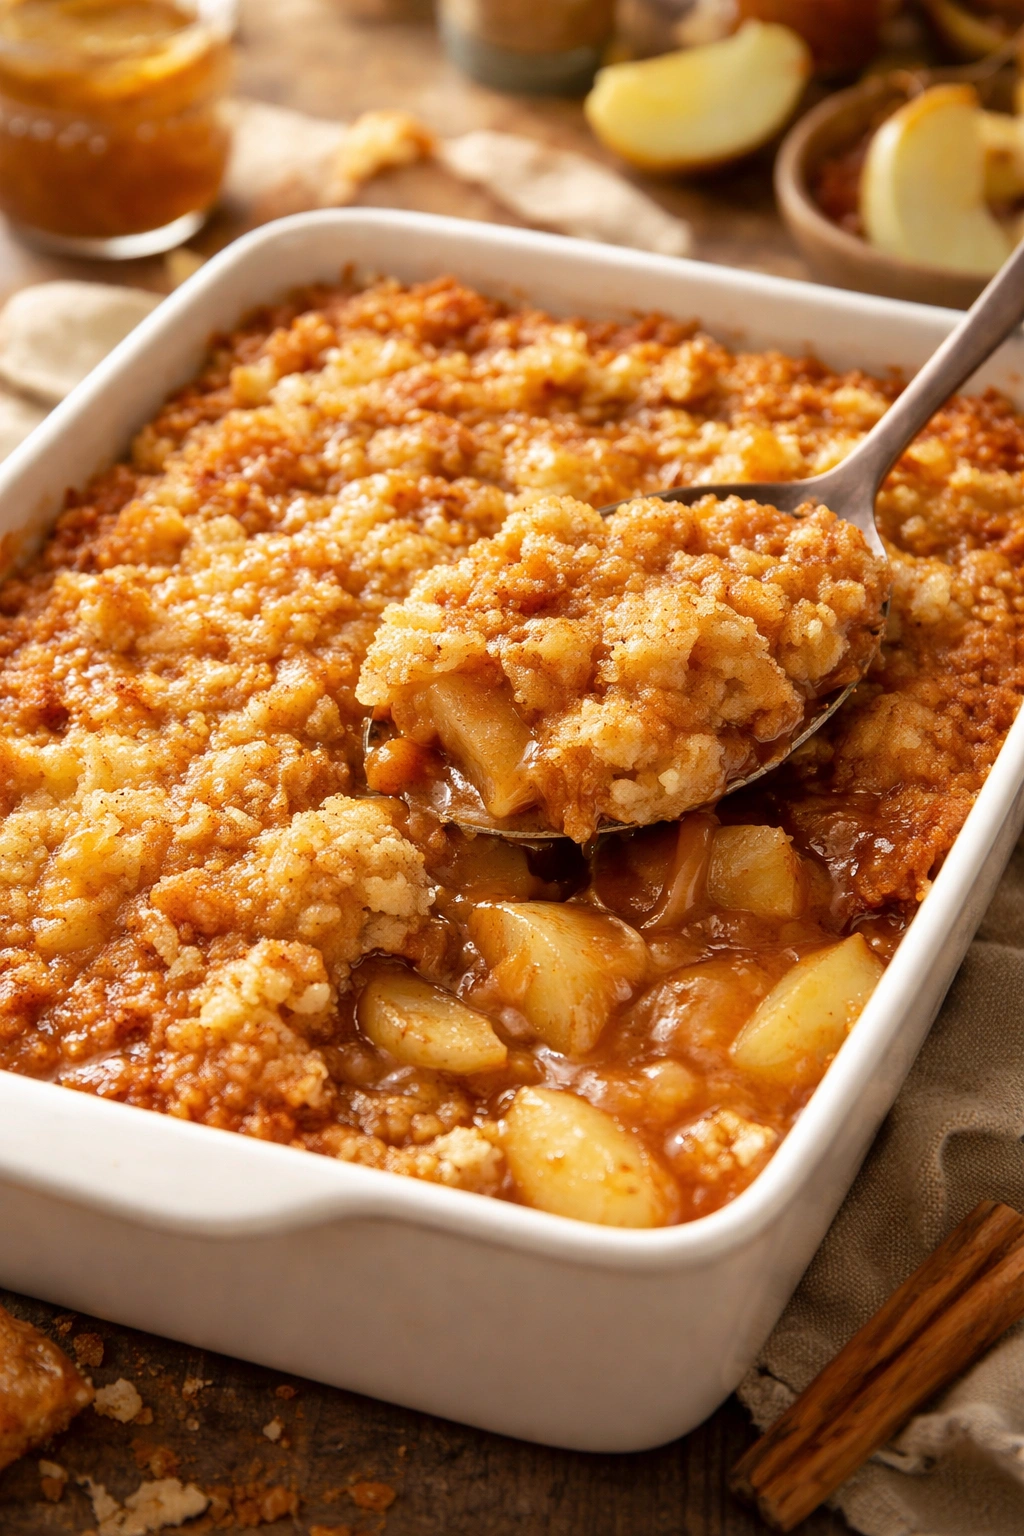
Caramel and apples are a classic pairing for good reason — the sweetness of caramel balances the tartness of apples perfectly. Rather than drizzling caramel on top after baking (which feels like extra work), this version builds it into the filling, so every bite includes that sweet, buttery flavor. Vanilla cake crumb absorbs the caramel-apple juices, creating an incredibly moist, flavorful dessert.
For the Filling:
- 6 cups fresh apples, peeled, cored, and sliced (about 6 medium apples), or four 15-ounce cans, drained
- ⅓ cup caramel sauce (store-bought is fine)
- ¼ cup brown sugar, packed
- 2 tablespoons fresh lemon juice
- 1 teaspoon vanilla extract
- ¼ teaspoon fine sea salt
- ¼ teaspoon ground cinnamon
For the Topping:
- 1½ cups all-purpose flour
- 1 cup granulated sugar
- 1½ teaspoons baking powder
- ½ teaspoon fine sea salt
- 6 tablespoons cold unsalted butter, cut into cubes
- ¾ cup whole milk
- 1 teaspoon vanilla extract
Yield: Serves 8 to 10
Prep Time: 15 minutes (mostly peeling and slicing apples)
Cook Time: 50 minutes
Total Time: 1 hour 5 minutes
Difficulty: Beginner — apple prep is the only technique required.
Bake:
-
Preheat the oven to 350°F (175°C) and position the rack in the center.
-
Spread the apple slices in a 9×13-inch baking dish. Drizzle the caramel sauce over the apples and sprinkle with the brown sugar, lemon juice, vanilla extract, salt, and cinnamon. Toss gently to distribute the seasonings evenly — the caramel will be thick, but it will loosen as the apples release their juice during baking.
-
In a medium bowl, whisk together the flour, granulated sugar, baking powder, and salt. Add the cold butter and use a fork to work it in until the mixture resembles coarse breadcrumbs.
-
Combine the milk and vanilla extract in a small bowl, then add to the flour mixture. Stir until just combined. Drop spoonfuls across the apple filling and spread gently into an uneven layer.
-
Bake for 45 to 50 minutes, rotating the pan halfway through, until the topping is golden brown and springs back lightly when pressed, and you can see caramel bubbling around the edges.
-
Let cool for 15 minutes before serving — this allows the caramel to set slightly.
Advertisements
Serving suggestion: Drizzle additional warm caramel sauce over each serving and top with vanilla ice cream for an over-the-top dessert that actually looks restaurant-quality despite being ridiculously easy to make.
10. Coconut Mango Dump Cake
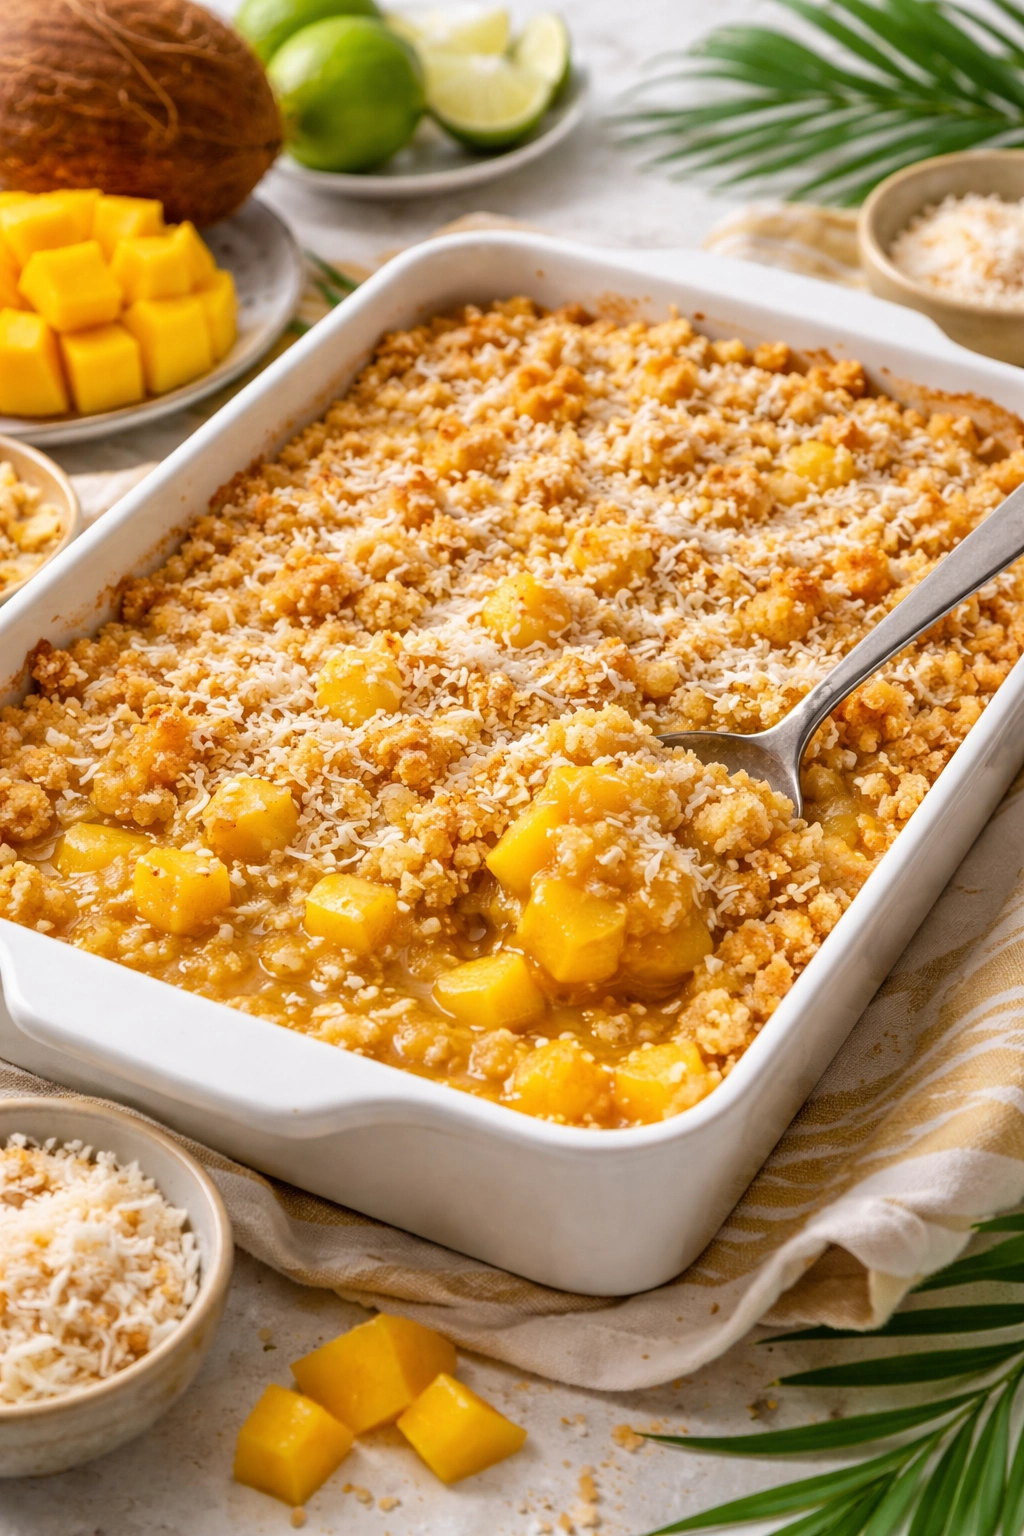
Mango brings tropical brightness and natural sweetness that pairs beautifully with coconut. This flavor combination evokes vacation vibes and sophisticated flavor, but the preparation is exactly as simple as every other dump cake. Frozen mango chunks work just as well as fresh and require zero prep — just thaw them and use them as-is.
For the Filling:
- 4 cups fresh or frozen mango chunks (about 2 pounds), thawed if frozen
- ¼ cup granulated sugar
- 2 tablespoons fresh lime juice
- 1 teaspoon vanilla extract
- ⅛ teaspoon fine sea salt
- ⅓ cup sweetened shredded coconut
For the Topping:
- 1½ cups all-purpose flour
- 1 cup granulated sugar
- 1½ teaspoons baking powder
- ½ teaspoon fine sea salt
- 6 tablespoons cold unsalted butter, cut into cubes
- ¾ cup coconut milk (full-fat canned works best)
- ½ teaspoon vanilla extract
- ¼ teaspoon coconut extract (optional)
Yield: Serves 8
Prep Time: 10 minutes
Cook Time: 50 minutes
Total Time: 1 hour
Difficulty: Beginner — mango chunks need no preparation, and the topping is mixed in one bowl.
Bake:
-
Preheat the oven to 350°F (175°C) with the rack positioned in the center.
-
Spread the mango chunks in a 9×13-inch baking dish. Sprinkle with the granulated sugar, lime juice, vanilla extract, and salt. Gently toss to combine, then sprinkle the shredded coconut evenly across the top.
-
In a medium bowl, whisk together the flour, sugar, baking powder, and salt. Add the cold butter cubes and use a fork to work them in until the mixture resembles coarse breadcrumbs.
-
Stir together the coconut milk, vanilla extract, and coconut extract (if using) in a small bowl, then add to the flour mixture. Stir until just combined — the batter will be thick. Drop spoonfuls across the mango filling and gently spread into an uneven layer.
Advertisements -
Bake for 45 to 50 minutes, rotating the pan halfway through, until the topping is golden brown and the mango filling is bubbling around the edges.
-
Cool for 15 minutes before serving.
Flavor hack: Toast the shredded coconut in a dry skillet over medium heat for about 3 minutes (until fragrant) before sprinkling it into the filling — toasted coconut has a much deeper, more complex flavor than raw. It’s a small step that genuinely elevates the whole dessert.
Final Thoughts
The beauty of dump cakes lies in how completely they upend the idea that good desserts require precision, advanced technique, or hours of your time. Every single recipe above comes together in roughly ten minutes of actual hands-on work, yet each one tastes like something you labored over. The fruit does half the work, the butter does half of what’s left, and the oven handles everything else.
The framework stays consistent — fruit plus sweetener, butter-based topping, moderate oven temperature, patient cooling — which means once you nail the technique on one dump cake, you can confidently swap in literally any fruit or flavor combination you can imagine. Have a bag of frozen cherries? Use them. Love pumpkin? Canned pumpkin with spices works beautifully. Want something chocolate? Mix cocoa into any fruit version and watch how dramatically the flavor evolves.
Start with whichever flavor combination speaks to you, and don’t stress about perfection. Dump cakes are forgiving — uneven batter distribution, slightly unevenly cut fruit, timing that’s off by a few minutes — none of it matters because the final result will still taste genuinely delicious. That’s why they’ve stayed popular for generations. They work, they taste incredible, and they prove that the best desserts are often the ones that require the least fuss to create.