Stir-fries have a reputation for being quick weeknight dinners, but they’re also phenomenally healthy when you load them with vegetables, lean beef, and a smart sauce. The beauty of beef stir-fry is that it delivers restaurant-quality flavor and a complete meal in less time than it takes to order delivery—no soggy vegetables, no mystery ingredients, just genuine food you made yourself. What surprises most home cooks is how much better a homemade stir-fry actually tastes compared to takeout, and once you nail the technique, you’ll make it on repeat.
The speed comes down to preparation and temperature control, not cutting corners on flavor or nutrition. When you have your ingredients prepped and your cooking surface screaming hot, those minutes fly by. A properly seared piece of beef, crisp-tender vegetables that still have bite, and a glossy, deeply flavored sauce—this is the texture and taste profile people actually crave. The whole thing works because you’re working with heat and momentum, not fighting against it.
This particular approach focuses on getting maximum results in exactly 25 minutes from start to finish, including the time you spend dicing vegetables and setting up your station. It’s genuinely doable if you understand the sequence and why each step matters. You’ll discover which vegetables stay tender instead of turning mushy, how to cook beef that stays juicy rather than tough, and the single technique that separates good stir-fries from mediocre ones. This isn’t about rushing—it’s about efficiency and confidence.
The Appeal of Quick Beef Stir-Fry
Beef stir-fry bridges the gap between convenience and nutrition in a way few dishes can match. You get lean protein, tons of vegetables, whole grains if you serve it over brown rice or quinoa, and the entire meal comes together in one pan. There’s something deeply satisfying about watching your ingredients transform from raw to finished in such a short window—it feels like you’ve accomplished something real in your kitchen without spending an entire evening there.
The vegetable-to-protein ratio in a stir-fry naturally skews healthier than many beef dishes. You’re using a relatively small amount of beef (usually 12 to 16 ounces for four people) stretched across several cups of vegetables, so each bite contains fiber, vitamins, and minerals alongside the protein. The cooking method—high heat, minimal time—preserves nutrients that would otherwise leach away in a long, slow braise or boil.
Stir-fries also accommodate dietary flexibility beautifully. You can adjust the sauce for lower sodium, swap vegetables based on what you have on hand, use different proteins entirely, or modify the rice or noodles to match your goals. It’s a framework, not a rigid formula, which means you can make it work whether you’re cooking for yourself, a family, or guests with specific preferences.
Why This Recipe Works for Busy Nights
The 25-minute timeframe includes prep, cook, and plating. This isn’t a mythical “prep time doesn’t count” situation—you’re genuinely eating within that window. The reason it works is that stir-frying is inherently fast. You’re cooking at high temperature with pieces small enough to cook through quickly. A half-inch-thick slice of beef cooks in about 2 minutes total. Vegetables hit the pan and go from raw to tender-crisp in 3 to 5 minutes. There’s no waiting for a pot to boil or an oven to preheat.
The real secret is doing your mise en place—culinary shorthand for having everything prepped and ready before you start cooking. You’ll spend about 10 minutes chopping and measuring, which feels slow until the actual cooking starts. Once your pan is hot and you begin cooking, everything moves fast. You’re not pausing to chop the next vegetable while something else waits in the pan; it’s all there, ready to go.
This approach also works because you’re managing one pan and working in sequence. You cook the beef first, set it aside, then build the vegetable mixture and sauce directly in the same pan, then combine everything at the end. There’s no juggling multiple pots or keeping things warm in the oven. Everything stays at optimal temperature, and the flavors build and deepen as you go.
Choosing the Right Cut of Beef
Not all beef cuts are equally suited to stir-frying. You want something with enough tenderness that it stays soft and pleasant at the high heat involved, but with enough flavor that it’s worth eating. Flank steak and skirt steak are the gold standards because they’re lean, flavorful, and tender when cut against the grain and cooked quickly. Both have visible grain that you can slice perpendicular to, which breaks up muscle fibers and makes every bite tender.
Sirloin works if that’s what you have in your freezer, though it’s slightly less forgiving. It can become tougher if you cook it much beyond medium, whereas flank steak maintains better texture through a wider range. Ribeye and strip steak are too expensive for a recipe like this; save those for times when you want to enjoy the steak as the main event. Chuck or ground beef changes the entire texture and isn’t what you’re going for here.
The thickness matters. You’ll want your beef sliced to about a quarter-inch thick—thick enough that it doesn’t shred into tiny pieces in the pan, thin enough that it cooks through quickly at high heat. If you’re starting with a whole steak, freeze it for 15 to 20 minutes first to firm it up. Partially frozen meat is significantly easier to slice evenly than warm, soft meat. A sharp knife or partially frozen beef makes clean slices; a dull knife on warm meat will just shred and frustrate you.
Slicing Against the Grain
The grain is the direction the muscle fibers run. When you slice perpendicular to it (across it rather than along with it), you cut those fibers into short pieces, making the beef taste and feel much more tender. Look at the raw steak—you’ll see lines running one direction. Slice at a 90-degree angle to those lines. If you slice parallel to the grain, you’re essentially making the fibers longer, which makes the steak feel chewier in your mouth. Taking 30 seconds to identify the grain and slice correctly changes the eating experience dramatically.
Marinating vs. Seasoning
A quick 15-minute soy-based marinade adds flavor and helps the beef stay tender, but it’s optional if you’re in a time crunch. If you do marinate, use soy sauce, a splash of sesame oil, minced ginger, and garlic. If you skip it, just season your beef with salt and pepper right before cooking and let the sauce do the flavor work. Both approaches work fine; marinating gives a subtle depth of flavor that’s nice but not essential for a good stir-fry.
The Vegetables That Make the Perfect Stir-Fry
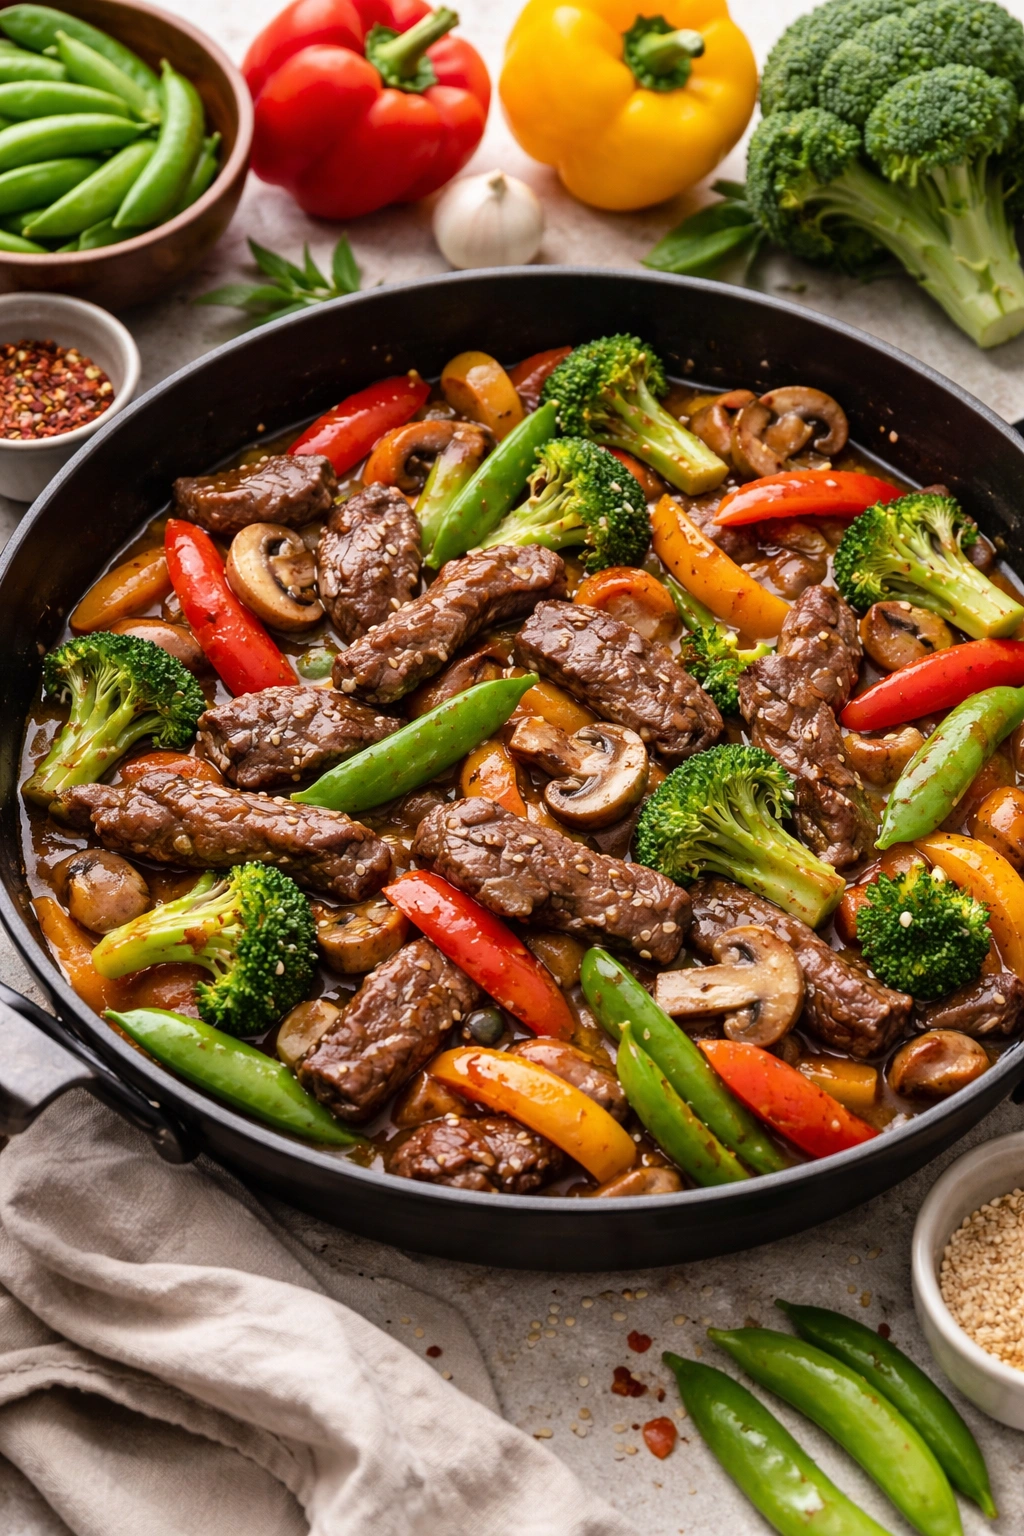
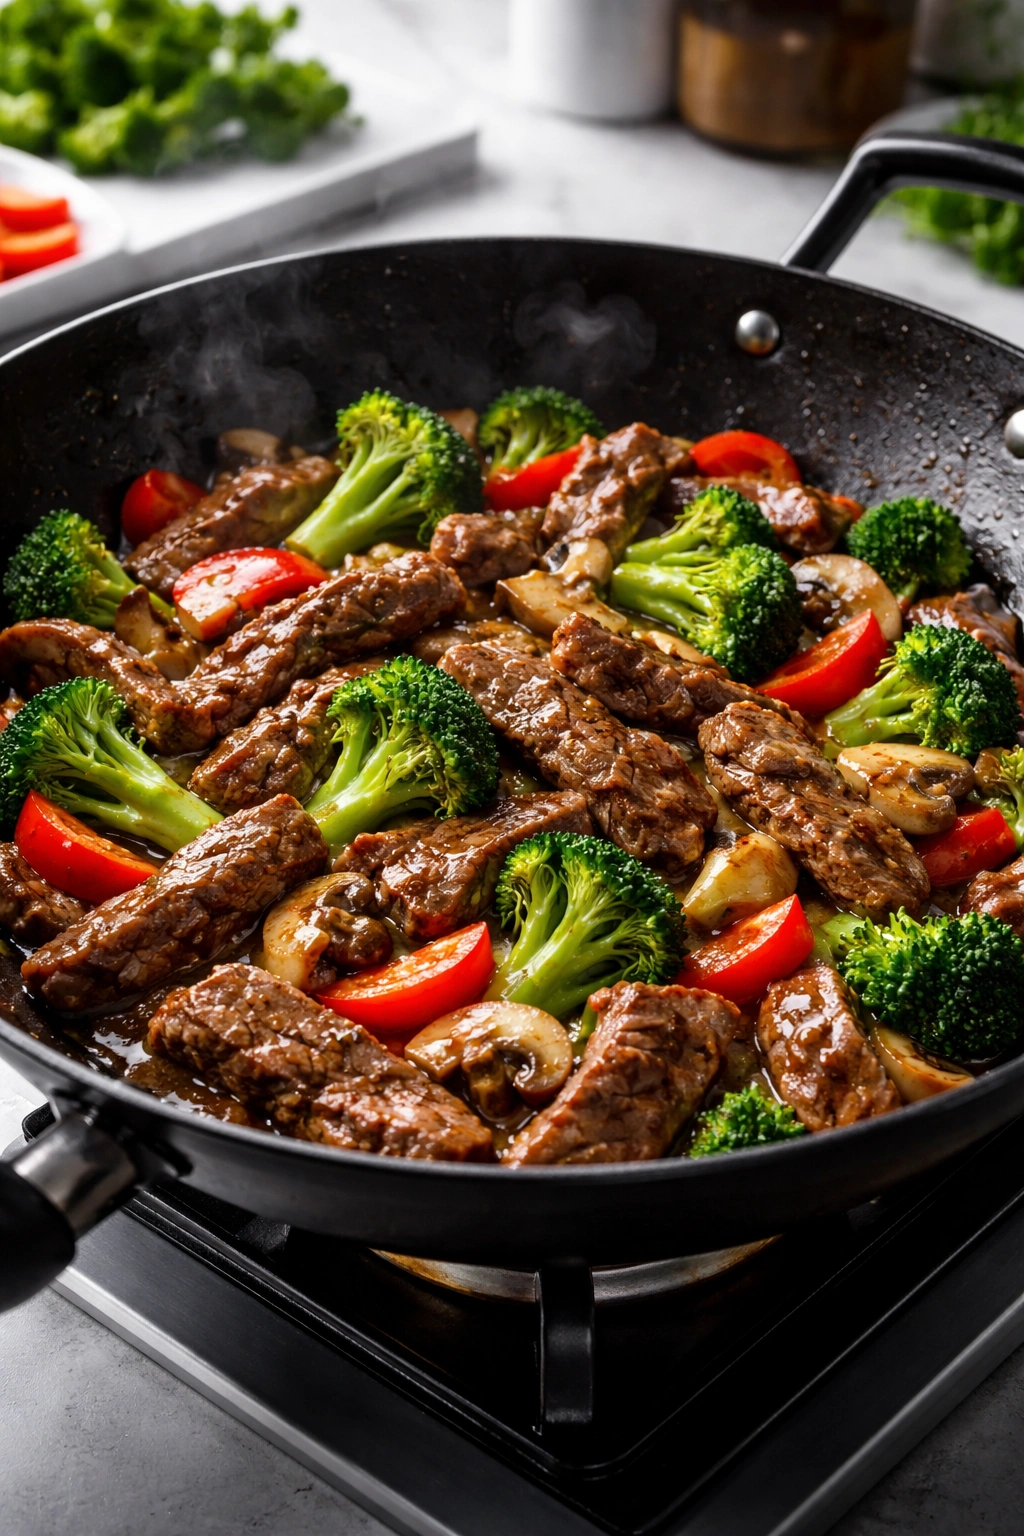
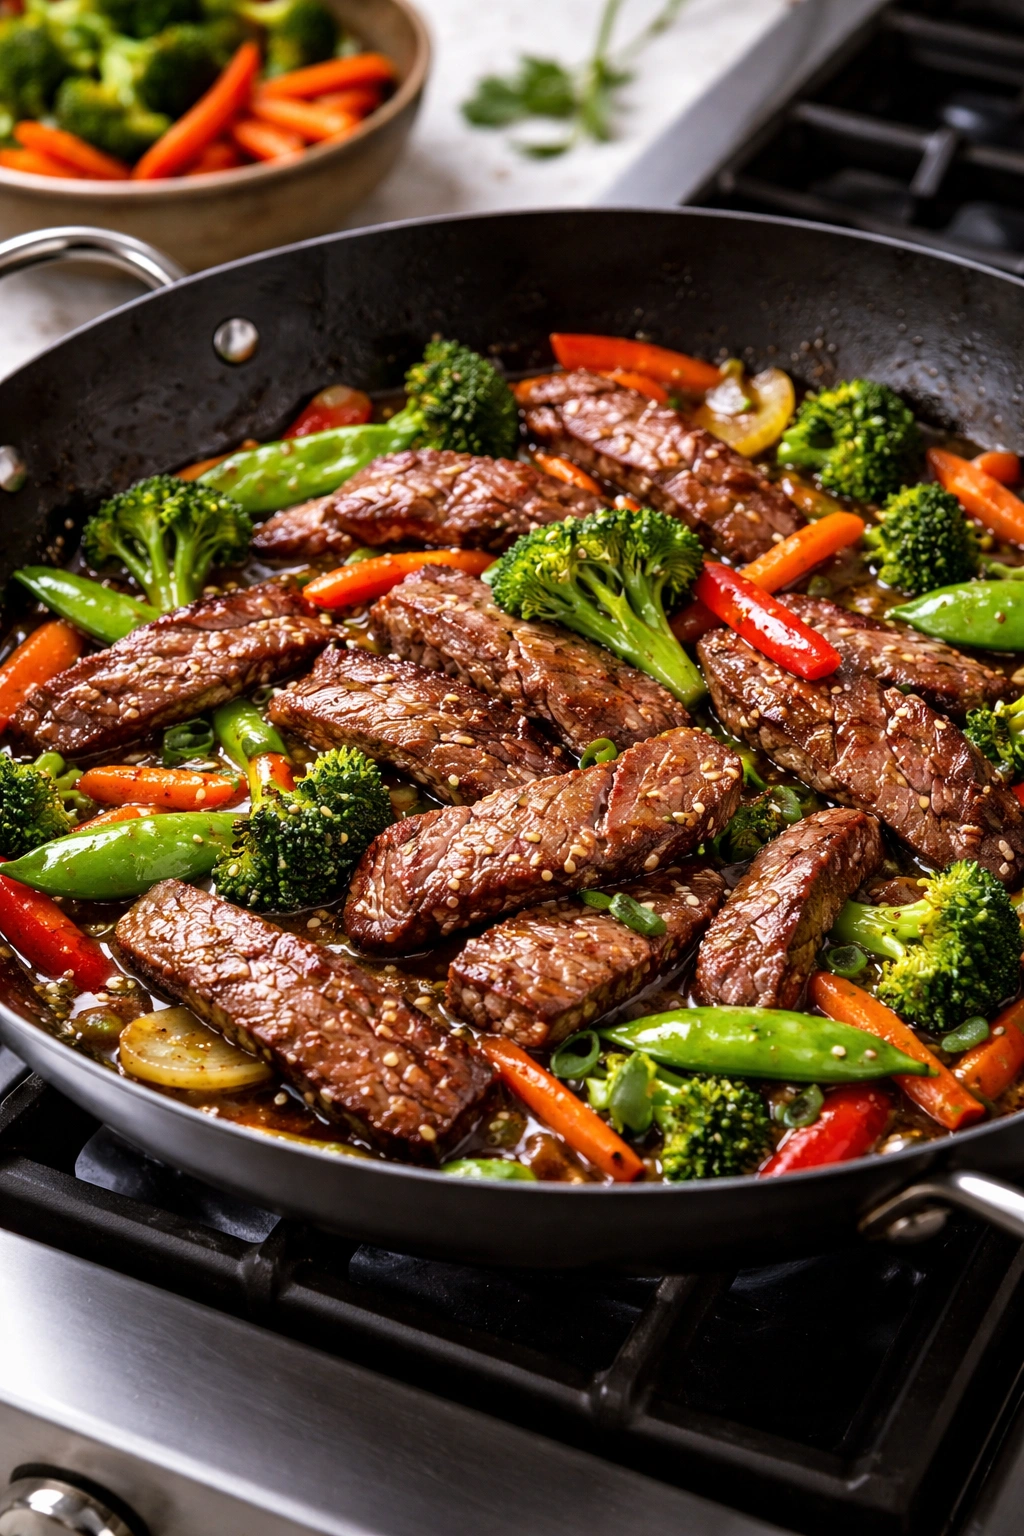
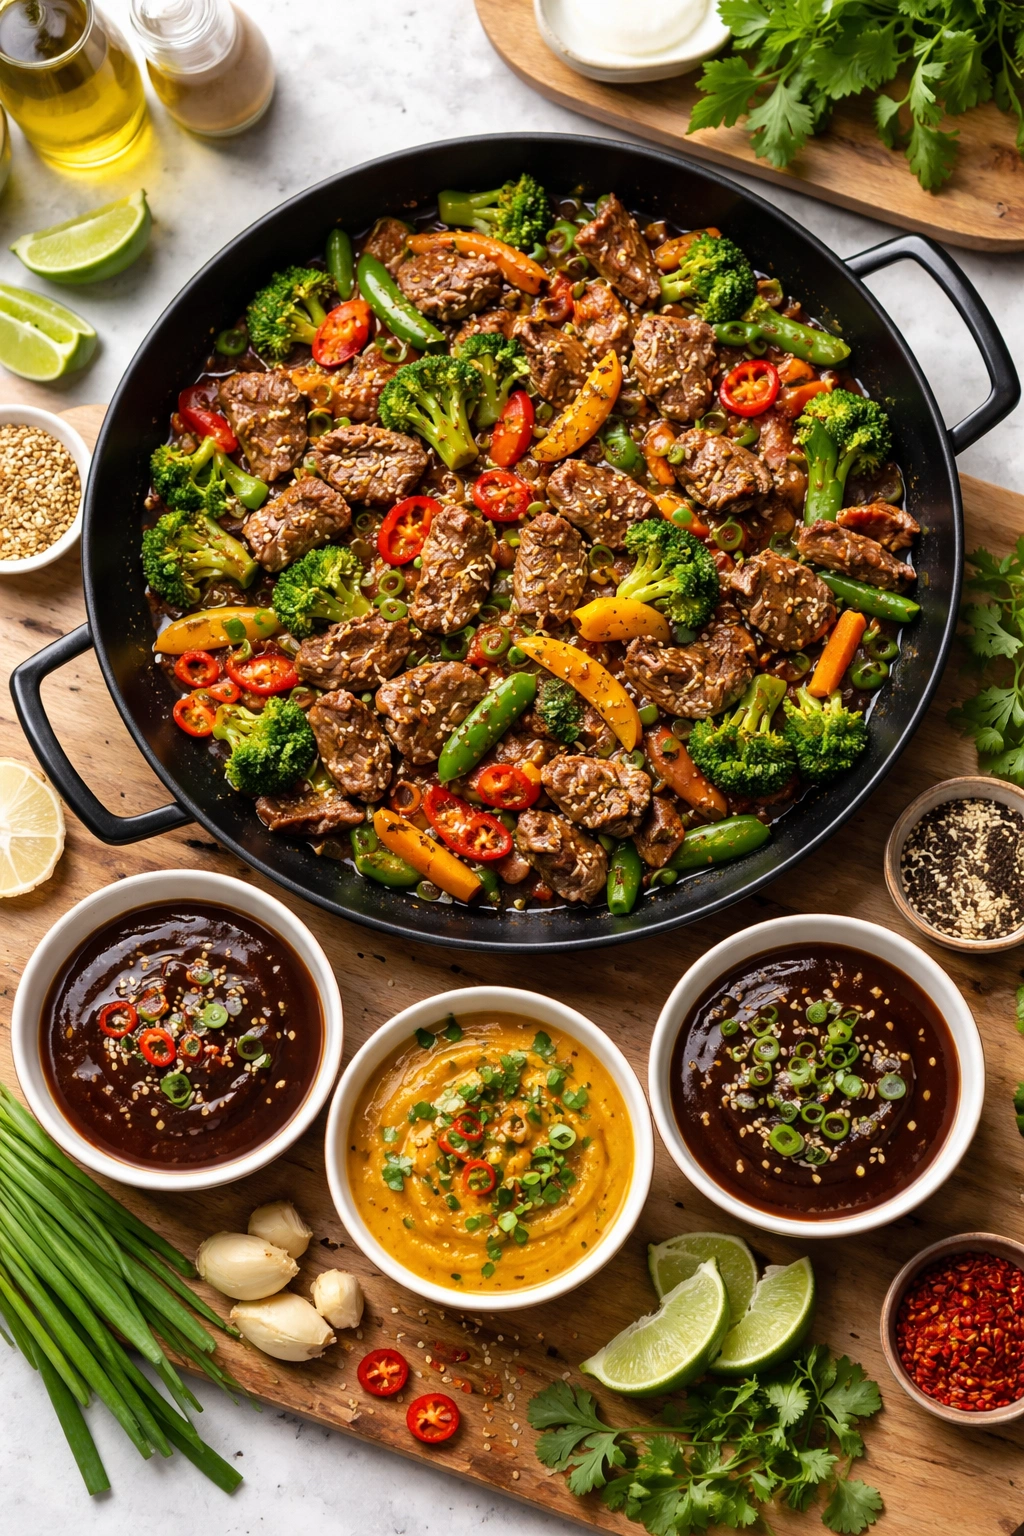
The vegetable selection is where your stir-fry either sings or falls flat. You want vegetables that cook at roughly the same speed and have complementary textures when done. Bell peppers (red, yellow, or orange for sweetness), snap peas, broccoli florets, and mushrooms are your reliable anchors. These vegetables hold their structure when cooked hot and fast, staying a little bit crisp rather than turning to mush.
Avoid vegetables that release excess water, like zucchini or regular tomatoes, which will make your sauce thin and watery. Save those for other dishes. Carrots work but need to be sliced thin or cut on the bias so they cook quickly enough to avoid being raw-tender while everything else is done. Onions (sliced thin) add sweetness and flavor. Garlic and ginger are aromatics that bloom when hit with hot oil, releasing their fragrance and flavor through the whole pan.
The texture contrast is crucial. You’re aiming for that signature stir-fry texture where vegetables are cooked but still have slight resistance when you bite them, never soft or limp. This happens at high heat with a short cooking time. If you cook vegetables slowly or for too long, they lose that appeal. Everything should take 4 to 5 minutes total in the pan, which means your pieces need to be cut consistently—roughly the same size so they cook evenly.
Volume and Proportion
Aim for about 4 to 5 cups of vegetables total for a four-person stir-fry. This sounds like a lot, but vegetables shrink significantly when cooked. You’ll use roughly one red bell pepper, one cup of broccoli florets, one cup of snap peas, a half cup of sliced mushrooms, and a handful of sliced green onion for color and bite. The vegetables should take up more volume in your final dish than the beef, which is both delicious and nutritionally smart.
Prep Order
Chop vegetables in this order: onions and aromatic vegetables first (they take a bit longer), then sturdier vegetables like broccoli and carrots, then tender vegetables like peas and mushrooms last. This way, the ingredients most likely to dry out or wilt are added last. Everything should be cut while you’re gathering confidence to start cooking.
Essential Pantry Ingredients for Flavor
A stir-fry sauce is what transforms this from simply cooked beef and vegetables into something craveable. The base is usually soy sauce, which provides salt and umami depth. You layer in ginger and garlic for pungency and warmth, a splash of rice vinegar for acidity and brightness, a touch of honey or brown sugar for balance, and a hint of sesame oil for toasted, nutty richness. You’ll also need cornstarch to thicken the sauce so it coats everything rather than pooling at the bottom of the pan.
Soy sauce is your foundation. Use regular soy sauce, not low-sodium, because you’ll use less of it overall and you want that classic deep flavor. Tamari is a good gluten-free swap if that matters for your situation. Light soy sauce is thinner and less flavorful than dark, so stick with regular.
Rice vinegar (white or unseasoned) adds brightness without the sharpness of other vinegars. Apple cider vinegar or distilled white vinegar can work in a pinch, but rice vinegar has a softer acidity that feels more integrated into the sauce. Sesame oil should be toasted sesame oil, which has deep brown color and nutty taste—not light sesame oil, which is nearly flavorless. A little goes a long way; you’re using about a teaspoon for the whole batch.
Fresh ginger and garlic are non-negotiable. Minced ginger (about a tablespoon) adds warmth and slight spice. Fresh garlic (3 to 4 cloves, minced) provides sharp, pungent flavor that mellows slightly when cooked. Jarred minced versions work in a pinch, but fresh tastes noticeably better. The difference between “pretty good” and “restaurant quality” often comes down to this single choice.
Equipment and Techniques for Success
You need one thing to make a great stir-fry: a large pan or wok that holds heat well and distributes it evenly. A 12-inch skillet, a wok, or even a large sauté pan works. Cast iron is excellent for stir-frying—it holds heat like nothing else. Stainless steel is also good if it’s a heavy-bottomed pan. Non-stick isn’t ideal because you want to develop proper browning on the beef and some fond (those flavorful browned bits) on the pan bottom. Non-stick surfaces prevent that.
Your burner needs to be set to high heat. Not medium-high, not medium—actually high. A stir-fry requires aggressive heat to cook vegetables quickly without turning them into mush and to sear the beef’s exterior while keeping the inside tender. If your stove seems weak, you may need to work in smaller batches or accept slightly longer cooking times.
A long-handled spatula or wooden spoon helps you move ingredients around the pan quickly and get into the corners. Metal is fine here; you’re not cooking in a non-stick surface. You’ll also want a small bowl for whisking together your sauce ingredients before you start cooking, and a plate for the cooked beef while you build the vegetable mixture.
The Most Important Technique: High Heat and Fast Movement
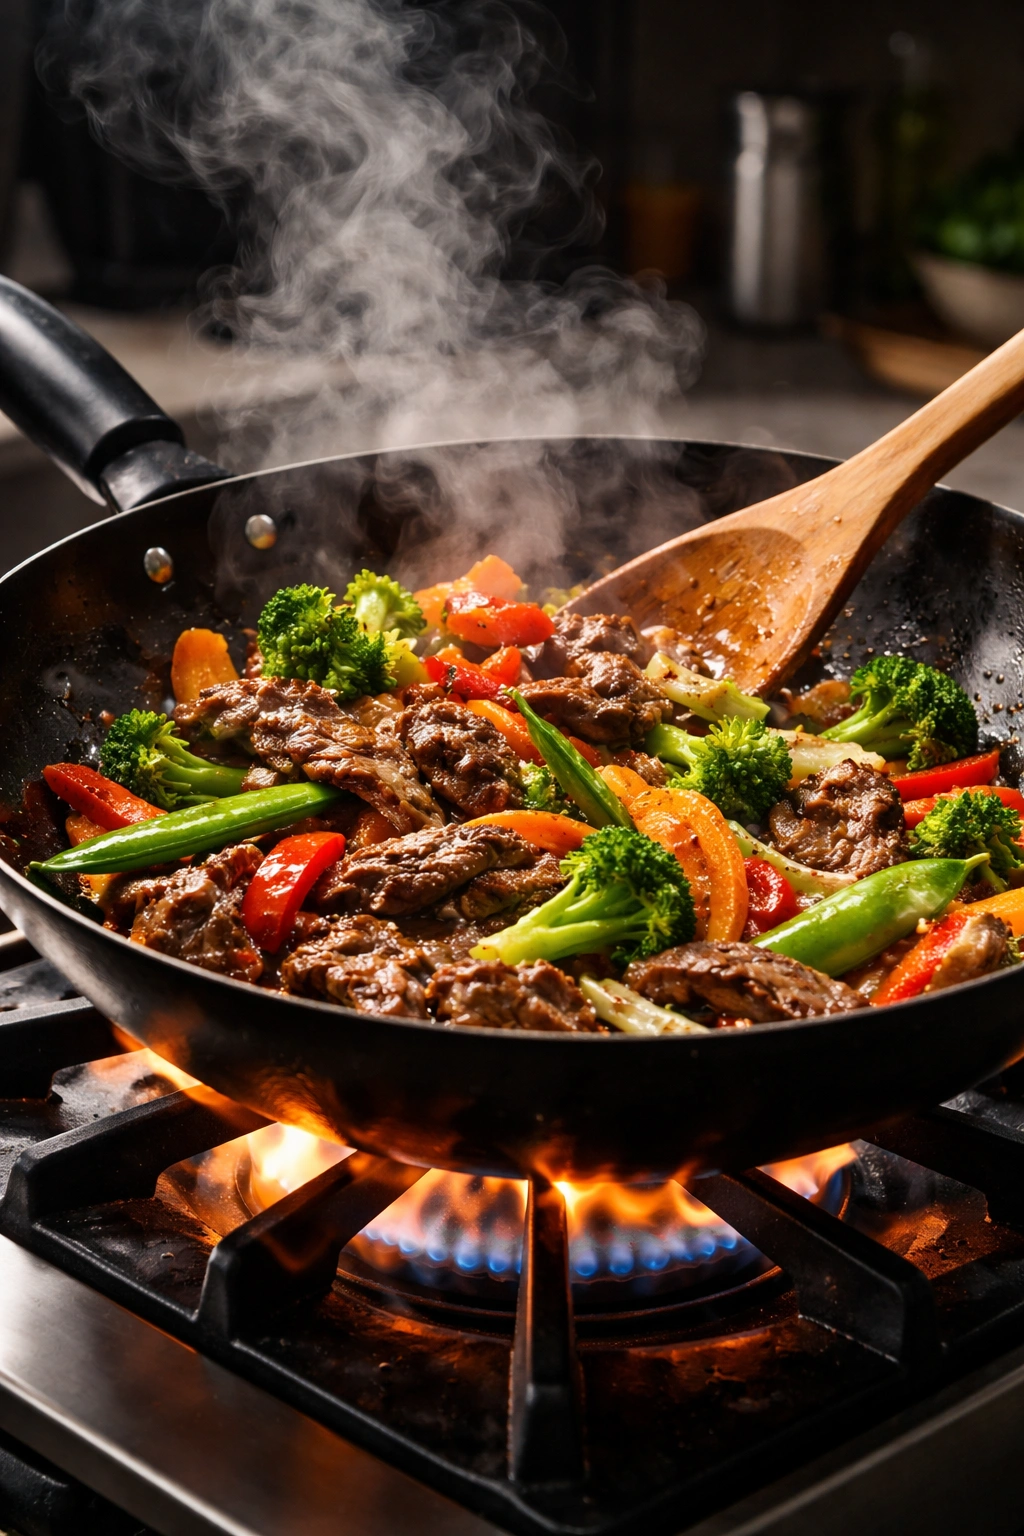
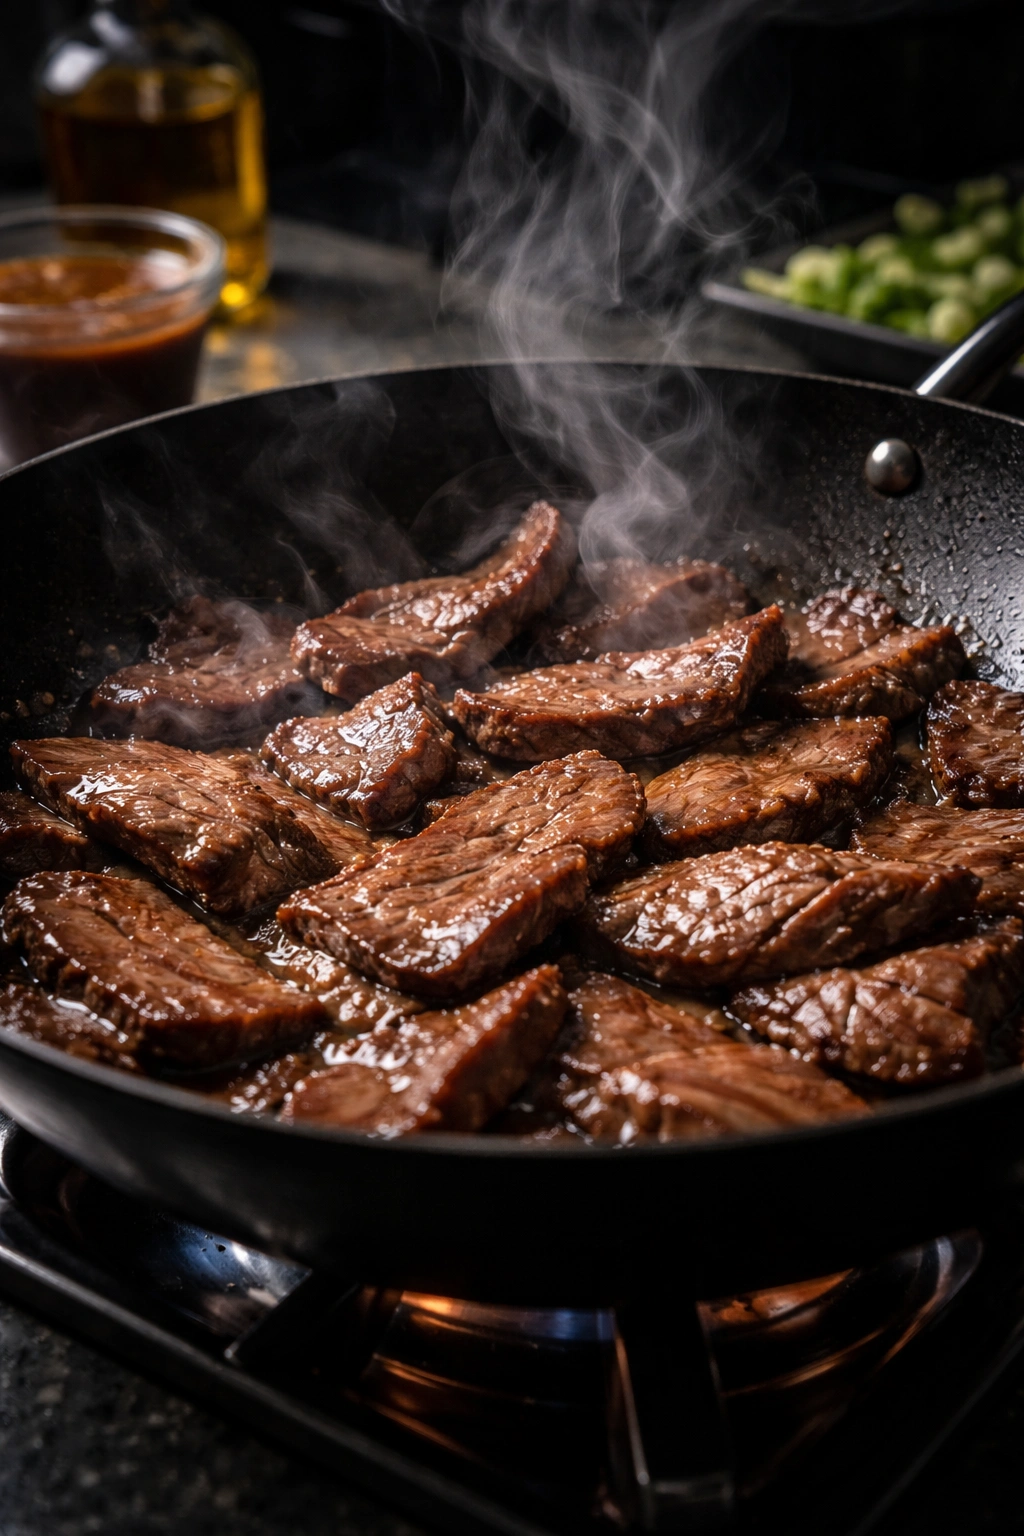
Here’s the fundamental stir-fry technique: sear the beef quickly in a very hot, lightly oiled pan. Don’t crowd the pan—if you add too much beef at once, it steams rather than sears. Do it in two batches if needed. Once the beef is browned on both sides (about 2 minutes total), remove it and set it aside. This is not fully cooked beef; it’ll finish cooking when you return it to the pan at the end.
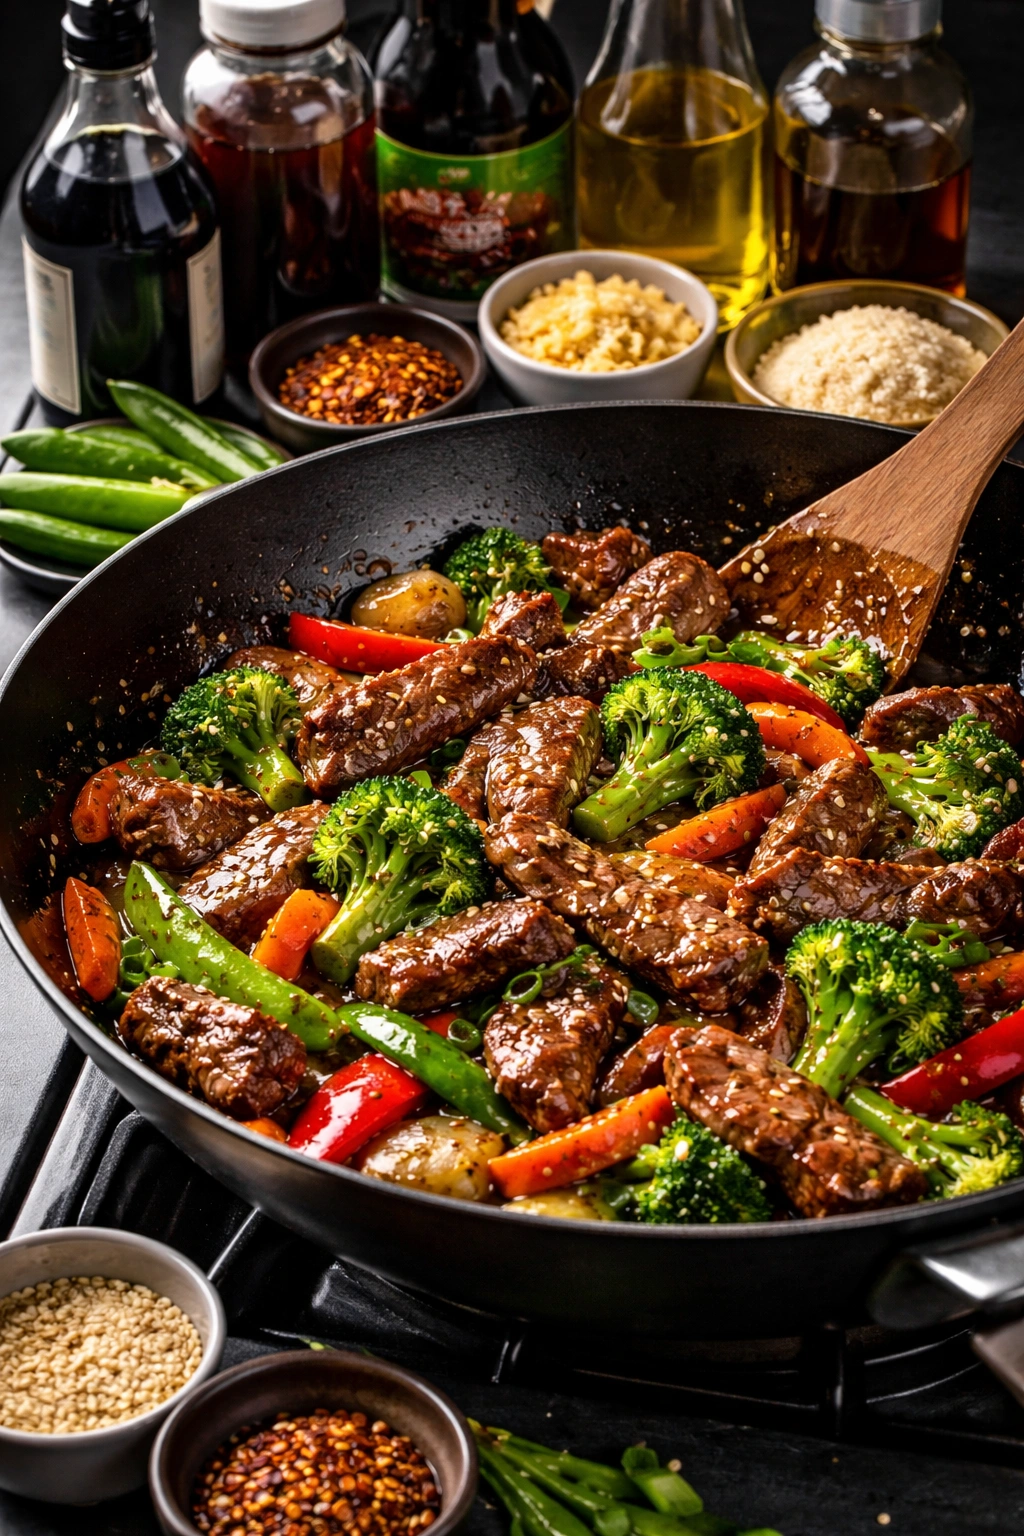
Then add your aromatics (ginger and garlic) to the same pan. They’ll sizzle and bloom for about 30 seconds, filling the kitchen with an incredible aroma. This is when you know the pan is hot enough. Add your sturdier vegetables next, stir constantly for about 2 minutes, then add tender vegetables. Once everything is hot and slightly soft but still has texture (about 2 to 3 minutes more), add your pre-mixed sauce and a splash of water if needed. The cornstarch will thicken the sauce almost immediately. Return the beef to the pan, toss everything together, and you’re done.
Ingredients and Timing Information
Yield: Serves 4 | Yields about 5 cups finished stir-fry
Prep Time: 10 minutes (chopping vegetables and mixing sauce)
Cook Time: 12 minutes (beef and vegetables)
Total Time: 22 minutes active from start to finish
Difficulty: Beginner—this recipe requires only basic knife skills and the cooking itself is straightforward once your ingredients are prepped. High heat can seem intimidating, but stir-frying is actually very forgiving; high heat prevents overcooking and develops better flavor than low heat ever will.
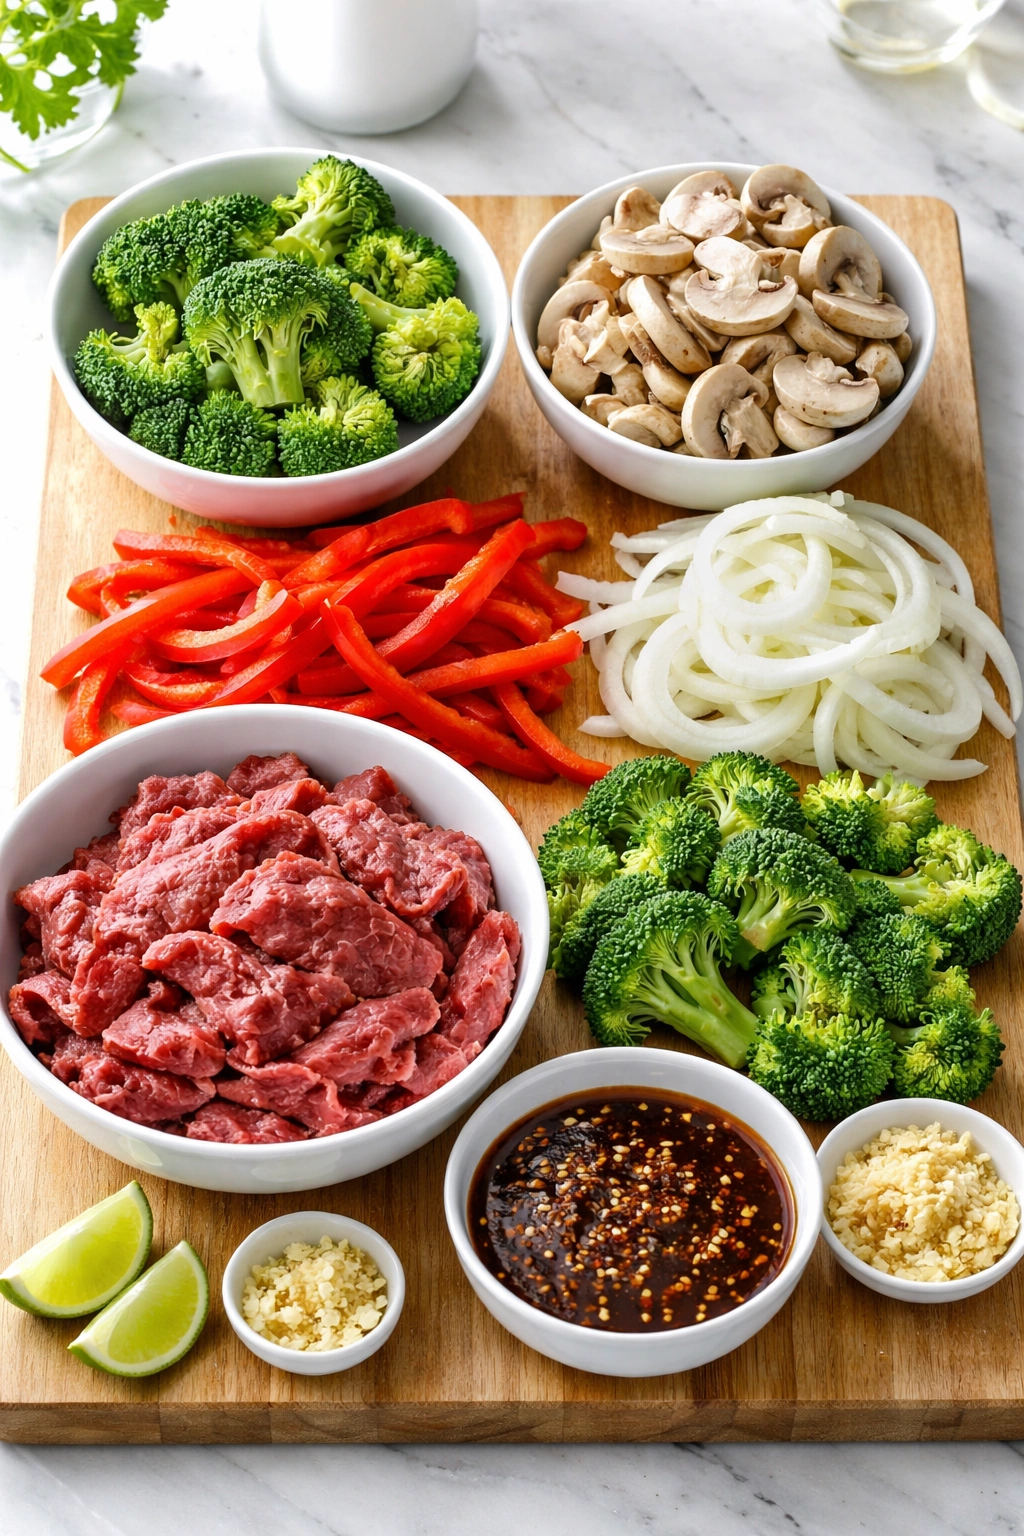
For the Beef and Vegetables:
- 1 pound flank steak or skirt steak, sliced thin (about ¼ inch thick) against the grain
- 2 tablespoons neutral oil (vegetable, canola, or peanut oil), divided
- 1 red bell pepper, sliced into strips about ¼ inch thick
- 2 cups fresh broccoli florets, cut into bite-sized pieces
- 1 cup snap peas, left whole or halved if very large
- 8 ounces mushrooms (cremini or button), sliced
- 1 medium onion, sliced into thin strips
- 3 cloves fresh garlic, minced
- 1 tablespoon fresh ginger, minced
- 2 green onions, sliced (white and light green parts separate from dark green parts)
- ¼ teaspoon red pepper flakes (optional, for subtle heat)
- Salt and freshly cracked black pepper to taste
For the Sauce:
- ⅓ cup soy sauce (use regular, not low-sodium)
- 2 tablespoons rice vinegar (unseasoned white rice vinegar works perfectly)
- 1 tablespoon honey or light brown sugar
- 2 teaspoons cornstarch
- 1 teaspoon toasted sesame oil
- 3 tablespoons water
- ½ teaspoon garlic powder (optional, if you want extra garlic depth)
Step-by-Step Instructions
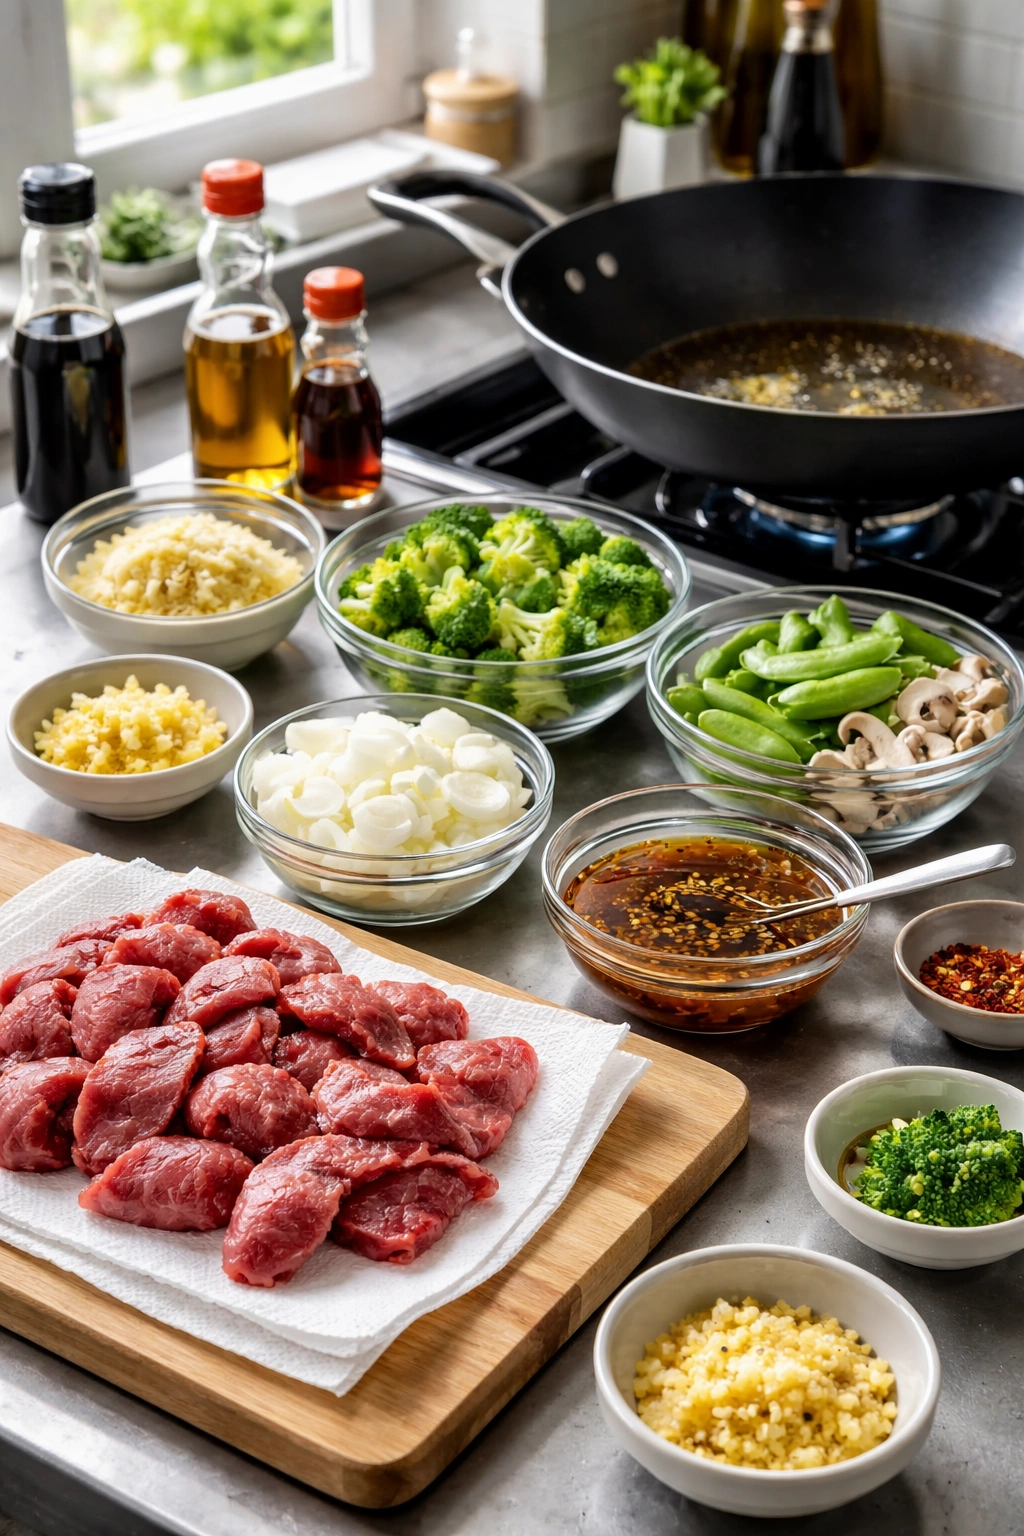
Prepare Your Station:
-
Whisk together all sauce ingredients (soy sauce, rice vinegar, honey, cornstarch, sesame oil, water, and garlic powder if using) in a small bowl until the cornstarch and honey are fully dissolved. Set this bowl near your stove within arm’s reach—you’ll need it quickly once cooking starts. Do not skip this step. Adding a cornstarch-based sauce to the pan when the sauce is already hot will cause lumps; everything must be pre-mixed and ready.
-
Pat the sliced beef completely dry with paper towels. Moisture on the surface prevents browning and creates steam instead of a sear. Season the beef generously with salt and pepper on all sides.
-
Arrange all your prepped vegetables in the order you’ll use them: aromatics (garlic and ginger) in one small bowl, onions and broccoli together, then snap peas and mushrooms together. This organized setup lets you move quickly without looking for what you need next.
-
Set a large plate next to the stove for holding the cooked beef. Have your long-handled spoon or spatula within reach.
Cook the Beef:
-
Place your large skillet or wok over high heat. Let it heat for 2 to 3 minutes until you can feel the heat radiating from the surface and it’s almost smoking. This is high enough that a drop of water sizzles away immediately.
Advertisements -
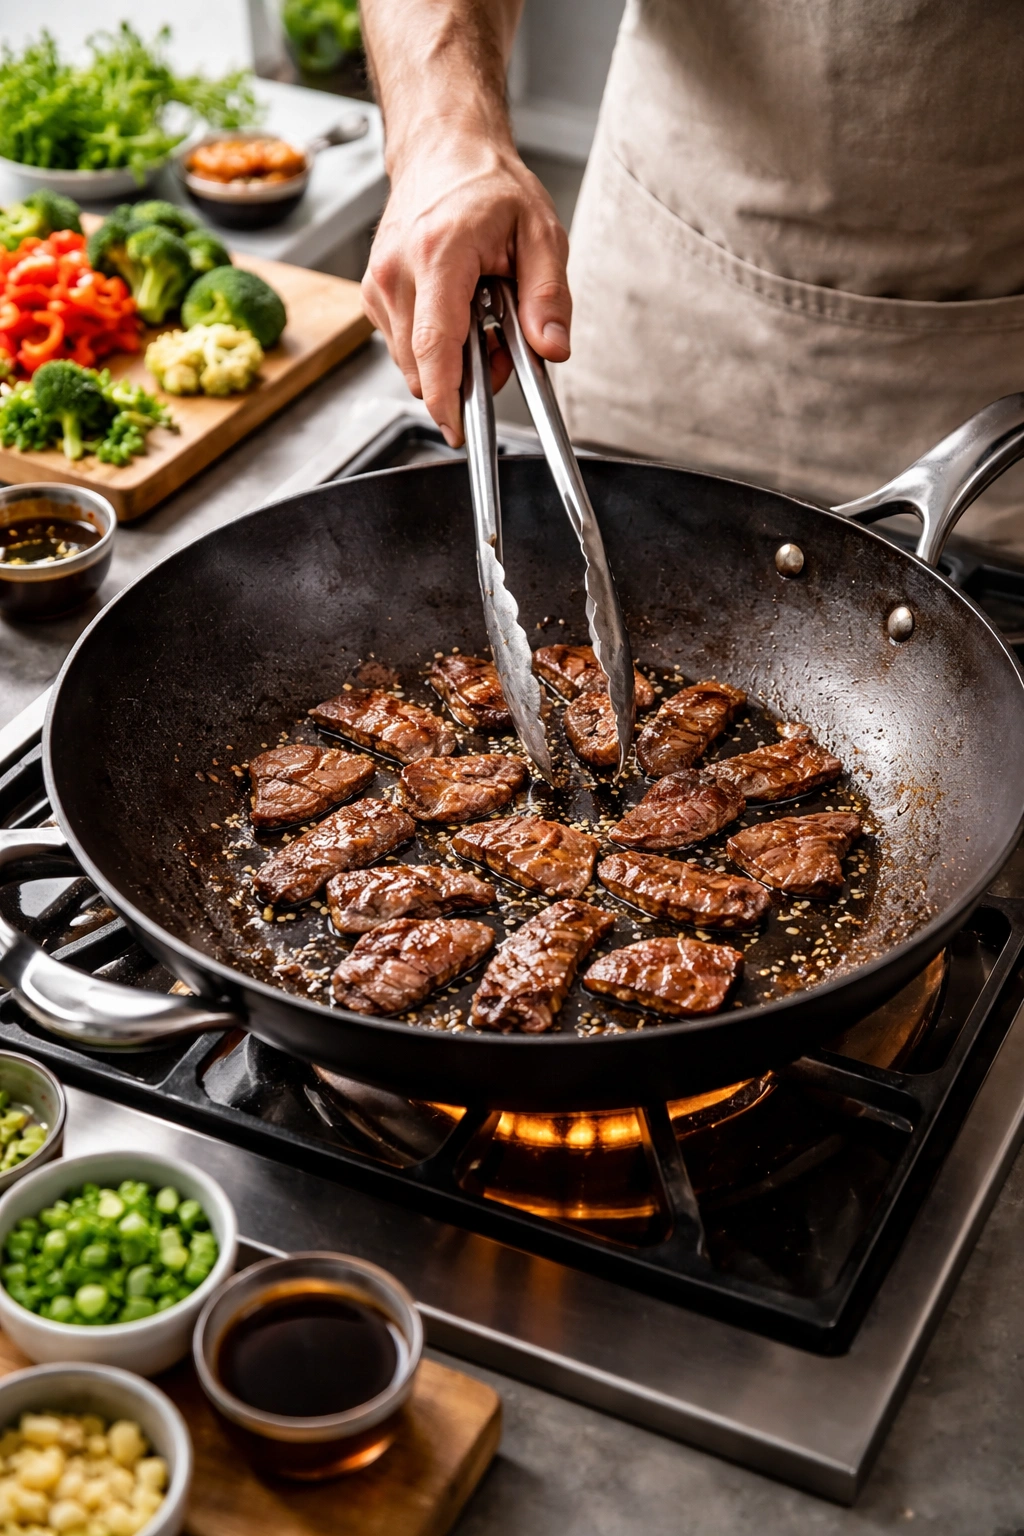
Add 1 tablespoon of oil to the hot pan. Immediately add about half the beef (the pan should be full but not overcrowded). Do not stir immediately. Let the beef sit undisturbed for 45 seconds, which allows browning to develop on the bottom surface. Stir once and cook for another 45 seconds to 1 minute until the beef is browned on the outside but still slightly pink inside. It will finish cooking when you return it to the pan later.
-
Using a slotted spoon or tongs, transfer the cooked beef to your plate. Repeat step 6 with the remaining tablespoon of oil and the rest of the beef. Transfer all beef to the plate and set aside.
Cook the Vegetables:
-
Add the onions and minced garlic and ginger to the same hot pan. Stir constantly for 30 seconds—you’ll smell the aroma bloom, which signals that the aromatics are releasing their flavors. Do not let them sit still; they burn quickly at this temperature.
-
Add the broccoli florets and bell pepper strips. Stir constantly for 2 minutes. The vegetables will begin to soften slightly and develop light browning on the edges. This is exactly what you want; it’s flavor development.
-
Add the snap peas and mushroom slices. Stir constantly for 1 to 2 minutes more until all the vegetables are heated through but still have slight firmness when you bite them. They should look vibrant in color, not faded or shrunken.
Build the Sauce and Finish:
-
Pour the pre-mixed sauce directly into the pan with the vegetables. Stir constantly as the sauce heats. Within 10 to 15 seconds, the cornstarch will thicken the sauce and it will go from thin and liquid to glossy and coat-like. The vegetables will glisten.
-
Return all the cooked beef to the pan. Add the green onion tops (the dark green parts you kept separate). Toss everything together for about 30 seconds, ensuring the beef is coated in sauce and warmed through. Taste and add salt or pepper if needed. The beef, which was only lightly cooked before, will finish cooking gently in the residual heat while you assemble the sauce.
-
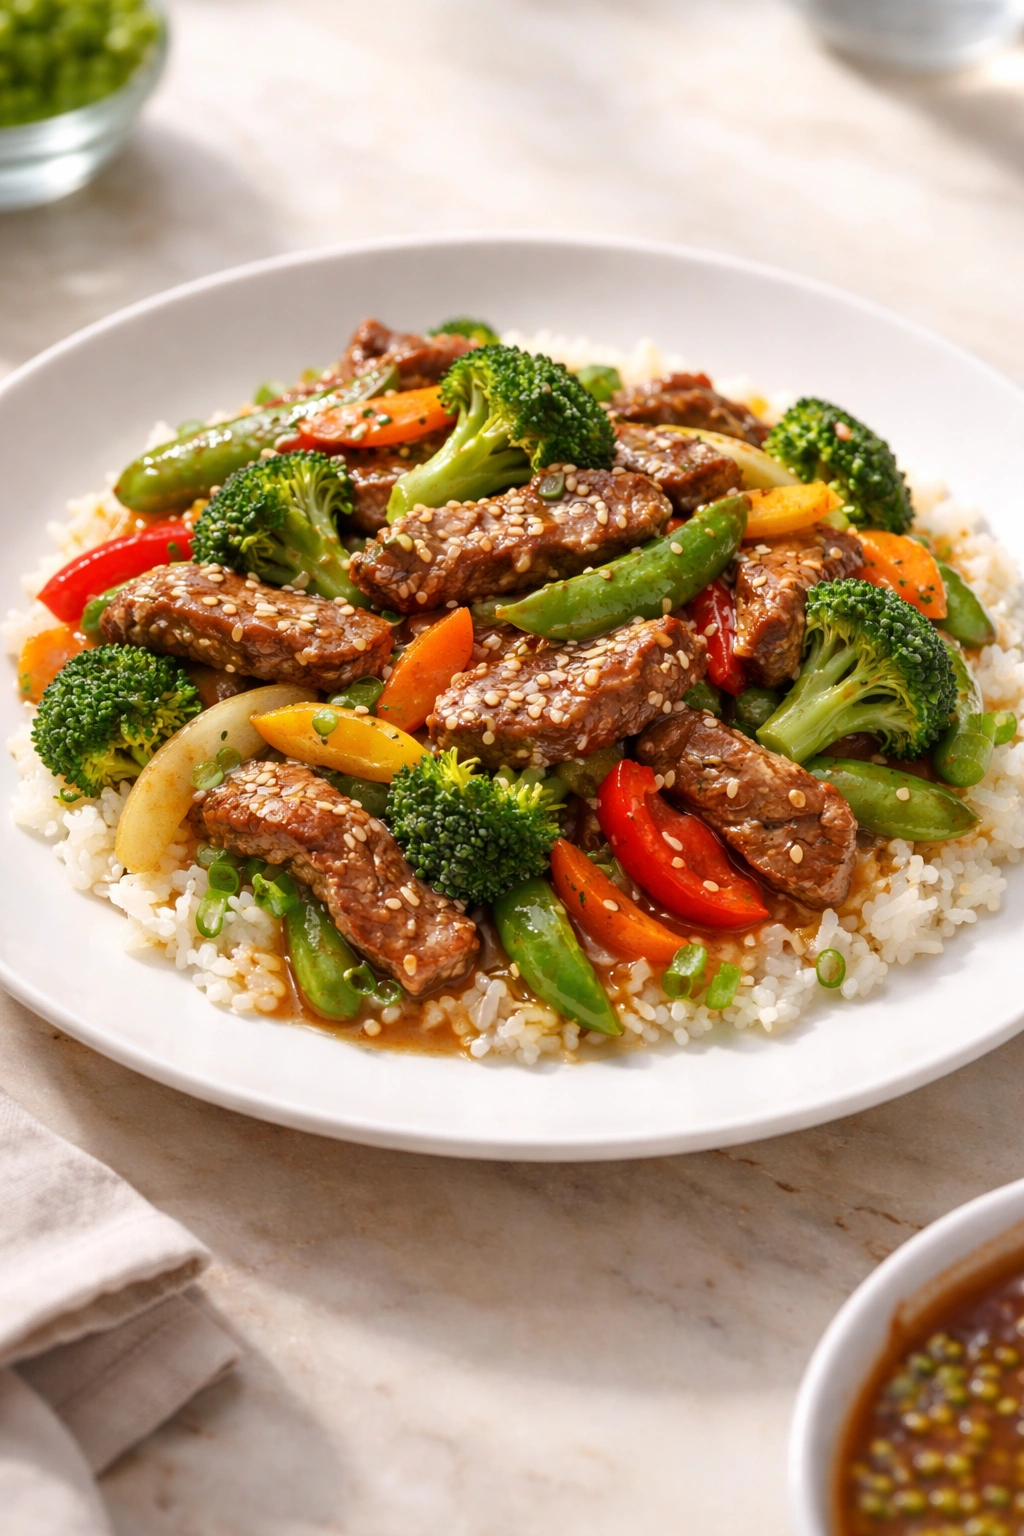
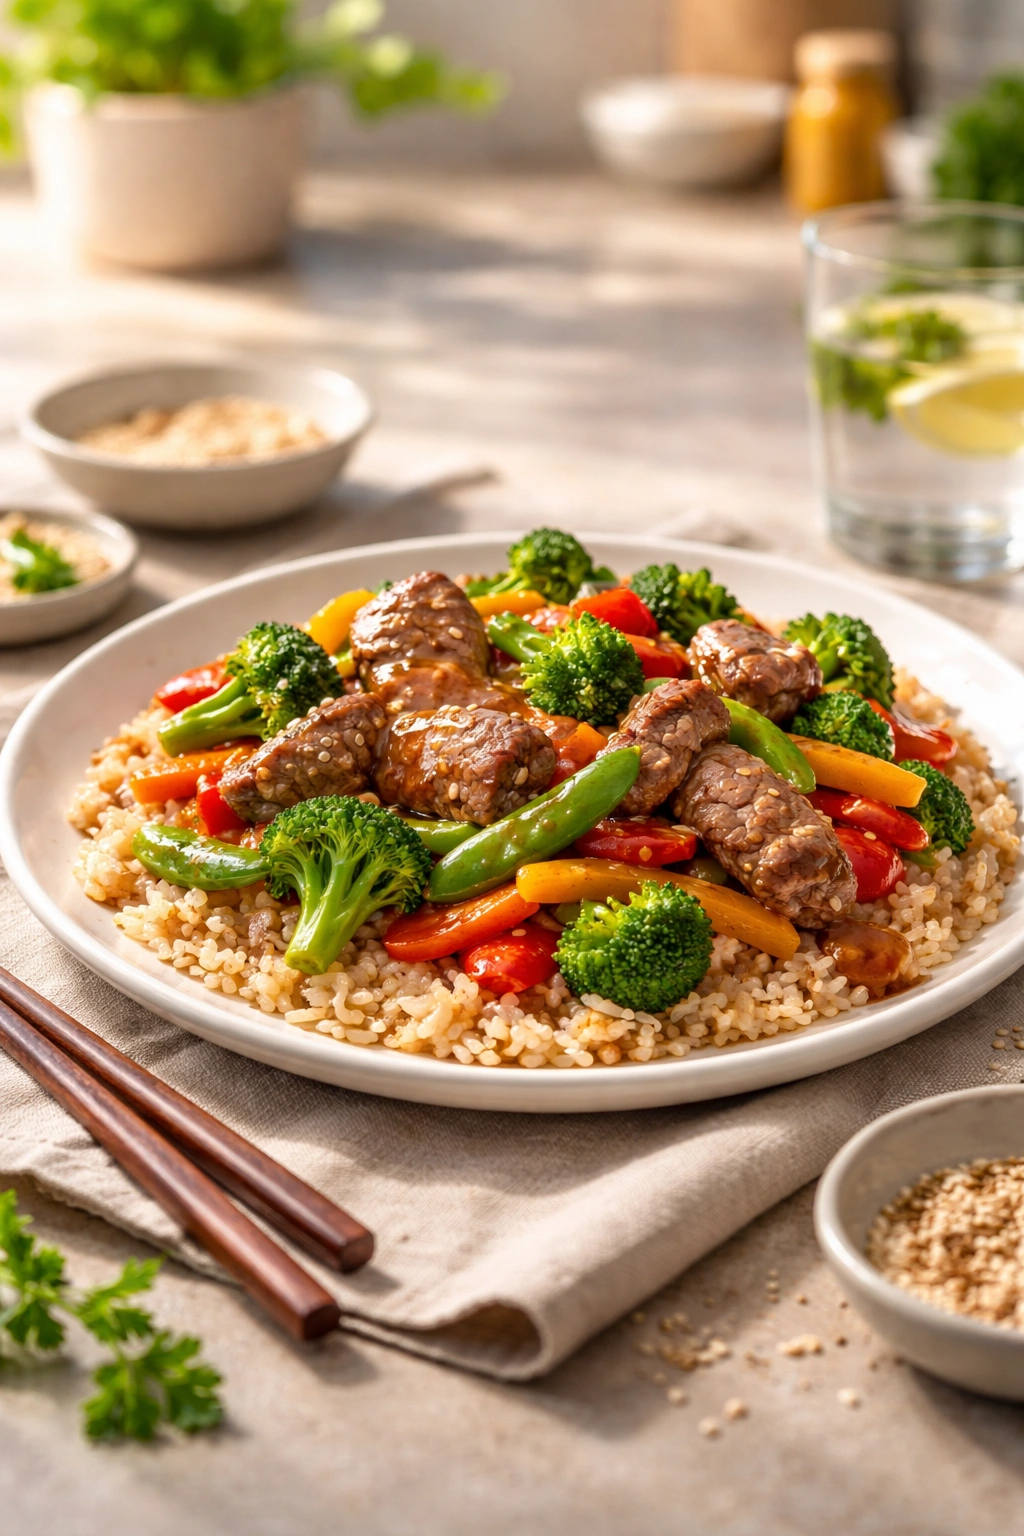
Transfer the finished stir-fry to a serving platter or directly into bowls. Serve immediately over steamed rice, brown rice, cauliflower rice, or noodles.
Advertisements
Tips to Nail Your Beef Stir-Fry Every Time
Don’t move the beef too much when it first hits the pan. The instinct is to stir constantly because it’s a stir-fry, but those first 30 to 45 seconds of stillness are when browning happens. Once you flip or stir, the beef can break apart or lose the dry surface it needs to brown properly. Let it sit, then start stirring once you flip it.
Keep your pan temperature high throughout. If at any point the pan looks like it’s cooling down—if you add something and the sizzle dies away—pause for 10 to 15 seconds before adding the next ingredient. You can’t rush high heat, but you can ensure it stays high enough to work properly. A stir-fry that’s cooked at medium heat will take twice as long and won’t develop the same level of flavor or texture.
Pre-mixing your sauce really does matter. If cornstarch hits the hot liquid in the pan, it clumps. If it’s already dissolved and pre-mixed, it thickens smoothly. This is a small step that prevents a common, frustrating mistake.
Don’t skip the sesame oil even though it’s only a teaspoon. It’s intensely flavorful—a small amount adds noticeable depth without overwhelming the other ingredients. Sesame oil isn’t something you cook with for long stretches; you add it at the very end for aroma and taste.
The vegetables should still have very slight bite to them when you finish cooking. They’ll be hot, cooked through, but not soft or wilted. If you cook them until they’re completely soft, they’ve passed their prime. Stir-fried vegetables taste best when there’s still a whisper of texture.
Managing the Timeline
If you’re cooking for four people and this is your first time, the entire process might take closer to 30 minutes—10 for careful prep, 20 for cooking while you get comfortable with the rhythm. That’s still faster than takeout. Once you’ve made this a few times and your knife work speeds up and you’re confident with the heat level, it genuinely becomes a 22 to 25-minute meal. Don’t feel rushed the first time.
Common Mistakes and How to Avoid Them
The most frequent mistake is cooking the beef all the way through the first time, then letting it overcook when you return it to the pan with the sauce. Your beef ends up tough and dry. The solution is simple: the beef should look underdone when you remove it from the pan initially—still pink inside, just browned on the outside. It finishes cooking during those final 30 seconds when it’s mixed with the hot sauce and vegetables. This technique keeps it tender and juicy.
Another common issue is cutting the beef the wrong direction. If you slice parallel to the grain instead of across it, every bite will be chewy. Take 30 seconds to identify the grain direction before you slice. Run your knife perpendicular to those muscle fiber lines. The difference between tender and chewy is literally that simple.
Overcrowding the pan when cooking the beef causes it to steam rather than brown. If you try to cook the entire pound of beef at once in a standard-sized skillet, the pieces overlap and touch, trapping moisture around them. They’ll still taste good, but they won’t have that seared, caramelized exterior that makes stir-fried beef special. Two batches are faster overall because proper browning takes less time than overcoming the moisture issue with one huge batch.
Under-seasoning the sauce is another frequent misstep. Soy sauce already contains salt, so the total amount of salt in the finished dish might seem like enough when you’re measuring it. But taste the sauce before it goes into the pan. It should taste bold and slightly salty on its own. That boldness mellows when mixed with the beef and vegetables, creating a balanced final dish. If your sauce tastes timid, it will make your stir-fry taste flat.
The Steam Problem
If your vegetables look steamed instead of sautéed—if they’re pale and soft instead of vibrant and crisp-tender—you didn’t have enough heat or your pan was too crowded. Both issues trap steam. Next time, ensure your pan is properly preheated and don’t add more than 4 to 5 cups of vegetables at once. If you need to cook more, do it in two batches and combine them at the end with the sauce.
Easy Flavor Variations to Try
The basic beef stir-fry framework is flexible. You can shift the entire flavor profile by changing your sauce and vegetables while keeping the technique identical.
For an Asian-inspired version with more depth: Add a tablespoon of hoisin sauce to your sauce mixture. Hoisin is fermented and sweet, adding complexity that’s distinctly Asian. It’s a single small change that noticeably shifts the taste profile. Use slightly less honey to compensate for hoisin’s sweetness.
For a spicy Thai-style version: Add a tablespoon of red curry paste to your sauce (whisk it into the liquid ingredients before cooking), increase the red pepper flakes to a half-teaspoon or more depending on your heat preference, and include fresh basil or cilantro as a garnish at the very end. Coconut milk can replace some of the water to add richness.
For a teriyaki-inspired version: Use a half cup of teriyaki sauce instead of the soy sauce, vinegar, and honey combination. Teriyaki does the heavy lifting flavor-wise, so you’ll use less ginger and garlic. This simplifies the sauce component and shifts toward a sweeter, more glazed finish.
For a cleaner, lighter version: Use tamari or liquid aminos instead of soy sauce (both are less sodium-heavy), increase the fresh ginger to 1.5 tablespoons for more pungency, add a teaspoon of fresh lemon juice or lime juice instead of rice vinegar for brightness, and skip or reduce the sesame oil. This version feels fresher and less heavy.
For a different vegetable profile: Swap out any vegetables you don’t have or don’t enjoy. Bok choy, sliced thin, is wonderful. Asparagus cut on the bias cooks quickly. Water chestnuts add crunch if you have them on hand. Sugar snap peas are interchangeable with snow peas. The only requirement is that your total vegetable volume stays around 4 to 5 cups and that you add sturdier vegetables before tender ones.
Substitutions for Dietary Preferences
If you need to reduce sodium, use low-sodium soy sauce (tamari works here too), reduce the total soy sauce amount to ¼ cup instead of ⅓, and increase the rice vinegar slightly to compensate for the missing depth. The sauce will be less intensely flavored but still delicious.
For a gluten-free version, use tamari instead of regular soy sauce. Tamari is wheat-free and delivers the same deep, salty umami flavor. Everything else in the recipe is naturally gluten-free, so this single swap makes the whole dish accessible.
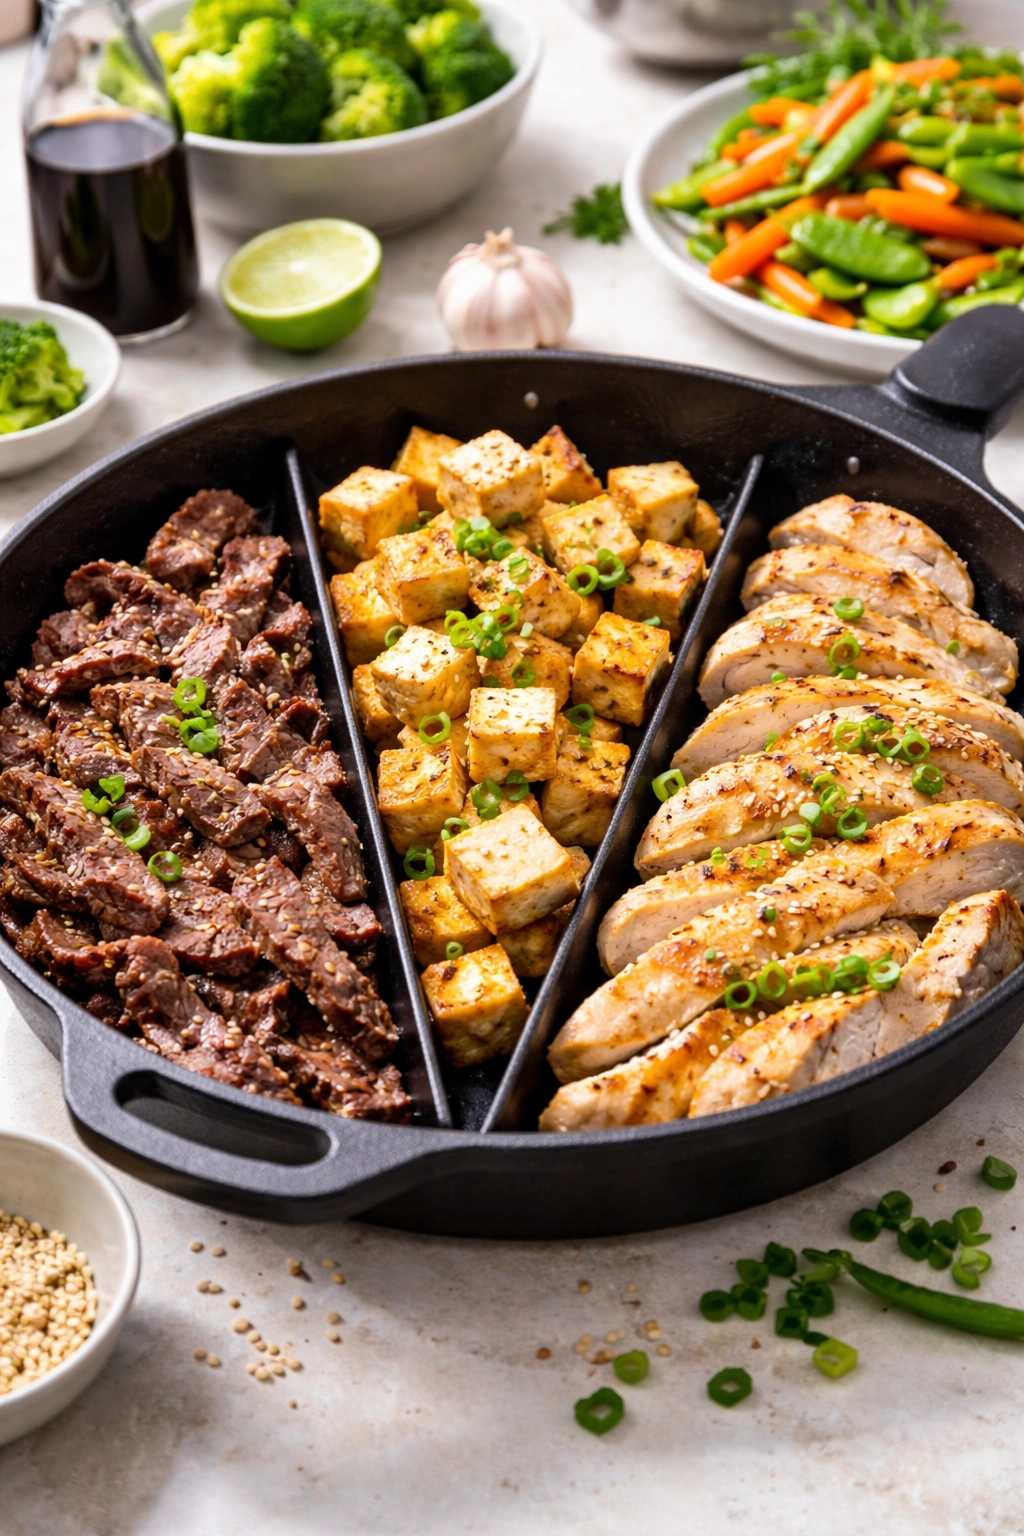
If you want to use a different protein, flank steak, skirt steak, or sirloin work fine with this exact cooking method. You can also use boneless, skinless chicken breast sliced thin (it’ll cook slightly faster, about 1.5 to 2 minutes per batch). Shrimp works beautifully too—cook it briefly, just until pink and cooked through (about 1 minute total), then set it aside and proceed with the vegetables.
For a vegetarian version, skip the beef entirely and increase your vegetables to 6 to 7 cups total. Add a block of pressed and cubed tofu, or keep it entirely vegetable-based. Use tamari or soy sauce made without added sugar if you’re vegan, and replace the honey with an equal amount of maple syrup or agave. The sauce will work perfectly with vegetables; it just becomes a vegetable stir-fry instead of a beef stir-fry.
Brown Rice and Cauliflower Rice Options
If you’re serving this over brown rice, start the rice before you prep vegetables so it’s ready when the stir-fry finishes. Brown rice takes about 45 minutes; if you only have 25 minutes, use quick-cooking brown rice or white rice instead, or choose cauliflower rice, which is ready immediately.
Storing and Reheating Leftovers
Beef stir-fry keeps well in the refrigerator for up to 3 days in an airtight container. The sauce may thicken further as it cools and sits; that’s normal and not a problem. The vegetables will soften slightly more after cooking, which is fine—they won’t go bad, just lose some of that fresh crispness.
To reheat, warm the stir-fry in a skillet over medium heat for 3 to 4 minutes, stirring occasionally, until it’s heated through. You can add a splash of water if it seems dry (the cornstarch absorbed liquid as it sat). Alternatively, microwave it in a covered container for 2 to 3 minutes, stirring halfway through. The texture won’t be identical to freshly cooked stir-fry—the vegetables will be softer—but the flavor is still very good.
You can freeze stir-fry for up to 3 months, though the vegetables will be softer when thawed and reheated. Cool it completely, transfer it to a freezer-safe container, label it with the date, and freeze. Thaw in the refrigerator overnight, then reheat on the stove or microwave as described above. The beef maintains its texture well; it’s the vegetables that soften more noticeably after freezing.
If you want to prepare components ahead, you can slice and refrigerate the beef for up to 1 day, chop vegetables up to 1 day in advance (store them in separate containers so they don’t transfer moisture to each other), and mix the sauce up to 3 days ahead. The only thing you can’t do ahead is actually cook the stir-fry, since the texture relies on the quick cooking time.
Serving Suggestions and Pairings
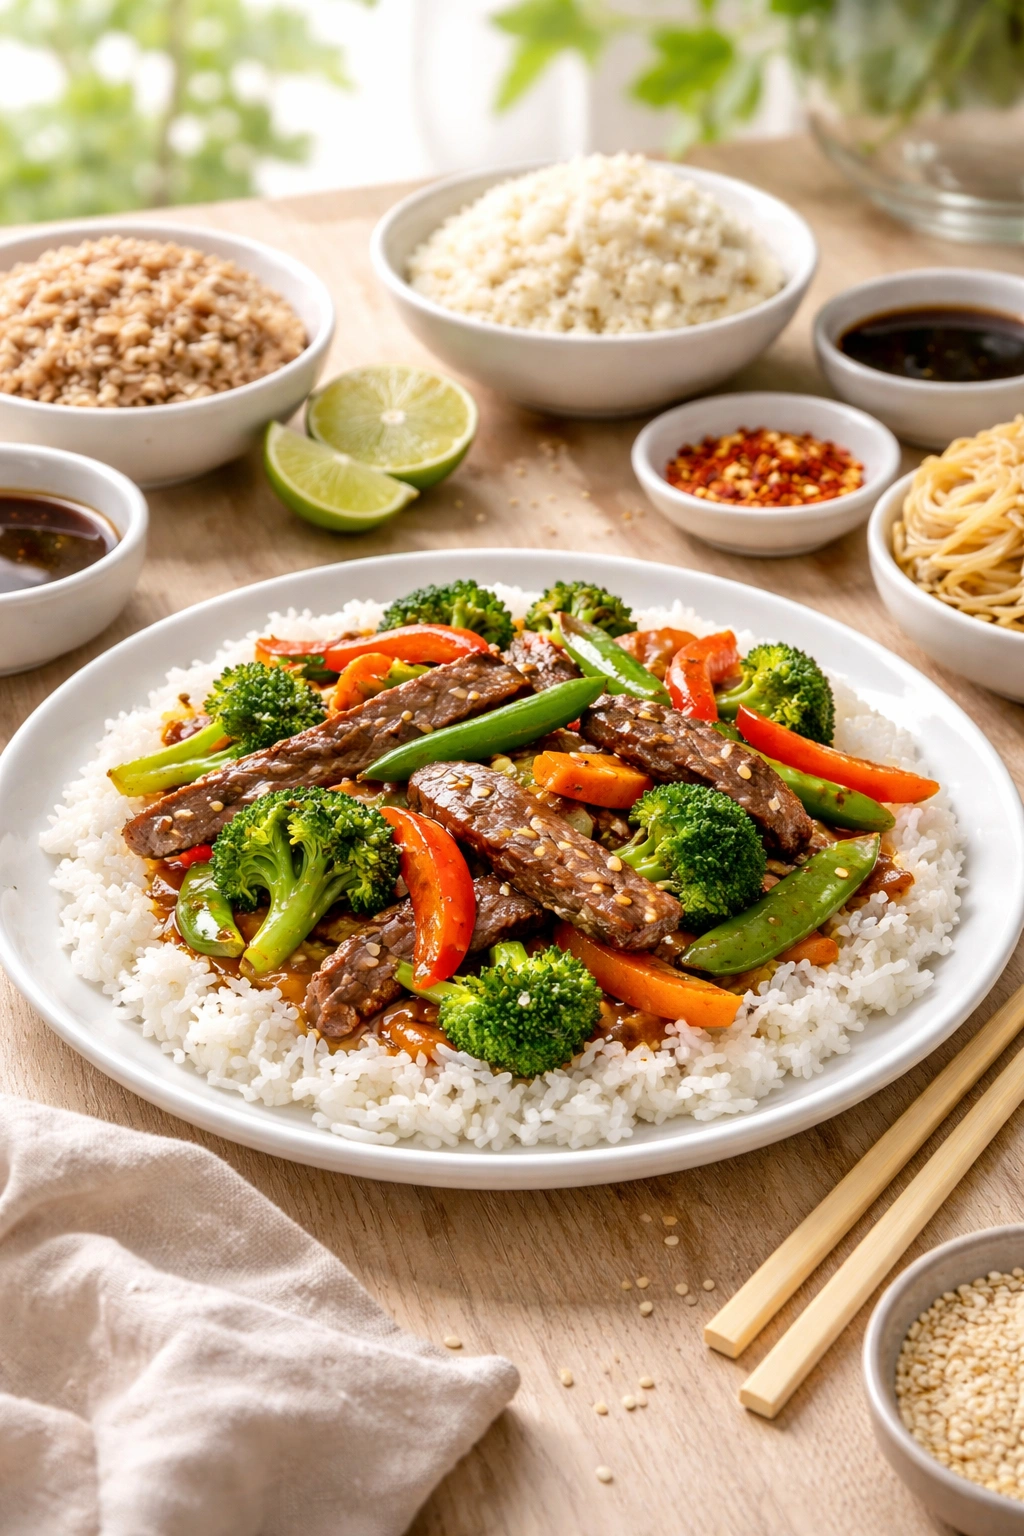
Serve this over a grain to turn it into a complete, balanced meal. White rice, brown rice, jasmine rice, or basmati rice are classic options. Cauliflower rice works if you’re going lower-carb. Noodles—ramen, udon, or lo mein—work beautifully and make the dish feel more substantial. Quinoa is an interesting whole-grain option that pairs well with the Asian flavors.
Fresh lime wedges on the side are lovely. A squeeze of lime juice over the finished stir-fry just before eating brightens everything. Fresh cilantro scattered on top adds a different green note than the green onions already in the dish. Sliced jalapeños on the side let people add heat without committing the whole dish to spice.
Serve this for casual weeknight dinners with minimal sides. The stir-fry is complete and filling on its own. A simple cucumber salad alongside is refreshing and doesn’t compete with flavors. A green salad works too, especially if you dress it with something light and not too vinegary—the stir-fry already has plenty of acidity.
This also works beautifully as a meal prep dish. Make a double batch on Sunday and portion it into containers for grab-and-heat weeknight meals. It’s legitimately better than takeout, costs a fraction as much, and takes no time at all to reheat.
You can also serve it at a casual dinner party. Scale the recipe up by 1.5 times or double it, cook in two batches if needed, and keep each batch warm while you finish the remaining batches. Guests appreciate how quickly you’ve pulled together something delicious and substantial. Offer the rice and noodles as options and let people build their own bowl.
Final Thoughts
A healthy beef stir-fry in 25 minutes sounds like a shortcut, but it’s actually a genuinely nutritious, genuinely delicious meal that comes together through technique and organization, not cutting corners. The high heat, the quick cooking, the abundance of vegetables—these aren’t compromises; they’re exactly what makes stir-fries worth cooking in the first place.
Once you’ve made this a couple of times, you’ll find yourself reaching for it on nights when you’re tired and hungry and don’t want to wait for takeout. You’ll notice the difference between this homemade version and restaurant stir-fry: the vegetables taste fresher, the beef is actually tender instead of tough, and the sauce coats everything perfectly instead of pooling at the bottom of a container. Your kitchen will smell incredible the entire time you’re cooking.
The beauty of a stir-fry is that it scales up for guests, adapts to whatever vegetables you have on hand, and genuinely improves with practice. Your first stir-fry might take 30 minutes and feel slightly chaotic. Your tenth stir-fry will take 22 minutes and feel like second nature. Every single one will be good food, made by you, in less time than you’d spend waiting for someone else to cook it. That’s worth knowing how to do well.